

Page 1

THOMAS BRAVO 20
BRAVO 20 S
_________________
Gebrauchsanweisung · Instructions for Use · Mode d’emploi
Gebruiksaanwijzing · Használati utasítás · Manualul de utilizare
Руководство по эксплуатации · Інструкція з використання
AQUAFILTER
Page 2

Inhalt Seite
Geräteabbildung/Teileidentifizierung 3/6
Montageabbildungen 4/5
Sicherheitshinweise 6
Der Umwelt zuliebe 7
Montage 7
Trockensaugen 7
Naßsaugen 8
Sprühextrahieren (Waschsaugen) 8
Hilfe bei eventuellen Störungen 10
Kundendienst 10
Garantie 53
D H
Tartalomjegyzék Oldal
A készülék és tartozékai/Tartozékok felsorolása 3/26
Összeszerelési rajzok 4/5
Biztonsági előírások 26
Mindent a környezetért 27
A készülék összeállítása 27
Száraz porszívózás 27
Nedves felszívás 28
Folyadékos takarítás 28
Hibaelhárítás 30
Minőségtanúsítás 30
Vevőszolgálat
30
Contents Page
Appliance diagram
Assembling the Appliance
Safety points 11
For the sake of the environment 12
Assembling the appliance 12
Dry vacuuming 12
Wet vacuuming 13
Spray extraction (shampooing) 13
If unexpected difficulties arise 15
Customer service 15
Guarantee 53
/Part identification 3/11
4/5
Table des matières Page
Schéma de l’appareil/identification des pièces 3/16
Schémas pour le montage 4/5
Consignes de sécurité 16
Pour l’amour de l’environnement 17
Montage 17
Aspiration à sec 17
Aspiration humide 18
Injection-extraction (aspiration-lavage) 18
Aide en cas de dysfonctionnements éventuels 20
Service après vente 20
Garantie 53
Inhoud Pagina
Apparaatafbeelding/Deelidentificatie 3/21
Montageafbeeldingen 4/5
Veiligheidsaanwijzingen 21
Ter wille van het milieu 22
Montage 22
Droogzuigen 22
Natzuigen 23
Sproeiextraheren (waszuigen) 23
Hulp bij eventuele storingen 25
Klantenservice 25
Garantie 53
GB
F
NL
Conţinut Pagină
Figură aparat/identificare piese 3/31
Figuri montaj 4/5
Instrucţiuni de siguranţă 31
Protecţia mediului înconjurător 32
Montaj 32
Aspirare uscată 32
Aspirare umedă 33
Extragere prin pulverizare (aspirare cu spălare) 34
Asistenţă în caz de eventuale defecţiuni 35
Serviciul de relaţii cu clienţii 35
Содержание Страница
Изображения прибора и идентификация деталей
Изображения в помощь при сборке прибора 4/5
Указания по технике безопасности 36
Ради окружающей среды 37
Сборка 37
Сухое всасывание 37
Мокрое всасывание 38
Оросительное экстрагирование (мойка/всасывание)
Помощь при возможных неполадках 40
Сервисная служба 40
Зміст Сторінка
Зовнішній вигляд пристрою / Назви деталей 3/41
Схеми монтажу 4/5
Вказівки з техніки безпеки 41
Захист довкілля 42
Монтаж 42
Сухе прибирання 42
Збір рідин 44
Пульверизаційне очищення (вологе прибирання) 44
Усунення неполадок 46
Сервісна служба 46
RO
RUS
3/36
38
UA
2
Page 3

Geräteabbildung ·
tartozékai · Figura aparatului · Изображения
Appliance diagram · Schéma de l’appareil · Apparaatafbeelding ·
A készülék és
прибора · Зовнішній вигляд пристрою
5
13
18
9
6
7
2
8
1
19 20 21
39*
15
11
16
12
14
38
37
17
10
19 23* 22
3
4
37
1.
22 23* 24 25 26*
BRAVO 20
30 33
BRAVO 20S Aquafilter
29* 32* 34* 35*
*) THOMAS B R AVO 20S Aquafilter
2.
3.
3
Page 4
Montageabbildungen
1
2
Pos. 1 o. 2
1
2
· Assembling the Appliance · Illustrations pour le montage ·
Montageafbeeldingen ·
Изображения
в помощь при сборке прибора · Схеми монтажу
Összeszerelési rajzok · Figurile de montaj ·
A B
C
30
2
E * F *
2 L
click
C *
32
29
D
G
clack“
„
H JJ
*) THOMAS B R AVO 20S Aquafilter
4
K
24
Page 5

Montageabbildungen
Montageafbeeldingen ·
Изображения
в помощь при сборке прибора · Схеми монтажу
· Assembling the Appliance · Illustrations pour le montage ·
Összeszerelési rajzok Figurile de montaj ·
L M
36
O P Q
R * S
N
6 7
5
5
Page 6

Vor der ersten
D
Inbetriebnahme
Bitte lesen Sie alle im folgenden
aufgeführten Informationen aufmerksam
durch. Sie geben wichtige Hinweise für
die Sicherheit, den Gebrauch und die
Wartung des Gerätes. Bewahren Sie die
Gebrauchsanweisung sorgfältig auf und
geben Sie diese an Nachbesitzer weiter.
Teileidentifizierung
1 = Behälter
2 = Motorkopf
3 = Verschlußschnapper
4 = Lenkrollen
5 = Schnellkupplung
6 = EIN /AUS-Schalter
7 = EI N/AUS-Pumpenschalter (beleuchtet)
8 = Ansaugstutzen
9 = Tragegriff
10 = Netzanschlußleitung
11 = Saugkraft regulierung
12 = Reinigungsmittelschlauch (oberer Teil)
13 = Saugschlauch
14 = Saugrohre
15 = Schlauchclips
16 = Absperrventil
17 = Teppich-Sprüh extrak tionsdüse
18 = Reinigungsmittelschlauch (unterer Teil)
19 = Polsterdüse
20 = Hartbodenadapter
21 = Teppichdüse
22 = Fugendüse
23 = Polstersprühextraktionsdüse
24 = Reinigungsmitteltank
25 = Textilreinigungs konzentrat (ProTex)
26 = Siphondüse*
29 = Filtervlies*
30 = Kegelfilter
32 = Spannring*
33 = Papierfiltersack
34 = AQUA-Filter*
35 = Feinstaub-Textilfilter*
36 = Ansaugschlauch für Reinigungsmittel
37 = Saugrohrhalterung
38 = Parkstellung Saugrohr
39 = Rohrclips*
*) = nur THOMAS BRAVO 20 S Aquafilter
Sicherheitshinweise
• THOMAS BRAVO dient ausschließlich der Nutzung im
Haushalt.
• Das Gerät auf keinen Fall in Betrieb nehmen, wenn:
– die Netzanschlußleitung beschädigt ist,
– es sichtbare Schäden aufweist,
– es einmal heruntergefallen sein sollte.
• Die Spannungsangabe auf dem Typenschild muss mit
der Versorgungsspannung übereinstimmen.
• Düsen und Rohre dürfen bei eingeschaltetem Gerät
nicht in Kopfnähe gelangen, da sonst Ver letzungsgefahr insbesondere für Augen und Ohren besteht.
•
Das Gerät ist nicht zum Absaugen gesundheits gefährdender,
ätzender und lösungs mittelhaltiger Stoffe geeignet.
• Das Gerät darf nicht in Räumen betrieben werden, in
denen feuergefährliche Stoffe lagern oder sich Gase
gebildet haben.
•
Bewahren Sie das Gerät sowie das Zubehör in trockenen,
sauberen und geschlossenen Räumlichkeiten auf.
• Stoffe wie Benzin, Farbverdünner und Heizöl können
durch Verwirbelung mit der Saugluft explosive
Dämpfe oder Gemische bilden.
• Niemals heiße Asche oder glühende Gegenstände
aufsaugen.
• Überprüfen Sie vor jedem Gebrauch, ob die jeweils
benötigten Filter richtig eingesetzt sind.
• Saugen Sie keinen Tonerstaub auf! Toner, der zum
Beispiel bei Druckern oder Kopiergeräten verwendet
wird, kann elektrisch leitfähig sein! Außerdem wird
der Toner vom Filtersystem des Staubsaugers evtl.
nicht vollständig ausgefiltert und kann so über das
Sauggebläse wieder in die Raumluft gelangen.
• Äußerste Umsicht ist beim Reinigen von Treppen
geboten. Sorgen Sie für eine ausreichende
Standsicherheit des Gerätes. Der Schlauch darf nicht
über seine Ursprungslänge hinaus gedehnt werden.
Halten Sie das Gerät stets mit einer Hand fest.
• Lassen Sie das Gerät im eingeschalteten Zustand nie
unbeaufsichtigt.
•
Dieses Gerät kann von Kindern ab 8
Jahren und darüber und von Personen
mit reduzierten physischen, sensorischen
oder mentalen Fähigkeiten oder Mangel
an Erfahrung und /oder Wissen benutzt werden, wenn sie beaufsichtigt
oder bezüglich des sicheren Gebrauchs
des Gerätes unterwiesen wurden und
die daraus resultierenden Gefahren
verstanden haben. Kinder dürfen
nicht mit dem Gerät spielen. Reinigung
und Benutzer-Wartung dürfen nicht
durch Kinder ohne Beaufsichtigung
durchgeführt werden.
6
Page 7

• Der Netzstecker ist zu ziehen:
➝
bei Störungen während des Betriebes,
➝
vor jeder Reinigung und Pflege,
➝
nach dem Gebrauch,
➝
bei jedem Filterwechsel.
• Niemals den Stecker am Kabel aus der Steck dose
ziehen, sondern ausschließlich am Stecker.
• Sorgen Sie dafür, daß die Anschlußleitung weder Hitze
und chemischen Flüssigkeiten ausgesetzt ist, noch über
scharfe Kanten oder Oberflächen gezogen wird.
• Schäden am Gerät, am Zubehör, oder an der
Netzanschlußleitung (Sonderleitung erforderlich)
niemals selbst reparieren, sondern nur durch eine
autorisierte Kundendienststation instand setzen
lassen, denn Veränderungen am Gerät können Ihre
Gesundheit gefährden. Sorgen Sie dafür, daß nur
Original-Ersatzteile und Zubehör verwendet wird.
• Das Gerät keinen Witterungseinflüssen, keiner
Feuchtigkeit und keinen Hitzequellen aussetzen.
• Nie den Reinigungsstrahl auf Menschen oder Tiere,
auf Steckdosen oder elektrische Geräte richten.
• Chemikalien wie die Reinigungsmittelkonzentrate
gehören nicht in die Hände von Kindern.
• Nur bei Verwendung der Original THOMAS
Reinigungsmittel kann die Gerätefunktion und die
volle Reinigungswirkung gewährleistet werden.
• Personen mit empfindlicher Haut sollen direkten
Kontakt mit der Reinigungslösung vermeiden.
• Sollte das Reinigungskonzentrat auf die Schleimhäute
(Auge, Mund, etc.) gelangen, ist sofort mit Wasser
nachzuspülen.
Der Umwelt zuliebe
Verpackungsmaterial und ausgediente Geräte nicht
einfach wegwerfen!
Geräteverpackung:
• Der Verpackungskarton kann der AltpapierSammlung zugeführt werden.
• Den Kunststoffbeutel aus Polyethylen (PE) zur
Wiederverwertung an Sammelstellen abgeben.
Verwertung des Gerätes nach dem Ende
seiner Lebenszeit:
• Entsorgen Sie das Gerät nach den örtlichen
Vorschriften und schneiden Sie vorher den
gezogenen Netzstecker ab.
Das Symbol auf dem Produkt oder seiner
Verpackung weist darauf hin, dass dieses
Produkt nicht als normaler Haushaltsabfall zu
für das Recycling von elektrischen und elektronischen Geräten abgegeben werden muss. Durch Ihren Beitrag zum
korrekten Entsorgen dieses Produkts schützen Sie die Umwelt und die Gesundheit Ihrer Mit menschen. Umwelt und
Gesundheit werden durch falsches Entsorgen gefährdet.
Weitere Informationen über das Recycling dieses Produkts
erhalten Sie von Ihrem Rathaus, Ihrer Müllabfuhr oder
dem Geschäft, in dem Sie das Produkt gekauft haben.
behandeln ist, son dern an einem Sammelpunkt
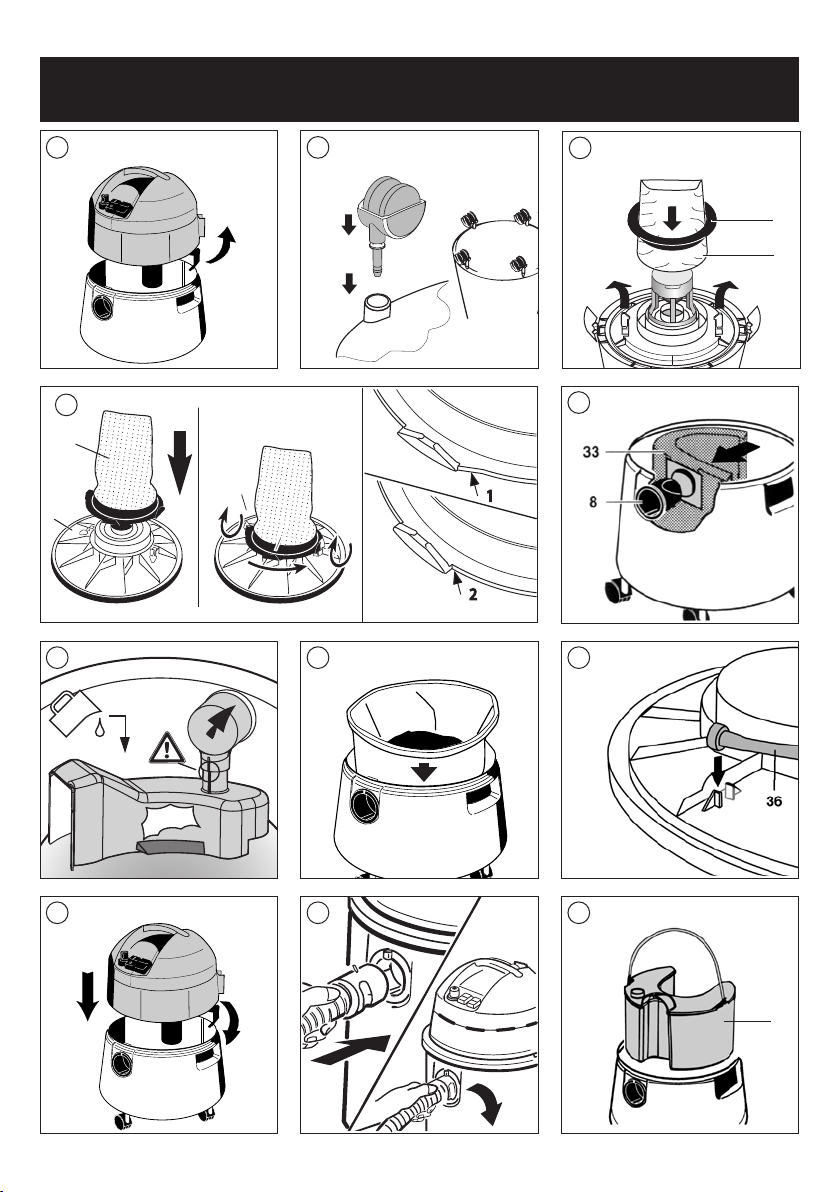
Montage Lenkrollen
A Verschlussschnapper öffnen und Motorkopf
abnehmen.
B Lenkrollen und Bolzen fest in den Behälterboden
eindrücken
Trockensaugen
THOMAS BRAVO 20
Nach vorherigem Nasssaugen muss das Gerät
absolut trocken sein; auch Schlauch oder Rohre
gegebenenfalls vorher trocknen.
Nie ohne oder mit beschädigten Filtern
trockensaugen.
K Reinigungsmitteltank entnehmen.
Verwenden Sie den Kegelfilter (30) zusätzlich
C
zum Papierfiltersack. Somit erreichen Sie bestes
Staubrückhaltevermögen.
Den Kegelfilter (30) an der Unterseite des
Motorkopfs (2) aufsetzen. Je nach Modell an
Pos. 1 oder 2 mit den Drehklammern verriegeln.
Bei starker Verschmutzung oder nachlassender
Saugleistung kann der Kegelfilter (30) mit klarem
Wasser, ohne Wasch- und Reinigungsmittelzusätze, ausgewaschen werden. Achten Sie darauf,
dass der Filter beim nächsten Saugeinsatz ganz
durchgetrocknet ist.
D Filtersack fest auf den Ansaugstutzen drücken und
an die Behälterwand anlegen.
G Ansaugschlauch für Reinigungsmittel an der
Unterseite des Motorkopfes einclipsen.
H Motorkopf aufsetzen und Verschlussschnapper
schließen.
J Saugschlauch anschließen. Zum Abnehmen den
Sauganschluß zur Seite drehen und herausziehen.
Montieren Sie das gewünschte Zubehör.
Netzstecker anschließen.
N Gerät mit EIN/AUS-Schalter (6) einschalten.
Pumpenschalter ( 7) darf nicht aufleuchten.
Mit der Saugkraftregulierung (11, Abb. P ) lässt
sich die Saugkraft verändern.
– Nebenluftschieber geschlossen
= volle Saugkraft
– Nebenluftschieber geöffnet
= verringerte Saugkraft
7
Page 8

THOMAS BRAVO 20S Aquafilter
Benutzen Sie Ihr AQUAFILTER-Gerät im
Trockensaugbetrieb niemals ohne Aquafilter,
Feinstaubtextilfilter und entsprechender
Wasserfüllung.
Saugen Sie keine großen Mengen von Feinstaub,
z.B. Mehl, Kakaopulver, Zement usw.
K Reinigungsmitteltank entnehmen.
E 2-teiligen AQUA-Filter bis auf Anschlag
zusammenstecken und fest auf den
Ansaugstutzen aufschieben.
Achten Sie dabei auf die
Markierungen.
Der AQUA- Filter muß am Saugtonnenboden
einrasten und am Boden gleichmäßig aufliegen.
Füllen Sie 2 Liter klares Wasser in den
Saugbehälter.
F Feinstaubtextilfilter durch Umlegen des oberen
Randes in den Saugbehälter einhängen.
G Ansaugschlauch für Reinigungsmittel an der
Unterseite des Motorkopfes einclipsen.
C Filtervlies (29) mittels Spannring (32) montieren
und mit den Drehklammern sichern.
H Motorkopf aufsetzen und Verschlussschnapper
schließen.
J Saugschlauch anschließen. Zum Abnehmen den
Sauganschluß zur Seite drehen und herausziehen.
Montieren Sie das gewünschte Zubehör.
Netzstecker anschließen.
Verschmutzung mit klarem Wasser, ohne Wasch- und
Reinigungsmittelzusätze, auswaschen. Achten Sie
darauf, dass der Filter beim nächsten Saugeinsatz ganz
durchgetrocknet ist.
Naßsaugen
Schwimmerventil (40, Abb. S ) stets sauber und
gangbar halten. Es unterbricht automatisch das
Ansaugen, wenn der Saugbehälter voll ist.
Beim Absaugen aus Behältern, deren Flüssigkeitsspiegel
höher liegt als die Oberkante des Saugbehälters und
deren Füllinhalt größer ist als das Fassungsvermögen
des Saugbehälters, kann bei geschlossenem
Schwimmerventil weiter Flüssigkeit nachfließen.
In solchen Fällen nur Teilmengen absaugen und
Saugbehälter zwischendurch entleeren.
Zuerst Saugrohr und -schlauch aus der Flüssigkeit
heben und danach das Gerät ausschalten, um ein
Nachlaufen von Flüssigkeit zu verhindern.
A Verschlussschnapper öffnen und Motorkopf
abnehmen.
Filter aus dem Gerät nehmen, da diese sonst
beschädigt werden (Abb. C und D). Bei
AQUAFILTER-Geräten den AQUA-Filter und
Feinstaubtextilfilter herausnehmen
(Abb. C, E und F).
Falls der Reinigungsmitteltank montiert ist, diesen
herausnehmen (Abb. K ).
H Motorkopf aufsetzen und Verschlussschnapper
schließen.
Netzstecker anschließen.
J Saugschlauch anschließen. Zum Abnehmen den
Sauganschluß zur Seite drehen und herausziehen.
N Gerät mit EIN/AUS-Schalter (6) einschalten.
Pumpenschalter (7) darf nicht aufleuchten.
Mit der Saugkraftregulierung (11, Abb. P ) lässt
sich die Saugkraft verändern.
– Nebenluftschieber geschlossen
= volle Saugkraft
– Nebenluftschieber geöffnet
= verringerte Saugkraft
Reinigung und Pflege des AQUAFiltersystems
Aus Hygienegründen das AQUAFILTER-
System und den Saugbehälter nach jedem
Gebrauch entleeren, reinigen und trocknen.
Schmutziges Wasser und feuchte Teile
begünstigen die Vermehrung von Bakterien
und Pilzen.
Feinstaubtextilfilter je nach Verschmutzung mit einem
trockenen oder feuchten Tuch abwischen. Bei stärkerer
8
P Saugkraftregulierung (11) am Handgriff
schließen.
N Gerät mit EIN/AUS-Schalter (6) einschalten.
Pumpenschalter (7) darf nicht aufleuchten.
Nach Beendigung des Nasssaugens das Gerät
und verwendete Zubehörteile reinigen und
trocknen.
Sprühextrahieren (Waschsaugen)
von Teppichen und Hartböden
Nur Teppiche reinigen, die für die Nassreinigung
geeignet sind.
Zarte handgewebte oder farbunechte Teppiche
dürfen nicht nassgereinigt werden.
Wenn der Teppich zu einem früheren Zeitpunkt
shampooniert wurde, kann es bei erstmaligem
Gebrauch des THOMAS BRAVO zu stärkerer
Schaumbildung kommen.
Page 9

Gerät dann abschalten und Saugbehälter
entleeren.
Um weitere Schaumbildung zu vermeiden, geben
1
Sie eine
⁄2 Tasse Essig in den Saugbehälter.
Erhöhte Schaumbildung ist nach einmaliger
Grundreinigung mit dem THOMAS Reinigungskonzentrat ausgeschlossen, da dieses mit einem
speziellen Schaumstopp ausgerüstet ist.
Achten Sie darauf, dass sich bei einge-
schalteter Sprühfunktion immer Flüssigkeit
im Frischwasserbehälter befindet, um eine
eventuelle Beschädigung der Pumpe zu
vermeiden.
Teppichreinigung
A Verschlussschnapper öffnen und Motorkopf
abnehmen.
K Deckel vom Reinigungsmitteltank abnehmen und
THOMAS ProTex Reinigungsmittel in den Tank
einfüllen.
Dosierung siehe Flaschenetikett.
Handwarmes Wasser (max. 30° C)
verwenden.
Deckel wieder aufsetzen und befüllten
Reinigungsmitteltank in das Gerät einsetzen.
G Ansaugschlauch für Reinigungsmittel aus der
Halterung am Motorkopf nehmen.
L Motorkopf so aufsetzen, dass der Ansaug-
schlauch (36) bis auf den Grund des Reinigungsmitteltanks eintaucht und nicht abgeknickt wird.
J Saugschlauch anschließen. Zum Abnehmen den
Sauganschluß zur Seite drehen und herausziehen.
M Absperrventil in die Aufnahme am Saugrohr
einschieben. Handgriff in das Saugrohr stecken
und den Reinigungsmittelschlauch mit den
Kunststoffclips am Saugschlauch befestigen.
P Hebel am Absperrventil (16) drücken.
Reinigungsmittel wird aufgesprüht.
Bevor der Reinigungsmitteltank erneut
befüllt wird, immer das Schmutzwasser im
Saugbehälter entleeren.
Hartbodenreinigung
Q Hartbodenadapter montieren.
Vorgehensweise siehe „Teppichreinigung“
Zur Hartbodenreinigung empfehlen wir das
THOMAS ProFloor Reinigungskonzentrat.
Polsterreinigung (je nach Modell)
Zur Reinigung Ihrer Polstermöbel oder Autositz verwenden Sie die
Polster-Sprühextraktionsdüse (23).
Achten Sie darauf, dass nicht zuviel Flüssigkeit
aufgetragen wird, da je nach Unterbau mit einer
längeren Trocknungszeit zu rechnen ist.
R Die Polster-Sprühextraktionsdüse montieren.
Reinigungsmittelschlauch durch Drehen befestigen.
Düse auf den Handgriff aufschieben.
Reinigung und Pflege des Sprühextraktions-Systems
K Zur Pflege der Pumpe und Ventile den
Reinigungsmitteltank mit klarem Wasser
befüllen und einsetzen.
Netzstecker anschließen, Ein-/Ausschalter (6)
sowie Pumpen-Schalter (7) einschalten.
P Sprühsystem z.B. über einem Spülbecken
in Betrieb nehmen (Hebel am Absperrventil
(16) betätigen).
N Reinigungsmittelschlauch in die Schnellkupplung
am Motorkopf einrasten.
O Teppich-Sprühextraktionsdüse auf das Saugrohr
aufstecken.
P Reinigungsmittelschlauch der Teppich-Sprühdüse
am Absperrventil ansetzen und durch Drehen
verriegeln. Reinigungsmittelschlauch in die
Schlauchhalterung an den Saugrohren drücken
bzw. bei Edelstahlrohren mit den kleineren
Rohrclipsen (39) am Saugrohr befestigen.
Netzstecker anschließen.
N EIN/AUS-Schalter (6) und beleuchteten
Pumpenschalter (7) einschalten.
N Vor dem Lösen des Reinigungsmittelschlauches
den Hebel am Absperrventil (16, Bild
P )
betätigen, um den Restdruck im System
abzubauen, dann Taste an der Schnellkupplung
(5) drücken.
Netzstecker ziehen!
Anschließend das Gerät und verwendete Zubehörteile
reinigen und trocknen.
Den Motorkopf nie in Wasser tauchen!
Motorgehäuse mit feuchtem Tuch abwischen und
nachtrocknen.
9
Page 10

Wichtige Tips
Ziehen Sie beim Nassreinigen die Teppich-
Sprühdüse immer Bahn für Bahn auf sich zu.
Um eine Neuverschmutzung zu vermeiden, sollten
gereinigte Teppichböden erst betreten werden,
wenn sie wieder trocken sind.
Um ein schnelleres Abtrocknen der gereinigten
Flächen zu erzielen, ist es sinnvoll, durch
nochmaliges Absaugen – ohne Drücken des
Ventilhebels – verbleibende Restfeuchtigkeit
weitgehend zu entfernen.
Zur Reinigung von Parkettböden verfahren Sie
gemäß den Anweisungen des ParkettbodenHerstellers.
Wenn der Motor nicht läuft:
• Sind Kabel, Stecker und Steckdose intakt?
• Vor Prüfung Stecker ziehen.
• Niemals selbst den Motor öffnen!
Wenn keine Reinigungsflüssigkeit austritt:
• Ist die Pumpe eingeschaltet (Schalter (7)) muß
aufleuchten?
• Ansaugfiltersieb am Ansaugschlauch (36) reinigen.
• Hängt der Ansaugschlauch ordnungsgemäß im
Reinigungsmitteltank?
• Ist die Sprühdüse verstopft? Falls die Sprühdüse
einmal verstopft ist, Düse einige Zeit ins Wasser
legen. Danach kräftig durchblasen.
Hilfe bei eventuellen Störungen
Falls Ihr Gerät wider Erwarten einmal nicht zufriedenstellend funktioniert, brauchen Sie nicht gleich den Kundendienst einzuschalten. Bitte prüfen Sie zunächst, ob
die Störung nur kleine Ursachen hat:
Wenn beim Saugen Staub austritt:
• Ist das Filtersystem richtig befestigt und ohne Defekt?
• Wurde ein Original THOMAS-Filter verwendet?
Wenn die Saugkraft allmählich nachläßt:
• Sind die Filterporen durch Feinstaub verstopft?
• Ist der Papierfiltersack voll?
• Sind Düse, Verlängerungsrohr oder Saugschlauch
durch Schmutz verstopft? (Saugschlauch bei
eingeschaltetem Gerät auseinanderziehen – Dehnung
lockert Verstopftes).
Wenn beim Saugen Wasser aus den
Ausblasöffnungen des Gerätes tritt:
• Ist der Schwimmer (Bild S) beim Saugen von
Flüssigkeiten blockiert und kann nicht ansprechen?
• Wurde ein Original THOMAS Reinigungskonzentrat
zum Waschsaugen benutzt?
• Sind AQUAFILTER und Feinstaubtextilfilter (je nach
Modell) gemäß Anleitung montiert?
Kundendienst
Wenden Sie sich an Ihren Fachhändler, der Ihnen im
Bedarfsfall auch gerne die Adresse oder Telefonnummer des für Sie zuständigen THOMAS-Kundendienstes
miteilt.
Bitte geben Sie dabei stets die Angaben auf dem Typenschild Ihres Saugers an.
Zur Aufrechterhaltung der Sicherheit des Gerätes
sollten Sie Reparaturen insbesondere an stromführenden Teilen nur durch Elektro-Fachkräfte
durchführen lassen. Im Störungsfall sollten sie sich
daher an Ihren Fachhändler ader direkt an den
Thomas Kundendienst wenden.
Die Kontaktdaten finden Sie auf der Rückseite.
Wenn die Saugkraft plötzlich nachläßt:
• Hat das Schwimmerventil die Saugluft gestoppt? Das
kann passieren bei extremer Schrägstellung oder
beim Umkippen des Ge rätes. Sauger ausschalten
– der Schwimmer fällt nach unten – das Gerät ist
wieder betriebsbereit.
10
Technische Änderungen vorbehalten.
Page 11

Before operating
GB
appliance for the first time
Please read through all of the information
below carefully. The information provides
important points for the safe use and the
maintenance of the appliance. Please
keep these operating instructions in a safe
place and provide them to the next owner.
Part identification
1 = Collecting bin
2 = Motor block
3 = Snap fastener
4 = Cover wheels
5 = Quick coupling
6 = On/Off switch
7 = On/Off pump switch (illuminated)
8 = Suction socket
9 = Carrying handle
10 = Mains cable
11 = Suction control
12 = Cleaning fluid hose (upper section)
13 = Flexible hose
14 = Suction tubes
15 = Hose clips
16 = Cut-off valve
17 = Carpet spray extraction nozzle
18 = Cleaning fluid hose (lower section)
19 = Upholstery nozzle
20 = Hard floor adapter
21 = Carpet nozzle
22 = Gap nozzle
23 = Upholstery spray extraction nozzle
24 = Cleaning fluid tank
25 = Textile cleaning fluid concentrate (ProTex)
26 = Siphon nozzle*
29 = Tissue filter*
30 = Taper filter
32 = Clamping ring*
33 = Tissue filter bag
34 = AQUA filter*
35 = Fine particle textile filter*
36 = Suction hose for cleaning fluid
37 = Suction tube
38 = Suction tube – park position
39 = Tube clips*
*) only THOMAS BRAVO 20 S Aquafilter
Safety points
• THOMAS BRAVO is intended for household use.
• The appliance must not be put into operation if:
– the mains cable is damaged
– the appliance shows clear signs of damage
– the appliance has fallen or been dropped.
• The voltage data on the appliance’s rating plate must
conform to the power supply.
• Do not allow nozzles and tubes (when the appliance
is switched on) to come within the proximity of the
head – danger for eyes and ears, for example.
• Do not vacuum noxious substances or corrosive or
solvent liquids.
•
Never operate the appliance in rooms where inflammable
materials are stored or where gases have formed.
• Store the appliance and its attachments in a dry,
clean and enclosed space.
• Materials such as petrol, paint thinner and heating
oil can form explosive gases or mixtures by being
subjected to centrifugal air from the appliance.
• Never vacuum hot ash or glowing objects.
• Check before every use to be sure that you have
correctly fitted the filters required for the specific
application.
• Do not vacuum toner dust! Toners such as those used
in printers and copiers, can be electric conductors!
Furthermore, it is possible that the appliance’s filter
system will not completely filter out toner dust, and in
this way it can enter the air supply of the room.
• Extreme care is required when vacuuming stair carpets
with your appliance. Ensure that the vacuum cleaner
stands firmly on the step and take care that the flexible
hose is not stretched beyond its actual length. When
using the vacuum cleaner on stairs, always ensure that
you hold the appliance steady with one hand.
• Do not leave the appliance unattended whilst it is
switched on.
• Always pull out the plug
– if the appliance malfunctions during operation
– before cleaning and maintenance
– after use
– when changing the filter.
•
This appliance can be used by children
who are over 8 and by those with
reduced physical, sensory or mental
capabilities or lacking experience and/
or knowledge given that they have been
supervised or instructed in the safe use
of the appliance and have understood
the resulting dangers. Children must
not play with the appliance. Cleaning
and user maintenance must not be
undertaken by children who are not
subject to supervision.
11
Page 12
• Never unplug the appliance by pulling at the cable,
but only by removing the plug directly from the
• Ensure that the main cable is not exposed to either
heat or chemical substances, nor that it is pulled
across sharp edges or surfaces.
• Never repair damage to the appliance, to the
accessories or to the cable (special cable required);
have repairs done only by an authorised customer
service station, because modifications to the
appliance can pose a risk to your health. Ensure that
only original spare parts and accessories are used.
• Do not expose the appliance to the elements,
humidity or heating sources.
• Never aim the cleaning jet at people or animals, at
electrical sockets or electrical appliances.
• Chemicals such as the cleaning fluid concentrates
should not be handled by children.
• The functionality and complete effectiveness of the
appliance can only be warranted if you use original
THOMAS cleaning fluids.
• Persons with sensitive skins should avoid direct contact
with the cleaning fluid.
• If cleaning fluid comes into contact with mucous
membranes (eyes, mouth, etc.), immediately flush with
water.
socket.
For sake of the environment
Do not just throw away packaging material and worn
out appliances!
Appliance packaging:
• The packaging carton can be placed in the waste
paper collection bin
• The plastic bag made of polyethylene (PE) should be
placed in the appropriate disposal bin for recycling.
Appliance disposal at the end of service life:
• Appliance disposal in accordance with the local
regulations but before doing so disconnect and cut
off the mains plug.
The symbol on the respective product or its
packaging indicates that this product must
not be disposed of as household waste.
collection point for recycling electrical and electronic
equipment.
By ensuring the proper disposal of this product, you will
help to prevent potential adverse consequences for the
environment and human health, which could otherwise
be caused by inappropriate disposal of this product.
For more explicit information about recycling of this
product, please contact your local town hall, your
household waste disposal service or the shop where
you purchased the product.
Instead, it should be handed into the
Assembly of castor wheels
A Undo the snap-on fasteners and lift the motor
block.
B Push the castor wheels and the pegs into the base
of the collecting bin until they snap into place.
Dry vacuuming
THOMAS BRAVO 20
After wet vacuuming, the appliance must be
absolutely dry; dry off the flexible hose or tubes
if necessary beforehand.
Never dry vacuum without filters or
with damaged filters.
K Remove the cleaning fluid tank.
C Use the taper filter (30) in addition to the paper
filter sack. By doing this you achieve the best
retention of the residue dust. Place the taper
filter (30) on the underside of the motor head (2).
Depending on the model in position 1 or 2 and
lock with the rotary clips. In the case of stubborn
dirt weak suction power the taper filter (30) can
be washed out with clear water without adding
washing detergents or cleaning agents. Make
sure that the filter is completely dry when using
the vacuum cleaner the next time.
D Press the filter sack on the suction connection
firmly and lay it against the wall of the collecting
bin.
G Clip the hose for the cleaning fluid to the
underside of the motor block.
H Place the motor block on top and secure it by
means of snap-on fasteners.
J Connecting the flexible hose. Remove the hose
by turning the hose connecting piece and
withdrawing the hose.
Assemble the accessories you require.
Connect the mains cable.
N Turn the appliance on with the On/Off switch.
The pump switch (7) must not light up.
Suction control (11, figure P) allows you to vary
the suction power.
– Sliding air trap closed = full suction power
– Sliding air trap open = reduced suction power
12
Page 13
THOMAS BRAVO 20S Aquafilter
Never use your AQUAFILTER appliance in dry
vacuum mode without the Aquafilter, the fine
particle textile filter and an appropriate water level.
Do not vacuum up large quantities of particle
dust, e.g. flour, cocoa powder, cement, etc.
K Remove the cleaning fluid tank.
E Connect up the two-piece AQUA filter, pushing it
together until the two parts fit snugly, and push it
firmly onto the suction socket.
Note the marker
guides!
The AQUA filter has to snap into place on the
floor of the suction canister and has to lie there
evenly.
Fill 2 litres of clear water into the collecting bin.
F Hang the fine particle filter in the collecting bin by
turning down the top edge.
G Clip the suction hose for cleaning fluid to the
underside of the motor block.
C Fit tissue filter (29) by means of the clamping ring
(32) and fasten with turning clips.
H Place the motor block onto the collecting bin and
snap shut with snap-on fasteners.
J Connect flexible hose. Remove the hose by
turning the hose connecting piece to the side and
withdrawing the hose.
Assemble the desired accessories.
Connect the mains cable.
N Switch on the appliance with the On/Off (6)
switch.
The pump switch (7) must not light up.
Suction control (11, figure P) allows you to vary
the suction power.
– Sliding air trap closed = full suction power
– Sliding air trap open = reduced suction power
Cleaning and care of the AQUA filter
system
For reasons of hygiene, empty, clean
and dry the AQUAFILTER system and
the collecting bin after each use. Dirty
water and damp parts will promote the
growth of bacteria and mildew.
Clean the fine particle filter – according to how dirty it
is – with a dry or damp cloth. If it is very dirty, clean
it out with clear water, without adding any detergents
or cleaning fluids. Please make sure that the filter is
completely dry before next using the vacuum cleaner.
Wet vacuuming
Keep the float valve (40, fig. S) clean and
accessible at all times. It automatically interrupts
vacuuming when the collecting bin is full.
When vacuuming out containers in which the liquid
level is higher than the top of the collecting bin and
which have a larger volume than the capacity of the
collecting bin, liquid can continue to be vacuumed
beyond the capacity of the collecting bin if the float
valve is closed.
In such cases, vacuum only in partial amounts and
intermittently empty the collecting bin.
Lift the tube and flexible hose out of the liquid first
and then turn off the appliance afterwards, in order to
prevent an afterflow of liquid.
A Open the snap-on fasteners and lift the motor
block.
Remove the filters from the appliance, because
they will otherwise be damaged (figures C
and D). If your appliance is an AQUAFILTER
appliance, remove the AQUA filter and the fine
particle filter (figures C, E and F).
If the cleaning fluid tank is fitted, remove it
(figure K).
H Place the motor block onto the collecting bin and
snap shut with snap-on fasteners.
Connect the mains cable.
J Connect flexible hose. Remove the hose by
turning the hose connecting piece to the side and
withdrawing the hose.
P Close the suction power control (11) on the
handle.
N Switch on the appliance with the On/Off (6)
switch.
The pump switch (7) must not light up.
After completion of wet vacuuming, please clean
and dry the appliance and the accessories used.
Spray extraction (shampooing) of
carpets and hard floor coverings
Shampoo only carpets which can be cleaned wet.
Fine, hand-woven or non-colour-fast carpets
should not be shampooed.
If the carpet has been shampooed before, it is
possible that you will obtain a great deal of foam
when you use THOMAS BRAVO for the first time.
If this is the case, switch off the appliance and
empty the collecting bin.
13
Page 14

Thereafter, in order to prevent excess foam, put
1
⁄2 cup of vinegar into the collecting bin.
Excess foaming will not occur after you have
thoroughly cleaned the carpet once with
THOMAS cleaning concentrate, because it
contains a special anti-foam substance.
P Press the hook on the cut-off valve (16).
Cleaning fluid spray will begin.
Before refilling the cleaning fluid tank,
always empty the dirty water from the
collecting bin.
Ensure that there is always liquid in
the fresh water container when the
spraying function is switched on, in
order to avoid possible damage to the
pump.
Carpet cleaning
A Open the snap-on fasteners and lift the motor
block.
K Remove the lid of the cleaning fluid tank and fill
the tank with THOMAS ProTex Cleaning Fluid.
See the bottle label for dosage instructions.
Use only lukewarm (max. 30 °C) water.
Replace the lid and insert the filled cleaning fluid
tank into the appliance.
G Take the suction hose for cleaning fluid out of its
holder on the motor block.
L Place the motor block onto the collecting bin such
that the suction hose (36) is immersed all the way
to the bottom of the cleaning fluid tank and is not
bent..
J Connect flexible hose. Remove the hose by
turning the hose connecting piece to the side and
withdrawing the hose.
M Insert the cut-off valve into its receptacle on the
suction tube. Snap the handle into the suction
tube and fasten the cleaning fluid hose to the
flexible hose by means of the plastic clips.
N Snap the cleaning fluid hose into the quick
coupling on the motor block.
O Fit the carpet spray extraction nozzle onto the
suction tube.
P Place the cleaning fluid hose of the carpet
spraying nozzle onto the cut-off valve and lock
it in place by turning it. Press the cleaning fluid
hose into the hose receptacle on the suction
tubes, or in the case of stainless steel tubes, fasten
it to the tube with the smaller tube clips (39).
Connect the mains cable.
N Switch on the appliance with the On/Off (6)
switch.
Switch on the pump switch (7).
14
Cleaning hard floors
Q Assemble hard floor adapter.
See ”Carpet cleaning” procedure.
We recommend THOMAS ProFloor cleaning
concentrate for cleaning hard floors.
Cleaning upholstery (according to model)
For cleaning your upholstery or car seats, please use
the upholstery spray extraction nozzle (23).
Take care not to apply too much liquid;
depending on the upholstery sublayer, you may
experience significant drying times.
R Assemble the upholstery spray extraction nozzle.
Fasten the cleaning fluid hose by turning it. Fit the
nozzle onto the handle.
Cleaning and care of the spray extraction
system
K To care for the pump and valves
properly, fill the cleaning fluid tank
with clear water and insert it.
Connect the mains cable. Switch on the
On/Off switch (6) as well as the pump
switch (7).
P Operate the spraying system, e.g. over
a sink (disengage the hook on the cutoff valve (16)).
N Before removing the cleaning fluid hose, engage
the hook on the cut-off valve (16, figure P) in
order to release the remaining pressure in the
system, and then press the key on the quick
coupling (5).
Remove mains cable!
Afterwards, clean and dry the appliance and the
accessories you have used.
Never immerse the motor block in water!
Clean the motor block casing with a damp cloth and
wipe dry.
Page 15

Important tips
When wet vacuuming, always vacuum by
drawing the carpet spray nozzle in straight
parallel strokes across the surface towards you.
In order to avoid soiling the carpet again, you
should not walk on shampooed carpets until they
have dried.
In order to achieve quicker drying of shampooed
surfaces, it is helpful to remove residual liquid
remaining in the carpet by vacuuming it again –
without engaging the valve hook.
When cleaning parquet floors, please observe
the instructions of the parquet floor manufacturer.
the float will fall back into place – the appliance is
ready for use again.
The motor does not function:
- Is there damage to the mains cable, plug or socket?
- Pull out the plug before checking.
- Never open the motor yourself!
No cleaning fluid is coming out:
- Is the pump switched on (switch (7) has to light up)?
- Clean the filter catch on the suction hose (36).
- Has the suction hose been correctly fitted in the
cleaning fluid tank?
- Is the spray nozzle clogged? If the spray nozzle
becomes clogged, lay the nozzle into water for a
while and then blow strongly through it.
If unexpected difficulties arise
If your appliance does not operate to your satisfaction,
you do not have to contact customer service straight
away. Please check first as to whether the fault is due
one of the following minor causes:
Dust escaping from suction sockets:
- Has the filter system been fitted in accordance with
the instructions?
- Has an original THOMAS filter been used?
Gradual reduction in suction power:
- Are the pores of the tissue filter clogged up by dust
or soot?
- Is the collecting bin full?
- Is there a blockage in the nozzle, extension tube
or flexible hose?/Stretch the flexible hose while
the appliance is switched on – this will loosen the
obstruction.)
Water is coming out of the air expulsion
openings of the appliance during
vacuuming:
- Is the float (figure S) blocked when vacuuming liquid
and unable to operate?
- Was original THOMAS cleaning concentrate used for
shampooing?
- Have AQUAFILTER and fine particle textile filter
(according to model) been fitted according to the
instructions?
Customer Service:
Ask your dealer for the address or telephone number
of your nearest THOMAS Customer Service.
Specify your model number and type when contacting
your dealer – you will find these details on the rating
plate.
To maintain the safety of your appliance,
you should have repairs, especially on live
parts, carried out by a trained electrician
only. In the event of a fault, you should
therefore approach your dealer or the
THOMAS Customer Service directly.
Contact details are on the reverse side.
Sudden reduction in suction power
- Has the float stopped the flow of air? This can happen
if the appliance is standing at a slant or if the
appliance falls over. Turn off the vacuum cleaner –
Subject to technical modifications.
15
Page 16

Avant la première
F
mise en service
Veuillez s.v.p. lire attentivement toutes
les informations indiquées ci-après. Elles
fournissent d’importantes consignes et
remarques pour la sécurité, l’emploi et
la maintenance de l’appareil. Veuillez
également conserver soigneusement le
présent mode d’emploi et le remettre au
propriétaire suivant.
Identification des pièces
1 = Cuve
2 = Tête du moteur
3 = Fermeture à déclic
4 = Roues de guidage
5 = Raccord rapide
6 = Bouton MARCHE/ARRET
7 = I
nterrupteur de la pompe MARCHE/ARRET (allumé)
8 = Raccord d’aspiration
9 = Poignée
10 = Câble de raccordement au secteur
11 = Bouton de régulation de la puissance d’aspiration
12 = Tuyau flexible pour détergent (partie supérieure)
13 = Tuyau flexible d’aspiration
14 = Tube d’aspiration
15 = Clips de flexible
16 = Soupape d’arrêt
17 = Injecteur-extracteur pour tapis et moquettes
18 = Tuyau flexible pour détergent (partie inférieure)
19 = Suceur pour meubles rembourrés
20 = Adaptateur pour sols durs
21 = Suceur pour tapis et moquettes
22 = Suceur pour joints
23 = Injecteur-extracteur pour meubles rembourrés
24 = Réservoir à détergent
25 = Détergent concentré pour textiles (ProTex)
26 = Tête siphon*
29 = Partie textile du filtre*
30 = Filtre conique
32 = Collier de serrage*
33 = Sac à poussière
34 = Filtre AQUA *
35 = Filtre textile pour poussières fines *
36 = Flexible d’aspiration pour détergent
37 = Dispositif d’accrochage du tube d’aspiration
38 = Support du tube d’aspiration
39 = Clips du tube*
* seulement avec THOMAS BRAVO 20 S Aquafilter
Consignes de sécurité
• THOMAS BRAVO est un appareil qui ne doit être
utilisé que dans le ménage.
• L’appareil ne doit jamais être mis en service:
–
si le câble de raccordement au secteur est endommagé,
– s’il présente des dommages visibles
– et s’il est tombé.
• La tension d’alimentation doit correspondre aux
indications données sur la plaque signalétique.
• Suceurs, injecteurs et tubes ne doivent jamais être
tenus au niveau de la tête lorsque l’appareil est en
marche, risque de lésion pour les yeux et les oreilles.
• L’appareil n’est pas approprié pour l’aspiration de
substances nocives, corrosives ou contenant des solvants.
• L’appareil ne doit pas être utilisé dans des pièces où
sont entreposées des substances inflammables ou
dans des locaux où des gaz se dégagent.
• Conservez l‘appareil ainsi que les accessoires dans
un endroit sec, propre et fermé.
•
Les substances comme l’essence, les solvants de
peinture
et le fuel peuvent, lorsqu’elles sont brassées
avec l’air d’aspiration, engendrer des vapeurs ou
des mélanges explosifs.
• Ne jamais aspirer de cendres chaudes ou des objets
incandescents.
•
Ne jamais aspirer des poussières de toner, tel que
contenues par exemple dans les cartouches pour
imprimantes ou photocopieurs. De telles poussières
peuvent en effet être conductrices d’électricité ! Par
ailleurs, il est éventuellement possible que le système de
filtration de l’aspirateur ne puisse pas filtrer intégralement
ces poussières de toner qui sont alors susceptibles d’être
à nouveau refoulées dans l’air ambiant.
• Une très grande prudence est recommandée lors
du nettoyage d’escaliers. Veiller à ce que l’appareil
dispose d’une place suffisante. Ne jamais tirer les
flexibles au-delà de leur longueur initiale. Toujours
maintenir l’appareil d’une main.
• Ne jamais laisser l’appareil allumé sans surveillance.
• Cet appareil peut être utilisé par des
enfants à partir de 8 ans et des
personnes ayant des capacités physiques,
sensorielles ou mentales réduites ou un
manque d'expérience ou de connaissances
sous surveillance ou à condition qu'ils
aient reçu les instructions appropriées
leur permettant de se servir de l'appareil
en toute sécurité et de comprendre les
risques qui peuvent en résulter. Ne laisser
pas les enfants jouer avec l'appareil.
Le nettoyage et l'entretien régulier de
l'appareil ne doivent pas être réalisés par
des enfants sans surveillance.
16
Page 17

• Le connecteur de branchement au secteur doit être retiré:
- en cas de dysfonctionnement de l’appareil
- avant chaque nettoyage et entretien de l’appareil
- après chaque utilisation
- à chaque changement de filtre
• Ne jamais tirer sur le câble pour débrancher le
connecteur de la prise, toujours tirer sur le connecteur
lui-même.
• Veiller à ce que le câble de branchement ne soit
jamais exposé à de fortes températures ou à des
fluides chimiques et à ce qu’il ne soit jamais tiré sur
des arêtes ou surfaces tranchantes.
• Ne jamais réparer soi-même les dommages
éventuels qui peuvent éventuellement se présenter
sur l’appareil, les accessoires ou le câble de
raccordement au secteur (câble spécial nécessaire).
De telles réparations doivent toujours être confiées
au service technique après vente.
• Ne pas exposer l’appareil aux intempéries, à l’humidité
ou à des sources de chaleur quelconques.
•
Ne jamais diriger un jet de détergent sur des personnes,
des animaux ou encore sur des prises de courants ou
des appareils électriques.
• Les agents chimiques, comme tous les concentrés
détergents, doivent toujours être tenus hors de la
portée des enfants.
• Les fonctions de l’appareil et l’effet de nettoyage ne
peuvent être intégralement garantis que sous réserve
de l’utilisation du produit détergent THOMAS.
• Les personnes à peau sensible doivent éviter tout
contact direct avec la solution de nettoyage.
• En cas de contact du concentré détergent avec les
muqueuses (yeux, bouche etc.), rincer immédiatement
à l’eau.
Pour l’amour de l’environnement
Ne vous débarrassez pas des emballages et appareils
usagés en les jetant tout simplement!
Emballage de l’appareil:
•
Le carton d’emballage peut être recyclé avec les
vieux papiers.
• Le sac en plastique polyéthylène (PE) peut être porté sur
une déchetterie pour recyclage.
Recyclage de l’appareil à la fin de sa durée de vie:
•
Eliminez l’appareil usagé conformément aux prescriptions
locales sans oublier de couper auparavant le
connecteur du câble de raccordement au secteur.
Si ce symbole est apposé sur le produit ou son
emballage, ceci souligne que ce produit ne peut
pas être traité comme un déchet ménager
ordinaire, mais qu’il doit être porté dans un
centre de collecte pour recyclage des appareils électriques
et électroniques.
En contribuant à une élimination correcte de ce
produit
,
vous contribuez à protéger l’environnement et
la santé
humaine. Environnement et santé sont menacés
par toute
procédure d’élimination incorrecte. Pour plus
d’information sur le recyclage de ce produit, veuillez vous
adresser à la mairie de votre commune, aux services de
ramassage des déchets ou au commerçant qui vous a
vendu ce produit.
Montage des roues de guidage
A Ouvrir le dispositif de fermeture à déclic et retirer
la tête du moteur.
B Bien enfoncer les roues de guidage et goujons
dans le fond de la cuve
Aspiration à sec
THOMAS BRAVO 20
L’appareil doit être absolument sec, c’est-à-
dire que si vous avez auparavant effectué une
aspiration humide, il vous faut tout d’abord séché
l’appareil ainsi que les flexibles et tubes.
Ne jamais aspirer à sec sans filtre ou
avec des filtres endommagés
K Retirer le réservoir à détergent
C Utilisez le filtre conique (30) en supplément du
sac à poussières. Le pouvoir de rétention de
la poussière sera ainsi optimisé. Placez le filtre
conique (30) sur la face inférieure de la tête du
moteur (2). En fonction du modèle, verrouillez le
sur la position 1 ou 2 avec les crochets rotatifs
prévus à cet effet. En cas de fort encrassement
ou de baisse de puissance de l’aspirateur, vous
pouvez laver le filtre conique (30) à l’eau claire.
N’utilisez jamais de produits de lavage ou de
nettoyage en supplément. Veillez à ce que le filtre
soit bien sec avant de l’utiliser à nouveau.
D Enfoncer le sac à poussières sur le raccord
d’aspiration puis le disposer contre la paroi de la
cuve.
G Enclencher le flexible d’aspiration pour détergent
sur la face inférieure de la tête du moteur.
H Monter la tête du moteur et fermer le dispositif
de fermeture à déclic
J Raccorder le flexible. Pour retirer le flexible
tourner le raccord sur le côté puis tirer.
Insérer l’accessoire désiré
Brancher le connecteur sur le secteur
N Mettre l’appareil en marche avec le bouton
MARCHE/ARRET (6)
La puissance d’aspiration peut être modifiée avec
le bouton de régulation (11, Schéma P).
– Coulisseau d’aération secondaire fermé
= pleine puissance
– Coulisseau d’aération secondaire ouvert
= puissance réduite
17
Page 18

THOMAS BRAVO 20S AQUAFILTER
En mode aspiration à sec, l’appareil AQUAFILTER
ne doit jamais être utilisé sans filtre AQUA et
sans filtre textile pour poussières fines. De même,
il faut toujours veiller auparavant à ce qu’il soit
rempli correctement avec de l’eau.
N’aspirez jamais de grandes quantités de
poussières fines, telles que par exemple de la
farine, du cacao en poudre, du ciment etc.
K Retirer le réservoir à détergent.
E Insérer le filtre AQUA deux pièces jusqu’à la
butée puis le pousser complètement jusqu’au
raccord d’aspiration.
Le filtre AQUA doit s’enclencher sur le fond de
F Accrocher le filtre textile pour poussières fines
G Enclencher le flexible d’aspiration pour détergent
C Monter la partie textile du filtre (29) à l’aide de
H Monter la tête du moteur et fermer le dispositif
J Raccorder le flexible. Pour retirer le flexible
Insérer l’accessoire désiré
Brancher le connecteur sur le secteur
N Mettre l’appareil en marche avec le bouton
L’interrupteur de la pompe (7) ne doit pas s’allumer
La puissance d’aspiration peut être modifiée avec
– Coulisseau d’aération secondaire fermé
= pleine puissance
– Coulisseau d’aération secondaire ouvert
= puissance réduite
Nettoyage et entretien du système
AQUAfilter
Pour des raisons d’hygiène, le système
18
Lors de cette opération, respecter les
marques apposées .
la cuve et reposer de façon uniforme au fond.
Remplir la cuve de l’aspirateur avec 2 litres d’eau
claire.
sur le bord de la cuve en retournant le bord
supérieur du filtre.
sur la face inférieure de la tête du moteur.
l’anneau de serrage (32) et fixer avec les brides
tournantes.
de fermeture à déclic
tourner le raccord sur le côté puis tirer.
MARCHE/ARRET (6)
le bouton de régulation (11, Schéma P).
AQUAfilter et la cuve de l’aspirateur
doivent être vidés, nettoyés et séchés
après chaque utilisation. Eau sale et
pièces humides favorisent en effet
la prolifération des bactéries et des
champignons.
Essuyer le filtre textile pour poussières fines, en fonction
de son encrassement, avec un chiffon sec ou humide.
S’il est fortement encrassé, le rincer à l’eau claire, sans
addition de produits de lavage ou de détergents.
Veiller à ce que le filtre soit entièrement sec lors de la
prochaine utilisation de l’aspirateur.
Aspiration humide
Toujours maintenir la soupape à flotteur (40,
schéma S) entièrement propre et en parfait état
de fonctionnement. Cette soupape interrompt
immédiatement l’aspiration lorsque la cuve de
l’aspirateur est pleine.
En cas d’aspiration à partir de cuves dont le niveau de
liquide est supérieur au bord supérieur de la cuve de
l’aspirateur et dont la capacité est supérieure à celle
de la cuve, il se peut que le liquide continue de
s’écouler même lorsque la soupape à flotteur est
fermée.
Dans de tels cas, nous vous recommandons de
n’aspirer qu’une certaine quantité de liquides et de
vider entre chaque opération la cuve de l’aspirateur.
Relever tout d’abord le tube et le flexible d’aspiration
au-dessus de la surface du liquide puis éteindre
l’appareil afin d’éviter une fuite de liquide.
A Ouvrir le dispositif de fermeture à déclic et retirer
la tête du moteur.
Retirer les filtres de l’appareil, car ils risqueraient
sinon d’être endommagés (Schémas C et D). Avec
les appareils AQUAFILTER, retirer le filtre AQUA
et le filtre textile pour poussières fines (Schémas
C, E et F).
Si le réservoir à détergent est monté sur
l’appareil, le retirer (Schéma K)
H Monter la tête du moteur et fermer le dispositif
de fermeture à déclic
J Raccorder le flexible. Pour retirer le flexible
tourner le raccord sur le côté puis tirer.
P Fermer le dispositif de régulation de la puissance
d’aspiration (11) sur la poignée.
N Mettre l’appareil en marche avec le bouton
MARCHE/ARRET (6)
L’interrupteur de la pompe (7) ne doit pas
s’allumer
Après aspiration humide, nettoyer et sécher
l’appareil et les accessoires utilisés
Injection-extraction (aspiration lavage)
pour tapis, moquettes et sols durs
Ne nettoyer que les tapis et moquettes résistants
à un nettoyage humide
Les tapis finement tissés main ou dont les couleurs
risquent de déteindre ne doivent pas être
nettoyés par voie humide.
Page 19

Si le tapis ou la moquette a déjà été shampooiné
à une époque précédente, il peut y avoir
formation importante de mousse lors de la
première utilisation de THOMAS BRAVO.
Dans un tel cas, arrêter l’appareil et vider la cuve
de l’aspirateur.
Pour inhiber ensuite la formation de mousse,
1
ajouter
⁄2 tasse de vinaigre dans la cuve de
l’aspirateur.
Une formation importante de mousse après un
nettoyage à fond avec le détergent concentré
THOMAS est exclue étant donné que ce produit
contient un anti-mousse spécial.
Lorsque la fonction injection est
activée, veiller à ce qu’il y ait toujours
assez de liquide dans le réservoir d’eau
claire, afin d’éviter un endommagement éventuel de la pompe.
Nettoyage des tapis et moquettes
A Ouvrir le dispositif de fermeture à déclic et retirer
la tête du moteur.
K Retirer le couvercle du réservoir à détergent et
remplir le réservoir avec le détergent THOMAS
ProTex.
Pour le dosage, voir étiquette sur le flacon
Utiliser de l’eau tiède (max. 30°C).
Remettre le couvercle et insérer le réservoir rempli
dans l’appareil.
G Retirer le flexible d’aspiration pour détergent de
son support sur la tête du moteur.
L Monter la tête du moteur de façon telle que le
flexible d’aspiration (36) soit immergé jusqu’au
fond du réservoir à détergent en évitant toute
formation de coudures.
J Raccorder le flexible. Pour retirer le flexible
tourner le raccord sur le côté puis tirer.
M Insérer la soupape d’arrêt dans le logement
prévu sur le tube d’aspiration. Enficher la poignée
dans le tube d’aspiration et fixer le flexible pour
détergent sur le flexible d’aspiration avec le clips
en plastique.
N Enclencher le flexible pour détergent dans le
raccord rapide sur la tête du moteur.
P Placer le flexible pour détergent de l’injecteur
pour tapis sur la soupape d’arrêt puis le
verrouiller en tournant. Pousser le flexible pour
détergent dans le support pour flexible sur les
tubes d’aspiration ou, dans le cas de tube en
acier inox, le fixer avec les petits clips (39) sur le
tube d’aspiration.
Brancher le connecteur sur le secteur
N Actionner le bouton MARCHE/ARRET (6) et
l’interrupteur de la pompe allumé (7)
P Pousser sur le levier de la soupape d’arrêt (16)
pour pulvériser le détergent.
Avant de remplir à nouveau le
réservoir à détergent, il faut toujours
vider l’eau sale qui se trouve dans la
cuve de l’aspirateur.
Nettoyage des sols durs
Q Monter l’adaptateur pour sols durs
Méthode opératoire: voir “Nettoyage
des tapis et moquettes”
Pour le nettoyage des sols durs, nous vous
conseillons d’utiliser le détergent concentré
THOMAS ProFloor.
Nettoyage des meubles rembourrés
(suivant modèle)
Pour le nettoyage de vos meubles rembourrés ou
sièges auto, utilisez l’injecteur-extracteur pour meubles
rembourrés (23).
Veiller à ne pas pulvériser trop de liquide étant
donné qu’en fonction du rembourrage, vous
devrez vous attendre alors à un temps de
séchage relativement long.
R Monter l’injecteur-extracteur pour meubles
rembourrés. Fixer le flexible pour détergent en
tournant. Pousser l’injecteur-extracteur sur la
poignée.
Nettoyage et entretien du système
d’injection-extraction
K Pour l’entretien de la pompe et des soupapes,
remplir le réservoir à détergent avec de l’eau
claire puis l’insérer dans l’appareil.
Raccorder le connecteur au secteur, actionner le
bouton Marche/arrêt (6) ainsi que l’interrupteur
de la pompe (7)
P Mettre le système d’injection en marche par
exemple au-dessus d’un lavabo [actionner le
levier sur la soupape d’arrêt (16)].
N Avant de dégager le flexible pour détergent,
actionner le levier (16, schéma P) pour éliminer
le reste de pression dans le système, ensuite
appuyer sur la touche sur le raccord rapide (5)
Retirer le connecteur du secteur!
Ensuite nettoyer et sécher l’appareil ainsi que les
accessoires utilisés
Ne jamais tremper la tête du moteur dans
l’eau!
Essuyer le carter du moteur avec un chiffon humide
puis avec sécher un chiffon sec.
19
Page 20

Conseils importants
En aspiration humide, effectuer des passes de
nettoyage en tirant toujours l’injecteur pour
moquettes vers vous, passe par passe.
Pour éviter un nouvel encrassement, attendre
avant de marcher sur la moquette qu’elle soit à
nouveau complètement sèche.
Pour que la surface nettoyée sèche rapidement,
il est judicieux de repasser l’aspirateur sur la
moquette sans actionner le levier de la soupape.
L’humidité restante peut ainsi être largement
éliminée.
Pour le nettoyage de parquets, veuillez s.v.p.
respecter les instructions du fabriquant du
parquet.
Aide en cas de
dysfonctionnements éventuels
S’il arrive que votre appareil ne fonctionne pas comme
il se doit, vous n’avez peut être pas besoin de recourir
immédiatement au service après vente. Nous vous
conseillons de vérifier auparavant si le dysfonctionnement
constaté ne s’explique pas par une raison toute simple.
Si de la poussière sort de l’aspirateur, en
mode aspiration, il est possible
• que le système filtre soit mal fixé et/ou défectueux,
• que vous n’ayez pas utilisé un filtre de la marque
THOMAS:
Si la puissance d’aspiration diminue peu à
peu, il est possible :
• que les pores du filtre soient bouchés par des
poussières fines.
• que le sac à poussières soit plein,
• que les suceurs, tubes rallonges ou flexibles soient
obstrués par des saletés (tirer alors sur le flexible,
l’appareil étant en marche – Cet allongement permet
de débloquer les matières qui l’obstruent).
en position fortement inclinée ou lorsqu’il a basculé.
Eteindre alors l’aspirateur – le flotteur retombe –
l’appareil est alors à nouveau prêt à fonctionner.
Si le moteur ne tourne plus, il est possible:
• qu’un câble, des connecteurs ou une prise de courant
soit défectueux.
• Avant de vérifier, retirez le connecteur du secteur.
• N’ouvrez jamais le moteur vous-même!
Si le détergent ne peut pas sortir, il est possible:
• que la pompe ne soit pas activée [Interrupteur (7)],
vérifier que l’interrupteur soit bien allumé,
• que le tamis de filtration sur le flexible d’aspiration
(36) ait besoin d’un nettoyage,
• que le flexible d’aspiration ne soit pas bien accroché
dans le réservoir à détergent,
• que l’injecteur soit bouché. Si l’injecteur est bouché,
tremper le pendant un certain temps dans l’eau. Puis
souffler fortement pour éliminer les saletés.
Service après vente
Veuillez s.v.p. vous adresser à votre commerçant
spécialisé. En cas de besoin, il vous indiquera volontiers
l’adresse ou le numéro de téléphone du service après
vente THOMAS compétent dans votre cas.
Lorsque vous recourez au service après vente, veuillez
toujours indiquer les renseignements qui se trouvent sur
la plaque signalétique de votre aspirateur.
Afin de garantir le maintien de la sécurité
de votre appareil, nous vous recommandons expressément de confier toutes les
réparations et, en particulier, les réparations sur les pièces conductrices d’électricité
à des ouvriers électriciens spécialisés. En cas
de dysfonctionnement, adressez-vous par
conséquent à votre commerçant spécialisé ou
directement au service après vente THOMAS:
Pour tout contact, vous trouverez les
coordonnées nécessaires au verso.
Si, en mode aspiration, de l’eau sort des
orifices d’échappement d’air, il est possible:
• que le flotteur (Schéma S) soit bloqué par des liquides
et ne puisse ainsi pas répondre,
• que vous ayez, en mode aspiration-lavage, utilisé un
produit autre que le détergent concentré THOMAS,
• que le filtre AQUA et le filtre textile pour poussières
fines (suivant modèle) ne soient pas montés
correctement, suivant les instructions de montage.
Si la puissance d’aspiration diminue
brutalement, il est possible :
• que la soupape à flotteur ait stoppé l’air d’aspi ra tion.
Ceci peut se produire lorsque l’appareil se trouve
20
Sous réserve de modifications techniques.
Page 21

Voor de eerste
NL
ingebruikneming
Leest U alstublieft alle volgende
aangevoerde informaties opmerkzaam
door. Zij geven belangrijke aanwijzingen
voor de veiligheid, het gebruik en het
onderhoud van het apparaat. Bewaart U
de gebruiksaanwijzing zorgvuldig en geeft
U deze aan de volgende bezitter verder.
Deelidentificatie:
1 = Reservoir
2 = Motorkop
3 = Sluitsnapschoot
4 = Zwenkwielen
5 = Snelkoppeling
6 = IN/UIT-schakelaar
7 = IN/UIT-pompschakelaar (verlicht)
8 = Toevoeropeningen
9 = Handgreep
10 = Netaansluitingsleiding
11 = Zuigkrachtregeling
12 = Reinigingsmiddelslang (bovenste deel)
13 = Zuigslang
14 = Zuigbuis
15 = Slangkliks
16 = Afsluitventiel
17 = Tapijt-sproeiextractiemondstuk
18 = Reinigingsmiddelslang (onderste deel)
19 = Kleine zuigmond
20 = Harte vloeradapter
21 = Tapijtmondstuk
22 = Kierenzuigmond
23 = Sproeiextractiemondstuk voor kleine zuigmond
24 = Reinigingsmiddeltank
25 = Textielreinigingsconcentraat (ProTex)
26 = Sifinmondstuk *)
29 = Filtervlies*
30 = Kegelfilter
32 = Spanring*
33 = Papieren filterzak
34 = AQUA-filter *)
35 = Fijne stof textielfilter *)
36 = Aanzuigslang voor reinigingsmiddel
37 = Zuigbuishouder
38 = Plaatspositie zuigbuis
39 = Buisclips *)
*) = slechts THOMAS BRAVO 20 S Aquafilter
Veiligheidsaanwijzingen
• THOMAS BRAVO dient uitsluitend voor het gebruik in
de huishouding.
•
Het apparaat in geen geval in gebruik nehmen, wanneer:
- de netaansluitingsleiding beschadigd is,
- er zichtbare schaden te zien zijn,
- het eens naar beneden gevallen zou zijn.
• De spanningsopgaaf op het typebordje moet met de
voedingsspanning overeenstemmen.
• Mondstukken en buizen mogen bij ingeschakeld
apparaat niet in de buurt van het hoofd geraken, omdat
anders een blessurerisico voor ogen en oren bestaat.
• Het apparaat niet voor het afzuigen
van gezondheidsgevaarlijke, bijtende en
oplossingsmiddelbevattende stoffen geschikt.
• Het apparaat mag niet in ruimtes worden gebruikt,
warin brandgevaarlijke stoppen zijn opgeslagen of
zich gassen hebben gevormd.
• Bewaar het apparaat en het toebehoren in een
droge, schone en gesloten ruimtes.
• Stoffen zoals benzine, verfverdunningsmiddelen en
brandstofolie kunnen door wervelen met de zuiglucht
explosieve dampen of mengsels vormen.
• Nooit hete as of gleiende voorwerpen opzuigen.
• Controleert U voor ieder gebruik, of de telkens
benodigde filters juist zijn ingezet.
• Zuigt U geen tonerstof op! Toner, die bijvoorbeeld
bij printers en kopieerapparaten wordt gebruikt,
kan elektrisch geleidbaar zijn! Bovendien wordt
de toner door het filtersysteem van de stofzuiger
eventueel niet geheel uitgefilterd en kann zo door de
zuigventilator weer in de ruimtelucht geraken.
•
Er moet met uiterste omzichtigheid bij het reinigen van
trappen te werk worden gegaan. Zorgt U voor een
toereikende standveiligheid van het apparaat. De slang
mag niet boven zijn oorspronkelijke lengte uit worden
gerekt. Houdt U het apparaat altijd met één hand vast.
• Laat U het apparaat nooit in ingeschakelde toestand
zonder toezicht staan.
• Dit apparaat kan door kinderen vanaf
8 jaar en ouder alsmede door personen
met een beperkt lichamelijk, sensorisch of
geestelijk vermogen of met een gebrek
aan ervaring en/of kennis gebruikt
worden, wanneer ze onder toezicht
staan of met betrekking tot het veilige
gebruik van het apparaat geïnstrueerd
werden en ze de daaruit resulterende
gevaren begrepen hebben. Kinderen
mogen niet met het apparaat spelen.
Reiniging en gebruiksonderhoud
mogen niet door kinderen zonder
toezicht
uitgevoerd worden.
21
Page 22

• De netstekker moet worden uitgetrokken:
bij storingen gedurende het bedrijf,
voor iedere reiniging en onderhoud,
na het gebruik,
bij iedere verwisseling van de stofzak.
• Nooit de stekker aan de kabel uit de contactdoos
trekken, maar uitsluitend aan de stekker.
• Zorgt U ervoor, dat de aansluitingsleiding noch aan
hitte en chemische vloeistoffen worden blootgesteld
noch over scherpe kanten en oppervlakken wordt
getrokken.
• Schade an het apparaat, an de toebehoren of
aan de netaansluitingsleiding (speciale leiding
noodzakelijk) nooit zelf repareren, maar alleen
door een geautoriseerde klantenservice laten
herstellen, want veranderingen aan het apparaat
kunnen gevaarlijk voor Uw gezondheid zijn. Zorgt
U ervoor, dat alleen originele reserveonderdelen en
toebehoren woren gebruikt.
• Het apparaat aan geen weersinvloeden, geen
vochtigheid en geen hittebronnen blootstellen.
• Chemicaliën, zoals de reinigingsmiddelconcentraten,
behoren niet in de handen van kinderen.
• Alleen bij gebruik van het originele THOMAS
reinigingsmiddel kan de functie van het apparaat en
de volle reinigingswerking gegarandeerd worden.
• Personen met gevoelige huid moeten direct contact
met de reinigings-middeloplossing vermijden.
• Zou het renigingsmiddelconcentraat op de slijmvliezen
(oog, mond, enz.) geraken, moet onmiddellijk met
water worden nagespoeld.
Ter wille van het milieu
Verpakkingsmateriaal en uitgediende apparaten a.u.b.
niet eenvoudig weggooien!
Verpakking van het apparaat:
• het verpakkingskarton kan met het oud papier
verwijderd worden;
• de kunststofverpakking van polyethyleen (PE) bij een
recycling-depot afgeven.
Verwijdering van het apparaat na het
einde van de levenstijd:
• verwijder het apparaat a.u.b. volgens de plaatselijke
voorschriften en snij eerst de stekker eraf, die u eerst
uit het stopcontact getrokken heeft.
Het symbool op het product of de verpakking
duidt erop dat dit product niet als gewoon
huisvuil kan worden behandeld, maar bij een
apparaten moet worden afgegeven.
Door uw bijdrage aan een correcte recycling beschermt
u het milieu en de gezondheid van uw medemensen.
Milieu en gezondheid worden door een foutieve
verwijdering van het product in gevaar gebracht.
Nadere informaties betreffende de recycling van dit product
krijgt u bij de bevoegde instanties, de vuilafvoer en in de
winkel, waar u het product gekocht heeft.
22
recyclingdepot voor elektrische en elektronische
Montage zwenkwielen
A Sluitsnapschoot openen den de motorkop
afnemen.
B Zwenkwielen en bouten vast in de
reservoirbodem indrukken.
Droogzuigen
THOMAS BRAVO 20
Na een voorafgaand natzuigen moet het
apparaat absoluut droog zijn; ook de slang of
buis eventueel vooraf drogen..
Nooit zonder of met beschadigde filters
droogzuigen!
K Reinigingsmiddeltank afnemen.
C Gebruik het kegelfilter (30) extra bij de
papierfilterzak. Zodoende wordt het stof het
beste gebonden. Het kegelfilter (30) aan de
onderkant van de motorkop (2) bevestigen. Al
naar gelang het model op positie 1 of 2 met de
draaiklemmen vergrendelen. Bij sterke vervuiling
of verminderde zuigcapaciteit kan het kegelfilter
(30) met helder water, zonder toevoeging van
was- en reinigingsmiddelen, uitgewassen worden.
Let er a.u.b. op dat het filter vóór het volgende
gebruik volledig droog is.
D Filterzak vast op de toevoeropening drukken en
aan de reservoirwand aanleggen.
G Aanzuigslang voor reinigingsmiddel aan de
onderkant van de motorkop inklikken.
H Motorkop opzetten en sluitsnapschoot sluiten.
J Zuigslang aansluiten. Voor het afnemen de
zuigaansluiting opzij draaien en eruit trekken.
Monteert U de gewensde toebehoren.
Netstekker aansluiten.
N Apparaat met IN/UIT-schakelaar (6) inschakelen.
Pompschakelaar (7) mag niet oplichten.
Met de zuigkrachtregeling (11, afb. P) laat zich de
zuigkracht veranderen.
– Nevenbeluchtingsklep gesloten =
volle zuigkracht
– Nevenbeluchtingsklep geopend =
verminderde zuigkracht
Page 23

THOMAS BRAVO 20S Aquafilter
Natzuigen
Benut U Uw AQUAFILTER-apparaat in een
droogzuigbedrijf nooit zonder aquafilter, fijne stof
textielfilter en pasende watervulling.
Zuigt u nooit grotere hoeveelheden van fijne stof
bijv. Meel, cacaopoeder, cement enz.
K Reinigingsmiddeltank afnemen.
E 2-delige AQUA-filter tot aan de aanslag
samensteken en vast op de toevoeropening
apschuiven.
Let U daarbij op de
markeringen.
De AQUA-filter moet op de zuigtonbodem
inklikken en gelijkmatig op de bodem liggen.
Vult U 2 liter helder water in de zuigreservoir.
F Fijne stof textielfilter door omleggen van de
bovenste rand in de zuigreservoir inhangen.
G Aanzuigslang voor het reinigingsmiddel aan de
onderkant van de motorkop inklikken.
C Het filtervlies (29) met behulp van de spanring
(32) monteren en met de draaiklemmen
beveiligen.
H Motorkop opzetten en sluitsnapschoot sluiten.
J Zuigslang aansluiten. Voor het afnemen de
zuigaansluiting opzij draaien en eruit trekken.
Monteert U de gewensde toebehoren.
Netstekker aansluiten.
N Apperaat met IN/UIT-schakelaar (6) inschakelen.
Pompschakelaar (7) mag niet oplichten.
Met de zuigkrachtregeling (11, afb. P) laat zich de
zuigkracht veranderen.
– Nevenbeluchtingsklep gesloten
= volle zuigkracht
– Nevenbeluchtingsklep geopend
= verminderde zuigkracht
Reiniging en onderhoud van het AQUAfiltersysteem
Om hygiëneredenen het AQUAFILTER-systeem
en de zuigreservoir na ieder gebruik ledigen,
reinigen en drogen. Vuil water en vochtige delen
begunstigen de vermeerdering van bacteriën en
schimmel.
Fijne stof tectielfilter al naar vervuiling met een droog
of vochtig doek afwissen. Bij sterkere verontreiniging
met helder water, zonder toevoeging van was- en reigigingsmiddelen, uitwassen. Let U erop, dat de filter bij
de volgende zuiginzet geheel is gedroogd.
Vlotterklep (40, afb. S) altijd zuiver en gangbaar
houden. Hij onderbreekt automatisch het
aanzuigen, wanneer de zuigreservoir vol is.
Bij het afzuigen uit reservoirs, waarvan de vloeistofspiegel hoger ligt als de bovenkant van de zuigreservoir en hun inhoud groter is dan de capaciteit van
de zuigreservoir, kann bij gesloten vlotterklep verder
vloeistof navloeien.
In zulke gevallen alleen deelhoeveelheden afzuigen en
de zuigreservoir tussendoor ledigen.
Allereerst zuigbuis en –slang uit de vloeistof nehmen
en daarna het apparaat uitschakelen om een navloeien van vloeistof te verhinderen.
A Sluitsnapschoot openen en motorkop afnemen.
Filters uit het apparaat nemen, omdat deze
anders worden beschadigd. (afb. C en D). Bij
AQUAFILTER-apparaten de AQUA-filter en de
fijne stof textielfilter eruit nemen. (afb. C, E en F).
Indien de reinigingsmiddeltank is gemonteerd,
deze eruit nemen (afb. K).
H Motorkop opzetten en sluitsnapschoot sluiten.
Netstekker aansluiten.
J Zuigslang aansluiten. Voor het afnemen de
zuigslang opzij draaien en eruit trekken.
P Zuigkrachtregeling (11) aan de handgreep
sluiten.
N Appraat met IN/UIT-schakelaar (6) inschakelen,
pompschakelaar (7) mag niet oplichten.
Na beeindiging van het natzuigen het apparaat
en de gebruikte toebehoren reinigen en drogen.
Sproeiextraheren (waszuigen)
van tapijten en harde vloeren
Alleen tapijten reinigen die voor een natte
reiniging geschikt zijn.
Zachte met de hand geweefde of kleuronechte
tapijten mogen niet natgereinigd worden.
Wanneer de tapijt op een vroeger tijdpunt wird
geshampooneerd, kan het bij een eerstmalig
gebruik van de THOMAS BRAVO tot een sterkere
schuimvorming komen.
Apparaat dan uitschakelen en zuigreservoir
ledigen.
Om verdere schuimvorming te vermijden, doet U
1
⁄2 kopje azijn in de zuigreservoir.
23
Page 24

Een verhoogde schuimvorming is na en
eenmalig grondreiniging met het THOMAS
reinigingsconcentraat uitgesloten, omdat dit met
een speciale schuimstop is uitgerust.
Let U erop, dat zich bij een
ingeschakelde sproeifunctie altijd
vloeistof in de vers waterreservoir
bevindt, om een eventuele
beschadiging van de pomp te
vermijden.
Tapijtreiniging
A Sluitsnapschoot openen en motorkop afnemen.
P Hefboom aan de afsluitklep (16) drukken.
Reinigingsmiddel wordt opgesproeid.
Alvorens de reinigingsmiddeltank
opnieuw wordt gevuld, altijd het vuil
water in de zuigreservoir ledigen.
Reiniging van harde vloeren
Q Harde vloeradapter monteren
Handelwijze zie ”tapijtreiniging”
Voor de reiniging van harde vloeren reden wij
het THOMAS ProFloor reinigingsconcentraat aan.
K Deksel van de reinigingsmiddeltank afnemen
en THOMAS ProTex reinigingsmiddel in de tank
vullen.
Dosering zie flesetiket.
Lauwarm water (max. 30° C) gebruiken.
Deksel weer opzetten en gevulde
reinigingsmiddeltank in het apparaat inzetten.
G Aanzuigslang voor renigingsmiddel uit de houder
van de motorkop nemen.
L Motorkop zo opzetten, dat de aanzuigslang (36)
tot op de bodem van de renigingsmiddeltank
onderdompelt en niet wordt afgebogen.
J Zuigslang aansluiten. Voor het afnemen de
zuigaansluiting opzij draaien en eruit trekken.
M Afsluitklep in de opneming aan de zuigbuis
inschuiven. Handgreep in de zuigbuis steken en
de reinigingsmiddelslang met de kunststofclips
aan de zuigslang bevestigen.
N Reinigingsmiddelslang in de snelkoppeling aan de
motorkop inklikken.
O Tapijt-sproeiextractiemondstuk op de zuigbuis
opsteken.
P Reinigingsmiddelslang van het
tapijtsproeimondstuk aan de afsluitklep
aanzetten en door draaien vergrendelen.
Reinigingsmiddelslang in de slanghouder aan
de zuigbuizen drukken resp. Bij edelstaalbuizen
met de kleinere buisclipsen (39) aan de zuigbuis
bevestigen.
Netstekker aansluiten.
N IN/UIT-schakelaar (6) en verlichte
pompschakelaar (7) inschakelen.
Kussenreiniging (al naar model)
Voor de reiniging van Uw gestoffeerde meubelen of
autozetels gebruikt U het kussen-sproeiextractiemondstuk (23).
Let U erop, dat niet teveel vloeistof wordt
aangebracht, omdat al naar onderbouw met
een langere droogtijd rekening moet worden
gehouden.
R Het kussen-sproeiextractiemondstuk monteren.
Reinigingsmiddelslang door draaien bevestigen.
Mondstuk op de handgreep opschuiven.
Reiniging en onderhoud van het
sproeiextractiesysteem
K Voor het onderehoud van de pump en
ventielen de reinigingsmiddeltank met
helder water vullen en inzetten.
P Sproeisysteem bijv. over een spoelbak
in gebruik nemen (hefboom aan
afsluitklep (16) bedienen).
N Voor het lossen van de reinigingsmiddelslang
de hefboom aan de afsluitklep (16, afb. P)
bediennen, om de restdruk in het systeem af te
bouwen, dan de toets aan de snelkoppeling (5)
drukken.
Netstekker trekken!
Aansluitend het apparaat en de gebruikte toebehoren
reinigen en drogen.
De motorkop nooit in water dompelen!
Motorhuis met een vochtig doek afwissen en nadrogen.
24
Page 25

Belangrijke aanwijzingen
Trekt U bij het natreinigen het
tapijtsproeimondstuk altijd baan voor baan naar
U toe.
Om een nieuwe vervuiling te vermijden, mogen
gereinigde vaste vloerbedekkingen eerst
betreden worden, wanneer deze weer droog
zijn.
Om een sneller drogen van de gereinigde
vlakken te bereiken, is het zinvol door een
tweede afzuigen – zonder drukken van de
ventielhefboom – de verblijvende restvochtigheid
zoveel mogelijk te verwijderen.
Voor de reiniging van parketvloeren handelt U
volgens de aanwijzingen van de
parketproducent.
Hulp bij eventuele storingen
Indien Uw apparaat tegen alle verwachtingen eens
niet tevredenstellend functioneert, hoeft U niet dadelijk
de klantenservice in te schakelen. Controleert U alstublieft vooreerst, of de storing slechts kleine oor-zaken
heeft:
Wanneer gedurende het zuigen stof
vrijkomt:
• Is het filtersysteem juist bevestigd en zonder defect?
• Werd een originele THOMAS-filter gebruikt?
Wanneer de zuigkracht geleidelijk
verzwakt?
• Zijn de filterporiën door fijn stof verstopt?
• Is de papieren filterzak vol?
• Zijn mondstuk, verlengingsbuis of zuigslang door vuil
verstopt? (Zuigslang bij ingeschakeld apparaat uit
elkaar trekken – uitrekking lost de verstopping).
omkippen van het apparaat. Zuiger uitschakelen – de
vlotter valt naar beneden – het apparaat is weer
bedrijfsklaar.
Wanneer de motor niet loopt:
• Zijn kabel, stekker en contactdoos intact?
• Voor controle de stekker trekken.
• Nooit zelf de motor openen.
Wanneer geen reinigingsvloeistof
vrijkomt:
• Is de pomp ingeschakeld (schakelaar (7) moet
oplichten)?
• Aanzuigfilterzeef aan de aanzuigslang (36) reiigen.
• Hangt de aanzuigslang reglementair in de
reinigingsmiddeltank?
• Is het sproeimondstuk verstopt? Indien het
sproeimondstuk eens verstopt is, het mondstuk enige
tijd in het water leggen. Daarna krachtig doorblazen.
Klantenservice
Wenst U zich aan Uw vakhandelaar, die U zo nodig
ook graag het adres of telefoonnummer van de voor
U bevoegde THOMAS-klantenservice meedeelt.
Geeft U daarbij altijd de gegevens op het typeplaatje
van Uw stofzuiger aan.
Voor de instandhouding van de veiligheid
van het apparaat mag U reparaties,
vooral aan stroomvoerende delen, alleen
door een elektro-vakman laten uitvoeren.
In geval van storing moet U zich daarom
direct aan Uw vakhandelaar of direct aan
de THOMAS klantenservice wenden.
De contactgegevens vindt u aan de
ommezijde.
Wanneer bij het zuigen water uit de
uitblaasopeningen van het apparaat
komt:
• Is de vlotter (af. S) bij het zuigen van vloeistoffen
geblokkeerd en kan niet reageren?
• Werd een origineel THOMAS-reinigingsconcentraat
voor het was zuigengebruikt?
• Zijn AQUAFILTER en fijne stof textielfilter(al naar
model) volgens de aanwijzing gemonteerd?
Wanneer de zijkracht plotseling verzwakt:
• Heeft het vlotterventiel de zuiglucht gestopt? Dat
kan gebeuren bij extreme schuine stand of bij het
Technische wijzigingen voorbehouden.
25
Page 26

Első üzembe helyezés előtt
Kérjük, olvassa el figyelmesen a használati
utasítást, amely fontos információkat tartalmaz
a takarítógép biztonságosságára, üzembe
helyezésére, használatára és karbantartására
vonatkozóan. Őrizze meg az utasítást és ha
használt készülékét eladja, adja ezt is át az új
tulajdonosnak.
A gyártó és kereskedő nem vállal felelősséget,
ha a továbbiakban felsorolt előírásokat
figyelmen kívül hagyja.
A takarítógépet a rendeltetéstől eltérően
üzemeltetni nem szabad, csak háztartási
célokra alkalmas.
A takarítógépet 230 V hálózati feszültség
működteti, a biztosíték min. 16 A.
Tartozékok felsorolása
1 = tartály
2 = motorblokk
3 = zárókallantyú
4 = görgő
5 = gyorscsatlakozó
6 = ki / be kapcsoló
7 = nyomószivattyú ki / be kapcsolója (megvilágított)
8 = szívó csőcsonk
9 = hordozó fogantyú
10 = hálózati csatlakozózsinór
11 = szívóerő szabályozó tolóka
12 = tisztítófolyadék nyomócsöve (felső rész)
13 = gégecső
14 = szívócső
15 = nyomócső felerősítő pánt (gégecsőhöz)
16 = nyomószelep
17 = szőnyegtisztító fej
18 = tisztítófolyadék nyomócsöve (alsó rész)
19 = kárpit szívófej
20 = fejkiegészítő adapter szilárd padlózathoz
21 = szőnyegszívó fej
22 = fuga szívófej (résszívófej)
23 = kárpittisztító fej
24 = tisztítófolyadék tartálya
25 = tisztítófolyadék koncentrátum (ProTex)
26 = szifon szívófej*
29 = Motorvédő szűrősapka*
30 = Kúpos szűrő
32 = rögzítő gyűrű*
33 = papír porzsák
34 = aquafilter (vízzel szűrő) rendszer*
35 = textil szűrőbetét*
36 = tisztítófolyadék felszívó csöve
37 = szívócső felakasztó kengyele
38 = szívócső elhelyezése
39 = nyomócső felerősítő pánt (fém szívócsőhöz)*
*=csak THOMAS BRAVO 20 S Aquafilter típushoz
26
H
Biztonsági előírások
• A készüléket nem szabad üzembe helyezni, ha
– a csatlakozózsinór sérült,
– maga a készülék láthatóan sérült,
– a motorblokkot valaha leejtették.
• változtatásokat a készüléken csak arra feljogosított
szakszerviz végezhet,
• nem szabad a gépet olyan helyiségben használni,
ahol tűzveszélyes anyagok találhatók ill. különböző
veszélyes és gyúlékony gázok képződhetnek,
• óvatosan járjon el lépcsők tisztításakor.
Győződjön meg róla, hogy a gép biztosan áll a
lépcsőfokon és a gégecsövet ne feszítse túl nagy
távolságra. Legjobb, ha munka közben egyik kezével
magát a készüléket fogja, rögzíti,
• a kívánt szűrő rendszer behelyezését minden
használat előtt ellenőrizze, ez különösen száraz
porszívózáskor kötelező,
• Tárolja a gépet és a tartozékokat száraz, tiszta és zárt
helyen.
• ez a készülék nem alkalmas egészségre káros
porszerű anyagok felszívására,
• oldószertartalmú folyadékokat, ú.m. festékhígító,
benzin, olaj, valamint maró folyadékokat nem szabad
a készülékkel felszívatni,
• másológépek, nyomtatók festékporát (toner) ne
szívassa fel, mert az elektromosan vezetővé válhat,
másrészt a szűrőrendszert eltömheti és egy része a
helyiség légterébe visszajuthat,
• soha ne szívasson fel forró hamut vagy izzó anyagokat,
• a takarítógépet nem szabad a szabadban tárolni,
sem közvetlen nedvességhatásnak kitenni,
• a szívócsövet ill. fejet (bekapcsolt készülék esetén)
ne emelje feje közvetlen közelébe - ez szemre, fülre
veszélyes lehet,
• a tisztítófolyadék sugarat ne irányítsa emberre, állatra,
elektromos készülékre vagy fali aljzatra,
• ne a zsinórt húzza ki az aljzatból, mindig a dugasznál
fogja meg,
•
Ezt a készüléket 8 éves és ennél
idősebb gyermekek és csökkent
fizikai, érzékszervi vagy mentális
képességekkel, vagy tapasztalattal
és/vagy ismeretekkel nem rendelkező
személyek csak akkor használhatják,
ha felügyelet alatt teszik ezt, vagy ha
kioktatták őket a készülék biztonságos
használatáról, és megértették az ebből
származó veszélyeket. A gyermekek
nem játszhatnak a készülékkel.
A tisztítást és a felhasználói
karbantartást a gyermekek csak
felügyelet mellett végezhetik el.
Page 27

• a csatlakozózsinórt ne húzza magas hőfokú hely
közelében, sem vegyszeres folyadékban; éles
peremen való átvezetése is kerülendő,
• a készülék forró tűzhely vagy fűtőtest közelében nem
tárolható,
• A meghibásodott készüléket - beleértve
a hálózati csatlakozózsinórt is - csak
szakember (szerviz) javíthatja!
• a hálózati csatlakozót ki kell húzni:
- üzemelés közben észlelt hiba esetén,
- minden tisztítás előtt,
- használat után mindenkor,
- szűrőbetét cserélésekor,
• folyadékos takarítás után tegyen legalább 1 liter
tiszta vizet a folyadéktartályba és a nyomószivattyú
bekapcsolásával kád vagy mosogató felett öblítse át
a szivattyút,
• érzékeny bőrűek kerüljék a tisztítófolyadékkal való
érintkezést. Ha a koncentrátum nyálkahártyára kerül
(szem, száj stb.), azonnal öblítsék le bő vízzel,
• csak eredeti THOMAS tisztítószerek használatával
biztosítható a takarítógép kifogástalan használata és
a tökéletes tisztító hatás.
Mindent a környezetért
A csomagolóanyagot és a már nem használható
készülékeket ne dobja csak úgy el!
A készülék összeállítása
A görgők felhelyezése
A Nyissa ki a két zárókallantyút és a motorblokkot
vegye le.
B A tartályt fordítsa fel, az alján található furatokba
üsse be a görgőtengelyeket, majd a görgőket
ütközésig nyomja rá a kiálló tengelycsonkokra.
Végül a tartályt állítsa a talpára, azaz a görgőkre.
Száraz porszívózás
THOMAS BRAVO 20
Ha a készüléket előzőleg nedves üzemmódban
használta, a csöveket és a tartályt ki kell szárítani.
Soha ne végezzen száraz porszívózást sérült
szűrővel vagy szűrő nélkül!
K Vegye ki a tisztítófolyadék-tartályt.
C A papír porzsák kiegészítéseként használjon kúpos
szűrőt (30)! Így éri el a legjobb porvisszatartó
képességet. A kúpos szűrőt (30) a motorfej (2) alsó
oldalán kell feltenni. Modelltől függően, az 1-es vagy
2-es pozíción kell rögzíteni a forgó szorítókapcsokkal.
A kúpos szűrőt (30) erős szennyeződése vagy
csökkenő szívóteljesítmény esetén ki lehet mosni
tiszta vízzel, mosó- és tisztítószer hozzáadása nélkül.
Ügyeljen arra, hogy a szűrő az újbóli használatnál
teljesen száraz legyen!
A csomagolóanyag:
●
A csomagoláshoz használt dobozt a papírhulladék
közé helyezheti.
●
A polietilén (PE) műanyag zsákot újrahasznosításra
adja le a gyűjtőhelyen!
Teendők a már kiszolgált készülékkel:
A készüléktől a helyi előírások betartásával
●
szabadulhat meg, de előbb le kell vágnia a
csatlakozó aljzatból kihúzott hálózati dugaszt.
Ez a szimbólum, mely a terméken vagy
annak csomagolásán található, arra utal,
hogy ezt a terméket nem lehet normál
adni a gyűjtőhelyen, ahol az elektromos és elektronikus
készülékek újrahasznosításával foglalkoznak.
E termék korrekt ártalmatlanításához való
hozzájárulásával Ön védi a környezetet és embertársai
egészségét. A helytelen hulladékkezelés veszélyezteti a
környezetet és az egészséget.
E termék újrahasznosításával kapcsolatban további
információkat kap a helyi önkormányzatnál,
szemétszállító cégnél vagy abban az üzletben, ahol a
terméket vásárolta.
háztartási hulladékként kezelni, hanem le kell
D A porzsák kemény kartonból kialakított kör alakú
nyílását szorosan húzza rá a tartályban lévő
beszívó csőcsonkra, majd a porzsákot körben
simítsa rá a tartály belső oldalára.
G A tisztítófolyadék felszívó csövét, mivel most nincs
rá szükség, csíptesse be a motorblokk belső
alaplapján kialakított helyre.
J A gégecsövet nyomja be a bemeneti csőcsonkba.
Levételkor a csövet csavaró mozgatással húzza
kifelé.
H Ezután helyezze fel a motorblokkot és a két
zárókallantyúval rögzítse.
N A készüléket a ki / be kapcsolóval (6) kapcsolja
be. A nyomószivattyú kapcsolójának (7) ekkor
nem szabad világítania.
Végül a gégecsőhöz csatlakoztatott merev szívócső
végére helyezze fel a kívánt szívófejet és dugja be a
hálózati csatlakozót, így a készülék üzemkész.
A szívóerő szabályozó tolókával (P ábra, 11) a
szívóerő változtatható.
- tolóka zárva = teljes szívóerő
- tolóka nyitva = csökkentett szívóerő
27
Page 28

THOMAS BRAVO 20 S Aquafilter
Aquafilter készülékét száraz porszívózásra soha
ne használja Aquafilter (vízzel szűrő egység), a
finom port felfogó textil szűrőbetét és a megfelelő
víztöltés nélkül.
Ne szívasson fel nagy mennyiségben finom port,
pl. lisztet, kakaóport, cementet , stb.
K A tisztítófolyadék tartályát emelje ki.
E A két részes aquafiltert dugja össze és a tartály
belső oldalán lévő szívócső csonkra erősítse fel.
Az Aquafilter betétnek a szívótartály alján
F A textil szűrőbetétet a szívótartály felső peremére
G A tisztítófolyadék felszívó csövét (amelyre ekkor
C A motorvédő szűrősapkát (29) és rá a
H Helyezze fel a motorblokkot és a
J Helyezze be a gégecsövet. Levételkor csavaró
Helyezze fel a kívánt szívófejet, majd a hálózati
N A gépet a ki / be kapcsolóval (6) kapcsolja be.
A szívóerő szabályozó tolókával (P ábra, 11) a
- tolóka zárva = teljes szívóerő
- tolóka nyitva = csökkentett szívóerő
Az Aquafilter rendszer tisztítása és
karbantartása
Az Aquafilter rendszert és a szívótartályt
A textil szűrőbetétet a szennyezettség mértékének
megfelelően száraz vagy nedves kendővel törölje
28
Ügyeljen
a jelzésekre.
bepattanva, vízszintesen kell elhelyezkednie.
Töltsön 2 liter tiszta vizet a szívótartályba.
felfektetve helyezze be.
nincs szükség) a motorblokk alján lévő műanyag
körmök közé csíptesse fel.
rögzítőgyűrűt (32) az ábra szerint helyezze
fel, végül a két szorítókallantyú ráfordításával
rögzítse.
zárókallantyúkkal rögzítse.
mozgással húzza kifelé.
csatlakozót dugja be.
A nyomószivattyú kapcsolójának (7) nem szabad
világítania.
szívóerő változtatható.
minden használat után higiéniai okokból
ürítse ki, tisztítsa és szárítsa meg,
ugyanis a szennyes víz és a nedves
alkatrészek elősegítik a baktériumok és
gombák elszaporodását.
át. Erős szennyezettség esetén tiszta vízzel, mosó- és
tisztítószer alkalmazása nélkül, mossa át. Ügyeljen
arra, hogy a szűrőbetétet csak teljesen megszáradt
állapotban használja ismét.
Nedves felszívás
Az úszószelepet (S ábra, 40) tartsa mindig
tisztán és mozgathatóan, mivel ez automatikusan
megszakítja a felszívást, amikor a tartály megtelik.
Ha a porszívó tartályánál nagyobb térfogatú
ill. magasabb folyadékszintű tartályból szívat át
folyadékot, akkor a porszívó tartályának megteltével
zárt úszószelep esetén továbbra is átfolyik a folyadék
a közlekedőedény-elv alapján. Éppen ezért egyszerre
csak részmennyiségeket szívasson át és időnként ürítse
ki a porszívótartályt. Felszívás után először a szívócsövet
emelje ki a folyadékból, csak ezután kapcsolja ki a
motort.
A Nyissa fel a zárókallantyúkat és vegye le a
motorfedelet.
A különböző szűrőket vegye ki a gépből, mivel
azok károsodást szenvedhetnek (C és D ábra).
Aquafilterrel üzemelő készülékeknél az Aquafilter
egységet és a textil szűrőbetétet vegye ki (C, E és
F ábra).
Ha a tisztítófolyadék-tartály a készülékben van,
ezt is vegye ki (K ábra).
H Helyezze vissza a motorblokkot és a
zárókallantyúkkal rögzítse. Dugja be a hálózati
csatlakozót.
J Helyezze be a gégecsövet. Levételkor csavaró
mozgással húzza kifelé.
P A szívóerő szabályozó tolókát (11) állítsa zárt
helyzetbe.
N A gépet a ki / be kapcsolóval (6) kapcsolja be.
A nyomószivattyú kapcsolójának (7) nem szabad
világítania.
A nedves felszívás végeztével a készüléket és a
használt tartozékokat tisztítsa és szárítsa meg.
Folyadékos takarítás (szőnyegek,
szőnyegpadlók és szilárd padlózatok)
Csak nedves tisztításra alkalmas szőnyegeket
tisztítson.
Gyenge, kézi szövött vagy nem színtartó
szőnyegeket ne vessen alá nedves tisztításnak.
Ha a szőnyeget korábban samponnal kezelték,
a folyadékporlasztós tisztítórendszer első
alkalmazásakor erőteljesebb habképződésre
kerülhet sor.
Page 29

Ekkor kapcsolja ki a készüléket és a szívótartályt
ürítse ki. További habképződés meggátlására
ajánljuk fél csésze ecet beöntését a szívótartályba.
Fokozott habképződés a THOMAS
tisztítófolyadék koncentrátumok egyszeri
használata után kizárt, mivel a folyadék speciális
habzásgátlót tartalmaz.
Ügyeljen arra, hogy folyadékporlasztós
üzemmódban mindig legyen
tisztítófolyadék a tartályban
a nyomószivattyú esetleges
meghibásodásának elkerülése érdekében.
Szőnyegtisztítás
A A hálózati csatlakozó kihúzása után vegye le a
motorblokkot.
P Nyomja meg a nyomószelep fogantyúját
(16) és ezzel a tisztítófolyadék kiporlasztása
megkezdődik.
Mielőtt a tisztítófolyadék-tartályt
ismét feltölti, a szennyezett vizet a
szívótartályból mindig ürítse ki.
Szilárd padlózatok tisztítása
Q A tisztítófejre tolja rá a fejkiegészítő adaptert.
A továbbiakban a "Szőnyegtisztítás" fejezet
szerint járjon el.
Szilárd padlózatok tisztításához a THOMAS
ProFloor tisztítófolyadék alkalmazását ajánljuk.
K A tisztítófolyadék-tartály fedelét nyissa fel és
töltsön THOMAS ProTex folyadékot a tartályba.
A hígítást és adagolást a palackon lévő címke
tartalmazza.
Csak kézmeleg vizet használjon
(max. 30°C).
A tartály fedelét zárja le és a feltöltött tisztítófolyadék-
tartályt helyezze vissza a készülékbe.
H Húzza ki a motorblokk alsó felén a tisztítófolyadék
felszívó csövét a vakfoglalatból.
L Úgy helyezze vissza a motorblokkot a készülékre,
hogy a felszívó cső (36) egészen az aljáig
belelógjon a tisztítóoldatos tartályba, de ne
törjön meg.
J Helyezze be a gégecsövet. Levételkor csavaró
mozgással húzza kifelé.
M Csúsztassa a nyomószelep részt a merev szívócső
felső darabjának végén található vezetősínbe,
majd a gégecsövet a szabályzó tolóka felőli
végdarabjával tolja össze a merev szívócsővel.
A vékony nyomócsövet ezután a pántokkal
erősítse a gégecsőhöz.
N A nyomócső végét helyezze be a motorblokkon
található gyorscsatlakozóba.
O A szőnyegtisztító fejet helyezze fel a szívócsőre.
P A szőnyegtisztító fejhez kötött nyomócsövet,
amelynek végén bajonett csatlakozó van,
csatlakoztassa a nyomószelephez és a bajonett
elfordításával rögzítse. A nyomócsövet a merev
szívócsőhöz az azon található vezetőhornyokba
nyomja be. Acél szívócsöves kivitel esetén a
nyomócsövet a kisebb műanyag pántokkal (39)
erősítse a szívócsőhöz.
Dugja be a hálózati csatlakozót.
N A ki / be kapcsolót (6) és a megvilágított
nyomószivattyú kapcsolót (7) kapcsolja be.
Kárpittisztítás (kiviteltől függően) , a tisztítófej
egyébként külön is kapható
Bútorkárpitok vagy autóülések tisztításához a
kárpittisztító fejet használja (23).
Ügyeljen arra, hogy ne hordjon fel túl sok
tisztítóoldatot, mivel a bútor felépítésétől függően
jóval hosszabb száradási időre kell számítania.
R A kárpittisztító fejet közvetlenül a gégecső
végére tegye fel, majd a nyomócsövet a bajonett
csatlakozóval rögzítse.
A folyadékporlasztós rendszer tisztítása és
karbantartása
K A nyomószivattyú és a szelepek
tisztításához a tisztítófolyadék-tartályt
töltse meg tiszta vízzel és helyezze be.
Dugja be a hálózati csatlakozót, a ki /
be kapcsolót (6) és a nyomószivattyú
kapcsolóját (7) kapcsolja be.
P A porlasztó rendszeren fúvassa át a
tiszta vizet mosdókagylóba vagy kádba
(nyomja a nyomószelep kallantyúját
(16).
N A tisztítófolyadék nyomócsövének levétele előtt
nyomja le a nyomószelep kallantyúját (P ábra,
16), hogy a maradék nyomás a rendszerből
eltávozzon, majd nyomja meg a készüléken
található gyorscsatlakozó (5) kioldó gombját.
Végül húzza ki a hálózati csatlakozót.
Tisztítsa és szárítsa meg a készüléket és a használt
tartozékokat.
A motorblokkot soha nem szabad vízbe
meríteni!
A motorházat nedves kendővel törölje le és utána
szárítsa meg.
29
Page 30

Hasznos tanácsok
A tisztítófej segítségével mindig szorosan egymás
mellett következő sávokban tisztítsa a szőnyeget
vagy szőnyegpadlót.
Az ismételt beszennyeződés elkerülése érdekében
csak akkor járjon a kitisztított szőnyegpadlón, ha
már megszáradt.
A tisztított felületek gyorsabb száradása
érdekében érdemes legalább még egyszer - a
nyomószelep lenyomása, tehát kiporlasztás nélkül
- a maradék nedvességet felszívatni, eltávolítani.
• vizsgálat előtt a hálózati csatlakozót húzza ki,
• semmi esetre sem szabad a motort felnyitni!
Nem jön ki a tisztítóoldat
• bekapcsolta-e a nyomószivattyút ((7) kapcsoló), a
kapcsolónak világítania kell,
• tisztítsa meg a felszívócső (36) végén levő kis szűrőt,
• a felszívócső szabadon belóg-e a tisztítóoldat
tartályába,
• esetleg eltömődött a porlasztó nyílás. Ebben az
esetben a fúvókát illesztéséből vegye ki, áztassa
vízben, utána erősen fújja át.
Parketta padlózatok tisztításakor a gyártó
előírásainak megfelelően járjon el.
HIBAELHÁRÍTÁS
Ha az alábbi hibák jelentkeznek az üzemelés során,
ezek esetleg közvetlenül elháríthatók, egyébként
forduljon szervizhez:
Működés közben por száll ki a készülékből
• vizsgálja meg, hogy a szűrőrendszer hibátlan-e,
felhelyezése megfelelő és szorosan illeszkedő legyen,
• ellenőrizze, hogy nem szakadt-e ki a porzsák,
• csak eredeti THOMAS szűrőt használjon.
A szívóerő fokozatosan csökken
• a szűrőbetétet esetleg finom por, korom, stb. tömte el,
• esetleg megtelt a porzsák,
• a szívófejet, a szívócsövet vagy a gégecsövet eltömte
a szennyeződés. (Bekapcsolt készülékkel húzza szét
a gégecsövet, így a szennyeződés fellazulhat és
kifúvódhat.)
Felszíváskor a készülék légkifúvó nyílásain víz
folyik ki
• az úszószelep (S ábra) folyadék felszívásakor
megszorult és nem tudja a felszívást leállítani,
• nedves tisztításhoz nem eredeti THOMAS
tisztítófolyadékot használtak,
• az aquafiltert és a textil szűrőbetétet (kiviteltől
függően) nem az előírásnak megfelelően szerelték be.
A szívóerő hirtelen lecsökken
• az úszószelep elzárja a szívólevegőt, amely
leginkább akkor fordulhat elő, ha a készüléket
erősen ferde helyzetben használja vagy feldönti.
A készüléket kapcsolja ki, az úszószelep ekkor
visszaesik és a készülék ismét használható.
Minőségtanúsítás
BRAVO 20 BRAVO 20 S
Hálózati feszültség 230 V 230 V
Biztosíték 16 A 16 A
Teljesítményfelvétel 1400 W max. 1600 W max.
Szivattyúnyomás 4 bar max. 4 bar max.
Tartály befogadóképessége 20 liter 20 liter
Szennyvízbefogadó képesség
folyadékporlasztásos tisztításnál 6 liter 6 liter
Tisztítóoldat tartálya 3,6 liter 3,6 liter
Zajteljesítményszint LWA 74 dB 74 dB
Fenti adatokért a gyártó felelősséget vállal, műszaki
változtatás joga fenntartva.
Vevőszolgálat
Az Ön esetében illetékes THOMAS
vevőszolgálattal kapcsolatban a szaküzletben
kaphat tájékoztatást.
Kérjük, adja meg számukra az Ön THOMASén elhelyezett adattábláról leolvasható
adatokat is!
A készülék biztonságának megóvása
érdekében a javításokat - elsősorban a gép
áramot vezető részein - bízza villamossági
szerelő szakemberre!
Hiba esetén ezért forduljon szaküzletéhez
vagy közvetlenül a gyári vevőszolgálathoz!
A kapcsolati adatokat a hátoldalon találja.
A motor nem működik
• vizsgálja meg a csatlakozózsinór, dugasz és aljzat
sértetlenségét,
30
Műszaki változtatások joga fenntartva.
Page 31

Înainte de prima
RO
punere în funcţiune
Vă rugăm să citiţi cu atenţie și în întregime
toate informaţiile prezentate în cele
ce urmează. Acestea oferă indicaţii
importante privind siguranţa, utilizarea și
întreţinerea echipamentului. Păstraţi cu grijă
instrucţiunile de utilizare și transmiteţi-le
proprietarului ulterior.
Identificarea pieselor
1 = Recipient
2 = Cap motor
3 = Zăvor de astupare
4 = Role de direcţie
5 = Cuplaj rapid
6 = Comutator PORNIT/OPRIT
7 = Comutator cu pompă PORNIT/OPRIT (iluminat)
8 = Ștuţ de aspirare
9 = Mâner de transport
10 = Conductor de legătură la reţea
11 = Regulator putere de aspirare
12 = Furtun detergent (partea superioară)
13 = Furtun de aspirare
14 = Tuburi de aspirare
15 = Cleme furtun
16 = Supapă de blocare
17 = Duză de extragere prin pulverizare mochete
18 = Furtun detergent (partea inferioară)
19 = Duză pentru tapiţerie
20 = Adaptor pentru dușumele
21 = Duză de mochete
22 = Duză pentru spaţii înguste
23 = Duză de extragere prin pulverizare tapiţerie
24 = Rezervor de detergent
25 = Concentrat de curăţare materiale textile (ProTex)
26 = Duză de sifoane*
29 = Material cardat de filtrare*
30 = Filtru conic
32 = Inel de tensionare*
33 = Sac filtrant din hârtie
34 = Filtru AQUA*
35 = Filtru materiale textile praf fin*
36 = Furtun de aspirare pentru detergent
37 = Suport pentru tubul de aspirare
38 = Poziţie de repaus tub de aspirare
39 = Cleme tub*
*) = numai THOMAS BRAVO 20 S Aquafilter
Instrucţiuni de siguranţă
• THOMAS BRAVO servește exclusiv la utilizarea în
activitatea casnică.
• În niciun caz nu puneţi în funcţiune aparatul, dacă:
– cablul de conectare la reţea este deteriorat,
– prezintă daune vizibile,
– există posibilitatea ca acesta să fi căzut.
• Tensiunea indicată pe eticheta cu date tehnice trebuie
să corespundă tensiunii de alimentare.
• Duzele și tuburile nu trebuie să fie aproape de cap
când aparatul este conectat, în caz contrar există
riscul de vătămare, în special la nivelul ochilor și
urechilor.
•
Aparatul nu este potrivit pentru aspirarea substanţelor
dăunătoare pentru sănătate, caustice și cu conţinut de
solvenţi.
• Aparatul nu trebuie operat în încăperi în care sunt
depozitate substanţe inflamabile sau în care s-au
format gaze.
•
Depozitaţi echipamentul și accesoriile acestuia în spaţii
uscate, curate și cu sistem de închidere.
• Substanţe precum benzina, diluantul de vopsea și
păcură pot forma vapori sau amestecuri explozive
prin turbionarea cu aerul de aspirare.
• Nu aspiraţi niciodată cenușă fierbinte sau obiecte
arzătoare.
• Înainte de fiecare utilizare, asiguraţi-vă că aţi introdus
corect filtrele respective necesare.
• Nu aspiraţi praful de toner! Tonerul, utilizat de
exemplu în imprimante sau copiatoare, poate
prezenta conductibilitate din punct de vedere electric!
În plus, tonerul din sistemul de filtrare al aspiratorului
de praf poate să nu fie complet filtrat și astfel să
poată reveni în aerul din incintă prin suflanta de
aspirare.
• Precauţia extremă este necesară la curăţarea
treptelor. Asiguraţi o stabilitate suficientă a aparatului.
Furtunul nu trebuie să se întindă mai mult de lungimea
iniţială. Ţineţi ferm în permanenţă aparatul în mână.
• Nu lăsaţi în nicio situaţie aparatul nesupravegheat în
timp ce acesta este pornit.
•
Acest echipament poate fi utilizat de
copii cu vârsta de minim 8 ani și de
persoane cu capacităţi fizice, senzoriale
sau mentale reduse sau lipsite de
experienţă și /sau cunoștinţe dacă
acestea sunt supravegheate sau au
fost instruite cu privire la utilizarea în
siguranţă a echipamentului și au înţeles
pericolele rezultate din aceasta. Copiii
nu trebuie să se joace cu aparatul.
Lucrările de curăţare și întreţinere
destinate utilizatorului nu trebuie
efectuate de copii nesupravegheaţi.
31
Page 32

• Scoateţi fișa de reţea:
în caz de defecţiune pe parcursul funcţionării,
înainte de fiecare curăţare și îngrijire,
după utilizare,
la fiecare schimbare a filtrului.
• Nu scoateţi niciodată ștecărul din priză trăgând de
cablu, ci numai de ștecăr.
• Cablul de racord nu trebuie să fie expus la căldură
sau la lichide chimice și nu trebuie să fie tras peste
muchii sau suprafeţe ascuţite.
• Nu remediaţi niciodată pe cont propriu daunele la
aparat, la accesorii sau la cablul de conectare la
reţea (cablu special necesar), ci solicitaţi reparaţia
unui centru de serviciu pentru clienţi autorizat,
deoarece modificările la nivelul aparatului pot
periclita sănătatea. Asiguraţi-vă că sunt utilizate
exclusiv piese de schimb și accesorii originale.
• Nu expuneţi aparatul la intemperiile atmosferice,
umiditate sau căldură.
• Nu îndreptaţi niciodată jetul de curăţare către oameni
sau animale, prize sau echipamente electrice.
• Substanţele chimice, cum ar fi concentratele de
detergent, nu aparţin copiilor.
• Numai la utilizarea agenţilor de curăţare originali
THOMAS , pot fi garantate funcţiile aparatului și
efectul de curăţare.
• Persoanele cu piele sensibilă trebuie să evite contactul
direct cu soluţia de curăţare.
• Dacă concentratul de curăţare ajunge la membranele
mucoase (ochi, gură etc.), clătiţi imediat cu apă.
Protecţia mediului înconjurător
Nu aruncaţi materialul de ambalare și aparatele ieșite
din uz!
Ambalajul aparatului:
• Cutia de ambalare poate fi transportată în colecţia
de hârtie veche.
• Revalorificaţi sacul de plastic din polietilenă (PE) la
centrele de colectare.
Valorificarea aparatului după încheierea
duratei de funcţionare:
• Eliminaţi aparatul ca deșeu conform prevederilor
legale și tăiaţi în prealabil ştecărul de reţea aferent.
Simbolul de pe produs sau de pe ambalaj
indică faptul că acest produs nu poate fi
tratat ca un deșeu casnic normal, ci trebuie
reciclarea ap
aratelor electrice și electronice. Prin contribuţia
dumneavoastră la eliminarea corectă ca deșeu a acestui
produs, protejaţi mediul
înconjurător și sănătatea persoanelor. Mediul
înconjurător și sănătatea sunt periclitate prin eliminarea
incorectă ca deșeu.
predat la un punct de colectare pentru
Pentru informaţii suplimentare cu privire la reciclarea
acestui produs, vă puteţi adresa primăriei locaţiei
dumneavoastră, unei întreprinderi de salubrizare sau
unui magazin de la care aţi achiziţionat acest produs.
Montajul rolelor de ghidare
A Deschideţi zăvorul de astupare și detașaţi capul
motorului.
B Apăsaţi ferm rolele de ghidare și bolţul în baza
recipientului
Aspirarea uscată
THOMAS BRAVO 20
După aspirarea precedentă umedă, aparatul
trebuie să fie complet uscat; dacă este necesar,
uscaţi și furtunul sau tuburile.
Nu aspiraţi uscat niciodată fără sau cu
filtre deteriorate.
K Extrageţi rezervorul de detergent.
Utilizaţi filtrul conic (30) suplimentar de la sacul
C
de filtru din hârtie. Astfel, obţineţi cea mai bună
capacitate de reţinere a prafului.
Așezaţi filtrul conic (30) pe partea inferioară a
capului motorului (2). În funcţie de model, blocaţi
poz. 1 sau 2, cu clemele rotative. În cazul unei
murdăriri puternice sau unei puteri de aspirare
reduse, filtrul conic (30) poate fi spălat cu apă
limpede, fără detergenţi și agenţi de curăţare.
Asiguraţi-vă că filtrul este complet uscat la
următoarea utilizare.
D Apăsaţi ferm sacul filtrant pe ștuţul de aspirare și
atașaţi-l pe peretele recipientului.
G Împingeţi furtunul de aspirare pentru detergent la
partea inferioară a capului motorului.
H Așezaţi capul motorului și închideţi zăvorul de
astupare.
J Racordaţi furtunul de aspirare. Pentru detașare,
rotiţi racordul de aspirare în lateral și extrageţi-l.
Montaţi accesoriul dorit.
Introduceţi ștecherul în priză.
N Porniţi aparatul cu comutatorul PORNIT/OPRIT
(6). Recipientul cu pompă (7) nu trebuie să se
aprindă.
32
Page 33

Forţa de aspirare se modifică cu regulatorul
puterii de aspirare (11 fig. P).
– Clapeta pentru aer secundar închisă
= forţă maximă de aspirare
– Clapeta pentru aer secundar deschisă
= forţă redusă de aspirare
THOMAS BRAVO 20S Aquafilter
Nu utilizaţi niciodată aparatul dumneavoastră
AQUAFILTER în regimul de aspirare uscată
fără filtrul Aqua, filtrul de praf fin și umplerea
corespunzătoare cu apă.
Nu aspiraţi cantităţi mari de praf fin, de ex. făină,
pudră de cacao, ciment etc.
K Extrageţi rezervorul de detergent.
E Asamblaţi printr-un cuplaj tip fișă filtrul AQUA din
2 părţi până la opritor și împingeţi ferm pe
ștuţul de aspirare.
Filtrul AQUA trebuie să se fixeze în poziţie pe
Umpleţi 2 litri de apă limpede în recipientul de
F Atașaţi filtrul pentru materiale textile praf fin prin
G Împingeţi furtunul de aspirare pentru detergent la
C Montaţi materialul cardat de filtrare (29) prin
H Așezaţi capul motorului și închideţi zăvorul de
Acordaţi atenţie marcajelor.
fundul butoiului de aspirare și să fie așezat
uniform pe sol.
aspirare.
întoarcerea marginii de sus în recipientul de
aspirare.
partea inferioară a capului motorului.
intermediul inelului de tensionare (32) și fixaţi-l cu
clemele rotative.
astupare.
Curăţarea și îngrijirea sistemului de filtrare AQUA
Din motive de igienă, sistemul
AQUAFILTER și recipientul de aspirare
trebuie golite, curăţate și uscate după
fiecare utilizare.
Apa murdară și piesele umede
favorizează înmulţirea bacteriilor și a
ciupercilor.
În funcţie de murdărie, ștergeţi filtrul pentru materiale
textile de praf fin cu o cârpă uscată sau umedă. În caz
de murdărire puternică, spălaţi cu apă limpede fără
detergenţi de curăţare. Asiguraţi-vă că filtrul este complet uscat la următoarea utilizare.
Aspirare umedă
Păstraţi supapa cu plutitor (40 fig. S) în
permanenţă curată și accesibilă. Acesta întrerupe
automat procesul de aspirare dacă recipientul de
aspirare este plin.
La aspirarea din recipiente ale căror nivel de lichid este
mai mare decât marginea superioară a recipientului de
aspirare
ș
capacitatea recipientului de aspirare, lichidul poate
continua să curgă când supapa cu plutitor este închisă.
În astfel de cazuri, aspiraţi doar cantităţi parţiale
goliţi recipientul de aspirare.
Mai întâi, ridicaţi tubul
apoi opriţi aparatul pentru a împiedica scurgerea
lichidului.
A Deschideţi zăvorul de astupare și detașaţi capul
Scoateţi filtrul din aparatul, în caz contrar, acesta
În cazul în care rezervorul de detergent este
i ale căror capacitate este mai mare decât
ș
i
ș
i furtunul de aspirare din lichid,
motorului.
se poate deteriora (fig. C și D). La aparatele
AQUAFILTER, extrageţi filtrul AQUA și filtrul de
materiale textile de praf fin
(fig. C, E și F).
montat, demontaţi-l (fig. K).
J Racordaţi furtunul de aspirare. Pentru detașare,
rotiţi racordul de aspirare în lateral și extrageţi-l.
Montaţi accesoriul dorit.
Introduceţi ștecherul în priză.
N Porniţi aparatul cu comutatorul PORNIT/OPRIT
(6). Recipientul cu pompă (7) nu trebuie să se
aprindă.
Forţa de aspirare se modifică cu regulatorul
puterii de aspirare (11 fig. P).
– Clapeta pentru aer secundar închisă
= forţă maximă de aspirare
– Clapeta pentru aer secundar deschisă
= forţă redusă de aspirare
H Așezaţi capul motorului și închideţi zăvorul de
astupare.
Introduceţi ștecherul în priză.
J Racordaţi furtunul de aspirare. Pentru detașare,
rotiţi racordul de aspirare în lateral și extrageţi-l.
P Închideţi regulatorul puterii de aspirare (11) de la
mâner.
N Porniţi aparatul cu comutatorul PORNIT/OPRIT
(6). Recipientul cu pompă (7) nu trebuie să se
aprindă.
După finalizarea procesului de aspirare umedă,
curăţaţi și uscaţi aparatul și accesoriile utilizate.
33
Page 34

Extragere prin pulverizare (aspirare cu spălare)
De pe mochetă și dușumea
Curăţaţi mochetele adecvate pentru curăţarea
umedă.
Mochetele delicate sau culori false nu trebuie
curăţate umed.
În cazul în care covorul a fost tratat anterior cu
șampon, la prima folosire a aparatului THOMAS
AQUA+|XT este posibilă formarea unei cantităţi
ridicate de spumă.
Deconectaţi apoi aparatul și goliţi recipientul de
aspirare.
Pentru a evita formarea ulterioară de spumă,
1
turnaţi
⁄2 ceașcă de oţet în recipientul de aspirare.
Este exclusă formarea de spumă în exces
după o singură curăţare completă cu o soluţie
concentrată de curăţare THOMAS, deoarece
acesta conţine un inhibitor special pentru spumă.
Când funcţia de pulverizare este pornită,
asiguraţi-vă că există întotdeauna lichid
în rezervorul de apă proaspătă, pentru a
evita deteriorarea pompei.
Curăţarea mochetelor
blocaţi-l prin rotire. Apăsaţi furtunul de detergent
în suportul de furtunuri de pe tuburile de aspirare
sau, în cazul tuburilor din oţel inox, cu clemele de
tuburi mai mici (39) de pe tubul de aspirare.
Introduceţi ștecherul în priză.
N Conectaţi comutatorul PORNIT/OPRIT (6) și
comutatorul cu pompă iluminat (7).
P Apăsaţi pârghia de pe supapa de blocare (16).
Detergentul este pulverizat.
Înainte de umplerea rezervorului de
detergent, goliţi întotdeauna apa
murdară din recipientul de aspirare.
Curăţarea dușumelelor
Q Montaţi adaptorul pentru dușumele.
Pentru modul de lucru, a se vedea
„Curăţarea covoarelor”
Pentru curăţarea dușumelelor, recomandăm
concentratul de curăţare THOMAS ProFloor.
A Deschideţi zăvorul de astupare și detașaţi capul
motorului.
K Detașaţi capacul rezervorul de detergent și
umpleţi rezervorul cu THOMAS ProTex.
Dozare, a se vedea eticheta flaconului.
Utilizaţi apă călduţă (max. 30 °C).
Așezaţi din nou capacul și introduceţi rezervorul
de detergent umplut în aparat.
G Scoateţi furtunul de aspirare pentru detergent din
suportul capului motorului.
L Așezaţi capul motorului, astfel încât furtunul de
aspirare (36) să intre până la baza rezervorului
de detergent fără a se frânge.
J Racordaţi furtunul de aspirare. Pentru detașare,
rotiţi racordul de aspirare în lateral și extrageţi-l.
M Împingeţi în interior supapa de blocare în locașul
tubului de aspirare. Introduceţi mânerul în tubul
de aspirare și asiguraţi furtunul de detergent la
furtunul de aspirare cu clemele de plastic.
N Fixaţi furtunul de detergent în cuplajul rapid al
capului motorului.
O Atașaţi duza de extracţie prin pulverizare mochete
pe tubul de aspirare.
P Așezaţi furtunul de detergent al duzei de
pulverizare mochetă pe supapa de blocare și
34
Curăţarea tapiţeriei (în funcţie de model)
Pentru curăţarea mobilei tapiţate sau scaunelor mașinii,
utilizaţi
duza de extracţie prin pulverizare tapiţerie (23).
Aveţi grijă să nu aplicaţi prea mult lichid,
deoarece, în funcţie de structura interioară, este
necesară luarea în considerare a unui timp de
uscare mai lung.
R Montaţi duza de extracţie prin pulverizare
tapiţerie. Fixaţi furtunul de detergent prin rotire.
Introduceţi duza pe mâner.
Curăţarea și îngrijirea sistemului de extracţie
prin pulverizare
K Pentru îngrijirea pompei și supapei,
umpleţi rezervorul de detergent cu apă
limpede și introduceţi-l.
Introduceţi ștecherul în priză, conectaţi
comutatorul de pornire/ oprire (6),
precum și comutatorul cu pompe (7).
P Sistemul de pulverizare, de ex. punerea
în funcţiune deasupra chiuvetei (acţionaţi
pârghia de pe supapa de blocare (16)).
N Înainte de a elibera furtunul de detergent,
acţionaţi pârghia de pe supapa de blocare
(16, imaginea
jP ) pentru a elibera presiunea
reziduală din sistem, apoi apăsaţi tasta de pe
cuplajul rapid (5).
Page 35

Scoateţi fișa de alimentare din priză!
Ulterior, curăţaţi și uscaţi aparatul și accesoriile utilizate.
Nu introduceţi niciodată în apă capul motorului!
Ștergeţi carcasa motorului cu o cârpă umedă și uscaţi-o.
Sfaturi importante
La curăţarea umedă, trageţi întotdeauna duza de
pulverizare mochetă spre dumneavoastră.
Pentru a preveni o altă murdărire, mochetele
curăţate trebuie introduse numai când sunt uscate.
Pentru a obţine o uscare mai rapidă a suprafeţelor
curăţate, este util să eliminaţi umezeala reziduală
prin reaspirare - fără a apăsa pârghia supapei.
Pentru curăţarea suprafeţelor acoperite cu
parchet, procedaţi conform instrucţiunilor
producătorului de parchet.
Dacă forţa de aspirare scade brusc:
• Supapa cu plutitor a oprit aerul de aspirare? Se
întâmplă în cazul poziţiei oblice sau răsturnării
extreme a aparatului. Schimbaţi aspiratorul - plutitorul
cade - aparatul este din nou pregătit de funcţionare.
Dacă motorul nu funcţionează:
• Cablurile , ștecărul și priza sunt intacte?
• Înainte de verificare, scoateţi fi
• Nu deschideţi niciodată singur motorul!
Dacă nu iese lichidul de curăţare:
• Este pompa conectată (comutatorul (7)) trebuie să se
aprindă?
• Curăţaţi sita filtrului de aspirare de la furtunul de
aspirare (36).
• Furtunul de aspirare este suspendat corespunzător în
rezervorul de detergent?
• Duza de pulverizare este înfundată? Dacă duza de
pulverizare este înfundată, puneţi duza în apă pentru
un timp. Apoi suflaţi energic.
ș
a.
Asistenţă în caz de eventuale defecţiuni
În cazul în care, contract așteptărilor, aparatul nu funcţionează satisfăcător, nu este nevoie să luaţi legătura cu
serviciul de asistenţă pentru clienţi. Rugăm verificaţi mai
întâi dacă defecţiunea are o cauză minoră:
Dacă iese praf în timpul aspirării:
•
Sistemul de filtrare este fixat corect și nu prezintă defecte?
• S-a utilizat un filtru original THOMAS?
Dacă forţa de aspirare scade treptat:
• Sunt porii filtrului blocaţi de praf fin?
• Sacul filtrului din hârtie este plin?
–
Duzele, tubul prelungitor sau furtunul de aspirare
sunt înfundate cu particule grosiere de murdărie?
(Despărţiţi prin tragere furtunul de aspirare cu aparatul
pornit - alungirea destinde partea înfundată).
Dacă iese apă din deschizătura de suflare a
aparatului la aspirare:
• Este plutitorul (imaginea S) blocat la aspirarea
lichidului
ș
i este fără reacţie?
• S-a utilizat un concentrat de curăţare original
THOMAS la aspirarea cu spălare?
• Sunt montate filtrul AQUA
de praf fin (în funcţie de model) conform manualului?
ș
i filtrul de materiale textile
Serviciul de relaţii cu clienţii
Adresaţi-vă reprezentantului dumneavoastră comercial
de specialitate, care să vă informeze despre adresa sau
numărul de telefon al serviciului pentru clienţi THOMAS.
Indicaţi întotdeauna indicaţiile de pe plăcuţa de fabricaţie a aspiratorului.
Pentru a menţine siguranţa echipamentului,
trebuie să dispuneţi efectuarea reparaţiilor,
în special la componentele alimentate cu
energie electrică, numai de către electricieni
calificaţi. În cazul unei defecţiuni, trebuie să
vă adresaţi reprezentantului dumneavoastră
comercial de specialitate sau direct serviciului
de relaţii cu clienţii.
Puteţi găsi datele de contact pe verso.
Ne rezervăm dreptul de a efectua modificări de natură tehnică.
35
Page 36

Перед первым пуском
в эксплуатацию
Пожалуйста, прочтите внимательно всю
нижеследующую информацию. Она содержит
важные указания относительно безопасности,
использования и технического обслуживания
прибора. Сберегайте данное руководство по
эксплуатации и передайте его дальше новому
пользователю.
Обозначения
1 = бак
2 = блок двигателя
3 = запирающая защёлка
4 = рулевые ролики
5 = быстроразъёмное соединение
6 = выключатель
7 = выключатель насоса (с подсветкой)
8 = всасывающие штуцеры
9 = ручка для переноски
10 = кабель для подключения к электросети
11 = регулятор мощности всасывания
12 = шланг для моющего средства (верхняя часть)
13 = всасывающий шланг
14 = всасывающие трубы
15 = шланговые фиксаторы
16 = запорный клапан
17 = оросительная экстракционная насадка для чистки
ковров*
18 = шланг для моющих средств (нижняя часть)
19 = насадка для чистки мягкой мебели
20 = адаптер для жёстких половых покрытий
21 = ковровая насадка
22 = узкая насадка
23 = оросительная экстракционная насадка для чистки
мягкой мебели
24 = бак для моющих средств
25 =
концентрат для чистки текстильных изделий (ProTex)
26 = сифонная насадка*
29 = вопокнистый фильтр*
30 = Конический фильтр
32 = обечайка*
33 = мешок для бумажного фильтра
34 = AQUA-фильтр*
35 = тонкодисперсный текстильный фильтр*
36 = всасывающий шланг для моющих средств
37 = крепление всасывающей трубы
38 = положение “запаркованной” всасывающей трубы
39 = трубные пружинные зажимы*
*) = только для модели THOMAS BRAVO 20 S Aquafilter
36
RUS
Указания по технике безопасности
• Пылесос THOMAS BRAVO служит
исключительно для использования в домашнем
хозяйстве и должен обслуживаться.
• Ни в коем случае не пользоваться прибором, если:
– неисправен электрокабель,
– имеются очевидные неисправности,
– Bы нечаянно уронили прибор.
• Напряжение, указанное на заводской табличке
прибора, должно соответствовать напряжению
питающей сети.
Насадки и трубки при включённом приборе не
•
должны находиться вблизи головы, так как иначе
имеется опасность ранения, особенного глаз и ушей.
• Прибор не пригоден для всасывания
опасных для здоровья, едких и содержащих
растворители веществ.
• Прибор не должен эксплуатироваться в
помещениях, в которых храняться огнеопасные
вещества или образовались газы.
• Храните прибор и его принадлежности в сухом,
чистом и закрытом помещении.
• Вещества, как бензин, растворители красок
и котельное масло, могут при турбулизации
с всасываемым воздухом образовывать
взрывоопасные пары или смеси.
• Никогда не всасывайте горячую золу или
раскалённые предметы.
• Перед каждым использованием прибора
проверьте, правильно ли насажены
необходимые фильтры.
•
Никогда не всасывайте рассыпавшийся красящий
порошок, который используется, например,
в печатных устройствах и копировальных
приборах, может быть электропродимым! Кроме
того, красящий порошок может не полностью
отфильтровываться системой фильтров пылесоса и
таким образом снова попадает в воздух помещения.
• При уборке лестниц требуется особая
осторожность. Вы должны обеспечить
достаточно устойчивое положение прибора.
Щланг не должен растягиваться более своей
изначальной длины. Всегда придерживайте
прибор одной рукой.
• Никогда не оставляйте без присмотра
работающий прибор
Дети в возрасте от 8 лет и старше,
•
а также лица со сниженными
физическими, сенсорными или
ментальными способностями,
либо не обладающие достаточным
опытом и (или) знаниями, могут
пользоваться этим пылесосом при
том условии, что они работают
под присмотром или были
проинструктированы о безопасном
обращении с прибором и осознали
связанные с его использованием
опасности. Играть с прибором детям
запрещено. Заниматься очисткой и
обслуживанием прибора детям без
присмотра запрещено.
Page 37

• Электрокабель следует отключить от сети:
– при помехах во время работы,
– перед каждой чисткой и уходом,
– после использования,
– при каждой смене фильтра.
• При отключении от сети никогда не тяните за
кабель, а только за штепсельную вилку.
• Следите за тем, чтобы электрокабель прибора
не подвергался воздействию повышенных
температур и химических жидкостей, а также
не перетягивался через острые края или
поверхности.
• Никогда не ремонтируйте сами неисправности
прибора, принадлежностей или электрокабеля
(требуется особая проводка), а предоставляйте
это делать только мастерам уполномоченной
мастерской по обслуживанию клиентов, потому
что изменения на приборе могут создавать
угрозу Вашему здоровью. Следите за тем,чтобы
использовались только оригинальные запчасти
и принадлежности.
• Не подвергайте прибор воздействиям погодных
условий, влаги и источников теплового излучения.
• Никогда при чистке не направляйте струю на
людей или животных, электророзетки или
электроприборы.
• Химикаты, как концентраты моющих средств,
не должны попадать в руки детям.
• Только при использовании оригинальных
моющих средств фирмы THOMAS может быть
обеспечена функциональность прибора и полная
мощность всасывания.
• Лица с восприимчивой кожей должны избегать
прямого контакта с раствором моющего средства.
• Если моющий концентрат попадёт на слизистые
оболочки (глаза, рот и т. п.), то эти места
следует сразу промыть водой.
Ради окружающей среды
Не выбрасывайте просто так упаковочный материал
и отслужившие приборы!
Упаковка:
• Упаковочный картон можно сдать в макулатуру;
• Пакет из полиэтилена (PE) сдавайте в сборный
пункт для переработки.
Утилизация прибора по окончании срока службы:
• Утилизируйте прибор согласно местным
предписаниям, предварительно отрезав выдернутую
из розетки электросети вилку сетевого шнура.
Этот символ, «перечеркнутый мусорный
бак», на изделии или на его упаковке
означает, что с изделием следует обращаться
не как с обычным мусором, а необходимо
сдавать его на сборный пункт
утилизации электрических и электронных приборов.
Надлежащей утилизацией данного изделия Вы
внесете свой вклад в защиту окружающей среды и
здоровья людей. Неправильная утилизация создает
опасность для окружающей среды и здоровья людей.
Дальнейшую информацию об утилизации
данного изделия Вы можете получить в Вашем
муниципалитете, в фирме осуществляющей у Вас
уборку мусора или в магазине, где Вы купили данное
изделие.
для
Монтаж рулевых роликов
А Откройте запирающую защёлку и снимите
головную часть прибора.
В Крепко вдавите рулевые ролики и оси в дно
ёмкости.
Сухое всасывание
THOMAS BRAVO 20
После предварительного процесса мокрого
всасывания прибор должен быть
абсолютно сухим; при необходимости также
предварительно следует просушить шланг и
трубки.
Никогда не делайте сухую уборку с
повреждённым фильтром или без него.
К Снимите бак для моющего средства.
спользуйте конический фильтр (30) совместно
С И
с бумажным пылесборником. Таким образом
Вы получите наилучшее задержание пыли.
Закрепите конический фильтр (30) на нижней
стороне головки мотора (2). Зафиксируйте
поворотными зажимами в поз. 1 или 2 (зависит
от модели). В случае сильных загрязнений или
при снижении качества уборки конический
фильтр (30) промывается чистой водой без
добавления моющих средств. Перед началом
следующей уборки убедитесь в том, что фильтр
полностью просох.
D Крепко насадите мешок для фильтра на
всасывающий штуцер и приложите к стенке
резервуара.
G
Защёлкните всасывающий шланг для моющего
средства на нижней стороне головной части
прибора.
Н Насадите головную часть прибора и
защёлкните запирающие защёлки.
J Подсоедините всасывающий шланг.
Для снятия поверните его в сторону и
отсоедините.
Монтируйте желаемые принадлежности.
Вставьте штепсельную вилку в розетку.
N Включите прибор нажатием кнопки для
включения/выключения (6).
Выключатель насоса (7) не должен
светиться.
С помощью кнопки регулирования мощности
(11, рис. Р) можно изменять мощность
всасывания.
- шибер дополнительного подсоса воздуха
закрыт = полная мощность всасывания
шибер дополнитеьного подсоса воздух
открыт = пониженная мощность всасывания
37
Page 38

THOMAS BRAVO 20S Aquafilter
Никогда при сухой уборке не пользуйтесь
Вашим прибором Aquafilter без аквафильтра,
тонкодисперсного текстильного фильтра и
соответствующей заправки водой.
Не всасывайте большие количества
тонкодисперсной пыли, напр., муки, порошка
какао, цемента и т. п.
К Снять бак для моющего средства.
Е
Состыковать до упора аквафильтр, состоящий
из 2 частей, и крепко насадить его на
всасывающий штуцер.
При этом следите за
Аквафильтр должен быть защёлкнут на дне
F Путём перекладывания верхнего края
G Защёлкнуть на нижней стороне головной
С Установить вопокнистый фильтр (29) с
Н Насадить головную часть прибора и
J Вставить всасывающий шланг. Для снятия
Монтируйте желаемые принадлежности.
Вставьте штепсельную вилку электрокабеля в розетку.
N Включите прибор нажатием кнопки для
С помощью кнопки регулирования мощности
- шибер дополнительного подсоса воздуха
- шибер дополнительного подсоса воздуха
Технический уход за системой аквафильтра.
По гигиеническим причинам систему
маркировкой.
всасывающего резервуара и равномерно
лежать на дне.
Залейте 2 литра чистой воды во всасывающий
бак.
подвесить тонкодисперсный текстильный
фильтр во всасывающем резервуаре.
части прибора всасывающий шланг для
моющего средства.
помощью зажимного кольца (32) и закрепить
его поворотными скобами.
защёлкнуть запирающие защёлки.
следует повернуть в сторону соединение
всасывающего шланга и вынуть его.
включения/выключения (6). Выключатель
насоса (7) не должен светиться.
(11, рис. Р) можно изменять мощность
всасывания.
закрыт = полная мощность всасывания
открыт = пониженная мощность всасывания
аквафильтра и всасывающий резервуар
после каждого использования следует
опорожнить, почистить и просушить. Грязная
вода и мокрые части благоприятствуют
размножению бактерий и грибков.
Тонкодисперсный текстильный фильтр в
зависимости от степени загрязнения нужно
протереть сухой или слегка влажной суконкой.
38
При сильном загрязнении его следует промыть
чистой водой без добавления моющих и
чистящих средств. Следите за тем, чтобы
при следующем использовании фильтр был
полностью просушен.
Мокрое всасывание
Поплавковый клапан (40, рис. S) должен
всегда содержаться в чистоте и свободно
двигаться в проходе. Он автоматически
прерывает процесс всасывания, если
всасывающий бак полный.
При всасывании из ёмкостей, уровень жидкости
которых находится выше верхнего края всасывающего
бака, и объём которых больше рабочего объёма
пылесоса, при закрытом поплавковом клапане жидкость
может и далее затекать внутрь.
В подобных случаях следует отсасывать только
по частям и в промежутках опорожнять
всасывающий бак.
Сначала извлечь из жидкости всасывающую
трубку и шланг и затем выключить прибор, чтобы
предотвратить затекание жидкости.
А Открыть запорные защёлки и снять
головную часть прибора.
Извлечь из прибора фильтр, так как иначе
он будет повреждён (рис. C и D). В приборов
с аквафильтром нужно вынуть аквафильтр и
тонкодисперсный текстильный фильтр (рис. C,
Е и F).
Если монтирован бак для моющих средств,
то его нужно извлечь (рис. К).
Н Насадить головную часть прибора и
защёлкнуть запорные защёлки.
J Вставить всасывающий шланг. Для снятия
следует повернуть в сторону соединение
всасывающего шланга и вынуть его.
Р Закрыть регулятор мощности (11) на рукоятке.
N Включите прибор нажатием кнопки для
включения/выключения (6). Выключатель
насоса (7) не должен светиться.
После окончания процесса мокрого
всасывания прибор и использованные части
следует почистить и просушить.
Экстрагирование с распылением (мокрое
всасывание) ковров и твёрдых половых покрытий
Чистить только те ковры, которые пригодны
для влажной уборки.
Тонкие ковры ручной работы или ковры
непрочными красками не должны подвергаться
влажной чистке.
Если ковёр ранее подвергался стирке с
применением шампуни, то при первом
использовании пылесоса THOMAS BRAVO
может иметь место обильное пенообразование.
с
Page 39

Тогда прибор следует выключить и
опорожнить всасывающий бак.
Чтобы избежать дальнейшего
пенообразования, добавьте 1/2 чашки
уксуса во всасывающий бак. Повышенное
пенообразование после одноразовой общей
химической чистки с применением моющего
концентрата фирмы THOMAS исколючено,
так как он содержит специальные вещества,
препятствующие пенообразованию.
Во избежание возможного повреждения
насоса следите за тем, чтобы при
включённой функции орошения бак для
свежей воды всегда был наполнен.
Чистка ковров
А Открыть запорные защёлки и снять
головную часть прибора.
К Снять крышку с бака для моющего средства
и залить в бак моющее средство THOMAS
ProTex.
Дозировка указана на этикетке бутылки.
Использовать только слегка тёплую воду
(макс. 30°С).
Снова насадить крышку и вставить в прибор
бак для моющего средства.
Н
Вынуть всасывающий шланг для моющего
средства из крепления на головной части
прибора.
L Головную часть прибора насадить таким
образом, чтобы всасывающий шланг (36)
погружён до самого дна бака для моющего
средства и не перегибался.
J Вставить всасывающий шланг. Для снятия
следует повернуть в сторону соединение
всасывающего шланга и вынуть его.
М Задвинуть запорный клапан в крепление
на всасывающей трубе. Вставить рукоятку
во всасывающую трубу и закрепить
на всасывающем шланге с помощью
пластмассовых пружинных зажимов шланг
для моющего средства.
N Зафиксировать шланг для моющего
средства в быстродействующем сцеплении
на головной части прибора.
О Насадить на всасывающую трубу ковровую
насадку для оросительного экстрагирования.
Р
Насадить на запорный клапан шланг для
моющего средства от ковровой оросительной
насадки и закрепить поворотом вокруг оси.
Шланг для моющего средства вдавить в
крепление шланга на всасывающих трубках
или у приборов с нержавеющими трубками
закрепить его на всасывающей трубе
пружинными зажимами (39).
N Нажать на кнопку включения/выключения
(6) и на подсвеченную кнопку включения
насоса (7).
был
Р Нажать рычаг на запорном клапане (16).
При этом распыляется моющее средство.
Прежде чем вновь будет заполнен бак
для моющего средства, всегда сливайте
грязную воду из всасывающего бака.
Чистка твёрдых половых покрытий
Q Монтировать адаптер для твёрдых половых
покрытий.
Порядок действий указан в главе “Чистка
ковров”.
Для чистки твёрдых половых покрытий мы
рекомендуем пользоваться концентратом
THOMAS ProFloor.
Чистка мягкой мебели (в зависимости от
модели)
Для чистки Вашей мягкой мебели или сидений
автомобиля используйте оросительноэкстракционную насадку для мягкой мебели (23).
Следите за тем, чтобы жидкости распылялось
не слишком много, так как в зависимости
от подкладки следует считаться с более
длительным временем просыхания.
R Монтировать оросительно-экстракционную
насадку для мягкой мебели. Вкрепить шланг
для моющего средства поворотом вокруг
оси. Насадить насадку на рукоятку.
Чистка и уход за оросительно-экстракционной
системой
К Для чистки насоса и клапанов следует
наполнить чистой водой бак для
моющего средства и вставить его на
место.
Вставить в розетку вилку электрокабеля,
нажать на кнопку включения/
выключения (6), а также на кнопку
включения насоса (7).
Р Оросительную систему включать, напр.,
над раковиной (нажать рычаг (16) на
запорном клапане).
N Перед откреплением шланга для моющего
средства сначала надо нажать рычаг
на запорном клапане (16, рис. P), чтобы
разрядить остаточное давление в системе,
затем нажать кнопку на бустродействующем
сцеплении (5).
Отсоединить электрокабель от сети! Затем
почистить и просушить прибор и использованные
принадлежности.
Никогда не погружайте в воду головную часть
прибора!
Корпус мотора протрите влажной суконкой и
затем просушите.
39
Page 40

Полезные советы
При влажной чистке всегда проводите
ковровой распылительной насадкой по
ковру полоса за полосой в направлении к
себе.
Чтобы вновь не запачкать ковры, после
чистки ходить по ним нужно только тогда,
когда они уже подсохли.
Чтобы достичь быстрого подсыхания
очищенной поверхности, имеет смысл
тщательно удалить остаточную влагу путём
повторного всасывания без нажимания на
рычаг клапана.
Для чистки паркета Вам следует
придерживаться указаний изготовителя
паркета.
Помощь при возможных неполадках
или при опрокидывании прибора. Пылесос
выключить – поплавок падает вниз – прибор
снова готов к работе.
Если мотор не работает:
• В порядке ли кабель, штепсельная вилка и
розетка?
• Перед проверкой вынуть штепсельную вилку из
розетки.
• Никодна не вскрывайте мотор сами!
Если не выступает моющая жидкость:
• Включён ли насос (7)? Подсветка на кнопке
должна светить.
• Почистить сито всасывающего фильтра на
всасывающем шланге (36).
• Правильно ли лежит всасывающий шланг в
баке для моющего средства?
• Не засорилась ли оросительная насадка? Если
засорилась оросительная насадка, то её на
некоторое время следует поместить в воду.
Затем основательно продуть.
Если Ваш прибор вопреки ожиданиям работает
неудовлетворительно, то Вам не нужно сразу
обращаться в службу сервиса. Пожалуйста,
проверьте сначала, не является ли причиной
неисправности какой-нибудь пустяк:
Если при всасывании пыль выступает наружу:
• Правильно ли закреплена система фильтров и
нет ли в ней неисправностей?
• Используется ли оригинальный фильтр фирмы
THOMAS?
Если мощность всасывания значительно
понижена:
• Не засорились ли поры фильтра
тонкодисперсной пылью?
• Не переполнен ли мешок для бумажного
фиьтра?
• Не засорены ли грязью насадка, труба или
всасывающий шланг? (При включённом
приборе растяните всасывающий шланг, это
способствует расслаблению пробки.)
Если при всасывании выступает вода из
выпускных отверстий прибора:
• Не заблокирован ли при всасывании жидкости
поплавок (рис. S) и не может срабатывать?
• Использовался ли при мокром всасывании
оригинальный моющий концентрат фирмы
THOMAS?
• Согласно ли руководства монтированы
аквафильтр и тонкодисперсный текстильный
фильтр (в зависимости от модели)?
Если внезапно снизилась мощность
всасывания:
• Не перекрыл ли поплавковый клапан
всасываемый воздух? Это может случиться
при экстремальном вертикальном положении
40
Сервисная служба
Обращайтесь к Вашему торговому представителю,
который также охотно предоставит Вам адреса
или номера телефонов ответственной для Вас
сервисной службы фирмы THOMAS.
Пожалуйста, при этом всегда сообщайте данные,
указанные на заводской табличке Вашего
пылесоса.
Для поддержания должного уровня
безопасности Вашего прибора ремонт прибора
и особенно его токопроводящих узлов должен
проводиться только специалистамиэлектриками. Поэтому в случае неисправности
Вы должны обращаться к Вашему торговому
представителю или прямо в сервисную службу
фирмы THOMAS.
Контактные данные указаны на обороте.
Дата изготовления:
см. фирменную табличку, расположенную на
нижней стороне прибора
Кат. №: xxxxxxxx _ _ _ _
• Правила и условия монтажа не установлены
изготовителем, т.к. изделие передвижное.
• Во время транспортировки не бросать, не
подвергать ударам о другие предметы.
• Правила и условия реализации не
установлены изготовителем и должны
соответствовать национальному и/или местному
законодательству страны реализации товара.
Возможны технические изменения.
(день недели) (календнеделя) (год)
Page 41

Перед першим
UA
використанням
Уважно прочитайте наведену нижче
інформацію. Мова йде про важливі
вказівки щодо безпеки, використання та
технічного обслуговування пристрою.
Зберігайте інструкцію в надійному
місці. У разі передачі пристрою іншому
користувачу, передайте йому інструкцію.
Назви деталей
1 = Контейнер
2 = Кришка двигуна
3 = Фіксатор
4 = Коліщатка
5 = Швидкорознімний з’єднувач
6 = Вимикач
7 = Вимикач насоса (з підсвічуванням)
8 = Всмоктувальний патрубок
9 = Ручка для перенесення
10 = Електричний кабель
11 = Регулятор потужності всмоктування
12 =
Гнучка трубка для мийного засобу (верхня частина)
13 = Гнучкий всмоктувальний шланг
14 = Всмоктувальна трубка
15 = Затискачі гнучкої трубки
16 = Запірний клапан
17 =
Насадка для пульверизаційного очищення килимів
18 =
Гнучка трубка для мийного засобу (нижня частина)
19 = Насадка для м’яких меблів
20 = Адаптер для підлоги з твердим покриттям
21 = Насадка для килимів
22 = Щілинна насадка
23 = Насадка для пульверизаційного очищення
м’яких меблів
24 = Резервуар для мийного засобу
25 = Концентрат миючого засобу для текстильних
виробів (ProTex)
26 = Сифонна насадка*
29 = Фільтрувальна прокладка*
30 = Конусоподібний фільтр
32 = Затискне кільце*
33 = Паперовий фільтр-мішок
34 = Аквафільтр*
35 = Тканинний фільтр для дрібного пилу*
36 =
Гнучка всмоктувальна трубка для мийного засобу
37 = Тримач всмоктувальної трубки
38 = Кріплення для всмоктвальної трубки під час
паркування
39 = Затискачі трубок*
*) = тільки в моделі THOMAS BRAVO 20 S Aquafilter
Вказівки з техніки безпеки
• THOMAS
використання тільки в домашніх умовах.
• У жодному разі не вмикайте пристрій, якщо:
– пошкоджено електричний кабель;
– пристрій має видимі пошкодження;
– пристрій впав.
• Напруга, зазначена на фірмовій табличці,
має відповідати напрузі в мережі.
• Не підносьте насадки та трубки до голови,
коли пристрій увімкнено – існує небезпека
травмування, особливо для очей і вух.
• Пристрій не можна використовувати для
збирання небезпечних для здоров’я та їдких
речовин, а також таких речовин, що містять
розчинники.
• Пристрій не можна використовувати
в приміщеннях, де зберігаються
легкозаймисті матеріали або утворюються
вибухонебезпечні гази.
• Зберігайте пристрій і його приладдя в сухому,
чистому, закритому приміщенні.
• Такі речовини, як бензин, розчинник для
фарб і рідке паливо, можуть унаслідок
завихрення утворювати вибухонебезпечну
пару чи суміш з повітрям, яке всмоктується.
• Заборонено збирати гарячий попіл та
розпечені предмети.
• Перед кожним використанням перевіряйте,
чи правильно вставлено необхідні фільтри.
• Пристрій не можна використовувати
для збирання тонера. Тонер, який
використовується, наприклад, у принтерах
або копіювальних апаратах, може проводити
електричний струм! Крім того, тонер може не
повністю відфільтруватися з фільтрувальної
системи пилососа і, як наслідок,
повернутися в повітря приміщення через
всмоктувальний вентилятор.
• Необхідна особлива увага під час
прибирання сходів. Подбайте про
забезпечення достатньої стійкості пристрою.
Гнучкий шланг не можна розтягувати.
Завжди тримайте пристрій однією рукою.
• Ніколи не залишайте ввімкнений пристрій
без нагляду.
•
Цей пристрій дозволено
BRAVO призначений для
використовувати дітям від
8 років та особам з обмеженими
фізичними, сенсорними або
розумовими здібностями, браком
досвіду та /або знань за умови,
що за ними здійснюється нагляд
або їх було проінструктовано
щодо безпечного використання
пристрою і вони зрозуміли
41
Page 42

наявні небезпеки. Дітям не
можна гратися з пристроєм.
Дітям без нагляду дорослих
заборонено очищувати пристрій
та проводити роботи з технічного
обслуговування, за які
відповідає користувач.
• Необхідно вийняти штепсельну вилку з
розетки:
➝
у разі неполадок під час роботи,
➝
перед проведенням операцій з очищення та догляду,
➝
після використання,
➝
під час кожної заміни фільтра.
• Ніколи не витягуйте вилку з розетки за
кабель. Беріться тільки за вилку.
• Бережіть електричний кабель від впливу
високих температур та хімічних рідин. Не
прокладайте його через гострі краї.
• У разі пошкодження пристрою, приладдя
або електричного кабелю (коли потрібна
заміна) не виконуйте ремонт самостійно.
Зверніться до авторизованого сервісного
центру, тому що модифікація пристрою
може бути небезпечною для вашого
здоров’я. Використовуйте лише оригінальні
запчастини та приладдя.
• Бережіть пристрій від впливу погодних
умов, вологи та джерел тепла.
• Не спрямовуйте очищувальний струмінь
на людей, тварин, штепсельні розетки та
електроприлади.
• Бережіть від дітей хімічні речовини, такі як
концентрати миючих засобів.
• Належне функціонування пристрою та
ефективність очищення гарантовано лише
за умови використання фірмових миючих
засобів THOMAS.
• Особам із чутливою шкірою слід уникати
контакту з миючим розчином.
• У разі потрапляння концентрату для
приготування миючого розчину на слизову
оболонку (в очі, рот тощо) необхідно
негайно промити ушкоджене місце водою.
Захист довкілля
Не викидайте використані пакувальні
матеріали та пристрої разом із побутовим
сміттям!
Упаковка пристрою:
• Пакувальний картон можна здати до
пункту прийому макулатури.
• Пакет із поліетилену (PE) можна здати на
переробку до пункту прийому вторинної
сировини.
Утилізація пристрою після закінчення
строку служби:
• Утилізуйте пристрій відповідно до місцевих
норм. Заздалегідь вийміть вилку з розетки
та відріжте її від кабелю.
Цей символ на виробі або його
упаковці вказує на те, що цей виріб
не можна утилізувати як звичайні
переробку до пункту прийому електричних та
електронних приладів. Роблячи внесок у
правильну утилізацію цього виробу, ви
піклуєтесь про довкілля та здоров’я людей.
Неправильна утилізація ставить під загрозу
довкілля та здоров’я людей.
Подальшу інформацію про утилізацію
цього виробу можна отримати в міській
адміністрації, у компаніях, які відповідають
за вивезення сміття, або в магазині, де було
придбано виріб.
побутові відходи. Його слід здати на
Монтаж коліщаток
A Розблокуйте фіксатор і зніміть кришку
двигуна.
B Щільно вставте коліщатка й болти в
днище контейнера.
Сухе прибирання
THOMAS BRAVO 20
Після попереднього вологого прибирання
пристрій має повністю висохнути; за
необхідності також слід висушити
гнучкий шланг або трубку.
Заборонено проводити сухе
прибирання з пошкодженими
фільтрами.
K Вийміть резервуар для мийного засобу.
Окрім паперового фільтра-мішка
C
використовуйте конусоподібний фільтр
(30). Це забезпечить краще утримання
пилу.
Розмістіть конусоподібний фільтр
(30) на нижньому боці кришки
двигуна (2). Залежно від моделі
зафіксуйте положення 1 або 2 за
допомогою затискного кільця. У разі
сильного забруднення або зменшеної
потужності всмоктування можна
промити конусоподібний фільтр (30)
чистою водою без додавання мийних і
очищувальних засобів. Перед наступним
42
Page 43

використанням фільтра переконайтеся,
що він повністю сухий.
D Щільно насуньте фільтр-мішок на
всмоктувальний патрубок і розмістіть
його на стінці контейнера.
G Закріпіть гнучку всмоктувальну трубку
для миючого засобу на нижньому боці
кришки двигуна.
H Установіть кришку двигуна та
заблокуйте фіксатор.
J Приєднайте гнучкий всмоктувальний
шланг. Щоб від’єднати, поверніть
всмоктувальний патрубок у бік і
витягніть.
Установіть потрібне приладдя.
Вставте штепсельну вилку в розетку.
N Увімкніть пристрій за допомогою
вимикача (6). Вимикач насоса (7) не має
світитися.
За допомогою регулятора потужності
всмоктування (11, рис. P) можна
змінювати потужність всмоктування:
– заслінку для подачі додаткового
повітря закрито = повна потужність
всмоктування;
– заслінку для подачі додаткового
повітря відкрито = зменшена потужність
всмоктування.
THOMAS BRAVO 20S Aquafilter
Заборонено використовувати пристрій
з аквафільтром для сухого прибирання
без аквафільтра, тканинного фільтра для
дрібного пилу й відповідного заповнення
водою.
Не збирайте у великих кількостях
дрібний пил, наприклад, борошно, какаопорошок, цемент тощо.
K Вийміть резервуар для миючого засобу.
E
З’єднайте 2 деталі аквафільтра одну
з одною до упору та щільно насуньте
аквафільтр на всмоктувальний патрубок.
Звертайте увагу на маркування.
F Установіть тканинний фільтр для
дрібного пилу, закріпивши його верхній
край за всмоктувальний контейнер.
G Закріпіть гнучку всмоктувальну трубку
для миючого засобу на нижньому боці
кришки двигуна.
C Установіть фільтрувальну прокладку
(29) за допомогою затискного кільця (32)
та закріпіть її за допомогою поворотних
хомутів.
H Установіть кришку двигуна та
заблокуйте фіксатор.
J
Приєднайте гнучкий всмоктувальний
шланг. Щоб від'єднати його, поверніть
всмоктувальний патрубок у бік і витягніть.
Установіть потрібне приладдя.
Вставте штепсельну вилку в розетку.
N Увімкніть пристрій за допомогою
вимикача (6). Вимикач насоса (7) не має
світитися.
За допомогою регулятора потужності
всмоктування (11, рис. P) можна
змінювати потужність всмоктування:
– заслінку для подачі додаткового
повітря закрито = повна потужність
всмоктування;
– заслінку для подачі додаткового
повітря відкрито = зменшена потужність
всмоктування.
Очищення системи аквафільтра й догляд за
нею
З міркувань гігієни систему
аквафільтра та всмоктувальний
контейнер слід спорожнювати,
очищувати й висушувати після
кожного використання.
Брудна вода та вологі деталі сприяють
розмноженню бактерій та грибків.
Залежно від ступеня забруднення протріть
тканинний фільтр для дрібного пилу сухою
або вологою тканиною. У разі сильного
забруднення промийте чистою водою без
додавання мийних і очищувальних засобів.
Перед наступним використанням фільтра
переконайтеся, що він повністю сухий.
Аквафільтр має ввійти в пази дна
всмоктувального барабана і рівномірно
розташуватися на дні.
Налийте 2 літри чистої води у контейнер
для збору пилу.
43
Page 44

Збір рідин
Слідкуйте за тим, щоб поплавковий
клапан (40, рис. S) завжди був чистим
і рухомим. Він автоматично зупиняє
всмоктування, коли заповнюється
контейнер для брудної води.
Під час відкачування вмісту контейнерів,
рівень рідини в яких вищий, ніж верхній край
контейнера для брудної води, і вміст яких
перевищує місткість контейнера для брудної
води, рідина може продовжувати текти і після
закриття поплавкового клапана.
У таких випадках слід відкачувати лише
часткові кількості й час від часу спорожняти
контейнер для брудної води.
Спочатку вийміть всмоктувальну трубку
та гнучку трубку з рідини, а потім вимкніть
пристрій, щоб уникнути подальшого
заливання рідини.
A Розблокуйте фіксатор і зніміть кришку
двигуна.
Вийміть фільтри з пристрою, щоб
уникнути їх пошкодження (рис. C і
D). У разі використання пристроїв
із аквафільтром потрібно вийняти
аквафільтр і тканинний фільтр для
дрібного пилу (рис. C, E і F).
Якщо встановлено резервуар для
миючого засобу, його потрібно вийняти
(рис. K ).
Пульверизаційне очищення (вологе прибирання)
килимів і підлоги з твердим покриттям
Можна чистити лише килими, придатні
для вологого чищення.
Делікатні килими ручної роботи та
килими з нестійкою фарбою не підходять
для вологого чищення.
Якщо килим вже очищували з
використанням спеціального шампуню,
то під час першого очищення килима з
використанням пилососа THOMAS BRAVO
можливе надмірне піноутворення.
У такому разі потрібно вимкнути пристрій
та спорожнити контейнер для брудної
води.
Щоб уникнути подальшого піноутворення,
влийте у контейнер для брудної води
1/2
чашки оцту.
Надмірного піноутворення не буде вже
після одноразового вологого очищення з
концентратом для приготування миючого
розчину THOMAS, оскільки він містить
спеціальні добавки, які перешкоджають
піноутворенню.
Коли ввімкнено функцію
розпилювання, слідкуйте, щоб
у резервуарі для чистої води
завжди була рідина, щоб уникнути
пошкодження насоса.
Очищення килимів
H Установіть кришку двигуна та
заблокуйте фіксатор.
Вставте штепсельну вилку в розетку.
J
Приєднайте гнучкий всмоктувальний
шланг. Щоб від'єднати його, поверніть
всмоктувальний патрубок у бік і витягніть.
P Закрийте регулятор потужності
всмоктування (11) на рукоятці.
N Увімкніть пристрій за допомогою
вимикача (6). Вимикач насоса (7) не має
світитися.
Після закінчення вологого прибирання
очистіть та висушіть пристрій і
використане приладдя.
44
A Розблокуйте фіксатор і зніміть кришку
двигуна.
K Зніміть кришку з резервуара для
миючого засобу і залийте в нього миючий
засіб THOMAS ProTex.
Вказівки з дозування див. на етикетці на
пляшці.
Використовуйте помірно теплу воду
(макс. 30 °C).
Знову встановіть кришку і вставте
заповнений резервуар для миючого
засобу в пристрій.
G Зніміть гнучку всмоктувальну трубку
для миючого засобу з тримача на кришці
двигуна.
L Установіть кришку двигуна таким чином,
щоб гнучка всмоктувальна трубка (36)
доходила до дна резервуара для мийного
засобу і не згиналася.
J
Приєднайте гнучкий всмоктувальний
шланг. Щоб від'єднати його, поверніть
всмоктувальний патрубок у бік і витягніть.
Page 45

M Вставте запірний клапан у відповідний
отвір на всмоктувальному шлангу.
Вставте рукоятку у всмоктувальний
шланг й зафіксуйте гнучку трубку для
миючого засобу на всмоктувальному
шлангу за допомогою пластикових
затискачів.
N Вставте гнучку трубку для миючого
засобу в швидкорознімний з’єднувач на
кришці двигуна до фіксації.
O Приєднайте насадку для
пульверизаційного очищення килимів до
всмоктувального шланга.
P Приєднайте гнучку трубку для миючого
засобу насадки для пульверизаційного
очищення до запірного клапана і
зафіксуйте поворотом. Вставте гнучку
трубку для миючого засобу в тримач
гнучкої трубки на всмоктувальному
шлангу або, якщо всмоктувальні
трубки вироблені з нержавіючої сталі,
зафіксуйте за допомогою менших
затискачів (39) на всмоктувальній трубці.
Вставте штепсельну вилку в розетку.
N Увімкніть пристрій за допомогою
вимикача (6) і насос – за допомогою
вимикача насоса з підсвічуванням (7).
P Натисніть важіль на запірному
клапані (16). Миючий засіб буде
розприскуватися.
Перед повторним заповненням
резервуара для мийного засобу
обов’язково вилийте брудну воду із
контейнера для брудної води.
R Установіть насадку для
пульверизаційного очищення м’яких
меблів. Зафіксуйте гнучку трубку
для мийного засобу, повернувши її.
Встановіть насадку на рукоятку.
Очищення системи пульверизаційного
очищення та догляд за нею
K Для догляду за насосом і клапанами
заповніть резервуар для мийного
засобу чистою водою і вставте в
пристрій.
Вставте штепсельну вилку в розетку,
увімкніть пристрій за допомогою
вимикача (6) і насос – за допомогою
вимикача насоса (7).
P Увімкніть систему розпилювання,
наприклад, над мийкою (натисніть
важіль на запірному клапані (16)).
N Перед від’єднанням гнучкої трубки
для мийного засобу натисніть важіль
запірного клапана (16, рис.
щоб скинути залишковий тиск у
системі, а потім натисніть кнопку на
швидкорознімному з’єднувачі (5).
Вийміть штепсельну вилку з розетки!
Після цього очистіть та висушіть пристрій і
використане приладдя.
Заборонено занурювати кришку двигуна
у воду!
Протріть корпус двигуна вологою тканиною і
висушіть.
P),
Очищення підлоги з твердим покриттям
Q Установіть адаптер для підлоги з
твердим покриттям.
Порядок дій див. в розділі «Очищення
килимів».
Для очищення підлоги з твердим
покриттям рекомендовано
використовувати концентрат THOMAS
ProFloor.
Очищення м’яких меблів (залежно від моделі)
Для чищення м’яких меблів або автомобільного
сидіння використовуйте насадку для пульвери
заційного очищення м’яких меблів (23).
Не використовуйте забагато рідини.
Враховуйте, що час сушіння залежить
від матеріалу основи.
-
45
Page 46

Важливі зауваження
Під час вологого прибирання завжди
пересувайте розпилювальну насадку
для килимів у напрямку до себе,
рухаючи її смуга за смугою.
Щоб уникнути нового забруднення,
перед подальшим використанням
очищених килимів слід зачекати, поки
вони висохнуть.
Щоб прискорити висихання очищених
поверхонь, доцільно зібрати залишок
вологи за допомогою повторного
всмоктування (без натискання важеля
розпилювального клапана).
Для чищення паркетної підлоги
дотримуйтесь інструкцій виробника
паркету.
Усунення неполадок
Якщо ваш пристрій не працює належним чином,
не потрібно відразу звертатися до сервісного
центру. Спочатку перевірте, чи не пов’язана ця
неполадка з незначною причиною.
Якщо пил виходить під час
всмоктування:
• Чи правильно приєднано систему фільтра і
чи немає в ній дефектів?
• Чи використовувався оригінальний фільтр
THOMAS?
• Чи встановлено аквафільтр і тканинний
фільтр для дрібного пилу (залежно від
моделі) відповідно до інструкцій?
Коли потужність всмоктування раптово
зменшується:
• Чи не зупинив поплавковий клапан
всмоктування повітря? Це може статися
в разі сильного нахилу або перекидання
пристрою. Вимкніть пилосос; поплавок
опуститься, і пристрій знову буде готовий до
роботи.
Коли двигун не працює:
• Чи справні кабель, штепсельна вилка і
розетка?
• Перед перевіркою вийміть штепсельну
вилку з розетки.
• У жодному разі не відкривайте двигун
самостійно!
Якщо не виходить мийний розчин:
• Чи ввімкнено насос (вимикач (7) має
світитися)?
• Очистіть сітчастий фільтр всмоктування на
гнучкому всмоктувальном шлангу (36).
• Чи правильно опущено гнучку
всмоктувальну трубку в резервуар для
миючого засобу?
• Чи не заблоковано розпилювальну
насадку? Якщо розпилювальну насадку
заблоковано брудом, опустіть її у воду на
деякий час. Після цього енергійно продуйте
її.
Коли потужність всмоктування
поступово зменшується:
• Чи не заблоковано пори фільтра дрібним
пилом?
• Чи не заповнено паперовий фільтр-мішок?
• Чи не заблоковано насадку, подовжувальну
трубку або гнучкий всмоктувальний
шланг брудом? (Розтягніть гнучкий
всмоктувальний шланг, коли пристрій
увімкнено, — розтягування вивільняє
засмічення.)
Якщо під час всмоктування з випускних
отворів пристрою витікає вода:
• Чи не заблоковано поплавок (рис. S) під час
всмоктування рідини, так, що він не може
спрацьовувати?
• Чи використовувався для вологого
прибирання оригінальний концентрат для
приготування миючого розчину THOMAS?
46
Сервісний центр
Зверніться до дилера, у якого ви придбали
пристрій, і він охоче надасть вам адресу або
телефонний номер відповідного сервісного
центру THOMAS.
Під час звернення слід надати всі дані, зазначені на фірмовій табличці пилососа.
Для підтримання безпечного стану пристрою необхідно, щоб усі ремонтні роботи,
особливо на струмопровідних частинах,
виконувалися лише фахівцями. У разі
виникнення несправностей зверніться
до дилера, у якого ви придбали пристрій,
або безпосередньо до сервісного центру
Thomas.
Контактні дані можна знайти на звороті.
Page 47

185 032
GARANTIE
Unabhängig von den Gewährleistungsverpflichtungen des
Händlers aus dem Kaufvertrag leisten wir für dieses Gerät
Garantie gemäß nachstehenden Bedingungen:
1. Die Garantiezeit beträgt 24 Monate - gerechnet vom Liefertag an den ersten Endabnehmer. Sie reduziert sich bei
gewerblicher Benutzung oder gleichzusetzender Beanspruchung auf 12 Monate. Zur Geltendmachung des
Anspruchs ist die Vorlage eines Kaufbeleges erforderlich.
2. Innerhalb der Garantiezeit beseitigen wir alle wesentlichen Funktionsmängel, die nachweislich auf mangelhafte Ausführung oder Materialfehler zurückzuführen sind
durch Instandsetzung der mangelhaften Teile oder Teilersatz nach unserer Wahl; ausgetauschte Teile gehen in
unser Eigentum über.
Die Garantie erstreckt sich nicht auf leicht zerbrechliche
Teile, wie z. B. Glas, Kunststoffe, Lampen.
Mängel sind uns innerhalb der Garantiezeit unverzüglich
nach Feststellung zu melden.
Während der Garantiefrist werden die zur Behebung von
aufgetretenen Funktionsfehlern benötigten Ersatzteile
sowie die Kosten der angefallenen Arbeitszeit nicht
berechnet. Bei unberechtigter Inanspruchnahme unseres
Kundendienstes gehen die damit verbundenen Kosten zu
Lasten des Kunden.
Instandsetzungsarbeiten beim Kunden oder am Aufstellungsort können nur für Großgeräte verlangt werden.
Andere Geräte sind unserer nächstgelegenen Kunden-
dienststelle oder Vertragswerkstatt zu übergeben bzw.
ins Werk zu senden.
3. Eine Garantiepflicht wird nicht ausgelöst durch geringfügige Abweichungen, die für Wert und Gebrauchstauglich
keit des Gerätes unerheblich sind, durch Schäden aus
chemischen und elektrochemischen Einwirkungen von
Wasser sowie allgemein aus anomalen Umweltbedingungen. Ein Garantieanspruch besteht nicht bei Schäden als
Folge normaler Abnutzung, ferner nicht bei Nichtbeachtung der Gebrauchsanweisung oder unsachgemäßer Verwendung.
4. Der Garantieanspruch verliert seine Gültigkeit, wenn von
uns nicht bevollmächtigte Personen Eingriffe oder Reparaturen an den Geräten vornehmen.
5. Garantieleistungen bewirken weder für das Gerät noch für
die eingebauten Ersatzteile eine Verlängerung oder
Erneuerung der Garantiefrist: die Garantiefrist für eingebaute Ersatzteile endet mit der Garantiefrist für das ganze
Gerät.
6. Weitergehende oder andere Ansprüche, insbesondere
solche auf Ersatz außerhalb des Gerätes entstandener
Schäden sind – soweit eine Haftung nicht zwingend
gesetzlich angeordnet ist – ausgeschlossen.
Auch nach Ablauf der Garantiefrist bieten wir Ihnen unsere
Kundendienstleistungen an. Bitte wenden Sie sich an Ihren
Händler oder direkt an unsere Kundendienst-Abteilung.
Technische Änderungen vorbehalten.
GUARANTEE
Irrespective of any guarantee obligations given by the dealer
in the sales contract, we undertake to guarantee this appliance on the following conditions:
1. The guarantee is valid for a period of 24 months from the
date of delivery to the first retail purchaser. In the case of
industrial use or similar employment of the appliance, the
guarantee period is reduced to 12 months. Proof of the
date of purchase, e. g. presentation of the sales receipt,
is required when making a claim on the guarantee.
2. Within the guarantee period, we undertake to remedy all
functional defects, which have evidently arisen from faulty
workmanship or materials, by repair or replacement of the
faulty pans according to our choice. We assume possession of the defective parts thus replaced.
The guarantee does not apply to easily breakable parts,
such as glass, plastics, lamps.
Any defects established should be reported to us immediately during the guarantee period.
Neither the replacement parts necessary for the repair of
any functional defects occuring during the guarantee
period, nor the labour costs incurred thereby, will be
charged. If unjustified claims are made on our service
department, any costs associated therewith will be charged to the
Demands for repair work to be carried out in the customer’s home or wherever the appliance is installed can
only be complied with in the case of large appliances. All
other appliances are to be submitted to our nearest
customer.
service branch or authorized service agent or else sent to
the factory.
3. The guarantee does not apply to minor discrepancies,
which are immaterial for the value and operating efficiency of the appliance, nor does it apply to damages arising
from chemical or electro-chemical reactions with water or
in general through anomalous environmental conditions.
No claims can be made on the guarantee for damages
occurring as a result of normal wear and tear, non-observance of the operating instructions or improper use.
4. The guarantee will be invalidated if modifications or repairs are carried out on the appliance by any persons
other than those authorised by us to do so.
5. Repairs and/or replacements carried out under the guarantee do not give rise to the extension or renewal of the
guarantee period of either the appliance or the fitted
replacement parts: the guarantee period of fitted replacement parts ends at the same time as that of the whole
appliance.
6. More extensive orotherclaims, particularly those for compensation for damages arising outside of the appliance,
are exclusive, so far as a coercive liability has not been
decreed by law.
Our after-sales services are also available after the expiry of
the guarantee period. Please contact your dealer or our
Customer Service Department directly.
Right to technical changes reserved.
47
Page 48

GARANTIE
Indépendamment des obligations du négocient, émanant du
contrat de vente, nous garantissons I’appareil suivant les conditions ci-après:
1. La durée de la garantie est de 24 mois et prend cours à la
date de livraison au premier consommateur. Elle est
rédulte à 12 mois lorsque l’appareil est employé à des fins
professionnelles ou similaires. La garantie n’est applicable que sur présentation d’un document d’achat.
2. Pendant la durée de la garantie, nous éIiminons tous les
défauts essentiels influançant le bon fonctionnement de
l’appareil, imputables à une execution imparfaits ou à un
défaut de matériaux, ce à notre meilleure convenance,
par la réparation ou le remplacement de la pièce défectueuse; les pièces remplacées deviennent notre propriété.
La garantie ne couvre pas les pièces fragiles comme p.ex.
Ie verre, ies plastiques, les lampes etc.
Durant la période de la garantie les défectuosités sont
nous signaler dès leur constatation.
Pendant la periode de la garantie les pièces nécessaires
pour la réparation des défauts de fonctionnement, ainsi
que les frais de main-d’oeuvre qui en découlent ne sont
pas portés en compte. Le retour à notre adresse est à
faire franco de port. Le retour au client se fait également franco. Les risques des transports sont à la charge
du client. Lors d’un appel non-justifié de notre service
technique, les frais qui en découlent sont à la charge du
client.
Des réparations à domicile ou au lieu d’installation peuvent seulement être exigées pour des appareils de grand
format. Les autres appareils sont à remettre à la station
service agrééu par notre firme la plus proche, ou à votre
fournisseur ou à notre service technique principal.
3. La garantie ne couvre pas les écarts minimes qui sont
insignifiants pour la valeur et le bon fonctionnement de
l’appareil, les dégâts provenant de l’influence chimique et
électrochimique de l’eau, ainsi que les dégâts provenant
de conditions d’environnement anormales. La garantie
n’est pas valable pour les défectuosités provenant d’une
usure normale, d’un mésusage ou du non-respect des
indications du mode d’emploi.
4. La nullité de cette garantie interviendrait de plain droit si I’appareil ou ses composants étaient démontés, transformés ou
réparés par des personnes non mandatées par nous.
5. La réparation et/ou le remplacement de pièces pendant
la période de la garantie ne peuvent avoir pour affet de
prolonger ou de renouveler la durée initiale de la garantie;
la durée de la garantie des pièces remplacées échoit avec
le délai de garantie de l’appareil.
6. Toutes autres indemnités, de quelque nature qu’elles
soient, spécialement celles pour les dégâts occasionnés
à I’extérieur de l’appareil, sont expressément exclues de
cette garantie.
Même après échéance de la garantie, nous mettons à votre
disposition notre service clientèle. Adressez-vous donc à
votre fournisseur ou directement à notre service technique.
Sous réserve de modifications techniques.
GARANTIE
Onafhankelijk van de garantieverplichtingen van de handelaar, bevat in het koopkontrakt, bieden wij voor dit toestel een
garantie aan, overeenkomstig de volgende voorwaarden:
1. De garantieperiode bedraagt 24 maanden, te berekenen
vanaf de datum van levering aan de eerste eindafnemer.
Zij wordt verminderd tot 12 maanden bij beroepsgebruik
of gelijkaardige belasting. Het vertonen van een aankoopbewijs is noodzakelijk om een aanspraak op garantie te
staven.
2. Binnen de garantieperiode herstellen wij alle belangrijke
funktiegebreken die klaarblijkelijk aan gebrekkige konstruktie of materiaalfouten te wijten zijn, door ofwel de
foutieve onderdelen te herstellen, ofwel een onderdeel te
vervangen, dit volgens onze voorkeur. Vervangen onderdelen worden onze eigendom.
De garantie dekt geen lichtbreekbare onderdelen zoals
glas, kunststof, lampen enz.
Gebreken van het apparaat, die binnen de garantieperiode vallen, moeten ons direkt na het vaststellen, gemeld
worden.
Gedurende de garantieperiode worden de vervangstukken, die nodig zijn om de gebreken te herstellen, evenals
de kosprijs van de noodzakelijke arbeidsduur, niet aangerekend. Het verzenden aan ons adres is portvrij te verrichten. De terugzendig naar de klant gebeurt eveneens
portvrij. De risiko’s van het vervoer vallen ten laste van de
klant. In geval van niet geoorloofd beroep op onze klantendienst, worden de daarmede verbonden onkosten
door de klant gedragen.
48
Alleen voor grote apparaten kan de herstelling bij de klant
thuis of op de plaats van aanwending verlangd worden.
Andere apparaten moeten afgeleverd worden in onze
dichtsbije klantendienst-werkplaats of kontraktwerkplaats.
3. De garantieplicht wordt niet van toepassing in geval van
kleine afwijkingen, die onbenullig zijn voor de waarde en
de deugdelijkheid van het toestel, evenmin bij schade
veroorzaakt door chemische of elektrochemische inwerking van water, of abnormale invloeden van de buitenwereld. Een aanspraak op garantie geldt niet in geval van
schade die het gevolg is van normaal slijtage en evenmin
door het niet naleven van de gebruiksaanwijzing of ondoelmatig gebruik.
4. De aanspraak op garantie vervalt in geval personen die
van ons geen volmacht hebben, ingrepen of herstellingen
aan de toestellen uitvoeren.
5. Garantieprestaties veroorzaken geen varlenging of vernieuwing van de garantieperiode, nach voor het apparaat,
noch voor de ingebouwde vervangstukken; de garantieperiode eindigt voor ingebouwde vervangstukken met de
garantietermijn van het ganse toestel.
6. Verdere of andere aanspraken, in het bijzondere op vergoeding van schade die buiten het toestel ontstaan is,
worden uitgesloten.
Ook na het verloop van de garantieperiode bieden wij U onze
klantendienst aan. Wij verzoeken U direkt uw handelaar of
onze klantendienst te raadplegen.
Technische wijzigingen voorbehouden.
Page 49

495051
Page 50

Page 51

Page 52

Türkiye:
İthalatçı Firma:
SİMPORT Ev Aletleri ve Müh. Hizm. Tic. Ltd. Şti.
Koza Plaza A Bl. Kat. 29; No :109
34235 Esenler – İst.
Müşteri Hizmetleri 444 6718
Telefon +90 (0) 212 675 23 03
Faks +90 (0) 212 675 23 04
E-mail: info@thomas.com.tr
www.robert-thomas.de/tr
Bu cihaz ayrıca T.C. Çevre ve Orman
Bakanlığının EEE yönetmeliğine uygundur.
Servis hizmetleri, aksesuar ve yedek parça temini
için 10 yıl Garanti.
Polska:
APRA Serwis Sp. z o.o.
ul. Nadrzeczna 25A, 00-705 Warszawa
Tel. +48 22 428 27 74
Tel. +48 22 886 56 05
Kom. +48 604 133 055
E-mail: thomas@apraserwis.pl
www.serwisthomas.pl
www.apraserwis.pl
Russia:
ООО "ЛОГИКА"
Бизнес Центр "Гранд Сетунь Плаза"
121596, Москва
улица Горбунова дом 2
строение 3, офис А612
Тел. 8-800-550-5515
E-mail: ru-service1@robert-thomas.net
http://thomas.info/servis-warranty.html
Kasachstan:
ИП "THOMAS - сервис"
Республика Казахстан
050035, г. Алматы,
ул. Щепеткова 117
Тел. + 7 (727) 327 25 45
+ 7 (727) 249 68 19
E-mail: kz-service1@robert-thomas.net
Ukraine:
THOMAS UA
м. Дніпропетровськ
вул. Донецьке шосе, 104
тел. (050)-533-68-88
Безкоштовна консультація
по тел.: (044) 286 70 95
E-mail: ua-service1@robert-thomas.net
сайт: www.thomas.ua
GERMANY
Kundendienststellen / After Sales Service Addresses
Türkiye:
İthalatçı Firma:
SİMPORT Ev Aletleri ve Müh. Hizm. Tic. Ltd. Şti.
Koza Plaza A Bl. Kat. 29; No :109
34235 Esenler – İst.
Müşteri Hizmetleri 444 6718
Telefon +90 (0) 212 675 23 03
Faks +90 (0) 212 675 23 04
E-mail: info@thomas.com.tr
www.robert-thomas.de/tr
Bu cihaz ayrıca T.C. Çevre ve Orman
Bakanlığının EEE yönetmeliğine uygundur.
Servis hizmetleri, aksesuar ve yedek parça temini
için 10 yıl Garanti.
Polska:
APRA Serwis Sp. z o.o.
ul. Nadrzeczna 25A, 00-705 Warszawa
Tel. +48 22 428 27 74
Tel. +48 22 886 56 05
Kom. +48 604 133 055
E-mail: thomas@apraserwis.pl
www.serwisthomas.pl
www.apraserwis.pl
Russia:
ООО "ЛОГИКА"
Бизнес Центр "Гранд Сетунь Плаза"
121596, Москва
улица Горбунова дом 2
строение 3, офис А612
Тел. 8-800-550-5515
E-mail: ru-service1@robert-thomas.net
http://thomas.info/servis-warranty.html
Kasachstan:
ИП "THOMAS - сервис"
Республика Казахстан
050035, г. Алматы,
ул. Щепеткова 117
Тел.
E-mail: kz-service1@robert-thomas.net
Ukraine:
THOMAS UA
м. Дніпропетровськ
вул. Донецьке шосе, 104
тел. (050)-533-68-88
Безкоштовна консультація
по тел.: (044) 286 70 95
E-mail: ua-service1@robert-thomas.net
сайт: www.thomas.ua
Deutschland und Schweiz:
Robert Thomas
Metall- und Elektrowerke GmbH & Co. KG
Hellerstraße 6
57290 Neunkirchen
Telefon +49 (0) 2735 - 788 - 581
+49 (0) 2735 - 788 - 583
Telefax +49 (0) 2735 - 788 - 599
E-mail: r-wilke@robert-thomas.de
www.robert-thomas.de
België, Luxembourg, Niederlande
& France:
THOMAS sprl
Goudenregenlaan 12
B – 2950 Kapellen
Tel. +32 (0) 3 605 98 72
Fax + 32 (0) 3 605 76 82
E-mail: be-service1@robert-thomas.net
ww.robert-thomas.net
Techn. Änderungen vorbehalten
Schweden:
Olsson & Co.
Toms Byväg 42
43033 Fjäras
Tel. +46 (0) 31 - 910085
Fax +46 (0) 31 - 015290
E-mail: chr.olsson@telia.com
Österreich:
Wukovits
Kaiser-Joseph-Straße 64
A-3002 Purkersdorf
Tel./Fax +43 (0) 2231/63467
E-mail: wukovits@gmx.at
Pölz GmbH
Brünner Straße 5
A-1210 Wien
Tel. +43 (0) 1/2785365
Fax +43 (0) 1/27853655
E-mail: info@poelz.co.at
www.poelz.co.at
Erwin Reicher
Hochenegg 17
A-8262 Ilz
Tel. +43 (0) 3385 583
Fax +43 (0) 3385 583 89
E-Mail: thomas.service@aon.at
Josef Pircher Betriebs GmbH
Belruptstraße 44
A-6900 Bregenz
Tel. +43 (0) 5574/42721-0
Fax +43 (0) 5574/427215
E-mail: elektrotechnik@pircher.at
www.pircher.at
Wörndl Elektro Ges.mbH
Hausgeräte Kundendienst
Gniglerstr. 18
A-5020 Salzburg
Tel. +43 (0) 662-872714
Fax +43 (0) 662-882487
E-mail: woerndl-kundendienst@aon.at
Italia:
AF ITALIA SRL
Via Monte Rosa 28
20863 Concorezzo (MB)
N° cortesia: +39 (0) 39/8951381
Tel. +39 (0) 39/6908049
Fax +39 (0) 39/6886853
E-mail: assistenza@afitalia.it
Hungary :
WellBrand Kft.
Iparvágány u. 2-16
1211 Budapest, Hungary
Tel. +36 (0) 1 2195435
Fax +36 (0) 1 2195436
E-mail: info@thomas.hu
www.thomas.hu
Türkiye:
İthalatçı Firma:
SİMPORT Ev Aletleri ve Müh. Hizm. Tic. Ltd. Şti.
Koza Plaza A Bl. Kat. 29; No :109
34235 Esenler – İst.
Müşteri Hizmetleri 444 6718
Telefon +90 (0) 212 675 23 03
Faks +90 (0) 212 675 23 04
E-mail: info@thomas.com.tr
www.robert-thomas.de/tr
Bu cihaz ayrıca T.C. Çevre ve Orman
Bakanlığının EEE yönetmeliğine uygundur.
Servis hizmetleri, aksesuar ve yedek parça temini
için 10 yıl Garanti.
Polska:
APRA Serwis Sp. z o.o.
ul. Nadrzeczna 25A, 00-705 Warszawa
Tel. +48 22 428 27 74
Tel. +48 22 886 56 05
Kom. +48 604 133 055
E-mail: thomas@apraserwis.pl
www.serwisthomas.pl
www.apraserwis.pl
Russia:
ООО "ЛОГИКА"
Бизнес Центр "Гранд Сетунь Плаза"
121596, Москва
улица Горбунова дом 2
строение 3, офис А612
Тел. 8-800-550-5515
E-mail: ru-service1@robert-thomas.net
http://thomas.info/servis-warranty.html
Kasachstan:
ИП "THOMAS - сервис"
Республика Казахстан
050035, г. Алматы,
ул. Щепеткова 117
Тел. + 7 (727) 327 25 45
E-mail: kz-service1@robert-thomas.net
Ukraine:
THOMAS UA
м. Дніпропетровськ
вул. Донецьке шосе, 104
тел. (050)-533-68-88
Безкоштовна консультація
по тел.: (044) 286 70 95
E-mail: ua-service1@robert-thomas.net
сайт: www.thomas.ua
Robert Thomas
Metall- und Elektrowerke GmbH & Co. KG
Postfach 1820, 57279 Neunkirchen
Hellerstraße 6, 57290 Neunkirchen
Telefon +49 (0) 2735 - 788 - 0
Telefax +49 (0) 2735 - 788 - 519
E-mail: service@robert-thomas.de
www.robert-thomas.de
+ 7 (727) 327 25 45
+ 7 (727) 249 68 19
+ 7 (727) 249 68 19
GA 12/18
Teile- Nr. 185 316
 Loading...