

Page 1
PCC1291 Issue 2
SPINFLO LIMITED, 19 Oakham Drive, Parkwood Industrial Estate
Rutland Road, Sheffield S3 9QY, ENGLAND.
TEL: + 44 (0) 114 273 8157 FAX: + 44 (0) 114 275 3094
USER AND INSTALLATION INSTRUCTIONS
READ AND RETAIN FOR FUTURE REFERENCE
FOR USE IN
GB, IE, FR, NL, BE, LU, ES, IT, NO, DE, DK, SE, CY, CZ, EE, GR, LT
LV, PT, RO, SK, CH, BG, FI
BUILD IN APPLIANCES
KITCHEN CENTRE
Page 2
INSTALLATION
Decide on the location of the Kitchen Centre taking into account the services required, and
prepare the worktop for installation as shown in Fig. 2.
Supplied with the bowl is a silicone rubber seal, which should be fitted to the bowl prior to fitting
into the aperture. Place the bowl into the prepared aperture in the worktop, ensure that the seal
is seated correctly, and open the glass lid.
There are 3 fixing positions, 2 on either side of the bowl towards the rear and one at the front
which also serves as the glass lid stop, see Fig 1 for details.
Supplied with the bowl in a small plastic bag is the glass lid bump stop, used at the front, and
the washers and covers for the rear screws. The front bump stop should be secured with a
25mm long Nº 6 woodscrew and the washers at the rear with a 15mm long Nº 6 woodscrew.
Before screwing the bowl in place it is advisable to drill pilot holes into the worktop edge with a
2.5mm drill.
To ensure a good seal, firstly apply pressure in the base of the bowl and drill a pilot hole for
each of the fixing positions. It is advisable to slightly angle the drill down so that when the screw
is applied it pulls the bowl down to the worktop. Take care not to angle the drill by more than
about 10º otherwise the screw will apply uneven pressure around the fixing hole, which could
result in damage.
To ensure a good seal, firstly apply pressure in the base of the bowl towards the rear and fix the
two rear screws at either side of the bowl. Then apply pressure in the base of the bowl towards
the front and fix in the front screw complete with glass lid bump stop.
When the bowl is fully fixed, clip on the 2 grey domed screw covers at the rear.
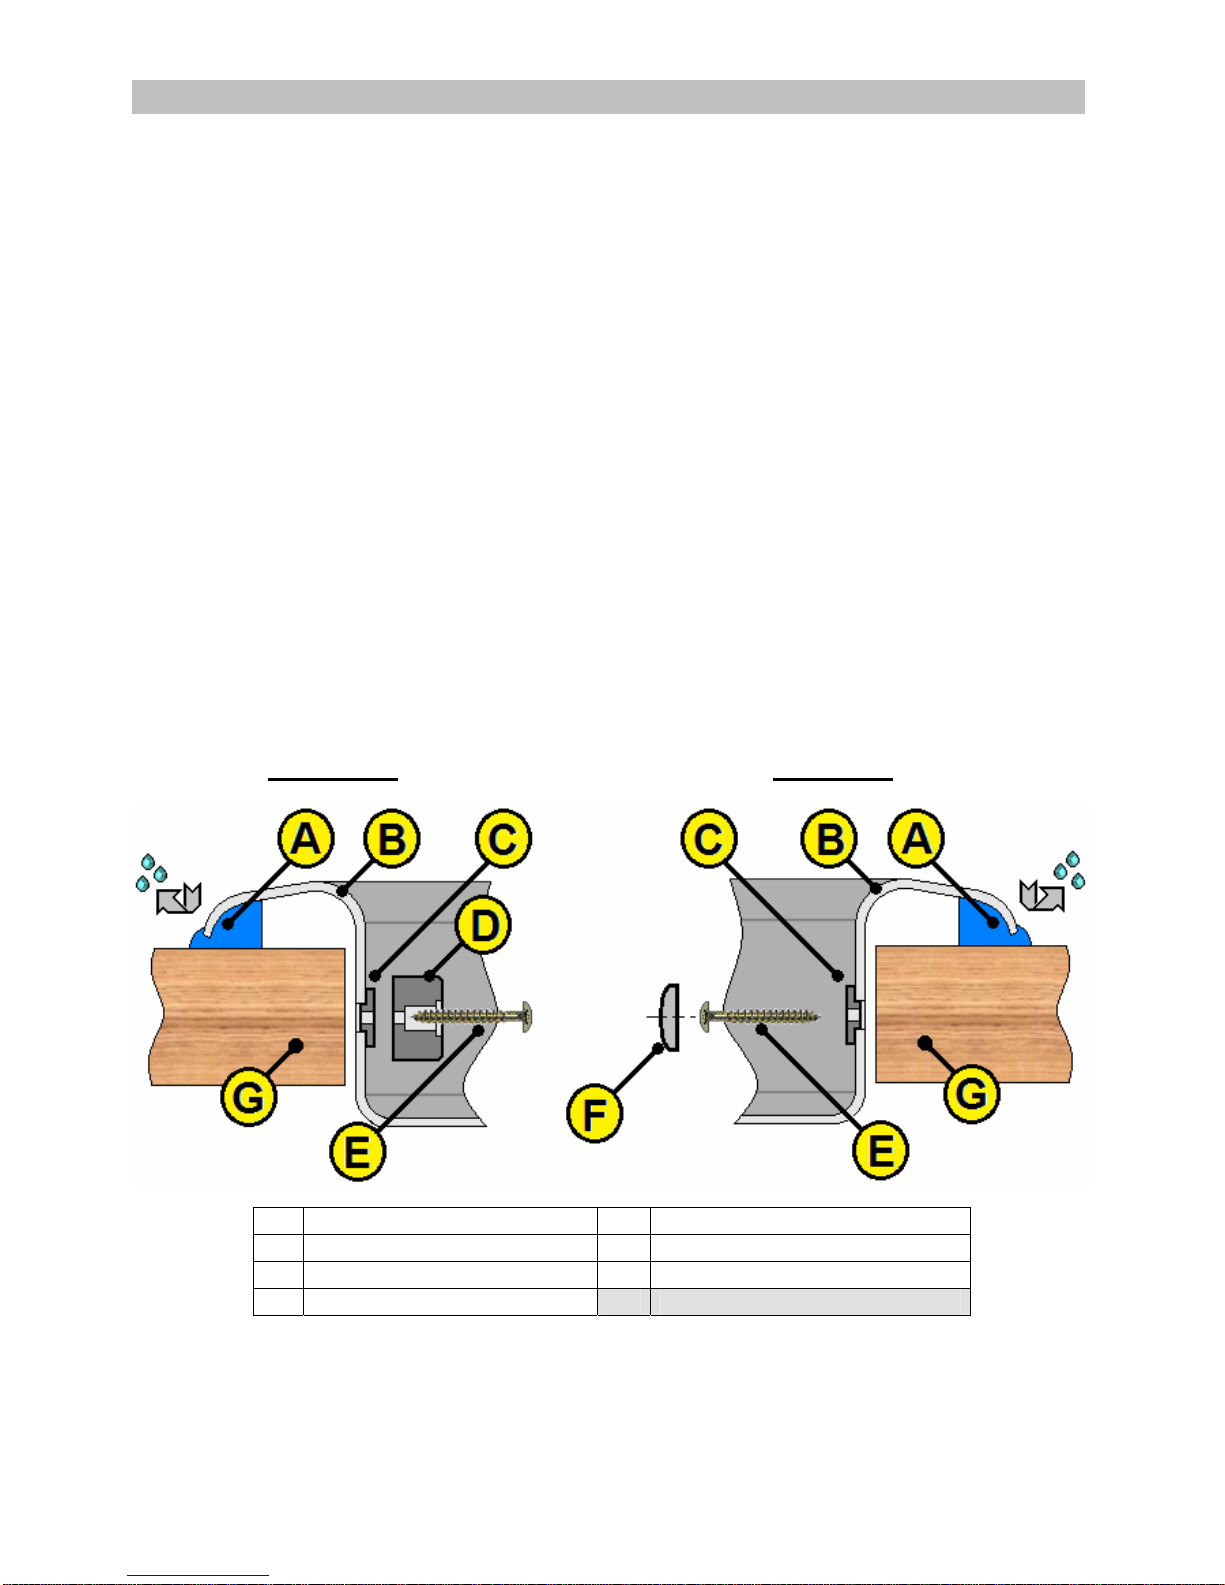
Fig. 1. Fixing Details
Front Fixing Side Fixing
A Optional Seal B Sink Pressing
C Nylon Washer D Glass Lid Bump Stop
E Woodscrew (UK No 6) F Nylon Cap
G Worktop
Page 3

Fig. 2 Worktop Cutout
R1 Corner radius 83mm R2 Side Radius 696mm
Front
APPLIANCE CARE INSTRUCTIONS
After use always remove any plastic bowl or mat, clean the surface with soap and hot water
followed by a clean water rinse and drying with a soft cloth to prevent spotting. For more
stubborn dirt or grease a non-abrasive multi-purpose cream cleaner, such as CIF, may be used.
To presewrve the appearance of your appliance we recommend plastic bowls or mats are not
stored in the sink during transit.
The quality of water can affect your bowl's appearance. If the water has high iron content, a
brown surface stain can form on the bowl giving the appearance of rust. Additionally, in areas
with a high concentration of minerals, or with over-softened water, a white film may develop on
the sink. To combat these problems, towel dry the sink after use, and clean at least once every
week .
Surface scratching will be most noticeable on highly polished components. These marks are
usually only superficial and can be removed with a proprietary stainless steel cleaner/polish. If
the surface has a directional polished grain always clean along the grain and NOT across.
Never use wire wool pads to clean the surface.
Cleaning agents containing bleach should NOT be left in contact with stainless steel. This
includes many of the new “trigger-dispense” products and some multi purpose cream cleaners.
Also leaving rubber mats or dishpans in the sink can lead to surface rust or pitting, always
remove them after use.
Page 4

SPINFLO LIMITED, 19 Oakham Drive, Parkwood Industrial Estate
Rutland Road, Sheffield S3 9QY, ENGLAND.
TEL: + 44 (0) 114 273 8157 FAX: + 44 (0) 114 275 3094
INSTRUCTIONS D’UTILISATION & INSTALLATION
A LIRE ATTENTIVEMENTET A CONSERVER
POUR UTILISATION AUX
GB, IE, FR, NL, BE, LU, ES, IT, NO, DE, DK, SE, CY, CZ, EE, GR, LT
LV, PT, RO, SK, CH, BG, FI
BUILD IN APPLIANCES
KITCHEN CENTRE
Page 5

Instructions d’installation Kitchen Centre
Décider de l’emplacement où vous allez installer votre ‘Kitchen Centre’ en prenant en compte
les paramètres de service requis et préparer le plan de travail à l’installation comme indiqué sur
le schéma 2.
Un joint silicone caoutchouc est fourni avec l’évier. Ce joint doit être mis en place sur le l’évier
avant toute insertion dans la découpe effectuée. Placer l’évier dans la découpe du plan de
travail en vous assurant que le joint est fixé correctement et ouvrir le couvercle en verre.
Il existe 3 points de fixations, 2 de chaque côté de l’évier vers l’arrière et un point situé à l’avant
qui sert aussi de butée pour le couvercle, se reporter au schéma 1 pour plus détails.
Le caoutchouc de butée pour le couvercle en verre et les cache-vis sont aussi fournis avec
votre ‘Kitchen Center’ dans un petit sachet en plastique. La butée frontale doit être fixée avec
une vis à bois de 25mm long et les butées arrière avec des 15 mm Nº 6.
Avant vissage de l’évier, il est préférable d’effectuer des pré-perforations dans le plan de travail
avec un forêt de 2.5mm.
Pour garantir une bonne étanchéité, appliquer d’abord une pression à la base de l’évier et faire
une pré-perforation aux points de fixations. Il est conseillé de légèrement incliner le forêt pour,
lors du serrage des vis, que l’évier soit bien appui sur le plan de travail. Prendre soin toutefois
de ne pas incliner le forêt à plus de 10º d’angle sinon la vis ne s’appliquera de manière égale
dans la perforation, pouvant créer des dommages.
Toujours pour garantir une bonne étanchéité, appliquer d’abord une pression vers l’arrière de
l’évier et fixer les deux vis arrière de chaque côté de l’évier. Appliquer ensuite la pression à
l’avant de l’évier, fixer la dernière vis et la butée du couvercle en verre.
Une fois que l’évier est complètement installé, clipser les 2 cache-vis gris à l’arrière.
Schéma. 1 Détails des fixations
Fixation Frontale Fixation Laterale
A Joint Optionnel B Pressage évier
C Rondelle D Butée de couvercle
E Vis à bois (UK No 6) F Cache-vis
G Plan de travail
Page 6

Schéma 2. Decoupe plan de travail
R1 Rayon d'angle 83mm R2 Rayon Side 696mm
Avant
Entretien Appliance
Après usage, enlever toute bol en plastique ou mat, toujours nettoyer la surface avec du savon
et de l’eau chaude et bien rincer à l’eau claire ensuite. Passer ensuite un chiffon sec et non
abrasif pour bien essuyer et empêcher la formation de traces. Pour les tâches les plus
résistantes et la graisse, une crème de nettoyage non abrasive peut être utilisée. Pour
préserver l'apparence de votre appareil, nous recommandons des bols en plastique ou des
nattes ne sont pas stockés dans l'évier pendant le transit.
La qualité de l’eau peut affecter l’apparence de votre évier. Une eau très ferrugineuse peut faire
apparaître des traces marron pouvant faire croire à l’apparition de rouille. De même, une eau
avec une forte concentration minérale, un léger film blanc peut se développer sur l’évier. Pour
lutter contre ces effets, bien essuyer l’évier après utilisation et nettoyer une fois par semaine au
moins.
Des éraflures peuvent aussi apparaître sur les éléments polis. Ces marques sont généralement
superficielles et peuvent être enlevées avec un nettoyant spécifique pour l’inox. Si la surface a
un grain directionnel, toujours nettoyer dans le sens du grain et pas de travers. Ne jamais
utiliser d’éponges métalliques pour nettoyer.
Des nettoyants contenant de la javel ne doivent jamais être laissés en contact avec la surface
inox, cela inclut tous les vaporisateurs de produits nettoyants. Laisser des ustensiles de cuisine
ou des éléments peut aussi créer des traces de rouille ou des piquetages dans l’évier, toujours
les enlever après utilisation.
 Loading...