

Page 1
Part No.
RV Toilets
42049
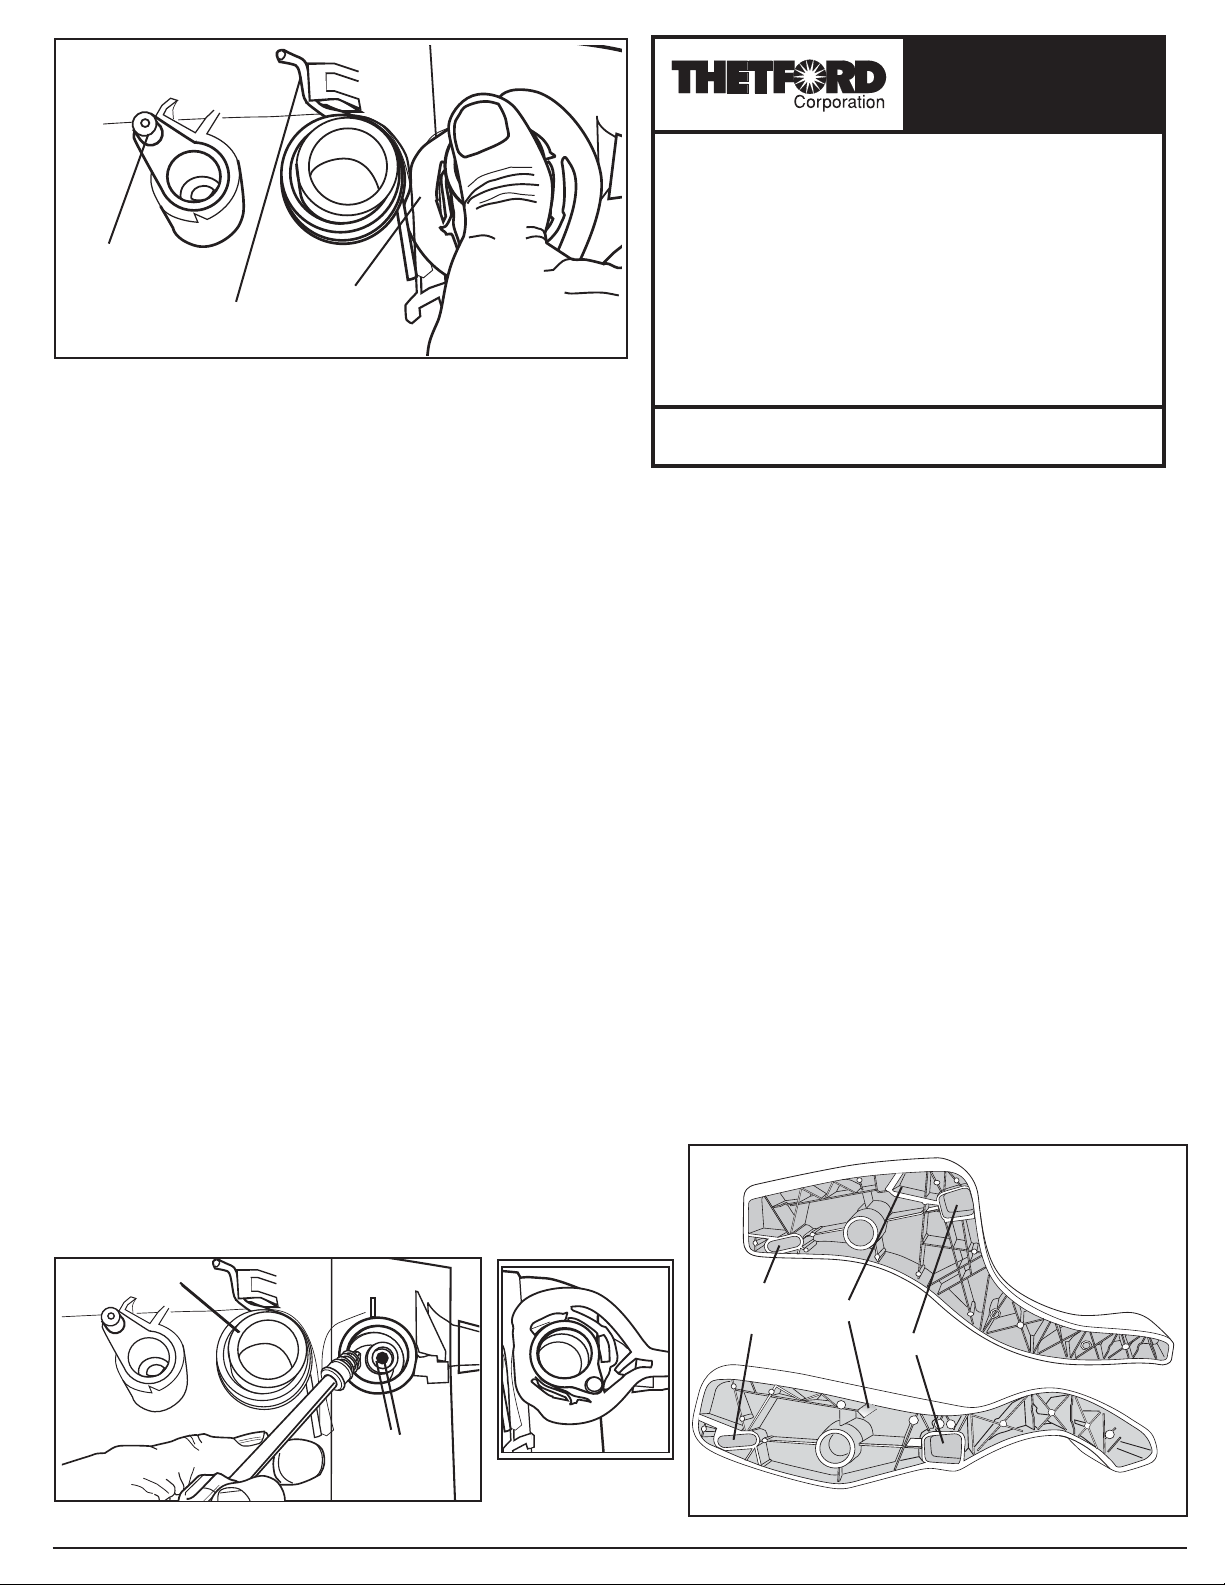
Waste ball drive arm
Water valve
Return spring
FIGURE 1 - PEDAL REMOVED
Kit Contains
Cartridge
Retainer
■ Water Valve Cartridge (PN 42002)
■ Drive Arm Seal (PN 42006)
■ Water Inlet Seal (PN 42009)
■ Water Inlet Spring (PN 42010)
■ Spring Retainer (PN 42099)
■ Closet flange seal (PN 02125)
■ Instruction sheet (PN 42109)
Needed
■ Towel(s)
■ Plastic trash bag
■ Pliers
■ Phillips-head screwdriver
■ 1/2-inch wrench
Before Beginning
■ Read all instructions completely.
■ Reduce holding tank odor: Rinse toilet with
water, drain holding tank, and add Thetford
Holding Tank Deodorant.
■ Wear protective gloves, glasses, long sleeves,
and nose/face mask to avoid contact with
human waste.
■ Wash entire toilet thoroughly.
■ Refer to Figure 1 for component locations.
NOTE: If you have suffi cient clearance
to remove and reinstall pedal and water
valve with toilet in place, you can skip
removing/reinstalling toilet.
Remove Toilet
1. Turn off RV water supply per RV Owner’s Manual.
Pedal Pivot
Residence, Style II
Water Valve Kit
Thetford Corporation
Ann Arbor, MI 1-800-543-1219 www.thetford.com
2. Flush toilet to drain.
3. Place towel(s) behind toilet under water connection
to catch water.
4. Disconnect RV water supply from toilet.
5. Remove Closet Flange Bolt Covers (if present) and
Nuts.
6.
Lift T oilet from fl oor and place on trash bag
7. Cover holding tank opening with a towel.
8. Remove old closet fl ange Seal. Discard.
Remove old Water Valve
1. Lay Toilet on its side on fl oor with pedal facing
upward.
2. Holding Bowl, grab front underside of Pedal. Pull
Pedal up and off with a quick motion.
3. See Fig. 1. Place thumb in depression and place
index fi nger under tab of Water Valve Cartridge
Retainer. Pull up on tab slightly and rotate Retainer
clockwise until it hits Spring. Grasp Retainer and
pull Water Valve Assembly out. Discard.
4. Remove Water Inlet Seal and Compression Spring
from Water Inlet opening with small needle-nose
pliers. Discard.
Install new Water Valve
1. Insert Water Inlet Seal Assembly in Water Inlet
opening (Fig. 2).
.
Water
Valve
Arm
Aqua-Magic
®
Made in the USA
2. Insert new Water Valve Cartridge Assembly until
fully seated.
3. Rotate Retainer until tab locks in place.
4. Place Water Valve Drive Pin in closed position (Fig.
3).
5.
(Figs. 2 & 4) Align Pedal onto Pedal Pivot. Align Pedal
Return Spring Tab with Pocket A and rotate Pedal
slightly until Drive Arm Pin aligns with Pocket B.
Holding Pedal down, fi rmly hit button on outside of
Pedal until Pedal snaps in place.
6. Place toilet upright. Activate Pedal several times to
assure Waste Ball opens and closes completely.
Reinstall Toilet
1. Install new Closet Flange Seal, lip side down, on
toilet.
2. Uncover holding tank opening and remove
towel(s).
3. Place Toilet on fl oor, aligning mounting holes with
closet bolts.
4. Tighten Closet Flange Nuts until toilet does not
rock. Do not overtighten.
5. Replace Bolt Covers (if present).
6. Connect RV water supply line to Toilet.
7. Turn on RV water supply.
9. Flush test Toilet, checking for leaks at all
connections.
Parts on toilet fi t into
pockets indicated:
High Profi le
Pocket A
Pocket B
Water Inlet
opening
FIGURE 2 - INSERTING WATER INLET SEAL ASSEMBLY
FIGURE 3 - WATER
VALVE CLOSED
POSITION
Low Profi le
FIGURE 4 - PEDAL REATTACHMENT
Form No. 42109 REV C 18/05/2012 1 www.thetford.com
 Loading...