

Thermo King HK-430, HK-430 HO Installation Manual

Installation Manual
Providing equipment and services to manage controlled-temperature environments for
food and other temperature-sensitive products, our Climate Control Technologies sector
Trailer Edition
HK-430 and HK-430 HO
Diesel Heating Units
TK 55186-2-IM (Rev. 0, 09/11)

Installation Manual
Trailer Edition
HK-430 and HK-430 HO
Diesel Heating Units
TK 55186-2-IM
(Rev. 0, 09/11)
Copyright© 2011 Thermo King Corp., Minneapolis, MN, U.S.A.
Printed in U.S.A.

2
Release History
Released Rev. 0, 09/11

3
Introduction
This installation manual was written to assist with the installation of the Thermo King HK-430 and HK-430 HO diesel heating units onto trailers or
intermodal containers specifically designed and built for these applications.
Due to its complexity, you should not attempt this installation unless you:
• Are an experienced mechanic
• Can safely lift 34 kilos (75 lbs.)
• Are certified or trained in the repair and maintenance of diesel powered refrigeration systems
• Have a basic understanding of electricity and electrical wiring
• Have the necessary tools and equipment to complete the installation.
This manual is published for informational purposes only. Thermo King makes no representations warranties express or implied, with respect to
the information recommendations and descriptions contained herein. Information provided should not be regarded as all-inclusive or covering
all contingencies. If further information is required, Thermo King Corporation Service Department should be consulted.
Thermo King’s warranty shall not apply to any equipment which has been “so installed, maintained, repaired or altered as, in the
manufacturer’s judgment, to affect its integrity.”
Manufacturer shall have no liability to any person or entity for any personal injury, property damage or any other direct, indirect,
special, or consequential damages whatsoever, arising out of the use of this manual or any information, recommendations or
descriptions contained herein.

4
Table of Contents
Safety Precautions . . . . . . . . . . . . . . . . . . . . . . . . . . . . . . . . . . . . . . . . . . . 5
Required Tools . . . . . . . . . . . . . . . . . . . . . . . . . . . . . . . . . . . . . . . . . . . . . 7
Installation Components . . . . . . . . . . . . . . . . . . . . . . . . . . . . . . . . . . . . . . 8
Trailer / Container Requirements. . . . . . . . . . . . . . . . . . . . . . . . . . . . . . . 10
Mounting Bolt Specifications and Installation Requirements . . . . . . . . . 12
Unit Dimensions. . . . . . . . . . . . . . . . . . . . . . . . . . . . . . . . . . . . . . . . . . . . 14
HMI Remote Mount Dimensions. . . . . . . . . . . . . . . . . . . . . . . . . . . . . . . 15
Status Light Dimensions (Option) . . . . . . . . . . . . . . . . . . . . . . . . . . . . . . 16
Flush Mount Status Light Opening Dimensions (Option) . . . . . . . . . . . . 17
Battery Selection Guide . . . . . . . . . . . . . . . . . . . . . . . . . . . . . . . . . . . . . 18
Group 31 Battery Dimensions . . . . . . . . . . . . . . . . . . . . . . . . . . . . . . . . . 19
Uncrating and Installing the Unit . . . . . . . . . . . . . . . . . . . . . . . . . . . . . . 20
Installing the Remote HMI . . . . . . . . . . . . . . . . . . . . . . . . . . . . . . . . . . . 22
Installing the Fuel Tank - Aluminum, 22'' dia. 30 & 50 Gallon - (Option) 24
Installing the Fuel Tank - Aluminum, L-Shaped, 65 Gallon - (Option) . 28
Installing the Fuel Tank - Steel, Rectangle, 65 Gallon - (Option) . . . . . 32
Installing the Fuel Pump and Fuel Lines . . . . . . . . . . . . . . . . . . . . . . . . . 36
Installing the Remote Status Light - (Option) . . . . . . . . . . . . . . . . . . . . . 40
Installing the Battery . . . . . . . . . . . . . . . . . . . . . . . . . . . . . . . . . . . . . . . . 42
SYSTEM CHECK LIST . . . . . . . . . . . . . . . . . . . . . . . . . . . . . . . . . . . . . 44
5
Safety Precautions
The symbol appears next to a point that is particularly important:
DANGER: Addresses a circumstance that, if encountered,
will lead to death or serious injury
WARNING: Addresses a circumstance that, if encountered,
might lead to death or serious injury.
CAUTION: Addresses a circumstance that, if encountered,
may cause damage to equipment or minor injury.
WARNING: Keep your hands away from fans and belts when
the unit is running. Set all electrical controls to the OFF
position before servicing the unit.
WARNING: Make sure all mounting bolts are tight and are of
correct length for their particular application
WARNING: Never drill holes in the unit unless absolutely
necessary. Holes drilled into the unit may weaken structural
components. Holes drilled into electrical wiring can cause fire
or explosion.
WARNING: When using ladders to install or service
refrigeration systems, always observe the ladder
manufacturer’s safety labels and warnings. A work platform is
the recommended method for installations.
CAUTION: Exposed coil fins are very sharp and can cause
painful lacerations.Wear leather work gloves to prevent injury.
6
Safety Precautions (continued)
Battery Installation and Cable Routing
WARNING: Improperly installed battery could result in a fire or
explosion! A Thermo King approved battery must be installed
and properly secured to the battery tray.
WARNING: Improperly installed battery cables could result in
fire or explosion! Battery cables must be installed, routed and
secured properly to prevent them from rubbing, chaffing or
making contact with hot, sharp or rotating components.
WARNING: Do not attach fuel lines or any additional wiring
harnesses to the battery cables as this could cause an
electrical fire!
CAUTION: Do not connect other manufacturer’s equipment or
accessories to the Thermo King unit. This could result in
severe damage to equipment and void the warranty!
CAUTION: Set all unit electrical controls to the OFF position
before connecting battery cables to the battery to prevent unit
from starting unexpectedly and causing personal injury.
CAUTION: Always wear protective clothing, gloves and eye
wear when handling and installing batteries. Battery acid can
cause serious burns when exposed to eyes or skin. If battery
acid contacts skin or clothing, wash immediately with soap
and water. If acid enters your eye, immediately flood it with
running cold water for at least twenty minutes and get medical
attention immediately.
CAUTION: Always cover battery terminals to prevent them
from making contact with metal components during battery
installation. Battery terminals grounding against metal could
cause the battery to explode.

7
Required Tools
1. Safety Glasses
2. Drill
3. Drill Bits
4. Tape Measure
5. Mechanics Tools
6. Lifting Device
7. Two Forged Eyebolts (1/2-13 UNC)
8. Work Platform (Recommended)
9. Torque Wrench
NOTE: Equipment such as torque wrenches should be in good
working condition and routinely calibrated to assure accurate
readings.

8
Installation Components
HARDWARE KIT
Clamps
Bandwraps
Screw 1/4-20 SS
Nut 1/4-20 SS
Nut 1/2-13
Washer 1/2- SAE
Washer 1/4 SS
Washer 1.25 OD
Screw #10
Screw 1/4-20
Screw Torx T-25
FUEL LINE KIT
Hose 1/4 OD x 40 ft.
Hose 3/8 OD x 40 ft.
Eyelet fitting 1/4''
Eyelet Fitting 3/8''
Sleeve Fitting 1/4''
Sleeve Fitting 3/8''
Nut Fitting 1/4''
Nut Fitting 3/8''
Connector 1/4''
Connector Fuel Line
Hose 4.00 in. long
FUEL PUMP KIT
Fuel Pump
Hose Fitting 3/8''
Pump Bracket
Harness
Nameplate

9
BLANK PAGE
10
Trailer / Container Requirements
HK-430 and HK-430 HO
IMPORTANT: Thermo King HK-430 and HK-430 HO diesel heating
units should only be installed onto trailers or containers specifically
designed and built for these applications.
* Does not include weight of fuel, fuel tank and brackets.
Front Wall Mounted Fuel Tank
-
IMPORTANT: Thermo King HK-430 and HK-430 HO diesel heating
units should only be installed onto trailers or containers specifically
designed and built for these applications.
DANGER: The front wall of the trailer or container must be
structurally strong enough to support the weight of the HK 430
or HK-430 HO unit!
WEIGHTS*
Thermo King HK unit with EON
battery installed.
HK-430
203 kg (448 lbs.)
HK-430 HO
221 kg (488 lbs.)
DANGER: The front wall of the trailer or container must be
structurally strong enough to support the weight of the
HK-430 or HK-430 HO unit and the 65 gallon fuel tank!
DANGER: An improperly installed fuel tank could lead to
serious injury or death! Consult your trailer or container
manufacturer for specific details on proper fuel tank
installation and recommendations.
11
Trailer / Container Requirements

12
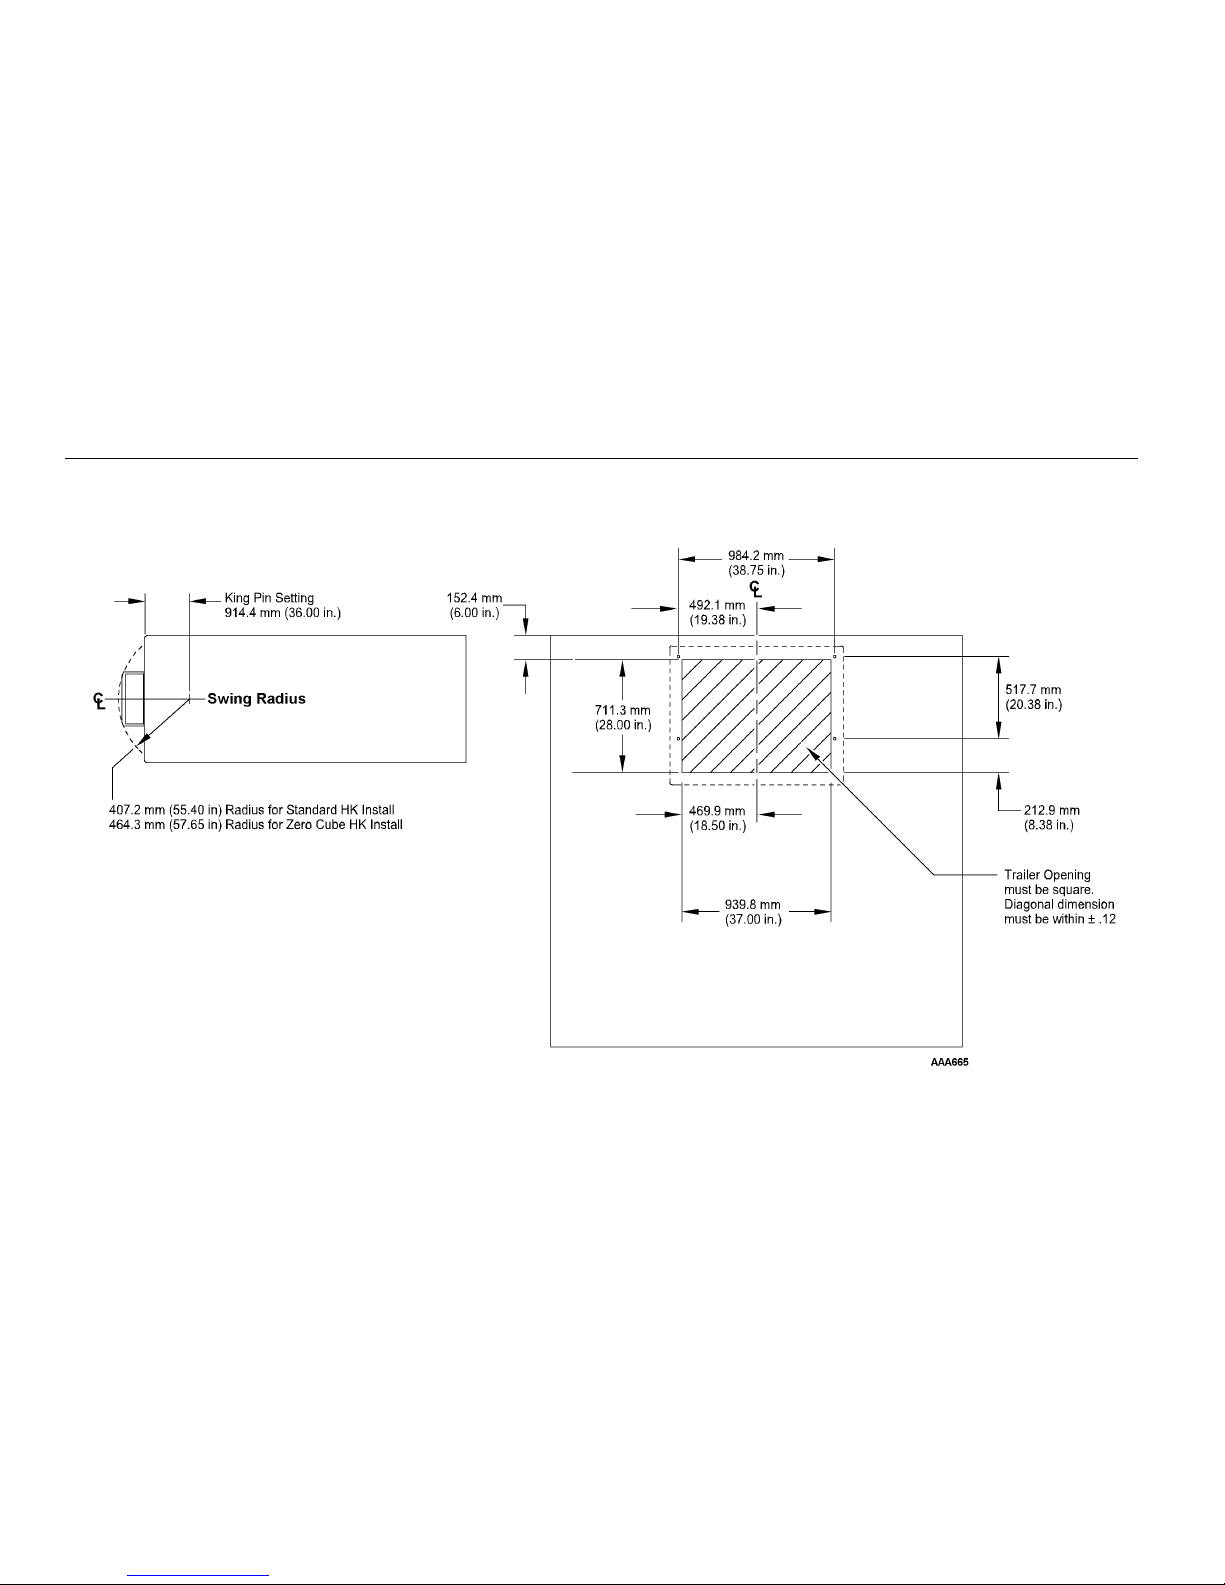
Mounting Bolt Specifications and Installation Requirements
Mounting Bolts Specifications
NOTE: Mounting hardware to be supplied by installer.
• Use Metric M12 x 1.75 pitch class 8.8 (1/2 in.-13 UNC - 2B Rolled
thread grade 5), medium carbon steel bolts and locking nuts.
• All hardware must be zinc plated with dichromate finish.
Mounting Bolt Installation Requirements
NOTE: The location of the unit mounting bolts in the trailer front wall
is critical to proper unit installation.
• A gasket sealing surface of 76.2 mm (3.00 in.) wide all around the
trailer wall opening must be free from rivets or bolt heads and flat
within 6.5 mm (.25 in.)
• All mounting bolts must be square with the front wall and securely
fastened to the trailer wall in such a manner to allow the mounting nuts
be torqued to 82 N•m (60 ft. lbs.) from outside the trailer.
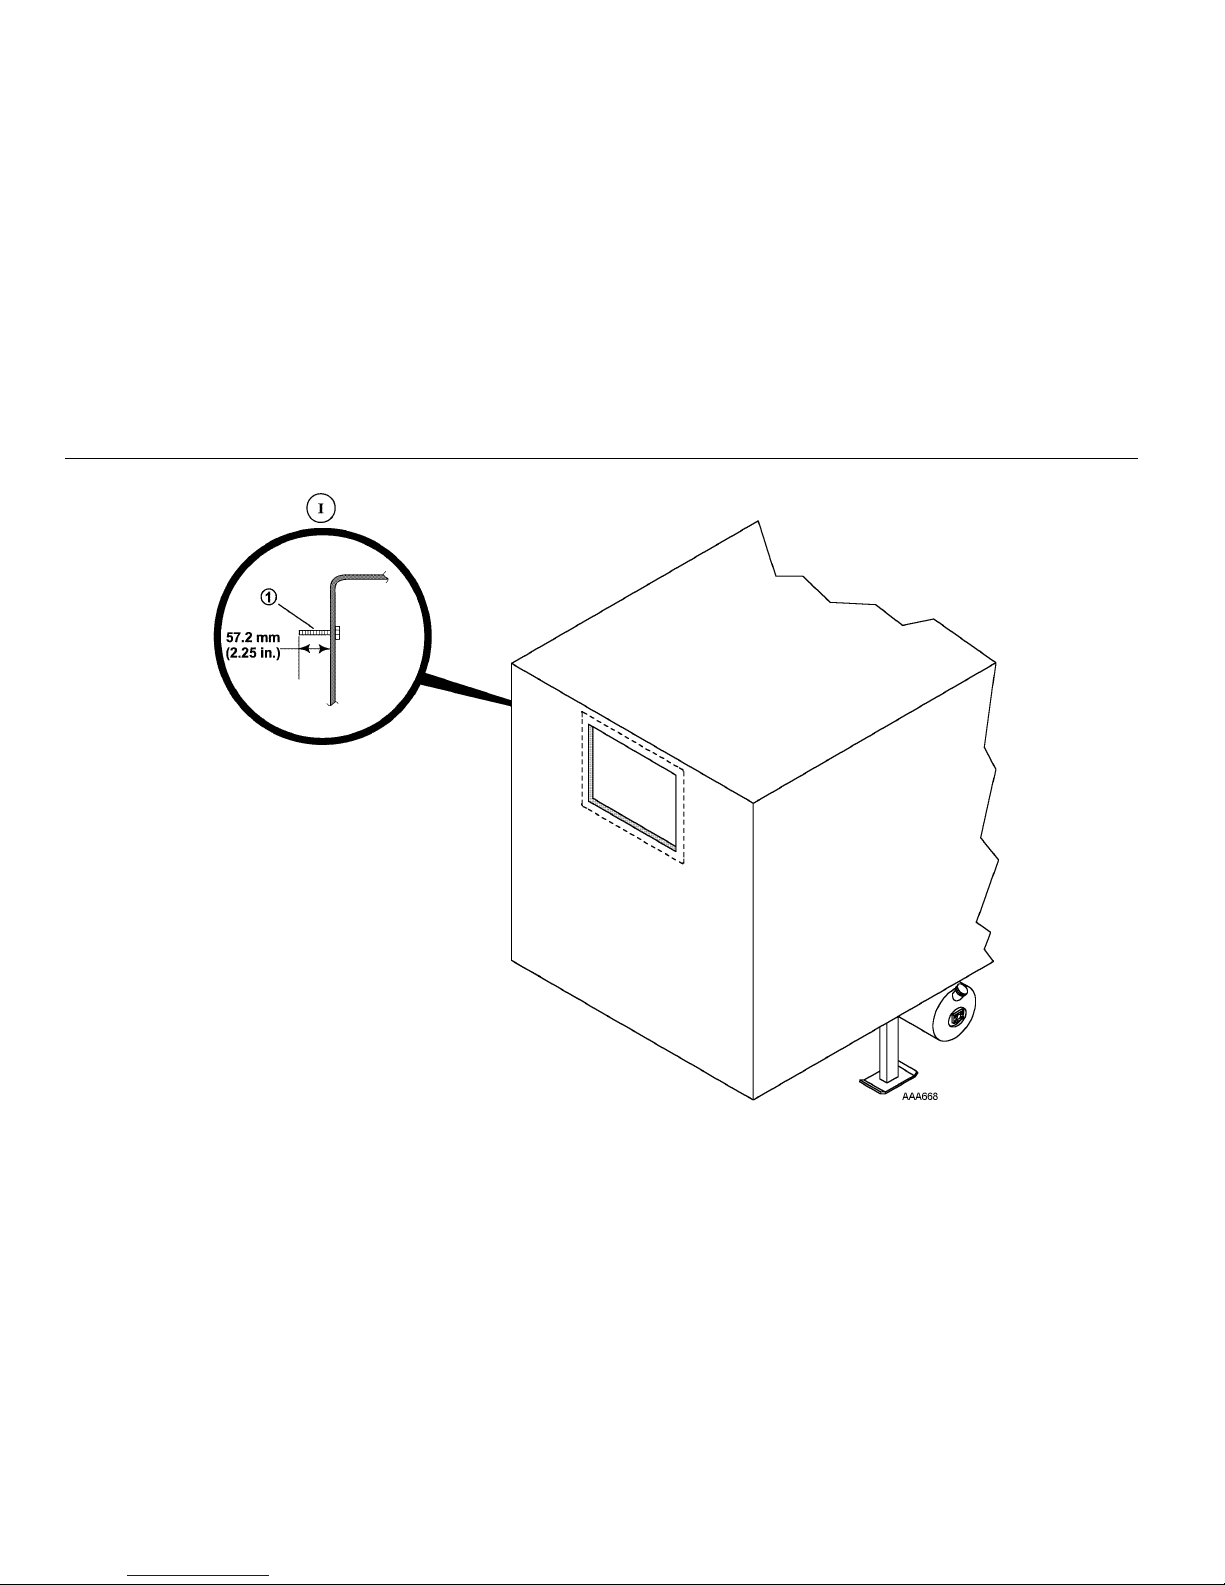
• Mounting bolts are to extend 57.2 mm (2.25 in.) beyond the front wall
(Detail I).
• Surface of all mounting bolts are to be flat within 2.5 mm (0.10 in.).
DANGER: The use of mounting bolts other than those
specified could result in severe damage to equipment, void
the warranty or cause personal injury or death!
DANGER: Four mounting bolts must be installed to properly
secure the unit to the trailer front wall! Failure to do so could
result in severe damage to equipment, void the warranty or
cause personal injury or death!
13
Mounting Bolt Specifications and Installation Requirements
 Loading...