

Page 1
MASTERPIECE® SERIES
Page 2

Page 3

Models/Modèle/Modelo
Combination steam oven
Table of Contents........................... 4
MES301HS
MES301HP
Page 4

Table of Contents
Use and care manual
About This Manual ........................................................ 5
How This Manual is Organized .......................................... 5
Safety Definitions .................................................................. 5
IMPORTANT SAFETY INSTRUCTIONS ........................ 6
Proper Installation and Maintenance ................................ 6
Fire Safety .............................................................................. 6
Burn Prevention .................................................................... 7
Child Safety ........................................................................... 7
Cleaning Safety ..................................................................... 8
Cookware Safety .................................................................. 8
State of California Proposition 65 Warnings ................... 8
Causes of damage ......................................................... 9
Your New Appliance ...................................................... 9
Control panel ......................................................................... 9
Oven cavity ......................................................................... 11
Cooling Fan ........................................................................ 11
Oven Vent ........................................................................... 11
Convection Fan .................................................................. 11
Accessories ........................................................................ 11
Operation ...................................................................... 12
Before using the appliance for the first time ................ 12
Fill water tank ..................................................................... 12
Operating the Appliance .................................................. 13
Automatic Shutoff .............................................................. 14
Clock and Timer Settings ................................................ 14
Automatic Programming - EasyCook ............................ 16
Favorites ............................................................................. 21
Panel Lock .......................................................................... 21
Basic Settings .................................................................... 21
Cleaning and Maintenance ......................................... 23
Cleaning .............................................................................. 23
Steam Clean ...................................................................... 24
Decalcify ............................................................................. 24
Removing and Installing the Appliance Door .............. 25
Cleaning the Door Glass ................................................. 26
Clean racks ........................................................................ 26
Replacing the Door Gasket ............................................ 27
Service ......................................................................... 27
Troubleshooting ................................................................. 27
Technical service .............................................................. 29
How to Obtain Service or Parts ...................................... 29
Getting the Most Out of Your Appliance ................... 29
General Tips ....................................................................... 29
Cooking Charts ................................................................. 30
STATEMENT OF LIMITED PRODUCT WARRANTY ... 39
What this Warranty Covers & Who it Applies to ......... 39
How Long the Warranty Lasts ........................................ 39
Repair/Replace as Your Exclusive Remedy ................ 39
Out of Warranty Product .................................................. 40
Warranty Exclusions ......................................................... 40
7KLV7+(50$'25$SSOLDQFHLVPDGHE\
%6++RPH$SSOLDQFHV&RUSRUDWLRQ
0DLQ6WUHHW6XLWH
,UYLQH&$
4XHVWLRQV"
ZZZWKHUPDGRUFRP
:HORRNIRUZDUGWRKHDULQJIURP\RX
4
Page 5

About This Manual
How This Manual is Organized
You can get the most out of your new oven by reading
this manual from beginning to end. This way you will
systematically get to know your appliance and become
familiar with its operation and features.
The manual consists of the following sections:
▯ The “Safety“ section provides information on how to
safely operate your oven.
▯ “Your New Appliance“ introduces you to the oven
components and features.
▯ The “Operation“ section offers you step-by-step
instructions on how to operate your oven.
▯ “Cleaning and Maintenance“ provides you with
information on how to clean and care for the various
oven parts.
▯ The “Service“ section includes do-it-yourself
troubleshooting tips.
▯ In “Getting the Most Out of Your Appliance“ you can
find a list of many common foods with the appropriate
heating mode, temperature, rack position and cook
time. This section also provides you with several
bakeware and preparation tips.
▯ The "“Warranty" section contains information on your
product warranty.
Pay special attention to the important safety
instructions in the “Safety“ section.
Safety Definitions
9 WARNING
This indicates that death or serious injuries may
occur as a result of non-observance of this warning.
9 CAUTION
This indicates that minor or moderate injuries may
occur as a result of non-observance of this warning.
NOTICE: This indicates that damage to the appliance or property may occur as a result of non-compliance with this advisory.
Note: This alerts you to important information and/or tips.
5
Page 6

9 IMPORTANT SAFETY INSTRUCTIONS
READ AND SAVE THESE INSTRUCTIONS
IMPORTANT SAFETY INS READ AND SAVE THESE INSTRUCTIONS
IMPORTANT
SAFEGUARDS
SAVE THESE
INSTRUCTIONS.
WARNING
When properly cared for, your new appliance has been
designed to be safe and reliable. Read all instructions
carefully before use. These precautions will reduce the
risk of burns, electric shock, fire, and injury to persons.
When using kitchen appliances, basic safety precautions
must be followed, including those in the following pages.
Proper Installation and Maintenance
Have the installer show you the location of the circuit
breaker or fuse. Mark it for easy reference.
This appliance must be properly installed and grounded
by a qualified technician. Connect only to properly
grounded outlet. Refer to Installation Instructions for
details.
This appliance is intended for normal family household
use only. It is not approved for outdoor use. See the
Statement of Limited Product Warranty. If you have any
questions, contact the manufacturer.
Do not store or use corrosive chemicals, vapors,
flammables or nonfood products in or near this
appliance. It is specifically designed for use when
heating or cooking food. The use of corrosive chemicals
in heating or cleaning will damage the appliance and
could result in injury.
Do not operate this appliance if it is not working properly,
or if it has been damaged. Contact an authorized
servicer.
Do not obstruct oven vents.
Do not repair or replace any part of the appliance unless
specifically recommended in this manual. Refer all
servicing to a factory authorized service center.
In the event of an error the display flashes and beeps
continuously. If this happens during self-clean,
disconnect appliance from the power supply and call a
qualified technician.
In the event of an error the display flashes and beeps
continuously. Disconnect appliance from the power
supply and call a qualified technician.
WARNING
When removing the door make sure oven is cool and
power to the oven has been turned off before removing
the door. Failure to do so could result in burns.
The oven door is heavy and fragile. Use both hands to
remove the oven door. The door front is glass. Handle
carefully to avoid breaking.
Grasp only the sides of the oven door. Do not grasp the
handle as it may swing in your hand and cause injury or
damage.
Failure to grasp the oven door firmly and properly could
result in personal injury or product damage.
Lay the door on a flat smooth surface so that the door
cannot fall over. Failure to do so may result in personal
injury or damage to the appliance.
WARNING
To avoid injury from hinge bracket snapping closed, be
sure that both levers are securely in place before
removing door. Also, do not force door open or closed the hinge could be damaged and injury could result.
WARNING
Make sure the appliance and lights are cool and power
to the appliance has been turned off before replacing the
light bulb(s). Failure to do so could result in electrical
shock or burns.The lenses (if equipped) must be in place
when using the appliance.The lenses (if equipped) serve
to protect the light bulb from breaking.The lenses (if
equipped) are made of glass. Handle carefully to avoid
breaking. Broken glass can cause an injury.
WARNING
Light socket is live when door is open if main power
supply is not turned off.
WARNING
Risk of short circuiting! Never allow electrical appliance
cords to become pinched in the hot appliance door. The
cord’s insulation can melt.
Fire Safety
WARNING
NEVER cover any slots, holes or passages in the oven
bottom or cover an entire rack with materials such as
aluminum foil. Doing so blocks air flow through the oven.
Aluminum foil linings may also trap heat, causing a fire
hazard.
If materials inside an oven or warming drawer should
ignite, keep door closed. Turn off the appliance and
disconnect the circuit at the circuit breaker box.
6
Page 7

9 IMPORTANT SAFETY INSTRUCTIONS
READ AND SAVE THESE INSTRUCTIONS
WARNING
Use this appliance only for its intended use as described
in this manual. NEVER use this appliance as a space
heater to heat or warm the room. Doing so may result in
overheating the appliance. Never use the appliance for
storage.
Always have a working smoke detector near the kitchen.
In the event that personal clothing or hair catches fire,
drop and roll immediately to extinguish flames.
Have an appropriate fire extinguisher available, nearby,
highly visible and easily accessible near the appliance.
Smother flames from food fires other than grease fires
with baking soda. Never use water on cooking fires.
WARNING
TO REDUCE THE RISK OF INJURY TO PERSONS IN THE EVENT OF A GREASE FIRE, OBSERVE THE FOLLOWING:
a.
SMOTHER FLAMES with a close-fitting lid, cookie
sheet, or metal tray, then turn off the burner. BE
CAREFUL TO PREVENT BURNS. If the flames do not
go out immediately, EVACUATE AND CALL THE FIRE
DEPARTMENT.
b.
NEVER PICK UP A FLAMING PAN – You may be
burned.
c.
DO NOT USE WATER, including wet dishcloths or
towels – a violent steam explosion will result.
d.
Use an extinguisher ONLY if:
- You know you have a Class ABC extinguisher, and
you already know how to operate it.
- The fire is small and contained in the area where it
started.
- The fire department is being called.
- You can fight the fire with your back to an exit.
Burn Prevention
DO NOT TOUCH HEATING ELEMENTS OR INTERIOR
SURFACES OF OVEN - Heating elements may be hot
even though they are dark in color. Interior surfaces of an
oven become hot enough to cause burns. During and
after use, do not touch, or let clothing, potholders, or
other flammable materials contact heating elements or
interior surfaces of oven until they have had sufficient
time to cool. Other surfaces of the appliance may
become hot enough to cause burns. Among these
surfaces are oven vent openings, surfaces near these
openings and oven doors.
Exercise caution when opening the appliance. Standing
to the side, open the door (or drawer) slowly and slightly
to let hot air and/or steam escape. Keep your face clear
of the opening and make sure there are no children or
pets near the unit. After the release of hot air and/or
steam, proceed with your cooking. Keep doors shut
unless necessary for cooking or cleaning purposes. Do
not leave open doors unattended.
Do not heat or warm unopened food containers. Build-up
of pressure may cause the container to burst and cause
injury.
Use caution when cooking foods with high alcohol
content (e.g. rum, brandy, bourbon) in the oven. Alcohol
evaporates at high temperatures. There is a risk of
burning as the alcohol vapors may catch fire in the oven.
Use only small quantities of alcohol in foods, and open
the oven door carefully.
Always place oven racks in desired location while oven is
cool. Always use oven mitts, when the oven is warm. If a
rack must be moved while oven is hot, do not let
potholder contact the heating elements.
Always use dry potholders. Moist or damp potholders on
hot surfaces may result in burns from steam. Do not let
potholder touch hot heating elements. Do not use a towel
or other bulky cloth.
Secure all loose garments, etc. before beginning. Tie
long hair so that it does not hang loose, and do not wear
loose fitting clothing or hanging garments, such as ties,
scarves, jewelry, or dangling sleeves.
Use pot holders to remove inserted cooking accessories
from the hot oven. Hot liquid may spill over when
removing the cooking accessories.
Hot steam can escape when opening the oven door. Hot
water may drip from the door. Keep children away.
Hot steam can escape during use. Do not touch the
ventilation openings.
Child Safety
When children become old enough to use the appliance,
it is the responsibility of the parents or legal guardians to
ensure that they are instructed in safe practices by
qualified persons.
Do not allow anyone to climb, stand, lean, sit, or hang on
any part of an appliance, especially a door, warming
drawer, or storage drawer. This can damage the
appliance, and the unit may tip over, potentially causing
severe injury.
Do not allow children to use this appliance unless closely
supervised by an adult. Children and pets should not be
left alone or unattended in the area where the appliance
is in use. They should never be allowed to play in its
vicinity, whether or not the appliance is in use.
CAUTION
Items of interest to children should not be stored in an
appliance, in cabinets above an appliance or on the
backsplash. Children climbing on an appliance to reach
items could be seriously injured.
7
Page 8

9 IMPORTANT SAFETY INSTRUCTIONS
READ AND SAVE THESE INSTRUCTIONS
Cleaning Safety
Risk of severe burns! Do not clean the appliance
immediately after turning it off. The water in the
evaporator dish is still hot. Wait until the appliance has
cooled down.
Keep oven free from grease build up.
WARNING
RISK OF INJURY
Scratched glass in the appliance door can burst. Do not
use any glass scrapers or strong or abrasive cleaning
agents.
WARNING
RISK OF ELECTRICAL SHOCK
Moisture entering the appliance can cause an electrical
shock. Don't use a high-pressure cleaner or steam
cleaner.
Cookware Safety
Do not place food directly on oven bottom.
Follow the manufacturer’s directions when using cooking
or roasting bags.
Ovenware must be heat and steam resistant. Silicone
baking pans are not suitable for Combination mode.
When using Steam mode with a perforated cooking pan,
always slide the baking pan underneath it. The pan will
catch any drippings.
The oven bottom and the evaporator dish must always
remain clear. Always place ovenware on the rack or in
the perforated cooking pan.
State of California Proposition 65 Warnings
WARNING
This product contains chemicals known to the State of
California to cause cancer, birth defects or other
reproductive harm.
8
Page 9
Causes of damage
▯ Do not place anything directly on the oven bottom. Do
not line it with aluminum foil. Heat build-up can
damage the appliance.
▯ The oven bottom and the evaporator dish should
always remain clear. Always place dishes in a
perforated baking pan or on a rack.
▯ Aluminum foil may not contact the door pane in the
oven. This can cause permanent discoloration of the
door pane.
▯ Dishes must be heat and steam resistant. Silicone
baking dishes are not suited for combination operation
with steam.
▯ Do not use dishes with rust spots. Even the smallest
spots can lead to corrosion in the oven.
▯ When steaming with a perforated baking pan, always
push the baking sheet or the unperforated baking pan
beneath it. This will catch drippings.
Your New Appliance
▯ Do not leave moist groceries in a closed oven for an
extended period of time. It can lead to corrosion inside
the oven.
▯ Fruit juice can leave stains in the oven. Always remove
fruit juice immediately and wipe up first with a damp
and then a dry cloth.
▯ If the door seal is very dirty, the appliance door will no
longer close correctly. Nearby furniture can be
damaged. Always keep the door seal clean and
replace if necessary.
▯ Do not place anything on the open appliance door.
This can damage the appliance.
▯ Do not hold or carry the appliance by the door handle.
The door handle cannot carry the weight of the device
and could break off.
▯ The appliance is made of high-grade stainless steel.
Incorrect care can cause corrosion in the oven.
Observe the care and cleaning instructions in the user
manual. Remove dirt in the oven immediately after the
appliance has cooled.
This section covers information on the following:
▯ Control panel
▯ Oven modes
▯ Oven and accessories
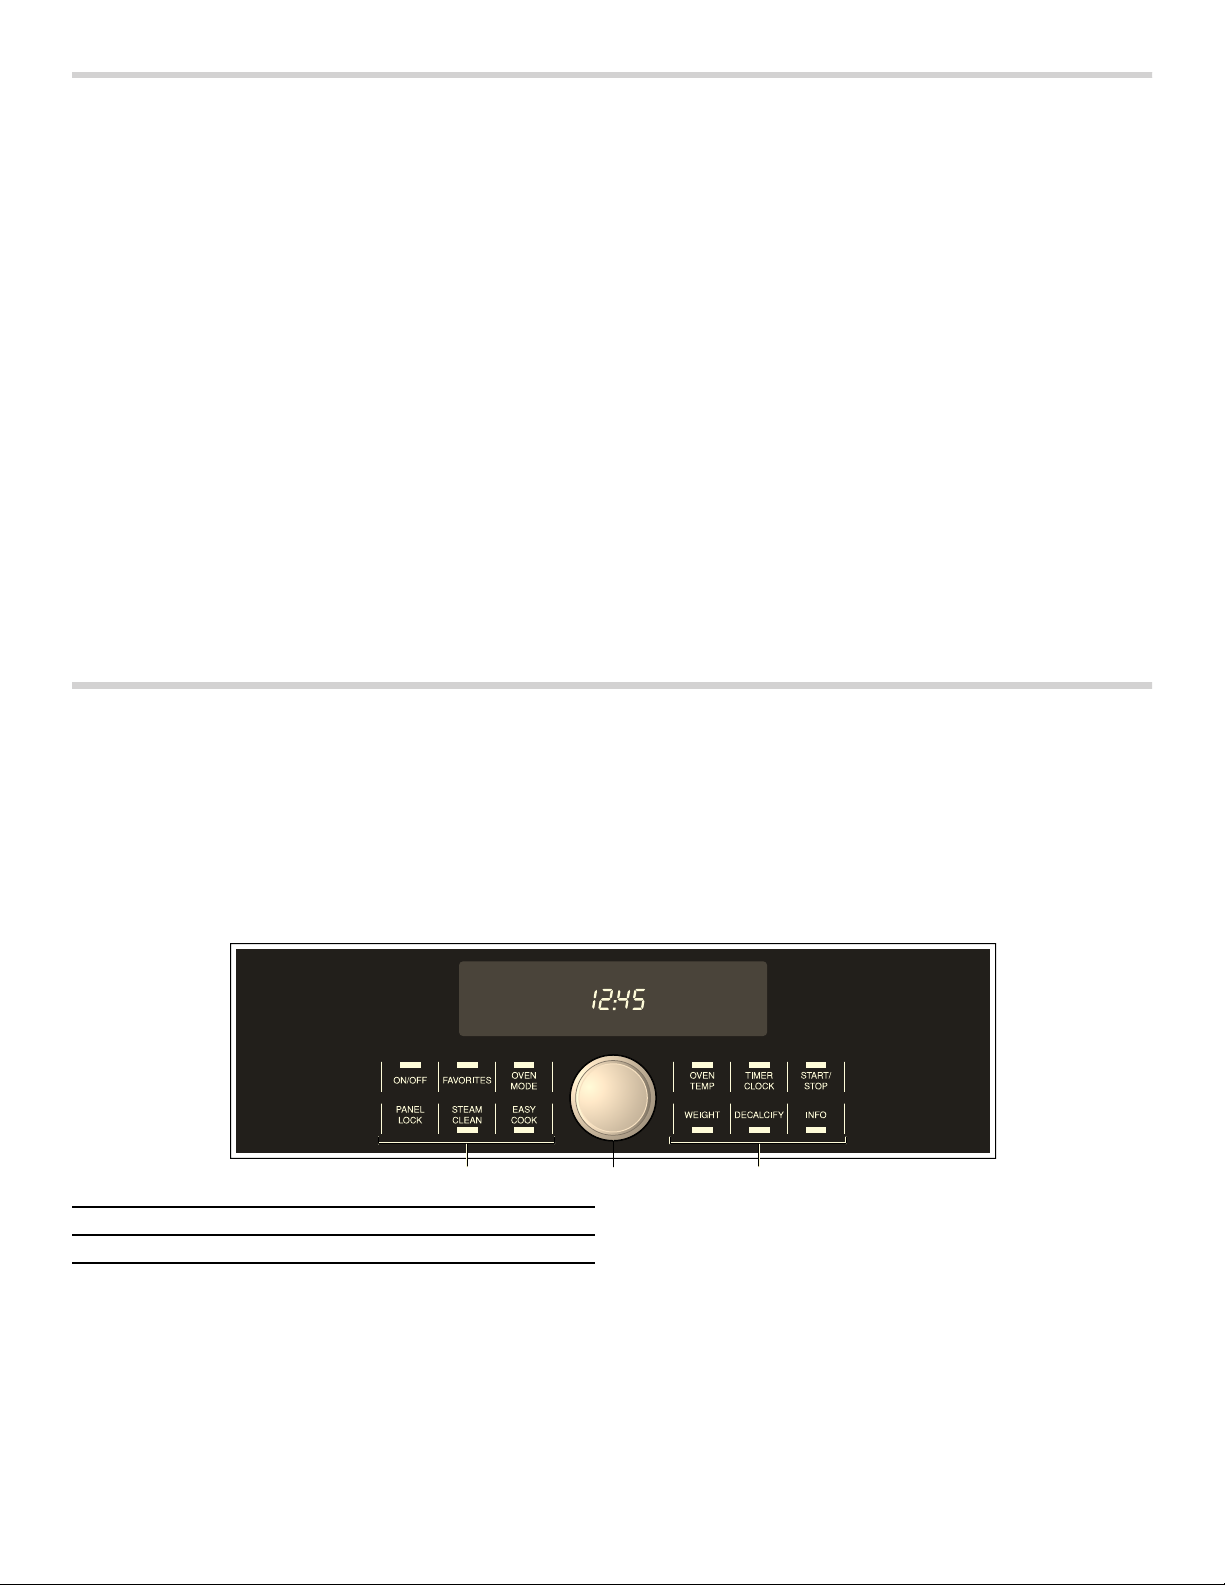
Control panel
1 Touchpads
2 Settings Dial
9
Page 10

Touchpads
You only have to press lightly on the touchpads to
operate them. The touchpads will not work if you press
several of them at once, such as when cleaning them.
ON/OFF Turn the appliance on and off.
FAVORITES Touch to select the Favorites menu.
Touch and hold longer to store
Favorites in memory.
OVEN MODE Sets the oven mode.
PANEL LOCK Touch and hold for four seconds to
turn the panel lock on or off.
Prevents the oven from being turned
on or its settings from being changed
accidentally.
STEAM CLEAN Sets Steam Clean mode.
Oven Modes
Use the OVEN MODE touchpad to access the various
oven modes of the appliance.
EASY COOK Sets automatic programming.
OVEN TEMP Set the temperature.
TIMER/CLOCK Sets the timer function.
START/STOP Touch briefly to start/pause
operation.
Touch and hold longer to cancel oper-
ation.
WEIGHT Sets the weight for EasyCook
automatic programming.
DECALCIFY Sets Decalcify mode.
INFO Touch briefly to view the current
preheating temperature.
Touch and hold longer to open or
close the basic settings menu.
Oven mode Temperature range Display
symbol
True
85 - 450 °F (30 - 230° C)
è
Convection
Steam 95 - 210 °F (35 - 100° C)
Combination 250 - 450 °F (120 - 230° C)
Reheat 210 - 360 °F (100 - 180° C)
Proof 95 - 120 °F (35 - 50° C)
Defrost 95 - 140 °F (35 - 60° C)
Slow Cook 140 - 250 °F (60 - 120° C)
Dish Warming 85 - 160 °F (30 - 70° C)
Keep Warm 140 - 210 °F (60 - 100° C)
Á
è+Á
ƒ+è+Á
Á+Ú
Å
ç+è
ƒ
Ú
Use
For moist cakes, sponge cakes, braised meat.
A fan on the back wall distributes the heat evently
throughout the oven.
Vegetables, fish, side dishes; extracting fruit juice
Fish, soufflés and baked goods.
Convection and Steam are combined
Plated dishes and baked goods.
Cooked food is gently reheated. The inflow of steam
keeps the food moist.
Yeast dough and sour dough.
The dough rises much faster than at room temperature.
Steam and Convection are combined to keep the surface
of the dough from drying out.
Fruit, vegetables, meat and fish.
Steam and Convection are combined. The humidity in the
steamer oven gently transfers heat to the food. The food
does not dry out or lose its shape.
Roast beef, leg of lamb.
Makes all types and cuts of meat extra tender.
For ovenware and plates.
Food in preheated ovenware does not cool down as
quickly. Drinks stay warm longer.
Keeps cooked food warm for up to one hour.
9 CAUTION
WHEN USING KEEP WARM MODE, FOLLOW THESE GUIDELINES:
▯ Do not use the Keep Warm mode to heat cold
food.
▯ Be sure to maintain proper food temperature. The
USDA recommends holding hot food at 140 °F
(60 °C) or warmer.
10
▯ DO NOT warm food longer than one hour.
Page 11
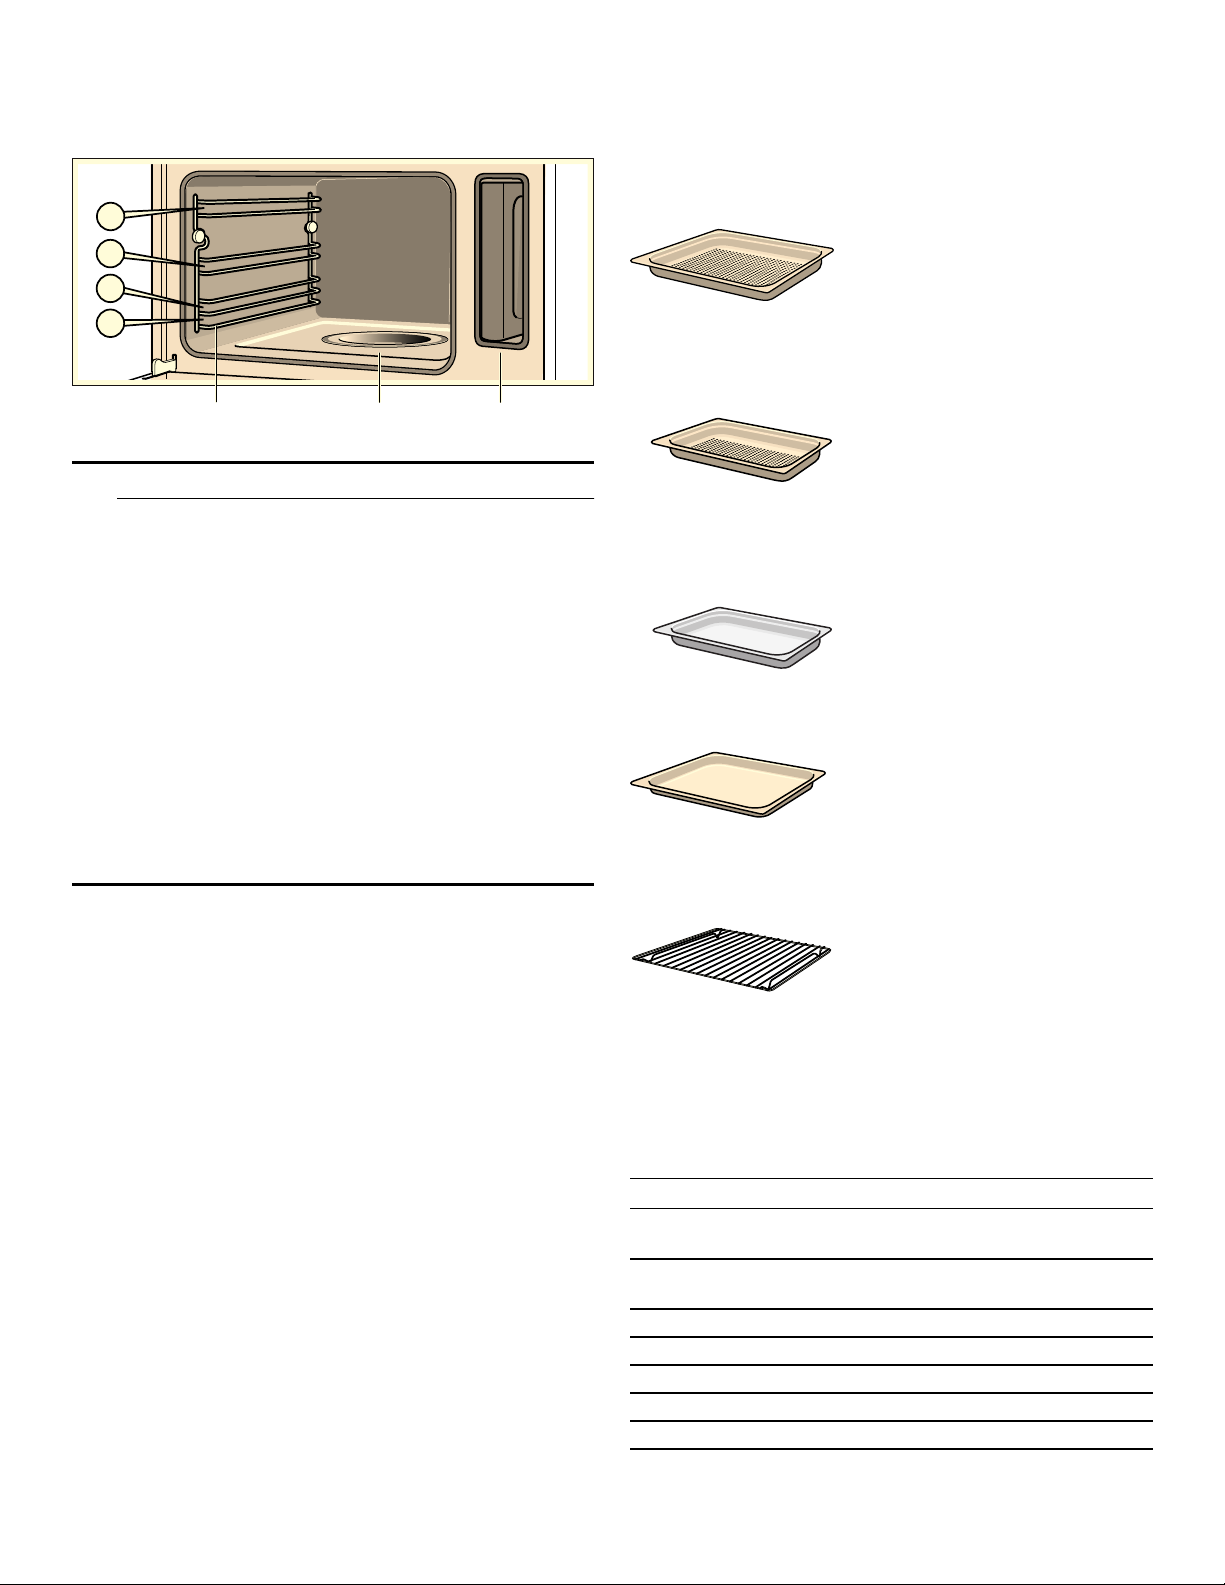
Oven cavity
DFFHVVRULHV
DWH
The oven has four levels. The levels are counted from the
bottom up.
5DFNVIRU
9 CAUTION
▯ Do not place anything directly on the oven
bottom. Do not line it with aluminum foil. Heat
build-up can damage the appliance.
▯ The oven bottom and the evaporator dish should
always remain clear. Always place dishes in a
perforated baking pan or on a rack.
▯ Do not push accessories between the insertion
levels, otherwise the appliance could tip.
▯ To avoid burns, place oven racks in desired
positions before turning oven on. Always use
oven mitts when the oven is warm. If a rack must
be moved while the oven is hot, do not let oven
mitts contact hot heating elements
▯ Use caution when removing oven racks from the
lowest rack position to avoid contact with the hot
oven door.
(YDSRUDWRUGLVK
7DQNGXFW
ZLWKZ
UWDQN
Accessories
Use only the accessories supplied with the product or
available from the after-sales service. They are specially
designed for your appliance.
Your appliance is equipped with the following
accessories:
Perforated cooking pan - full size
(CS2XLPH).
1 5/8" deep
Ideal for steaming fish or large
quantities of vegetables; for
extracting juice from berries and
much more.
Perforated cooking pan - half size
(CS1XLPH).
1 5/8" deep
Ideal for steaming vegetables,
extracting juice from berries,
defrosting, and for smaller
quantities of food.
Cooking pan - half size
(CS1XLH).
1 5/8" deep
Use for smaller quantities, rice and
cereals.
Baking pan - full size
(CS2LH).
1 1/8" deep
Ideal for baking cakes and
catching dripping liquids when
steaming.
Cooling Fan
The cooling fan runs during all cooking modes. The fan
can be heard when it is running, and warm air may be
felt as it is released from the oven vent. The fan may also
run after the oven is off.
Oven Vent
The oven vent is located at the bottom of the unit. Warm
air may be released from the vent before, during and
after cooking. It is normal to see steam escaping from
the vent, and condensation may collect in this area. This
area may be warm when the oven is in use. Do not block
the vent, since it is important for air circulation.
Convection Fan
The convection fan operates during all convection
modes. When the oven is operating in a convection
mode, the fan turns off automatically when the door is
opened. The convection fan may also run during Fast
Preheat and Self-Clean.
Wire rack
(CSRACKH).
Ideal for baking, cake pans and
casseroles. Also ideal for roasts
when used with the full size baking
pan.
Additional accessories
The following additional accessories can be purchased
in retail stores:
Accessory Order no.
Perforated cooking pan - Full Size, 1 5/8"
deep
Perforated cooking pan - Half Size, 1 5/8"
deep
Cooking pan - Full Size, 1 5/8" deep
Cooking pan - Half Size, 1 5/8" deep
Baking pan - Full Size, 1 1/8" deep
Wire rack CSRACKH
Powder descaler 310967
CS2XLPH
CS1XLPH
CS2XLH
CS1XLH
CS2LH
11
Page 12

Note: The cooking pans may become warped during baking. This is due to major temperature fluctuations affecting the accessory. This may occur if food is placed on only one part of the accessory or a deep frozen item such as pizza has been placed on the accessory.
Operation
Before using the appliance for the first time
▯ Appliance must be properly installed by a qualified
technician before use.
▯ Remove all packing materials from inside and outside
the oven.
▯ While cool, wipe with a clean, damp cloth and dry.
▯ There may be a slight odor from your new appliance;
this is normal and will disappear after a short time.
▯ Optimum cooking results depend on proper cookware
being used.
▯ Read and understand all safety precautions and Use
and Care Manual information.
Execute the following sections prior to operating:
Setting the Clock
After plugging in the appliance, ‚ƒ:‹‹ flashes on the
display.
Turn the settings dial to set the clock to the current time.
The setting is automatically accepted after a few
seconds.
Changing the time
1.
Touch TIMER/CLOCK repeatedly until the arrow appears next to the clock symbol 0Á.
2.
Use the settings dial to set the current time.
3.
Touch TIMER/CLOCK to confirm.
Adjusting the Water Hardness Level
Descale the appliance using Decalcify mode at regular
intervals. This can prevent damage to the appliance.
The appliance automatically informs you when descaling
is required. The factory setting is water hardness level II.
Change the setting if your water is softer or harder.
Checking water hardness
Check the water hardness using the test strips provided
or ask your water utility company.
Softened water
Descaling is not required if you only use softened water.
In this case, change the water hardness level to softened
"-".
Changing the water hardness level
1.
Touch and hold ON/OFF until the appliance turns on.
2.
Touch and hold INFO for approximately 4 seconds.
The initial basic setting ’‹‚ appears in the display.
3.
Touch INFO repeatedly until ’‹ˆ (water hardness level) appears in the display.
4.
Use the settings dial to change the water hardness level.
Options:
- softened
‚
ƒ
„
…
5.
Touch and hold INFO for approximately 4 seconds.
1-soft I
2-average II
3-hard III
4-very hard IV
The change is stored.
Cleaning
Before initial use, heat up the appliance once while
empty and clean the accessories.
Heating up the appliance
1.
Fill and slide in the water tank.
2.
Touch and hold ON/OFF to turn the appliance on.
OVEN MODE lights up on the display.
3.
Use the settings dial to set the oven mode to Steam Á.
4.
Touch START/STOP to turn on the appliance.
The appliance automatically heats up to 210 °F
(100° C) and turns off after 20 minutes. A beep
sounds.
5.
Touch and hold ON/OFF until the appliance turns off.
Leave the door open a crack until the appliance has
cooled.
Cleaning accessories before use
Clean the accessories thoroughly with soapy water and a
cloth before initial use.
Fill water tank
When you open the door, you'll see the water tank to the
right.
NOTICE: Use of inappropriate liquids can damage the appliance!
▯ Only use fresh tap water, softened water, or mineral
water without carbonation.
▯ If your tap water contains a lot of lime, we recommend
softened water.
▯ Do not use distilled water, highly chlorinated tap water
(> 40 mg/l), or any other liquids.
Information about your tap water can be obtained from
your water utility office. The hardness of your water can
be tested with the accompanying test strip.
12
Page 13
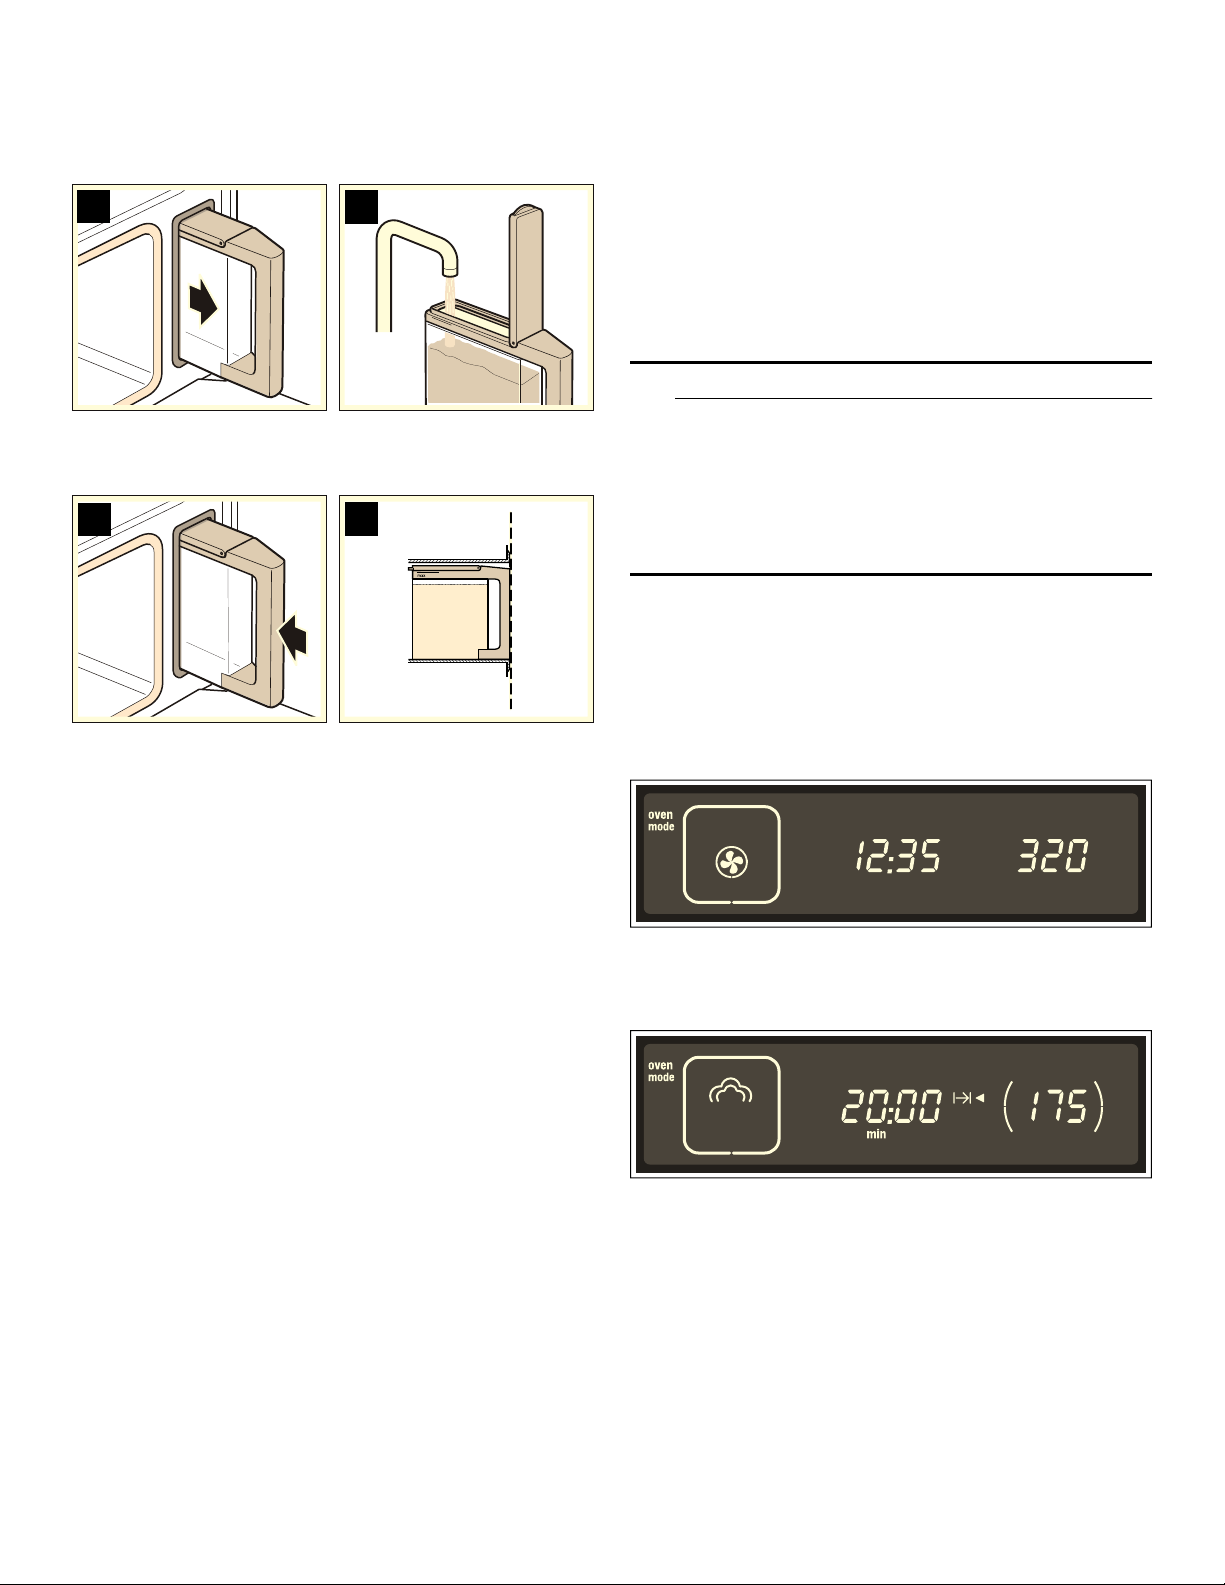
Fill the water tank before each use:
1.
Open door and remove water tank (picture A).
2.
Fill the water tank to the "max" line with cold water (picture B).
$
3.
Close tank lid until it snaps.
4.
Insert water tank completely (picture C).
&
%
PD[
'
The tank must be flush with the tank funnel (picture D).
has been installed. This takes place automatically the
first time steam is used at 210 °F (100° C). More steam
than usual will be produced during calibration.
After moving: To ensure that the appliance will
automatically adjust to the new location, reset the
appliance to its factory settings (see Basic Settings)
Operating the Appliance
This section covers the following:
▯ Turning the appliance on and off
▯ Important instructions to follow after each use.
9 WARNING
SCALDING HAZARD
Movement when opening the appliance door and
when removing the cookware can cause hot liquid
to spray out. Do not stand too close to the
appliance when opening it. Open appliance door
carefully. Remove cookware carefully. Keep children
away.
Turning on the Appliance
Expample shown in the illustration:
Set the oven mode to Steam at 175 °F (80° C).
1.
Touch and hold ON/OFF until the appliance turns on.
OVEN MODE lights up in the display. The first oven
mode, True Convection è appears in the display.
After each use
Empty the water tank after each use.
1.
Keep the water tank level while slowly pulling it out of the appliance to ensure that no remaining water drips down and out through the vent.
2.
Pour out the water.
3.
Thoroughly dry the seal of the tank lid and the slot where the tank resides in the appliance.
Indication of water level
The 9 indicator lights up:
The water tank is only half full.
If you think that the amount of water in the water tank is
sufficient for what you want to cook, you can start the
appliance. If the water level is too low, then fill the water
tank up to “max", slide the tank back in and then start the
appliance.
The 9 indicator starts flashing:
The water tank is empty. A beep sound and operation is
stopped.
1.
Carefully open the oven door. Steam will escape from inside.
2.
Remove the water tank, fill it and slide it back in.
3.
Press START/STOP.
Automatic Calibration
The temperature at which the water will boil depends on
the air pressure. During calibration, the appliance is
adjusted to the pressure conditions in the area where it
2.
Use the settings dial to set the desired oven mode.
3.
Touch OVEN TEMP and use the settigns dial to set the temperature.
4.
Touch TIMER/CLOCK repeatedly until the arrow appears after the xO Cook Time symbol.
5.
Use the settings dial to set the Cook Time (see Clock and Timer Settings).
6.
Press START/STOP to turn on the appliance.
The appliance starts to heat up. When using Steam
mode, the Cook Time starts after the appliance is
preheated.
Changing the temperature
After Cook Time starts, you can turn the settings dial at
any time to change the temperature.
13
Page 14

Changing the End Time
See Clock and Timer Settings, Changing the End Time.
Turning Off the Appliance
9 WARNING
RISK OF SEVERE BURNS
Hot steam may escape when opening the appliance
door. Carefully open the door only after cooking is
finished.
At the end of Cook Time
If you set a cook time, the appliance will turn off
automatically. A beep sounds. Press TIMER/CLOCK to
stop the signal.
Touch and hold ON/OFF until the appliance turns off.
Carefully open the appliance door.
Pausing Operation
Touch START/STOP or open the appliance door. The
appliance pauses operation. START/STOP flashes.
Close the appliance door and press START/STOP to
resume operation.
If you have activated Autostart, the appliance will not
resume operation (see Basic Settings).
Canceling Operation
Touch and hold ON/OFF to cancel operation and turn off
the appliance.
The cooling fan may continue to run when you open the
appliance door.
After every use
Empty water tank
1.
Open the appliance door carefully.
Hot steam can escape!
2.
Remove and empty water tank.
3.
Dry the tank lid and tank duct in the appliance well.
NOTICE: Do not dry the water tank in the hot oven. This will damage the water tank.
Dry oven
9 WARNING
RISK OF SCALDING
The water in the evaporator shell can be hot. Let it
cool before wiping it out.
1.
Leave the appliance door open a crack until the appliance has cooled.
2.
Wipe out the cooled oven and evaporator shell with the accompanying sponge and dry it off well with a soft cloth.
3.
Remove dirt from the oven immediately after the appliance has cooled. Burnt on food is much harder to remove later.
4.
Wipe down furniture or handles in case condensation has accumulated there.
Automatic Shutoff
The appliance features an automatic shutoff function.
Automatic shutoff is activated when the settings have not
been changed over an extended period of time. The time
when automatic shutoff is activated is based on the
temperature selected.
Shutoff Activated
”‰ appears in the display. Operation is interrupted.
Touch any key to make the display indicator disappear.
You can now adjust the settings.
Clock and Timer Settings
Use TIMER/CLOCK to access the clock and timer
settings. The following options are available.
If the appliance is off
▯ Q sets the timer
▯ 0 sets the clock
If the appliance is on
▯ Q sets the timer
▯ x sets the Cook Time, if applicable
▯ y changes the End Time, if applicable
▯ 0 displays the time
A short beep will sound when you are not permitted to
change or adjust a setting.
Setting the Timer
The timer works independently from other functions of
the appliance. It can be used as a kitchen timer and can
be set at any time.
1.
Touch TIMER/CLOCK.
The arrow appears after the Timer symbol QO.
2.
Use the settings dial to set the timer.
The timer is set for "minutes:seconds".
The timer runs on the display for a few seconds. It then
moves to the background. The Q symbol indicates that
the timer is running.
Display the running timer
Touch TIMER/CLOCK. The timer appears for a few
seconds.
Changing the timer
Touch TIMER/CLOCK. Use the settings dial to change
the timer.
Canceling the timer
Touch TIMER/CLOCK and turn the settings dial to reset
the timer to 00:00. The timer disappears after a few
seconds.
After the timer runs out
A beep sounds. 00:00 QO appears on the display.
Touch TIMER/CLOCK to cancel the signal.
14
Page 15

Setting the Cook Time
If you set Cook Time for your dish, operation
automatically stops at the end of the programmed time.
The appliance stops heating.
Note: Cook Time must always be set when using oven modes with steam.
Example shown in the illustration:
Set Cook Time to 35 minutes.
Requirement:
An oven mode and temperature must be set.
1.
Touch TIMER/CLOCK repeatedly until the arrow
appears after the
2.
Use the settings dial to set the Cook Time.
xO Cook Time symbol.
The Cook Time is accepted after a few seconds. The
parentheses to the left and right of the Cook Time
disappear. The xO symbol lights up.
3.
If operation has not yet started, touch START/STOP.
The running Cook Time is visible in the display.
Note: When using Steam mode, the Cook Time starts after the appliance is preheated.
Checking the Time Settings
Use TIMER/CLOCK to check all settings.
Changing the End Time
You can change the time when the food will be done.
The appliance starts automatically and turns off at the
preferred End Time.
9 CAUTION
To maintain food safety, do not leave food in the
oven for more than one hour before or after
cooking.
Note: Some programs do not allow the End Time to be changed.
The time required for preheating when using Steam must
be considered when setting the Cook Time. The set End
Time can be delayed to make up fo the time required for
preheating.
Delaying the End Time
The example is shown in the illustrations:
It is 9:30 a.m. The food takes 45 minutes to cook, but
should not be ready until 12:45 p.m.
Requirements:
▯ The set mode has not started.
▯ A Cook Time has been set.
1.
Touch TIMER/CLOCK repeatedly until the arrow appears after the End Time symbol yO.
The bars in the display indicate that the End Time has
not been changed.
After the Cook Time runs out
A beep sounds. The appliance stops heating. Touch
TIMER/CLOCK to stop the signal early.
9 CAUTION
Hot steam can escape when opening the oven
door.
Open the oven door.and use potholders to carefully
remove ovenware. Touch and hold ON/OFF until the
appliance turns off.
Changing the Cook Time
Touch TIMER/CLOCK repeatedly until the arrow appears
after the xO Cook Time symbol. Use the settings dial to
change the Cook Time. The changed Cook Time starts.
2.
Use the settings dial to set the End Time to a later time.
3.
Touch START/STOP to confirm.
The setting is accepted. The appliance is in delayed
mode. The End Time yO is displayed.
Operation starts automatically at the correct time. In the
example, operation starts at 12:00 p.m. The running
Cook Time xO then appears in the display.
15
Page 16

Adjusting the End Time
The End Time can be adjusted as long as the appliance
is in delayed mode. To do this, use TIMER/CLOCK to
switch to End Time yO and use the settings dial to
adjust the End Time.
Canceling the End Time
The End Time can be canceled as long as the appliance
is in delayed mode. To do this, use TIMER/CLOCK to
switch to End Time yO and turn the settings dial to the
left until - -:- - appears. Cook Time starts immediately.
After the Cook Time runs out
A beep sounds. The appliance stops heating. Touch
TIMER/CLOCK to stop the signal early.
9 CAUTION
Automatic Programming - EasyCook
This section covers the following:
▯ Setting a program from automatic programming -
EasyCook
▯ Information and tips on the programs
▯ Available programs
Automatic programming makes it easy to prepare food.
There are 16 program groups with a total of
40 programs.
9 CAUTION
To maintain food safety, do not leave food in the
oven for more than one hour before or after
cooking.
Hot steam can escape when opening the oven
door.
Open the oven door.and use potholders to carefully
remove ovenware. Touch and hold ON/OFF until the
appliance turns off.
Setting the Clock
The appliance must be off in order to set or change the
clock.
After a Power Outage
After a power outage, four zeros flash in the display.
1.
Use the settings dial to set the current time.
2.
Touch TIMER/CLOCK. The clock setting is accepted.
Changing the Time
Example:
Switching daylight savings on or off on the clock.
1.
Touch TIMER/CLOCK repeatedly until the arrow appears after the Clock symbol 0O.
2.
Use the settings dial to change the time.
3.
Touch TIMER/CLOCK. The new clock setting is accepted.
Changing the Time Format
The clock can display the time in 12-hour or 24-hour
format (see Basic Settings).
Displaying the Time
When the appliance is off, the current time is not
displayed. You can change this setting, so that the time
is also displayed when the appliance is off (see Basic
Settings).
Setting a Program
Select the appropriate program from the program chart.
Read the information on the programs.
The example is shown in the illustration:To roast 3 lbs
(1.4 kg) of fresh chicken (program P13):
1.
Touch and hold ON/OFF until the appliance turns on.
2.
Touch EASY COOK.
The first program ˜‹‚ and a suggested weight
appear in the display.
3.
Use the settings dial to select the preferred program.
4.
Touch WEIGHT and use the settings dial to set the weight of the food.
16
Page 17

5.
Touch START/STOP tp start the appliance.
The running Cook Time of the program xO appears
in the display.
9 WARNING
RISK OF SEVERE BURNS
Hot steam may escape when opening the appliance
door. Carefully open the door only after cooking is
finished.
Changing End Time
Some programs allow you to delay the End Time. The
program starts later and ends at the preferred time (see
section: Clock and Timer Settings).
Clearing Settings
To clear all settings, touch and hold START/STOP for
four seconds. You can now set a new oven mode or a
new program.
At the End of Cook Time
A beep sounds. Touch TIMER/CLOCK to stop the signal
early.
Open the oven door and use pot holders to carefully
remove ovenware. Touch and hold ON/OFF until the
appliance turns off.
Vegetables
Wait until after cooking to season vegetables.
Canceling a Program
Touch and hold ON/OFF to cancel operation and turn off
the appliance.
Program Information
All programs are designed for cooking on one level.
Cooking results may vary depending on the amount and
quality of the food.
Ovenware
Use the recommended ovenware. All meals have been
tested using this ovenware. Cooking results may vary if
different ovenware is used.
When cooking food in a perforated cooking pan, also
insert the baking pan at rack level 1. The pan will catch
any drippings.
Quantity/Weight
Add liquid and food mixtures such as rice and water no
more than 1.6 inches up the side of the accessory.
Automatic programming requires the weight of the food.
For individual pieces, like pieces of chicken, always enter
the weight of the largest piece. The total weigth must be
within the present weight range.
Cooking Time
The cooking time appears after the program starts. You
can change it during the first 10 minutes, since the
preheat time depends on conditions such as the
temperature of the water and of the food being cooked.
EasyCook - Program Charts
This section covers all of the programs available for
automatic programming. Read the instructions before
using a program to prepare the food.
Program Notes Ovenware/accessories Level
P1* Steam cauliflower florets Florets of equal size Perforated cooking pan +
baking pan
P2* Steam green beans - Perforated cooking pan +
baking pan
P3* Steam broccoli florets Florets of equal size Perforated cooking pan +
baking pan
P4* Steam green asparagus - Perforated cooking pan +
baking pan
P5** Steam mixed vegetables, frozen - Perforated cooking pan +
baking pan
* You can delay the End Time for this program
** Can be used with all frozen vegetables
3
1
3
1
3
1
3
1
3
1
17
Page 18

Potatoes
Wait until after cooking to season potatoes.
Program Notes Ovenware/accessories Level
P6* Unpeeled boiled potatoes Medium-size, 1.6-2" diam. Perforated cooking pan +
baking pan
P7* Boiled potatoes Medium-sized, quartered,
individual weight, 1-1.4 oz
(30-40 g)
* You can delay the End Time for this program
Cereals and grains
Weigh out the food to be cooked and add the correct
amount of water:
Rice 1 : 1.5
Couscous 1 : 1
Enter the dry weight. One cup of rice equals 0.4 lbs.
Program Notes Ovenware/accessories Level
P8 Basmati rice max. 1.7 lbs. (0.75 kg) Cooking pan 2
P9 Brown rice max. 1.7 lbs. (0.75 kg) Cooking pan 2
P10 Long grain rice max. 1.7 lbs. (0.75 kg) Cooking pan 2
P11 Couscous max. 1.7 lbs. (0.75 kg) Cooking pan 2
P12 Risotto, Arborio rice max. 4.5 lbs. (2 kg) Cooking pan 2
Stir the cereal or grain after cooking. This will help it
quickly absorb the remaining water.
To prepare risotto: Add water to the risotto at a ratio of 1
to 2. Enter the entire weight, including the water. One cup
of risotto and 2 cups of water equal approximately 1.5
lbs. The message "stir" will appear after approximately
15 minutes. Stir the risotto.
Perforated cooking pan +
baking pan
3
1
3
1
Poultry
Do not place pieces of chicken on top of each other in
the ovenware. You can marinate the pieces of chicken
before cooking.
Program Notes Ovenware/accessories Level
P13 Whole chicken, fresh Total weight 1.5 - 4.5 lbs.
(0.7 - 1.5 kg)
P14 Chicken parts Total weight 0.3 - 1.2 lbs.
(0.04 - 0.35 kg)
Beef
A tall roast is recommended for roast beef.
Program Notes Ovenware/accessories Level
P15** Sirloin, fresh,
slow cook, medium
P16* Pot roast (chuck), fresh 1 - 3.5 lbs.
* You can delay the End Time for this program
** Sear the meat before cooking
Pork
Cut the rind from the center outward prior to cooking.
The shoulder cut is the best cut for a roast with crust.
Total weight 2 - 4.5 lbs.
(1 - 2 kg)
(1 - 1.5 kg)
Wire rack + baking pan 2
Wire rack + baking pan 2
Baking pan 2
Baking pan 2
Program Notes Ovenware/accessories Level
P17* Roast, fresh 2 - 4.5 lbs. (0.8 - 2 kg) Wire rack + baking pan 2
* You can delay the End Time for this program
18
Page 19

Lamb
Program Notes Ovenware/accessories Level
P18 Leg, fresh, boned, well done 2 - 4.5 lbs. (1 - 2 kg) Wire rack + baking pan 2
P19* Leg, fresh, boned, slow cook, medium* 2 - 4.5 lbs. (1 - 2 kg) Baking pan 2
* Sear the meat well beforehand
Fish
Grease the perforated cooking pan to prepare for the
fish.
Program Notes Ovenware/accessories Level
P20 Steaming whole fresh fish 0.5 - 4.5 lbs. (0.3 - 2 kg) Perforated cooking pan +
P21 Steaming fish fillets, fresh max. 1" thick Perforated cooking pan +
P22 Steaming fish fillet, frozen max. 1" thick Perforated cooking pan +
P23 Oysters and clams - Perforated cooking pan +
Do not place whole fish, fish fillets or fish sticks on top of
each other. Enter the weight of the heaviest piece of fish
and select pieces that are approximately the same size.
3
baking pan
baking pan
baking pan
baking pan
1
3
1
3
1
2
Baked goods, desserts
Preparing fruit compote: This program is suitable for
fruits with stones and pits only. Weigh out the fruit, add
approximately Y of water and add sugar and spices to
taste.
Program Notes Ovenware/accessories Level
P24* Fruit compote - Baking pan 2
P25 Rice pudding - Baking pan 2
* You can delay the End TIme for this program
Bread, bread rolls
Use parchment paper on the baking pan when baking
bread and bread rolls.
Baking bread: The programs are for free-form loaves
only. Baking bread in a loaf pan is not recommended.
The dough should not be too soft. Before baking, use a
sharp knife to make several slashes about 0.4 inches
deep into the bread dough..
Program Notes Ovenware/accessories Level
P26* White bread, bake 1 - 4.5 lbs. (0.4 - 2 kg) Baking pan + parchment
P27 White bread, proof and bake Note the message Baking pan + parchment
P28* Multigrain bread, bake 1.25 - 4.5 lbs. (0.6 - 2 kg) Baking pan + parchment
P29 Multigrain bread, proof and bake Note the message Baking pan + parchment
P30* Rye bread, bake 1.25 - 4.5 lbs. (0.6 - 2 kg) Baking pan + parchment
P31 Rye bread, proof and bake Note the message Baking pan + parchment
* You can delay the End TIme for this program
Preparing rice pudding: Weigh out the rice and add 2.5
times as much milk. Add the rice and milk no more than
1 inch up the side of the accessory. Stir after cooking.
The remaining milk will be absorbed quickly.
Let the dough rise and then bake. A beep will sound
after approximately 20 minutes. Make slash marks in the
dough and then touch START/STOP.
Baking fresh bread rolls: The rolls should all weigh the
same. Enter the weight of the individual bread rolls.
paper
paper
paper
paper
paper
paper
2
2
2
2
2
2
19
Page 20

Program Notes Ovenware/accessories Level
P32* Fresh bread rolls, bake Weight per piece 0.1 - 0.3 lbs.
(0.05 - 0.1 kg)
P33 Frozen bread rolls, bake Total weight 0.5 - 2.5 lbs.
(0.2 - 1 kg)
Baking pan + parchment
paper
Baking pan + parchment
paper
* You can delay the End TIme for this program
Reheat
Program Notes Ovenware/accessories Level
P34* Pizza, cooked, thin crust - Wire rack + baking pan 3
P35* Pizza, cooked, deep dish - Wire rack + baking pan 3
* You can delay the End Time for this program
2
2
Defrosting
▯ Freeze the food as flat as possible and in appropriate
portions at -0° F (-18°C).
▯ Do not freeze oversized portions. Defrosted food does
not keep as long and spoils more quickly than fresh
food.
▯ All defrost programs assume the food is raw.
▯ If necessary, while the food is thawing, split it up or
9 WARNING
HEALTH HAZARD
When defrosting animal food products, make sure
to remove the thawed liquid. The liquid must not
come into contact with other food products. Germs
could be transferred to the other food. After the food
has thawed, heat up the steamer oven using True
Convection for 15 minutes at 360° F (180°C).
take pieces that have already thawed out of the
appliance.
▯ Let the food sit for another 5 to 15 minutes after it has
thawed to complete defrosting.
▯ Defrost whole bird: Remove the packaging before
defrosting. Let the bird sit for some time after it has
thawed. For large chickens, you can remove the
giblets after resting for approximately 30 minutes.
▯ Defrost meat: Use this program to defrost individual
cuts of roast.
▯ Thaw fruit only: If you want to thaw fruit slightly, adjust
the cooking results based on the individual fruit.
Program Notes Ovenware/accessories Level
P36 Chicken pieces, bone-in max. 4.5 lbs. (1.8 kg) Perforated cooking pan +
baking pan
P37 Meat max. weight 3.5 lbs.
(1.5 kg) per piece
Perforated cooking pan +
baking pan
P38 Berries - Perforated cooking pan +
baking pan
3
1
3
1
3
1
eggs on top of each other. One large egg weighs
Cooking eggs
approx. 2 oz. (57 g).
Pierce holes in eggs before cooking. If eggs are not
pierced, they may burst during cooking. Do not place
Program Notes Ovenware/accessories Level
P39* Soft-boiled eggs Eggs, large, max. 2 lbs.
(1 kg)
P40* Hard-boiled eggs Eggs, large, max. 4 lbs.
(1.8 kg)
* You can delay the End Time for this program
20
Perforated cooking pan +
baking pan
Perforated cooking pan +
baking pan
3
1
3
1
Page 21

Favorites
Use FAVORITES to store and access 6 custom programs
at any time. FAVORITES is useful if you frequently
prepare particular types of meals. You can also store a
meal from automatic programming.
Storing a Setting in Favorites
1.
Set the preferred mode. Do not start the oven.
2.
Briefly touch FAVORITES and use the settings dial to select the memory setting.
3.
Touch and hold FAVORITES until the Ñ symbol appears after the memory setting.
The setting is stored and can be started at any time.
Storing a Different Setting
Enter a new setting and store it. This will override the old
setting.
Canceling a FAVORITES Setting
Touch and hold START/STOP.
Starting a FAVORITES Setting
You can start stored settings at any time.
1.
Briefly touch FAVORITES and use the settings dial to select the memeory setting. The stored settings are displayed.
2.
Touch START/STOP.
The FAVORITES setting starts.
Changing the Memory Setting
Once a setting is started, you cannot change it.
Canceling a running FAVORITES Setting
Touch and hold START/STOP until True Convection
mode è appears. You can now adjust the settings.
Panel Lock
You can use the panel lock to prevent children from
accidentally turning the appliance on.
Activate Panel Lock
Turn off the appliance. Touch and hold PANEL LOCK for
approximately four seconds until the @ symbol
appears.
The Panel Lock ist activated.
Deactivate Panel Lock
Touch PANEL LOCK until the @ symbol disappears.
The Panel Lock is deactivated.
Note: You can still set the timer while the panel lock is activated.
Basic Settings
The appliance features various basic settings present in
the factory. These basic settings can, however, be
changed as necessary.
You can restore the factory settigns to reverse any
changes.
The example is shown in the illustration:
Change the basic setting for the Cook Time signal from
short to long.
1.
Touch and hold ON/OFF until the appliance turns on.
2.
Touch and hold INFO for approximately 4 seconds. The first basic setting ’‹‚ appears in the display.
3.
Touch INFO repeatedly until the desired basic setting appears.
4.
Use the settings dial to change the basic setting.
Deleting a FAVORITES Setting
If you change the basic setting ’‹‚, ’‹Š, ’‚‹ or ’‚‚,
all FAVORITES settings are cleared (see: Basic Settings).
Now you can touch INFO to select additional basic
settings and change them using the settings dial.
5.
Touch and hold INFO for approximately 4 seconds. All changes have been saved.
Canceling Changes
Touch START/STOP. The changes are not saved.
21
Page 22

Basic Settings Table
The following basic settings can be changed:
Basic Setting Function Options
’‹‚*
National code
’‹ƒ
Clock display
’‹„
Time
’‹…
Touchpad sound
’‹†
Cook Time signal
Preselection of units and clock display mode:
USA - °F, 12-hour mode, lbs.
Canada - °C, 24-hour mode, kg
When the appliance is off
Sets current time
Sound emitted when a touchpad is touched
Signal after Cook Timer ends
‹ = none
‚ = USA
ƒ = Canada
‹ = off
‚ = on
‹ = off
‚ = on
‚ = short
ƒ = medium
„ = long
’‹‡
Oven Autostart
’‹ˆ
Water hardness level
Autostart activated:
Oven does not restart after oven door is opened
Water hardness level setting for the Decalcify indicator - = softened
‹ = off
‚ = on
‚ = soft
ƒ = average
„ = hard
… = very hard
’‹‰
Calibration
’‹Š*
Temperature units
’‚‹*
Clock display mode
’‚‚*
Weight units
’‚ƒ
Display brightness
* If you change the basic settings, all Favorites settings are cleared (see: Favorites).
Resets calibration.
The appliance is recalibrated the next time Steam
mode is used at 210° F (100 °C).
Temperatures are indicated in °F. If you switch to °C,
"°C" also appears in the display.
The clock in the display appears in 12-hour or 24-hour
mode
Weights can be displayed in lbs. or kg.
‹”” = reset off
‹Ÿ = reset on
‹ = °F
‚ = °C
‹ = 12-hour mode
‚ = 24-hour mode
‹ = lbs.
‚ = kg
Sets the display brightness. 8 levels:
‹ (dark) - ˆ (bright)
22
Page 23

Cleaning and Maintenance
Cleaning
This section covers information on the following:
▯ Care and cleaning of the appliance
▯ Cleaning agents and aids
▯ Steam Clean mode
▯ Decalcify mode
9 WARNING
RISK OF SHORT CIRCUITING
Never use pressure washers or steam jet blowers to
clean the appliance.
NOTICE:
▯ Remove food residue and spills from the cavity
immediately after the appliance has cooled down.
Burned on residue is very difficult to remove at a later
time.
▯ If heavily soiled, use Steam Clean mode (see Steam
Clean).
▯ Salts are very abrasive and can cause rust spots.
Remove residue left by strong sauces (ketchup,
mustard) or salted foods immediately after the oven
has cooled down.
Cleaning Sponge
The cleaning sponge provided is very absorbent. Use the
cleaning sponge only to clean the oven cavity and to
9 WARNING
RISK OF BURNS
remove any remaining water from the evaporator dish.
Wash the cleaning sponge thoroughly before initial use.
The cleaning sponge can be washed in a dishwasher.
Wait until the appliance has cooled down before
cleaning.
Cleaners
Appliance exterior Soapy water, Use a soft cloth to dry.
aluminum front panel/handle Mild window cleaner. Wipe using a soft window cloth or a lint-free microfiber
cloth at a horizontal angle without placing pressure on the surfaces.
stainless stell front trim, door handle Soapy water, Use a soft cloth to dry. Always remove lime deposits, grease, oil,
starch and egg white stains immediately.
Special stainless steel cleaners are available through customer service or at
retail stores.
Oven interior Warm soapy water or vinegar and water mixture.
Use the cleaning sponge provided or a soft dishwashing brush.
NOTICE: : Never use steelwool or abrasive pads! The oven cavity can rust.
If heavily soiled, use an all-purpose cleaner, such as Simple Green. Follow
package directions for mixing. Spray on soils, allow to work for 15 - 30 minutes, then wipe the entire cavity with paper towels or cloth. Run Steam Clean
cycle so the cavity is rinsed thoroughly.
NOTICE: : Do not allow the oven light, bulb or door gaskets to come in contact
with the cleaner.
Evaporator dish Warm soapy water or vinegar and water mixture.
Outer gasket on oven Warm soapy water.
Water tank Soapy water. Do not clean in dishwasher!
Tank slot Wipe dry after each use.
Lid seal Dry well after each use.
Rack rails Use warm soapy water or wash in dishwasher (see Cleaning Racks).
Glass in doors Glass cleaner
Accessories Soak in warm soapy water. Clean with a brush or kitchen sponge or wash in
dishwasher.
Use a water and vinegar mixture for stains or discoloration caused by starchy
foods (such as rice).
23
Page 24

Steam Clean
Steam Clean uses steam to help dissolve food residue
and spills in the oven. Residue and spills can be easily
removed afterward.
Steam Clean takes approximately 30 minutes. Note: Operation of the appliance will be blocked if
Steam Clean is canceled. The appliance cannot be
operated again until after the first and second cleaning
cycle to ensure that no dishwashing liquid remains
inside.
Preparation
▯ Let the oven cool down and remove any accessories.
▯ Clean the evaporator dish using the cleaning sponge
provided.
▯ Fill the water tank with water up to "max". Add a drop
of dishwashing liquid to the evaporator dish on the
oven bottom.
Starting Steam Clean
1.
Touch and hold ON/OFF until the appliance turns on.
2.
Touch STEAM CLEAN to select Steam Clean mode.
3.
Touch START/STOP. Steam Clean starts. The light in the oven remains off.
Cleaning Cycle 1
A beep sounds after approximately 30 minutes. The <
(empty evaporator dish) symbol appears.
1.
Remove the rack rails from the oven and clean (see Removing Rack Rails).
2.
Use a soft dishwashing brush and the cleaning sponge to wipe out the partially dissolved food soil from the oven and evaporator dish.
3.
Fill the water tank with water, if necessary, and then slide it back in.
4.
Touch START/STOP. The appliance starts the cleaning process.
Cleaning Cycle 2
After a short time, the < symbol appears for the second
time.
1.
Thoroughly wash out the cleaning sponge.
2.
Use the cleaning sponge to remove any water remaining in the evaporator dish.
3.
Touch START/STOP.
The appliance starts the cleaning process. After the
second cleaning cycle, the < symbol appears.
4.
Touch and hold ON/OFF.
Removing Residual Water
Use the cleaning sponge to remove any water remaining
in the evaporator dish. Wipe down the oven using the
cleaning sponge and dry afterwards using a soft cloth.
Canceling Steam Clean
1.
Touch and hold ON/OFF. Steam Clean stops.
The appliance must be cleaned twice after Steam
Clean is canceled to ensure that no dishwashing soap
remains inside.
2.
Touch ON/OFF. The < symbol appears.
Now follow the same steps as under Cleaning Cycle 1
described above.
Decalcify
Run Decalcify mode at specific intervals to ensure that
the appliance continues to operate properly. The
indicator will remind you.
The descaling process takes approximately 30 minutes.
Decalcify mode is not required if you only use softened
water. Note: Operation of the appliance will be blocked if
Decalcify is canceled. The appliance cannot be operated
again until after the first and second cleaning cycle to
ensure that not descaling agent remains inside.
Descaling Agent
Use only the powder descaler recommended by
customer service to descale the appliance.
USA:
www.thermador-eshop.com
Canada :
Marcone - 800 - 287 - 1627
or Reliable Parts - 800-663-6060, www.reliableparts.ca
NOTICE: Other descaling agents can damage the appliance.
1.
Mix 32 oz water and 1 packet powder descaler to produce a descaler solution.
2.
Empty the water tank and fill it with the descaling solution.
NOTICE: Do not let the descaling solution come in contact with the control panel or other sensitive surfaces. If it does, immediately remove it using water.
Starting Decalcify Mode
The oven cavity must be cooled down completely.
1.
Touch and hold ON/OFF until the appliance turns on.
2.
Touch DECALCIFY to select Decalcify mode.
3.
Touch START/STOP. Decalcify mode starts. The light in the oven remains off.
Cleaning Cycle 1
A beep sounds after approximately 30 minutes. The 9
(fill water tank) symbol appears.
1.
Wash out the water tank thoroughly, fill it with water and slide it back in. the < (empty evaporator dish) symbol appears.
2.
Use the cleaning sponge provided to remove any water remaining in the evaporator dish.
3.
Touch START/STOP. The appliance starts the cleaning process.
8
24
Page 25

Cleaning Cycle 2
After a short time, the
< symbol appears for the second
time.
1.
Thoroughly wash out the cleaning sponge.
2.
Use the cleaning sponge to remove any water remaining in the evaporator dish.
3.
Touch START/STOP. The appliance starts the cleaning
process. After Decalcify mode is complete,
<
appears.
4.
Touch and hold ON/OFF.
Removing Residual Water
Use the cleaning sponge to remove any water remaining
in the evaporator dish. Wipe down the oven using the
cleaning sponge and dry afterwards using a soft cloth.
Canceling Decalcify Mode
1.
Touch and hold ON/OFF. Decalcify mode stops.
The appliance must be cleaned twice after Decalcify
mode is canceled to ensure that no descaling solution
remains inside.
2.
Touch ON/OFF. The 9 symbol appears.
Now follow the same steps as under Cleaning Cycle 1
described above.
Descaling Only the Evaporator Dish
You can also use Decalcify mode to descale only the
evaporator dish in the oven cavity without descaling the
entire appliance.
The only difference in this procedure is as follows:
1.
Mix 1Y cups of water and 2 teaspoons powder descaler to produce a descaler solution.
2.
Fill the evaporator dish completely with the descaling solution.
3.
Fill the water tank with water only.
4.
Start Decalcify mode as described.
You can also descale the evaporator dish manually.
door front includes glass components. Handle
carefully to avoid breakage.
▯ Grasp only the sides of the oven door. Do not
grasp the handle as it may swing in your hand
and cause damage or injury.
▯ Failure to grasp the oven door firmly and properly
could result in personal injury or product damage.
▯ To avoid injury from hinge bracket snapping
closed, be sure that both locking levers are
securely in place before removing the door. Also,
do not force the oven door open or closed - the
hinge could be damaged and injury could result.
▯ If the door is removed without turning both
retainers until thex stop, the hinge can snap back.
Do not reach into the hinge area. Call customer
service.
▯ Do not lay the removed door on sharp or pointed
objects as this could break the glass. Lay the
door on a flat, smooth surface, positioned so that
the door cannot fall over.
Removing the Appliance Door
1.
Open the door all the way.
2.
Lay the two stop levers on the right and left down flat (picture A).
3.
Position the door at an angle. Use both hands to grasp the left and right sides of the door. Close the door a little more and then remove it (picture B).
$
%
Removing and Installing the Appliance Door
The appliance door can be removed for easy cleaning.
9 CAUTION
WHEN REMOVING THE OVEN DOOR:
▯ Make sure oven is cool and power to the oven
has been turned off before removing the door.
Failure to do so could result in electrical shock or
burns.
▯ The oven door is heavy and parts of it are fragile.
Use both hands to remove the oven door. The
Installing the Appliance Door
Reattach the door after cleaning.
1.
Keep the door hinges straight while inserting them into the left and right oven openings . The notch on both hinges must lock in place on both sides (picture C).
&
2.
Open the door all the way and flip up the stop lever
'
(picture C).
3.
Close the door.
25
Page 26

Cleaning the Door Glass
The inner door glass on the appliance can be removed
for easier cleaning.
9 WARNING
RISK OF PERSONAL INJURY
▯ Do not use the appliance until the door glass and
appliance door have been properly installed.
▯ Hidden parts at the appliance door could have
sharp edges. Use protective gloves!
1.
Remove the door and place it on a towel, handle side down.
2.
Unscrew the top cover on the door. To do this, loosen the left and right screws (Fig. A).
3.
Remove the door glass (Fig. B).
$
%
Fitting the intermediate panel
1.
Insert the intermediate panel on the left and right into the supports.
2.
Push the intermediate panel downwards in the retainers.
Installing the Door Glass
1.
Reinsert the door glass.
Make sure that the flat surface faces outward and the
printed surface is on the inside.
2.
Put the cover in place and screw it back on.
3.
Reinstall the door.
Clean the door glass using a glass cleaner and a soft
cloth.
Removing the intermediate panel
Before removing, make a note of the position in which
the intermediate panel is fitted, so that you do not refit it
the wrong way round later.
1.
Press the left and right-hand holders outwards.
2.
Lift the intermediate panel slightly and take it out.
Cleaning
Clean the door glass using a glass cleaner and a soft
cloth.
NOTICE: Do not use any sharp or abrasive medium or a glass scraper. The glass could be damaged.
Clean racks
The racks can be removed for cleaning.
9 WARNING
RISK OF BURNS FROM HOT PARTS WITHIN THE
OVEN
Wait until the oven is cool.
Unhinging racks
NOTICE: Tilt the rack all the way to the front only until you feel resistance because otherwise the appliance sidewall will be bent.
1.
Carefully press the front of the rack up until it unhinges and release it sideways from the bracket (image A).
2.
Unhinge the rack from the bracket and remove it (image B).
$
%
26
3.
Clean racks with dish detergent and dish sponge/ brush or clean racks in the dish washer.
Page 27

Reinserting racks
1.
Insert the rack with the indentations facing up.
2.
Hook rack in back and push it back until it engages (image C).
3.
Hook rack on the front bracket and press down until it engages and is horizontally secured in the appliance (image D).
3.
Insert the new door gasket and tuck it in all the way around the door. The seam must be on the side of the door.
4.
Check the fit of the door gasket again, particularly in the corners.
&
The racks each only fit on one side.
'
Replacing the Door Gasket
If the outer gasket on the oven door is defective, it must
be replaced. Replacement gaskets for the appliance can
be obtained through customer service. Provide customer
service with the appliance model and serial numbers.
1.
Open the appliance door.
2.
Remove the old door gasket.
Service
Troubleshooting
If you encounter a problem, it often will merely be
something minor. Before you call customer service,
consider the suggestions and instructions below:
Problem Possible Cause Tip/Solution
Appliance is not working Cord is not plugged in Connect appliance to power.
Power outage Check if other kitchen appliances
Defective fuse Check the fuse or breaker box to
Faulty operation Turn off power to the appliance at
Appliance does not start Appliance door is not closed all the way Close the appliance door.
Appliance does not start, ‹‹:…‹ min.
appears and < flashes in the display
Four zeros appear in the display
‹‹:‹‹
Steam Clean or Decalcify was canceled Clean the appliance twice (see
Power outage Set the current time using the set-
9 CAUTION
Repairs should only be done by a trained servicer.
Improper repair of your appliance may result in risk
of severe physical injury or death.
are working.
see if the breaker or fuse to the
appliance is working.
the main power supply (fuse or
breaker box) and turn it back on
after approximately 10 seconds.
Canceling Steam Clean or Canceling Decalcify Mode).
tings dial and then touch TIMER/
CLOCK.
27
Page 28

Problem Possible Cause Tip/Solution
Appliance is not operating. A cook
time appears in the display
Appliance is not heating up. Three
heat indicator bars appear in the display
”‰ appears in the display
9 appears
The 9 indicator appears, but the
water tank is full
The 9 indicator appears, but the
water tank is not empty yet, or the
water tank is empty, but the 9 indicator does not appear
Water tank empties without any
apparent reason. Evaporator dish is
overflowing.
Evaporator dish has been boiled dry
even though the water tank is full
A "plop" noise can be heard when
cooking
An excessive amount of steam is produced when steaming
An excessive amount of steam is
repeatedly produced when steaming
Steam escapes from the vent openings when cooking
Appliance no longer produces steam
correctly
The error message "E.." appears in
the display
The error message "E011" appears in
the display
The settings dial was turned accidentally Touch START/STOP.
After adjusting the setting, START/STOP
was not touched
A touchpad combination was touched Disconnect from power and recon-
Automatic shutoff is activated Touch any touch key.
Appliance has not been used for at least
2 days and the water tank is full
Water tank was not inserted correctly Slide in the water tank until it locks
Detection system not working Call customer service.
Water tank is dirty. The moving water
level detectors are stuck
Water tank was not closed properly Close the tank lid until it clearly
Tank lid seal is dirty Clean the seal.
Tank lid seal is defective Obtain a new water tank through
Water tank was not inserted correctly Slide in the water tank until it locks
Supply line is clogged Descale appliance. Verify that the
Temperature change affecting frozen
food and caused by water vapor
Appliance is being calibrated automatically
Appliance cannot be calibrated automatically when cooking for short periods of
time
The appliance needs to be descaled Start Decalcify mode.
Technical defect Turn the settings dial to clear the
A touchpad was touched for too long or
is stuck
Touch START/STOP, or clear the
setting by touching ON/OFF.
nect after approximately
20 seconds. Within 2 minutes,
touch and hold PANEL LOCK for
4 seconds.
Empty and clean the water tank.
Always empty the water tank after
cooking.
in place.
Shake and clean the water tank. If
the components are still stuck,
obtain a new water tank through
customer service.
snaps into place.
customer service.
into place.
water hardness level is set correctly.
This is normal.
This is normal.
Reset the appliance to the factory
setting (see Basic Settings). Next,
start the Steam mode for
20 minutes at 210 °F (100° C).
This is normal.
error message and reset the clock,
if necessary.
If the error message reappears,
contact customer service.
Turn the settings dial to clear the
error message.
Touch all touchpads individually to
check if they are clean.
28
Page 29

Technical service
Contact our Technical Service Department if your
appliance needs repair. Our central Customer Service
Center (see below) will also be happy to supply you with
details on a center close to you.
E number and FD number:
When you contact our service, please have the Model (E)
number and the FD number for your appliance available.
You can find the data plate with these numbers on the
bottom left side when you open the appliance door. To
ensure that you can easily find the numbers in the event
of a malfunction, write down the appliance information
here.
Model no.
Serial no.
Questions? Please contact us. We look forward to
hearing from you!
ZZZWKHUPDGRUFRP
0DLQ6WUHHW6XLWH
,UYLQH&$
How to Obtain Service or Parts
To reach a service representative, see the contact
information at the front of the manual. Please be
prepared with the information printed on your product
data plate when calling.
Customer Service O
Getting the Most Out of Your Appliance
General Tips
Accessories
Use the accessories that come with the appliance. When
using steam with a perforated cooking pan, always slide
the baking pan underneath it. The baking pan will catch
any drippings..
Ovenware
If you use ovenware, always place it in the center of the
rack.
The ovenware must be heat and steam resistant. Thickwalled ovenware extends the cooking time.
Use foil to cover food that would normally be prepared in
a water bath (such as when melting chocolate).
Aluminum Foil
9 WARNING
Do not use aluminum foil or protective liners to line
any part of the appliance, especially the oven
bottom. Installing these liners may result in risk of
electric shock or fire.
Steaming
Steaming is a particularly gentle way to cook food. The
steam envelopes the food, preventing the food from
losing nutrients. No excess pressure is needed for
cooking, allowing the food to maintain its shape, color
and typical flavor.
Cooking Times and Quantities
When steaming, the cooking times are based on the size
of the piece, not on the entire quantity of food. The
appliance can steam up to 4.5 lbs. (2 kg) of food.
Note the sizes of pieces listed in the tables. The cooking
time is shorter for smaller pieces and longer for larger
pieces. The quality and age of the food also affect the
cooking time. The values provided therefore serve only
as a guideline.
Distribute Food Evenly
Always distribute the food evenly in the ovenware. If the
food is placed unevenly in the ovenware, it will cook
unevenly.
Delicate Food
Do not layer delicate foods too high in the cooking pan. It
is better to use two pans in this case.
Cooking an Entire Meal
You can cook entire meals at the same time in Steam
mode without mixing the flavors of the different food.
Place the food with the longest cooking time in the
appliance first and then add the remaining dishes at the
appropriate time. This will ensure that all dishes are
ready at the same time.
The total cooking time will be longer when cooking an
entire meal, since every time the appliance door is
opened, some steam escapes and the appliance has to
reheat.
True Convection
True Convection is particularly suited for sweet and
savory baked goods, braised meat and various cakes.
29
Page 30

Cooking Charts
The charts can be used as a guide. Follow package or
recipe directions.
Slow Cooking Meat
Slow cooking is ideal for cooking tender cuts of meat
that will be cooked medium rare. The meat stays very
moist and is tender.
Place the baking pan in the combination oven and
preheat the oven using Slow Cook mode.
These charts contain a selection of dishes that can be
easily prepared in the steamer oven. You can find out
which oven mode, accessories and cooking time are
best suited for your dish. If not specified otherwise, this
information applies to dishes placed in a cold appliance.
Sear the meat well on all sides on the cooktop.
Place the meat in the preheated combination oven and
continue to slow cook.
After it is done, arragne it on preheated plates and add a
warm sauce on top.
Food Amount Accessories Level Oven mode Temperature
in°C
Boned leg of lamb 2 - 3.5 lbs (1 -
1.5 kg)
Roast beef 3.5 - 5.5 lbs
(1.5 - 2.5 kg)
Pork fillets - baking pan 2 Slow Cook 175 - 195 °F
Pork medallions - baking pan 2 Slow Cook 175 °F (80° C) 60 80
Beef steaks approx. 1.2 in.
(3 cm) thick
Duck breast - baking pan 2 Slow Cook 175 °F (80° C) 35 - 55
Reheating Food
Reheat mode gently reheats food. The food tastes and
looks as if it were freshly prepared. Baked goods from
Food Accessories Level Oven mode Temperature Cooking time in
Dinner plate wire rack 2 Reheat 250 °F (120° C) 12 - 18
Vegetables baking pan 3 Reheat 210 °F (100° C) 12 15
Noodles, potatoes,
rice
Bread rolls* wire rack 2 Combination 340 - 360 °F (170 -
Baguettes* wire rack 2 Combination 340 - 360 °F (170 -
Bread* wire rack 2 Combination 340 - 360 °F (170 -
Pizza wire rack + baking
* Preheat for 5 minutes
baking pan 3 Reheat 210 °F (100° C) 5 - 10
pan
baking pan 2 Slow Cook 175 °F (80° C) 140 - 160
baking pan 2 Slow Cook 175 °F (80° C) 150 180
(80 - 90° C)
baking pan 2 Slow Cook 175 °F (80° C) 40 60
the day before can alos be reheated to their original
crispness.
180° C)
180° C)
180° C)
3 Reheat 340 - 360 °F (170 -
180° C)
Cooking time
in min.
50 - 70
min.
6 8
5 10
8 - 12
12 - 15
Defrosting
Freeze the food as flat as possible and in appropriate
portions at -0 °F (-18° C). Do not freeze oversized
portions. Defrosted food does not keep as long and
spoils more quickly than fresh food.
Defrost food in the freezer bag on a plate or in the
perforated cooking pan. Always slide the baking pan
under the perforated cooking pan. This keeps the food
from lying in the defrosted water and keeps the oven
clean.
Use Defrost mode.
Let the food sit for another 5 to 15 minutes after it has
thawed to complete defrosting.
30
9 WARNING
HEALTH HAZARD
When defrosting animal food products, make sure
to remove the thawed liquid. The liquid must not
come into contact with other food products. Germs
could be transferred to the other food. After the food
has thawed, heat up the steam oven using True
Convection for 15 minutes at 360° F (180 °C).
Defrosting meat
Thaw cuts of meat that will be breaded just until
seasonings and bread crubs can stick to the meat.
Page 31

Defrosting poultry
Remove from packaging before defrosting. Make sure to
pour out any defrosted liquid.
Food Amount Accessories Level Temperature Cooking time
in min.
Chicken parts, bone-in 2 lbs (1 kg) perforated +
baking pan
Chicken parts, boneless 1 lb (0.4 kg) perforated +
baking pan
Block-frozen vegetables
(such as spinach)
Berries 0.66 lb (0.3 kg) perforated +
Fish fillet 1 lb (0.4 kg) perforated +
Beef 2 lbs (1 kg) perforated +
1 lb (0.4 kg) perforated +
baking pan
baking pan
baking pan
baking pan
3
1
3
1
3
1
3
1
3
1
3
1
115 - 120° F
(45 - 50 °C)
115 - 120° F
(45 - 50 °C)
115 - 120° F
(45 - 50 °C)
115 - 120° F
(45 - 50 °C)
115 - 120° F
(45 - 50 °C)
115 - 120° F
(45 - 50 °C)
60 70
30 - 35
20 30
5 - 8
15 - 20
70 80
Proofing Dough
The dough rises much faster using this mode than at
room temperature.
You can choose any rack level for the rack or carfully
place the rack on the oven bootom.
Food Amount/weight Ovenware Temperature Cooking time in min.
Yeast dough 2 lbs (1 kg) bowl + wire rack 105° F (40 °C) 20 - 30
Sourdough 2 lbs (1 kg) bowl + wire rack 105° F (40 °C) 20 - 30
Vegetables
Place the vegetables in the perforated cooking pan and
place at rack level 3. Place the baking pan underneath at
rack level 1. The baking pan will catch any drippings.
Food Size Accessories Operating
Artichokes whole perforated + baking
tray
Cauliflower whole perforated + baking
tray
Cauliflower florets perforated + baking
tray
Broccoli florets perforated + baking
tray
Peas - perforated + baking
tray
Fennel slices perforated + baking
tray
Stuffed vegetables
(zucchini, eggplant, peppers)
Green beans - perforated + baking
Carrots slices perforated + baking
Kohlrabi slices perforated + baking
* Preheat the appliance
Do not precook vegetables
baking tray at level 2 Combina-
tray
tray
tray
NOTICE: Do not scratch the oven bottom. Place the dough-rising bowl on the rack. Do not cover
the dough.
Temperature Cooking time
mode
Steam 210 °F (100° C)30 - 35
Steam 210 °F (100° C)30 - 40
Steam 210 °F (100° C)10 - 15
Steam 210 °F (100° C)8 - 10
Steam 210 °F (100° C)5 - 10
Steam 210 °F (100° C)10 - 14
320 - 360 °F
tion
Steam 210 °F (100° C)15 - 20
Steam 210 °F (100° C)10 - 20
Steam 210 °F (100° C)15 - 20
(160 - 180° C)
in min.
15 - 30
31
Page 32

Food Size Accessories Operating
mode
Leeks slices perforated + baking
tray
Swiss chard* shredded perforated + baking
tray
Green asparagus* whole perforated + baking
tray
White asparagus* whole perforated + baking
tray
Spinach* - perforated + baking
tray
Brussels sprouts sprouts perforated + baking
tray
Red beets whole perforated + baking
tray
Red cabbage shredded perforated + baking
tray
Cabbage shredded perforated + baking
tray
Zucchini slices perforated + baking
tray
Peapods - perforated + baking
tray
* Preheat the appliance
Steam 210 °F (100° C)4 - 6
Steam 210 °F (100° C)8 - 10
Steam 210 °F (100° C)7 - 12
Steam 210 °F (100° C)10 - 15
Steam 210 °F (100° C)2 - 3
Steam 210 °F (100° C)20 30
Steam 210 °F (100° C)40 50
Steam 210 °F (100° C)30 - 35
Steam 210 °F (100° C)25 35
Steam 210 °F (100° C)2 - 3
Steam 210 °F (100° C)8 - 12
Temperature Cooking time
in min.
Side Dishes and Legumes
Add the appropriate amount of water or liquid.
Example: 1 : 1.5 = for every ^ cup of rice, add _ cup of
water.
Food Ratio Accessories Level Oven mode Temperature Duration in
Unpeeled boiled
potatoes
(Medium size)
Boiled potatoes
(Quartered)
Potato gratin - Baking pan 2 True Convec-
Brown rice 1:1,5 Cooking pan - Steam 210 °F (100° C) 30 - 40
Long grain rice 1:1,5 Cooking pan - Steam 210 °F (100° C) 20 - 30
Basmati rice 1:1,5 Cooking pan - Steam 210 °F (100° C) 20 - 30
Parboiled rice 1:1,5 Cooking pan - Steam 210 °F (100° C) 15 - 20
Lentils 1:2 Cooking pan - Steam 210 °F (100° C) 30 - 45
Canellini beans, pre-
softened
Couscous 1:1 Cooking pan - Steam 210 °F (100° C) 6 - 10
Dumplings - Perforated +
- Perforated +
baking pan
- Perforated +
baking pan
1:2 Cooking pan - Steam 210 °F (100° C) 65 - 75
baking pan
You can choose any rack level for the cooking pan.
min.
3
1
3
1
3
1
Steam 210 °F (100° C) 35 - 45
Steam 210 °F (100° C) 20 - 25
340 - 360° F
tion
Steam 205 °F (95° C) 20 - 25
(170 - 180° C)
35 - 45
Poultry, Meat, Fish
Insert rack and baking pan together at the same rack
level.
Once the roast is done, let it rest in the closed steamer
oven for an additional 10 minutes after turning it off. This
will help the meat retain its juices.
32
Using the Combination oven mode makes the meat
particularly tender and juicy on the inside while forming a
crust on the outside.
Page 33

Poultry
Food Amount/
weight
Chicken, whole 2.65 lbs
(1.2 kg)
Chicken, halved per 1 lbs
(0.4 kg)
Chicken breast per 0.33 lbs
(0.15 kg)
Chicken piece per 2.65 lbs
(0.12 kg)
Duck, whole 4.5 lbs (2 kg) wire rack + baking
Duck breast* per (0.35 kg) wire rack + baking
Turkey, whole,
unstuffed
Turkey, whole,
unstuffed**
Rolled turkey roast 3.5 lbs (1.5
Turkey breast 2 lbs (1 kg) wire rack + baking
* Sear first
** Use baking pan 1 5/8" deep (see Additional Accessories)
8 - 11 lbs wire rack + baking
12 - 14 lbs wire rack + baking
kg)
Accessories Level Oven mode Temperature Cooking time
wire rack + baking
pan
wire rack + baking
pan
perforated +
baking pan
wire rack + baking
pan
pan
pan
pan
pan
wire rack + baking
tray
tray
in min.
2 Combination 360 - 375 °F
(180 190° C)
2 Combination 360 - 375 °F
(180 190° C)
3
1
2 Combination 360 - 390 °F
2 Combination 340 °F (170° C) 60 80
2 Combination 340 - 360 °F
1 Combination 325 °F (165° C) 15 - 75
1 Combination 325 °F (165° C) 80 - 95
2 Combination 300 - 320 °F
2 Combination 300 - 320 °F
Steam 210 °F (100° C) 15 25
(180 200° C)
True Convection
410 °F (210° C) 15 - 20
(170 180° C)
(150 160° C)
(150 160° C)
50 - 60
35 45
20 35
10 - 15
70 90
60 80
Beef
Food Amount/
weight
Pot-roast beef* 3.5 lbs
(1,5 kg)
Fillet of beef,
medium*
Thin slice of roast
beef, medium*
Thick cut of sirloin,
medium*
* Sear first
Veal
Food Amount/
Veal, bone-in 3.5 lbs
Veal, loin* 2 lbs (1 kg) wire rack + baking
Breast of veal,
stuffed
* Sear first
2 lbs (1 kg) Wire rack + baking
2 lbs (1 kg) Wire rack + baking
2 lbs (1 kg) Wire rack + baking
weight
(1.5 kg)
3.5 lbs
(1.5 kg)
Accessories Level Oven mode Temperature Cooking time
Wire rack + baking
pan
pan
pan
pan
Accessories Level Oven mode Temperature Cooking time
wire rack + baking
pan
pan
wire rack + baking
pan
2 Reheat 285 - 300 °F
(140 - 150° C)
2 Reheat 340 - 360 °F
(170 - 180° C)
2 True Convec-
tion
2 True Convec-
tion
2 Combination 320 - 360 °F
2 Combination 320 - 360 °F
2 Combination 285 - 320 °F
340 - 360 °F
(170 - 180° C)
340 - 360 °F
(170 - 180° C)
(160 180° C)
(160 180° C)
(140 160° C)
in min.
100 - 140
20 - 28
40 - 55
45 - 60
in min.
50 70
15 - 25
75 - 120
33
Page 34

Pork
Food Amount/
weight
Bone-in without rind 3.5 lbs
(1.5 kg)
Bone-in with rind 3.5 lbs
(1.5 kg)
Pork chop, boneless*
Fillet in puff pastry 2 lbs (1 kg) baking pan 2 Combination 360 - 390 °F
Smoked pork on the
bone
Smoked pork ribs sliced baking pan 2 Steam 210 °F (100° C) 15 - 20
Rolled roast 3.5 lbs
* Sear first
Other
Food Amount/
Meat loaf made from
Boned leg of lamb 3.5 lbs
Loin of lamb on the
bone*
Wiener sausages - perforated +
* Sear first
1.2 lbs
(0.5 kg)
2 lbs (1 kg) wire rack + baking
(1.5 kg)
weight
1.2 lbs
(0.5 kg)
minced meat
(1.5 kg)
3.5 lbs
(1.5 kg)
Accessories Level Oven mode Temperature Cooking time
in min.
wire rack + baking
pan
wire rack + baking
pan
wire rack + baking
pan
pan
wire rack + baking
pan
Accessories Level Oven mode Temperature Cooking time
baking pan 2 Combination 340 - 360 °F
wire rack + baking
pan
wire rack + baking
pan
baking pan
2 Combination 340 - 360 °F
(170 180° C)
2 Steam 210 °F (100° C) 20 25
Combination 285 - 320 °F
(140 160° C)
True Convection
2 Combination 320 - 360 °F
2 Combination 250 - 285°F
2 Combination 340 - 360 °F
2 Combination 340 - 360 °F
2 Combination 320 - 340 °F
3
1
Steam 175 - 185 °F
410 - 430 °F
(210 220° C)
(160 180° C)
(180 200° C)
(120 140° C)
(170 180° C)
(170 180° C)
(170 180° C)
(160 170° C)
(80 85° C)
70 80
40 50
20
20 30
40 60
60 70
70 80
in min.
45 60
60 80
15 25
12 - 18
Fish
Food Amount/
weight
Whole per 0.66 lbs
(0.3 kg)
Fillet per 3.5 lbs
(0.15 kg)
Trout, whole per 0.5 lbs
(0.2 kg)
Cod fillet per 0.33 lbs
(0.15 kg)
Salmon fillet per 0.33 lbs
(0.15 kg)
Clams, oysters 0.33 lbs
(1.5 kg)
Haddock, perch fillet
Sole rolls, stuffed - perforated +
34
per 0.5 lbs
(0.15 kg)
Accessories Level Oven mode Temperature Cooking time
perforated +
baking tray
perforated +
baking tray
perforated +
baking tray
perforated +
baking tray
perforated +
baking tray
baking tray 2 Steam 210 °F (100° C) 10 - 15
perforated +
baking tray
baking tray
3
1
3
1
3
1
3
1
3
1
3
1
3
1
in min.
Steam 175 - 195 °F
(80 90° C)
Steam 175 - 195 °F
(80 90° C)
Steam 175 - 195 °F
(80 90° C)
Steam 175 - 195 °F
(80 90° C)
Steam 210 °F (100° C) 8 - 10
Steam 175 - 195 °F
(80 90° C)
Steam 175 - 195 °F
(80 90° C)
15 25
10 - 20
12 - 15
10 - 14
10 - 20
10 - 20
Page 35

Food Amount/
weight
Shrimp, large per 1 lb
(0.4 kg)
Shrimp, medium per 1 lb
(0.4 kg)
Roasting Tips
When is the roast done? Use a meat thermometer (available in stores) to measure the meat temperature.
The roast is too dark and the crust
is burnt in some areas.
The roast turned out well, but the
sauce is burned.
The roast looks good, but the
sauce is too light and runny.
Soufflés, Casseroles, Additions to Soups, etc.
Accessories Level Oven mode Temperature Cooking time
in min.
perforated +
baking tray
perforated +
baking tray
Check the rack level and temperature.
Next time, use a smaller roasting pan or add more liquid.
Next time, use a larger roasting pan or add less liquid.
3
1
3
1
Steam 210 °F (100° C) 8 - 13
Steam 210 °F (100° C) 5 - 8
Food Accessories Level Oven mode Temperature
in°C
Lasagna baking pan 2 Combination 320 - 340 °F
(160 - 170° C)
Soufflés soufflé dish + baking
pan
Semolina dumplings perforated + baking pan 3
Desserts, compote
Compote
Weigh out the fruit, add approximately Y the amount of
water and add sugar and spices to taste.
Rice pudding
Weigh out the rice and add 2.5 times as much milk. Add
the rice and milk no higher than i inch (2.5 cm) up the
side of the accessory. Stir after cooking. The remaining
milk will be absorbed quickly.
Yogurt
Heat the milk to 195° F (90 °C) on the cooktop. Remove
Food Accessories Oven mode Temperature Cooking time
Yeast dumplings baking pan Steam 210 °F (100° C) 20 25
Egg custard mold + wire rack Steam 195 - 210 °F (90 -
Sweet baked items (such as rice
pudding)
Rice pudding* baking pan Steam 210 °F (100° C) 25 35
Yogurt* portion-sized jars + wire rack Steam 105 °F (40° C) 300 - 360
Apple compote baking pan Steam 210 °F (100° C) 10 - 15
Pear compote baking pan Steam 210 °F (100° C) 10 - 15
Cherry compote baking pan Steam 210 °F (100° C) 10 - 15
Rhubarb compote baking pan Steam 210 °F (100° C) 10 - 15
Plum compote baking pan Steam 210 °F (100° C) 15 - 20
* You can also use the appropriate program (see section: Automatic Programming)
ovenproof dish + wire rack Combination 320 - 340 °F (160
2 Combination 360 - 390 °F
(180 - 200° C)
Steam 195 - 205 °F
1
from heat and let cool to 105° F (40 °C). Heating the
milk is not required if using ultra high temperature (UHT)
milk.
Stir in one to two teaspoons of plain yogurt or the
appropriate amount of yogurt starter per 100 ml milk.
Pour the mixture into clean glass jars and cover with lids.
After preparation, leave the glass jars in the refrigerator
to cool.
(90 - 95° C)
100° C)
-170° C)
Cooking time
in min.
35 - 45
15 25
7 - 10
in min.
15 - 20
50 - 60
35
Page 36

Cakes and Baked Goods
Dark metal baking pans are recommended.
The temperature and cooking time depend on the
quantity and consistency of the dough. Temperature
ranges are therefore provided in the charts.
Food Accessories Level Oven mode Temperature Cooking time
Sponge cake 10-inch tube pan 2 True
Sponge flan base ring 2 True
Delicate fruit flan, sponge springform cake pan 2 True
Sponge base (2 eggs) ring 2 True
Sponge flan (6 eggs) springform cake pan 2 True
Shortcrust pastry base with crust springform cake pan 2 True
Swiss flan springform cake pan 2 True
Bundt Bundt cake pan 2 Combination 300 - 320 °F
Savoury cakes (such as quiche) quiche dish 2 True
Apple tart flan-base cake pan 2 True
Start with a lower temperature setting. This will provide
for more even browning. Use a higher temperature
setting the next time, if necessary.
Do not overfill the rack or baking pan.
in min.
Convection
Convection
Convection
Convection
Convection
Convection
Convection
Convection
Convection
300 - 320 °F
(150 -160° C)
300 - 320 °F
(150 -160° C)
300 - 320 °F
(150 -160° C)
360 - 375 °F
(180 -190° C)
300 - 320 °F
(150 -160° C)
300 - 320 °F
(150 -160° C)
360 - 375 °F
(180 -190° C)
(150 -160° C)
360 - 375 °F
(180 -190° C)
340 - 375 °F
(170 -190° C)
60 70
30 45
45 - 55
12 - 16
25 35
40 50
35 - 60
35 45
35 - 60
35 50
Food Accessories Level Operating mode Temperature
in°C
Yeast cake with dry topping baking pan 2 Combination 300 - 320 °F
(150 -160° C)
True Convection 300 - 320 °F
(150 -160° C)
Swiss roll baking pan 2 True Convection 360 - 390 °F
(180 -200° C)
Braided loaf baking pan 2 Combination 300 - 320 °F
(150 -160° C)
Strudel, sweet baking pan 2 Combination 320 - 360 °F
(160 -180° C)
Onion tart baking pan 2 Combination 340 - 360 °F
(170 -180° C)
Bread, Bread Rolls
Food Accessories Level Oven mode Temperature Cooking
White bread, 1.7 lbs
(0.75 kg) flour
Sourdough bread,
1.7 lbs (0.75 kg) flour
baking pan + parchment
paper
baking pan + parchment
paper
2 Combination 390 - 410 °F
(200 - 210° C)
True Convection 320 - 340 °F
(160 - 170° C)
2 Combination 390 - 430 °F
(200 - 220° C)
True Convection 300 - 320 °F
(150 - 160° C)
Cooking time in
min.
35 45
35 45
10 - 15
25 35
40 60
30 - 40
time in min.
15 20
20 - 25
15 - 25
40 - 60
36
Page 37

Food Accessories Level Oven mode Temperature Cooking
time in min.
Multigrain bread,
1.7 lbs (0.75 kg) flour
Whole grain bread,
1.7 lbs (0.75 kg) flour
Rye bread, 1.7 lbs
(0.75 kg) flour
Bread rolls, 0.15 lbs
(70 g) each, unbaked
baking pan + parchment
paper
baking pan + parchment
paper
baking pan + parchment
paper
baking pan + parchment
paper
2 Combination 390 - 430 °F
(200 - 220° C)
True Convection 320 - 340 °F
(160 - 170° C)
2 Combination 390 - 430 °F
(200 - 220° C)
True Convection 285 - 300 °F
(140 - 150° C)
2 Combination 390 - 430 °F
(200 - 220° C)
True Convection 300 - 320 °F
(150 - 160° C)
2 Combination 375 - 390 °F
(190 - 200° C)
15 - 20
25 40
20 - 30
40 - 60
20 - 30
50 - 60
25 - 30
Bread rolls made with
seet yeast dough,
0.15 lbs (70 g) each,
unbaked
Small Baked Products
Food Accessories Level Operating mode Temperature Cooking time
Meringue baking pan 2 True Convection 175 - 195° F
Macaroons baking pan 2 True Convection 285 - 320° F
Puff pastry baking pan 2 Combination 340 - 375° F
Muffins muffin pan 2 True Convection 340 - 360° F
Choux pastry, such as cream
puffs
Biscuits baking pan 2 True Convection 300 - 320° F
Leavened cake, such as
apple cake
baking pan + parchment
paper
baking pan 2 True Convection 340 - 375° F
baking pan 2 True Convection 300 - 320° F
2 Combination 340 - 360 °F
(170 - 180° C)
20 - 30
in min.
120 - 180
(80 90 °C)
15 25
(140 160 °C)
10 - 20
(170 190 °C)
20 30
(170 180 °C)
27 - 35
(170 190 °C)
12 - 17
(150 160 °C)
15 - 20
(150 160 °C)
Baking Tips
If using your own recipe Look at cakes or baked goods in the table that are similar to your recipe.
This will help to determine if the
cake is cooked through
The cake collapses Next time, use less liquid or set oven temperature 20° F (10 °C) lower. Use the
The center of the cake is higher
than on the sides
Springform of loaf cake is too dark
in the back
The cake is too dry Use a toothpick to make tiny holes in the finished cake and pour drops of fruit
About 10 minutes before the end of baking time according to your recipe, stick
a toothpick into the highest part of the cake. The cake is done when the batter
no longer sticks to the toothpick.
mixing times specified in the recipe.
Do not grease the sides of the springform or cake pan. After baking, carefully
remove the cake from the pan using a knife
Do not place the baking pan up against the back wall of the oven. Place it on
the center of the rack.
juice or alcoholic beverage over the cake. Next time, set the temperature 20° F
(10 °C) higher and shorten the baking time or use the Combination oven mode.
37
Page 38

The bread or cake looks good, but
is runny inside (overly moist, has
streaks of liquid running through
it)
Cakes or baked goods brown
unevenly
Juice Extraction
Before extracting juice from berries, place the berries in a
bowl and add sugar. Let the berries sit for one hour so
that the juice is drawn out.
Food Accessories Level Oven mode Temperature Cooking time
Raspberries Perforated + cooking pan 3
Red currants Perforated + cooking pan 3
Frozen products
Follow the manufacturer’s instructions on the packaging. The specified cooking times apply to dishes placed in a
Next time, use less liquid. Bake a little longer and at a lower temperature. Prebake crusts for pies and cakes with juicy/runny fillings. Sprinkle crust with
almonds or bread crumbs and then add the filling.Observe the baking time
specified in the recipe
Set the temperature a little lower next time
Place the berries into the perforated cooking pan and
place pan at rack level 3. To catch the juice, place the
non-perforated cooking pan at rack level 1.
When ready, pour the berries into acheese cloth and
squeeze out the remaining juice.
in min.
Steam 210° F (100 °C) 30 - 45
1
Steam 210° F (100 °C) 40 - 50
1
cold oven.
Food Accessories Level Oven mode Temperature Cooking
time in
min.
French fries baking pan + parchment
paper
Croquettes baking pan + parchment
paper
Thinly sliced fried potatoes baking pan + parchment
paper
Pasta, fresh, refrigerated* baking pan 2 Steam 210° F (100 °C) 5 - 10
Lasagna, frozen baking pan + wire rack 2 Combination 375 - 410° F
Pizza, thin crust baking pan + wire rack 2 True Convection 360 - 390° F
Pizza, deep dish baking pan + wire rack 2 True Convection 360 - 390° F
Pizza, French bread baking pan + wire rack 2 True Convection 360 - 390° F
Pizza, chilled baking pan + parchment
paper
Herb butter baguette, refriger-
ated
Bread rolls, baguette, frozen baking pan + wire rack 2 True Convection 360 - 390° F
Pretzels, frozen baking pan + parchment
Partially cooked bread rolls or
baguette, pre-baked
Strudel, frozen baking pan + parchment
Fish sticks baking pan + parchment
* Add a little liquid
baking pan 2 True Convection 360 - 390° F
paper
baking pan + parchment
paper
paper
paper
2 True Convection 340 - 375° F
(170 190 °C)
2 True Convection 360 - 390° F
(180 200 °C)
2 True Convection 360 - 390° F
(180 200 °C)
(190 210 °C)
(180 200 °C)
(180 200 °C)
(180 200 °C)
2 True Convection 340 - 360° F
(170 180 °C)
(180 200 °C)
(180 200 °C)
2 True Convection 360 - 390° F
(180 200 °C)
2 True Convection 300 - 340° F
(150 170 °C)
2 Combination 320 - 360° F
(160 180 °C)
2 True Convection 380 - 400° F
(195 205 °C)
25 35
18 - 22
25 - 30
35 - 55
15 - 23
18 - 25
18 - 22
12 - 17
15 - 20
18 - 22
18 - 22
12 - 15
45 60
20 - 24
38
Page 39

Food Accessories Level Oven mode Temperature Cooking
time in
min.
Whole fish perforated +
baking pan
Frozen fish fillet baking pan + wire rack 2 Combination 360 - 390° F
Salmon fillets Perforated + cooking pan 3
Broccoli Perforated + cooking pan 3
Cauliflower Perforated + cooking pan 3
Green beans Perforated + cooking pan 3
Peas Perforated + cooking pan 3
Carrots Perforated + cooking pan 3
Mixed vegetables Perforated cooking pan +
baking pan
Brussels sprouts Perforated cooking pan +
baking pan
* Add a little liquid
3
1
1
1
1
1
1
1
3
1
3
1
Steam 175 - 210° F
(80 100 °C)
(180 200 °C)
Steam 175 - 210° F
(80 100 °C)
Steam 210° F (100 °C) 4 - 6
Steam 210° F (100 °C) 5 - 8
Steam 210° F (100 °C) 4 - 6
Steam 210° F (100 °C) 4 - 6
Steam 210° F (100 °C) 3 - 5
Steam 210° F (100 °C) 4 - 8
Steam 210° F (100 °C) 5 - 10
20 25
35 50
20 25
STATEMENT OF LIMITED PRODUCT WARRANTY
What this Warranty Covers & Who it Applies to
The limited warranty provided by BSH Home Appliances
in this Statement of Limited Product Warranty applies
only to the Thermador Built-in Oven sold to you, the first
using purchaser, provided that the Product was
purchased:
▯ For your normal, household (non-commercial) use,
and has in fact at all times only been used for normal
household purposes.
▯ New at retail (not a display, "as is", or previously
returned model), and not for resale, or commercial
use.
▯ Within the United States or Canada, and has at all
times remained within the country of original purchase.
The warranties stated herein apply only to the first
purchaser of the Product and are not transferable.
Thermador reserves the right to request proof of
purchase at the time any warranty claim is submitted to
confirm that the Product falls within the scope of this
limited product warranty.
Please make sure to return your registration card; while
not necessary to effectuate warranty coverage, it is the
best way for Thermador to notify you in the unlikely event
of a safety notice or product recall.
How Long the Warranty Lasts
BSH warrants that the Product is free from defects in
materials and workmanship for a period of seven
hundred and thirty (730) days from the date of purchase.
The foregoing timeline begins to run upon the date of
purchase, and shall not be stalled, tolled, extended, or
suspended, for any reason whatsoever.
This Product is also warranted to be free from cosmetic
defects in material and workmanship (such as scratches
of stainless steel, paint/porcelain blemishes, chip, dents,
or other damage to the finish of the Product), for a period
of sixty (60) days from the date of purchase or closing
date for new construction. This cosmetic warranty
excludes slight color variations due to inherent
differences in painted and porcelain parts, as well as
differences caused by kitchen lighting, product location,
or other similar factors. This cosmetic warranty
specifically excludes any display, floor, “As Is”, or “B”
stock appliances.
Repair/Replace as Your Exclusive Remedy
During this warranty period, BSH or one of its authorized
service providers will repair your Product without charge
to you (subject to certain limitations stated herein) if your
Product proves to have been manufactured with a defect
in materials or workmanship. If reasonable attempts to
repair the Product have been made without success,
then BSH will replace your Product (upgraded models
may be available to you, in BSH's sole discretion, for an
additional charge). All removed parts and components
39
Page 40

shall become the property of BSH at its sole option. All
replaced and/or repaired parts shall assume the identity
of the original part for purposes of this warranty and this
warranty shall not be extended with respect to such
parts. BSH's sole liability and responsibility hereunder is
to repair manufacturer-defective Product only, using a
BSH-authorized service provider during normal business
hours. For safety and property damage concerns, BSH
highly recommends that you do not attempt to repair the
Product yourself, or use an un-authorized servicer; BSH
will have no responsibility or liability for repairs or work
performed by a non-authorized servicer. If you choose to
have someone other than an authorized service provider
work on your Product, THIS WARRANTY WILL
AUTOMATICALLY BECOME NULL AND VOID. Authorized
service providers are those persons or companies that
have been specially trained on BSH products, and who
possess, in BSH's opinion, a superior reputation for
customer service and technical ability (note that they are
independent entities and are not agents, partners,
affiliates or representatives of BSH). Notwithstanding the
foregoing, BSH will not incur any liability, or have
responsibility, for the Product if it is located in a remote
area (more than 100 miles from an authorized service
provider) or is reasonably inaccessible, hazardous,
threatening, or treacherous locale, surroundings, or
environment; in any such event, if you request, BSH
would still pay for labor and parts and ship the parts to
the nearest authorized service provider, but you would
still be fully liable and responsible for any travel time or
other special charges by the service company, assuming
they agree to make the service call.
Out of Warranty Product
BSH is under no obligation, at law or otherwise, to
provide you with any concessions, including repairs, prorates, or Product replacement, once this warranty has
expired.
Warranty Exclusions
The warranty coverage described herein excludes all
defects or damage that are not the direct fault of BSH,
including without limitation, one or more of the following:
▯ Use of the Product in anything other than its normal,
customary and intended manner (including without
limitation, any form of commercial use, use or storage
of an indoor product outdoors, use of the Product in
conjunction with air or water-going vessels).
▯ Any party's willful misconduct, negligence, misuse,
abuse, accidents, neglect, improper operation, failure
to maintain, improper or negligent installation,
tampering, failure to follow operating instructions,
mishandling, unauthorized service (including selfperformed "fixing" or exploration of the appliance's
internal workings).
▯ Adjustment, alteration or modification of any kind.
▯ A failure to comply with any applicable state, local,
city, or county electrical, plumbing and/or building
codes, regulations, or laws, including failure to install
the product in strict conformity with local fire and
building codes and regulations.
▯ Ordinary wear and tear, spills of food, liquid, grease
accumulations, or other substances that accumulate
on, in, or around the Product.
▯ Any external, elemental and/or environmental forces
and factors, including without limitation, rain, wind,
sand, floods, fires, mud slides, freezing temperatures,
excessive moisture or extended exposure to humidity,
lightning, power surges, structural failures surrounding
the appliance, and acts of God.
In no event shall BSH have any liability or responsibility
whatsoever for damage to surrounding property,
including cabinetry, floors, ceilings, and other structures
or objects around the Product. Also excluded from this
warranty are scratches, nicks, minor dents, and cosmetic
damages on external surfaces and exposed parts;
Products on which the serial numbers have been altered,
defaced, or removed; service visits to teach you how to
use the Product, or visits where there is nothing wrong
with the Product; correction of installation problems (you
are solely responsible for any structure and setting for
the Product, including all electrical, plumbing or other
connecting facilities, for proper foundation/flooring, and
for any alterations including without limitation cabinetry,
walls, floors, shelving, etc.); and resetting of breakers or
fuses.
TO THE EXTENT ALLOWED BY LAW, THIS WARRANTY
SETS OUT YOUR EXCLUSIVE REMEDIES WITH
RESPECT TO PRODUCT, WHETHER THE CLAIM ARISES
IN CONTRACT OR TORT (INCLUDING STRICT LIABILITY,
OR NEGLIGENCE) OR OTHERWISE. THIS WARRANTY
IS IN LIEU OF ALL OTHER WARRANTIES, WHETHER
EXPRESS OR IMPLIED. ANY WARRANTY IMPLIED BY
LAW, WHETHER FOR MERCHANTABILITY OR FITNESS
FOR A PARTICULAR PURPOSE, OR OTHERWISE,
SHALL BE EFFECTIVE ONLY FOR THE PERIOD THAT
THIS EXPRESS LIMITED WARRANTY IS EFFECTIVE. IN
NO EVENT WILL THE MANUFACTURER BE LIABLE FOR
CONSEQUENTIAL, SPECIAL, INCIDENTAL, INDIRECT,
"BUSINESS LOSS", AND/OR PUNITIVE DAMAGES,
LOSSES, OR EXPENSES, INCLUDING WITHOUT
LIMITATION TIME AWAY FROM WORK, HOTELS AND/
OR RESTAURANT MEALS, REMODELLING EXPENSES
IN EXCESS OF DIRECT DAMAGES WHICH ARE
DEFINITIVELY CAUSED EXCLUSIVELY BY BSH, OR
OTHERWISE. SOME STATES DO NOT ALLOW THE
EXCLUSION OR LIMITATION OF INCIDENTAL OR
CONSEQUENTIAL DAMAGES, AND SOME STATES DO
NOT ALLOW LIMITATIONS ON HOW LONG AN IMPLIED
WARRANTY LASTS, SO THE ABOVE LIMITATIONS MAY
NOT APPLY TO YOU. THIS WARRANTY GIVES YOU
SPECIFIC LEGAL RIGHTS, AND YOU MAY ALSO HAVE
OTHER RIGHTS WHICH VARY FROM STATE TO STATE.
No attempt to alter, modify or amend this warranty shall
be effective unless authorized in writing by an officer of
BSH.
40
Page 41

Page 42

Page 43

Page 44

THERMADOR® Support/Réparation/Servicio técnico
Service
We realize that you have made a
considerable investment in your
kitchen. We are dedicated to
supporting you and your appliance
so that you have many years of
creative cooking.
Please don’t hesitate to contact
our STAR® Customer Support
Department if you have any
questions or in the unlikely event
that your THERMADOR® appliance
needs service. Our service team is
ready to assist you.
Parts & Accessories
Parts, filters, descalers, stainless
steel cleaners and more can be
purchased in the THERMADOR®
eShop or by phone.
USA
Service
800-735-4328
www.thermador.com/support
Parts & Accessories
www.thermador-eshop.com
Canada
Service
800-735-4328
www.thermador.ca
Parts & Accessories
Marcone - 800-287-1627
or
Reliable Parts - 800-663-6060
Réparation
Nous comprenons que vous avez
fait un investissement important
pour votre cuisine. C'est pourquoi
nous nous engageons à offrir un
service de qualité à vous comme
à votre appareil afin de vous
garantir des années de créativité
dans votre cuisine.
N'hésitez pas à contacter notre
département du service à la
clientèle STARMD si vous avez des
questions ou dans le cas peu
probable que votre appareil
THERMADORMD nécessite une
réparation. Notre équipe de
réparation est prête à vous aider.
Pièces et accessoires
Plusieurs pièces, filtres,
détartrants et nettoyants pour
l'acier inoxydable sont offerts dans
la boutique électronique eShop de
THERMADORMD ou par téléphone.
États-Uni
Réparation
800-735-4328
www.thermador.com/support
Pièces et accessoires
www.thermador-eshop.com
Canada
Réparation
800-735-4328
www.thermador.ca
Pièces et accessoires
Marcone - 800-287-1627
ou
Reliable Parts - 800-663-6060
Servicio técnico
Sabemos que usted ha realizado
una inversión considerable en su
cocina. Nos dedicamos a brindar
asistencia técnica para usted y su
electrodomésticode manera que
tenga muchos años de cocina
creativa.
No dude en comunicarse con
nuestro Departamento de
Atención al Cliente de STAR® si
tiene alguna pregunta o en el caso
poco probable de que su
electrodoméstico THERMADOR®
necesite servicio técnico. Nuestro
equipo de servicio técnico está
listo para asistirlo.
Piezas y accesorios
Puede comprar piezas, filtros,
productos para eliminar el sarro,
limpiadores para acero inoxidable
y más artículos en la tienda
electrónica de THERMADOR® o
por teléfono.
EE. UU.
Servicio técnico
800-735-4328
www.thermador.com/support
Piezas y accesorios
www.thermador-eshop.com
Canada
Servicio técnico
800-735-4328
www.thermador.ca
Piezas y accesorios
Marcone - 800-287-1627
o
Reliable Parts - 800-663-6060
*9000786377*
9000786377
02/16
1901 Main Street, Suite 600 • Irvine, CA 92614 • 1-800-735-4328
www.thermador.com • © 2016 BSH Home Appliances
 Loading...