

Theben RAMSES 850 OT Operating Instructions Manual

310 123
RAMSES 850 OT
쮕 Bedienungsanleitung 1
Uhrenthermostat
Operating instructions 18
Clockthermostat
Mode d’emploi 35
Thermostat à horloge
Instrucciones de servicio 52
Cronotermostato
Istruzioni per l’uso 69
Cronotermostato
Gebruiksaanwijzing 86
Klocktermostaat
t
RAM 701 RAM 722 RAM 713 EIB RAM 741 TR 610 top
RAM 366 top Cheops EIB

Table of Contents
1. Designated Use . . . . . . . . . . . . . . . . . . . . . . . . . . . . . . 18
2. Safety Instructions . . . . . . . . . . . . . . . . . . . . . . . . . . . . .18
3. Description and Mounting of the Device . . . . . . . . . . . .18
3.1. Device Overview . . . . . . . . . . . . . . . . . . . . . . . . . . . . . . . . . .19
3.2. Mounting and Electrical Connection . . . . . . . . . . . . . . . . . . . .20
Mounting . . . . . . . . . . . . . . . . . . . . . . . . . . . . . . . . . . . . . . .20
Electrical Connection . . . . . . . . . . . . . . . . . . . . . . . . . . . . . . .20
Connection of External Temperature Sensors . . . . . . . . . . . . . .20
4. Installation and Operation . . . . . . . . . . . . . . . . . . . . . . .21
4.1. Carrying out a Reset . . . . . . . . . . . . . . . . . . . . . . . . . . . . . . .21
4.2. Selecting the Language . . . . . . . . . . . . . . . . . . . . . . . . . . . . .21
4.3. Setting the Time / Date . . . . . . . . . . . . . . . . . . . . . . . . . . . . . .21
4.4. Selecting the Temperature Profile . . . . . . . . . . . . . . . . . . . . . .22
4.5. Party / Eco Program . . . . . . . . . . . . . . . . . . . . . . . . . . . . . . . .23
4.6. Info Button – Checking Current Room Temperature
and Settings . . . . . . . . . . . . . . . . . . . . . . . . . . . . . . . . . . . . .23
5. Control Systems / Types . . . . . . . . . . . . . . . . . . . . . . . . .24
5.1. Settings for Room-Temperature-Compensated Control . . . . . .24
5.1.1. Setting Target Temperature . . . . . . . . . . . . . . . . . . . . . . . . . . .24
5.1.2. Temporarily Changing the Target Temperature . . . . . . . . . . . . .25
5.2.. Setting for Weather-Compensated Control . . . . . . . . . . . . . . .25
5.2.1. Setting the Heating Curve . . . . . . . . . . . . . . . . . . . . . . . . . . .25
5.2.2. Temporarily Changing the Temperature Curve . . . . . . . . . . . . .26
5.2.3 Disconnecting the Heating . . . . . . . . . . . . . . . . . . . . . . . . . . .26
6. Programming . . . . . . . . . . . . . . . . . . . . . . . . . . . . . . . . .27
6.1. Setting the Target Temperature . . . . . . . . . . . . . . . . . . . . . . . .27
6.2. Setting the Time / Date . . . . . . . . . . . . . . . . . . . . . . . . . . . . . .27
6.3. Program P3 (Heating and hot water) . . . . . . . . . . . . . . . . . . .28
6.4. Setting the Holiday Program . . . . . . . . . . . . . . . . . . . . . . . . .31
6.5. Service Settings . . . . . . . . . . . . . . . . . . . . . . . . . . . . . . . . . . .31
6.5.1. Overview . . . . . . . . . . . . . . . . . . . . . . . . . . . . . . . . . . . . . . . .31
6.5.2. Selecting the Display Type . . . . . . . . . . . . . . . . . . . . . . . . . . .31
6.5.3. Selecting Hot Water . . . . . . . . . . . . . . . . . . . . . . . . . . . . . . . .32
6.5.4. Setting the Wall Compensation . . . . . . . . . . . . . . . . . . . . . . .32
ENGLISH
6.5.5. Selecting the Language . . . . . . . . . . . . . . . . . . . . . . . . . . . . .32
6.5.6. Enabling Household Water by Selecting “hot water immediately” 32
6.5.7. Heating Switch-Off Depending on Outdoor
Temperature (only Weather-Compensated Control) . . . . . . . . .33
7. Delivery / Software Reset . . . . . . . . . . . . . . . . . . . . . . . .33
8. Maintenance and Repair . . . . . . . . . . . . . . . . . . . . . . . .33
9. Disposal . . . . . . . . . . . . . . . . . . . . . . . . . . . . . . . . . . . . .33
10. Technical Data . . . . . . . . . . . . . . . . . . . . . . . . . . . . . . . .34
1. Designated Use
The RAMSES 850 OT regulates the room and household water temperature depending on room or weather compensation and time.The room
thermostat must only be operated with heat generators having the symbol OpenTherm or in connection with an OT-box 815/ 816/ 817 or
821. The system consists of RAMSES 850 OT and a OT-Box. It switches
an electrical load with a maximal current consumption of 8 (1)A (e. g. a
circulation pump, a burner or a motor mixing valve) on and off depending on time and room temperature. Use the system only in dry rooms
with impurities that are usual for flats or houses.
Designated use also includes adherence to the operating and mounting
instructions.Any other use is considered contrary to the designated use.
The manufacturer cannot be held liable for damages resulting from such
use.
2. Safety Instructions
The connection and installation of electrical devices must
only be carried out by a qualified technician.
The national regulations and respective safety instructions
are to be observed. Interferences and changes to the device will lead
to cancellation of the warranty.

3. Description and Mounting of the Device
3.1. Device Overview
Hinged cover
Display of the day of week
(1 = Monday, 2 = Tuesday, etc.)
Multifunctional display, e.g.
“Room temperature 20,0˚C”
Display PARTY - or
ECO program active
Display of the switch phases
RESET button
Icon bar for display of the
programming level
(rotary switch position MENU)
Enable household water
Modification buttons
+/–
Rotary switch for program selection
Button OK (confirmation of settings/
selection or programming)
Button ESC (cancellation of
programming entries)
Info button for checking
the settings
19
ENGLISH
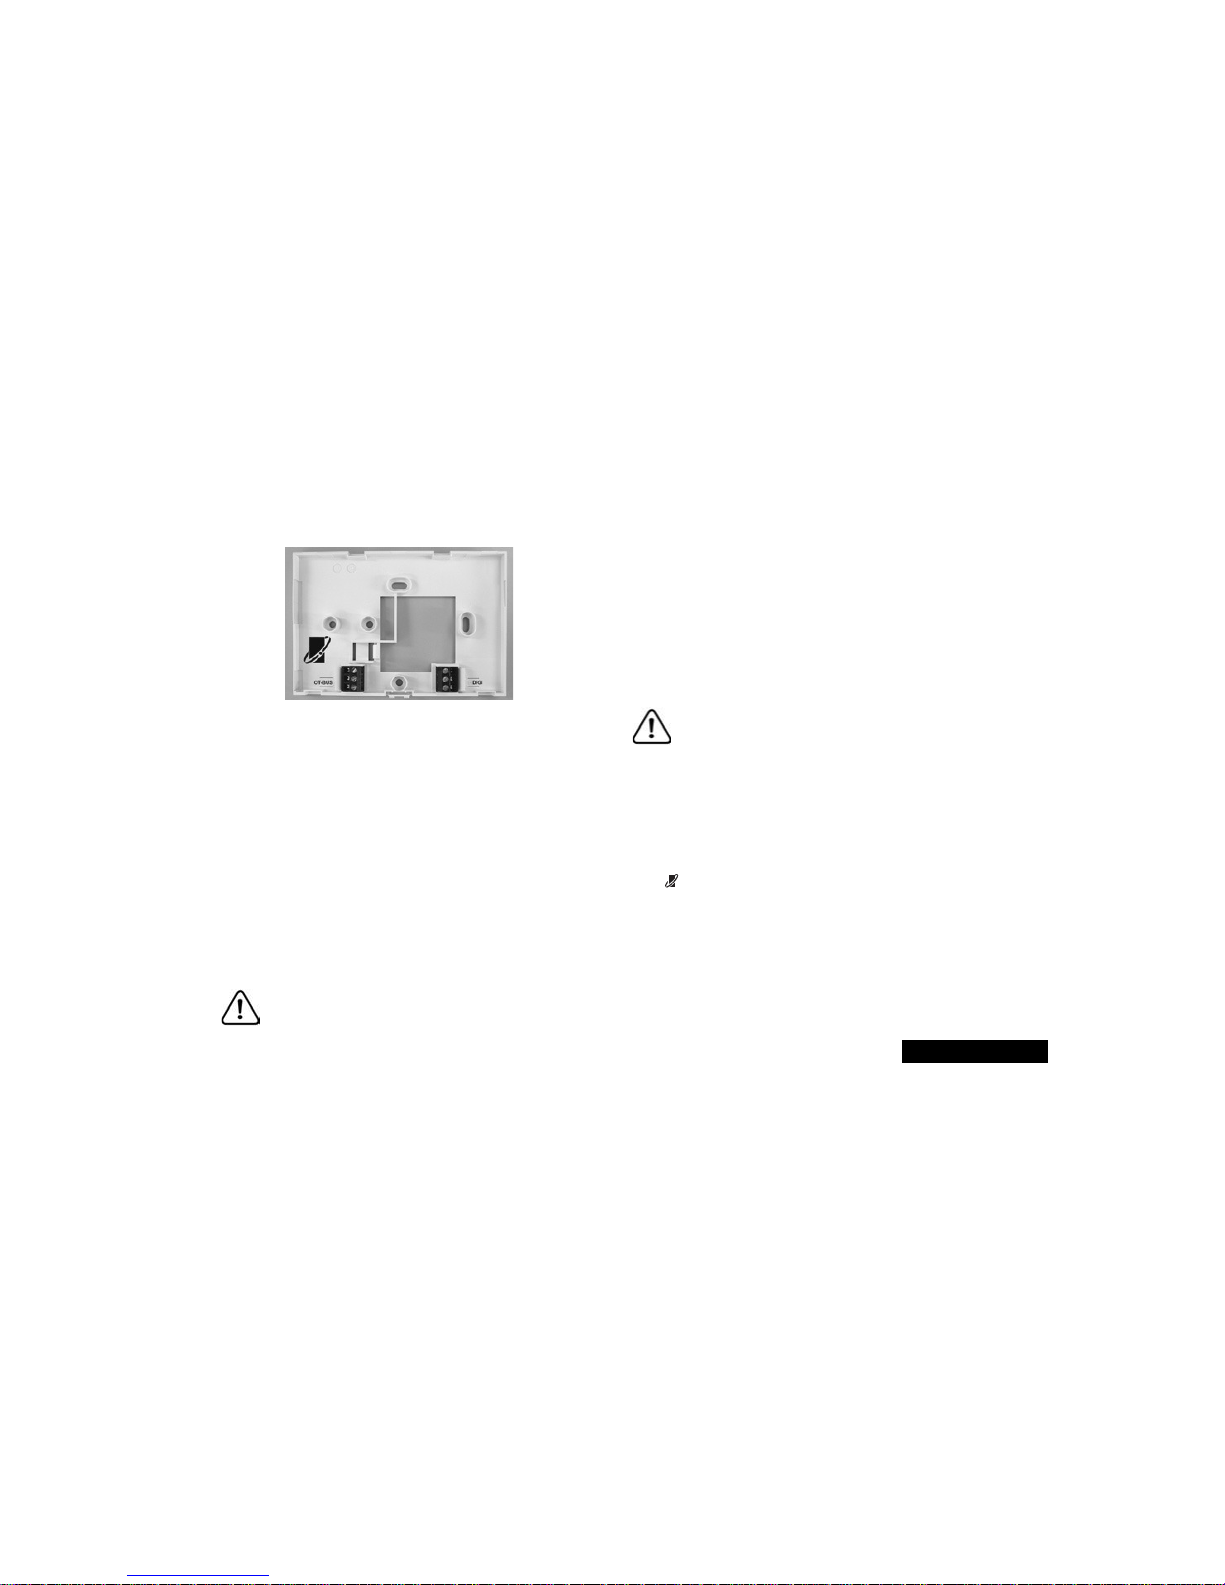
3.2. Mounting and Electrical Connection
Mounting
• First, fix the back plate of the RAMSES 850 top using the
enclosed mounting material. Use the back plate as
drilling pattern.
• Do not place the room thermostat to an exterior wall.
The ideal place is an interior wall at about 1.5 m height.
• Avoid installation near radiators, windows, televisions or
heat dissipating devices.
The room thermostat measures the temperature of the room in
which it is placed and regulates it according to the programmed specifications. Therefore, avoid an unintentional interference with the
measurement of temperature; errors could occur in the temperature
control.
Connection of External Temperature Sensors
You can connect an external temperature sensor to the terminal
with the designation “DIGI”. The room thermostat automatically
recognizes the sensor and regulates the temperature measured by
the remote sensor.
Electrical Connection
The heating boiler with OpenTherm connection provides
the thermostat with power. For that purpose the boiler is
equipped with a safety transformer.
The two-wire connection (OpenTherm) is not polarized, i.e. the
wires can be connected as desired to the terminals of the heating
boiler.
Do not lay the thermostat cable in the same cable channel as the
230 V mains cable.
Do not lay it parallel to a power cable.
Before connecting the thermostat, disconnect the heating boiler
from mains by unplugging the mains cable.
Attention
The thermostat must not be connected directly to a 24V
connection or to the terminal for an ON/OFF-thermostat.
This could cause irreparable damage to the thermostat.
Make sure that the thermostat is connected to the right terminals
before you connect the heating boiler again to the power supply.
Interferences and changes to the thermostat will lead to the loss
of warranty claims.
Note
Only connect this thermostat to a boiler with the OpenTherm
Logo .
20
ENGLISH
Deutsch
English
Francais
Italiano
Espanol
NL
OK
OK
the
Hour
0:00
OK
Hour
15:00
OK
Minute
15:34
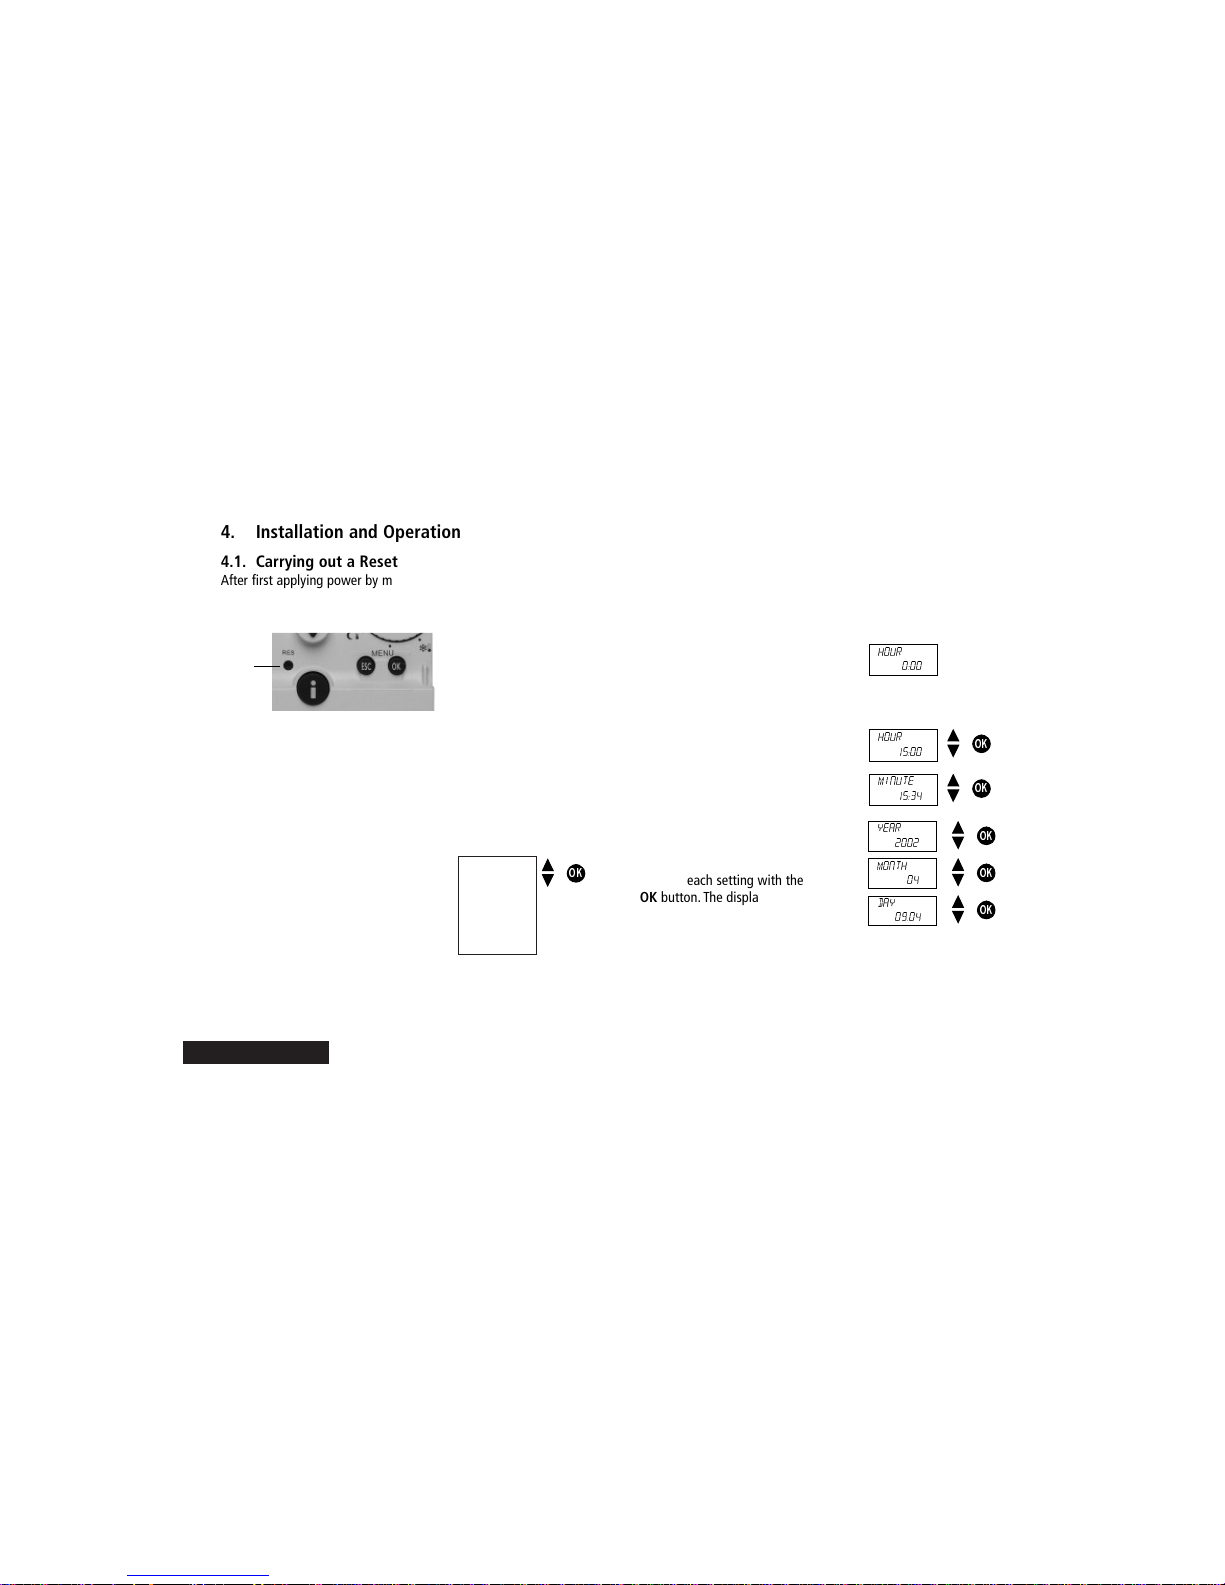
4. Installation and Operation
4.1. Carrying out a Reset
After first applying power by means of the OpenTherm connection,
you must carry out a reset. Open the hinged cover and press on the
reset button with a pointed object.
2. Select your language with the ▲ or
▼ buttons. The available languages
are displayed one after the other.
Confirm with the OK button.
3. The display will then automatically switch to the time setting.
Note: The language can also be changed in the “settings” menu
(see chap. 6.5.5., page 32)
4.3. Setting the Time / Date
After selecting your language, the display automatically switches to
the time and date setting. With the ESC button you can always
return to the previous programming step and change the setting
already entered.
1. The display shows the time.
2. Use the buttons ▲ and ▼
to set the current time
Set the hour and confirm with the
OK button.
Set the minutes and confirm with the
OK button.
4.2. Selecting the Language
1. After the first reset or the reset to factory setting, the display
shows the language selection.
(Resetting the device to factory setting, see chap. 7, page 33)
OK
Year
2002
Month
04
OK
Day
09.04
OK
3. The display shows the date.
Set the year, month
and day one after the other.
Confirm each setting with the
OK button. The display changes
automatically.
4. The display changes now automatically to the set automatic mode
(e.g. display of the target temperature).
Note: Time and date as well as setting of the automatic changeover
from summer to winter time can also be changed in the
”HOUR/DATE“ menu (see chap. 6.2., page 27).
21
Reset
deutsch
nl
englisch
francais
italiano
dansk
espanol
ENGLISH
 Loading...