

Page 1

User's Guide
SLAU282 – April 2009
TSC2117EVM-K
This user’s guide describes the operation of the TSC2117EVM-K evaluation module (EVM). The EVM
features a TSC2117 touch screen controller with stereo audio codec, amplifiers for speakers and
headphones and a digital signal processing module. Together with the USB-MODEVM board, the
TSC2117 Control Software and a PC running Windows™ XP it is a plug-and-play solution to evaluate the
capabilities of the TSC2117.
The information in a caution or a warning is provided for your protection. Read each caution and warning
carefully.
Contents
1 EVM Overview ............................................................................................................... 2
1.1 Introduction .......................................................................................................... 2
1.2 Box Contents ........................................................................................................ 2
1.3 Related Documentation From Texas Instruments .............................................................. 2
2 EVM + PC .................................................................................................................... 3
2.1 EVM Preparation .................................................................................................... 3
2.2 Control Software .................................................................................................... 4
2.3 Installation ........................................................................................................... 4
2.4 Concepts ............................................................................................................. 4
2.5 Main Window ........................................................................................................ 5
2.6 Dialogs and Active Objects ........................................................................................ 6
3 EVM Hardware ............................................................................................................. 19
3.1 Connectors and Jumpers......................................................................................... 19
3.2 EVM Schematics .................................................................................................. 22
3.3 EVM Bill of Materials .............................................................................................. 23
Appendix A USB-MODEVM Schematic ...................................................................................... 25
Appendix B USB-MODEVM Bill of Materials ................................................................................ 26
Appendix C USB-MODEVM Protocol ......................................................................................... 28
1 TSC2117 EVM + USB MODEVM.......................................................................................... 3
2 Main Window ................................................................................................................. 5
3 Initialization Script ........................................................................................................... 7
4 Command Dialog ............................................................................................................ 8
5 Register Inspector ........................................................................................................... 9
6 Clock and Digital Signal Routing ......................................................................................... 11
7 Digital Configuration: Codec Clock / PLL ............................................................................... 12
8 Advanced Clock Settings. ................................................................................................. 13
9 Audio Interface .............................................................................................................. 14
10 Touch Screen Active Object .............................................................................................. 15
11 SAR ADC Data ............................................................................................................. 16
12 Automatic Gain Control .................................................................................................... 17
13 DRC Transfer Function and DRC Dialog ............................................................................... 18
I2S, I2C are trademarks of Koninklijke Philips Electronics N.V.
Windows is a trademark of Microsoft Corporation.
SPI is a trademark of Motorola, Inc.
SLAU282 – April 2009 TSC2117EVM-K 1
Submit Documentation Feedback
List of Figures
Page 2

EVM Overview
1 EVM Overview
1.1 Introduction
www.ti.com
List of Tables
1 Analog I/O ................................................................................................................... 19
2 Touch Screen ............................................................................................................... 19
3 GPI ........................................................................................................................... 19
4 Jumpers ..................................................................................................................... 20
5 Expansion Connectors P12/J12 .......................................................................................... 20
6 Expansion Connectors P22/J22 .......................................................................................... 21
7 Power Supply ............................................................................................................... 21
B-1 USB-MODEVM Bill of Materials .......................................................................................... 26
C-1 USB Control Endpoint HIDSETREPORT Request .................................................................... 28
C-2 Data Packet Configuration ................................................................................................ 28
C-3 GPIO Pin Assignments .................................................................................................... 31
The TSC2117EVM-K features a TSC2117 touch screen controller with stereo audio codec, amplifiers for
speakers and headphones and a digital signal processing module.
Together with the USB-MODEVM board, the TSC2117 Control Software and a PC running Windows XP, it
is a plug-and-play solution to evaluate the capabilities of the TSC2117.
The USB-MODEVM board contains a TAS1020B streaming audio USB controller, which enumerates as a
USB audio class device.
When the USB-MODEVM + TSC2117 EVM is connected to a PC running Microsoft Windows XP, it will be
recognized as a sound card. Once the TSC2117 is configured using the TSC2117 control software, any
audio playback and record software on the PC that uses the Windows audio subsystem (sound card) can
use the TSC2117.
Besides configuration, the TSC2117 control software allows evaluation of the touch screen module of the
TSC2117. The TSC2117 is compatible with 4 wire resistive touch screens (not provided by TI).
1.2 Box Contents
The following items ship with the TSC2117EVM-K:
• TSC2117 EVM
• USB-MODEVM
The control software required to operate the EVM is available from the TSC2117 product folder at
http://www.ti.com
1.3 Related Documentation From Texas Instruments
TSC2117 data sheet (SLAS550 )
TSC2117EVM-K 2 SLAU282 – April 2009
Submit Documentation Feedback
Page 3

TSC2117_RGZ_EVM
SW2
J6 Speakers
J1 LineIn
USB-MODEVM
J8
J4 Touchscreen
Headphones
J7 USB
ONOFF
www.ti.com
2 EVM + PC
This chapter explains how to use the TSC2117 EVM with a PC running Windows XP.
2.1 EVM Preparation
To interface the TSC2117 EVM with a PC using USB, plug the TSC2117 EVM onto the USB-MODEVM as
shown in Figure 2 1. TSC2117 EVM + USB MODEVM.
EVM + PC
2.1.1 Analog Signal Connections
• Connect a headphone to J8 (3,5 mm jack)
• Connect 8- Ω speakers to J6 (4 screw terminal)
• Connect a line-level audio source to J1 (3,5 mm jack)
2.1.2 Touch Screen Connections
The TSC2117 EVM is compatible with 4-wire resistive touch screens. Connect the touch screen to J4 (X+,
X–, Y+, Y–).
Note: USB-MODEVM configuration
To control the TSC2117 from the PC via the USB-MODEVM, set switch SW2 position 1, 3, 4,
5, 6, 7 to ON and position 2 and 8 to OFF.
– Left speaker to SPLN and SPLP
– Right speaker to SPRN and SPRP
Figure 1. TSC2117 EVM + USB MODEVM
SLAU282 – April 2009 TSC2117EVM-K 3
Submit Documentation Feedback
Page 4

EVM + PC
2.2 Control Software
2.3 Installation
www.ti.com
The TSC2117 control software exposes most features of the TSC2117 through an intuitive graphical user
interface.
Note: Before Windows on the PC can use the TSC2117EVM-K as a sound card, the TSC2117 on
the EVM must be configured (sampling rate, audio routing, internal amplifier settings etc.)
with the TSC2117 control software.
Download the TSC2117 control software (SLAC264 ) from the TSC2117 product folder at http://www.ti.com
and launch the program (SLAC264 ).
This file is a self-extracting archive. The default target folder is:
C:\Program Files\Texas Instruments\TSC2117
Click the Unzip button to complete the installation.
The TSC2117 control software is now available in the target folder. The name of the executable is
TSC2117.exe
To launch the TSC2117 control software, navigate to the target folder with the Windows Explorer and
double click TSC2117.exe.
2.4 Concepts
The TSC2117 control software presents a block diagram view of the TSC2117 (or select modules within
the TSC2117).
The block diagram consists of active objects that can react to user input (for example switches or
amplifiers with variable gain that show a volume control on a mouse click event).
Note: Each active object will change color to red if the mouse cursor is above the object. Clicking
the object will trigger its function.
Some active objects are linked to control register(s) of the TSC2117 in a two way fashion. If an EVM is
connected, the control software will update the appropriate register(s) whenever an active object is
triggered. If a register that is linked to an active object is changed via other components (for example the
script interpreter or the register inspector), the active object will change its state accordingly.
The control software will automatically detect a TSC2117EVM-K once it is connected to a USB port of the
PC.
If no TSC2117EVM-K is connected to the PC, the control software changes to a simulation mode, where it
is possible to retrieve script commands based on user input within the block diagram.
TSC2117EVM-K 4 SLAU282 – April 2009
Submit Documentation Feedback
Page 5

www.ti.com
2.5 Main Window
EVM + PC
Figure 2. Main Window
At the top of the main window is a tool bar with buttons to change between four different use cases of the
TSC2117:
• Full featured TSC2117
• Playback only
• Record only
• Touch Screen only
By default, the control software displays the full featured block diagram of the TSC2117.
Each use case has its own initialization script, which will run if a use case is selected by clicking on one of
the use case buttons. The initialization script contains register settings for the TSC2117 to configure the
device for a specific use case.
The toolbar contains a control that determines the zoom factor. Change the zoom by selecting the desired
zoom factor.
To move the block diagram, click on a blank area within the block diagram and drag the diagram with the
mouse.
At the bottom of the main window is a status bar that provides information about the state of the
communication between the control software and the TSC2117EVM-K. It also shows hints about elements
in the block diagram, for example the I2C page and register / bit location of a selected switch.
Audio signal paths (both digital and analog) will change color from black to
• Blue for left audio output
• Turquoise for right audio output
SLAU282 – April 2009 TSC2117EVM-K 5
Submit Documentation Feedback
Page 6
EVM + PC
• Magenta for audio input
once they are activated via switches. This feature visualizes all audio paths and immediately highlights if a
path is disabled.
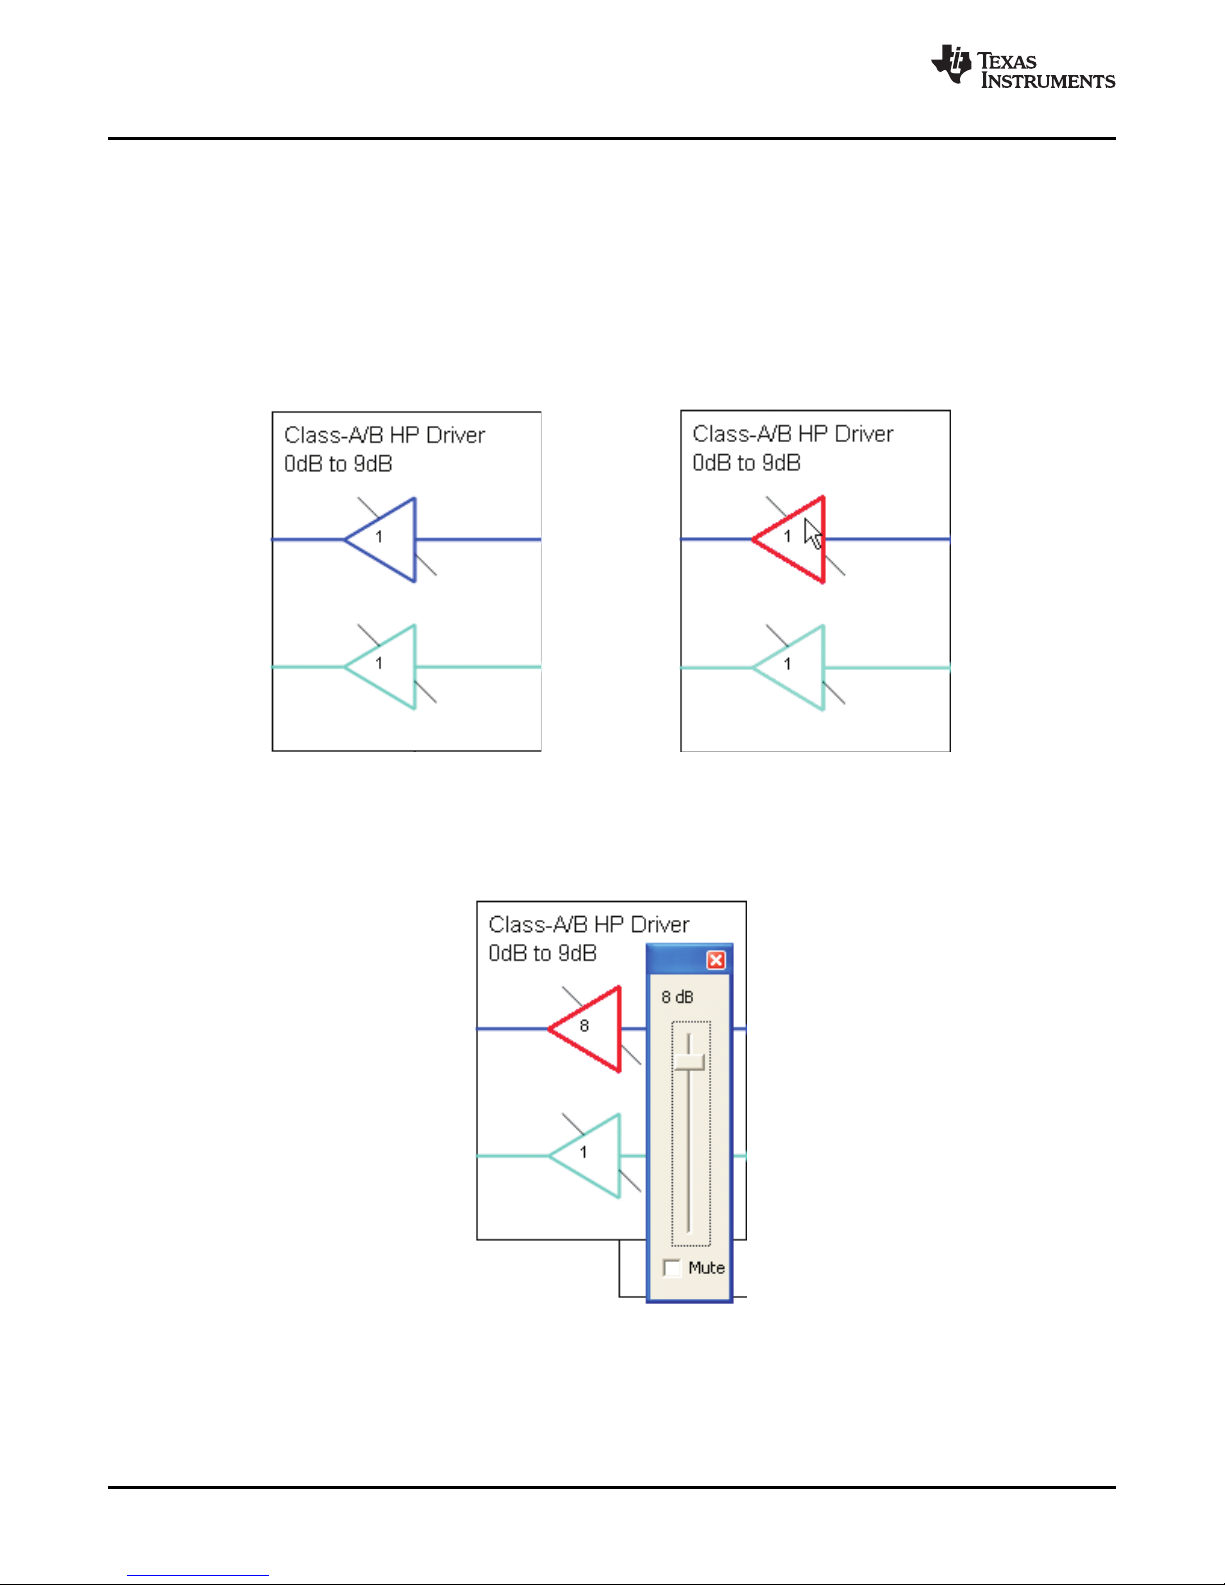
2.5.1 Using Active Objects
Moving the mouse pointer over an active object will light up the active object (the color of the object turns
red).
For example, the Class-A/B HP Driver left amplifier active object will turn from its inactive state to its active
state when the mouse pointer enters the amplifier symbol:
www.ti.com
Clicking the activated object will trigger its function. In the case of the amplifier active object, the function
is a volume control. Moving the volume control slider changes the volume setting of the amplifier (it is also
possible to change the volume by clicking onto the number within the amplifier symbol and typing the new
gain setting).The control software updates the appropriate register in the TSC2117 and as a result the
volume on the headphone output will change accordingly.
2.6 Dialogs and Active Objects
The TSC2117 control software contains several dialog windows that give access to additional features.
Most dialogs are linked to active objects and are opened by clicking on the active object.
A few dialogs are not linked to active objects and are opened using the View menu.
6 TSC2117EVM-K SLAU282 – April 2009
Submit Documentation Feedback
Page 7
www.ti.com
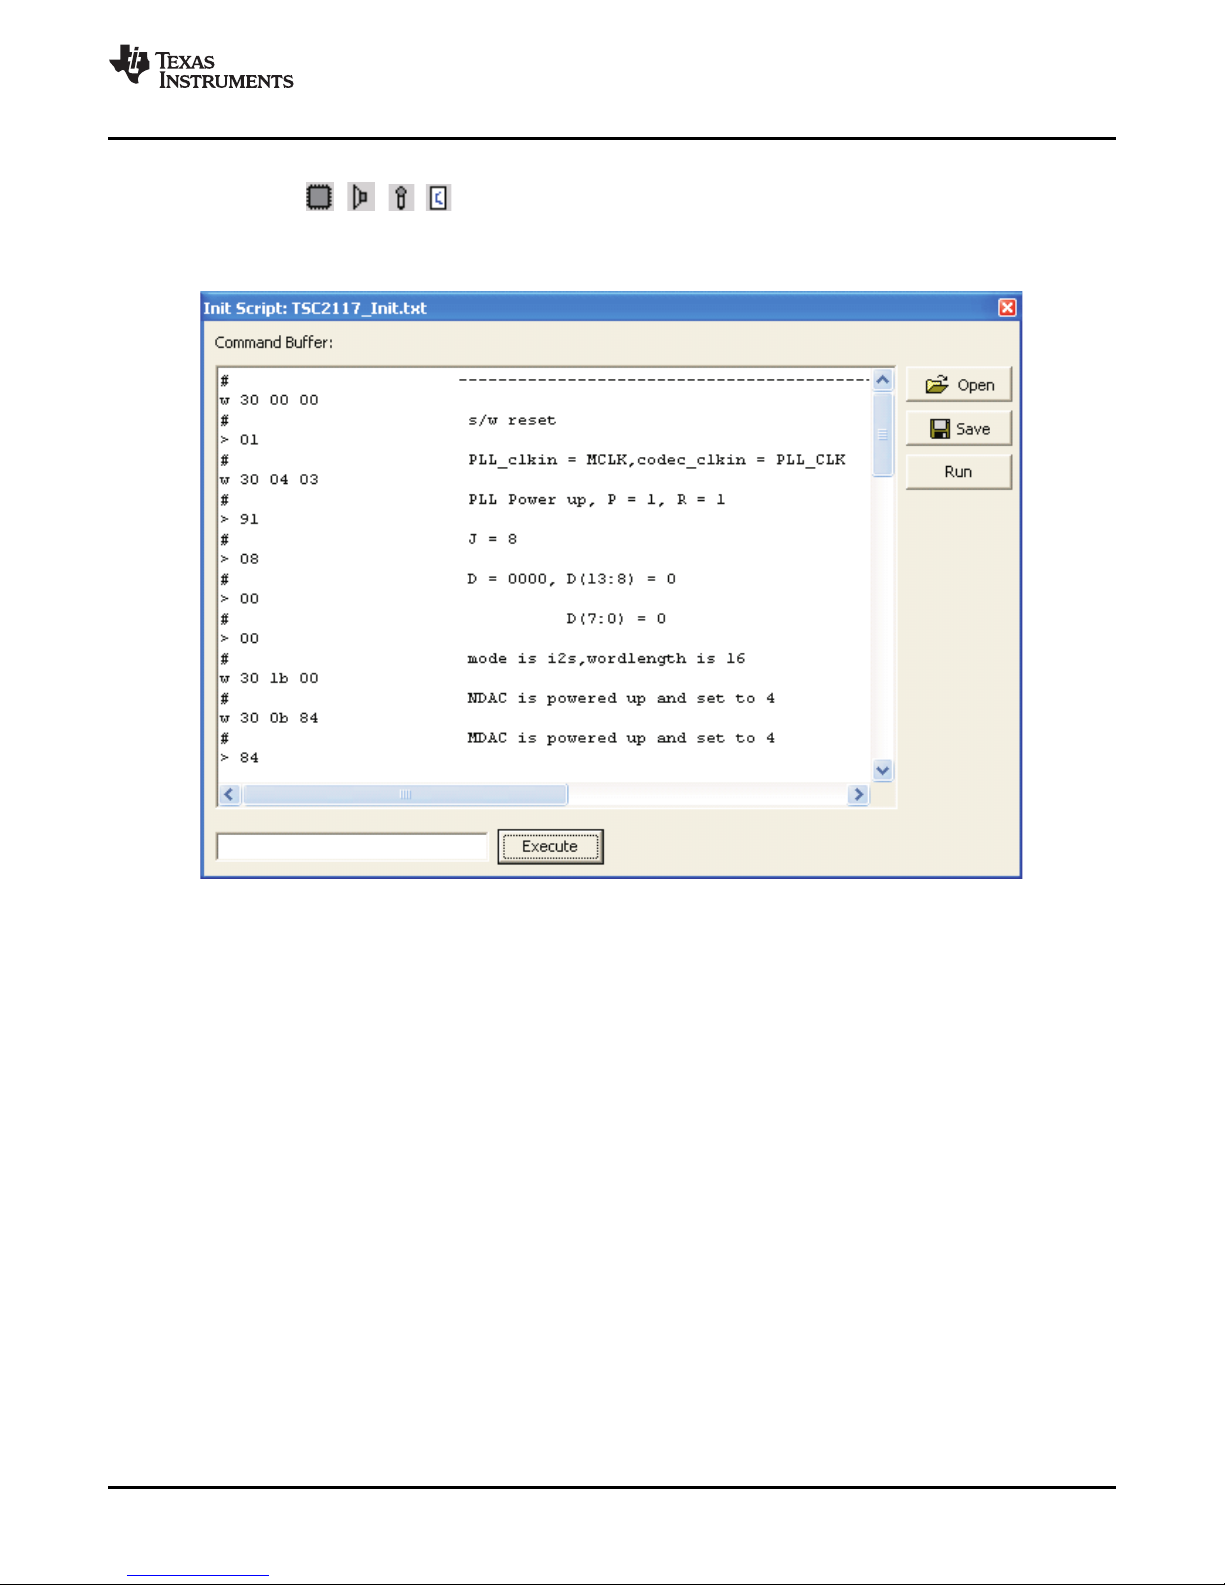
2.6.1 Init Script Dialog
Each use case , , , owns a unique initialization script which will automatically run when a
TSC2117EVM-K is detected or if the user selects another use case.
To show or edit the initialization script, choose View->Init Script … from the main window menu bar.
EVM + PC
Figure 3. Initialization Script
Click the Run button to run the script again. For further information about the script syntax, see Figure 3 .
SLAU282 – April 2009 TSC2117EVM-K 7
Submit Documentation Feedback
Page 8
EVM + PC
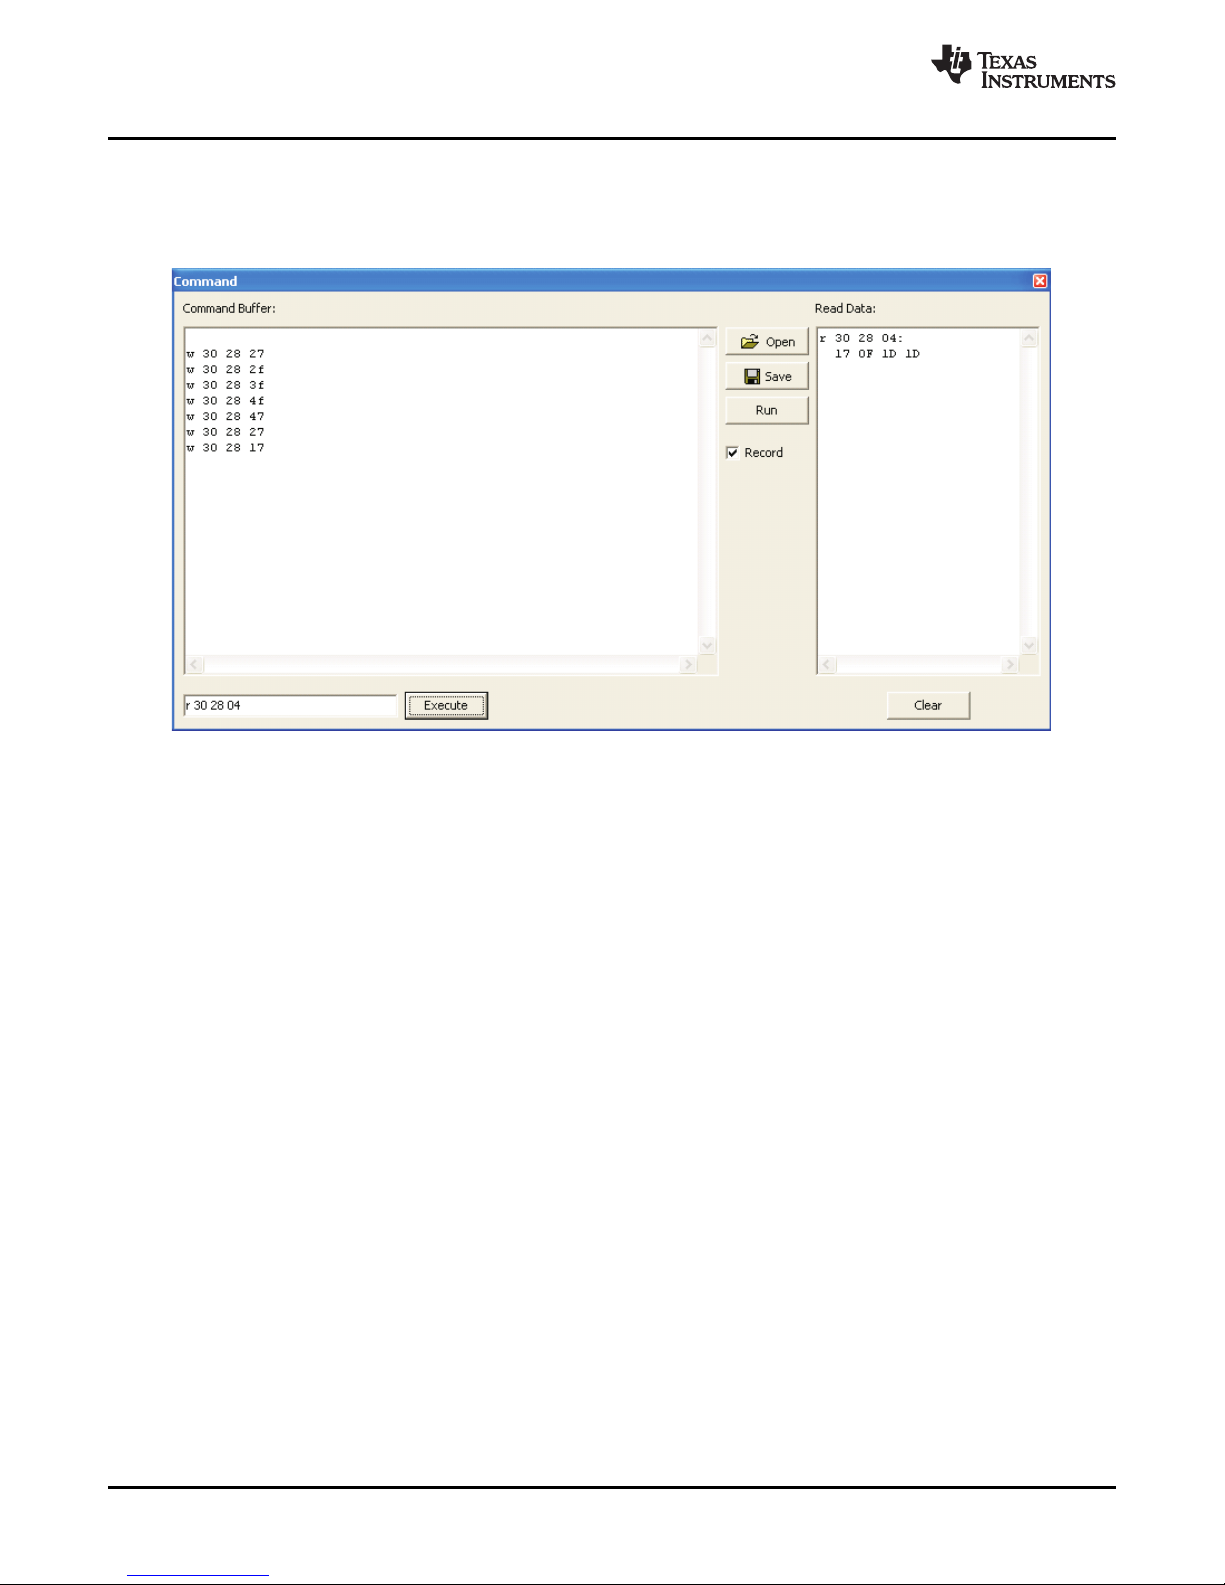
2.6.2 Command Dialog
Open the command dialog (View->Command … ) to write, edit, load, save and run command scripts.
Command scripts are text files that contain commands to communicate with the TSC2117. The syntax is
described in Figure 4 .
www.ti.com
Figure 4. Command Dialog
• The main area of the command dialog is command buffer (editable text) which contains the command
script. To run the command script, click the Run button.
• The smaller read only text area on the right side of the command dialog displays control data read
from the TSC2117. The Clear button clears the Read Data field.
• The one line text edit field on the left bottom allows single command execution.
• The Record check box enables recording of commands generated by the control software.
Figure 4 shows a recording of the volume control for the left Class-A/B HP Driver amplifier (note that the
Record checkbox is checked).
A single command to read four bytes starting at address 0x28 was executed and the result is displayed in
the Read Data field.
TSC2117EVM-K 8 SLAU282 – April 2009
Submit Documentation Feedback
Page 9
www.ti.com
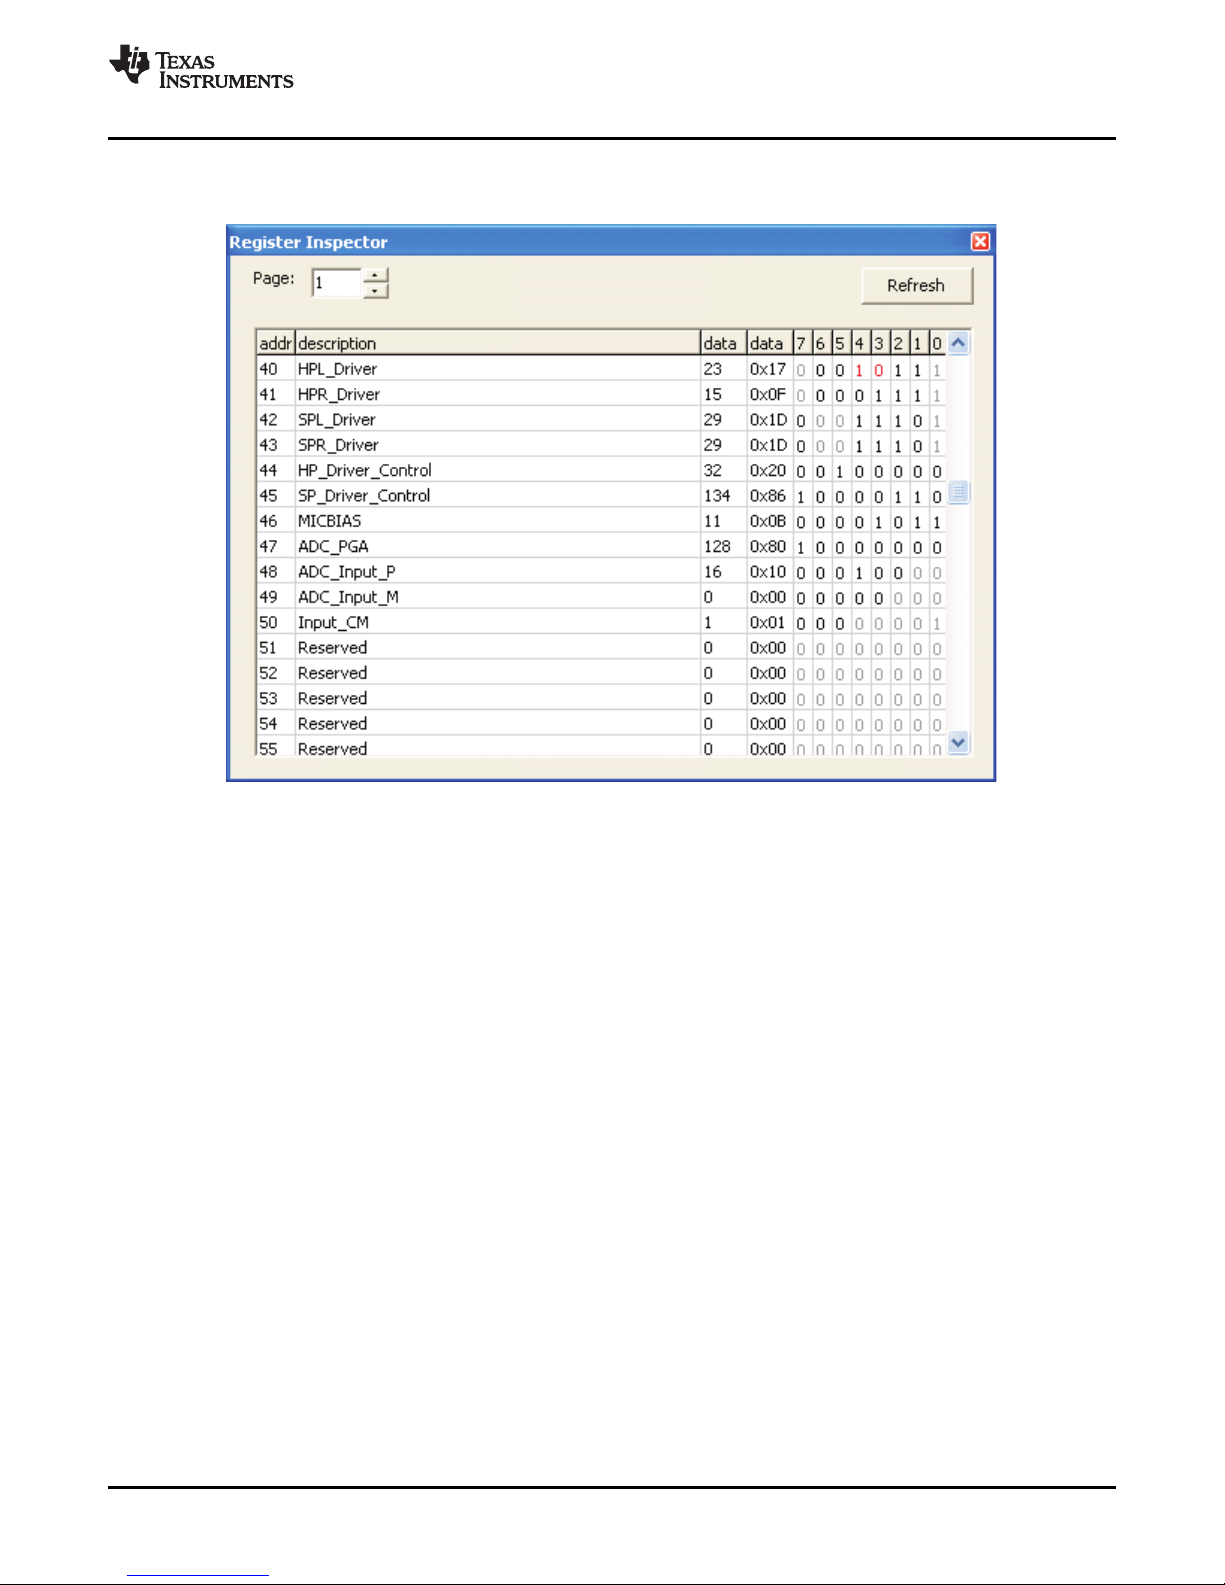
2.6.3 Register Inspector
The register inspector dialog (View->Register Inspector … ) gives access to all registers of the TSC2117.
EVM + PC
Figure 5. Register Inspector
The register inspector displays the content of the TSC2117 registers. The control software will read all
TSC2117 registers when a TSC2117EVM-K is detected. To force reading the content of one page, click
the Refresh button.
• The Page edit field selects the page to be displayed.
• The addr column shows the address of the registers within the selected page in decimal notation.
• The description column contains a description for each register. If the register has no function
assigned, it is declared Reserved.
• The data columns show the data of each register (one byte). The first data column uses decimal
notation, the second uses hexadecimal notation. It is possible to change the register value by clicking
into one of the data fields and typing the new value (either decimal or hexadecimal).
• The numbered columns show the register content in binary notation. Read/Write bits are shown solid
black or red; read only bits are gray or dark red. Red numbers represent bits that recently changed. To
change a single writeable bit, click on the bit and it will flip.
SLAU282 – April 2009 TSC2117EVM-K 9
Submit Documentation Feedback
Page 10
EVM + PC
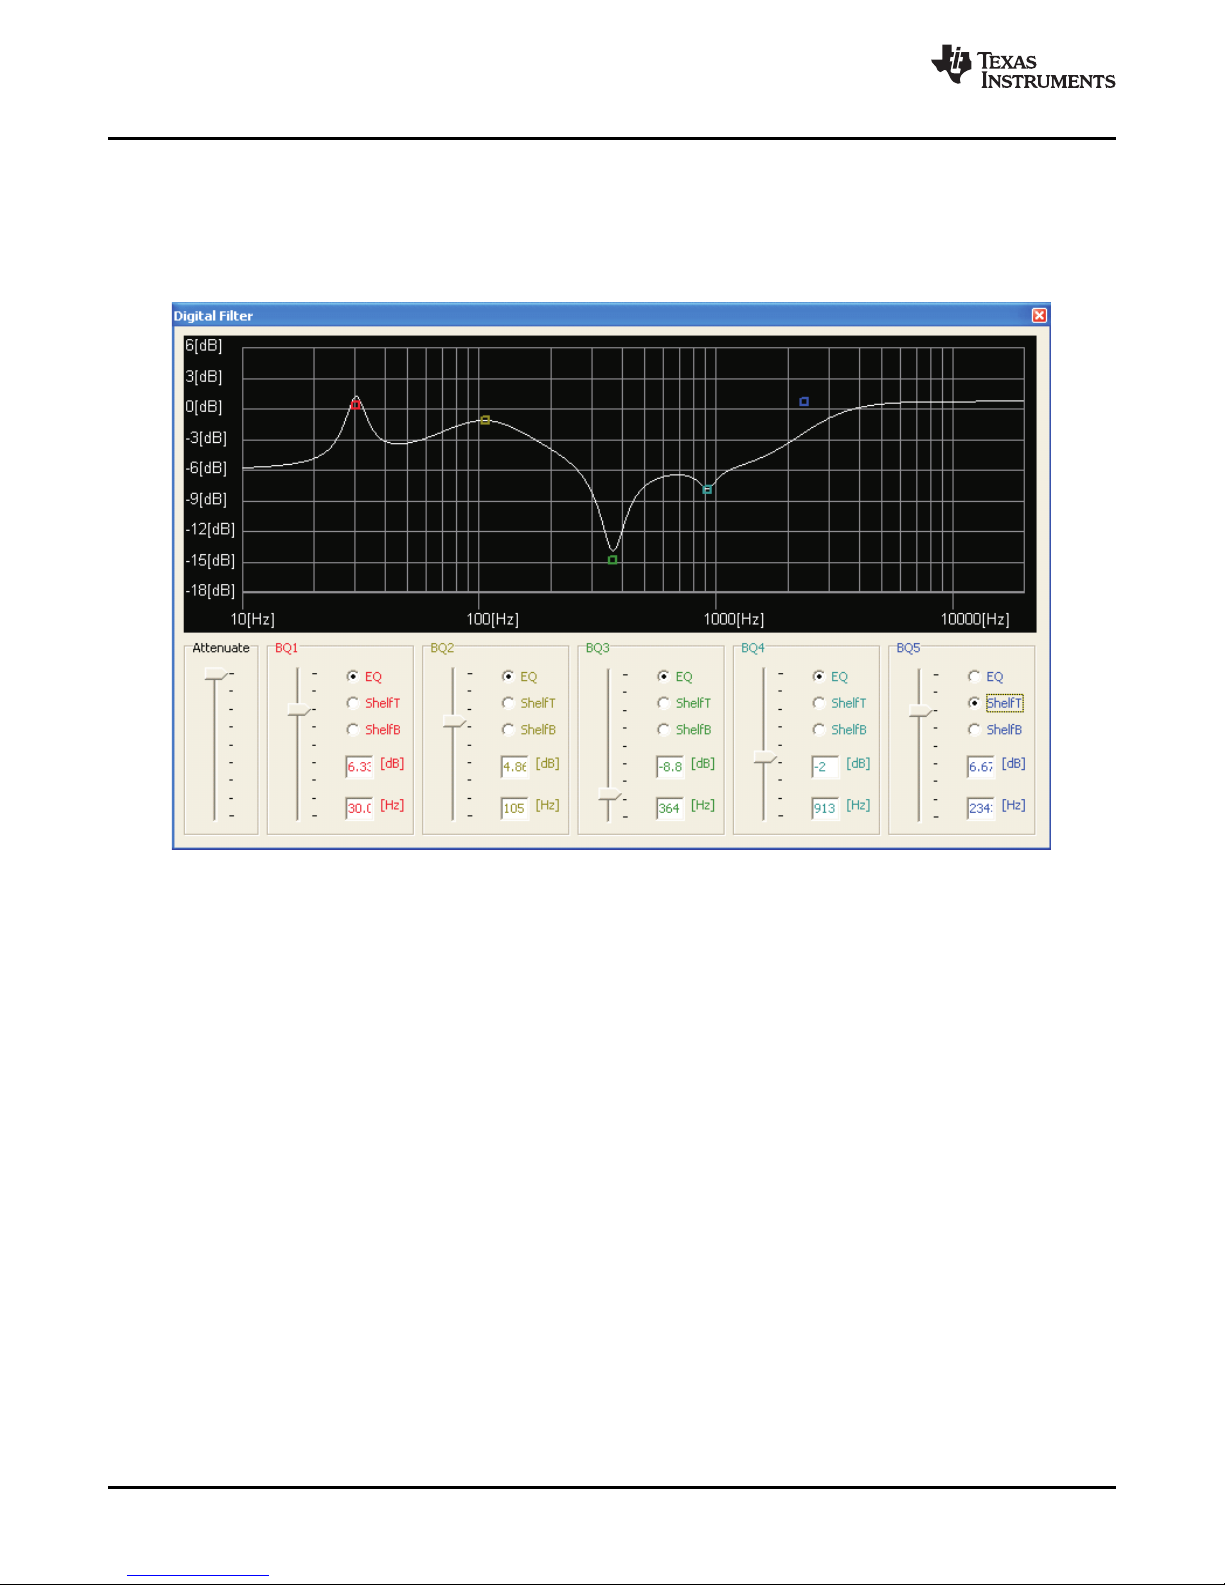
2.6.4 DAC Filter
One of the digital signal processing blocks of the TSC2117 implements five digital biquad filters. The DAC
digital filter dialog (View->DAC Filter … ) allows real time graphical manipulation of the digital filters.
The control software will automatically configure the digital signal processing block when the DAC digital
filter dialog is opened.
www.ti.com
The digital filter dialog limits the range of each digital biquad filter to +/-12[dB] (this is an arbitrary limitation
for demonstration purposes).
• Each biquad has its own unique handle with a unique color. Each handle will light up white if the
mouse pointer is in the vicinity, showing that it can be selected. To change the frequency and gain of a
biquad, grab and drag its handle.
It is also possible to change the gain using the slider for each biquad.
• Each biquad can be configured for parametric EQ, Shelf Treble or Shelf Bass. If it is configured for EQ,
press the shift key before selecting the handle to adjust the bandwidth of the EQ using the mouse
pointer.
• Due to digital range limitations, the biquads will automatically scale, if the biquad coefficients exceed
the limitations.
The coordinate system will shift accordingly to reflect the resulting attenuation.
• To avoid clipping, add additional attenuation with the Attenuate slider.
• To retrieve the biquad coefficients, open the command dialog (see 0) and check Record.
TSC2117EVM-K 10 SLAU282 – April 2009
Submit Documentation Feedback
Page 11
www.ti.com
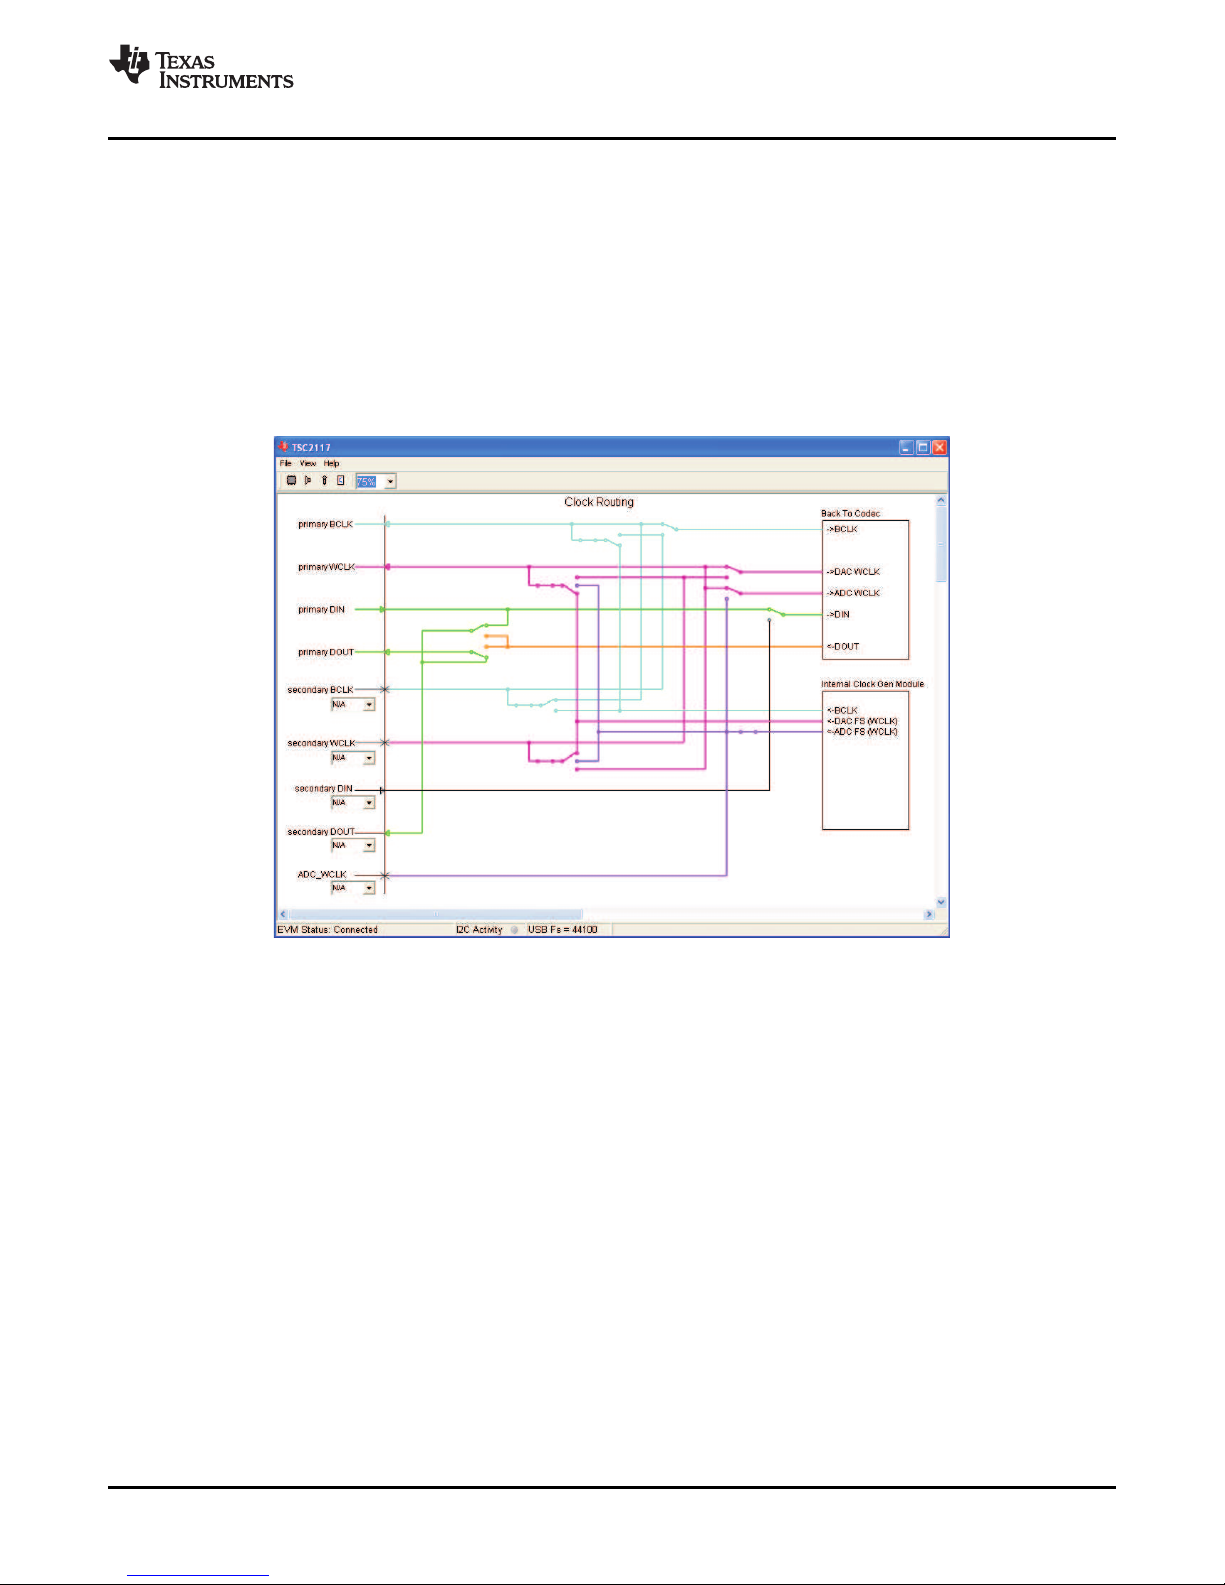
2.6.5 Clock and Digital Signal Routing
The TSC2117 has a flexible and complex clock and digital signal routing architecture.
Two processors can connect to the TSC2117 using two separate I2S™ interfaces: The primary I2S
interface has dedicated pins whereas the secondary I2S interface signals can be assigned to a selection
of pins.
The TSC2117 has an on-chip clock generation module which can be configured to generate the sampling
rate, modulator clocks, converter clocks, bit clock and word clock.
Click on the “Digital Audio Processing Serial Interface” active object (if it is not within the current scope of
the main window, drag the block diagram to the left until the active object appears). This will change the
block diagram to the clock and digital signal routing diagram:
EVM + PC
Figure 6. Clock and Digital Signal Routing
The clock and digital signal routing diagram shows the current state of the TSC2117 routing configuration
and allows interactive manipulation.
• Each clock or signal source has its own unique color. For example, the BCLK signal from the internal
clock generation module has a turquoise color.
• To trace the routing of a specific signal, follow its color. The example in Figure 6 shows that the BCLK
signal from the internal clock generation module is routed to the primary I2C™ BCLK pin (which is
configured as an output), to the secondary I2S BCLK signal (which is not connected to a pin) and to
the BCLK input of the codec (ADC and DAC within the TSC2117).
• To change the definition of a pin (input or output), click the active object (arrow) that belongs to the pin.
Only pins that can change between input and output are linked to such an active object. The clock
routing diagram will automatically change to reflect the new routing.
• Some of the switches within the diagram are active objects, which can be manipulated using the
mouse pointer. Other switches open or close depending on the state of the associated pin.
• To assign a pin to a signal of the secondary I2S interface, choose one of the available pins in the drop
down box that belongs to the signal. The list of available pins will change automatically depending on
the assignment of other signals to pins.
• Click on the “Back To Codec” active object to return to the previous block diagram.
• Click on the “Internal Clock Gen Module” active object to display the digital configuration dialog.
SLAU282 – April 2009 TSC2117EVM-K 11
Submit Documentation Feedback
Page 12
EVM + PC
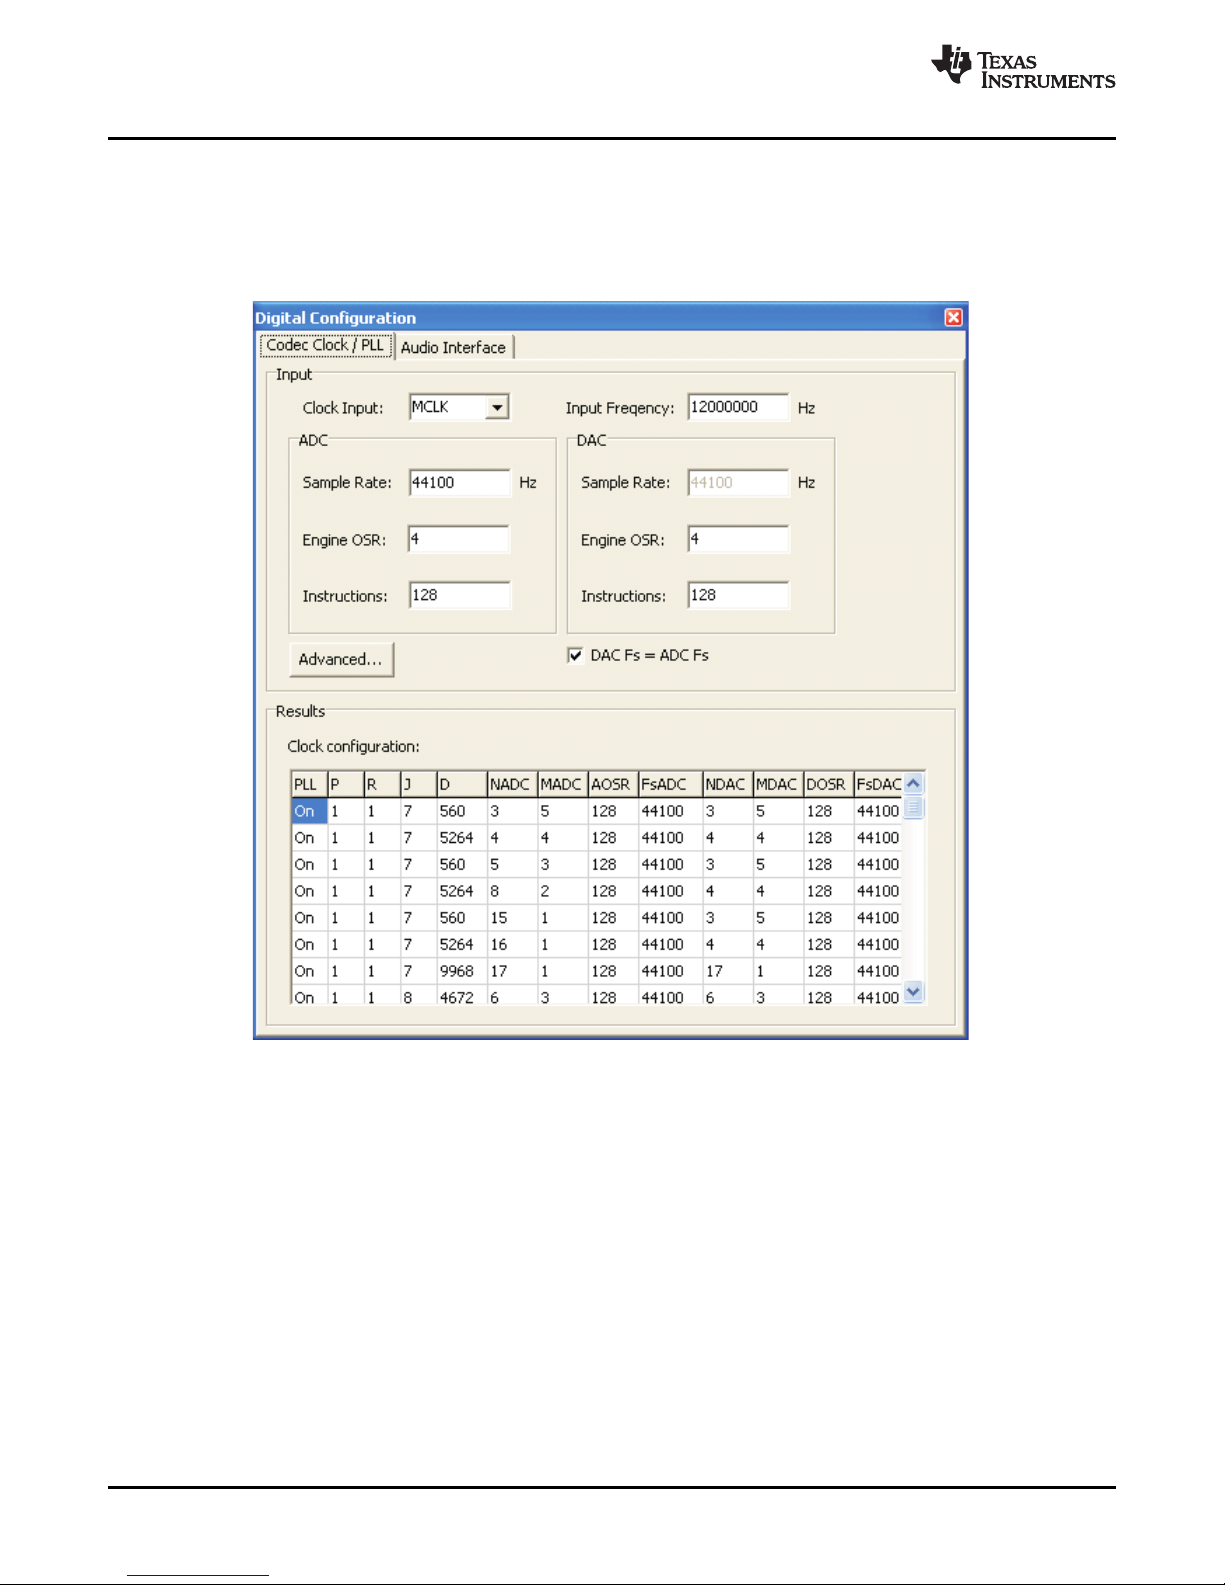
2.6.6 Digital Configuration
www.ti.com
The digital configuration dialog gives access to the codec clock and PLL settings as well as the audio
interface settings.
To open the digital configuration dialog, navigate to the clock and digital signal routing diagram (see
Figure 6 ) and click on the “Internal Clock Gen Module” active object.
Figure 7. Digital Configuration: Codec Clock / PLL
The digital configuration dialog contains two tabs, one for the Codec Clock / PLL settings and one for the
Audio Interface settings.
The Codec Clock / PLL settings tab (see Figure 7 ) enables simple generation of PLL and clock divider
settings based on the available input frequency and the desired sample rate:
1. Choose the clock input using the Clock Input drop down box.
2. Type the available input frequency in the Input Frequency edit field.
3. Type the desired sample rate in the Sample Rate edit field of the ADC. By default, the DAC sample
rate equals the ADC sample rate. Uncheck DAC Fs = ADC Fs and enter the DAC sample rate for
different sample rates.
4. The Engine OSR and Instructions fields affect the miniDSP. Please contact your TI representative for
further information about the miniDSP.
5. The Results list shows all clock settings that fulfill the chosen parameters. Double click on one of the
results to program the TSC2117 with the new settings.
Each result has the following columns:
12 TSC2117EVM-K SLAU282 – April 2009
Submit Documentation Feedback
Page 13

www.ti.com
EVM + PC
• PLL: On or Off
• P,R,J,D: PLL configuration
• NADC, MADC: ADC clock dividers
• AOSR: ADC over-sampling factor
• FsADC: ADC sampling rate
• NDAC, MDAC: DAC clock dividers
• DOSR: DAC over-sampling factor
• FsDAC: DAC sampling rate
Click the Advanced … button to show the advanced clock settings dialog.
The advanced clock settings dialog gives direct access to the PLL and codec clock dividers. It will
recalculate the clock results dynamically whenever a parameter is changed.
The internally generated bit clock signal (BCLK) can be derived from several sources and divided by an
integer number. Select the desired source with the Source drop down box, choose the divisor and enable
power to the divider, if required.
It is possible to put out a clock signal CLKOUT. Select the clock source, the divider and the destination pin
using the advanced clock settings dialog.
SLAU282 – April 2009 TSC2117EVM-K 13
Submit Documentation Feedback
Figure 8. Advanced Clock Settings.
Page 14

EVM + PC
2.6.7 Audio Interface
www.ti.com
The Audio Interface tab ( see Figure 9 ) contains controls to manipulate the digital audio interface:
Figure 9. Audio Interface
Use the Format drop down box to change the digital audio interface format:
• I2S
• DSP
• Right Justified
• Left Justified
For details about the digital audio interface formats see the TSC2117 data sheet (SLAS550 ), 5.4 AUDIO
DIGITAL I/O INTERFACE.
The Word Length drop down box defines the number of bits per audio word.
The DIN/DOUT offset defines where the data for the ADC or from the DAC is located in the bit-stream.
This is required for TDM (DSP) interface format.
TSC2117EVM-K 14 SLAU282 – April 2009
Submit Documentation Feedback
Page 15

www.ti.com
2.6.8 Touch Screen
The Touch Screen is implemented as an active object in the block diagram for the full TSC2117 and in
the block diagram for touch screen operation . It is labeled “Touchscreen”.
Once activated, the touch screen active object configures the TSC2117 touch screen module for
Conversion Mode 2 and starts polling the TSC2117 touch screen registers with a period of 50 ms.
The inside of the touch screen active object (rectangle) shows the current coordinates (X and Y) and a
drawing based on touch screen input.
EVM + PC
To change the touch screen module parameters, click on the touch screen active object. This will display
the touch screen dialog.
To clear the touch screen drawing, open the touch screen dialog and click on the Clear button.
SLAU282 – April 2009 TSC2117EVM-K 15
Submit Documentation Feedback
Figure 10. Touch Screen Active Object
Page 16

EVM + PC
2.6.9 SAR ADC Data
The results of the SAR ADC data conversions are available in an active object labeled SAR Data within
the block diagram for the full TSC2117 .
Once activated, the SAR data active object configures the TSC2117 touch screen module for Conversion
Mode 9 and starts polling the TSC2117 SAR data registers with a period of 50 ms.
The inside of the SAR data active object (rectangle) shows the conversion results for IN1, IN2, BAT and
TEMP.
www.ti.com
To change the SAR ADC module parameters, click on the SAR data active object. This will display the
SAR ADC dialog.
TSC2117EVM-K 16 SLAU282 – April 2009
Figure 11. SAR ADC Data
Submit Documentation Feedback
Page 17

www.ti.com
2.6.10 AGC
EVM + PC
The TSC2117 has an automatic gain control module, which is accessible by an active object labeled AGC
within the block diagram for the full TSC2117 .
Clicking on the AGC active objects opens the AGC Dialog:
Figure 12. Automatic Gain Control
If the AGC is enabled, the TSC2117 will adjust the gain of the analog audio input signal amplifier so that
the input signal level for input signal amplitudes above the noise threshold approximates the target level.
• The main display in the AGC dialog shows the Amplitude of the ADC output data in decibel with 0dB
equal to a full scale signal.
•
– The target level line can be adjusted using the mouse pointer. It will change color to red if it the
mouse pointer is in the vicinity, indicating that it can be moved (click and drag).
– The noise threshold line is also adjustable
• The small display on the left shows the ADC output data
• The AGC Gain field shows the applied gain (if the AGC is enabled) and allows setting a maximum gain
using the slider.
Advanced AGC controls are available by clicking the More button. This will reveal further controls to adjust
various AGC parameters.
SLAU282 – April 2009 TSC2117EVM-K 17
Submit Documentation Feedback
Page 18

EVM + PC
2.6.11 Digital Volume Control and DRC
The TSC2117 has digital volume control and dynamic range compression modules for each DAC channel.
Each is accessible by a active objects labeled DVol within the block diagram for the full TSC2117 and
the playback use case .
Clicking on the DVol active object opens the DAC Vol dialog, which contains a slider to set the digital
volume and several options. Checking the DRC option reveals the DRC transfer function.
www.ti.com
Figure 13. DRC Transfer Function and DRC Dialog
The horizontal axis of the DRC transfer function shows the input to the DRC and the vertical axis shows
the output of the DRC. The green line shows the gain below the DRC threshold, the magenta colored
horizontal line shows the DRC threshold and the red line shows the gain above the DRC threshold.
The DRC transfer function will change depending on the digital volume setting and the DRC threshold.
Click on the DRC transfer function to reveal the DRC dialog, which contains a slider to change the DRC
threshold.
TSC2117EVM-K 18 SLAU282 – April 2009
Submit Documentation Feedback
Page 19

www.ti.com
3 EVM Hardware
This chapter contains information about the EVM Hardware (switches, jumpers, schematics).
3.1 Connectors and Jumpers
EVM Hardware
Table 1. Analog I/O
Connector Function
J1 MIC/LINE in
J2 1 IN1
2 IN2
3 IN3
4 AGND
J3 1 REF
2 AGND
J5 1 LN (speaker filtered)
2 LP (speaker filtered)
3 RN (speaker filtered)
4 RP (speaker filtered)
J6 1 SPLN (speaker)
2 SPLP (speaker)
3 SPRN (speaker)
4 SPRP (speaker)
J7 1 BATT
2 GND
J8 Headphones
J9 Headphones (filtered)
J10 1 HPL
2 AGND
3 HPR
Table 2. Touch Screen
Connector Function
J4 1 Y–
2 X–
3 Y+
4 Y–
P11 10 Y–
12 X–
14 Y+
16 Y–
Table 3. GPI
Connector Function
W19 1 GPI1
2 GPI2
3 GPI3
SLAU282 – April 2009 TSC2117EVM-K 19
Submit Documentation Feedback
Page 20

EVM Hardware
www.ti.com
Table 4. Jumpers
Jumper Function Positions Default
W1 IOVDD select 1-2: 1.8V 1-2: 1.8V
2-3: 3.3V
W9 MIC bias select 1-2: TSC2117 1-2: TSC2117
2-3: 3.3V
W10 IN1 select 1-2: ext J2 not populated
2-3: on-board V
W11 IN2 select 1-2: ext J2 not populated
2-3: on-board V
W12 IN3 select 1-2: ext J2 not populated
2-3: on-board V
W13 REF select 1-2: ext J3 not populated
2-3: on-board V
W14 HPL 16 Ω load 1-2: add load not populated
W15 HPR 16 Ω load 1-2: add load not populated
W16 HPL CAP bypass 1-2: bypass not populated
W17 HPR CAP bypass 1-2: bypass not populated
W18 Firmware select 1-2: select EVM 1-2: select EVM
W19 HPL CAP bypass 1-2: bypass 1-2: TSC2117
2-3: 3.3V
W20 Reset source 1-2: reset from USB-MODEVM not populated
Table 5. Expansion Connectors P12/J12
Pin Number Signal Description
P12.1/J12.1 NC
P12.2/J12.2 NC
P12.3/J12.3 SCLK SPI™ Serial Clock
P12.4/J12.4 DGND Digital Ground
P12.5/J12.5 NC
P12.6/J12.6 NC
P12.7/J12.7 SS SPI Chip Select
P12.8/J12.8 NC
P12.9/J12.9 NC
P12.10/J12.10 DGND Digital Ground
P12.11/J12.11 MOSI SPI MOSI Slave Serial Data Input
P12.12/J12.12 NC
P12.13/J12.13 MISO SPI MISO Slave Serial Data Output
P12.14/J12.14 RESET TAS1020B Reset
P12.15/J12.15 NC
P12.16/J12.16 SCL I2C Serial Clock
P12.17/J12.17 NC
P12.18/J12.18 DGND Digital Ground
P12.19/J12.19 NC
P12.20/J12.20 SDA I2C Serial Data Input/Output
TSC2117EVM-K 20 SLAU282 – April 2009
Submit Documentation Feedback
Page 21

www.ti.com
EVM Hardware
Table 6. Expansion Connectors P22/J22
Pin Number Signal Description
P22.1/J22.1 NC
P22.2/J22.2 NC
P22.3/J22.3 BCLK Audio Serial Data Bus Bit Clock
P22.4/J22.4 DGND Digital Ground
P22.5/J22.5 NC
P22.6/J22.6 NC
P22.7/J22.7 WCLK Audio Serial Data Bus Word Clock
P22.8/J22.8 NC
P22.9/J22.9 NC
P22.10/J22.10 DGND Digital Ground
P22.11/J22.11 DIN Audio Serial Data Bus Data Input
P22.12/J22.12 NC
P22.13/J22.13 DOUT Audio Serial Data Bus Data Output
P22.14/J22.14 NC
P22.15/J22.15 NC
P22.16/J22.16 NC
P22.17/J22.17 MCLK Master Clock Input
P22.18/J22.18 DGND Digital Ground
P22.19/J22.19 NC
P22.20/J22.20 NC
Table 7. Power Supply
Pin Number Signal
P23.1/J23.1 NC
P23.2/J23.2 NC
P23.3/J23.3 +5VA
P23.4/J23.4 NC
P23.5/J23.5 DGND
P23.6/J23.6 AGND
P23.7/J23.7 +1.8VD
P23.8/J23.8 NC
P23.9/J23.9 +3.3VD
P23.10/J23.10 +5VD
SLAU282 – April 2009 TSC2117EVM-K 21
Submit Documentation Feedback
Page 22

EVM Hardware
www.ti.com
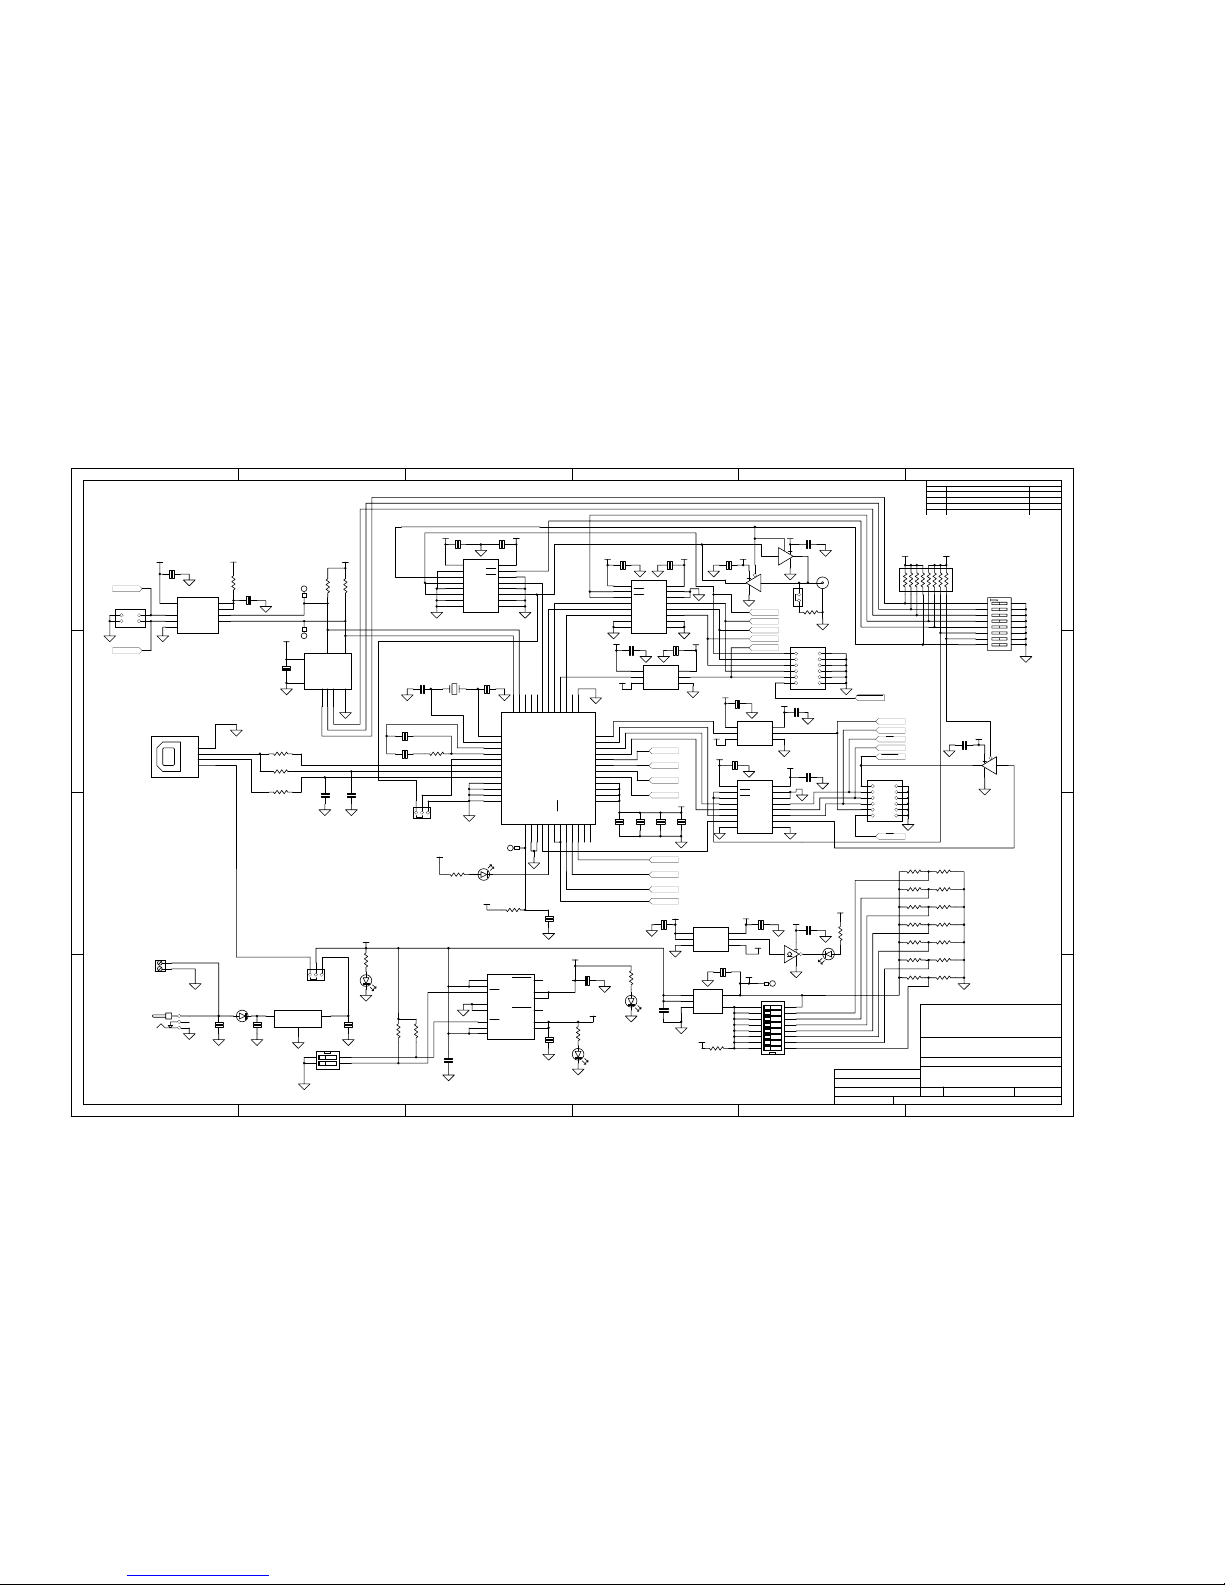
3.2 EVM Schematics
The schematic diagram for the TSC2117EVM is provided as a reference.
TSC2117EVM-K 22 SLAU282 – April 2009
Submit Documentation Feedback
Page 23

1 2 3 4 5 6
A
B
C
D
6
54321
D
C
B
A
ti
6730 SOUTH TUCSON BLVD., TUCSON, AZ 85706 USA
TITLE
SHEET OF FILE
SIZE DATE REVdd MMM yyyy
DRAWN BY
ENGINEER
REVISION HISTORY
REV ENGINEERING CHANGE NUMBER APPROVED
B
DATA ACQUISITION PRODUCTS
HIGH-PERFORMANCE ANALOG DIVISION
SEMICONDUCTOR GROUP
FRYE D. ZERKETTS
I. C. SPOTTS
???
A
1 1
untitled
DOCUMENT CONTROL NO.1234567
Daughtercard_Interface
Daughtercard_Interface.Sch
TSC2117_RGZ
TSC2117_RGZ.Sch
Page 24

1 2 3 4 5 6
A
B
C
D
6
54321
D
C
B
A
ti
12500 T.I. Boulevard, Dallas, Texas 75243 USA
TITLE
SHEET OF FILE
SIZE DATE REV5-Nov-2008
DRAWN BY
ENGINEER
REVISION HISTORY
REV ENGINEERING CHANGE NUMBER APPROVED
B
DATA ACQUISITION PRODUCTS
HIGH-PERFORMANCE ANALOG DIVISION
SEMICONDUCTOR GROUP
MIKE TSECOURAS
STEVE LEGGIO
A
2 2
TSC2117_RGZ_EVM
DOCUMENT CONTROL NO.N/A
+5VA
A0(+)
2
A1(+)
4
A2(+)
6
A3(+)
8
A4
10
A5
12
A6
14
A7
16
REF-
18
REF+
20
A0(-)
1
A1(-)
3
A2(-)
5
A3(-)
7
AGND
9
AGND
11
AGND
13
VCOM
15
AGND
17
AGND
19
J21
CONN_EVM_ANALOG
-VA
2
-5VA
4
AGND
6
VD1
8
+5VD
10
+VA
1
+5VA
3
DGND
5
+1.8VD
7
+3.3VD
9
J23
CONN_EVM_POWER
-VA
2
-5VA
4
AGND
6
VD1
8
+5VD
10
+VA
1
+5VA
3
DGND
5
+1.8VD
7
+3.3VD
9
P23
CONN_EVM_POWER
GPIO0
2
DGND
4
GPIO1
6
GPIO2
8
DGND
10
GPIO3
12
GPIO4
14
SCL
16
DGND
18
SDA
20
CNTL
1
CLKX
3
CLKR
5
FSX
7
FSR
9
DX
11
DR
13
INT
15
TOUT
17
GPIO5
19
P12
CONN_EVM_SERIAL
GPIO0
2
DGND
4
GPIO1
6
GPIO2
8
DGND
10
GPIO3
12
GPIO4
14
SCL
16
DGND
18
SDA
20
CNTL
1
CLKX
3
CLKR
5
FSX
7
FSR
9
DX
11
DR
13
INT
15
TOUT
17
GPIO5
19
J12
CONN_EVM_SERIAL
GPIO0
2
DGND
4
GPIO1
6
GPIO2
8
DGND
10
GPIO3
12
GPIO4
14
SCL
16
DGND
18
SDA
20
CNTL
1
CLKX
3
CLKR
5
FSX
7
FSR
9
DX
11
DR
13
INT
15
TOUT
17
GPIO5
19
P22
CONN_EVM_SERIAL
GPIO0
2
DGND
4
GPIO1
6
GPIO2
8
DGND
10
GPIO3
12
GPIO4
14
SCL
16
DGND
18
SDA
20
CNTL
1
CLKX
3
CLKR
5
FSX
7
FSR
9
DX
11
DR
13
INT
15
TOUT
17
GPIO5
19
J22
CONN_EVM_SERIAL
MCLK
BICK
WCLK
DIN
DOUT
MISO
MOSI
/SS
SCLK
/RESET
SDA
SCL
GPIO1
BOTTOM SIDE
TOP SIDE
BOTTOM SIDE
TOP SIDE
BOTTOM SIDE
TOP SIDE
BOTTOM SIDE
+1.8VD
+3.3VD
TP3
AGND
TP4
DGND
TP2
AGND
TP5
DGND
TP1
AGND
TP6
DGND
+3.3VA
C2
10uF
C1
0.33uF
R1
100K
R2
100K
C3
10uF
1GND
3
1EN
4
1IN
5
1IN
6
2GND
9
2EN
10
2IN
11
2IN122OUT
17
2OUT
18
2RESET
22
1OUT
23
1OUT
24
1RESET
28
1FB
25
U1
TPS767D301PWP
R3
56KR530.1K
+3.9VA+5VA
TP7
+5VA
TP8
+3.3VA
TP9
+3.9VA
R4
20K
TP11
+1.8VD
TP12
+3.3VD
1
2
3
W1
IOVDD
IOVDD
TP10
IOVDD
X+
XY+
Y-
A0(+)
2
A1(+)
4
A2(+)
6
A3(+)
8
A4
10
A5
12
A6
14
A7
16
REF-
18
REF+
20
A0(-)
1
A1(-)
3
A2(-)
5
A3(-)
7
AGND
9
AGND
11
AGND
13
VCOM
15
AGND
17
AGND
19
P11
CONN_EVM_ANALOG
A0(+)
2
A1(+)
4
A2(+)
6
A3(+)
8
A4
10
A5
12
A6
14
A7
16
REF-
18
REF+
20
A0(-)
1
A1(-)
3
A2(-)
5
A3(-)
7
AGND
9
AGND
11
AGND
13
VCOM
15
AGND
17
AGND
19
J11
CONN_EVM_ANALOG
TOP SIDE
BOTTOM SIDE
GPIO2
Page 25

1 2 3 4 5 6
A
B
C
D
6
54321
D
C
B
A
Revision History
REV ECN Number Approved
ti
12500 T.I. Boulevard, Dallas, Texas 75243 USA
TITLE
SHEET OF FILE
SIZE DATE REV5-Nov-2008
DRAWN BY
ENGINEER
A
DATA ACQUISITION PRODUCTS
HIGH PERFORMANCE ANALOG DIVISION
SEMICONDUCTOR GROUP
STEVE LEGGIO
MIKE TSECOURAS
A
1 2
TSC2117_RGZ_EVM
DOCUMENT CONTROL NO.N/A
TP36
SDA
TP35
SCL
SCL
SDA
SDA
SCL
TP37
MCLK
DIN
WCLK
BICK
TP40
DIN
TP39
WCLK
TP38
BICK
DIN
WCLK
BICK
MCLK
DOUT
TP41
DOUT
DOUT
+1.8VD
C10
0.1uF
C16
10uF
12
W7
+3.3VD
C11
0.1uF
C17
10uF
12
W8
IOVDD33
DVDD18
TP46
MOSI
MOSI
TP45
/SS
TP44
SCLK
SCLK
TP43
GPIO1
TP42
GPIO2
GPIO1
MOSI
/SS
SCLK
GPIO1
GPIO2
TP49
GPI1
TP47
MISO
MISO
GPI1
/RESET
MISO
C56
47uF
C57
47uF
TP34
HPR
TP33
HPL
HPL
HPR
TP30
SPRN
TP29
SPLP
TP28
SPLN
TP31
SPRP
L1
0 ohm
L2
0 ohm
L3
0 ohm
L4
0 ohm
C51
NI
C50
NI
C48NIC49
NI
C44
.022uF
R21
402
TP24
LN
C45
.022uF
R22
402
TP25
LP
C46
.022uF
R23
402
TP26
RN
C47
.022uF
R24
402
TP27
RP
SPLN
SPLP
SPRN
SPRP
Y-
X-
Y+
X+
+3.3VA
C5
0.1uF
C14
10uF
12
W3
AVDD33
+3.3VA
C9
0.1uF
C15
10uF
1 2
W6
SVDD
C8
0.1uF
C19
22uF
1 2
W5
SVDD2
HVDD33
+3.3VA
C4
0.1uF
C13
10uF
1 2
W2
SVDD
C7
0.1uF
C18
22uF
1 2
W4
SVDD1
TSVDD33
C6
0.1uF
C12
10uF
1
2
J3
EXT VREF
TP19
VREF
R20
220
VREF
R7
2.2K
C20
0.1uF
1
2
MK1
MD9745APZ-F
EXT MIC IN
ONBOARD MIC
TP13
LIN
C21
NI
R6
0
C22
NI
C21 - C22 are optional
noise filtering caps for
microphone and bias
lines.
MPWR
LIN
LIN
1
2
3
4
J2
EXT. INPUTS
GND
R16
220
R17
220
R18
220
C31
0.1uF
C33
0.1uF
C34
0.1uF
TP18
IN3
TP16
IN1
TP17
IN2
IN1
IN2
IN3
C25
10uF
R8
1.0K
123
W9
MIC BIAS SEL+3.3VA
TP14
MPWR
R10
50K R11
49.9K
+3.3VA
TP15
VOL
C26
0.22uF
VOL
MPWR
C24
NI
C23
NI
MCLK
/SS
R32
0
RED
C62
0.1uF
1A
1
1B
2
1Y
7
VCC
8
GND
4
2Y
3
2B
6
2A
5
U6
SN74LVC2G00
2
1
3
SW2
/RESET
+3.3VD
R37
10K
+3.3VD
R36
10K
TP48
/RESET
R34
332
C61
0.1uF
+3.3VD
D5
/RESET
A
1
B
2
Y
4
VCC
5
GND
3
U5
SN74LVC1G08
/RESET
R35
4.7K
+3.3VD
1 2
W20
W10
W12
W11
GND_F
1
GND_S
2
IN
4
OUT_F
6
ENABLE
3
OUT_S
5
U2 REF3225
+5VA
"RESET"
SHOWN POSITION
"/RESET"
C30
0.1uF
R19
22
C39
2.2uF
C38
47uF
C32
0.1uF
C29
0.1uF
C37
47uF
C28
0.1uF
C36
47uF
C27
0.1uF
C35
47uF
W13
VCC
8
VSS4SDA
5
SCL
6
A0
1
A1
2
A2
3
WP
7
U4
MICROCHIP_24AA64
C60
0.1uF
+3.3VD
R29
2.7K
1 2
W18
R30
2.7K
R31
2.7K
+3.3VD
1
2
3
J10
HEADPHONE
R12
10K
R13
10K
R14
10K
R15
10K
C58
47nF
12
W14
R25
100
R27
16
C59
47nF
12
W15
R26
100
R28
16
C43
0.1uF
C42
0.1uF
C41
0.1uF
C40
0.1uF
TP22
Y+
TP21
X-
TP20
Y-
TP23
X+
3
1
2
D3
3
1
2
D4
3
1
2
D1
3
1
2
D2
+3.3VA
D1-4 can be installed for extra ESD
protection, or reducing touch panel noise.
C40-43 can be installed for noise filtering.
However adding the caps will slow down the
SAR Conversion speed.
TP32
SVDD
C55
10uF
1
2
J7
BATT. SVDD
C52
0.1uF
+3.9VA
L5
SVDD
C53
47uF
C54
47uF
2
1
3
SW1
BATT
HPR
HPL
R9
0
MISO
1
MOSI
2
GPIO1
5
BICK
13
WCLK
12
DIN
11
DOUT
10
DVDD18
9
DVDD_IO
8
IOVSS
7
GPIO2
6
SCLK
4
/SS
3
/RESET48GPI147GPI246GPI345HPR44DVSS43HVDD3342HPL41SPRP40SRVSS39SRVDD38SPRN
37
SPLP
36
SLVDD
35
SLVSS
34
SPLN
33
TSVDD33
32
XP
31
YP
30
DVSS
29
XM
28
YM
27
TSVSS
26
VBAT
24
AVDD33
23
AVSS
22
IN221IN1
20
MIC
19
MICBIAS
18
VOL17SCL
16
SDA
15
MCLK
14
VREF
25
PPAD
0
U3
TSC2117IRGE
1 2
W16
HPL
1 2
W17
HPR
5
1
3
4
2
J8
SJ1-3515-SMT
5
1
3
4
2
J1
SJ1-3515-SMT
1 2
W21
1 2
W22
1
2
3
4
J6
SPEAKER OUTPUT
1
2
3
4
J5
SPEAKER FILTERED
1
2
3
4
J4
TOUCH SCREEN
Y+
X-
X+
Y-
TP50
GPI2
TP51
GPI3
GPI3
GPI2
GPIO2
1
2
3
W19
GPI
R33
0
TEST ONLY
5
1
3
4
2
J9
SJ1-3515-SMT
HEADPHONE
R38
100K
Page 26

www.ti.com
3.3 EVM Bill of Materials
Qty Value Ref Des Description
4 0 R6, R9, R32, R33 RES 0 Ω 1/10W 5% 0603 SMD
4 0 L1, L2, L3, L4 RES 0 Ω 1 1/4W 5% 1206 SMD
2 16 R27, R28 RES 16 Ω 1W 5% 2512 SMD
1 22 R19 RES 22 Ω 1/10W 5% 0603 SMD
2 100 R25, R26 RES 100 Ω 1/10W 1% 0603 SMD
4 220 R16, R17, R18, R20 RES 220 Ω 1/10W 5% 0603 SMD
1 332 R34 RES 332 Ω 1/10W 1% 0603 SMD
4 402 R21– R24 RES 402 Ω 1/10W 1% 0603 SMD
1 1.0K R8 RES 1.00 k Ω 1/10W 1% 0603 SMD
1 2.2K R7 RES 2.2 k Ω 1/10W 5% 0603 SMD
3 2.7K R29, R30, R31 RES 2.7 k Ω 1/10W 5% 0603 SMD
1 4.7K R35 RES 4.7 k Ω 1/10W 5% 0603 SMD
6 10K R12–R15, R36, R37 RES 10 k Ω 1/10W 5% 0603 SMD
1 20K R4 TRIMPOT 20 k Ω 4MM TOP ADJ SMD
1 30.1K R5 RES 30.1 k Ω 1/10W 1% 0603 SMD
1 49.9K R11 RES 49.9 k Ω 1/10W 1% 0603 SMD
1 50K R10 POT 50 k Ω 3/8" SQ CERM SL ST
1 56.0K R3 RES 56.0 k Ω 1/10W 1% 0603 SMD
3 100K R1, R2, R38 RES 100 k Ω 1/10W 1% 0603 SMD
4 .022uF C44–C47 CAP CER 0.022 µ F 50V X8R 10% 0603
2 .047uF C58, C59 CAP CER 47000 pF 50V X7R 10% 0603
8 0.1uF C4–C11 CAP CER .10UF 6.3V X5R 10% 0402
17 0.1uF C20, C27–C34, C40–C43, CAP CER 0.1 µ F 25V X7R 0603
C52, C60–C62
1 .22uF C26 CAP CER 0.22 µ F 16V X7R 10% 0603
1 .33uF C1 CAP CER 0.33 µ F 16V X7R 0603
1 2.2uF C39 CAP 2.2 µ F 25V CERAMIC X5R 1210
7 10uF C12–C17, C25 CAP CERAMIC 10 µ F 6.3V X5R 0603
2 10uF C2, C3 CAP CERAMIC 10 µ F 10V X5R 0805
1 10uF C55 CAP CER 10 µ F 16V X5R 20% 1206
2 22uF C18, C19 CAP CER 22 µ F 6.3V X5R 20% 0805
8 47uF C35–C38, C53, C54, C56, CAP CER 47 µ F 10V X5R 1210
C57
1 U1 Dual-Output Low-Dropout (LDO) Voltage Regulators
1 U2 2.5V 4ppm/Degrees C, 100uA SOT23-6 Series (Bandgap) Voltage Reference
1 U3 Audio Codec
1 U4 IC SERIAL EEPROM 64K 1.7V 8SOIC
1 U5 Single 2-Input Positive-AND Gate
1 U6 Dual 2-Input Positive-NAND Gate
1 600 L5 FERRITE CHIP 600 Ω 500mA 0805
1 D5 LED THIN 635NM RED DIFF 0805 SMD
1 MK1 Omnidirectional Microphone Cartridge or alternate
2 SW1, SW2 SWITCH SLIDE SPDT 30V.2A PC MNT
3 J1, J8, J9 3,5mm Audio Jack, T-R-S, SMD
2 J3, J7 Screw Terminal Block, 2 Position
1 J10 Screw Terminal Block, 3 Position
4 J2, J4–J6 Screw Terminal Block, 4 Position
1 P23 10 Pin SMT Plug Header
EVM Hardware
SLAU282 – April 2009 TSC2117EVM-K 23
Submit Documentation Feedback
Page 27

EVM Hardware
Qty Value Ref Des Description
1 J23 10 pin SMT Socket Header
3 P11, P12, P22 20 Pin SMT Plug Header
4 J11, J12, J21, J22 20 pin SMT Socket Header
6 TP1–TP6 TEST POINT PC MULTI PURPOSE BLK
7 W2–W8 Bus Wire (18-22 Gauge)
8 W14– W18, W20–W22 2 Pin Thru-hole Plug Header (Jumper), 0 .1" spacing
7 W1, W9–W13, W19 3 Position Jumper , 0 .1" spacing
www.ti.com
TSC2117EVM-K 24 SLAU282 – April 2009
Submit Documentation Feedback
Page 28

www.ti.com
Appendix A USB-MODEVM Schematic
The schematic diagram for USB-MODEVM Interface Board is provided as a reference.
Appendix A
SLAU282 – April 2009 USB-MODEVM Schematic 25
Submit Documentation Feedback
Page 29

1 2 3 4 5 6
A
B
C
D
6
54321
D
C
B
A
ti
6730 SOUTH TUCSON BLVD., TUCSON, AZ 85706 USA
TITLE
SHEET OF FILE
SIZE
DATE REVdd MMM yyyy
DRAWN BY
ENGINEER
REVISION HISTORY
REV ENGINEERING CHANGE NUMBER APPROVED
B
DATA ACQUISITION PRODUCTS
HIGH-PERFORMANCE ANALOG DIVISION
SEMICONDUCTOR GROUP
FRYE D. ZERKETTS
I. C. SPOTTS
???
A
11
untitled
DOCUMENT CONTROL NO.1234567
MCLK
BCLK
LRCLK
I2SDIN
I2SDOUT
MISO
MOSI
SS
SCLK
RESET
INT
PWR_DWN
P3.3
P3.4
P3.5
P1.0
SDA
SCL
P1.1
P1.2
P1.3
Daughtercard Interface
Daughtercard Interface
MCLK
BCLK
LRCLK
I2SDIN
I2SDOUT
INT
MISO
MOSI
SS
SCLK
RESET
PWR_DWN
SDA
SCL
P3.3
P3.4
P3.5
P1.0
P1.1
P1.2
P1.3
USB Interface
USB Interface
Page 30

1 2 3 4 5 6
A
B
C
D
6
54321
D
C
B
A
ti
6730 SOUTH TUCSON BLVD., TUCSON, AZ 85706 USA
TITLE
SHEET OF FILE
SIZE
DATE REV3-Apr-2007
DRAWN BY
ENGINEER
REVISION HISTORY
REV ENGINEERING CHANGE NUMBER APPROVED
B
DATA ACQUISITION PRODUCTS
HIGH-PERFORMANCE ANALOG DIVISION
SEMICONDUCTOR GROUP
RICK DOWNS
ROBERT BENJAMIN
C:\01_TI\designs\USB_MODEVM\usb-modevm_revD\USB Mother board - M odEvm .ddb - D ocum ents\SC H\D aughtercard I nterf ace
D
22
USB-MODEVM INTERFACE
DOCUMENT CONTROL NO.6463996
GPIO0
2
DGND
4
GPIO1
6
GPIO2
8
DGND
10
GPIO3
12
GPIO4
14
SCL
16
DGND
18
SDA
20
CNTL
1
CLKX
3
CLKR
5
FSX
7
FSR
9
DX
11
DR
13
INT
15
TOUT
17
GPIO5
19
J12
DAUGHTER-SERIAL
+5VD
+5VA
1 2
JMP2
1 2
JMP1
JPR-2X1
+5VA +5VD
J2
+5VA
J3
+5VD
+5VA +5VD
C2
10uF
C3
10uF
J4
+1.8VD
J5
+3.3VD
C4
10uF
C5
10uF
J1
-5VA
C1
10uF
A0(+)
2
A1(+)
4
A2(+)
6
A3(+)
8
A4
10
A5
12
A6
14
A7
16
REF-
18
REF+
20
A0(-)
1
A1(-)
3
A2(-)
5
A3(-)
7
AGND
9
AGND
11
AGND
13
VCOM
15
AGND
17
AGND
19
J11
DAUGHTER-ANALOG
GPIO0
2
DGND
4
GPIO1
6
GPIO2
8
DGND
10
GPIO3
12
GPIO4
14
SCL
16
DGND
18
SDA
20
CNTL
1
CLKX
3
CLKR
5
FSX
7
FSR
9
DX
11
DR
13
INT
15
TOUT
17
GPIO5
19
J17
DAUGHTER-SERIAL
+5VD
+5VA
A0(+)
2
A1(+)
4
A2(+)
6
A3(+)
8
A4
10
A5
12
A6
14
A7
16
REF-
18
REF+
20
A0(-)
1
A1(-)
3
A2(-)
5
A3(-)
7
AGND
9
AGND
11
AGND
13
VCOM
15
AGND
17
AGND
19
J16
DAUGHTER-ANALOG
+1.8VD
+3.3VD
+1.8VD
+3.3VD
123
JMP5
1 2
JMP3
1 2
JMP4
R2
2.7K
R1
2.7K
IOVDD
-5VA
-5VA
-5VA
MCLK
BCLK
LRCLK
I2SDIN
I2SDOUT
MISO
MOSI
SS
SCLK
RESET
P3.1-P3.2
PWR_DWN
P3.3
P3.4
P3.5
P1.0
SDA
SCL
P1.1
P1.2
P1.3
TP1 TP2 TP3
TP5
TP4
TP7
AGND
TP8
DGND
R21
390
R22
390
D7
SML-LX0603GW-TR
GREEN
D6
SML-LX0603GW-TR
GREEN
J11A (TOP) = SAM_TSM-110-01-L-DV-P
J11B (BOTTOM) = SAM_SSW-110-22-F-D-VS-
J12A (TOP) = SAM_TSM-110-01-L-DV-P
J12B (BOTTOM) = SAM_SSW-110-22-F-D-VS-
J13A (TOP) = SAM_TSM-105-01-L-DV-P
J13B (BOTTOM) = SAM_SSW-105-22-F-D-VS-
J16A (TOP) = SAM_TSM-110-01-L-DV-P
J16B (BOTTOM) = SAM_SSW-110-22-F-D-VS-
J17A (TOP) = SAM_TSM-110-01-L-DV-P
J17B (BOTTOM) = SAM_SSW-110-22-F-D-VS-
J18A (TOP) = SAM_TSM-105-01-L-DV-P
J18B (BOTTOM) = SAM_SSW-105-22-F-D-VS-
-VA
2
-5VA
4
AGND
6
VD1
8
+5VD
10
+VA
1
+5VA
3
DGND
5
+1.8VD
7
+3.3VD
9
J13
DAUGHTER-POWER
-VA
2
-5VA
4
AGND
6
VD1
8
+5VD
10
+VA
1
+5VA
3
DGND
5
+1.8VD
7
+3.3VD
9
J18
DAUGHTER-POWER
GND
1
A1
2
A2
3
A3
4
A4
5
A5
6
A6
7
A7
8
A8
9
A9
10
A10
11
A1112B11
13
B10
14
B9
15
B8
16
B7
17
B6
18
B5
19
B4
20
B3
21
B2
22
B1
23
GATE
24
U6
SN74TVC3010PW
IOVDD
+3.3VD
R6
200k
C29
0.1uF
IOVDD
R7
200k
R8
200k
+3.3VD
RA2
10k
IOVDD
INT
IOVDD
IOVDD
Page 31
1 2 3 4 5 6
A
B
C
D
6
54321
D
C
B
A
ti
6730 SOUTH TUCSON BLVD., TUCSON, AZ 85706 USA
TITLE
SHEET OF FILE
SIZE
DATE REV3-Apr-2007
DRAWN BY
ENGINEER
REVISION HISTORY
REV ENGINEERING CHANGE NUMBER APPROVED
B
DATA ACQUISITION PRODUCTS
HIGH PERFORMANCE ANALOG DIVISION
SEMICONDUCTOR GROUP
RICK DOWNS
ROBERT BENJAMIN
C:\01_TI\designs\USB_MODEVM\usb-modevm_revD\USB Moth erboard - M odE vm .ddb - Docum ents\S CH \USB I nterface
D
12
USB-MODEVM INTERFACE
J9
CUI-STACK PJ102-BH
YELLOW
2.5 MM
6VDC-10VDC IN
C15
0.1uF
DOCUMENT CONTROL NO.
CSCHNE
32
CRESET
34
CSYNC
35
CDATI
36
CSCLK
37
MCLKO139MCLKO2
40
RESET
41
VREN
42
SDA43SCL
44
XTALO
46
XTALI
47
PLLFILI
48
PLLFILO
1
MCLKI
3
PUR
5
DP
6
DM
7
MRESET
9
DVSS
4
DVSS
16
DVSS
28
AVSS
45
TEST10EXTEN
11
CDATO
38
RSTO12NC20NC
22
P3.013P3.114P3.2/XINT15P3.317P3.418P3.5
19
AVDD
2
DVDD
33
DVDD
21
DVDD
8
P1.0
23
P1.1
24
P1.2
25
P1.3
26
P1.4
27
P1.5
29
P1.6
30
P1.7
31
U8
TAS1020BPFB
VCC
1
D-
2
D+
3
GND
4
J7
897-30-004-90-000000
R9
1.5K
R10
27.4
R11
27.4
C13
47pF
C14
47pF
123
JMP6
PWR SELECT
C20
100pF
C21
.001uF
R12
3.09K
X1
MA-505 6.000M-C0
C18
33pF
C19
33pF
+3.3VD
VCC
8
VSS
4
SDA5SCL
6
A01A12A23WP
7
U1
24LC64I/SN
+3.3VD
C9
0.1uF
TP9
TP10
R3
2.7KR52.7K
+3.3VD
MCLK
BCLK
LRCLK
I2SDIN
I2SDOUT
INT
MISO
MOSI
SS
SCLK
R13
649
+3.3VD
R4
10
C10
0.1uF
C11
0.1uF
C12
0.1uF
USB SLAVE CONN
EXT PWR IN
6.00 MHZ
6463996
RED
IOVDD
IOVDD
C23
0.1uF
C22
0.1uF
IOVDD
C27
0.1uF
+3.3VD
C26
0.1uF
+3.3VD
IOVDD
+3.3VD
IOVDD
TP11
MRESET
3.3VD ENABLE
1.8VD ENABLE
C17
0.33uF
C7
10uF
1GND
3
1EN
4
1IN
5
1IN
6
2GND
9
2EN
10
2IN
11
2IN
12
2OUT
17
2OUT
18
2RESET
22
1OUT
23
1OUT
24
1RESET
28
U9
TPS767D318PWP
R17
100K
+3.3VD
C8
10uF
D5
SML-LX0603IW-TR
D2
SML-LX0603YW-TR
D4
SML-LX0603GW-TR
R19
220
GREEN
USB I2S
USB MCK
USB SPI
USB SPI
USB I2S
USB MCK
+1.8VD
RESET
C24
0.1uF
USB ACTIVE
USB RST
USB RST
2
4
6
1
3
5
7 8
9 10
11 12
J15
EXTERNAL SPI
2
4
6
1
3
5
7 8
9 10
11 12
J14
EXTERNAL AUDIO DATA
PWR_DWN
J10
EXT MCLK
R20
75
+3.3VD
1
2
3
4
5
6
7
8
16
15
14
13
12
11
10
9
SW2
SW DIP-8
EXT MCK
241
3
J6
EXTERNAL I2C
IOVDD
SDA
SCL
+5VD
R15
10K
R16
10K
14
23
SW1
REGULATOR ENABLE
VIN3VOUT
2
GND
1
U2
REG1117-5
D1
DL4001
C16
0.33uF
C6
10uF
P3.3
P3.4
P3.5
P1.0
P1.1
P1.2
P1.3
J8
ED555/2DS
TP6
D3
SML-LX0603GW-TR
R14
390
GREEN
A0
A1
A2
24
1
53
U10
SN74LVC1G125DBV
C28
0.1uF
RA1
10K
VREF12VREF2
7
EN
8
GND
1
SCL2
6
SDA2
5
SCL1
3
SDA1
4
U11
PCA9306DCT
C30
0.1uF
R23
200k
C31
0.1uF
+3.3VD
IN
1
GND
2
EN
3
OUT
5
FB
4
U14
TPS73201DBV
116
215
314
413
512
611
710
89
SW3
IOVDD SELECT
C25
10uF
1.2V
1.4V
1.6V
1.8V
2.0V
2.5V
3.0V
3.3V
R27
25.5k
R29
28k
R35
46.4k
R36
30.9k
R34
36.5k
R32
48.7k
R31
32.4k
R33
39.2k
R25
22.1k
R26
137k
R28
76.8k
R30
56.2k
R18
30.1k
R37
52.3k
C37
0.1uF
VCCA
1
DIR1
2
1A1
4
1A2
5
2A1
6
2A2
7
DIR2
3
GND8GND
9
OE2
14
2B2
10
2B1
11
1B2
12
1B1
13
OE1
15
VCCB
16
U3
SN74AVC4T245PW
+3.3VD
C34
0.1uF
VCCA
1
A
3
GND
2
VCCB
6
B
4
DIR
5
U7
SN74AVC1T45DBV
C42
0.1uF
VCCA
1
A
3
GND
2
VCCB
6
B
4
DIR
5
U5
SN74AVC1T45DBV
C35
0.1uF
IOVDD
IOVDD
VCCA
1
DIR1
2
1A1
4
1A2
5
2A1
6
2A2
7
DIR2
3
GND8GND
9
OE2
14
2B2
10
2B1
11
1B2
12
1B1
13
OE1
15
VCCB
16
U12
SN74AVC4T245PW
+3.3VDIOVDD
C32
0.1uF
C33
0.1uF
EXT MCK
VCCA
1
DIR1
2
1A1
4
1A2
5
2A1
6
2A2
7
DIR2
3
GND8GND
9
OE2
14
2B2
10
2B1
11
1B2
12
1B1
13
OE1
15
VCCB
16
U4
SN74AVC4T245PW
C43
0.1uF
+3.3VD
24
1
53
U17
SN74AUP1G125DBV
C40
0.1uF
IOVDD
123
JMP7
JPR-1X3
1 2
JMP8
JPR-2X1
2 4
1
53
U15
SN74LVC1G126DBV
+3.3VD
C41
0.1uF
VCCA
1
A
3
GND
2
VCCB
6
B
4
DIR
5
U13
SN74AVC1T45DBV
C36
0.1uF
C38
0.1uF
+3.3VDIOVDD
IOVDD
+3.3VD
+3.3VD
C39
0.1uF
D8
SML-LX0603GW-TR
R24
220
GREEN
IOVDD
P3.1-P3.2
C44
1uF
+3.3VD
2 4
53
U16
SN74LVC1G06DBV
R38
10M
IOVDD
Page 32

Appendix B
Appendix B USB-MODEVM Bill of Materials
The complete bill of materials for USB-MODEVM Interface Board is provided as a reference.
Table B-1. USB-MODEVM Bill of Materials
Designators Description Manufacturer Mfg. Part Number
R4 10 Ω 1/10W 5% Chip Resistor Panasonic ERJ-3GEYJ1300V
R10, R11 27.4 Ω 1/16W 1% Chip Resistor Panasonic ERJ-3EKF27R4V
R20 75 Ω 1/4W 1% Chip Resistor Panasonic ERJ-14NF75R0U
R19 220 Ω 1/10W 5% Chip Resistor Panasonic ERJ-3GEYJ221V
R14, R21, R22 390 Ω 1/10W 5% Chip Resistor Panasonic ERJ-3GEYJ391V
R13 649 Ω 1/16W 1% Chip Resistor Panasonic ERJ-3EKF6490V
R9 1.5K Ω 1/10W 5% Chip Resistor Panasonic ERJ-3GEYJ1352V
R1–R3, R5–R8 2.7K Ω 1/10W 5% Chip Resistor Panasonic ERJ-3GEYJ272V
R12 3.09K Ω 1/16W 1% Chip Resistor Panasonic ERJ-3EKF3091V
R15, R16 10K Ω 1/10W 5% Chip Resistor Panasonic ERJ-3GEYJ1303V
R17, R18 100k Ω 1/10W 5%Chip Resistor Panasonic ERJ-3GEYJ1304V
RA1 10K Ω 1/8W Octal Isolated Resistor Array CTS Corporation 742C163103JTR
C18, C19 33pF 50V Ceramic Chip Capacitor, ± 5%, NPO TDK C1608C0G1H330J
C13, C14 47pF 50V Ceramic Chip Capacitor, ± 5%, NPO TDK C1608C0G1H470J
C20 100pF 50V Ceramic Chip Capacitor, ± 5%, NPO TDK C1608C0G1H101J
C21 1000pF 50V Ceramic Chip Capacitor, ± 5%, NPO TDK C1608C0G1H102J
C15 0.1 µ F 16V Ceramic Chip Capacitor, ± 10%, X7R TDK C1608X7R1C104K
C16, C17 0.33 µ F 16V Ceramic Chip Capacitor, ± 20%, Y5V TDK C1608X5R1C334K
C9–C12, C22–C28 1 µ F 6.3V Ceramic Chip Capacitor, ± 10%, X5R TDK C1608X5R0J1305K
C1–C8 10 µ F 6.3V Ceramic Chip Capacitor, ± 10%, X5R TDK C3216X5R0J1306K
D1 50V, 1A, Diode MELF SMD Micro Commercial Components DL4001
D2 Yellow Light Emitting Diode Lumex SML-LX0603YW-TR
D3– D7 Green Light Emitting Diode Lumex SML-LX0603GW-TR
D5 Red Light Emitting Diode Lumex SML-LX0603IW-TR
Q1, Q2 N-Channel MOSFET Zetex ZXMN6A07F
X1 6MHz Crystal SMD Epson MA-505 6.000M-C0
U8 USB Streaming Controller Texas Instruments TAS1020BPFB
U2 5V LDO Regulator Texas Instruments REG1117-5
U9 3.3V/1.8V Dual Output LDO Regulator Texas Instruments TPS767D318PWP
U3, U4 Quad, 3-State Buffers Texas Instruments SN74LVC125APW
U5–U7 Single IC Buffer Driver with Open Drain o/p Texas Instruments SN74LVC1G07DBVR
U10 Single 3-State Buffer Texas Instruments SN74LVC1G125DBVR
U1 Microchip 24LC64I/SN
TP1–TP6, TP9–TP11 Miniature test point terminal Keystone Electronics 5000
TP7, TP8 Multipurpose test point terminal Keystone Electronics 5011
J7 USB Type B Slave Connector Thru-Hole Mill-Max 897-30-004-90-000000
J13, J2–J5, J8 2-position terminal block On Shore Technology ED555/2DS
J9 2.5mm power connector CUI Stack PJ-102B
J130 BNC connector, female, PC mount AMP/Tyco 414305-1
J131A, J132A, J21A, J22A 20-pin SMT plug Samtec TSM-110-01-L-DV-P
J131B, J132B, J21B, J22B 20-pin SMT socket Samtec SSW-110-22-F-D-VS-K
J133A, J23A 10-pin SMT plug Samtec TSM-105-01-L-DV-P
J133B, J23B 10-pin SMT socket Samtec SSW-105-22-F-D-VS-K
J6 4-pin double row header (2x2) 0.1" Samtec TSW-102-07-L-D
J134, J135 12-pin double row header (2x6) 0.1" Samtec TSW-106-07-L-D
JMP1–JMP4 2-position jumper, 0.1" spacing Samtec TSW-102-07-L-S
64K 2-Wire Serial EEPROM I2C
USB-MODEVM PCB Texas Instruments 6463995
www.ti.com
26 USB-MODEVM Bill of Materials SLAU282 – April 2009
Submit Documentation Feedback
Page 33

www.ti.com
Table B-1. USB-MODEVM Bill of Materials (continued)
Designators Description Manufacturer Mfg. Part Number
JMP8–JMP14 2-position jumper, 0.1" spacing Samtec TSW-102-07-L-S
JMP5, JMP6 3-position jumper, 0.1" spacing Samtec TSW-103-07-L-S
JMP7 3-position dual row jumper, 0.1" spacing Samtec TSW-103-07-L-D
SW1 SMT, half-pitch 2-position switch C & K Division, ITT TDA02H0SK1
SW2 SMT, half-pitch 8-position switch C & K Division, ITT TDA08H0SK1
Jumper plug Samtec SNT-100-BK-T
Appendix B
SLAU282 – April 2009 USB-MODEVM Bill of Materials 27
Submit Documentation Feedback
Page 34

Appendix C
Appendix C USB-MODEVM Protocol
C.1 USB-MODEVM Protocol
The USB-MODEVM is defined to be a Vendor-Specific class and is identified on the PC system as an
NI-VISA device. Because the TAS1020B has several routines in its ROM which are designed for use with
HID-class devices, HID-like structures are used, even though the USB-MODEVM is not an HID-class
device. Data is passed from the PC to the TAS1020B using the control endpoint.
Data is sent in a HIDSETREPORT (see Table C-1 ).
Part Value Description
bmRequestType 0x21 00100001
bRequest 0x09 SET_REPORT
wValue 0x00 don't care
wIndex 0x03 HID interface is index 3
wLength calculated by host
Data Data packet as described in Table C-2 .
The data packet consists of the following bytes, shown in Table C-2 :
www.ti.com
Table C-1. USB Control Endpoint
HIDSETREPORT Request
Table C-2. Data Packet Configuration
BYTE NUMBER TYPE DESCRIPTION
0 Interface Specifies serial interface and operation. The two values are logically ORed.
1 I2C Slave Slave address of I2C device or MSB of 16-bit reg addr for SPI
Address
2 Length Length of data to write/read (number of bytes)
3 Register address Address of register for I2C or 8-bit SPI; LSB of 16-bit address for SPI
4..64 Data Up to 60 data bytes could be written at a time. EP0 maximum length is 64. The return
Operation:
READ 0x00
WRITE 0x10
Interface:
GPIO 0x08
SPI_16 0x04
I2C_FAST 0x02
I2C_STD 0x01
SPI_8 0x00
packet is limited to 42 bytes, so advise only sending 32 bytes at any one time.
Example usage:
Write two bytes (AA, 55) to device starting at register 5 of an I2C device with address A0:
[0] 0x11
[1] 0xA0
[2] 0x02
[3] 0x05
[4] 0xAA
[5] 0x55
28 USB-MODEVM Protocol SLAU282 – April 2009
Submit Documentation Feedback
Page 35

www.ti.com
USB-MODEVM Protocol
Do the same with a fast mode I2C device:
[0] 0x12
[1] 0xA0
[2] 0x02
[3] 0x05
[4] 0xAA
[5] 0x55
Now with an SPI device which uses an 8-bit register address:
[0] 0x10
[1] 0xA0
[2] 0x02
[3] 0x05
[4] 0xAA
[5] 0x55
Now, do a 16-bit register address, as found on parts like the TSC2101. Assume the register address
(command word) is 0x10E0:
[0] 0x14
[1] 0x10 → Note: the I2C address now serves as MSB of reg addr.
[2] 0x02
[3] 0xE0
[4] 0xAA
[5] 0x55
In each case, the TAS1020 returns, in an HID interrupt packet, the following:
[0] interface byte | status
status:
REQ_ERROR 0x80
INTF_ERROR 0x40
REQ_DONE 0x20
[1] for I2C interfaces, the I2C address as sent
for SPI interfaces, the read back data from SPI line for transmission of the corresponding byte
[2] length as sent
[3] for I2C interfaces, the reg address as sent
for SPI interfaces, the read back data from SPI line for transmission of the corresponding byte
[4..60] echo of data packet sent
SLAU282 – April 2009 USB-MODEVM Protocol 29
Submit Documentation Feedback
Page 36

USB-MODEVM Protocol
www.ti.com
If the command is sent with no problem, the returning byte [0] is the same as the sent one logically ORed
with 0x20 - in the preceding first example, the returning packet is:
[0] 0x31
[1] 0xA0
[2] 0x02
[3] 0x05
[4] 0xAA
[5] 0x55
If for some reason the interface fails (for example, the I2C device does not acknowledge), it comes back
as:
[0] 0x51 → interface | INTF_ERROR
[1] 0xA0
[2] 0x02
[3] 0x05
[4] 0xAA
[5] 0x55
If the request is malformed, that is, the interface byte (byte [0]) takes on a value which is not as previously
described, the return packet is:
[0] 0x93 → the user sent 0x13, which is not valid, so 0x93 returned
[1] 0xA0
[2] 0x02
[3] 0x05
[4] 0xAA
[5] 0x55
The preceding examples used writes. Reading is similar:
Read two bytes from device starting at register 5 of an I2C device with address A0:
[0] 0x01
[1] 0xA0
[2] 0x02
[3] 0x05
30 USB-MODEVM Protocol SLAU282 – April 2009
Submit Documentation Feedback
Page 37

www.ti.com
The return packet is:
[0] 0x21
[1] 0xA0
[2] 0x02
[3] 0x05
[4] 0xAA
[5] 0x55
assuming that the values written starting at Register 5 were actually written to the device.
C.2 GPIO Capability
The USB-MODEVM has seven GPIO lines. Access them by specifying the interface to be 0x08, and then
using the standard format for packets—but addresses are unnecessary. The GPIO lines are mapped into
one byte (see Table C-3 ):
Table C-3. GPIO Pin Assignments
Bit 7 6 5 4 3 2 1 0
x P3.5 P3.4 P3.3 P1.3 P1.2 P1.1 P1.0
Example: write P3.5 to a 1, set all others to 0:
[0] 0x18 → write, GPIO
[1] 0x00 → this value is ignored
[2] 0x01 → length - ALWAYS a 1
[3] 0x00 → this value is ignored
[4] 0x40 → 01000000
The user can also read back from the GPIO to see the state of the pins. Assume the previous example
was just written to the port pins.
Example: read the GPIO
[0] 0x08 → read, GPIO
[1] 0x00 → this value is ignored
[2] 0x01 → length - ALWAYS a 1
[3] 0x00 → this value is ignored
The return packet is:
[0] 0x28
[1] 0x00
[2] 0x01
[3] 0x00
[4] 0x40
GPIO Capability
C.3 Writing Scripts
A script is simply a text file that contains data to send to the serial control buses.
Each line in a script file is one command. No provision is made for extending lines beyond one line, except
for the > command. A line is terminated by a carriage return.
The first character of a line is the command. Commands are:
i Set interface bus to use
r Read from the serial control bus
w Write to the serial control bus
> Extend repeated write commands to lines below a w
# Comment
b Break
d Delay
f Wait for Flag
SLAU282 – April 2009 USB-MODEVM Protocol 31
Submit Documentation Feedback
Page 38

Writing Scripts
www.ti.com
The first command, i, sets the interface to use for the commands to follow. This command must be
followed by one of the following parameters:
i2cstd Standard mode I2C bus
i2cfast Fast mode I2C bus
spi8 SPI bus with 8-bit register addressing
spi16 SPI bus with 16-bit register addressing
gpio Use the USB-MODEVM GPIO capability
For example, if a fast mode I2C bus is to be used, the script begins with:
i i2cfast
A double quoted string of characters following the b command can be added to provide information to the
user about each breakpoint. When the script is executed, the software's command handler halts as soon
as a breakpoint is detected and displays the string of characters within the double quotes.
The Wait for Flag command, f, reads a specified register and verifies if the bitmap provided with the
command matches the data being read. If the data does not match, the command handler retries for up to
200 times. This feature is useful when switching buffers in parts that support the adaptive filtering mode.
The command f syntax follows:
f [i2c address] [register] [D7][D6][D5][D4][D3][D2][D1][D0]
where 'i2c address' and 'register' are in hexadecimal format
and 'D7' through 'D0' are in binary format with values of 0,
1 or X for don't care.
Anything following a comment command # is ignored by the parser, provided that it is on the same line.
The delay command d allows the user to specify a time, in milliseconds, that the script pauses before
proceeding. The delay time is entered in decimal format.
A series of byte values follows either a read or write command. Each byte value is expressed in
hexadecimal, and each byte must be separated by a space. Commands are interpreted and sent to the
TAS1020B by the program using the protocol described in Section C.1 .
The first byte following an r (read) or w (write) command is the I2C slave address of the device (if I2C is
used) or the first data byte to write (if SPI is used—note that SPI interfaces are not standardized on
protocols, so the meaning of this byte varies with the device being addressed on the SPI bus). The
second byte is the starting register address that data will be written to (again, with I2C; SPI varies—see
Section C.1 for additional information about what variations may be necessary for a particular SPI mode).
Following these two bytes are data, if writing; if reading, the third byte value is the number of bytes to
read, (expressed in hexadecimal).
For example, to write the values 0xAA 0x55 to an I2C device with a slave address of 0x30, starting at a
register address of 0x03, the user writes:
#example script
i i2cfast
w 30 03 AA 55
r 30 03 02
This script begins with a comment, specifies that a fast I2C bus will be used, then writes 0xAA 0x55 to the
I2C slave device at address 0x30, writing the values into registers 0x03 and 0x04. The script then reads
back two bytes from the same device starting at register address 0x03. Note that the slave device value
does not change. It is unnecessary to set the R/ W bit for I2C devices in the script; the read or write
commands does that.
USB-MODEVM Protocol32 SLAU282 – April 2009
Submit Documentation Feedback
Page 39

www.ti.com
Writing Scripts
If extensive repeated write commands are sent and commenting is desired for a group of bytes, the >
command can be used to extend the bytes to other lines that follow. A usage example for the > command
follows:
#example script for '>' command
i i2cfast
# Write AA and BB to registers 3 and 4, respectively
w 30 03 AA BB
# Write CC, DD, EE and FF to registers 5, 6, 7 and 8, respectively
> CC DD EE FF
# Place a commented breakpoint
b "AA BB CC DD EE FF was written, starting at register 3"
# Read back all six registers, starting at register 3
r 30 03 06
The following example demonstrates usage of the Wait for Flag command, f:
#example script for 'wait for flag' command
i i2cfast
# Switch to Page 44
w 30 00 2C
# Switch buffers
w 30 01 05
# Wait for bit D0 to clear. 'x' denotes a don't care.
f 30 01 xxxxxxx0
Any text editor can be used to write these scripts; Jedit is an editor that is highly recommended for general
usage. For more information, go to: http://www.jedit.org .
Once the script is written, it can be used in the command window by running the program, and then
selecting Open Script File... from the File menu. Locate the script and open it. The script is then displayed
in the command buffer. The user can also edit the script once it is in the buffer and save it by selecting
Save Script File... from the File menu.
Once the script is in the command buffer, it can be executed by pressing the Execute Command Buffer
button. If there are breakpoints in the script, the script executes to that point, and the user is presented
with a dialog box with a button to press to continue executing the script. When ready to proceed, push that
button and the script continues.
SLAU282 – April 2009 USB-MODEVM Protocol 33
Submit Documentation Feedback
Page 40

IMPORTANT NOTICE
Texas Instruments Incorporated and its subsidiaries (TI) reserve the right to make corrections, modifications, enhancements, improvements,
and other changes to its products and services at any time and to discontinue any product or service without notice. Customers should
obtain the latest relevant information before placing orders and should verify that such information is current and complete. All products are
sold subject to TI’s terms and conditions of sale supplied at the time of order acknowledgment.
TI warrants performance of its hardware products to the specifications applicable at the time of sale in accordance with TI’s standard
warranty. Testing and other quality control techniques are used to the extent TI deems necessary to support this warranty. Except where
mandated by government requirements, testing of all parameters of each product is not necessarily performed.
TI assumes no liability for applications assistance or customer product design. Customers are responsible for their products and
applications using TI components. To minimize the risks associated with customer products and applications, customers should provide
adequate design and operating safeguards.
TI does not warrant or represent that any license, either express or implied, is granted under any TI patent right, copyright, mask work right,
or other TI intellectual property right relating to any combination, machine, or process in which TI products or services are used. Information
published by TI regarding third-party products or services does not constitute a license from TI to use such products or services or a
warranty or endorsement thereof. Use of such information may require a license from a third party under the patents or other intellectual
property of the third party, or a license from TI under the patents or other intellectual property of TI.
Reproduction of TI information in TI data books or data sheets is permissible only if reproduction is without alteration and is accompanied
by all associated warranties, conditions, limitations, and notices. Reproduction of this information with alteration is an unfair and deceptive
business practice. TI is not responsible or liable for such altered documentation. Information of third parties may be subject to additional
restrictions.
Resale of TI products or services with statements different from or beyond the parameters stated by TI for that product or service voids all
express and any implied warranties for the associated TI product or service and is an unfair and deceptive business practice. TI is not
responsible or liable for any such statements.
TI products are not authorized for use in safety-critical applications (such as life support) where a failure of the TI product would reasonably
be expected to cause severe personal injury or death, unless officers of the parties have executed an agreement specifically governing
such use. Buyers represent that they have all necessary expertise in the safety and regulatory ramifications of their applications, and
acknowledge and agree that they are solely responsible for all legal, regulatory and safety-related requirements concerning their products
and any use of TI products in such safety-critical applications, notwithstanding any applications-related information or support that may be
provided by TI. Further, Buyers must fully indemnify TI and its representatives against any damages arising out of the use of TI products in
such safety-critical applications.
TI products are neither designed nor intended for use in military/aerospace applications or environments unless the TI products are
specifically designated by TI as military-grade or "enhanced plastic." Only products designated by TI as military-grade meet military
specifications. Buyers acknowledge and agree that any such use of TI products which TI has not designated as military-grade is solely at
the Buyer's risk, and that they are solely responsible for compliance with all legal and regulatory requirements in connection with such use.
TI products are neither designed nor intended for use in automotive applications or environments unless the specific TI products are
designated by TI as compliant with ISO/TS 16949 requirements. Buyers acknowledge and agree that, if they use any non-designated
products in automotive applications, TI will not be responsible for any failure to meet such requirements.
Following are URLs where you can obtain information on other Texas Instruments products and application solutions:
Products Applications
Amplifiers amplifier.ti.com Audio www.ti.com/audio
Data Converters dataconverter.ti.com Automotive www.ti.com/automotive
DLP® Products www.dlp.com Broadband www.ti.com/broadband
DSP dsp.ti.com Digital Control www.ti.com/digitalcontrol
Clocks and Timers www.ti.com/clocks Medical www.ti.com/medical
Interface interface.ti.com Military www.ti.com/military
Logic logic.ti.com Optical Networking www.ti.com/opticalnetwork
Power Mgmt power.ti.com Security www.ti.com/security
Microcontrollers microcontroller.ti.com Telephony www.ti.com/telephony
RFID www.ti-rfid.com Video & Imaging www.ti.com/video
RF/IF and ZigBee® Solutions www.ti.com/lprf Wireless www.ti.com/wireless
Mailing Address: Texas Instruments, Post Office Box 655303, Dallas, Texas 75265
Copyright © 2009, Texas Instruments Incorporated
 Loading...