


TI-SmartView™
Guidebook
for Macintosh®

Important Information
Texas Instruments makes no warranty, either express or implied,
including but not limited to any implied warranties of merchantability
and fitness for a particular purpose, regarding any programs or book
materials and makes such materials available solely on an "as-is" basis. In
no event shall Texas Instruments be liable to anyone for special,
collateral, incidental, or consequential damages in connection with or
arising out of the purchase or use of these materials, and the sole and
exclusive liability of Texas Instruments, regardless of the form of action,
shall not exceed the purchase price of this product. Moreover, Texas
Instruments shall not be liable for any claim of any kind whatsoever
against the use of these materials by any other party.
Copyright © 2005 Texas Instruments Incorporated.
Macintosh, Mac, Safari, and Netscape are trademarks of their respective
owners.
ii

Contents
Important Information................................................................... ii
Getting started .......................................................................1
What's new in version 2.0.............................................................. 1
Overview of TI-SmartView............................................................. 2
System requirements...................................................................... 3
Installing TI-SmartView.................................................................. 3
Things you need to know .............................................................. 3
Choosing a display option ............................................................. 4
Changing the size of TI-SmartView............................................... 6
Changing the color of the face plate............................................ 6
Saving and loading an emulator state.......................................... 6
Resetting the emulator state......................................................... 7
Saving calculator data to the computer ....................................... 8
Loading a calculator file from the computer ............................... 9
Updating the software from the Internet .................................. 11
Working with images ...........................................................13
Capturing calculator screens........................................................ 13
Adding or removing a border ..................................................... 13
Saving a screen image.................................................................. 14
Viewing screen images................................................................. 15
Dragging and dropping an image to another application........ 16
Using the key press history ..................................................19
What is the key press history? ..................................................... 19
Showing or hiding the key press history..................................... 19
Clearing the key press history...................................................... 19
Copying the key press history to another application............... 20
Using scripts ..........................................................................21
What is a script? ........................................................................... 21
Recording a new script................................................................. 21
Tips for recording a script ............................................................ 22
Playing a script.............................................................................. 23
Adjusting the script speed ........................................................... 24
Saving a script............................................................................... 24
Saving a copy of a script .............................................................. 25
Opening an existing script........................................................... 25
Closing a script.............................................................................. 25
Stepping through a script............................................................ 26
Stopping a script........................................................................... 27
Contents iii

Pausing a script .............................................................................27
Inserting a delay into a script.......................................................28
Inserting a text point into a script...............................................29
Inserting a Go to Home command ..............................................30
Editing a script ..............................................................................31
Copying a script to another application......................................32
Locating common scripts..............................................................33
Connecting a calculator or CBL 2/CBR 2 .............................. 35
Using a connected calculator to control TI-SmartView .............. 35
Transferring data to and from a connected calculator .............. 38
Using a connected CBL 2 or CBR 2...............................................39
FAQs and keyboard shortcuts.............................................. 41
Frequently asked questions.......................................................... 41
Using the computer keyboard .....................................................42
Legal information ................................................................ 47
Texas Instruments Support and Service .......................................47
Index ..................................................................................... 49
iv Contents

Getting started
What's new in version 2.0
• Control the TI-SmartView™ software using a connected
calculator — Connect a TI-84 Plus or TI-84 Plus Silver Edition
graphing calculator to the computer. When you press keys and
perform calculations on the calculator, those actions are repeated
automatically on TI-SmartView™. The connected calculator acts as a
remote keyboard.
• Connect a CBL 2™ or CBR 2™ — Use TI-SmartView™ to collect
real-time data from a CBL 2 or CBR 2 connected to the computer.
Then graph and analyze that data.
3
• Select the View
show for each of the three displays.
• Save calculator data to the computer — Send data (lists,
matrices, etc.) from TI-SmartView™ to files stored on the computer.
You can use these files as backup copies of your data, or you can
transfer that data to a compatible TI graphing calculator. You can
also load calculator files from the computer.
• Hold down the arrow keys to scroll — When you use an arrow
key to move the cursor, you can hold down the key to scroll the
cursor continuously, instead of having to press the key repeatedly. In
the key press history and in a script, the icon for a repeating arrow
key has a clock symbol attached to it. For example:
™ screens — Select which calculator screen to
• Use the alpha typing mode with the computer keyboard —
When you click ƒ or press [F7], the keyboard switches to its
alpha typing mode, where pressing [A] types A. (In the keyboard’s
normal shortcut mode, [A] is a shortcut to .) To lock the alpha
key, click y 7
press [F7].
Getting started 1
or press [F6] [F7]. To unlock it, click ƒ or
Overview of TI-SmartView
The TI-SmartView™ software gives you a TI-84 Plus calculator on your
computer. The entire functionality of the TI-84 Plus is at your disposal,
including the ability to load and use calculator files such as applications
(Apps), lists, matrices, programs, and so on. The Apps that come already
loaded on the TI-84 Plus Silver Edition are also included with
TI-SmartView™.
TI-SmartView™ lets you show the TI-84 Plus to an audience without using
calculator-specific projection equipment and gives you additional
functionality that aids in presentations and demonstrations.
3
• Supplement the current TI-84 Plus screen by using the View
to show three extra screens simultaneously. You can select any three
of the following calculator screens: Y= editor, table, graph, stat plot,
list, and window.
• Repeat demonstrations quickly and easily by using scripts to play
back a series of keystrokes.
• View the history of your calculator entries, any open scripts, and a
large version of the current calculator screen.
• Capture screen images that you can save and use in other
documents.
™ pane
2 Getting started

System requirements
The personal computer that you use to run the TI-SmartView™ software
must meet the following hardware and software requirements.
• Mac® OS X 10.3 or later
• G3 CPU or higher
• 256 MB RAM
• 65 MB of available hard-disk space
• CD-ROM drive
• Safari™ 1.0 or later;
Firefox 1.0;
Internet Explorer 5.5 or later;
or Netscape® 6.0 or later
Installing TI-SmartView
If you are installing a full version of the TI-SmartView™ software (as
opposed to a trial version), find the CD key located on the CD case or CD.
1. Insert the TI-SmartView™ CD in your computer’s CD-ROM drive. The
disk icon appears on the desktop.
2. Double-click the TI-SmartView™ disk icon to display its contents.
3. Either drag or copy the TI-SmartView™ program icon to the
Applications folder or an appropriate location.
The first time you run the full-version of TI-SmartView™, you are
prompted to enter the CD key.
Note: When entering the CD key, be careful to not enter a zero for the
letter O or a letter O for a zero. Similarly, do not confuse the number one
with a lowercase letter L.
Things you need to know
The mouse pointer takes the place of your finger pressing keys
on the calculator.
Getting started 3

When you use the mouse, remember that the pointer takes the place of
your finger. You must click the keys on the calculator just like you would
press the keys on the TI-84 Plus. The TI-SmartView™ calculator screen is
not interactive. For example, when you change mode settings, you might
be tempted to click the mode setting on the calculator screen to select it.
However, clicking on the screen does nothing. You must click the arrow
keys to move the cursor to the desired setting and then click Í to
select it.
Typing text using the computer keyboard doesn’t work unless
you first place the keyboard in its alpha typing mode.
By default, the keyboard is in its normal shortcut mode, in which keys are
simply shortcuts to calculator keys. For example, pressing
[A] is the same
as clicking on the calculator. In this mode, you cannot directly type
the letters A through Z.
To type a letter or other alpha character, click ƒ or press [F7] first.
For example,
[F7] [A] gives you an A, not the key and not a B (the
alpha character associated with Œ). After you type the character, the
keyboard returns to its normal shortcut mode.
To lock the alpha key so you can type more than one character at a time,
click y 7 or press
mode, click ƒ or press
In alpha typing mode,
[1] types Y (the alpha character associated with À). To type a number,
[F6] [F7]. To return to the normal shortcut
[F7].
[0] through [9] still act as shortcuts. Pressing
be sure the keyboard is not in the alpha typing mode. These keys do type
the digits 0 through 9 in the normal shortcut mode.
When you record a script, you record only calculator key presses.
These key presses can be difficult to interpret, viewed by
themselves.
Because you record key presses, editing a script can be a little tricky. For
example, if you change the mode to parametric, the script records z
† † † ~ Í. The script doesn’t overtly tell you that you changed the
mode to parametric. For this reason, it can be quite helpful to step
through a script one key press at a time, or to play the script back at a
slower speed so that you can see exactly where an edit needs to be made.
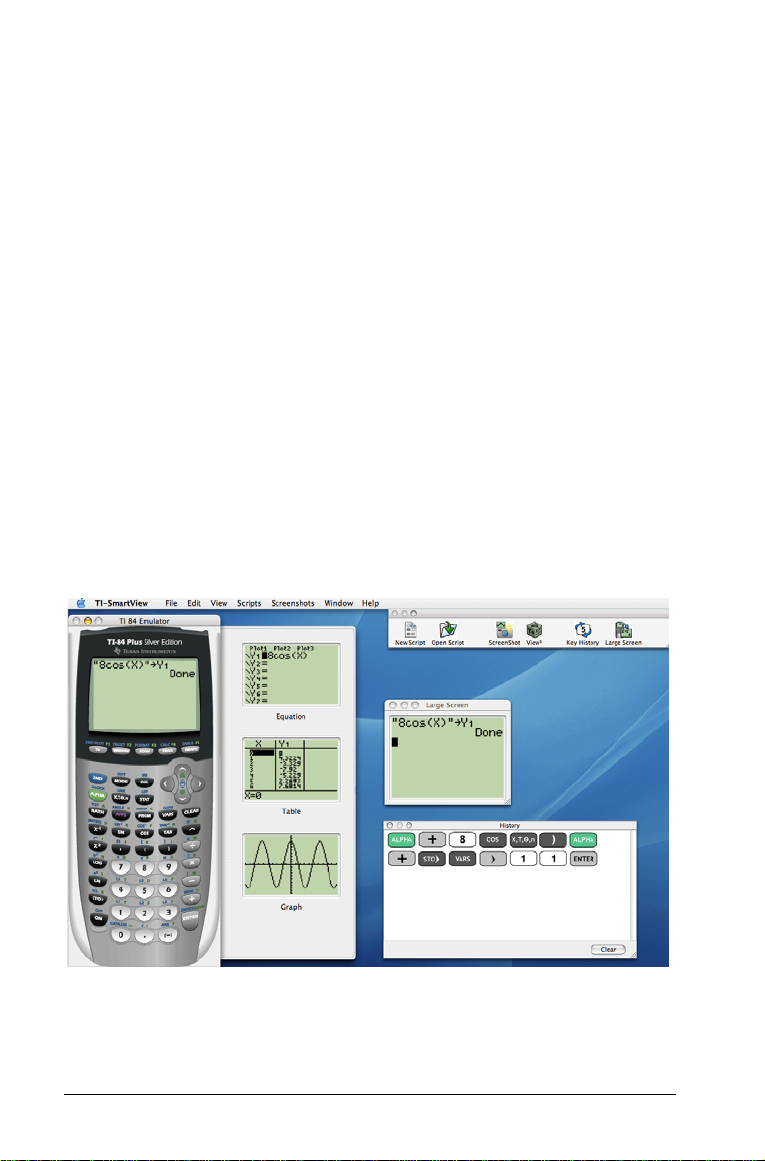
Choosing a display option
By default, the TI-SmartView™ calculator is displayed by itself. However,
you can open optional windows to display additional information that
may be helpful to you.
4 Getting started

The View3™ drawer initially shows the Y= editor, table, and graph
screens. However, you can select which calculator screen you want to
show for each of the three displays. (The stat plot, list, and window
screens are also available.) The screens are updated each time you press
one of the graphing keys (p, q, r, s), change the
Window or Zoom settings, or press Í.
The History window shows all of the calculator keys you have clicked.
The Large Screen window shows a large image of the current calculator
screen.
Script windows show any open scripts.
Display Option Click:
3
or to toggle the
View
3
™ drawer
Window > Show/Hide View
drawer open and closed.
Window > Show/Hide Key History or to
Key press history
toggle the History window on and off.
Window > Large Screen or to show the
Large Screen. To close the window, use the close
Large screen
Getting started 5
button in its title bar or
W.

Display Option Click:
Scripts
File > Open
File > New Script or to open a new, blank
script window.
The close button in the script window’s title bar or
press
Note: Hiding the key press history does not clear it.
or to open a script.
W to close the script.
Changing the size of TI-SmartView
When you first use the TI-SmartView™ software, the largest window size
that will fit on the screen is displayed. You can use whichever size you
want, but the small, medium, and large versions are optimized for the
following screen resolutions.
If your screen resolution is: Click:
800 x 600 View > Size > Small
1024 x 768 View > Size > Medium
1280 x 1024 View > Size > Large
Changing the color of the face plate
Just like with the TI-84 Plus, you can change the color of the face plate on
the TI-SmartView™ calculator. You can choose from four colors. The
default face plate color is silver.
f Click View > Color and then click a color.
Saving and loading an emulator state
When you save the emulator state, a file is created that stores the
calculator with all of the changes that you have made to its setup. Think
of the emulator state file as representing a single TI-84 Plus that you have
used and then set aside. When you load an emulator state, you pick up
that same TI-84 Plus to use again. All of the changes that you made to
the calculator are intact.
6 Getting started

For example, you might want to set up a class demonstration by entering
functions in the Y= editor and changing Window and Zoom settings.
When you save your changes in an emulator state file, you simply load
the file to show your demonstration. If you want to create different
demonstrations for different classes, you can create multiple emulator
state files. There is no limit on the number of emulator states that you
can save.
Note: The key press history, screen capture images, open scripts, face
plate color, and size are not saved in the emulator state file.
Saving the emulator state
1. Click File > Save Emulator State.
2. In the dialog box:
a) Navigate to the folder in which you want to store the
emulator state file.
b) Type a file name. Use a name that describes the emulator
state.
c) Click
Save.
Loading an emulator state
1. Click File > Open.
2. In the dialog box:
a) Navigate to the folder that contains the emulator state file.
b) Click the emulator state name to highlight it.
c) Click
Open.
Resetting the emulator state
Resetting the emulator state returns the TI-SmartView™ software to the
TI-84 Plus Silver Edition factory-default settings. The key press history is
cleared. Any open scripts are stopped, but remain open.
1. Click
2. In the dialog box, click
Getting started 7
File > Restore Default State.
Restore to confirm that you want to reset the
emulator state.

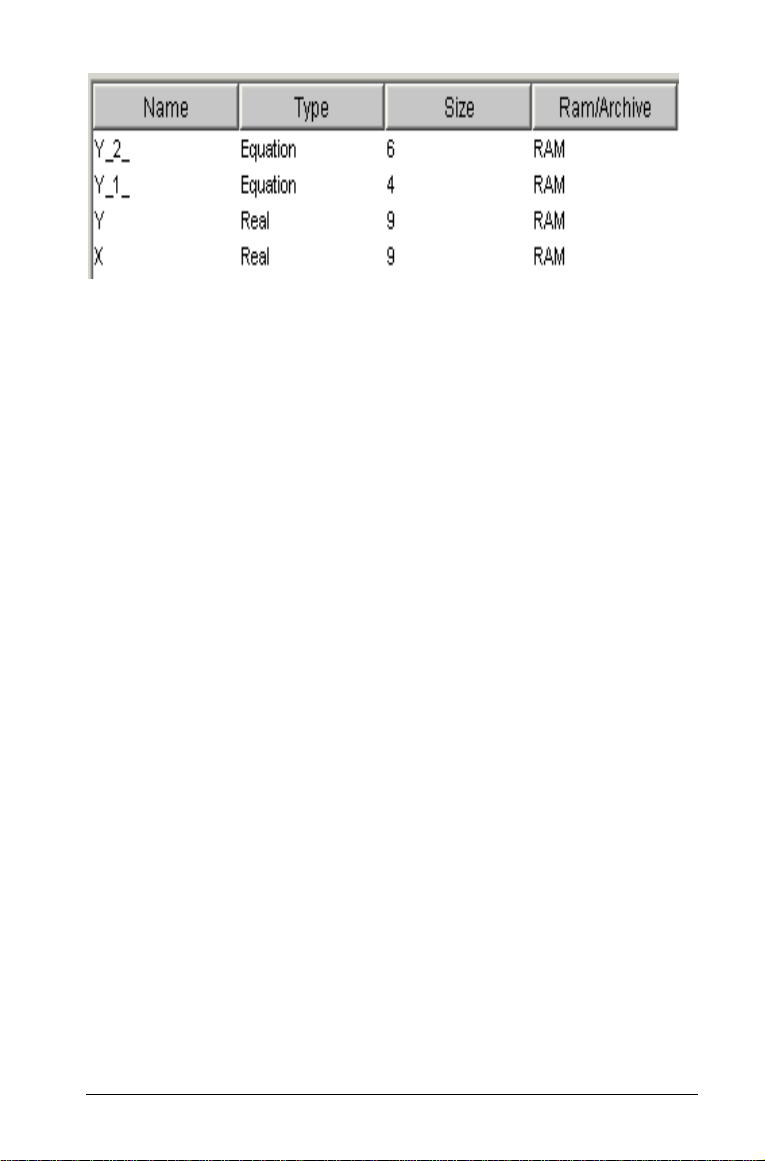
Saving calculator data to the computer
By saving data (lists, matrices, programs, etc.) from the TI-SmartView™
calculator to files on the computer, you can make backup copies of that
data. If you delete the data from TI-SmartView™, you can load the
calculator files from the computer at any time.
1. Click
2. Click an item to highlight it.
3. Click Save Selected Item(s).
4. In the dialog box, navigate to the folder in which you want to store
5. Click
6. When you’re finished, click
Note: In the Device Contents dialog box, you can sort the list by clicking
a heading. For example, click Name to sort by name and switch between
ascending (a-z) and descending (z-a) order.
File > Save Calculator File.
The Device Contents dialog box lists the data items on the
TI-SmartView™ calculator, which may take several seconds.
• To select multiple items, hold down on the computer
keyboard as you click each additional item.
• To select a range of items, click the first item in the range. Then
hold down Shift and click the last item in the range.
the files. If necessary, click New Folder.
Choose.
Each selected item is saved as a separate file on the computer. File
names are assigned automatically. The file name’s extension
identifies the data type.
If the folder already contains a file with the assigned name,
TI-SmartView™ automatically adds a suffix such as -1, -2, etc., to the
new file name.
The Device Contents dialog box stays open so you can select and save
additional data items.
Close.
8 Getting started
Transferring files to supported graphing calculators
You can transfer files to the following calculators: TI-83 Plus, TI-83 Plus
Silver Edition, TI-84 Plus, and TI-84 Plus Silver Edition.
To transfer calculator files from the computer, use TI Connect™ software
and an appropriate TI Connectivity Cable available from
education.ti.com. Some calculators come with a TI Connectivity Cable,
which lets you connect the calculator to the computer.
You can also transfer data directly between TI-SmartView™ and a
connected calculator, much the same way you can connect two
calculators and transfer data between them.
Loading a calculator file from the computer
If you previously stored calculator files containing lists, programs,
applications, etc., on your computer, you can load them into the
TI-SmartView™ software. The files may be backups saved by
TI-SmartView™ or files transferred to the computer from a calculator.
(See “Transferring files from supported graphing calculators” on
page 10.)
1. Click
2. In the dialog box:
File > Load File.
a) Navigate to the folder that contains the file you want to
load.
b) Click the file name to highlight it.
c) Click
If TI-SmartView™ already contains a data item with that name,
you’re prompted whether to overwrite the existing item.
Open.
Calculator file names on the computer
Calculator file names have the form:
Getting started 9

filename.8x?
where filename is as close as possible to the data item’s name on the
calculator, 8x indicates the file was created by TI-SmartView™ or a
supported graphing calculator, and ? is a letter that identifies the type of
data. Common data types are:
If ? is: Type of data
c complex variable
d GDB (graph database)
eequation
ffunction
ggroup
i picture
k Flash application
l list (real or complex)
mmatrix
n real number
pprogram
s string variable
ttable setup
v application variable
w user zoom window
z zoom window setting
Note: If you load a Flash application file, TI-SmartView™ automatically
installs the application.
Transferring files from supported graphing calculators
TI-SmartView™ can load files transferred to your computer from the
following calculators: TI-83 Plus, TI-83 Plus Silver Edition, TI-84 Plus, and
TI-84 Plus Silver Edition.
To transfer files from a calculator to the computer, use TI Connect™
software and an appropriate TI Connectivity Cable available from
education.ti.com. Some calculators come with a TI Connectivity Cable,
which lets you connect the calculator to the computer.
10 Getting started

You can also transfer data directly between TI-SmartView™ and a
connected calculator, much the same way you can connect two
calculators and transfer data between them.
Updating the software from the Internet
Visit education.ti.com for free software updates that you can download.
11

12

Working with images
Capturing calculator screens
You can capture the current calculator screen image using the
TI-SmartView™ screen capture tool. When you capture a screen, the
Screen Capture window opens. In this window, you can view, manipulate,
and save screen images.
f Click Screenshots > Take Screenshot or click .
With a border, the image size is 100 pixels wide by 68 pixels high.
Without a border, the image size is 96 pixels wide by 64 pixels high. A
border is automatically added to each image when you capture it, but
you can remove it.
The number of screen images you can capture is limited only by the
available memory on your computer. Each unsaved screen image is stored
in memory until you quit the application or delete the image. Closing the
Screen Capture window does not discard unsaved screen images.
Adding or removing a border
The toolbar button for adding or removing a border toggles between
add and remove depending on whether or not the selected
image contains a border.
Adding or removing a border on a single screen image
1. Click the screen capture image to select it.
2. Click
Screenshots > Remove Border or click to remove the
border.
—or—
Click
Screenshots > Add Border or click to add a border.
Adding or removing a border from a group of screen
images
1. Switch to thumbnail view.
2. Select the group of images. You can either:
Working with images 13

• Click the first image you want to select, and then hold down
on the computer keyboard as you click each additional image.
• Select a range of images by clicking the first image in the range,
holding down Shift, and clicking the last image in the range.
• Drag the mouse to highlight the images.
3. Click
Note: To select all of the images, click Edit > Select All.
Screenshots > Remove Border or click to remove the
border
—or—
Screenshots > Add Border or click to add a border.
Click
Saving a screen image
You can save screen images in TIFF, GIF, PNG, or JPEG formats. You can
save a larger or smaller version of the screen image by zooming in or out
on that image and then saving it.
1. Click the screen image you want to save.
2. Click
3. In the dialog box:
Note:
• If you save a file to a location where that file name already exists, a
File > Save or click .
a) Navigate to the folder in which you want to store the screen
image file.
b) Select the image format.
c) Type a file name. Use a name that describes the screen
image.
d) Click Save.
dialog box opens giving you the option to replace the existing file or
to cancel and return to the Save As window.
14 Working with images

• You can select multiple images (by holding down or Shift as you
click images, or by dragging the mouse) and save them all at one
time. When you do this, you select the location to save the files in the
Save As window, but do not specify file names. Each screen image is
saved with its default file name. If that name already exists, a suffix
such as -1, -2, etc., is added to the new file name so it does not
overwrite the previous file.
Viewing screen images
When you capture a screen image, that image opens in the Screen
Capture window. You can view the images individually or as a group of
images, called thumbnails. A reference name is displayed under each
image.
Working with images 15

f To view screen image thumbnails, click Screenshots >
Thumbnail View
f To view individual screen images, click
Screen View
or click .
Screenshots > Single
or click .
Navigating among screen images
f To view the previous screen image, click
Screenshot
or click .
f To view the next screen image, click
Screenshot
or click .
Screenshots > Previous
Screenshots > Next
Zooming in and zooming out
You can zoom in or out on any single image to view a larger or smaller
version of it.
You can save a larger or smaller version of a screen image by zooming in
or out before you save it. For example, to save an image that is larger
than the standard 96 x 64 size, zoom in until the image is the size you
want and then save it.
f To display a larger screen image, click Screenshots > Zoom In or
click .
f To display a smaller screen image, click
Screenshots > Zoom Out
or click .
Dragging and dropping an image to another application
You can drag any TI-SmartView™ screen image and drop it into another
application. These images include the following:
• Saved or unsaved screen capture images
3
•View
• The Large Screen image
16 Working with images
™ feature screens

Note: In the thumbnail view in the Screen Capture window, the selected
image has a blue border. However, the borders on the Large Screen
image and the View
3
™ feature screens do not change color when you
select them.
To drag and drop a screen image into another application:
1. Adjust the sizes of the windows of the two applications so that both
of them fit on the computer screen.
2. To drag-and-drop the image:
a) Click the screen image to select it.
b) Drag the screen image from TI-SmartView™ and then drop
it into the other application.
Working with images 17

18 Working with images

Using the key press history
What is the key press history?
Each key you click on the calculator is recorded automatically in the key
press history. At any time, you can view the key press history to see a
listing of all the keys you’ve used. This has several benefits, including:
• If a calculation gives unexpected results, you can view the key press
history to see if you entered the correct data.
• If you perform a calculation and then find you need to perform it
repeatedly, you can copy those keys from the key press history and
paste them into a script. When you need to repeat the calculation,
you can play the script instead of re-entering all the key presses.
The key press history shows some key sequences in a different form than
they’re shown in the user’s guide for the TI-84 Plus calculator. For
example, suppose you display the calculator’s MEMORY menu.
• The user’s guide shows the key sequence as y L, where L is
the 2nd function of the à key.
• The key press history shows the key sequence as
because those are the actual keys you click.
Similarly, suppose you select the round( function from the
menu.
MATH NUM
• The user’s guide shows the function as round(.
• The key press history shows because those are
the keys you click.
Showing or hiding the key press history
f Click Window > Show/Hide Key History or click .
This toggles the History window on and off. Hiding the window does not
clear the contents of the key press history.
Clearing the key press history
f Click Edit > Clear Key Press History, or click Clear at the bottom
of the History window.
Using the key press history 19

Copying the key press history to another application
You can copy all or only a selected portion of the key press history to
another application such as a word processor. The procedure is the same
as used to copy scripts. (See “Copying a script to another application” on
page 32.)
20 Using the key press history

Using scripts
What is a script?
A script is a series of calculator key presses that can be stored and played
repeatedly. By saving the script, you can open it at a later time and play it
again without having to re-enter all the key presses.
Overview of using a script
Create,
record,
and save
the script
Play
the
script
Close
the script
Suppose, after performing one or more calculations on the calculator,
you decide to create a script that perfoms those same calculations.
Instead of repeating the key presses while recording a new script, you
can:
• Copy keys from the key press history and paste them into the script.
• Edit the script as necessary so the keys work properly in the context
of that script.
You can also:
• Insert text points.
• Insert pauses and delays.
• Insert a Go To Home
command.
You can:
• Play the script normally.
• Step-through one key at a
time.
• Manually pause the script.
Recording a new script
You can begin recording a new script at any time.
Using scripts 21

1. Click File > New Script or click .
A new, blank script window opens. The title bar shows the script’s
default name, which is Untitled, Untitled 2, etc.
2. Click
3. Click the keys on the calculator to record the key presses for your
4. When you’re finished, click Scripts > Stop or click .
Note:
• You can also insert Go To Home commands, text points, delays, and
• You can help ensure that your script plays properly under various
• You can reuse key sequences that you previously entered in the
Scripts > Record or click on the script’s toolbar.
script.
pauses in a script.
conditions by following a few simple guidelines. (See “Tips for
recording a script” on page 22.)
calculator. Copy the keys from the key press history and paste them
into the script. The procedure is the same as used to copy scripts. (See
“Copying a script to another application” on page 32.)
Tips for recording a script
If you record a script assuming the calculator will always have its current
settings, you may have problems later if you play the script with different
calculator settings. Therefore, it’s a good practice to add the necessary
settings directly into the script. The following tips can help you create
scripts that play correctly in a variety of situations.
At the beginning of a script:
• Insert a Go To Home command to ensure the script starts on the
calculator’s home screen. This lets your script begin at a known
starting point, regardless of what screen is shown on the calculator
when you play the script.
• Press y L
When graphing:
• Press u before entering an equation into the Y= editor.
• Insert a Pause command after graphing a frunction.
When using variables, lists, and statistical data:
7 2 2 to reset the memory to its defaults.
22 Using scripts

• Clear a variable before storing to it.
• Press y L 4 Í to clear all lists before storing to them.
• Press …
editor. This command removes all list names from the stat editor and
then restores list names L1 through L6 to columns 1 through 6.
When selecting an item from a menu:
• Press the number or letter for that item. Suppose you need fMax(
from the MATH menu. The script runs faster if you use 7 (two
key presses) instead of † † † † † † Í (eight key
presses).
When starting an application from within a script:
• If you share the script with other people using TI-SmartView™
software on different computers, remember that their
APPLICATIONS menus may not list the same applications in the same
order. Pressing Œ
may not start the same application on theirs.
• Instead, have your script press Œ to display the APPLICATIONS
menu and then use a text point telling the user to select the
appropriate application from the list.
At the end of a script:
• Insert a Pause command. This is particularly useful if a script displays
text points that you want the user to see after the script finishes.
Otherwise, text points are closed automatically at the end of a script.
Note: When resetting the memory, clear only the applicable portion of
the memory. Using y L
situations.
5 Í to execute SetUpEditor, which clears the stat
4 to start an application on your TI-SmartView™
7 1 2 to reset all RAM is not required in most
Playing a script
After recording a new script or opening an existing one, you can play it.
You cannot play a script while you’re recording it.
1. Select the appropriate script window.
2. Click Scripts > Play or click .
Note: You can also press the space bar on the computer keyboard to play
a script.
Using scripts 23

Adjusting the script speed
You can vary the speed at which each key press in a script is executed,
from Slow (approximately one key press every 4 seconds) to Fast
(approximately one every 1/2 second).
1. Click
2. In the submenu, click a speed in the displayed range.
Note:
• You can also use the slider located to the right of the script’s toolbar.
• The speed setting affects every key press in the script, which may not
Scripts > Script Speed.
Drag the slider to the appropriate position.
be what you want. Suppose the script enters numbers such as
425,237,234. Setting the speed to one key press every 2 seconds takes
18 seconds to enter the number. Instead, you may want to use a faster
speed and insert pauses or delays at certain points in the script.
Saving a script
After recording a new script or editing an existing one, save the script so
you can use it again later.
1. Select the appropriate script window.
2. Click
3. If you see the dialog box:
Note: If you do not want to save the changes you made to an existing
script, close the script instead of saving it. When prompted whether to
save the changes, click Don’t Save.
File > Save or click .
For an existing script that was saved previously, the new version
automatically overwrites the existing one. For a new script, the Save
As dialog box opens.
a) Navigate to the folder in which you want to store the script
file.
b) Type a file name. Use a name that indicates the purpose of
the script.
c) Click
Save.
24 Using scripts

Saving a copy of a script
Sometimes you may need a script that is similar to an existing one but
with some changes. Instead of recording a new script, it may be easier to
copy the existing script and edit it.
1. Open the script you want to copy.
2. Click
3. In the dialog box:
Note: If you change a script and want to keep those changes in the
File > Save As.
Note: Do not click .
a) Navigate to the folder in which you want to store the copy.
b) Type a file name. Use a name that indicates the purpose of
the script.
c) Click
Save.
existing script, click
Otherwise, the changes are saved in the copy but not in the original
script.
File > Save or before selecting Save As.
Opening an existing script
After a script is recorded and saved, you can open it later and play the
script again, edit it, or save a copy of it.
1. Click
2. In the dialog box:
The script window opens.
Note: To open a recently used script, you can click
and then click a script name.
File > Open or click .
a) Navigate to the folder that contains the script file.
b) Click the script name to highlight it.
c) Click
Open.
File > Open Recent
Closing a script
When you’re finished using a script, you may want to close it. This
removes the script window from the desktop. If the script is not saved,
you are prompted whether to save it.
Using scripts 25

f Click File > Close or click X in the script window’s upper-left
corner.
Click to close
the script.
Stepping through a script
You can step through a script one key press at a time. This is the same
effect as if you had used pause commands to halt the script between
every key press. Depending on the length of the script, you may want to
step through all or only parts of it.
Stepping through a script from the beginning
In the script window, instead of playing the script:
1. Click Scripts > Step or click to start the script.
Note: Do not click
The script pauses automatically after every key press.
2. Click repeatedly to step through each key press.
3. After stepping through a series of key presses, you can click to
play the remaining key presses continuously.
Note: After the first pause, you can also press the right arrow key on the
computer keyboard to step through a script.
Scripts > Play or .
Stepping through part of a script
In the script window:
1. Click
2. Click
3. Click
Scripts > Play or click .
Scripts > Pause or click to pause at a location before you
want to start stepping through.
Scripts > Step or click repeatedly to step through each
key press.
26 Using scripts

4. After stepping through a series of key presses, you can click to
play the remaining key presses continuously.
You can repeat steps 2 - 4 as often as necessary to step through different
parts of the script.
Note: After the first pause, you can also press the right arrow key on the
computer keyboard to step through a script.
Stopping a script
When you finish recording a script, you need to stop recording. When
you play a script, you may want to stop the script manually at some time
before it would normally end.
f Click Scripts > Stop or click .
Unlike when you pause a script, you cannot continue playing the script
from the location where it stopped. You can only replay the script from
the beginning.
Note: While a script is playing, you can also press
keyboard to stop it.
Esc on the computer
Pausing a script
At various times while a script is running, you may want to halt it
temporarily. For example, you may want to view an intermediate result
or graph before continuing with another operation that changes the
calculator screen or graph. You can either pause the script manually or
insert a pause command directly into the script.
Pausing the script manually
In the script window, while the script is playing:
f Click Pause .
The Play button changes to Pause when you play the script.
After you pause the script, the button changes back to
again when you’re ready to continue the script.
Note: You can also press the space bar on the computer keyboard to
pause a script. Press the space bar again to continue.
Using scripts 27
Play. Click Play

Inserting a pause command in the script
In the script window:
1. Click the location where you want to insert the pause.
The cursor appears at that position.
2. Click Scripts > Insert Special > Insert Pause, or click Insert
and then click Pause.
appears in the script to mark the location of the pause. When you
play the script, it always halts at this pause command.
When you’re ready to continue the script, click Scripts > Play or click
.
Deleting an existing pause command
Delete the icon the same way you would delete any other key press
in the script.
Inserting a delay into a script
In some cases, you may want to delay the script a specified period of time
before it continues to the next key press. For example, you may want to
display a result or graph for a few extra seconds before the script
executes the next key press.
Inserting a delay
In the script window:
1. Click the location where you want to insert the delay.
The cursor appears at that position.
2. Click
A delay has the same effect as a blank key press. It lasts as long as a single
key press (as determined the script’s speed setting) and has no other
effect on the script.
28 Using scripts
Scripts > Insert Special > Insert Delay, or click Insert
and then click
appears in the script to mark the delay.
Delay.

For a longer delay, insert more than one. For example, suppose the speed
is set for one key press every second. To delay five seconds, insert five
delays.
Note: If you don’t know how long to delay the script, consider inserting
a pause instead. After the script pauses, it does not start again until you
Scripts > Play or click to continue.
click
Deleting an existing delay
Delete the icon the same way you would delete any other key
press in the script.
Inserting a text point into a script
If you use a script to show a presentation, you may want to display a text
screen at certain locations to explain a result or describe what the script
will be doing next.
Inserting a new text point
In the script window:
1. Click the location where you want to insert the text point.
The cursor appears at that position.
2. Click
3. In the text entry sheet:
Note:
• When you run the script, a text display drawer opens to show the
• The text from all text points in the script is placed one after another
Using scripts 29
Scripts > Insert Special > Insert Text, or click Insert
and then click
a) Type the text using your computer’s keyboard. You cannot
b) Click
appears in the script to mark the text point.
text. The text display drawer remains open until you click
bottom of the drawer.
in the text display drawer. As necessary, you may need to scroll to see
all the text.
Text Po i n t .
use the calculator to enter the text.
OK.
Close at the

• You can change the size of the displayed text by dragging the slider
located to the left of the
Close button.
Editing an existing text point
In the script window:
1. Double-click the marker.
The text entry sheet opens.
2. Edit the text as necessary.
3. Click
OK.
Deleting an existing text point
Delete the marker the same way you would delete any other key
press in the script.
Inserting a Go to Home command
A script executes each key press in sequence. However, these key presses
may have different effects depending on what screen (Home, Graph,
Table, etc.) is shown on the calculator when you play the script. By using
a Go To Home command at the beginning of a script, you can ensure that
it begins on the Home screen.
Inserting a new Go To Home
In the script window:
1. Place the cursor at the beginning of the script.
2. Click
Scripts > Insert Special > Insert Go To Home, or click Insert
and then click
appears in the script to mark the location of the command.
Note: You can insert a Go To Home command at any location in your
script. While you’re recording key presses inside a script, however, it’s
usually better to record the actual key presses used to display the Home
screen.
30 Using scripts
Home.

Deleting an existing Go To Home command
Delete the icon the same way you would delete any other key press
in the script.
Editing a script
Editing a script is similar to editing a text document. For example, you
can drag the mouse to highlight a series of keys the same as you would
drag to highlight text in a word processor. (You can also hold down Shift
and use the arrow keys on your computer keyboard.)
Inserting key presses or script elements (pauses, delays,
etc.)
In the script window:
1. Click Scripts > Record or click .
2. Click the location where you want to insert the keys or script
elements.
3. You can:
• Click the calculator keys you want to insert.
•Use
4. When you’re finished, click Scripts > Stop or click .
Note: You can use
required only when you want to enter keys by clicking the calculator.
Insert to insert a pause, delay, etc.
Insert without recording first. Recording is
Deleting key presses or script elements
In the script window, either:
• Place the cursor immediately to the right of the items you want to
delete. Then press
– or –
• To delete multiple items at one time, highlight the items. Then click
Edit > Delete or click on the script’s toolbar.
Using scripts 31
Delete on your computer keyboard.

Moving items to a different location
In the script window:
1. Highlight the items you want to move.
2. Click Edit > Cut or click .
3. Click the location where you want to insert the items.
4. Click
Note: You can also use the mouse to drag the highlighted items to the
new location.
Edit > Paste or click .
Copying items to a different location
In the script window:
1. Highlight the items you want to copy.
2. Click Edit > Copy or click .
3. Click the location where you want to insert the copy.
4. Click
Note: You can also hold down Option on your computer keyboard and
use the mouse to drag a copy of the highlighted items to the new
location.
Edit > Paste or click .
Copying a script to another application
You can copy all or only a selected portion of a script to another
application such as a word processor. You can copy the key graphics as
they are shown in the script window, or you can copy the key presses as
font text characters.
Note: When you copy as font text characters, those characters use the
TI84EmuKeys font. This font is installed on your computer automatically
when you install the TI-SmartView™ software.
Copying keys as graphics
1. Open the appropriate script.
2. Select the keys you want to copy. To select all the keys, click
Select All
32 Using scripts
.
Edit >

3. Click Edit > Copy, switch to the other application, and paste the keys
at the appropriate location.
Note: You can also drag the selected keys to the new application.
Copying keys as font text characters
1. Open the appropriate script.
2. Select the keys you want to copy. To select all the keys, click
Select All
3. Click
4. Switch to the other application, and paste the characters at the
appropriate location.
In some applications, the pasted characters may be shown in the font
that is in effect at that location. So they may not look anything like
calculator keys.
5. If necessary, apply the TI84EmuKeys font to the characters.
Note: The script icons for text points, delays, pauses, and Go To Home
commands cannot be copied as font text characters. They are ignored
when you paste the characters into the other application.
.
Edit > Copy As Font.
Edit >
Locating common scripts
If you have access to scripts written by other people, you can open and
play those scripts on your own computer. Texas Instruments provides a
number of scripts that perform commonly used operations.
• Open the TI-SmartView™ installation CD to display its contents, and
double-click the file DoubleClickMe.html. On the displayed screen,
click the
scripts that you can save to your computer.
• Check the Texas Instruments web site at education.ti.com.
By using available scripts and viewing their content, you can get ideas
about how to create additional scripts for automating your own
operations.
activities and tutorials tab. Most of the listed items are
Using scripts 33

34 Using scripts

Connecting a calculator or CBL 2/CBR 2
Using a connected calculator to control TI-SmartView
You can connect a TI-84 Plus or TI-84 Plus Silver Edition graphing
calculator to your computer and use it as a remote keyboard for the
TI-SmartView™ software. If you press a series of keys on the calculator,
those same key presses are repeated on TI-SmartView™. This is useful if
you feel more comfortable pressing real keys on a calculator but want to
see the results on the computer.
Note: The calculator must have a supported operating system. (See
“Checking the calculator’s operating system” on page 36.) Also, the
SmartPad™ application must be installed on the calculator.
Controlling TI-SmartView
1. Connect the calculator (See “Connecting the calculator to the
computer” on page 35.) and start TI-SmartView™.
2. On the connected calculator, press Œ and run the SmartPad™
application. (The application will not run if the calculator is not
connected.)
The SmartPad™ title screen appears. The calculator shows this title
screen as long as the application is running. All key presses and
results appear on the computer only.
Note: If the Keyboard Setup Assistant appears when you run
SmartPad™, simply close the assistant. The application will work
properly.
3. Press keys on the connected calculator to control TI-SmartView™.
4. When you’re finished, either:
• Press y M on the connected calculator.
– or –
• Disconnect the USB cable.
Connecting the calculator to the computer
You must use the Standard-A to Mini-B USB Cable that comes with your
TI-84 Plus calculator. Other TI Connectivity Cables are not supported. If
you need to purchase a cable, go to education.ti.com.
Connecting a calculator or CBL 2/CBR 2 35

1. Firmly insert the cable’s standard USB connector into a USB port on
the computer.
2. Insert the cable’s mini USB connector into the calculator’s USB port.
The TI-84 Plus port is at the top right edge of the calculator.
3. Turn on the calculator.
Checking the calculator’s operating system
Not all TI-84 Plus or TI-84 Plus Silver Edition graphing calculators have an
operating system that can control TI-SmartView™. To check your
calculator:
f Press y L and then select 1:About.
The operating system number, immediately below the calculator name,
must be 2.40 or later. For example:
36 Connecting a calculator or CBL 2/CBR 2

If you need to upgrade your operating system, go to education.ti.com.
Note
• While a calculator is connected, you can continue to perform
operations by clicking keys on TI-SmartView™. You can also run
applications (such as Cabri® Jr., Inequality Graphing, or
Transformation Graphing) or any programs stored on
TI-SmartView™.
• All calculations use the TI-SmartView™ emulator state, not the
connected calculator’s. If the connected calculator contains data,
applications, or programs that are not on TI-SmartView™, you
cannot access those items.
– Suppose the variable a equals 20 on the calculator but is not
defined on TI-SmartView™. If you calculate 5a, the answer will
not be 100 as you may expect.
– Even if TI-SmartView™ contains the same application or
program as the calculator, it may be in a different location on
the menu. For example, an application may be item 3 on the
APPLICATIONS menu on TI-SmartView™ and item 2 on the
connected calculator. So pressing Π2 may give unexpected
results.
• The connected calculator turns off automatically if not used for
about five minutes. To continue using it, turn the calculator on.
• You do not need TI Connect™ software on your computer to control
TI-SmartView™.
Connecting a calculator or CBL 2/CBR 2 37

Transferring data to and from a connected calculator
With a TI-84 Plus calculator, you can connect it to another compatible
calculator and transfer data between them. Likewise, you can transfer
data between TI-SmartView™ software and a connected calculator.
Compatible calculators are the TI-83 Plus, TI-83 Plus Silver Edition, TI-84
Plus, and TI-84 Plus Silver Edition.
Note: To connect the calculator, you must use the USB Silver Edition
cable available from education.ti.com. Other TI Connectivity Cables are
not supported for this type of connection.
1. Plug the cable’s USB connector into any USB port on the computer,
and plug the other end of the cable into the calculator’s I/O link port.
2. Click
3. Click the applicable device to highlight it, and then click Select.
4. Use y 8 to transfer the data by using the detailed instructions
5. When you’re finished transferring data, click
You can use TI-SmartView™ when the calculator is connected, but it’s a
good practice to disconnect it when you’re done. Don’t simply unplug
the cable.
Note: If you unplug the USB connector from the computer while the
calculator connection is active, the computer may lock up.
TI-SmartView > Establish Connection.
A dialog box lists all devices connected to the computer with a USB
Silver Edition cable, such as a CBL 2™, CBR 2™, and a calculator.
If the device is not listed, check both ends of the cable and make sure
they’re connected properly. Then click Refresh to update the list.
TI-SmartView™ connects the device and displays Device Connected
on the title bar. Also, the Establish Connection menu item changes
to Disconnect.
given in the Communication Link chapter of the TI-84 Plus
Guidebook. The general steps are:
a) Set the receiving unit to receive.
b) On the sending unit, select the applicable data items and
transmit them.
The TI-84 Plus Guidebook is available on the TI-SmartView™
installation CD, or you can download it from
education.ti.com/guides.
TI-SmartView >
Disconnect
.
38 Connecting a calculator or CBL 2/CBR 2

Using a connected CBL 2 or CBR 2
You can connect a Calculator-Based Laboratory™ 2 (CBL 2™) or
Calculator-Based Ranger™ 2 (CBR 2™) device to your computer. By using
one of the following applications on the TI-SmartView™ calculator, you
can then collect and analyze real-world data.
DataMate — Used for CBL 2. This application comes with the CBL 2
•
and needs to be transferred to TI-SmartView™ before you can use it.
• EasyData — Used for both CBL 2 and CBR 2. This application is
standard on TI-84 Plus calculators and is included with
TI-SmartView™. (On a TI-84 Plus, EasyData launches automatically
when you plug in a USB sensor. On TI-SmartView™, however,
EasyData does not autolaunch.)
CBL/CBR — Used for both CBL 2 and CBR 2. This application is
•
standard on TI-83 Plus calculators and is included with
TI-SmartView™.
Note: To connect a CBL 2 or CBR 2, you must use the USB Silver Edition
cable available from education.ti.com. Other TI Connectivity Cables are
not supported for this type of connection.
Connecting the device and running the application
If you want to use DataMate, be sure the application is already installed
on TI-SmartView™. (See “Transferring DataMate to TI-SmartView” on
page 40.) Then:
1. Plug the cable’s USB connector into any USB port on the computer,
and plug the other end of the cable into the device’s I/O port.
2. Click
3. Click the applicable device to highlight it, and then click
4. Click Œ, and then run DataMate, EasyData, or CBL/CBR.
5. Use the application to collect data. For information about using:
Tools > Establish Connection.
A dialog box lists all devices connected to the computer with a USB
Silver Edition cable, such as a CBL 2, CBR 2, and a calculator.
If the device is not listed, check both ends of the cable and make sure
they’re connected properly. Then click
TI-SmartView™ connects the device and displays Device Connected
on the title bar. Also, the Establish Connection menu item changes
Disconnect.
to
– DataMate, refer to the guidebook that came with the CBL 2.
Refresh to update the list.
Select.
Connecting a calculator or CBL 2/CBR 2 39

– EasyData, refer to the Applications chapter of the TI-84 Plus
Guidebook, available on the TI-SmartView™ installation CD or
at education.ti.com/guides.
– CBL/CBR, refer to the Applications chapter of the TI-83 Plus
Guidebook, available at education.ti.com/guides.
6. When you’re finished, click
Tools > Disconnect.
You can use TI-SmartView™ when the CBL 2 or CBR 2 is connected, but
it’s a good practice to disconnect it when you’re done. Don’t simply
unplug the cable.
Note:
• If you unplug the USB connector from the computer while the
connection is active, the computer may lock up and need to be
rebooted.
• After a device is connected, you can switch the cable’s plug to
another device without reconnecting. Suppose you first use a CBR 2
and then want to switch to a CBL 2. Unplug the cable from the CBR 2
and plug it into the CBL 2.
• Other than a CBR 2, you can only use probes connected to a CBL 2.
TI-SmartView™ does not use direct-connect probes.
• You can also collect data with a CBR 2 separately, and then transfer
that data to TI-SmartView™ for analysis.
• For complete information about using the CBL 2 or CBR 2, refer to the
guidebook that comes with the device.
Transferring DataMate to TI-SmartView
If you use a CBL 2, you should use the DataMate application that comes
with the device. You only need to transfer it once.
1. Attach the CBL 2 to the computer using the USB Silver Edition cable,
and then establish a connection as previously described.
2. Click y 8 ~ Í to put TI-SmartView™ in Receive mode.
3. Push
4. When the transfer is complete, press y 5 on TI-SmartView™.
DataMate is now available from the TI-SmartView™ APPLICATIONS
menu.
40 Connecting a calculator or CBL 2/CBR 2
TRANSFER on the CBL 2.
The application and any supporting programs are transferred.

FAQs and keyboard shortcuts
Frequently asked questions
I clicked on the calculator screen to select an option, but nothing
happened. Why?
On the TI-SmartView™ calculator, use the mouse to click keys the same as
you would use your finger to press keys on a real TI-84 Plus calculator.
And just like on a real calculator, you can’t press the screen to select an
option, even though it’s very tempting on a computer. You must click the
same keys you would press on the calculator.
I typed a name and got an error message. Why?
You probably typed the name on your computer keyboard. By default,
the keyboard is in its normal shortcut mode, where
. To put the keyboard in its alpha typing mode, click ƒ or press
[F7]. After you type the alpha character, the keyboard returns to its
normal shortcut mode.
To lock the alpha key, click y 7 or press
the normal shortcut mode, click ƒ or press [F7].
I’m having trouble editing a script. How do I figure out where I
need to be in the script to make a change?
Because scripts record key presses, it might be easier to step through the
[A] is a shortcut to
[F6] [F7]. To return to
script by clicking on the script toolbar or to change the script’s
playback speed so that you can see exactly where you need to make the
change.
The TI-SmartView™ calculator is too big for my computer screen.
How do I change the size?
Clicking
Some keys show a in the key press history or in a script. What
does that mean?
When you hold down an arrow key for more than a certain amount of
time, the cursor begins to scroll. The key that starts this scrolling feature
has a clock icon attached to it. For example:
FAQs and keyboard shortcuts 41
View > Size and then select a smaller size.

The amount of scrolling represented by this single key icon is equivalent
to clicking the key multiple times. If you run a script that contains one of
these keys, TI-SmartView™ reproduces the equivalent number of key
presses.
Using the computer keyboard
You can use the computer keyboard to enter data into the
TI-SmartView™ software. However, the keyboard does not work the
same as using the TI Keyboard with a calculator. You cannot simply use
the keys like a QWERTY keyboard to type A through Z. By default, the
keys are shortcuts to a corresponding key on the calculator.
Note: You can use the keyboard to access second functions and alpha
characters, but you must use y and ƒ the same as you would on
the calculator.
Where possible, shortcut keys correspond to alpha characters on the
calculator. For example, the calculator has keys such as:
where labels above the keys indicate second functions and alpha
characters.
On the keyboard, press: To do this:
[A]
Shortcut to .
[F6] A,
where
[F7] A,
where
Keys such as and u do not have associated alpha characters.
Refer to the table later in this topic to find the shortcut to those keys. For
example,
42 FAQs and keyboard shortcuts
[F6] is the shortcut to y
[F7] is the shortcut to ƒ
[Shift]+[V] is the shortcut to .
Show the TEST menu.
Type the letter A.

Normal shortcut mode
The calculator keys have the following shortcuts.
[F1]
[F6]
[F7]
[A]
[D]
[I]
[N]
[F2] [F3] [F4]
+[M]
[Shift]
[Shift]
+[X] [Shift]+[S]
[B] [C]
[E]
[,]
[7] [8] [9]
[Delete]
[F]
+[ ( ] [Shift]+[)]
[Shift]
[]
[]
[Shift]+[V]
[G]
[F5]
[]
[]
[Backspace]
[Shift]
+[^]
[/]
+[*]
[Shift]
[S]
[X]
[Shift]
+[~]
FAQs and keyboard shortcuts 43
[4] [5] [6]
[1] [2] [3]
[0] [.]
[Shift]
+[-]
[Shift]
[-]
+[+]
[Enter]

Note: Some calculators keys have more than one shortcut, but the table
shows only the most straightforward ones. For example, you can also
type 1 by pressing
calculator). However, it’s much easier to press [1].
[Y] (because Y is the alpha character for À on the
Alpha typing mode for A through Z and other characters
When you use ƒ, the keyboard switches automatically to its alpha
typing mode, where pressing
1. Click ƒ on the TI-SmartView™ screen or press
keyboard.
The cursor changes to .
2. Press the applicable key.
To type: Press:
A through Z [A] through [Z]
space [ space bar ]
[A] gives you an A, not the key.
[F7] on the
: (colon)
" (double quote)
? (question mark) [Shift]+[?]
q (theta)
Keys without an associated alpha character act the same as they do in the
normal shortcut mode. For example, [F1] is still a shortcut to o.
After you type the alpha character, the keyboard returns to its normal
shortcut mode.
Note:
• To lock the alpha key so you can type multiple alpha characters, click
y 7 or press [F6] [F7]. To unlock the alpha key, click ƒ or
[F7].
press
• In alpha typing mode,
on the calculator. Pressing
not 1. To type a number, be sure the keyboard is not in the alpha
typing mode. For example, to type TEST1, press either:
– [F7] [T] [F7] [E] [F7] [S] [F7] [T] [1]
–or [ F6 ] [ F7 ] [ T ] [ E ] [ S ] [ T ] [ F7 ] [ 1 ].
• When you are prompted to enter a name for a program or group, the
calculator locks the alpha key automatically.
[Shift]+[:]
[Shift]+["]
[3]
[0] through [9] act the same as Ê through ®
[1] types Y (the alpha character for À),
44 FAQs and keyboard shortcuts

• Alpha characters are used to enter text characters only. You cannot
use alpha characters to enter function names. For example, typing
COS or FMIN does not calculate that function. You must press the
appropriate function key or select the function from a menu.
Keyboard shortcuts in scripts
You can use any of the above shortcuts to enter calculator keys into
scripts. In addition, you can use the following keyboard shortcuts to play,
pause, and stop scripts.
Note: A script must be open and the script window must be active in
order to use these keyboard shortcuts.
Press this key To do this:
[ space bar ] Toggle between Play and Pause
[ESC]
[]
Stop the script playback
Step through the script
FAQs and keyboard shortcuts 45

46 FAQs and keyboard shortcuts

Legal information
Texas Instruments Support and Service
For general information
Home Page: education.ti.com
KnowledgeBase
and e-mail
inquiries:
Phone: (800) TI-CARES / (800) 842-2737
International
information:
For technical support
education.ti.com/support
For U.S., Canada, Mexico, Puerto Rico, and
Virgin Islands only
education.ti.com/international
KnowledgeBase
and support by
e-mail:
Phone
(not toll-free):
education.ti.com/support
(972) 917-8324
For product (hardware) service
Customers in the U.S., Canada, Mexico, Puerto Rico and Virgin
Islands: Always contact Texas Instruments Customer Support before
returning a product for service.
All other customers: Refer to the leaflet enclosed with this product
(hardware) or contact your local Texas Instruments retailer/distributor.
License
Your right to use this product is governed by the license you accepted
when you installed the software.
Legal information 47

48

Index
A
alpha typing mode 44
C
calculator files 8, 9
capturing a screen image
CBL 2 and CBR 2
CBL/CBR application
clearing the key press history
closing a script
connecting a calculator to the
computer
contact information
controlling the emulator with a
calculator
copying
key press history to another
application
screen images to another
application
scripts
scripts to another application
copyright statement
customer support and service
39
25
35
35
25
13
39
19
47
20
16
ii
47
D
DataMate application 39, 40
delays in a script
28
32
G
go to home command in a script 30
H
home screen command in a script 30
I
Installing the software 3
K
key press history
clearing
copying to another application
overview
showing or hiding
keyboard shortcuts
alpha typing mode
in scripts
normal shortcut mode
19
20
19
19
44
45
43
L
loading a calculator file 9
N
normal shortcut mode 43
E
EasyData application 39
editing a script
emulator
viewing size
emulator state
loading
resetting
saving
31
6
7
7
7
O
opening a script 25
P
pausing a script 27
playing a script
23
R
recording a new script 21, 22
resetting the emulator state
7
F
face plate
changing the color
frequently asked questions
Index 49
6
41
S
saving a copy of a script 25

saving a script 24
saving calculator data
screen capture
8
13
screen images
adding or removing a border
capturing
13
copying to another application
16
graphic formats you can save in
14
navigating among
saving
14
size
13
thumbnails
viewing
15
zooming in and out
16
15
16
scripts
adjusting the script speed
closing
25
copying
25
copying to another application
32
delays
28
editing
31
go to home
keyboard shortcuts
30
45
locating common scripts
opening
overview
pauses
playing
25
21
27
23
33
24
13
recording a new script
saving
24
saving a copy
25
stepping through
stopping
text points
tips for recording a script
service and support
speed of a script
27
29
47
24
stepping through a script
stopping a script
support and service
system requirements
27
47
3
T
text points in a script 29
thumbnails
viewing
15, 16
tips for recording a script
trademarks
transferring data with a connected
calculator
ii
38
V
View3 feature
showing and hiding
viewing
emulator size
screen images
thumbnails
6
15
15
21
26
22
26
22
4
50 Index
 Loading...