

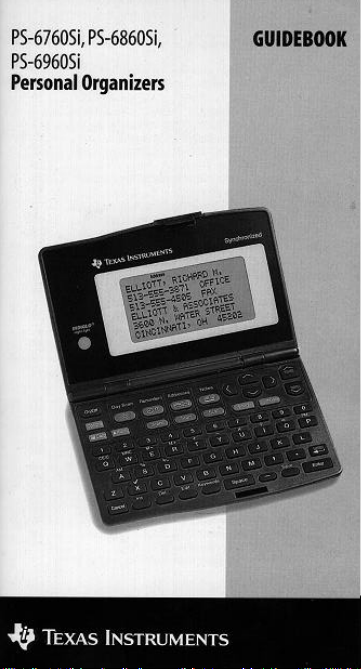
Page 1
Page 2

Table of Contents
Get Started 4
Change the Display Language 4
Set the Display Contrast 5
Turn On the INDIGLO night-light 5
Select from a Menu 6
Set the Date and Time 7
Enter an Appointment Reminder 9
Set the Key Tone 12
Important Information about Reminders 13
Enter a Reminder 14
Enter an Appointment Reminder 14
Enter a Task Reminder 14
Check Off Tasks 15
Set Up Task Reminders 15
Enter a Yearly Reminder 16
Set Alarms 17
Set Reminder Alarms 17
Set Daily Alarms 18
Turn All Alarm Sounds Off or On 18
Acknowledge Alarms 19
View Reminders 20
Display Reminders for the Current Date 20
Display Reminders for Another Date 20
Change the Date on the Reminders Menu 20
About the Calendar 21
Change the Date Using the Calendar 21
Scan Reminders 22
Use the % Key 22
Use the $ Key 23
Move from the Summary List to an Entry 23
Enter an Address 24
Name the Address Lists 26
Assign Default Address Lists 26
View Addresses 27
View the Master Address List 27
Use the Addresses ã Key 28
Move Between the Scan List and an Entry 28
View the Custom Address Lists 29
Enter a Note 30
View Notes 31
View the Master Notes List 31
2-ENG
Page 3

Use the Notes ã Key 31
Move Between the Scan List and an Entry 31
Secret Notes 32
Enter a Secret Note 32
View Secret Notes 32
Find Words In an Entry 33
Enter and Select Keywords 34
Enter or Edit Keywords 34
Select a Keyword 35
Select a Symbol to Use in an Entry 36
Edit and Delete Entries 37
Edit an Entry 37
Delete an Entry 37
The Calculator 38
Protect Information 40
Set the Password 40
Change the Password 40
Lock and Unlock the Organizer 41
Set Up Cities and Times List 42
Select Cities and Times 42
Choose from the City List 43
Enter an Unlisted City 44
View Cities and Times List 45
Memory Space 46
Check Memory Space 46
Optimize Memory Space 46
Linking to a Personal Computer 47
Linking the Organizer to a PC 47
Synchronizing the Organizer to a PC 47
Battery Information 48
Check the Batteries 48
Warning to Change the Batteries 48
When to Replace the Batteries 49
How to Replace the Batteries 50
Set Automatic Power Down 51
TI Product Service and Warranty Information 52
TI Product and Services Information 52
Service and Warranty Information 52
Appendix: Display Indicators 53
3-ENG
Page 4

Get Started
The organizer keeps three main types of information:
Reminders, Addresses, and Notes. Within these three
areas, there are many different ways to store and
recall information. The organizer’s memory is
flexible, giving you the freedom to make entries as
large as you need them and to enter information
where you need it most.
The organizer itself has many options so you can set it up
and use it the way that suits you best. The Getting
Started section covers many of these basic topics.
Change the Display Language
English is the default language for the organizer
display. However, you may select to display the
words in the menus and prompts on the screen in
Spanish, French, Italian, or German.
1. Press 5 to display the first screen of the
Options menu.
2. Press E to select SET CUSTOM OPTIONS.
The first screen of the Custom Options menu
is displayed.
3. Press y to display the second screen of the
Custom Options menu.
4. Press I to select SELECT A language. The
screen is displayed.
5. Press a number to select the language you want
to display: A for English, B for Spanish/Español,
C for French/Français, D for Italian/Italiano, or
E for German/Deutsch.
4-ENG
Page 5

Get Started (Continued)
Set the Display Contrast
To turn on the organizer, press Á in the upperleft corner of the keyboard.
If the organizer’s screen is too light or dark to read
easily, you can adjust the display contrast.
1. Press 5 to display the first screen of the
Options menu.
MAKE A SELECTION:
________________________
ß ô SET DISPLAY CONTRAST
ö LOCK/UNLOCK THE UNIT
õ SET DAILY ALARMS
ú SET DATE AND TIME
ù SET CUSTOM OPTIONS
2. Press A or 9 to display the SET DISPLAY
CONTRAST: screen.
3. Press and hold u to darken the display or v to
lighten it. Release the key when the display is at
the desired contrast.
4. Press 9 or :.
Turn On the INDIGLO night-light
To light the display, press and hold the INDIGLO
night-light key. You can make entries while the
display is lighted. When you release the INDIGLO
night-light key, the light stays on for ten seconds.
INDIGLO is a registered trademark of Indiglo Corporation.
5-ENG
Page 6

Select from a Menu
A menu is a screen that displays a numbered list of
tasks; for example, press 5 to display the first
screen of the Options menu.
MAKE A SELECTION:
________________________
ß ô SET DISPLAY CONTRAST
ö LOCK/UNLOCK THE UNIT
õ SET DAILY ALARMS
ú SET DATE AND TIME
ù SET CUSTOM OPTIONS
ë
To select from a menu, you can either:
• Press v or u to move the ß pointer to the task
you want. Then press 9.
• Press the number key for the task you want. You
do not have to press 9.
When a menu has more than five selections, the ë
symbol at the bottom of the screen lets you know
that the menu continues to a second screen.
• You can press y to move to the second screen
and then make your selection.
• If you know the number of the task you want on
the second screen, you can press the number key
from the first screen.
Prompts, like MAKE A SELECTION: on the screen
above, are usually displayed on the top line of a
screen. They tell you what to do next.
6-ENG
Page 7
Get Started (Continued)
Set the Date and Time
Before you can use the organizer’s features that
require date and time, such as Reminder entries,
alarms, or the cities and times feature, you must set
the date and time.
1. Press 5 to display the first screen of the
Options menu.
MAKE A SELECTION:
------------------------
ß ô SET DISPLAY CONTRAST
ö LOCK/UNLOCK THE UNIT
õ SET DAILY ALARMS
ú SET DATE AND TIME
ù SET CUSTOM OPTIONS
2. Press D to select SET DATE AND TIME.
SET DATE AND TIME:
-----------------------SET DATE: __/__/__
(MM/DD/YY)
SET TIME: __:__ AM
(12 HOUR)
3. Enter the current date in MM/ DD/YY format, keying
in two digits each for the month, day, and year.
4. Key in the current time in 12-hour format. If the
first digit you key in is 2, 3, 4, 5, 6, 7, 8, or 9, it
automatically moves to the second space for the
hour. Then key in the minutes.
If necessary, press q (the key) or Z (the j key).
7-ENG
Page 8

Set the Date and Time (Continued)
5. When you finish entering the date and time, press 9.
SET DATE AND TIME:
-----------------------TO SET FORMATS, PRESS é.
MONTH/DAY:
é MM/DD è DD/MM
HOURLY:
é 12 HR è 24 HR
6. Press v, u, x, or w to move between
selections. Press “(the ¢ key) to mark the
format you prefer.
For example, for November 29, 1996, you can
choose MM/DD to display 11/29/96, or DD/MM to
display 29/11/96.
You can also choose either 12-hour time with AM
and PM, or 24-hour time.
Note: Examples in this guidebook use DD/MM
and 12-hour formats.
7. When you finish, press 9.
SET DATE AND TIME:
-----------------------TIME SET: 8:30 AM
IS THIS DAYLIGHT SAVINGS
TIME?
è YES é NO
8. Press “ to mark whether or not the time you set
is daylight savings time. The ì symbol displayed
after a time indicates daylight savings time.
9. When you finish, press 9.
8-ENG
Page 9
Get Started (Continued)
Enter an Appointment Reminder
The following example shows how to enter an
appointment with a time.
For the purpose of this example, the current date is
shown as March 12, 1996, and the time is 8:30 AM. It
is not daylight savings time.
1. Press ! to display the Reminders menu.
12/3/96 TUE 8:30 AM
-----------------------
ß ô SHOW REMINDERS
ö ENTER NEW REMINDER
õ ENTER YEARLY REMINDER
ú SHOW CALENDAR
ù CHANGE TO 12/03/96
Note: To change the date on the top line, press
y or z.
2. Select ENTER NEW REMINDER by either:
< Pressing B.
< Pressing v to move the ß pointer to ö and
then pressing 9.
ENTER DATE:
-----------------------12/3/96
9-ENG
Page 10

Enter an Appointment Reminder (Continued)
3. To enter the date June 14, 1996, press J F A D I F.
The day of the week is automatically displayed.
ENTER START - END TIME:
----------------------6/14/96 FRI
__:__ AM - __:__ AM
4. To enter 11:30 for the start time, press A A C J.
AM is assumed for this time.
5. Press x to move to the first space for the ending
time. To key in 1:30, press J A C J. PM is
assumed for this time.
6. Press æ4 to set an alarm to ring as a
notification of the appointment. ò is displayed.
Note: You can set the alarm any time during the
entry after entering a valid start time.
7. Press 9.
ENTER DESCRIPTION:
----------------------6/14/96 FRI
11:30 AM - 1:30 PM
10-ENG
(continued)
Page 11

Get Started (Continued)
Enter an Appointment Reminder (Continued)
8. Key in the description LUNCH MEETING WITH
PAUL and press 9.
When entering a description, remember that part
of the first line will be displayed in the summary
lists. These lists are displayed when you press
% or $.
Note: If you make a mistake, press w or x to move
to the incorrect character. Then type over it or use
Å or Æ.
ENTER 0-15 DAYS NOTICE
-----------------------14/6/96 FRI
11:30 AM - 1:30 PM ò
LUNCH MEETING WITH Paul
00 DAYS NOTICE
Note: If the description is longer than two lines,
it temporarily moves up to make room for
DAYS NOTICE. It returns after the number of
days notice is entered.
9. Press E for an advance notice five days before
the meeting.
The specified number of days before the
appointment, the organizer will display an
“advance notice” (indicated by î) in the Day Scan
summary list.
10. Press :. Your entry is displayed.
11-ENG
Page 12
Set the Key Tone
You have three choices for the sound made each
time you press a key: a click, a beep, or no sound.
1. Press 5 to display the first screen of the
Options menu.
2. Press E to select SET CUSTOM OPTIONS. The
first screen of the Custom Options menu is
displayed.
SELECT A CUSTOM OPTION:
-----------------------
ß ô SET/CHANGE PASSWORD
ö SET KEY TONE
õ ENTER/EDIT A KEYWORD
ú SET UP ADDRESS LISTS
ù SET UP TASK REMINDERS
3. Press B to select SET KEY TONE.
SET KEY TONE:
-----------------------TO SET TONE, PRESS é.
ON/OFF: é on è OFF
TONE: é CLICK è BEEP
4. Press v, u, x, or w to move between selections.
Press “ (the ¢ key) to mark your choices.
5. Press :.
12-ENG
Page 13

Important Information about
Reminders
There are three types of reminders.
• Appointments—entered for a specific date and
time. You can set an alarm for an appointment.
• Tasks—entered for a specific date, but no time.
You can set tasks to carry forward to subsequent
days if they are not checked off as completed.
• Yearly reminders—entered for the same date
each year. Yearly reminders may or may not have
a time.
All reminders are stored together in a master list in
the following order: yearly reminders with a time,
yearly reminders without a time, appointment
reminders, task reminders that have not been
checked off, and task reminders that have been
checked off. Within each group, they are stored in
chronological order, first by date, then by time.
In addition to the master list of reminders, you have
two keys for scanning various summary lists of
reminders.
• The $ key lets you view several different
summary lists. You can see a list of appointment
reminders with alarms, reminders by week,
reminders by month, yearly reminders, or task
reminders by week.
• The % key shows you a summary list of all
reminders for one day.
In the summary list entries are stored in the same
order as in the master list, with one addition.
Reminders you have marked with an advance notice
are displayed first on the day you requested the
advance notice. Advance notices are not displayed in
the master list.
13-ENG
Page 14

Enter a Reminder
Enter an Appointment Reminder
See Getting Started, page 8.
Enter a Task Reminder
This procedure shows how to enter a reminder that
does not have a time associated with it.
1. Press ! to display the Reminders menu.
2. Press B to select ENTER NEW REMINDER.
3. Key in the date. The day of the week is displayed
and the cursor moves to the time.
4. For a task, do not enter a time. Press 9 to
continue.
Note: Because a task does not have a time
associated with it, you cannot set an alarm.
5. Key in a description of the task and then press
9. 00 DAYS NOTICE is displayed.
Note: If the description is longer than two lines,
it temporarily moves up to make room for
DAYS NOTICE. It returns after the number of
days notice is entered.
6. Key in the number of days (0 to 15) before the
date of the task that you want the organizer to
notify you of it.
7. If necessary, use the cursor keys (u, v, w, or
x) to go back to any part of the entry you need to
change. Type over it or use Å or Æ.
8. Press :. _(é WHEN COMPLETE.) will be
displayed so that you can check off the task
when it is completed.
14-ENG
Page 15

Enter a Reminder (Continued)
Check Off Tasks
A “check blank” is displayed with tasks in the master
list and in the summary lists. This distinguishes tasks
from appointments and allows you to check off a
task when it is completed.
To check off a task:
• In the master list, display the entry and press “
(the ¢ key).
• In a summary list, move the ß pointer to the item
and press “ (the ¢ key).
The entry you checked is automatically sorted and
stored with other checked-off tasks.
Even though a task is checked off, it remains in the
organizer on the date checked until you delete it.
Set Up Task Reminders
You can keep tasks current by setting the option to
have them carry forward to subsequent days if they
are not checked off as completed.
1. Press 5 to display the first screen of the
Options menu.
2. Press E to select SET CUSTOM OPTIONS. The
Custom Options menu is displayed.
3. Press E to select SET UP TASK REMINDERS. A
screen is displayed so you can choose to roll task
reminders to subsequent days if they are not
checked off.
4. Press “ to mark your selection.
5. Press :.
15-ENG
Page 16

Enter a Yearly Reminder
Yearly reminders appear on the same date every year
and may or may not have a time. Those without a time do
not carry forward day to day, but do carry forward year
to year.
1. Press ! to display the Reminders menu.
2. Press C to select ENTER YEARLY REMINDER.
3. Key in the month and day. The year and day of
the week are automatically displayed. (They will
automatically change with each year.)
4. You can either:
< Key in a starting time and, if necessary, an
ending time. Press j for PM or for AM.
< Press 9 without entering a time.
5. If you have entered a yearly appointment with a
time, you can set an alarm. Press æ4. ò is
displayed.
6. Key in a description and press 9.
7. Key in the number of days (0 to 15) before the
date of the reminder that you want to be notified
of it.
8. If necessary, use the cursor keys (u, v, w, or
x) to go back to any part of the entry you need to
change. Type over it or use Åor Æ.
9. Press :.
16-ENG
Page 17

Set Alarms
You can set an alarm to notify you of an appointment,
and you can set up to four separate daily alarms.
You can also set the number of minutes before the
appointment times that you want alarms to ring, or
turn off all alarm sounds temporarily.
Set Reminder Alarms
You can set reminder alarms to ring from 1 to 99
minutes ahead of set appointment times.
1. Press 5 to display the first screen of the
Options menu.
2. Press E to select SET CUSTOM OPTIONS. The
first screen of the Custom Options menu is
displayed.
3. Press y to display the second screen of the menu.
4. Press F or 9 to select SET UP REMINDER
ALARM.
5. Key in the number of minutes (1 to 99) before
appointment times that you want alarms to ring.
(Press w before entering a two-digit number.)
6. Press :.
17-ENG
Page 18

Set Daily Alarms
You can set up to four daily alarms.
1. Press 5 to display the first screen of the
Options menu.
2. Press C to select SET DAILY ALARMS.
3. Press A, B, C, or D to select the daily alarm
you want to set.
4. Key in the alarm time you want. For example, to
enter an alarm for 8:30 AM, key in H C J.
5. Press j for PM or for AM.
6. Press :.
The organizer returns you to the SELECT ALARM
TO SET: screen so you can set other alarms.
Turn All Alarm Sounds Off or On
You can temporarily turn off all alarm sounds. When
you turn the alarm sounds back on, alarms for future
times will sound.
1. Press 5 to display the first screen of the
Options menu.
2. Press G to select TURN ALARMS ON/OFF.
3. Press “ to mark your choice, ON or OFF.
4. Press :.
18-ENG
Page 19

Set Alarms (Continued)
Acknowledge Alarms
When an alarm time arrives, the alarm sounds and
the æ indicator flashes, even if the organizer is
turned off. To stop both the alarm sound and the
flashing indicator, press any key.
• If the alarm is for an appointment, the entry is
displayed.
• If the alarm is for a daily alarm, DAILY ALARM is
displayed along with the set alarm time.
If you are entering or editing an entry when an alarm
time arrives, the alarm sounds and the indicator
flashes, but the entry you are working on remains in
the display.
If you do not press a key to acknowledge an alarm
immediately, the alarm sound stops after
approximately 30 seconds. However, the indicator
continues to flash until you press æ4 to
acknowledge the alarm.
19-ENG
Page 20

View Reminders
Display Reminders for the Current Date
1. Press ! to display the Reminders menu.
The current date is on the top line.
2. Press A or 9 to select SHOW REMINDERS.
The first reminder for the currently set date is
displayed.
3. To see additional reminders for this date, press
y. To see reminders for later or earlier dates,
continue pressing y or z.
Display Reminders for Another Date
To display reminders for another date, you must
change the date on the top line of the Reminders
menu. You can do this through the Reminders menu
or the calendar.
Change the Date on the Reminders Menu
1. Press ! to display the Reminders menu.
2. You can either:
< Press y or z to change the date on the top
line.
< Press E to select CHANGE TO 12/03/96.
Key in the date you want and press 9.
3. When the date you want is on the top line, press
A or 9 to select SHOW REMINDERS for the
new date. The first reminder for that date is
displayed.
4. To see additional reminders for this date, press
y. To scroll to reminders for later or earlier
dates, continue pressing y or z.
Note: To return to the previously set date at any
time, press ! twice.
20-ENG
Page 21

View Reminders (Continued)
About the Calendar
You can view a calendar for any month from
January, 1960, to December, 2059.
The calendar and the Reminders menu share the
same date. If you display the calendar after changing
the date on the Reminders menu, the displayed
calendar is for the same date that was on the
Reminders menu screen.
Also, if you press ! after some activity in the
calendar mode, the date displayed on the top line of
the Reminders menu is the same as the month and
day you specified in the calendar mode.
Change the Date Using the Calendar
1. Press ! to display the Reminders menu.
2. Press D to select SHOW CALENDAR. The
calendar for the current month is displayed. The
current date blinks.
Some months cannot be completely displayed on
one screen. If ë or ê is displayed, press v as
necessary to scroll to the last day(s) of the
month, or u to scroll to the first day(s).
3. To move around the calendar, press:
< x or w to move a day at a time.
< v or u to move a week at a time.
< y or z to move a month at a time.
4. Highlight the date you want and press 9. The
Reminders menu is displayed with the date you
specified on the top line.
Note: To return to the previously set date at any
time, press ! twice.
21-ENG
Page 22

Scan Reminders
You can always access a complete master list of your
reminder entries when you select SHOW REMINDERS
from the Reminders menu. You can also view different
summary lists by pressing % and $.
Use the % Key
To display a summary list of entries for the current
date, press %.
For example, if the current date is March 12, 1996,
and you press % at 8:30 in the morning to
check your reminders for that day, a list similar to
the following might be displayed.
12/3/96 TUE 8:30 am
-----------------------
ßî15/03 _DO WEEKLY REPORT
ñANNIVERSARY
9:30-11 STAFF MEETING
ò1-2 MEET WITH NORM
_GET INFO TO PEGGY
î symbol indicates an advance notice.
ñ symbol indicates a yearly reminder.
ò symbol indicates an alarm.
To display reminders for a different date, change the
date as described on page 21. Then press %.
22-ENG
Page 23

Scan Reminders (Continued)
Use the $ Key
When you press $, the Reminders Scan menu is
displayed. You can choose to scan:
• Appointment reminders with alarms.
• Reminders by week.
• Reminders by month.
• Yearly reminders.
• Task reminders by week.
Select the list you want to scan the same way you
make a selection on any other menu. Either:
• Press the number key for the selection you want.
• Press v or u to move the ß pointer to the
selection you want; then press 9.
To display reminders for a different date, change the
date as described on pages 20 and 21. Then press $.
Move from the Summary List to an Entry
From a summary list, you can select an item for
which you want to see the complete entry in the
master list.
Move the ß pointer beside the item you want and
press 9. The complete entry in the master list is
displayed.
23-ENG
Page 24

Enter an Address
All address entries are stored together in a master
list in alphabetical order.
In addition to the master address list, you can name
and assign address entries to one, two, or all three
“custom” address lists. You can even set up the
organizer so entries are automatically assigned to
the list(s) of your choice. These lists allow you to
personalize and organize your address entries in the
way that suits you best.
To enter a new address:
1. Press " to display the Addresses menu.
2. Press B to select ENTER NEW ADDRESS.
ENTER NAME: is displayed on the top line.
3. Key in the name. For personal names, you might
want to enter the last name first.
4. When you finish, press 9. ENTER PHONE
NUMBER(S): is displayed on the top line.
5. Key in as many phone numbers as you need.
Press { after each number to move to the next
line for the next phone number.
The first 13 digits of the first phone number will
be displayed in the Phone Scan list.
(continued)
24-ENG
Page 25

Enter an Address (Continued)
6. Press 9. ENTER ADDRESS AND INFO: is
displayed on the top line.
7. Enter one or more addresses and as much
information as you need.
Press { as needed to move to the next line.
8. Press 9. CHOOSE ADDRESS LIST(S): is
displayed on the top line.
If necessary, the entry temporarily moves up to
make room for the address list choices. You can
assign the entry to one, two, all, or none of the
three custom address lists.
Note: If you have not named your lists, LIST 1,
LIST 2, and LIST 3 are displayed. For naming
instructions, see page 26.
9. Press v, u, x, or w to move between the lists
or 9 to move down the lists. Press “ (the ¢
key) to mark your choice(s).
10. If necessary, use the cursor keys (v, u, w, x)
to go back to any part of the entry you need to
change. Type over it or use Å or Æ.
11. Press :.
25-ENG
Page 26

Name the Address Lists
In addition to the master address list, you can assign
address entries to three custom address lists. For
example, you might create one custom list for all of
the members of your project team at work, and
another list for the people on your soccer team.
1. Press 5 to display the first screen of the
Options menu.
2. Press E to select SET CUSTOM OPTIONS.
3. Press D to select SET UP ADDRESS LISTS.
4. Press A or 9 to select ENTER/EDIT LIST
NAMES.
5. Press A, B, or C to select the list you want to
name. ENTER OR EDIT LIST NAME: is
displayed.
6. Key in a name of up to 11 characters and press
9 or :.
The SELECT LIST TO NAME: screen is
displayed with the newly named list.
Assign Default Address Lists
If you do not want to make custom address list
assignments each time you make an entry, you can
choose to have entries assigned to a custom list
automatically.
1. Follow steps 1 through 3 above.
2. Press B to select CHOOSE ADDRESS LIST
DEFAULTS. SET LIST DEFAULTS: is displayed.
3. Press v, u, x, or w to move between the lists.
Press “(the ¢ key) to mark your choice(s).
4. Press :.
26-ENG
Page 27

View Addresses
View the Master Address List
1. Press " to display the Addresses menu.
2. You can either:
< Press A or 9 to select SHOW
Addresses to access the master
alphabetical list of all address entries. The
first entry is displayed.
< Press a letter key to display the first entry
beginning with that letter.
3. To see other address entries you can either:
< Press y to move through the list in
alphabetical order.
< Press a letter key to display the first entry
beginning with that letter.
If an entry is too long to be displayed on one
screen, ë or ê is displayed. You can press v or
u to see the remainder of the entry.
27-ENG
Page 28

Use the Addresses ã Key
The Addresses ã key lets you view an abbreviated
alphabetical list of names and phone numbers from
your Address entries.
When you press the Addresses ã key, a list similar
to the following may be displayed.
PRESS A LETTER OR ENTER:
------------------------
ß ALEXANDER 908-555-5656
BOWERS P 817-555-1234
JORDAN M 719-555-2091
MOCK M 214-555-7119
WILLIAMS C 415-555-3859
To move through the list you can either:
• Press v or u.
• Press a letter key to move to the first entry
beginning with that letter.
Move Between the Scan List and an Entry
From the Phone Scan list, you can select a name and
phone number for which you want to see the
complete entry in the master address list.
Move the ß pointer beside the entry you want and
press 9. The complete entry in the master list is
displayed.
To get back to the summary List from the entry,
press the Addresses ã key. The summary list is
displayed with the ß pointer beside the same entry,
which is displayed at the top of the screen. Press u
or v to continue scrolling through the list.
28-ENG
Page 29

View the Custom Address Lists
You can easily view the entries you have assigned to
each of the three custom address lists.
1. Press " to display the Addresses menu.
2. Press C to select SELECT AN ADDRESS LIST.
Note: If you have named your lists, the names
you entered are displayed. For naming
instructions, see page 26.
3. Press the number key for the custom list you
want to see.
For example, to see the third list, press C. The 3
indicator, in addition to the Address indicator, is
displayed with the list.
4. To move through the list you can either:
< Press v or u.
< Press a letter key to move to the first entry
beginning with that letter.
29-ENG
Page 30

Enter a Note
Note entries hold the kind of information you would
keep as a list or personal record. Notes are stored
alphabetically by title which you assign.
1. Press # to display the Notes menu.
2. Press B to select ENTER NEW NOTE.
ENTER NOTE TITLE: is displayed.
3. Enter a title for the note and press 9. ENTER
NOTE: is displayed.
The title can be longer than one line. However,
only one line of the title will show in the summary
list of titles displayed when you press the Notes
ã key.
4. Key in as much information for the note as you need.
5. If necessary, use the cursor keys (u, v, w, or
x) to go back to any part of the entry you need to
change. Type over it or use Å or Æ.
6. Press :.
The organizer automatically adds UPDATED,
along with the current date, to the end of the note
when you press :. This happens the first time
you enter the note and whenever you edit it.
30-ENG
Page 31

View Notes
View the Master Notes List
1. Press # to display the Notes menu.
2. Press A or 9 to select SHOW NOTES.
3. The first note entry is displayed. To see other
note entries you can either:
< Press y or z to move through the list in
alphabetical order by title.
< Press a letter key to display the first entry
with a title beginning with that letter.
When ë is displayed at the bottom of the screen,
the note is longer than can be displayed on one
screen. Press v or u to see the complete entry.
Use the Notes ã Key
To display an alphabetical list of the titles of your
notes, press the Notes ã key. To move through
the list you can either:
• Press v or u.
• Press a letter key to display the first title
beginning with that letter.
Move Between the Scan List and an Entry
From the Title Scan list, you can select the title for
which you want to see the complete entry in the
master note list.
Move the ß pointer beside the entry you want and
press 9. The complete entry in the master list is
displayed.
To get back to the summary list from the entry, press
the Notes ã key. The summary list is displayed
with the ß pointer beside the same entry, which is
displayed at the top of the screen. Press u or v to
continue scrolling through the list.
31-ENG
Page 32

Secret Notes
Enter a Secret Note
Secret notes are stored in a “locked” area separate
from regular notes. You must enter a password to
view secret notes. When you leave secret notes, they
are automatically locked and protected.
You assign each secret note a title, just as you do a
regular note, and they are stored alphabetically by
title. However, secret note titles do not appear in the
Title Scan list.
1. Press # to display the Notes menu.
2. Press C to select GO TO SECRET NOTES.
< If you have not entered a password, a screen
is displayed telling you how to do so. See page
40 for instructions.
< If you have a password, a screen is displayed
prompting you to enter it.
3. Key in your password and press 9.
4. Press B to select ENTER NEW SECRET NOTE.
Enter the note as you would a regular note.
View Secret Notes
1. Follow steps 1 through 3 above.
2. Press A or 9 to select SHOW SECRET
NOTES.
3. The first secret note is displayed. You can show
and scroll through secret note entries just as you
do through regular note entries. See page 31 for
information.
32-ENG
Page 33

Find Words In an Entry
The organizer gives you the ability to search through
your entries for specific characters or words up to 24
characters. You can search one area or all four areas
at once.
1. Press å. The SELECT LIST TO SEARCH:
menu is displayed.
2. Press the number key for the list you want to search.
For example, to search addresses, press C.
Note: If you select SECRET NOTES or ALL
FOUR lists and have a password, the ENTER
THE PASSWORD: screen is displayed. Enter the
password to continue.
3. Key in the character(s) or word(s) you want to
find and press 9.
4. When a match is found, the entry is displayed.
You can either:
< Press y or 9 to continue the search.
< Press ä to edit the displayed entry. The
CANCEL SEARCH? screen is displayed. You
may cancel the search to edit the entry.
< Press Æ to delete the entry. You can
continue the search.
5. To cancel the search at any time, press È.
The CANCEL SEARCH? screen is displayed.
< To continue the search and go on to the next
entry, press A.
< To cancel the search, press B.
< To return to the previous entry, press C. The
previous entry is displayed and the search is
canceled.
33-ENG
Page 34

Enter and Select Keywords
Keywords are words or phrases that you use
frequently when making entries, such as “meet with”
or “call.” The keywords feature lets you enter five
keywords or phrases for quick recall when making
an entry. A keyword or phrase can have up to 22
characters.
Enter or Edit Keywords
1. Press 5 to display the first screen of the
Options menu.
2. Press E to select SET CUSTOM OPTIONS. The
first screen of the Custom Options menu is
displayed.
3. Press C to select ENTER/EDIT A KEYWORD.
SELECT KEYWORD TO EDIT: is displayed.
Note: If you have already entered keywords, they
are shown instead of WORD 1, WORD 2, etc.
4. Press the number key for the keyword you want
to enter or edit.
For example, to enter or edit the first keyword,
press A. ENTER OR EDIT KEYWORD: is
displayed to prompt you.
5. Key in a word or phrase of up to 22 characters.
6. Press :. The SELECT KEYWORD TO EDIT:
screen is displayed with the keyword or phrase
you entered in place. You can enter or edit more
keywords.
34-ENG
Page 35

Enter and Select Keywords (Cont.)
Select a Keyword
When entering or editing an entry, you can insert a
keyword from the list you created. The keyword will
be inserted wherever the cursor is in the entry.
1. Position the cursor where you want the keyword
inserted.
2. Press à to display the list of keywords.
(Your entry is temporarily overwritten.)
For example:
SELECT A KEYWORD:
-----------------------
ß ô MEET WITH
ö MEETING IN
õ THIS IS DUE
ú CALL
ù WORD 5
3. Press the number key for the keyword you want. For
example, to choose the third keyword, press C.
4. The entry reappears and the keyword you
selected is copied to the entry.
5. Continue entering or editing the entry.
Note: You can press à to show the list of
keywords any time you are entering or editing an entry.
35-ENG
Page 36

Select a Symbol to Use in an Entry
When you are entering or editing an entry, you can
insert a special character from the symbols list. The
symbol will be inserted where the cursor is in your
entry.
1. Position the cursor where you want the symbol
inserted.
2. Press  to display the first screen of the
symbols list.
SELECT A SYMBOL:
------------------------1ã! 6ã^ AãØ Fã:
2ã@ 7ã& BãÆ Gã;
3ã# 8ã* Cã± hã'
4ã$ 9ã( Dã? Iã"
5ã% 0ã) Eã− Jã{
3. Press the number or letter key for the symbol you
want. For example, to choose $ press D. To
choose :, press „.
4. The entry reappears and the symbol you selected
is copied to the entry.
5. Continue entering or editing the entry.
Note: You can press  to show the list of symbols
any time you are entering or editing an entry.
36-ENG
Page 37

Edit and Delete Entries
Edit an Entry
1. Display the entry you want to edit.
2. Press ä. The cursor is displayed and the
prompts reappear to guide you.
3. Move to the part of the entry you want to change.
Then you can either:
< Type over existing information.
< Press Å to activate the insert cursor
ç and insert information.
< Press Æ to delete a character.
4. When you have finished making changes, either:
< Press : to save the changed entry.
< Press È to display a menu that allows you to
cancel the changes or keep the changed entry.
Delete an Entry
1. Display the entry you want to delete.
2. Press Æ. The DELETE ENTRY? screen is
displayed.
3. You can either:
< Press A to keep the entry.
< Press B to delete the entry.
Note: You cannot delete an entry from a scan list.
37-ENG
Page 38

The Calculator
To display the calculator screen, press t6.
Calculator functions are printed above the first row
of letter keys and above the ‚ and ƒ keys. Use the
period key © to enter a decimal.
Entries and results are displayed with a maximum of
10 digits.
• A minus sign (-) is displayed to the left of a
negative number.
• M is displayed when a value other than zero is
stored in memory.
• E is displayed when an error condition occurs.
Note: If you selected the DD/MM/YY format for
dates, numbers are displayed with decimals and
commas in this format: 12.345.678,90.
• To clear an error condition (E), press Q twice.
Then re-enter the calculation.
• To clear an incorrectly entered digit, press Æ.
• To clear an incorrect entry, press Q once.
Then enter the correct number and continue your
calculation.
• To clear the current calculation, press Q
twice.
• To clear the memory, press R twice.
• To clear the display and memory, press R R
Q Q.
Note: The calculator does not retain any displayed
value or value in memory when you exit the
calculator.
38-ENG
Page 39

The Calculator (Continued)
Addition and Subtraction
23.79 + 0.54 - 6
23.79 U .54 V 6
Y
18.33
-
12.3 + 7.9 + 1.6
12.3 s U 7.9 U 1.6
Y
2.8
Multiplication and Division
12 × 13 ÷ 6
12 W 13 X 6
Y
28 ÷ 0.5 × 76
28 X .5 W76
Y
4,256
Percentage Calculations
5% of 250
250 W 5
r
12.5
250 + 5%
250 U 5
r
262.5
250 - 5%
250 V 5
r
237.5
Memory Operations
(4 × 11.99) +
(12 × 0.98)
R R
4 W 11.99
T
12 W.98
T
R
M 47.96
M 11.76
M 59.72
7.9 + 8.1
(5.2 + 2.8)
R R
5.2 U 2.8
S
7.9 U 8.1
X
R Y
M 8
M 16
M
Examples Enter/Press Display
-
26
-
-2
39-ENG
Page 40

Protect Information
Setting a password allows you to enter information
in secret notes or lock the organizer to protect all
information from access by other people. You can
change the password at any time.
Set the Password
1. Press 5 to display the first screen of the
Options menu.
2. Press E to select SET CUSTOM OPTIONS. The
first screen of the Custom Options menu is
displayed.
3. Press A or 9 to select SET/CHANGE
PASSWORD.
4. Key in a password of up to six characters and
press 9. The password is set.
Change the Password
1. Follow steps 1, 2, and 3 above. ENTER CURRENT
PASSWORD: is displayed.
2. Key in the current password and press 9.
CHANGE THE PASSWORD TO: is displayed.
3. Key in the new password and press 9.
Note: If you have secret notes and press : or
9 to exit without a valid password, you will get
an error message and be returned to the password
screen. You cannot have secret notes without having
a password.
40-ENG
Page 41

Protect Information (Continued)
Lock and Unlock the Organizer
Once you have entered a password, you can lock the
organizer to protect information in the organizer
from access by other people. When the organizer is
locked, the è indicator is displayed.
To lock or unlock the organizer:
1. Press 5 to display the first screen of the
Options menu.
2. Press B to select LOCK/UNLOCK THE UNIT.
< If you have not entered a password, a screen
is displayed instructing you to do so.
< If you have entered a password but the organizer
is not locked, THE UNIT IS UNLOCKED! is
displayed. To lock the organizer, key in your
password and press 9.
< If you have entered a password and the organizer
is already locked, THE UNIT IS LOCKED! is
displayed. To unlock the organizer, key in your
password and press 9.
41-ENG
Page 42

Set Up Cities and Times List
You can create a list of five cities (your home city
and four other cities around the world) for which you
want to see the time.
Important! You must set the home city before you
can set any other cities in the list.
Note: These instructions assume you are setting
HOME CITY, but the procedure for setting CITY 2,
CITY 3, CITY 4, or CITY 5 is the same. The screen
headers will change to correspond to the city you are
setting.
Select Cities and Times
1. Press 5 to display the first screen of the
Options menu.
2. Press E to select SET CUSTOM OPTIONS. The
first screen of the Custom Options menu is
displayed.
3. Press y, then press G to select SELECT
CITIES/TIMES.
4. Press A to select HOME CITY.
5. You can either:
< Press A to choose from a city list. To do this,
go to page 43.
< Press B to enter an unlisted city. To do this,
go to page 44.
42-ENG
Page 43

Set Up Cities and Times List (Cont.)
Choose from the City List
The organizer has a list of 62 cities that represent the
24 time zones around the world. You can choose
from this list to create your own custom list.
The following steps assume you have already been
through the steps on page 42.
1. Press A to select CHOOSE FROM CITY LIST.
The first screen of the city list is displayed.
Note: The number of hours difference from
Greenwich mean time (GMT) is displayed to the
right of each city. For example, Anchorage (-9)
is nine hours earlier than Greenwich mean time,
while Auckland (+12) is twelve hours later.
2. To select a city from the city list you can either:
< Scroll through the list until the ß pointer is
beside the city you want.
< Press a letter key to display the first city
beginning with that letter. Then scroll to the
city you want.
3. When the ß pointer is beside the city you want,
press 9.
< If setting HOME CITY, the city is set and the
SELECT A CITY: screen returns to the display.
OR
< If setting CITY 2-5, the city and time are
displayed along with the question IS THIS
DAYLIGHT SAVINGS TIME? Press “ to
mark YES or NO, then press 9. The city is
set, and the SELECT A CITY: screen
returns to the display.
You can continue setting cities and times.
Note: For your home city, the time displayed is
the time currently set in the organizer. For other
cities, the displayed time is adjusted according to
your home city time.
43-ENG
Page 44

Enter an Unlisted City
The following steps assume you have already been
through the steps on page 42.
1. Press B to select ENTER UNLISTED CITY.
ENTER CITY NAME: is displayed.
2. Key in a city name of up to 11 characters and
press 9. The first screen of the city list is
displayed.
3. Select a city in the same time zone as the city you
keyed in so the organizer can calculate the time
for the city you entered. You can either:
< Scroll through the list until the ß pointer is
beside the city you want.
< Press a letter key to display the first city
beginning with that letter. Then scroll to the
city you want.
For example, if you keyed in Cardiff for the city name,
you would select London from the city list because
Cardiff and London are in the same time zone.
4. When the ß pointer is beside the city you want,
press 9.
< If setting HOME CITY, the city is set and the
SELECT A CITY: screen returns to the
display.
OR
< If setting CITY 2-5, the city and time are
displayed along with the question IS THIS
DAYLIGHT SAVINGS TIME? Press “ to
mark YES or NO, then press 9. The city is
set, and the SELECT A CITY: screen
returns to the display.
You can continue setting cities and times.
Note: For your home city, the time displayed is
the time currently set in the organizer. For other
cities, the displayed time is adjusted according to
your home city time.
44-ENG
Page 45

View Cities and Times List
Once you have created your list of cities (your home
city and up to four other cities around the world),
you can view the list at any time.
1. Press 5 to display the first screen of the
Options menu.
2. Press y, then press J to select SHOW CITIES
AND TIMES.
3. The list of cities you created is displayed, along
with the current date and time for each city.
45-ENG
Page 46

Memory Space
Check Memory Space
To avoid running out of memory while making an
entry, check the organizer’s memory occasionally to
see how much memory you are using.
1. Press 5 to display the first screen of the
Options menu.
2. Press y to display the second screen of the
Options menu.
3. Press H to select CHECK UNIT MEMORY.
The approximate percent of memory used and
number of bytes still available are displayed.
Optimize Memory Space
If the organizer’s memory used is nearing 100%, you
can increase the amount of available memory by
optimizing memory space.
Warning: Do not optimize memory space if you are
linking the organizer to your Personal Computer.
Optimizing memory space will destroy the
synchronization with the PC!
1. Press 5 to display the first screen of the
Options menu.
2. Press y to display the second screen of the
Options menu.
3. Press I. The Optimize MEMORY SPACE?
screen is displayed.
4. You can either:
< Press A to cancel the request.
< Press B to optimize memory space.
46-ENG
Page 47

Linking to a Personal Computer
Linking the Organizer to a PC
It is often useful to exchange information between
the organizer and a Personal Computer. For
example, if you already have address entries in a
software program such as Lotus Organizer, it is
easier to transfer the existing information to your
pocket organizer than to re-enter the information
into the organizer. You can also backup your
organizer’s memory to the PC for safekeeping.
Available separately, the PS-6155 PC Connectivity
Kit lets you exchange information between your
organizer and an IBMë-compatible PC. The software
operates in Microsoftë Windows. For more
information, contact your Texas Instruments retailer.
You can also contact Texas Instruments by e-mail at:
ti-cares@ti.com
Synchronizing the Organizer to a PC
This organizer has been designed with a special
synchronization feature. When the organizer is
connected to a PC using the PS-6155 PC Connectivity
Kit, a single keystroke on the PC automatically
compares and updates both PC and organizer entries
to ensure that the same information exists in both
locations.
47-ENG
Page 48

Battery Information
Check the Batteries
1. Press 5 to display the first screen of the
Options menu.
2. Press y to display the second screen of the
Options menu.
3. Press F to select CHECK BATTERIES.
4. A screen is displayed to let you know the current
status of the batteries.
Warning to Change the Batteries
If battery power is low, the ç indicator is displayed to
let you know it is time to replace the batteries.
If battery power becomes so low that you are in
danger of losing information, the organizer briefly
displays the following screen when you press Á
to turn the calculator on.
WARNING!
YOU NEED TO
CHANGE BATTERIES!
CHANGE BATTERY # FIRST.
Instead of the # symbol, 1 or 2 is displayed to let
you know which battery to change first.
If battery power becomes so low that the organizer
cannot retain stored information much longer, the
clock stops running to conserve power.
48-ENG
Page 49

Battery Information (Continued)
•
•
•
•
•
•
When to Replace the Batteries
Important! Never replace batteries one minute
before or after midnight. Never remove both
batteries at the same time. Either of these actions
will result in loss of data.
Replace both batteries when:
• The ç indicator is displayed.
• The display contrast will not adjust.
• The display becomes erratic or slow.
• The CHECK BATTERIES: screen indicates that
one or both batteries need to be replaced.
• The WARNING! screen is displayed when you
press Á to turn the organizer on.
• The clock stops running.
To prevent loss of data, replace batteries:
• As soon as the ç indicator is displayed, before
the old ones are completely discharged.
• One at a time and in the order indicated on the
WARNING! screen.
• Within a short time to minimize the length of time
the organizer is without full power.
• Without touching any keys during the procedure.
You can replace batteries without losing data, but it
is a good idea to retain a record of your data.
The organizer uses two of the following batteries:
Duracell DL2032
Panasonic CR2032
Toshiba CR2032
Eveready E-2032
Ray-O-Vac CR2032
Or the equivalent
49-ENG
Page 50

How to Replace the Batteries
1.Press Á to turn the organizer off. Then close
the case and turn the organizer over so that the
back is facing you.
2.Notice the two battery compartments on the
back of the organizer labeled
Important! Replace batteries in the order
indicated on the WARNING! screen. Never
remove both batteries at the same time.
3.Notice the slide switch above the battery
compartments. Slide the switch to the left or right to
remove the opposite battery compartment cover. For
example:
< To replace battery
battery
l
< To replace battery
battery
k
4.Remove the battery compartment cover. Press
firmly on the arrow and push or pull in the
direction of the arrow. After the cover partially
opens, lift the cover off.
5.Use a pen or paper clip to gently pry the battery
out of the battery compartment.
6.Place a new battery in the compartment with the
+ symbol facing upward.
7.Replace the battery compartment cover.
8.Move the slide switch and replace the other
battery in the same way.
9.When you have finished replacing both batteries,
move the slide switch to the center to lock both
battery compartment covers.
Caution: Do not incinerate old batteries or leave
them within reach of small children.
k
.
l
.
and l.
k
, slide the switch toward
, slide the switch toward
50-ENG
Page 51

Battery Information (Continued)
Set Automatic Power Down
To prolong the life of the batteries, the Automatic
Power Down (APD™) feature turns off the organizer
automatically if you have not pressed any keys for
several minutes. You can set the number of minutes
before the organizer automatically powers down.
1. Press 5 to display the first screen of the
Options menu.
2. Press E to select SET CUSTOM OPTIONS. The
first screen of the Custom Options menu is
displayed.
3. Press y to move to the second screen of the
Custom Options menu; then press H to select
SET POWER DOWN TIME.
4. Press the appropriate number key to enter the
number of minutes (1 through 7) you want the
organizer to remain on before it automatically
powers down.
5. Press :.
51-ENG
Page 52

TI Product Service and Warranty
Information
TI Product and Services Information
For more information about TI products and
services, contact TI by e-mail or visit the TI
calculator home page on the world-wide web.
e-mail address: ti-cares@ti.com
internet address: http://www.ti.com/calc
Service and Warranty Information
For information about the length and terms of the
warranty or about product service, refer to the
warranty statement enclosed with this product or
contact your local Texas Instruments
retailer/distributor.
52-ENG
Page 53

Appendix: Display Indicators
Meaning
Reminder
You have pressed
!, $
, or
%
to access Reminder entries.
Address
You have pressed
"
or the Addresses
ã key to access Address entries.
A
Displayed with Address when you are
viewing LIST 1.
B
Displayed with Address when you are
viewing LIST 2.
C
Displayed with Address when you are
viewing LIST 3.
Note
You have pressed
#
or the Notes ã
key to access Note entries.
The organizer’s display has indicators to let you
know what is going on. Several indicators may be on
at the same time.
Indicator
53-ENG
Page 54

Indicator
Meaning
$
You have pressed a key that displays one of
the summary lists:
•
Displayed with Reminder when you
press $ or
%
.
•
Displayed with Address when you press
the Addresses ã key.
•
Displayed with Note when you press the
Notes ã key.
Options
You have pressed
5
to select a basic
or custom option.
ä
You are making a new entry or have
pressed ä to revise the currently
displayed entry.
å
You have pressed å to search for one or
more words in your entries.
æ
Flashes to notify you that a reminder alarm
or daily alarm time has arrived.
The power is getting low in at least one
battery. See Battery Information section.
Busy
The organizer is processing and will not
respond to key presses.
You have entered a password and “locked
the organizer to prevent access to
information by other people.
ê ë
The currently displayed entry, menu, or list
is longer than can be displayed on one
screen and extends above and/or below it.
Displayed to the left of a number on a menu
screen to indicate the current selection.
ç
è
ß
”
54-ENG
Page 55

55-ENG
 Loading...