

Page 1
VIDIU AND VIDIU PRO
REFERENCE GUIDE
© 2017 Teradek, LLC. All Rights Reserved.
Page 2

TABLE OF CONTENTS
1. Introduction ................................................................................ 3
Support Resources ........................................................ 3
Disclaimer ......................................................................... 3
Warning ............................................................................. 3
Physical Properties ........................................................ 4
2. Getting Started .......................................................................... 6
Power Your Device ......................................................... 6
Connect to a Network .................................................. 7
Choose a Platform ......................................................... 7
Internet Streaming with Live:Air Action ...............11
3. Settings Overview ..................................................................12
Settings Diagrams ....................................................... 13
Broadcast: Platform Settings ...................................16
Broadcast: Quality Settings .......................................21
Video/Audio ...................................................................22
System ............................................................................23
Network...........................................................................24
Wired .............................................................................. 24
Wireless ..........................................................................24
USB 3G/4G Modem ....................................................25
Mobile .............................................................................25
Recording ....................................................................... 26
Sharelink ........................................................................26
5. Troubleshooting ....................................................................... 28
6. Technical Specifications ........................................................30
7. FCC Statement ..........................................................................32
Page 2
Page 3

INTRODUCTION
Thank you for purchasing Teradek’s VidiU, the ultimate entry-level streaming solution for HDMI video
sources. This reference guide is for both VidiU and VidiU Pro encoders; save where otherwise noted,
operations are identical. VidiU and VidiU Pro deliver high definition live streaming video with the quality and
reliability expected in traditional HD broadcast. VidiU features native integration with some of the most
popular video platforms, offering a seamless streaming experience. Use this reference guide to enhance
your usage and knowledge of VidiU or VidiU Pro.
Support Resources
In addition to this reference guide, there are a number of resources available for more information on the
VidiU’s features and operation. For tips, information, and all the latest available firmware and software
updates, visit Teradek’s support forum at https://support.teradek.com. If you are unable to find what you are
looking for online, please contact Teradek’s support staff at [email protected] | Phone: (888) 941-2111
Ext. 2 (available M-F 5am-6pm PST).
Disclaimer
This manual is intended for user information only. Every effort has been made to ensure that the contents
within are accurate at the time of printing, and that updates are made in a timely manner. Teradek cannot
be held responsible for inaccuracies, typographical errors, or out-of-date information contained within this
manual.
Warning
Teradek VidiU products contain no user serviceable parts. Disassembly, modification, or removal of any of
the device’s components may void your warranty. Please visit http://store.teradek.com/pages/warranty-
information for up-to-date warranty terms and conditions.
Page 3© Teradek, LLC 2017. All rights reserved.
Page 4
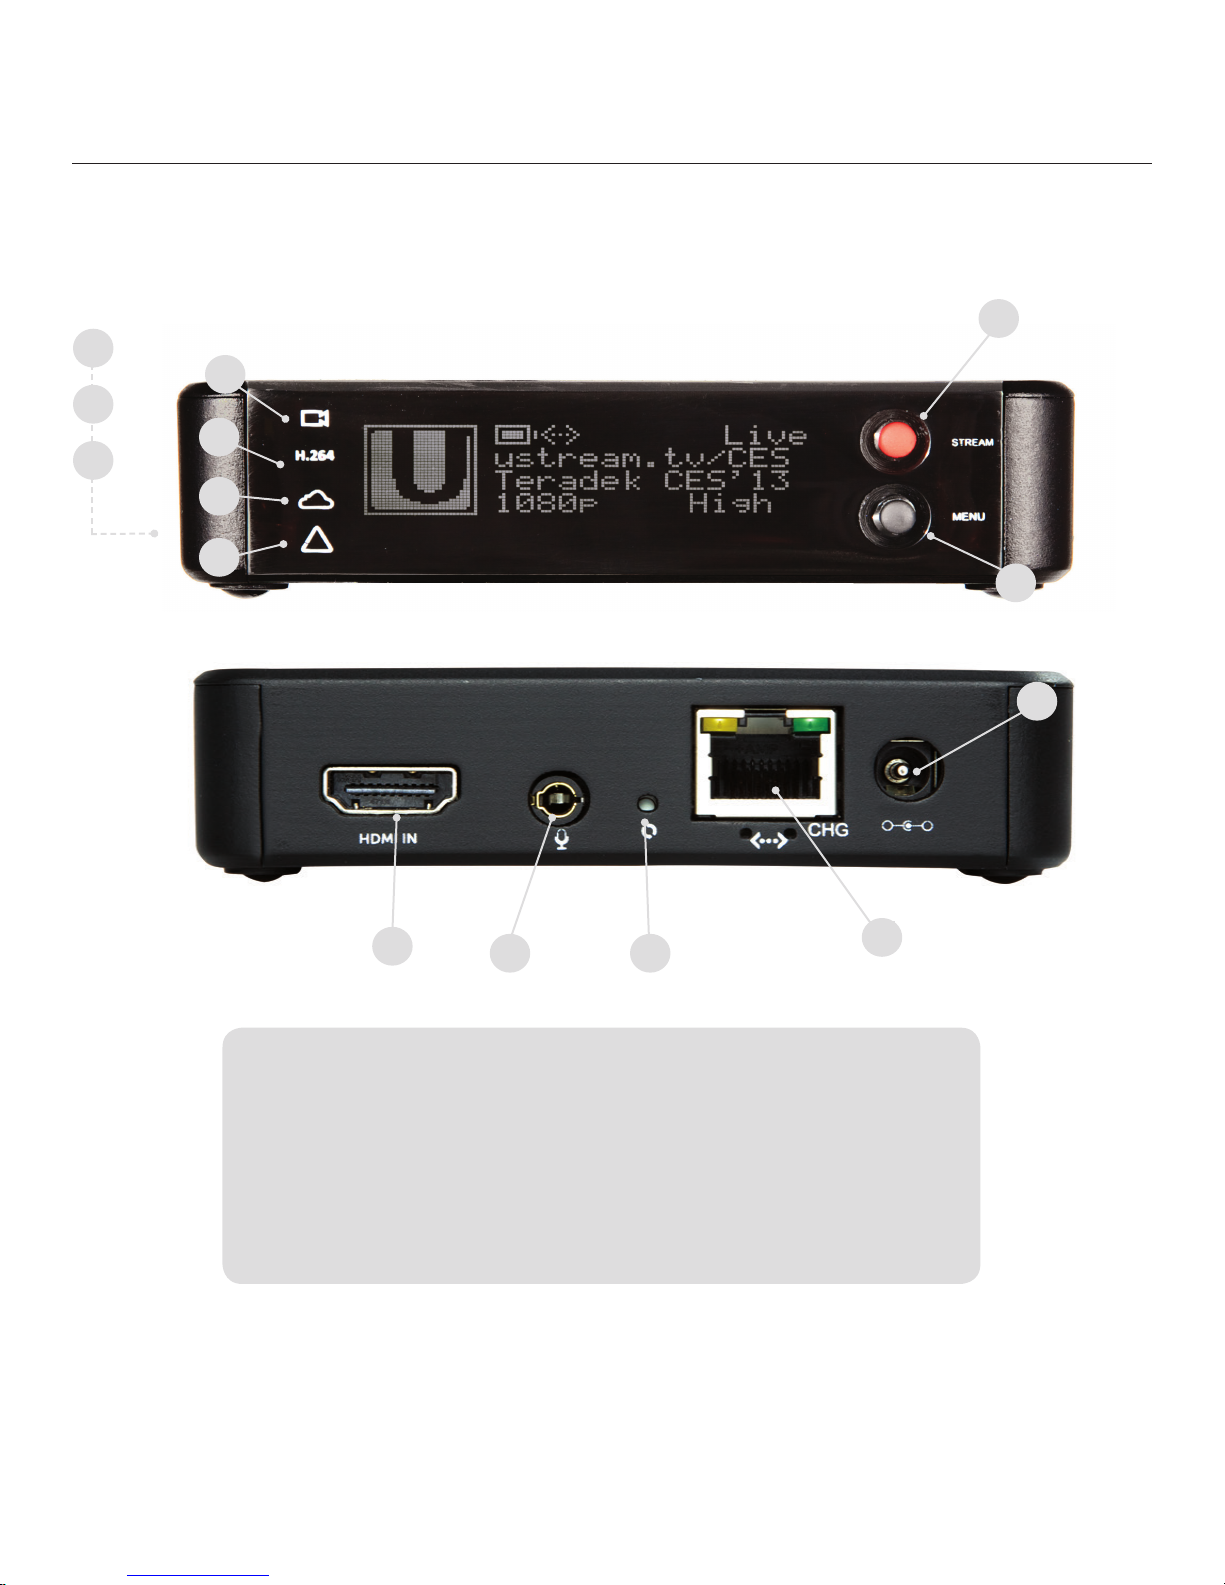
PHYSICAL PROPERTIES (VIDIU)
A
D
B
E
C
F
G
H
I
N
Page 4
J
A. Power Switch (Side)
B. USB Port (Side)
C. Headphone Output (Side)
D. Video Input Status
E. Encoder Status
F. Broadcast Status
G. Warning Indicator
K L
M
H. Start/Stop Joystick
I. Menu Joystick
J. HDMI Input
K. Mic/Line Input
L. Reset Button
M. Ethernet
N. Power Input
Page 5
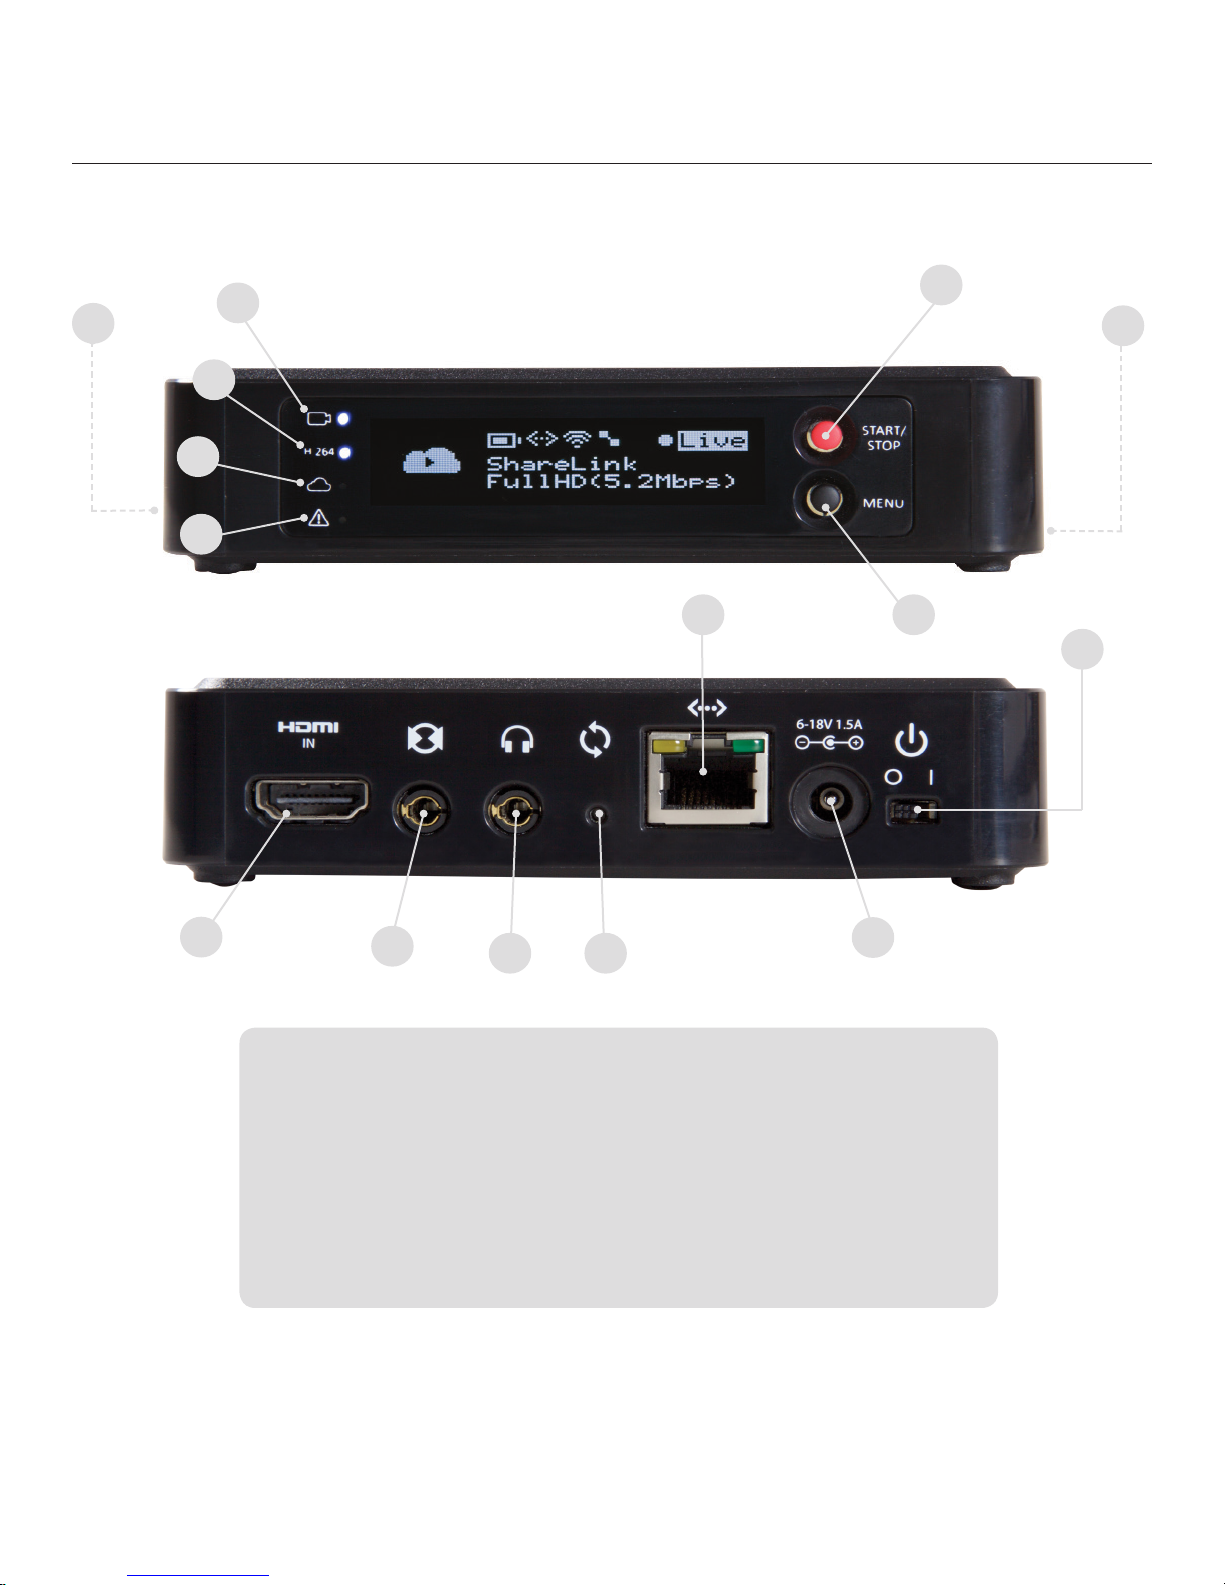
PHYSICAL PROPERTIES (VIDIU PRO)
A
D
B
C
E
M
F
G
H
O
I
A. SD Card Slot (side)
B. Video Input Status
C. Encoder Status
D. Broadcast Status
E. Warning Indicator
F. Start/Stop
G. USB Port (side)
H. Menu Joystick
J
K L
N
I. HDMI Input
J. MIC/Line Input
K. Headphone Output
L. Reset Button
M. Ethernet
N. DC Input
O. Power Switch
Page 5© Teradek, LLC 2017. All rights reserved.
Page 6
GETTING STARTED
There are three key steps to going live with VidiU:
1. Power your device
2. Connect VidiU to a network
3. Choose your streaming platform
POWER YOUR DEVICE
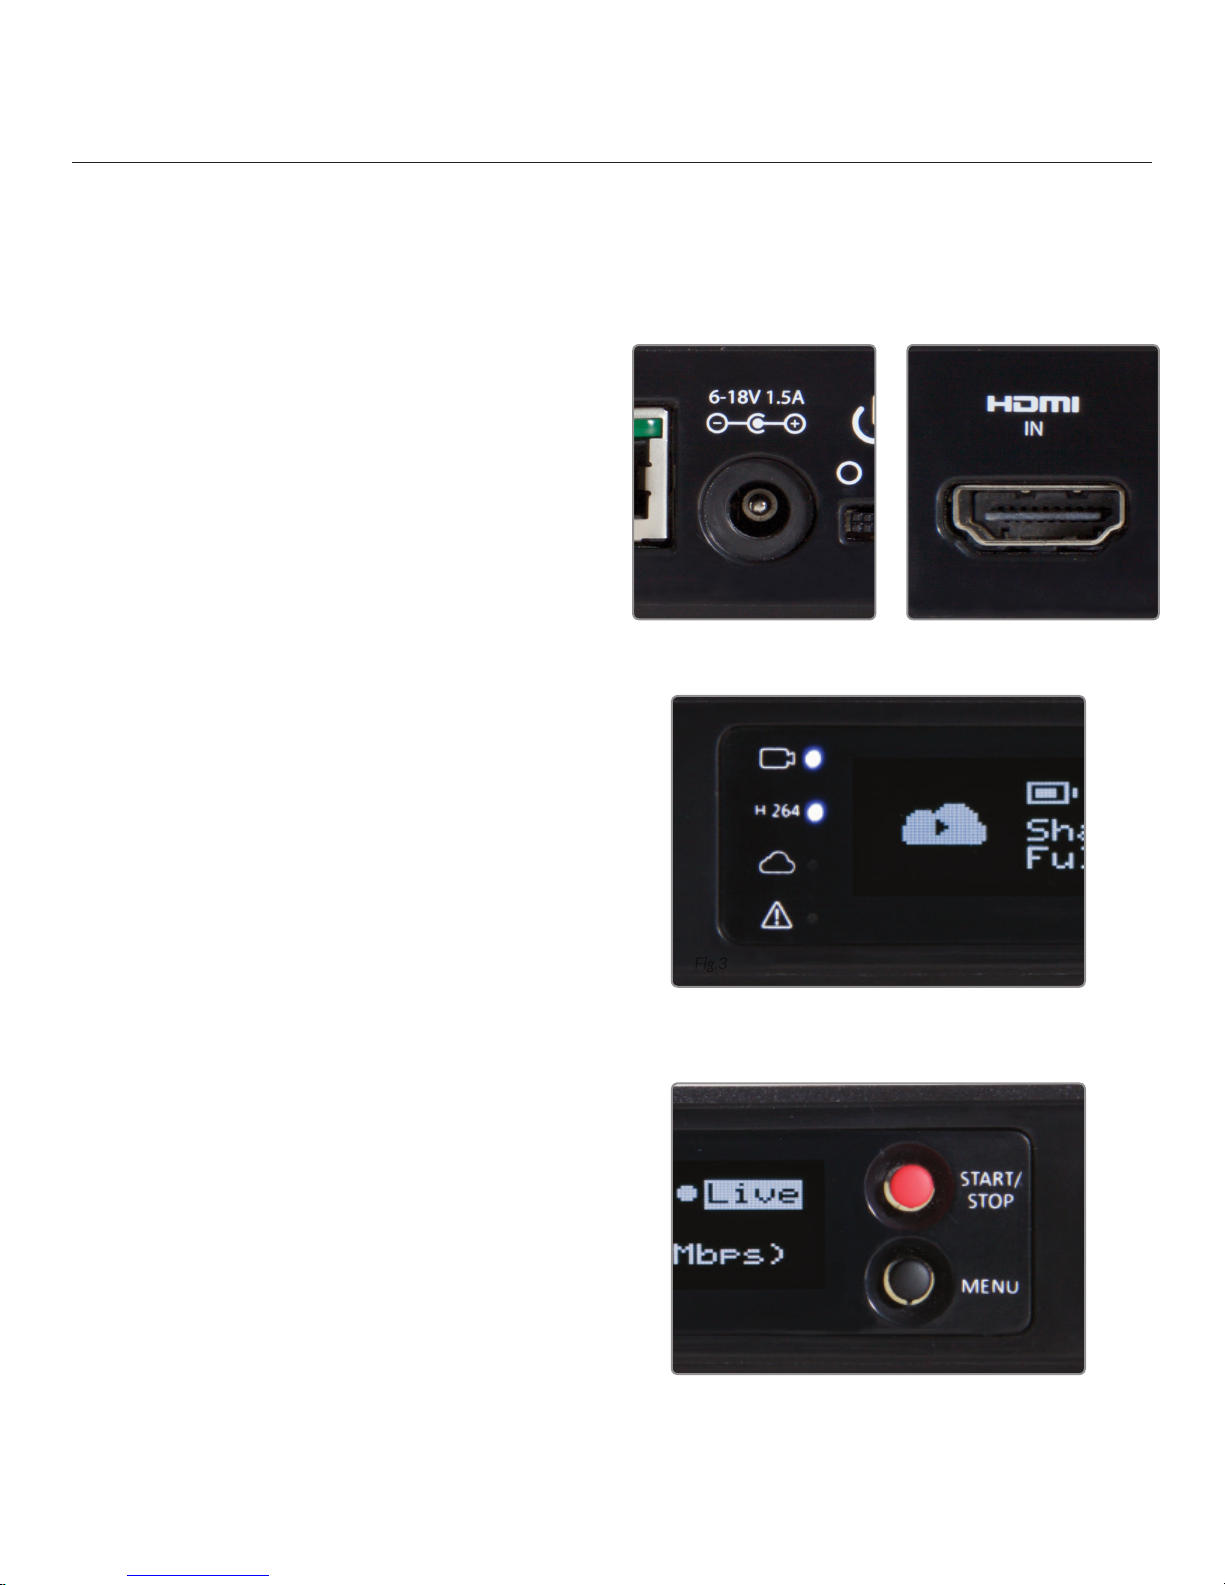
1. To power your VidiU or VidiU Pro, connect the AC
adapter to the DC input (Fig. 2-1) located on the
back of the device, then turn the power switch to
the On position. VidiU begins to boot as soon as
the power is activated.
2. Turn on your video source, then connect it to
VidiU using the HDMI input, also located on the
back of the device (Fig. 2-2).
3. Use the enclosed hot shoe mount and a 1/4”-20
screw to mount the VidiU to your camera, tripod
mount, or other accessory mount, if desired.
4. Once the VidiU has booted, verify that the Video
Input Status and Encoder (H.264) LEDs are blue
(Fig. 2-3).
START/STOP AND MENU JOYSTICKS
Use the Start/Stop and Menu Joysticks (Fig. 2-4) to
navigate the Front Panel Interface.
Start/Stop:
● (button press): Start/Stop broadcasts, exit menu screens
Fig. 2-1
Fig. 2-3
Fig. 2-2
Fig.3
Menu:
▼
, ● (button press): Confirm selection, open selected menu
▼
▲,▼, , : Select menu items, change status screen
on main display, select characters.
Page 6
▼
Fig. 2-4
Page 7
CONNECT TO A NETWORK
You can use the VidiU app, the Web User Interface (Web UI), or the front panel interface to connect VidiU to
a network. Select one of the following options.
Using the VidiU App
The VidiU iOS application allows you to remotely monitor and configure VidiU. Download the VidiU iOS app
from the App Store, then choose one of the following methods to get VidiU online.
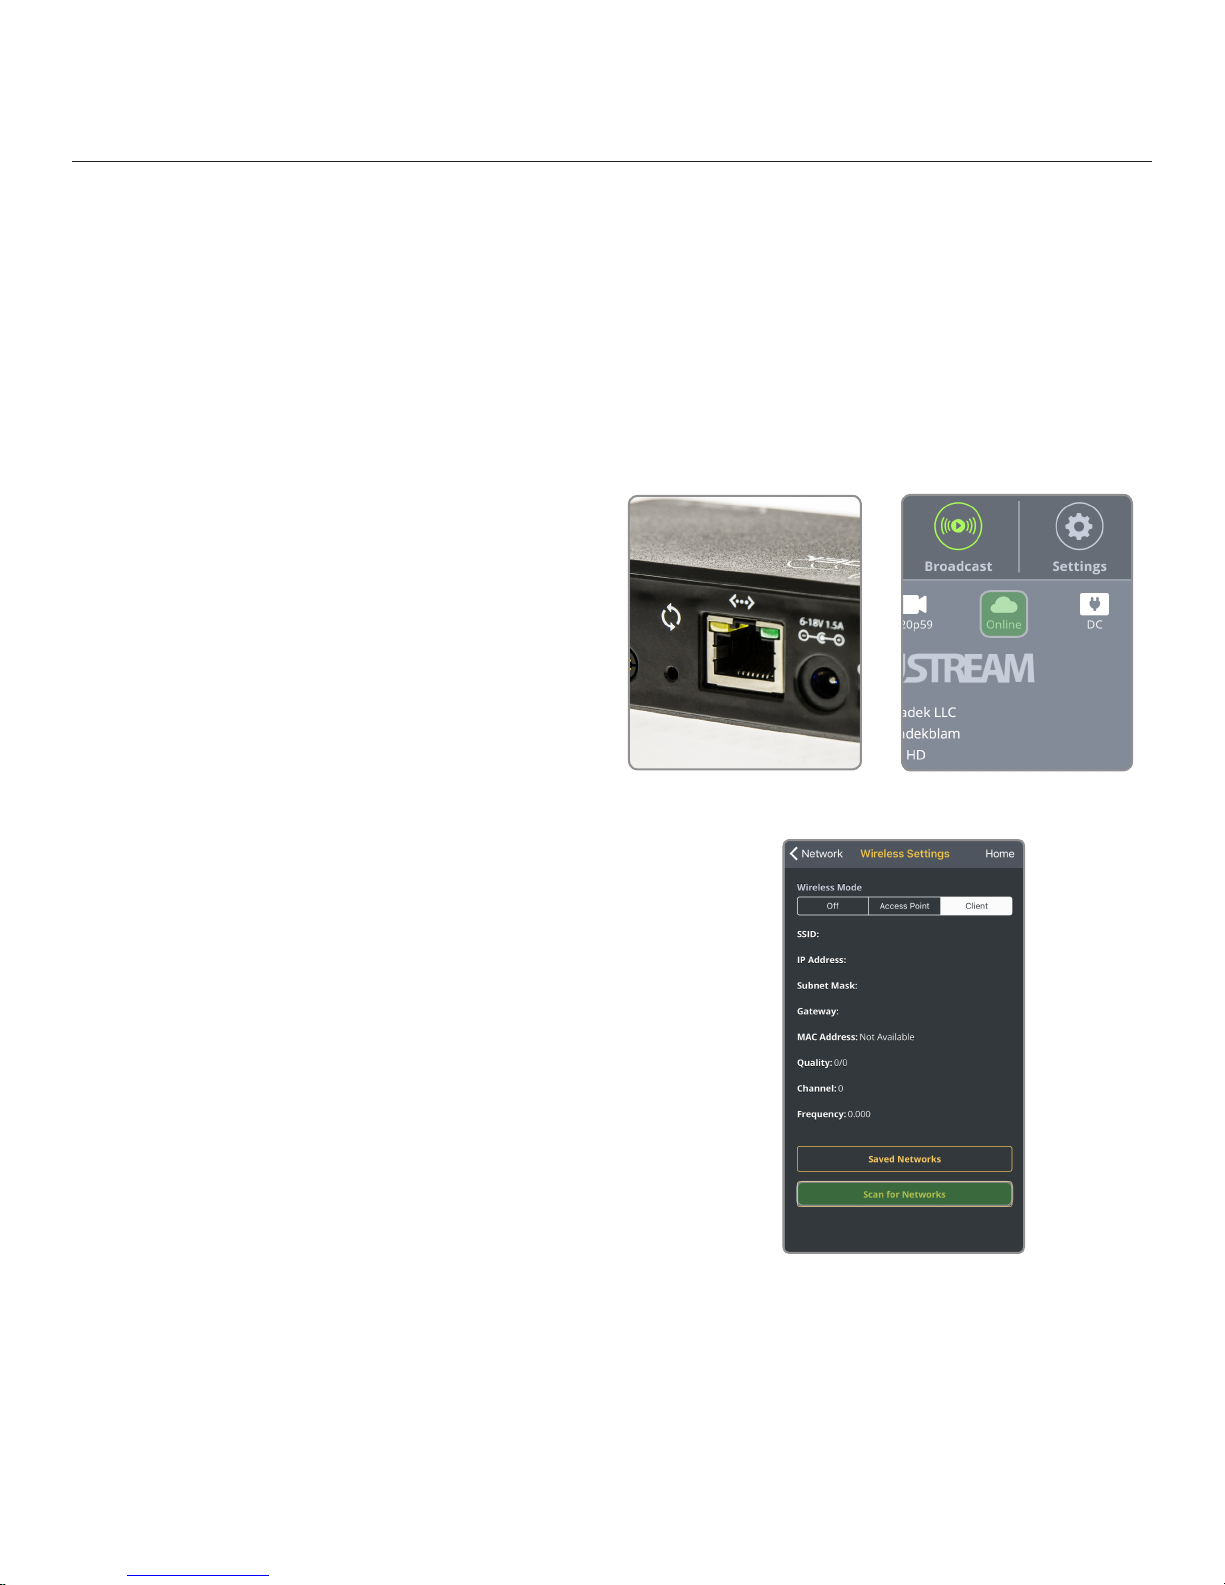
Connect VidiU to an Ethernet Network:
1. Plug an Ethernet cable into VidiU’s Ethernet
port (Fig. 2-5) and attach it to an Internet−
connected Ethernet switch or router.
2. Connect your iOS device to VidiU’s Access Point
network (pg. 24): VidiU−XXXXX (serial number
of the device).
3. Open the app and select VidiU, then verify that
the connection status shows Online (Fig. 2-6).
Connect VidiU to a Wi-Fi Network:
1. Connect your iOS device to VidiU’s Access Point
network, then select the VidiU.
2. Navigate to the Settings menu, select Network,
then select Wireless.
3. Select Client Mode, then tap Scan for Networks
(Fig. 2-7).
4. Select a network, then connect your iOS device
to that network.
Fig. 2-5 Fig. 2-6
Fig. 2-7
Page 7© Teradek, LLC 2017. All rights reserved.
Page 8
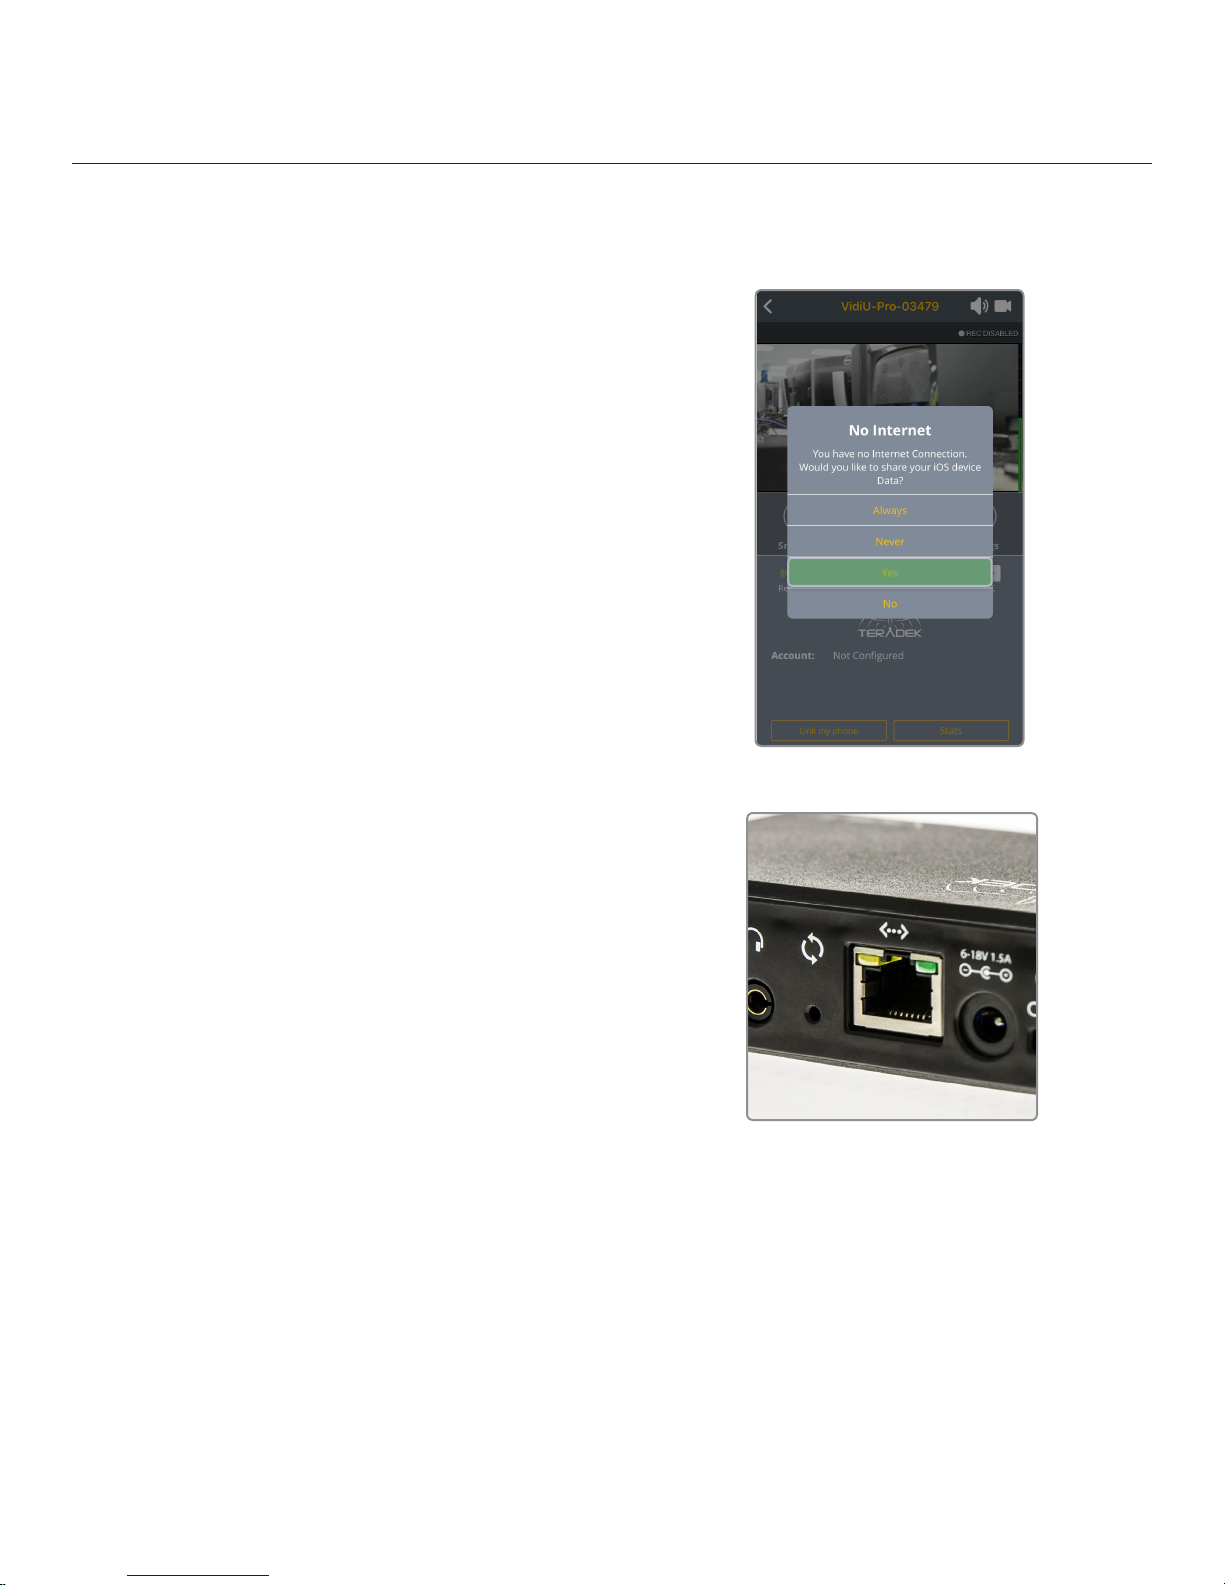
Connect using your phone’s data plan:
1. Connect your iOS device to VidiU’s Access Point network
(pg. 24): VidiU−XXXXX (serial number of the device).
2. Open the VidiU app and select VidiU with the
corresponding serial number under the list of Wi-Fi
devices.
3. When prompted, click Yes to use your cellular data plan
(Fig. 2-8).
Using the Front Panel Interface
Connect to a Wired Network:
1. Plug an Ethernet cable into VidiU’s Ethernet port
(Fig. 2-9) and attach it to an Internet−connected
Ethernet switch or router.
2. Once the device is connected to the network,
VidiU’s front panel interface will indicate that it’s
‘Ready.’
3. Using the Menu Joystick, navigate to the
Network menu, then select Wired.
4. Once the device is configured and connected to
the network, VidiU’s IP address is displayed.
To access the Web UI:
5. Open a web browser and enter VidiU’s IP address
in the navigation bar (Fig. 2-12).
Fig. 2-8
Fig. 2-9
Page 8
Page 9
Connect to a Wi-Fi Network:
1. Using the Menu Joystick, navigate to the
Network menu, then select WiFi.
2. Launch Client Mode, then select Scan for
Networks. Select a Wi-Fi Network, then enter
your credentials.
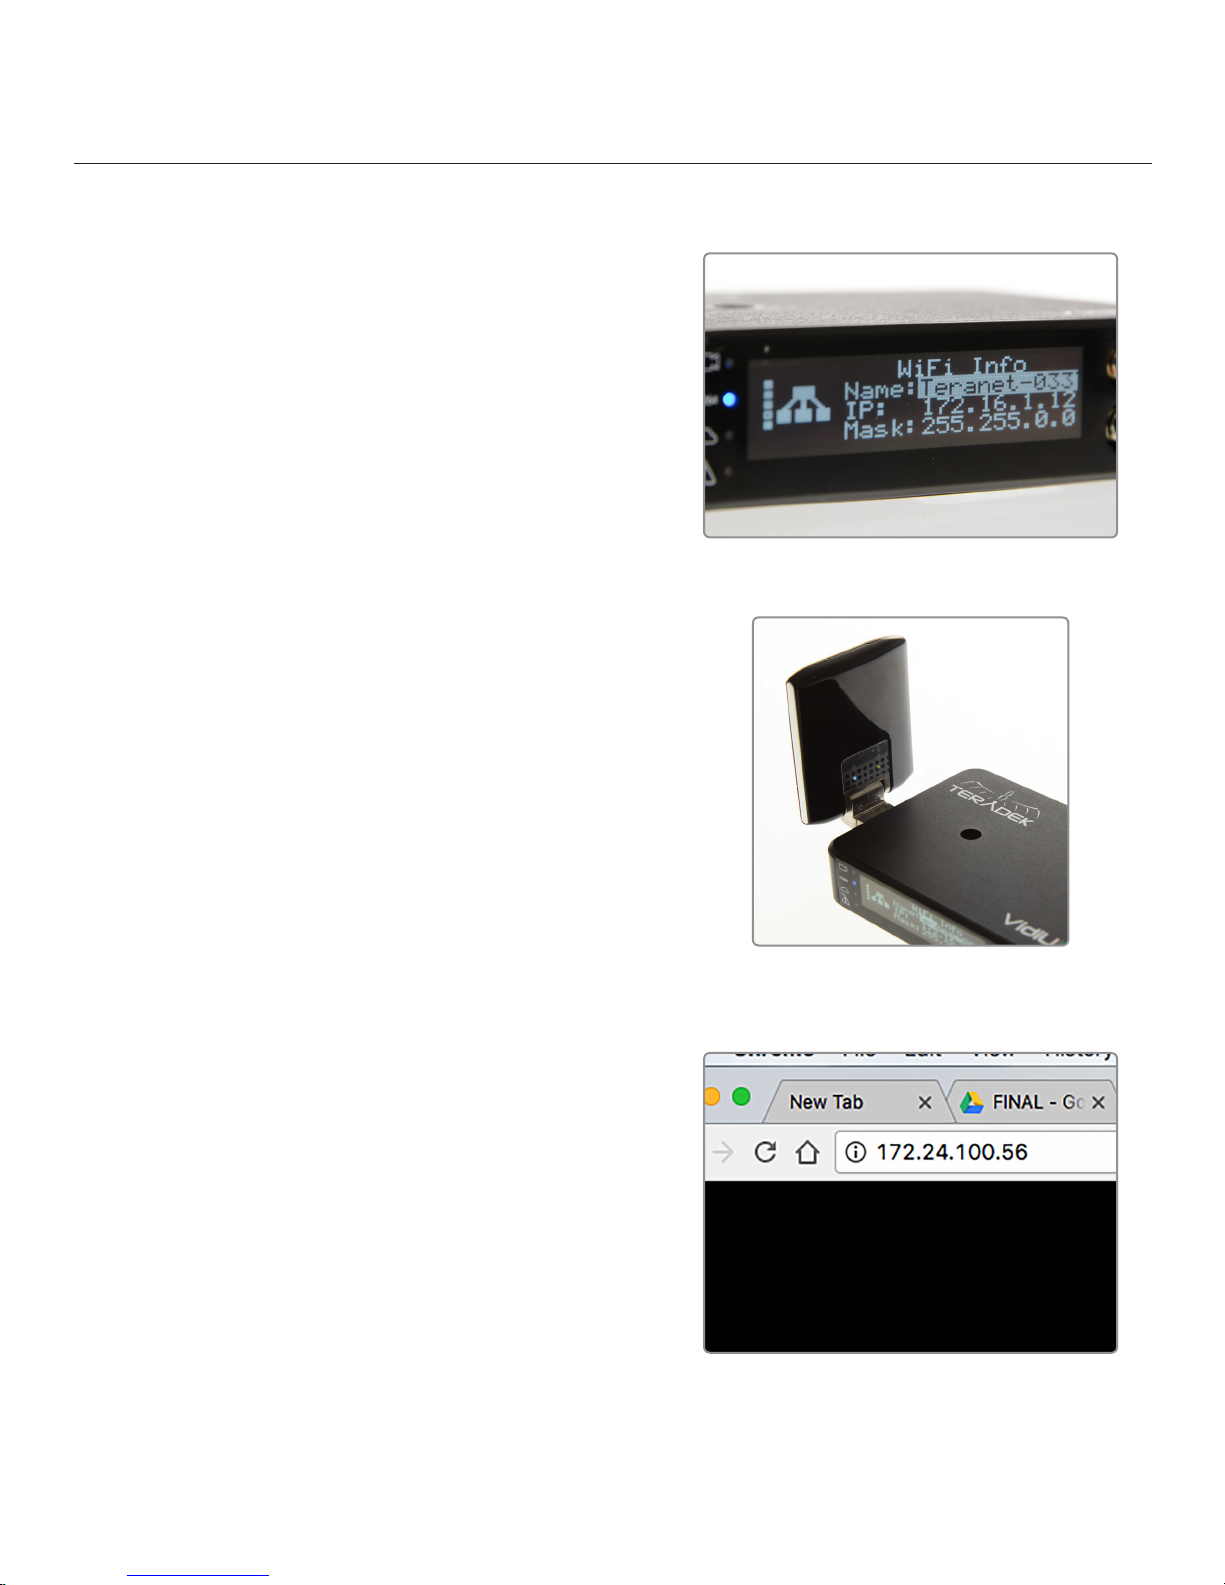
3. Once the device is configured, select [INFO] to
view the IP address (Fig. 2-10).
To access the Web UI:
4. Open a web browser and enter VidiU’s IP
address in the navigation bar (Fig. 2-12).
Connect using a 3G/4G USB Modem:
1. Insert a compatible 3G/4G USB modem into the
USB port (Fig. 2-11) and wait for the cellular
reception icon (4 bars) to appear.
2. To confirm the modem is connected, navigate to
the Network Settings menu and select USB
Modem.*
To access the Web UI:
3. Connect your computer to VidiU’s AP network.
Fig. 2-10
Fig. 2-7
Fig. 2-11
4. Open a web browser and enter VidiU’s IP address
in the navigation bar (Fig. 2-12).
Fig. 2-12
Page 9© Teradek, LLC 2017. All rights reserved.
Page 10
CHOOSE YOUR PLATFORM
VidiU and VidiU Pro are capable of broadcasting to any compatible online video platform. VidiU offers
integration with many popular video streaming platforms. Simply enter your credentials using the VidiU
app, Web UI, or the front panel interface.
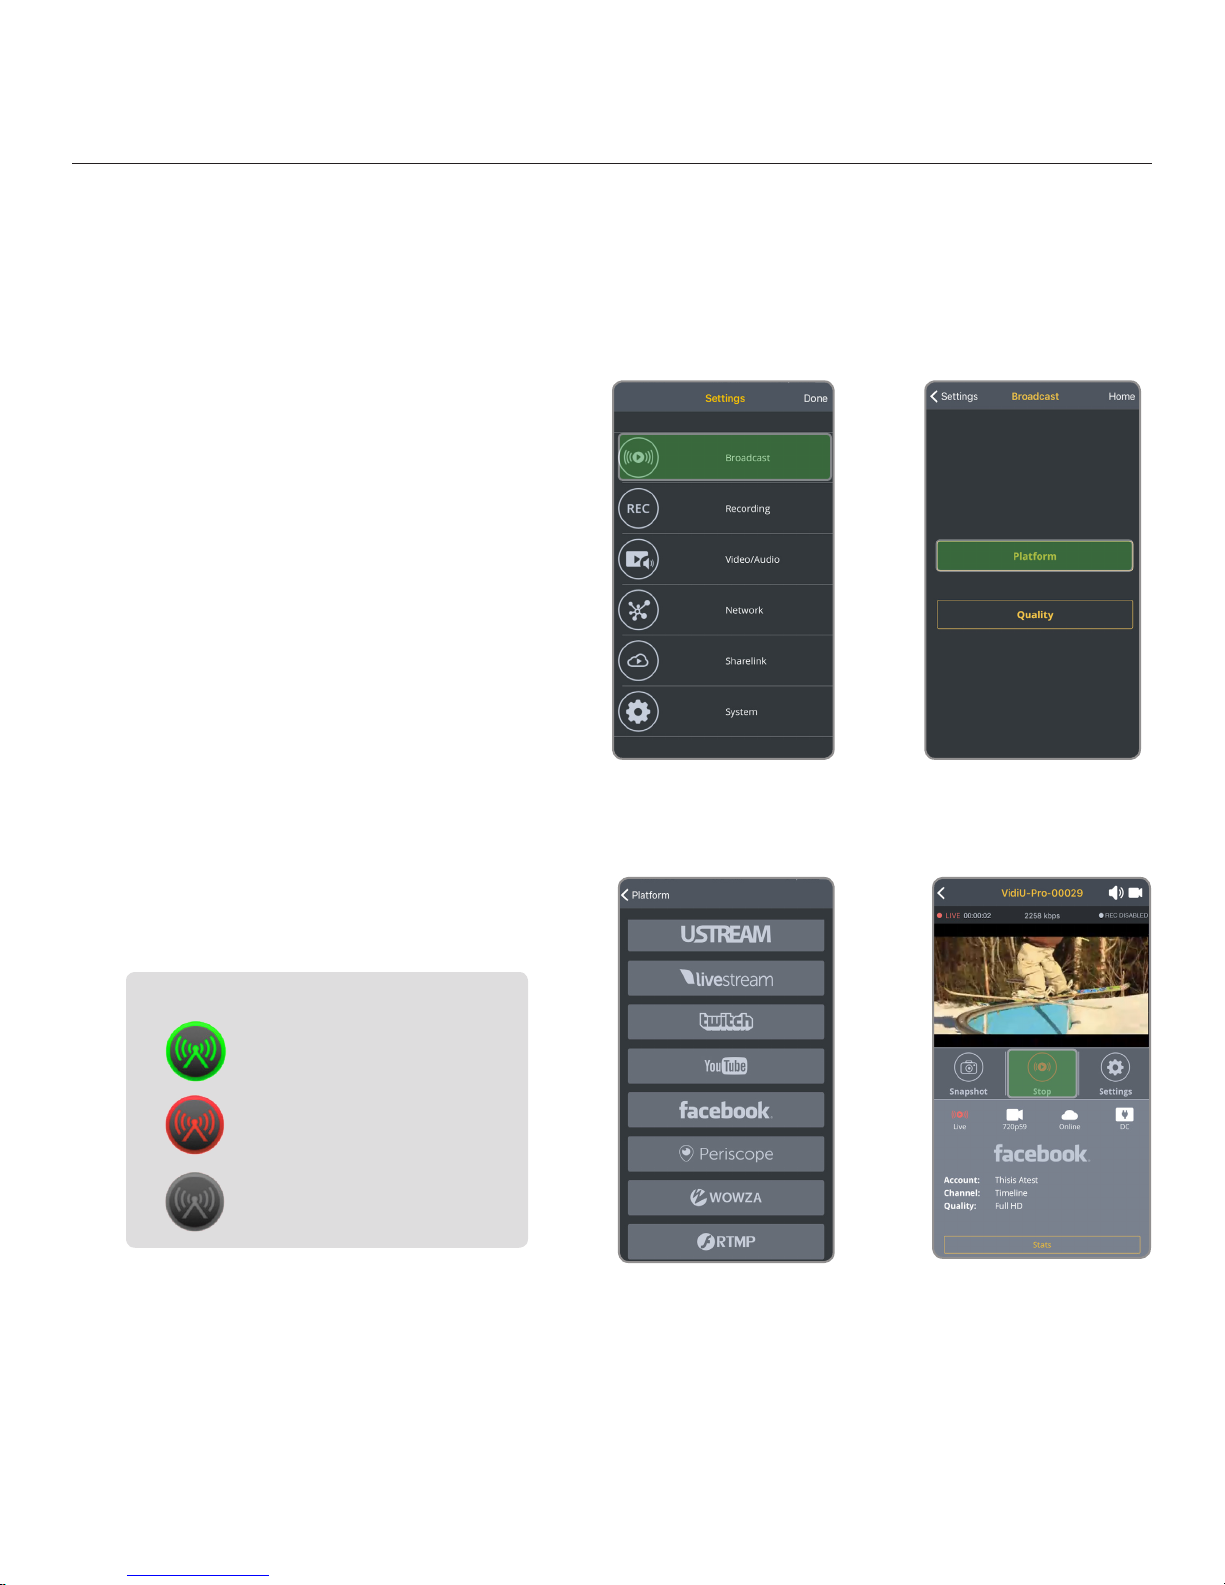
Connect to a Streaming Platform:
1. Go to Settings, select Broadcast (Fig. 2-13)
then select Platform (Fig. 2-14).
2. Select a streaming platform (Fig. 2-15) and
enter your credentials, or follow the on screen prompts to authorize VidiU with
YouTube or Facebook. (For more detailed set
up instructions, go to the Platform Settings section
on pg.16.)
3. Select a channel or event to stream to.
4. After configuring your device, you will be
redirected to the Settings menu. Select Done
on the upper right corner.
5. Tap the ‘Broadcast’ button to go live
(Fig. 2-16).
BROADCAST BUTTON:
VidiU is ready to broadcast
Broadcast is in session
VidiU is not ready to broadcast
Fig. 2-13 Fig. 2-14
Fig. 2-15
Fig. 2-16
Page 10
Page 11
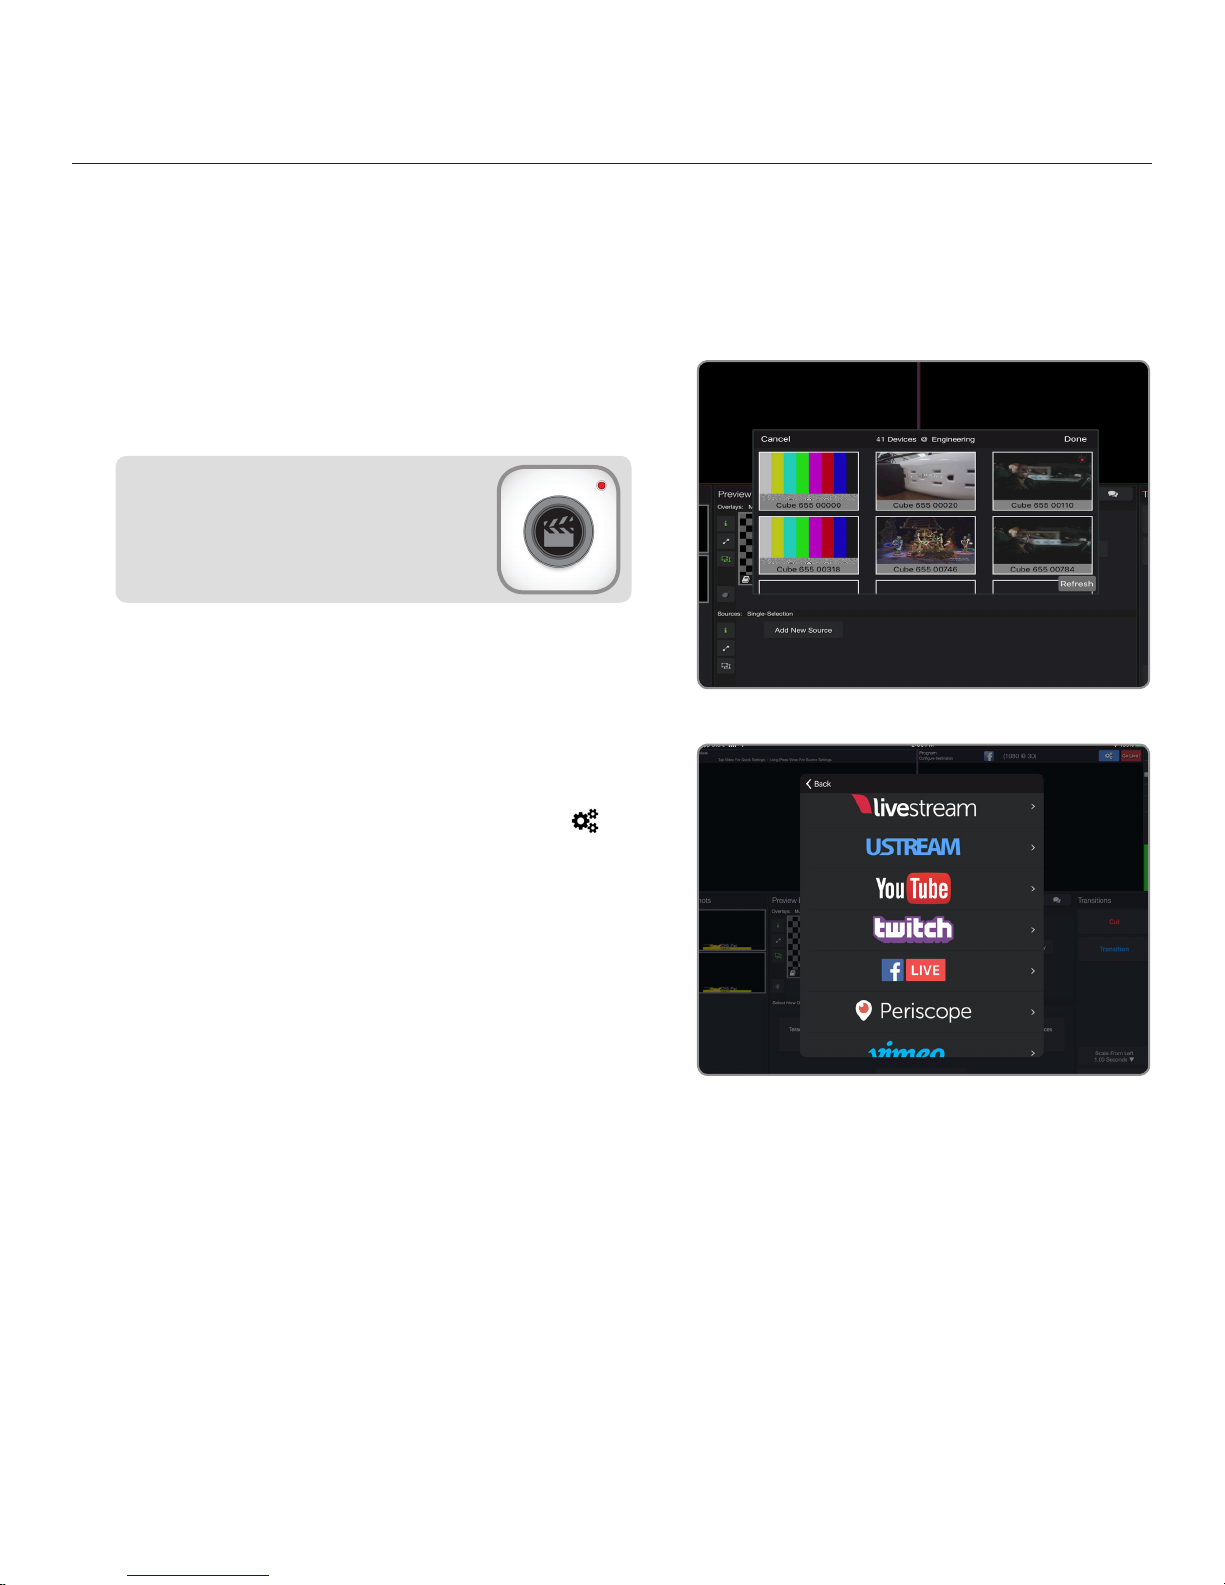
Internet Streaming with Live:Air Action
VidiU and VidiU Pro can be used for live production and monitoring with Live:Air Action. Use Live:Air Action
to preview, monitor, and edit multiple video sources before broadcasting your video to one of the integrated
platforms.
Connect and Broadcast using Live:Air Action
1. Connect your iPad to the same network as Cube.
Live:Air Action or Live:Air Solo
Live:Air Action is compatible with iPad Air 1
and newer. Live:Air Solo is compatible with
both iPad and iPhone. Both apps are available
in the iTunes App Store.
2. Launch the Live:Air Action app.
3. Tap the Add New Source button on the Preview
Editor’s bottom panel, then tap the Teradek Device
button. Select a device (Fig. 2-11), then tap Done.
4. To configure a streaming destination, tap the button
in the upper right-hand corner, enter the Broadcasting
Destinations page, then navigate to Manage
Destinations>Add a Destination (Fig. 2-12). Select a
platform, then enter your credentials (if applicable).
5. To begin live streaming, tap the ‘Go Live!’ button in the
upper right-hand corner.
Fig. 2-11
Fig. 2-12
Fig. 2-19
Page 11© Teradek, LLC 2017. All rights reserved.
Page 12
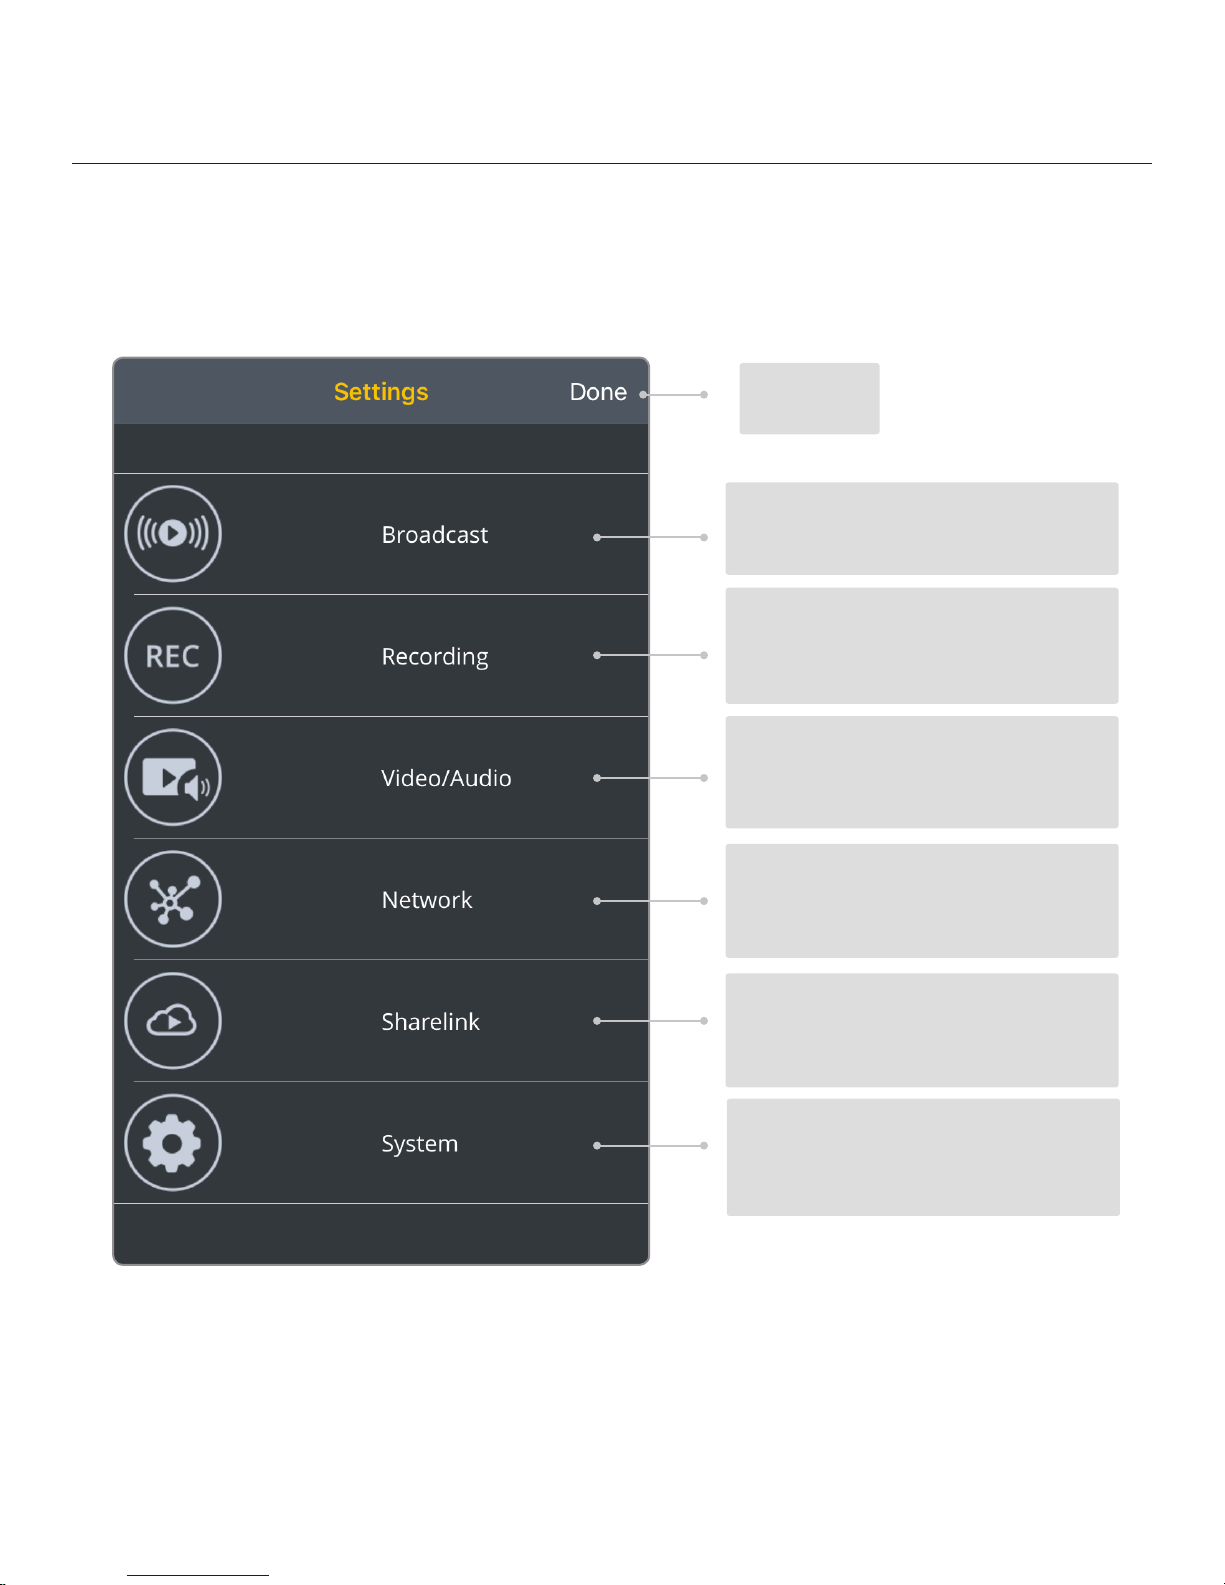
SETTINGS OVERVIEW
Navigating the Settings Menu
The Settings menu allows you to customize and control VidiU or VidiU Pro’s broadcast, audio/video, and
network settings. Use the VidiU app, Web UI, or the front panel interface to access the Settings menu, then
select a setting to modify.
Return to the
Home screen
BROADCAST
Modify Platform and Quality settings
RECORDING**
Enable recording and select a media
storage option
VIDEO/AUDIO
Adjust the Video and Audio input
settings
NETWORK
Choose a method of connecting to the
Internet
SHARELINK**
Log in to your Sharelink account to
increase bandwidth
SYSTEM
Perform factory reset, firmware
upgrade,* and system diagnostics**
* Options available only while using the Web UI
** Features available only on VidiU Pro
Page 12
Page 13
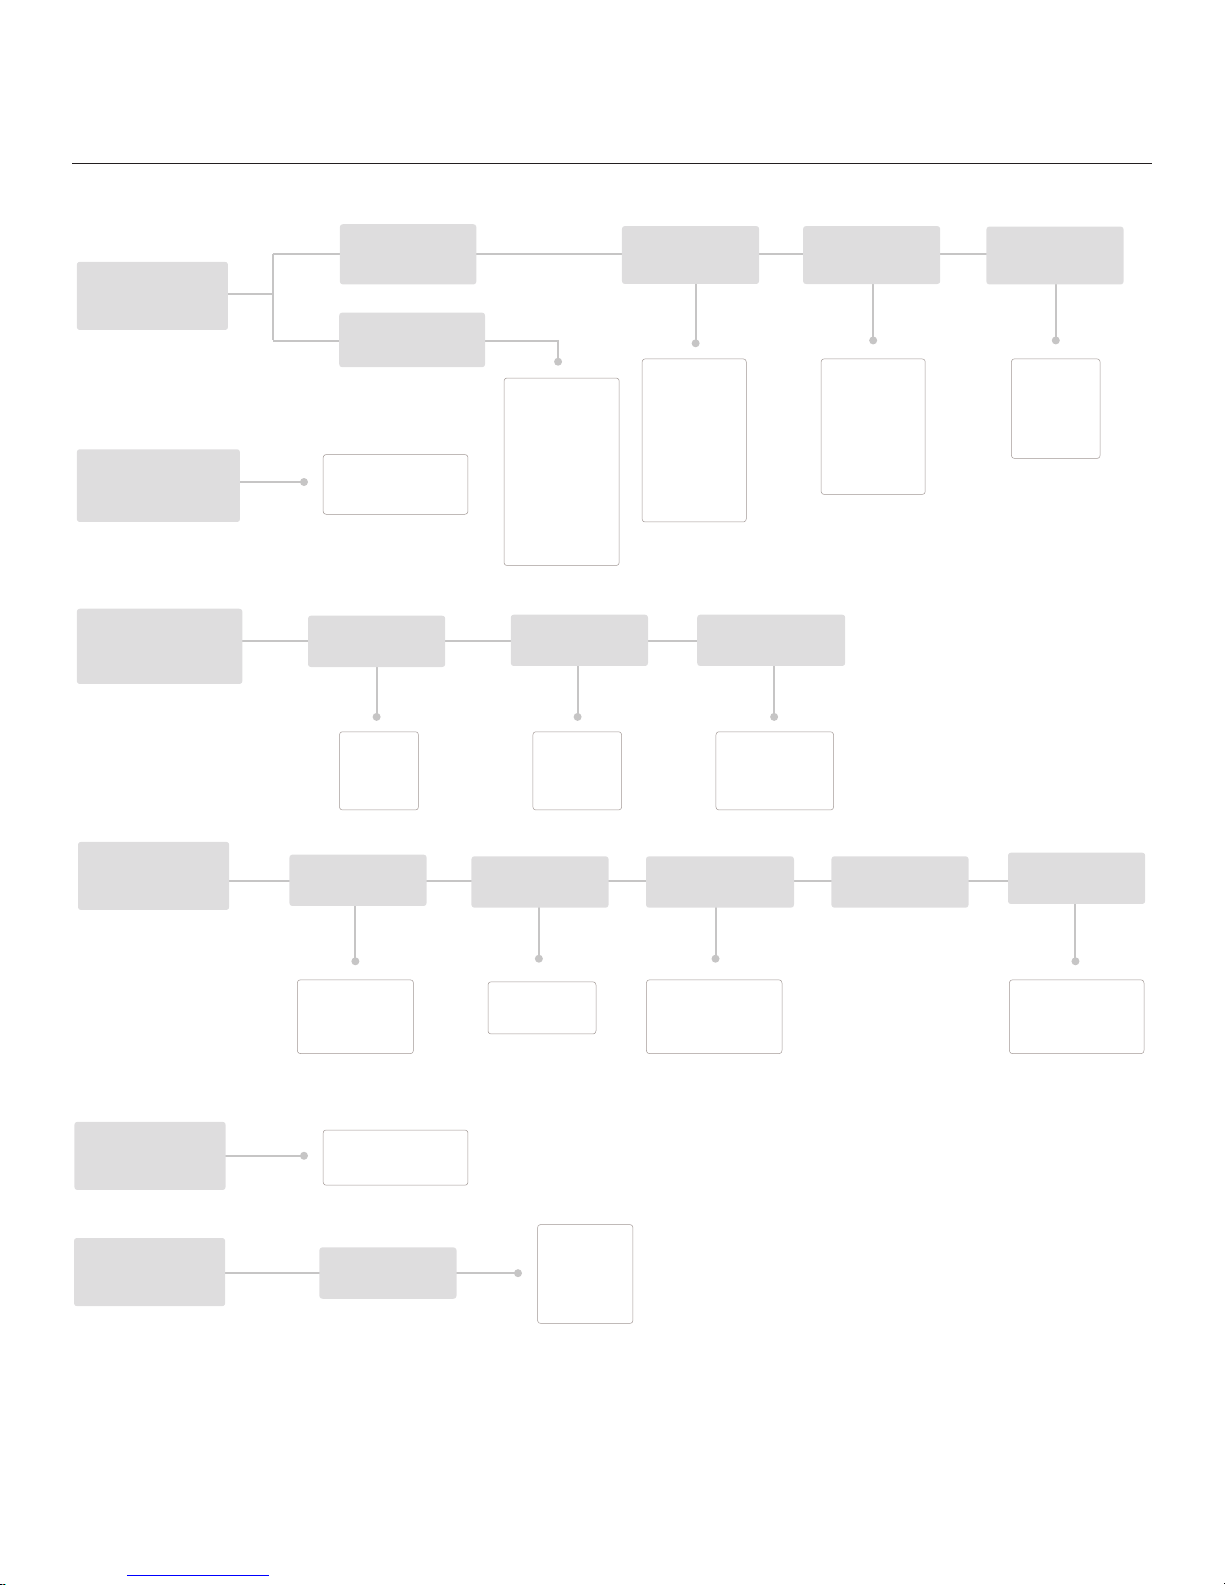
VIDIU IOS APP SETTINGS DIAGRAM
BROADCAST
RECORDING
VIDEO/AUDIO
Quality
Platform*
Enable/Disable
Recording
Widescreen
Auto
Yes
No
Livestream
UStream
YouTube
Twitch
Facebook
Manual
Live:Air
Periscope
Wowza
Audio Source
HDMI
Analog
Disabled
Video
Full HD
HD+
HD
High
Medium
Low
Mobile
Audio Channel
Stereo
Mono Left
Mono Right
Audio
HD
High
Medium
Low
Mobile
Auto
Framerate
High
Full
Half
Quarter
NETWORK
SHARELINK
SYSTEM
USB Modem
Auto
Preset
Custom
Purchase Plan
Login
Factory Reset
Wired
Dynamic
Static
Broadcast
Network
All
Cancel
Wireless
Access Point
Client
Off
Speed Test
* Settings options will vary, depending on the platform
Mobile
Never
Always
Ask
Page 13© Teradek, LLC 2017. All rights reserved.
Page 14
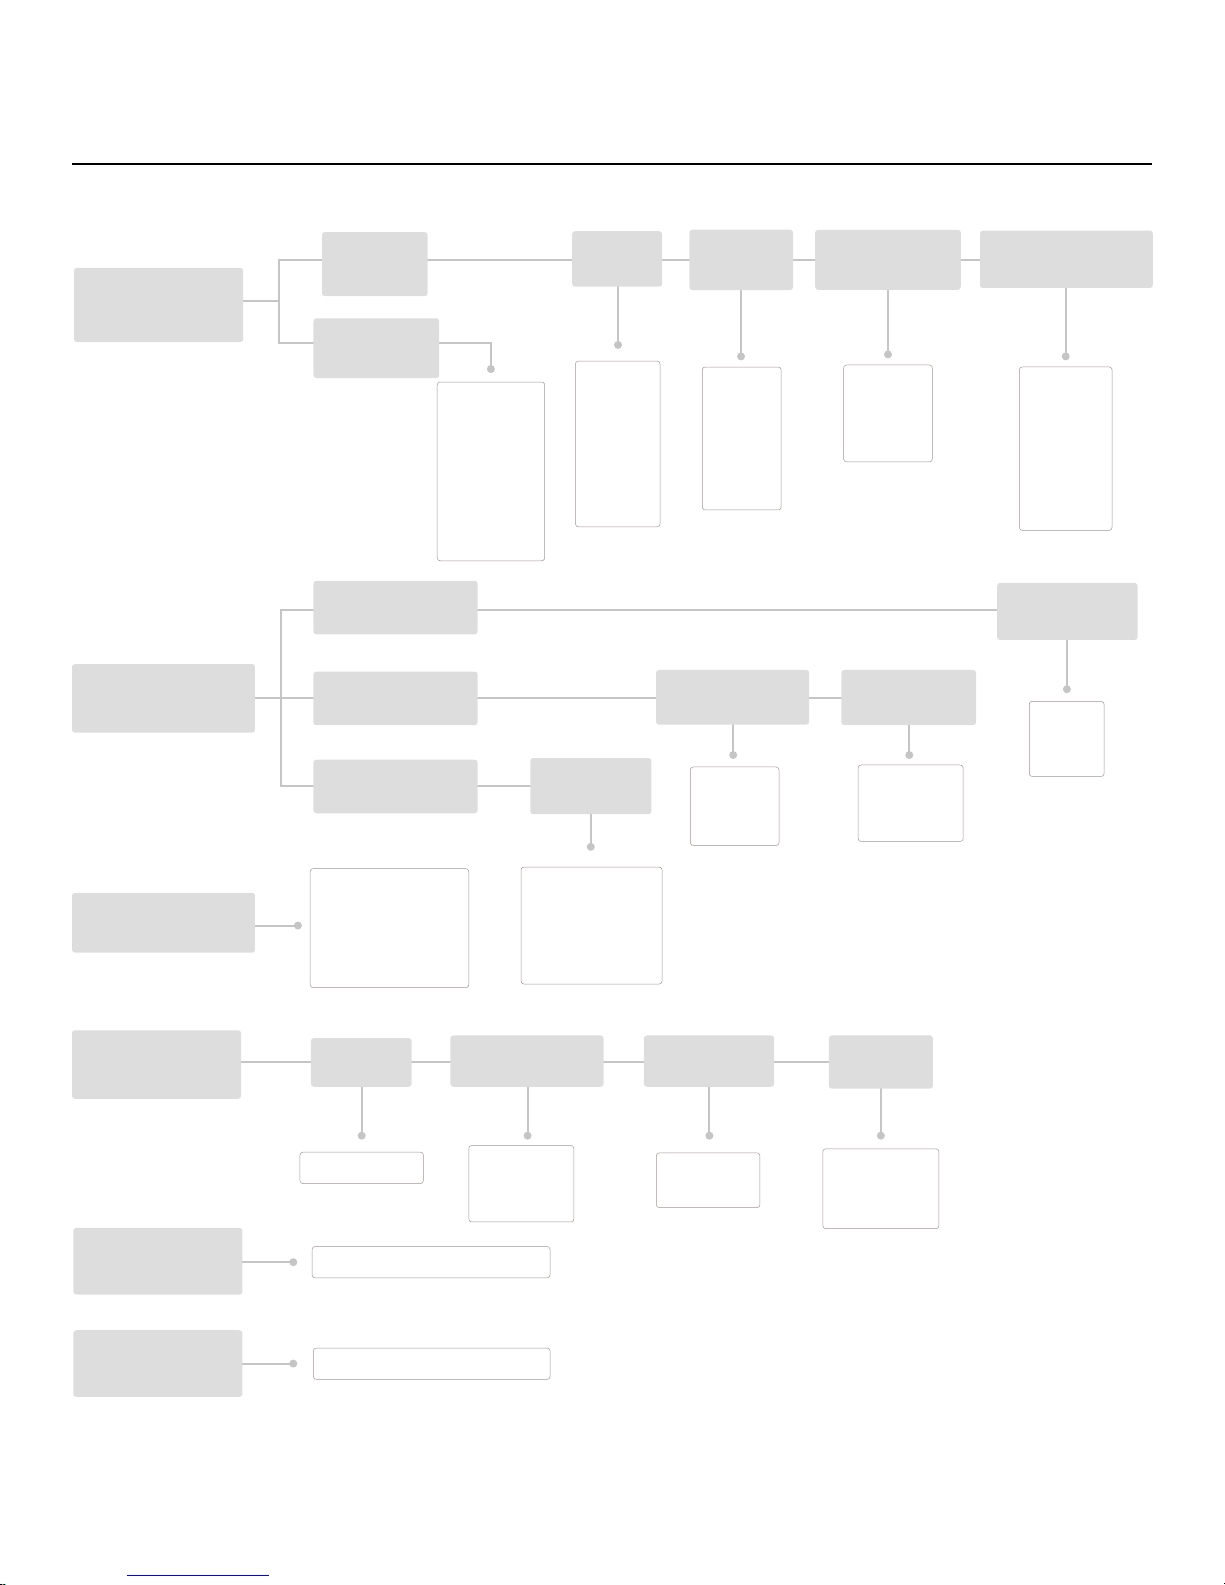
WEB USER INTERFACE (WEB UI) SETTINGS DIAGRAM
BROADCAST
VIDEO/AUDIO
Quality
Platform*
Video Settings
Audio Settings
Overlay Settings
Livestream
Ustream
YouTube
Twitch
Facebook
Manual
Live:Air
Periscope
Wowza
Video
Full HD
HD+
HD
High
Medium
Low
Mobile
Overlay
Audio
HD
High
Medium
Low
Mobile
Auto
Audio Source
HDMI
Analog
Disabled
Frame Rate
High
Full
Half
Quarter
Channel
Stereo
Mono Left
Mono Right
Custom Bitrate
256000
192000
128000
96000
48000
32000
16000
Widescreen
Auto
Yes
No
SYSTEM
NETWORK
RECORDING
SHARELINK
Firmware Upgrade
Password
System Time
Reboot
Factory Reset
System Diagnostics
General
Speed Test
Enable/Disable Recording
Purchase Plan/Sign In
Overlay Mode
Show Title
Title Text
Show Time
USB Modem
Auto
Preset
Custom
Font
Wired
Dynamic
Static
Wi-Fi
Off
Access Point
Client
* Settings options will vary, depending on the platform
Page 14
Page 15
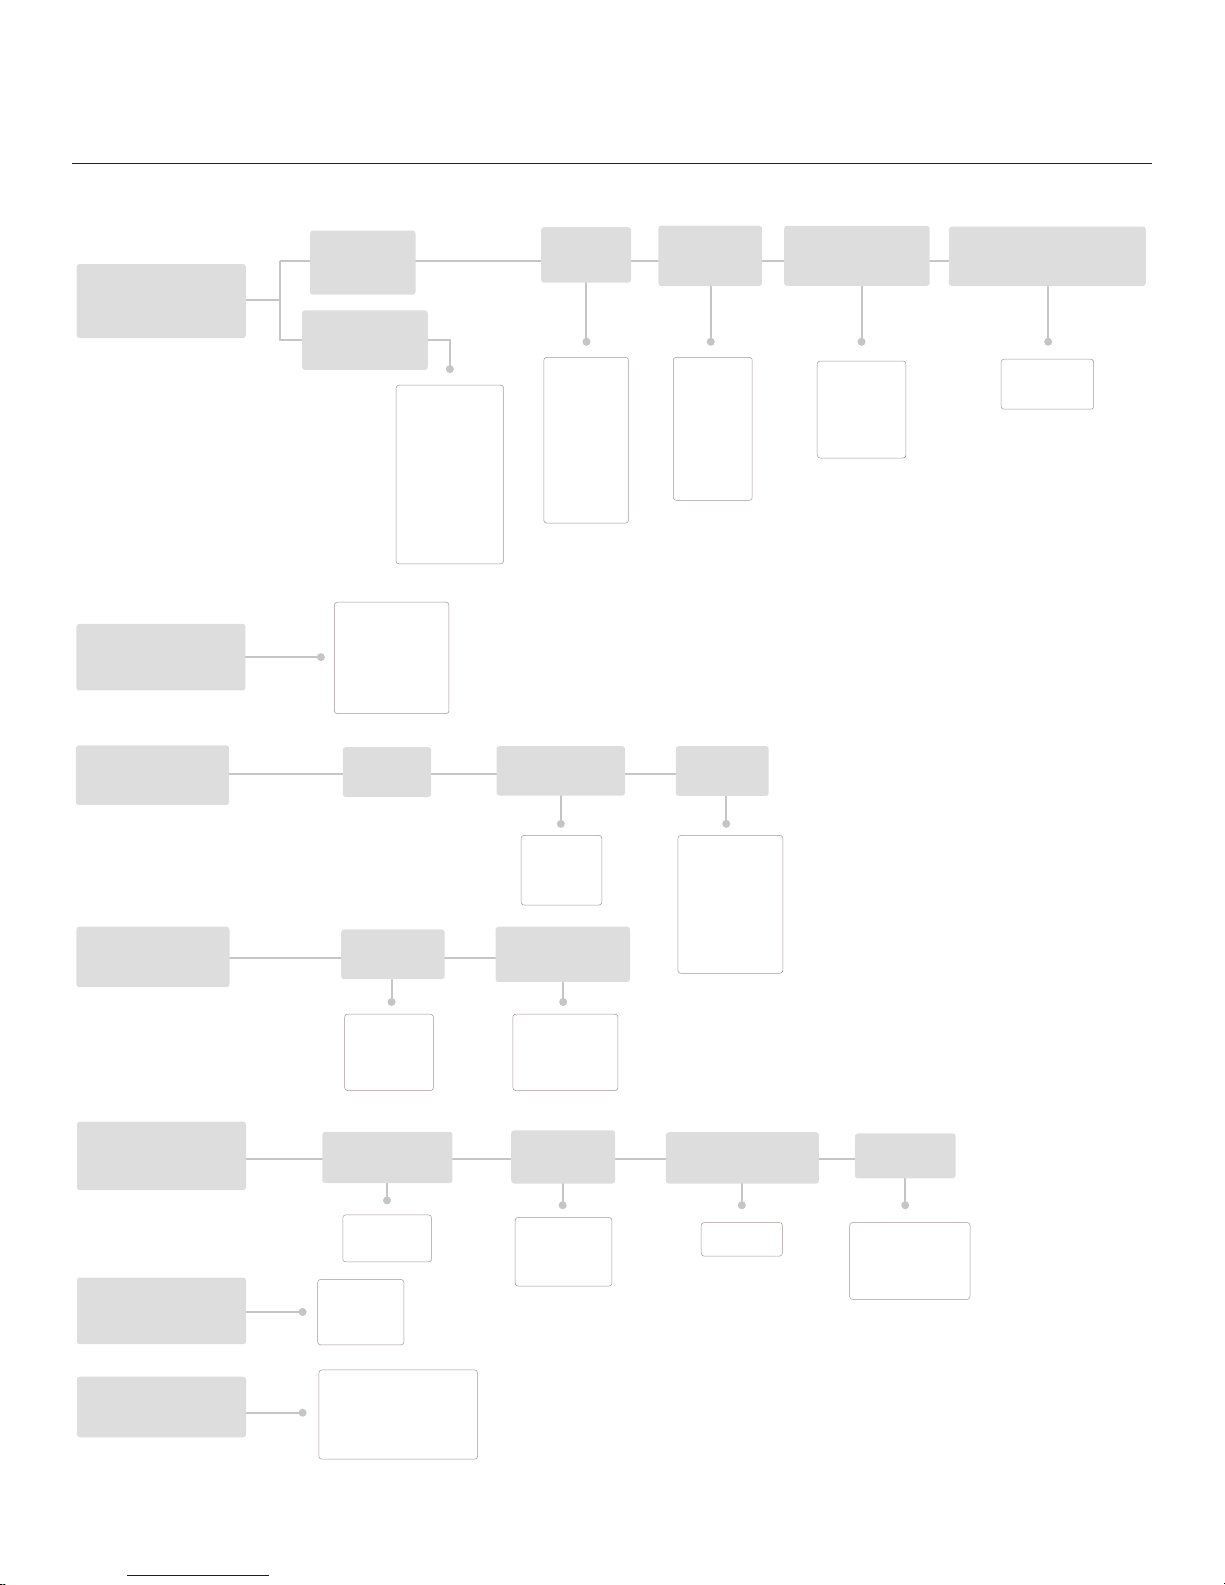
VIDIU FRONT PANEL INTERFACE SETTINGS DIAGRAM
BROADCAST
RECORDING
VIDEO
Quality
Platform*
Media
Format
Enable/
Disable
Input
Eject
Livestream
Ustream
YouTube
Twitch
Facebook
Manual
Live:Air
Periscope
Wowza
Video
Full HD
HD+
High
Medium
Low
Mobile
Widescreen
HD
Audio
Medium
HD
High
Low
Mobile
Auto
Overlay
Frame Rate
High
Full
Half
Quarter
Adaptive Bitrate
On/Off
AUDIO
NETWORK
SHARELINK
SYSTEM
Source
HDMI
Analog
Disabled
Wired
Mode
[Info]
Enable/
Disable
About VidiU
Firmware Updates
Factory Reset
Display Settings
Auto
Channel
Stereo
Mono Left
Mono Right
Wi-Fi
Mode
[Setup]
[Info]
Yes
No
Overlay
Text
Title
Time Stamp
Font
Location
USB Modem
[Info]
Tools
Connections
Speed Test
Priority
* Settings options will vary, depending on the platform
Page 15© Teradek, LLC 2017. All rights reserved.
Page 16
Broadcast: Platform Settings
VidiU and VidiU Pro feature native integration with some of the most popular streaming platforms.
Navigate to Settings>Broadcast>Platform (Broadcast Settings>Platform from the front panel), select one
of several broadcast platforms, then enter your credentials or destination information.
Integrated Platforms
● Ustream (pg. 16)
● Livestream (pg. 17)
● Twitch (pg. 17)
● YouTube Live (pg. 18)
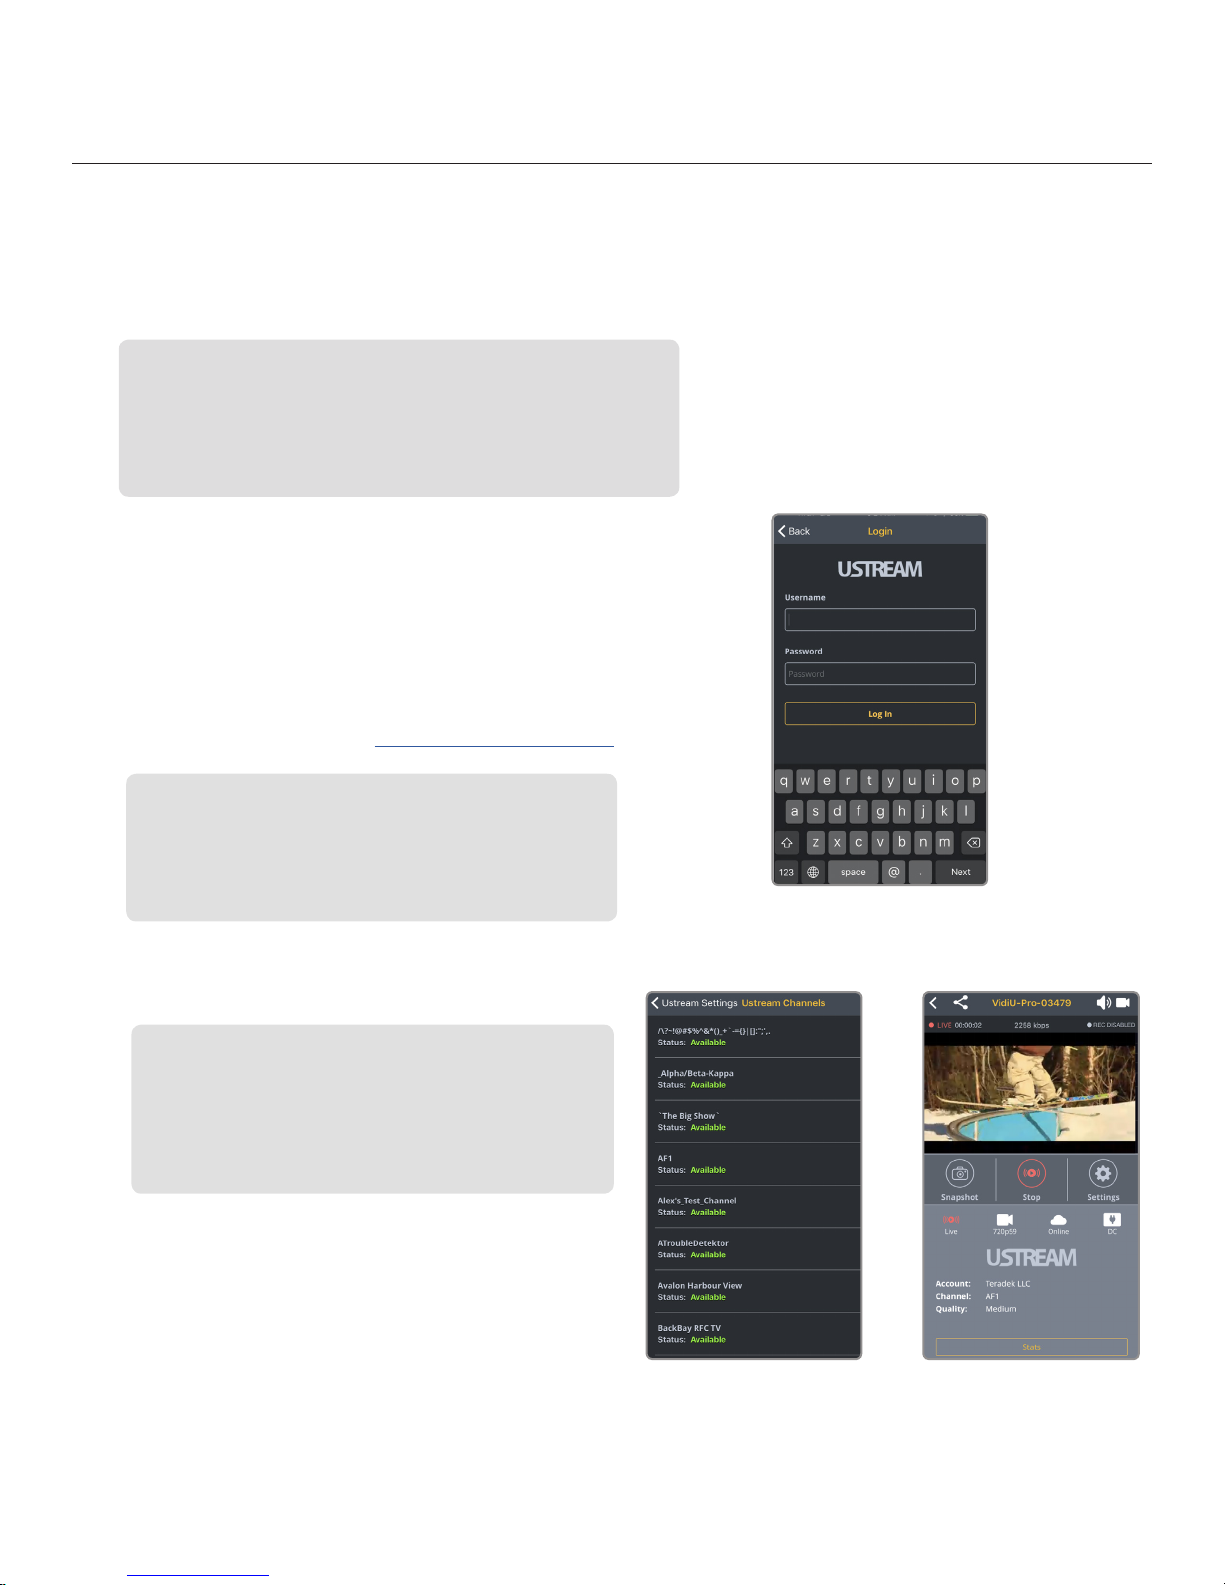
Ustream:
1. Select Ustream and enter your credentials
(Fig. 3-1).
2. Select a channel to stream to (Fig. 3-2), or
create a new channel at https://www.ustream.tv.
● Facebook (pg. 19)
● Wowza (pg. 19)
● Periscope (pg. 20)
● RTMP/Manual (pg. 20)
Channel List
The Ustream Channels list (Fig. 3-2) indicates which
channels are available to stream to. Once you have entered
our credentials, you will be prompted to select one of the
available channels.
3. After selecting a channel, return to the
Home screen.
Auto Record and recorded files
Depending on your Ustream account level, broadcasts to
your channel may be automatically recorded for viewing
later. Enabling the ‘Auto-Record’ setting triggers these
recordings. Access permissions for the recorded files can
be configured on your UStream account.
4. Tap the “Broadcast” button to go live (Fig. 3-3).
Fig. 3-1
Fig. 3-2 Fig. 3-3
Page 16
Page 17
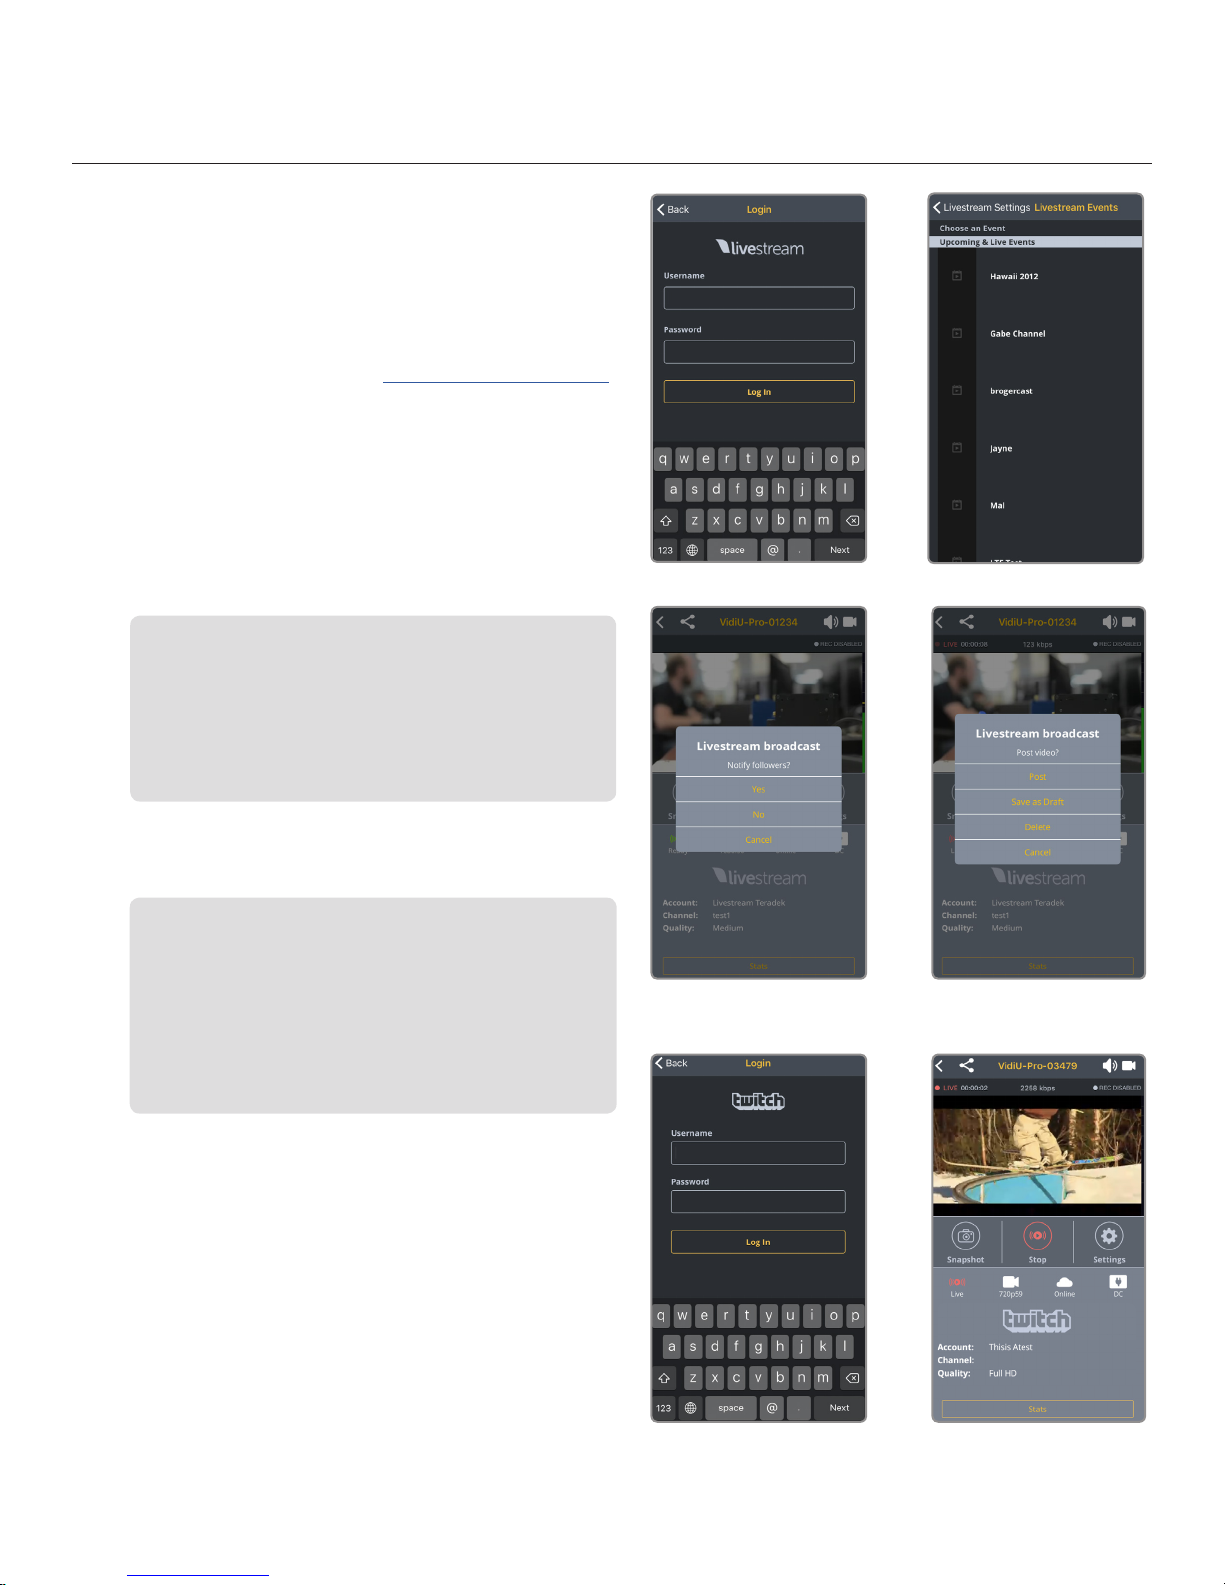
Livestream:
1. Select Livestream and enter your credentials
(Fig. 3-4).
2. Select the event you wish to stream to (Fig. 3-5),
or create a new event at https://livestream.com.
3. After selecting an event, return to the Home
screen.
4. Tap the ‘Broadcast’ button to go live, then
choose whether or not to notify your followers.
Notify Followers
a. If broadcasting from VidiU’s Web UI, you can notify your
account’s followers by toggling the ‘Notify Followers’
switch to On before tapping the broadcast button.
b. If broadcasting from the VidiU app (Fig. 3-6), you will be
prompted to select whether or not to notify your
followers after tapping the broadcast button.
Fig. 3-4 Fig. 3-5
5. When ending the broadcast, choose whether to
Post, Save, or Delete the video from the event.
Post, Save, or Delete
From the Web UI: During your broadcast, you can select
whether to Post the recorded video immediately, Save it
for posting later, or Delete it from the event.
From the VidiU app (Fig. 3-7): When ending your
broadcast, you will be prompted to select whether to
Post the recorded video immediately, Save it for posting
later, or Delete it from the event.
Twitch:
1. Select Twitch, enter your credentials (Fig. 3-8),
then return to the Home screen.
2. To begin live streaming, tap the “Broadcast”
button (Fig. 3-9).
Fig. 3-6 Fig. 3-7
Fig. 3-8
Fig. 3-9
Page 17© Teradek, LLC 2017. All rights reserved.
Page 18
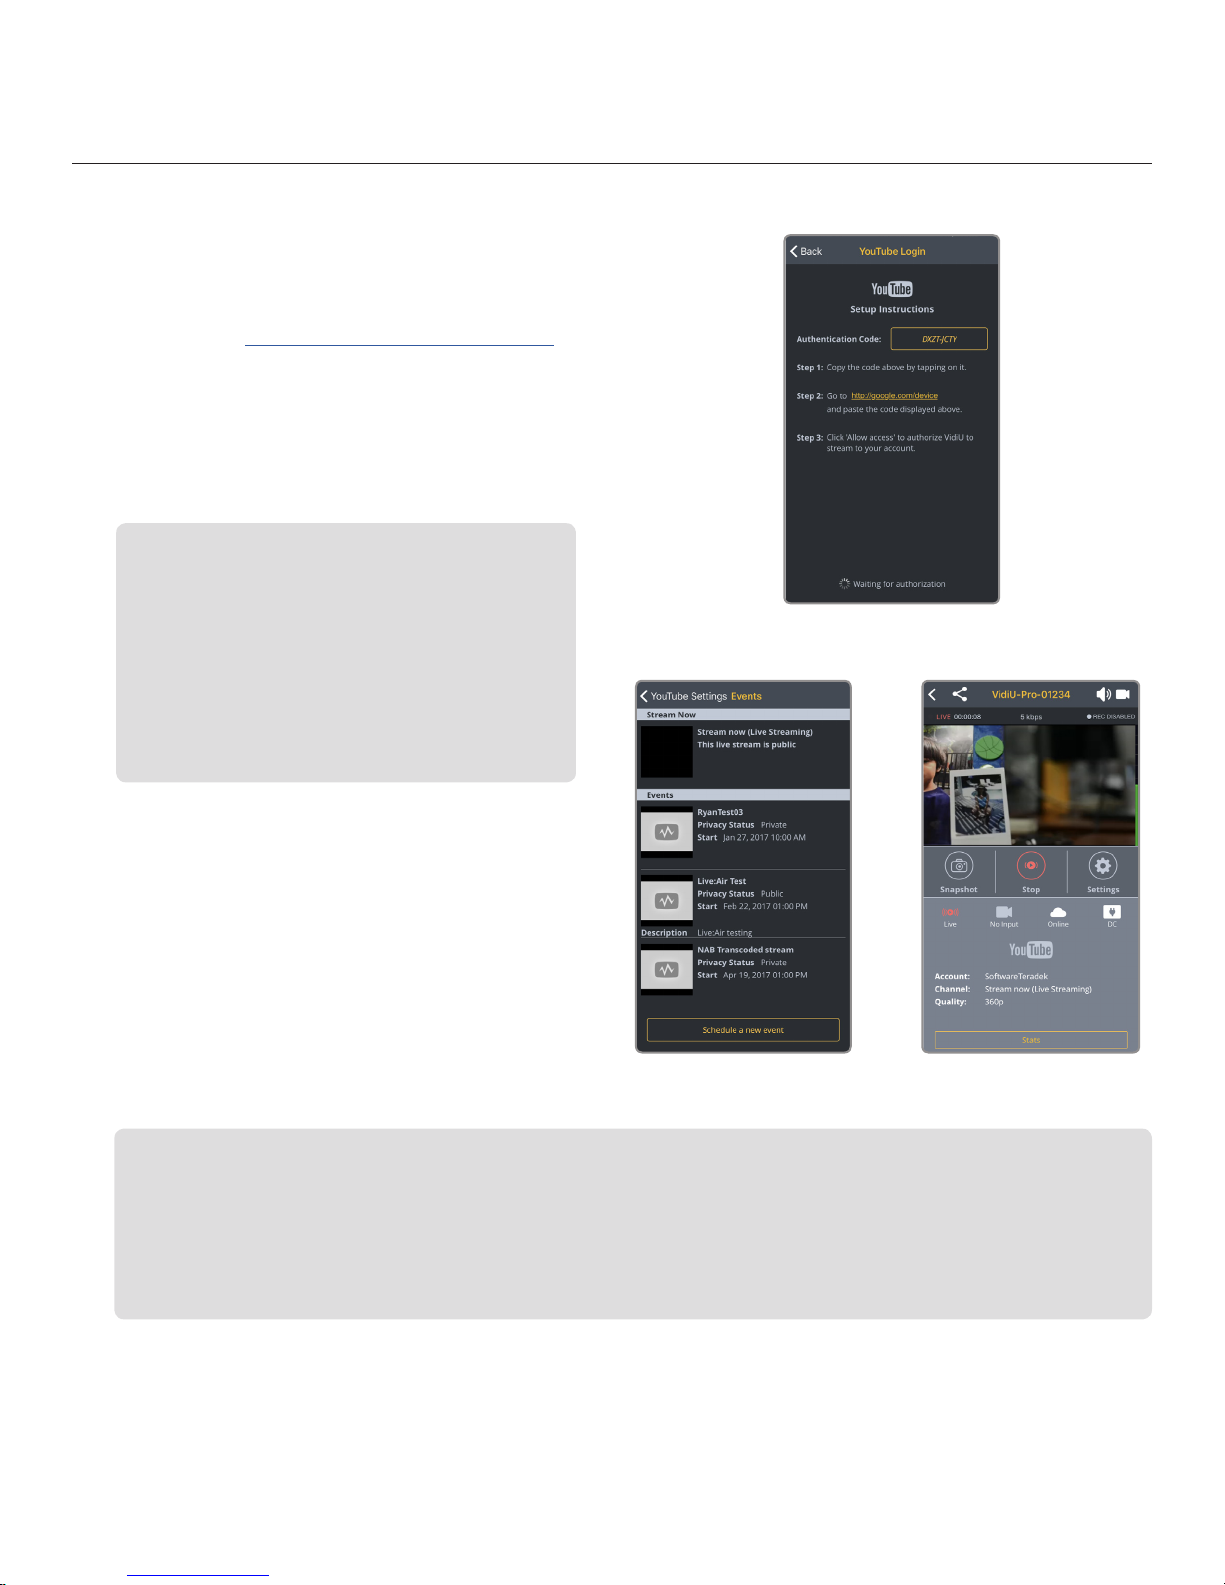
YouTube Live:
1. Select YouTube Live.
2. Copy the authentication code generated for your
device, go to http://www.google.com/device, then
enter your credentials (Fig. 3-10). Enter the code,
then allow VidiU to access your account.
3. Select an event, create a new event, or select
‘Stream Now’ (Fig. 3-11).
Two types of Broadcast destinations
a. The ‘Stream Now’ destination is a continuously
accessible public channel with a permanent URL.
Streaming to the ‘Stream Now’ page is as simple as
start and stop.
b. Event destinations can be created, scheduled,
started, and stopped. Every event comes with its own
page URL, and once an event is finished it cannot be
started again. After finishing an event, it is saved on
its own page.
Fig. 3-10
4. After selecting an event, return to the
Home screen.
5. Tap the ‘Broadcast’ button (Fig. 3-12), then
select whether to Preview the broadcast or to
Go Live.
6. When ending the broadcast, choose either
Stop or Complete Event.
Four key stages in the life cycle of a broadcast
Once you start Broadcast:
Preview - Preview the video you intend to broadcast. Videos in preview state are visible on the event’s Live Control Room page.
Go Live - Makes your event visible on its own channel page. An event can not return to preview once it has gone live.
Once you stop Broadcast:
Stopped - Broadcasts can be stopped and restarted at any time while the event is in the preview or Live state.
Complete Event - You will no longer be able to broadcast to the event, but it will be saved on the event page for viewing.
Fig. 3-11 Fig. 3-12
Page 18
Page 19
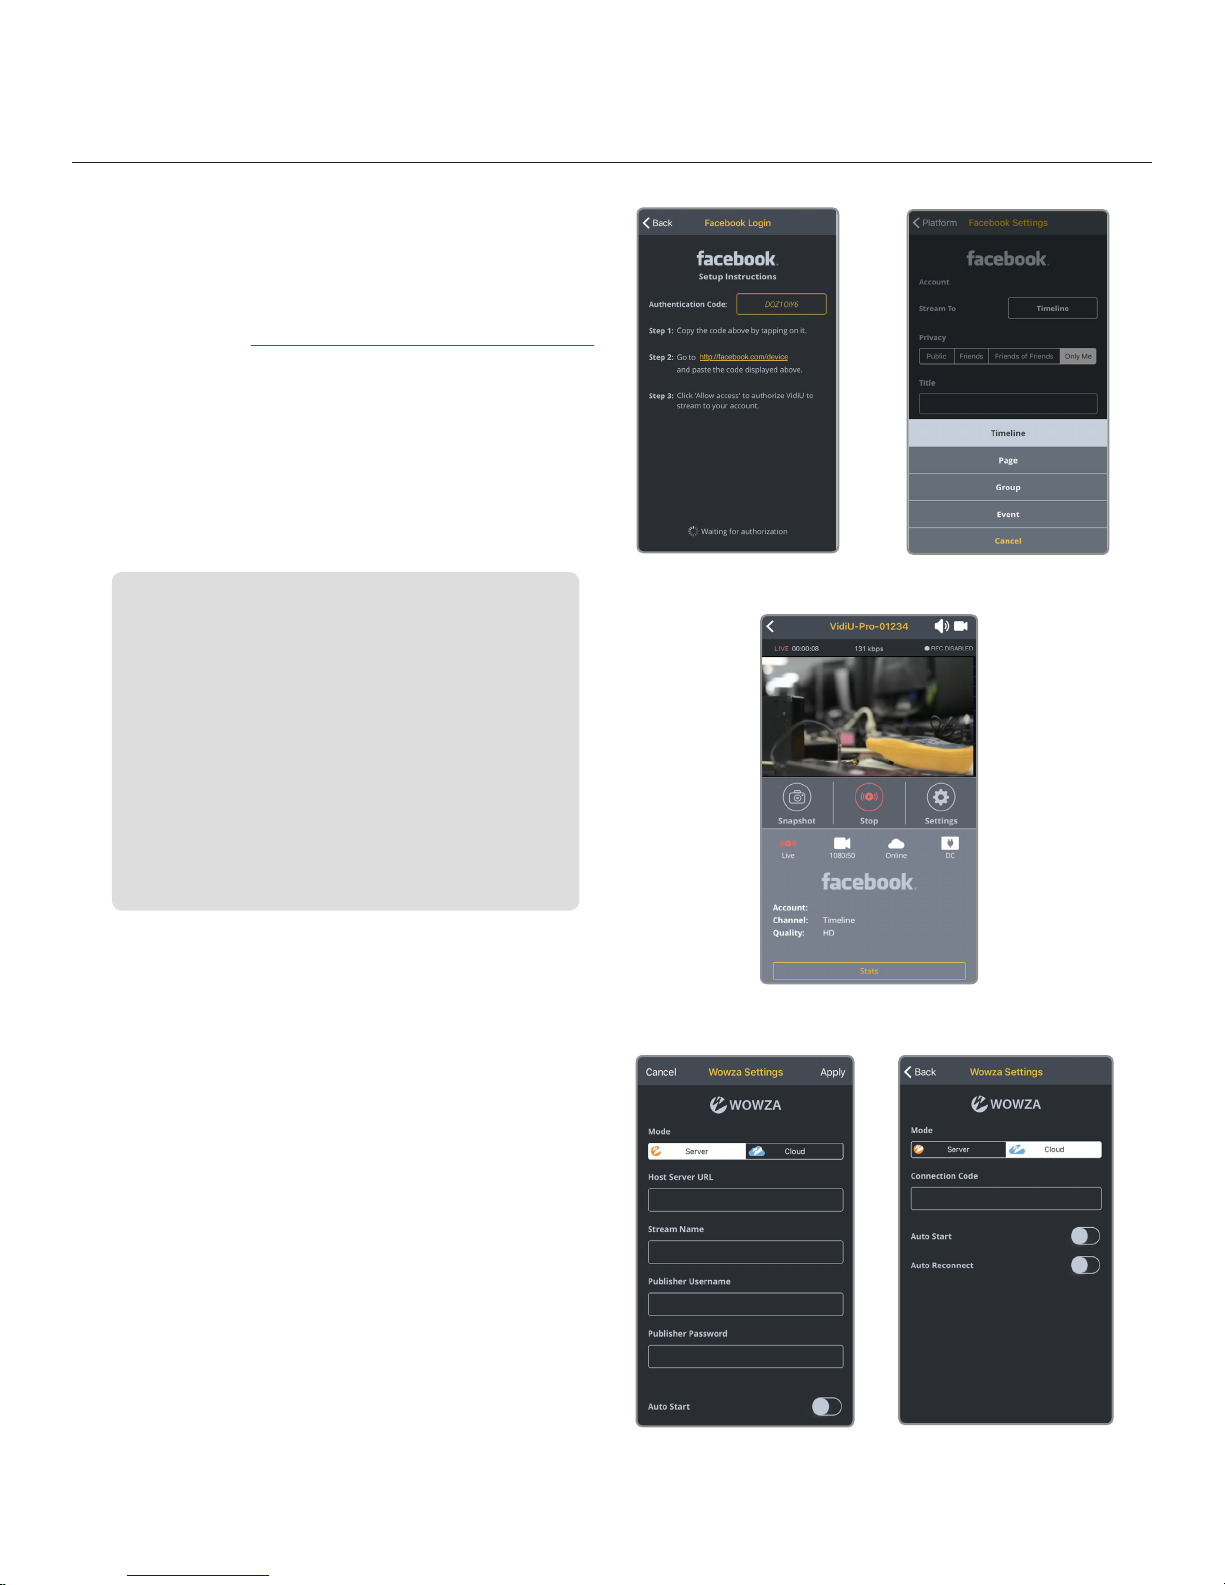
Facebook:
1. Select Facebook.
2. Copy the authentication code generated for your
device, go to https://www.facebook.com/device,
then enter your credentials (Fig. 3-13). Enter the
code, then allow VidiU to access your account.
3. Choose whether to stream to your timeline
or to a specific page (Fig. 3-14), then return to
the Home screen. You can also create a page to
stream to from your Facebook account.
Streaming Destinations
Timeline - Broadcast the video to your personal
timeline or “wall.”
Page - Broadcast the video to a page you manage.
Group - Broadcast the video to a group you manage.
Event - Broadcast the video to an event you created.
Privacy Settings
● Your Timeline privacy setting will be used if a less
restrictive privacy option is chosen. (e.g. your timeline
is set to Friends, but you set VidiU to ‘All.’ The post will
be visible to friends).
● Posts to Facebook pages are always public.
Fig. 3-13
Fig. 3-14
4. Tap the ‘Broadcast’ button to go live (Fig. 3-15).
Wowza:
1. Select Wowza.
Server Mode (Fig. 3-16):
a. Enter the host server URL and stream
name provided by the streaming service.
b. Enter your credentials, select Apply, then
return to the Home screen.
Cloud Mode (Fig. 3-17):
a. Enter the connection code
b. Enter your credentials, select Apply, then
return to the Home screen.
2. Tap the ‘Broadcast’ button to go live.
Fig. 3-15
Fig. 3-16 Fig. 3-17
Page 19© Teradek, LLC 2017. All rights reserved.
Page 20
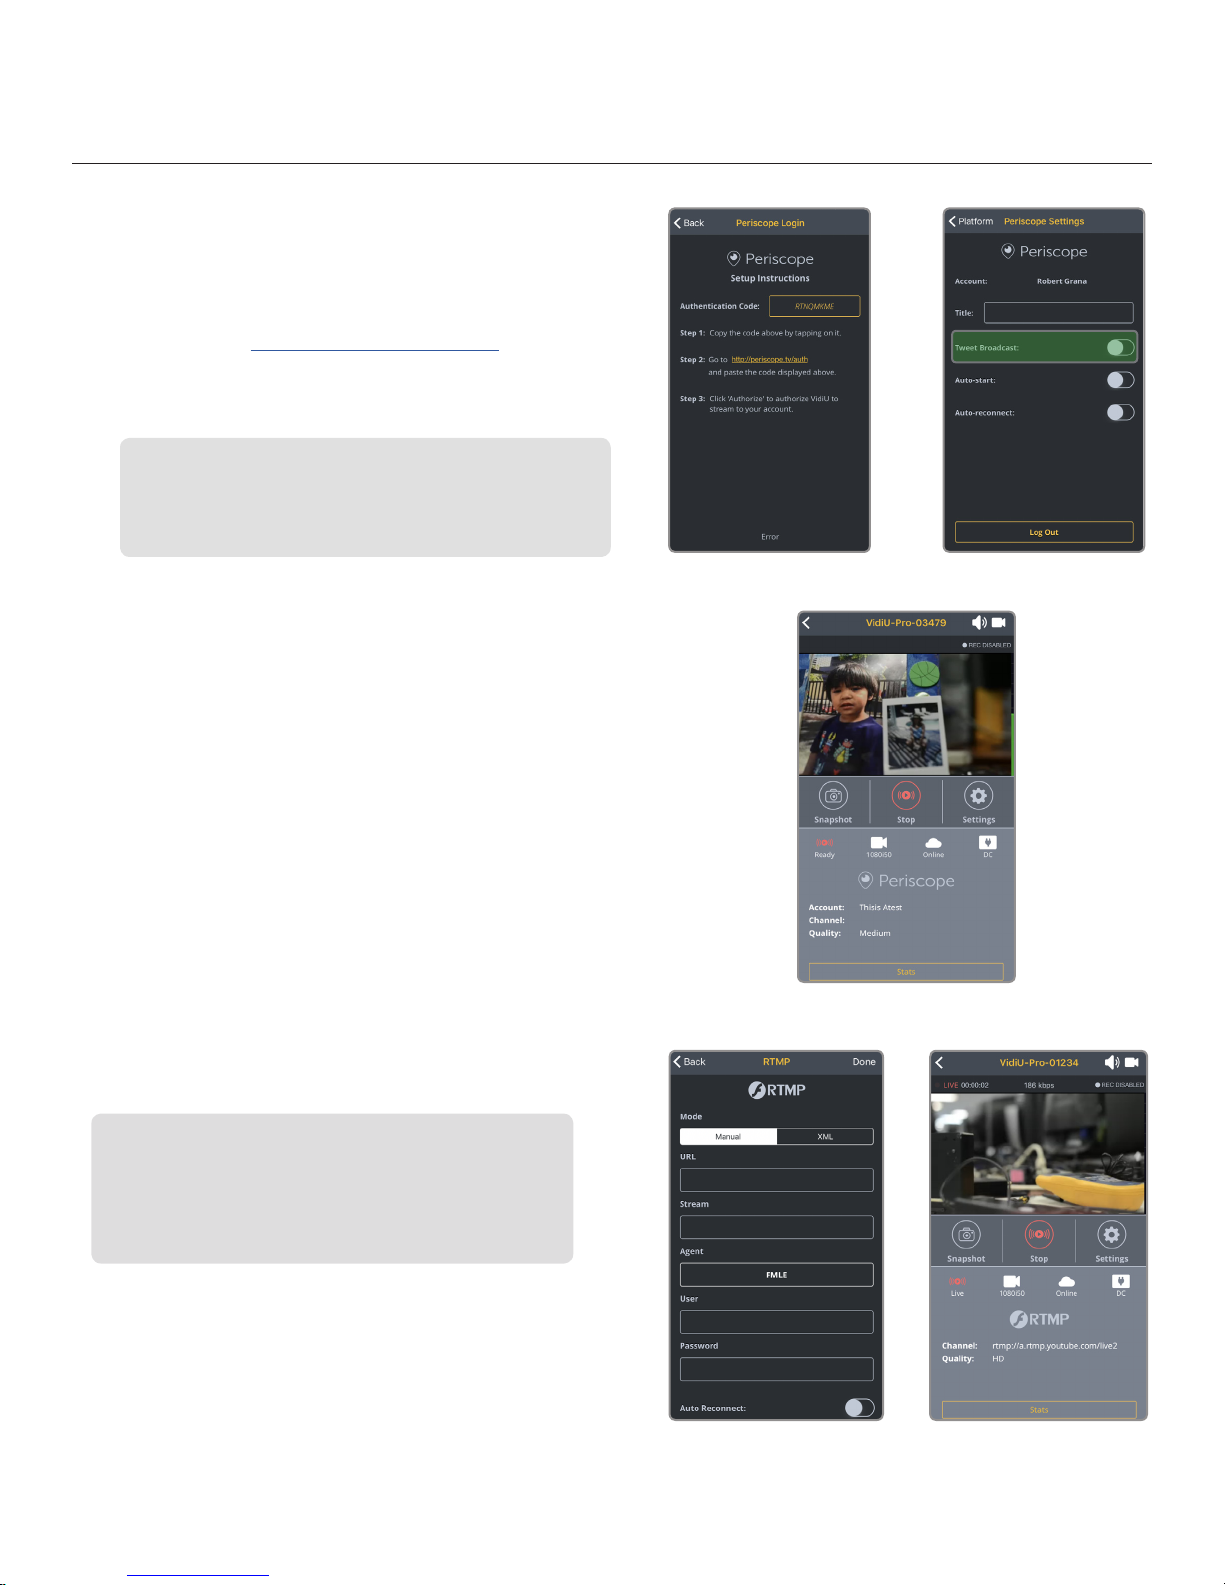
Persicope:
1. Select Periscope.
2. Copy the authentication code generated for your
device, go to https://periscope.tv/auth, then enter
your credentials (Fig. 3-18). Enter the code, then
allow VidiU to access your account.
Persicope and Twitter
Periscope works in conjunction with Twitter. In order to use
Persicope, you must ceate an account with your Twitter
credentials, or by using your mobile phone number.
3. To post a link to your live stream on Twitter,
enable the Tweet Broadcast feature (3-19).
4. Tap the Broadcast button to begin streaming
(Fig. 3-20).
Fig. 3-18
Fig. 3-19
RTMP (Manual):
VidiU can stream to other video platforms, CDNs, and
streaming servers using RTMP mode. RTMP is supported
by most video streaming platforms.
1. Select RTMP (Manual if using the Web UI).
2. Enter the URL and stream key/name (Fig. 3-21)
information provided by the streaming service.
URL and Stream Name/Key
In order to stream to a broadcast platform other than a
platform already integrated into VidiU, you must obtain a
URL and stream key/name. Log into your account’s settings
and retrieve the URL and stream key/name.
3. Enter your credentials (if applicable).
4. Select Apply, then return to the Home screen.
Fig. 3-20
5. Tap the ‘Broadcast’ button to go live (Fig. 3-22).
Page 20
Fig. 3-21 Fig. 3-22
Page 21
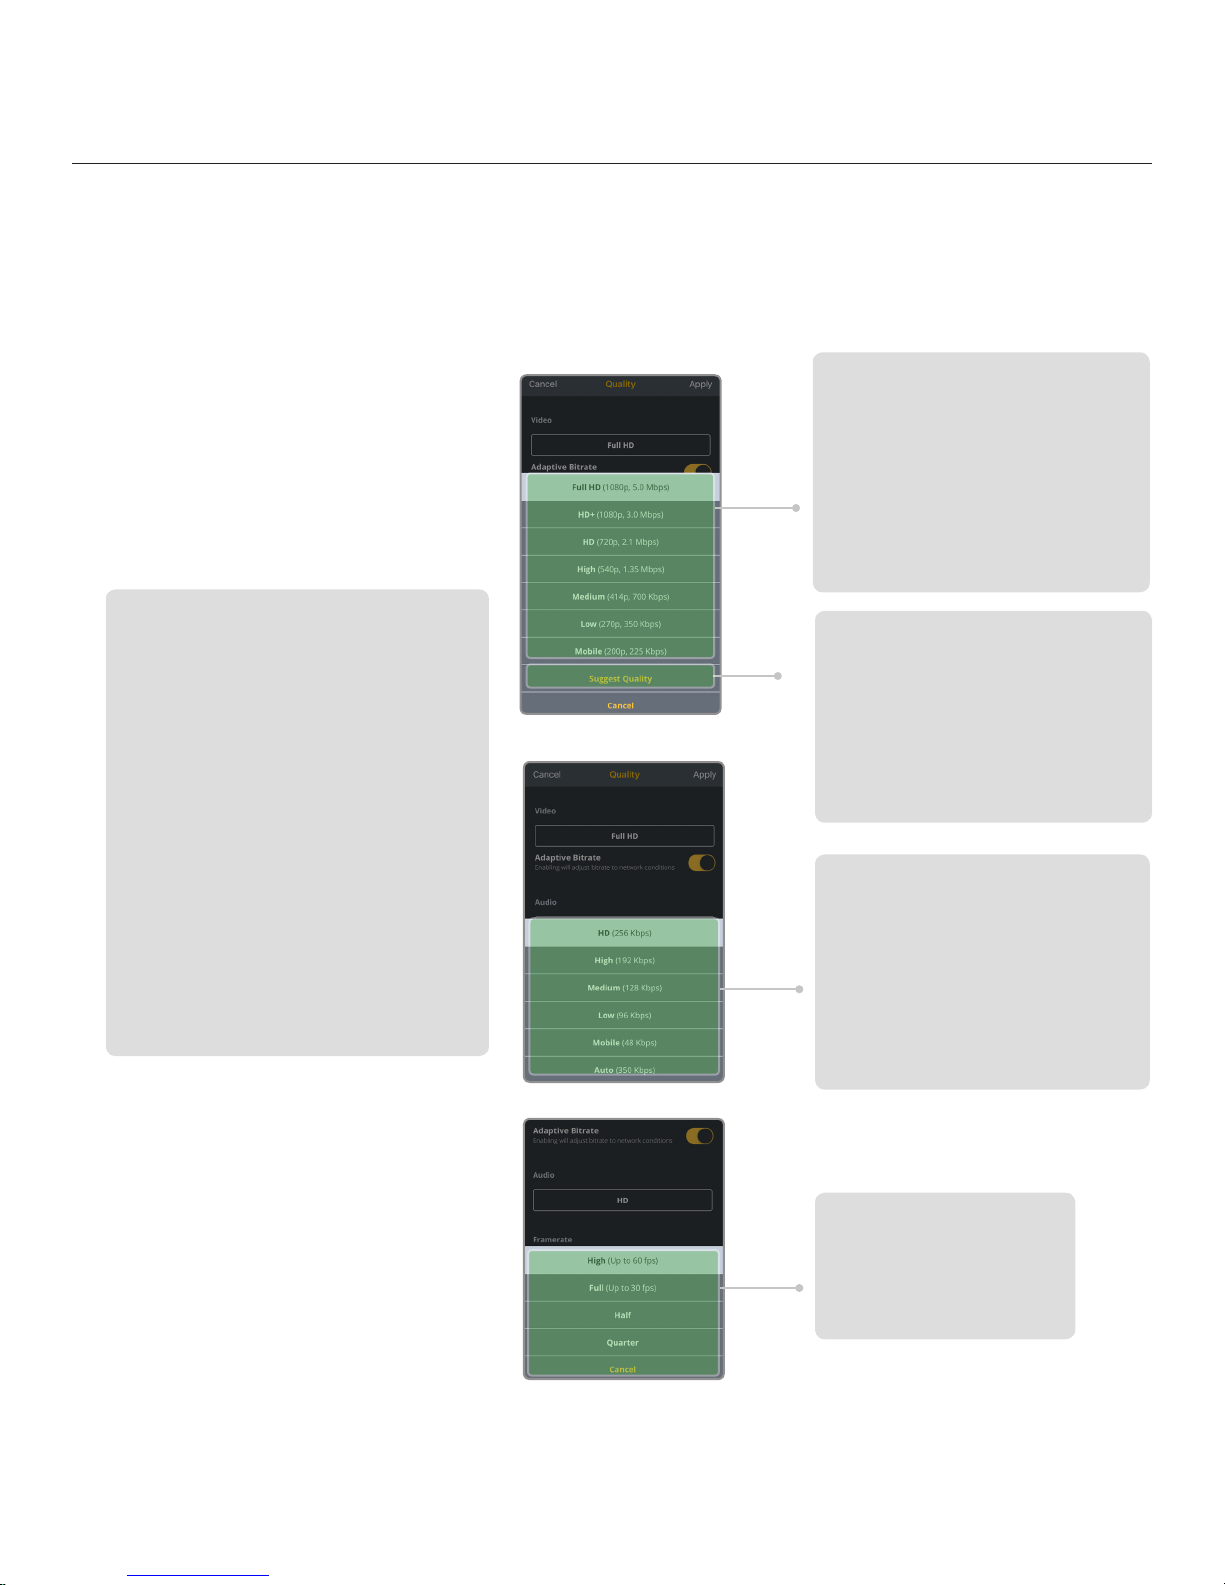
Broadcast: Quality Settings
The Broadcast Quality menu allows you to configure the video resolution, bitrate, frame rate, and the
audio bitrate. Navigate to Settings>Broadcast>Quality (Broadcast Settings>Quality from the front
panel), select Quality, then make a selection.
Adjusting Quality Settings:*
1. Select Video, Audio, or Frame Rate.
2. Select a Quality setting.
3. Select Apply, then return to the
Home screen.
Video Quality Considerations
● The Video Quality settings combine video
bitrate and resolution and will vary based
on the bandwidth available and the
platform used.
● Always select a video bitrate that is less
than 70% of the total upload bandwidth
available on the Internet connection. (i.e.
if 5 Mbps is available, set the video to 3.5
Mbps or lower).
● Some platforms (i.e. YouTube) will
automatically generate lower quality
streams from a high quality input
(transcoding), so the highest possible
quality can be used. If the streaming
platform does not transcode the video,
consider that your viewers must have
the available download bandwidth to view
the stream.
Video Quality settings correspond to
the following bitrates and resolutions:
Full HD - 5.0 Mbps 1920x1080
HD+ - 4.0 Mbps 1280x720
HD - 2.0 Mbps 1280x720
High - 1.25 Mbps 960x540
Medium - 700 Kbps 736x414
Low - 350 Kbps 480x270
Mobile - 225 Kbps 360x200
Suggest Quality measures the current
available bandwidth and recommends
a quality setting based on the result.
Adaptive Bitrate (previous screen)
measures the current available
bandwidth and recommends a quality
setting based on the result.
Audio Quality settings correspond to
the following bitrates:
HD - 256 Kbps
High - 192 Kbps
Medium - 128 Kbps
Low - 96 Kbps
Mobile - 48 Kbps
Auto - Audio quality is set
based on video quality
* Steps apply to all Quality Settings.
** Some platforms do not support frame rates higher than 30fps
Frame Rates:
High - Up to 50/60fps**
Full - 24/30fps
Half - 12.5/15 fps
Quarter - 6/7.5 fps
Page 21© Teradek, LLC 2017. All rights reserved.
Page 22
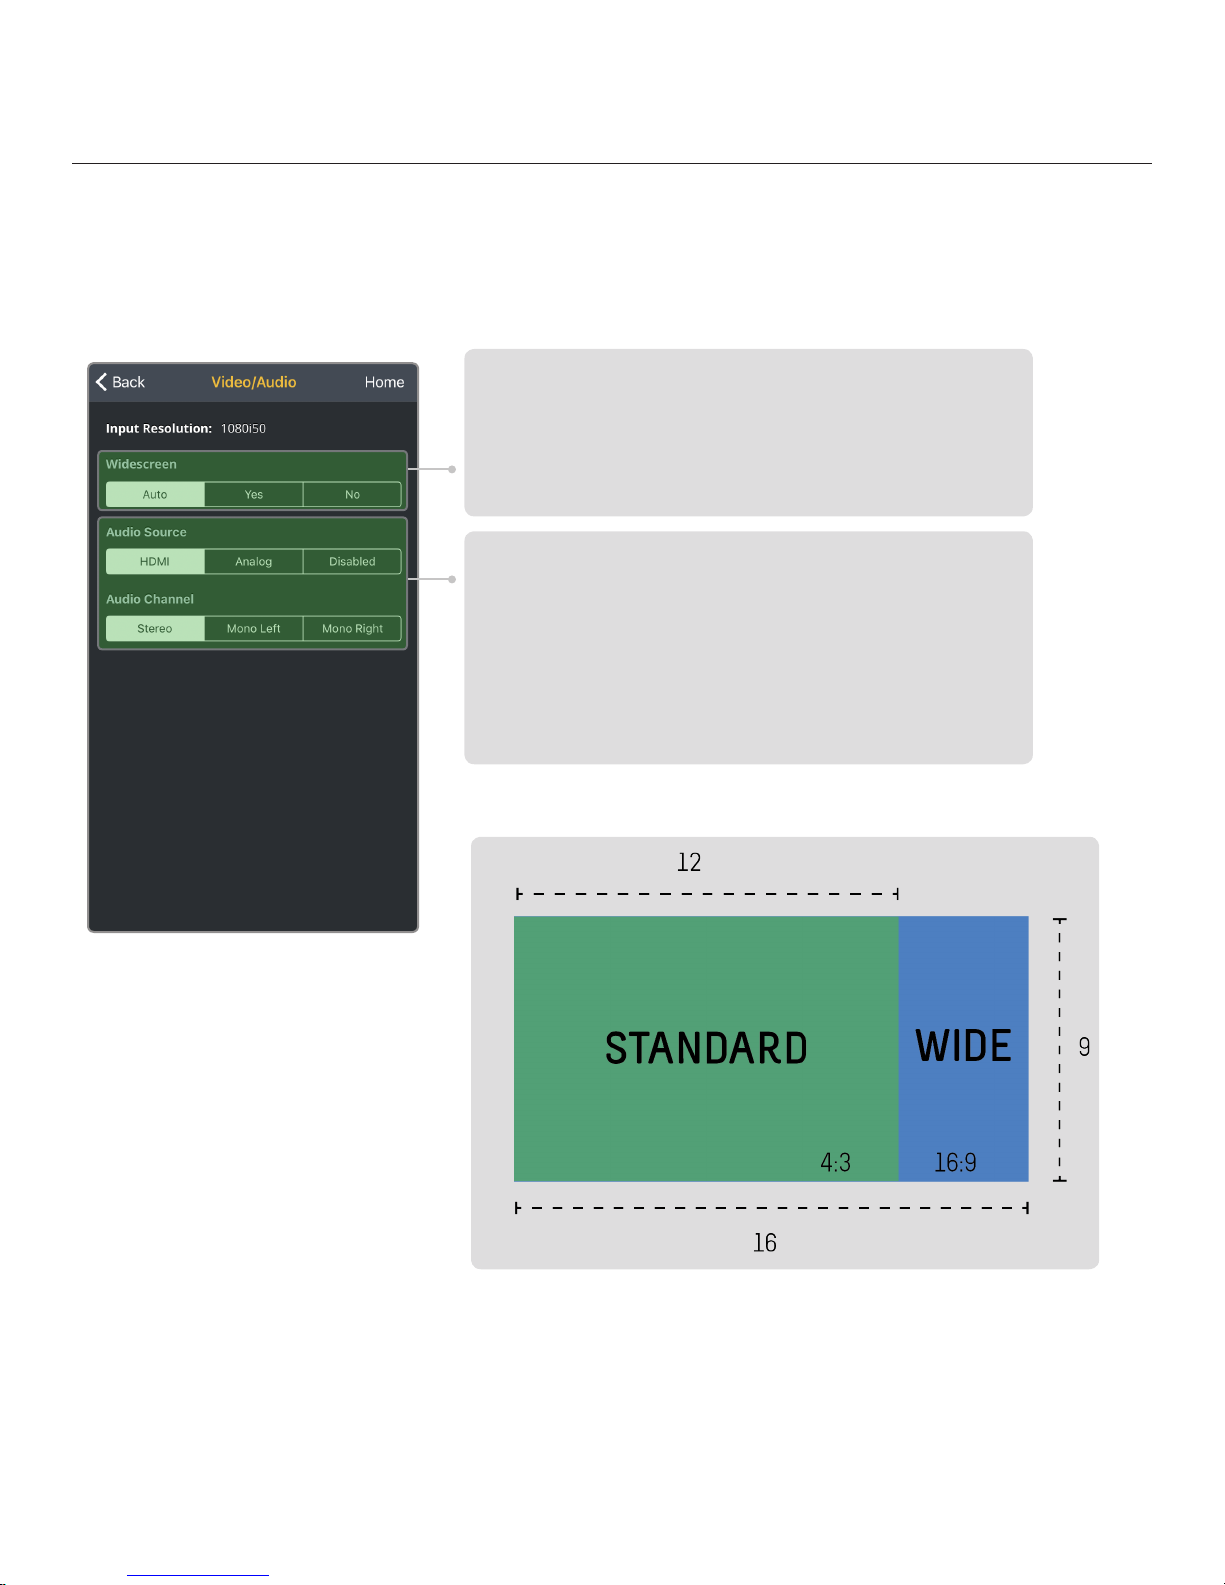
Video/Audio
The Video/Audio menu contains input source configuration and video overlay options. Navigate to
Settings>Video/Audio (Video Settings or Audio Settings from the front panel), then tap the
Video/Audio button.
Widescreen settings:
Auto - HD (1080i, 720p) streamed video will have a 16:9 aspect ratio,
and standard definition streamed video will have a 4:3 aspect ratio.
Yes - Streamed video will only have a 16:9 aspect ratio
No - Streamed video will only have a 4:3 aspect ratio.
(for aspect ratio comparison, refer to Fig. 3-23)
Audio Source
The audio source setting allows you to choose the source used for the
audio stream. Select embedded HDMI, Analog audio,* or Disable
audio for a silent stream.
Audio Channel
Select either Stereo, Mono Left, or Mono Right.
Overlay Settings (previous screen)
VidiU allows you to add a timer or scoreboard to your broadcast.
Configure these options using the Overlay Settings menu.
* Audio level and volume are adjustable when Analog input is selected.
Page 22
Fig 3-23: Aspect Ratio Comparison
Page 23
System
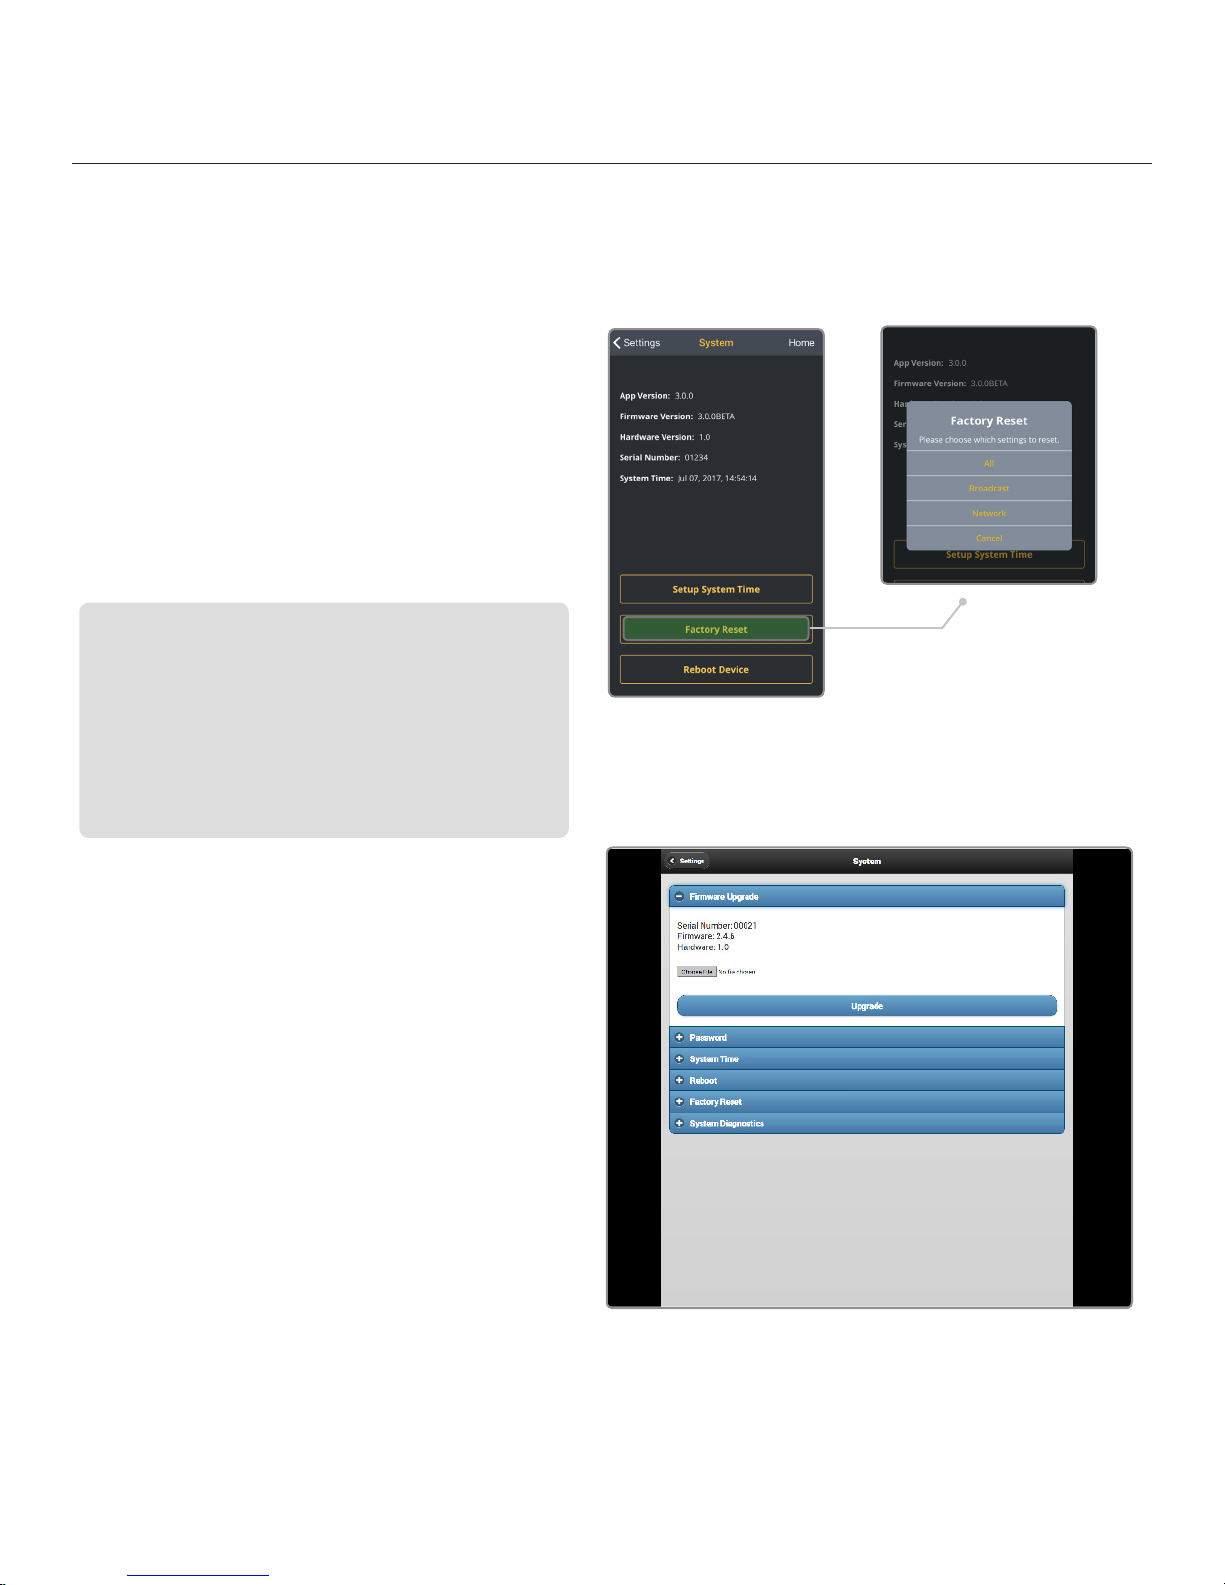
Essential system functions, including factory reset and firmware upgrade, can be performed from the
System menu. Navigate to Settings>System(System Settings from the front panel), then make a selection.
Factory Reset
Restore VidiU to its original settings by selecting
an option (All, Broadcast, or Network) to reset.
Access the System menu and select Factory Reset
(Fig. 3-24).
Firmware Upgrade
Upgrade VidiU’s firmware to the lastest version.
Perform a Firmware Upgrade from front panel or VidiU app
When you turn on VidiU, the device will automatically check
for new firmware. If an update is available, follow the
prompts to complete the update.
Perform a Firmware Upgrade from Web UI (Fig. 3-25)
a. Download the latest firmware version from
teradek.com.
b. Select Firmware Upgrade.
c. Upload the file from your computer and select Upgrade.
Fig. 3-24
Password*
Add, change, or delete the password.
Setup System Time
Select Manual mode to manually input the
time and date, or select NTP to automatically
synchronize the time and date.
Reboot Device
Restart your VidiU device by selecting Reboot
Device.
System Diagnostics*
Generate a diagnostic report specific to
your device. Diagnostic reports can be used
by Teradek’s support team to assist during
troubleshooting.
* Options available only while using the Web UI.
Fig 3-25: Web User Interface
Page 23© Teradek, LLC 2017. All rights reserved.
Page 24
Network
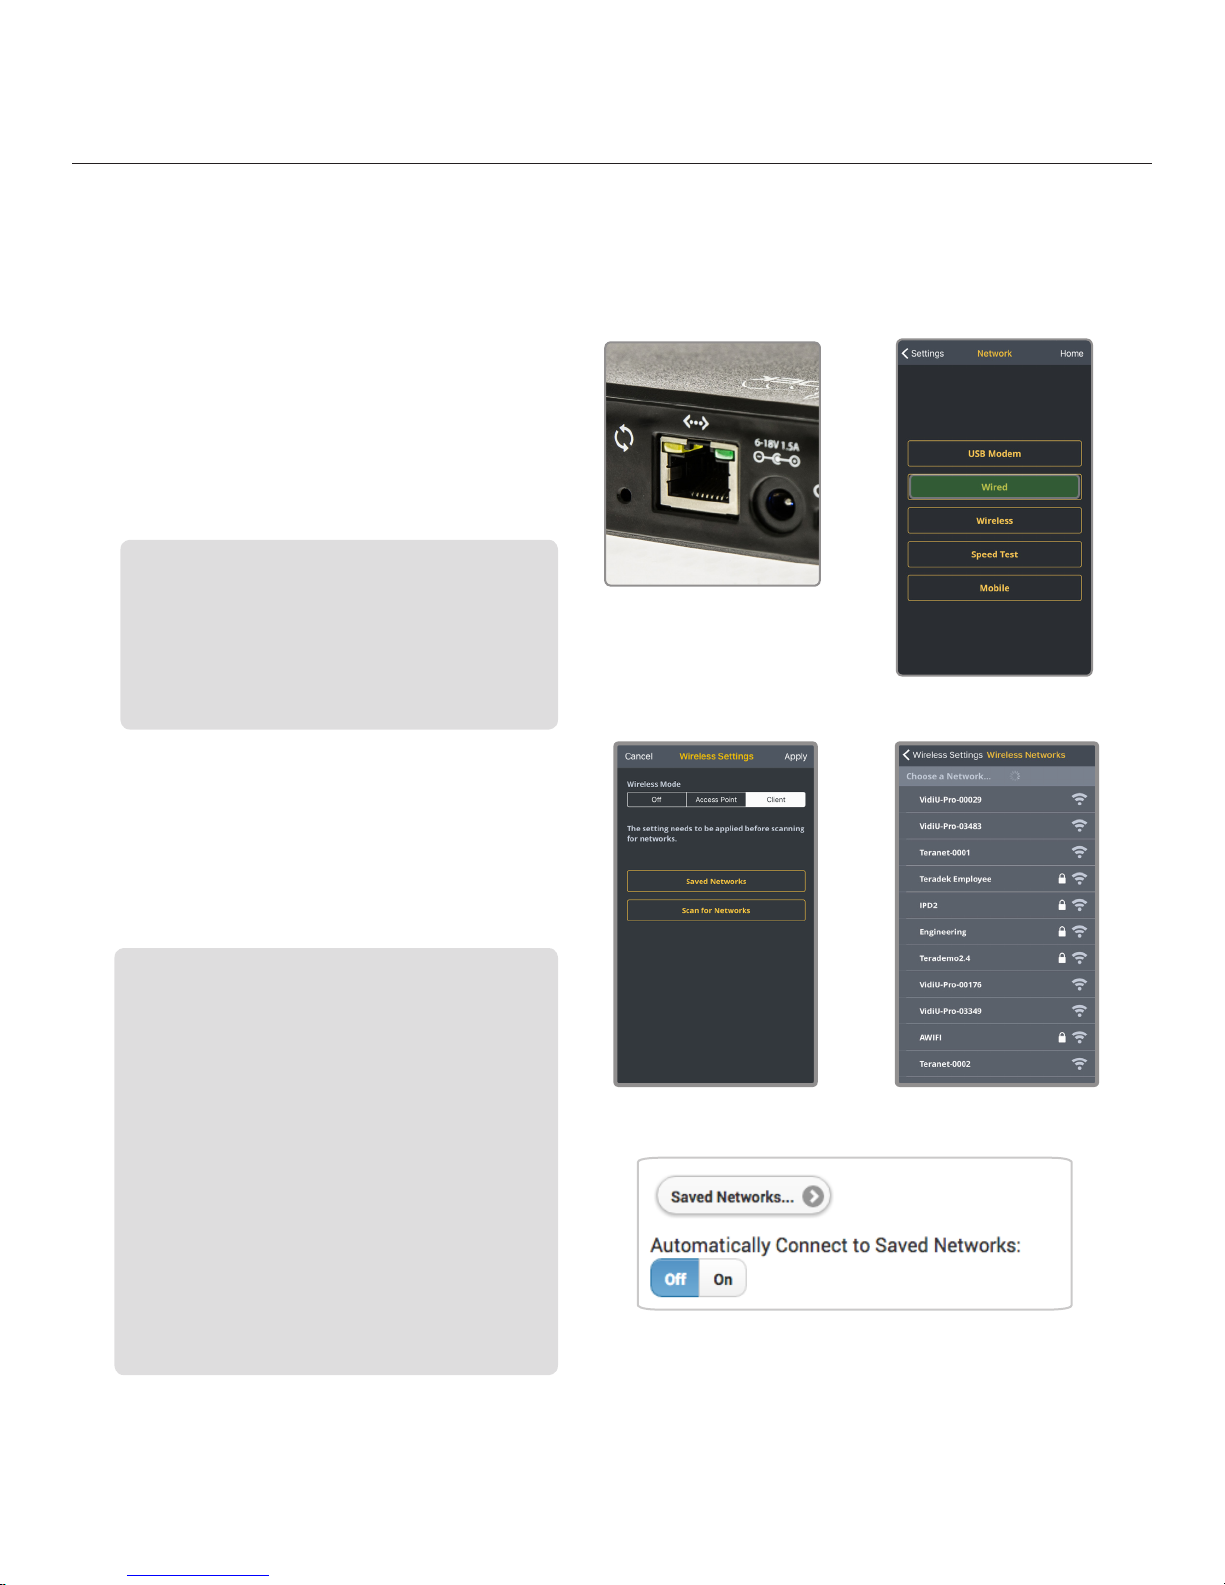
VidiU allows you to connect and stream to the Internet by utilizing one of several network interfaces.
Navigate to Settings>Network (Network Settings from the front panel), then make a selection.
Wired
A wired Ethernet connection is typically the most
reliable means for connecting to a network, as
you don’t have to deal with the instability of a
Wi-Fi or cellular connection. Connect an Ethernet
cable to VidiU (Fig. 3-26*), select Wired, (Fig.
3-27) then choose a configuration mode.
IP Address Modes
Dynamic (DHCP): The connected router generates
an IP address, allowing the Vidiu to be automatically
configured.
Static: Manually configure the IP address settings
if a DHCP server is not available, or if applications
require a fixed address.
Wireless (Wi-Fi)
Although an Ethernet connection is the most
reliable method of connecting to a network, a
Wi-Fi connection may be more convenient,
especially if an Ethernet connection is unavailable.
There are two Wi-Fi modes available:
Fig 3-26*
Fig 3-27
Wi-Fi Modes (Fig. 3-28)
Access Point (AP) Mode: VidiU acts as its own dual
band access point, allowing you to connect your device
directly to VidiU’s AP network.
Client Mode: VidiU and your mobile device connect
to the same local wireless network. Access Client
Mode, scan for available networks (Fig. 3-29) or
connect to a previously saved network, then enter
your credentials. Additionally, you can enable VidiU
to Automatically Connect to Saved Networks** by
accessing the Wi-Fi dropdown menu from the Web
UI, then toggling the corresponding switch to On
(Fig. 3-30).
On - VidiU will connect to any saved network as
soon as it becomes available.
Off - VidiU will only connect to the most recently
saved network
* Right LED (green) is a combined link/activity indicator.
Left LED (yellow) does not illuminate.
** Feature available only while using the Web UI.
Page 24
Fig 3-28 Fig 3-29
Fig 3-30
Page 25
Network (cont.)
USB Modem
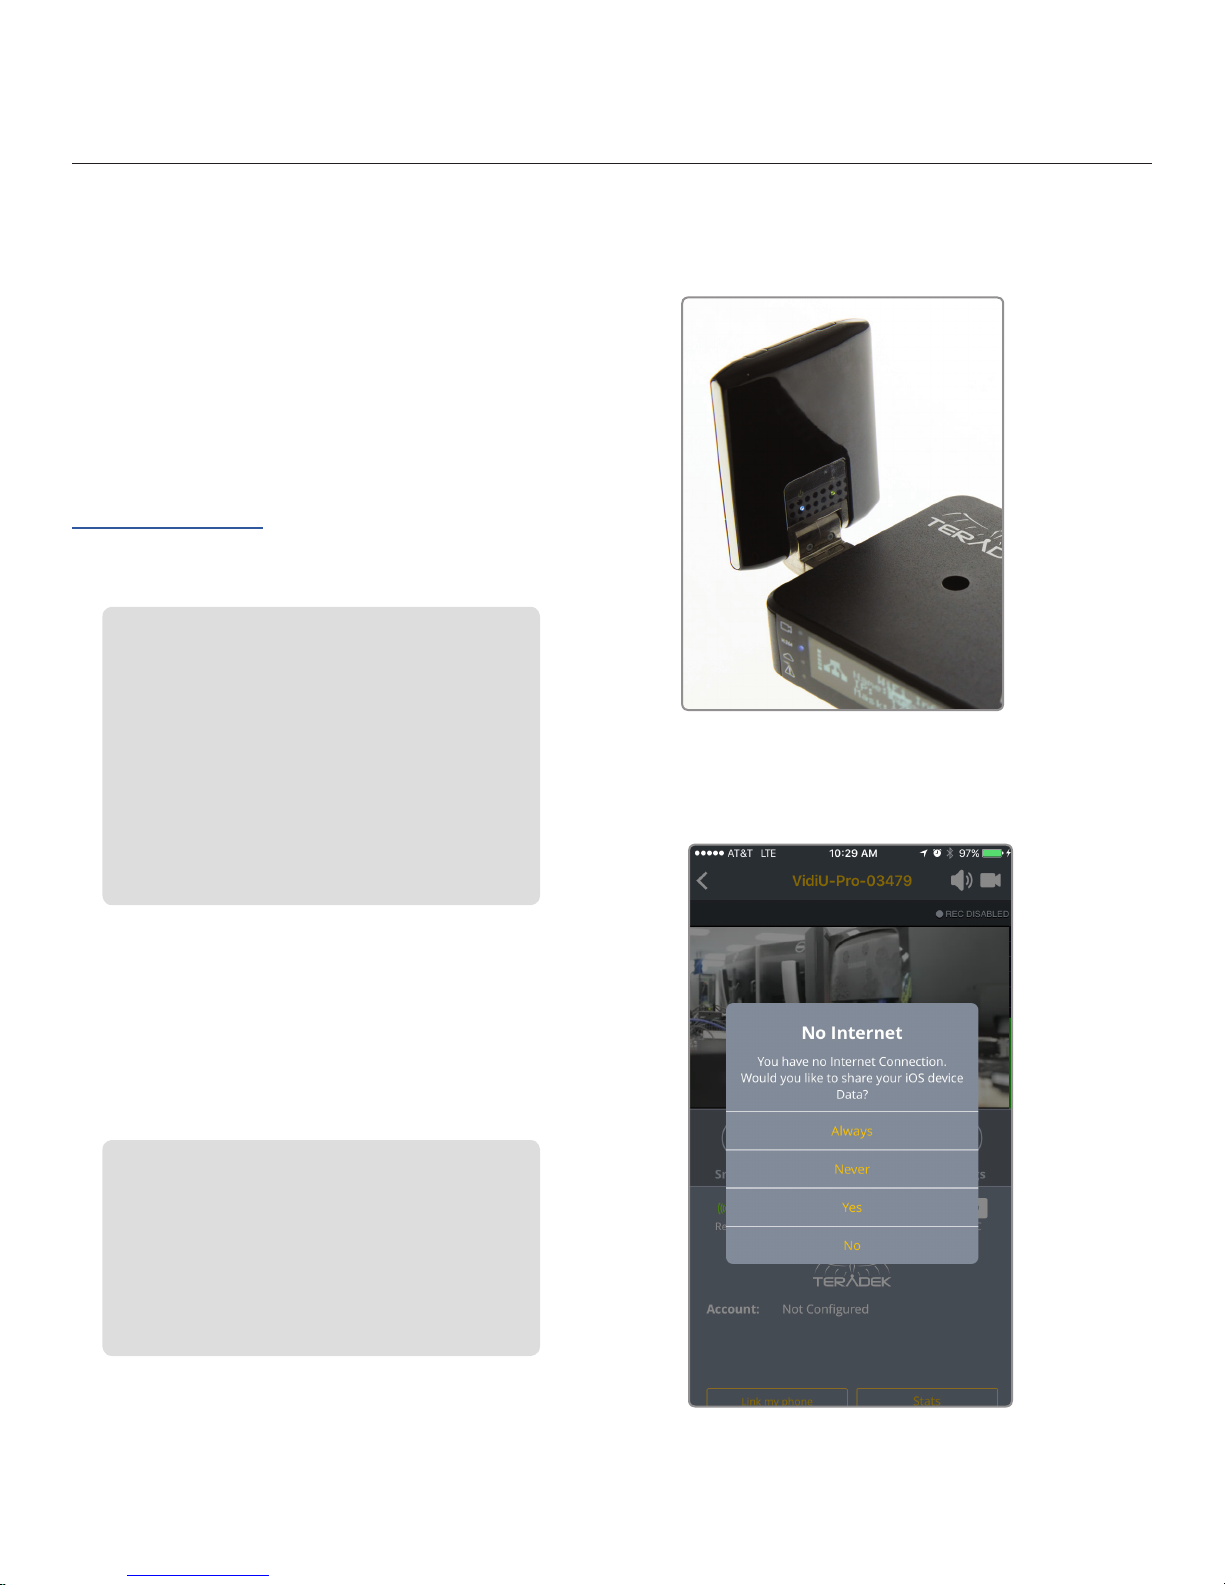
A USB modem allows you to broadcast wherever a cell
connection is available. To configure VidiU while using
a modem, connect to VidiU using AP mode (Page 24).
Insert a compatible USB Modem to VidiU (Fig.3-31)
and wait for the cellular reception icon (4 bars) to
appear.
VidiU supports many modems worldwide using the ‘Auto’ setting. Visit
http://support.teradek.com for more information about specic modem
models.
Configuration Modes
Auto (default): The modem is automatically detected
and configured.
Preset: Contains configurations for modems that
are supported but cannot be auto detected. User
credentials are required if the modem account is
password protected.
Custom: Allows you to manually configure a
modem if it’s not automatically detected. Available
configuration modes are GSM, CDMA, Composite,
and Ethernet. Modes will vary based on the modem
model and mobile network provider.
Fig 3-31
Mobile (only from the VidiU app)
When used with an iOS device, VidiU can utilize
the device’s data plan for Internet access.
Connect your iOS device to VidiU’s access point
(AP) network, open the VidiU app, then select a
mobile connection setting (Fig.3-32):
Mobile Connection settings*
Always - If no other Internet connection is detected,
VidiU will always utilize your mobile device’s data
connection
Never - The VidiU app will not prompt you to share
your phone’s Internet connection
Ask (Yes/No)- You will be asked whether or not to
use your phone’s data connection
* You can manage your Mobile Connection prompts from the
Mobile Settings menu.
Fig 3-32
Page 25© Teradek, LLC 2017. All rights reserved.
Page 26
Recording (VidiU Pro only)
With VidiU Pro, you can record your broadcasts directly to an SD card or USB drive. Each recording is saved
with the same resolution and bit rate set on the device. From the front panel interface, Web UI, or the VidiU
app, go to your Settings, then select Recording.
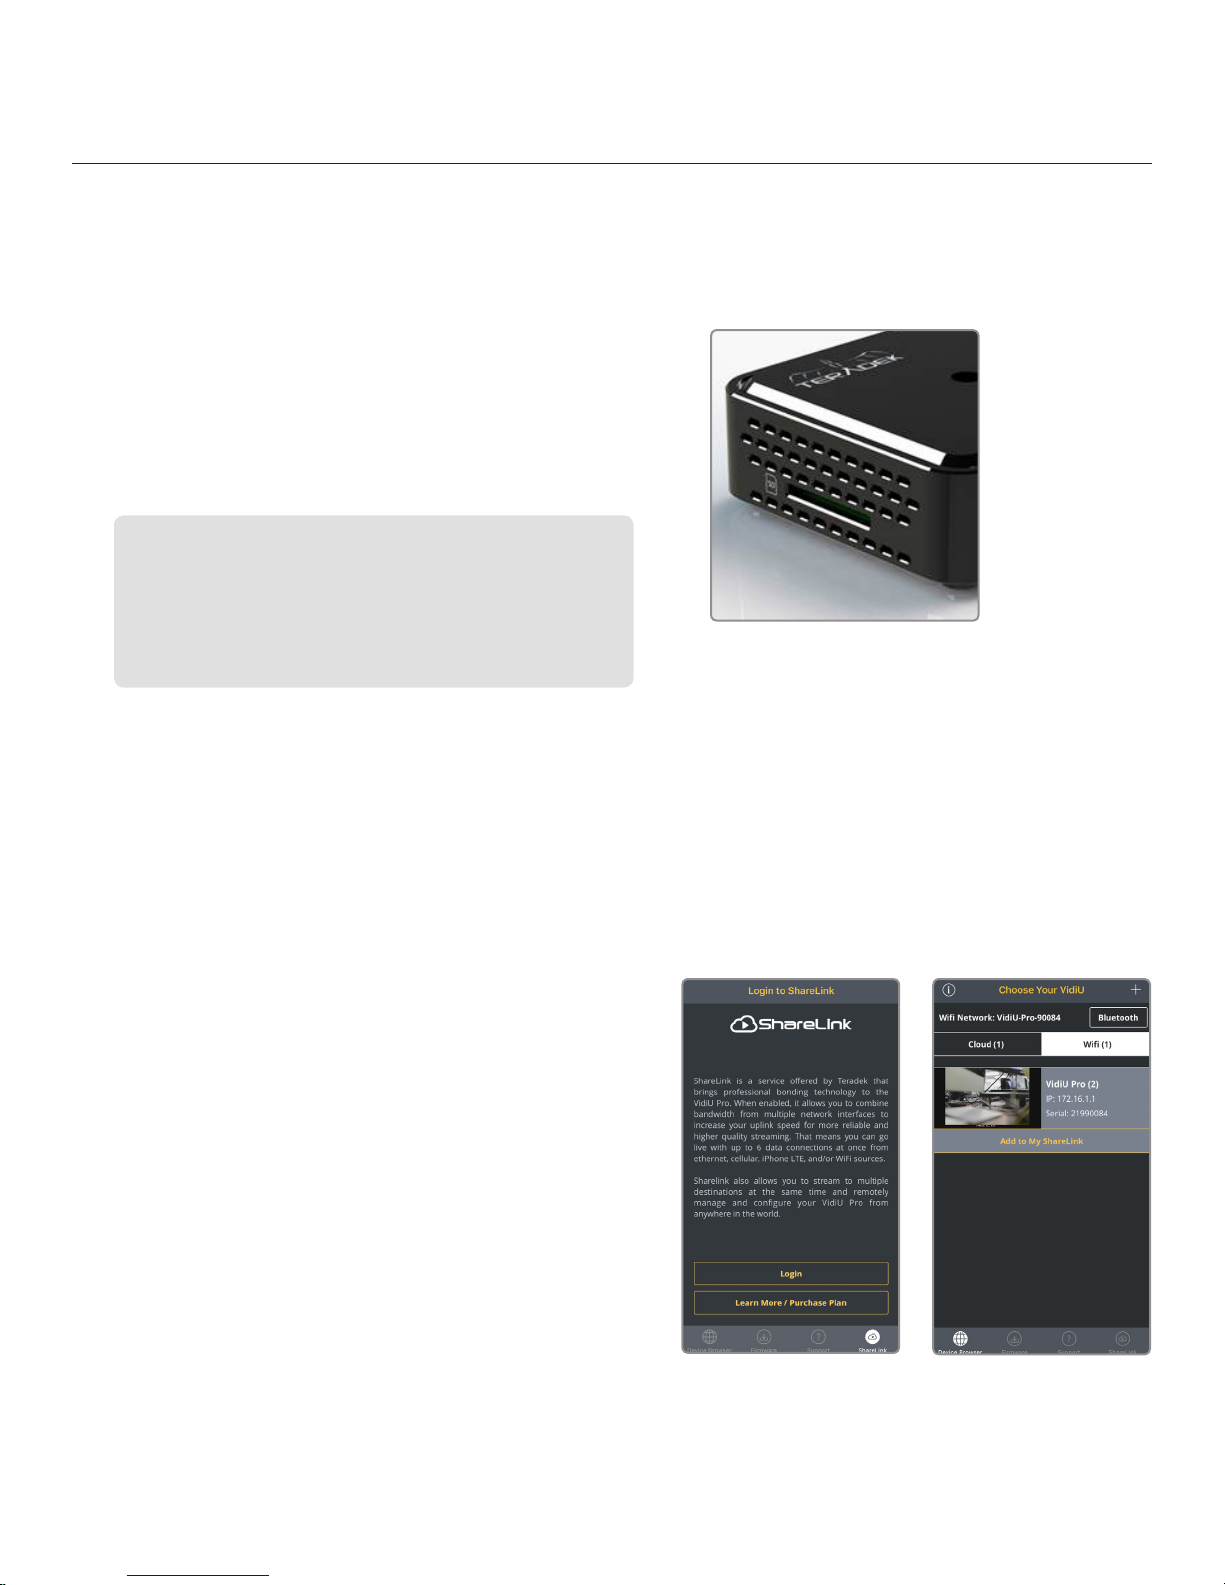
1. Insert an SD card (Fig.3-33) or USB drive into the
device.
2. Toggle the ‘Enable/Disable Recording’ switch
to Enable (from the front panel interface’s
Recording Settings menu, select ‘Enable’).
Recording Considerations
● For best results, use Class 6 or higher SD cards.
● Media should be formatted using FAT32.
● File size is limited to 4GB
● New recordings are automatically started after the file size
limit is reached
Fig 3-33
Sharelink (VidiU Pro only)
Sharelink allows you to stream to multiple destinations simultaneously and remotely manage your VidiU
Pro from anywhere in the world. Sharelink also increases your broadcast’s bandwidth and reliability by
bonding multiple Internet connections. To take advantage of these features, you’ll need to purchase a
Sharelink subscription, activate the Sharelink service, and authorize VidiU Pro.
Configure Sharelink using the VidiU app:
1. Select Sharelink from the bottom of the home screen.
Tap Learn More/Purchase Plan to sign up for
Sharelink, or tap Login if you already have an account
(Fig. 3-34).
2. Once logged in, select Device Browser from the
bottom of the screen, then tap the Add to My
Sharelink button to add VidiU Pro to your Sharelink
account (Fig. 3-35)
3. Select VidiU Pro, then tap Yes to link your iOS device’s
data when prompted.
Fig. 3-34
4. To select a different server region, navigate to
Settings>Sharelink, tap the Region button to display
the available regions, then make a selection.
Fig. 3-35
Page 26
Page 27
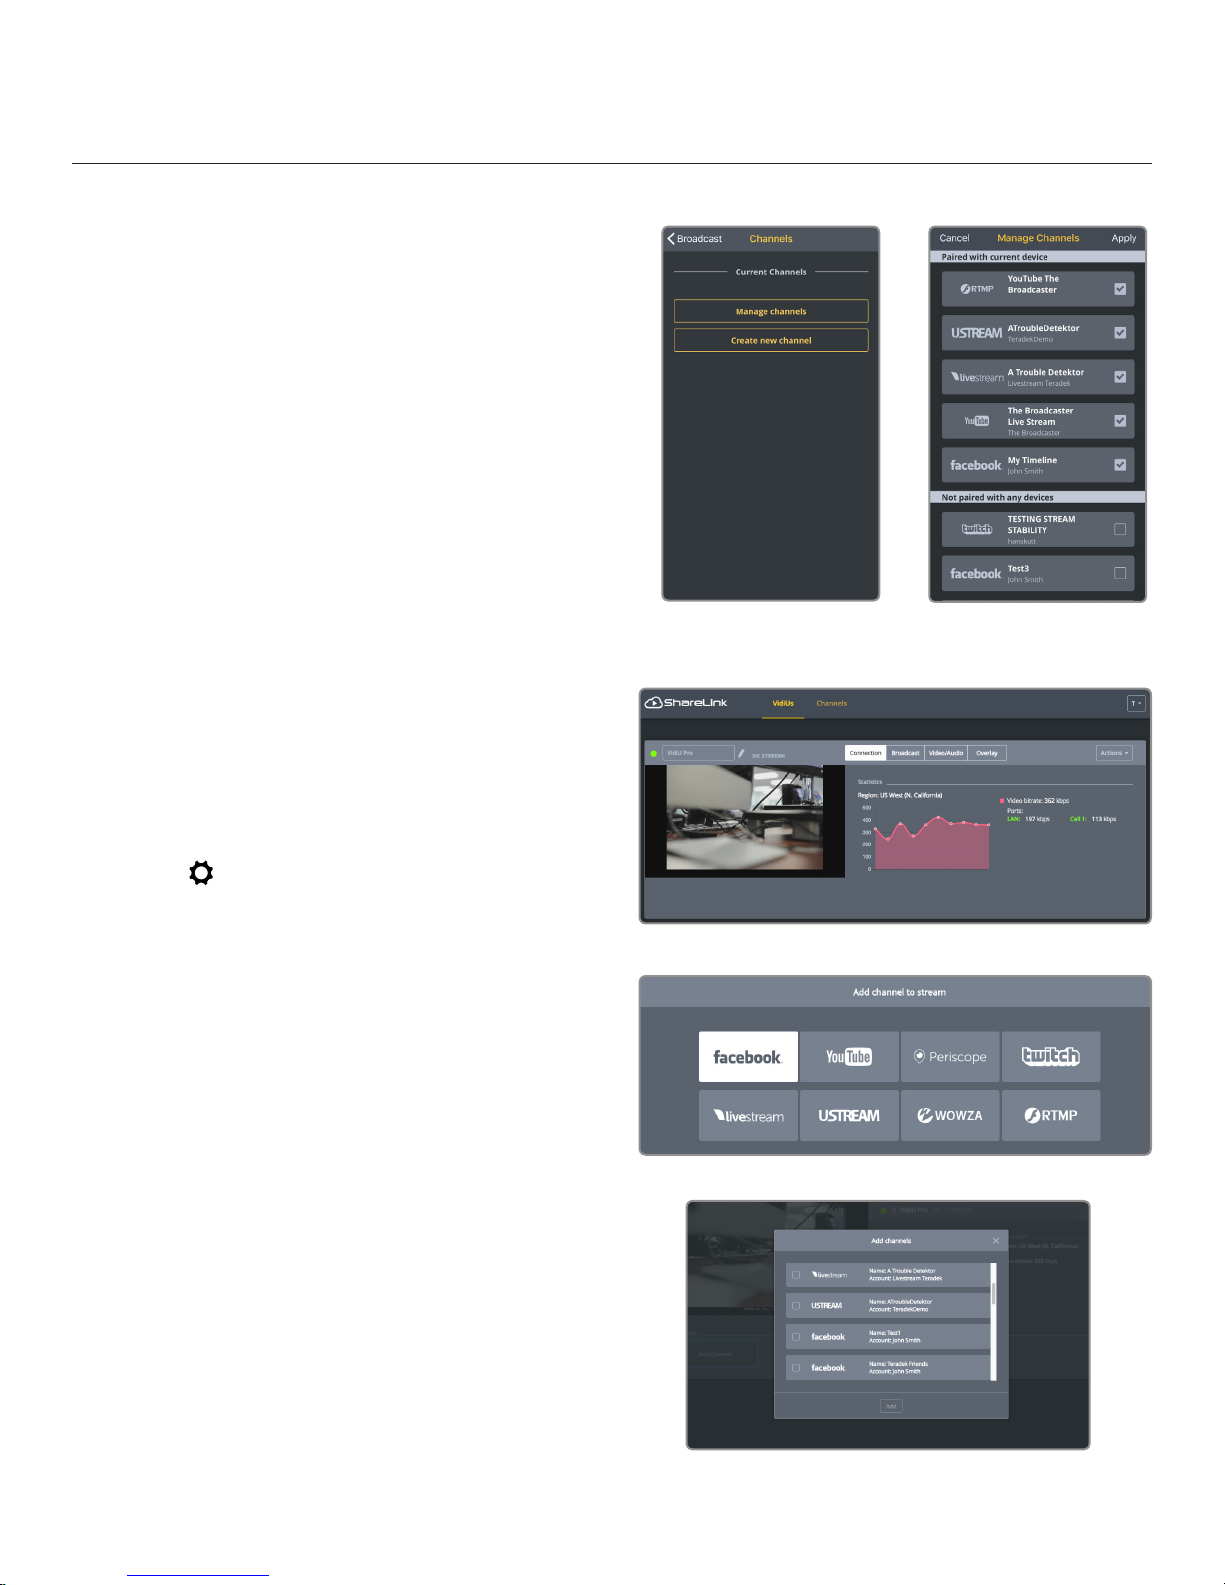
To configure broadcast channels:
1. Navigate to Settings>Broadcast, then select
Channels.
2. Tap Create new channel (Fig. 3-36) to select a
platform and enter your credentials. Repeat this
step to pair additional channels (up to five channels
at a time).
3. To pair channels that have already been configured,
tap Manage channels (Fig. 3-36), select the
channel(s) you wish to broadcast to (Fig. 3-37), then
tap Apply on the upper right-hand corner.
4. Return to the Home screen, and tap the ‘Broadcast’
To control VidiU Pro from the Sharelink dashboard:
1. Visit https://sharelink.teradek.com and log in to
your account.
Fig. 3-36
Fig. 3-37
2. Tap the icon to configure the broadcast quality,
video/audio, and overlay settings, or to view
connection stats (Fig. 3-38).
3. To pair a new channel, select Channels, then tap
Add channel to stream at the bottom of the screen.
4. Select a platform (Fig. 3-39), enter your credentials,
than tap Save. Repeat this step to pair additional
channels (up to five channels at a time).
5. To pair channels that have already been configured,
tap Add channel, select the channel(s) you wish to
broadcast to (Fig. 3-40), then tap Add on the upper
right-hand corner.
Fig. 3-38
Fig. 3-39
Fig 3-40
Page 27© Teradek, LLC 2017. All rights reserved.
Page 28

TROUBLESHOOTING
My firewall/router is blocking RTMP streaming.
VidiU and VidiU Pro use a set of ports for RTMP streaming. Make sure the required ports are allowed
through your firewall or router. The list can be found at https://support.teradek.com/hc/en-us/
articles/226177168.
What are the supported resolutions for each social media CDN?
Every live streaming platform’s specifications are different, and generally change over time. Visit your
streaming platform’s website to find supported resolutions.
Why is my stream choppy?
The most common cause of stream delay is the resolution:bitrate ratio. While finding the correct ratio is
determined by trial and error, here are some general recommendations:
Full HD: 1920 x 1080 / 5.2 Mbps
HD: 1280 x 720 / 2.2 Mbps
High: 960 x 540 / 1.4 Mbps
Medium: 736 x 414 / 796 Kbps
Low: 480 x 270 / 446 Kbps
Mobile: 360 x 200 / 273 Kbps
Lowering the quality of streams can also improve stream upkeep.
Why is my stream suddenly chopping while streaming?
Intermittent Wi-Fi connections can cause instability even when streaming over Ethernet. If you encounter
issues while streaming over Ethernet, disabling Wi-Fi may help. To fix this:
1. Scroll to Network Settings.
2. Select Wi-Fi.
3. Select Client. Turn Client mode to Off.
Why does YouTube tell me my bitrate is too low?
VidiU and VidiU Pro are preconfigured to use adaptive bitrate which changes according to the user’s
bandwidth. This means that the bitrates can sometimes jump or dip depending on the stream, prompting
a message from YouTube. While this operation is completely normal, it may cause a message to appear on
the YouTube event control room page (pg. 21).
Page 28
Page 29

Why is Facebook Live not streaming my video?
Facebook Live has strict streaming specs that users must adhere to. The specs are as follows:
Video resolution: 720p max, 30fps
Keyframe interval: 2 seconds
Duration: 4 hours
Audio bitrate: 128Kbps
Configuring the VidiU via front panel is difficult.
We recommend using VidiU’s web interface or the VidiU iOS app for configuring VidiU. It’s much faster and
simpler.
To connect with the iOS app, connect VidiU and your iOS device to the same wireless network. VidiU will
automatically appear in the app.
To connect using the web interface, find your VidiU’s IP address from the front panel. Type this address into
your web browser. You will be connected to your VidiU and can change settings accordingly (see pg. 8).
I’ve pressed the Start/Stop button to go live, but my stream is not live.
Some streaming networks such as Periscope, YouTube events, and Facebook Pages may require additional
steps to publish your stream.. This depends on the CDN’s workflow. Remember to go live on both VidiU and
destination page to fully start streaming (see Platform Settings on pg. 16).
Page 29© Teradek, LLC 2017. All rights reserved.
Page 30
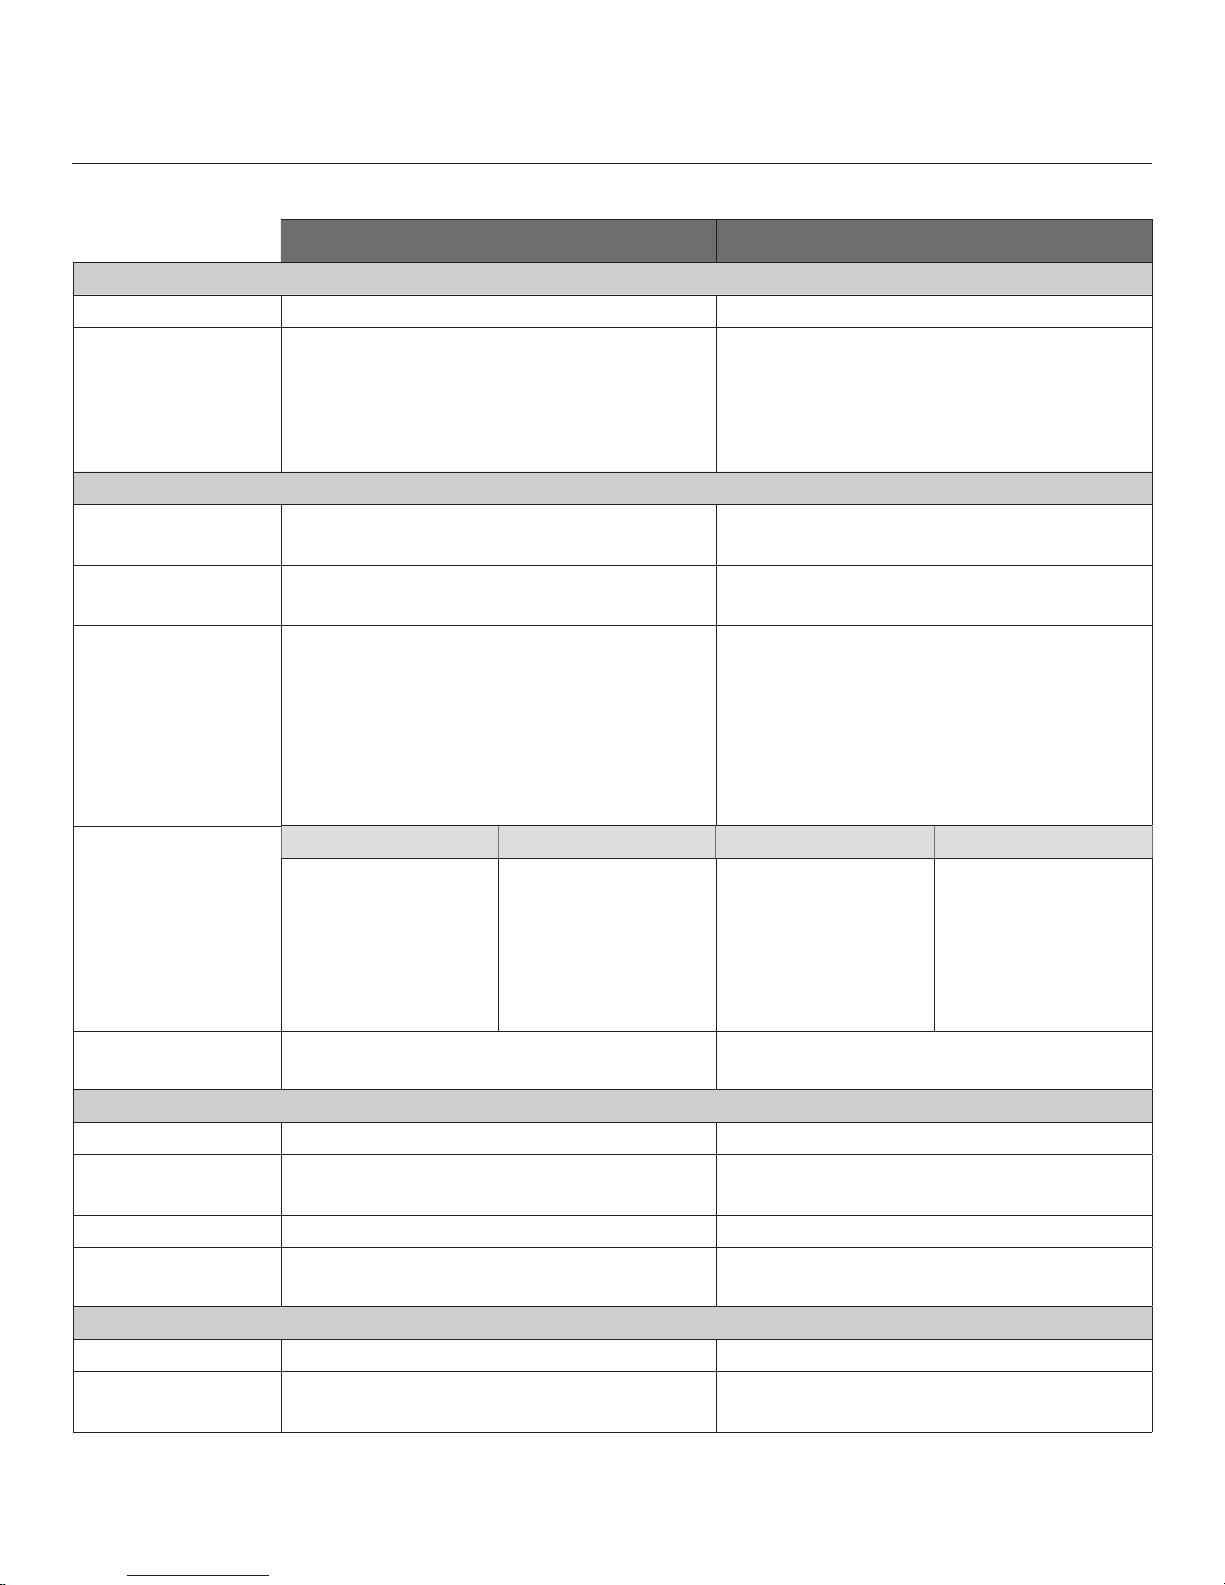
TECHNICAL SPECIFICATIONS
VIDIU VIDIU PRO
VIDEO
Video Inputs HDMI 1.4a: Full Size HDMI 1.4a: Full Size
Supported
Resolution
VIDEO PROCESSING
Video
Compression
Supported Video
Bitrate
Supported Video
Bitrate Details
Supported Output
Resolutions
Video Format
Conversion Support
PROTOCOL SUPPORT
Network Protocols TCP/IP, UDP, HTTP, DHCP, NTP, SSL, IGMP TCP/IP, UDP, HTTP, DHCP, NTP, SSL, IGMP
Supported Video
Transport Protocols
Bonding N/A Sharelink
Platform Integration UStream, YouTube Live, Facebook,
AUDIO
Audio Compression AAC-LC, MPEG Layer 2 AAC-LC, MPEG Layer 2
Audio Input Embedded audio input, analog line or mic in,
1080p 23.98/24/25/29.97/30
1080i 50/59.94/60
720p 50/59.94/60
576i/p
480i/p
H.264, baseline, and main profile H.264, baseline, and main profile
250 Kbps to 5 Mbps 250 Kbps to 5 Mbps
Full HD: 5.2 Mbit/s
HD+:3.0 Mbits/s
HD:2.2 Mbit/s
High: 1.4 Mbit/s
Medium: 796 Kbit/s
Low: 446 Kbit/s
Mobile: 273 Kbit/s
4:3 16:9 4:3 16:9
Full HD: 1440 x 1080
HD: 960 x 720
High: 720 x 540
Medium: 560 x 414
Low: 368 x 270
Mobile: 272 x 200
Built-in video scaler and deinterlacer Built-in video scaler and deinterlacer
RTMP, Live:Air RTMP, Live:Air
Livestream, Twitch, Periscope, Vimeo
adjustable gain
Full HD: 1920 x 1080
HD: 1280 x 720
High: 960 x 540
Medium: 736 x 414
Low: 480 x 270
Mobile: 360 x 200
1080p 23.98/24/25/29.97/30
1080i 50/59.94/60
720p 50/59.94/60
576i/p
480i/p
Full HD: 5.2 Mbit/s
HD+:3.0 Mbits/s
HD:2.2 Mbit/s
High: 1.4 Mbit/s
Medium: 796 Kbit/s
Low: 446 Kbit/s
Mobile: 273 Kbit/s
Full HD: 1440 x 1080
HD: 960 x 720
High: 720 x 540
Medium: 560 x 414
Low: 368 x 270
Mobile: 272 x 200
UStream, YouTube Live, Facebook,
Livestream, Twitch, Periscope, Vimeo
Embedded audio input, analog line or mic in,
adjustable gain
Full HD: 1920 x 1080
HD: 1280 x 720
High: 960 x 540
Medium: 736 x 414
Low: 480 x 270
Mobile: 360 x 200
Page 30
Page 31
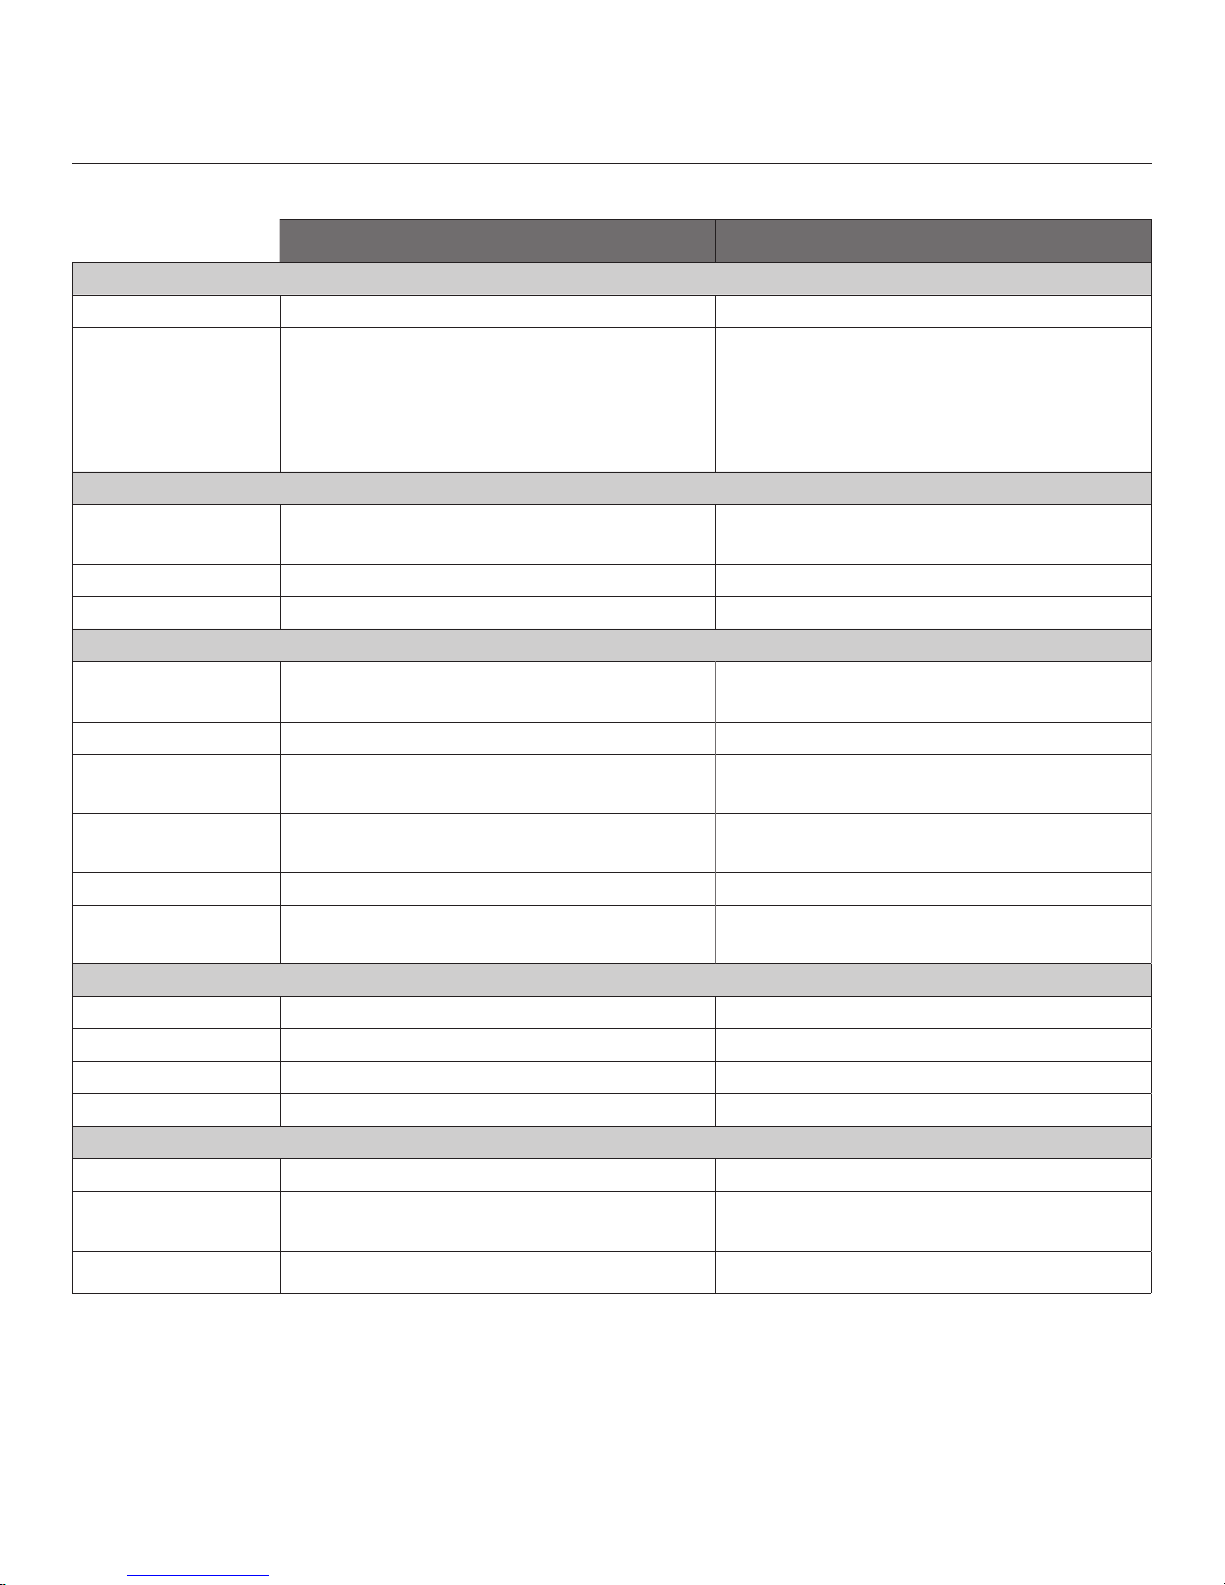
VIDIU VIDIU PRO
AUDIO (cont.)
Audio Output Headphone output Headphone output
Supported Video
Bitrate Details
PHYSICAL
Dimensions
Weight 5oz [141.75g] 5oz [141.75g]
Construction ABS Plastic ABS Plastic
INTERFACES
Configuration
Interfaces
Switches On/Off and reset switch On/Off and reset switch
Recording/Storage N/A SD/SDHC (class 6 and above) formatted
Desktop App Feature-rich web UI for configuration and
Mobile App VidiU app for iOS VidiU app for iOS
USB Interface
Functionality
NETWORK
Ethernet 10/100/1000 BASE-T Gigabit 10/100/1000 BASE-T Gigabit
Wireless WiFi: Dual Band MIMO 802.11 a/b/g/n WiFi: Dual Band MIMO 802.11 a/b/g/n
USB USB 3G/4G Modem support USB 3G/4G Modem support
RF Channel Auto Auto
POWER
Power Input 6-12V DC Barrel Adapter 6-18V DC Barrel Adapter
Nominal Power
Consumption
Battery Internal Rechargeable Lithium-ion Battery Internal Rechargeable Lithium-ion Battery
HD: 256kbps
High: 192kbps
Medium: 128kbps
Low: 96kbps
Mobile: 48kbps
3” W x 4” D x 1” H [76.2 x 101.6 x 25.4mm] 4.7” W x 3” D x 1.2” H [119.38 x 76.2 x
OLED Display with joystick navigation
buttons
control
Powered USB 2.0 host port Powered USB 2.0 host port
3W (while Charging: up to 10W) 4.5W (while charging: up to 10W)
HD: 256kbps
High: 192kbps
Medium: 128kbps
Low: 96kbps
Mobile: 48kbps
30.48mm]
OLED Display with joystick navigation
buttons
FAT32, USB formatted FAT32
Feature-rich web UI for configuration and
control
Page 31© Teradek, LLC 2017. All rights reserved.
Page 32

FCC STATEMENT
This equipment has been tested and found to comply with the limits for a Class A digital device, pursuant
to Part 15 of the FCC rules. These limits are designed to provide reasonable protection against harmful
interference in a residential installation. This equipment generates, uses, and can radiate radio frequency
energy, and, if not installed and used in accordance with the instructions, may cause harmful interference
to radio communications. However, there is no guarantee that interference will not occur in a particular
installation. If this equipment does cause harmful interference to radio or television reception, which can be
determined by turning the equipment off and on, the user is encouraged to try to correct the interference
by one or more of the following measures:
● Reorient or relocate the receiving antenna.
● Increase the separation between the equipment and the receiver.
● Connect the equipment into an outlet on a circuit different from that to which the receiver is connected.
● Consult the dealer or an experienced radio or television technician for help.
This device complies with Part 15 of the FCC rules and also with RSS-210 of Industry Canada. Operation is subject to
the following two conditions:
1. This device may not cause harmful interference, and
2. This device must accept any interference received, including interference that may
cause undesired operation.
EC DECLARATION OF CONFORMITY
Teradek LLC herby declares that the VidiU and VidiU Pro are in compliance with Directive
1999/5/EC. The full text of the EC Declaration of Conformity is available at the following
internet address: https://support.teradek.com/hc/en-us/articles/233429747-EC-
Declaration-of-Conformity-for-CE-mark
Page 32
 Loading...