

Page 1
DEVICE CONFIGURATION
2
CONNECT TO BOND PRO
• Via WiFi – Attach antenna to (E). Open your computer’s wireless network configuration and find Bond Pro’s
WiFi network (
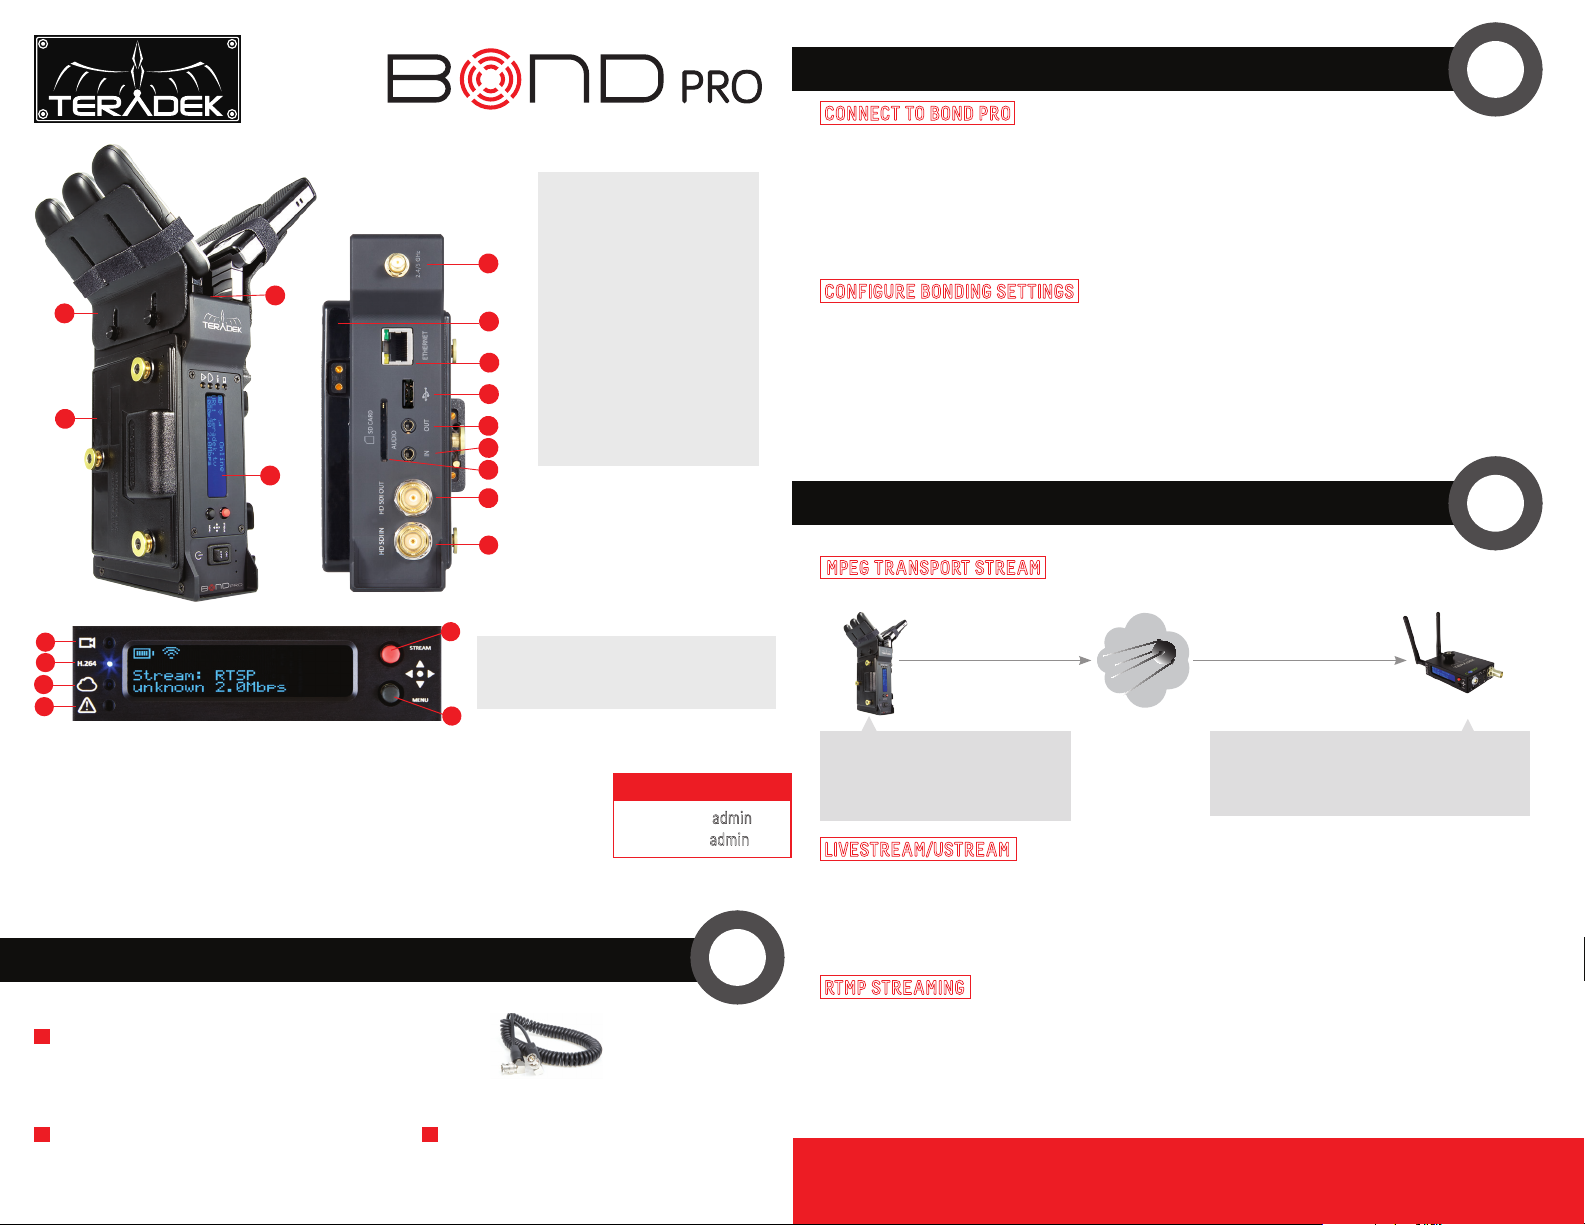
A: Modem Clips
B: AB Gold- or V-mount
C: Modem Activity LEDs
E
A
B
C
F
G
H
I
J
D
K
L
M
D: OLED Display
E: Antenna
F: Battery Plate
G: Ethernet Port
H: USB Port
I: Audio Out
J: Audio In
K: SD Card Slot
L: HD-SDI Output
M: HD-SDI Input
*Modems not included
• Via Ethernet – Connect Bond Pro to a wired network or directly to your computer.
1. Open a web browser and enter the IP address of Bond Pro. View the WiFi IP address by pressing ▼ once
and the Ethernet address by pressing ▼ twice.
2. Log in to Bond Pro – The username is
CONFIGURE BONDING SETTINGS
1. Navigate to Video Setup > Bonding
2. Enter a Sputnik Host Address. For Sputnik server setup instructions please see the Sputnik Setup Guide
(http://www.teradek.com/pages/downloads).
3. Confirm the Sputnik Port matches your Sputnik server’s configured inbound port. The default value is 5111.
4. Adjust the Max Bitrate and Max Buffer Length settings, if desired.
5. Click Apply.
6. Confirm that data is reaching Sputnik by navigating to the server’s Dashboard, or by verifying
activity on the modem activity LEDs (C).
BROADCAST CONFIGURATION
Configure the following from the Video Setup > Stream Settings page.
Teranet – XXXX
, where
XXXX
is the last four digits of Bond Pro’s serial number).
admin
and the default password is
admin
.
3
MPEG TRANSPORT STREAM
1. Configure the Following settings on Bond Pro. 2. Configure the following settings on your decoder.
N
O
P
Q
Stream Joystick:
, : Selects options from streaming/recording prompts
▲
▲
● (button press): Returns to main status screen, start/stop recordings and broadcasts
Menu Joystick:
▲,▼: Select menu items, change status screen on main display, select characters
: Back, move to higher menu level
▲
,● (button press): Confirm selection, open selected menu
▲
R
N: Encoder Status
O: Status
P: Broadcast/Record
S
SETUP
1
Connect a power source Bond Pro’s battery plate (F). Connect
your video source to (M).
CineCoil SDI
2
Connect one or more modems to Bond Pro’s USB
ports. If desired, attach modem plates and use
velcro strips to secure modems.
3
Attach Bond Pro to your camera’s battery mount.
Q: Fault/Error
R: Stream Joystick
S: Menu Joystick
WEB UI LOGIN
username: admin
password: admin
1
Decoder
Primary Stream
Mode: MPEG Transport Stream
Transport Stream Server: Enabled
Listening Port: 5000
Sputnik
Decoder Settings
Mode: MPEG Transport Stream
Protocol: TCP Pull
Host: Your Sputnik Server Address Port: 5000
LIVESTREAM/USTREAM
1. Select Live Internet Streaming as the Stream Mode.
2. Select your provider.
3. Enter your user name and password, click login.
4. Select your Channel and click Apply.
5. Start/stop the stream with the buttons on the Stream Settings page or with the Stream Joystick.
RTMP STREAMING
1. Select RTMP as the Stream Mode.
2. Enter the server URL. Depending on your destination (local server or CDN), this will look similar to
rtmp://server.address:1935/live.
3. Enter the stream name. For many platforms this is found with the server URL.
4. Click Apply.
5. Start/stop the stream with the buttons on the Stream Settings page or with the Stream Joystick.
NEED MORE HELP?
1. Support forum: http://support.teradek.com → Contains tips, information and all the latest firmware & software updates.
2. Training videos: http://www.teradek.com/training
TERADEK SUPPORT STAFF: support@teradek.com or call 888−941−2111 ext2 (Mon−Fri 9am to 6pm PST)
 Loading...