

Page 1
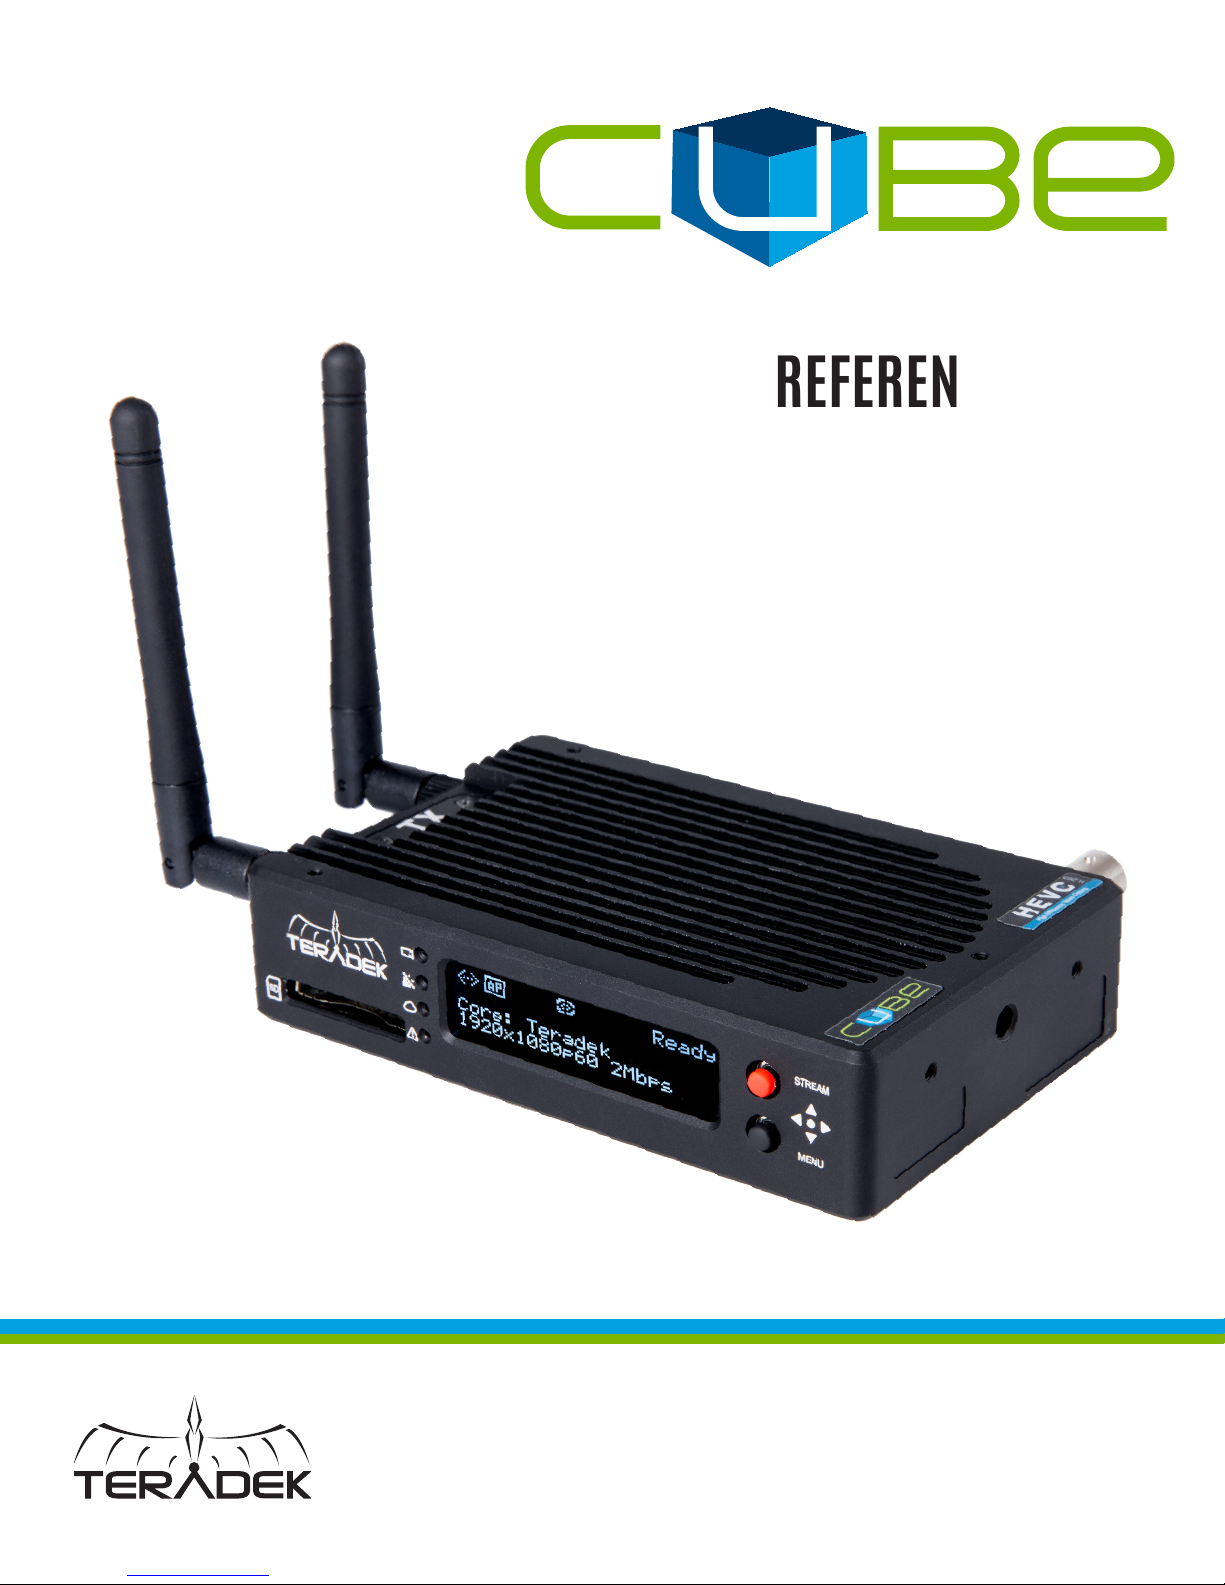
CUBE ENCODER AND DECODER
REFERENCE GUIDE
© 2017 Teradek, LLC. All Rights Reserved.
Page 2

TABLE OF CONTENTS
1. Introduction ................................................................................ 3
Support Resources ........................................................ 3
Disclaimer ......................................................................... 3
Warning ............................................................................. 3
Physical Properties ........................................................ 4
2. Getting Started .......................................................................... 5
Power Your Device ......................................................... 5
Connect to a Network .................................................. 6
Choose Your Application .............................................. 7
Choose a Stream Mode ............................................... 9
3. Encoder Configuration ..........................................................10
Video/Audio Input .......................................................12
Color Management ......................................................13
Encoder ...........................................................................14
Network Interfaces .....................................................15
Cloud Services ..............................................................17
Video Stream Output...................................................18
Recording ...................................................................... 26
System ............................................................................27
Licenses ..........................................................................28
4. Decoder Configuration ...........................................................29
Video/Audio Output ....................................................30
Color Management ......................................................30
Network Interfaces .....................................................31
Video Stream Source ...................................................33
System .............................................................................35
Licenses ...........................................................................36
5. Troubleshooting ....................................................................... 37
6. Technical Specifications ........................................................39
7. FCC Statement ..........................................................................44
Page 2
Page 3

Thank you for purchasing Cube, the world’s first camera-top streaming HD video solution. Cube encoders
stream HD video over any IP network. Wireless-enabled Cubes can connect directly to laptops, Cube
decoders, mobile devices, or join an existing wireless network to stream over a LAN or WAN. USB-enabled
Cubes are also capable of streaming using select 4G capable modems. Cube features native integration with
some of the most popular video platforms for turn-key live Internet streaming and content distribution. Use
this reference guide to help get the most out of your Cube.
Support Resources
In addition to this reference guide, there are a number of resources available for more information on Cube’s
features and operation. For tips, information, and all the latest available firmware and software updates,
visit Teradek’s support forum at https://support.teradek.com. If you are unable to find what you are looking
for online, please contact Teradek’s support staff at [email protected] | Phone: (888) 941-2111 Ext. 2
(available M-F 5am-6pm PST).
Disclaimer
This manual is intended for user information only. Every effort has been made to ensure that the contents
within are accurate at the time of printing, and that updates are made in a timely manner. Teradek cannot
be held responsible for inaccuracies, typographical errors, or out-of-date information contained within this
manual.
Warning
Teradek Cube products contain no user serviceable parts. Disassembly, modification, or removal of any of
the device’s components may void your warranty. Please visit http://store.teradek.com/pages/warranty-
information for up-to-date warranty terms and conditions.
© Teradek, LLC 2017. All rights reserved.
Page 3
Page 4
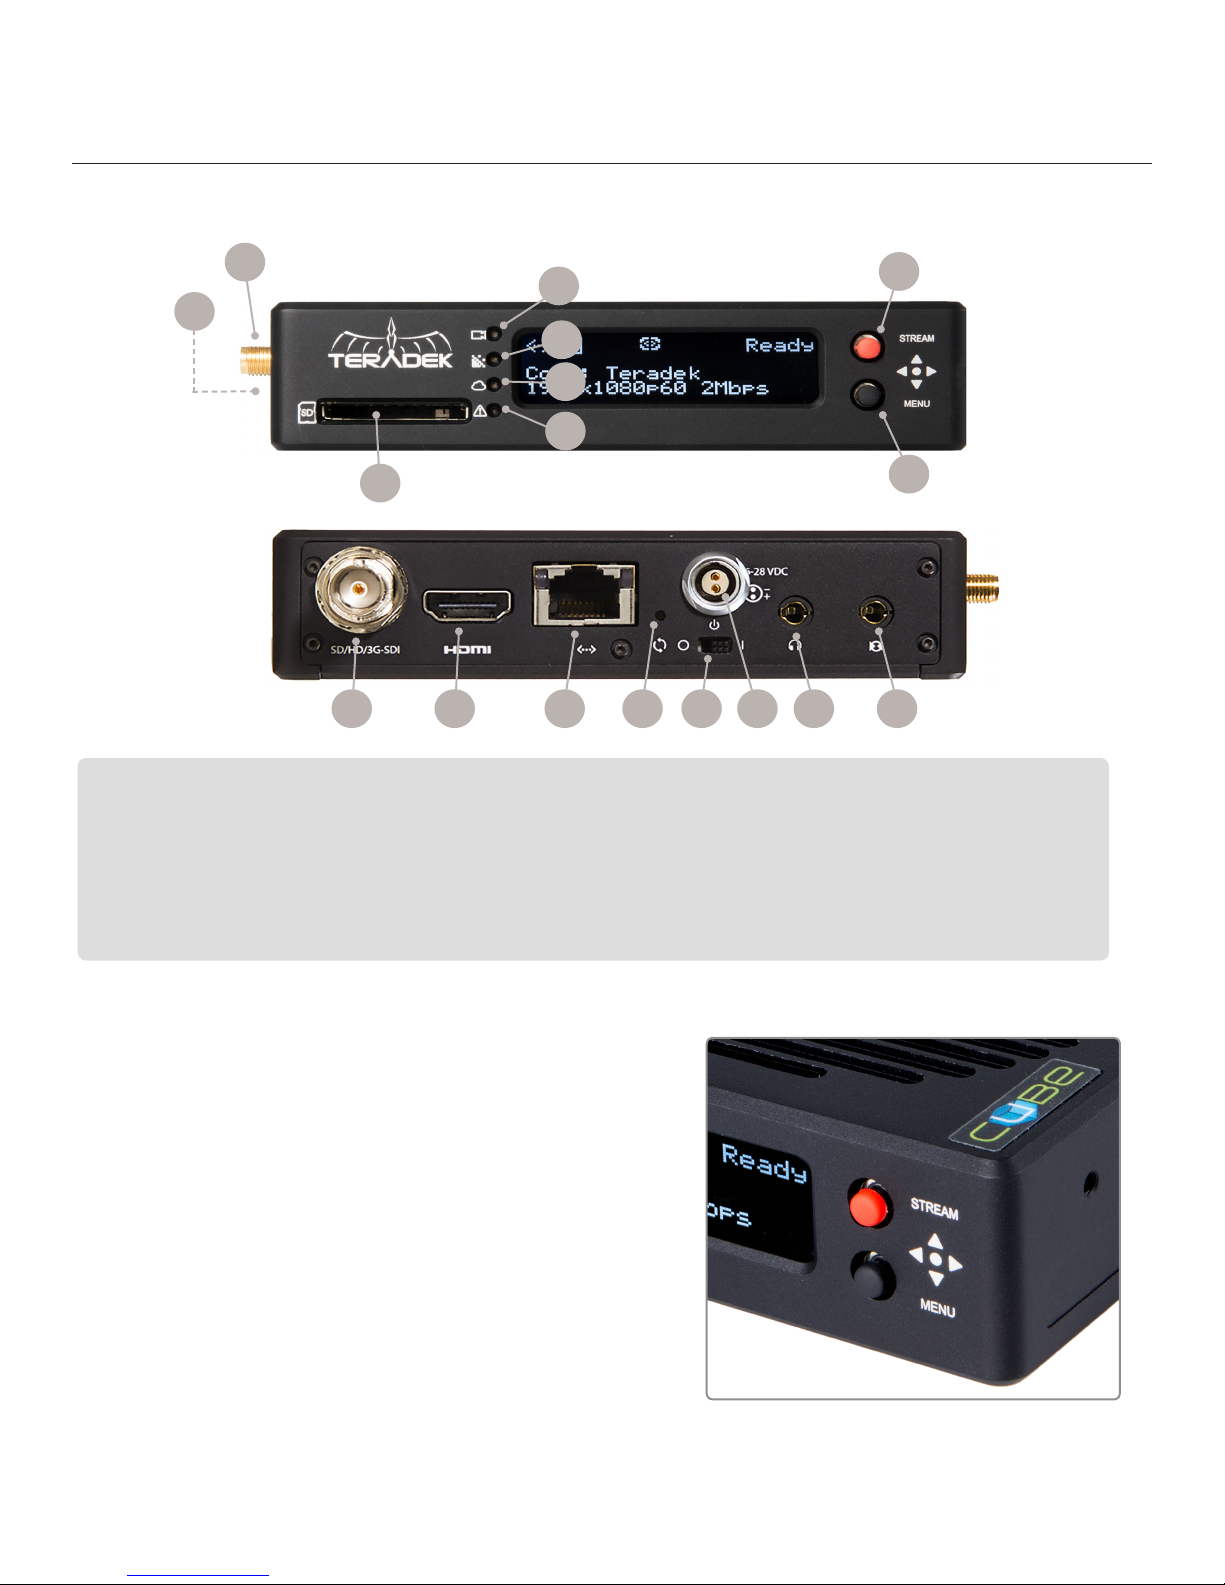
PHYSICAL PROPERTIES CUBE ENCODER/DECODER
A
B
A. RP-SMA connectors
B. USB port
C. Video input status
D. Codec status
E. Broadcast status
F. Fault/Error
C
D
E
F
G
J O P
K L
G. SD card slot
H. Stream joystick
I. Menu joystick
J. SD/HD/3G−SDI input/output
K. HDMI input/output
L. 10/100/1000 Ethernet
M
N
M. Reset button
N. Power switch
O. Power input
P. 1/8” headphone output
Q. Mic/Line stereo input
H
I
Q
START/STOP AND MENU JOYSTICKS
Use the Stream and Menu Joysticks (Fig. 2-1) to navigate
the front panel interface.
Stream Joystick:
● (button press): Access quick menu actions, exit menu
screens, start/stop recordings and broadcasts
Menu Joystick:
▼
▲,▼, , : Select menu items, change status screen on
main display, select character.
● (button press): Confirm selection, open selected menu.
Page 4
▼
Fig. 2-1
Page 5
GETTING STARTED
There are three key steps to getting started with Cube:
1. Power your device.
2. Connect to a network.
3. Choose your application.
POWER YOUR DEVICE
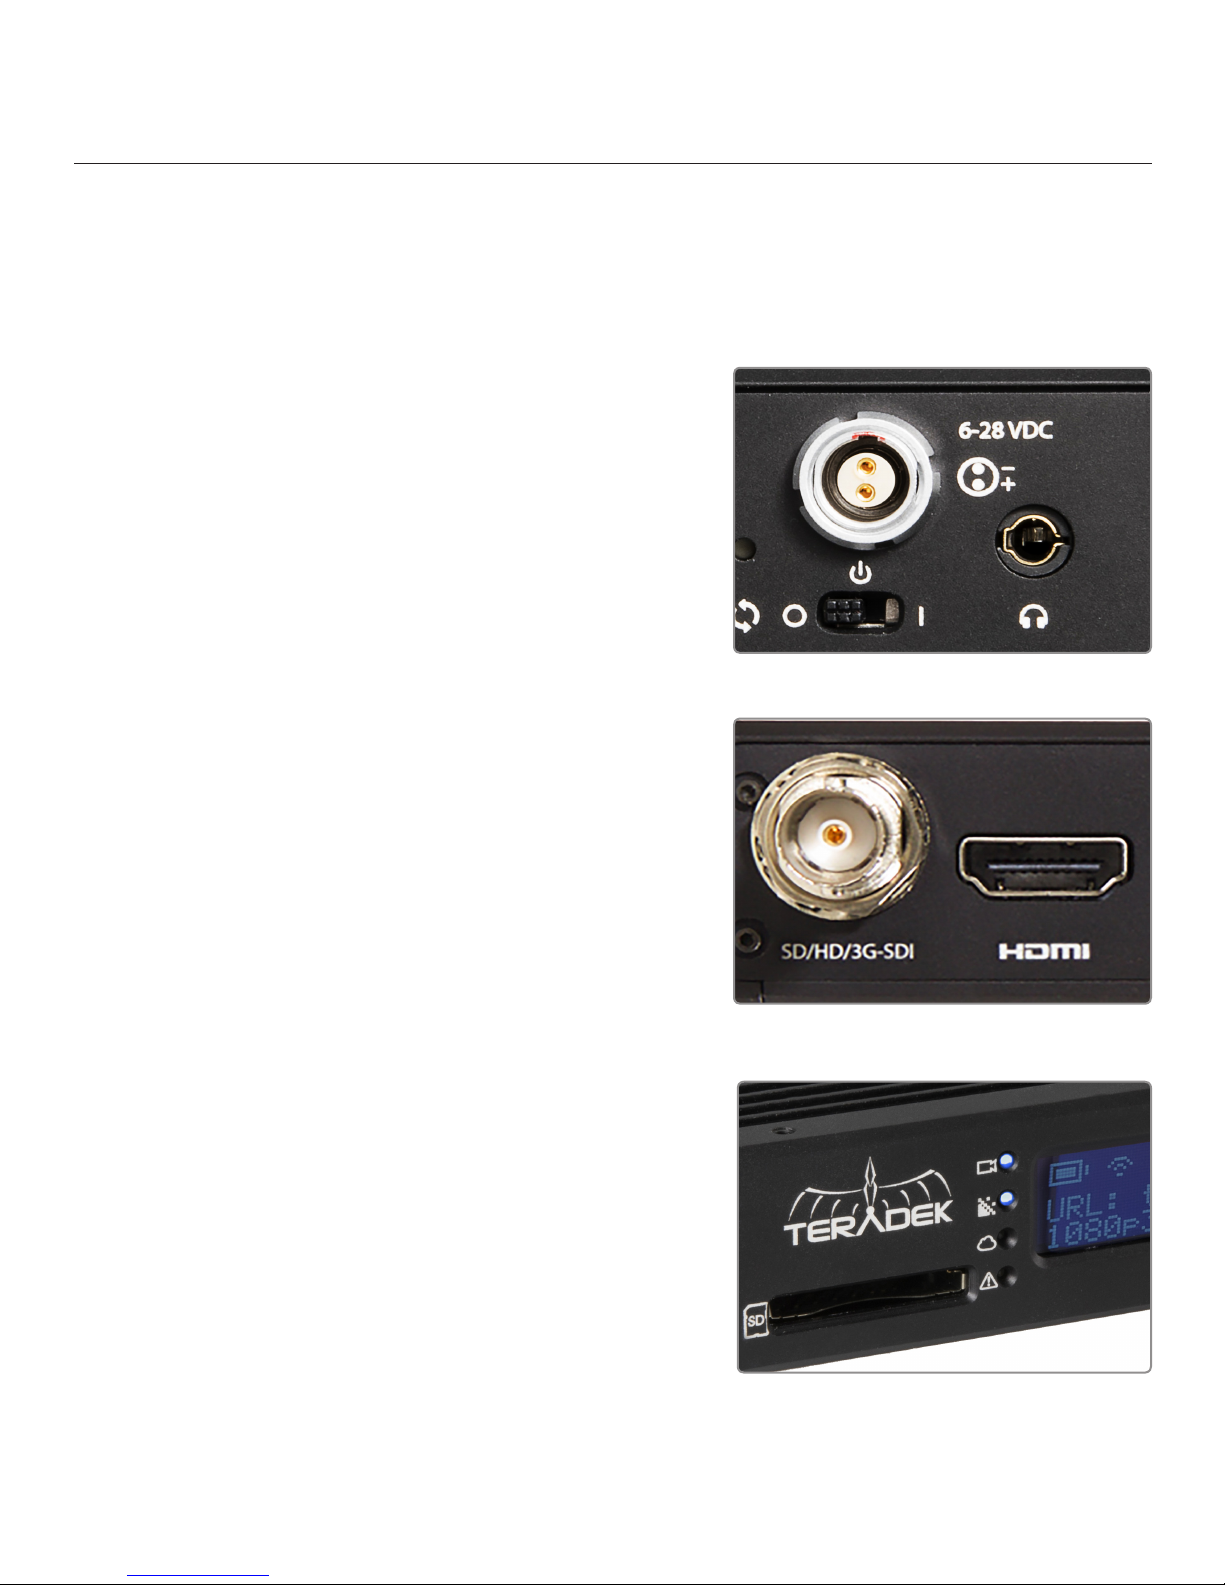
1. To power Cube, connect the AC adapter using the 2-pin
connector marked ‘6-28 VDC Input (Fig. 2-2), then turn
the power switch to the On position. Cube begins to boot
as soon as power is connected. NOTE: The codec LED
blinks to indicate Cube is booting. This process takes
approximately 1½ minutes.
2. Turn on your video source, then connect it to Cube using
either an SDI or HDMI cable (Fig.2-3).
3. Attach the antenna (if applicable) via the threaded
RP-SMA connector.
4. Attach any mounting accessories, such as the enclosed
hot shoe mount, if desired.
5. Once Cube has booted, verify that the Video Input Status
and Codec LEDs are illuminated, indicating a video source
has been successfully detected (Fig. 2-4) and the codec is
ready. If using a Cube decoder, the codec LED will remain
off until it is configured (see page 10).
Fig. 2-2
Fig. 2-3
© Teradek, LLC 2017. All rights reserved.
Fig. 2-4
Page 5
Page 6
CONNECT TO A NETWORK
Cube allows you to connect to a network using Wi-Fi, an Ethernet connection, or a USB modem. Use the
front panel interface or the web user interface (web UI) to connect Cube to a network.
Connect via wireless (Wi-Fi)
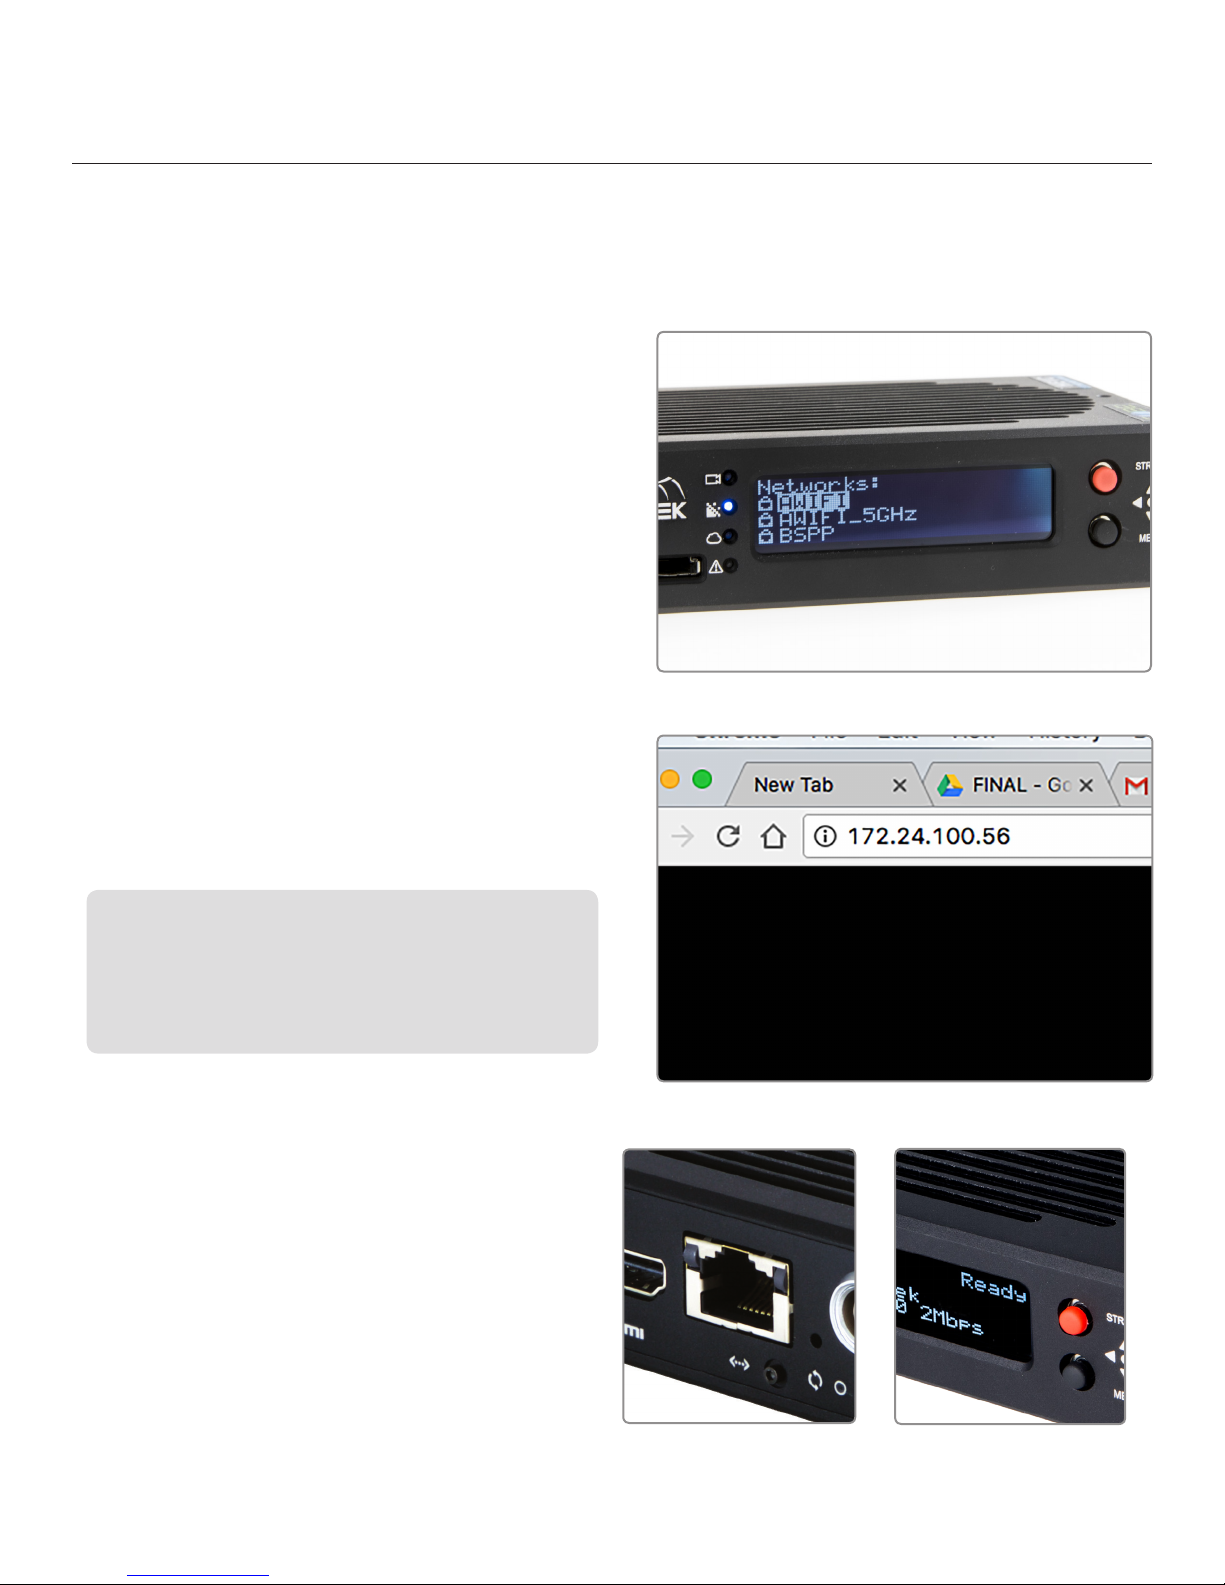
1. Using the Menu joystick, navigate to the
Network Setup menu, then select WiFi.
2. Press the Menu joystick to enter the WiFi mode
menu, then select a mode:
a. Access Point (AP) Mode - AP Mode is
automatically enabled by default. Connect
your computer to Cube’s AP network:
Teranet-XXXXX (serial number of the device).
b. Infrastructure Mode - Select Infrastructure
Mode, then Scan for Networks. Select a
Wi-Fi network (Fig. 2-5), then enter your
credentials.
3. To obtain the IP address, select [Status], or
press ▼ on the menu joystick from the main
screen.
Fig. 2-5
Access the web UI
The web UI can be accessed by using any available network
interface. Simply open a web browser and enter the network’s IP
address in the navigation bar (Fig. 2-6). If using a USB modem,
connect your computer to Cube’s AP network first, then enter the
IP address in the navigation bar.
Connect to an Ethernet network (Wired)
1. Plug an Ethernet cable into Cube’s Ethernet
port (Fig. 2-7) and connect it to an Ethernet
switch or router.
2. Once Cube is connected to the network,
the front panel interface will indicate that
it’s “Ready” (Fig. 2-8).
3. To obtain the IP address, press ▼ on the menu
joystick, or navigate to the Wired menu, where
it will be displayed.
Page 6
Fig. 2-6
Fig. 2-7 Fig. 2-8
Page 7
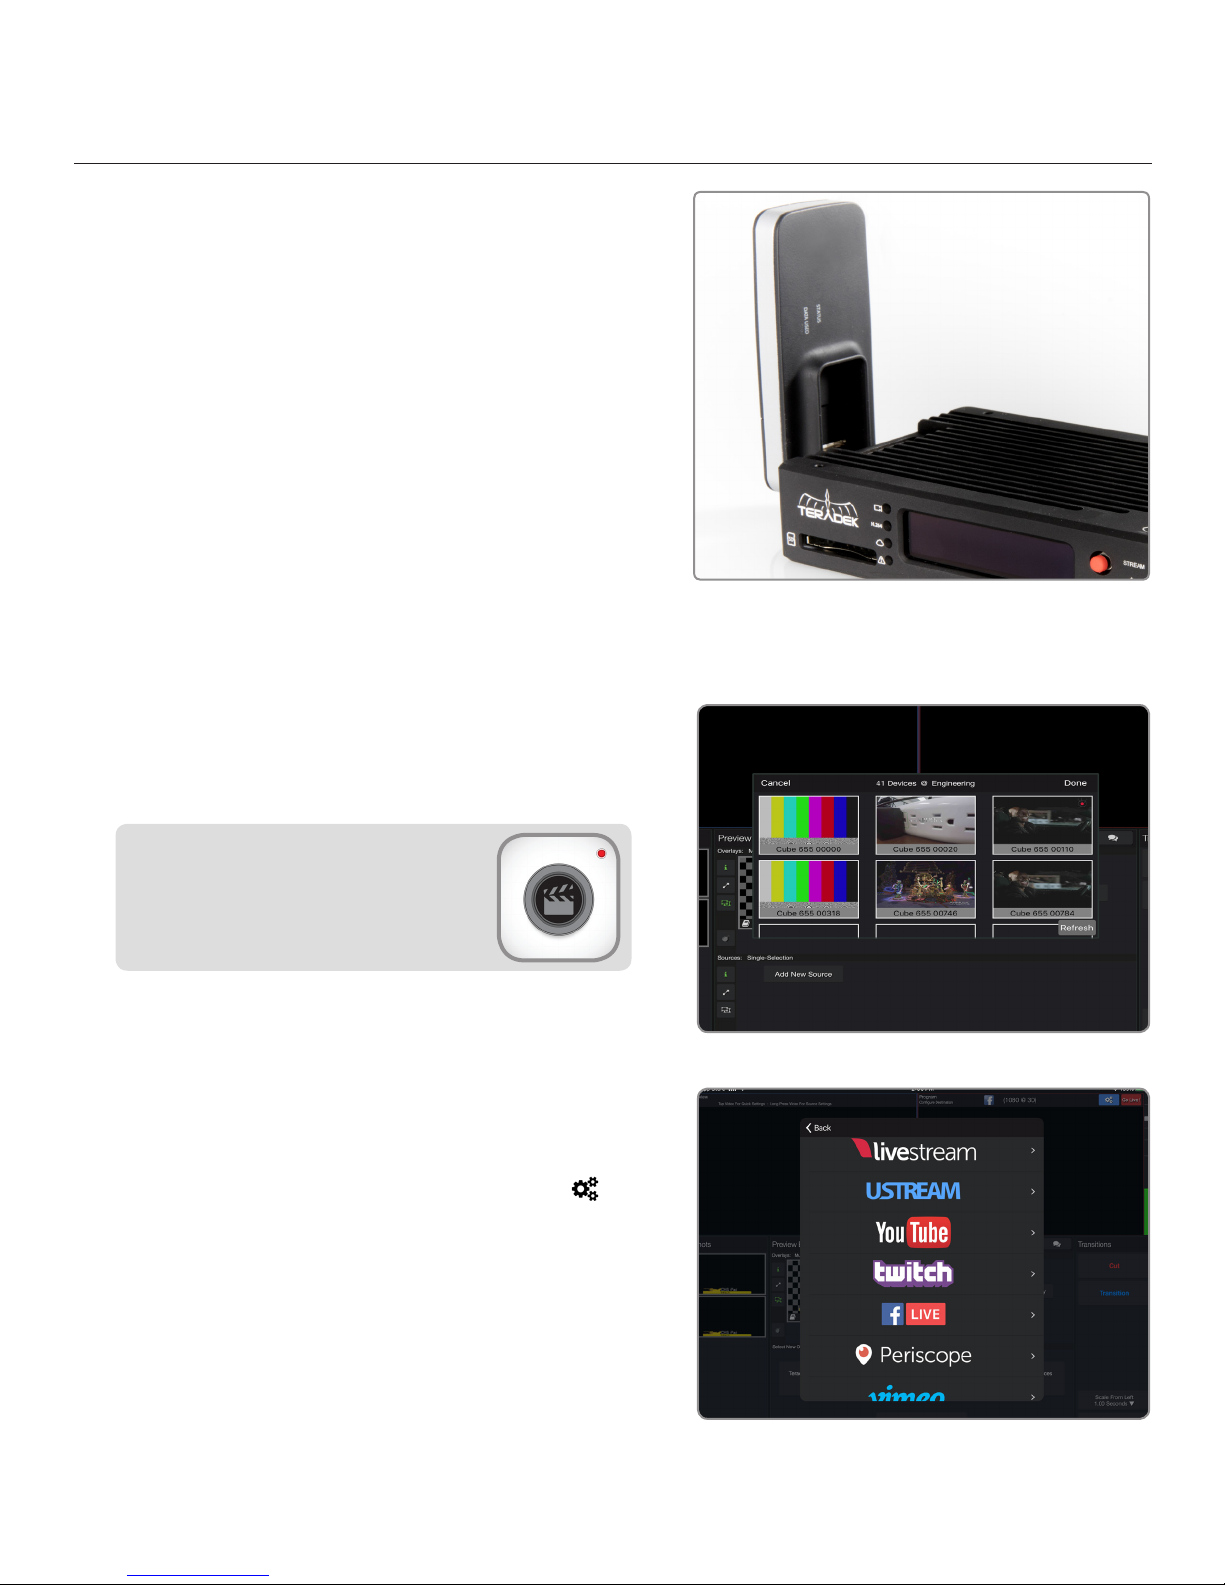
Connect using a USB Modem:
1. Insert a compatible 3G/4G USB modem into the
USB port (Fig. 2-9) and wait for the cellular
reception icon (4 bars) to appear.
2. To confirm the modem is connected, navigate to
the Network Setup menu and select USB
Modem.
For additional configuration options, see page 16.
Fig. 2-7
CHOOSE YOUR APPLICATION
Fig. 2-9
Cube can be used for a variety of applications, such as live production and monitoring on Teradek’s iOS
apps, streaming to the internet, or transmitting to a decoder.
Connect and Broadcast using Live:Air Action
1. Connect your iPad to the same network as Cube.
Live:Air Action or Live:Air Solo
Live:Air Action is compatible with iPad Air 1
and newer. Live:Air Solo is compatible with
both iPad and iPhone. Both apps are available
in the iTunes App Store.
2. Launch the Live:Air Action app.
Fig. 2-11
3. Tap the Add New Source button on the Preview
Editor’s bottom panel, then tap the Teradek Device
button. Select a device (Fig. 2-11), then tap Done.
4. To configure a streaming destination, tap the button
in the upper right-hand corner, enter the Broadcasting
Destinations page, then navigate to Manage
Destinations>Add a Destination (Fig. 2-12). Select a
platform, then enter your credentials (if applicable).
5. To begin live streaming, tap the ‘Go Live!’ button in the
upper right-hand corner.
© Teradek, LLC 2017. All rights reserved.
Fig. 2-12
Page 7
Page 8
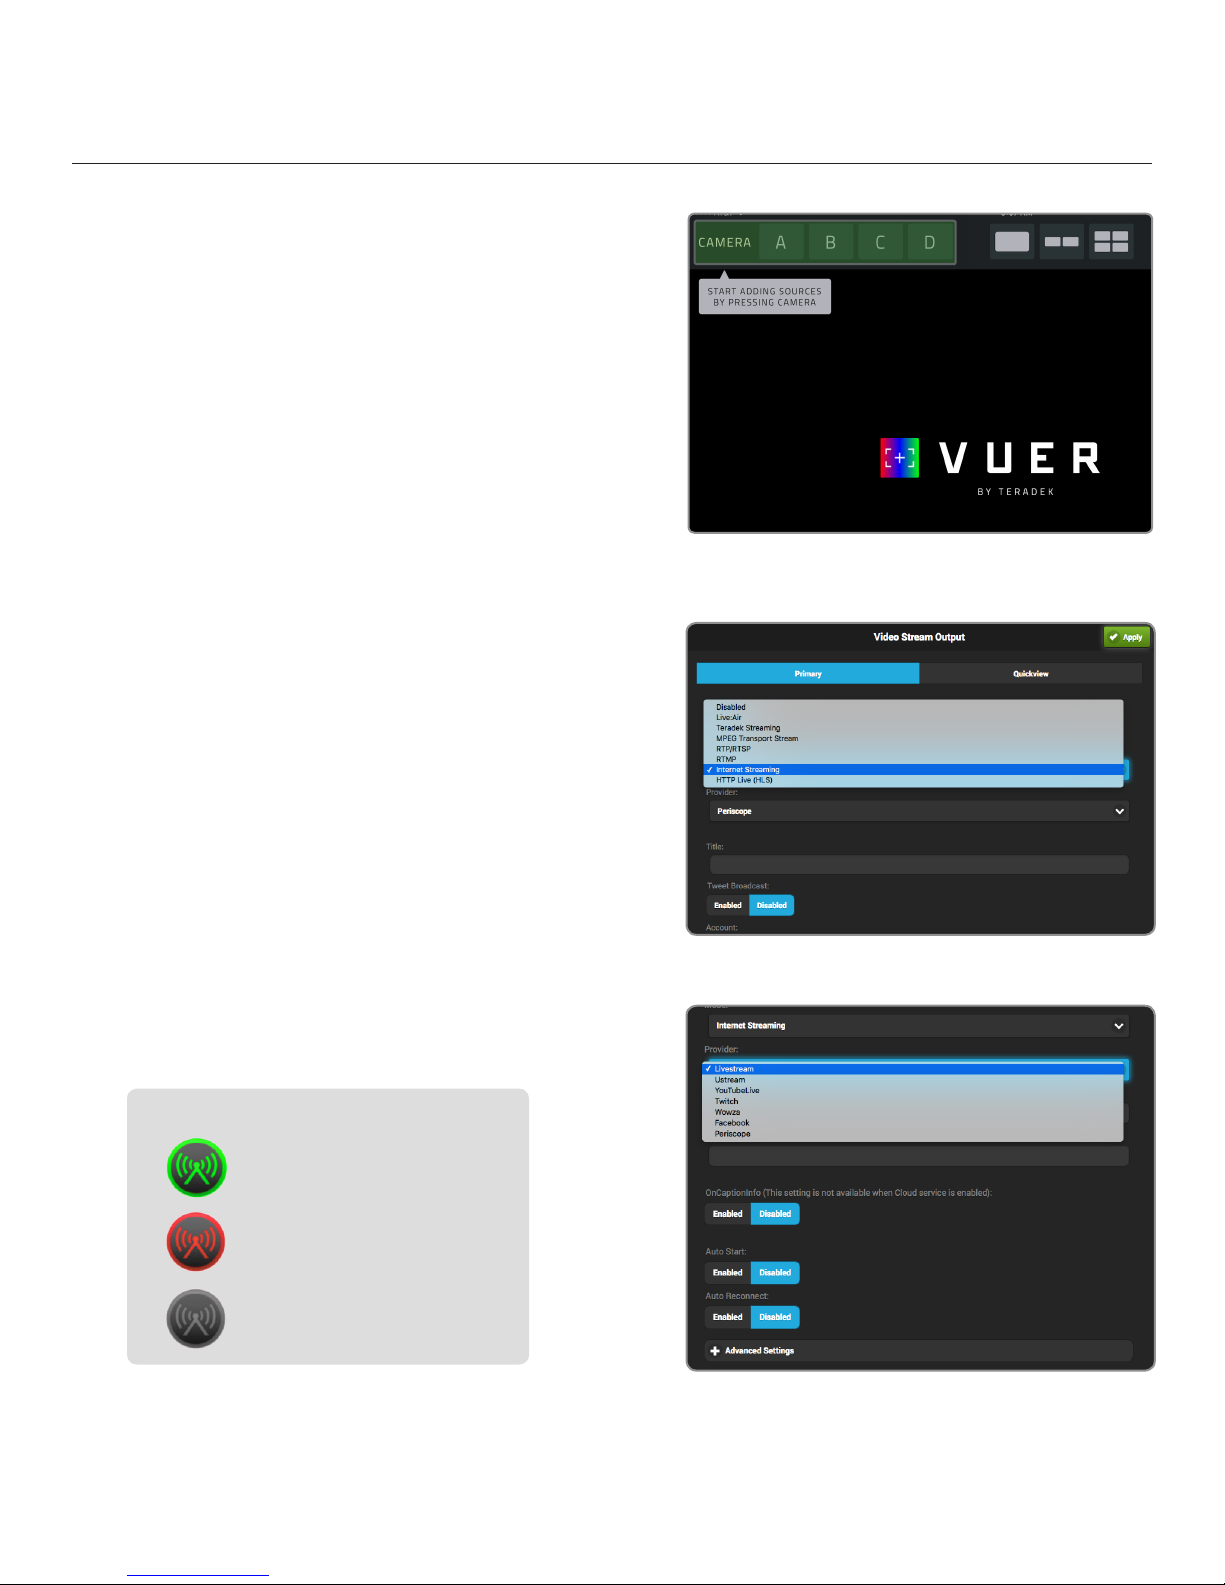
Monitor using VUER
1. Set your stream mode to Live:Air.
2. Connect your iPad to the same network as Cube.
3. Launch the VUER app.
4. From the VUER app, tap the CAMERA button in the
upper left-hand corner (Fig. 2-13), select your
device(s), then tap Done.
Stream to an Internet Platform
1. From the Video Stream Output menu, select
Internet Streaming as your stream mode (Fig. 2-14).
2. Select a streaming platform provider (Fig. 2-15) and
enter your credentials, or follow the on-screen
prompts to authorize Cube.
3. Select a channel or event to stream to.
Fig. 2-13
4. After configuring your device, navigate back to the
main display.
5. Press the Stream Joystick (see page 7) or tap the
Broadcast button to go live.
BROADCAST BUTTON:
Cube is ready to broadcast
Broadcast is in session
Page 8
Cube is not ready to broadcast
Fig. 2-14
Fig. 2-15
Page 9
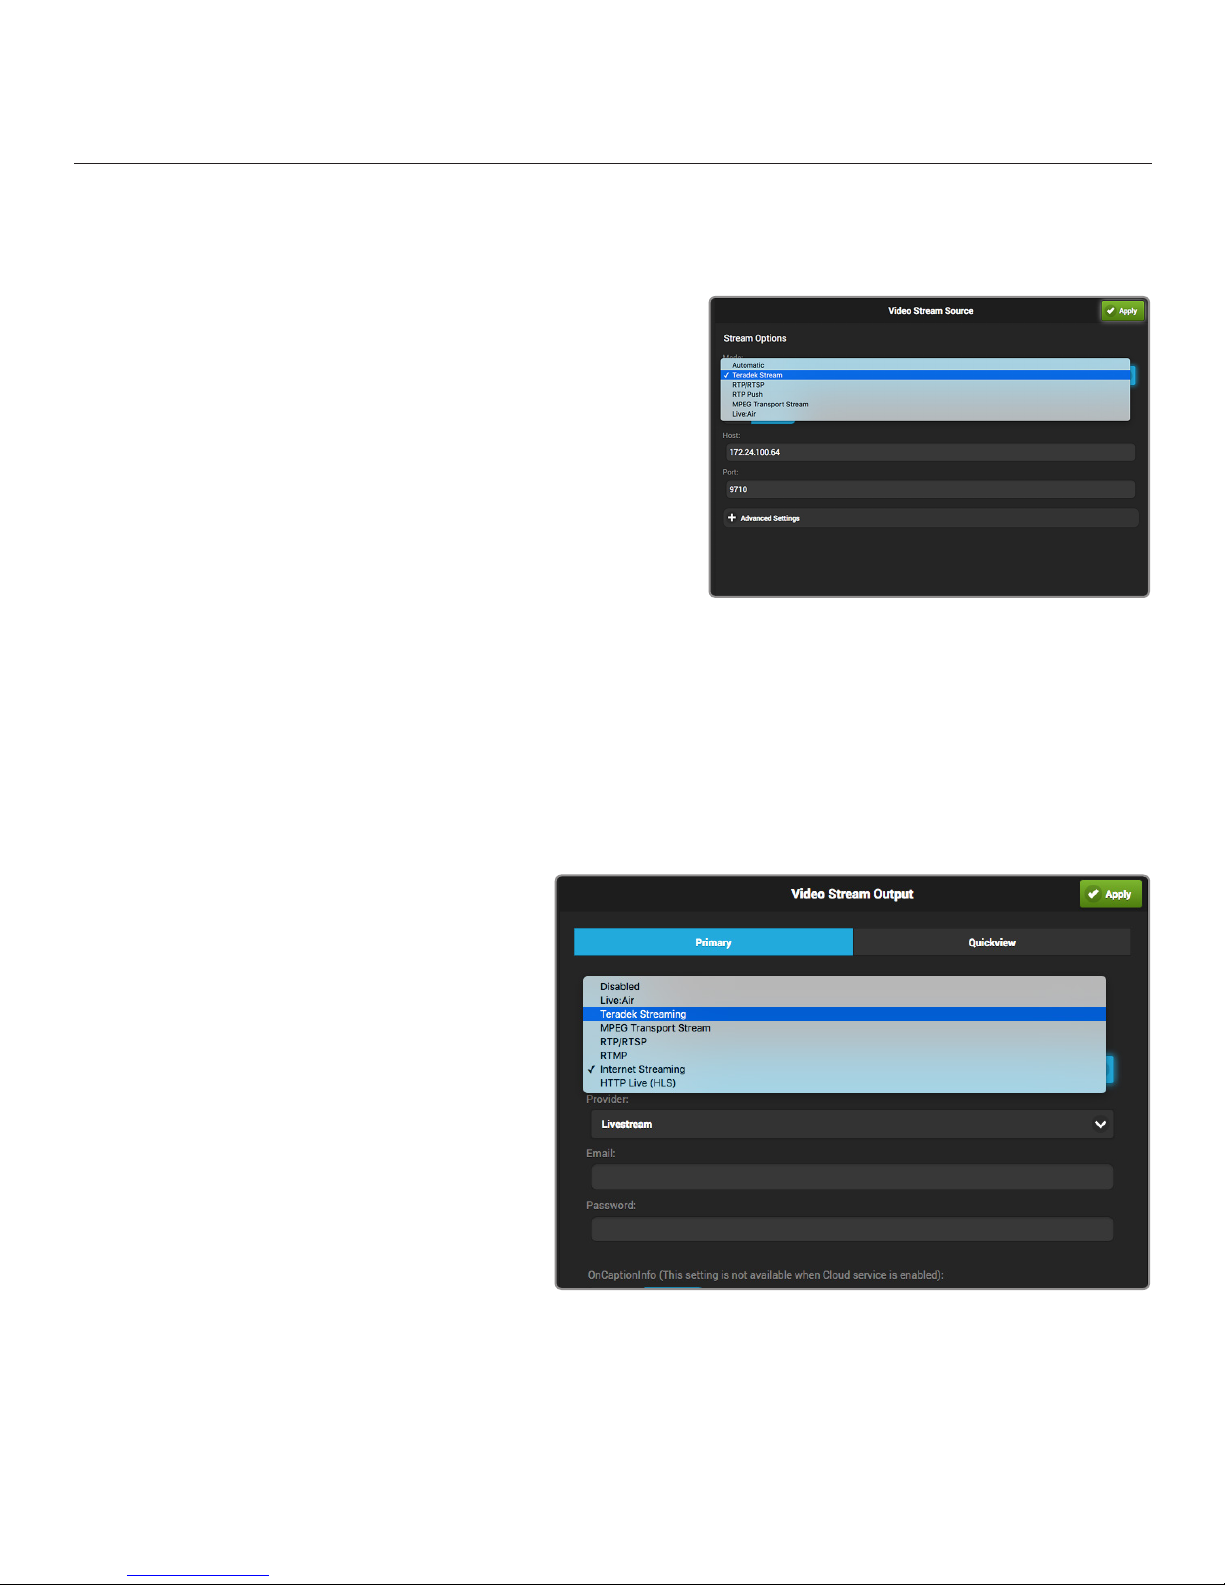
Transmitting to a Decoder
If you purchased a Cube decoder along with the encoder, use the following steps to pair the two devices.
1. From the encoder’s front panel, navigate to the Streaming
Setup menu, then select Primary Stream. If using the
web UI, navigate to the Video Stream Output menu, then
select Primary (see page 9).
2. From the decoder’s front panel, navigate to the Decoder
Setup menu. If using the web UI, navigate to the
Video Stream Source menu (Fig. 2-16).
3. Ensure that the both the Cube encoder and decoder are
on the same network, and using the same stream
mode and protocol.
Fig. 2-16
CHOOSE A STREAMING MODE
Cube encodes and streams video using a variety of stream modes. Use the following steps to view,
modify, or select a streaming mode to best suit your application.
1. Navigate to the Streaming Setup menu
using the Menu joystick, then select
Primary Stream. If using the web UI,
navigate to the Video Stream Output
menu, then select Primary (Fig. 2-10).
2. Select one of the following Stream
Modes:
● LIVE:AIR
● TERADEK STREAM (TDS)
● MPEG TRANSPORT STREAM (LICENSE REQUIRED)
INTERNET STREAMING
●
● RTMP
● RTP/RTSP
● HLS (HTTP LIVE)
Fig. 2-10
See page 18 for Stream Mode descriptions
and applications.
© Teradek, LLC 2017. All rights reserved.
Page 9
Page 10
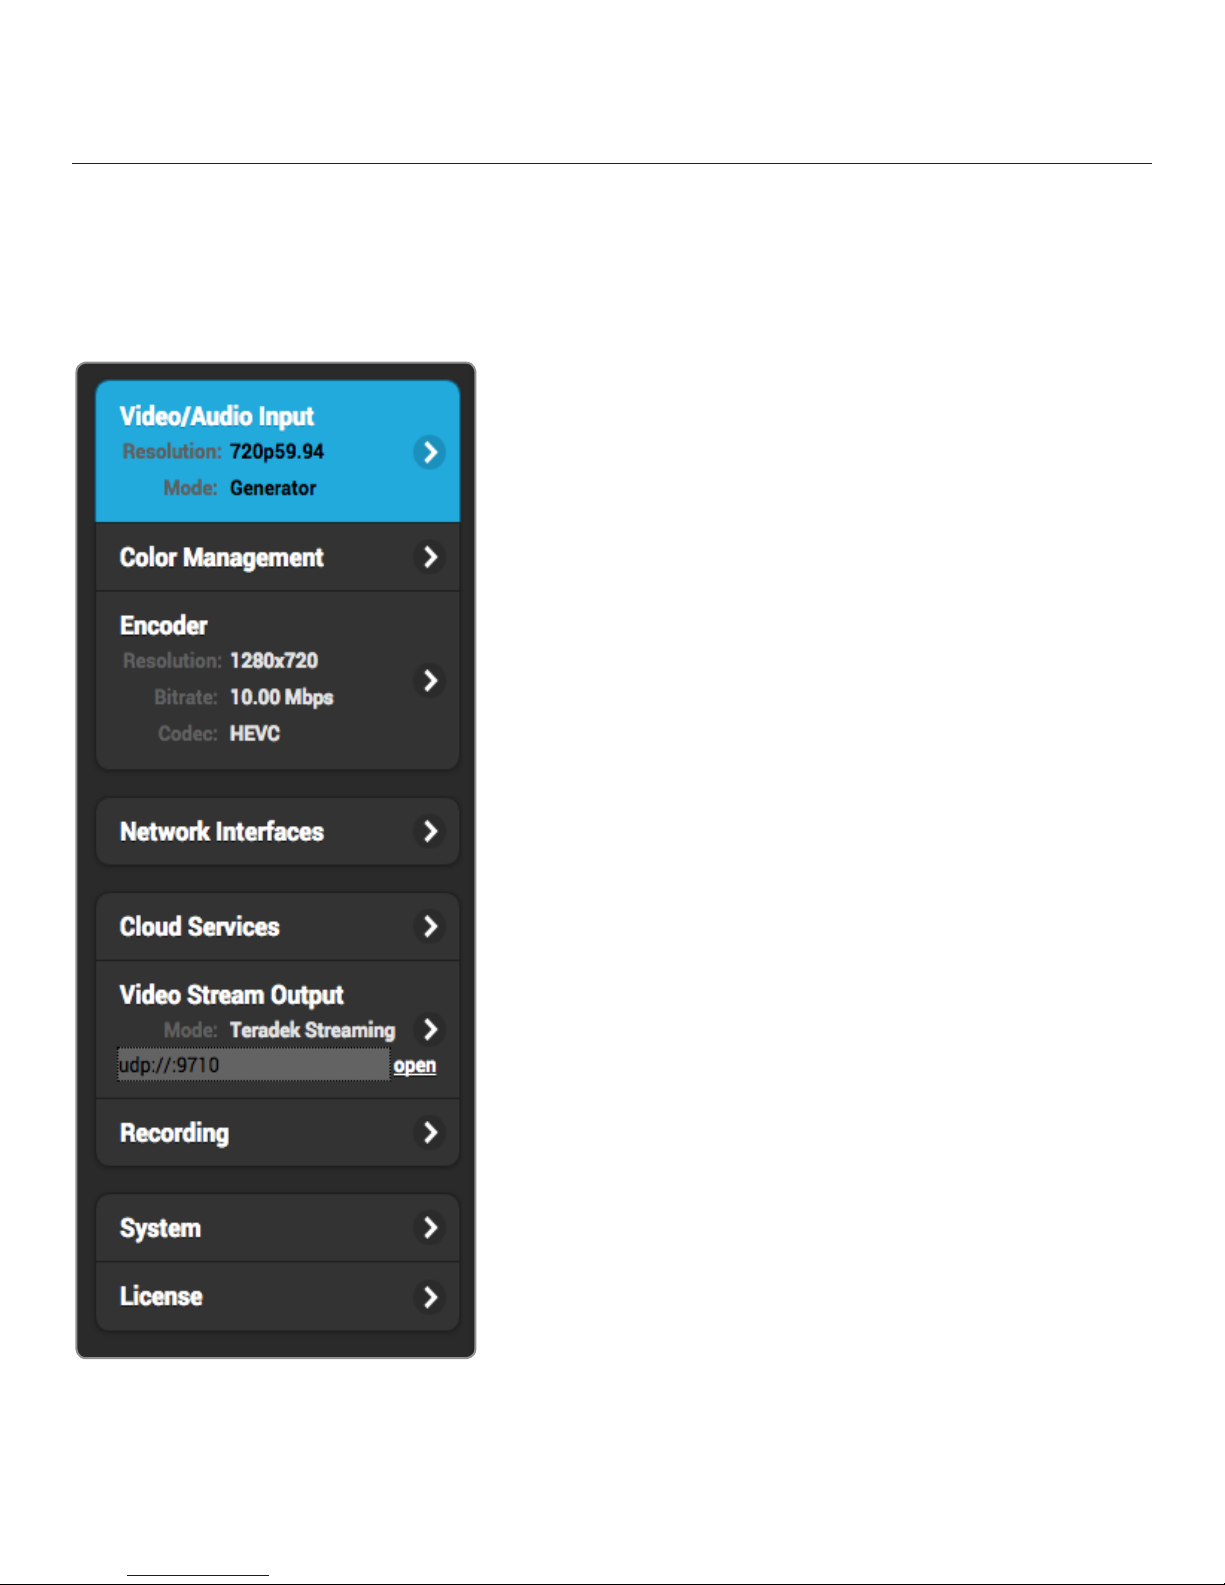
ENCODER CONFIGURATION
NAVIGATING THE SETTINGS MENU
The Settings menu allows you to customize and control Cube’s broadcast, audio/video, and network
settings. Use the web UI or the front panel interface to access and modify the settings. NOTE: This section
illustrates the settings as they are available on the web UI. These settings can also be configured from
Cube’s front panel interface (see page 11).
VIDEO/AUDIO INPUT: Contains options for configuring your
video/audio input, Test Pattern, and Deinterlacer preferences.
COLOR MANAGEMENT: Allows you to select 3D LUT and
CDL files stored on your computer to apply to your video output.
ENCODER: Adjust the codec, bitrate, resolution, frame rate,
and other key features related to your Primary or Quickview
stream. Options include:
● Codec ● Resolution ● Key Frame Interval
● Bitrate ● Frame Rate ● Advanced Options
● Audio Bitrate ● Max Frame Rate ● Overlay
NETWORK INTERFACES: Contains options for configuring
Ethernet, Wi-Fi, and USB modem interfaces.
CLOUD SERVICES: Allows you to access and manage Core,
Teradek’s cloud service management service.
VIDEO STREAM OUTPUT: Select and configure a streaming
mode and broadcast destination. Options include:
● Live:Air ● MPEG-TS (license required) ● Internet Streaming
● Teradek Streaming ● RTP/RTSP ● HTTP Live (HLS)
● SRT ● RTMP
RECORDING: Enable or disable recording and select a
media storage option.
SYSTEM: Perform factory reset, firmware upgrade, system
diagnostics, and other essential functions.
Page 10
LICENSE: Add, import, or export license files for additional
functionality.
Page 11
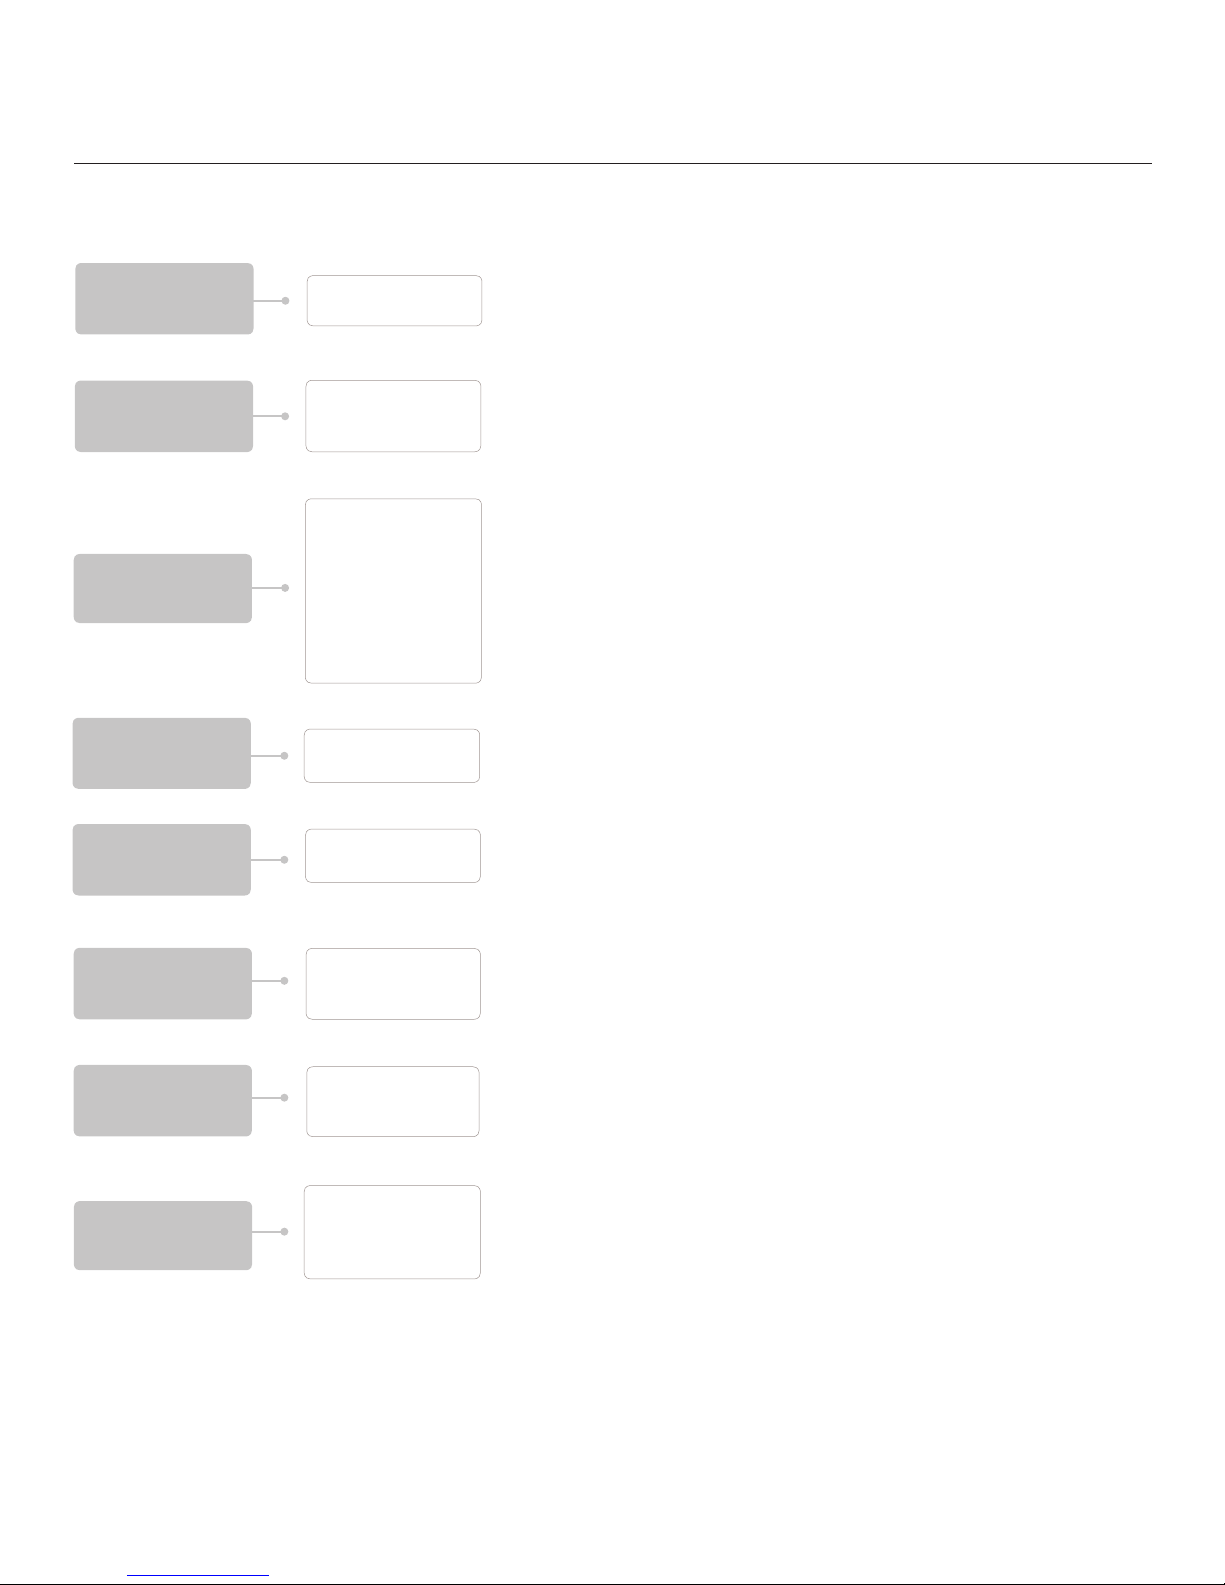
FRONT PANEL INTERFACE SETTINGS
STREAMING
SETUP
RECORDING
SETUP
VIDEO SETUP
AUDIO SETUP
3D LUT SETUP
Primary Stream
Quickview Sream
Recording
Media
Trigger
Input
Resolution
Codec (700 series)
Frame Rate
Max Frame Rate
Bitrate
Deinterlacer
Profile
Overlay
Analog
Embedded
Mode
Preset
STREAMING SETUP: Configure a streaming mode option
and/or broadcast destination for the Primary stream, or enable
the Quickview stream. Primary stream options include:
● Live:Air ● MPEG-TS (license required) ● Internet Streaming
● Teradek Streaming ● RTP/RTSP ● HTTP Live (HLS)
● SRT ● RTMP
RECORDING SETUP: Enable or disable the recording feature,
and select a recording trigger and media storage option.
VIDEO SETUP: Adjust the codec (700 series only), bitrate,
resolution, frame rate, and other key features related to your
stream. Options include:
● Input ● Frame Rate ● Deinterlacer
● Resolution ● Max Frame Rate ● Profile
● Codec (Cube 700) ● Bitrate ● Overlay
AUDIO SETUP: Allows you to configure an audio input source.
NETWORK
SETUP
CLOUD
SERVICES
Check Firmware Update
SYSTEM
© Teradek, LLC 2017. All rights reserved.
Wired
WiFi
USB Modem
None
Sputnik
Core
Factory Reset
Display Settings
Debug Settings
3D LUT SETUP: Enable or disable a look preset, or display a
split screen view.
NETWORK SETUP: Contains options for configuring
Ethernet, Wi-Fi, and USB modem interfaces.
CLOUD SERVICES: Allows you to enable Core, Teradek’s cloud
service management service.
SYSTEM: Perform factory reset, firmware upgrade, and modify
your display settings.
Page 11
Page 12
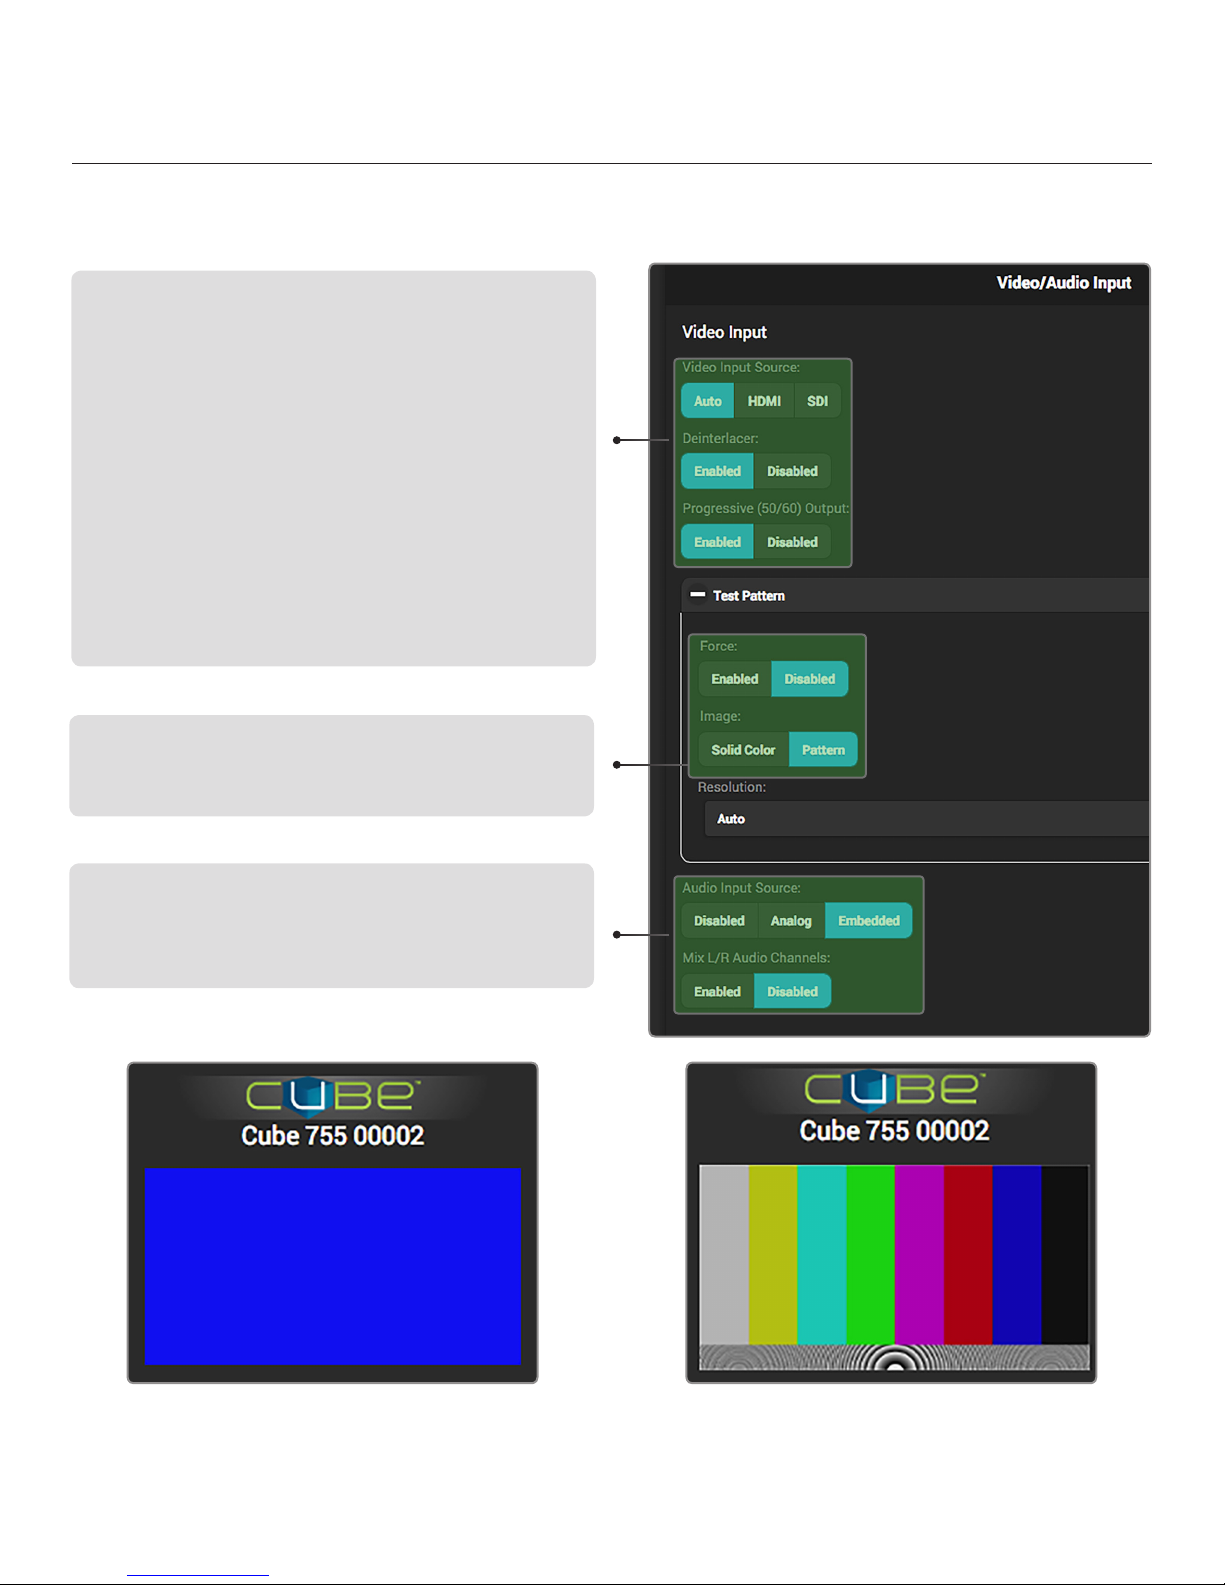
VIDEO/AUDIO INPUT
The Video/Audio Input menu contains several input source configuration and video overlay options.
Video Input Source - Video Input Source lets you select the type
of signal providing the video source.
Deinterlacer - The Deinterlacer converts interlaced video into
progressive video before streaming, improving the appearance
of video that has been scaled down from the original input
resolution. In addition to supporting scaled down interlaced video,
deinterlacing is also useful when streaming to the internet or
mobile devices instead of a decoder.
1080p 50/60 Handling (600 series encoders only) - Select
whether to convert your video input to progressive video (Half
Framerate) or interlaced video (Interlacer).
Progressive (50/60) Output (700 series encoders only) - With
the Deinterlacer enabled, select whether your your stream is
transmitted in 1080p60 (Enabled), or 1080p30 (Disabled).
SDI Ancillary Data (600 series encoders only) - Extract Timecode
or Closed Captions data from the SDI input and embed it into
your stream.
Test Pattern Broadcast a test image when no video is connected.
Setting Force to Enabled allows the encoder to stream a test
pattern (Fig. 3-1, 3-2) regardless of the video connection.
Audio Input Source - Configure the audio input source. Selecting
Embedded (HDMI) allows you to enable or disable L/R audio
channels. Selecting Analog allows you to manually adjust the
volume. Selecting Disabled produces a silent stream.
Fig. 3-1: Test pattern - solid color image Fig. 3-2: Test pattern - pattern image
Page 12
Page 13
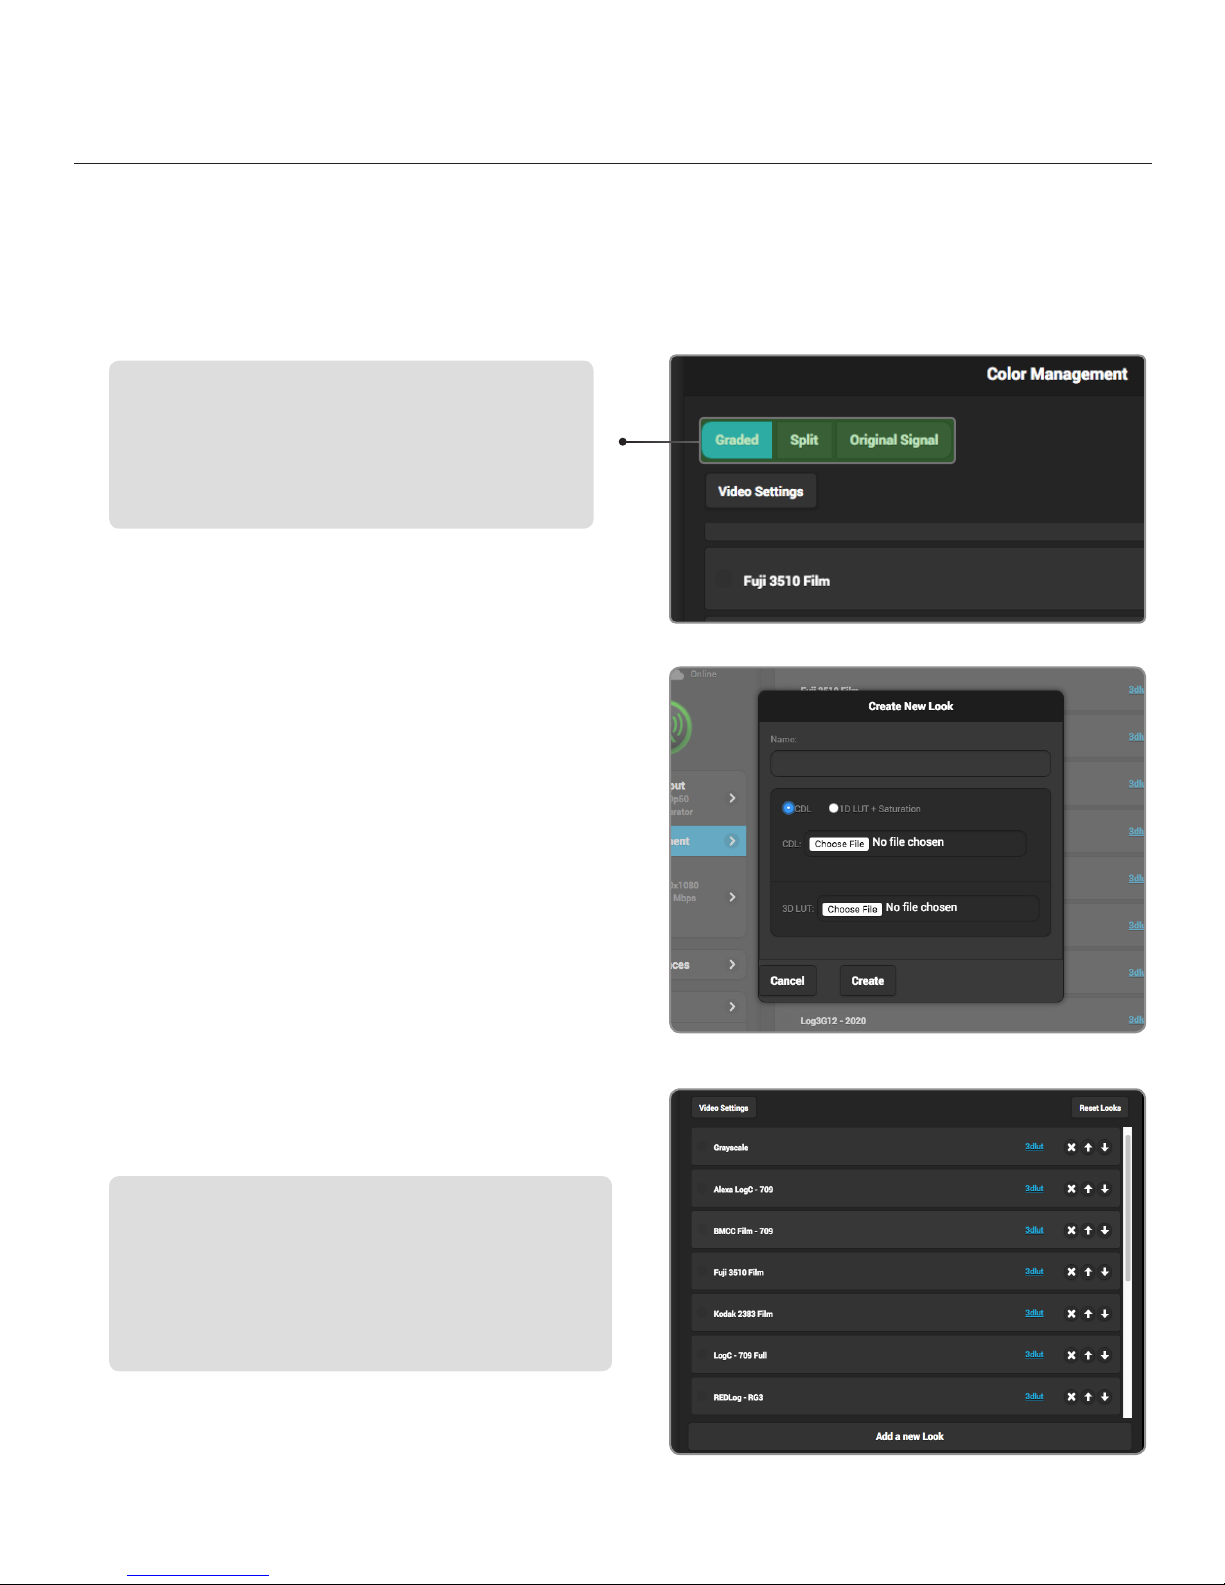
COLOR MANAGEMENT
The Color Management menu contains options for adding specific looks from your computer and saving
them to Cube’s interface. These looks can either be 3D LUT files, CDL preset files, or files composed of
both formats. Use this menu or the front panel interface to apply presets to the video output. Up to 32
looks can be stored on the device.
Color Management options
Graded - Enable a look preset
Split - Display a split screen view of the original image and
any selected preset
Original Signal - Transmit the input source’s original look
without a look preset
Creating a Look
Look presets can be created from a 3D LUT and either an
ASC CDL file or 1D LUT + Saturation files.
1. Select Add a new Look.
2. Enter a name for your look under the name field.
If a name is not entered, the look will use the
same name as the 3D LUT filename. Names can
be up to 32 characters long.
3. Select whether you would like to load a CDL file
(Fig. 3-3), or a 1D LUT file + Saturation file,
then click Choose File to select the file(s) from
your computer.
4. Select Choose File under the 3D LUT section and
pick the 3D LUT file you wish to use.
Organizing look presets (Fig. 3-4)
Arrange look presets either by dragging the desired preset up
and down on the list or clicking the or icons.
Deleting looks
Look presets can be deleted by clicking the X button located in
the look’s listing.
Fig. 3-3
© Teradek, LLC 2017. All rights reserved.
Fig. 3-4
Page 13
Page 14
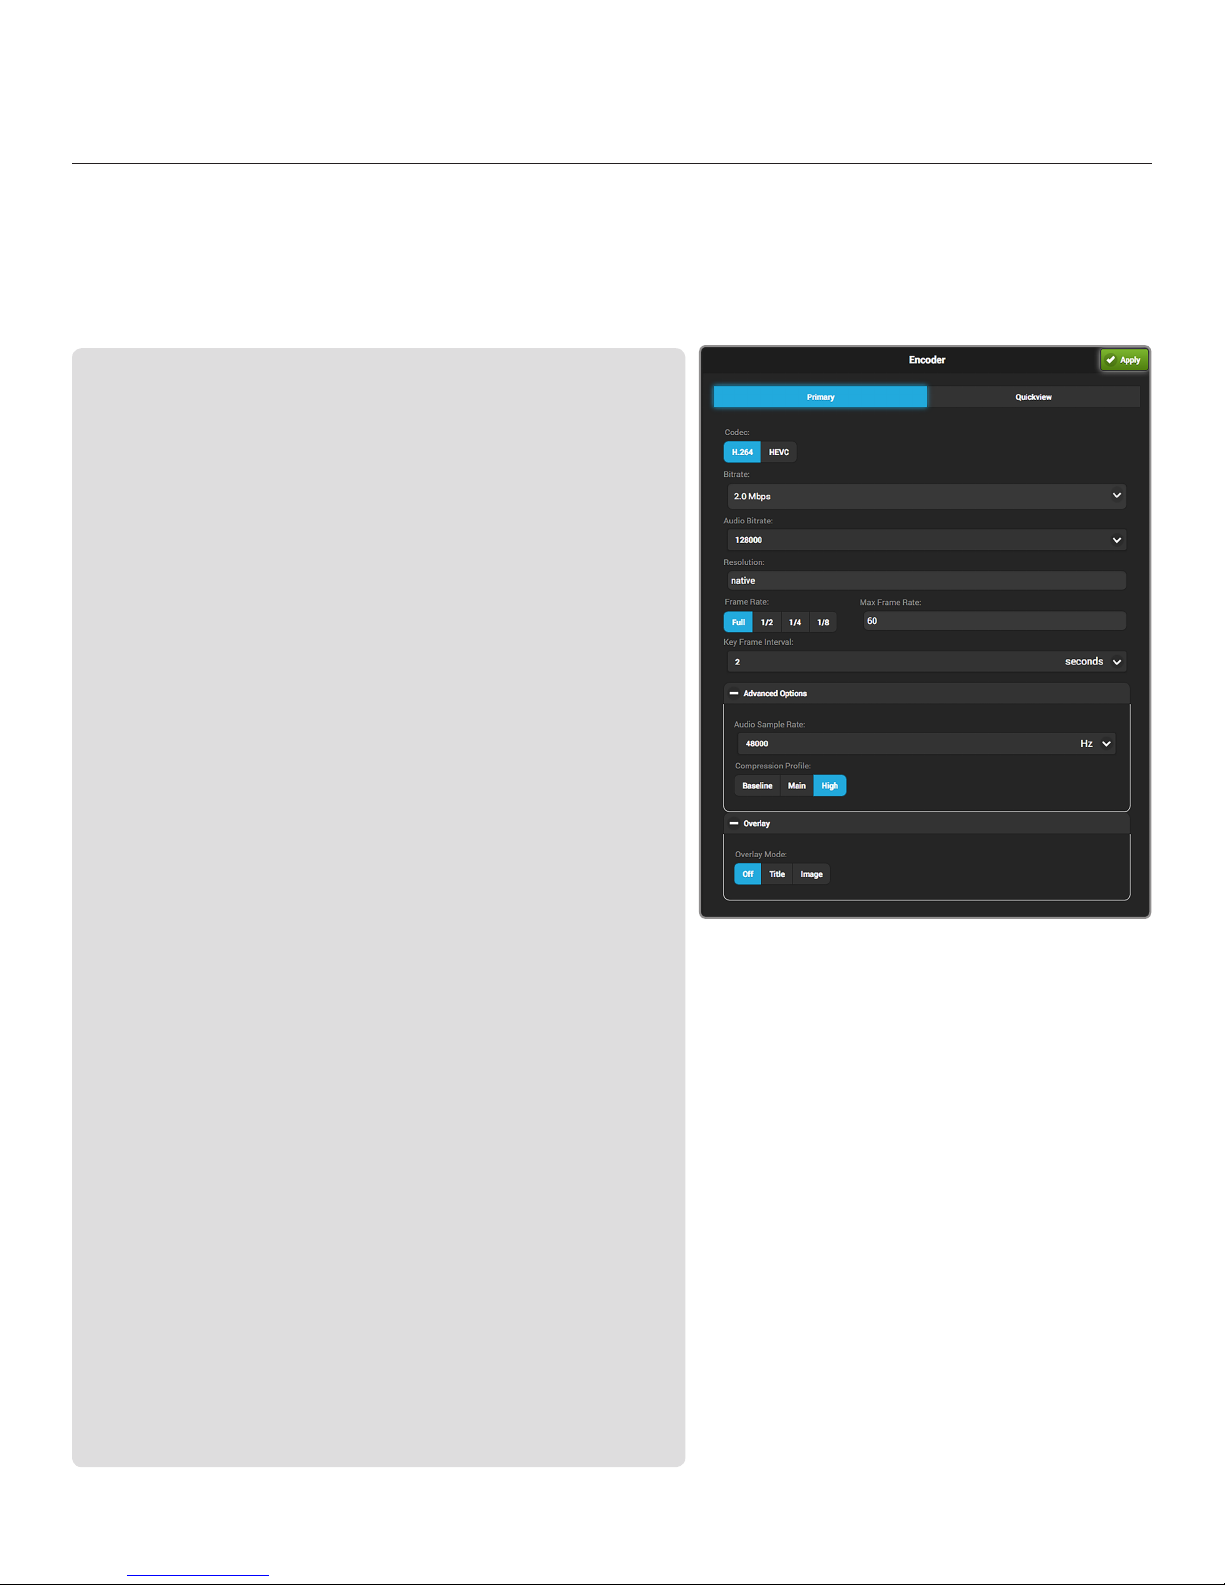
ENCODER
With Cube, you can control various characteristics of the network video stream, such as bitrate, frame rate,
and resolution. Use this section to help you adjust the video stream to best suit your streaming
environment. The Primary stream offers a complete set of options that are fully configurable; a subset of
those options are available for the Quickview stream.
Encoder Options
Codec (700 series encoders only) - Select either HEVC or H.264 compression
formats.
Bitrate and Audio Bitrate - Select your stream’s target bitrate. Lower bitrates
require less bandwidth and may allow for a more stable stream while higher
bitrates offer better video quality, but require more network bandwidth.
Resolution - Scale down the encoder’s input resolution or maintain the input’s
native resolution.
Frame Rate - Set the encoder frame rate to full frame rate or a fraction of the
input frame rate.
Max Frame Rate - Manually enter your stream’s target frame rate.
Key Frame Interval - Adjust the amount of time between full picture refreshes.
By default, the encoder generates one key frame every two seconds.
Advanced Options
Caching* - This value can be left at its default (300 ms) in most cases. Decreasing
the value reduces overall latency, but video quality and stability may deteriorate.
Increase this value if your video stream stability is affected by a poor or
challenging network environment.
Audio Sample Rate - Set the encoder audio sample rate.
Aspect Ratio* - Select the encoder aspect ratio -- Either Auto, 4:3, or 16:9.
Use Square Pixels*- This feature can be left enabled unless used with a decoder
that requires non-square pixels. When enabled, the horizontal resolution is
adjusted to set the picture aspect ratio (1:1 pixel aspect ratio). If disabled, the pixel
aspect ratio varies to determine the picture aspect ratio.
Compression Profile - High profile encoding typically gives the best image quality
at a given bitrate. Main and Baseline profiles utilize slightly different features, and
may be more compatible with some decoders.
Frame Structure*- Select Macroblock-adaptive frame-field (MBAFF), frame, or
field coding for interlaced video encoding.
SEI Timing* -Enable or disable SEI timing. This should be left enabled unless
required for a particular stream application.
Overlay
Title - Overlay text or images onto your video stream, then adjust the appearance
and location of text.
Image - Overlay imported images onto your video stream, then adjust the
location of the image.
Rate Control*
Mode- Select Auto, Manual, or Debug. Additional options are present when set to
Manual‟or Debug mode.
Static Scene Detection - Prevents bitrate spikes during static-to-dynamic scene
transitions when enabled. Improves video quality in mostly static scenes when
disabled.
Complexity Detection- Allows the encoder to adapt more quickly to very complex
content and scene changes.
Zero Padding - The stream is held at the configured bitrate. Extra data is added to
the stream to “pad” the bitrate if it would otherwise drop below the configured
value, preventing the bitrate from exceeding the configured value.
* 600 series encoders only
Encoder Settings Considerations
● Encoder settings will vary based on the
bandwidth available and the platform used.
● Always select a video bitrate that is less than
70% of the total upload bandwidth available
on the Internet connection (i.e. if 5 Mbps is
available, set the video to 3.5 Mbps or lower).
● Some platforms (i.e. YouTube) will
automatically generate lower quality streams
from a high quality input (transcoding), so the
highest possible quality can be used. If the
streaming platform does not transcode the
video, consider that your viewers must have
the available download bandwidth to view
the stream.
Page 14
Page 15
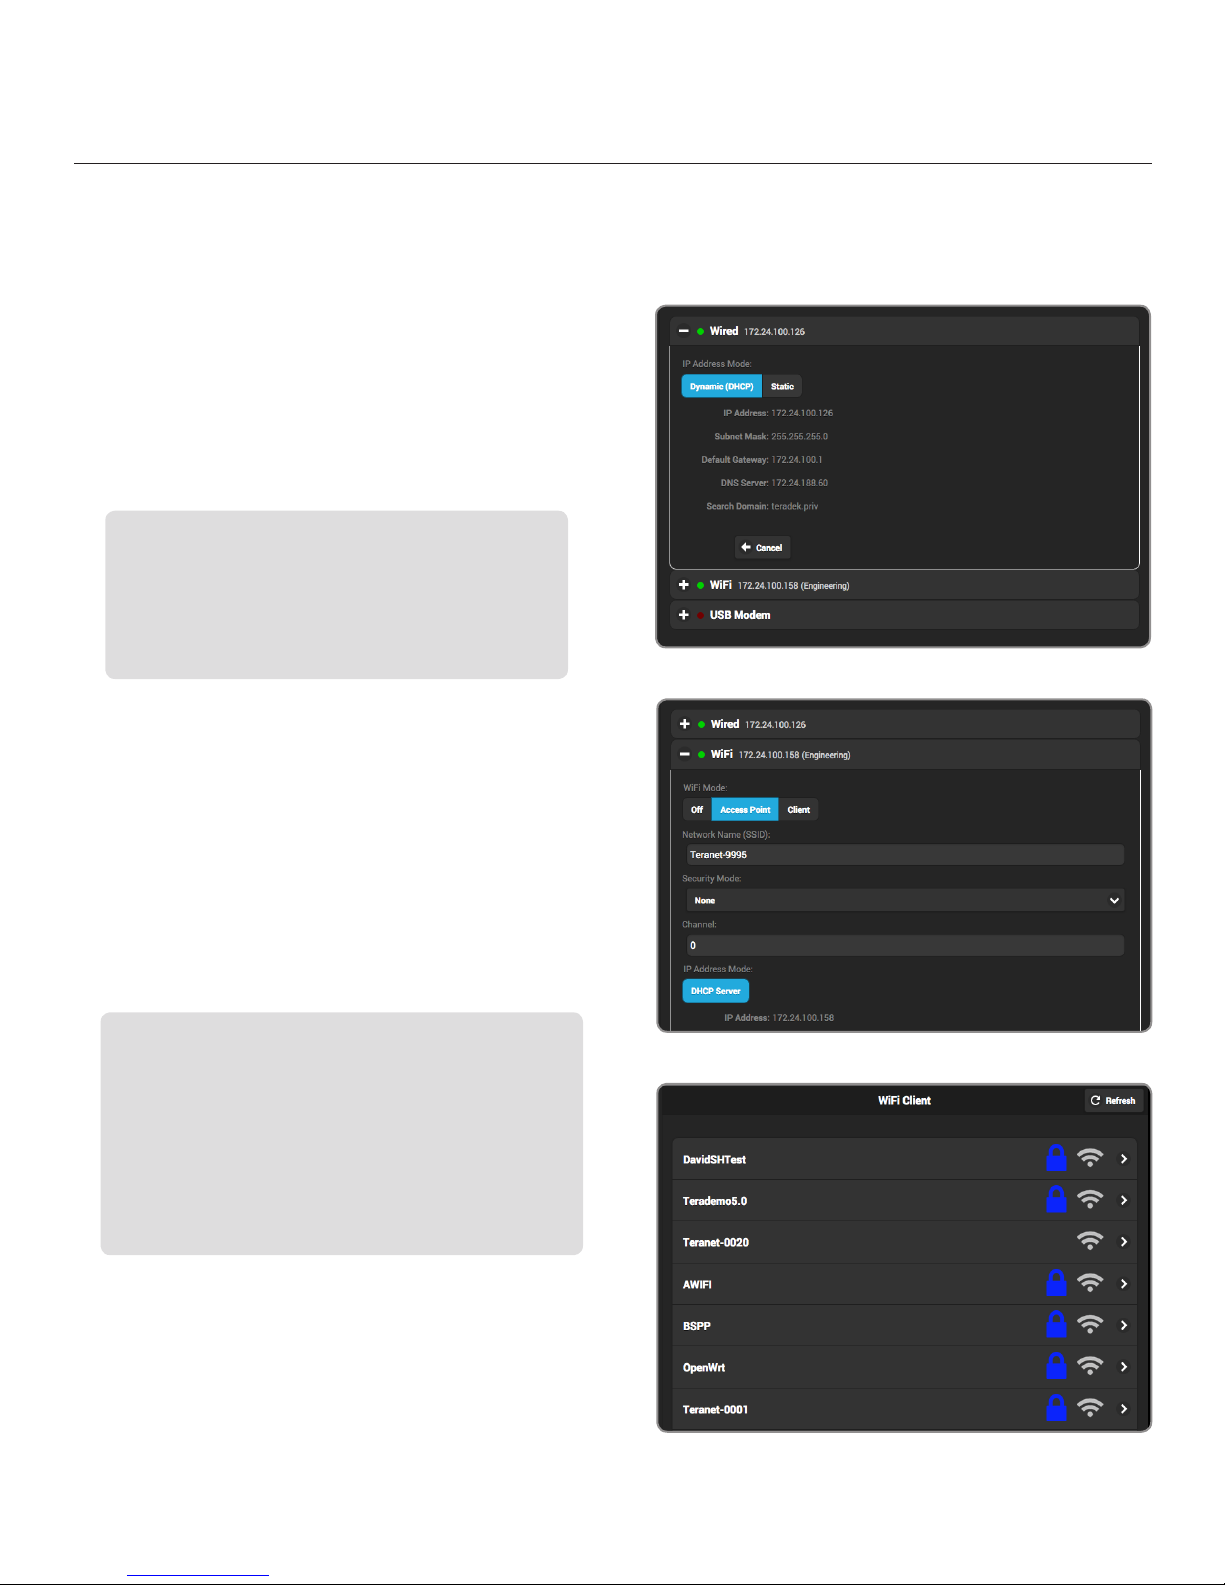
NETWORK INTERFACES
Cube allows you to connect and stream to the Internet by utilizing one of several network interfaces.
Wired
A wired Ethernet connection is typically the most
reliable means for connecting to a network, as you
don’t have to deal with the instability of a Wi-Fi
or cellular connection. To configure the Ethernet
interface, select Wired from the Network Interfaces
page, then click Modify (Fig. 3-5).
IP Address Modes
Dynamic (DHCP) - The connected router generates an IP
address, allowing Cube to be automatically configured.
Static - Manually configure the IP address settings if a
DHCP server is not available, or if applications require a
fixed address.
Fig. 3-5
Wireless (Wi-Fi)
Although an Ethernet connection is the most reliable
method of connecting to a network, a Wi-Fi connection
may be more convenient, especially if an Ethernet
connection is unavailable. There are two Wi-Fi
modes available; Access Point (AP) Mode and Client
(Infrastructure) Mode (Fig. 3-6).
Wi-Fi Modes
Access Point (AP) Mode - Cube acts as its own dual band
access point, allowing you to connect your device directly
to Cube’s AP network.
Client (Infrastructure) Mode - Cube and your device
connect to the same local wireless network. Access Client
Mode, then click Browse to scan for available networks
(Fig. 3-7), or Saved Networks to connect to a previously
saved network, then enter your credentials.
Fig. 3-6
© Teradek, LLC 2017. All rights reserved.
Fig. 3-7
Page 15
Page 16
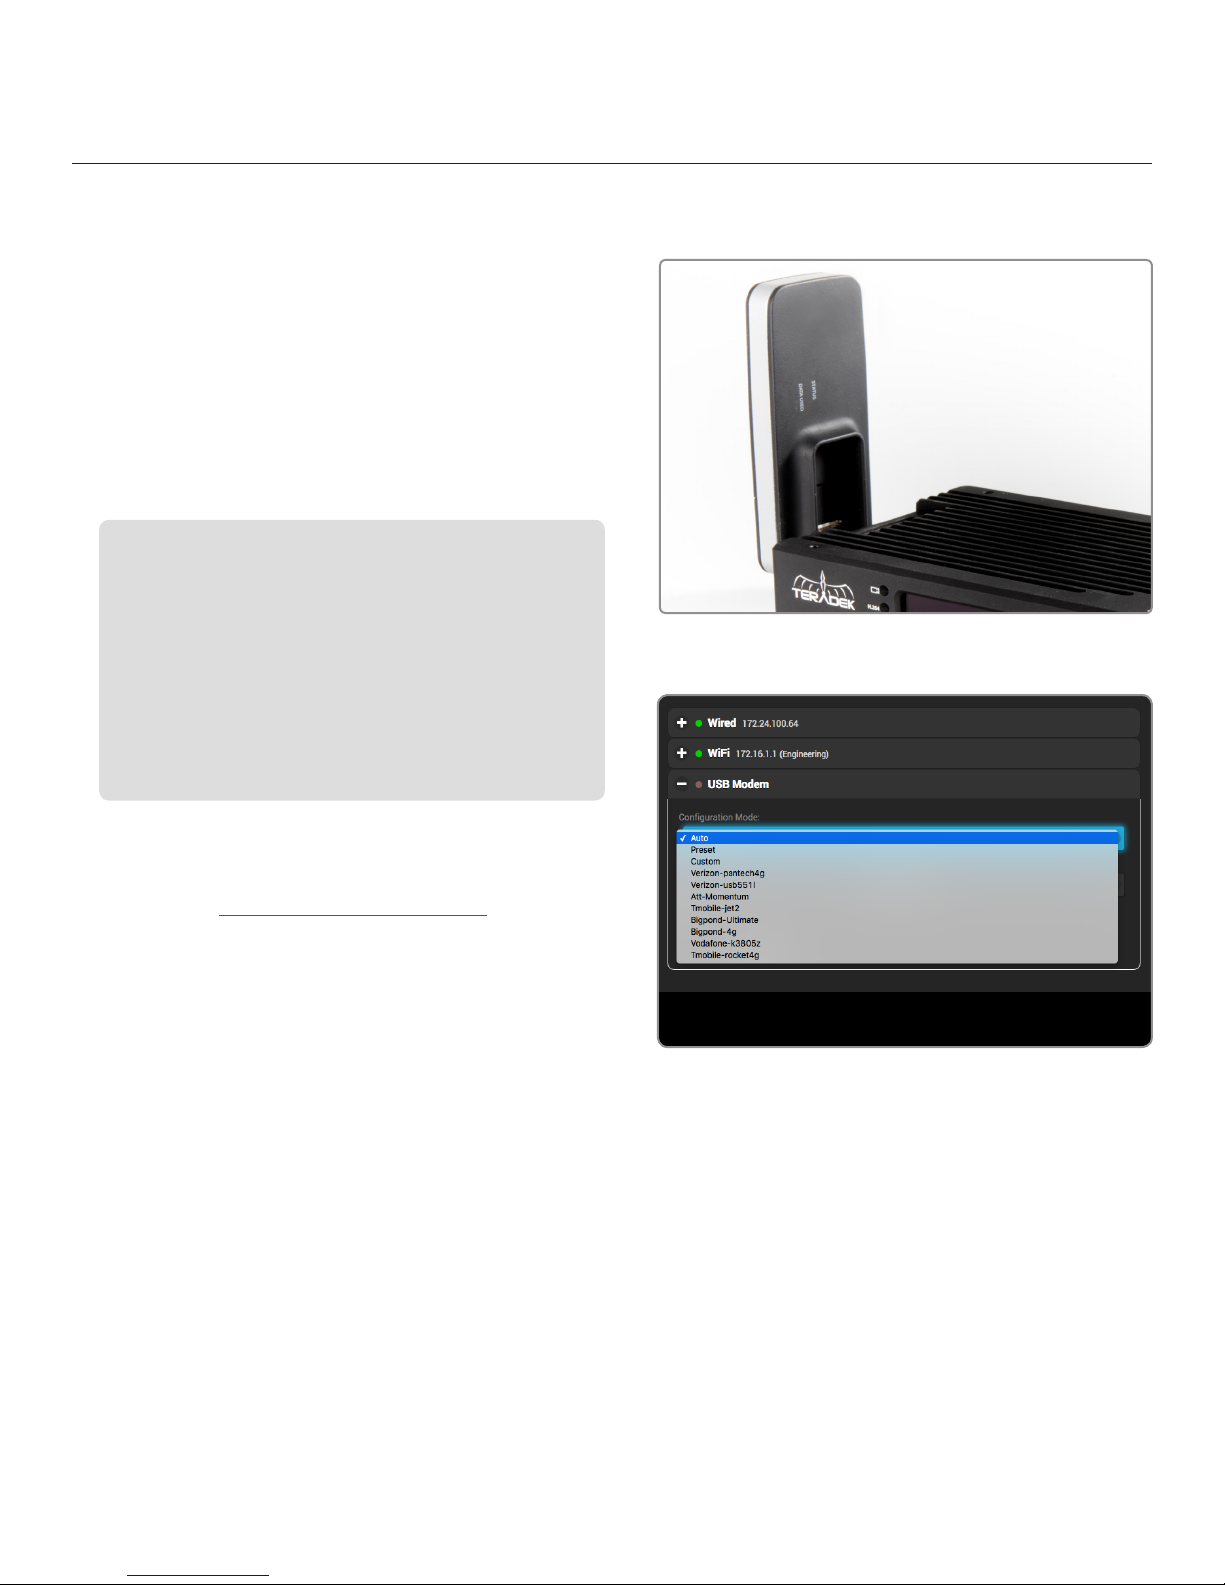
NETWORK INTERFACES (CONT.)
USB Modem
A USB modem allows you to broadcast wherever a cell
connection is available. Cube automatically detects and
supports many modems using the Auto setting. If you
need to configure a modem, connect to Cube (see page
17) and insert the USB Modem into Cube (Fig. 3-8).
From the Network Interfaces page, select USB Modem,
then select a configuration mode.
Configuration Modes
Auto (default): The modem is automatically detected and
configured. Cube supports many modems worldwide using
this setting.
Preset: Contains configurations for modems that are
supported but cannot be auto detected. User credentials
are required if the modem account is password protected.
Custom: Allows you to manually configure a modem if it’s
not automatically detected. Available configuration modes
are GSM, CDMA, Composite, and Ethernet. Modes will vary
based on the modem model and mobile network provider.
Fig. 3-8
In addition to the above configuration modes, you can
also select from several supported modem configurations
(Fig. 3-9). Visit http://support.teradek.com for more
information about specific modem models.
Fig. 3-9
Page 16
Page 17
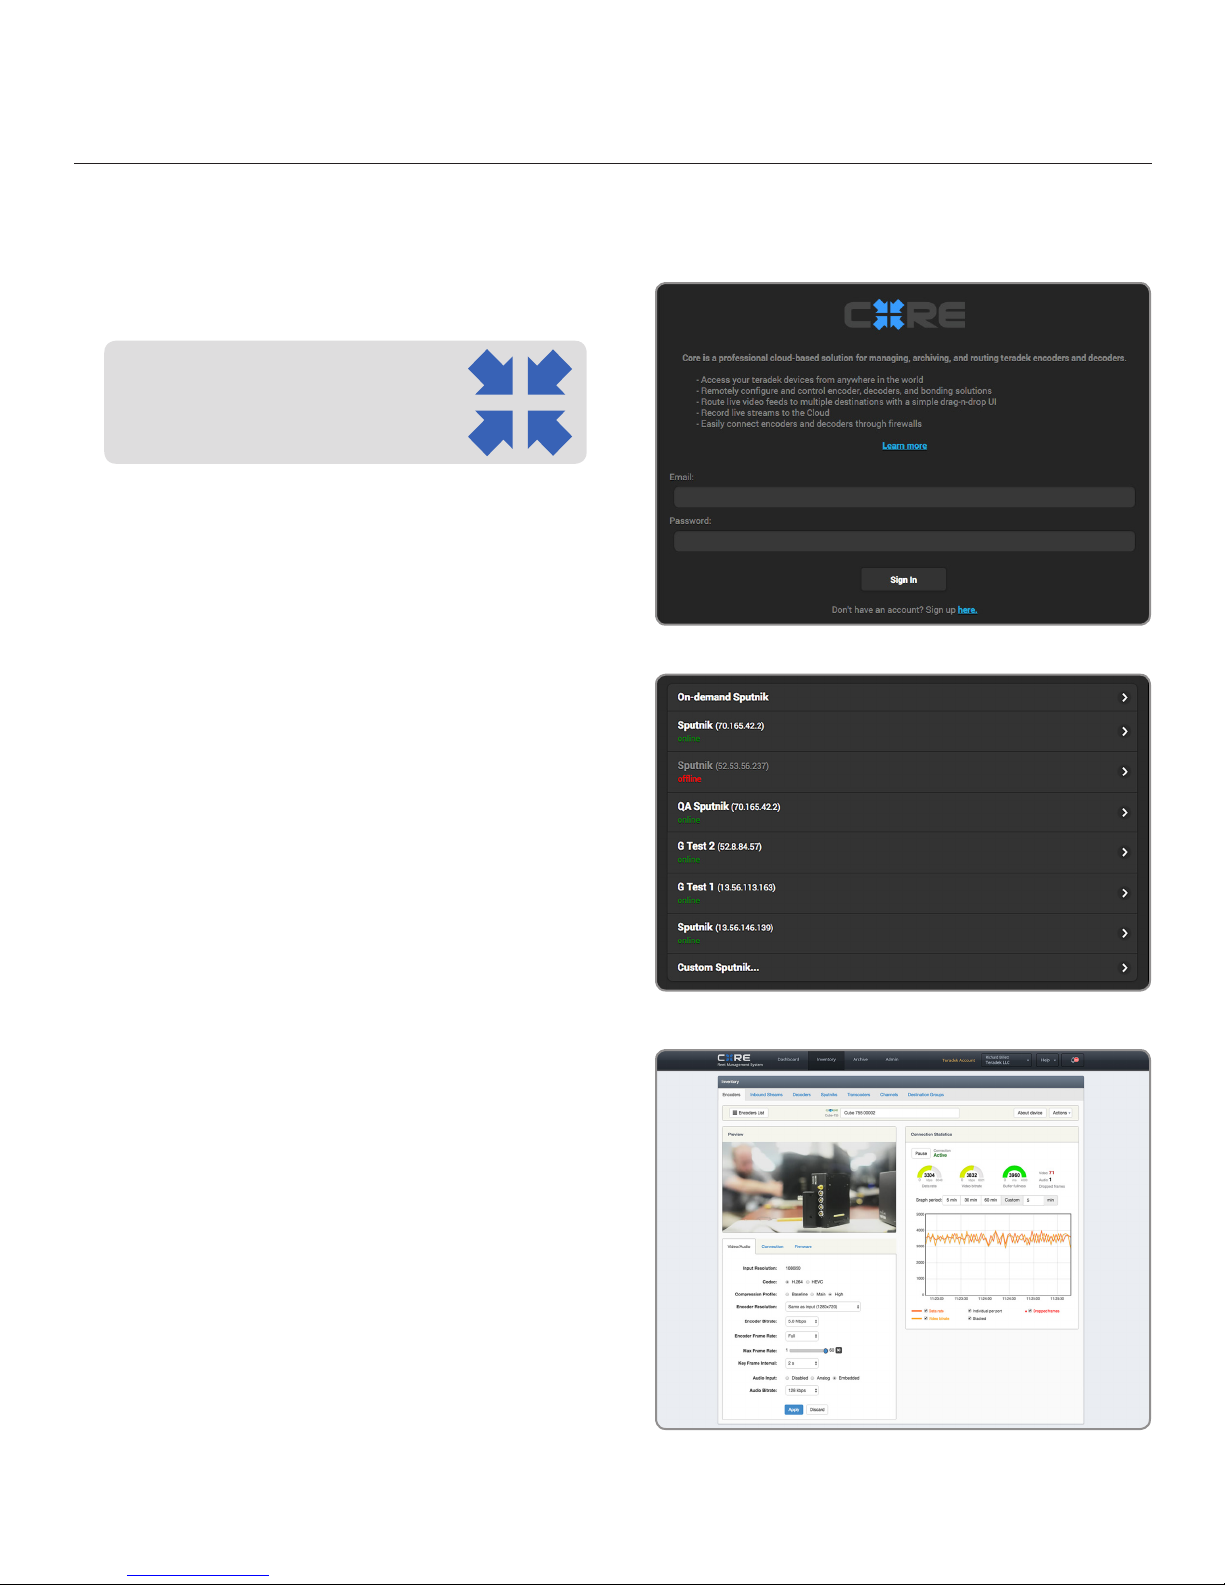
CLOUD SERVICES
Cube encoders and decoders can be remotely accessed, configured, and controlled using Teradek’s CORE
Cloud management and routing service.
CORE
CORE Cloud Service
CORE is a professional cloud-based solution
for managing, archiving, and routing Teradek
encoders and decoders.
With CORE, you can:
● Bond multiple Internet connections, increasing
your broadcast’s bandwidth and reliability
● Remotely control Teradek encoders, decoders
and bonded systems from anywhere in the world
● Route live video feeds to multiple destinations
and streaming platforms using a simple drag and-drop web UI
● Easily connect encoders and decoders through
firewalls
● Record streams from encoders and archive them
to the “cloud” in real time
Fig. 3-10
To get started, select CORE, then click Apply in the
upper right-hand corner:
1. Sign up for CORE, then log in from the web UI
(Fig. 3-10).
2. Select an account (company), then click “Not
Configured...” to select a Sputnik server. If one
isn’t available, open the CORE dashboard and
navigate to Inventory>Sputniks, then select Add
Sputnik to configure a Sputnik server.
3. After selecting a Sputnik (Fig. 3-11), click Apply in
the upper right-hand corner. Return to the web UI
and select Refresh to display the Sputnik server.
4. Once a connection is established, you can
configure and control Cube from the CORE
dashboard (Fig. 3-12).
Visit http://core.teradek.com to learn more and to create an
account.
Fig. 3-11
Fig. 3-12
© Teradek, LLC 2017. All rights reserved.
Page 17
Page 18

VIDEO STREAM OUTPUT
Depending on the video’s destination, you can pick from a variety of different stream modes, each with it’s
own set of configurable settings described here.
CONFIGURABLE SETTINGS
LIVE:AIR
Live:Air Action is a video production suite that can receive feeds
from any Cube encoder for real-time video mixing, switching and
even transitions. Once you’ve configured Cube to stream in Live:Air
mode, you can manage it from the Live:Air Action (see page 7) or
VUER apps (see page 8).
• Advanced Settings
- Buffer - Max Clients
TERADEK STREAMING TDS
TDS is specifically optimized for local streaming with minimum
latency between Teradek devices. Configure TDS by entering the IP
address and destination port of a Teradek decoder.
MPEG TRANSPORT STREAM MPEG-TS
To stream over MPEG Transport Stream, you’ll first need to purchase
the license from Teradek. In MPEG Transport Stream Mode, Cube
sends video via a TCP or UDP protocol to a specified unicast or
multicast address. TCP is recommended when streaming over the
internet, while UDP is recommended when streaming over a local
network to avoid the additional network overhead of TCP. Select
the protocol best suited for your application needs, and ensure
the Cube encoder is configured to stream to the Cube decoder’s
corresponding IP address and port.
• Host
• Port
• Advanced Settings
- Buffer - Packet Size
- Protocol - DSCP
• Protocol (UDP/TCP/Multicast)
• Host
• Port
• MPEG-TS Server Mode
• Advanced Settings
- Audio Codec - PSI Period
- Packet SIze - DSCP
- PCR Period
• Constant Bitrate
• Adaptive Bitrate (TCP only)
• Transport Stream Info
SRT
SRT is used to transmit high quality, low-latency video over
unreliable networks. SRT has two Server modes: Enabled or
Disabled. When server mode is Enabled the encoder waits for one
or more clients to connect and pull the stream from it. When server
mode is Disabled, the encoder pushes video to a single destination
IP address on a specific port. For either mode, a port number is
needed, and a passphrase (if one is set). For a direct connection
(Server mode disabled), enter the correct destination IP address.
Page 18
• Server Mode
• Passphrase
• Encryption Key Size
• Latency
• Adaptive Bitrate
Page 19

RTP/RTSP
Cube is configured to stream via RTSP by default. RTSP is used for
local streaming to computers and Cube decoders. When RTP/RTSP
mode is enabled, the decoder communicates whether to use the
TCP or UDP protocol for the stream. Ensure you have the correct
port and stream name (stream1 is the default). To view your stream
on VLC, copy the link displayed under Video Stream Output panel in
the Settings Menu (Fig. 3-14). To view an RTSP stream, launch VLC
and navigate to File>Open Network. Paste the link in the URL field,
then click Open.
CONFIGURABLE SETTINGS
• Stream
• Port
• RTSP Authentication
• Username
• Password
RTMP
RTMP mode allows Cube to stream to other video platforms,
CDNs, and streaming servers that are not one of the available
Internet Streaming platforms (see below). RTMP is supported by
most video streaming platforms, but you must first obtain a URL
and stream key/name from the service you choose to stream to.
Log into your account’s settings and retrieve the URL and stream
key/name.
HTTP LIVE HLS
HTTP Live streaming (HLS) is supported natively by iOS-based
devices and desktop computers (Mac OS X). Due to unreliable
network conditions, local streaming to a browser or iOS device will
have a higher degree of latency. For low latency streaming to iOS
devices, use Live:Air mode with Teradek’s Live:Air Action, VUER, or
TeraView apps.
INTERNET STREAMING
Cube features native integration with some of the most popular
streaming platforms. Select a provider (platform), then enter your
credentials and/or destination information.
Integrated Platforms
Livestream (pg. 20)
Ustream (pg. 21)
YouTube Live (pg. 22)
Twitch (pg. 23)
Wowza (pg. 23)
Facebook (pg. 24)
Periscope (pg. 25)
• RTMP Server URL
• Stream
• OnCaptionInfo
• Auto Start
• Auto reconnect
• Advanced Settings
- Backup URL - Password
- User Agent - DSCP
- Username
• No Configurable Settings
• Provider
- Livestream - Wowza
- Ustream - Facebook
- YouTube Live - Periscope
- Twitch
• Username
• Password
• OnCaptionInfo
• Auto Start
• Auto reconnect
• Advanced Settings
- DSCP
© Teradek, LLC 2017. All rights reserved.
Page 19
Page 20
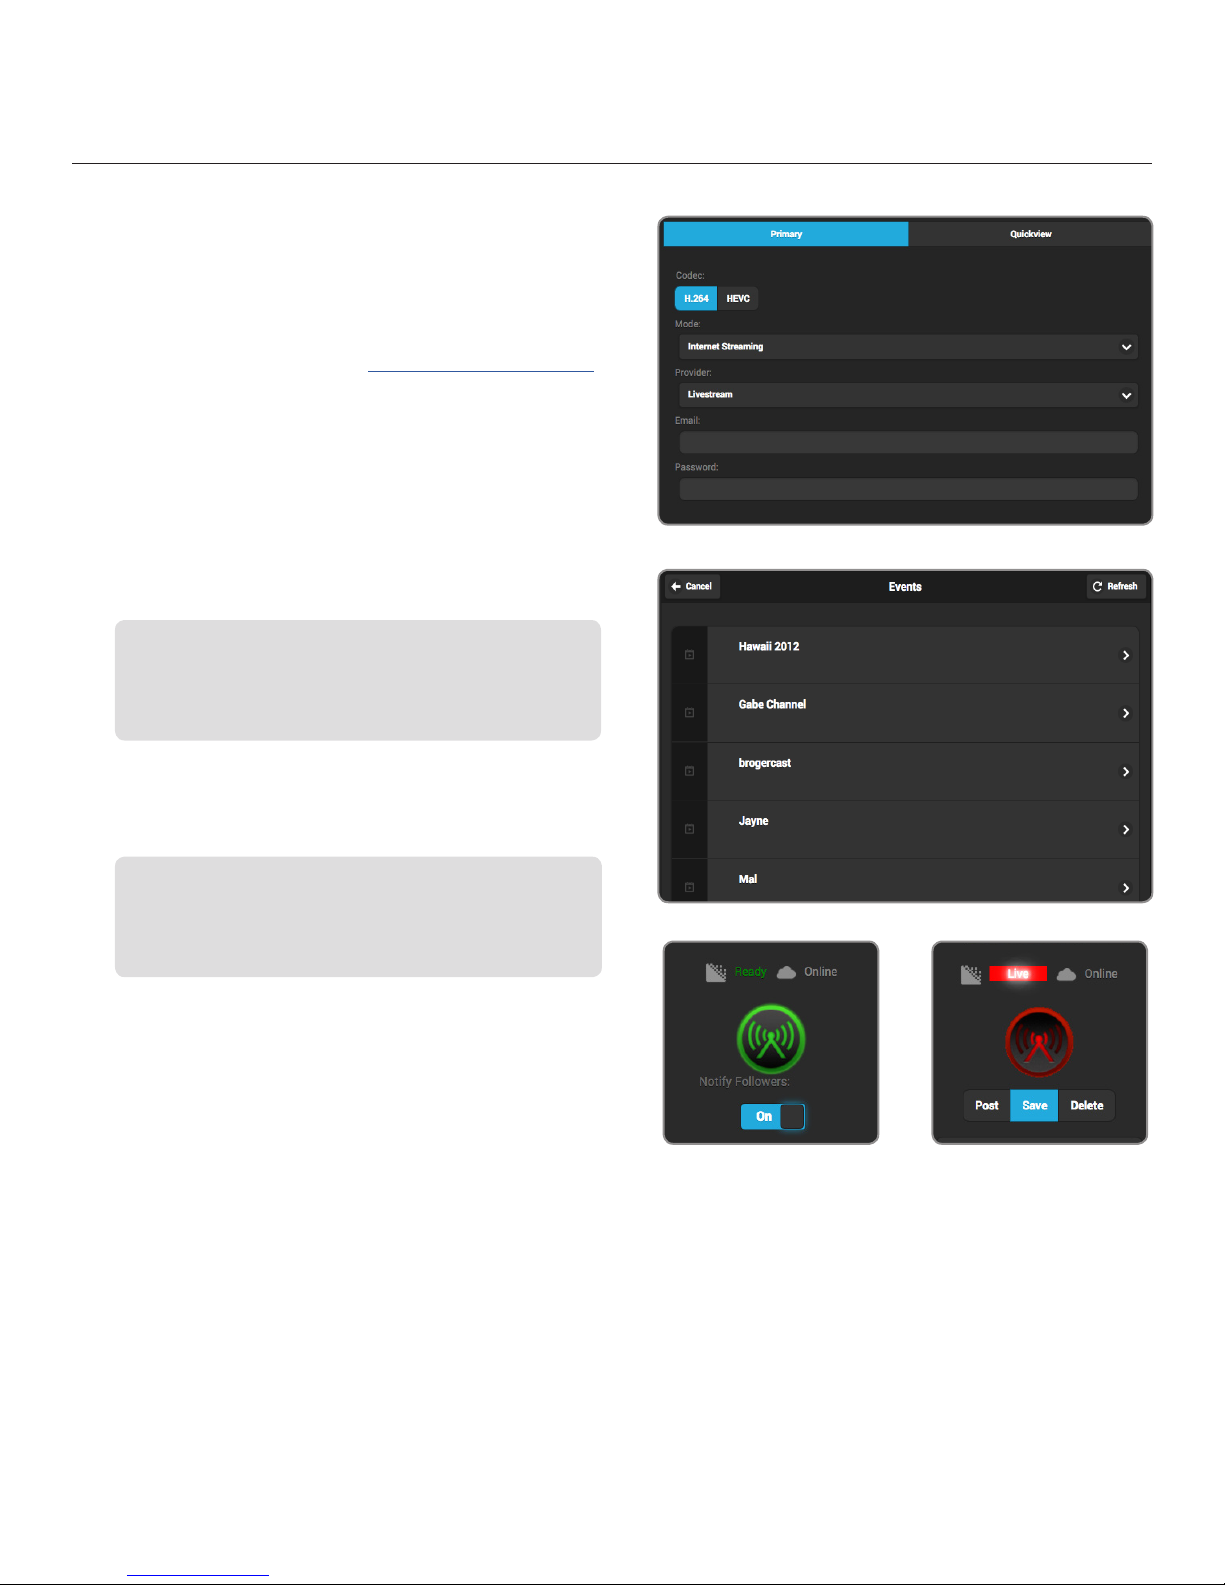
Livestream:
1. Select Livestream and enter your credentials
(Fig. 3-13).
2. Select the event you wish to stream to (Fig. 3-14),
or create a new event at https://livestream.com.
3. After selecting an event, you will be redirected
to the Video Stream Output page. Select Apply
on the upper right corner.
4. Tap the Broadcast button to go live, then
select whether or not to notify your followers
(Fig. 3-15).
Notify Followers
If broadcasting from Cube’s web UI, you can notify your
account’s followers by toggling the ‘Notify Followers’
switch to On before tapping the broadcast button.
5. When ending the broadcast, select whether to
Post, Save, or Delete the video from the event
(Fig. 3-16).
Post, Save, or Delete
During your broadcast, you can select whether to Post
the recorded video immediately, Save it for posting later,
or Delete it from the event.
Fig. 3-13
Fig. 3-14
Page 20
Fig. 3-15 Fig. 3-16
Page 21
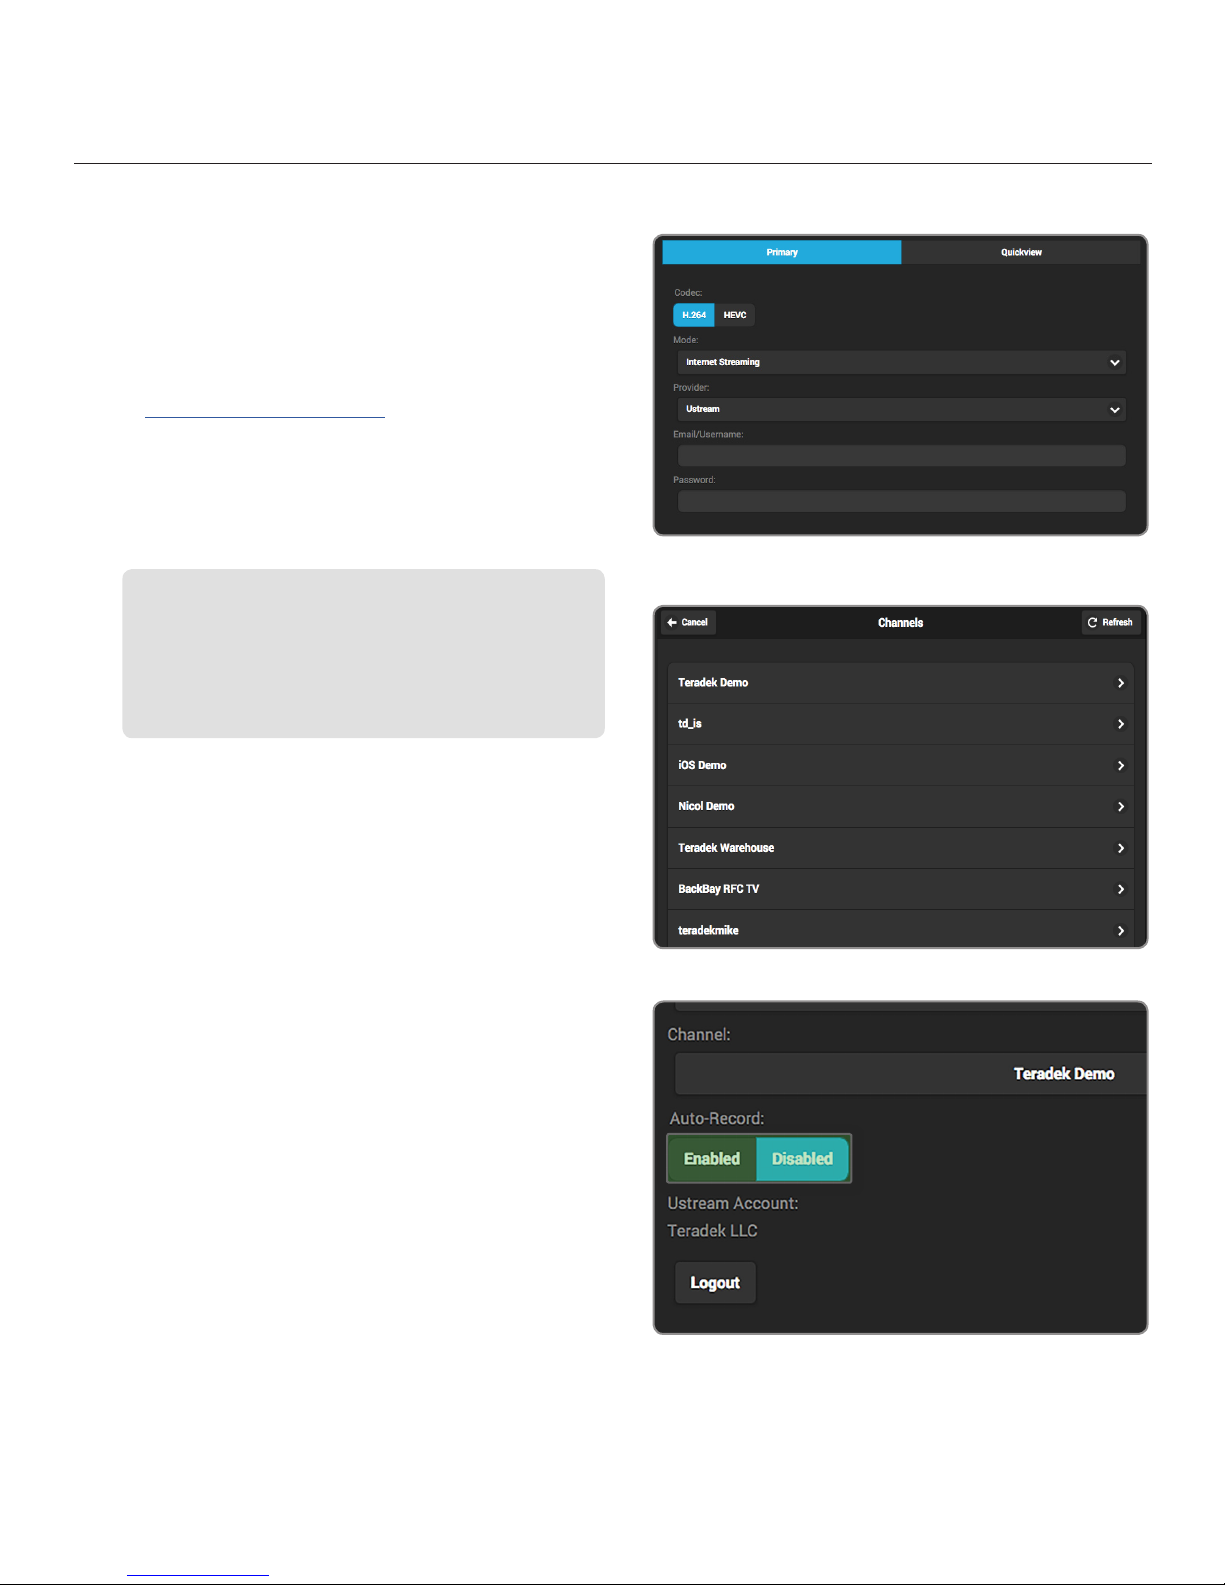
Ustream:
1. Select Ustream, enter your credentials, then select
Apply in the upper-right corner (Fig. 3-17).
2. Select an available channel to stream to from the
Channels List (Fig. 3-18), or create a new channel
at https://www.ustream.tv.
3. After selecting a channel, you will be redirected to
the Video Stream Output page. Tap the Broadcast
button to go live.
Auto Record and recorded files
Depending on your Ustream account level, broadcasts to
your channel may be automatically recorded for viewing
later. Enabling the ‘Auto-Record’ setting (Fig. 3-19) triggers
these recordings. Access permissions for the recorded files
can be configured on your Ustream account.
Fig. 3-17
© Teradek, LLC 2017. All rights reserved.
Fig. 3-18
Fig. 3-19
Page 21
Page 22
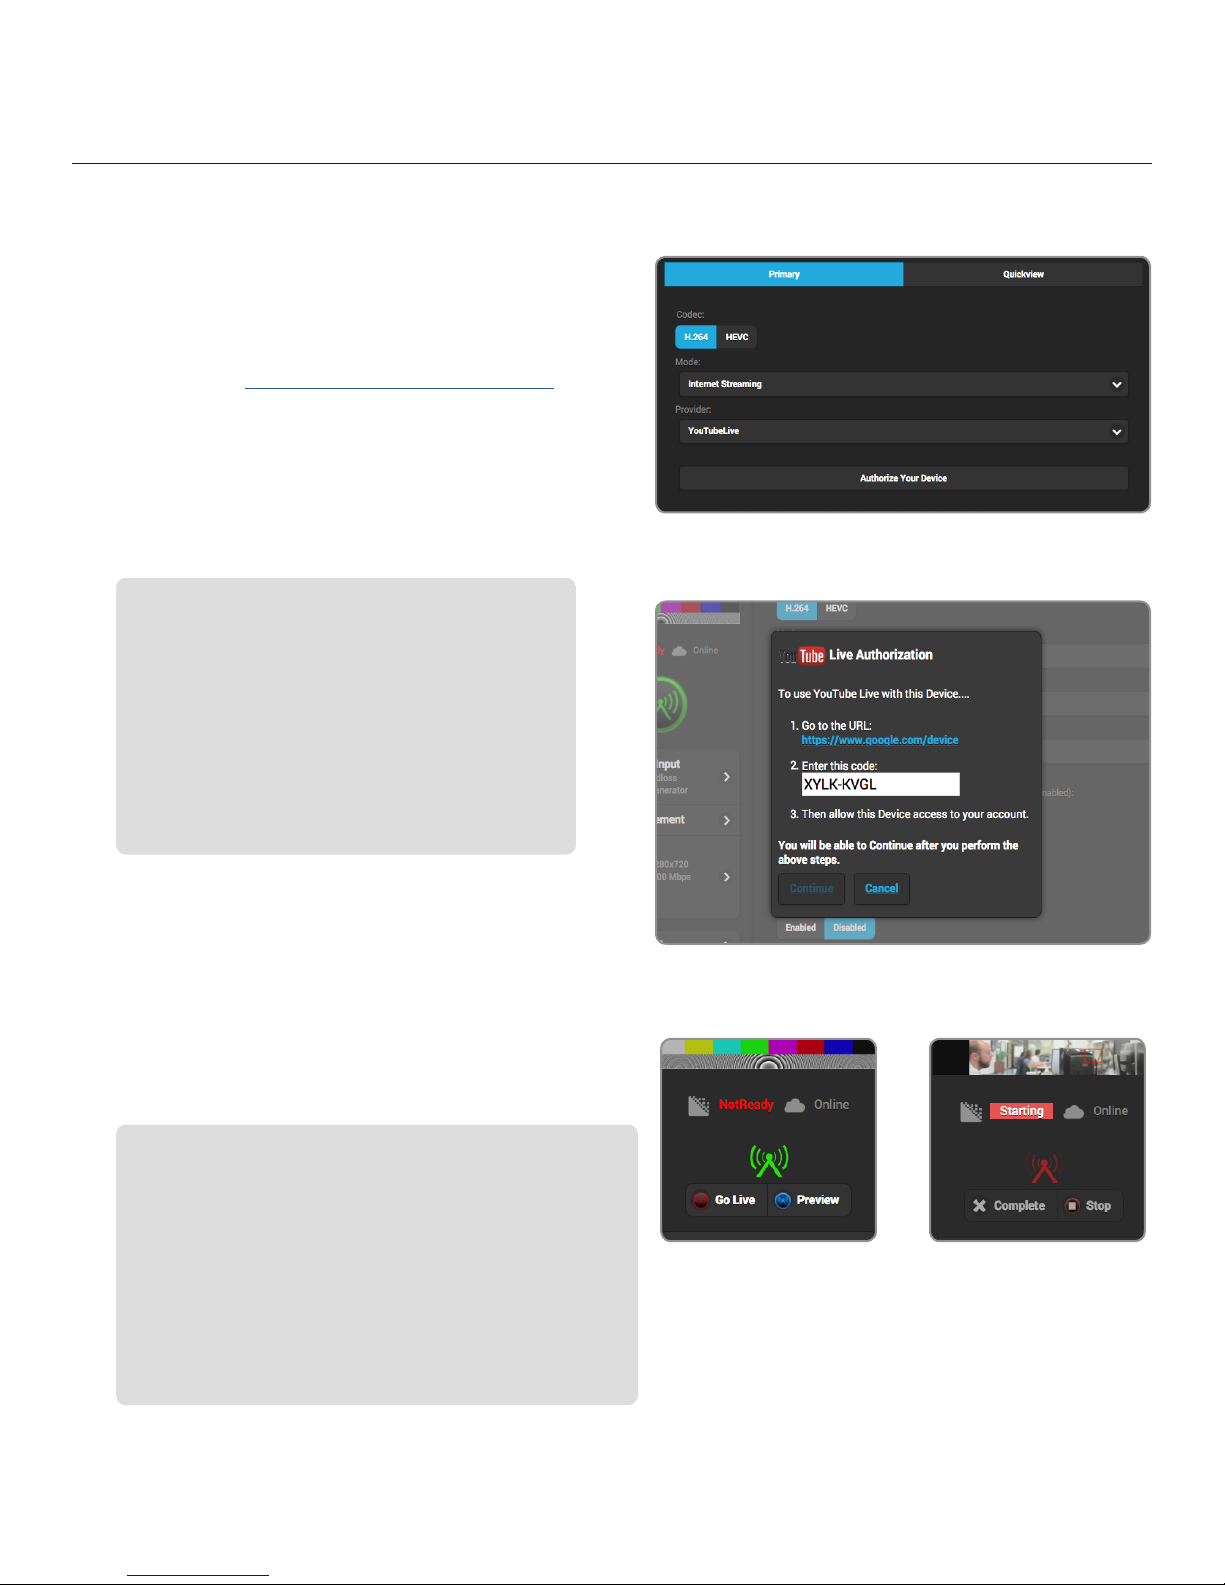
YouTube Live:
1. Select YouTube Live, then click Authorize Your
Device (Fig. 3-20).
2. Copy the authentication code generated for your
device, go to http://www.google.com/device, then
enter your credentials (Fig. 3-21). Enter the code,
then allow Cube to access your account.
3. Select an event, create a new event, or select
“Stream Now”.
Two types of Broadcast destinations
a. The ‘Stream Now’ destination is a continuously
accessible public channel with a permanent URL.
Streaming to the ‘Stream Now’ page is as simple as
start and stop.
b. ‘Event’ destinations can be created, scheduled,
started, and stopped. Every event comes with its own
page URL, and once an event is finished it cannot be
started again. After finishing an event, it is saved on
its own page. Selecting an Event destination allows
you to preview your broadcast.
Fig. 3-20
4. After selecting a destination, begin your
broadcast by selecting Go Live. If you selected
an Event, you will have the option to Preview
your broadcast (Fig. 3-22).
5. When ending the broadcast, select either
Stop or Complete Event (Fig. 3-23).
Four key stages in the life cycle of a broadcast
To start Broadcast:
Preview - Preview the video you intend to broadcast. Videos in
preview state are visible on the event’s Live Control Room page.
Go Live - Makes your event visible on its own channel page. An
event can not return to preview once it has gone live.
To stop Broadcast:
Stopped - Broadcasts can be stopped and restarted at any time
while the event is in the preview or Live state.
Complete Event - You will no longer be able to broadcast to the
event, but it will be saved on the event page for viewing.
Page 22
Fig. 3-21
Fig. 3-22 Fig. 3-23
Page 23
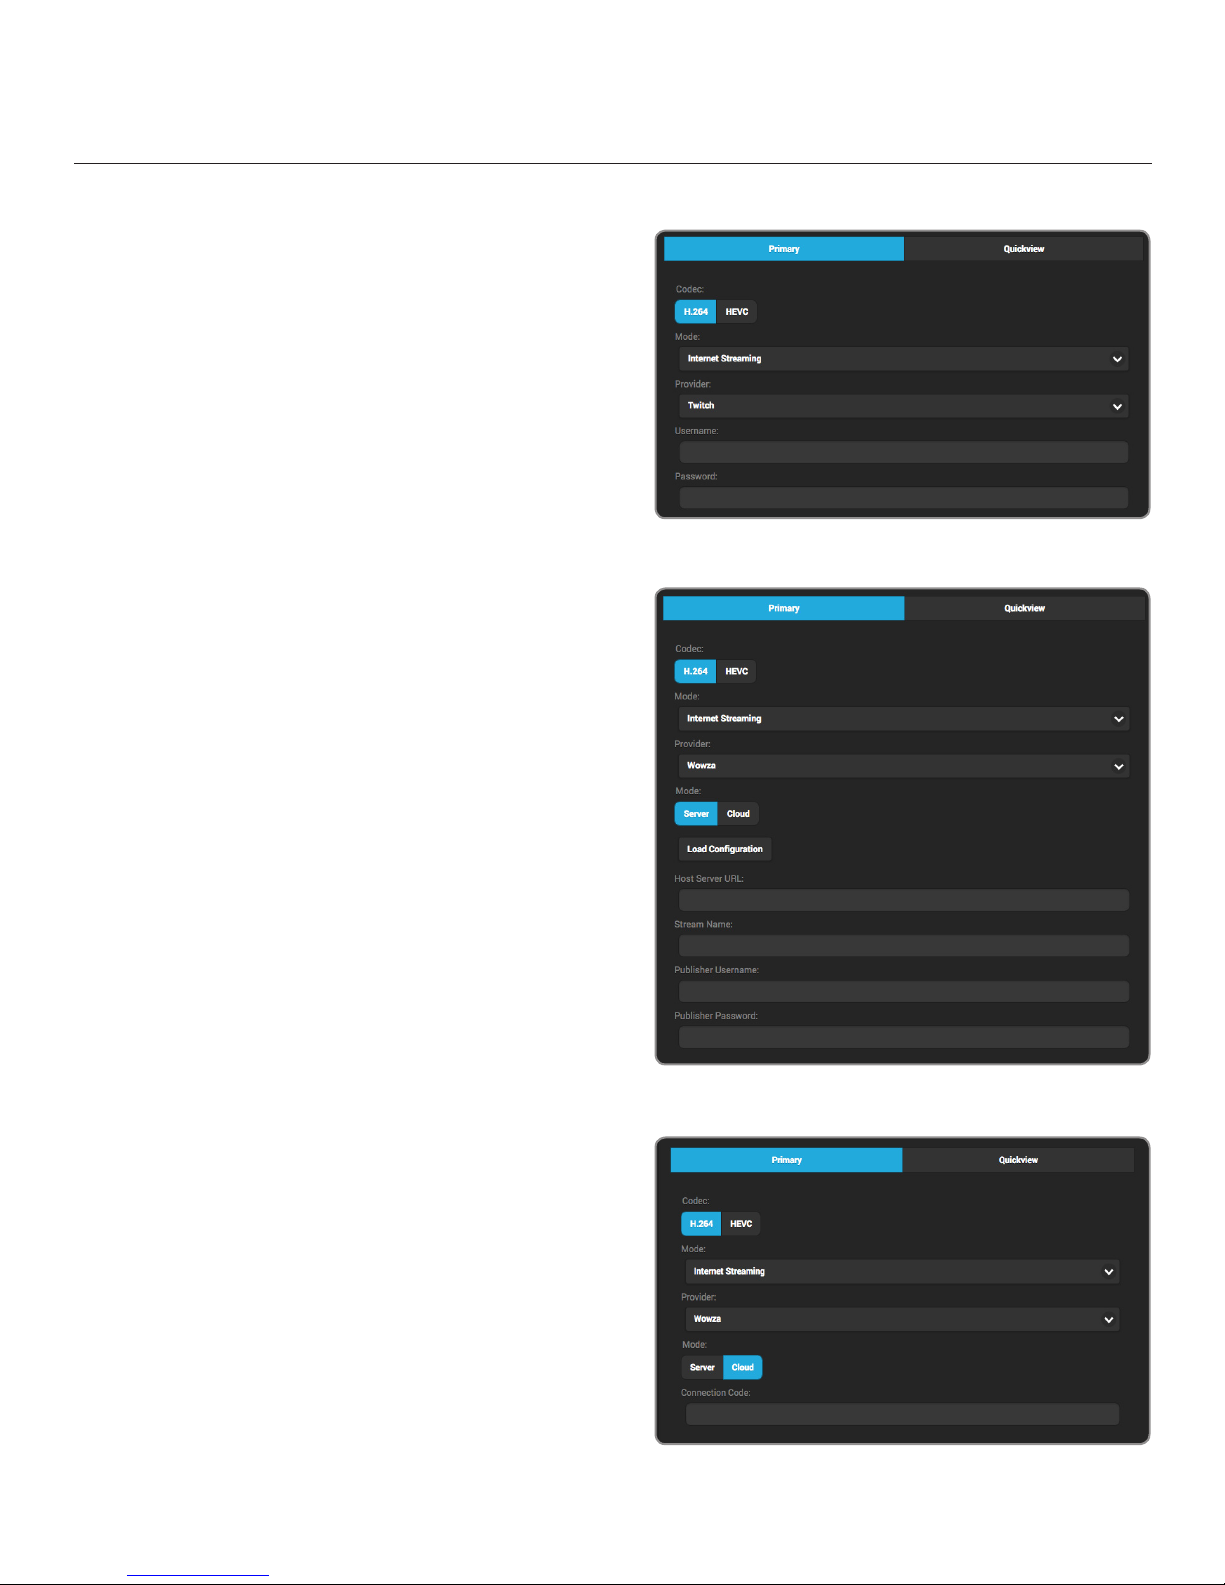
Twitch:
1. Select Twitch, enter your credentials (Fig. 3-24),
then select Apply on the upper-right corner.
2. To begin live streaming, tap the Broadcast
button.
Wowza:
1. Select Wowza.
Server Mode (Fig. 3-25):
a) Enter the host server URL and stream
name provided by the streaming service.
b) Enter your credentials, select Apply, then
return to the Home screen.
Cloud Mode (Fig. 3-26):
a) Enter the connection code
b) Enter your credentials, select Apply, then
return to the Home screen.
Fig. 3-24
2. Tap the Broadcast button to go live.
© Teradek, LLC 2017. All rights reserved.
Fig. 3-25
Fig. 3-26
Page 23
Page 24
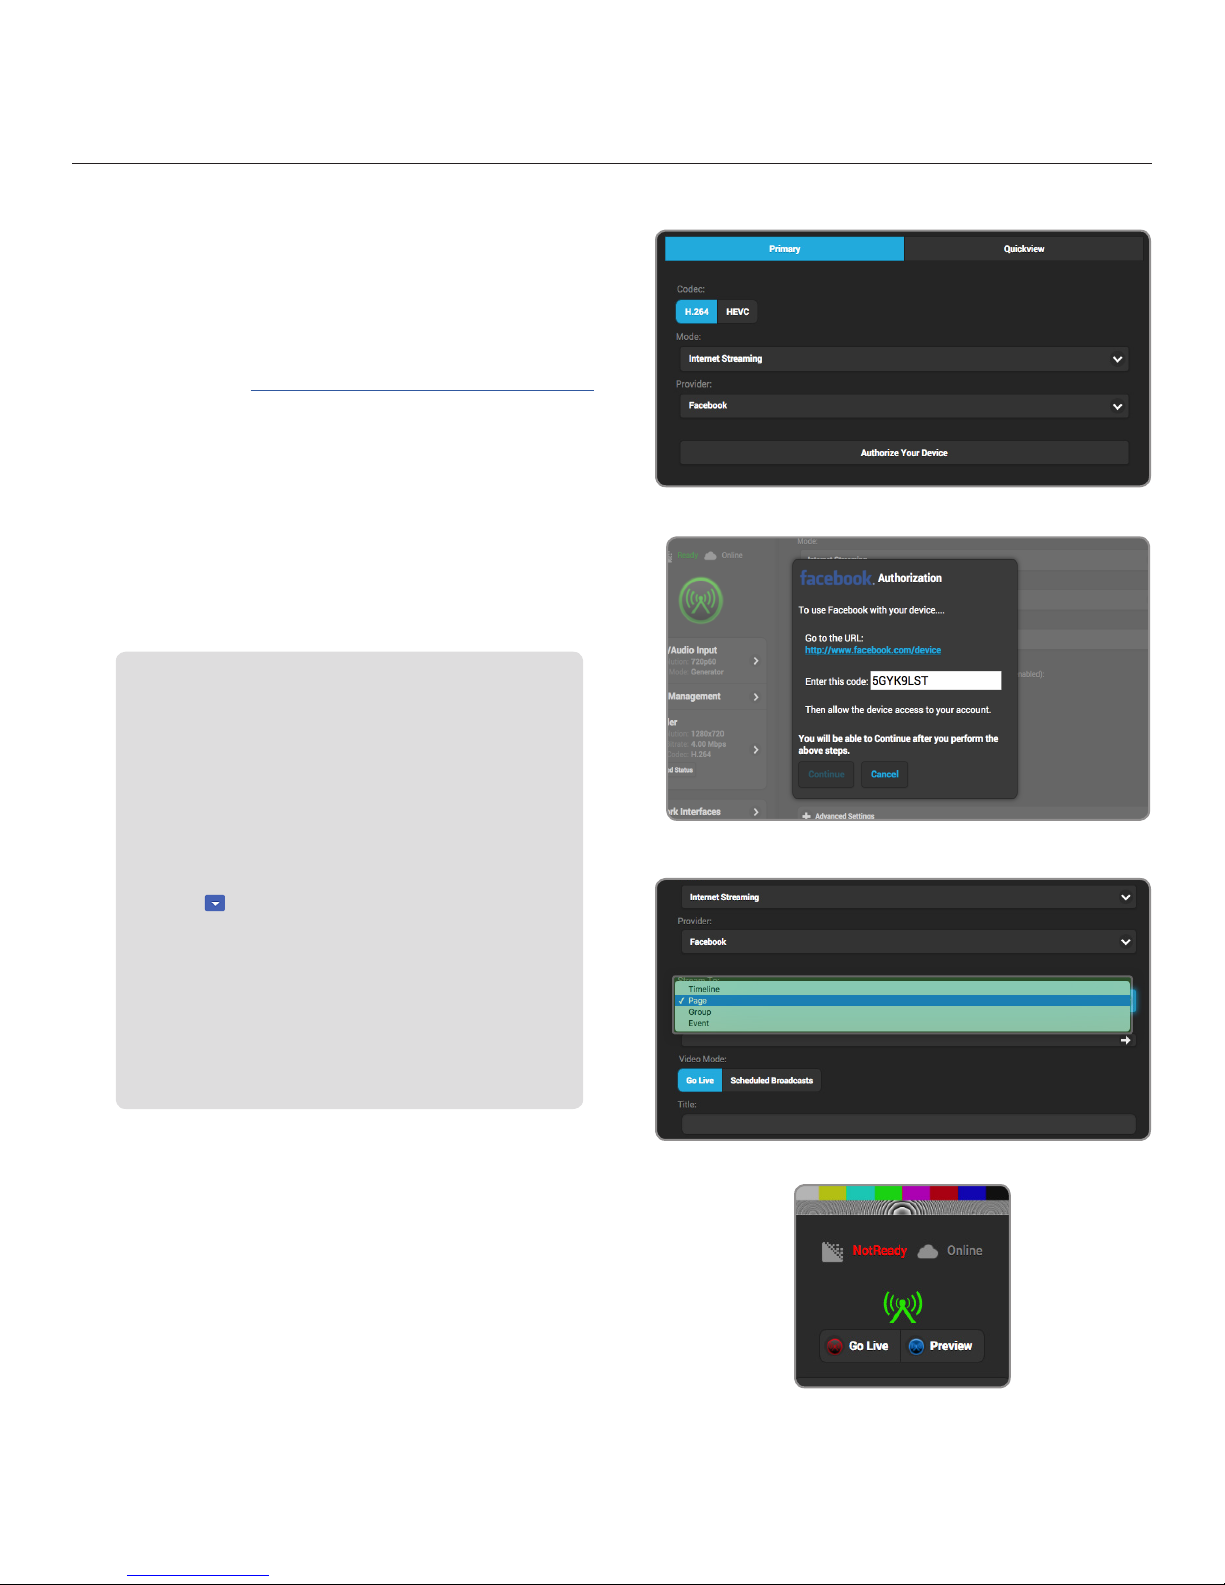
Facebook:
1. Select Facebook, then click Authorize Your
Device (Fig. 3-27).
2. Copy the authentication code generated for your
device, go to https://www.facebook.com/device,
then enter your credentials (Fig. 3-28).
3. Enter the authentication code, then allow Cube
to access your account.
4. Select whether to stream to your timeline
or to a specific page, group, or event (Fig. 3-29),
then click Apply on the upper left corner.
Streaming Destinations
Timeline - Broadcast the video to your personal timeline
or “wall.”
Page - Broadcast the video to a page you manage.
Group - Broadcast the video to a group you manage.
Event - Broadcast the video to an event you created.
Fig. 3-27
Scheduled Broadcasts
You can schedule a broadcast to post at a specific date
and time. After creating a post on the page’s timeline,
click the next to Publish, select Schedule, then enter
the date and time you want your post to be broadcast.
Privacy Settings
● Your Timeline privacy setting will be used if a less
restrictive privacy option is chosen. (e.g. your timeline
is set to Friends, but you set Cube to ‘All.’ The post will
be visible to friends).
● Posts to Facebook pages are always public.
4. Tap the Broadcast button to go live (Fig. 3-30).
Fig. 3-28
Fig. 3-24
Fig. 3-29
Fig. 3-30
Page 24
Page 25
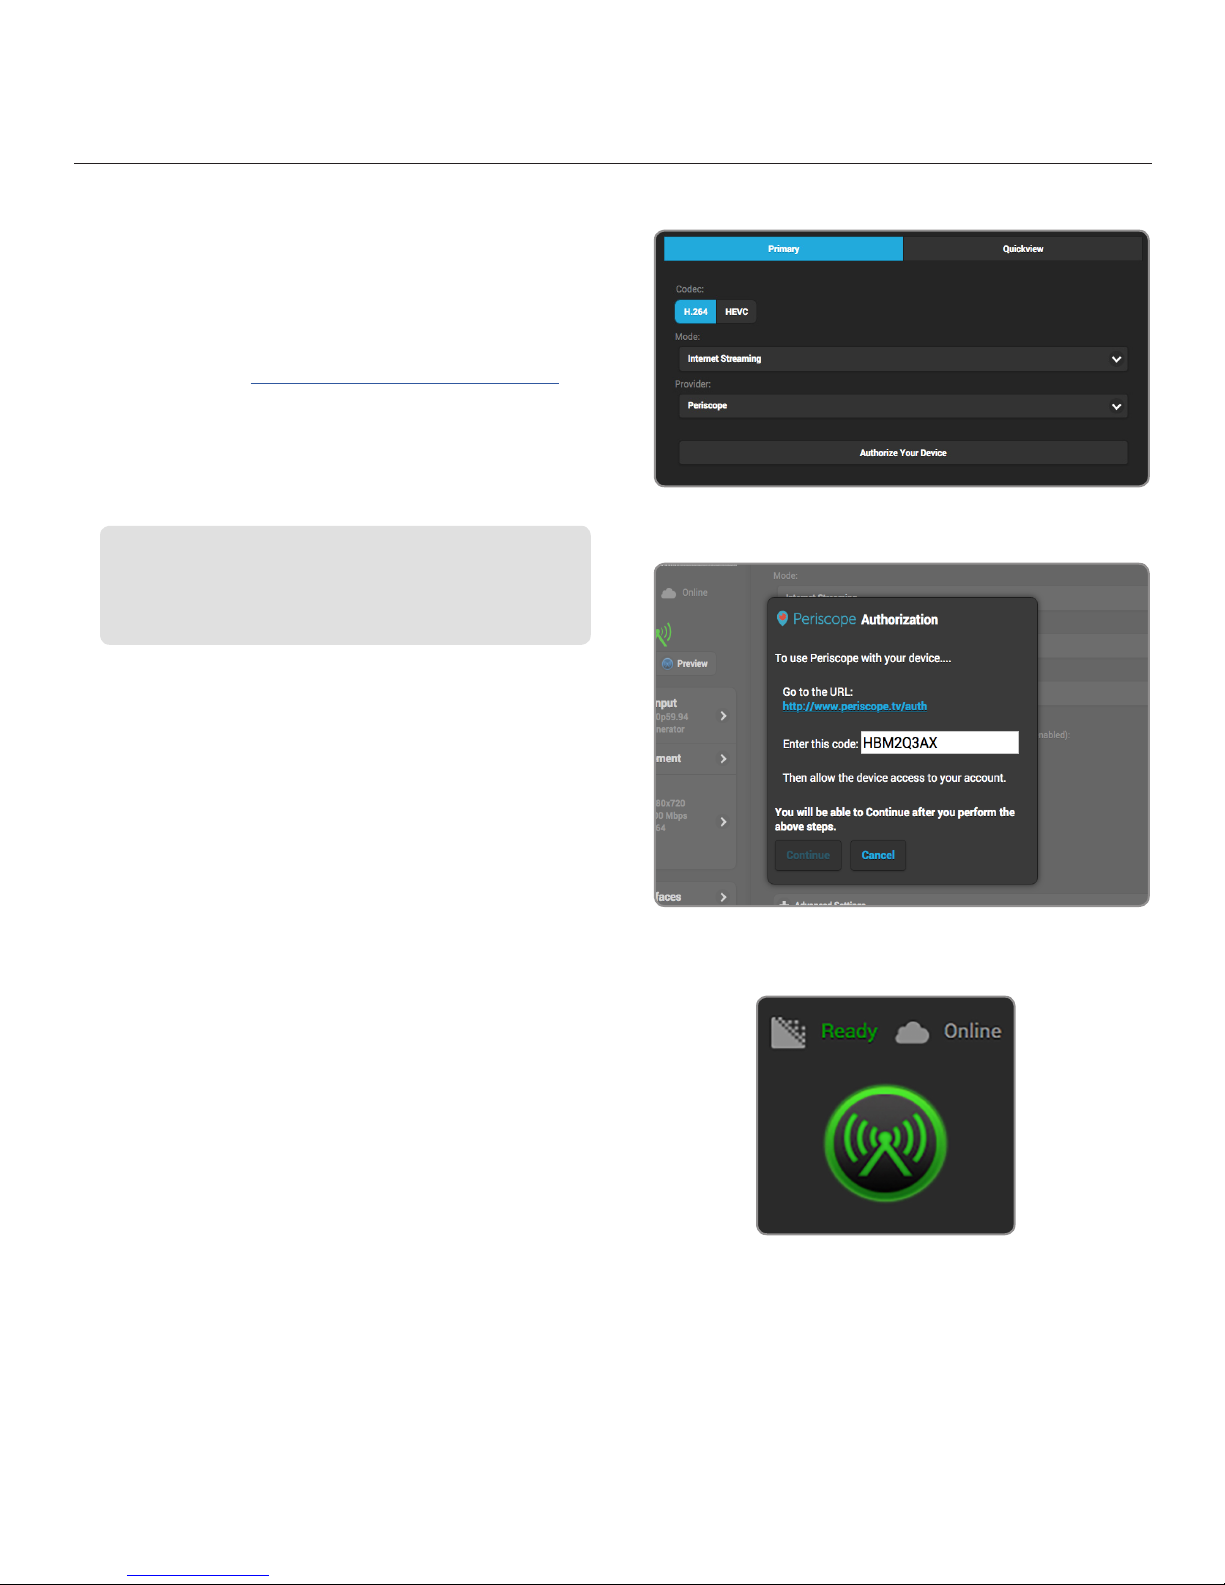
Periscope:
1. Select Periscope, then click Authorize Your
Device (Fig. 3-31).
2. Copy the authentication code generated for your
device, go to https://www.periscope.tv/auth,
then enter your credentials (Fig. 3-32).
3. Enter the authentication code, then allow Cube
to access your account.
Persicope and Twitter
Periscope works in conjunction with Twitter. In order to use
Persicope, you must ceate an account with your Twitter
credentials, or by using your mobile phone number.
4. To post a link to your live stream on Twitter,
enable the Tweet Broadcast feature.
5. Tap the Broadcast button to begin streaming
(Fig. 3-33).
Fig. 3-31
© Teradek, LLC 2017. All rights reserved.
Fig. 3-32
Fig. 3-33
Page 25
Page 26
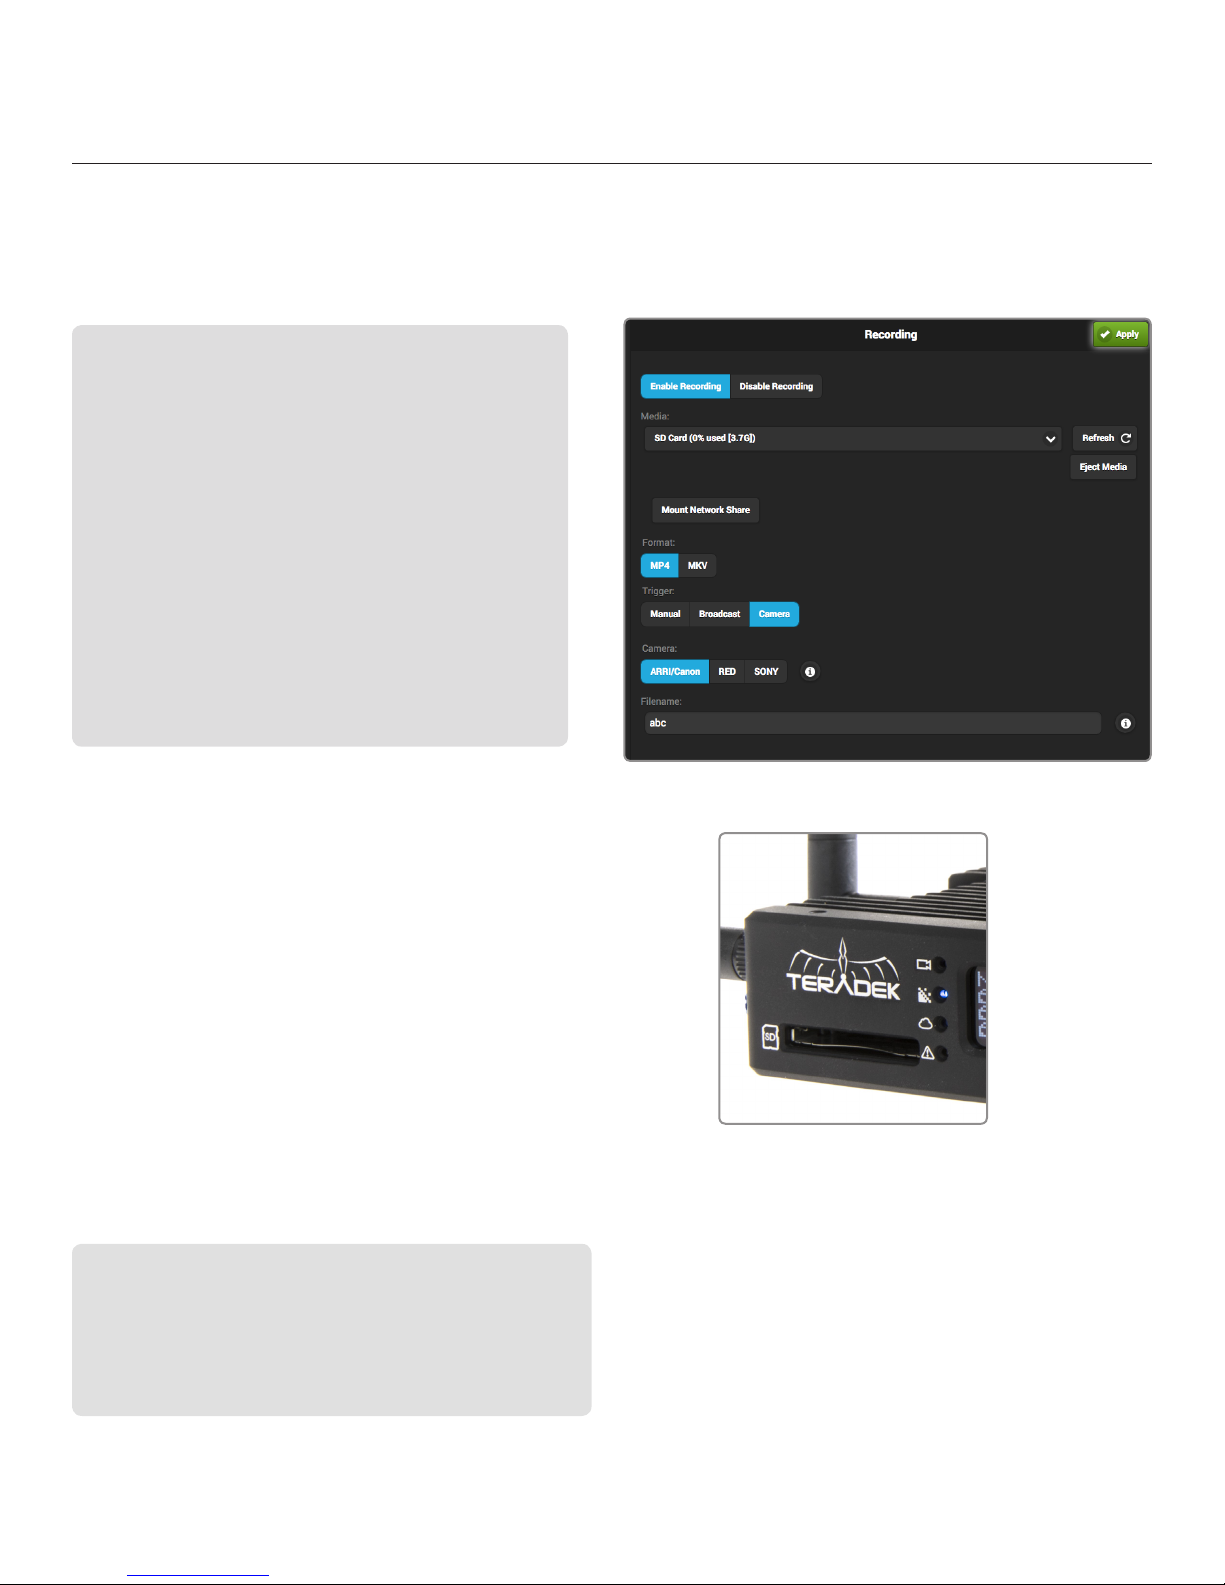
RECORDING
Cube allows you to record your broadcasts directly to an attached USB, SD or micro SD card, or network
file system (NFS). Each recording is saved with the same resolution and bit rate set on the device.
Enable/Disable Recording - Turns the recording feature
on or off.
Media- Select a configured device location to store your
recorded footage to.
Mount Network Share - Configure an NFS location to store
your recorded footage to.
Format - Select a format for your recording.
Trigger - Select how recording is initiated:
● Manual - Recording function is controlled manually
from either the web UI or the Stream joystick on the
device
● Broadcast - Recording function is triggered when you
start the broadcast.
● Camera (600 series encoders only) - Cube will start
recording the stream when a supported camera starts
recording.
Filename - Select how the recording is identified.
To begin recording:
1. Insert a compatible SD card (Fig. 3-34) or USB drive
into Cube, and enable recording.
2. Select the media you will be recording to.
3. Select a Trigger, or click Start Recording below the
Broadcast button.
To configure and record to an NFS:
1. Select Mount Network Share.
2. Enter the host address and port, then click Mount.
Recording Considerations
● For best results, use Class 6 or higher SD cards.
● Media should be formatted using FAT32.
● Maximum size for each file is 4GB
● New recordings are automatically started after the file size
limit is reached.
Fig 3-34
Page 26
Page 27
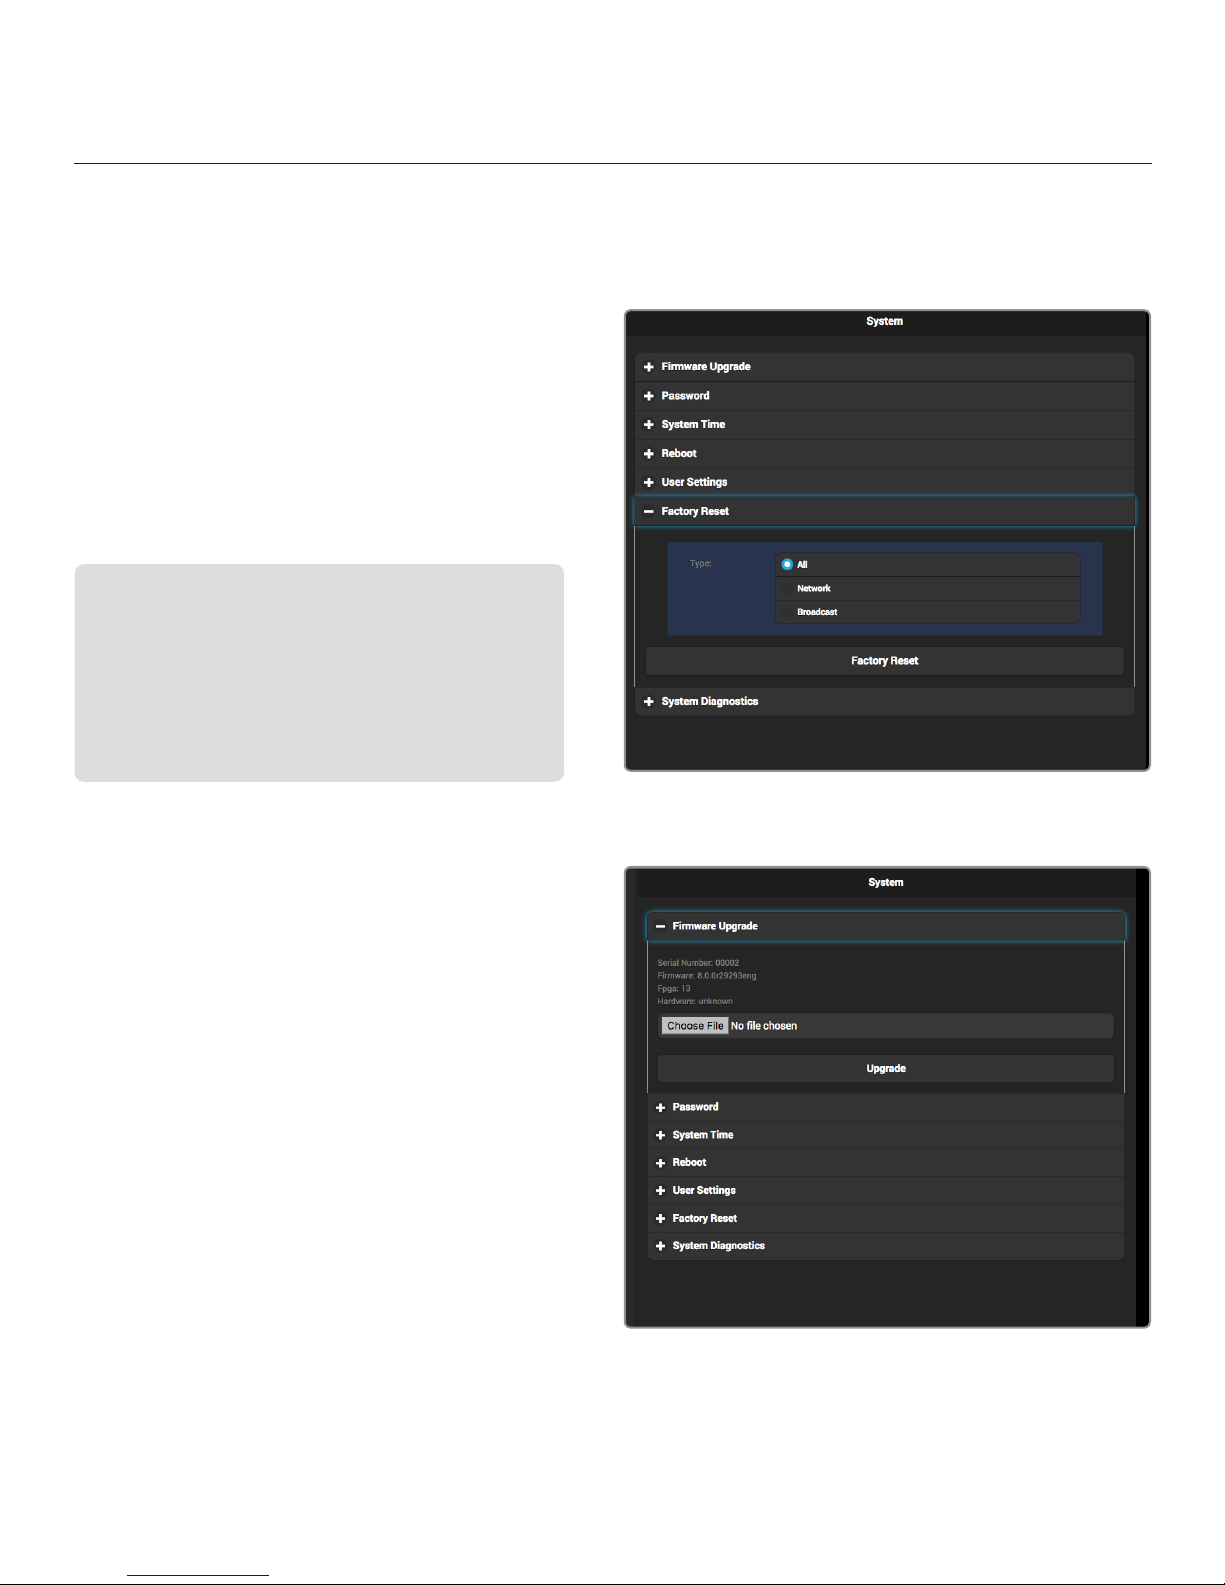
SYSTEM
Essential system functions, including factory reset and firmware upgrade, can be performed from the
System menu in the web UI (System Setup from the front panel interface).
Factory Reset
Access the System menu and select Factory Reset
(Fig. 3-35). Restore Cube to its original settings by
selecting an option (All, Broadcast, or Network) to
reset.
Firmware Upgrade
Upgrade Cube’s firmware to the latest version.
Perform a Firmware Upgrade from front panel
After turning on Cube, navigate to the System Setup menu
to check for new firmware. If an update is available, simply
follow the prompts to complete the firmware update.
Perform a Firmware Upgrade from web UI (Fig. 3-36)
a. Download the latest firmware version from teradek.com.
b. Select Firmware Upgrade.
c. Upload the file from your computer and select Upgrade.
Password
To add, change, or delete your password, select
Password from the system menu on the web UI,
then follow the prompts.
System Time
Select Manual mode to manually input the time and
date, or select NTP to automatically synchronize the
time and date.
Reboot
Restart your Cube device by selecting Reboot, or
simply turn Cube off and on again.
User Settings
Import or export a saved user setting configuration.
System Diagnostics
Generate a diagnostic report specific to your device.
Diagnostic reports can be used by Teradek’s support
team to assist during troubleshooting.
Fig 3-35 Factory Reset
Fig 3-36 Firmware Upgrade
© Teradek, LLC 2017. All rights reserved.
Page 27
Page 28
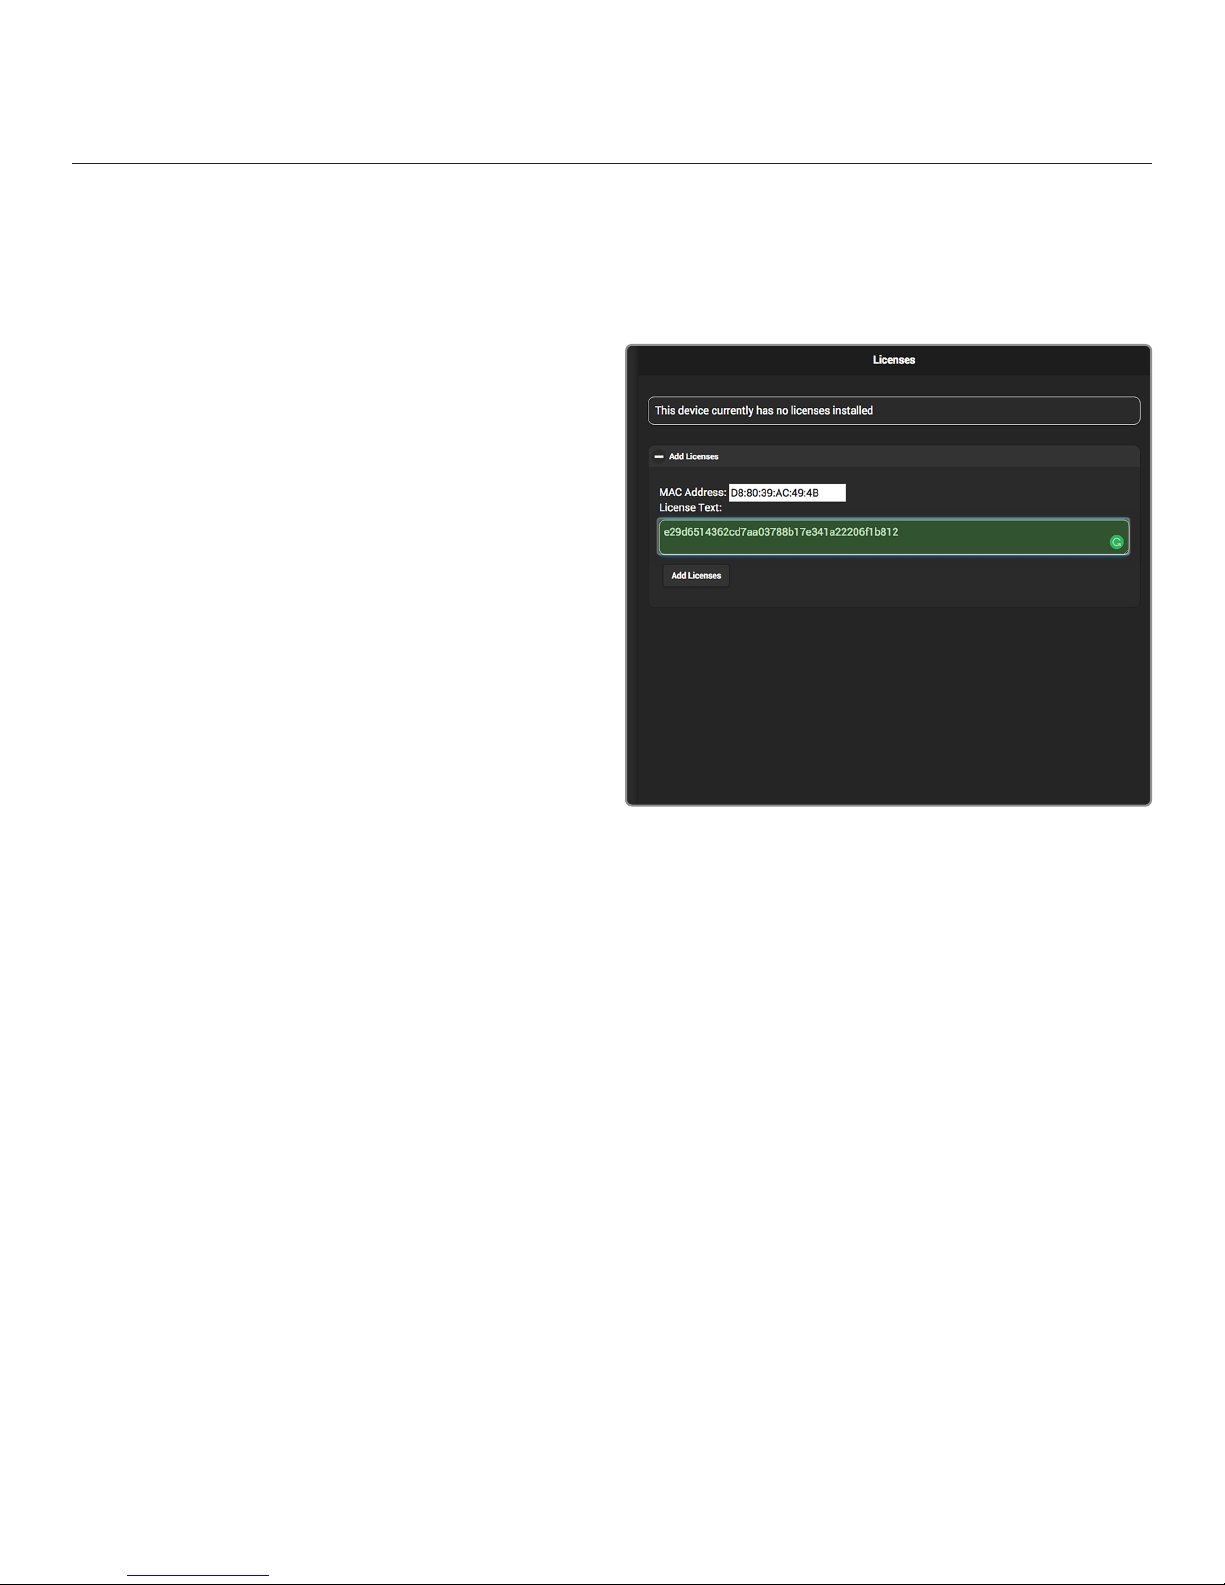
LICENSES
Cube supports a variety of features that are activatable on a per-device basis. After purchasing a license,
you will receive an email from Teradek containing the license key.
To add a License:
1. Copy the license key from the email, then paste
it on to the License Text field (Fig. 3-37).
2. Click Add Licenses.
3. To activate the license, you will be
prompted to reboot Cube. Navigate to
the System menu and select Reboot.
Fig 3-37
Page 28
Page 29
DECODER CONFIGURATION
NAVIGATING THE SETTINGS MENU
The Decoder Settings menu allows you to customize and control Cube’s audio/video output, and network
settings. Use the web UI or the front panel interface to access the Decoder Settings menu. NOTE: This
section illustrates the settings as they are available on the web UI. These settings can also be configured
from Cube’s front panel interface (see below).
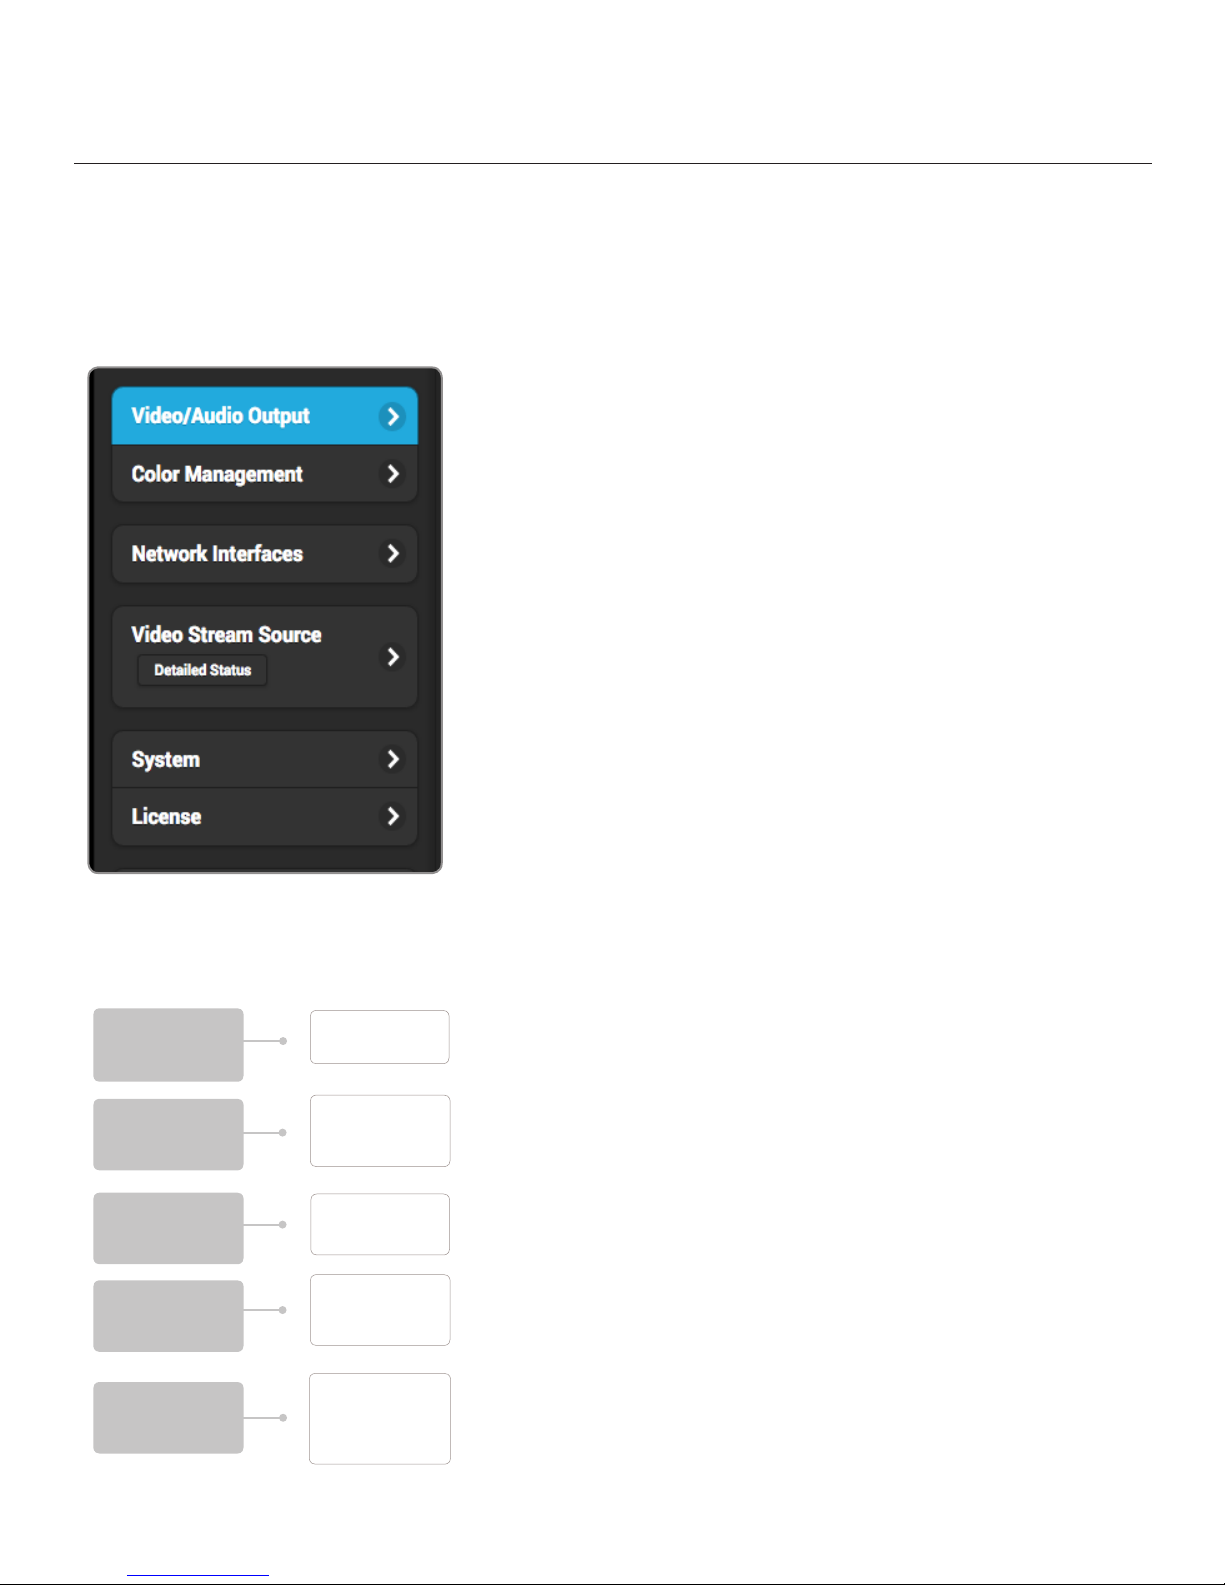
VIDEO/AUDIO OUTPUT: Contains options for configuring your
video/audio output and Test Pattern preferences.
COLOR MANAGEMENT: Select 3D LUT and CDL files stored on
your computer to apply to your video output.
NETWORK INTERFACES: Contains options for configuring
Ethernet, Wi-Fi, and USB modem interfaces.
VIDEO STREAM SOURCE: Allows you to select and configure a
streaming mode and its characteristics. Options include:
● Automatic ● RTP/RTSP ● MPEG Transport Stream
● Teradek Streaming ● RTP Push ● Live:Air
SYSTEM: Perform factory reset, firmware upgrade, system
diagnostics, and other essential system functions.
LICENSE: Add, import, or export license files for additional
functionality.
FRONT PANEL INTERFACE SETTINGS
DECODER
SETUP
OUTPUT
SETUP
3D LUT
SETUP
NETWORK
SETUP
Mode
Stream
Resolution
Audio
Stereo Mode
Mode
Preset
Wired
WiFi
USB Modem
DECODER SETUP: Configure the video stream source and
streaming mode option.
OUTPUT SETUP: Allows you to configure the vide and audio
output.
3D LUT SETUP: Apply specific looks stored on Cube to apply to
the video output.
NETWORK SETUP: Contains options for configuring Ethernet,
Wi-Fi, and USB modem interfaces.
● SRT
SYSTEM
SETUP
© Teradek, LLC 2017. All rights reserved.
Firmware Update
Factory Reset
Display Settings
Debug Settings
SYSTEM SETUP: Perform factory reset, firmware upgrade, and
configure your display and debug settings.
Page 29
Page 30
VIDEO/AUDIO OUTPUT
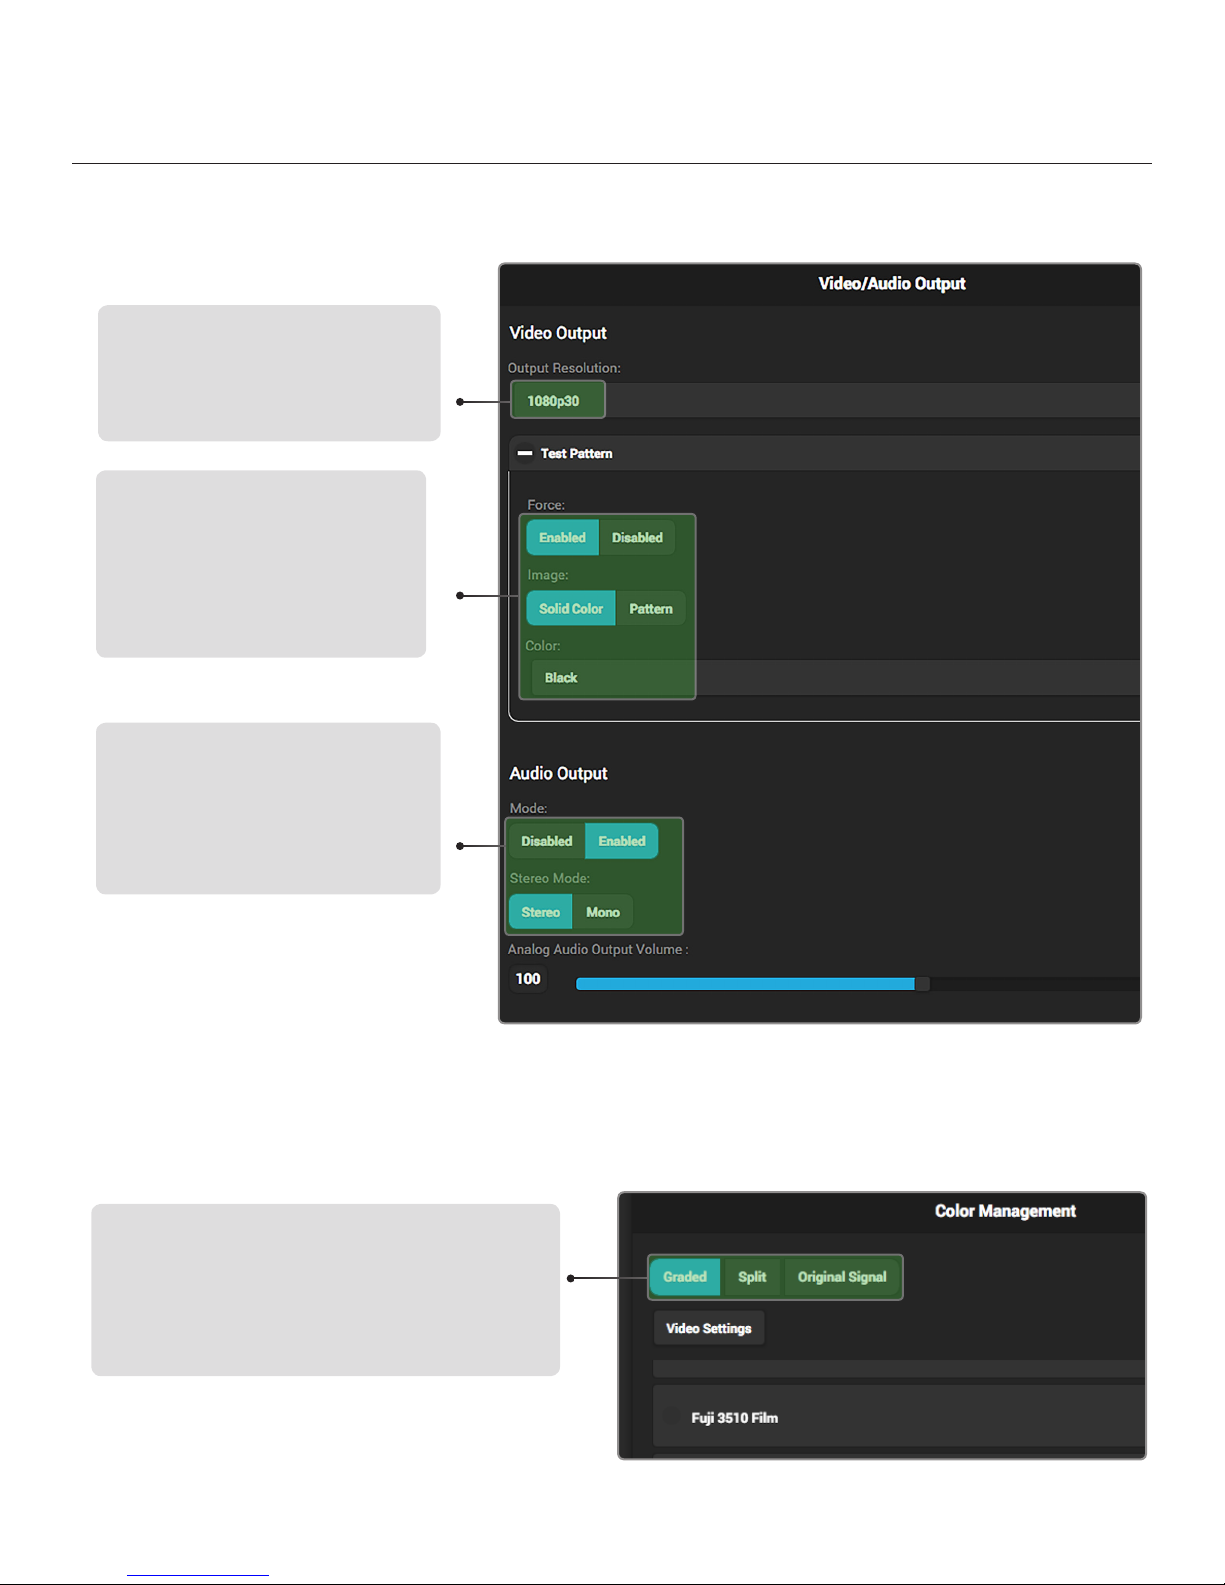
The Video/Audio Output menu contains several output source configuration and test pattern options.
Output Resolution
Use this option to configure the video
output format. The output resolution can
be set independently of the video stream
resolution.
Test Pattern
The Test Pattern option allows you to
output a test image when no video is
connected. Setting Force to Enabled
causes the decoder to output a test
pattern (Fig. 4-1, Fig. 4-2), regardless
of the video connection.
Audio Output
Configure the audio output. Audio can
be enabled or disabled, and the output
can be set to Mono or Stereo. When set
to Mono, channel 1 (left) audio is output
on channels 1 and 2 (left/right).
COLOR MANAGEMENT
The Color Management menu contains options for adding specific looks from your computer and saving
them to Cube’s interface. These looks can either be 3D LUT files, CDL preset files, or files composed of
both formats. Use this menu or the front panel interface to apply presets to the video output. Up to 32
looks can be stored on the device.
Color Management options
Graded - Enable a look preset.
Split - Display a split screen view of the original image and
any selected preset.
Original Signal - Transmit the input source’s original look
without a look preset.
Page 30
Page 31
COLOR MANAGEMENT (CONT.)
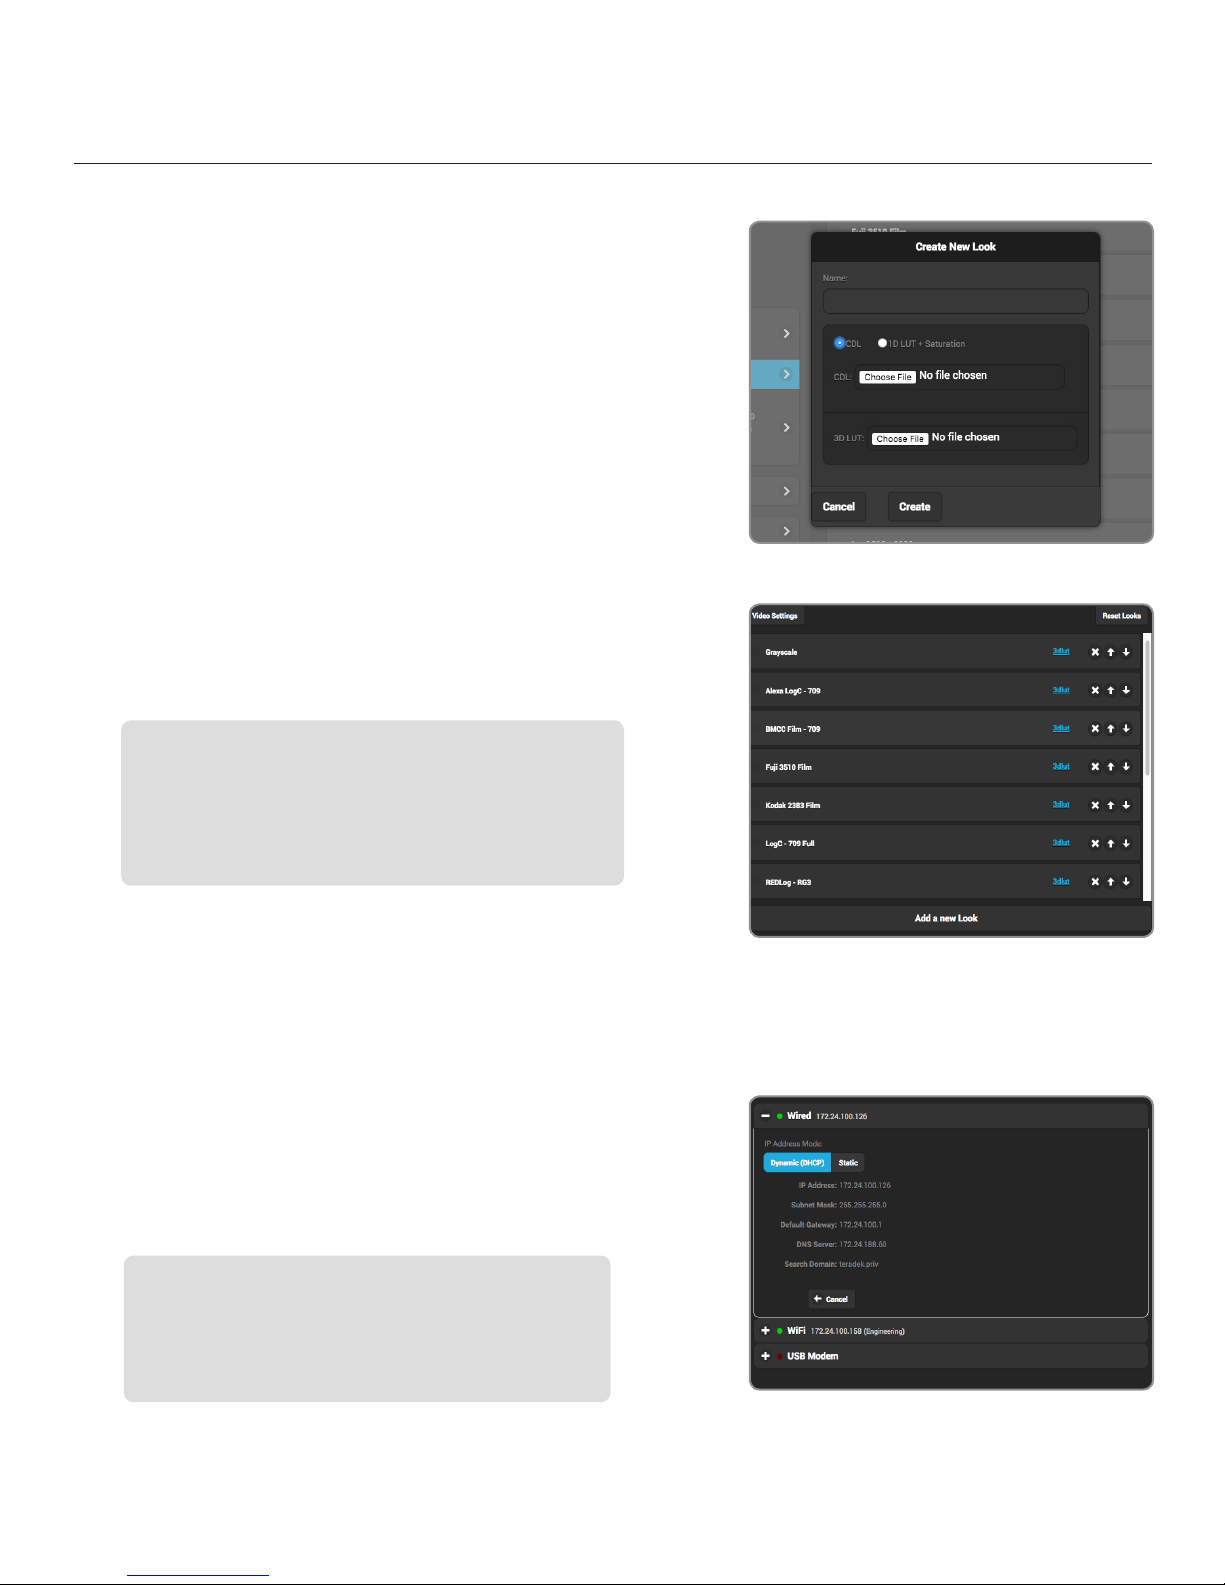
Creating a Look:
Look presets can be created from a 3D LUT and either an ASC
CDL file or 1D LUT + Saturation files.
1. Select Add a new Look.
2. Enter a name for your look under the name field. If a name
is not entered, the look will use the same name as the 3D
LUT filename. Names can be up to 32 characters long.
3. Select whether you would like to load a CDL file (Fig. 4-3), or
a 1D LUT file + Saturation file, then click Choose File to
select the file(s) from your computer.
4. Select Choose File under the 3D LUT section and
pick the 3D LUT file you wish to use.
Organizing look presets (Fig. 3-4)
Arrange look presets either by dragging the desired preset up
and down on the list or clicking the or icons.
Deleting looks
Look presets can be deleted by clicking the X button located in
the look’s listing.
Fig. 4-3
Fig. 4-4
NETWORK INTERFACES
Cube allows you to connect and stream to the Internet by utilizing one of several network interfaces.
Wired
A wired Ethernet connection is typically the most reliable means
for connecting to a network, as you don’t have to deal with the
instability of a Wi-Fi or cellular connection. To configure the
Ethernet interface, select Wired from the Network Interfaces
page, then click Modify (Fig. 4-5).
IP Address Modes
Dynamic (DHCP) - The connected router generates an IP
address, allowing Cube to be automatically configured.
Static - Manually configure the IP address settings if a DHCP
server is not available, or if applications require fixed address.
Fig. 4-5
© Teradek, LLC 2017. All rights reserved.
Page 31
Page 32
Wireless (Wi-Fi)
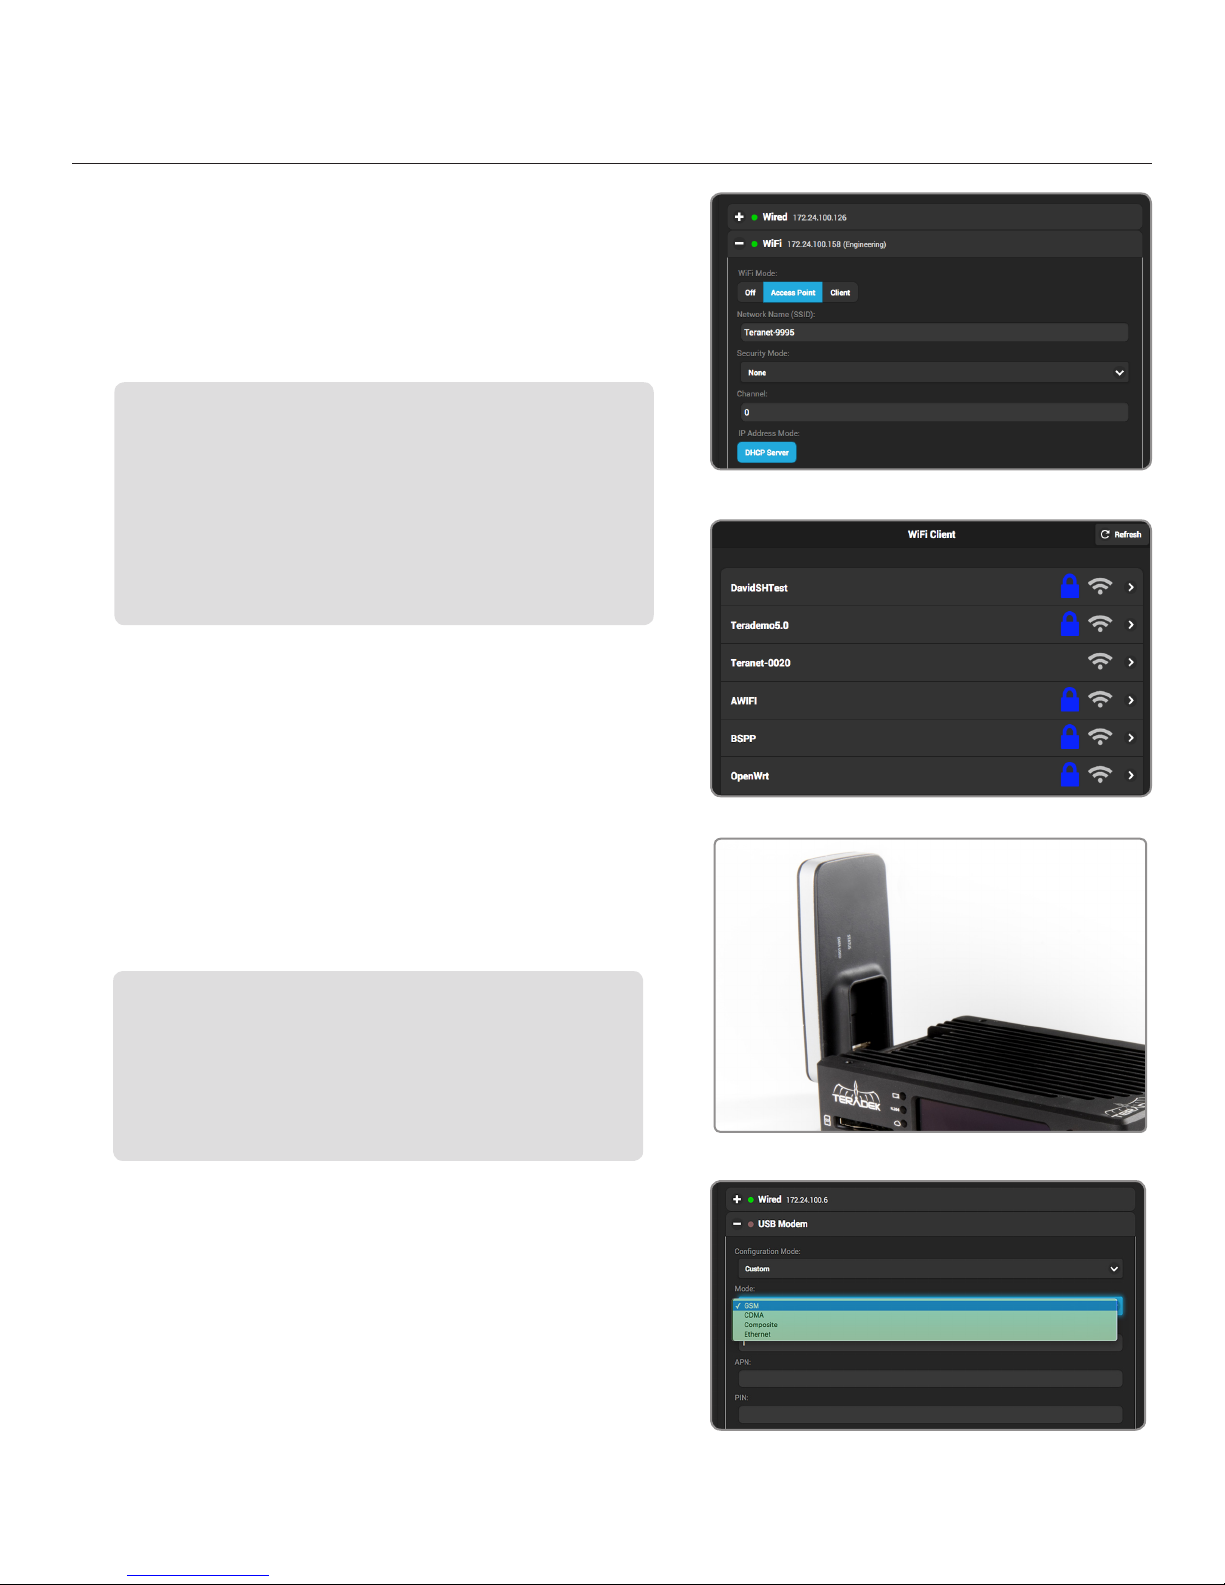
Although an Ethernet connection is the most reliable
method of connecting to a network, a Wi-Fi connection may
be more convenient, especially if an Ethernet connection is
unavailable. There are two Wi-Fi modes available (Fig. 4-6);
Access Point (AP) Mode and Client (Infrastructure) Mode.
Wi-Fi Modes
Access Point (AP) Mode - Cube acts as its own dual band access
point, allowing you to connect your device directly to Cube’s AP
network.
Client (Infrastructure) Mode - Cube and your device connect to the
same local wireless network. Access Client Mode, then click Browse
to scan for available networks (Fig. 4-7), or Saved Networks
to connect to a previously saved network, then enter your
credentials.
USB Modem
A USB modem allows you to broadcast wherever a cell
connection is available. Cube automatically detects and
supports many modems using the Auto setting. If you
need to configure a modem, connect to Cube using AP
mode (see page 17), and insert the USB Modem into
Cube (Fig. 4-8). From the Network Interfaces page,
select USB Modem, then select a configuration mode.
Fig. 4-6
Fig. 4-7
Configuration Modes (Fig. 4-9)
Auto (default): The modem is automatically detected and
configured.
Custom: Allows you to manually configure a modem if it’s
not automatically detected. Available configuration modes
are GSM, CDMA, Composite, and Ethernet. Modes will vary
based on the modem model and mobile network provider.
Page 32
Fig. 4-8
Fig. 4-9
Page 33

VIDEO STREAM SOURCE
Select from a variety of different stream types to match your input source from the drop-down menu, or
select an available stream to decode.
CONFIGURABLE SETTINGS
TERADEK STREAMING TDS
TDS is specifically optimized for local streaming with minimum
latency between Teradek devices. Configure TDS by selecting a
protocol (UDP or Multicast) and entering the destination port of the
Teradek encoder. Enter the IP address if streaming in Multicast.
• Protocol
• Port
• Advanced Settings
- Caching
- Audio Sample Rate
RTP/RTSP
When RTP/RTSP mode is enabled, the decoder communicates
whether to use the TCP or UDP protocol for the stream. Ensure you
have the correct port and stream name (stream1 is the default). To
view your stream on VLC, copy the IP address from the Host field,
launch VLC and open File>Open Network. Paste the IP address in
the URL field, then click Open.
RTP PUSH
RTP Push streaming allows you to direct video to a server or client
and generate an SDP file containing the stream description. SDP
files can be stored on a streaming server, or opened by video players
like VLC. The RTP Push license is provided by request, free of charge.
MPEG TRANSPORT STREAM MPEG-TS
To stream over MPEG Transport Stream, you’ll first need to purchase
the license from Teradek. In MPEG Transport Stream Mode, Cube
sends video via a TCP or UDP protocol to a specified unicast or
multicast address. TCP is recommended when streaming over the
internet, while UDP is recommended when streaming over a local
network to avoid the additional network overhead of TCP. Select
the protocol best suited for your application needs, and ensure
the Cube encoder is configured to stream to the Cube decoder’s
corresponding IP address and port.
• Host
• Port
• Stream name
• Username
• Password
• Client Port
• Advanced Settings
- Caching
- Audio Sample Rate
• Video Port
• Audio Port
• Advanced Settings
- Caching
- Audio Sample Rate
• Protocol
• Host
• Port
• Jitter Buffering
• Audio Codec
• Advanced Settings
- Caching
- Audio Sample Rate
© Teradek, LLC 2017. All rights reserved.
Page 33
Page 34

SRT
SRT is used to transmit high quality, low-latency video over
unreliable networks. SRT has two connection types: Pull or Listen.
Pull draws the stream from the encoder, while Listen waits for the
encoder to initiate the connection. For either mode, a port number
will be needed, and a passphrase (if one is set).
LIVE:AIR
Live:Air Action is a video production suite that can receive feeds
from any Cube encoder for real-time video mixing, switching and
even transitions. Once you’ve configured Cube to stream in Live:Air
mode, you can manage it from the Live:Air Action (see page 7) or
VUER apps (see page 8).
CONFIGURABLE SETTINGS
• Connection type
• Port
• Passphrase
• Encryption Key Size
• Latency
• Advanced Settings
- Caching
- Audio Sample Rate
• Host
• Port
• Advanced Settings
- Caching
- Audio Sample Rate
AUTOMATIC
Automatic allows you to select a device to decode from.
• Choose a Stream
• Advanced Settings
- Caching
- Audio Sample Rate
Page 34
Page 35
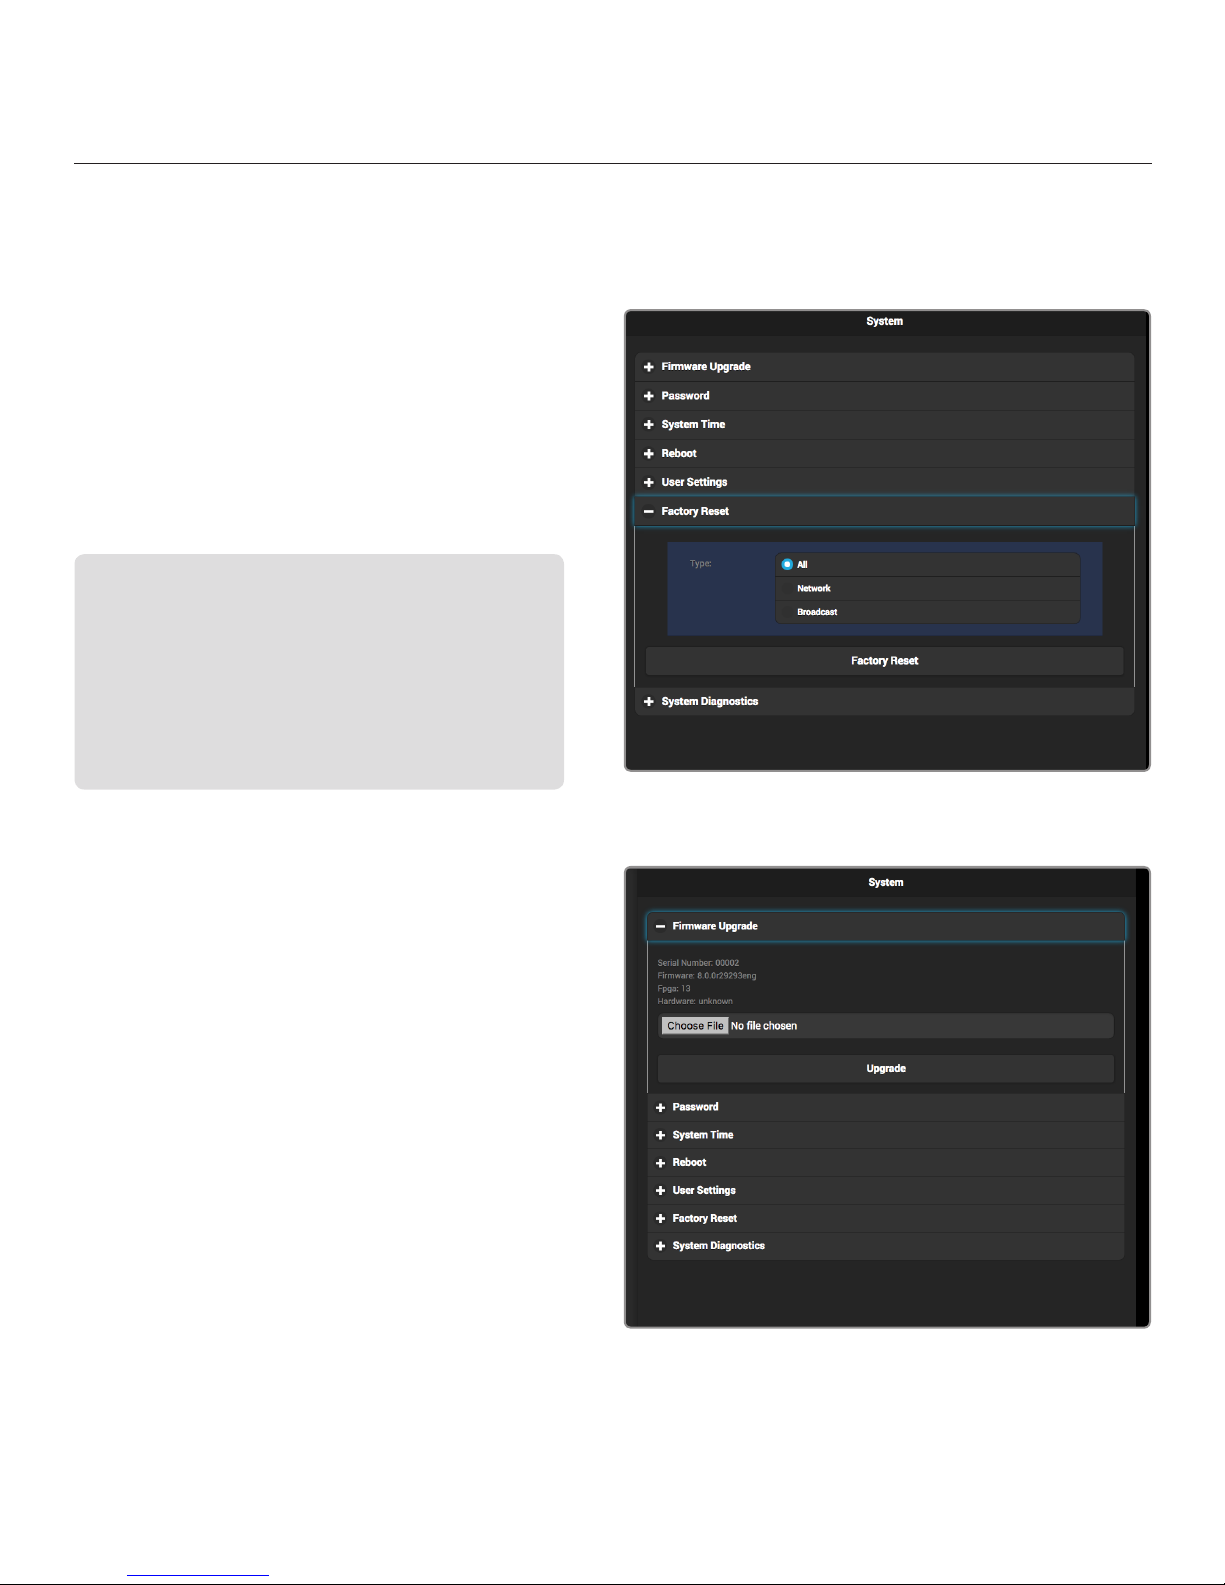
SYSTEM
Essential system functions, including factory reset and firmware upgrade, can be performed from the
System menu in the web UI (System Setup from the front panel interface).
Factory Reset
Access the System menu and select Factory Reset
(Fig. 4-10). Restore Cube to its original settings by
selecting an option (All, Broadcast, or Network) to
reset.
Firmware Upgrade
Upgrade Cube’s firmware to the latest version.
Perform a Firmware Upgrade from front panel
When you turn on Cube, the device will automatically check
for new firmware. If an update is available, follow the
prompts to complete the update.
Perform a Firmware Upgrade from web UI (Fig. 4-11)
a. Download the latest firmware version from
teradek.com.
b. Select Firmware Upgrade.
c. Upload the file from your computer and select Upgrade.
Fig 4-10 Factory Reset
Password
To add, change, or delete your password, select
Password from the system menu on the web UI,
then follow the prompts.
System Time
Select Manual mode to manually input the time and
date, or select NTP to automatically synchronize the
time and date.
Reboot
Restart your Cube device by selecting Reboot, or
simply turn Cube off and on again.
User Settings
Import or export a saved user setting configuration.
System Diagnostics
Generate a diagnostic report specific to your device.
Diagnostic reports can be used by Teradek’s support
team to assist during troubleshooting.
Fig 4-11 Firmware Upgrade
© Teradek, LLC 2017. All rights reserved.
Page 35
Page 36
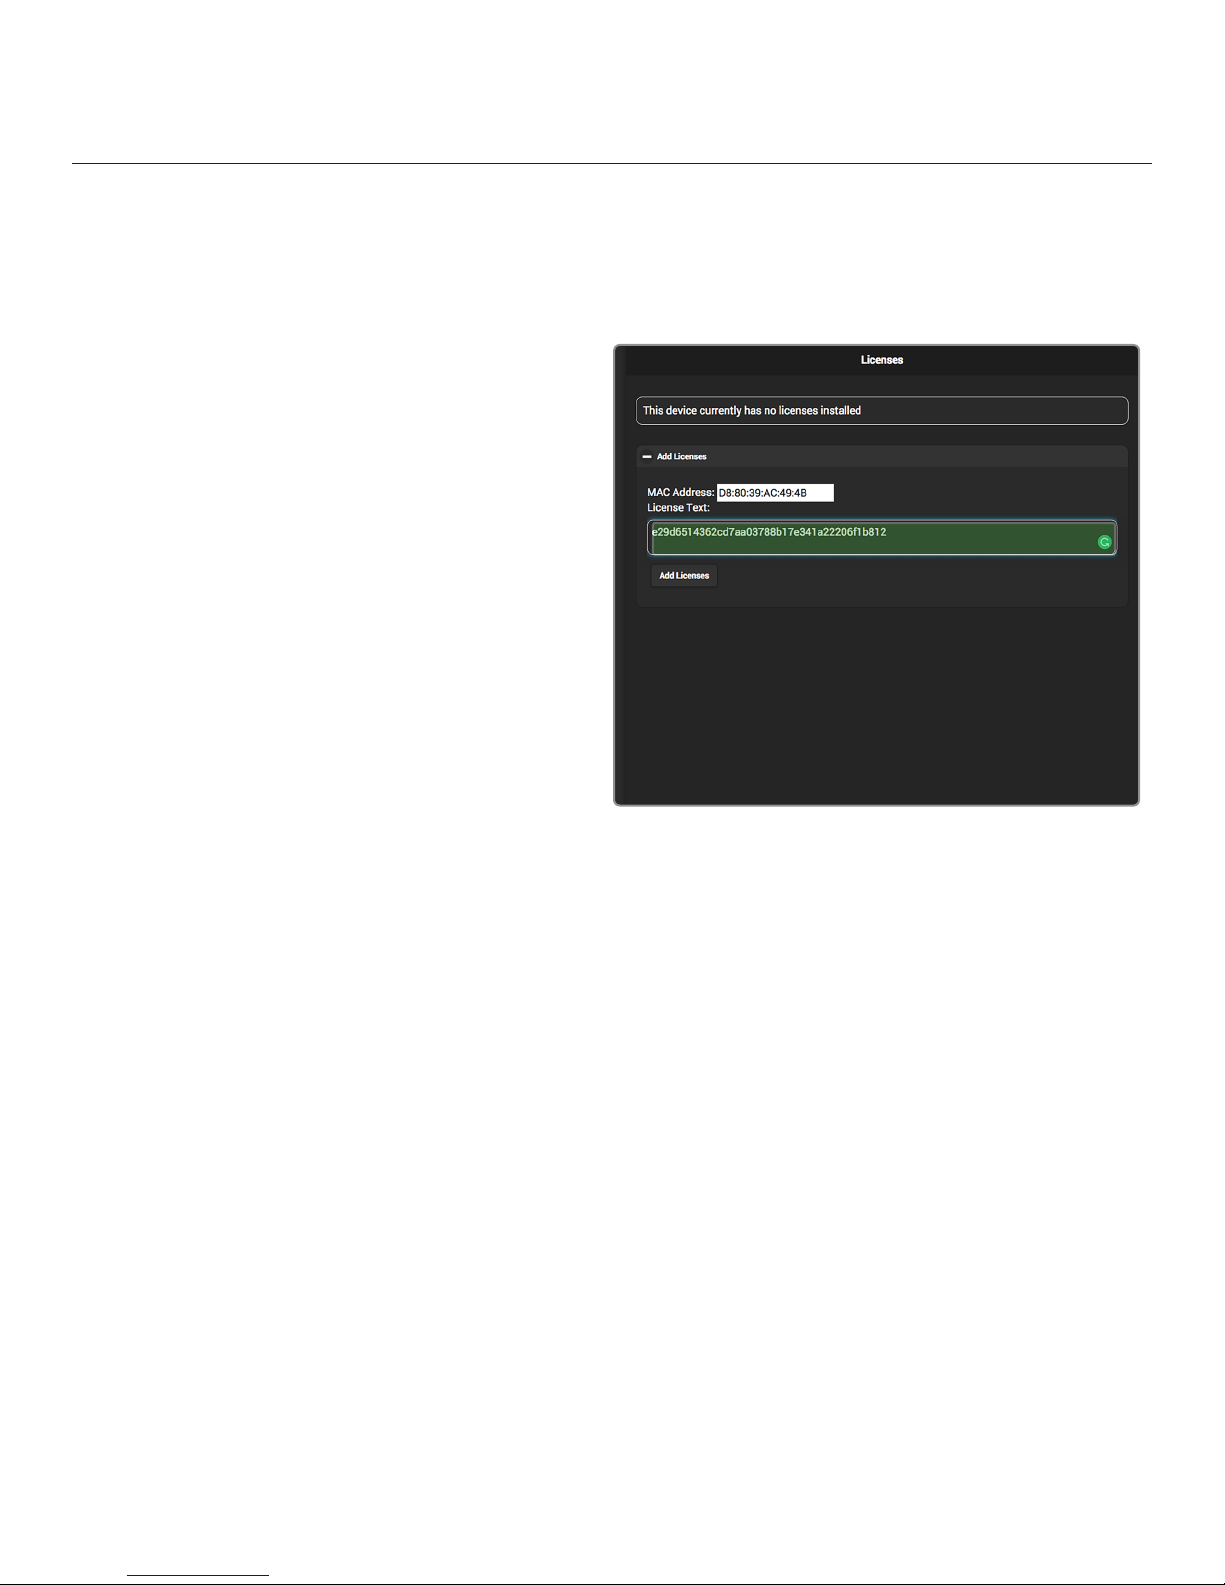
LICENSES
Cube supports a variety of features that are activatable on a per-device basis. After purchasing a license,
you will receive an email from Teradek containing the license key.
To add a License:
1. Copy the license key from the email, then
paste it on to the License Text field (Fig. 4-12).
2. Click Add Licenses.
3. To activate the license, you must reboot
Cube. Navigate to the System menu and
select Reboot.
Fig 4-12
Page 36
Page 37

TROUBLESHOOTING
POWER/CONNECTION ISSUES
Cube will not power on.
Power cable may not be connected properly, or the external battery may be discharged. Check the battery’s
charge. If the battery is charged, remove the video cable and verify that the power cable or battery plates
are connected and the cables are not damaged.
Video Input LED stays off, but a video cable is connected.
No video input is detected. Verify that your video source is connected to Cube. Check cables for damage.
Check that the camera’s video output is enabled, and the output format is compatible with Cube
AUDIO/VIDEO STREAMING
Cannot open or view my video stream.
Cube may not be encoding, or the stream URL may be incorrect. Verify that Cube is encoding (Codec Status
LED is illuminated).
Video stream keeps breaking up/freezing.
Bitrate/resolution may be set too high for the network’s available bandwidth. From the Encoder menu,
lower the bit rate and/or resolution to avoid lost/late video data. For 600 series Cubes, manually adjusting
the Rate Control settings (see page 14) provides more control over the streaming bandwidth, and may
improve performance in challenging or restricted network environments.
VLC video latency is more than a second.
By default, VLC’s buffer is set to 1.2 seconds. Decreasing the buffer size will reduce the latency.
Video to iPad is delayed by more than 10 seconds.
HTTP Live mode is enabled. For low latency streaming to iOS devices, download any of Teradek’s video
streaming iOS apps (Live:Air Action, TeraView, or VUER), then switch to Quickview stream.
NETWORK/WEB UI
My video stream does not have audio.
Either audio is disabled, or Quickview stream is being used. Enable audio (embedded or analog) on the Video/
Audio Input menu.
Cannot connect to Cube in Access Point (AP) mode.
The network settings may be incorrect.
(a) Verify you are connected to Cube’s AP network (see page 8). Make sure Cube’s Wi-Fi indicator is displayed.
(b) Verify your computer is set to DHCP or has an IP address in the 172.16.x.x
Cannot connect to Cube in Infrastructure (Client) mode.
Cube may be disconnected from the network, or the network settings may be incorrect. From the front panel
interface, navigate to Network Setup > WiFi, then select [Status] to view the WiFi status menu
(see page 6). If you still cannot configure your WiFi connection, connect an Ethernet cable to Cube, access the
web UI, and verify that infrastructure SSID, password, and security type are correct.
© Teradek, LLC 2017. All rights reserved.
Page 37
Page 38

Cannot log in to web UI.
Below is the default login information for Cube’s web UI:
Login: admin
Password: admin
If the password has been changed, perform a full factory reset (see page 28).
INTERNET STREAMING
Cannot verify login.
You may have entered incorrect account information, or have no internet connection. Verify your account
credentials are correct. If they are correct, verify that your network has an internet connection. Also, verify
Cube’s Network Interfaces menu has valid gateway and name server values.
Cannot start broadcast.
Cube may not have an internet connection, or the Cube encoder may not be started. Verify Cube has an
internet connection, and/or verify that the ENC LED is illuminated a solid green.
Broadcast has started, channel shows “LIVE,” but only a black screen is shown.
This indicates the bit rate may be set too high for the network’s available bandwidth. From the Encoder
menu, lower the bit rate and/or resolution to avoid lost/late video data.
Page 38
Page 39

TECHNICAL SPECIFICATIONS
CUBE ENCODER
600 SERIES 700 SERIES
VIDEO
Video Inputs HDMI 1.4a: Full Size
SD/HD/3G-SDI (75 Ω BNC)
Supported
Resolution
VIDEO PROCESSING
Video
Compression
Supported Video
Bitrate
Test Pattern
Generator Support
Video Format
Conversion Support
Color Correction CDL/1024 1D LUT (supports 10-bit color),
PROTOCOL SUPPORT
Network Protocols TCP/IP, UDP, HTTP, DHCP, NTP, SSL, IGMP TCP/IP, UDP, HTTP, DHCP, NTP, SSL, IGMP
Supported Video
Transport Protocols
Bonding Ethernet, Wi-Fi, USB Modem, TeraLink,
Remote Teradek Core Teradek Core
Platform Integration UStream, YouTube Live, Facebook,
AUDIO
Audio Compression AAC-LC, MPEG Layer 2 AAC-LC, MPEG Layer 2
Audio Input Embedded audio input, analog line or mic in,
Audio Output Headphone output Headphone output
1080p 23.98/24/25/29.97/30/50/59.94/60
1080i 50/59.94/60
1080PsF 23/24/25/29/30
720p 50/59.94/60
576i
480i
480p (for HDMI input only)
576p (for HDMI input only)
H.264, baseline, main and high profile H.265, H.264, baseline, main and high profile
250 Kbps to 15 Mbps (Wired:15 Mbps,
WiFi:10 Mbps)
Yes Yes
Built-in video scaler and deinterlacer Built-in video scaler and deinterlacer
33x33x33 3D LUT (supports 10-bit color)
RTMP, RTP, RTSP, RTSP over HTTP,
MPEG-TS (MPEG-TS is an optional paid
license)
accepts Teradek Bond 4-port cellular bonding
device
Livestream, Twitch, Periscope
adjustable gain
HDMI 1.4a: Full Size
SD/HD/3G-SDI (75 Ω BNC)
1080p 23.98/24/25/29.97/30/50/59.94/60
1080i 50/59.94/60
1080PsF 23/24/25/29/30
720p 50/59.94/60
576i
480i
480p (for HDMI input only)
576p (for HDMI input only)
250 Kbps to 30 Mbps
CDL/1024 1D LUT (supports 10-bit color),
33x33x33 3D LUT (supports 10-bit color)
RTMP, RTP, RTSP, RTSP over HTTP,
MPEG-TS (MPEG-TS is an optional paid
license)
Ethernet, Wi-Fi, USB Modem, TeraLink,
accepts Teradek Bond 4-port cellular bonding
device
UStream, YouTube Live, Facebook,
Livestream, Twitch, Periscope
Embedded audio input, analog line or mic in,
adjustable gain
© Teradek, LLC 2017. All rights reserved.
Page 39
Page 40
600 SERIES 700 SERIES
PHYSICAL
Dimensions
Weight 11.6oz (328.9g) 11.6oz (328.9g)
Construction Milled Aluminum Milled Aluminum
INTERFACES
Configuration
Interfaces
Switches On/Off and reset switch On/Off and reset switch
Recording/Storage SD Card: Full size SD Card: Full size
Desktop App Feature-rich web UI for configuration and
Mobile App VUER, Live:Air Action VUER, Live:Air Action
USB Interface
Functionality
NETWORK
Ethernet 10/100/1000 BASE-T Gigabit 10/100/1000 BASE-T Gigabit
Wireless Cube 655 only - 2.4/5GHz 802.11 ac/a/b/
USB USB 3G/4G Modem support USB 3G/4G Modem support
RF Channel Cube 655 only - Auto with 3 modes: (2.4 or 5
Encryption Cube 655 only - 802.1x, 802,11i, WPA2,
POWER
Power Input 2 pin circular-locking connector 2 pin circular-locking connector
Nominal Power
Consumption
Auxiliary Power
Input
4.75”W x 3”D x 1.1”H [120.7 x 76.2 x 27.9mm] 4.75”W x 3”D x 1.1”H [120.7 x 76.2 x 27.9mm]
OLED Display with joystick navigation
buttons
control
Powered USB 2.0 host port Powered USB 2.0 host port
g/n MiMo
Ghz), Auto (2.4 GHz only), Auto (5 Ghz only),
Configurable to specific channels
WPA and WEP 64/128 TKIP, 128bit AES
7W (no WiFi) 8W, 7W (no WiFi)
6-28V DC 6-28V DC
OLED Display with joystick navigation
buttons
Feature-rich web UI for configuration and
control
Cube 755 only - 2.4/5GHz 802.11 ac/a/b/g/n
MiMo
Auto with 3 modes: (2.4 or 5 Ghz), Auto (2.4
GHz only), Auto (5 Ghz only), Configurable to
specific channels
802.1x, 802,11i, WPA2, WPA and WEP
64/128 TKIP, 128bit AES
Page 40
Page 41
CUBE DECODER
600 SERIES 700 SERIES
VIDEO
Video Outputs HDMI 1.4a: Full Size
SD/HD/3G-SDI (75 Ω BNC)
Supported
Resolution
VIDEO PROCESSING
Video
Decompression
Supported Video
Bitrate
Test Pattern
Generator Support
Video Format
Conversion Support
PROTOCOL SUPPORT
Network Protocols TCP/IP, UDP, HTTP, DHCP, NTP, SSL, IGMP TCP/IP, UDP, HTTP, DHCP, NTP, SSL, IGMP
Supported Video
Transport Protocols
Remote Teradek Core Teradek Core
AUDIO
Audio Compression AAC-LC, MPEG Layer 2 AAC-LC, MPEG Layer 2
Audio Output Embedded audio output, analog line or mic in,
PHYSICAL
Dimensions
Weight 11.6oz (328.9g) 11.6oz (328.9g)
Construction Milled Aluminum Milled Aluminum
1080p 23.98/24/25/29.97/30/50/59.94/60
1080i 50/59.94/60
1080PsF 23/24/25/29/30
720p 50/59.94/60
576i
480i
480p (for HDMI output only)
576p (for HDMI output only)
H.264, baseline, main and high profile H.265, H.264, baseline, main and high profile
250 Kbps to 15 Mbps (Wired:15 Mbps,
WiFi:10 Mbps)
Yes Yes
Built-in video scaler and deinterlacer Built-in video scaler and deinterlacer
RTMP, RTP, RTSP, RTSP over HTTP,
MPEG-TS (MPEG-TS is an optional paid
license)
adjustable gain, headphone output
4.75”W x 3”D x 1.1”H [120.7 x 76.2 x 27.9mm] 4.75”W x 3”D x 1.1”H [120.7 x 76.2 x 27.9mm]
HDMI 1.4a: Full Size
SD/HD/3G-SDI (75 Ω BNC)
1080p 23.98/24/25/29.97/30/50/59.94/60
1080i 50/59.94/60
1080PsF 23/24/25/29/30
720p 50/59.94/60
576i
480i
480p (for HDMI output only)
576p (for HDMI output only)
250 Kbps to 30 Mbps
RTMP, RTP, RTSP, RTSP over HTTP,
MPEG-TS (MPEG-TS is an optional paid
license)
Embedded audio output, analog line or mic in,
adjustable gain, headphone output
© Teradek, LLC 2017. All rights reserved.
Page 41
Page 42
600 SERIES 700 SERIES
INTERFACES
Local Device
Configuration
Switches On/Off and reset switch On/Off and reset switch
Recording/Storage SD Card: Full size SD Card: Full size
Desktop App Feature-rich web UI for configuration and
Mobile App VUER, Live:Air Action VUER, Live:Air Action
USB Interface
Functionality
NETWORK
Ethernet 10/100/1000 BASE-T Gigabit 10/100/1000 BASE-T Gigabit
Wireless Cube 675 only - 2.4/5GHz 802.11 ac/a/b/
USB N/A USB 3G/4G Modem support
RF Channel Cube 675 only - Auto with 3 modes: (2.4 or 5
Encryption Cube 675 only - 802.1x, 802,11i, WPA2,
POWER
Power Input 2 pin circular-locking connector 2 pin circular-locking connector
Nominal Power
Consumption
Auxiliary Power
Input
OLED Display with joystick navigation
buttons
OLED Display with joystick navigation
buttons
Feature-rich web UI for configuration and
control
control
Powered USB 2.0 host port Powered USB 2.0 host port
Cube 775 only - 2.4/5GHz 802.11 ac/a/b/g/n
g/n MiMo
MiMo
Auto with 3 modes: (2.4 or 5 Ghz), Auto (2.4
Ghz), Auto (2.4 GHz only), Auto (5 Ghz only),
Configurable to specific channels
GHz only), Auto (5 Ghz only), Configurable to
specific channels
802.1x, 802,11i, WPA2, WPA and WEP
WPA and WEP 64/128 TKIP, 128bit AES
64/128 TKIP, 128bit AES
8W, 7W (no WiFi) 8W
6-28V DC 6-28V DC
Page 42
Page 43

© Teradek, LLC 2017. All rights reserved.
Page 43
Page 44

FCC STATEMENT
This equipment has been tested and found to comply with the limits for a Class A digital device, pursuant
to Part 15 of the FCC rules. These limits are designed to provide reasonable protection against harmful
interference in a residential installation. This equipment generates, uses, and can radiate radio frequency
energy, and, if not installed and used in accordance with the instructions, may cause harmful interference
to radio communications. However, there is no guarantee that interference will not occur in a particular
installation. If this equipment does cause harmful interference to radio or television reception, which can be
determined by turning the equipment off and on, the user is encouraged to try to correct the interference
by one or more of the following measures:
● Reorient or relocate the receiving antenna.
● Increase the separation between the equipment and the receiver.
● Connect the equipment into an outlet on a circuit different from that to which the receiver is connected.
● Consult the dealer or an experienced radio or television technician for help.
This device complies with Part 15 of the FCC rules and also with RSS-210 of Industry Canada. Operation is subject to
the following two conditions:
1. This device may not cause harmful interference, and
2. This device must accept any interference received, including interference that may
cause undesired operation.
EC DECLARATION OF CONFORMITY
Teradek LLC herby declares that the Cube encoder and decoder are in compliance with Directive
1999/5/EC. The full text of the EC Declaration of Conformity is available at the following
internet address: https://support.teradek.com/hc/en-us/articles/233429747-EC-
Declaration-of-Conformity-for-CE-mark
Page 44
 Loading...