


(Back cover)
All other product or service names are the pro p erty of their respective owners.
The information contained in this user’s guides is believed to be correct at the time of
printing. We reserve the right to change or modify any information or specifications
without notice. The contents of this user’s guides are provided “as is.” Except as required
by applicable law, no warranties of any kind, either express or implied, including, but not
limited to, the implied warranties of merchantability and fitness for a particular purpose, are
made in relation to the accuracy, rel i ability, or contents of this guide.
© Copyright 2005, BRIGHTSTAR Corp., All rights reserved.

FX2000xg
2005. 10.10
REV.00
1

WELCOME
Congratulations on your purchase of a FX2000xg product!
Product registration is an important step toward enjoying your new product. Registering
helps us facilitate warranty service, and permit us to contact you should your product
require an update or other service. Registration is not required for warranty coverage.
Please retain your original dated sales receipt for your records.
For warranty service of your Motorola br anded product you will need to provide a copy of
your dated sales receipt to confirm warra n t y sta t us.
Please read important safety instructions on page 2 before use.
Read and understand all instructions before use.
Please retain this guide for future reference.
2

Hereby, BRIGHTSTAR Corp., declares that this unit is in compliance with the
relevant provisions of the Low Voltage Directive 73/23/EEC and the EMC
Directive 89/336/EEC.
Hereby, BRIGHTSTAR Corp. declares that this unit is in compliance with the
essential requirements and other relevant provisions of Directive 1999/5/EC.
This product carries the CE-Mark in accordance with the related European
Directives.
3

CONTENTS
1. SAFETY INFORMATION.................................................................................................9
2. PREPARE YOUR PHONE FOR USE.............................................................................15
2.1. Install the coiled cord. ............................... ............................................................15
2.2. Plug the AC / DC adaptor................................................ ......................................15
2.3 Back up Battery.......................................... ............................................................16
3. FEATURE HIGHLIGHTS ...............................................................................................17
4. ABOUT THE PHONE.................................................. ................................ ....................18
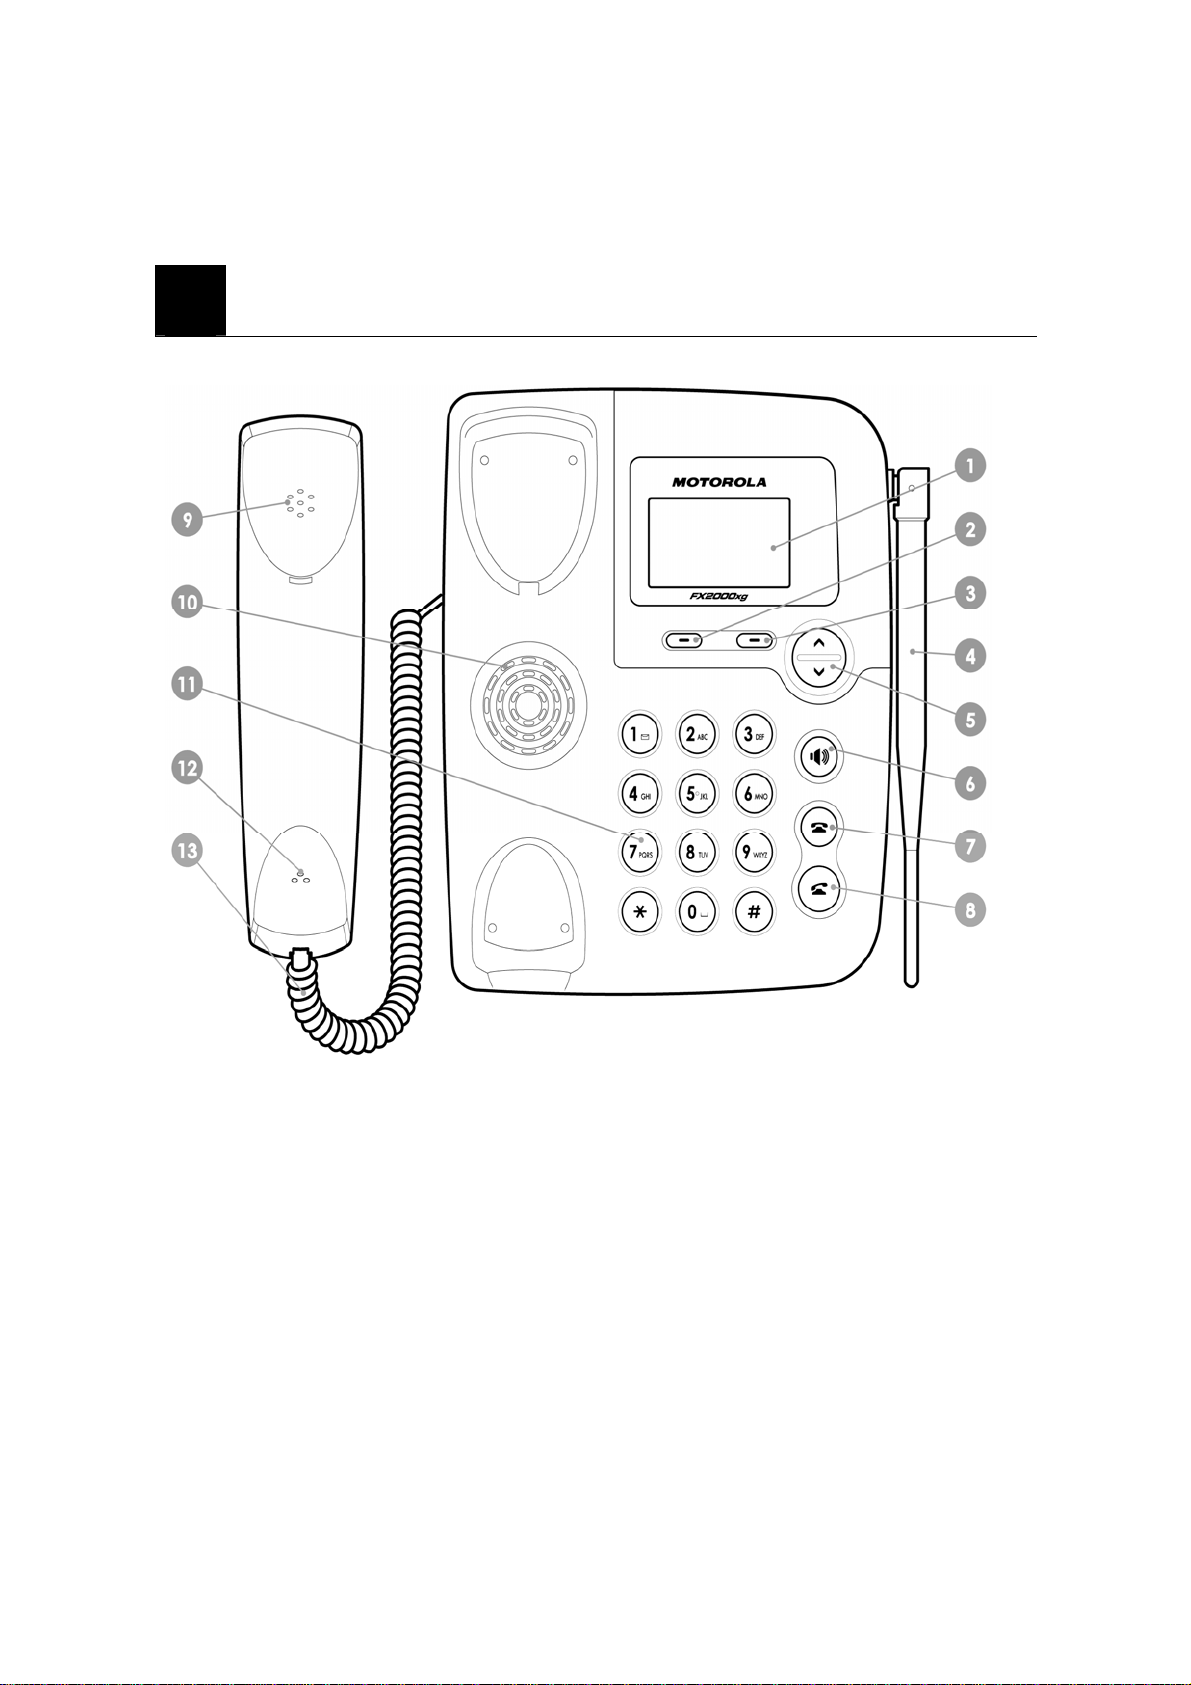
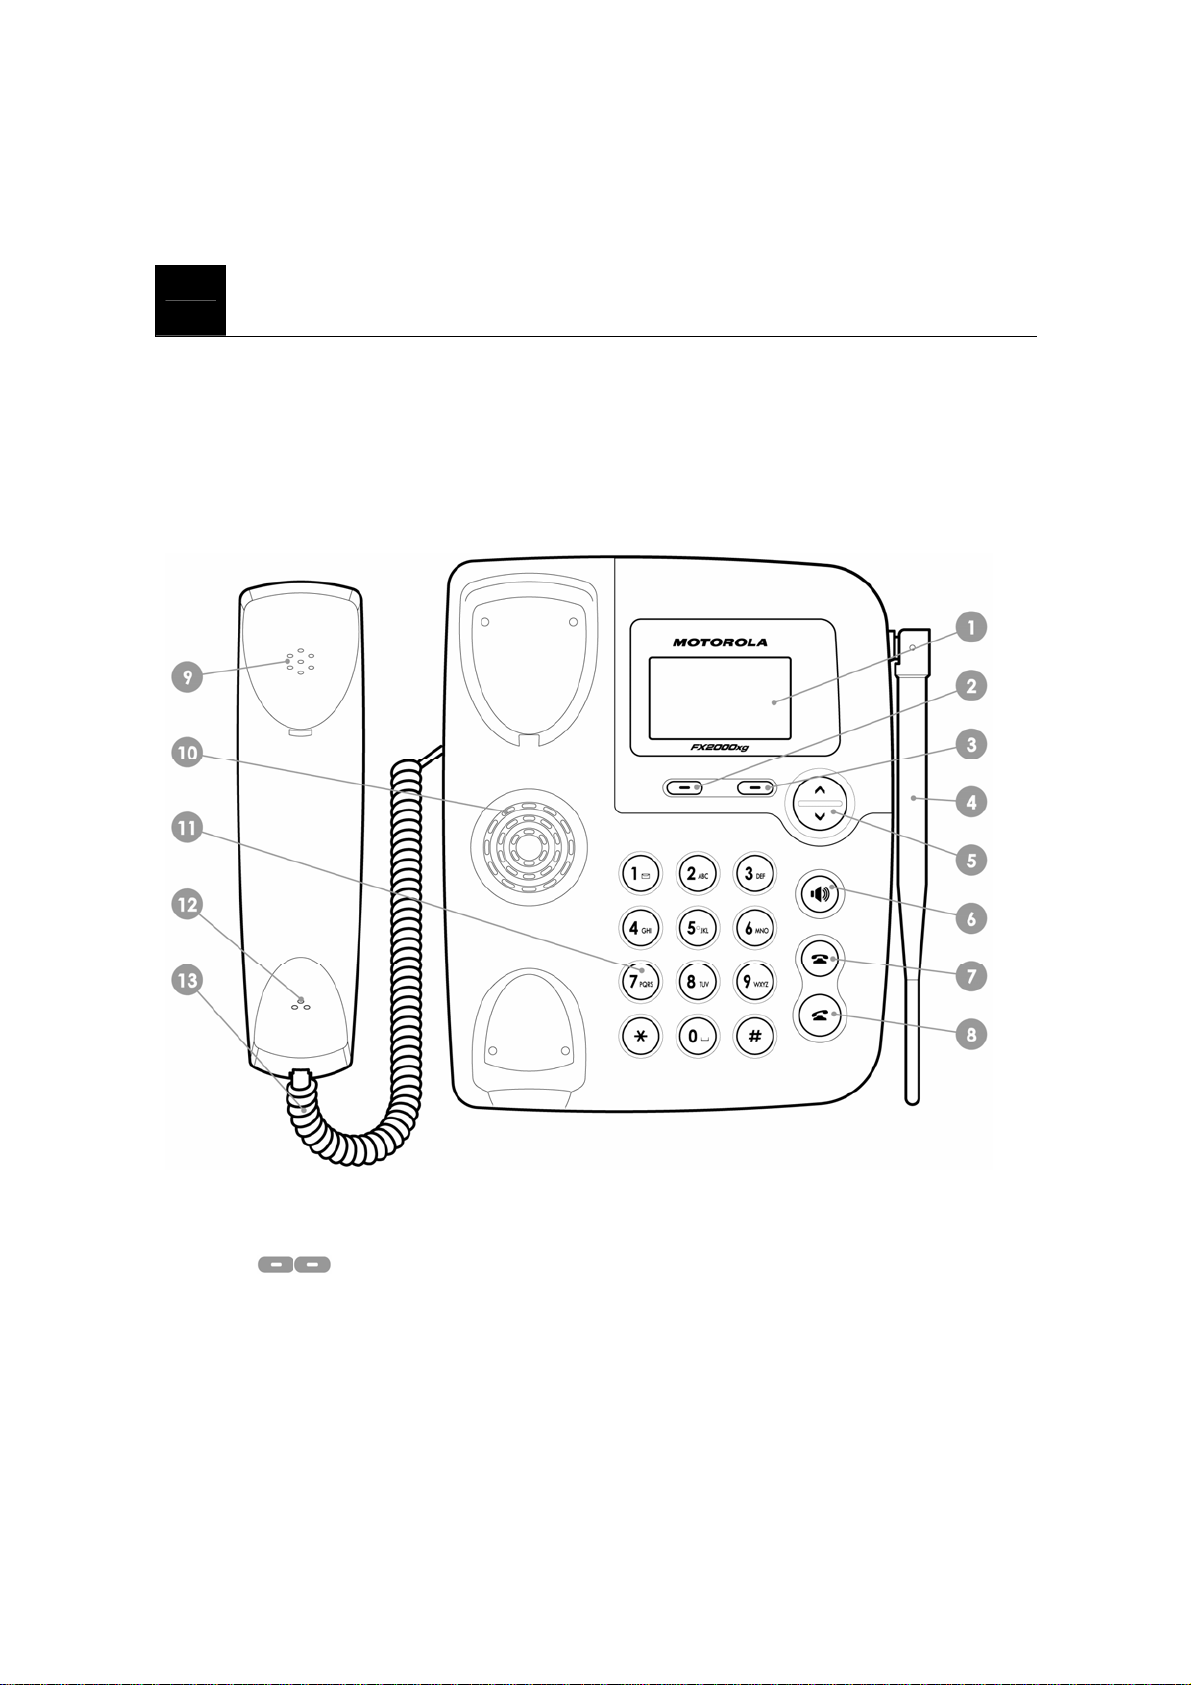
4.1 Name.......................................................................................................................18
4.2 Key functions............................ .. ............................................................................18
4.2.1 Menu / Selection / Name key.......................................... .. ............18
4.2.2 Send key...............................................................................................19
4.2.3 End key..............................................................................................19
4.2.4 ~ , ...........................................................................................19
4.2.5 Scroll keys.........................................................................................19
4.2.6 Using the selection keys..............................................................................19
4.2.7 Using the scroll keys ...................................................................................20
4.2.8 Speaker button.............................. ................................... ......................20
4.3 About display indicators and icons.........................................................................20
4.3.1 Start screen..................................................................................................20
4.3.2 Scroll bar .....................................................................................................20
4.4 Indicators and icons.......................................... .................................. ....................20
5. BASIC OPERATIONS....................................... ..............................................................22
4

5.1 Switch the phone ON and OFF ..............................................................................22
5.2 Make a call .............................................................................................................22
5.3 Answer a call ............................................................ ................................ ..............23
5.4 Speaker mode.........................................................................................................23
5.5 Adjust the V olume.. ................................ ................................ ................................ .23
5.5.1 Adjust the ring volume ................................................................................23
5.5.2 Adjust earpiece volume .............................................. ................................ .24
5.6 Redial the last-dialed number..................................................................... ............24
5.7 Caller ID .................................................. .. ............................................................24
5.8 SMS and Voice Mail.............................................. ................................... ..............25
6. USE PHONE MENUS.....................................................................................................26
6.1 Navigate menus ....................................................................................................26
6.1.1 Scroll through menus...................................................................................26
6.1.2 Use a shortcut.......................................................................................... ....26
6.1.3 Exit menu levels..........................................................................................26
6.2 List of Menus..........................................................................................................26
7. ENTER LETTERS AND NUMBERS ................. ................................... .........................33
7.1 Enter Letters ...........................................................................................................33
7.1.1 Edit name.....................................................................................................33
7.1.2 Change case of letters and numbers ................... ... ......................................34
8. USE THE PHONE BOOK......................................... .. ....................................................35
8.1 About the phone book....................................................... .. ....................................35
8.2 Use phone book menus...........................................................................................35
8.3 Search Entry – by name..........................................................................................35
8.4 Add a new phone book Entry ............................. ................................... .................36
8.5 Delete All............................... ... .................................................................. ............36
8.6 Copy All Entries.....................................................................................................36
8.7 Owner Number................................................................................. ......................37
8.8 Check Memory Status ................... .........................................................................37
5

9. SEND AND RECEIVE TEXT MESSAGES ...................................................................38
9.1 Send a Text Message ..............................................................................................38
9.2 View Inbox / Outbox..............................................................................................39
9.3 Use Template................................................................................................. .........40
9.4 Message Settings....................................................................................................40
9.5 Use Voicemail (Network Service)..........................................................................41
9.6 Broadcast Message (Network Service)...................................................................42
10. USE CALL HISTOR Y..................................... .................................. ............................43
10.1 Check Missed / Dialed / Received Calls ..................... ................................... ......43
10.2 Delete Call Log.....................................................................................................44
10.3 Track / Reset T ime Records................................. ........... ........ .......... ........... ........ .44
10.4 Check / Set / Reset Call Cost................................................................................44
11. SETTINGS.....................................................................................................................46
11. 1 Phone Setup.........................................................................................................46
11.1.1 Set Time and Date / Home City .................................................................46
11.1.2 Select Language.........................................................................................47
11.1.3 Input Method......................................................... ... .................................47
11.1.4 Change display setup..................................... ............................................47
11.1.5 Set Contrast................................................................................................48
11.1.6 Greeting Text............... .................................................................. ............48
11.1.7 Auto update of date and time.................................................... ... ..............49
11.2 Call Setup........ ..... ..... ... ..... ...... .. ...... ..... ... ..... ..... ... ..... ...... .. ...... ..... ..... ... ..... ...... .. ....49
11.2.1 Caller ID....................................................................................................49
11.2.2 Call waiting (Network service)..................................................................49
11.2.3 Call Forward............................................. ................................... ..............50
11.2.4 Call Barring (Ne twork Service).................................................................51
11.2.5 Line Switching (Network Service)............................................................51
11.2.6 Call Time Reminder.................. ... ..............................................................52
11.2.7 Auto Redial.................................................. ................................ ..............52
11.2.8 Closed User Group (Networ k Service)......................................................52
11.3 Network Set up......................................... ...... ..... ... ..... ..... ... ..... ...... .. ...... ..... ... ..... .53
6

11.3.1 Network Selection............... .. ....................................................................53
11.3.2 Band Selection............................... ............................................................53
11.4 Security Setup................................................. ......................................................53
11.4.1 Phone Lock................................................................................................54
11.4.2 Auto Key Lock...........................................................................................54
11.4.3 Fixed Dial ..................................................................................................54
11.4.4 Barred Dial........ ... ......................................................................................55
11.4.5 Change Password.......................................................................................55
11.5 Restore Factory Settings.......................................................................................55
12. USER PROFILES ..........................................................................................................56
12.1 Activate a Profile......................................... ... ......................................................56
12.2 Customize a Profile ........................ ......................................................................56
12.2.1 Tone setup...................................... ........... ........... .......... ........ ........... .........57
12.2.2 Volume.............................................. ........... .......... ........... ........ ........... ......57
12.2.3 Ring Type.......................................................... .........................................57
12.2.4 Extra Tone..................................................................................................57
12.2.5 Answer Mode................................. ................................ ............................58
12.2.6 LCD backlight...........................................................................................58
13. ORGANIZER................................................................... ..............................................59
13.1 View / Edit / Add Tasks .................................. .. ...... ..... ... ..... ..... ... ..... ...... .. ...... ..... .59
13.2 Alarm.............................................. ................................ ................................ ......59
13.3 Calculator ....................................... ......................................................................60
14. SHORTCUT ...................................................................................................................61
15. SIM TOOL KIT (NETWORK PROVIDER OPTION)..................................................62
16. REFERENCE INFORMATION.....................................................................................63
16.1 Emergency Calls...................................................................................................63
16.1.1 Make an emergency call............................................................................63
16.2 Troubleshooti ng................................ ........ ........... ........... .......... ........ ........... .........63
7

16.2.1 No service.............................................................................. ....................63
16.2.2 What if the call does not go through?........................................................64
16.2.3 Check these points to ascertain if the phone is broken or not. ..................64
17. TECHNICAL INFORMATION.................................................... ........ ........... .......... ....66
17.1 Specific Absorption Rate Data ....................... ......................................................66
18. WARRANTY...................................................... ........... ........ ........... .......... ........... ........ .68
8

1. SAFETY INFORMATION
SAFETY INFORMATION FOR FIXED PHONES
For the safe and efficient operation of your phone, observe the following guidelines:
When using this phone, basic safety precautions sho uld always be followed to reduce the
risk of fire, electric shock, or personal injury. Read this information before using your
phone.
1. Read and understand all instructions.
Follow all warnings and instructions marked on this unit.
2. Unplug this unit from AC outlets before cleaning . Do not use liquid or aerosol cleaners.
Use a damp cloth for cleaning.
3. Do not use this unit near water, for example, near a bathtub, washbowl, kitchen sink, or
similar.
4. Place this unit securely on a stable su rface. Serious damage and / or injury may result if
the unit falls.
5. Do not cover the slots and openings on the unit. They are provided for ventilation against
overheating. Never place the unit near radiators, or other sources of heat, or in a place
where proper ventilation is not provided.
6. Use only the power source marked on the unit. If you are not sure of the type of power
supplied to your home or office, consult your dealer or local power company.
7. Do not place objects on the power co rd. Install the unit where no on e can step on or trip
on the cord.
8. Do not overload wall outlets and extension cords. This can result in the risk of fire or
electric shock.
9. Never push any objects through the slots in th e unit. This can result in th e risk of fire or
electric shock. Never spill any liquid on the unit.
10. To reduce the risk of electric shock, do not di sassemble this unit. Take the unit to an
authorized dealer when service is required. Opening or removing covers may expose you to
dangerous voltages or other risks and may void the warranty. Incorrect reassembly can
result in electric shock when the unit is subsequently used.
9

11. Unplug the unit from the wall outlet and refer to an authorized dealer when the
following conditions occur:
a. If liquid has been spilled into the unit.
b. If the unit has been exposed to rain or water.
c. If the unit does not work normally by following the operating instructions.
Adjust only the controls covered by the operating instructions. Improper
adjustments may damage the unit.
d. If the unit has been dropped or is physically damaged.
e. If the unit exhibits a distinct c h ange in performance.
f. When the power cord or pl u g is d amaged or frayed.
12. Do not use this unit to report a gas leak when in the vicinity of the leak.
13. NEVER attempt to remove the antenna while the phone is in use or switched on.
Always disconnect the AC supply and remove the batteries before disconnecting the
antenna. Failure to take this precaution may result in damage to the phone and void the
warranty.
14. The batteries are for emergency backup only. Connect the AC supply and confirm that
the telephone is working normally befo re inst alli ng th e b atteries. This pho n e is not intended
for use without the AC adapter.
15. In the event of power failure the call may be disconnected.
16. Replace the batteries every six months to ensure proper service in the event of power
failure.
17. Making changes to the Network Settings section may prevent the phone from
functioning normally.
EXPOSURE TO RADIO FREQUENCY (RF) ENERGY
You r wireless telephone is a high power radio transmitter and receiver. When it is ON, it
receives and also sends out radio frequency (RF) signals. When you communicate with
your phone, the system handling your call controls the power level at which your phone
transmits.
In August 1996, the Federal Communications Commissions (FCC) adopted RF exposure
10

guidelines with safety levels for handheld wireless phones. Those guidelin es are consistent
with the safety standards pre vio usly set by both U.S. and internatio na l standards bodies:
ANSI C95.1 (1992)*
NCRP Report 86 (1986)**
ICNIRP (1996)
#
* American National Standards Institute;** National Council on Radiation Protection and
#
Measurements;
International Commission on Non-Ionizing Radiation Protection. Those
standards were based on comprehensive and periodic evaluations of the relevant
scientific literature. For example, over 120 scientists, engineers, and physicians from
universities, government health agencies, and industry reviewed the available body of
research to develop the ANSI Standard (C95.1)
The design of your phone complies with the FCC guidelines (and those standards).
ANTENNA CARE
Use only the supplied or an approved replacement antenna. Unauthorized antennas,
modifications, or at ta chments could damage the phone and may violate FCC regulations.
PHONE OPERATION
This device complies with Part 15 of the FCC Rules. Operation is subject to the following
two conditions:
1) This device may not cause harmful inte rference.
2) This device must accept any interference received, including int erference that may
cause undesired operation.
11

RF ENERGY INTERFERENCE / COMPATIBILITIES
Note: Nearly every electronic device is susceptible to RF energy interference from
external sources if inadequately shielded, designed, or otherwise configured for
RF energy compatibility. In some circumstances your phone may cause
interference.
MEDICAL DEVICE
Pacemakers
Pacemaker manufacturers recommend that a minimum separation of 6 inches
(15centimeters) be maintained between a handheld wireless phone and a pacemaker.
Persons with pacemakers should:
z ALWAYS keep the phone more than 6 inches (15 centimeters) from your
pacemaker when the phone is turne d ON.
z Not carry the phone in the breast pocket
z Use the opposite ear of the pacemaker to minimize the potential for interference.
z Turn OFF the phone immediately if you have any reason to suspect that
interference is taking place.
Hearing Aids
Some digital wireless phones may interfere with some hearing aids. In the event of such
interference, you may want to consult your hearing aid manufacturer to discuss alternatives.
Other Medical Devices
If you use any other personal medical device, consult the manufacturer of your device to
determine if it is adequately shielded from RF energy. Your physician may be able to assist
you in obtaining this information.
OPERATIONAL WARNING
For Vehicles with an Air Bag
Do not place a phone in the area over an air bag or in the air b og dep loyment area. Air b ags
inflate with great force. If a phone is placed in the air bag deploy ment area and the air bag
inflates, the phone may be propelled with great force and cause seriou s injury to occupants
of the vehicle.
12

Potentially Explosive Atm osp he res
Turn off your phone prior to en tering any area with a potentially explosive atmosphere. Do
not remove, install, or charge batteries in such areas. Sparks in a potentially explosive
atmosphere can cause an explosion or fire resulting in bodily injury or even death.
Note : The areas with potentially explosive atmospheres referred to above include fueling
areas such as below decks on boats, fuel, or chemical transfer or storage facilities, areas
where the air contains chemicals or particles, such as grain, dust or, or metal powders.
Areas with potentially explosive atmospheres are often but not always posted.
BATTERIES
Batteries can cause property damage and / or bodily injury such as burns if conductive
materials such as jewelry, keys, or beaded chains touch exposed terminals. The conductive
material may complet e an electrical circuit (short circuit) and become quite hot . Exercise
care in handling any charged battery, particularly when placing it inside a pocket, purse or
other container with metal objects. Use only FX2000xg original batter ie s a nd chargers.
Your battery or phone may contain symbols, defined as follows.
Symbol Definition
Important safety information will follow
Your battery or phone should not be disposed of in a fire
Your battery or phone may require recycling in accordance
with local laws. Contact your local regulatory authorities for
more information.
Your battery or phone should not be thrown in the trash
13

Seizures / Blackouts
Some people may be susceptible to epileptic seizures or blackouts when exposed to
flashing lights, such as when watching television or playing video games. These seizures or
blackouts may occur even if a person never had a previous seizure or blackout.
If you experienced seizures or blackouts, or if you have a family history of such
occurrences, please consult with your doctor.
14
2. PREPARE YOUR PHONE FOR USE
Before using your phone, phone must be setup as the following instruction.
2.1. Install the coiled cord.
z Connect the coiled cord to both the handy and the base.
(Picture added)
2.2. Plug the AC / DC adaptor
z Connect the adaptor to the AC Wall outlet.
(Picture added)
15

2.3 Back up Battery
• Remove the battery door
• Insert the rechargeable battery pack into the battery compartment.
• Place the battery door
(Picture added)
Note: Battery pack is a backup for emerg ency case of power failure. Do not operate the
phone without the AC/DC Adaptor connected.
Be sure to carefully match the positive and negative terminals as shown in the
battery.
Caution:
• SIM card for this Fixed Wireless Phone is prohibited to use in other GSM mobile
phones. Once SIM pin number is entered, SIM pin is automatically changed so
initial PIN is no longer valid. Therefore, it is highly recommended not to take out
the SIM card once it is installed in this product.
• DO not bend or scratch your SIM card, and avoid expo sing it to static electricity,
water, or dirt.
16

3. FEATURE HIGHLIGHTS
z Dial tone generation
z Desktop Form factor
z Auto Dialing
z Voice mail
z Short Message Service
z Long Message Service up to 450 characters
z Emergency call
z Call logs
z Call restriction
z Caller ID
z Clock with alarm
z Calculator
z Graphic bigger displa y
z Blue back light for LCD and keypad
z Multi ring tone
z Speakerphone
z Multi language (English, Spanish, Portuguese)
z 200 phone book memory (100 phone book in the phone, 100 in SIM card)
z Rechargeable battery
z TNC antenna connector (50ohms) for charging external antenna
z Wall mount (Optional)
17
4. ABOUT THE PHONE
This phone operates in a different band. It supports dual band (850MHz / 1900MHz) or
dual band (900MHz / 1800MHz)
4.1 Name
4.2 Key functions
4.2.1 Menu / Selection / Name key
z Press the left key to perform the function (menu) indicated by the text on the screen
above the key.
z Press the right key (name) to directly enter to the phone book list.
18

4.2.2
z Press to make a call to a name / number shown on the screen.
z Press to answer a call.
z Press once to enter to the list of recently dialed numbers.
Send key
4.2.3
z Press to end a call.
z Press once to exit a function and to return to the start screen.
End key
4.2.4
z Used for entering numbers and letters.
z Press and hold to call the voice mailbox.
z Press to toggle between upper case, lower case and numeric modes.
~ ,
4.2.5
z Press to increase the earpiece and ring volume.
z Press to decrease the earpiece and ring volume.
Scroll keys
4.2.6 Using the selection keys
The functions of the selection keys depend on the guiding texts shown above the
keys.
For example, when the text MENU is above the left selection key, press left key
enters the menu functions. Similarly, pressing the right selection right key
the text NAME accesses the phone book functions.
under
19

4.2.7 Using the scroll keys
The phone has two scroll keys,
located just below the screen.
The scroll keys have up and down arrows on them; press these to scroll through the
phone’s menus.
4.2.8
z Turn on and off the speaker in the c o nversation mode.
Speaker button
4.3 About display indicators and icons
The display indicators and icons inform about the operation of the phone.
4.3.1 Start screen
The start screen displays when the phone is turned on. Several features can be used only
when the phone is at the Start Screen.
4.3.2 Scroll bar
When you access the phone’s menu, there is a scroll bar at the far right of the screen.
This bar indicates user’s location in the menu: each “tab” on the bar represents a
different menu item.
4.4 Indicators and icons
On your phone, you have two types of identifiers: indicators and icons. Icons are graphical
representations of a specific item or situation. For example, an icon appears when you have
a voice message waiting to be heard.
Indicators show the status of something. The phone uses three types of indicators:
z Signal strength indicator: This indicator shows the signal strength of the wireless
20

network at your current locati on. The higher the bar, the stronger signal .
z Ringer volume indicator: When you press upper key once during stand by,
you are able to enter the ringer volume adjustment . Scrolling up and down the key
adjusts the ringer volume higher or lower.
The list below shows what each icon means.
You have an active call.
You have a missed call.
You have one or more new voice m essages waiting.
You have one or more unread t e xt messages waiting.
Any alpha characters you enter will be uppercase (capital
letters). Press
to switch to lowercase.
Any alpha characters you enter will be lowercase.
Press
to switch to numeric mode.
You are in numbers mode. After switching to this numbers mode,
you cannot enter any alpha characters. You can enter only numbers.
The alarm clock is set.
Battery indicator
Ring
Keypad lock
Line switch. Line 1
21

5. BASIC OPERATIONS
5.1 Switch the phone ON and OFF
Case 1:
z To turn the phone on, press and hold the until the phone displays “Telcel ” on
the screen.
z To turn the phone off, press and hol d t h e
5.2 Make a call
Case 1:
• Deactivate the Key guard, if it is on.
• Pick up the handy and dial tone is generated.
• Enter the phone number includi n g the are code and press
• Press
to end th e call or to cancel the call attempt. If handy is placed in a base,
call is automatically terminated.
Note: The phone may generate heat during longer calls.
Case 2:
① Enter the phone number with the handset on the base.
② Press
③ Press
. The phone enters speaker mode.
to end the call or to cancel the call attempt. If pressing speaker button,
call is automatically terminated.
22

Note: The number is automatically dialed 6 seconds later you press the number without
pressing
.
5.3 Answer a call
Case 1:
• When the handy is resting in its base, lift the handy.
• The ringing will stop and talk icon
Case 2:
① When the phone rings, press send button.
will appear in the display.
The phone will be in speaker mode.
5.4 Speaker mode
You can make or answer a phone call by pressing when the handset is on the cradle.
To make a call:
• Press
• If you hear the dial tone, press the nu mber you want to connect to.
to turn on the speaker phone mode.
• Press
Note: The call is automatically made without pressing 8 seconds you press the
number.
To answer a call:
• When the phone rings, press
.
to turn on the speaker phone mode.
5.5 Adjust the Volume
5.5.1 Adjust the ring volume
23

You can adjust the ring tone volume by pressing the scroll keys on the phone.
z Press upper to go into ring volume control screen.
z Press upper to increase the volume.
z Press down to decrease the volume.
5.5.2 Adjust earpiece volu me
You can adjust the earpiece volume during a call by pressing the scroll keys on the
phone.
z Press upper to increase the volume.
z Press down to decrease the volume.
Note : You can also adjust speaker volume with
when you are in speaker
mode.
5.6 Redial the last-dialed number
The phone stores up to 10 recently dialed numbers. Stored numbers may be up to 20 digits
long.
① Press
② Press
③ Press
for about two seconds to find the most recently dialed numbers.
to scroll to the number you wish to dial.
once.
Note: If no recently dialed numbers are stored, you are not able to use this function.
5.7 Caller ID
Caller ID is a network service that identifies incoming calls. Contact your service provider
24

to find out how to get this feature.
When Caller ID is active, your phone sho ws the caller ’s phone number during an incoming
call, as long as this number is a part of your service provider’s wireless network.
The wireless network lets you know if it does no t recognize the caller’s phon e nu mber. The
wireless network will also let you know if the calling party has blocked the Caller ID
feature.
If you have stored the name an d number of the calling party in y our phone book and that
number is supported by the wireless network, the caller’s name can also appear.
5.8 SMS and Voice Mail
A new SMS or Voice mail arrives,
z The back light of keypad is ON and the handy displays “New Message(s)” on the
screen.
z The backlight is off if you lift up the handy from the base.
25

6. USE PHONE MENUS
6.1 Navigate menus
A menu is a list of choices you can make. Your phone menu has 7 sub menus. Each sub
menu contains options that allow you to use the phone book , change the ringing tone, and
so on. You can use menus and su bmenus in two ways: by scrolli ng o r by using shortcuts.
6.1.1 Scroll through menus
• From the Start screen, press MENU, and then scroll through the menus using the
• Use the scroll and selection keys to navigate the submenus and to return to the Start
screen.
6.1.2 Use a shortcut
You can use a shortcut to get to options directly without scrolling throug h l ists.
6.1.3 Exit menu levels
z To return to the previous menu level, press BACK or CANCEL.
z To return to the Start screen, press . No menu setting changes are saved.
6.2 List of Menus
Your phone’s menu may differ from the following list, depending on the network services
to which you have subscribed and the accessories you are using. If you have any questions,
call your service provider.
1. Phone book
1. Search Entry
2. Add New Entry
1. To SIM
26

2. To Phone
3. Delete All
1. From SIM
2. From Phone
4. Copy All
1. From SIM
2. From Phone
5. Owner Number
6. Memory Status
2. Messages
1. Write Message
2. Inbox
3. Outbox
4. Template
Call Me Now
How about lunch?
Be right back
I am busy now…
Sorry
Thank you
How was the day?
Long time, we met
Lots of fun
How are you?
5. Message Settings
1. Profile Setting (MSC number, Validity, T yp e)
2. Common Setting (Delivery report, Reply Path)
3. Memory Status (SIM, Phone)
6. Voice Mail
Number
Erase
27

Connect to Voice Mail
7. Broadcast Message
1. Receive Mode (ON, Off)
2. Languages (all languages, English)
3. Channel (Select, Add, Edit, Delete)
3. Call History
1. Missed Calls
2. Dialed Calls
3. Received Calls
4. Delete Call Log
1. Missed Calls
2. Dialed Calls
3. Received Calls
4. Delete All
5. Call Time
1. Last Call Time
2. Total Sent
3. Total Received
4. Reset All time
6. Call Cost
1. Last Call Cost
2. Total Cost
3. Reset Cost
4. Max Cost
5. Price Per Unit
4. Settings
1. Phone Setup
1. Time and Date (Set Home City , Set Time / Da te)
2. Language (English, Spanish, Portugu ese)
3. Input Method (Multi Tap ABC, Multi Tap abc,
28

Numeric)
4. Display (Off, Show date and Time, Show Owner
Number)
5. Contrast
6. Greeting Text
7. Auto update of date and time (On, Off)
2. Call Setup
1. Caller ID (Set by Network, Hide ID, Send ID)
2. Call Waiting (Activate, Deactivate, Query Status)
3. Call Forward
1. All Voice Calls (Activate, Deactivate, Query
Status)
2. If unreachable (Activate, Deactivate, Query
Status)
3. If No Answer (Activate, Deactivate, Query
Status)
4. If Busy (Activate, Deactivate, Query Status)
5. All Data Calls (Activate, Deactivate, Query
Status)
6. Cancel All Divert
4. Call Barring
1. Outgoing Calls
All Calls (Activate, Deactivate, Query Status)
International Calls (Activate, Deactivate, Query
Status)
International Except Home (Activate,
Deactivate, Query Status)
2. Incoming Calls
All Calls (Activate, Deactivate, Query Status)
When Roaming (Activate, Deactivate, Query
Status)
3. Cancel All
29

4. Changing Barring PW
5. Line Switching (Line 1, Line 2)
6. Call Time Reminder (Off, Single, Periodic)
7. Auto Redial (On, Off)
8. Closed User Group (Edit, Activate, Deactivate)
3. Network Setup
1. Network Selection (Automatic, M an ua l )
2. Band Selection
1. 850
2. 900
3. 1800
4. 1900
5. Dual band (850 and 1900)
6. Dual band (900 and 1800)
4. Security Setup
1. Phone Lock (On, Off)
2. Auto Key lock
1. None
2. 5 sec
3. 30sec
4. 1 min
5. 5min
3. Fixed Dial
1. Mode (On, Off)
2. Fixed Dial List (Name, Number)
4. Barred Dial
1. Mode (On, Off)
2. Barred Dial List (Name, Number)
5. Change Password
1. PIN
2. PIN 2
3. Phone Lock
30

5. Restore Factory Setting
5. User Profiles
1. General
1. Activate
2. Customize
1. Tone Setup
1. Incoming Call (List of Tone)
2. Alarm (List of Tone)
3. Power On (List of Tone)
4. Power Off (List of Tone)
5. Message Tone (List of Tone)
6. Keypad Tone (Silent, Click, Tone)
2. Volume
1. Ring Tone
2. Key Tone
3. Ring Type
1. Repeat
2. Ascending
4. Extra Tone
1. Warning
2. Error
3. Camp On
4. Connect
5. Connect
5. Answer Mode
1. Any Key
2. Lift Answer
6. LCD Backlight
1. 5sec
2. 15sec
3. 30sec
31

4. 45sec
2. Meeting
1. Activate
2. Customize (Same as above tree)
3. Outdoor
1. Activate
2. Customize (Same as above tree)
4. Indoor
1. Activate
2. Customize (Same as above tree)
5. Headset
1. Customize (Same as above tree)
6. Organizer
1. To do List
2. Alarm
3. Calculator
7. Short cuts (example)
1. User Profile
2. Inbox
3. Write Message
4. Missed Calls
5. Received Calls
6. To Do List
7. Alarm
8. Calculator
9. Call Forward
10. Search Entry
8. STK
32

7. ENTER LETTERS AND NUMBERS
You can enter letters, as well as numbers, when storing information into your phone by
using your phone’s keypad. To enter letters, press the key associated with the letter you
wish to enter until it appears on the screen (numbers also appear).
7.1 Enter Letters
When you want to add new names or when you view names in the phone book, your phone
automatically switches to the ABC mode and displays the ABC icon.
Key Characters Key Characters
. , ? ! ’ “ : ; @ _ & 1
A B C 2
D E F 3
G H I 4
J K L 5
M N O 6
Press a key once or several times to enter the letter(s) you want. For example, press
three times to enter the letter C. The selection displays.
7.1.1 Edit name
To edit a name in the phone book:
z Use upper to scroll the cursor to the left.
P Q R S 7
T U V 8
W X Y Z 9
9 (space),0 ()+ - * = # %
\ / ~ < > f$ ¥§ £※[ ] ( )
Change letter case
z Use down to scroll the cursor to the right.
z Press Clear to correct any mistakes.
33

7.1.2 Change case of letters and numbers
You can switch the mode among uppercase and lowercase letters and numbers by
pressing
.
34

8. USE THE PHONE BOOK
8.1 About the phone book
New entries can be stored in the SIM card or in your handy.
You can store up to 100 entries in the phone and addi tional 100 in
the SIM depending on SIM limitation.
Entries stored in the Phone allow numbers of up to 30 digits, and names of up to 16
characters.
In standby mode, you can press right
Name to enter immediately Phone Book Lis t .
When the number is found pressing Name, you can select it and choose to View, Edit,
Delete, Copy, Move and Send message.
8.2 Use phone book menus
The phone book has several menus to select from. These menus appear when you press
Name and sele ct numb er. Pre ss right option to select menu. Use to scroll to the
menu you want to use.
z View View nam e and num be r you selec te d .
z Edit Edit name and number you selected.
z Delete Delete single entry you selected.
z Copy Delete the complete entry of the selected name.
z Move Move name and number to the phone
z Send Message Write message and send to the number you selected.
8.3 Search Entry – by name
From the Phonebook menu, select Search Entry and press right Ok.
Enter the first 1 or 2 letters of the name you need and press right
Select name using
to scroll and press right option to select menu. Use to
scroll to the menu you want to use.
Search.
35

Note: You can retrieve phone book using quick access in idle screen. Press “N+#” for quick
access. “N” means the order number for the specific number stored in SIM. The total
number of N can be limited per SIM.
8.4 Add a new phone book Entry
To create a phonebook entry:
① Press Menu > Phonebook.
② Scroll to [Add New Entry] and press Ok.
③ Press To SIM or To phone depending on where you want to store the phone entry.
④ Press right
⑤ Add Name and number
⑥ Press right
⑦ Press Done to save the change.
Edit to chose Name and number
Ok to complete input
8.5 Delete All
You can delete all phonebook entr ie s:
① Press Menu > Phonebook
② Scroll to [Delete all] and press Ok.
③ Press To SIM or To phone where you want to delete all phone book entries.
④ Press Ok to confirm the delete of all phone book entries.
⑤ Select Yes if you want to delete. Otherwise, select No to go back to previous m en u.
Caution: Note that this action cannot be undone once you perform this feature; all the
stored information in your phonebook is deleted.
8.6 Copy All Entries
You can use this function to Copy numbers in the SIM card to your fixed phone, or vice
versa:
① Press Menu > Phonebook
② Scroll to Delete all and press Ok.
③ Press From SIM or From phone where you want to copy all phone book en tries
36

from.
④ Press Ok
⑤ Select Yes if you want to copy. Otherwise, select No to go back to previous menu.
8.7 Owner Number
You can check, edit, erase and save your Owner Number:
① Press Menu > Phonebook
② Scroll to Owner number and press Ok.
③ Press option to chose Edit or Erase
8.8 Check Memory Status
You can check out memory status for phone book:
① Press Menu > Phonebook
② Scroll to Memory status and Press Ok
③ Check the memory status. For example, if you see “36/100”, it means the capacity
is 100 entries and there are 36 entries saved.
④ Press Back to return to phone book menu.
Note: You can send a message from the phonebook menu. Please see 9.2.
37

9. SEND AND RECEIVE TEXT MESSAGES
You can send or receive text messages with your phone. Text messages that you receive
can contain ring tones that you can store on your phone. It supports 450 characters and y ou
can insert Use Template (alrea d y i nstalled in your phone) to shorten the editing time.
After complete a message’s contents, you can choose to send it out right away, or to save it
as a draft.
z Write Message
z Inbox
z Outbox
z Template
z Message Settings
z Voice Mail
z Broadcast Message
9.1 Send a Text Message
You can send a text message to one or more recipients. You can manually enter each
recipient’s phone number, or you can select the numbers from the phonebook.
Note: The maximum length of a text message differs depending on the capabilities of
the network from which it originated. Also, text messages may appear different
at different times because message s can originate in networks other than yo ur
own.
Contact your service provider for more information about this feature.
① Press MENU > Messages .
② Scroll to the Write Message and press Ok.
③ You can create the message.
④ When you press OPTIONS, you can scroll to one of the following message
options:
38

z Done Finish creating a message.
z Use Template Use stored message.
- Call me Now
- How about lunch?
- Be right back
- I am busy now…
- Sorry
- Thank you
- How was the day?
- “Long time, we met”
- Lots of fun
- How are you?
⑤ Scroll to DONE and press Ok.
⑥ Scroll to send options :
z Send only Send message to only one number
z Save and Send Save and send message to only one numbe r
z Save Save a message as a draft
z Send to many Send message to maximum 10 numbers.
Press Edit list and pick up 10 numbers. To send a
message, press Back and Send Now.
Note: You need to enter phone number or searc h the number fr om the ph one list.
9.2 View Inbox / Outbox
When a message arrived, a pop-up message is displayed and a new message icon
appears. You can read it immediately, or read it later in your Inbox.
Outbox stores messages sent and saved.
① Press MENU > Messages
② Scroll to the Inbox or the Outbox and press Ok.
③ From the list, highlight the one you need and press Ok
④ When you press Option, you can scroll to one of the following messa ge o ptions:
z Reply (Inbox) Reply the chosen message.
39

z Send(Outbox ) Send the chosen message.
z Forward(Inbox) Forward the chosen message.
z Edit Edit the chosen message.
z Delete Delete the chosen message.
z Delete All Delete all Inbox or Outbox messages.
z Use Number Extract and then dial or save the number(s) embedded in
the message.
9.3 Use Template
The template consists of predefined or self-edit canned messages.
① Press MENU > Messages
② Scroll to the Template and press Ok.
③ From the list, select one you need an d press Option
z Edit Edit the original template and continue to compose it. After finish
editing, press Ok to Save directly.
z Erase Remove the template.
9.4 Message Settings
The configure settings of message include: Profile Setting, Common Setting and Memory
status.
① Press MENU > Messages
② Scroll to the Message Settings and press Ok.
③ From the list, select one option you need and press Ok
z Profile Setting Each profile has a unique set of settings: Profile Name, Message
Center (network service), Valid Period (Set the duration that your
message is stored at the message center. Select 1 hour, 12 hours,
1 day, 1 week or maximum) and Message Type Text / Fax / Page
/ E-mail).
9 MSC(Message Service Center) phone number : The SMS Center Number
is required to send
messages. Ask your
service provider for this
40

number.
9 Validity: Set the period of time the message is stored in the service
center. You can set the period for 1 hour, 12 hours, 1 day, 1
week, maximum. When the set period expires, the service
center will delete all messages, even if the user does not receive
the message.
9 Type: When you set the message type , the network will convert the
message to the type you have se t.
z Common Setting Delivery Report (to receive the delivery report informing you
when a message is delivered) and Reply Path (let s the recipient
of your message send you a reply message through your
message center if provided by your netw o rk.).
z Memory Status Check out memory status in the SIM and in Phone. It shows
percentage for used memory. For example, SIM: 30%
means 30% used in SIM card out of 100%.
Note: After SMS memory in SIM card is full, the phone starts
using memory in the phone.
9.5 Use Voicemail (Network Service)
You can listen to your voicemail messages by calling your network voicemail phone
number. Voicemail messages are stored on the network voicemail box, not on your phone.
① Press MENU > Messages
② Scroll to the [Voice mail] and press Ok. If there is no network service numbers
listed, “Empty” is displayed; press Ok and then select Edit to create one.
③ From the list, select one option you need and press Ok
z Empty & Edit Enter or modify the network service number.
z Erase Delete all pre-saved info of the chosen Voice Mail Server.
z Connect to Voice Dial the network service number and connects you to the
voice mail service.
Note: Press and hold
to call the voice mailbox. If there is no voice mail, “No
41

Number to dial” message pops up.
9.6 Broadcast Message (Network Service)
You can receive broadcast message regularly from your service provider.
① Press MENU > Messages
② Scroll to the Broadcast Message and press Ok.
③ From the list, select one option you need and press Ok or Change
z Receive Mode On/Off.
z Languages Select the languages of the broadcast message. It has two
selections All Languages and English.
z Channels You can either Select, Add, Edit or Delete broadcast chan n els.
You can set up to 10 channels which have 3 di gits and save those
in the SIM. By factory setting, the default is “Off”, so you need
to turn it “On” if you want to use this option.
42

10. USE CALL HISTORY
The Call History keeps track of:
z Missed Calls
z Dialed Calls
z Received Calls
z Delete Call Log
z Call Time
z Call Cost
Note: Your phone can store up to 30 call numbers including missed, received and
dialed call .
When you miss a call(s), the message Missed calls icon appears on your phone’s
screen. You can press Read to view Missed Calls list or press Back to ignore the message
and go back to Standby. The records will be stored in Call History.
You are notified of missed calls only wh en your phon e is turn ed on in the serv ice area fro m
which the missed call originated.
10.1 Check Missed / Dialed / Received Calls
① Press MENU > Call History
② Select Missed Calls or Received or Missed Calls and press Ok.
③ From the list of records, select one that you need and press Ok
④ Screen shows Call Info. Including Number, Date, Time and Counter.
⑤ Press Option for the following options.
z Delete Delete the chosen record.
z Save Save this number into to SIM Card or to Phone. You can choose to
save this entry to the SIM card or to the Phone.
z Dial Dial the chosen number.
z Edit Edit the number and then save it to the Phone Book or SIM card. You
can chose to save this entry to the SIM card or to the Phone.
43

Note: In Standby, the icon
indicates there are unread missed call records.
10.2 Delete Call Log
You can choose to delete Missed Calls, Dialed Calls or Received Calls and delete All.
① Press MENU > Call History
② Select Delete Call Log and press Ok.
③ Select Missed Calls, Dialed Calls , or Received Calls and press Ok.
④ Press Yes to delete or press No to quit.
You can also delete all with selection Delete All and Press Ok.
Caution: Note that this action cannot be undone once you perform this feature, all the
stored information in your log is deleted.
10.3 Track / Reset Time Record s.
In Call time menu, you can check:
z Last Call Time Check the duration of the last call.
z Total Sent Check the total duration of all outgoing calls.
z Total Received Check the total duration of all received calls.
You can select Reset All Time to reset the timer.
① Press MENU > Call History and Ok
② Select Call Time and press Ok.
③ Scroll to the Reset All Time and press Ok.
④ Delete? Message pops up. Press Yes to reset or No to quit.
Caution: Note that this action cannot be undone once you perform this feature, all the
stored information in your log is deleted.
10.4 Check / Set / Reset Call Cost.
In Call Cost, you can check:
z Last Call Cost Check the cost of the last call.
z Total Cost Check the cost of all calls.
44

z Reset Cost Reset the cost record. You need to enter the PIN2 number to
use this function.
z Max Cost This men u sets the maximum call cost you can use.
① Select Max Cost, then a message appears ask ing you to enter PIN2 in the screen.
② Enter the PIN2 in the screen.
③ Then, the screen appears where you can enter the max credit.
④ Enter the new max credit.
Caution: if PIN2 is entered incorrectly three times, you cannot start this function.
Refer to the section 16, Trouble shooting to solve this problem.
z Price Per Unit Enable you to input the current unit price so the phone can
estimate the cost.PIN2 code is required.
① Press MENU > Call History
② Press Call Cost and Press Ok
③ Scroll to the follow options :
④ Select Last Call Cost to view the cost of the last call and Press Ok
⑤ Select Total Cost to view the cost for all calls Press Ok
⑥ Select Reset Cost and press Ok. Input PIN2 code and press Ok. Contact service
provider for detailed operations if necessary.
⑦ Select Max Cost and press Set. Input PIN2 code and press Ok. Contact service
provider for detailed operations if necessary.
⑧ Select Price Per Unit and press Set. Input PIN2 code and press Ok. Contact
service provider for detailed operations if necessary.
45

11. SETTINGS
Setting menu includes:
z Phone Setup
z Call Setup
z Network Setup
z Security Setup
z Restore Factory Settings
11. 1 Phone Setup
11.1.1 Set Time and Date / Home City
This menu guides you to set Home City, Time/Date.
z Set Home City Set the correct city where you are using this phone, so you can
ensure the correction of World Clock.
z Set Time/Date Set the correct date and time to ensure the Alarm is working
correctly.
Set Home City:
① Press MENU > Settings
① Press Phone Setup and Press Ok
② Select Time and Date and then press Ok.
③ Select Set Home City and press Ok.
④ Scroll to the city where you are using this phone and Press Ok
Set Time / Date:
① Press MENU > Settings
② Press Phone Setup and Press Ok
③ Select Time and Date and then press Ok.
④ Select Set Time / Date and press Ok.
⑤ Press Change and use numeric keys to input current date an d time and Press Ok.
46

⑥ After fin ishing, Press Done
⑦ Save? message pops up. Press Yes to complete or No to quit.
11.1.2 Select Language
You can select the language you need. The phon es currently support three languages
(English, Spanish, and Portu g uese)
① Press MENU > Settings
② Press Phone Setup and Press Ok
③ Select Language and then press Ok.
④ Select the language you need and press Ok
11.1.3 Input Method
The chosen input method will be used as the main input method while editing.
① Press MENU > Settings
② Press Phone Setup and Press Ok
③ Select Input Method and then press Ok.
④ Scroll up and down arrow key to select one method and press Ok
z Multitap ABC
z Multitap abc
z Numeric
11.1.4 Change display setup
In Display menu, you can set your favorite Display Characteristic to show Date and
time or Owner Number.
Show Date and Time:
You can choose whether to display date and time in Standby screen or not.
① MENU > Settings
② Press Phone Setup and Press Ok
③ Select Display and then press Ok. Toggle Show Date and Time and press Ok
47

Show Owner Number
You can choose whether to display you r phone number (or name) in Standby screen or
not.
① Press MENU > Settings
② Press Phone Setup and Press Ok
③ Select Display and then press Ok.
④ To ggle Show Owner Number and press Ok
11.1.5 Set Contrast
There are 15 levels for LCD Contrast.
① Press MENU > Settings
② Press Phone Setup and Press Ok
③ Select Contrast and then press Ok.
④ Adjust contrast using ,
⑤ Press Ok to complete.
11.1.6 Greeting Text
The Greeting phrase is shown after power-on animation.
On / Off status:
① Press MENU > Settings
② Press Phone Setup and Press Ok
③ Select Greeting Text and then press Ok.
④ Select On or Off depending on your current greeting text s ta t u s an d press change.
⑤ Toggle On or Off using
⑥ Press Ok to complete.
Change Text:
① Press MENU > Settings
key
key to set Status to On or Off
② Press Phone Setup and Press Ok
48

③ Select Greeting Text and then press Ok.
④ Press below to highlight the Greeting Text and press Edit.
⑤ Edit the greeting text and then press Ok.
11.1.7 Auto update of date and time
This is a network or subscription dependent service.
If the function is enabled, the phone pops you NITZ (Network Identity Time Zone)
messages and inquires you to change the date and time for the phone.
① Press MENU > Settings
② Press Phone Setup and Press Ok
③ Select Auto Update of date and time and then press Ok.
④ To ggle On or Off.
11.2 Call Setup
11.2.1 Caller ID
You can choose to send/hide your phone number to/from the calling party.
① Press MENU > Settings
② Press Call Setup and Press Ok
③ Press Caller ID and Press Ok
④ Toggle Set by Network or Hide Id or Send Id and then
press Ok.
⑤ To ggle On or Off.
z Set By Network Accept the default value set by Network.
z Hide Id Not to show your phone number to the calling party.
z Send Id Show your phone number to the calling party.
11.2.2 Call waiting (Network service)
Call Waiting is a network or subscription dependent service.
If set to Activate, Call Waiting feature enables the network to remind you other
49

incoming calls during a call in progress.
① Press MENU > Settings
② Press Call Setup and Press Ok
③ Press Call Waiting and Press Ok
④ Select Activate, or Deactivate or Query Status and then press Ok.
z Active Activate Call Waiting function.
z Deactivate Deactivate Call Waiting function.
z Query Status Check current Call Waiting setting status.
11.2.3 Call Forward
Call Divert is a network or subscription dependent service. It allows you to forward a
call to another number, based on different conditions.
① Press MENU > Settings
② Press Call Setup and Press Ok
③ Press Call Forward and Press Ok
④ Select One of options below and then press Ok.
z All Voice Calls Divert all incoming calls to designated number.
z If Unreachable Divert all incoming calls when the phone is not reachable due
to some network error or other reasons.
z If No Answer Divert the incoming call if it is not answered.
z If Busy Divert all incoming calls when there is at least one call in
progress.
z All Data Calls Divert all incoming data calls.
z Cancel All Divert Deactivate Call Divert function.
⑤ Sel ect Active, Deactivate or Query Status and press Ok.
z Activate Activate the chosen Call Divert option. Type the number you want
a call to be forwarded to. Y ou can also choose the number from
your phone book pressing Searching.
z Deactivate Deactivate the chosen Call Divert option.
z Query Status Check current Call Divert setting status.
50

11.2.4 Call Barring (Network Service)
Call Barring is a network or subscr iption dependent service.
This feature allows you to restrict or bar certain or all types of calls to and from your
phone.
① Press MENU > Settings
② Press Call Setup and Press Ok
③ Press Call Barring and Press Ok
④ Select One of options below and then press Ok.
Outgoing Calls:
z All Calls Bar all outgoing calls.
z International Calls Bar all outgoing international calls.
z International Except Home Prevent users from making any international calls
other than to home PLMN.
Incoming Calls:
z All Calls Bar all incoming calls.
z When Roaming Bar all incoming calls when the phone is roaming.
Cancel All: Password is require d.
⑤ Select Active, Deactivate or Query Status and press Ok.
z Activate Activate the chose n Call Barring option.
z Deactivate Deactivate the chosen Call Barring option.
z Query Status Check current Call Barring setting status.
Note: To active and Deactivate Outgoing, Incoming, and cancel calls, the SIM
password is required. Contact your cellular phone provider.
11.2.5 Line Switching (Network Service)
Line Switching is a network or subscription dependent service.
This feature allows you to switch different lines base on your need s.
① Press MENU > Settings
51

② Press Call Setup and Press Ok
③ Press Line Switching and Press Change
④ Toggle Line 1 or Line 2 and press Ok to switch different lines.
11.2.6 Call Time Reminder
Call Time Reminder alerts every specific time period to remind you the call du rat ion.
① Press MENU > Settings
② Press Call Setup and Press Ok
③ Press Call Time Reminder and Press Ok
④ Toggle One of options below and then press Ok.
z Off Set Call Time Reminder to Off.
z Single Reminder beeps once. You have to set reminder time value (1-3000 sec.)
z Periodic Reminder beeps periodically every minute at the number of seconds you
set. You have to set reminder time value (30-60 sec.).
⑤ For the Single and Periodic option, you need to type a time value using keypad and
press Ok.
11.2.7 Auto Redial
Set Auto Redial to On enabl es the phone to k eep trying dialing if the called party is not
available.
① Press MENU > Settings
② Press Call Setup and Press Ok
③ Press Auto Redial and Press Change
④ To ggle On or Off and then press Ok.
11.2.8 Closed User Group (Network Service)
This feature allows you to program specific call-out and call-in rules. This is especially
suitable for use in off i ce s and re stricts phones to company use.
You can create up to 1 group.
① Press MENU > Settings
② Press Call Setup and Press Ok
52

③ Press Closed User Group and Press Ok
④ Screen shows the options, Edit, Active and Deactivate.
z Edit Edit the group name.
z Activate Activate the user group.
z Deactivate Deactivate t he user group.
11.3 Network Set up
11.3.1 Network Selection
You can set the phone to au tomati cally sea rch th e most su itab le netwo rk to ca mp on; or
to manually select the network you need.
① Press MENU > Settings
② Press Network Setup and Press Ok
③ Press Network Selection and Press Ok
④ Select Automatic or Manua l and press Ok. If Manual is selected, the phone starts
searching available networks. Use the up and down key to browse the network li st,
and press Ok to set the highlighted network.
11.3.2 Band Selection
There are 3 options available: 900 , 1800 and Dual Band (900&180 0). Or 85 0, 190 0 and
Dual Band (850&1900)
① Press MENU > Settings
② Press Network Setup and Press Ok
③ Press Band Selection and Press Ok
④ Select the option you need and press Ok
11.4 Security Setup
There are 5 options available:
z Phone Lock Prevent unauthorized use of the phone.
z Auto Key Lock Prevent accidentally pressing the
keypad in Standby.
53

z Fixed Dial The phone can dial out and send message only the those
numbers set in Fixed Dial list.
Caution: You should know PIN2 to user the Fixed Dial function. If pIN2 is entered
incorrectly three times in a row, you ca n no t use this function.
z Barred Dial The phone cannot dial out the numbers set in Barred Dial list.
z Change Password. Change PIN, PIN2 or Phone Lock passwords.
11.4.1 Phone Lock
The default password is “0000”.
① Press MENU > Settings
② Press Security Setup and Press Ok
③ Press Phone Lock and Press Ok
④ Toggle On or Off to lock or unlock phone.
⑤ Enter 4~8 digits password and press Ok.
11.4.2 Auto Key Lock
If you don’t press the key for a certain period of time (default time or set by the user),
keys are automatically locked in order to prevent accidentally pressing keys.
① Press MENU > Settings
② Press Security Setup and Press Ok
③ Press Auto KeyLock and Press Ok
④ To ggle None to deactivate Auto Key pad Lock; or select timer duration: 5 sec., 30
sec., 1 min. or 5 min and Press Ok
Note: When the key is lo cked, screen shows “unlock” in left bottom side. Press the
Unlock soft key then a, message “Press # to unlock” appears.. Press # to
unlock.
11.4.3 Fixed Dial
Fixed Dial is a network or subscription dependent feature.
① Press MENU > Settings
② Press Security Setup and Press Ok
54

③ Press Fixed Dial Press Ok
④ Sel ect Mode and toggle On or Off to activate or deactivate Fixed Dial feature.
⑤ Enter PIN2 code and press Ok.
⑥ Select Fixed Dial List and press Ok.
⑦ Screen shows FDN List. Press Add and then Edit to create new entries in FDN list.
Note: Please get PIN2 code from your Network Service Provider.
11.4.4 Barred Dial
Barred Dial is a network or subscription de pe n de nt feature.
① Press MENU > Settings
② Press Security Setup and Press Ok
③ Press Barred Dial Press Ok
④ Contact your service provider for detailed operations to finish Barred Dia l setup.
11.4.5 Change Password
This feature allows you to c hange the PIN co de, PIN2 code or Phone Lock password.
① Press MENU > Settings
② Press Security Setup and Press Ok
③ Press Change Password Press Ok
④ Select the option you need ( PIN2, Phone Lock) and press Ok
⑤ Enter the old and new codes and press Ok
11.5 Restore Factory Settings
This feature resets the current settings to factory default values. The default password is
“0000”.
① Press MENU > Settings
② Press Restore Factory Settings and Press Ok
③ Press Change Pwd Press Ok
④ Enter the 4 digit password and press Ok
55

12. USER PROFILES
This feature enables you to customize each profile to suit your needs such as ring style, ring
volume, LCD backlight. You may select different profiles depends on different
environments.
User Profiles are available:
z General
z Meeting
z Outdoor
z Indoor
z Headset
12.1 Activate a Profile
① Press MENU > User Profiles and Press Ok
② Select one profile and press Option
③ Sel ect Activate and Press Ok
Note: If you want to activate Headset, you need to insert the headset first.
12.2 Customize a Profile
① Press MENU > User Profiles and Press Ok
② Select one profile and press Option
③ Select Customize and press Ok
④ Select each of the following items and press Ok to
modify the values.
z Tone Setup Set tones
z Volume Set volume
z Ring Type Set ring type for repeat or for ascending
z Extra Tone Set additional option for tone in a specific phone’s behavior
z Answer Mode Set Answer mode pressing any key or answer once handy is
56

picked up from base.
z LCD Backlight Set Specific LCD and Keypad Backlight time.
12.2.1 Tone setup
Set tones for Incoming Call, Alarm, Power On, Power Off, Message Tone and Keypad
Tone.
Note: For each set tone setup, you can choose one from the 10 sing ring tones and
6 MIDI tones.
12.2.2 Volume
7 volume levels are available for Ring Tone and Key Tone. Adjust the volume to your
preference.
12.2.3 Ring Type
You can set the ringer to play rep ea tedly or to play in ascending volume mode.
① Select Ring Type and Press Ok
② Toggle Repeat or Ascending and Press Ok
12.2.4 Extra Tone
Extra Tone includes Warning, E r ror, Camp on and Connect tones.
① Toggle On or Off to following options to mark or clear the check box and press
Done. If Camp on is set to On, a tone is heard when camp on a networ k. If Connect
is set to On, a tone is heard when an outgoing call is established successfully.
z Warning
z Error
z Camp on
z Connect
57

12.2.5 Answer Mode
This allows user to set the answer mode. If any key is marked, user can answer an
incoming call pressing any key. I f lift answer is marked, when handy is in a cradle, if
user picks up handy, call can be automatically answered without press i n g an y key.
① Select Answer Mode and Press Ok
② Toggle Any Key or Lift Answer and Press Ok
12.2.6 LCD backlight
Set Specific LCD and Keypad Backlight time.
① Select LCD Backlight and Press Ok
② Toggle 5 sec, 15sec, 30 sec or 45sec and Press Ok
58

13. ORGANIZER
Organizer includes:
z To Do List
z Alarm
z Calculator
13.1 View / Edit / Add Tasks
You can memorize the date, time and task as an alarm.
① Press MENU > Organizer and Press Ok
② Select To Do List and press Ok
③ Press the up and down key to browse the list. Highlight the task you need and
press Option. The following options are shown.
z Add Add new task. Press Change and Input Date, Time, Note, set
Alarm (On, Off, Once, Every Day), and then press Done an d Yes
to save the new added task.
z Edit Edit the current task Press Change and Input Date, Time, Note, set
Alarm(On, Off, Once, Every Day), and then press Done and Yes to
save the modifications
z Delete Delete the chosen task.
z Delete All Delete all tasks.
13.2 Alarm
When Alarm is set, the icon appears on Standby screen.
① Press MENU > Organizer and Press Ok
② Select Alarm and press Ok
③ Press Change to select On, Off, Once, and Everyday. Toggle one of them and
press Ok.
④ Select alarm time an d Press Change
59

⑤ Set time you wish to alarm using numeric keys and Press Ok
⑥ Press Done and Yes to save the alarm time.
13.3 Calculator
You can calculate up to 8 digits.
Key description:
+, -, /, x : Use up and down arrow keys to select.
Back
values.
/ Clear: Press once to clear one digit. Hold to clear all values except memory
① Press MENU > Organizer and Press Ok
② Select Calculator and press Ok
③ Start calculation
60

14. SHORTCUT
You can directly enter the menu that you want to use using shortcut fu nc tion.
Maximum 10 menus can be selected in shortcut list.
How to use:
① Press down arrow key
② Shortcut list shows in the screen
③ Select the menu you want and Press Ok
④ You can continue to follow procedure after entering to the menu you selected.
How to edit :
① Press MENU > Shortcut and Press Ok
② Total 10 shortcuts shows in a screen
③ Select the one which you want to edit or delete and Press Edit
④ Screen changes to show total 25 lists.
⑤ Select the one you want to add in the shortcut list and Press Ok
61

15. SIM TOOL KIT (NETWORK PROVIDER OPTION)
SIM Application Toolkit has been agreed and in corporated within the Global System for
Mobiles (GSM) standard.
SIM Application Toolkit is designed as service application. Some services that the
customer can have: Phone banking, information service, stock trading, mobile data and fax,
etc.
Further details please contact wit h your netw or k servic e pro vider.
62

16. REFERENCE INFORMATION
16.1 Emergency Calls
IMPORTANT!
This phone, like any wireless phone, operates using radio signals, wireless and landline
networks, and user-programmed functions. Because of this, connections in all conditions
cannot be guaranteed. Therefore, you should never r ely solely on any wireless phone for
essential communications (e.g. medical emergencies).
Remember, to make or receive any calls, the phone must be switched on and be used in a
service area that has adequate signal strength . Emergency calls might not b e possible on all
wireless phone networks or when certain network servi ces and/or phone features are in use.
Check with local service providers.
16.1.1 Make an emergency call
① Enter the emergency number for your present location (for example, 911 or any
other official emergency number emergency numbers vary by location).
② Press .
If certain features are in use (Keyguard, restrict calls, and so on), you might first need to
turn those features off before you can make an emergency call. Consult this guide and
your local cellular service provider.
When making an emergency call, remember to give all of the necessary information as
accurately as possible. Remember that your wireless phone might be the only means of
communication at the scene of an accident do not terminate the call until given
permission to do so.
16.2 Troubleshooting
16.2.1 No service
If you are outside the wireless service area, No serv ice will d isplay on you r phon e. No
calls can be made or received, however, emergency calls may still be possible.
63

16.2.2 What if the call does not go through?
Your phone can make and receiv e calls only when i t is switched on and in the wireless
network’s service area.
No service means that you are p robably outside the wireless service are a. No calls can
be made or received.
This number is restricted means calls to the phone number you tried to call are
restricted
16.2.3 Check these points to ascertain if the phone is broken or not.
Symptoms How to Solve the problem
Phone does not immediately turn
on after plugging in charger after
extended period of non-use.
When this
SIM Invalid Check whether you have inserted the SIM card in
message
appears
on the
Enter PIN PIN is set by the user to prevent others from
screen
Enter PUK This message appears when the PIN is incorrectly
Message “Searching”
It may be necessary to charge for up to 4 hours to
recharge the battery enough to turn the phone on.
Charge battery as long as needed until phone
turns on.
the phone, and whether you have inserted it
correctly.
using this phone. In this case, enter your PIN.
entered three times in a row. At this time, enter
the PUK you received when you purchased the
SIM card in order to use your phone again. If the
PUK is incorrectly entered more than 10 times,
your SIM card will be permanently blocked, and
you need to purchase a new SIM card.
z When this happens in a service area, turn off
is displayed along
with “No Network or
mark.
the unit for 2~3 minutes, and then turn the
power back on.
z If this continues for some time without any
reason, contact the nearest BRIGHTSTAR
64

service center.
You cannot make a call even
though you have entered the
number and pressed the Send
button
No Incoming Calls from others
z Check whether you are in a service area. (If
you are not in a service area,
will be
displayed on the screen)
z Check whether you have set Outgoing Calls to
be barred. If this function is set, you cannot
make a call. (You can check All Outgoing
menu in the Call Barring menu of the Security
menu)
z Check whether you area in a service area. (If
you are not in a service area,
will be
displayed on the screen).
z Check whether you have set Incoming Call s to
be barred. If this function is set, you cannot
receive calls. (You can check the option “All
Incoming” in the Call Barring menu of the
Security menu)
65

17. TECHNICAL INFORMATION
17.1 Specific Absorption Rate Data
This wireless phone meets the government’s requirements for exposure to radio waves.
Your wireless phone is a radio transmitter and receiver. It is designed and manufactured not
to exceed limits for exposure to radio frequency (RF) energy set by the Federal
Communications Commission (FCC) of the U.S. Government. These limits are part of
comprehensive guidelines and establish permitted levels of RF energy for the general
population. The guidelines are based on standards that were developed by independent
scientific organizations through periodic and thorough evaluation of scientific studies. The
standards include a substantial safety margin designed to assure the safety of all persons,
regardless of age or health.
The exposure standard for wireless fixed phone employs a unit of measurement known as
the Specific Absorption Rate, or SAR. The SAR limits set by the FCC are 1.6W/kg. Tests
for SAR area conducted using standard operating positions accepted by the FCC with the
phone transmitting as its highest certified power level in all tested frequency bands.
Although the SAR is determined at the highest certified power level , the actual SAR level
of the phone while operating can be well below the maximum value. This is because the
phone is designed to operate at multiple power levels so as to use only the power requ ired
to reach the network. In general, the closer you are to a wireless base station, the lower the
output power.
Before a phone model is available for sale to the publ ic in the U.S. and Canada, it must be
tested and certified to the FCC that it does not exceed the limit established by each
government for safe exposure. The tests area performed in positions and location (e.g., at
the ear and worn on the body) reported to the FCC. The highest SAR value for this model
phone when worn on the body, as described in this user guide, is 0.327W/kg.
66

While there may be differences between the SAR levels of various phones and at various
positions, they all met the governmental requirements for safe exposure. Please note that
improvements to this product model could cause differences in the SAR value for later
products; in all cases, products are designed to be within the guidelines.
Weight
Size (H x W x D)
Wireless Networks
Frequency Range
Back up Battery
Handy : 142.0grams(0.31 lbs)
Base : 612.0grams(1.34 lbs)
Handy
48.8mm(W) x 200.0mm(L) x 45.5( H)
1.92”(H) x 7.87”(W) x 1.79”(T)
Base
158.0mm(W) x 214.0mm(L) x 69.0(H)
(Antenna adds 18.0mm to the width)
6.22”(H) x 8.42”(W) x 2.71”(T)
(Antenna adds 0.71“ to the width)
GSM 850 & 1900
824 ~849MHz
1850 ~1910MHz
Rechargeable batt ery pack
Near-Body Operation
To maintain compliance with FCC RF exposure requirements, maintain a 2.5cm(0.98 inch),
separation distance between the user's body and the phone, including the antenna, whether
extended or retracted.
67

18. WARRANTY
Limited Warranty for Personal Communication Products, Accessories
and Software.
What Does this Warranty Cover? Subject to the exclusions contained below,
BRIGTHSTAR warrants the Motorola branded FX2000xg that it manufactures (“Products”),
to be free from defects in materials and workmanship under normal consumer usage for the
period(s) outlined below. This limited warranty is a consumer’s exclusive remedy, and
applies as follows to new Motorola branded Products manufactured by BRIGHTSTAR, and
purchased by consumers around the world which are accompanied by this written warranty:
PRODUCTS COVERED
A. Products
1. The Fixed Wireless Telephone.
2. The accessories included with the Fixed Wireless Telephone.
LENGTH OF COVERAGE
A. One (1) year from the date of purchase by the first consumer purchaser of the product.
EXCLUSIONS
Normal Wear and Tear.
normal wear and tear are excluded from coverage.
Batteries.
capacity and batteries that leak ar e covered by this limited warranty.
as defined above.
Periodic maintenance, repair and replacement of parts due to
Only batteries whose fully charged capacity falls below 80% of their rated
68

Abuse & Misuse.
Defects or damage that result from: (a) improper operation, storage,
misuse or abuse, accident or neglect, such as physical damage (cracks, scratches, etc.) to
the surface of the product resulting from misuse; (b) contact with liquid, water, rain,
extreme humidity or heavy perspiration, sand, dirt or the like, extreme heat, or food; (c) use
of the Products for commercial purposes or subjecting the Product to abnormal usage or
conditions; or (d) other acts which are not the fault of
BRIGHTSTAR, are excluded from
coverage.
Use of Non-Pulsare branded Products and Accessories.
Defects or damage that result
from the use of Non-Motorola branded or certified Products, Accessories, Software or
other peripheral equipment are excluded from coverage.
Unauthorized Service or Modification.
Defects or damages resulting from service, testing,
adjustment, installation, maintenance, alteration, or modification in any way by someone
other than
BRIGHTSTAR or its authorized service centers are excluded from coverage.
Altered Products.
Products or Accessories with (a) serial numb ers or date tags that have
been removed, altered or obliterated; (b) broken seals or that show evidence o f tampering;
(c) mismatched board serial numbers; or (d) nonconforming or non-Motorola branded
housings, or parts, are excluded from coverage.
Communication Services.
Defects, damages, or the failure of products, due to any
communication service or signal you may subscribe to or use with the Products is excluded
from coverage.
Who is covered? This warranty extends only to the first consumer purchaser, and is not
transferable.
What will BRIGHTSTAR Do? BRIGHTSTAR, at its option, will at no charge repair,
69

replace or refund the purchase price of any Products that does not conform to this warranty.
We may use functionally equivalent reconditioned/refurbished/pre-owned or new Products,
Accessories or parts. No data, software or applications added to your Product, Accessory
or Software, including but not limited to personal contacts, games and ringer tones, will be
reinstalled. To avoid losing such data, software and applications please create a back up
prior to requesting service.
How to Obtain Warranty Service or Other Information?
For information on how to obtain service, contact the place where the product was
purchased or a BRIGHTSTAR Service Center in your country.
In order for this Warranty to take effect, take your unit, along with this policy, to the place
of purchase or to a BRIGHTSTAR Authorized Service Cen ter.
You will receive instructions on how to ship the Products, at your expense, to a
BRIGHTSTAR Authorized Repair Center. To o btain service, you must include: (a) a copy
of your receipt, bill of sale or other comparable proof of purchase; (b) a written description
of the problem; (c) the name of your service provider, if applicable; (d) the name and
location of the installation facility (if applicable) and, most importantly; (e) your address
and telephone number.
What Other Limitations Are There?
THE IMPLIED WARRANTIES OF MERCHANTABILITY AND FITNESS FOR A PARTICULAR PURPOSE, SHALL BE LIMITED
TO THE DURATION OF THIS LIMITED WARRANTY, OTHERWISE THE REPAIR, REPLACEMENT, OR REFUND AS
PROVIDED UNDER THIS EXPRESS LIMITED WARRANTY IS THE EXCLUSIVE REMEDY OF THE CONSUMER, A ND IS
PROVIDED IN LIEU OF ALL OTHER WARRANTIES, EXPRESS OF IMPLIED. IN NO EVENT SHALL BRIGHTSTAR BE
LIABLE, WHETHER IN CONTRACT OR TORT (INCLUDING NEGLIGENCE) FOR DAMAGES IN EXCESS OF THE PURCHASE
PRICE OF THE PRODUCT, OR FOR ANY INDIRECT, INCIDENTAL, SPECIAL OR CONSEQUENTIAL DAMAGES OF ANY
KIND, OR LOSS OF REVENUE OR PROFITS, LOSS OF BUSINESS, LOSS OF INFORMATION OR DATA OR OTHER
FINANCIAL LOSS ARISING OUT OF OR IN CONNECTION WITH THE ABILITY OR INABILITY TO USE THE PRODUCTS, TO
THE FULL EXTENT THESE DAMAGES MAY BE DISCLAIMED BY LAW.
ANY IMPLIED WARRANTIES, INCLUDING WITHOUT LIMITATION
70

Some states and jurisdictions do not allow the limitation or exclusion of incidental or
consequential damages, or limitation on the length of an implied warranty, so the
above limitations or exclusions may not apply to you. This warranty gives yo u specifi c
legal rights, and you may also have other rights that vary from state to state or from
one jurisdiction to an other.
71
 Loading...