


FTD-8800/CRX-1000
2005. 1. 28

CONTENTS
1. SAFETY INFORMATION
2. PREPARING YOUR PHONE FOR USE
2.1 Install the coiled cord
2.2 Plug AC/DC Adaptor
2.3 Back up Battery
3. FEATURE HIGHLIGHTS
4. ABOUT THE PHONE
4.1 Name and function
4.2 Key functions
4.2.1 Selection keys / Mute key (RSK)
4.2.2 Send key
4.2.3 End key
4.2.4 ~ Number keys
4.2.5 Scroll keys
4.2.6 Speaker button
4.2.7 Using the selection keys
4.2.8 Using the scroll keys
4.3 About display indicators and icons
4.3.1 Start Screen
4.3.2 Scroll Bar
4.4 Indicators and icons
5. BASIC OPERATIONS
5.1 Make a call
5.2 Answer a call
5.3 Speaker phone mode

5.4 Adjust the earpiece volume
5.5 Redial the last-dialed number
5.6 Use Caller ID
6. USE PHONE MENUS
6.1 Navigate menus
6.1.1 Scroll through menus
6.1.2 Use a shortcut
6.1.3 Exit menu levels
6.2 List of Menus
7. ENTER LETTERS AND NUMBERS
7.1 Enter Letters
7.1.1 Edit name
7.1.2 Change case of letters and numbers
8. USE THE PHONE BOOK
8.1 About the phone book
8.2 Use phone book menus
8.3 Create a phone book Entry
8.4 Edit a Phonebook Entry
8.5 Delete Phonebook Entry
8.6 Delete All phonebook Entries
8.7 Send Message
8.8 Monitor Phonebook Capacity
8.9 Sort Phonebook Entry
9. USE THE RECENT CALL
9.1 View Recent Calls
9.2 View Notepad
9.3 View Call Times
9.4 Delete All Call Log

10. SEND AND RECEIVE TEXT MESSAGES
10.1 Send a Text Message
10.2 Set a Quick Note
10.3 Receive a Text Message
10.4 Use Voicemail
10.4.1 Receive a Voicemail Message
10.4.2 Listen to a Voicemail Message
10.5 Use Outbox
10.6 Use Drafts
10.7 Cleanup Messages
10.8 Monitor Memory Meter
10.9 Set Up the Message
10.9.1 Set Inbox setup
10.9.2 Store your voicemail number
11. CUSTOMIZE YOUR PHONE
11.1 Personalize
11.1.1 Change Greeting Text
11.1.2 Change Shortcuts
11.2 In call Setup
11.2.1 Set In Call Timer
11.2.2 Set Answer Options
11.2.3 Set the Easy Prefix
11.2.3.1 Auto Change
11.2.3.2 Pref. Opr.(Preferred Operator)
11.2.3.3 Override
11.3 Initial Setup
11.3.1 Set Time and Data
11.3.1.1 Set Time
11.3.1.2 Set Data
11.3.1.3 Auto update
11.3.2 Set the Backlight
11.3.3 Set TTY Operation

11.3.4 Set Language
11.3.5 Set Contrast
11.3.6 Use DTMF Tone
11.3.7 Reset All Options
11.3.8 Clear All Stored Information
11.4 Phone Status
11.4.1 View Your Phone Number
11.4.2 View the phone Specifications
11.5 Network Setup
11.5.1 View Currently Registered Network
11.5.2 Set Service Tones
11.5.3 Set Call Drop Alert
11.5.4 Set Network Scan
11.5.5 Set Network Service
11.5.5.1 Store the Feature Code
11.5.5.2 Call Forwarding
11.5.5.3 Call Waiting
11.5.5.4 Caller ID
11.6 SECURITY
11.6.1 Talk Security (Voice Privacy)
11.6.2 Restrict Calls
11.6.3 Set Password
12. RING STYLES
12.1 Set Ring Styles
12.1.1 Change Style
12.1.2 Set Style Details
12.1.3 Set Reminders
13. ALARM
13.1 Set Alarm
13.2 Edit, Enable or Delete Alarm
13.3 Respond to Alarm

14. REFERENCE INFORMATION
14.1 Emergency Calls
14.1.1 Make an emergency call
14.2 Troubleshooting
14.2.1 No Service
14.2.2 What if the call does not go through?
15. TECHNICAL INFORMATION

1
SAFETY INFORMATION FOR FIXED PHONES
For the safe and efficient operation of your phone, observe the following guidelines:
EXPOSURE TO RADIO FREQUENCY SIGNALS
Your wireless handheld portable telephone is a low power radio transmitter and receiver.
When it is ON, it receives and also sends out radio frequency (RF) signals.
In August 1996, the Federal Communications Commissions (FCC) adopted RF exposure
guidelines with safety levels for handheld wireless phones. Those guidelines are consistent
with the safety standards previously set by both U.S. and international standards bodies:
ANSI C95.1 (1992)*
NCRP Report 86 (1986)*
ICNIRP (1996)*
★ American National Standards Institute; National Council on Radiation Protection and
Measurements; International Commission on Non-Ionizing Radiation Protection
SAFETY INFORMATION
Those standards were based on comprehensive and periodic evaluations of the relevant
scientific literature. For example, over 120 scientists, engineers, and physicians from
universities, government health agencies, and industry reviewed the available body of
research to develop the ANSI Standard (C95.1)
The design of your phone complies with the FCC guidelines (and those standards).
Near-Body Operation
CAUTION! To comply with FCC radio-frequency exposure requirements, the antenna
for this device must be placed 2 inches(5cm) or more from the body while it is in
operation.
ANTENNA CARE
Use only the supplied or an approved replacement antenna. Unauthorized antennas,
modifications, or attachments could damage the phone and may violate FCC regulations.
PHONE OPERATION
This device complies with Part 15 of the FCC Rules. Operation is subject to the following
two conditions:
1) This device may not cause harmful interference.

2) This device must accept any interference received, including interference that may
cause undesired operation.
Note: Hold the phone as you would any other telephone with the antenna pointed up and
over your shoulder.
TIPS ON EFFICIENT OPERATION
For your phone to operate most efficiently:
z Do not touch the antenna unnecessarily when the phone is in use. Contact with the
antenna affects call quality and may cause the phone to operate at a higher power
level than otherwise needed.
ELECTRONIC DEVICES
Most modern electronic equipment is shielded from RF signals. However, certain electronic
equipment may not be shielded against the RF signals from your wireless phone.
Pacemakers
The Health Industry Manufacturers Association recommends that a minimum separation of
six inches (6”) be maintained between the bast and a pacemaker to avoid potential
interference with the pacemaker. These recommendations are consistent with the
independent research by and recommendations of Wireless Technology Research.
Persons with pacemakers:
z Should ALWAYS keep the phone more than six inches (6”) from their pacemaker.
z Should use the ear opposite the pacemaker to minimize the potential for
interference.
Other Medical Devices
If you use any other personal medical device, consult the manufacturer of your device to
determine if they are adequately shielded from external RF energy. Your physician may be
able to assist you in obtaining this information.
Turn your phone OFF in health care facilities when any regulations posted in these areas
instruct you to do so. Hospitals or health care facilities may be using equipment that could
be sensitive to external RF energy.
Posted Facilities
Turn your phone OFF in any facility where posted notices so require.

2
Before using your phone, phone must be setup as the following instruction.
2.1 Install the coiled cord
2.2 Plug the AC/DC Adaptor
2.3 Back up Battery
Note: Batteries are backup for emergency case of power failure, Do not operate unit
without the AC/DC Adaptor connected.
Note: Be sure to carefully match the positive and negative terminals as shown in the
battery.
PREPARE YOUR PHONE FOR USE
z Connect the coiled cord to both the handset and the base.
z Connect the adaptor to the AC Wall outlet.
① Remove the battery door.
② Insert four AA batteries into battery comportment.
③ Place the battery door on.

3
FEATURE HIGHLIGHTS
z Easy to read graphical display
z Phone book (up to 500 names and 4 numbers per name)
z Easy to use keypad layout
z 14 Ring tones and 3 Ring style selections
z Adjustable ring volume
z Quick access to the last 10 numbers dialed
z Caller ID
z Auto redial
z Clock with alarm
z Dialed, received, missed calls
z Call restriction
z Keypad lock
z Call timer
z Text message service
z Voice mail capability
z 2 different NAM
z Multi-languages (English, Spanish and Portuguese)
z Speaker phone
4
This phone operates in digital mode within the 800 MHz frequency band and operates in
analog mode within the 800 MHz range.
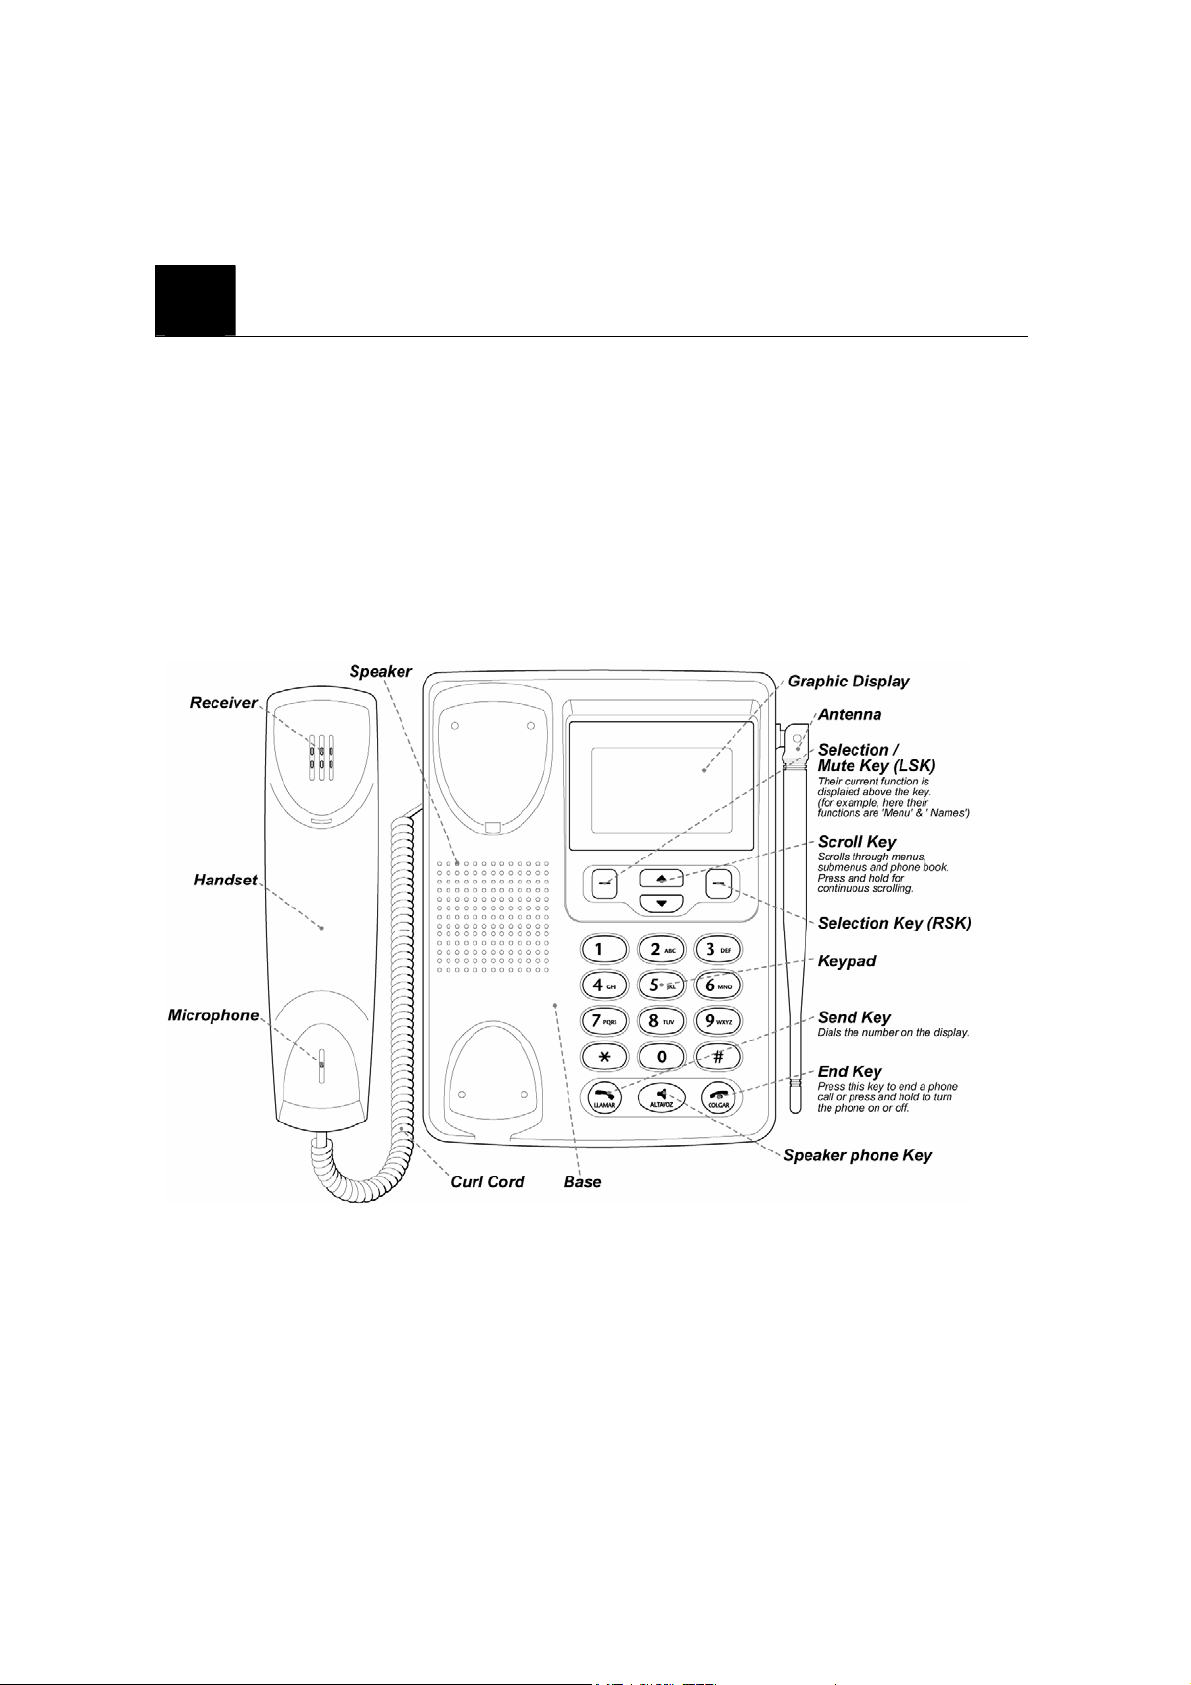
4.1 Name and function
ABOUT THE PHONE

4.2 Key functions
4.2.1
Selection keys / Mute key (RSK)
z Press to perform the function indicated by the text on the screen above the key.
z Press right selection key to temporarily mute a call.
4.2.2
z Press to make a call to name / number shown on the screen.
z Press to answer a call.
z Press once to enter the list of recently dialed numbers.
4.2.3
z Press and hold the key to switch the phone on or off.
z Press to end a call.
z Press once to exit a function and to return to the start screen.
Send key
End key
4.2.4
~ , , ,
z Used for entering numbers and letters.
z Press and hold to call the voice mailbox.
z Press to toggle between upper case, lower case and numeric modes.
4.2.5
z Press to increase the earpiece volume.
z Press to decrease the earpiece volume.
Scroll keys
4.2.6
z Turn on and off the speaker in conversation
Speaker button

4.2.7 Using the selection keys
The functions of the selection keys depend on the guiding texts shown above the keys.
For example, when the text MENU is above the left selection key, press this key
enters the menu functions.
Similarly, pressing the right selection key under the text NAMES accesses the phone
book functions.
4.2.8 Using the scroll keys
The phone has two scroll keys,
The scroll keys have up and down arrows on them; press these to scroll through the phone’s
menus.
4.3 About display indicators and icons
The display indicators and icons inform about the operation of the phone.
and , located just below the screen.
4.3.1 Start screen
The start screen displays when the phone is turned on. Several features can be used only
when the phone is at the Start Screen.
4.3.2 Scroll bar
When you access the phone’s menu, there is a scroll bar at the far right of the screen. This
bar indicates user’s location in the menu: each “tab” on the bar represents a different menu
item.
4.4 Indicators and icons
On your phone, you have two types of identifiers: indicators and icons. Icons are graphical
representations of a specific item or situation. For example, an icon appears when you have
a voice message waiting to be heard.
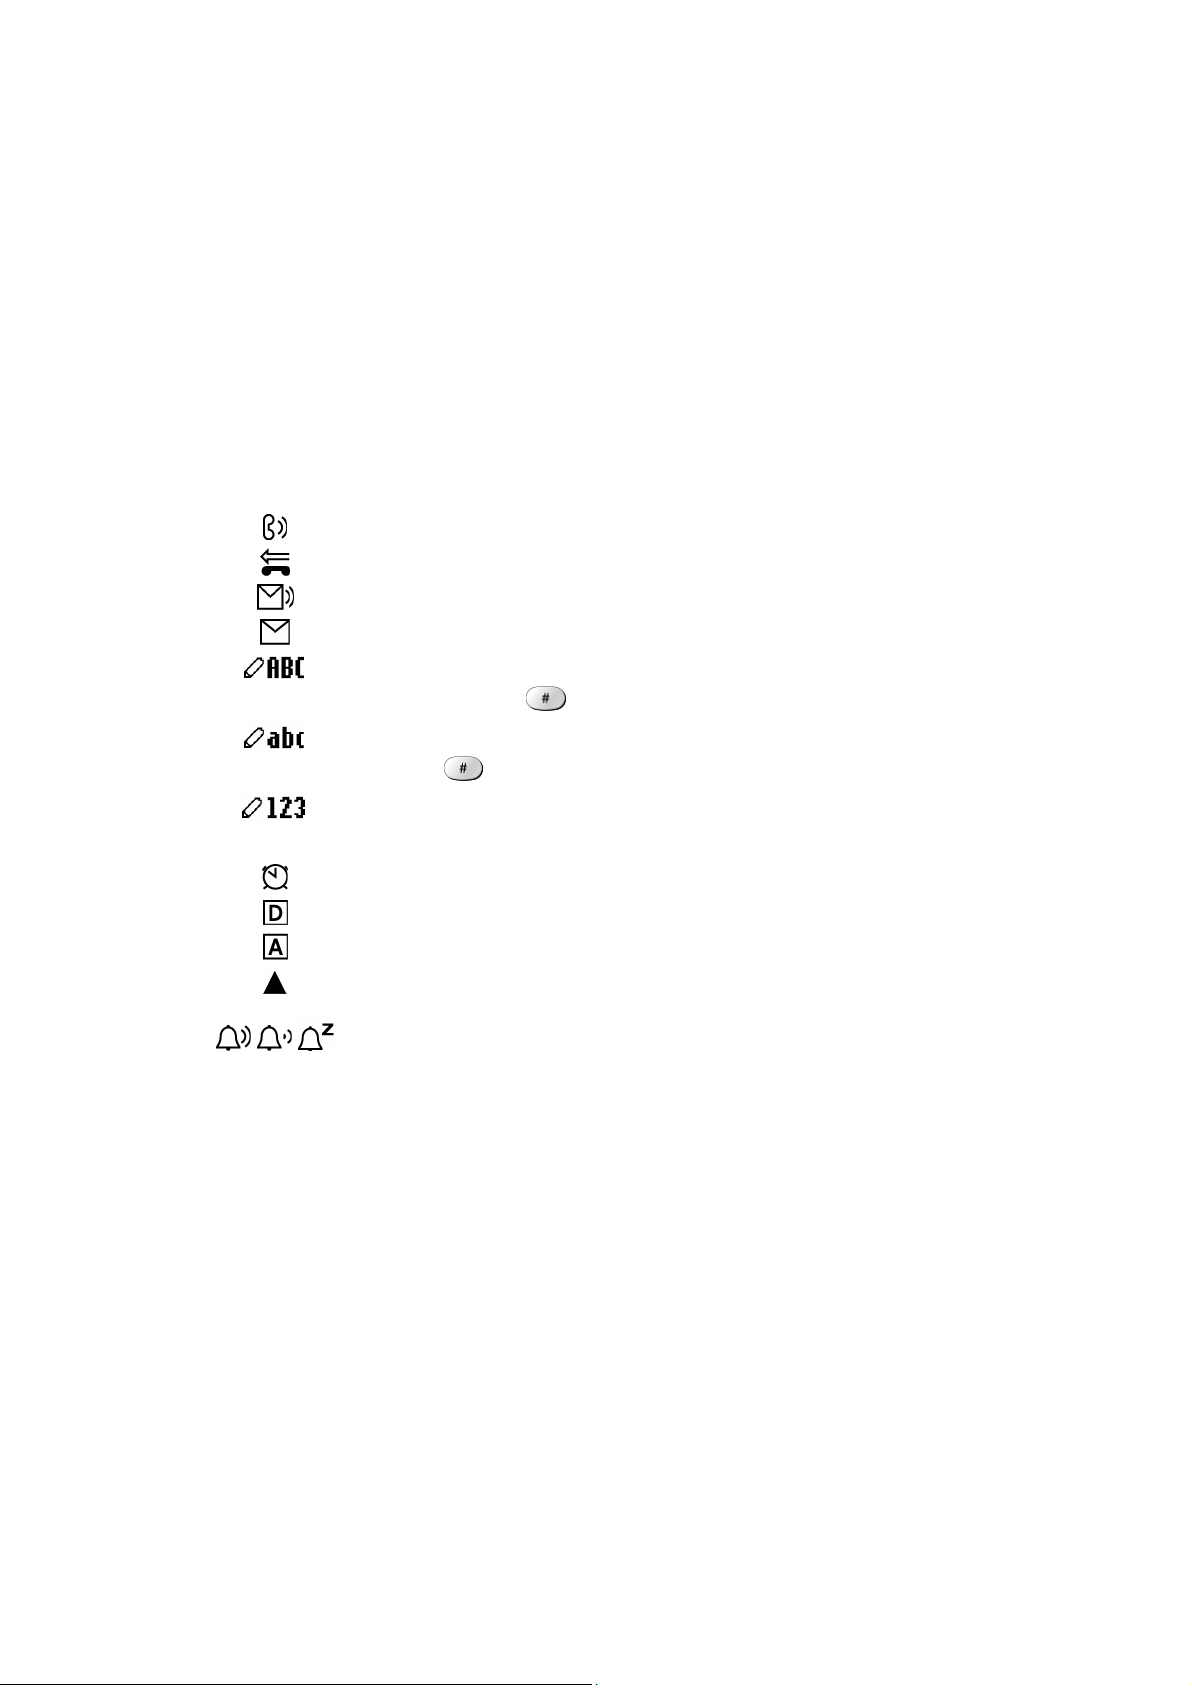
Indicators show the status of something. The phone uses three types of indicators:
z Signal strength indicator: This indicator shows the signal strength of the wireless
network at your current location. The higher the bar, the stronger signal. (그림)
z Ringer volume indicator: When you scroll keys during stand by, you are able to
adjust ringer volume higher or lower
The list below shows what each icon means.
You have an active call.
You have a missed call.
You have one or more new voice messages waiting.
You have one or more unread text messages waiting.
Any alpha characters you enter will be uppercase (capital
letters). Press
to switch to uppercase.
Any alpha characters you enter will be lowercase.
Press
to switch to uppercase.
You are in numbers mode. After switching to this numbers mode,
you cannot enter any alpha characters. You can enter only numbers.
The alarm clock is set.
Digital mode.
Analog mode.
Roaming
Ring Style (Active/Current Ring Style)
/ /

5
5.1 Make a call
BASIC OPERATIONS
① Deactivate the Keyguard, if it is on.
② Hold up the handset to hear Dial Tone.
③ Enter the phone number-including the area code-and press
④ Press to end the call or to cancel the call attempt.
Note: The phone may generate heat during longer calls.
5.2 Answer a call
To answer a phone call:
① When the handset is resting in its base, hold up the handset.
② The ringing will stop and talk icon
Note: If you hold up the handset during a call in speaker phone mode, the speaker
phone mode is deactivated.
5.3 Speaker phone mode
You can make or answer a phone call by pressing
To make a call:
will appear in the display.
when the handset is on the cradle.
.
① Press
② If you hear the dial tone, press the number you want to connect to.
To answer a call:
① When the phone rings, press
5.4 Adjust the earpiece volume
You can adjust the earpiece volume during a call by pressing the scroll keys on the phone.
z Press to increase the volume.
to turn on the speaker phone mode.
to turn on the speaker phone mode.

z Press to decrease the volume.
Note: When the speaker volume while the speaker is active with
and keys.
5.5 Redial the last-dialed number
The phone stores up to 10 recently dialed numbers. Stored numbers may be up to 20 digits
long.
① Press
② Press
③ Press
once to find the most recently dialed numbers.
or to scroll to the number you wish to dial.
once.
Note: If no recently dialed numbers are stored, you are not able to use this function.
5.6 Caller ID
Caller ID is a network service that identifies incoming calls. Contact your service provider
to find out how to get this feature.
When Caller ID is active, your phone shows the caller’s phone number during an incoming
call, as long as this number is a part of your service provider’s wireless network.
The wireless network lets you know if it does not recognize the caller’s phone number. The
wireless network will also let you know if the calling party has blocked the Caller ID
feature.
If you have stored the name and number of the calling party in your phone book and that
number is supported by the wireless network, the caller’s name can also appear.
5.7 Keyguard Lock (Keypad Lock)
When the key guard is activated, you can prevent to press the key accidentally.
5.7.1 Activate Keyguard
① Press MENU and .
5.7.2 Deactivate Keyguard
① Press UNLOCK and .

Note: If you lift up the handset or press to answer a call when key guard is on, the
key pad is automatically unlocked. When you end the call, key guard automatically
becomes activated again.

6
6.1 Navigate menus
A menu is a list of choices you can make. Your phone has 6 main menus. Each main menu
contains numerous submenus that allow you to use the phone book, change the ringing tone,
and so on. You can use menus and submenus two ways: by scrolling or by using shortcuts.
6.1.1 Scroll through menus
6.1.2 Use a shortcut
You can use a shortcut to get to options directly without scrolling through lists.
USE PHONE MENUS
① From the Start screen, press MENU, and then scroll through the menus using the
and .
② Use the scroll and selection keys to navigate the submenus and to return to the Start
screen.
6.1.3 Exit menu levels
z To return the previous menu level, press BACK or CANCEL.
z To return to the Start screen, press . No menu setting changes are saved.
6.2 List of Menus
Your phone’s menu may differ from the following list, depending on the network services
to which you have subscribed and the accessories you are using. If you have any questions,
call your service provider.
1. Phone book
<…entry 1…>
1. New
2. Edit
3. Delete
4. Delete Name
5. Send Msg

6. Ph Book Capacity
7. Delete All
8. Sort By
<…entry 2…>
<…entry N…>
[New Entry]
[Delete All]
2. Recent Calls
1. Missed Calls
2. Received Calls
3. Dialed Calls
4. Notepad
5. Call times
1. Last Call
2. Dialed Calls
3. Received Calls
4. All Calls
6. Life Time
7. Delete all call log
3. Messages
1. Create Message
2. Voice mail
3. Inbox
<…message 1…>
1. Create Message
2. Delete
3. Call back
4. Reply
5. Forward
6. Lock
7. Store Number
<…message 2…>
<…message N…>

[Create Message]
[Delete All]
4. Quick Notes
<…Quicknote 1…>
1. New
2. Edit
3. Delete
4. Send
<…Quicknote 2…>
<…Quicknote N…>
[New Quick Note]
[Delete All]
5. Outbox
<…message 1…>
1. Create Message
2. Delete
3. Re-send
4. Forward
5. Message Status
6. Cleanup Message
<…message 2…>
<…message N…>
[Create Message]
[Delete All]
6. Drafts
<…message 1…>
1. Create
2. Send
3. Cleanup Message
<…message 2…>
<…message N…>
[Create Message]
[Delete All]

7. Memory Meter
8. Message Setup
1. Inbox Setup
2. Voicemail Setup
3. SMS Delivery Report
4. SMS Read Receipt
4. Setting
1. Personalize
1. Greetings text
2. Shortcuts
2. In call Setup
1. In call timer
2. Answer settings
3. Easy prefix
3. Initial Setup
1. Time and Date
2. Backlight
3. TTY
4. Language
5. Contrast
6. DTMF
7. Master reset
8. Master clear
4. Phone Status
1. My Phone Number
2. Other Information
5. Network Setup
1. Current network
2. Service tone
3. Call Drop tone
4. Network scan
5. Network service
6. Security

1. Talk security
2. Restrict call
3. New password
5. Ring Styles
1. Style
1. Loud
2. Soft
3. Silent
2. Style Details
1. Ring Volume
2. Calls
3. Text Messages
4. Voicemail
5. Alarms
6. Reminders
6. Alarms
<…Alarm 1…>
1. Disable/Enable
2. New
3. Edit
4. Delete
5. Delete All
<…Alarm 2…>
<…Alarm N…>
[New Alarm]
[Delete All]

_
7
You can enter letters, as well as numbers, when storing information into your phone by
using your phone’s keypad. To enter letters, press the key associated with the letter you
wish to enter until it appears on the screen (numbers also appear).
7.1 Enter Letters
When you want to add new names or when you view names in the phone book, your phone
automatically switches to the ABC mode and displays the ABC icon.
ENTER LETTERS AND NUMBERS
Key Characters Key Characters
space . 1 @ ? ! , & : ; ( ) ‘ % $
A B C 2 À Á Â Ã ç T U V 8 Ú Ù Ü
P Q R S 7
D E F 3È É Ê W X Y Z 9
G H I 4 Í + - 0 * / = > < # [ ]
J K L 5 ?
M N O 6 Ň ò ó ô ŏ Change letter case
Press a key once or several times to enter the letter(s) you want. For example, press
three times to enter the letter C.
7.1.1 Edit name
To edit a name in the phone book:
z Use to scroll the cursor to the left.
z Use to scroll the cursor to the right.
z Press Delete to correct any mistakes.

7.1.2 Change case of letters and numbers
You can switch the mode among uppercase and lowercase letters and numbers by pressing
.
Note: You cannot enter special characters in 123 mode.

8
USE THE PHONE BOOK
8.1 About the phone book
You can store up to 500 names and 4 numbers per name.
You can sort the entries of phone book by name or speed dial number.
8.2 Use phone book menus
The phone book has several menus to select from. These menus appear when you press
NAMES or [NEW ENTRY]. Use to scroll to the menu you want to use.
z NEW Enter new name, e-mail and number
z EDIT Edit an entry
z DELETE Delete single entry
z DELETE NAME Delete the complete entry of the selected name.
z SEND Msg Send a SMS message.
z Ph book Capacity Show the memory meter which fills up as entries are made.
z Delete All Delete all phone book entries
z Sort By Sort entries by name or speed dial number.
8.3 Create a phone book Entry
To create a phonebook entry:
① Press MENU > Phonebook.
② Scroll to [New Entry] and press SELECT.
③ Press CHANGE and enter a name, an email and phone number you want to store.
④ Press OK to save the change.
⑤ Set Type, Speed No. and Ringer ID if you want to.
⑥ Press DONE to save the change.
z NAME Entry’s name (Maximum 32 characters).
z E-MAIL Entry’s e-mail address (Maximum 48 characters).
z NO. Entry’s phone number (Maximum 40 characters).
z TYPE Work / Home / Main / Mobile
z Speed No. Entry’s default speed dial number.

z Ringer ID Select to set a distinctive ringer alert for the phone number. Your
phone uses the alert to notify you when you receive a call from this phone number.
z ...More... Same entry’s other information
Note: You can make a call directly to the number you stored from the phone book by
pressing
.
If there is phone book stored:
① Press MENU > Phonebook.
② Scroll to the name you want and press SELECT.
③ Press SELECT.
④ Press OPTION to view the option menu.
⑤ Scroll to NEW and press SELECT.
⑥ Enter name, phone number and other information and press DONE to save.
8.4 Edit a Phonebook Entry
You can edit the phonebook entries of your phonebook.
① Press MENU.
② Scroll to the name you want and press SELECT.
③ Press SELECT.
④ Press OPTIONS.
⑤ Scroll to EDIT and press SELECT.
⑥ Scroll to the field you want to change and press CHANGE.
⑦ After editing Name, Email, No., Speed No or Speed No, press OK.
⑧ After editing Type or Ringer ID, press SELECT.
⑨ Press DONE to save the change.
8.5 Delete Phonebook Entry
You can delete the name and associated number of currently selected phonebook entry.
① Press MENU > Phonebook.
② Scroll to the name you want and press SELECT.
③ Press SELECT.
④ Press OPTIONS.
⑤ Scroll to Delete Name

⑥ Press SELECT.
⑦ Delete the name and associated fields.
Note: You cannot undo Delete functions, so be careful!
8.6 Delete All phonebook Entries
You can delete the contents of your phonebook. Note that this action cannot undone once
you perform this feature, all the stored information in your phonebook is deleted.
① Press MENU > Phonebook.
② Scroll to the name you want and press SELECT.
③ Press SELECT.
④ Press OPTIONS.
⑤ Scroll to Delete All
⑥ Press SELECT.
⑦ Enter Security Code and press OK.
8.7. Send Message
You can send a message from the phonebook menu. Please see page 10 Send and Receive
Text Message for more information to use this function.
8.8. Monitor Phonebook Capacity
Memory meter hint you about total number of phonebook entries already stored in
phonebook. When the memory meter is full, you are not able to store any new information.
8.9. Sort Phonebook Entry
You can sort the contents of your phonebook. The phonebook entry is sorted by name or
speed dial number.
① Press MENU > Phonebook.
② Scroll to the name you want and press SELECT.
③ Press SELECT.
④ Press OPTIONS.
⑤ Scroll to Sort By and press SELECT.
⑥ Scroll to Name or Speed No. and press SELECT.

9
USE THE RECENT CALL
The call log keeps track of:
z Missed calls
z Received calls
z Dialed calls
z Notepad
z Call times (Recent Calls)
z Delete All Call Log
9.1 View Recent Calls
Your phone keeps lists of the calls you recently received and dialed and even the calls you
failed to connect. The lists are sorted from the newest to the oldest entries. The oldest
entries are deleted as new ones are added.
① Press MENU > Recent Calls.
② Scroll to Missed call, Received calls, or Dialed Calls and press SELECT
③ Press OPTION
④ Use or to scroll to one of the options and press SELECT.
z View View the date and call time and call number you missed, received
or dialed.
z Save Save the number in the phonebook
z Delete Delete the call number you missed, received or dialed.
z Delete All Delete all the calls you missed, received and dialed.
z Send Msg Send a message to the number you missed, received or dialed.
⑤ Press SELECT.
⑥ When VIEW is selected, Call Info Options screen is displayed.
⑦ Scroll to the option menu you want.
z Delete
z Save
z Send Message
⑧ Press SELECT.

9.2 View Notepad
Your phone stores the most recent string of digits entered on the keypad in a temporary
memory location called the notepad. This can be a phone number that you called, or a
number that you entered but did not call.
To retrieve the number stored in the notepad:
① Press MENU > Recent Calls.
② Scroll to Notepad and press SELECT.
③ View the Calling Status screen and press OPTION.
④ Scroll to the item you want:
z Save
z Insert Wait Insert a ‘w’ (wait) character. Your phone dials the preceding digits,
waits for the call to connect, then prompts you for confirmation before it sends the
remaining digit(s).
z Insert Pause Insert a ‘p’ (pause) character. Your phone dials the
preceding digits, waits for the call to connect, then sends the remaining digit(s).
z Insert ‘n’ Insert an ‘n’ (number) character. Your phone prompts you for a
number before dialing the call. The number you enter is inserted into the dialing
sequence in place of the n character.
z Send message
⑤ Press SELECT.
9.3 View Call Times
Network connection time is counted from the moment you connect to your service
provider’s network to the moment you end the call by pressing
. This time includes
busy signals and ringing. The time record of your resettable timer may not be equal to the
time for which you are billed by your service provider.
① Press MENU > Recent Calls.
② Scroll to Call Times and press SELECT.
③ Scroll to the item you want
z Last Call Approximate time spent on the last dialed or received call. You
cannot reset this timer.
z Dialed Calls Approximate total time spent on dialed calls since the last time

you reset this timer.
z Received Calls Approximate total time spent on calls received since the last time
you reset this timer.
z All Calls Approximate total time spent on dialed and received calls since the
last time you reset this timer.
z Life Time Approximate total time spent on all calls on this phone. You
cannot reset this timer.
④ Press RESET to delete dialed call times.
⑤ Select YES or NO.
9.4 Delete All Call Log
This feature will clear all dialed numbers, as well as numbers of answered calls and missed
calls. You can not undo this operation, so be careful.
① Press MENU > Recent Calls.
② Scroll to Delete All Call Log and press SELECT.
③ View the confirmation message: Delete All Call Logs?
④ Select YES or NO.

10
SEND AND RECEIVE TEXT MESSAGES
You can send or receive text messages with your phone. Text messages that you receive
can contain ring tones that you can store on your phone.
z Create Message
z Voicemail
z Inbox
z Quick Notes
z Outbox
z Drafts
z Memory Meter
z Message Setup
10.1 Send a Text Message
You can send a text message to one or more recipients. You can manually enter each
recipient’s phone number, email address or you can select the numbers from the phonebook
or the list of recent calls.
Note: The maximum length of a text message differs depending on the capabilities of
the network from which it originated. Also, text messages may appear different at
different times because messages can originate in networks other than your own.
Contact your service provider for more information about this feature.
① Press MENU > Messages. > Create Message
② Scroll to the Create Message and press SELECT.
③ You can create the message.
④ When you press OPTIONS, you can scroll to one of the message options:
z Done Finish creating a message.
z Quick Notes Retrieve stored message, or create or delete the message.
z Numeric Change edit mode to number.
z Alpha Change edit mode to alphabet.
⑤ Press DONE when you finish creating a message.
⑥ Scroll to the sending method you want and press SELECT.

z Phone Number
z E-Mail Address
If you select Phone Number:
⑦ Scroll to One Time Entry to manually enter the phone number and press SELECT.
Press Done to go to next step or press Insert to retrieve the number stored in
phonebook or the list of recent calls.
z Phonebook
z Received Calls
z Dialed Calls
z Missed Calls
Or,
Scroll to the stored name you want to call and press ADD and DONE.
View Create Message Display and press ⑧ OPTIONS.
Scroll and select the menu to send a message, save to drafts or cancel message.
⑨
If you select Email Address:
You can manually ent⑦ er Email address or press PH.BOOK to call the stored Email
address in your phone.
View Create Message Display and press ⑧ OPTIONS.
Scroll and se⑨ lect the menu to send a message, save to drafts or cancel message.
10.2 Set a Quick Note
Quick notes are pre-written messages that you can insert in a message and send quickly (for
example, “Call me later”). You can create and store maximum 15 quick notes in your
phone.
① Press MENU and select Messages.
② Scroll to the Quick Notes Item and press SELECT.
③ Press OPTION.
④ Scroll to Option menu to perform other procedure
z New Create a new quick note
z Edit Edit the quick note
z Delete Delete the quick note.
z Send Open a new message with the quick note
Select the Item and press ⑤ SELECT.

10.3 Receive a Text Message
When you receive a text message, your phone displays the
(message waiting) indicator
with “New Message” notice, and plays an alert.
Press ① READ.
Press ② OPTION.
Scroll to the option menu you want③ and press SELECT.
z Create Message Open the Create Message screen
z Delete Delete the message
z Callback Call the number in the message header or embedded in the
message
z Reply Open a new text message, with the sender’s number or
email address in the To field.
z Forward Open a copy of the text message, with an empty To field.
z Lock Lock or unlock the message.
z Store Number Display a list of items that can be stored, including
the sender’s number
z Cleanup Message Delete the contents of your messages
z Inbox Setup Open the text message inbox setup menu visual
confirmation.
10.4 Use Voicemail
You can listen to your voicemail messages by calling your network voicemail phone
number. Voicemail messages are stored on the network voicemail box, not on your phone.
10.4.1 Receive a Voicemail Message
When you receive a voicemail message, your phone displays the
(voice message
waiting) indicator and a “New Voicemail” notification.
10.4.2 Listen to a Voicemail Message
The phone calls your voicemail number. If no voicemail number is stored, your phone
prompts you to store one.

Shortcut: If your voicemail number is also stored as phonebook entry number 1, you can
press and hold
to listen to your voicemail message(s).
Your service provider may additionally store your voicemail number as phonebook entry
number 1, so you can use one-touch dial to listen to your voicemail messages.
10.5 Use Outbox
Outbox is consisted of mobile originated SMS messages (both sent and unsent) stored in
phone, sorted in descending time order.
① Press MENU> Messages > Outbox
② Scroll to the message and press SELECT
③ Scroll to the and press OPTION.
④ Scroll to one of message option
z Create Message Create a new message.
z Delete Delete the message.
z RE-send Resend the message to the same destination address
z Forward Forward the message to the other destination address
z Message Status Shows the particular message number along with the
error number
z Cleanup Message Delete the contents of your messages
Select the option and press ⑤ SELECT.
10.6 Use Drafts
This provides the capability to store the unsent messages. Whether you select the saved
message or press SELECT, phones display the contents of the message. If you want to
save a message to draft, select save to draft menu, then the message will be saved in draft
menu.
① Press MENU > Messages > Drafts
② Scroll to the message and press SELECT.
③ Press OPTION.
④ Scroll to the option you want
z Delete Delete the draft message
z Send Send the draft message

z Cleanup Messages Delete all the stored information in your messages
Scroll to the option you want and press ⑤ SELECT.
10.7 Cleanup Messages
You can delete the contents of your message folder. Note that this action cannot be undone.
Once you have performed this procedure, all the stored information in your messages is
deleted.
Warning: This feature will erase your entire messages, which can not be undone!
① Press MENU > Messages > Inbox or Outbox or Drafts > Cleanup Messages
②
Scroll to the Cleanup Messages you want
z All
z Inbox
z Outbox
z Draft
View the confirma③ tion message and press YES.
10.8 Monitor Memory Meter
Memory meter hint you about total number of messages already stored in the inbox, outbox
and drafts folder. When the memory meter is full, user is not able to create any new text
message.
10.9 Setup Message
Message Setup is to configure Inbox, Voicemail, SMS Delivery Report and SMS Read
Receipt. The case of Inbox set up, you can set message alert duration. In other words, this
is message reminder function. If you set 5 seconds, it will alert every 5 minutes. The case of
voicemail setup, you can save voicemail number.
10.9.1 Set Inbox Setup
You must set up your message inbox if you want incoming message alerts while you are on
a voice call.
Press① MENU > Messages > Message Setup > Inbox Setup
Scroll to the Message Setup you want and press ② SELECT.

10.9.2 Store Your Voicemail Number
Storing your voicemail number on your phone makes it easy for you to listen to new
voicemail messages. In many cases, your service provider has already done this for you.
Press ① MENU > Messages > Message Setup > Voicemail Setup
Enter your voicemail number and press ② OK.

11
SETTINGS
z Personalize
z In call Setup
z Initial Setup
z Phone Status
z Network Setup
z Security
11.1 Personalize
The Default settings of the personalize menu when the phone is used for the first time. It
has two menus that Greetings Text, and Shortcuts.
11.1.1 Change Greeting Text
To change the greeting that appears when you turn on your phone. The length of the text
will be 40characters.
Press ① MENU >Setting >Personalize>Greeting Text
②
Enter the text of the Greeting text note
Complete the Greeting text note and press ③ DONE.
11.1.2 Change Shortcuts
Your phone includes several standard shortcuts. You can change custom shortcuts to
frequently-used menu items.
Press ① MENU >Setting >Personalize>Shortcuts
Scroll to the shortcut item you want and press ② EDIT.
③
Scroll to the Shortcut list
z Security
z Initial setup
z Call times
z Phone status
z Missed calls
z Received calls

z Dialed calls
z Language
z Personalize
z Network setup
View the confirmation message
④ “Replace Shortcut:<old item> -> <new item>?” and
press OK.
Change the shortcut and press ⑤ YES.
11.2 In call Setup
The In Call Setup contains info for the settings when the user is in call.
11.2.1 Set In Call Timer
Press ① Menu > Settings > In Call Setup >In Call Timer
Select one the following Display option
z ON Display in call timer
z OFF Do not display in call timer
Select one the following Beep option
z OFF Do not beep during a call
z 1 Minute Beep at 1-minute intervals during a call
z 2 Minute Beep at 2-minute intervals during a call
z 5 Minute Beep at 5-minute intervals during a call
11.2.2 Set Answer Options
You can answer incoming calls by pressing any key.
Press ① Menu > Settings > In Call Setup >Answer Settings > Multikey
Select one of the following Multikey option
z ON Activate the Multikey
z OFF Do not activate the Multikey
11.2.3 Set the Easy Prefix
You can choose your operator for long distance calls using easy prefix feature. Easy prefix
feature sets your operator for long-distance calls automatically whenever you dial a long

distance call.
11.2.3.1 Auto Change
Your phone can be automatically inserted the operator code in the dial number (only when
you dial a long-distance call).
① Press MENU >Settings > In call Setup >Easy Prefix >Auto Change
② Scroll to ON or OFF.
③ Select the item and press SELECT.
11.2.3.2 Pref. Opr.(Preferred Operator)
You can view and choose a particular operator as your preferred operator for long distance
calls.
Press① MENU > Setting >In call Setup >Easy Prefix >Pref. Opr.
Scroll to operator list for long distance calls you want and press ② OPTION.
Scroll to the option items you want
③
z Select Select a particular operator
z New Add a particular operator.
z Edit Edit operator information
z Delete Delete a particular operator
Select the item and ④ press SELECT.
11.2.3.3 Override
Your phone can automatically replace the operator code (if entered by you) with the set
operator code (preferred operator).
Press① MENU >Settings>In call Setup >Easy Prefix>Override
Scroll to ② ON or OFF and press SELECT.
11.3 Initial Setup
You can use the Initial Setup menu to view or adjust personal options, the initial setup of
your phone, the way your phone connects to your service provider’s network, and the setup
of optional equipment needed for hands-free use.
z Time and Date Set the phone’s time and date
z Backlight Set the amount of time that the display backlight remains on, or

turn off the backlight to conserve battery power
z TTY Set the TTY option.
z Language Set the language for phone menus
z Contrast Adjust the contrast setting for your display
z DTMF Switch DTMF tones to be long, short, or off.
z Master Reset Reset all options back to their original factory settings except
for the unlock code, security code, and lifetime timer.
z Master Clear Reset all options back to their original factory settings except for
the unlock code, security code, and lifetime timer, and clear all user settings and
entries.
Note: This option deletes all user-entered information stored in your phone’s memory,
including phonebook entries. Once you delete the information, it cannot be recovered.
11.3.1 Set Time and Date
You must set the correct time and date on your phone to use the datebook application
11.3.1.2 Set Time
Press ① MENU >Settings >Initial Setup>Time and Date
Scroll to time item and press ② CHANGE..
Scroll to time format you want
③ .
z AM
z PM
z 24 Hrs
Select the time format you want and press ④ SELECT.
⑤ the time using HH:MM format.
Enter
Save the time and press ⑥ OK.
11.3.1.1 Set D ata
Press ① MENU >Settings >Initial Setup>Time and Date
Scroll to dat② e item and press CHANGE.
Scroll to dat
③ e
④
Enter the time using DD:MM:YYYY format
Save the dat⑤ e and press OK.

Scroll to⑥ Format and press CHANGE.
Scroll to one these dat
⑦ e format
z DD/MM/YYYY
z MM/DD/YYYY
z DD-Mon-YYYY
Press ⑧ SELECT.
11.3.1.3 Auto update
If you set Auto update on, time and date information is updated automatically by network.
Note: This menu item will not be available for some phones.
Select one of the following Auto update option
11.3.2 Set Backlight
Set the amount of time that the display backlight remains on, or turn off the backlight to
conserve battery power. If you set backlight time to 5 seconds, the backlight will be off
after 5 seconds from you don’t do anything with phone.
Press ① MENU >Settings>Initial Setup>Initial Setup>Backlight
Scroll to one of these
②
z Always on
z 5 seconds
z 10 seconds
z 20 seconds
Press ③ SELECT.
11.3.3 Set TTY Operation
You can use an optional TTY device with your phone to send and receive calls. You must
plug the TTY device into the phone’s headset jack and set the phone to operate in one of
three TTY modes.
Notes: Use a TSB-121 compliant cable (provided by the TTY manufacturer) to connect the
TTY device to your phone. For optimal performance, your phone should be at least 12
inches (30 centimeters) away from the TTY device. Placing the phone too close to the TTY
device may cause high error rates.
Press ① MENU >Settings>Initial Setup>Initial Setup>TTY

11.3.4 Set Language
Set the language in which your phone displays menu. The phone has three languages that
English, Español, and Portuguese. If you select Portuguese, all of character will be
changed to Portuguese and you can use menu with Portuguese.
Press① MENU >Settings>Initial Setup>Initial Setup>Language
②
Scroll to the language you want
z English
z Espanol
z Portugues
③ Select the language and press OK.
11.3.5 Set Contrast
You can adjust the backlight level with this function. When you want a brighter contrast on
display, you should press the up button in the keypad. And if you want a darker contrast,
press the down button in the keypad. Further, even if the value is zero, this should be
visible.
Press① MENU >Settings>Initial Setup>Initial Setup>Contrast
Scroll to the desired setting and press ② OK.
11.3.6 Use DTMF Tones
Switch DTMF tones to be long, short, or off. This function is being for notification of
number inform in network. So if you set off the tone, it will be changed to silent.
Press ① MENU >Settings>Initial Setup>Initial Setup>DTMF
② oll to the desired setting
Scr
z Short
z Long
z Off
Press ③ SELECT
11.3.7 Reset All Options
Reset all options to their original factory settings, except the unlock code, security code,
and lifetime timer.

Press① MENU >Settings>Initial Setup>Initial Setup>Master Reset
Enter the security code
②
View the confirmation message ③ “Reset All Phone Settings?” and press OK
Press ④ YES
11.3.8 Clear All Stored Information
To reset all options to their original factory settings except the unlock code, security code,
and lifetime timer, and clear all user settings and entries.
Caution: Master Clear erases all user-downloaded content and user-entered information
stored in your phone’s memory, including phonebook and datebook entries. Once you erase
the information, it cannot be recovered.
Press ① MENU >Settings>Initial Setup>Initial Setup>Master Clear
②
Enter the security code
view the confirmation message③ “Call All Phone Data ?” and press YES.
11.4 Phone status
11.4.1 View Your Phone Number
You can view the name/number of currently active NAM. If the name is not entered in the
subsequent menus then number will be displayed.
If there is no name set, you can edit the name. But, you can only view the number, number
is not editable.
Press ① MENU >Settings>Phone Status>My Phone Number
Press ② View.
If you want to change the name, press ③ EDIT and CHANGE.
Enter the number
④ ’s name (Maximum of 40 characters)
Press ⑤ DONE.
11.4.2 View Phone Specifications
To view your phone’s feature specifications (if available from the service provider)
Press ① MENU >Settings>Phone Status>Other Information
Scroll to the other i
② nformation menu you want
z MMI Dev Build

z Flex Version
z Technology
z ESN
z H/W Version
z S/W Version
z IRDB Version
Press③ SELECT
11.5 Network Setup
Your service provider registers your phone to a network. You can view information about
the current network, change how your phone searches for a network, specify your preferred
networks, and activate alerts that indicate when a call is dropped or network registration
changes.
11.5.1 View Currently Registered Network
Current network menu will show you current band which your phone is supporting.
Press① MENU >Settings>Network Setup>Current Network
Your phone displays the network ID.
11.5.2 Set Service Tones
You can set your phone to beep each time the network registration status changes.
① Press MENU >Settings>Network Setup>Service Tone
Se
② lect one of the following Service Tone option
11.5.3 Set Call Drop Alert
You can set your phone to sound an alert tone whenever the network drops a call. Because
digital networks are so quiet, the call drop alert may be your only indication that a call has
been dropped.
Press ① MENU >Settings>Network Setup>Call Drop Tone
Select one of the following Call Drop Tone option
②
11.5.4 Set Network Scan
You may decide to switch to another network to improve the calling conditions, because of

network coverage or roaming conditions.
To view your phone’s feature specifications (if available from the service provider):
Note: This menu item will not be available for some phones.
Press ① MENU >Settings>Network Setup>Network Scan
②
Scroll to the network option you want
z IRDB
z Home Only
z Standard
z Reverse
z A Systems Only
z B Systems Only
Confirm the entry and press ③ SELECT
11.5.5 Set Network Service
Call forwarding, Call waiting and Caller id are network services available through your
service provider or dealer.
When you subscribe to any of these services, your service provider or dealer gives you a
separate feature code to activate each service. Deactivation codes are used to deactivate
each service.
Once you store the appropriate code in your phone, the service appears as a menu item.
You can then use the menu to activate and deactivate these services.
Each time you use a feature that requires a feature code, that code is sent to the network to
verify you’re using the correct feature code.
Note: This menu item will not be available for some phones.
11.5.5.1 Store Feature Code
Press① MENU >Settings>Network Service>Feature Code Set
Enter the feature code your service provider gave you and press ② OK
11.5.5.2 Call Forwarding
Call forwarding sends your phone’s incoming calls directly to another phone number.
Warning: You must first store a feature code (supplied by your service provider) before you
can activate the call forwarding feature.

Press ① MENU >Settings>Network Service>(Feature Code Set)>Call Forwarding
Scr
② oll to the desired call forwarding option
z All Calls Forward all incoming calls
z If Busy Forward calls if your phone is busy and you do not have voicemail
z If Not Answered Forward calls if you do not answer them
z If Out of Reach Forward calls if you are out of the home wireless network or the
phone is turned off.
z Cancel All Fwd Cancel all forwarding options currently active
③ Press SELECT.
Scroll to ④ Activate and press SELECT.
Enter the number to which you want calls forwarding and press ⑤ OK.
Your phone calls the network to confirm the feature code you entered. After the network
confirms the code, call forwarding is activated.
11.5.5.3 Call Waiting
When you are on a call, an alert tone sounds to indicate that you have received a second
call.
Warning: You must first store a feature code (supplied by your service provider) before you
can activate the call waiting feature.
Press① MENU >Settings>Network Service>(Feature Code Set)>Call Waiting
Scroll to ② Activate and press SELECT
The phone calls the network to confirm the feature code you entered. After the network
confirms the feature code, call waiting is activated.
11.5.5.4 Activate Caller ID
Calling line identification (caller ID) displays the phone number for incoming calls.
The phone displays the caller’s name when the name matches one stored in your
phonebook, or Incoming Call when caller ID information is not available.
Warning: You must first store a feature code (supplied by your service provider) before you
can activate the caller id feature.
Press ① MENU >Settings>Network Service>(Feature Code Set)>Call ID
Scroll to ② Activate and press SELECT

11.6 Security
11.6.1 Talk Security (Voice Privacy)
Your phone can attempt to send your calls using a high-security connection, to prevent
others from intercepting them.
Press ① MENU >Settings>Security>Talk Secure
②
Select one of the following Talk Security option
z ON
z OFF
11.6.2 Restrict Calls
You can stop all incoming and/or outgoing calls, or you can restrict incoming/outgoing
calls to the numbers stored in your phonebook.
z You can make emergency calls when outgoing calls are restricted.
z Your phone still receives incoming text messages when incoming calls are
restricted.
z When you restrict incoming calls to numbers in the phonebook, a valid incoming
call may be restricted if caller ID information is not available from the network.
① Press MENU >Settings>Security>Restrict Calls
② Enter your unlock code and press OK.
③ Scroll to Outgoing or Incoming and press CHANGE.
④ Scroll to the restrict calls menu you want
z All Restrict All call.
z None Restrict no call.
z Phonebook Restrict on phonebook
⑤ Press SELECT
11.6.3 Set Password
Your phone’s four-digit unlock code is originally set to 1234, and the six-digit security
code is originally set to 000000 at the factory. Your service provider may reset these
numbers before you receive your phone.
If your service provider has not reset these numbers, we recommend that you change them

to prevent other users from accessing your personal information. The unlock code must
contain four digits, and the security code must contain six digits.
Press ① MENU >Settings>Security>New Passwords
Scroll to ② Unlock Code or Security Code and press CHANGE
Enter your old code and press ③ OK
Enter your new code and press ④ OK
Re⑤ -enter your new code and press OK

12
RING STYLES
You can change the alerts that notify you of incoming calls, text
messages, voicemail messages, data calls, alarms, and
reminders. Any changes you make are saved to the current ring
style.
z Style Which shows the current setting of the
ring style and it will appear as hint of the style caption.
z Style Details Which provides the facility to mobile user to display the various
current settings of the ring style
12.1 Change Style
Style provides the facility of changing the mode of playing of ring style. There would be
three modes loud, soft, and silent
Press① MENU >Ring Styles >Style
Scroll through options until you here the one you want and press ② SELECT
12.2 Set Style Details
This screen have the various ring styles attributes Ring Volume, Calls ,Text Messages,
Voicemail, Alarms, and Reminders
z Ring Volume Ring Volume has value from 0 to 7.
z Calls List of tones for call shall be displayed
including the downloaded tones
z Text Messages List of tones for text messages shall be
displayed including the downloaded tones.
z Voicemail List of tones for voicemail shall be displayed including the
downloaded tones.
z Alarms List of tones for alarms shall be displayed including the
downloaded tones.
z Reminders Reminders can take three values Off and beep
Press① MENU >Ring Styles >Style Details
Scroll to② Calls, Text Messages, Voicemail or Alarms

Select the item and press ③ CHANGE
Scroll to the style for which you want to select a tone and press ④ SELECT
12.2 Set Reminders
A reminder is an alert that rings or vibrates at regular intervals to notify you about a
voicemail or text message that you have received
Press ① MENU >Ring Styles >Style Details>Caller ID’s
Scroll to ② Beep to set the reminder alert type or off to turn off all reminders
Press③ SELECT

13
Your phone includes an alarm clock, which you can set up
according to your own need. Your phone can store up to 5 alarms.
Notes:
Your phone must be turned on to use the alarm
13.1 Set the Alarm
The Alarm clock icon will appear on the idle display to indicate that an alarm is set.
ALARM
z The alarm clock setting does not display in the datebook
day view, and is not synchronized with datebook settings.
Press ① MENU >Alarm>[New Alarm]
Select ② Name and press CHANGE
Enter the alarm name and press ③ DONE
Scroll to ④ Time and press CHANGE
Enter the time you want to set (using HH:MM 24H format)
⑤
Press ⑥ DONE to save the time.
Scroll to ⑦ Alert/Volume and enter necessary information.
You can set the alert tone and volume
Save the alarm setting and press ⑧ DONE
13.2 Edit, Enable or Delete an Alarm
Press ① MENU >Alarm
Scroll to the stored alarm and press ② SELECT.
View the Details screen and press③ OPTION.
Scroll to ④ Disable/Enable, New, Edit, Delete or Delete All
Press ⑤ SELECT and follow the display.
13.3 Respond To an Alarm
When the alarm is activated, your phone rings or vibrates (depending on the alarm setting),
and displays the time and alarm title.
The alarm is programmed to ring for 3 minutes, or until you perform one of the following

operations. This cycle continues till maximum 90 minutes.
z DISABLE Press LSK Turn off the alarm
z SNOOZE Press RSK to turn off the alarm for 8 minutes. The alarm
reactivates after 8 minutes

14
14.1 Emergency Calls
IMPORTANT!
This phone, like any wireless phone, operates using radio signals, wireless and landline
networks, and user-programmed functions. Because of this, connections in all conditions
cannot be guaranteed. Therefore, you should never rely solely on any wireless phone for
essential communications (e.g. medical emergencies).
Remember, to make or receive any calls, the phone must be switched on and be used in a
service area that has adequate signal strength. Emergency calls might not be possible on all
wireless phone networks or when certain network services and/or phone features are in use.
Check with local service providers.
14.1.1 Make an emergency call
other official emergency number emergency numbers vary by location).
REFERENCE INFORMATION
Enter the emergency number for your present location (for example, 911 or any
①
② Press
If certain features are in use (Keyguard, fixed dialing, restrict calls, and so on), you might
first need to turn those features off before you can make an emergency call. Consult this
guide and your local cellular service provider.
When making an emergency call, remember to give all of the necessary information as
accurately as possible. Remember that your wireless phone might be the only means of
communication at the scene of an accident do not terminate the call until given permission
to do so.
14.2 Troubleshooting
14.2.1 No service
If you are outside the wireless service area, No service will display on your phone. No
calls can be made or received, however, emergency calls may still be possible.
.

14.2.2 What if the call does not go through?
Your phone can make and receive calls only when it is switched on and in the wireless
network’s service area.
No service means that you are probably outside the wireless service area. No calls can be
made or received.
This number is restricted means calls to the phone number you tried to call are restricted
(see 11.6.2).

15
N
r
TECHNICAL INFORMATION
Weight
Size (H x W x D)
Wireless Networks
Frequency Range
Number of Channels
Number of NAMs
Memory Locations
Memory Capacity
Back up Battery
872g
214x 158 x 81.8 mm
TDMA 800 / AMPS
824.04-848.97 MHz (TX)
869.04-893.97 MHz (RX)
832
2
500
Alpha : 32 digits per location
umeric : 40 digits pe
location
1.5V AA X 4EA (User option)
 Loading...