

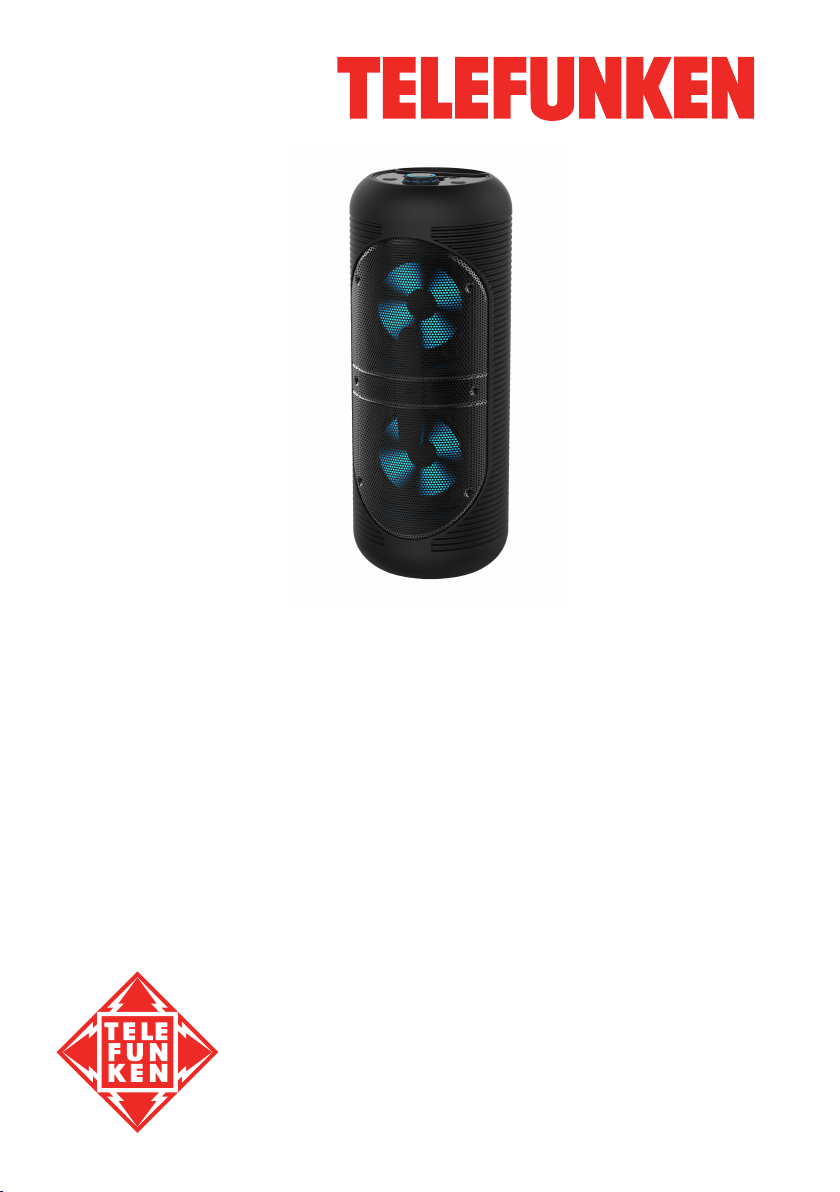
PORTABLE MINI MUSIC SYSTEM WITH BLUETOOTH
ПОРТАТИВНАЯ МУЗЫКАЛЬНАЯ MINI СИСТЕМА С
BLUETOOTH
TF-PS2205
Instruction manual
Руководство по
эксплуатации

Instruction manual
Dear customer!
Thank you for purchasing our product. For safety, it is strongly recommended to read
this manual carefully before connecting, operating and/or adjusting the product and keep
the manual for reference in future.
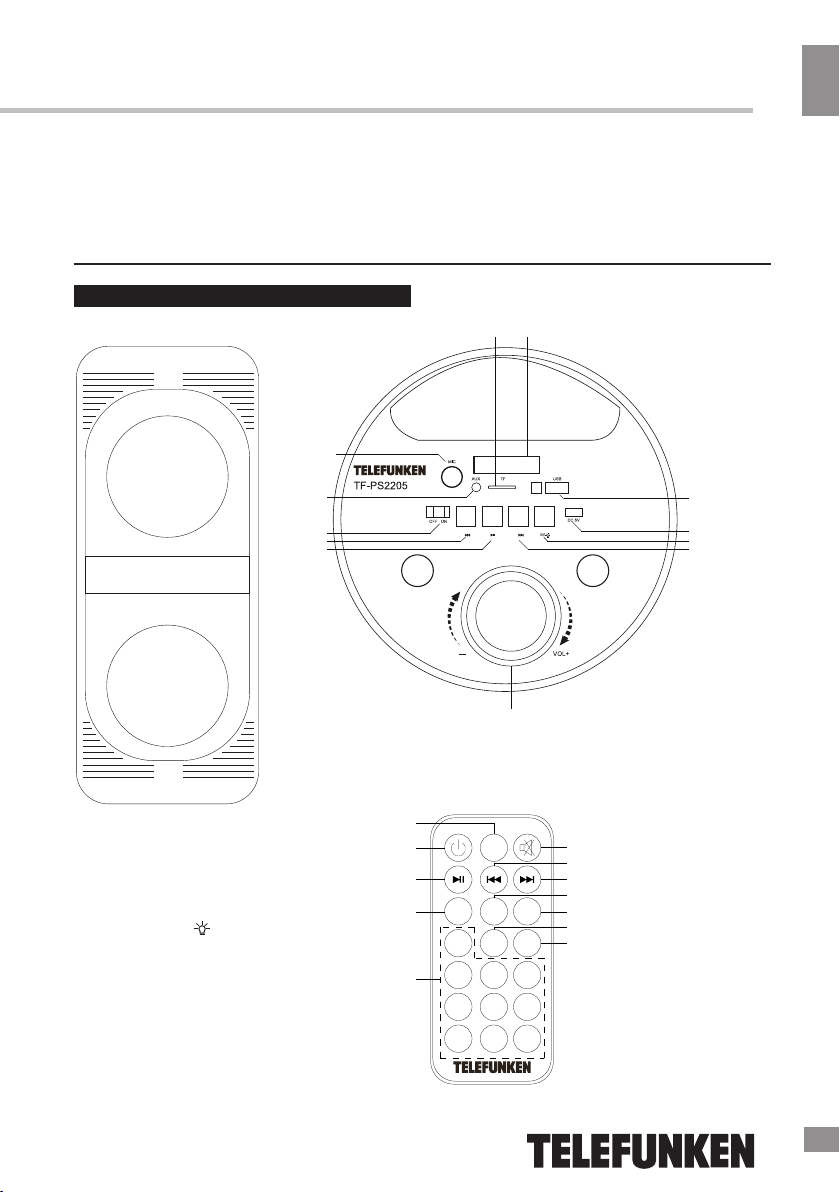
Description
1 2
12
1. TF (microSD) card slot
2. LCD screen
3. USB port
4. DC 5V microUSB charging port
5. M (MODE) / (LIGHT) button
6. ⏭
(NEXT) button
7. Master volume knob
8. ⏯ (PLAY/PAUSE) button
9. ⏮ (PREVIOUS) button
10. Power (OFF/ON) switch
11. AUX input 3.5mm
12. Microphone input 6.35mm
11
10
9
8
7
3
4
5
6
Remote control
1
2
5
8
12
Mode
EQ VOL-
RPT
0
1 2 3
4 5 6
7 8 9
VOL+
U/SD
1. MODE button
2. ⏻ (POWER) button
3
4
3. MUTE button
6
4. ⏮ (PREVIOUS) button
7
5. ⏯ (PLAY/PAUSE) button
9
6. ⏭ (NEXT) button
10
7. VOL- button
11
8. EQ button
9. VOL+ button
10. RPT (REPEAT) button
11. U/SD button
12. Numeric buttons
2

Instruction manual
Connection diagram
Mobile device
3.5mm mini-jack to 3.5 minijack audio cable
USB to micro USB
power cable
Socket
PC
USB port
Important safeguards
• The instruction manual contains important
operating and maintenance instructions. For
your safety, it is necessary to refer to the
manual. Keep the manual for future use.
• Do not hit or drop the unit.
• Do not expose the unit to vibration, direct
sunlight, too high or low temperatures or
humidity.
• Do not disassemble the unit yourselves
Refer servicing to qualified service personnel.
All the illustrations in this manual are
schematic images, which may differ from
actual objects.
Power supply
• The unit operates on an internal
echargeable Li-
r
mains (via adapter).
• The battery can be recharged with the
provided USB charging cable. Before first
plugging the appliance check that voltage
indicated on the rating label corresponds
to the mains voltage in your home.
ion battery and 220V
• Insert the charging cable into the
DC 5V socket (microUSB) on the unit.
• Connect the charging cable to the power
adapter (not included) or to another
power source.
• For best results, try to fully charge the
battery before each use. If the battery is
drained, please allow it to recharge for a few
hours.
• Put the OFF/ON switch into ON
position to switch the unit on. Put it
into OFF position to switch off.
General operations
Bluetooth wireless playback
• This unit can wirelessly playback audio
from any device with Bluetooth A2DP
function.
• The wireless range is approximately
within 10 meters in direct line of sight.
3
Instruction Manual
• Wireless audio streaming requires pairing
of a Bluetooth device (e.g. smartphone).
HOW TO PAIR YOUR DEVICE TO
THIS UNIT:
• Make sure the Bluetooth function is
switched on in your device (e.g. smartphone,
tablet).
• Switch on the unit and press the
MODE button repeatedly to select
the Bluetooth mode (selected by default).
The display will show "bt".
• Once the Bluetooth pairing indicator
begins flashing, you will find the unit listed in
the Bluetooth connections list of your device
(as TF-PS2205).
• If asked for a passcode, enter “0000”.
• The initial setup is required only once
per device. The unit will automatically pair to
the last paired device.
• The LED indicator will flash when
searching for a Bluetooth device and stay
on when the devices are paired.
• When playing files, you can press
button to pause and resumethe
playback.
• Press the or button to
go to a previous or next track.
Rotate the volume knob or press
the volume buttons on the
remote to adjust volume.
External device connection
• You can connect the audio output of an
external device to this unit, to listen to the sound
of that device through the speaker.
• To connect an external audio device,
please use an audio cable with 3.5mm-to-3.5
mm plugs to connect the headphone out or
audio line-out of the external device to the
AUX input of this unit.
• Press MODE button to select the AUX mode.
• Turn on the external device. You can
press the volume buttons to adjust volume.
USB/MicroSD operation
Playback
•
Turn on the device.
•
Insert a microSD (TF) card into the slot.
Or insert a USB drive into the USB
port. Press the MODE button repeatedly to
select the USB or MicroSD mode.
• When playing, you can press
to play/pause the playback.
• During the playback you can press
the and buttons to go to the previous
and next track. Rotate the volume indicator
to adjust volume.
It may take up to 60 seconds to open
and verify a large microSD card / USB drive
with many files.
• Press the EQ button to switch
between various equalizer presets. EQ is
only available in the BT and USB/TF
modes.
General USB/MicroSD notes
• This unit is equipped with a microSD
and USB port that can read and play MP3
files stored on standard microSD cards and
USB drives up to 32 GB.
• FAT and FAT32 file system is supported
by this unit.
Never remove microSD cards and USB
drives from the unit during playback, always
stop playback, then press the MODE button
to switch to another mode before removing
the storage to prevent damage to your files
and cards/drives themselves.
If there is a microSD card or USB
drive installed in the unit, when powered
on, playback will automatically start
from microSD/USB.
Slight noise during playback pauses
is not a construction defect, it is
determined by the factory presets of the
dynamic noise reduction system.
slot
4

Instruction manual
FM radio
•
Turn on the device.
•
Press the MODE button
repeatedly to
• Press PLAY/PAUSE to automatically
scan and save all available radio
stations. The procedure will take
several minutes and cannot be
interrupted.
• Radio frequency can be set
manually using the numeric buttons on
the remote control.
• Once the search is finished, you can
press the and buttons to go to a
previous or next radio station. Also you
can input the frequency directly using
the numeric buttons on the remote.
select the FM mode.
Microphone
• You can connect the microphone for
karaoke or other purposes into this unit by
connecting it to the 6.35mm microphone
input jack. Please do not plug the
microphone when the unit is charging.
TWS function
Mood light
• Press and hold the M / button
to switch the mood light on and off.
Maintenance and care
Switch off the unit, unplug from the
power supply. The outside of the appliance
can be cleaned with a slightly damp cloth.
Accessories
Music system
USB cable
AUX cable
Wired microphone
Remote control
Instruction manual
1 pc
1 pc
1 pc
1 pc
1 pc
1 pc
• If you have two units at your
disposal, you can pair them to each other
and enable the True Wireless (TWS)
stereo sound.
• Turn the both units on and
switch them into the Bluetooth mode.
Connect one music system to your mobile
device via Bluetooth as described in the
manual. Then press the PLAY / PAUSE
button on the second music system twice.
The units are now connected.
5
 Loading...