

Page 1
CORDLESS PHONE
TELEFUNKEN TC 101
USER GUIDE
TELEFUNKEN TC 151
(with answering machine)
Page 2

User guide TELEFUNKEN TC101/TC151 DECT cordless phone
I. Important safety instructions ........................................................................ 3
II.
Package contents ....................................................................................... 5
Get to know your phone ............................................................................ 6
III.
1. Handset overview ................................................................................................................ 6
2. Base overview (with answering machine TC 151) .............................................................. 9
3. Base overview (without answering machine TC101) ........................................................ 10
4. Handset LCD display ........................................................................................................... 11
IV. Install your phone .................................................................................... 12
1. Connect the Base Station ................................................................................................... 12
2. Install and Charge the Batteries ......................................................................................... 12
V. Use your phone ........................................................................................ 13
1. Make an External Call ........................................................................................................ 13
2. Answer a Call ...................................................................................................................... 14
3. End a call ............................................................................................................................ 14
VI. Sound ...................................................................................................... 14
1. Handset ringer ................................................................................................................... 14
2. Set the base ringer ............................................................................................................. 15
3. Other tones ........................................................................................................................ 15
VII. Special functions ...................................................................................... 15
1. Adjust handset volume. ..................................................................................................... 15
2. Mute a call ......................................................................................................................... 16
3. Set the Silent Mode ........................................................................................................... 16
Non binding document subject to modifications in the event of missprint (mktg 0109)
1
Page 3

4. Redial) ................................................................................................................................ 16
5. Keypad Lock ....................................................................................................................... 17
6. Find Handset ...................................................................................................................... 17
7. Access Inbox ....................................................................................................................... 17
8. Call list ................................................................................................................................ 17
VIII. Advanced functions .............................................................................. 19
1. Make an Internal Call. ........................................................................................................ 19
2. Transfer an external call to another handset .................................................................... 20
3. Make a 3-way conference call ........................................................................................... 20
IX. Phonebook .............................................................................................. 20
1. Add a new entry ................................................................................................................. 20
2. Edit an entry ....................................................................................................................... 21
3. View an entry ..................................................................................................................... 21
4. Copy an Entry ..................................................................................................................... 21
5. Copy all entries ................................................................................................................... 21
6. Delete an entry .................................................................................................................. 22
7. Delete the Entire Phonebook ............................................................................................ 22
8. Afficher la capacité du répertoire ...................................................................................... 22
9. Edit Call Group ................................................................................................................... 22
10. Speed Dial .......................................................................................................................... 23
X. SMS function ............................................................................................ 23
1. Write and Send a Text Message ........................................................................................ 24
2. Read a Received Text Message .......................................................................................... 24
3. Reply a text message to the sender ................................................................................... 24
4. Store the replying message ............................................................................................... 25
5. Forward a received text message ...................................................................................... 25
6. Call the sender’s number ................................................................................................... 26
7. Store the sender’s number into the phonebook ............................................................... 26
Non binding document subject to modifications in the event of missprint (mktg 0109)
2
Page 4

8. Delete the received text message ..................................................................................... 26
9. Delete all the received text messages ............................................................................... 27
10. Review the Messages in the Outbox ................................................................................. 27
11. Set the SMS Service Centre Numbers ................................................................................ 27
12. Select the SMS Send Service Centre .................................................................................. 28
13. Turn On or Off the New SMS Alert .................................................................................... 28
XI. Settings .................................................................................................... 28
1. Handset Settings ................................................................................................................ 28
2. Base Settings ...................................................................................................................... 31
XII. Answering machine. (Only available on TC151) ........................................ 33
1. Use the answering machine from the handset ................................................................. 33
2. Use the Answering Machine from the Base ...................................................................... 35
3. Remote Access ................................................................................................................... 36
XIII. Menu Structure ..................................................................................... 38
XIV.
Default Settings .................................................................................... 39
Troubleshooting : ..................................................................................... 40
XV.
XVI.
Warranty .............................................................................................. 41
I. Important safety instructions
Non binding document subject to modifications in the event of missprint (mktg 0109)
3
Page 5

When using your telephone equipment, basic safety precautions should always be followed to
reduce the risk of fire, electric shock and injury, including the following:
- Read and understand all the instructions.
- Follow all warnings and instructions marked on the product.
- Unplug this product from the wall outlet before cleaning. Do not use liquid cleaners or
aerosol cleaners. Use a damp cloth for cleaning.
- Do not use this product near water (for example, near a bath tub, kitchen sink, swimming
pool).
- Do not overload wall outlets and extension cords as this can result in the risk of fire or
electric shock.
- Unplug this product from the wall outlet and refer servicing to Vtech under the following
conditions:
• When the power supply cord or plug is damaged or frayed.
• If the product does not operate normally by following the operating instructions.
• If the product has been dropped and the cabinet has been damaged.
• If the product exhibits a distinct change in performance.
- Avoid using a telephone (other than a cordless type) during an electrical storm. There may
be a remote risk of electric shock from lightning.
- Do not use the telephone to report a gas leak in the vicinity of the leak.
- Use only the supplied NiMH (Nickel Metal Hydride) batteries! The operation periods for the
handsets are only applicable with the default battery capacities
- The use of other battery types or non-rechargeable batteries/primary cells can be
dangerous. These may cause interference and/or unit damages. The manufacturer will not
be held liable for damage arising from such non-compliance.
- Do not use third party charging bays. The batteries may be damaged.
- Please note the correct polarity while inserting the batteries.
- Do not immerse batteries in water, do not place in fire.
Non binding document subject to modifications in the event of missprint (mktg 0109)
4
Page 6

II. Package contents
The package contains the following items:
• 1 Handset
• 1 Base station
• 1 AC power adapter
• 1 Telephone line cord
• 1 Battery pack
• 1 User manual
The maximum range between the base station and the handset is approximately 300 meters.
Depending on the surrounding conditions as well as spatial and structural factors, the range may be
reduced. The range indoors is normally less than outdoors.
Non binding document subject to modifications in the event of missprint (mktg 0109)
5
Page 7

III. Get to know your phone
2
8
9
10
11
14
12 1 3 4 5 6 7
13
1. Handset overview
6
Non binding document subject to modifications in the event of missprint (mktg 0109)
Page 8
Press to access ten important phone numbers that share with all
8
During call screening: Press to activate call
During answering machine message playback:
Press to play or pause the message playback
In editing mode: Press to go one line upwards
9
current message
10
During answering machine message playback:
Press to skip forward to next message
During answering machine message playback: Press to skip
backward to previous message
11
In menu mode: Press to scroll down the menu
1 INFO
handsets
2 UP/REDIAL
In idle mode: Press to access the redial list
In menu mode: Press to scroll up the menu items
In Phonebook list / Redial list / Call List: Press to scroll up the list
During a call: Press to increase the volume
3 LEFT SOFT KEY
In idle mode: Press to select a handset to make an internal call
In sub-menu mode: Press to go back to previous level
In contextual menu during a call: Press to go back previous level
In editing / predialing mode: Press to clear a character / digit
RIGHT SOFT KEY
In idle mode: Press to access the main menu
In sub-menu mode: Press to confirm the selection
screening on handset
RECALL / FLASH
In idle / predialing mode: Press to insert a flash
During a call: Press to dial a flash
RIGHT / SMS / TAM Message
In Idle: Press to access the status summary of call
list, SMS and answering machine messages.
In sub-menu mode: Press to go to next menu level
In Call list: Press to view the details of the selected
call list entry
In editing / predialing mode: Long press to delete all the characters
/ digit
During answering machine message playback: Press to delete the
4 LEFT/ PHONEBOOK
In idle mode: Press to access phonebook
In main menu mode: Press to go back to idle
In sub-menu mode: Press to go back to previous level
During a call: Press to mute / unmute the microphone
In predialling mode: Press to move the cursor one character to the
left
5 SPEAKERPHONE
In predialing / editing mode: Press to move the
cursor one character to the right
DOWN / CALL LIST
In idle mode: Press to access the call list
items
In Phonebook list / Redial list / Call List: Press to
scroll down the list
During a call: Press to decrease the volume
In editing mode: Press to go one line downwards
12
TALK OFF
Non binding document subject to modifications in the event of missprint (mktg 0109)
7
Page 9

During a call: Press to turn on / off the speakerphone. Call List /
Phonebook entry: Press to make a call with speakerphone
During a call: Press to end a call and go back to idle
screen
In Idle: Press and hold to choose to power off the
the handset
During call screening: Press to intercept a call
13
key in editing mode: Press to toggle between uppercase or
0 key in idle / predialing / number editing mode: Long press to
In Idle: Press and hold key 1 to access the network voice mail (if
number stored in the respective digit key (applicable if user has
stored numbers in the speed dial locations)
During ringing: Press to answer a call with speakerphone
During answering machine message playback/call screening: Press
to play the message via speaker
6 TALK ON
In idle / predialing mode : Press to make a call
In Redial list / Call List/ Phonebook entry: Press to make a call to
the selected entry in the list
During ringing: Press to answer a call
7 ALPHANUMERIC KEYPAD, * (STAR), # (HASH)
Press to insert a digit / character / * / #
* key in idle mode: Long press to turn off the ringer
#
lowercase character input
In menu / editing mode: Press to go back to idle
screen
handset
When the handset is power off: Press to power on
MICROPHONE
14
EARPIECE
# key in Idle mode: Long press to turn on / off the keypad lock
insert a pause
applicable)
In Idle: Press and hold any digit key (except 1, *, #) to access the
Non binding document subject to modifications in the event of missprint (mktg 0109)
8
Page 10
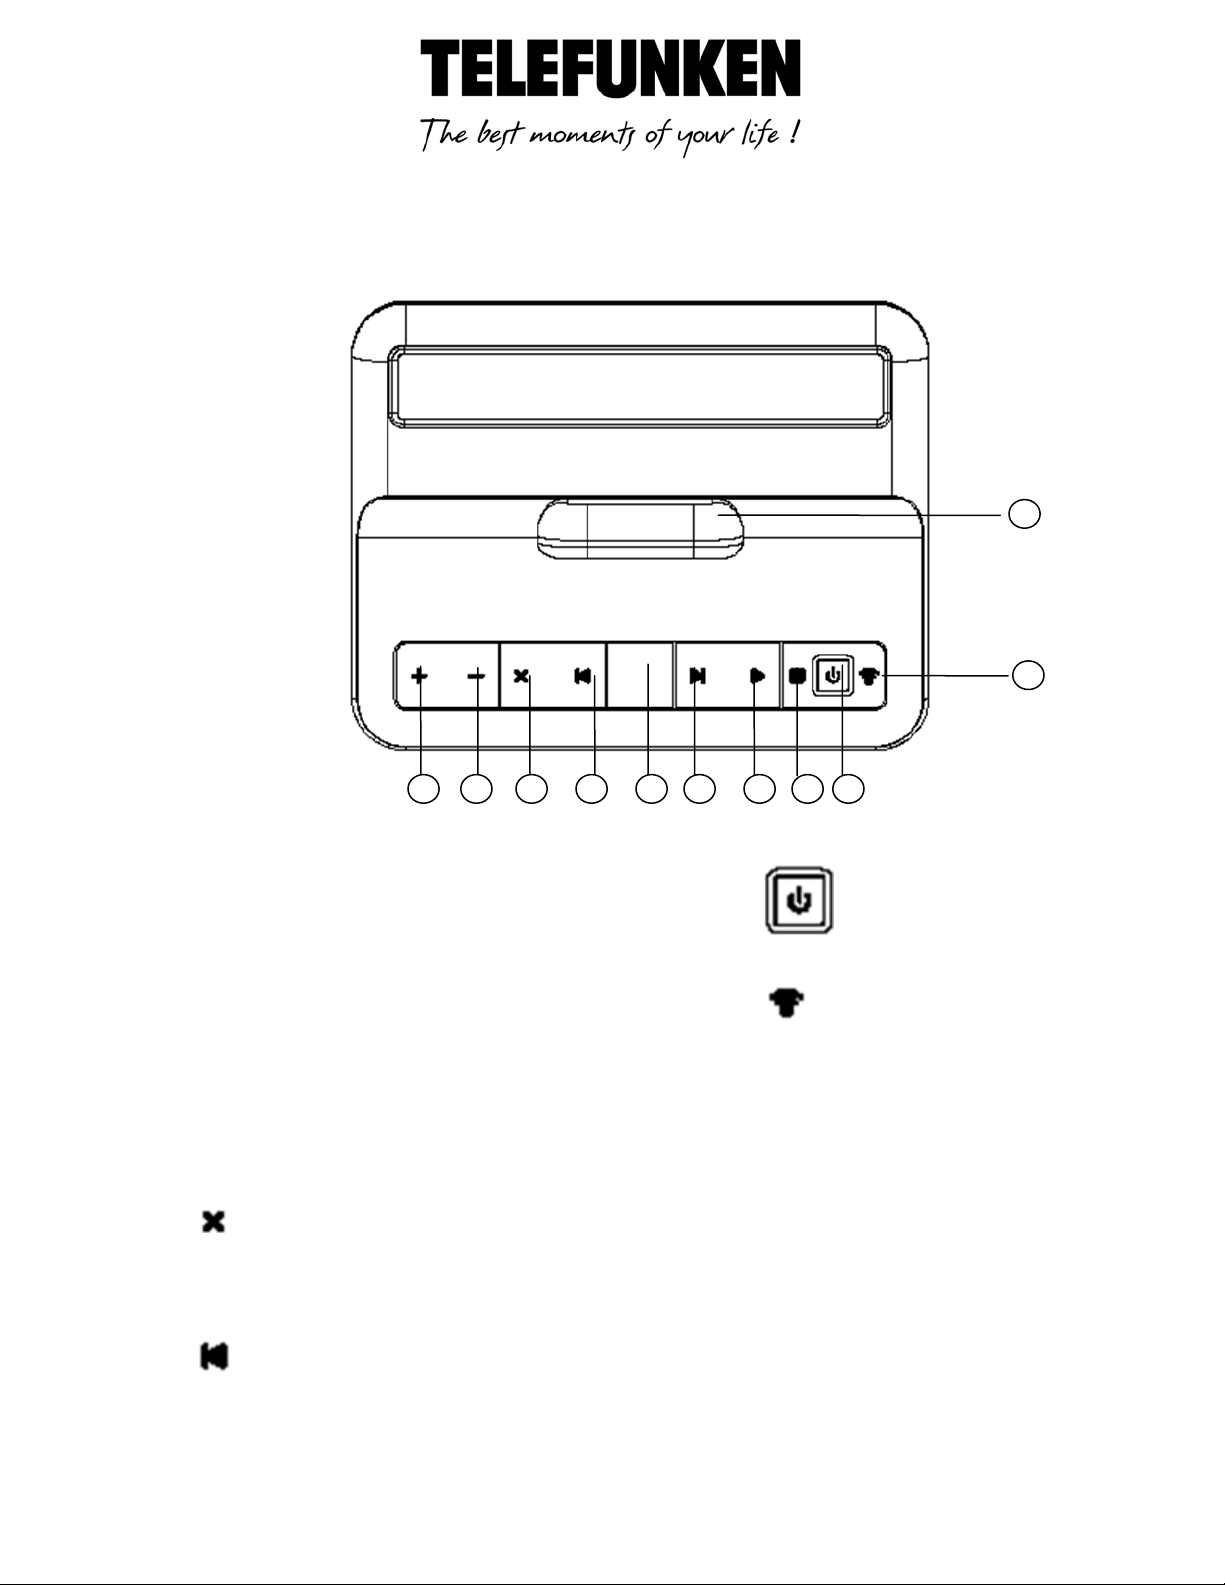
2. Base overview (with answering machine TC 151)
Place the handset on the charging cradle for
charging.
Press to turn on or off the answering
machine
Increase volume during message playback.
Press to ring all registered handsets. You
Long press to enter into registration mode
Decrease volume during message playback
Delete the current message playback.
Press twice consecutively to delete all old
messages
Press to ring all registered handsets. You can
1
2 3 4 5 8 9 10
7
11
6
Charging Contacts
1
10
2 VOL +
11
can make use of this to find the missing
handset.
3 VOL -
4
5
Non binding document subject to modifications in the event of missprint (mktg 0109)
9
Page 11
make use of this to find the missing handset.
Long press to enter into registration mode
--: Answer Machine is Off.
0 to 99: Answer Machine is On and display the
rE: Recording message is in progress.
Skip forward to next message
Play the message.
9
Stop the current message playback
1
6 Indicateur de messages
number of messages. Flashes when there are new
messages.
rA: Remote access is in progress.
7
8
3. Base overview (without answering machine TC101)
Non binding document subject to modifications in the event of missprint (mktg 0109)
10
Page 12
Press to ring all registered handsets. You can make use of this to find the missing handset.
Steady when the handset is in range of the base.
Flash when the handset is in marginal range of the base.
Off when the handset is not registered to the base or out of range.
Indicate when new SMS is received.
Flash when the SMS inbox is full.
Turn off when all new SMS have been read
Indicate when missed call is received (Network Subscription is required).
Turn off when at least one missed call has been read.
Indicate when new answering machine message is received.
Flash when the answering machine memory is full.
Turn off when no new answering machine message
Indicate a call is in progress.
Flash when ringing.
Indicate that hands-free is being used.
Indicate the answering machine is turned on.
Turn off if the answering machine is turned off
1
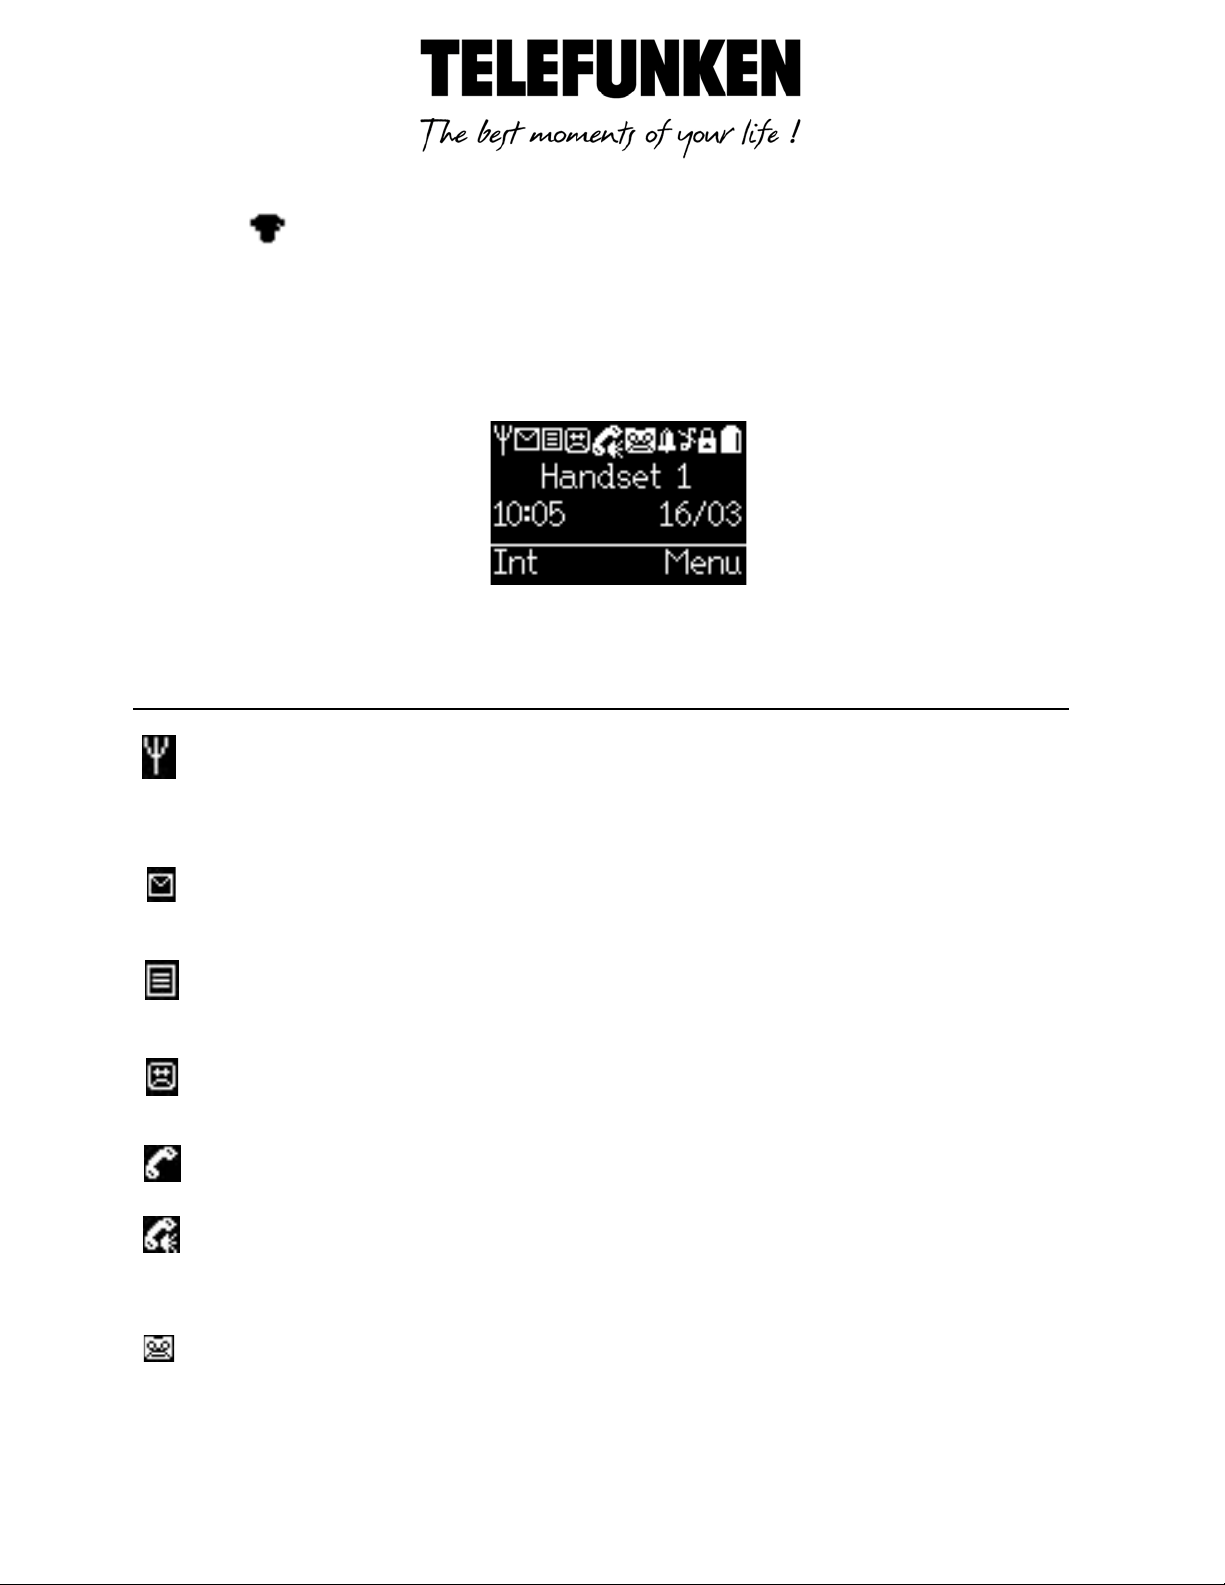
4. Handset LCD display
Icons Description
(Sample idle screen display).
.
Non binding document subject to modifications in the event of missprint (mktg 0109)
11
Page 13
Indicate that the alarm is set.
Flash when the alarm time is reached.
Turn off when the alarm is off.
Indicate that the ringer is switched off
Indicate that the keypad is locked
Indicate when the battery is fully charged
Indicate when the battery is 1/4 charged.
Indicate when the battery is 1/2 charged
Indicate when the battery is ¾ charged
Flash when low battery is detected and indicate that it needs charging.
Animate during charging
IV. Install your phone
1. Connect the Base Station
- Plug the power supply & line cord into the base station
- Plug the power supply & line cord into the wall socket.
- Always use the cables provided in the box
2. Install and Charge the Batteries
- Slide out the battery compartment cover
- Place the supplied battery pack as indicated. Locate the battery lead and connector and plug
it into the socket inside the battery compartment (the red wire should be on the left). Tuck
the battery leads in the space above the battery.
Non binding document subject to modifications in the event of missprint (mktg 0109)
12
Page 14

- Slide the battery compartment cover back.
- Put the handset on the base and charge the battery for 14 hours first time. A beep indicates
that the handset is properly placed on the base or charger
IMPORTANT : Use only the NiMH battery pack provided
V. Use your phone
1. Make an External Call
- Direct call
Press or to take the line and enter the phone number.
- Preparatory dialing.
Enter the phone number and press or to dial the number.
By pressing , you call in hands free mode. Press left to clear a bad entry
- Call from the phonebook
Press to access the phonebook and press ou select the desired phonebook entry.
Press or to dial out to the selected phonebook entry.
Non binding document subject to modifications in the event of missprint (mktg 0109)
13
Page 15

- Call from the call list
Press pour to access the call list and press or to select the desired call list entry.
Press or to dial out to the selected call list entry
- Call from the redial list
Press to access the redial list and press to select the desired redial number.
Press or to dial out to the selected redial number.
- Call timer
Your handset automatically times the duration of every call. The call timer will display a few
seconds after the call has made. It is shown in hours, minutes and seconds format (HH:MM:SS)
2. Answer a Call
If handset is not on the charging cradle When the phone is ringing, press or to answer a call.
If the handset is on the charging cradle or the base station with « auto-talk » enable, pick up the
handset to answer a call.
If the handset is on the charging cradle or the base station with « auto-talk » disable, pick up the
handset and press or .
(See chapter 11 p 31 to enable/disable auto-talk)
3. End a call
During a call connection, press to end the call. or put the handset on the base station to end the
call
VI. Sound
You can set different melodies to personalize your external and internal ringer. A total of 15
melodies are provided for your selection
1. Handset ringer
In idle, press right and to select« Sound ».
Press right (OK) and to select « Ringer ».
Press right (OK) and to select « External »..
Press and to select your desired melody for your external ringer.
Press and to select your desired ringer volume from Level 1 to Level 5 or Off.
Non binding document subject to modifications in the event of missprint (mktg 0109)
14
Page 16

Press and to set Silent to Beep
NOTE : When you set the ringer to Off, you can still hear a beep when there is an incoming call by
setting the Silent to Beep. If you set the Silent to Off, you cannot hear any tone when there is an
incoming and the ringer is set to Off.
Press right (OK) to confirm.
2. Set the base ringer
In Idle, press right (MENU) and to select « Settings ».
Press right (OK) and to select « Base settings »
Press right (OK) and to select « Ringer »
Press right (OK) and to select your desired melody for your base ringer. (A total of five
melodies for base ringer are provided.
Press and to select your desired ringer volume from Level 1 to Level 5 or Off
Press right (OK) to confirm.
3. Other tones
Your handset can give a beep to you when an action is confirmed to be successful, out of range is
detected, a key is pressed or low battery is detected
In idle, press right (MENU) and to select « Sound ».
Press right (OK) and to select « Tones ».
Press right (OK) and to select « Key beeps ».
Press and to turn on or off the Confirmation tone
Press and to turn on or off the Battery Low alert tone.
Press and to turn on or off the Out of Range alert tone.
Press right (OK) to confirm.
VII. Special functions
1. Adjust handset volume.
5 volume levels (Level 1 to Level 5) to choose from for each of earpiece and handsfree volume.
During a call, press increase or decrease the volume level respectively. The current setting is
shown. When you end the call, the settings will remain at the last selected level.
Non binding document subject to modifications in the event of missprint (mktg 0109)
15
Page 17

2. Mute a call
You can talk to someone nearby without letting the caller hear you during a call.
During a call, press to mute the microphone and “Mute On” is displayed on the LCD. Your caller
cannot hear you.
Press again to unmute the microphone.
3. Set the Silent Mode
In idle, press and hold to turn off the ringer. The Ringer off icon is displayed on the LCD
To disable « Silent mode », press and hold .
4. Redial)
You can redial up to 20 of the last numbers called. If you have stored a name in the phonebook to
go with the number, the name will be displayed instead.
Note: After making a call, further key input after call timer is displayed will not be stored in the
redial list.
- Redial a number from the redial list
Press to access the redial list.
Press browse the redial list.
Press to dial to the selected redial number.
Note: If there are no numbers in the redial list, the display shows « List empty ».
- Save a redial number into the phonebook
Press to access the redial list.
Press browse the redial list.
Press right (OPTIONS) and to select « Store number »
Press right (OK) to enter the name, edit the number and select the group if necessary
Press right (OK) to save the redial number into the phonebook.
- Delete a redial number
Press to access the redial list.
Press browse the redial list.
Press right (OPTIONS) and to select « Delete »
Non binding document subject to modifications in the event of missprint (mktg 0109)
16
Page 18

Press right (OK)to confirm.
- Delete the entire redial list
Press to access the redial list.
Press browse the redial list.
Press right (OPTIONS) and to select « Delete list»
Press right (OK)to confirm..
5. Keypad Lock
You can lock the keypad so that it cannot be used accidentally while carrying it around.
To lock the keypad: In idle mode, press and hold . The message « Keypad locked. » and. icon
will display
To unlock the keypad: In idle mode, press and hold . The message « Keypad locked. and. icon
will disapear.
6. Find Handset
You can locate the handset by pressing on the base station. All the handsets registered to the
base will ring up for 30 seconds and « Paging » is displayed on the LCD.
You can stop the paging by pressing , or right (BACK) on the handset or on the base
again.
7. Access Inbox
In idle, press to access the Inbox.
Press to select « Calls », « Messages (only on TC151 )» or « SMS ».
Press right (OK) view the Call List, play answering machine message(only on TC151) or SMS
Inbox.
Press gauche (BACK) or to return to idle.
8. Call list
This feature is available if you have subscribed the Caller Line Identification service with your
network service provider
Non binding document subject to modifications in the event of missprint (mktg 0109)
17
Page 19

Your phone can store up to 30 calls with date/time information in the call list. The number will be
shown on the LCD when the phone is ringing. If the number matches with one of the entries in your
private phonebook, the caller’s name stored in the private phonebook will be displayed
alternatively with the number.
If the caller number is withheld, “Withheld” will display.
If the caller number is unavailable, “Unavailable” will display.
- View the Call List
All unanswered calls are saved in calls log with the latest call putting at the top of the list. When the
call list is full, the oldest call will be replaced by a new call. The unanswered call which has not been
read is marked with “New” at the bottom of the unanswered call entry
Press to access the call list.
Press to select the desired entry.
Press right (OPTION) and to select « Détails »
Press right (OK) to view the date and time information of the selected call list entry.
- Store a Call List Number into the Phonebook
Press to access the call list.
Press to select the desired entry.
Press right (OPTION) and to select « Store number ».
Press right (OK) and to enter the name, number and call group if necessary.
Press right (OK) to confirm.
- Dial a Call List Number
Press to access the call list.
Press to select the desired entry.
Press right (OPTION) and to select « Call number ».
Press right (OK) and you can edit the selected call list number.
Press to dial out to the call list number.
- Delete an Entry in the Call List
Press to access the call list.
Press to select the desired entry.
Press right (OPTION) and to select « Delete ».
Press right (OK) to confirm.
Non binding document subject to modifications in the event of missprint (mktg 0109)
18
Page 20

- Delete the Entire Call List
Press to access the call list.
Press to select the desired entry.
Press right (OPTION) and to select « Delete all ».
Press right (OK) to confirm.
Press right (OK) to reconfirm.
- Store All Calls or Only Unanswered Calls in the Call List
If All Calls is selected, answered and unanswered calls are stored in the call list. If Missed Calls is
selected, only unanswered calls are stored in the call list.
Press to access the call list.
Press to select the desired entry.
Press right (OPTION) and to select « Settings ».
Press right (OK) and to select « All calls » ou « Missed calls »
Press right (OK) to confirm.
- Turn On or Off the New Call Alert
If New Call Alert is turned on, you will hear a beep when there is a missed call and icon will
display.
Press to access the call list.
Press to select the desired entry.
Press right (OPTION) and to select « Settings ».
Press right (OPTION) and to select « New call alert »
Press to turn on or off the new call alert
Press right (OK) to confirm.
VIII. Advanced functions
Only available with several handsets
BE CAREFUL : These features are only applicable when there are at least two registered handsets.
It allows you to make internal calls, transfer external calls from one handset to another handset and
make conference calls
1. Make an Internal Call.
Press left ( INT ) and to select the handset that you want to make an internal call with.
Press right (OK)
The called handset rings.
Non binding document subject to modifications in the event of missprint (mktg 0109)
19
Page 21

Your correspondent press on the called handset to establish the internal call.
2. Transfer an external call to another handset
During a call :
Press left ( INT ) and to select the handset that you want to transfer an external call.
Press right (OK)
The external call is put on hold automatically and the called handset rings.
Press on the called handset to establish an internal call.
Press the calling handset to end the current call with the external party
The external call is transferred to the called handset.
3. Make a 3-way conference call
The conference call feature allows one external call to be shared with two handsets (in intercom).
The three parties can share the conversation and no network subscription is required.
During an external call :
Press left ( INT ) and to select the handset that you want to make a 3-way conference
call.
Press right (OK)
Press on the called handset to establish an internal call.
Press left ( CONF ) to establish the 3-way conference.
Any handset hangs up during a conference call will leave the other handset still in connection with
the external call.
During the conference call:
Press left ( SIMPLE ) on the calling handset to select « Simple call ».
The calling handset talks to the internal party and the external party is put on hold automatically.
IX. Phonebook
Your phone can store up to 200 private phonebook entries with names and numbers. Each
phonebook entry can have a maximum of 24 digits for the phone number and 15 characters for the
name. You can categorize your phonebook entry into one of the seven call groups.
1. Add a new entry
In idle, press to access the phonebook.
NOTE : If no entry is found in the phonebook « List empty ».
Non binding document subject to modifications in the event of missprint (mktg 0109)
20
Page 22

Press to select the desired phonebook entry.
Press right (OPTION) and to select « New entry »
Press right (OK) and to enter the name, number and call group.
NOTE : You can press toggle between the uppercase and lowercase letters. Phone number is
mandatory to enter in order to save it as a phonebook entry.
Press right (OK) to save the phonebook entry.
2. Edit an entry
In idle, press to access the phonebook.
Press to select the desired phonebook entry.
Press right (OPTION) and to select « Edit entry »
Enter the revised name, phone number and call group and press right (OK)
Press right (OK) to confirm.
3. View an entry
In idle, press to access the phonebook.
Press to select the desired phonebook entry.
Press right (OPTION) and to select « View ».
Press right (OK) to confirm.
4. Copy an Entry
In idle, press to access the phonebook.
Press to select the desired entry
Press right (OPTION) and to select « Copy »
Press right (OK) and to select the handset you want to copy.
Press left (OUI) to confirm or right (NO) to cancel.
NOTE: if no base or other handsets are registered, « Not available » will display on the screen.
At the receiving handset :
Upon successful copying, the display will show « Copied »
NOTE: The PB entries in the initiating handset are copied and appended to existing PB entries in the
receiving handset and are sorted in alphabetical order.
5. Copy all entries
In idle, press to access the phonebook. The first entry is displayed
Press right (OPTION) and to select « Copy all »
Non binding document subject to modifications in the event of missprint (mktg 0109)
21
Page 23

Press right (OK)and to select the handset you want to copy.
NOTE : if no base or other handsets are registered, « Not available » display on the screen.
At the receiving handset :
Press left (OUI) to confirm or droite (NO) to cancel.
Upon successful copying, the display will show « Copied ».
NOTE: The PB entries in the initiating handset are copied and appended to existing PB entries in the
receiving handset and are sorted in alphabetical order.
6. Delete an entry
In idle, press to access the phonebook.
Press to select the desired entry.
Press right (OPTION) and to select « Delete »
Press right (OK) to confirm.
Press left (YES) to confirm or right (NO) to cancel.
7. Delete the Entire Phonebook
In idle, press to access the phonebook.
Appuyez sur les touches pour choisir le contact voulu.
Press right (OPTION) and to select « Delete all »
Press right (OK) to confirm.
Press left (YES) to confirm or right (NO) to cancel.
8. Afficher la capacité du répertoire
In idle, press to access the phonebook.
Press right (OPTION) and to select « Capacity ».
Press right (OK) to display the number of entries remaining in the phonebook memory.
9. Edit Call Group
- Edit call group name
In idle, press to access the phonebook.
Press right (OPTION) and to select « Edit callGp. »
Press to the desired call group.
Press right (OK) to select « Rename group ».
Press right (OK) et « Clear » to delete the current name and enter a new name.
Non binding document subject to modifications in the event of missprint (mktg 0109)
22
Page 24

Press right (OK) to save.
- Change call group ringtone
In idle, press to access the phonebook.
Press right (OPTION) and to select « Edit callGp. »
Press to the desired call group.
Press right (OK) to select « Ringtone »
Press right (OK) and to choose the desired melody. Corresponding melody is played
while browsing the melody list. A total of 15 melodies are provided for your selection.
Press right (OK) to confirm.
10. Speed Dial
- Edit a speed dial
In idle, press to access the phonebook.
Press right (OPTION) and to select « Speed dial »
Press right (OK) and to select the speed dial location.
NOTE : If no number is stored in the selected speed dial location « No number » will display in the
screen.
Press right (OK) and to select your desired phonebook entry that you want to store in
the selected speed dial location
Press right (OK) to confirm.
- Delete a speed dial
In idle, press to access the phonebook.
Press right (OPTION) and to select « Speed dial »
Press right (OK) and to select the speed dial location.
Press right (OPTION) and to select « Delete »
Press right (OK) to confirm.
X. SMS function
Your phone can send and receive SMS text messages between fixed line and mobile networks that
support SMS services. You can store up to a total of 20 messages in your Inbox and Outbox.
Non binding document subject to modifications in the event of missprint (mktg 0109)
23
Page 25

1. Write and Send a Text Message
In idle, press right (MENU) and 4-way Key to select « SMS ».
Press right (OK) and to select « Write new SMS »
Use the keypad to enter your text message
NOTE : While entering the message, the remaining number of characters that can be entered is
displayed at the top right corner of the handset display. Maximum number of characters in writing
a text message is 160.
Press right (OPTION) and to select « Send »
Press right (OK) to enter the recipient’s number or press right (OPTION) and to
select a number from Phonebook, Redial List or Call List.
Press right (OK) to confirm.
Press right (SEND) to start sending the message. It will display « Sending message ».
NOTE : If the SMS is successfully sent, it will display «Message Sent», otherwise, «Message Not
Sent»will display and the unsent message is stored in the Outbox
2. Read a Received Text Message
When a text message is received, you will hear a SMS alert tone and <New SMS icon> is displayed. If
you receive a text message which contains more than 160 characters, it will be divided into multiple
text messages, each will contain a maximum of 153 characters. The maximum number of
characters of receiving a new message is 612.
In idle, press right (MENU) and 4-way Key to select « SMS ».
Press right (OK) and to select « Inbox »
Press right (OK) pour to display the most recent received SMS with the sender’s number,
received date and time, or press to display the sender’s number of next received SMS.
NOTE : If the sender’s number matches with the phonebook records, it will display the phonebook
name. The current SMS message number and the total number of received SMS is displayed at the
right bottom of the message. E.g. 1/3 represents that the current text message is message number 1
and three text messages are received and stored in the Inbox. Received SMS which has not been
read is indicated by «New» at the left bottom of the handset display. If the new received SMS has
been read, «New» will become «Old».
Press « Read » to display the text message content.
3. Reply a text message to the sender
In idle, press right (MENU) and 4-way Key to select « SMS ».
Press right (OK) and to select « Inbox ».
Non binding document subject to modifications in the event of missprint (mktg 0109)
24
Page 26

Press right (OK) pour to display the most recent received SMS with the sender’s number,
received date and time, or press to display the sender’s number of next received SMS.
Press « Read » to display the text message content.
Press right (OPTION) and to select « Answer »
Press right (OK) to choose whether you would like to reply the SMS with the received SMS
contents
Press left (YES) to include received SMS contents or right (NO) to remove the received SMS
contents
Enter your message to reply to the sender.
Press right (OPTION) and to select « Send »
Press « OK » to send the message to the sender. « Sending message » is displayed.
NOTE : If the SMS is successfully sent, it will display «Message Sent», otherwise, «Message Not
Sent»will display and the unsent message is stored in the Outbox
4. Store the replying message
In idle, press right (MENU) and 4-way Key to select « SMS ».
Press right (OK) and to select « Inbox ».
Press right (OK) pour to display the most recent received SMS with the sender’s number,
received date and time, or press to display the sender’s number of next received SMS.
Press « Read » to display the text message content.
Press right (OPTION) and to select « Answer »
Press right (OK) to choose whether you would like to reply the SMS with the received SMS
contents
Press left (YES) to include received SMS contents or right (NO) to remove the received SMS
contents
Enter your message to reply to the sender.
Press right (OK) and to select « Store »
Press right (OK) to store the replying message in the Outbox.
5. Forward a received text message
In idle, press right (MENU) and 4-way Key to select « SMS ».
Press right (OK) and to select « Inbox ».
Press right (OK) pour to display the most recent received SMS with the sender’s number,
received date and time, or press to display the sender’s number of next received SMS.
Press « Read » to display the text message content.
Press right (OPTION) and to select « Forward ».
The received text message will still display in editing screen. The cursor is at the end of the received
SMS
Non binding document subject to modifications in the event of missprint (mktg 0109)
25
Page 27

Press right (OPTION) and to select « Send »
Press right (OK) to send the message to the sender. « Sending message » is displayed.
NOTE : If the SMS is successfully sent, it will display «Message Sent», otherwise, «Message Not
Sent»will display and the unsent message is stored in the Outbox
6. Call the sender’s number
In idle, press right (MENU) and 4-way Key to select « SMS ».
Press right (OK) and to select « Inbox ».
Press right (OK) pour to display the most recent received SMS with the sender’s number,
received date and time, or press to display the sender’s number of next received SMS.
Press « Read » to display the text message content.
Press right (OK) and to select « Call number »
Press right (OK) to edit the sender’s number if necessary.
Press to dial out to the sender’s number.
7. Store the sender’s number into the phonebook
In idle, press right (MENU) and 4-way Key to select « SMS ».
Press right (OK) and to select « Inbox ».
Press right (OK) pour to display the most recent received SMS with the sender’s number,
received date and time, or press to display the sender’s number of next received SMS.
Press « Read » to display the text message content.
Press right (OK) and to select « Store number »
Press right (OK) and to edit the detail of sender.
Press right (OK) to confirm.
8. Delete the received text message
In idle, press right (MENU) and 4-way Key to select « SMS ».
Press right (OK) and to select « Inbox ».
Press right (OK) pour to display the most recent received SMS with the sender’s number,
received date and time, or press to display the sender’s number of next received SMS.
Press « Read » to display the text message content.
Press right (OPTION) and to select « Delete »
Press right (OK) to confirm.
Non binding document subject to modifications in the event of missprint (mktg 0109)
26
Page 28

9. Delete all the received text messages
In idle, press right (MENU) and 4-way Key to select « SMS ».
Press right (OK) and to select « Inbox ».
Press right (OK) pour to display the most recent received SMS with the sender’s number,
received date and time, or press to display the sender’s number of next received SMS.
Press « Read » to display the text message content.
Press right (OPTION) and to select « Delete all ».
Press right (OK) to confirm.
10. Review the Messages in the Outbox
In the Outbox, saved, sent and unsent messages are stored. When the Outbox is full, the new
message will replace the oldest message
In idle, press right (MENU) and 4-way Key to select « SMS ».
Press right (OK) and to select « Outbox »
Press right (OK) display the most recent SMS or press to display the next SMS.
NOTE : If the recipient’s number matches with the phonebook record, it will display the phonebook
name. The current SMS message number and the total number of SMS kept in the Outbox is
displayed at the right bottom of the message. E.g. 1/3 represents that the current text message is
message number 1 and three text messages are stored in the Outbox. SMS which has not been sent
successfully is indicated by «Failed» at the left bottom of the handset display. If the SMS has been
sent successfully, it will display «Sent». If the SMS is a stored message only, it will display «Saved».
Press « Edit » to edit the text message content.
You can now :
Send the message (cf. chapter X.1 p. 24)
Store the message (cf. chapter X.4 p. 25)
Delete selected message (cf. chapter X.9 p. 27)
Delete all the SMS kept in the outbox (cf. chapter X.10 p. 27)
11. Set the SMS Service Centre Numbers
IMPORTANT : You have to store the SMS Service Centre Numbers before sending or receiving SMS.
You can enter up to two SMS Service Centre Numbers for incoming messages (SMS Centre 2 and 4)
and up to two SMS Service Centre Numbers for outgoing messages (SMS Centre 1 and 3). Check
with your network service provider for the details of the SMS Service Centre Numbers information
In idle, press right (MENU) and 4-way Key to select « SMS ».
Press right (OK) and to select « SMS settings ».
Press right (OK) and to select « Service centre ».
Non binding document subject to modifications in the event of missprint (mktg 0109)
27
Page 29

Press right (OK) and to select a SMS Service Centre number.
Press right (OK) to enter the number for the selected SMS Service Centre number.
Press right (OK) to confirm.
12. Select the SMS Send Service Centre
Only those SMS service centers with numbers stored before will be displayed in the list
In idle, press right (MENU) and 4-way Key to select « SMS ».
Press right (OK) and to select « SMS settings ».
Press right (OK) and to select « Send service »
Press right (OK) and to select the SMS Send Service Centre.
Press right (OK) to confirm.
13. Turn On or Off the New SMS Alert
When a new SMS is received, a beep will sound, <New SMS icon> will display and the base
indication light will flash.
In idle, press right (MENU) and 4-way Key to select « SMS ».
Press right (OK) and to select « SMS settings ».
Press right (OK) and to select « New SMS alert »
Press right (OK) and to turn on or off the New SMS Alert.
Press right (OK) to confirm.
XI. Settings
Your phone comes with a selection of settings that you can change to personalize your phone the
way you like it to work
1. Handset Settings
- Enable the Direct Call
When activated, the direct call feature enables you to dial the selected number by pressing any key
on your handset. This feature is very useful for direct access to emergency service.
In idle, press right (MENU) and 4-way Key to select « Settings »
Press right (OK) and to select « HS settings »
Press right (OK) and to select « Direct call »
Press right (OK) to enter the 4-digit system PIN. (Default 4-digit system PIN is 0000)
Press right (OK) and to select « On » to enable the direct call.
Non binding document subject to modifications in the event of missprint (mktg 0109)
28
Page 30

Press right (OK) to enter the number for direct call.
Press right (OK) to return to Idle displaying with « Direct call »
- Disable the Direct Call
In idle, press right (MENU) and 4-way Key to select « Settings »
Press right (OK) and to select « HS settings »
Press right (OK) and to select « Direct call »
Press right (OK) to enter the 4-digit system PIN. (Default 4-digit system PIN is 0000)
Press right (OK) and to select « Off » to disable the direct call.
Press right (OK) to confirm.
- Set an alarm
In idle, press right (MENU) and 4-way Key to select « Settings »
Press right (OK) and to select « HS settings »
Press right (OK) and to select « Alarm »
Press right (OK) > to enter the alarm time using the 24 hour format
Press and turn on or off the alarm.
Press and to select the alarm melody.
Press right (OK) to confirm.
- Select base station
If your handset is registered to more than one base stations, you can select which base station to
use.
In idle, press right (MENU) and 4-way Key to select « Settings »
Press right (OK) and to select « HS settings »
Press right (OK) and to select « Select base ».
Press and select your desired base station.
Press right (OK) to confirm.
- Adjust the display contrast, rename handset
In idle, press right (MENU) and 4-way Key to select « Settings »
Press right (OK) and to select « HS settings »
Press right (OK) and to select « Display »
Press right (OK) and to select the contrast level from 1 to 8.
Press to rename the handset
Press right (CLEAR) to delete one character.
Press right (OK) to confirm.
Non binding document subject to modifications in the event of missprint (mktg 0109)
29
Page 31

- Set language
To change handset language.
In idle, press right (MENU) and 4-way Key to select « Settings »
Press right (OK) and to select « HS settings »
Press right (OK) and to select « Language ».
Press right (OK) and to select the desired language.
Press right (OK) to confirm.
- Turn on or off the auto answer.
In idle, press right (MENU) and 4-way Key to select « Settings »
Press right (OK) and to select « HS settings »
Press right (OK) and to select « Auto answer » .
Press right (OK) and turn on or off the Auto Answer feature.
Press right (OK) to confirm.
- Register an additional handset
You can register up to 5 handsets per base station Internal calls, calls forwards and conférence 3way conference are available.
In idle, press right (MENU) and 4-way Key to select « Settings »
Press right (OK) and to select « HS settings ».
Press right (OK) and to select « Register » .
Press right (OK) and to select the desired base station that you want your handset to
register to.
Press right (OK) to enter the 4-digit system PIN
NOTE : 4-digit PIN is entered in ****. Once 4 digits are entered, the right soft key will become OK.
Press and hold on the base station.
Press right (OK) to confirm.
Note: «Registering…» will display. A beep tone is emitted from the handset to indicate successful
registration and the screen returns to idle mode.
If the base is found and the PIN is correct, an unused handset number will be assigned
automatically.
If the PIN is incorrect, «Incorrect PIN» will display with an error tone, and the handset returns to
idle.
If no base is found within a certain period, «No Base Found» will display with an error tone, and
the handset returns to idle...
- De-Register a handset
In idle, press right (MENU) and 4-way Key to select « Settings »
Press right (OK) and to select « HS settings ».
Non binding document subject to modifications in the event of missprint (mktg 0109)
30
Page 32

Press right (OK) and to select « De-register ».
Press right(OK) to enter the 4-digit System PIN
NOTE : 4-digit PIN is entered in ****. Once 4 digits are entered, the right soft key will become OK
Appuyez sur droite (OK) et sur les touches pour sélectionner le combiné à supprimer.
NOTE : Only subscribed handsets are listed. The handset currently used cannot be de-registered.
Press right (OK) to confirm de-registration
«De-registered» will display and go back to idle.
- Restore the handset to default settings
In idle, press right (MENU) and 4-way Key to select « Settings »
Press right (OK) and to select « HS settings ».
Press right (OK) and to select « Hanset reset »
Press right (OK) and left (YES) confirm resetting the handset to default settings
NOTE : Phonebook and speed dial entries will not be deleted after handset reset.
2. Base Settings
- Set the handset priority
When you have more than one handset registered to the base station, you can set which handset to
ring first before the others
In idle, press right (MENU) and 4-way Key to select « Settings »
Press right (OK) and to select « Base settings »
Press right (OK) and to select «Handset priority ».
Press right (OK) and to select « Select handset ».
Press right (OK) and select which handset to get the priority to ring first.
NOTE : If «All Handsets» is chosen, all the registered handsets will ring at the same time
Press right (OK) to confirm.
Press right (OK) and to select the number of ring delay (2 Rings / 4 Rings / 6 Rings / 8
Rings).
Press right (OK) to confirm.
- Set the dial mode
In idle, press right (MENU) and 4-way Key to select « Settings »
Press right (OK) and to select « Base settings »
Press right (OK) and to select « Dial mode ».
Press right (OK) and to select Tone or Pulse.
Press right (OK) to confirm.
Non binding document subject to modifications in the event of missprint (mktg 0109)
31
Page 33

- Set the flash time
In idle, press right (MENU) and 4-way Key to select « Settings »
Press right (OK) and to select « Base settings »
Press right (OK) and to select « Flash time ».
Press right (OK) and to select the desired flash time
Press right (OK) to confirm.
- Set date and time
In idle, press right (MENU) and 4-way Key to select « Settings »
Press right (OK) and to select « Clock/Alarm »
Press right (OK) and to select « Date/Time »
Press right (OK) and pour select 12 hour or 24 hour format..
Press and to select dd/mm or mm/dd date format
Press to enter the time. During time input, press to toggle between AM or PM if 12 hour time
format is selected.
Press to enter the date.
Press right (OK) to confirm.
- Change the system PIN
The default system PIN is 0000. It is recommended to select another PIN system.
In idle, press right (MENU) and 4-way Key to select « Settings »
Press right (OK) and to select « Base settings »
Press right (OK) and to select « System Pin. »
Press right (OK) to enter the new 4-digit system PIN.
Press right (OK) to enter the new 4-digit system PIN again.
Press right (OK) to reconfirm and save the new 4-digit PIN
NOTE : If the PIN is incorrect, «INCORRECT PIN» will display with an error tone in the screen.
- Activate the ECO mode
Your telephone is provided with a low-emission mode. If ECO mode is activated, as soon as you
place the handset in the base station, the transmission power between handset and base station is
reduced to the minimum. This applies to base with single handset registration only. If more than
one handset is registered to the base station, the ECO mode will not work.
In idle, press right (MENU) and 4-way Key to select « Settings »
Press right (OK) and to select « Base settings »
Press right (OK) and to select « Eco mode ».
Non binding document subject to modifications in the event of missprint (mktg 0109)
32
Page 34

Press right (OK) to activate ECO mode.
Press right (OK) to confirm.
- Reset the base settings to default settings
In idle, press right (MENU) and 4-way Key to select « Settings »
Press right (OK) and to select « Base settings ».
Press right (OK) and to select « System reset ».
Press right (OK) to enter the 4-digit System PIN.
Press right (OK) and left (YES) to confirm resetting the base settings to default settings.
The base will restore to default settings and return to standby
XII. Answering machine. (Only available on TC151)
Your phone can digitally record up to 15 minutes of messages or up to 59 messages. Each incoming
message can last up to 1 minute in maximum
You can operate your answering machine from:
• the handset.
• the base
• remotely
1. Use the answering machine from the handset
- Switch the answering machine on / off
In idle, press right (MENU) and 4-way Key to select « Answer machine »
Press right (OK) and to select « Answer On/Off »
Press right (OK) and switch on/off answering machine. When switched on the handset
display shows icon.
- Record your own outgoing message
The outgoing message is the message a caller first hears when the answering machine picks up
his/her call. There are two pre-recorded outgoing messages. One for each of Ans & Record mode of
Answer Only mode to choose from or you can record your own
In idle, press right (MENU) and 4-way Key to select « Answer machine ».
Press right (OK) and to select « Outgoing message ».
Press right (OK) and to select « Record message ».
Press right (OK) and to select « Ans&Record. » or « Answer only ».
Non binding document subject to modifications in the event of missprint (mktg 0109)
33
Page 35

Playback the message through the speakerphone
Increase or decrease the playback volume.
Press to stop the message playback
During announcing the message number, press once to skip backward to play
Speak your announcement after the long beep.
Press right (SAVE) to stop recording.
Your message is then played back automatically. If you want to delete it, press left (DELETE)
during playback or press right (OK) to stop the outgoing message playback.
- Play and delete outgoing message
In idle, press right (MENU) and 4-way Key to select « Answer machine ».
Press right (OK) and to select « Outgoing message ».
Press right (OK) and to select « Play message »
Press right (OK) and to select « Ans&Record. » or « Answer only ».
Your message is then played back automatically. If you want to delete it, press left (DELETE)
during playback or press right (OK) to stop the outgoing message playback.
- Set the answering machine
In idle, press right (MENU) and 4-way Key to select « Answer machine ».
Press right (OK) and to select « Ans. Settings ».
Press right (OK) and to select « Ans&Record. » or « Answer only ».
Press and to set the number of rings for answer delay (Available options: Time Saver, 2
Rings, 4 Rings, 6 Rings and 8 Rings).
Press and to set the incoming message recording time (Available options: 60s, 120s and
180s)
Press and turn on or off the call screening feature.
Press right (OK) to confirm.
- Message playback
In idle, press right (MENU) and 4-way Key to select « Answer machine »
Press right (OK) and to select « Play message »
Press right (OK) to start playing new message (if there are new message received).
The handset displays the number or name of the caller if available, and the date and time it was
received.
During playback, you have the following options:
Key Function
Non binding document subject to modifications in the event of missprint (mktg 0109)
34
Page 36

the previous message.
After message number is announced, press once to repeat playing the current
message at the beginning
gauche
(EFFACER)
Delete the current message.
Skip forward to play the next message.
<Pause>
Pause the message playback.
<Play>
Resume message playback
Stop the current message playback and return to standby.
At the end of playback the handset will return to standby.
NOTE : If there are no messages in the answer machine, «No Message» will display on the handset
and the handset will return to previous screen.
- Delete all old messages
In idle, press right (MENU) and 4-way Key to select « Answer machine ».
Press right (OK) and to select « Delete Msg »
If there are no old messages, the display shows « No old messages ».
If there are old messages, the display shows « Delete all ? ».
Press YES to confirm.
NOTE :
When TAM memory is full :
If the phone is currently in Answer and Record mode and if a call is received, after seizing the line
and playing the relevant voice prompt, the unit will wait for 8 seconds to enter into remote access.
If TAM messages are deleted to free some space during remote access, when the call ends, the unit
will return to answer and record mode.
If the phone is currently in Answer Only mode, if a call is received, after seizing the line and playing
the relevant voice prompt, the unit will wait for 8 seconds to enter into remote access. If no
instruction of remote access is received, it will return to answer only mode.
2. Use the Answering Machine from the Base
- Switch on/off the answering machine
Press
Press
During playback, you have the following options :
Non binding document subject to modifications in the event of missprint (mktg 0109)
(on/off) turn on or off the answering machine.
- Message playback
PLAY. New messages are played first.
35
Page 37

Press once to delete the current message.
Press twice consecutively to delete all old messages
Pause or resume message playback.
During announcing the message number, press once to skip backward to play
the previous message.
message at the beginning.
Skip forward to next message.
Stop the current message playback.
<Vol + / Vol ->
Increase or decrease the speaker volume during message playback.
Key Function
After message number is announced, press once to repeat playing the current
- Call Screening
When the answering machine is on and takes a call, you can listen to the caller leaving a message.
You can then identify the caller and decide whether to take the call in person.
The call can be heard through the base speaker, or the handset as follows :
When your handset rings, wait for the answering machine to take the call. When the caller starts to
leave a message, the display shows « Screening ? ». Press YES to hear the caller or press to stop
screening without talking to the caller.
During call screening, press adjust the speaker volume level from level 1 to level 5.
Press to interrupt and speak to the caller directly.
3. Remote Access
You can operate your answering machine from any phone by calling your phone and entering a 4digit security code.
- Enable/Disable remote access
In idle, press right (MENU) and 4-way Key to select « Answer machine ».
Press right (OK) and to select « Remote access »
Press right (OK) and to disable or enable the remote access.
If you select « Enable », the display asks you to enter the Remote access PIN. Enter the current 4digit PIN. (The default remote access PIN is 0000).
NOTE : You have to change the remote access PIN from 0000 in order to use this feature.
Enter a new 4-digit PIN and press right (OK).
Enter the new 4-digit PIN again.
Press right (OK) to confirm.
Non binding document subject to modifications in the event of missprint (mktg 0109)
36
Page 38

Key
Function
1
Play the remote access menu
2
Play all messages
3
Play new messages
4
Press once to repeat playing the current message from the
beginning. Press twice to skip backward to previous message.
5
Delete current message
6
Skip forward to next message
7
Access answer mode
8
Play OGM
9
Record OGM
0
Turn on or off the answering machine
*
Enter the remote access code if the answering machine is on
and outgoing message is playing.
#
Stop recording outgoing message.
- Activate remote access if the answering machine is off
Call your number from another phone and let it ring. After 20 rings, the answering machine will
switch on and answer your call.
Enter your remote access PIN. Play back your messages
If you do not choose to switch your answering machine on, it will switch off when the call is ended.
- Operating your answering machine remotely
your phone number. When you hear your outgoing message, press . You will hear “Please enter
your security code”
Enter your 4 digit Remote Access PIN. You will hear, “You have X new messages”. If you only have
old messages, you will hear “You have X messages” followed by “To hear main menu, press 1 ».
NOTE : If you enter the incorrect PIN code you will be allowed one further attempt. If it is still
incorrect, you will hear “Thank you for calling”, and your phone will hang up.
When you have accessed your phone, you can use the keypad to operate your answering machine.
Follow the announcements and instructions you hear :
NOTE : If no button is pressed for 8 seconds or more, your phone will hang up.
Non binding document subject to modifications in the event of missprint (mktg 0109)
37
Page 39

Main
SMS
Answer
Phonebook
Sound
HS Settings
Base
Write New SMS
Inbox
Play Messages
Delete Msg
Phonebook
entries
Ringer
Tones
Direct Call
Alarm
De-Register
Handset Reset
Ringer
Ring Priority
ECO Mode
System Reset
Left / Phonebook
Delete
Delete All
Details
Delete
New Entry
Capacity
New Entry
Edit Entry
Edit Call Gp
Speed Dial
<UP/DOWN>
<UP/DOWN>
Key Press
XIII. Menu Structure
In idle mode, press right (MENU) will firstly access the SMS menu. Press will access the Call
List. Refer to the following for the menu structure. Press will access the Redial List.
<MENU>
<UP/DOWN>
<UP/DOWN>
Menu
Machine
Sub
menu
Outbox
Template
SMS Settings
Answer On/Off
Outgoing Msg
Ans. Settings
Remote Access
Select Base
Display
Language
Auto Answer
Register
The following menus can be accessed by pressing relevant keys in idle mode:
Keys UP/REDIAL Down / Call List
Left / Phonebook
or
List Empty or
Display Redial List
List Empty or
Display Call List
List Empty Display
Phonebook entries
Sub menu
Call Number
Store Number
Delete All
Call Number
Store Number
Settings
View
Copy
Copy All
Delete Entry
Delete All
Capacity
Settings
Dial Mode
Flash Time
Date/Time
System PIN
Exchange Code
Non binding document subject to modifications in the event of missprint (mktg 0109)
38
Page 40

XIV. Default Settings
Items
Default Values
SMS
Service Centre 1
-
Service Centre 2
-
New SMS Alert
On
Answer Machine
Answer On/Off
On
Answer Mode
Ans & Rec
Answer Delay
Country Dependent
Recording Time
60s
Call Screening
On
Remote Access
Enable
Call List
All Calls or Unanswered Calls
Only
All Calls
New Call Alert
On
Sound
External Ringer Melody
Melody 1
Internal Ringer Melody
Melody 2
Ringer Volume
Level 3
Silence
Off
Key Beep Tone
On
Confirmation Tone
On
Low Battery Tone
On
Out of Range Tone
On
Handset Settings
Direct Call
Off
Contrast
Level 5
Handset Rename
Empty
Wallpaper
Wallpaper 1
Colour Theme
Theme 1
Language
Country Dependent
Auto Answer
On
Base Settings
Ringer Melody
Melody 1
Ringer Volume
Level 2
Handset Priority
All Handsets
Dial Mode
Tone
Flash Time
Country Dependent
System PIN
0000
Exchange Code
Empty
Non binding document subject to modifications in the event of missprint (mktg 0109)
39
Page 41

a. The connection cord of the base
AS)
a. Check the connections. Unplug
and plug back in the mains.
c. Wait until the line is unoccupied.
d. Use the original connection cord.
When connect to a PBX, no and/or
wrong connection after dialing.
Dialing prefix is needed.
Insert the dialing prefix
is displayed.
Base station out of range.
Base station not connected to mains.
Reduce the range.
Connect base station to mains.
The call does not work.
Service not activated or wrong
operator or wrong setting
Check your Subscription with network
or change the dial mode.
No display.
Empty battery
Recharge battery
XV. Troubleshooting :
If you have difficulty with your phone, please try the suggestions listed below..
Problem Cause Solutions
No dialing tone when pressing <TALK
ON> key
"Searching"
station is not plugged in.
b. The adapter cord is not plugged
in correctly in the base station.
c. The line is busy, as another
handset is used.
d. Wrong connection cord (no Euro
Check that the telephone line
cord has been plugged into the
base station and the phone
socket.
b. Check the base station plug and
the 220V plug (remove and plugin).
Please contact the technical support of the network provider for further information.
This telephone is not equipped with a grounding function! Therefore some of the functions may be
limited when used in PBX systems.
- Conformity
This unit conforms to the following rules and regulations:1995/5/EC Radio frequency and
telecommunication equipment and the mutual acceptance of conformity.The CE mark proves the
above
Non binding document subject to modifications in the event of missprint (mktg 0109)
40
Page 42

XVI. Warranty
The warranty concern is on the product but not the accessories.
Are considered as accessories :
Rechargeable batteries
Power supply adaptor
Line phone cable.
Please contact the shop where you bought the product to buy the accessories recommended by the
manufacturer.
Warranty duration
This product is covered by 12 month warranty duration. The warranty period starts the day the
product has been purchased.
You will have to prove the warranty with the original invoice or the receipt or any documents on
which the purchasing date appears.
Coverage
A defective product shall be returned to the distributor with all the accessories, instruction manual
and gift box together with a note to explain the default.
The date you purchased the product defines the day the warranty period starts.
The warranty period is not extended in case of repairing or exchange by our after sales service.
Exclusions
Damage or defaults caused by a non appropriated use of the product and the use of other
accessories than those provided with the product or recommended by the manufacturer and in this
instruction manual are not covered by the warranty.
The warranty doesn’t cover damages caused by lightning, water or fire or any other damage caused
during transportation.
The warranty will be cancelled if the serial number of this product has been removed, modified,
deleted or is illegible.
The warranty will also be cancelled if this product has been repaired, modified or affected by a
third party and non authorized person, service or company.
Non binding document subject to modifications in the event of missprint (mktg 0109)
41
Page 43

Conformity
This product is conform to the CE norms :
EN 60950 2000 Article No 3(1) (a) of R&TTE Directive 1999/5/EC
Article No 4 of Low Voltage Directive 73/23/EEC
EN 301 489-1 2000 Article No 3(1) (b) of R&TTE Directive 1999/5/EC
EN 301 489-6 2000 Article No 4 of EMC Directive 89/336/EEC
EN 301 406 2001 Article No 3(2) of R&TTE Directive 1999/5/EC
Non binding document subject to modifications in the event of missprint (mktg 0109)
42
 Loading...