

Page 1

Service Manual
TR 210 Huntron Tracker
071-0113-00
Warning
The servicing instructions are for use by qualified
personnel only. To avoid personal injury, do not
perform any servicing unless you are qualified to
do so. Refer to all safety summaries prior to
performing service.
Page 2

Copyright T ektronix, Inc. All rights reserved.
T ektronix products are covered by U.S. and foreign patents, issued and pending. Information in this publication supercedes
that in all previously published material. Specifications and price change privileges reserved.
Printed in the U.S.A.
T ektronix, Inc., P.O. Box 1000, Wilsonville, OR 97070–1000
TEKTRONIX and TEK are registered trademarks of T ektronix, Inc.
Huntron and Tracker are registered trademarks of Huntron, Inc.
Page 3

WARRANTY
T ektronix warrants that the products that it manufactures and sells will be free from defects in materials and workmanship
for a period of one (1) year from the date of shipment. If a product proves defective during this warranty period, T ektronix,
at its option, either will repair the defective product without charge for parts and labor, or will provide a replacement in
exchange for the defective product.
In order to obtain service under this warranty, Customer must notify Tektronix of the defect before the expiration of the
warranty period and make suitable arrangements for the performance of service. Customer shall be responsible for
packaging and shipping the defective product to the service center designated by T ektronix, with shipping charges prepaid.
T ektronix shall pay for the return of the product to Customer if the shipment is to a location within the country in which the
T ektronix service center is located. Customer shall be responsible for paying all shipping charges, duties, taxes, and any
other charges for products returned to any other locations.
This warranty shall not apply to any defect, failure or damage caused by improper use or improper or inadequate
maintenance and care. T ektronix shall not be obligated to furnish service under this warranty a) to repair damage resulting
from attempts by personnel other than T ektronix representatives to install, repair or service the product; b) to repair
damage resulting from improper use or connection to incompatible equipment; c) to repair any damage or malfunction
caused by the use of non-T ektronix supplies; or d) to service a product that has been modified or integrated with other
products when the effect of such modification or integration increases the time or difficulty of servicing the product.
THIS WARRANTY IS GIVEN BY TEKTRONIX IN LIEU OF ANY OTHER WARRANTIES, EXPRESS OR
IMPLIED. TEKTRONIX AND ITS VENDORS DISCLAIM ANY IMPLIED WARRANTIES OF
MERCHANTABILITY OR FITNESS FOR A PARTICULAR PURPOSE. TEKTRONIX’ RESPONSIBILITY TO
REP AIR OR REPLACE DEFECTIVE PRODUCTS IS THE SOLE AND EXCLUSIVE REMEDY PROVIDED TO
THE CUSTOMER FOR BREACH OF THIS WARRANTY. TEKTRONIX AND ITS VENDORS WILL NOT BE
LIABLE FOR ANY INDIRECT , SPECIAL, INCIDENTAL, OR CONSEQUENTIAL DAMAGES IRRESPECTIVE
OF WHETHER TEKTRONIX OR THE VENDOR HAS ADVANCE NOTICE OF THE POSSIBILITY OF SUCH
DAMAGES.
Page 4

Page 5

Table of Contents
Specifications
Operating Basics
General Safety Summary v. . . . . . . . . . . . . . . . . . . . . . . . . . . . . . . . . . . .
Service Safety Summary vii. . . . . . . . . . . . . . . . . . . . . . . . . . . . . . . . . . . . .
Preface ix. . . . . . . . . . . . . . . . . . . . . . . . . . . . . . . . . . . . . . . . . . . . . . . . . . .
Related Manuals ix. . . . . . . . . . . . . . . . . . . . . . . . . . . . . . . . . . . . . . . . . . . . . . . . . .
Contacting T ektronix ix. . . . . . . . . . . . . . . . . . . . . . . . . . . . . . . . . . . . . . . . . . . . . .
Electrical Specifications 1–1. . . . . . . . . . . . . . . . . . . . . . . . . . . . . . . . . . . . . . . . . . . .
Mechanical Specifications 1–2. . . . . . . . . . . . . . . . . . . . . . . . . . . . . . . . . . . . . . . . . .
Environmental Specifications 1–2. . . . . . . . . . . . . . . . . . . . . . . . . . . . . . . . . . . . . . .
Certifications and Compliances 1–3. . . . . . . . . . . . . . . . . . . . . . . . . . . . . . . . . . . . . .
Installation 2–1. . . . . . . . . . . . . . . . . . . . . . . . . . . . . . . . . . . . . . . . . . . . . . . .
Power Configuration 2–1. . . . . . . . . . . . . . . . . . . . . . . . . . . . . . . . . . . . . . . . . . . . . .
Oscilloscope Connection 2–2. . . . . . . . . . . . . . . . . . . . . . . . . . . . . . . . . . . . . . . . . . .
Operation 2–3. . . . . . . . . . . . . . . . . . . . . . . . . . . . . . . . . . . . . . . . . . . . . . . . .
Front-Panel Controls and Connectors 2–3. . . . . . . . . . . . . . . . . . . . . . . . . . . . . . . . .
Operational Check Procedure 2–4. . . . . . . . . . . . . . . . . . . . . . . . . . . . . . . . . . . . . . .
Theory of Operation
Front Panel Module 3–1. . . . . . . . . . . . . . . . . . . . . . . . . . . . . . . . . . . . . . . . . . . . . . .
Main Board Module 3–1. . . . . . . . . . . . . . . . . . . . . . . . . . . . . . . . . . . . . . . . . . . . . . .
Line Filter Module 3–2. . . . . . . . . . . . . . . . . . . . . . . . . . . . . . . . . . . . . . . . . . . . . . . .
Rear Panel Module 3–2. . . . . . . . . . . . . . . . . . . . . . . . . . . . . . . . . . . . . . . . . . . . . . . .
Performance Verification
Equipment Required 4–1. . . . . . . . . . . . . . . . . . . . . . . . . . . . . . . . . . . . . . . . . . . . . . .
Preparation 4–2. . . . . . . . . . . . . . . . . . . . . . . . . . . . . . . . . . . . . . . . . . . . . . . . . . . . . .
Logic Section 4–2. . . . . . . . . . . . . . . . . . . . . . . . . . . . . . . . . . . . . . . . . . . . . . . . . . . .
Signal Section 4–4. . . . . . . . . . . . . . . . . . . . . . . . . . . . . . . . . . . . . . . . . . . . . . . . . . . .
Pulse Generator Section 4–8. . . . . . . . . . . . . . . . . . . . . . . . . . . . . . . . . . . . . . . . . . . .
Adjustment Procedures
Equipment Required 5–1. . . . . . . . . . . . . . . . . . . . . . . . . . . . . . . . . . . . . . . . . . . . . . .
Preparation 5–1. . . . . . . . . . . . . . . . . . . . . . . . . . . . . . . . . . . . . . . . . . . . . . . . . . . . . .
Adjustment Procedure 5–3. . . . . . . . . . . . . . . . . . . . . . . . . . . . . . . . . . . . . . . . . . . . .
TR 210 Service Manual
i
Page 6

Table of Contents
Maintenance
Maintenance 6–1. . . . . . . . . . . . . . . . . . . . . . . . . . . . . . . . . . . . . . . . . . . . . . .
Preparation 6–1. . . . . . . . . . . . . . . . . . . . . . . . . . . . . . . . . . . . . . . . . . . . . . . . . . . . . .
Inspection and Cleaning 6–2. . . . . . . . . . . . . . . . . . . . . . . . . . . . . . . . . . . . . . . . . . . .
Removal and Installation Procedures 6–5. . . . . . . . . . . . . . . . . . . . . . . . . .
Equipment Required 6–5. . . . . . . . . . . . . . . . . . . . . . . . . . . . . . . . . . . . . . . . . . . . . . .
Line Fuse 6–6. . . . . . . . . . . . . . . . . . . . . . . . . . . . . . . . . . . . . . . . . . . . . . . . . . . . . . .
Signal Fuse 6–6. . . . . . . . . . . . . . . . . . . . . . . . . . . . . . . . . . . . . . . . . . . . . . . . . . . . . .
Front Panel Knobs 6–7. . . . . . . . . . . . . . . . . . . . . . . . . . . . . . . . . . . . . . . . . . . . . . . .
T op Cover 6–7. . . . . . . . . . . . . . . . . . . . . . . . . . . . . . . . . . . . . . . . . . . . . . . . . . . . . . .
Line Filter 6–8. . . . . . . . . . . . . . . . . . . . . . . . . . . . . . . . . . . . . . . . . . . . . . . . . . . . . . .
Rear Panel Assembly 6–8. . . . . . . . . . . . . . . . . . . . . . . . . . . . . . . . . . . . . . . . . . . . . .
Front Panel Assembly 6–9. . . . . . . . . . . . . . . . . . . . . . . . . . . . . . . . . . . . . . . . . . . . .
Front Panel Potentiometers and Elastomer 6–9. . . . . . . . . . . . . . . . . . . . . . . . . . . . .
Main Board 6–9. . . . . . . . . . . . . . . . . . . . . . . . . . . . . . . . . . . . . . . . . . . . . . . . . . . . . .
Options Replaceable Electrical Parts Diagrams Replaceable Mechanical Parts
ii
TR 210 Service Manual
Page 7

List of Figures
Table of Contents
Figure 2–1: TR 210 rear panel 2–1. . . . . . . . . . . . . . . . . . . . . . . . . . . . . . . .
Figure 2–2: Connecting the TR 210 Huntron Tracker to an
oscilloscope 2–2. . . . . . . . . . . . . . . . . . . . . . . . . . . . . . . . . . . . . . . . . . . . .
Figure 2–3: Front panel 2–3. . . . . . . . . . . . . . . . . . . . . . . . . . . . . . . . . . . . .
Figure 2–4: Typical open-circuit signature 2–5. . . . . . . . . . . . . . . . . . . . . .
Figure 2–5: Typical short-circuit signature 2–5. . . . . . . . . . . . . . . . . . . . . .
Figure 3–1: TR 210 block diagram 3–1. . . . . . . . . . . . . . . . . . . . . . . . . . . .
Figure 4–1: Pulse types 4–10. . . . . . . . . . . . . . . . . . . . . . . . . . . . . . . . . . . . . .
Figure 5–1: TR 210 adjustment locations and test points 5–3. . . . . . . . . .
Figure 6–1: Accessing the line fuse and spare fuse (159-0414-00) 6–6. . . .
Figure 6–2: Signal fuse (159-0312-00) 6–6. . . . . . . . . . . . . . . . . . . . . . . . . .
Figure 6–3: Retainer clips 6–7. . . . . . . . . . . . . . . . . . . . . . . . . . . . . . . . . . . .
Figure 6–4: Line filter 6–8. . . . . . . . . . . . . . . . . . . . . . . . . . . . . . . . . . . . . . .
Figure 10–1: TR 210 replaceable parts and accessories 10–1. . . . . . . . . . .
TR 210 Service Manual
iii
Page 8

Table of Contents
List of Tables
Table 1–1: Electrical specifications 1–1. . . . . . . . . . . . . . . . . . . . . . . . . . . .
Table 1–2: Mechanical specifications 1–2. . . . . . . . . . . . . . . . . . . . . . . . . .
Table 1–3: Environmental specifications 1–2. . . . . . . . . . . . . . . . . . . . . . .
Table 1–4: Certifications and compliances 1–3. . . . . . . . . . . . . . . . . . . . . .
Table 2–1: Front-panel controls and connectors 2–3. . . . . . . . . . . . . . . . .
Table 4–1: Test equipment, fixtures, and supplies 4–1. . . . . . . . . . . . . . . .
Table 5–1: Test equipment, fixtures, and supplies 5–1. . . . . . . . . . . . . . . .
Table 6–1: Internal inspection check list 6–3. . . . . . . . . . . . . . . . . . . . . . .
Table 6–2: Tools required for module removal 6–5. . . . . . . . . . . . . . . . . .
Table 7–1: Power cord identification 7–1. . . . . . . . . . . . . . . . . . . . . . . . . .
iv
TR 210 Service Manual
Page 9

General Safety Summary
Review the following safety precautions to avoid injury and prevent damage to
this product or any products connected to it. To avoid potential hazards, use this
product only as specified.
Only qualified personnel should perform service procedures.
To Avoid Fire or
Personal Injury
Use Proper Power Cord. Use only the power cord specified for this product and
certified for the country of use.
Use Proper V oltage Setting. Before applying power, ensure that the line selector is
in the proper position for the power source being used.
Ground the Product. This product is grounded through the grounding conductor
of the power cord. To avoid electric shock, the grounding conductor must be
connected to earth ground. Before making connections to the input or output
terminals of the product, ensure that the product is properly grounded.
Observe All Terminal Ratings. To avoid fire or shock hazard, observe all ratings
and markings on the product. Consult the product manual for further ratings
information before making connections to the product.
The common terminal is at ground potential. Do not connect the common
terminal to elevated voltages.
Use Proper Fuse. Use only the fuse type and rating specified for this product.
Avoid Exposed Circuitry. Do not touch exposed connections and components
when power is present.
Do Not Operate in Wet/Damp Conditions.
Do Not Operate in an Explosive Atmosphere.
Symbols and Terms
TR 210 Service Manual
T erms in this Manual. These terms may appear in this manual:
WARNING. Warning statements identify conditions or practices that could result
in injury or loss of life.
CAUTION. Caution statements identify conditions or practices that could result in
damage to this product or other property.
v
Page 10

General Safety Summary
T erms on the Product. These terms may appear on the product:
DANGER indicates an injury hazard immediately accessible as you read the
marking.
WARNING indicates an injury hazard not immediately accessible as you read the
marking.
CAUTION indicates a hazard to property including the product.
Symbols on the Product. The following symbols may appear on the product:
WARNING
High Voltage
Protective Ground
(Earth) T erminal
CAUTION
Refer to Manual
Double
Insulated
vi
TR 210 Service Manual
Page 11

Service Safety Summary
Only qualified personnel should perform service procedures. Read this Service
Safety Summary and the General Safety Summary before performing any service
procedures.
Do Not Service Alone. Do not perform internal service or adjustments of this
product unless another person capable of rendering first aid and resuscitation is
present.
Disconnect Power. To avoid electric shock, disconnect the mains power by means
of the power cord or the power switch.
Use Care When Servicing With Power On. Dangerous voltages or currents may
exist in this product. Disconnect power, remove battery (if applicable), and
disconnect test leads before removing protective panels, soldering, or replacing
components.
To avoid electric shock, do not touch exposed connections.
TR 210 Service Manual
vii
Page 12

Service Safety Summary
viii
TR 210 Service Manual
Page 13

Preface
Related Manuals
Contacting Tektronix
This manual provides information to troubleshoot and repair the TR 210 Huntron
Tracker to the module level.
Additional documentation for the instrument is contained in the TR 210 Huntron
Tracker User Manual (part number 071-0114-XX).
Product
Support
Service
Support
For other
information
To write us Tektronix, Inc.
For application-oriented questions about a Tektronix measurement product, call toll free in North America:
1-800-TEK-WIDE (1-800-835-9433 ext. 2400)
6:00 a.m. – 5:00 p.m. Pacific time
Or contact us by e-mail:
tm_app_supp@tek.com
For product support outside of North America, contact your
local Tektronix distributor or sales office.
Contact your local Tektronix distributor or sales office. Or visit
our web site for a listing of worldwide service locations.
http://www.tek.com
In North America:
1-800-TEK-WIDE (1-800-835-9433)
An operator will direct your call.
P.O. Box 1000
Wilsonville, OR 97070-1000
TR 210 Service Manual
ix
Page 14

Preface
x
TR 210 Service Manual
Page 15

Page 16

Specifications
This chapter contains the specifications for the TR 210 Huntron Tracker. All
specifications are guaranteed unless noted as “typical.” Typical specifications are
provided for your convenience but are not guaranteed.
Electrical Specifications
Table 1–1 lists the electrical specifications for the TR 210 Huntron Tracker.
T able 1–1: Electrical specifications
Test Signal
Signal Type Sine wave
Ranges
Open Circuit Voltage (Vs), typical Source Resistance (Rs), typical
HIGH
MED 2
MED 1
LOW 2
LOW 1
Frequency 50/60 Hz (switch selectable), 200 Hz, or 2 kHz
Channels 2
Display Modes A, B, or ALT
Signal Fuse (overload protection) 5 mm x 20 mm, F250 mA, 250 V, (IEC127–2/II, type GDB), user replaceable
Overvoltage Category CA T I
Pulse Generator
Outputs 2
Level Range, typical 0 V to ± 5 V
DC Mode ± DC level
Pulse Mode ± or composite
Frequency Matches selected test signal frequency
Width (pulse mode), typical 2% to 50% duty cycle
Source Resistance, typical 100 (each output)
Short Circuit Current 50 mA maximum (each output)
60 V
20 V
15 V
10 V
3 V
pk
pk
pk
pk
pk
74 k
27.6 k
1.24 k
54
10 k
TR 210 Service Manual
1–1
Page 17

Specifications
T able 1–1: Electrical specifications (Cont.)
Power Requirements
Line Voltage 100/1 15 VAC or 230 VAC, selector switch on rear panel
Frequency 50 Hz to 60 Hz
Power 15 W maximum
Line Fuse 100/1 15 V: 5 mm x 20 mm, T125 mA, 250 V,(IEC127-2/III, type GDC), user replaceable
230 V: 5 mm x 20 mm, T125 mA, 250 V,(IEC127-2/III, type GDC), user replaceable
Mechanical Specifications
Table 1–2 lists the mechanical specifications for the TR 210 Huntron Tracker.
T able 1–2: Mechanical specifications
Dimensions (W x H x D) 11.5 in x 2.7 in x 10.2 in (29.1 cm x 6.9 cm x 25.9 cm)
Weight 4.6 lbs. (2.1 kg)
Shipping Weight Approximately 7 lbs. (3 kg)
Environmental Specifications
Table 1–3 lists the environmental specifications for the TR 210 Huntron Tracker.
T able 1–3: Environmental specifications
Application Indoor use
Altitude < 2000 m (< 6560 ft)
Operating Temperature 0 °C to +40 °C (32 °F to 104 °F)
Storage Temperature –50 °C to +60 °C (–58 °F to 140 °F)
Relative Humidity < 80% up to 31 °C, derated linearly to 50% at 40 °C
1–2
TR 210 Service Manual
Page 18

Certifications and Compliances
Table 1–4 lists the certifications and compliances for the TR 210 Huntron
Tracker.
T able 1–4: Certifications and compliances
Characteristic Description
Specifications
EC Declaration of Conformity –
EMC
EC Declaration of Conformity –
Low Voltage
Approvals UL3111-1 – Standard for electrical measuring and test equipment
Installation Category Descriptions Terminals on this product may have different installation category designations. The installation
Pollution Degree 2
Meets intent of Directive 89/336/EEC for Electromagnetic Compatibility. Compliance was
demonstrated to the following specifications as listed in the Official Journal of the European
Communities:
EN 50081-1 Emissions:
EN 55011 Class B Radiated and Conducted Emissions
EN 50082-1 Immunity:
IEC 1000-4-2 Electrostatic Discharge Immunity
IEC 1000-4-3 RF Electromagnetic Field Immunity
IEC 1000-4-4 Electrical Fast Transient/Burst Immunity
IEC 1000-4-5 Power Line Surge Immunity
Compliance was demonstrated to the following specification as listed in the Official Journal of the
European Communities:
Low Voltage Directive 73/23/EEC, as amended by 93/68/EEC
EN 61010-1:1993 Safety requirements for electrical equipment for measurement,
control, and laboratory use
CAN/CSA C22.2 No. 1010.1 – Safety requirements for electrical equipment for measurement,
control and laboratory use
categories are:
CA T III Distribution-level mains (usually permanently connected). Equipment at this level is
typically in a fixed industrial location
CA T II Local-level mains (wall sockets). Equipment at this level includes appliances, portable
tools, and similar products. Equipment is usually cord-connected
CA T I Secondary (signal level) or battery operated circuits of electronic equipment
TR 210 Service Manual
1–3
Page 19

Specifications
1–4
TR 210 Service Manual
Page 20

Page 21
Installation
Power Configuration
This section describes how to configure the TR 210 Huntron Tracker and connect
it to an oscilloscope.
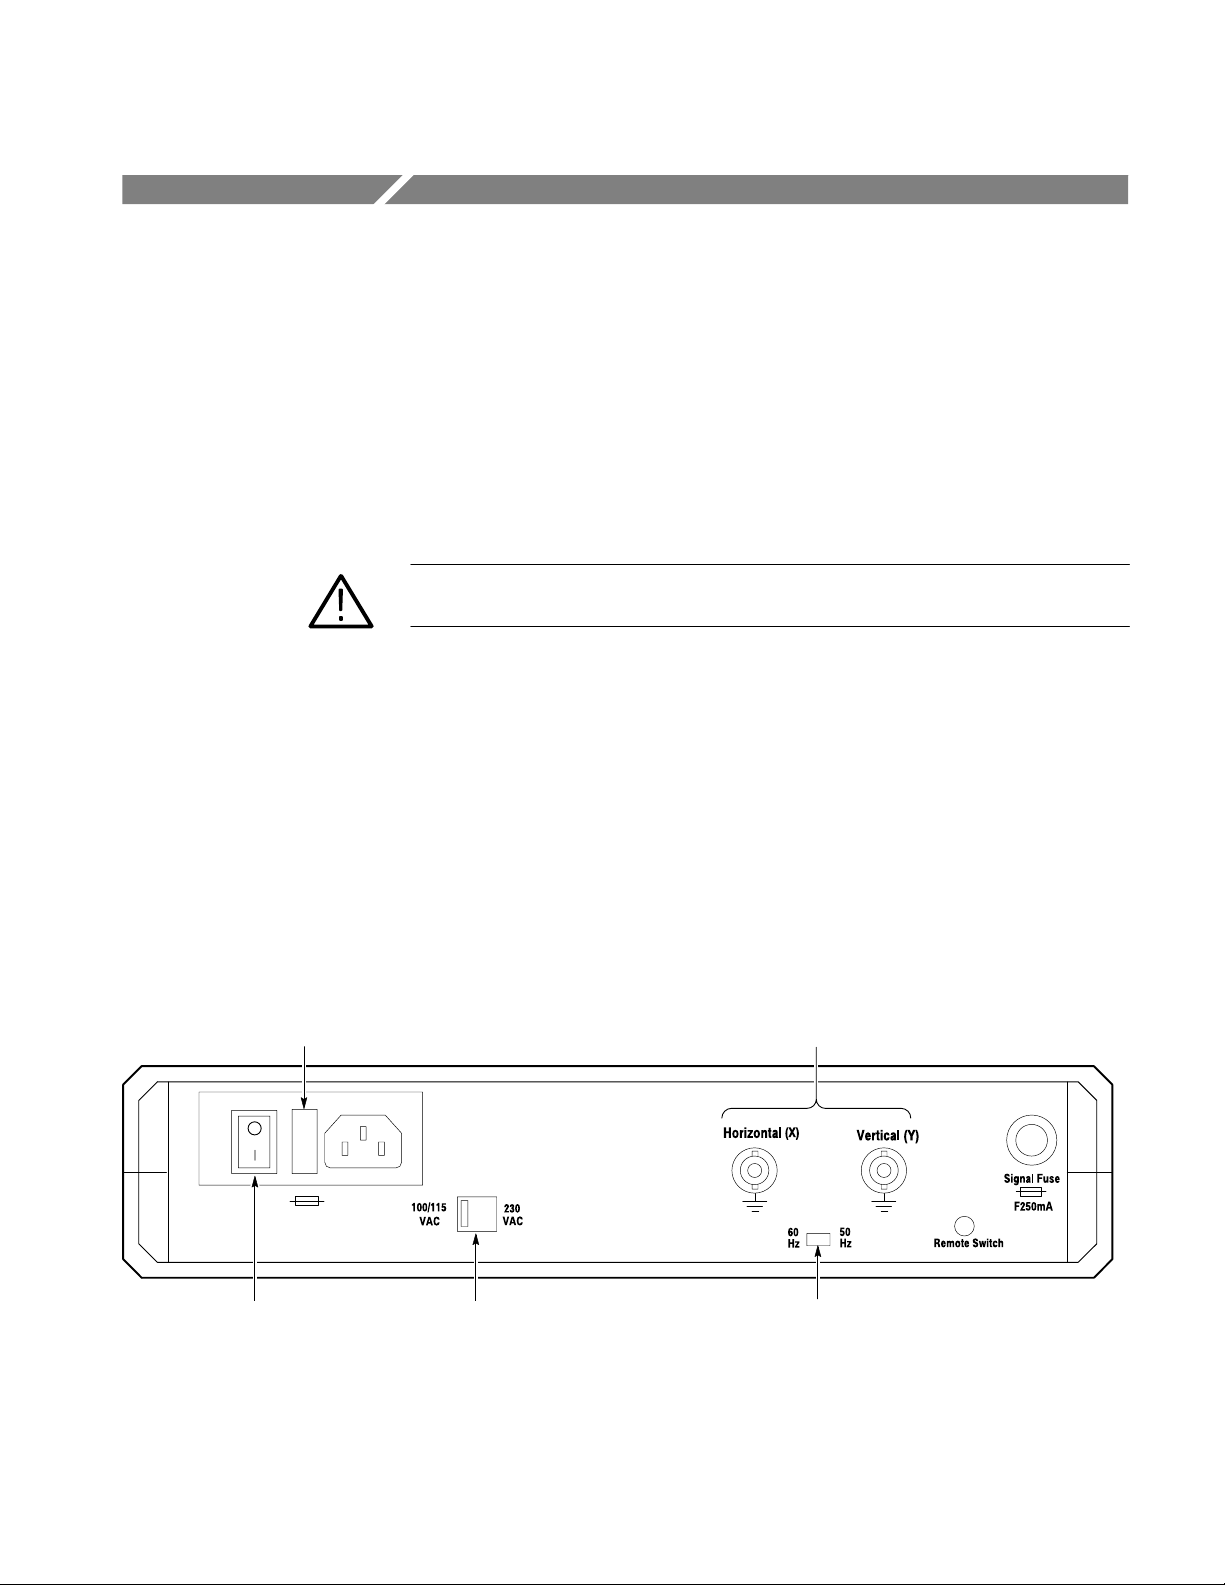
For the following discussion, refer to Figure 2–1 for the location of the rear
panel features.
CAUTION. To avoid product damage, set the line selector switch to the correct
position and install the correct fuse before applying line power.
Line Selector Switch
Line Fuse
50/60 Hz Selector Switch
Line fuse
Set the line selector switch to the correct position for 100/115 V
operation.
The power entry module has a removeable tray that contains the line fuse and a
spare fuse. Install the correct line fuse according to the specification on
page 1–2. To replace the fuse, see Figure 6–1 on page 6–6.
Set the 50/60 Hz selector switch, located on the rear panel, to the setting that
matches your line frequency.
To oscilloscope X and Y inputs
or 230 V
AC
AC
Power switch Line voltage
Figure 2–1: TR 210 rear panel
TR 210 Service Manual
Line frequency
2–1
Page 22
Installation
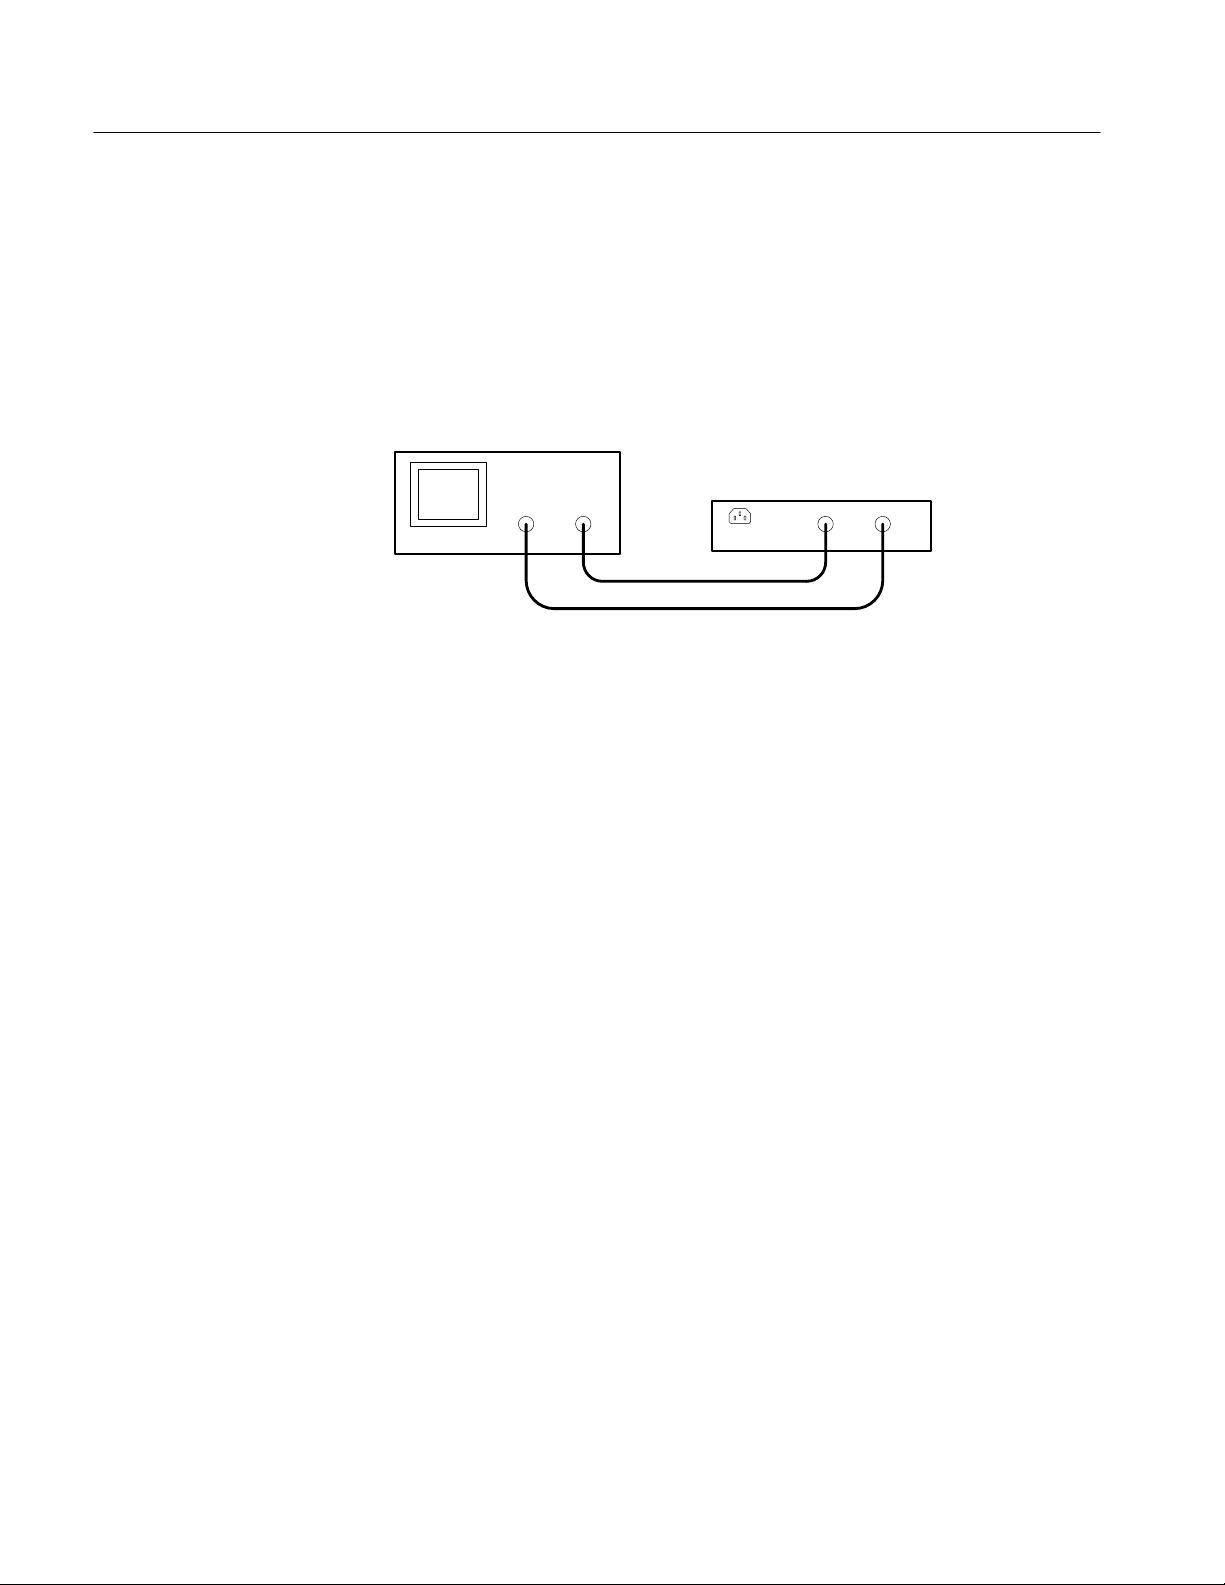
Oscilloscope Connection
The TR 210 Huntron Tracker works with an analog or digital oscilloscope to
display component signatures. The oscilloscope must be capable of displaying an
untriggered XY waveform that is generated by the TR 210 Huntron Tracker.
Connect the TR 210 Huntron Tracker to the oscilloscope as shown in Figure 2–2.
Figure 2–2: Connecting the TR 210 Huntron Tracker to an oscilloscope
Test oscilloscope
TR 210 (rear)
(Y)
(X)
When operating the TR 210 Huntron Tracker, set the oscilloscope to the
following settings:
1. Set the channel 1 and channel 2 vertical scale to 1 V/div.
2. Set the channel 1 and channel 2 vertical positions to center screen.
3. Set the time base to 5 ms/div.
4. Set the trigger source to channel 1.
5. Turn on XY display mode.
2–2
TR 210 Service Manual
Page 23

Operation
This section briefly describes the TR 210 operation. For more information, refer
to the TR 210 User Manual.
Front-Panel Controls and Connectors
Figure 2–3 identifies the front-panel controls and connectors that are described in
Table 2–1.
12 3
Figure 2–3: Front panel
5 67 89104
16
T able 2–1: Front-panel controls and connectors
Name Function
1 Channel A test terminal Safety shrouded banana jack for the channel A test
signal.
2 G1 terminal Pulse generator output for channel A (electrically
connected to G2 terminal).
1112131415
TR 210 Service Manual
3 RATE control Controls the speed of channel alternation or range
scanning.
4 Channel A button Selects channel A for display on the oscilloscope.
5 SCAN button Initiates automatic scanning of the five ranges from
LOW 1 to HIGH. The RATE control determines the
scanning speed.
6 Range selector buttons Select one of the five ranges: LOW 1, LOW 2, MED 1,
MED 2, or HIGH.
2–3
Page 24

Operation
T able 2–1: Front-panel controls and connectors (Cont.)
FunctionName
7 NO HIGH button Prevents entering the HIGH range either manually or
during scanning.
8 LEVEL control Sets the pulse generator output amplitude.
9 G2 terminal Pulse generator output for channel B (electrically
connected to G1 terminal).
10 Channel B terminal Safety shrouded banana jack for the channel B test
signal.
11 COM terminal Safety shrouded banana jack that is the instrument
common.
12 WIDTH terminal Controls the pulse generator duty cycle.
13 Pulse generator buttons Select the output modes for the pulse generator: + pulse,
– pulse, composite + and – pulse, or DC level. The
PULSE/DC button lights steadily when the pulse
generator output is DC. The PULSE/DC button flashes
when the pulse generator output is a pulse.
14 Frequency buttons Select the test signal frequency: 50/60 Hz (depends on
15 AL T button Causes channel A and channel B to alternate in the
16 Channel B button Selects channel B for display on the oscilloscope.
Operational Check Procedure
The following procedure verifies that the TR 210 and the oscilloscope are set up
and connected correctly.
1. Connect the TR 210 and oscilloscope together and set up the oscilloscope as
described in Oscilloscope Connection on page 2–2. Power on both instruments.
2. Verify that a horizontal line is displayed on the oscilloscope screen similar to
that shown in Figure 2–4. This is the open-circuit signature.
3. Fine tune the oscilloscope vertical position controls to center the signature
waveform. The channel 1 vertical position control affects the horizontal
position of the signature. The channel 2 vertical position control affects the
vertical position of the signature.
rear-panel switch setting), 200 Hz, or 2 kHz.
oscilloscope display.
2–4
TR 210 Service Manual
Page 25

Figure 2–4: Typical open-circuit signature
Operation
4. On the TR 210, short the channel A test terminal to the COM test terminal.
5. Verify that a vertical line is now displayed on the oscilloscope screen similar
to that shown in Figure 2–5. This is the short-circuit signature.
Figure 2–5: Typical short-circuit signature
TR 210 Service Manual
This completes the operational check procedure.
2–5
Page 26

Operation
2–6
TR 210 Service Manual
Page 27

Page 28

Theory of Operation
Figure 3–1 shows a block diagram of the TR 210 Huntron Tracker and replaceable modules.
Front Panel Module Main Board Module
Front panel
controls
G1
G2
Front panel
connectors
A
COM
B
COM
Control logic
Pulse generator
Oscillator
Test signal
Figure 3–1: TR 210 block diagram
+ 15 V
Power supply
– 15 V
Rear Panel
Module
Line Filter Module
Horizontal (X)
Vertical (Y)
To external
oscilloscope
in XY mode
Front Panel Module
Main Board Module
TR 210 Service Manual
The front panel module contains all the probe connections and front panel
controls for the TR 210 Huntron Tracker. Wiring harnesses connect the front
panel controls to the main board.
Control logic circuitry reads the front panel switches and generates the test signal
for Analog Signature Analysis (ASA). An oscillator circuit generates the signal
that alternates the A and B test signals and produces the pulse signals.
To display the signature, the TR 210 Huntron Tracker outputs voltage (V) and
current (I) signals to the horizontal (X) and vertical (Y) inputs of an oscilloscope.
3–1
Page 29

Theory of Operation
Line Filter Module
Rear Panel Module
A line selector switch changes the winding ratio of power transformer. The
power supply circuitry rectifies and filters the transformer output to + and
– 15 VDC.
The line filter module contains the AC input socket, power switch, and line fuse.
The line filter connects to the main board with a 3-wide socket.
The rear panel module contains the rear panel X and Y BNC connectors, signal
fuse, and line filter module.
3–2
TR 210 Service Manual
Page 30

Page 31

Performance Verification
The performance verification procedures in this section verify the basic operation
of the TR 210 Huntron Tracker. Because all specifications are either typical or
guaranteed nominal, no measurement tolerances are given.
Equipment Required
The equipment listed in Table 4–1 is required to verify the performance of the
the TR 210 Huntron Tracker.
T able 4–1: Test equipment, fixtures, and supplies
Item number and description Minimum requirements Example Purpose
1. Multimeter with test leads AC volts, AC current, 50 Hz to
2 kHz frequency
2. One (1) pair shrouded red
and black banana leads
(male-to-male)
3. Oscilloscope with X/Y
display mode
4. Two (2) coaxial cables BNC male-to-male Tektronix part number
5. BNC male to dual binding
post adapter
6. BNC female to dual male
banana
7. Banana plug patch cord As per description Tektronix part number
As per description Tektronix ATL21 Connect DMM to tracker test
As per description and purpose Tektronix TDS 210 Display tracker signals
As per description Tektronix part number
As per description Tektronix part number
Tektronix DMM 916 Measure tracker output voltage,
012-0057-01
103-0035-00
103-0090-00
012-0031-00 or 012-0039-00
frequency, and current
terminals and short tracker test
terminals
Connect tracker signals to
oscilloscope inputs
Adapt female BNC to banana
patch cord
Adapt male BNC to dual
banana connections
Patch connection
TR 210 Service Manual
4–1
Page 32

Performance Verification
Preparation
Prepare the TR 210 Huntron Tracker for the verification as follows:
1. Make sure the line frequency and line voltage switches on the back panel are
set correctly.
2. Plug the TR 210 Huntron Tracker in and turn the power on.
The control indicators of the tracker under test should power up in the following
states:
Control name Indicator status
CHANNEL A On (Channel B and ALT are of f)
LOW 2 On (all other ranges off)
50/60 (Hz) On (all other frequencies off)
PULSE DC On (+ and – off)
Logic Section
3. Turn the RATE control to midrange.
4. Turn the LEVEL and WIDTH controls fully counterclockwise.
1. Check the frequency selection buttons.
a. Press the 200 Hz, 2000 Hz and 50/60 Hz button in that order.
b. Check that each corresponding LED lights when the button is pressed
and that it stays on until another frequency button is pressed.
2. Check the ALT mode.
a. Press the ALT button. Check that the ALT LED lights and the Channel A
and Channel B LEDs alternate.
b. Verify that the alternation rate increases with clockwise rotation of the
RATE control and decreases with counterclockwise rotation of the RATE
control. Return the RATE control to midrange.
c. Press the Channel A button. The ALT LED should go off and the
Channel A LED should stay on.
4–2
d. Press the ALT button again and then press the Channel B button to make
sure it also cancels the ALT function.
TR 210 Service Manual
Page 33

Performance Verification
3. Check the SCAN mode.
a. Press the SCAN button. The SCAN LED should light and the tracker
should scan through the ranges as follows: LOW1, LOW2, MED1,
MED2, HIGH, back to LOW1 and repeat.
b. Verify that the scanning rate increases with clockwise rotation of the
RATE control and decreases with counterclockwise rotation of the RATE
control. Return the RATE control to midrange.
c. Press the LOW1 button. This should cancel the SCAN function and set
the tracker to the LOW1 range.
d. Repeat this procedure for the other 4 ranges (i.e. select SCAN, then
select a range).
4. Check the HIGH lock features
a. Press the HIGH range button. The HIGH range LED should be on.
b. Press the HIGH lock button. The HIGH lock LED should be on and the
HIGH range LED should go off. The MED2 range LED should turn on.
c. Press the SCAN button. The tracker should scan through all the ranges
except the HIGH range.
d. Press the LOW1 button to cancel scanning.
e. Press the HIGH lock button to remove the lock.
5. Check the combined operation of ALT and SCAN.
a. Press the SCAN button. Press the ALT button. The ALT LED should be
on and the Channel A and Channel B LEDs should alternate on and off.
The SCAN LED should be on and all the test ranges should be scanned.
Ranges should change on the B to A transition of the channels.
b. Verify that the scanning and alternation rates increase with clockwise
rotation of the RATE control and decreases with counterclockwise
rotation of the RATE control. Return the RATE control to midrange.
6. Check the PULSE GENERATOR buttons.
a. The PULSE/DC LED should be on.
b. Press the + (positive) button several times. The + LED should toggle
between on an off each time the button is pressed.
c. With the + LED off, repeat the above procedure using the – (negative)
button. The LED should toggle on and off each time the button is
pressed.
TR 210 Service Manual
4–3
Page 34

Performance Verification
Signal Section
d. Turn + on and – off. The PULSE/DC LED should be on and not flashing
which indicates DC mode.
e. Press the PULSE/DC button once. The PULSE/DC LED should flash on
and off to indicate Pulse mode.
f. Press the + and – button so that both the + and – LEDs are on and the
PULSE/DC LED is flashing. Press the PULSE/DC button once so that
the LED is continuously on. The – LED should go off (all three LEDs
cannot be continuously on).
g. Press the + button several times. With each press, the + LED should go
off and the –LED should come on, or visa versa.
Verify the signal voltages on the Channel A and Channel B test terminals and the
X/Y outputs.
Test Terminals
1. Make sure that the HIGH lock LED is off.
2. Select Channel A, HIGH range, and 50/60 Hz.
3. Connect the DMM between the Channel A and COM test terminals with the
red and black banana leads (items 1 and 2 on page 4–1).
4. Measure the RMS sine wave voltage for each range listed below:
DMM range Tracker range selector Measured voltage (typical)
200 VAC HIGH 42.1 VAC
20 VAC MED2 14.1 VAC
20 VAC MED1 10.6 VAC
20 VAC LOW2 7.1 V AC
20 VAC LOW1 2.1 V AC
RMS
RMS
RMS
RMS
RMS
5. Select Channel B and HIGH range.
6. Connect the DMM between the Channel B and COM test terminals. Repeat
the measurements for each range listed.
4–4
7. Remove the connections.
TR 210 Service Manual
Page 35

X/Y Output Signals
Performance Verification
1. Connect the tracker under test to an oscilloscope (item 3) using two BNC
cables (item 4):
a. The Horizontal (X) output connects to the Channel 1 (X) input on the
oscilloscope.
b. The Vertical (Y) output connects to the Channel 2 (Y) input on the
oscilloscope.
2. With Channel B selected, select the HIGH range and 2000 Hz range on the
tracker under test.
3. Make the following oscilloscope settings:
Mode Setting
Time base 100 ms
Channel 1 and 2 1 V/div
Trigger source Channel 1
XY mode On
X and Y position Adjust open circuit trace to center graticule
NOTE. If a horizontal and a diagonal trace is displayed, turn channel 1 off to
eliminate the diagonal trace.
4. Press each test range selector in turn (MED2, MED1, ...). The total
horizontal trace length should be about 8 divisions for opens in any test
range. Select Channel A and repeat the test.
5. With Channel A selected, short the A to COM terminals with a banana lead
(item 2). The total vertical trace length should be about 6 divisions for shorts
in any test range.
6. Remove the short from the A to COM terminals, short the B to COM
terminals, select channel B and repeat the test.
7. Remove the short from the B to COM terminals.
TR 210 Service Manual
4–5
Page 36

Performance Verification
X/Y Output Voltages
1. Connect the Horizontal (X) output to the DMM voltage input with a coax
cable and female BNC to banana adapter (items 4 and 6).
2. Measure the following voltages for each tracker range listed (Channel B):
Measured voltage (X)
DMM range Tracker range (open circuit)
20 VAC HIGH 2.8 V AC
20 VAC MED2 2.8 VAC
20 VAC MED1 2.8 VAC
20 VAC LOW2 2.8 V AC
20 VAC LOW1 2.8 V AC
(typical)
RMS
RMS
RMS
RMS
RMS
3. Select Channel A and repeat the test.
Test Terminal Frequency
4. Connect the Vertical (Y) output to the DMM voltage input with a coax cable
and female BNC to banana adapter (items 4 and 6).
5. Short the Channel A to COM terminals with a banana lead and measure the
following voltages for each tracker range listed:
Measured voltage (Y)
DMM range Tracker range (short circuit)
20 VAC HIGH 2.1 V AC
20 VAC MED2 2.1 VAC
20 VAC MED1 2.1 VAC
20 VAC LOW2 2.1 V AC
20 VAC LOW1 2.1 V AC
(typical)
RMS
RMS
RMS
RMS
RMS
6. Select Channel B, short the Channel B to COM terminals, and repeat the
test.
7. Disconnect the banana lead, coax, and BNC adapter.
4–6
Check the frequency of the test terminal signal.
1. Set the 60/50 Hz switch on the back of the tracker to 60 Hz.
TR 210 Service Manual
Page 37

Performance Verification
2. Select the frequency mode on the DMM and select the 20 VAC range.
3. Select Channel A, LOW2, and 2000 Hz on the tracker.
4. Connect the A and COM terminals of the tracker under test to the frequency
(voltage) inputs of the DMM with the banana leads (item 2).
5. On the front panel of the tracker, select the test signal frequencies listed
below and measure the corresponding frequencies.
Test Terminal Current
DMM range
(frequency mode)
20 VAC 2000 Hz 2000 Hz
20 VAC 200 Hz 200 Hz
20 VAC 50/60 Hz 60 Hz
Selected test signal
frequency
Measured test signal
frequency (typical)
6. Set the 60/50 Hz switch on the back of the tracker to 50 Hz.
7. Verify that the frequency on the output measures 50 Hz nominal.
8. Move the 60/50 Hz switch back to the line frequency.
Measure the RMS value of the test terminal short circuit current in each range.
1. Connect Channel A and COM inputs of the tracker under test to the DMM
200 mA current and common inputs with the banana leads (item 2).
2. Set the DMM to read mA-AC.
3. Verify the following RMS current readings:
TR 210 Service Manual
DMM range
(current mode)
20 mA HIGH 0.57 mA
20 mA MED2 0.53 mA
20 mA MED1 8.2 mA
200 mA LOW2 132 mA
20 mA LOW1 0.21 mA
Tracker range
Measured current
(typical)
4–7
Page 38

Performance Verification
Pulse Generator Section
1. Setup the Oscilloscope for measuring the positive and negative DC levels
(X/Y off).
a. Connect Channel A of the tracker to Channel 1 of the oscilloscope with
the coax cable and BNC female to dual banana adapter (items 4 and 6).
b. Connect G1 (PULSE GENERATOR terminal) of tracker to Channel 2 of
the oscilloscope with a banana patch cord and a male BNC to banana
adapter (items 7 and 5). Connect the patch cord to the red side of the
adapter.
c. Setup the equipment controls as follows:
Tracker control Setting
50/60 Hz On
Channel A On
LOW2 button On
Oscilloscope control Setting
Trigger source Channel 1
Channel 1 5 V/div
Channel 2 2 V/div
Time base 10 ms/div
2. Measure the + DC levels of G1.
a. Press the PULSE/DC button so that it is on continuously.
b. Press the + button so that it is on. Rotate the LEVEL knob clockwise to
its maximum position.
c. Verify that the DC voltage level is approximately 5 volts on Channel 2
of the oscilloscope.
d. Rotate the LEVEL knob counterclockwise and verify that the DC
voltage drops to near zero.
3. Verify that G1 stays at zero.
4–8
a. Press the + and – buttons so that both + and – LEDs are off. Verify that
the voltage level is near zero for this condition.
b. Rotate the LEVEL knob in both directions. The voltage level on
Channel 2 of the oscilloscope should remain near zero.
TR 210 Service Manual
Page 39

Performance Verification
c. Press the PULSE/DC button once so that the PULSE/DC LED is
flashing. The + and – LEDs should still be off.
d. Rotate the LEVEL knob in both directions and verify that the voltage
level remains near zero.
4. Check the width control of G1.
a. Press the + and – buttons. Both + and – LEDs should be on and the
PULSE/DC LED should be flashing.
b. Rotate the LEVEL control knob all the way clockwise.
c. Set the tracker to 50/60 Hz and the oscilloscope time base to 5 ms/div.
d. Vary the Width control and change the + and – settings to display the
waveforms for each of the three pulse types shown in Figure 4–1 on
page 4–10.
e. The rising edge of a positive pulse should always coincide with each
positive going zero-crossing of the sine wave test signal.
f. The falling edge of a negative pulse should always start at each
negative-going zero-crossing of the test signal.
g. Repeat this step for 200 and 2000 Hz. A slight slope in the rising and
falling edges of the pulses is acceptable for 2000 Hz. Set the oscilloscope time base as follows for each frequency range:
Tracker frequency range Oscilloscope time base setting
50/60 Hz 5 ms/div
200 Hz 1 ms/div
2000 Hz 250 ms/div
TR 210 Service Manual
4–9
Page 40

Performance Verification
Pulse
width
settings
Test signal 0
Positive 0
Negative 0
Composite 0
Figure 4–1: Pulse types
(min) (max)
4–10
TR 210 Service Manual
Page 41

Page 42

Adjustment Procedures
This section contains information needed to adjust the TR 210 Huntron Tracker.
NOTE. This procedure is for trained service technicians only
Equipment Required
The equipment listed in Table 5–1 is required to adjust the TR 210 Huntron
Tracker.
T able 5–1: Test equipment, fixtures, and supplies
Item number and description Minimum requirements Example Purpose
1. Multimeter with test leads AC/DC volts Tektronix DMM 916 Measure tracker voltages
2. One (1) pair shrouded red
and black banana leads
(male-to-male)
3. Oscilloscope with X/Y
display mode
4. Two (2) coaxial cables BNC male-to-male Tektronix part number
5. Insulated adjustment tool As per description Electrical adjustments
As per description Tektronix ATL21 Connect DMM to tracker test
terminals
As per description and purpose Tektronix TDS 210 Display tracker signals
Connect tracker signals to
012-0057-01
oscilloscope inputs
Preparation
TR 210 Service Manual
Prepare the TR 210 Huntron Tracker for adjustment as follows:
1. Make sure the line frequency and line voltage switches on the back panel are
set correctly.
2. Refer to the procedure on page 6–7 and remove the top cover.
3. Plug the TR 210 Huntron Tracker in and turn the power on.
5–1
Page 43

Adjustment Procedures
The control indicators of the tracker under test should power up in the following
states:
Control name Indicator status
CHANNEL A On (Channel B and ALT are of f)
LOW 2 On (all other ranges off)
50/60 (Hz) On (all other frequencies off)
PULSE DC On (+ and – off)
4. Turn the RATE control to midrange.
5. Turn the LEVEL and WIDTH controls fully counterclockwise.
5–2
TR 210 Service Manual
Page 44

Adjustment Procedure
Adjustment Procedures
The illustration in Figure 5–1 shows the adjustment locations for the TR 210
Huntron Tracker.
Cathode, D9
Anode, D7
R106
TP1
C123
Figure 5–1: TR 210 adjustment locations and test points
1. Using a DMM (item 1), verify the following voltages with respect to
TP1 (com):
a. Cathode of D9 is between +12 VDC and +18 VDC.
b. Anode of D7 is between –12 VDC and –18 VDC.
2. Make sure that the HIGH lock LED is off.
3. Connect the Channel A and COM test terminals to the voltage inputs of the
DMM with banana leads (items 1 and 2 on page 5–1). Measure the sine
wave voltage.
TR 210 Service Manual
4. Adjust R106 so that the RMS voltage reads between 7.070 and 7.072 V
RMS
.
5–3
Page 45

Adjustment Procedures
5. Connect the tracker under test to an oscilloscope (item 3) using the 2 BNC
cables (item 4):
a. The Horizontal (X) output connects to the Channel 1 (X) input on the
oscilloscope.
b. The Vertical (Y) output connects to the Channel 2 (Y) input on the
oscilloscope.
6. Select the HIGH range and 2000 Hz settings.
7. Make the following oscilloscope settings:
Mode Setting
Time base 100 ms/div
Channel 1 and 2 1 V/div
Trigger source Channel 1
XY mode On
X and Y position Adjust open circuit trace to center graticule
NOTE. If a horizontal and a diagonal trace is displayed, turn channel 1 off to
eliminate the diagonal trace.
8. Adjust the trim cap C123 to eliminate any split trace.
NOTE. Some split trace is normal in all other ranges at 2000 Hz.
5–4
TR 210 Service Manual
Page 46

Page 47

Maintenance
Preparation
This section contains the information needed to do periodic and corrective
maintenance on the TR 210 Huntron Tracker.
Before servicing this product, read the Safety Summary and Introduction at the
front of the manual and the ESD information below.
CAUTION. Static discharge can damage any semiconductor component in this
instrument.
When performing any service which requires internal access to the instrument,
adhere to the following precautions to avoid damaging internal modules and their
components due to electrostatic discharge (ESD).
1. Minimize handling of static-sensitive modules.
2. Transport and store static-sensitive modules in their static protected
containers or on a metal rail. Label any package that contains static-sensitive
modules.
3. Discharge the static voltage from your body by wearing a grounded antistatic
wrist strap while handling these modules. Do service of static-sensitive
modules only at a static-free work station.
4. Nothing capable of generating or holding a static charge should be allowed
on the work station surface.
5. Handle circuit boards by the edges when possible.
6. Do not slide the modules over any surface.
7. Avoid handling modules in areas that have a floor or work-surface covering
capable of generating a static charge.
TR 210 Service Manual
6–1
Page 48

Maintenance
Inspection and Cleaning
How often to do maintenance depends on the severity of the environment in
which the instrument is used. A proper time to perform preventive maintenance
is just before instrument adjustment.
Exterior
Internal
Inspect the outside of the instrument for damage, wear, and missing parts.
Instruments that appear to have been dropped or otherwise abused should be
checked thoroughly to verify correct operation and performance. Immediately
repair defects that could cause personal injury or lead to further damage to the
instrument.
To clean the instrument exterior, do the following steps:
1. Remove loose dust on the outside of the instrument with a lint free cloth.
2. Remove remaining dirt with a lint free cloth dampened in a general purpose
detergent-and-water solution. Do not use abrasive cleaners.
CAUTION. To prevent getting moisture inside the instrument during external
cleaning, use only enough liquid to dampen the cloth or applicator.
To access the inside of the instrument for inspection and repair, refer to the
Removal and Installation Procedures in this section.
No periodic cleaning of internal components is necessary. Cleaning of internal
components should only be necessary after repair. There is no periodic lubrication required for this instrument.
6–2
CAUTION. Avoid the use of chemical cleaning agents which might damage the
plastics used in this instrument. For interior components, use a 75% isopropyl
alcohol solution as a cleaner and rinse with deionized water. Before using any
other type of cleaner, consult your Tektronix Service Center or representative.
Inspect the internal portions of the instrument for damage using Table 6–1 as a
guide. Defects found should be repaired immediately.
TR 210 Service Manual
Page 49

T able 6–1: Internal inspection check list
Item Inspect For Repair Action
Circuit boards Loose, broken, or corroded solder
connections. Burned circuit
boards. Burned, broken, or
cracked circuit-run plating.
Remove failed module and
replace with a fresh module.
Maintenance
Resistors Burned, cracked, broken, blis-
tered condition.
Solder connections Cold solder or rosin joints. Resolder joint and clean with
Capacitors Damaged or leaking cases.
Corroded solder on leads or
terminals.
Wiring and cables Loose plugs or connectors.
Burned, broken, or frayed wiring.
Chassis Dents, deformations, and dam-
aged hardware.
Remove failed module and
replace with a fresh module.
isopropyl alcohol.
Remove damaged module and
replace with a fresh module from
the factory.
Firmly seat connectors. Repair or
replace modules with defective
wires or cables.
Straighten, repair, or replace
defective hardware.
TR 210 Service Manual
6–3
Page 50

Maintenance
6–4
TR 210 Service Manual
Page 51

Removal and Installation Procedures
This section contains procedures for removal and installation of all replaceable
mechanical and electrical parts. For an exploded view and list of these parts, refer
to the Mechanical Parts List on page 10–1.
WARNING. Before doing this or any other procedure in this manual, read the
Safety Summary found at the beginning of this manual. Also, to prevent possible
injury to service personnel or damage to this instrument’s components, read
Installation in Section 2, and Preventing ESD in this section.
Before doing any procedure in this subsection, disconnect the power cord from
the line voltage source. Failure to do so could cause serious injury or death.
Unless indicated otherwise, perform installation in reverse order of removal.
Equipment Required
Refer to Table 6–2 for a list of all equipment required to perform the procedures.
T able 6–2: Tools required for module removal
Item No. Name Description
1 # 1 Phillips screwdriver Standard tool
2 # 1 Pozidrive screwdriver Standard tool
3 Small, flat-blade
screwdriver
4 Angle-Tip Tweezers Standard tool
5 Soldering Iron Standard tool
6 Pliers Standard tool
7 11/32 hex wrench Standard tool
Standard tool
TR 210 Service Manual
6–5
Page 52

Removal and Installation Procedures
Line Fuse
1. Insert a small flat-blade screwdriver into the notch just inside the power cord
2. To access the spare fuse, push out the fuse drawer located inside the fuse
3. Replace the fuse in the fuse holder and snap the fuse holder back into the
socket of the line filter. Use the notch to pull the fuse holder straight out to
remove the fuse.
holder.
lined filter.
Line fuse and spare fuse holder
Line fuse
Spare fuse
Signal Fuse
Release notch
Line filter
Figure 6–1: Accessing the line fuse and spare fuse (159-0414-00)
1. Unscrew the fuse holder located on the right rear panel.
2. Remove and replace the signal fuse from the fuse clip. Use a fuse that has the
same size and rating. The rating for the fuse is listed on the rear panel below
the fuse holder.
6–6
Figure 6–2: Signal fuse (159-0312-00)
TR 210 Service Manual
Page 53

Front Panel Knobs
Top Cover
Removal and Installation Procedures
1. Set the instrument bottom down on the work surface and face the front to
you.
2. Grasp any knob you want to remove and pull it straight out from the front
panel. If the knob is difficult to remove, insert a pair of angle-tip tweezers
between the knob and front panel and carefully pry the knob forward off the
shaft.
3. To reinstall, align the knob to the shaft and push it on.
1. Lay the instrument upside down on the top cover.
2. Use a small flat-blade screwdriver to unsnap the four retainer clips on the
bottom cover that have the rubber feet. See Figure 6–3.
Pry with small screwdriver to unsnap
Retainer clip
Figure 6–3: Retainer clips
3. Use a #1 Phillips screwdriver to unscrew the four cabinet screws.
4. Turn the instrument over and lay it on the bottom cover.
5. Separate the top cover from the front and rear panel assemblies and lift it off
the instrument.
6. To replace the cover, turn the cover so that the tongue and groove features in
the sides of the top cover align with those in the bottom cover and that both
sides fit snugly together. Tighten the screws and reinstall the bottom cover
clips.
TR 210 Service Manual
6–7
Page 54

Removal and Installation Procedures
Line Filter
1. Remove the top cover.
2. Disconnect the wiring harness of the line fuse from the connector receptacle
3. Disconnect the ground wire from the stud on the back chassis using a
4. Use a small flat-blade screwdriver to press in the spring clips on the sides of
on the main board.
inch hex wrench.
the line filter as you pull the line filter out.
Spring clips
11
/
32
Rear Panel Assembly
Line filter
Figure 6–4: Line filter
1. Remove the top cover.
2. Disconnect the rear panel wiring harnesses and from the main circuit board.
3. Disconnect the ground wire on the main board from the stud on the back
11
chassis using a
/32 inch hex wrench.
4. Unscrew the main circuit board from the bottom cover with a #1 Pozidrive
screwdriver.
5. To protect the line frequency switch and remote control socket, keep the rear
of the main board and the rear panel assembly together lifting the back of the
main board only far enough to remove the rear panel assembly.
6–8
6. Remove and replace the rear panel assembly.
7. Reinstall the main circuit board and rear panel assembly in the bottom cover
and tighten the screws so they are just snug (about 2 inch/lbs). Do not
overtighten
TR 210 Service Manual
Page 55

Front Panel Assembly
1. Remove the top cover.
2. Disconnect the ribbon cable from the front panel circuit board.
3. Disconnect the 4-wire and 2-wire harnesses from the main board.
4. Use a #1 Pozidrive screwdriver to disconnect the ground wire from the front
panel assembly.
5. Remove the front panel assembly from the bottom cover.
Front Panel Potentiometers and Elastomer
1. Remove the top cover.
2. Remove the front panel knobs.
Removal and Installation Procedures
Main Board
3. Remove the front panel circuit board.
4. Remove the elastomer for the front panel push buttons.
5. Desolder the potentiometer(s) from the circuit board.
6. Using pliers, untwist the tabs that secure the potentiometer(s) to the circuit
board and remove the potentiometer(s).
1. Remove the top cover.
2. Disconnect the front and rear panel wiring from the main circuit board.
3. Remove the front panel assembly.
4. Unscrew the main circuit board from the bottom cover with a #1 Pozidrive
screwdriver.
5. To protect the line frequency switch and remote control socket, keep the rear
of the main board and the rear panel assembly together as you lift them out
of the bottom cover.
TR 210 Service Manual
6. Reinstall the main circuit board in the bottom cover and tighten the screws so
they are just snug (about 2 inch/lbs). Do not overtighten
6–9
Page 56

Removal and Installation Procedures
6–10
TR 210 Service Manual
Page 57

Page 58

Options
Table 7–1 shows the power cord options available with the TR 210 Huntron
Tracker at the time of purchase. Besides the power cord options, no other options
are available at the time of purchase.
T able 7–1: Power cord identification
Plug configuration Normal usage Option number
North America
125 V/15 A Plug
NEMA 5-15P
Europe
230 V
United Kingdom
230 V
Standard
A1
A2
TR 210 Service Manual
7–1
Page 59

Options
7–2
TR 210 Service Manual
Page 60

Page 61

Replaceable Electrical Parts
For a list of all replaceable parts, refer to the Mechanical Parts List on
page 10–1.
TR 210 Service Manual
8–1
Page 62

Replaceable Electrical Parts
8–2
TR 210 Service Manual
Page 63

Page 64

Diagrams
For an exploded view diagram of the TR 210 Huntron Tracker, refer to the
Mechanical Parts List on page 10–1.
TR 210 Service Manual
9–1
Page 65

Diagrams
9–2
TR 210 Service Manual
Page 66

Page 67

Replaceable Mechanical Parts
14
20
13
19
21
15
16
17
18
1
2
5
4
3
7
8
9
6
12
11
Figure 10–1: TR 210 replaceable parts and accessories
TR 210 Service Manual
10
1
10–1
Page 68

Replaceable Mechanical Parts
Replaceable parts list
Fig. &
index
number
10–1–1 390–1188–00 1 CABINET ASSY:PLASTIC,TOP & BOTTOM
–2 050–3319–00 1 PARTS REPL KIT:SERVICE
–3 650–3815–00 1 PANEL ASSY:REAR,INCLUDES,BNC’S W/WIRING,
–4 159–0312–00 1 FUSE,CARTRIDGE:METRIC,250MA,250V,FAST 57705 02–0022
–5 119–5867–00 1 FILTER,RFI:POWER MODULE 57705 06–2136
–6 159–0414–00 1 FUSE:250V,0.125 A RMS,FAST BLOW,PERIEC125, 57705 02–0023
–7 311–2555–00 1 RES,VAR:CONTROL POT,50K,0.5W,5/8 X 1/8 SHAFT 57705 02–1056
–8 311–2556–00 1 RES,VAR:LIN CONTROL POT,1M,0.5W,5/8 X 1/8
–9 671–4458–00 1 CIRCUIT BD ASSY:MAIN,HUNTRON PN 06–3106 57705 06–3106
–10 342–1040–00 1 INSULATOR:PCB,NOMEX,MAIN BD 57705 01–1242
–11 211–0963–00 12 SCREW:W/O WASHER,MAIN ECB 57705 07–3205
–12 174–3944–00 1 CABLE ASSY:FLAT,MAIN T O FRONT 57705 06–4142
–13 644–0922–00 1 PANEL ASSY:FRONT ,INPUT
–14 366–0801–00 3 KNOB:GREY,W/O INDEX,FRONT PANEL 57705 07–2142
–15 260–2707–00 1 SWITCH:ELASTOMERIC KEY P AD 57705 01–1243
–16 671–4457–00 1 CIRCUIT BD ASSY:PCA CONTROL 57705 06–3105
–17 211–0962–00 6 SCREW:ECB,PCA CNTL,4–40 X 1/4,PH PHI,
–18 311–2557–00 1 RES,VAR:CCW AUD CONTROL POT,1M
–19 ATL25 1 TRACKER PROBES: 1 EA RED AND BLACK 57705 ATL25
–20 –––––––––– 2 Black ground leads 57705 98–0043
–21 –––––––––– 2 Blue Clip Leads 57705 98–0036
Tektronix
part number
161–0230–01 1 CABLE ASSY,PWR:3,18 AWG,92 L,SVT,TAN,60 DEG
071–0113–00 1 MANUAL,TECH:SERVICE,TR210 80009 071–0113–00
071–0114–00 1 MANUAL,TECH:USER,ENGLISH,TR210 80009 071–0114–00
Serial no.
effective
Serial no.
discont’d
Qty Name & description Mfr. code Mfr. part number
CABINET,W/CLIPS & SCREWS
REPLACEMENT,BOTTOM & TOP PLASTIC CLIP
W/FOOT ,8 EA,CASE SCREWS 4 EA
CONNECTORS,FUSE HOLDER & CONNECT,AC
LINE FILTER
SHAFT
JACKS,WIRING&CONNECTORS,ELASTOMERIC
KEY PAD,PCB CONTROL BD W/POTS, CABLE ASSY
FLAT
(Includes Figures 13, 15 & 16)
W/WASHER
OHM,0.5W,5/8 X 1/8 SHAFT
C,MC–6–3C/G X RTANG BME,10A/125V,
57705 01–1241
57705 050–3319–00
57705 06–2135
57705 02–1057
57705 06–2134
57705 07–3050
57705 02–1058
2W733 ORDER BY
DESCRIPTION
10–2
TR 210 Service Manual
Page 69

Replaceable Mechanical Parts
Manufacturers cross index
Mfr.
code
2W733 BELDEN WIRE & CABLE COMPANY 2200 US HWY 27 SOUTH
57705 HUNTRON INC 15720 MILL CREEK BLVD MILL CREEK, WA 98012
80009 TEKTRONIX INC 14150 SW KARL BRAUN DR
TK2280 ESCORT INSTRUMENTS CORP NO. 6, ALLEY 6, LANE 45
Manufacturer Address City, state, zip code
PO BOX 1980
PO BOX 500
PAO–HSIN RD
RICHMOND, IN 47374
BEAVERT ON, OR 97077–0001
HSIN TIEN, TAIPEI, TAIWAN CN
TR 210 Service Manual
10–3
Page 70

Replaceable Mechanical Parts
10–4
TR 210 Service Manual
Page 71

Page 72

 Loading...