

Page 1

Instruction Manual
TMSST1
775-Pin Socket Hardware Support
071-1315-00
www.tektronix.com
Page 2

Copyright © Tektronix, Inc. All rights reserved.
Tektronix products are covered by U.S. and foreign patents, issued and pending. Information in this publication supercedes
that in all previously published material. Specifications and price change privileges reserved.
Tektronix, Inc., P.O. Box 500, Beaverton, OR 97077
TEKTRONIX and TEK are registered trademarks of Tektronix, Inc.
Page 3

HARDWARE WARRANTY
Tektronix warrants that the products that it manufactures and sells will be free from defects in materials and
workmanship for a period of one (1) year from the date of shipment. If a product proves defective during this
warranty period, Tektronix, at its option, either will repair the defective product without charge for parts and labor,
or will provide a replacement in exchange for the defective product.
In order to obtain service under this warranty, Customer must notify Tektronix of the defect before the expiration
of the warranty peri od and make suitable arrangements for the performance of service. Custome r shall be
responsible for packaging and shipping the defective product to the service center designated by Tektronix, with
shipping charges prepaid. Tektronix shall pay for the return of the product to Customer if the shipment is to a
location within the country in which the Tektronix service center is located. Customer shall be responsible for
paying all shipping charges, duties, taxes, and any ot her charges for products returned to any other locations.
This warranty shal l not appl y to any defect , failure or damage caused by improper use or improper or inadequate
maintenance and care. Tektronix shall not be obligate d to furnish service under this warranty a) to repair damage
resulting from attempts by personnel other than Tektronix representatives to install , re pair or service the product;
b) to repair damage resulting from improper use or connection to incompatible equipment; c) to repair any
damage or malfunction caused by the use of non-Tektronix supplies; or d) to service a product that has been
modified or integrated with other products when the effect of such modification or integration increases the time
or difficulty of servicing the product.
THIS WARRANTY IS GIVEN BY TEKTRONIX IN LIEU OF ANY OTHER W ARRANTIES, EXPRESS
OR IMPLIED. TEKTRONIX AND ITS VENDORS DISCLAIM ANY IMPLIED WARRANTIES OF
MERCHANTABILITY OR FITNESS FOR A PARTICULAR PURPOSE. TEKTRONIX’
RESPONSIBILITY TO REPAIR OR REPLACE DEFECTIVE PRODUCTS IS THE SOLE AND
EXCLUSIVE REMEDY PROVIDED TO THE CUSTOMER FOR BREACH OF THIS WARRANTY.
TEKTRONIX AND ITS VENDORS WILL NOT BE LIABLE FOR ANY INDIRECT, SPECIAL,
INCIDENTAL, OR CONSEQUENTIAL DAMAGES IRRESPECTIVE OF WHETHER TEKTRONIX OR
THE VENDOR HAS ADVANCE NOTICE OF THE POSSIBILITY OF SUCH DAMAGES.
Page 4

Page 5

Table of Contents
Getting Started
General Safety Summary v..........................................
Service Safety Summary vii...........................................
Preface ix...................................................
Manual Conventions ix..............................................
Contacting Tektronix x..............................................
Product Description 1--1..............................................
Logic Analyzer Configuration 1--1......................................
P6860 Probes 1--2................................................
LAI Cables 1--2..................................................
Labeling P6860 Probes 1--3........................................
Labeling LAI Cables 1--3..........................................
Standard and Optional Accessories 1--3...................................
Probe Adapter Review 1--3............................................
System Clock Rate 1--3............................................
Acquisition before Reset 1--3.......................................
Data Bus 1--3....................................................
Address Bus 1--3.................................................
Disabling the Cache 1--4...........................................
Connecting the Logic Analyzer to a Target System 1--4......................
Tools 1--4......................................................
Removing the Probe Head from the Target System 1--8...................
Applying LAI Labels 1--9.............................................
Connect the Probes and LAI Cables 1--10..................................
P6860 Probes
(Four Modules) 1--12.......................................
Fifth Module 1--12................................................
Applying and Removing Power 1--12.....................................
Logic Analyzer Software Compatibility 1--13...............................
Installing the Software 1--13............................................
Care and Maintenance 1--14.............................................
External Cleaning Only 1--14........................................
Fuses 1--14......................................................
Short-Term Storage 1--15...........................................
Long-Term Storage 1--16...........................................
Shipping the Probe Adapter 1--18........................................
Specifications
Circuit Description 2--1...............................................
Latched Operation 2--1............................................
Derived Signals 2--2..............................................
Signal Probing 2--2...............................................
Bus Tracking Logic 2--2...........................................
Common Clock 2--2..............................................
Loading Diagrams 2--3................................................
TMSST1 775-Pin Socket Hardware Support
i
Page 6

Table of Contents
Reference
Replaceable Parts List
Index
Specification Tables 2--4..............................................
Reference Tables 3--1..........................................
Viewing Reference Tables 3--1..........................................
To View a Symbol Table 3--1.......................................
To Extract Groups 3--1............................................
Overview of Reference Tables 3--2......................................
Group Definitions 3--2............................................
Symbols 3--2....................................................
Channel Assignments 3--2..........................................
Parts Ordering Information 4--1.........................................
Using the Replaceable Parts List 4--2.....................................
ii
TMSST1 775-Pin Socket Hardware Support
Page 7

List of Figures
Table of Contents
Figure 1--1: Master and Slave module configuration 1--2.............
Figure 1--2: Attach the custom load plate to the target-system socket 1--5
Figure 1--3: Connect the microprocessor to the probe-head socket 1--6.
Figure 1--4: Attach the probe head to the target system 1--7..........
Figure 1--5: Attach the heat sink to the target system 1--8............
Figure 1--6: Apply LAI labels 1--9................................
Figure 1--7: LAI Cable, P6860 probe, and preprocessor unit 1--10......
Figure 1--8: LAI Cable, P6860 probe, and module configurations 1--11..
Figure 1--9: Nonspecific probe head and case 1--15...................
Figure 1--10: Use static-shielding bags. 1--16........................
Figure 1--11: Place foam in the cardboard carton 1--16...............
Figure 1--12: Place the preprocessor unit in the cardboard carton 1--17.
Figure 1--13: Place the cables carefully over the preprocessor unit 1--17.
Figure 1--14: Place the foam and probe head in place 1--17............
List of Tables
Figure 2--1: Electrical load model for typical signals 2--3.............
Figure 2--2: Mated Samtec load model 2--4........................
Figure 2--3: Receiver load model 2--4.............................
Figure 2--4: Dimensions of the probe head 2--8.....................
Figure 2--5: Dimensions of the preprocessor unit 2--9...............
Figure 4--1: Probe adapter exploded view 4--5......................
Table 1--1: P6860 probe and LAI Cable configurations 1--11..........
Table 2--1: Electrical specifications for the target system 2--4........
Table 2--2: Electrical specifications for the AC input to the
preprocessor unit 2--5......................................
Table 2--3: Environmental specifications 2--5......................
Table 2--4: Certifications and compliances 2--6.....................
TMSST1 775-Pin Socket Hardware Support
iii
Page 8

Table of Contents
iv
TMSST1 775-Pin Socket Hardware Support
Page 9

General Safety Summary
Review the following safety precautions to avoid injury and prevent damage to
this product or any products connected to it.
To avoid potential hazards, use this product only as specified.
Only qualified personnel should perform service procedures.
While using this product, you may need to access other parts of the system. Read
the General Safety Summary in other system manuals for warnings and cautions
related to operating the system.
ToAvoidFireor
Personal Injury
Use Proper Power Cord. Use only the power cord specified for this product and
certified for the country of use.
Connect and Disconnect Properly. Do not connect or disconnect probes or test
leads while they are connected to a voltage source.
Ground the Product. This product is grounded through the grounding conductor
of the power cord. To avoid electric shock, the grounding conductor must be
connected to earth ground. B efore making connections to the input or output
terminals of the product, ensure that the product is properly grounded.
Observe All Terminal Ratings. To avoid fire or shock hazard, observe all ratings
and markings on the product. Consult the product manual for further ratings
information before making connections to the product.
Connect the ground lead of the probe to earth ground only.
Do Not Operate Without Covers. Do not operate this product with covers or panels
removed.
Use Proper Fuse. Use only the fuse type and rating specified for this product.
Avoid Exposed Circuitry. Do not touch exposed connections and components
when power is present.
Do Not Operate With Suspected Failures. If you suspect there is damage to this
product, have it inspected by qualified service personnel.
Do Not Operate in Wet/Damp Conditions.
Do Not Operate in an Explosive Atm osphere.
Keep Product Surfaces Clean and Dry.
Provide Proper Ventilation. Refer to the manual’s installation instructions for
details on installing the product so it has proper ventilation.
TMSST1 775-Pin Socket Hardware Support
v
Page 10

General Safety Summary
Symbols and Terms
Terms in this Manual. These terms may appear in this manual:
WARNING. Warning statements identify conditions or practices that could result
in injury or loss of life.
CAUTION. Caution statements identify conditions or practices that could result in
damage to this product or other property.
Terms on the Product . These terms may appear on the product:
DANGER indicates an injury hazard immediately accessible as you read the
marking.
WARNING indicates an injury hazard not immediately accessible as you read the
marking.
CAUTION indicates a hazard to property including the product.
Symbols on the Product. The following symbols may appear on the product:
CAUTION
Refer to Manual
WARNING
High Voltage
Protective Ground
(Earth) Terminal
vi
TMSST1 775-Pin Socket Hardware Support
Page 11

Service Safety Summary
Only qualified personnel should perform service procedures. Read this Service
Safety Summary and the General Safety Summary before performing any service
procedures.
Do Not Service Alone. Do not perform internal service or adjustments of this
product unless another person capable of rendering first aid and resuscitation is
present.
Disconnect Power. To avoid electric shock, switch off the instrument power, then
disconnect the power cord from the mains power.
Use Care When Servicing With Power On. Dangerous voltages or currents may
exist in this product. Disconnect power, remove battery (if applicable), and
disconnect test leads before removing protective panels, soldering, or replacing
components.
To avoid electric shock, do not touch exposed connections.
TMSST1 775-Pin Socket Hardware Support
vii
Page 12

Service Safety Summary
viii
TMSST1 775-Pin Socket Hardware Support
Page 13

Preface
Manual Conventions
This instruction manual contains specific information about the TMSST1
775-Pin Socket Hardware support product and is part of a set of information on
how to operate this product on compatible Tektronix logic analyzers.
If you are familiar with operating Microprocessor support products on the logic
analyzer, all you need is this instruction manual to set up and run the support
product.
If you are not familiar with operating Microprocessor support products, you need
to supplement this instruction manual with information on basic operations from
the Tektronix logic analyzer online help to set up and run the support product.
This manual uses the following conventions:
H The terms “master” and “slave” refer to modules that are located in specific
slots in a five-wide module chassis (see Figure 1--1 on page 1--2).
H The term “LAI” is an acronym for Logic Analyzer Interface.
H The term “interposer” refers to the probe head that is located between the
target system and the microprocessor for the purpose of acquiring signals for
circuit analysis.
TMSST1 775-Pin Socket Hardware Support
ix
Page 14

Preface
Contacting Tektronix
Phone 1-800-833-9200*
Address Tektronix, Inc.
Department or name (if known)
14200 SW Karl Braun Drive
P.O. Box 500
Beaverton, OR 97077
USA
Web site www.tektronix.com
Sales support 1-800-833-9200, select option 1*
Service support 1-800-833-9200, select option 2*
Technical support www.tektronix.com/support
1-800-833-9200, select option 3*
6:00 a.m. -- 5:00 p.m. Pacific Standard Time
* This phone number is toll free in North America. After office hours, please leave a voice mail
message.
Outside North America, contact a Tektronix sales office or distributor; see the Tektronix web
site for a list of offices.
x
TMSST1 775-Pin Socket Hardware Support
Page 15

Getting Started
Page 16

Page 17

Getting Started
Product Description
This section contains the following information on the TMSST1 775-Pin Socket
hardware product.
H Connecting the logic analyzer to the target system, see page 1--4
H Applying power to the probe adapter, see page 1--12
H Installing software, see page 1--13
H Caring for and maintaining the probe adapter, see page 1--14
The TMSST1 probe adapter is an interposer design that allows the logic analyzer
to acquire data from a Microprocessor in the operating environment with little
effect on the target system.
To accomplish this, the probe adapter is connected to the target system, and then
the microprocessor is connected to the probe adapter. Signals from the Microprocessor based system flow through the probe adapter probe cables and to the logic
analyzer.
This software acquires signals for viewing along with timing signals. Included
with the TMSST1
H PUB32G9 software — acquires signals using four modules
NOTE. The TMSST1 probe Adapter is compatible with the TMS118 IA32G9
software support package. This software support package is available only to
customers with a valid, restricted, secret nondisclosure agreement (RS-NDA)
with Intel.
Logic Analyzer Configuration
To use the probe adapter to acquire most signals, you need a Tektronix logic
analyzer equipped with a minimum of four, 136-channel, 450 MHz merged
modules. To also acquire auxiliary common clock signals, you need five,
136-channel, 450 MHz merged modules.
775-Pin Socket probe adapter is the following software:
TMSST1 775-Pin Socket Hardware Support
1--1
Page 18

Getting Started
The modules must be configured and merged as shown in Figure 1--1. The
memory depth is chosen automatically based on the shallowest memory depth of
the four modules.
Plus auxiliary common
clock signals
Most signals
P6860 Probes
S
L
A
V
E
4
Figure 1--1: Master and Slave module configuration
The term Master module refers to the middle module of a 5-wide module merge.
The term Slave module refers to the modules to the left or right of the Master
module of a 4 or 5-wide module merge. Figure 1--1 shows the configuration for a
4- or 5-wide module merge.
You can use the TLA7AX, 450 MHz logic analyzer modules and P6860 probes
to connect to the TMSST1 probe adapter.
For more information on connecting your P6860 probes to the preprocessor unit,
see page 1--10.
S
L
A
V
E
2
M
A
S
T
E
R
S
L
A
V
E
1
S
L
A
V
E
3
1--2
LAI Cables
Refer to the P6810, P6860, and P6880 Logic Analyzer Probes Instruction
Manual, Tektronix part number 071-1059-XX, for more information. You can
access this manual from the Tektronix.com web site. You can also find information about the P6860 probes in the logic analyzer online help.
You can use the TLA7AX, 450 MHz logic analyzer modules, and LAI cables to
connect to the TMSST1 probe Adapter. The LAI cables are specifically designed
for use with the TMSST1 probe Adapter.
TMSST1 775-Pin Socket Hardware Support
Page 19

Getting Started
For more information on connecting your LAI cables to the preprocessor unit,
see page 1--10.
Labeling P6860 Probes
Labeling LAI Cables
The probe adapter relies on the default channel mapping and labeling scheme for
the probes. Apply labels using the instructions described in the P6860 High
Density Logic Analyzer Probe Label Instructions, Tektronix part number
071-1123-XX. This manual can be accessed from the Tektronix.com web site.
This information is also located in the logic analyzer online help.
To apply labels to the LAI cables, see page 1--9.
Standard and Optional Accessories
A complete list of standard and optional accessories is provided in the Replaceable Parts List on page 4--4.
Probe Adapter Review
Along with the TMSST1 instruction manual, each logic analyzer includes
additional information that describes how to perform tasks common to support
products on that platform.
This additional information is located in the logic analyzer online help, an
installation manual, or a user manual. Review the additional information if you
are unfamiliar with using support products on a logic analyzer product.
Review electrical, environmental, and mechanical specifications in the Specifica-
tions section on page 2--1 as they pertain to the target system, as well as the
following information.
System Clock Rate
Acquisition before Reset
Data Bus
Address Bus
TMSST1 775-Pin Socket Hardware Support
The TMSST1 hardware support can acquire data from the Microprocessor
operating at speeds of up to 266 MHz.
Contact the Tektronix sales representative for current information on the fastest
devices supported.
If data is acquired just before a power on Reset signal is observed by the target
system, the data acquired by the logic analyzer will be inaccurate.
The TMSST1 probe Adapter supports only a quad-pumped data bus.
The TMSST1 probe Adapter supports only a double-pumped address bus.
1--3
Page 20

Getting Started
Disabling the Cache
The cache bus is not monitored; therefore, the cache must be disabled. Disabling
the cache makes all instruction prefetches visible on the bus so that they are
acquired and displayed and correctly disassembled.
Connecting the Logic Analyzer to a Target System
WARNING. To prevent static damage to the Microprocessor, the probe adapter, the
probes, and the module, you must handle components only in a static-free
environment. Always wear a grounding wrist strap, heel strap, or similar device
while handling the Microprocessor and probe adapter.
To prevent harm to yourself or damage to the preprocessor unit, do not open the
preprocessor unit. There are no operator serviceable parts inside the preprocessor unit. Refer servicing of internal parts in the preprocessor unit to Tektronix
authorized personnel only. External parts may be replaced by qualified service
personnel.
You must allow airflow clearance for the preprocessor unit. Refer to the
dimensions on page 2--6 for the required clearance.
Tools
Following is a list of tools:
H Use a flatbladed screwdriver (0.1 inch tip width) to tighten the probe head to
the target system.
H Optional Tool. A torque wrench helps to ensure reliable connections by
meeting the nominal torque values listed in these instructions. When
attaching screws to the probe head use 4 in-lbs (0.451 N
unless stated otherwise.
NOTE. For storage and shipping, retain the cardboard cartons and packing
material that is shipped with the probe adapter.
G
m) of torque,
1--4
TMSST1 775-Pin Socket Hardware Support
Page 21

Getting Started
Read the following instructions before installing parts.
To connect the logic analyzer to the target system, follow these steps:
1. Power off the target system. It is not necessary to power off the logic analyzer.
2. Power off any probe adapters that may be attached to your target system.
3. T o discharge static electricity, touch the ground connector located on the logic
analyzer.
4. Follow the steps in Figures 1--2 through 1--4 to install the probe head.
Target-system socket
Open the
load lever.
1
Close the
load lever.
Open and remove
2
your load plate.
Remove the
3
microprocessor from
the target system.
Attach the custom
4
load plate.
Note: Load plates are vendor-specific.
5
Use the load plates marked with an F with
the Foxconn socket and the load plate
marked with a T with the Tyco socket.
Figure 1--2: Attach the custom load plate to the target-system socket
TMSST1 775-Pin Socket Hardware Support
Caution: To prevent damage
to the socket, do not touch
the springs in the socket.
1--5
Page 22

Getting Started
Probe head
Caution: To prevent damage to
the springs in the probe head
socket, always insert the spring
protector board when the probe
head is not in use.
Caution: To prevent damage to the
springs in the processor socket or
damage to the preprocessor unit
caused by power and ground shorts,
check that the pin 1’s on the probe
head and target system are
correctly aligned.
Remove the spring
protector board.
7
Pin 1
Pin 1
Open the load lever
6
and load plate.
Caution: To prevent damage
to the socket, do not touch
the springs in the socket.
Install the
8
microprocessor.
1--6
Close load plate.
9
Close the
load lever.
10
Figure 1--3: Connect the microprocessor to the probe-head socket
TMSST1 775-Pin Socket Hardware Support
Page 23

Check the following before you
connect the probe head:
Sthe bar is positioned as shown
Syou have correctly located Pin 1
Getting Started
Bar
Caution: To prevent damage to the
springs in the processor socket or
damage to the preprocessor unit
caused by power and ground shorts,
check that pin 1’s on the probe head
and target system are correctly
aligned.
Pin 1
12
Attach the probe
head to the target
system.
Tighten these two screws
to the custom load plate
Do not remove the
11
pin-head spacer.
13
(torque to 8 in-lbs).
Figure 1--4: Attach the probe head to the target system
TMSST1 775-Pin Socket Hardware Support
NOTE: Apply forced air cooling across the
microprocessor and heat sink to keep the
microprocessor from overheating unless you
are using a forced air-cooled heat sink and
fan assembly.
1--7
Page 24

Getting Started
15
Snap the heat sink
into the standoffs (4).
14
Thread the standoffs
onto the screws.
Removing the Probe Head
from the Target System
Figure 1--5: Attach the heat sink to the target system
Follow these steps to remove the probe head from the target system:
1. Power off the target system, and unplug the AC power cord on the preproces-
sor unit. The power switch for the probe adapter is located on the back of the
preprocessor unit. It is not necessary to power off the logic analyzer.
2. Reverse the steps in Figures 1--2 through 1--5 to remove the probe head.
3. Store the probe head (see page 1--15.)
1--8
TMSST1 775-Pin Socket Hardware Support
Page 25

Applying LAI Labels
Getting Started
Since the LAI cables are shipped without labels, you must attach labels to the
module end and the preprocessor end of the LAI cables. Read the following note
before you begin attaching labels.
NOTE. Always use flat-nosed tweezers to remove the labels from the sheet of
labels. Never peel labels with your fingers. The labels are made of soft vinyl and
can stretch and distort easily. To avoid stretching the label, always grasp it from
the top right corner while removing it from the sheet of labels.
The adhesive on the vinyl labels is extremely strong. Carefully align the label to
the indented outline on the module end and preprocessor unit end. Once labels
are placed on the LAI cables, they are difficult to remove.
To attach labels, perform the following steps:
1. Determine which channel groups you are planning to use and identify the
matching labels.
2. Follow the steps in Figure 1--6 while attaching the labels.
Module
end
Blank
4
Align and place the labels
in the label indents.
Repeat for all steps.
LAI cable
3
Blank
1
Match the
color and the
channel name.
Probe-head
end
2
Figure 1--6: Apply LAI labels
TMSST1 775-Pin Socket Hardware Support
1--9
Page 26

Getting Started
Connect the Probes and LAI Cables
To configure the P6860 probes and LAI cables for the disassembly and timing
support functions, you must determine if you are using a four or five module
configuration (see Table 1 --1 on page 1--11). Then, follow the probe and cable
connection instructions on pages 1--11 and 1--12.
If you need to apply labels to the LAI cables, see page 1--9
.
Figure 1--7 shows a P6860 probe, an LAI cable, and the preprocessor unit.
P6860 probe
LAI cable
Preprocessor
unit
1--10
Figure 1--7: LAI cable, P6860 probe, and preprocessor unit
TMSST1 775-Pin Socket Hardware Support
Page 27

Getting Started
Table 1--1 lists the P6860 probe and LAI cable configurations for a 4- or
5-module configuration.
Table 1--1: P6860 probe and LAI cable configurations
Software
support
PUB32G9
IA32G9
IA32G9NWT
IA32G9_5W
IA32G9NWT_5W
Plus auxiliary common
clock signals
S
L
A
V
E
4
P6860
Modules LAI cables
4 6 (M,S1,S2) 4(S3) Does not acquire auxiliary
5 7 (M, S1,S2,S4) 5(S3,S4) Acquires all signals, plus
Most signals
S
L
A
V
E
2
M
A
S
T
E
R
S
L
A
V
E
1
probes
S
L
A
V
E
3
Description
common clock signals
auxiliary common clock
signals
One LAI cable
and one
P6860 probe
Figure 1--8: LAI cable, P6860 probe, and module configurations
LAI Cables
(Four Module)
1. Match the A, D, C, and E LAI cables from the Master module with the
corresponding D3/D2 and A3/A2, D1/D0 and A1/A0, C1/C0 and C3/C2, and
M_E3/E2 and E1/E0 connector labels on the preprocessor unit. The LAI
cable connector is keyed for correct alignment to the preprocessor unit.
2. Repeat step 1 to make LAI cable connections between Slave1 and Slave2
modules and the connector labels on the preprocessor unit.
TMSST1 775-Pin Socket Hardware Support
LAI cables
(6 cables)
P6860 probes
(4 probes)
1--11
Page 28

Getting Started
CAUTION. To prevent damage to the P6860 probe and preprocessor unit, you
must always position the probes perpendicular to the foot print on the PCB.
Incorrect handling of the P6860 probe while connecting to or disconnecting from
the preprocessor unit can damage the probe.
P6860 Probes
(Four Modules)
Fifth Module
3. Match the A, D, C, and E P6860 probes from the Slave3 module with the
corresponding D3/D2 and A3/A2, D1/D0 and A1/A0, C1/C0 and C3/C2, and
E3/E2 and E1/E0 connector labels on the preprocessor unit. The P6860 probe
connector is keyed for correct alignment to the preprocessor unit.
4. Make the additional P6860 probe and LAI cable connections between the
Slave4 module and the connector labels on the preprocessor unit.
NOTE. For more detailed information about how to attach a P6860 probe, refer
to the probe manual information listed on page 1--2.
Applying and Removing Power
To apply power to the probe adapter and target system, follow these steps:
1. Make sure the power switch on the preprocessor unit is in the off position. If
powered off, the zero (0) is visible on the power switch.
2. Plug the AC power cord into the IEC connector on the back of the preproces-
sor unit.
1--12
3. Plug the AC power cord into an electrical outlet that you know is working
properly.
4. Power on the probe adapter at the back of the preprocessor unit. A green,
power-on LED lights on the front of the preprocessor unit, indicating that the
probe adapter is active.
5. Power on the target system.
To remove power from the target system and the probe adapter, reverse the
preceding steps. You can skip step 1.
TMSST1 775-Pin Socket Hardware Support
Page 29

Logic Analyzer Software Compatibility
The disc label on the software support disc states that the version 4.3 SP1+ of the
logic analyzer software is compatible with this support.
Installing the Software
Now you are ready to install the software. If you have not used a support product,
you may want to refer to information on general tasks and functions in the
Tektronix logic analyzer online help or the user manual.
NOTE. Before you install any software, it is recommended you verify that the
microprocessor support software is compatible with the logic analyzer software.
To install the software on your Tektronix logic analyzer, follow these steps:
1. Insert the disc in the disc drive.
Getting Started
2. Click the Windows Start button, point to Settings, and click Control Panel.
3. In the Control Panel window, double-click Add/Remove Programs.
4. Follow the instructions on the screen for installing the software from the
disc.
To remove or uninstall software, follow the above instructions except select
Uninstall. You must close all windows before you uninstall any software.
TMSST1 775-Pin Socket Hardware Support
1--13
Page 30

Getting Started
Care and Maintenance
Before cleaning this product, read the following information.
CAUTION. To prevent static damage, you must handle components only in a
static-free environment. Static discharge can damage the Microprocessor, the
probe adapter, the probes, and the module.
The probe adapter, consisting of the probe head and preprocessor unit, does not
require scheduled or periodic maintenance. However, to keep good electrical
contact and efficient heat dissipation, keep the probe adapter free of dirt, dust,
and contaminants. When not in use, store the probe adapter in the original
shipping bags and cardboard carton.
External Cleaning Only
Fuses
Clean dirt and dust with a soft bristle brush. For more extensive cleaning, use
only a damp cloth moistened with deionized water; do not use any other chemical
cleaning agents.
WARNING. To prevent harm to yourself or damage to the preprocessor unit, do
not open the preprocessor unit for cleaning and do not allow any moisture inside
the preprocessor unit. There are no operator serviceable parts inside the
preprocessor unit. Refer servicing of internal parts in the preprocessor unit to
Tektronix authorized personnel only. External parts may be replaced by qualified
service personnel.
The fuses in the preprocessor unit are not replaceable by the customer (operator).
If the probe adapter is not functioning correctly, contact your Tektronix sales
representative.
1--14
TMSST1 775-Pin Socket Hardware Support
Page 31

Getting Started
Short-Term Storage
Follow steps 1 through 4 for short-term storage of the probe head:
CAUTION. To prevent static damage to the Microprocessor, the probe adapter, the
probes, and the module, handle components only in a static-free environment.
Always wear a grounding wrist strap, heel strap, or similar device while
handling the Microprocessor and probe adapter.
1. Power off the target system, and unplug the AC power cord on the preproces-
sor unit. The power switch for the probe adapter is located on the back of the
preprocessor unit. It is not necessary to power off the logic analyzer.
CAUTION. To prevent damage to the probe head or microprocessor, use the
provided extraction tool and follow the procedure from the extraction tool vendor
to remove the microprocessor from the probe head.
2. Reverse the steps in Figures 1--2 through 1--5 to remove the probe head.
CAUTION. To prevent damage to the sensitive probe head cables, you must dress
the cables so they are not pinched or contacting any sharp objects. When you
fold the cables use a minimum radius of 0.25-in (0.64 cm) at the fold.
3. Using nonstatic generating tape, tape the pin-protector board to the pin
header on the bottom of the probe head.
4. Store the probe head in the black case it was shipped in.
Figure 1--9: Nonspecific probe head and case
TMSST1 775-Pin Socket Hardware Support
1--15
Page 32

Getting Started
Long-Term Storage
For long-term storage, use the existing cardboard carton and packaging, and
follow these steps:
1. Disconnect the preprocessor unit from the logic analyzer by removing the
probes and LAI cables from the top of the preprocessor unit.
2. Follow Figures 1--10 through 1--14 to repackage the probe adapter.
Figure 1--10: Use static-shielding bags.
1--16
Figure 1--11: Place foam in the cardboard carton
TMSST1 775-Pin Socket Hardware Support
Page 33

Place the foam end caps on
both sides of the preprocessor
unit.
Figure 1--12: Place the preprocessor unit in the cardboard carton
Getting Started
Figure 1--13: Place the cables carefully over the preprocessor unit
Figure 1--14: Place the foam and probe head in place
3. Place the accessory box on top of the foam.
4. Close and tape the cardboard carton.
To ship the probe adapter, Refer to Shipping the probe Adapter.
TMSST1 775-Pin Socket Hardware Support
1--17
Page 34

Getting Started
Shipping the probe Adapter
To commercially transport the TMSST1 probe Adapter, package as follows:
1. Use the existing cardboard shipping carton and cushioning material to ship
the probe adapter.
If the existing shipping carton is not available, use a double-walled,
corrugated cardboard shipping carton that allows a 3 inch (7.62 cm)
minimum on all sides of the product.
2. Follow Figures 1--10 through 1--14 starting on page 1--16 to repackage the
probe head and preprocessor unit.
3. If you are shipping a probe adapter to a Tektronix service center for warranty
service, attach a tag to the probe adapter showing the following:
H Owner’s name and address
H Name of a person who can be contacted
H probe adapter type and serial number
H Description of the problem
1--18
TMSST1 775-Pin Socket Hardware Support
Page 35

Specifications
Page 36

Page 37

Specifications
Circuit Description
This section contains specifications for the TMSST1 775-Pin Socket hardware
support.
The TMSST1 probe adapter hardware uses a custom ASIC to preprocess all
signals on the microprocessor before the signals are captured by the logic
analyzer. The custom ASIC performs the following functions:
H Latches signals within a narrow valid window
H Demultiplexes double-pumped, source-synchronous signals
H Deterministically synchronizes source-synchronous signals to BCLK
Latched Operation
The ASIC latches all signals on the microprocessor. The latched signals are
processed in the ASIC according to their type. Following is a description of each
type:
4x Quad-Pumped Signals. These signals include D[63:00]# and DBI[3:0]#. The
ASIC latches these signals using their dedicated strobes, STBP[3:0] and
STBN[3:0], and then performs four-way demultiplexing on these signals. The
ASIC also inverts the appropriate signals when the DBI[3:0] signals are active.
2x Double-Pumped Signals. These signals include A[35:03]#and REQ[4:0]#. The
ASIC latches these signals using their dedicated strobes, ASTB[1:0], and then
performs two-way demultiplexing on these signals.
1x Common-Clock Signals. These signals include all of the remaining front-side
bus signals. The ASIC latches these signals using the rising edge of BCLK.
TMSST1 775-Pin Socket Hardware Support
2--1
Page 38

Specifications
Derived Signals
Signal Probing
Bus Tracking Logic
Common Clock
The TMSST1 probe adapter hardware derives several custom signals from the
front-side bus signals captured by the ASIC. These signals are used by the logic
analyzer support software to provide clocking, transaction phase linking, and
disassembly. Following is a description of these custom signals:
PHASE_D. This signal can be used by the logic analyzer to store only bus cycles
that contain active information. The PHASE_D signal is asserted when any of the
following signals are asserted: ADS#, DRDY#, INIT#, RESET#, RS[2:0]#, and
SNOOP_D.
TRACK_ERR_D. This signal is asserted whenever the request or snoop counters
exceed their maximum or a minimum value. This signal is also asserted when
ADS# has been observed active for two clock cycles in a row.
The probe adapter uses passive series isolation to acquire data.
The probe adapter uses a bus tracking PAL to aid the disassembly software in
linking various bus phases.
The IA32G9 software allows disassembly from a data bus operating at the
common clock rate specified in Table 2--1 on page 2--4. The setup and hold
sample points are set to default timing numbers based on FSB specifications.
2--2
TMSST1 775-Pin Socket Hardware Support
Page 39
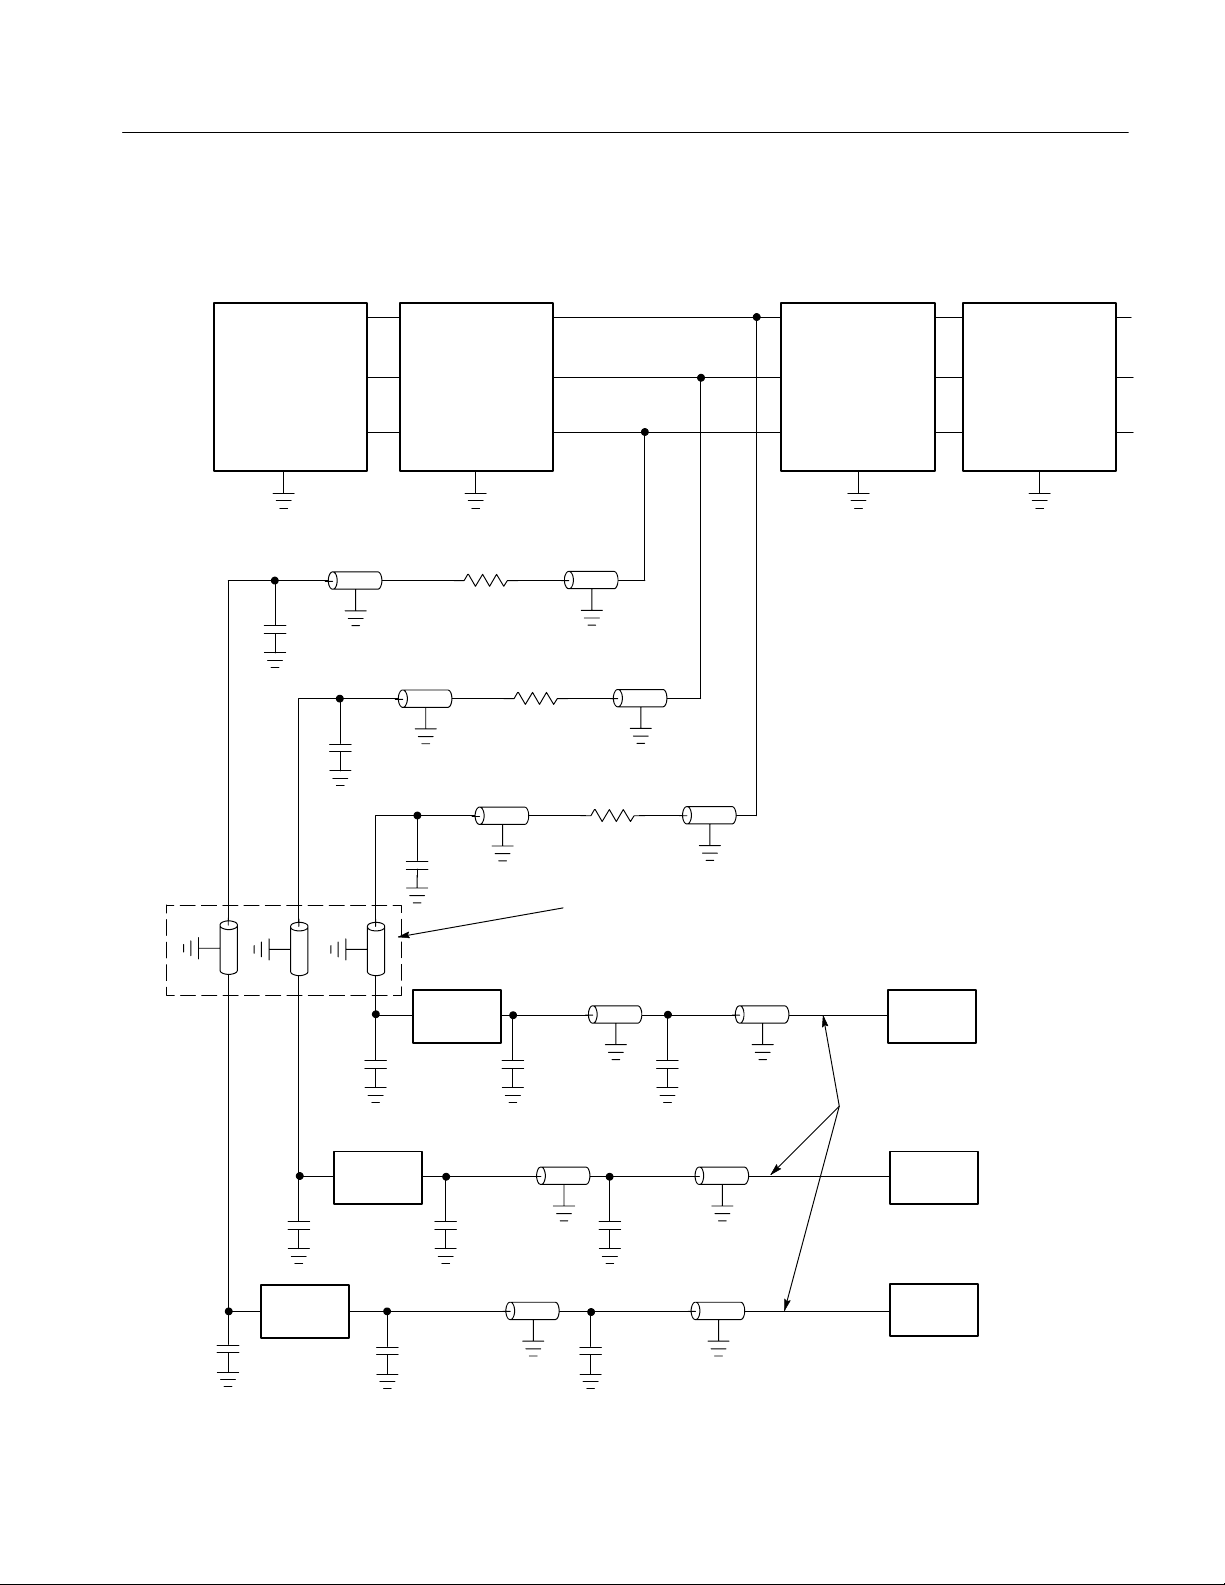
Loading Diagrams
Specifications
LGA775 Socket
microprocessor
Signal 1
Signal 2
Signal 3
VSS
~1300 mils
C1
0.7 pF
75 Ω
213 ps
C2
0.7 pF
LGA775 Socket
In 1
LGA socket
In 2
200 Ω±15%
75 Ω
~1300 mils
213 ps
Out 1
Out 2
Out 3In 3
VSS
R1
200 Ω±15%
75 Ω
~1300 mils
213 ps
R2
75 Ω
~25 mils
4.6 ps
75 Ω
~25 mils
4.6 ps
R3
200 Ω±15%
75 Ω
~25 mils
4.6 ps
Probe head FR4
(see details below)
Node 7
Node 6
Node 3
Probe FR4
Node 2
Node 4Node 8
VSS
LGA775 Spacer
(see details below)
Node 8
LGA Spacer
Node 7
Node 2
Node 1
Node 3Node 9
VSS
C3
0.7 pF
Mated
Samtec
C7
0.7 pF
75 Ω
~44’’
4.18 ns
75 Ω
~44’’
4.18 ns
C6
0.7 pF
Mated
Samtec
C5
0.7 pF
C4
0.7 pF
Mated
Samtec
C8
0.7 pF
C9
0.7 pF
Figure 2--1: Electrical load model for typical signals
75 Ω
Coax Ribbon Loss
4”
--0.4dB@1.7GHz
477 ps
75 Ω
~44’’
4.18 ns
C11
0.4 pF
C12
0.7 pF
~1350 mils
C10
0.4 pF
75 Ω
~1350 mils
213 ps
75 Ω
~1300 mils
213 ps
75 Ω
213 ps
Receiver
Coax Ribbon Loss
--0.58dB@1.7GHz
Receiver
Receiver
TMSST1 775-Pin Socket Hardware Support
2--3
Page 40

Specifications
Specification Tables
Signal In 1
R1
10 mΩ
C4
0.5 pF
L1
3.2 nH
C3
0.7 pF
Signal Out 2
Figure 2--2: Mated Samtec load model
TD=83 ps
Z0=75 Ω
0.2 Ω
225 fF
TD=5 ps
Z0=100 Ω
Figure 2--3: Receiver load model
C2
0.5 pF
450 fF
75 Ω
VREF~0.8 V
These specifications are for a probe adapter connected between a compatible
Tektronix logic analyzer and a target system. The signal voltage swing in your
target system must be at least 600 mV
around the GTL+ reference voltage.
p-p
Table 2--1 lists the electrical requirements of the target system. Table 2--2 lists the
electrical requirements for the power supply that provides power to the probe
adapter. Table 2--3 lists the environmental specifications.
Table 2--1: Electrical specifications for the target system
Characteristics Requirements (Typical)
DC power requirements
Typical - - Vcc= 1.2 V, V
Voltage, V
cc
Common clock rate Maximum 266 MHz
Common clock capture
Typical - - Vcc= 1.2 V, V
Window 750 ps
T
su
T
hd
= 0.8 V, at 25 °C
REF
= 0.8 V, VIH=V
REF
1.2 V ᐔ5%
+400 mV, VIL=V
REF,
1ns
--250 ps
--400mV,at25°C
REF
2--4
TMSST1 775-Pin Socket Hardware Support
Page 41

Table 2--1: Electrical specifications for the target system (cont.)
Characteristics Requirements (Typical)
2x Source-Synchronous capture
Window 500 ps
Specifications
T
su
T
hd
250 ps
250 ps
4x Source-Synchronous capture (DBI
disabled)
Window 350 ps
T
su
T
hd
175 ps
175 ps
Table 2--2: Electrical specifications for the AC input to the preprocessor unit
Characteristics Description
Input Voltage rating 100 -- 240 VAC CAT II
Input Frequency Rating 50 -- 60 Hz
Input Current Rating 60 A maximum
Table 2--3: Environmental specifications
Characteristic
Temperature
Maximum operating +50 °C (+122 °F)
Minimum operating 0 °C (+32 °F)
Nonoperating -- 5 5 °Cto+75°C(--67°F to +167 °F)
Humidity 10 to 90% relative humidity, noncondensing
Altitude
Operating 3 km (10,000 ft) maximum
Nonoperating 12 km (40,000 ft) maximum
TMSST1 775-Pin Socket Hardware Support
1
Description
2
2--5
Page 42

Specifications
g
gyp
Table 2--3: Environmental specifications (cont.)
Characteristic
1
Description
Electrostatic immunity The probe adapter is static sensitive
Required airflow clearances
for the preprocessor unit
Front, top, left side 5.08 cm (2 in)
Back 7.62 cm (3 in)
Bottom, right side 0.635 cm (0.250 in)
1
Designed to meet Tektronix standard 062-2847-00 class 5.
2
Not to exceed Microprocessor thermal considerations. Customer supplied cooling
might be required across the CPU.
Table 2--4: Certifications and compliances
Category Standards or description
EC Declaration of Conformity -Low Voltage
U.S. Nationally Recognized
Testing Laboratory Listing
Canadian Certification CAN/CSA C22.2 No. 1010.1 Safety requirements for electrical equipment for measurement,
Additional Compliance IEC61010--1/A2:1995 Safety requirements for electrical equipment for measurement,
Installation (Overvoltage)
Category Descriptions
Equipment Type Test and measuring
Safety Class Class 1 (as defined in IEC 61010-1, Annex H) -- grounded product
Overvoltage Category Mains input: Overvoltage Category II (as defined in IEC 61010-1, Annex J)
Pollution Degree Pollution Degree 2 (as defined in IEC 61010-1). Note: Rated for indoor use only.
Compliance was demonstrated to the following specification as listed in the Official Journal of the
European Communities:
Essential requirements of the Low Voltage Directive 73/23/EEC, amended by 93/68/EEC
UL61010B:2003 Standard for electrical measuring and test equipment.
control, and laboratory use.
control, and laboratory use
Terminals on this product may have different installation (overvoltage) category designations. The
installation categories are:
CAT III Distribution-level mains (usually permanently connected). Equipment at this level is
typically in a fixed industrial location.
CAT II Local-level mains (wall sockets). Equipment at this level includes appliances, portable
tools, and similar products. Equipment is usually cord-connected.
CAT I Secondary (signal level) or battery operated circuits of electronic equipment.
All other inputs and outputs: 5 V maximum
2--6
TMSST1 775-Pin Socket Hardware Support
Page 43

Specifications
Dimensions
35.33 mm
(1.391 in)
Center of processor
Socket pin 1
Figure 2--4 shows the dimensions of the probe head.
64.33 mm
(2.533 in)
16.86 mm
(0.664 in)
73.66 mm
(2.900 in)
15.24 mm
(0.630 in)
40.36 mm
(1.589 in)
17.20 mm
(0.677 in)
1.625 mm
(0.064 in)
1.88 mm
(0.074 in)
11. 5 5 mm
(0.455 in)
Figure 2--4: Dimensions of the probe head
1.88 mm
(0.074 in)
4.57 mm
(0.180 in)
TMSST1 775-Pin Socket Hardware Support
2--7
Page 44
Specifications
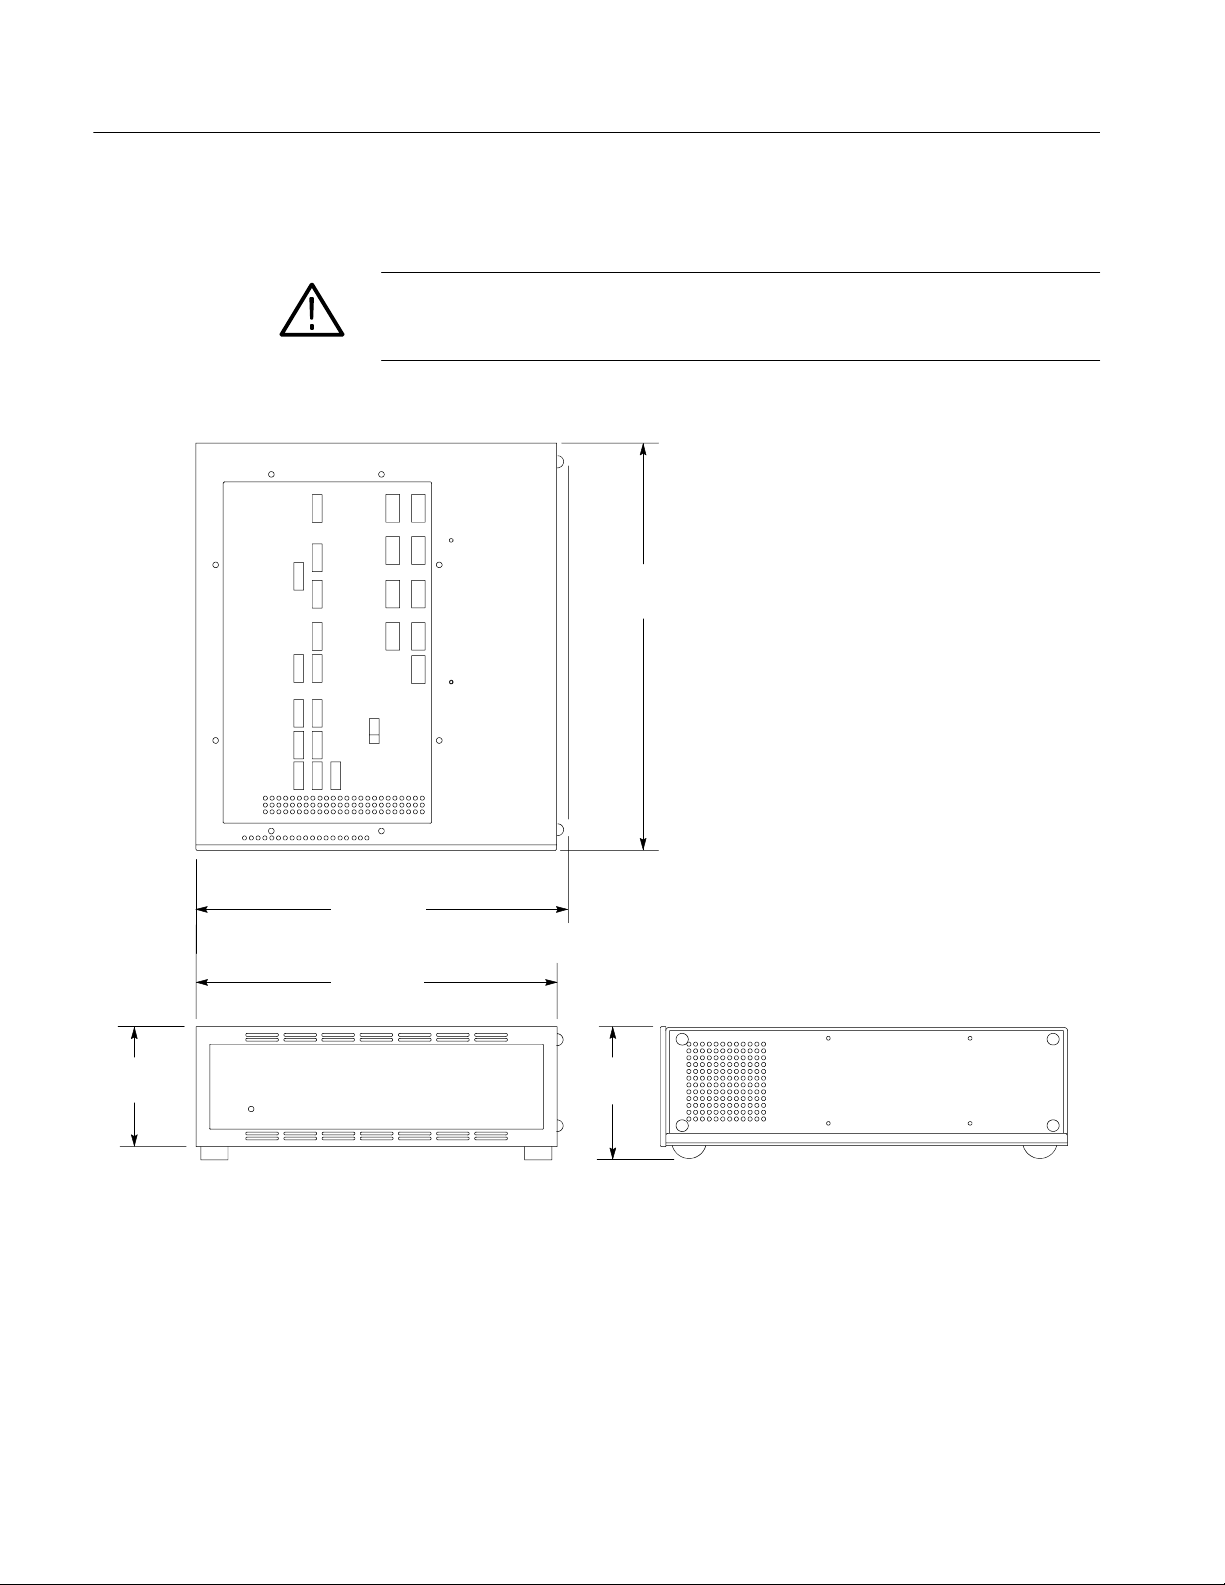
Figure 2--5 shows the dimensions of the preprocessor unit.
CAUTION. To prevent damage to the circuitry in the preprocessor unit, you must
observe the required clearances in Table 2--3 on page 2--6 (clearances are not shown
in Figure 2--5).
474.32 mm
(18.674 in)
425.45 mm
(16.750 in)
420.37 mm
(16.550 in)
139.70 mm
(5.500 in)
Figure 2--5: Dimensions of the preprocessor unit
160.27 mm
(6.310 in)
2--8
TMSST1 775-Pin Socket Hardware Support
Page 45

Reference
Page 46

Page 47

Reference Tables
The TMSST1 software floppy contains the following reference tables. Viewing a
table is not a requirement when preparing the module for use. You can view the
reference tables without connecting the TLA to your target system. These tables
are provided to assist you when you are debugging a target system.
H Channel and Group Definition Tables — The TMSST1 software
automatically defines channel groups. These groups define the channel
assignments and the groups for a software support set up. If you want to
know what the group definition is for a channel group or which signal is in
which channel group, refer to these tables.
H Symbol Tables — Symbol files are files of alphanumeric symbol names and
associated data values. Symbol files are used to map a channel group value
to a text string and/or color. For example, a symbol file could map an
address group value to a function name. This is faster and easier to interpret
than a numeric value.
NOTE. The Color symbol table is not associated with any channel groups.
Viewing Reference Tables
You must load your support and merge the modules before completing the
following steps.
To view a symbol table, follow these steps:
1. In the System window under System, select Symbol to display the Symbol
2. Select Load to display the Load Symbol File window.
3. Select and right click one of the .tsf files to display the S elect menu.
4. Select Open and select the appropriate editor, (Word Pad for example) to
window.
view the symbol table.
TMSST1 775-Pin Socket Hardware Support
3- 1
Page 48

Reference Tables
To Extract Groups
To extract a channel group or a group definition table, follow these steps:
1. Open a System window.
2. Select the Setup icon.
3. In the Setup window, open the Window menu and select Setup: <support file
name>.
4. In the Setup window under Group Name, select a group.
5. Open File > Export Channel Setup to display a Channel Setup Export
window. Notice the Export Path name to locate your exported file later.
In the Channel Setup Export window under Export Selections, check that the
Export Channel Information and the Export Group Information boxes are
checked.
The Field delimiter box controls how the tables are displayed. See the
Tektronix logic analyzer online help for more information.
6. Select Export.
3- 2
TMSST1 775-Pin Socket Hardware Support
Page 49

Replaceable Parts List
Page 50

Page 51

Replaceable Parts List
This section contains a list of the replaceable components or modules for the
TMSST1 Hardware Support package.
Parts Ordering Information
Replacement parts are available through your local Tektronix field office or
representative.
Changes to Tektronix products are sometimes made to accommodate improved
components as they become available and to give you the benefit of the latest
improvements. Therefore, when ordering parts, it is important to include the
following information in your order:
H Part number
H Instrument type or model number
H Instrument serial number
H Instrument modification number, if applicable
Module Servicing
If you order a part that has been replaced with a different or improved part, your
local Tektronix field office or representative will contact you concerning any
change in part number.
Modules can be serviced by selecting one of the following three options. Contact
your local Tektronix service center or representative for repair assistance.
Module Exchange. In some cases you may exchange your module for a remanufactured module. These modules cost significantly less than new modules and
meet the same factory specifications. For more information about the module
exchange program, call 1-800-833-9200. Outside North America, contact a
Tektronix sales office or distributor; see the Tektronix web site for a list of
offices: www.tektronix.com.
Module Repair and Return. You may ship your module to us for repair, after which
we will return it to you.
New Modules. You may purchase replacement modules in the same way as other
replacement parts.
TMSST1 775-Pin Socket Hardware Support
4--1
Page 52

Replaceable Parts List
Using the Replaceable Parts List
This section contains a list of the mechanical and/or electrical components that
are replaceable for the TMSST1 Hardware Support package. Use this list to
identify and order replacement parts. The following table describes each column
in the parts list.
Parts list column descriptions
Column Column name Description
1 Figure & index number Items in this section are referenced by figure and index numbers to the exploded view illustrations
that follow.
2 Tektronix part number Use this part number when ordering replacement parts from Tektronix.
3 and 4 Serial number Column three indicates the serial number at which the part was first effective. Column four
indicates the serial number at which the part was discontinued. No entry indicates the part is
good for all serial numbers.
5 Qty This indicates the quantity of parts used.
6 Name & description An item name is separated from the description by a colon (:). Because of space limitations, an
item name may sometimes appear as incomplete. Use the U.S. Federal Catalog handbook H6-1
for further item name identification.
7 Mfr. code This indicates the code of the actual manufacturer of the part.
8 Mfr. part number This indicates the actual manufacturer’s or vendor’s part number.
Abbreviations
Mfr. Code to Manufacturer
Cross Index
Abbreviations conform to American National Standard ANSI Y1.1--1972.
The table titled Manufacturers Cross Index shows codes, names, and addresses of
manufacturers or vendors of components listed in the parts list.
4--2
TMSST1 775-Pin Socket Hardware Support
Page 53

Replaceable Parts List
Manufacturers cross index
Mfr.
code
TK2548 XEROX CORPORATION 7431 EVERGREEN PARKWAY HILLSBORO, OR 97124
060D9 TENSOLITE COMPANY PRECISION HARNESS AND ASSEMBLY~3000
0B445 ELECTRI--CORD MFG CO INC 312 EAST MAIN STREET WESTFIELD, PA 16950
0KB01 STAUFFER SUPPLY CO 810 SE SHERMAN PORTLAND, OR 97214--4657
1K3Q9 PACKAGING RESOURCES 12555 SW TUALATIN SHERWOOD RD TUALATIN, OR 97062--8051
1WNW6 ACCRA--FAB INC 23201 E APPLEWAY LIBERTY LAKE, WA 99019
S3109 FELLER U.S. CORPORATION 10B VAN DYKE AVENUE NEW BRUNSWICK, NJ 08901
TK1373 PATELEC--CEM 10156 TORINO~VAICENTALLO~62/456 ITALY,
TK6121 TUMBLER CORP 4241 BUSINESS CENTER DR FREMONT, CA 94538
TK6585 TRESKE PRECISION MACHINE INC 14140 SW GALBREATH DRIVE SHERWOOD, OR 97140
80009 TEKTRONIX INC 14150 SW KARL BRAUN DR
Manufacturer Address City, state, zip code
PACKAGING RESOURCES 12555 SW TUALATIN SHERWOOD RD TUALATIN, OR US 97062--8051
VANCOUVER, WA 98661
COLUMBIA HOUSE BLVD~#120
BEAVERTON, OR 97077--0001
PO BOX 500
TMSST1 775-Pin Socket Hardware Support
4--3
Page 54

Replaceable Parts List
Replaceable parts list
Fig. &
index
number
4--1--1 672--5701--50
Tektronix part
number
--2 386 --7379--00 1 BRACKET SUPPORT;FILTER MOUNT 386737900
--3 200 --4843--00 1 COVER,SOCKET;TMSST1 TK6585 200--4843--00
--4 386 --7400--00 1 LOAD PLATE,BOTTOM;TYCO;ELECTROLESS NICKEL
--5 386 --7401--00 1 LOAD PLATE,TOP;ELECTROLESS NICKEL FINISH;S7 TOOL
--6 361 --1808--00 4 STANDOFF,HEATSINK ATTACH;BRASS WITH NYLON
--7 211--1187--00 4 SCREW; M3.5 X 8MM,FLT,PHL,STL 18--8;.3C8MXFS 0KB01 .3C8MXFS
--8 065 --0701--00 1 SHIPPING KIT;TMSST1 065070100
--9 016 --1940--00 1 CASE,STORAGE; PLASTIC,W/FOAM,12.4X8.9X2.9;FLEX
*
Serial no.
effective
Serial no.
discont’d
Qty Name & description
1 CIRCUIT BD ASSY; TMSST1 PROBE HEAD W/CABLES &
PADDLE BD;TESTED
FINISH;S7 TOOL STEEL;TMSST1
STEEL;SUB PART OF 136140000;TMSST1
INSERT;TMSST1
CABLE ASSEMBLY
Mfr.
code
80009 672--5701--50
TK6585 386740100
TK6585 361--1808--00
1K3Q9 016194000
Mfr. part number
STANDARD ACCESSORIES
071--1315--XX 1 MANUAL,TECH;INSTRUCTION,HARDWARE/SOFTWARE;PUB
161--0104--00 1 CABLE ASSY,PWR; 3,18 AWG,98.0 L,125V/10AMP,RIGHT
--10 012--1661--00 6--7 CA ASSY; INTCON,SHLD RIBBON,MCP,72 L 060D9 012--1661--00
------------ -------- 4--5 P6860 PROBE 80009 ORDER BY
161--0104--05 1 CABLE ASSY,PWR; 3,1.0MM SQ,250V/10A,2.5 ME-
161--0104--06 1 CABLE ASSY,PWR; 3,1.0MM SQ,250V/10A,2.5 ME-
161--0104--07 1 CABLE ASSY,PWR; 3,1.0MM SQ,250V/10A,2.5 ME-
161--0167--00 1 CABLE ASSY,PWR; 3,0.75MM SQ,250V/10A,2.5 ME-
*
Return the preprocessor unit to the factory for service.
32G9;TMSST1
ANGLE,IEC320,NEMA 15--5P,WITH CORD GRIP,US,SAFETY
CONTROLLED
OPTIONAL ACCESSORIES
TER,RTANG,IEC320,RCPT,AUSTRALIA,SAFETY CONTROLLED
TER,RTANG,IEC320,RCPT,EUROPEAN,SAFETY CONTROLLED
TER,RTANG,IEC320,RCPT X 13A,FUSED,UK PLUG,(13A
FUSE),UNITED KINGDOM,SAFETY CONTROLLED
TER,RTANG,IEC320,RCPT,SWISS,NO CORD GRIP,SAFETY
CONTROLLED
TK2548 071--1315--XX
TK6121 3572WV88.2GI
DESCRIPTION
TK1373 161--0104--05
S3109 1923
TK6121 21072WH518.2
0B445 161--0167--00
4--4
TMSST1 775-Pin Socket Hardware Support
Page 55

Replaceable Parts List
2
3
1
10
4 5
6
8
9
7
Figure 4--1: Probe adapter exploded view
TMSST1 775-Pin Socket Hardware Support
4--5
Page 56

Replaceable Parts List
4--6
TMSST1 775-Pin Socket Hardware Support
Page 57

Index
Page 58

Page 59

Index
A
About this manual set, ix
Address, Tektronix, x
Address bus, 1--3
Airflow clearance, 2--6
Application, logic analyzer configuration, 1--1
C
Care and maintenance, external, 1--14
Channel assignment tables, 3--2
Circuit description, 2--1
Clock rate, 1--3
Connections
LAI_Cable, 1--2
P6860, 1-- 2
to target system, 1--5
Contacting Tektronix, x
D
Data bus, 1--3
Default channel mapping
LAI_Cable labels, 1--3
probe labels, 1--3
Definitions
information on basic operations, ix
Master module, ix
Slave module, ix
Dimensions
preprocessor unit, 2--9
probe head, 2--8
Disabling the cache, 1--4
Disassembler
logic analyzer configuration, 1-- 1
setup, 1--13
E
Electrical specifications, 2--1, 2--4
AC adapter, 2-- 5
clock rate, 2--4
power requirements, 2--4
setup time, 2--4
source synchronous capture, disabled, 2--5
Environmental specifications, 2--5
airflow clearance, 2--6
altitude, 2--5
electrostatic immunity, 2--6
humidity, 2--5
temperature, 2--5
F
Fuses, maintenance, 1--14
G
Group definitions, 3--2
I
Installing support software, 1-- 1 3
Interposer, definition, ix
L
LAI_Cable
configuration, 1--11
connections, 1--2, 1--11
LAI_Cable labels, default channel mapping, 1--3
Loading diagrams, 2--3
Logic analyzer
configuration for disassembler, 1--1
configuration for the application, 1--1
M
Maintenance, fuses, 1--14
Manual
conventions, ix
how to use the set, ix
Master module, definition, ix
Modules connections, 1--2
O
Options, 1--3
TMSST1 775-Pin Socket Hardware Support
Index--1
Page 60

Index
P
P6860, 1-- 2
connections, 1--12
P6860 probe, configuration, 1-- 11
Phone number, Tektronix, x
Power, applying, 1--12
Probe adaper review, 1--3
Probe adapter
hardware description, 1--1
software compatibility, 1--1
Probe labels, default channel mapping, 1--3
Product support, contact information, x
R
Reference tables
symbol, channel group, group definition, 3--1
viewing, 3--1
Removing hardware, from target system, 1--8, 1--15
Reset, 1--3
Restrictions, 1--3
address bus, 1--3
clock rate, 1--3
data bus, 1--3
disabling the cache, 1--4
Setups
disassembler, 1--13
support, 1--13
Shipping, probe adapter, assembled, 1--18
Slave module, definition, ix
Specifications, 2--1
electrical, 2--1, 2--4
environmental, 2--5
mechanical (dimensions), 2--8, 2--9
Storage, long--term, 1-- 16
Support, setup, 1--13
Symbol tables, 3--2
System clock rate, 1--3
T
Tables, 3--2
Technical support, contact information, x
Tektronix, contacting, x
Terminology, ix
TLA7AX, probes, measurements, 1-- 2
TLA7AX module, measurements, 1-- 2
U
URL, Tektronix, x
S
Service support, contact information, x
W
Web site address, Tektronix, x
Index--2
TMSST1 775-Pin Socket Hardware Support
 Loading...