


THS710A, THS720A,
THS730A & THS720P
TekScope
Reference
070-9741-01

Getting Started
123
Connect probes or leads. Press AUTORANGE.
Choose SCOPE
or METER mode.
Copyright E Tektronix, Inc. Printed in U.S.A.

Scope Mode
Oscilloscope
waveform
Meter Mode
118.6 VAC
Ch1
Freq
26.76 MHz
DMM reading
Automated
measurements
DMM reading
Data Logger
plot
1 18.6 VAC
Maximum statistic
Current reading
Minimum statistic
Bar graph

Menu System
Press a front-panel button to display a menu.
1
Press a bezel button to choose a menu item. If a pop-up menu appears,
2
continue to press the bezel button to choose an item in the pop-up menu.

Certain menu choices require you to set a numerical value to complete
3
the setup. Use the
+
/– rocker to adjust the value.
If the OK bezel button is displayed, press it to confirm your choice.
4

Acquisition Mode
Press ACQUIRE.
1
Choose an acquisition
2
mode.
To remove menus, press
3
CLEAR MENU.
Harmonics (THS720P)
Connect the probes or leads.
1
Ch 2Ch 1
P3
P2
P1
S3
S2
S1
N

Press DISPLAY
2
(HARMONICS).
Harmonics measurements
Status line
Choose On.
3
Choose a set of
4
harmonics.
Harmonics readout
Waveform readout
To choose other measurements, press one of the following buttons.
5
Select next
harmonic
Voltage
harmonics
Current
harmonics
Power
measurements

Trigger Type
Press
1
TRIGGER MENU.
Edge or Motor
Choose Ch 1 or Ch 2
or External (Edge)
DC
Choose a trigger type.
2
Adjust the
3
TRIGGER LEVEL.
Pulse Video
Choose Ch 1 or Ch 2 Choose Ch 1 or Ch 2
Source
Positive
1
Odd Field
(Interlaced)
3
HF
Reject
LF
Reject
Noise Rej (DC Low
Sensitivity)
Positive
Slope SourceCoupling (Ch 1 or Ch 2)
Negative
Negative
Polarity & width SourceTrigger when
1
Set pulse width with
+
/– rocker
Less
Than Width
Greater
Than Width
Equal To
2
Width
Not Equal
To Width
2
Set tolerance
1
Even Field
Trigger on
(Interlaced)
Any Field
3
Any
line
3
(Non-interlaced)
Lines
3
Choose line with
+
/– rocker
NTSC
PAL
Video Class
SECAM
Custom Scan
2
4
Rate
4
Set scan rate with
+
/– rocker

DMM and Data Logger
Choose a DMM function.
1
Press AUTORANGE or set a
2
specific range.
To select a Data Logger zoom factor, press VERTICAL MENU and then choose a
4
zoom factor.
Set the Data Logger rate.
3
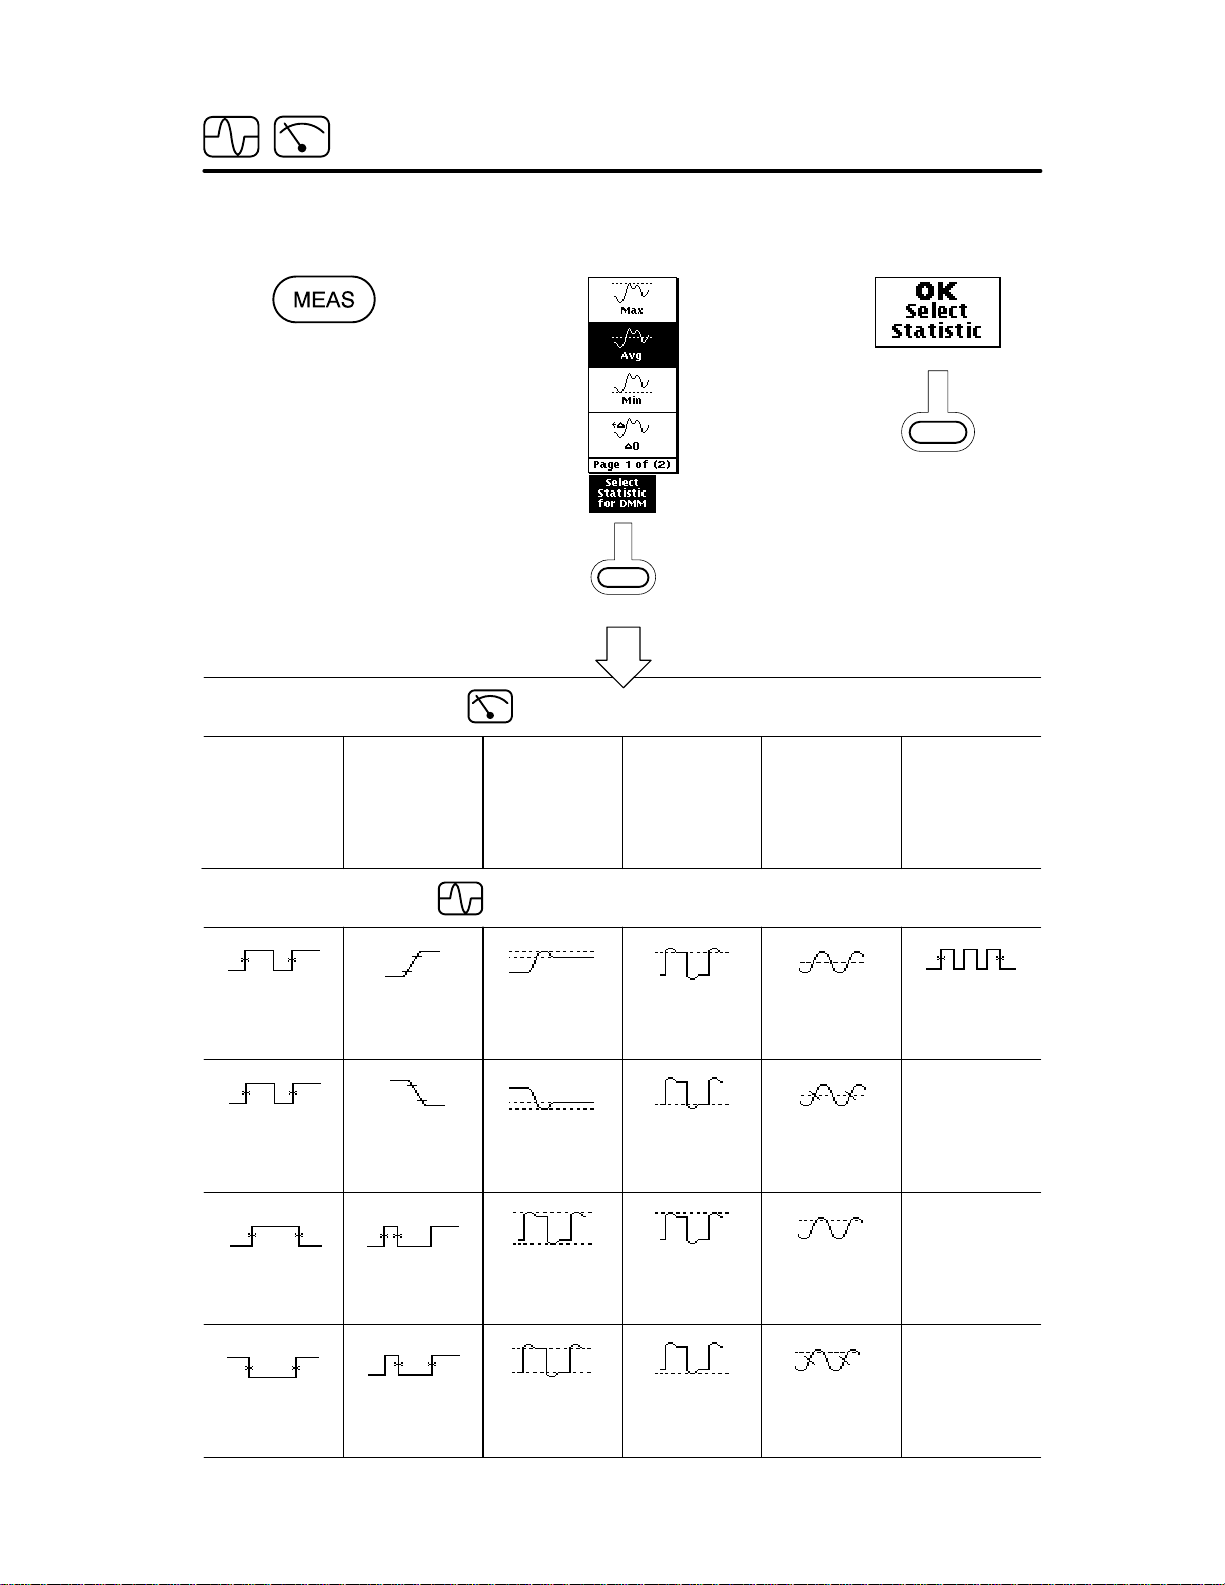
Automated Measurements
1
Press MEAS.
2
Choose from the pop-up
menu.
Meter Statistic Choices
3
Press OK.
Period
Frequency
Positive
Width
Rise Time
Fall Time
Positive
Duty Cycle
Scope Measurement Choices
Positive
Overshoot
Negative
Overshoot
Pk–Pk
High
Low
Max
Rel Max–MinAverageMinMax
Mean
Cycle Mean
RMS
Burst Width
Negative
Width
Negative
Duty Cycle
Amplitude
Min
Cycle RMS
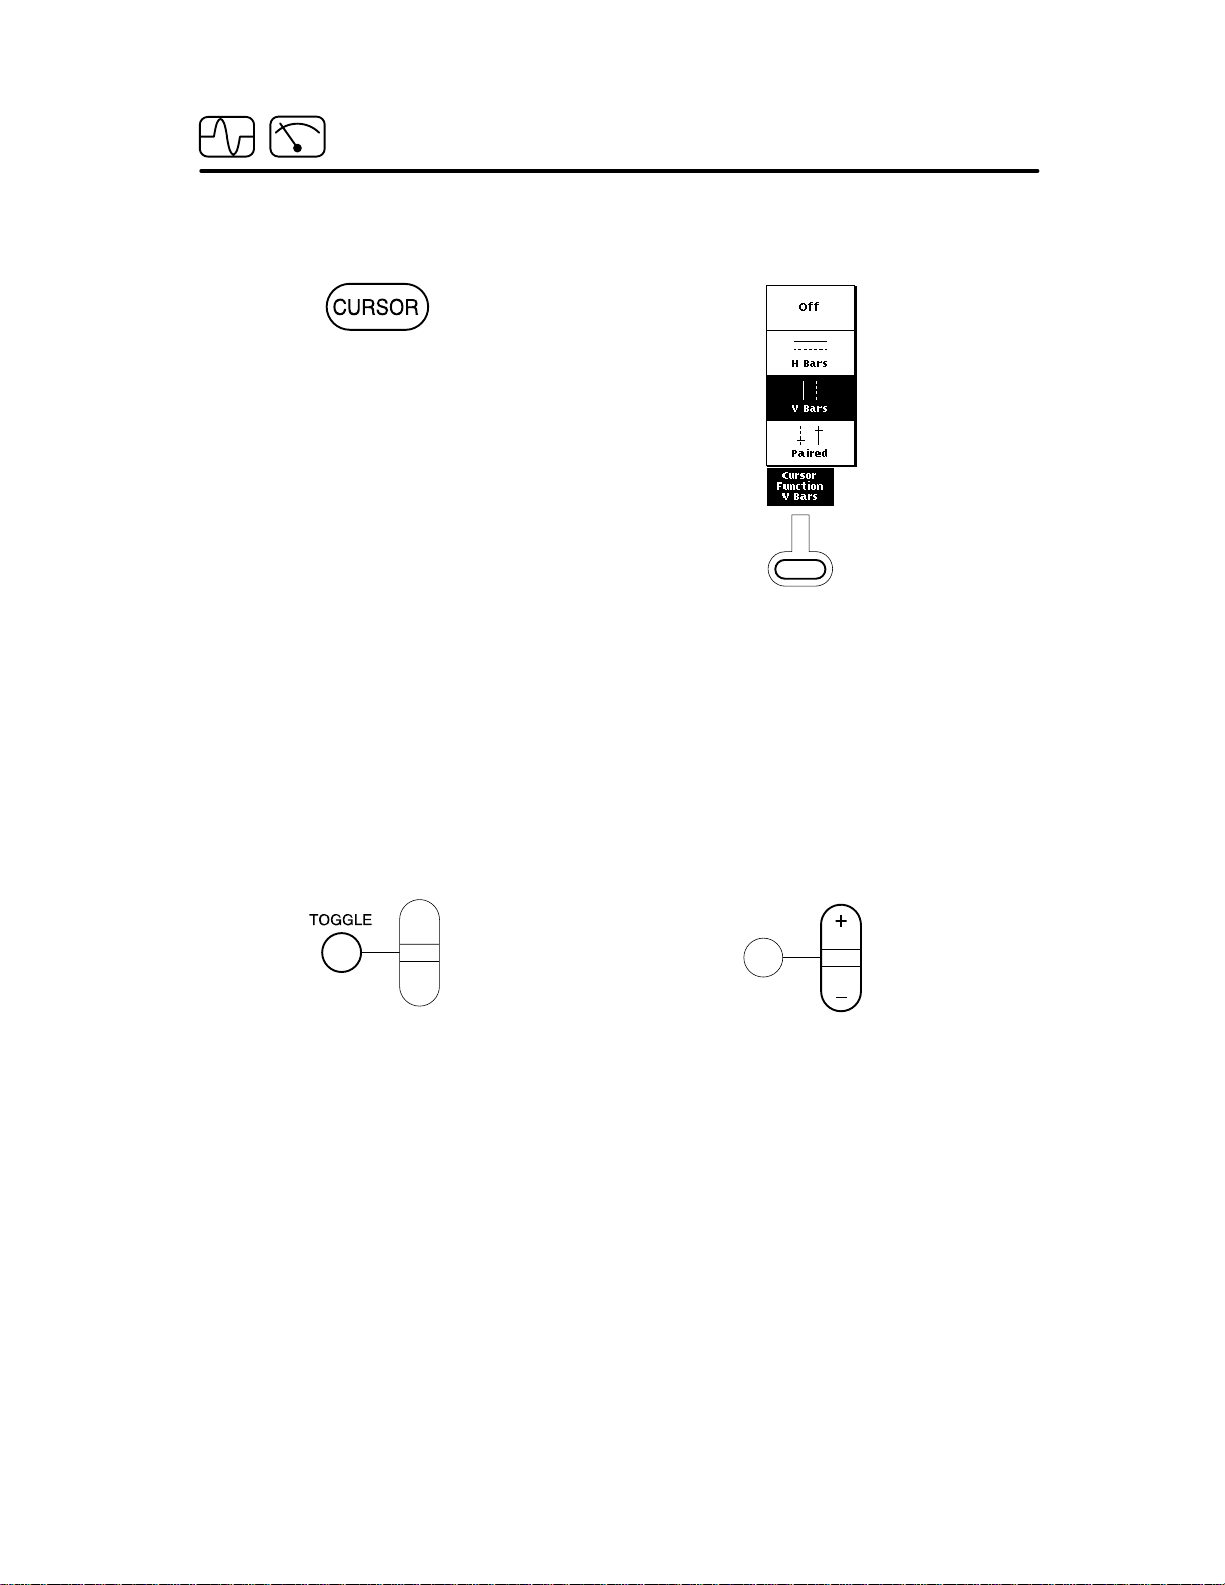
Cursors
12
Press CURSOR. Choose a cursor function.
34
Use TOGGLE to choose the
active cursor.
Use the +/– rocker to adjust the
cursor position.

Hard Copy
1
Connect the TekScope instrument to a printer or PC using an RS-232 cable.
Check the table below for any additional adapters required.
Printer
TekScope instrument
RJ-45 to 9-pin female
null modem adapter
(standard)
HC 411 or DPU 411-II
printer
RS-232 cable
RJ-45 to 25-pin male
adapter
9-pin male to 25-pin
male adapter
PC
25-pin female to female
gender adapter
Most other serial
printers
Sun workstations
PC/AT or laptop with
9-pin male connector
Old-style PC with
25-pin male connector

2
Press UTILITY.
3
Choose Hard Copy from the
System pop-up menu.
4
Choose a printer format. Press OK.
5
When ready to print, press
HARD COPY.
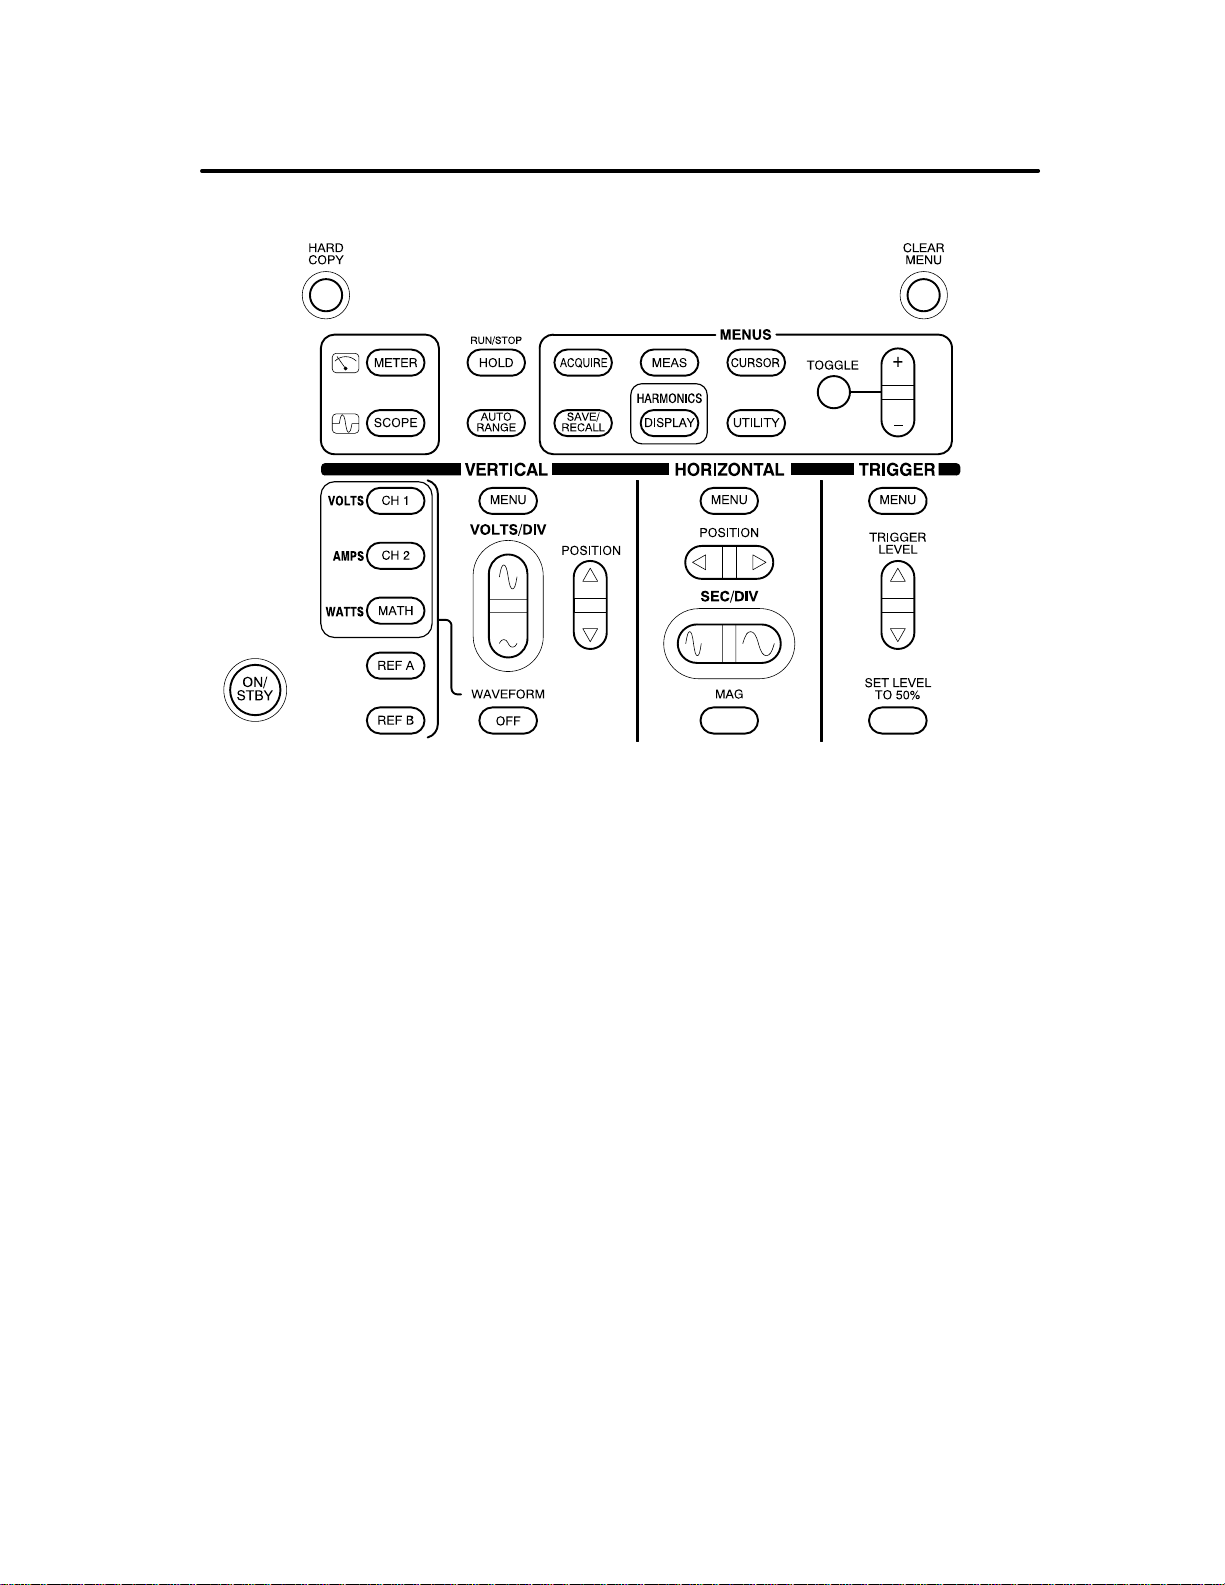
Front-Panel Buttons
ACQUIRE. Displays the Acquire menu.
AUTORANGE. Selects oscilloscope or meter Autorange function.
CH 1 and CH 2. Displays and selects a channel waveform.
CLEAR MENU. Clears menu from display .
CURSOR. Displays the Cursor menu.
DISPLAY. Displays the Display menu and activates Harmonics (THS720P).
HARD COPY. Initiates a hard copy using the RS-232 port.
HOLD. Stops/restarts oscilloscope acquisition or holds/resets meter readout.
HORIZONTAL MENU. Displays the Horizontal menu.

HORIZONTAL POSITION. Adjusts oscilloscope waveform horizontal position.
MAG. Turns 10X horizontal magnification on and off.
MATH. Displays and selects the math waveform.
MEAS. Displays the Measurement menu.
METER. Selects meter mode.
ON/STBY. Selects on or standby. Does not disconnect power from the instrument.
REF A and REF B. Displays and selects a reference waveform.
SAVE/RECALL. Displays the Save/Recall menu.
SCOPE. Selects scope mode.
SEC/DIV. Adjusts horizontal scale factor for oscilloscope or data logger.
SET LEVEL TO 50%. Sets trigger level to midpoint of oscilloscope waveform.
+
TOGGLE and
/– Rocker. Select and move cursors. Adjust numerical values.
TRIGGER LEVEL. Adjusts trigger level.
TRIGGER MENU. Displays the Trigger menu.
UTILITY. Displays the Utility menu.
VERTICAL MENU. Displays the Vertical menu.
VERTICAL POSITION. Adjusts oscilloscope waveform or data logger vertical position.
VOLTS/DIV. Adjusts oscilloscope vertical scale factor or meter range.
WAVEFORM OFF. Removes selected oscilloscope waveform from display.
 Loading...