

Page 1

xx
TekSmartLab™
ZZZ
TBX3000A and TSL3000B
User Manual
*P077111002*
077-1110-02
Page 2

Page 3

xx
TekSmartLab™
ZZZ
TBX3000A and TSL3000B
User Manual
Revision A
Register now!
Click the following link to protect your product.
► www.tek.com/register
www.tek.com
077-1110-02
Page 4

Copyright © Tektronix. All rights reserved. Licensed software products are owned by Tektronix or its subsidiaries
or suppliers, and are protected by national copyright laws and international treaty provisions.
Tektronix products are covered by U.S. and foreign patents, issued and pending. Information in this publication
supersedes that in all previously published material. Specifications and price change privileges reserved.
TEKTRONIX and TEK are registered trademarks of Tektronix, Inc.
Contacting Tektronix
Tektronix, Inc.
14150 SW Karl Braun Drive
P.O. B ox 500
Beaverto
USA
For product information, sales, service, and technical support:
n, OR 97077
In North America, call 1-800-833-9200.
Worldwide, visit www.tek.com to find contacts in your area.
Page 5

This is the hardware warranty.
Warranty
Tektronix war
years from the date of original purchase from an authorized Tektronix distributor. If the product proves defective
during this warranty period, Tektronix, at its option, either will repair the defective product without charge for
parts and labor, or will provide a replacement in exchange for the defective product. Batteries are excluded from
this warranty. Parts, modules and replacement products used by Tektronix for warranty work may be new or
reconditioned to like new performance. All replaced parts, modules and products become the property of Tektronix.
In order to obtain service under this warranty, Customer must notify Tektronix of the defect before the expiration
of the warranty period and make suitable arrangements for the performance of service. Customer shall be
responsib
shipping charges prepaid, and with a copy of customer proof of purchase. Tektronix shall pay for the return of the
product to Customer if the shipment is to a location within the country in which the Tektronix service center is
located. Customer shall be responsible for paying all shipping charges, duties, taxes, and any other charges for
products returned to any other locations.
This warranty shall not apply to any defect, failure or damage caused by improper use or improper or inadequate
maintenance and care. Tektronix shall not be obligated to furnish service under this warranty a) to repair damage
resulting from attempts by personnel other than Tektronix representatives to install, repair or service the product;
epair damage resulting from improper use or connection to incompatible equipment; c) to repair any damage
b) to r
or malfunction caused by the use of non-Tektronix supplies; or d) to service a product that has been modified or
integrated with other products when the effect of such modification or integration increases the time or difficulty
of servicing the product.
THIS WARRANTY IS GIVEN BY TEKTRONIX WITH RESPECT TO THE PRODUCT IN LIEU OF ANY
OTHER WARRANTIES, EXPRESS OR IMPLIED. TEKTRONIX AND ITS VENDORS DISCLAIM ANY
IMPLIED WARRANTIES OF MERCHANTABILITY OR FITNESS FOR A PARTICULAR PURPOSE.
TEKTRONIX' RESPONSIBILITY TO REPAIR OR REPLACE DEFECTIVE PRODUCTS IS THE SOLE
D EXCLUSIVE REMEDY PROVIDED TO THE CUSTOMER FOR BREACH OF THIS WARRANTY.
AN
TEKTRONIX AND ITS VENDORS WILL NOT BE LIABLE FOR ANY INDIRECT, SPECIAL, INCIDENTAL,
OR CONSEQUENTIAL DAMAGES IRRESPECTIVE OF WHETHER TEKTRONIX OR THE VENDOR HAS
ADVANCE NOTICE OF THE POSSIBILITY OF SUCH DAMAGES.
rants that the product will be free from defects in materials and workmanship for a period of three (3)
le for packaging and shipping the defective product to the service center designated by Tektronix,
[W16 – 15AUG04]
Page 6

This is the software warranty.
Warranty
Tektron ix war
the media will be free from defects in materials and workmanship for a period of three (3) months from the date of
shipment. If any such medium or encoding proves defective during the warranty period, Tektronix will provide
a replacement in exchange for the defective medium. Except as to the media on which this software product is
furnished, this software product is provided “as is” without warranty of any kind, either express or implied.
Tektronix does not warrant that the functions contained in this software product will meet Customer's requirements
or that the
In order to obtain service under this warranty, Customer must notify Tektronix of the defect before the expiration
of the warr
workmanship within a reasonable time thereafter, Customer may terminate the license for this software product
and return this software product and any associated materials for credit or refund.
THIS WARRANTY IS GIVEN BY TEKTRONIX WITH RESPECT TO THE PRODUCT IN LIEU OF ANY
OTHER WARRANTIES, EXPRESS OR IMPLIED. TEKTRONIX AND ITS VENDORS DISCLAIM ANY
IMPLIED WARRANTIES OF MERCHANTABILITY OR FITNESS FOR A PARTICULAR PURPOSE.
TEKTRONIX' RESPONSIBILITY TO REPLACE DEFECTIVE MEDIA OR REFUND CUSTOMER'S
PAYMENT IS THE SOLE AND EXCLUSIVE REMEDY PROVIDED TO THE CUSTOMER FOR BREACH
OF THI
SPECIAL, INCIDENTAL, OR CONSEQUENTIAL DAMAGES IRRESPECTIVE OF WHETHER TEKTRONIX
OR THE VENDOR HAS ADVANCE NOTICE OF THE POSSIBILITY OF SUCH DAMAGES.
[W9b – 15AUG04]
rants that the media on which this software product is furnished and the encoding of the programs on
operation of the programs will be uninterrupted or error-free.
anty period. If Tektronix is unable to provide a replacement that is free from defects in materials and
S WARRANTY. TEKTRONIX AND ITS VENDORS WILL NOT BE LIABLE FOR ANY INDIRECT,
Page 7

Table of Contents
Important safety information..... .................................. ................................ ............. viii
General safety summary .................................................................................... viii
Service safety summary ........................ ................................ ............................... x
Terms in this manual ................... ................................ .................................. ..... x
Symbols and terms on the product.......................................................................... xi
Compliance information ......................................................................................... xii
EMC compliance ............... ................................ ................................ ............. xii
Safety compliance ........................................................................................... xiii
Environmental considerations.............................................................................. xiv
TBX3000A .......................................................................................................... 1
Overview ...... .................................. ................................ ............................... 1
Packing list ..................................................................................................... 1
Get acquainted with the TBX3000A......................................................................... 1
Configure the TBX3000A .................................................................................... 4
TSL3000B installation ............................................................................................. 8
Hardware and software requirements for the server ....................................................... 8
Installing TSL3000B ......................... .. .. . . . . . . . . . . . . . . . . . . . . . . . . . . . . . . . . . . . . . . . . . . . . . . . . . . . . ......... 8
Installing SQL server 2014 express............. .. . . . . . . . . . . . . . . . . . . . . . . . . . . . . . . . . . . . . ....................... 9
IIS installation and configuration ..................... ................................ ...................... 27
TSL3000B.................................. ................................ ................................ ........ 49
General information .......................................................................................... 49
Lab instrument management ................................................................................ 56
Lab teaching flow management ............................................................................. 70
Case Study.......................................................................................................... 80
Set up a TekSmartLab network system..................................................................... 80
Install TekSmartLab on the lab server........................ ................................ .............. 82
Configure the TBX3000A ................................................................................... 82
Arrange the bench and lab layout....... ................................ .................................. .. 91
Monitoring a bench ........................................................................................... 96
Asset management............................................................................................ 99
Create a new exercise .............. .................................. ................................ ...... 100
Instrument configuration saving/recalling . .................................. .. . . . . . . . . . . . . . . . . . . . . . . . . . . 101
Student access ............................. ................................ .................................. 103
Sharing exercise material .................................................................................. 104
Test report editing..................................................... .. . . . . . . . . . . . . . . . . . . . . . . . . . . . . . . . . . . . . 106
Campus Level TekSmartLab ...... .................................. ................................ ...... 110
Troubleshooting.................................................................................................. 115
Previous software version installed............. ................................ .......................... 115
Software can’t be displayed properly..................................................................... 115
TekSmartLab User Manual i
Page 8

Table of Contents
TBX3000A config
Benches disconnected ...................................................................................... 117
Unstable connection in a 15-bench or above WIFI network ........................................... 119
Unstable connection in a 20-bench LAN network ...................................................... 120
Instruments are displayed disconnected.................................................................. 121
Instrument parameters are not displayed ......................... .................................. ...... 122
Students ca
n’t log in the bench webpage................................................................. 122
uration page can’t be logged in........................................ .............. 117
ii TekSmartLab User Manual
Page 9

List of Figures
Figure 1: Side view 1 of TBX3000A.......................... ................................ ................... 2
Figure 2: Side view 2 of TBX3000A.......................... ................................ ................... 2
Figure 3: Top view of TBX3000A ............................................................................... 3
Figure 4: Bottom view of TBX3000A ................ ................................ ........................... 4
Figure 5: Welcome page for TBX3000A configuration. ................................ ....................... 4
Figure 6: LAN Configuration ..................................................................................... 5
Figure 7: TBX3000A WIFI Configuration ...................................................................... 6
Figure 8: Set Password ............................................................................................ 7
Figure 9: Extracting files ............... ................................ .................................. ........ 10
Figure 10: Installation center............. .................................. ................................ ...... 10
Figure 11: License terms ......................................................................................... 11
Figure 12: Setup fi les check.................. ................................ .................................. .. 12
Figure 13: Feature selection........................ ................................ .............................. 13
Figure 14: Instance configuration.......................... ................................ ...................... 13
Figure 15: Server configuration.................................................................................. 14
Figure 16: Database engine configuration ...................................................................... 14
Figure 17: Installation progress.................................................................................. 15
Figure 18: Installation complete ......................... ................................ ........................ 16
Figure 19: Select configuration manager ....................................................................... 17
Figure 20: Enable TCP/IP protocol.............................. ................................ ................ 17
Figure 21: TCP/IP protocol enabled........................... .................................. ................ 18
Figure 22: SQL server services ........................ ................................ .......................... 18
Figure 23: Select SQL server management studio............................. ................................ 18
Figure 24: Connect to server... ................................ ................................ .................. 19
Figure 25: Main screen ........................................................................................... 19
Figure 26: Restore database ...................................................................................... 20
Figure 27: Specify backup........................................................................................ 20
Figure 28: Change file type....................................................................................... 21
Figure 29: Backup file found..................................................................................... 21
Figure 30: Select the most recent database ..................................................................... 22
Figure 31: Database configuration complete ................... ................................ ................ 22
Figure 32: Overwrite the existing database................... ................................ .................. 23
Figure 33: Create new rule ................... .................................. ................................ .. 24
Figure 34: Select port ............................... ................................ .............................. 24
Figure 35: Allow the connection ................................................................................ 25
Figure 36: Profile................ .................................. ................................ ................ 25
Figure 37: Input name ............................................................................................ 26
Figure 38: Select internet information services ................................................................ 27
Figure 39: Open internet information services manager ........................ .............................. 28
TekSmartLab User Manual iii
Page 10

Table of Contents
Figure 40: Inte
Figure 41: Add a web site ............ .................................. ................................ .......... 30
Figure 42: Select the SLWeb file................................................................................. 31
Figure 43: IIS manager ... ................................ ................................ ........................ 32
Figure 44: Allow ASP .NET 4.0............... ................................ ................................ .. 33
Figure 45: ASP .NET 4.0 allowed....................................... ................................ ........ 33
Figure 46: ASP .NET v4.0 not found ........................................................................... 34
Figure 47: Paste command by right key ...................... ................................ .................. 35
Figure 48: Command window after entering the command .................................................. 35
Figure 49: Result of the command running......................... .................................. .......... 36
Figure 50: Computer management .................. .................................. .......................... 37
Figure 51: Configure ASP .Net State Service .................................................................. 38
Figure 52: Add inbound rules...................... .................................. ............................ 39
Figure 53: New inbound rule wizard............................................................................ 40
Figure 54: Protocol and ports .. .................................. ................................ ................ 41
Figure 55: Action.................................................................................................. 42
Figure 56: Profile...................... ................................ ................................ ............ 43
Figure 57: Name................................................................................................... 44
Figure 58: Inbound rules added.. ................................ ................................ ................ 44
Figure 59: Outbound rules added ................................................................................ 45
Figure 60: Application pools..................................................................................... 46
Figure 61: SLWeb home .......................................................................................... 47
Figure 62: TekSmartLab web page ........................ ................................ ...................... 48
Figure 63: Home page ...... ................................ ................................ ...................... 49
Figure 64: Change language ..................................................................................... 50
Figure 65: General information.................................................................................. 50
Figure 66: Edit general information..... ................................ ................................ ........ 51
Figure 67: Change password....... .................................. ................................ ............ 51
Figure 68: Input new password .................................................................................. 52
Figure 69: Install license................................ .................................. ........................ 53
Figure 70: License install finished............................................................................... 54
Figure 71: Select a license to remove ........................................................................... 54
Figure 72: Export the license file .......................... ................................ ...................... 55
Figure 73: Software information............... ................................ ................................ .. 55
Figure 74: Bench/Lab layout configuration .................................................................... 56
Figure 75: Bench layout configuration tab ..................................................................... 57
Figure 76: Choose the instrument type.................... ................................ ...................... 57
Figure 77: Instrument chosen .............. ................................ ................................ ...... 58
Figure 78: Lab layout configuration tab ........ ................................ ................................ 58
Figure 79: Arranging benches.................................................................................... 59
Figure 80: Number the benches manually .......................... ................................ ............ 60
rnet Information Services (IIS) manager .... . . . . . . . . . . . . . . . . . . . . . . . . . . . . ...................... 29
iv TekSmartLab User Manual
Page 11

Table of Contents
Figure 81: Two b
Figure 82: Configure instruments................................................................................ 61
Figure 83: Instrument selected..................... .................................. ............................ 61
Figure 84: Select bench ............................... ................................ ............................ 62
Figure 85: Bench configured ..................................................................................... 63
Figure 86: Firmware upgrade .................................................................................... 64
Figure 87: Lab overview.......................................................................................... 65
Figure 88: Bench page ............................................................................................ 65
Figure 89: Oscilloscope page . . . . . . . . . . . . . . . . . . . . . . . . . . . . . . .................................... .. . . . . . . . . . . . . . . . . 66
Figure 90: Vertical and horizontal settings ... .. . . . . . . . . . . . . . . . . . . . . . . . . . . . . . . . . ................................ 67
Figure 91: Cursors..................... .................................. ................................ .......... 68
Figure 92: Asset management.................................................................................... 69
Figure 93: Create a new course.... .................................. ................................ ............ 70
Figure 94: Create new exercise .................................................................................. 70
Figure 95: Select an existing exercise........................................................................... 71
Figure 96: Configure the instruments ........................................................................... 71
Figure 97: Configure the instruments ........................................................................... 72
Figure 98: Generating QR code.................................................................................. 73
Figure 99: Log in to the bench webpage...................................... ................................ .. 74
Figure 100: Edit exercise material........................................... .................................. .. 75
Figure 101: Add or delete exercise material............ .................................. ...................... 75
Figure 102: Download exercise material ......... .................................. ............................ 76
Figure 103: Importing test report template ................... ................................ .................. 76
Figure 104: Create a new test report ............................................................................ 77
Figure 105: Create a new test report ............................................................................ 77
Figure 106: Scope snapshot inserted ................ ................................ ............................ 78
Figure 107: Query test report .................. ................................ ................................ .. 79
Figure 108: TekSmartLab .......................... ................................ .............................. 80
Figure 109: Connecting TBX3000A .. .................................. ................................ ........ 82
Figure 110: Connect the TBX3000A directly to a computer ....................... .......................... 83
Figure 111: LAN configuration .................................................................................. 83
Figure 112: Connect TBX3000A to a router ........... .................................. ...................... 84
Figure 113: Computer connected to ‘school_lab_1’ network ................................................ 84
Figure 114: TBX3000A welcome page........... ................................ .............................. 85
Figure 115: LAN configuration .............. .................................. ................................ .. 85
Figure 116: Modify LAN configuration ........................................................................ 85
Figure 117: WIFI configuration.................................................................................. 86
Figure 118: Scan AP .............................................................................................. 86
Figure 119: Input password .............. .................................. ................................ ...... 87
Figure 120: WIFI configuration.................................................................................. 87
Figure 121: Modify WIFI configuration........................................................................ 88
enches numbered the same........................... ................................ ........ 60
TekSmartLab User Manual v
Page 12

Table of Contents
Figure 122: WIF
Figure 123: Two TBX3000As with the same host name...................................................... 89
Figure 124: LAN configuration .................................................................................. 90
Figure 125: Modify LAN configuration ........................................................................ 90
Figure 126: Four-instrument bench layout ... ................................ .................................. 91
Figure 127: Choosing instruments............................................................................... 91
Figure 128: Lab layout............................................ ................................ ................ 92
Figure 129: Arrange lab layout ........ ................................ .................................. ........ 93
Figure 130: Configure instrument ............................................................................... 94
Figure 131: Configure oscilloscope . . . . . . . . . . . . . . . . . . . ........................ .. . . . . . . . . . . . . . . . . . . . . . . .......... 94
Figure 132: Bench selection...................................................................................... 95
Figure 133: Instrument status .................................................................................... 96
Figure 134: Scope not online............... .................................. ................................ .... 96
Figure 135: Monitoring a bench ................................................................................. 97
Figure 136: Monitoring an oscilloscope . . . . . . . . . . . . . . . . . . . . . . . . . . .............................................. 97
Figure 137: Monitoring an oscilloscope . . . . . . . . . . . . . . . . . . . . . . . . . . .............................................. 98
Figure 138: V-position changed .. . . . . . . . . . . . . . . . . . . . . . . . . . ............................................ .. . . . . . . . . 98
Figure 139: Query the instruments .................. .................................. .......................... 99
Figure 140: Create an exercise..... ................................ .................................. .......... 100
Figure 141: Selecting an instructor............................................................................ 100
Figure 142: Select Scope and AFG................ ................................ ............................ 101
Figure 143: Configure Scope and AFG ..... ................................ ................................ .. 102
Figure 144: Apply to other benches ........................................................................... 102
Figure 145: Generate bench webpage................. .................................. ...................... 103
Figure 146: Visiting bench webpage . . . . . . ............................ . . . . . . . . . . . . . . . . . . . . . . . . ................ 104
Figure 147: Share exercise material........................................................................... 104
Figure 148: Add exercise material............................................................................. 105
Figure 149: Access exercise material ......................................................................... 105
Figure 150: Edit report template............................. .................................. ................ 106
Figure 151: Create a new report ......... .................................. ................................ .... 107
Figure 152: Edit new report.................................................................................... 107
Figure 153: Scope snapshot inserted .. ................................ ................................ ........ 108
Figure 154: Open the test report on the computer ......... ................................ .................. 108
Figure 155: Query and check test report............ .................................. ........................ 109
Figure 156: Campus level TekSmartLab network diagram ..................... ............................ 110
Figure 157: Remote lab configuration interface on the lab server ......................................... 111
Figure 158: Pinging lab server IP from lab manager computer ............................................ 111
Figure 159: Remote lab configuration interface on lab manager computer............................... 112
Figure 160: Connect to lab server from lab manager computer............................................ 112
Figure 161: Main interface on lab manager computer .................. .................................. .. 113
Figure 162: Connecting to a lab server remotely ............................................................ 113
Iconfiguration finished...... ................................ .................................. 88
vi TekSmartLab User Manual
Page 13

Table of Contents
Figure 163: Scr
Figure 164: Set the screen resolution.......................................................................... 116
Figure 165: Set the font size ............. .................................. ................................ .... 116
Figure 166: All the benches not connected..... ................................ .............................. 117
Figure 167: Ping TBX3000A IP address ..................................................................... 118
Figure 168: Instruments on bench 1 displayed disconnected............................................... 121
Figure 169:
Figure 170: 80 port conflict .................................................................................... 123
Figure 171: Window task manager ...... ................................ ................................ ...... 124
Figure 172: Command prompt................................................................................. 125
Figure 173: Changing port for Skype ......................................................................... 125
een page not displayed properly............. ................................ ................ 115
Localhost webpage.............................. ................................ .................. 123
TekSmartLab User Manual vii
Page 14

Important safety information
Important saf
ety information
This manual c
for safe operation and to keep the product in a safe condition.
To safely perform service on this p roduct, additional information is provided at
the end of this section. (See page x, Service safety summary.)
General safety summary
Use the product only as specified. Review the following safety precautions to
avoid injury and prevent damage to this product or any products connected to it.
Carefully read all instructions. Retain these instructions for future reference.
Comply with local and national safety codes.
For correct and safe operation of the product, it is essential that you follow
generally accepted safety procedures in addition to the safety precautions specified
in this manual.
The product is designed to be used by trained personnel only.
Only qualified personnel who are aware of the hazards involved should remove
the cover for repair, maintenance, or adjustment.
ontains information and warnings that must be followed by the user
To avoid fire or personal
injury
This product is not intended for detection of hazardous voltages.
While using this product, you may need to access other parts of a larger system.
Read the safety sections of the other component manuals for warnings and
cautions related to operating the system.
When incorporating this equipment into a system, the safety of that system is the
responsibility of the assembler of the system.
Use proper power cord. Use only the power cord s pecified for this product and
certified for the country of use.
Do not use the provided power cord for other products.
Ground the product. This product is grounded through the grounding conductor
of the power cord. To avoid electric shock, the grounding conductor must be
connected to earth ground. Before making connections to the input or output
terminals of the product, make sure that the product is properly grounded.
Power disconnect. The power cord disconnects the product from the power
source. See instructions for the location. Do not position the equipment so that it
is difficult to disconnect the power cord; it must remain accessible to the user at
all times to allow for quick disconnection if needed.
viii TekSmartLab User Manual
Page 15

Important safety information
Use proper AC ad
Observe all terminal ratings. To a void fire or shock hazard, observe all ratings
and markings on the product. Consult the product manual for further ratings
information before making connections to the product.
The measuring terminals on this product are not rated for connection to mains or
Category II, III, or IV circuits.
Do not oper
removed, or with the case open. Hazardous voltage exposure is possible.
Avoid exposed circuitry. Do not touch exposed connections and components
when power is present.
Do not op
product, have it inspected by qualified service personnel.
Disabl
or operates incorrectly. If in doubt about safety of the product, turn it off and
disconnect the power cord. Clearly mark the product to prevent its further
operation.
Examine the exterior of the product before you use it. Look for cracks or missing
pieces.
erate with suspected failures. If you suspect that there is damage to this
e the product if it is damaged. Do not use the product if it is damaged
apter. Use only the AC adapter specified for this product.
ate without covers. Do not operate this product with covers or panels
Use only specified replacement parts.
Do not operate in wet/damp conditions. Be aware that condensation may occur if
a unit is moved from a cold to a warm environment.
Do not operate in an explosive atmosphere.
Keep product surfaces clean and dry. Remove the input signals before you clean
he product.
t
Provide a safe working environment. Always place the product in a location
convenient for viewing the display and indicators.
Avoid improper or prolonged use of keyboards, pointers, and button pads.
Improper or prolonged keyboard or pointer use may result in serious injury.
Be sure your work area meets applicable ergonomic standards. Consult with an
ergonomics professional to avoid stress injuries.
TekSmartLab User Manual ix
Page 16

Important safety information
Service safet
ysummary
Termsinthismanual
The Service safety summary section contains additional information required to
safely perform service on the product. Only qualified personnel should perform
service proc
summary before performing any service procedures.
To avoid electric shock. Do not touch exposed connections.
Do not service alone. Do not perform internal service or adjustments of this
product un
present.
Disconnect power. To a void electric shock, switch off the product power and
disconnect the power cord from the mains power before removing any covers or
panels, or opening the case for servicing.
Use c are when servicing with power on. Dangerous voltages or currents may exist
in this product. Disconnect power, remove battery (if applicable), and disconnect
test leads before removing protective panels, soldering, or replacing components.
edures. Read this Service safety summary and the General safety
less another person capable of rendering first aid and resuscitation is
These terms may appear in this manual:
WARNING. Warning statements identify conditions or practices that could result
in injury or loss of life.
CAUTION. Caution statements identify conditions or practices that could result in
damage to this product or other property.
x TekSmartLab User Manual
Page 17

Important safety information
Symbols and te
rms on the product
These terms may appear on the product:
DANGER indicates an injury hazard immediately accessible as you read
the marking.
WARNING indicates an injury hazard not immediately accessible as you
read the marking.
CAUTION indicates a hazard to property including the product.
When this symbol is marked on the product, be sure to consult the manual
to find out the nature o f the potential hazards and any actions which have to
be taken to avoid them. (This symbol may also be used to refer the user to
ratings in the manual.)
The follo
wing symbol(s) may appear on the product:
TekSmartLab User Manual xi
Page 18

Compliance information
Compliance in
EMC compliance
EC Declaration of
Conformity – EMC
formation
This section
environmental standards with which the instrument complies.
Meets intent of Directive 2004/108/EC for Electromagnetic Compatibility.
Compliance was demonstrated to the following specifications as listed in the
Official Journal of the European Communities:
EN 61326-1 2006. EMC requirements for electrical equipment for measurement,
control
CISPR 11:2003. Radiated and conducted emissions, Group 1, Class A
IEC 61000-4-2:2001. Electrostatic discharge immunity
IEC 61000-4-3:2002. RF electromagnetic field immunity
IEC 61000-4-4:2004. Electrical fast transient / burst immunity
IEC 61000-4-5:2001. Power line surge immunity
lists the EMC (electromagnetic compliance), safety, and
, and laboratory use.
123
1000-4-6:2003. Conducted RF immunity
IEC 6
IEC 61000-4-11:2004. Voltage dips and interruptions immunity
EN 61000-3-2:2006. AC power line harmonic emissions
EN 61000-3-3:1995. Voltage changes, fluctuations, and flicker
European contact.
ektronix UK, Ltd.
T
Western Peninsula
Western Road
Bracknell, RG12 1RF
United Kingdom
1
This product is intended for use in nonresidential areas only. Use in residential areas may cause electromagnetic
interference.
2
Emissions which exceed the levels required by this standard may occur when this equipment is connected to a
test object.
3
For compliance with the EMC standards listed here, high quality shielded interface cables should be used.
xii TekSmartLab User Manual
Page 19

Compliance information
Australia / New Zealand
Declaration o f
Conformity – EMC
Safety compliance
Equipme
Pollution degree
nt type
descriptions
Complies with t
following standard, in accordance with ACMA:
CISPR 11:2003
accordance with EN 61326-1:2006.
Australia / New Zealand contact.
Baker & McKenzie
Level 27, AMP Centre
50 Bridge Street
Sydney NSW 2000, Australia
This section lists other safety compliance information.
Test and measuring equipment.
A measure of the contaminants that could occur in the environment around
and within a product. Typically the internal environment inside a product is
dered to b e the same as the external. Products should be u sed only in the
consi
environment for which they are rated.
he EMC provision of the Radiocommunications Act per the
. Radiated and Conducted Emissions, Group 1, Class A, in
Pollution degree rating
ution degree 1. No pollution or only dry, nonconductive pollution occurs.
Poll
Products in this category are generally encapsulated, hermetically sealed, or
located in clean rooms.
Pollution degree 2. Normally only dry, nonconductive pollution occurs.
Occasionally a temporary conductivity that is caused by condensation must
be expected. This location is a typical office/home environment. Temporary
condensation occurs only when the product is out of service.
Pollution degree 3. Conductive pollution, or dry, nonconductive pollution
that becomes conductive due to condensation. These are sheltered locations
where neither temperature nor humidity is controlled. The area is protected
from direct sunshine, rain, or direct wind.
Pollution degree 4. Pollution that generates persistent conductivity through
conductive dust, rain, or snow. Typical outdoor locations.
Pollution degree 2 (as defined in IEC 61010-1). Rated for indoor, dry location
use only.
TekSmartLab User Manual xiii
Page 20

Compliance information
Environmental considerations
This section provides information about the environmental impact of the product.
Product end-of-life
ction of hazardous
Restri
handling
substances
Observe the f
Equipment recycling. Production of this equipment required the extraction and
use of natural resources. The equipment may contain substances that could be
harmful to the environment or human health if improperly handled at the product’s
end of life. To avoid release of such substances into the environment and to
reduce the use of natural resources, we encourage you to recycle this product in
an approp
recycled appropriately.
This product is classified as an industrial monitoring and control instrument
accessory, and is not required to comply with the substance restrictions of the
recast RoHS Directive 2011/65/EU until July 22, 2017.
ollowing guidelines when recycling an instrument or component:
riate system that will ensure that most of the materials are reused or
This symbol indicates that this product complies with the applicable European
Union requirements according to Directives 2002/96/EC and 2006/66/EC
on waste electrical and electronic equipment (WEEE) and batteries. For
information about recycling options, check the Support/Service section of the
Tektronix Web site (www.tek.com).
xiv TekSmartLab User Manual
Page 21

TBX3000A
Overview
Packing list
This guide introduces the TBX3000A and provides a step by step demonstration
of how to use the product.
Please confirm that you have received all the items listed in the packing list:
The TBX300A
4USBcables
1 power ca
1 DC power adaptor
Get acquainted with the TBX3000A
Main features
TBX3000A is used to connect Tektronix and Keithley products: oscilloscope,
l generator, digital multimeter, and power supply.
signa
It is equipped with USB 2.0 ports and RJ45 10/100Mbps Ethernet port
It can be connected to WIFI after installing a USB WIFI dongle
(eg. TEK-USB-WIFI)
It is powered by a DC power adaptor (5V/3A)
ble
TekSmartLab User Manual 1
Page 22

TBX3000A
Appearance
Figure 1: Side view 1 of TBX3000A
One side of TBX3000A has the following connectors, buttons, and indicators:
Ethernet LAN port: The TBX3000A is connected to the network through
this port.
USB device port: The original code of the product is burned through this port,
whichisusedbymanufactureronly.
Reset button: If you press this button and hold down to 5 seconds, the SYS
indicator will blink rapidly for 5 seconds, then the default setting (including
passwor
DC power socket: Use this connector for the DC power supply that came
with yo
d and IP parameters) will be restored.
ur instrument.
Figure 2: Side view 2 of TBX3000A
The figure above shows another side of TBX3000A with six USB 2.0 ports. You
connect TBX3000A to other instruments by USB cable.
can
2 TekSmartLab User Manual
Page 23

TBX3000A
The figure below
and indicators.
Figure 3: Top view of TBX3000A
The first six are USB indicators. If the indicator is on or blinking, it means
some instrument is connected to TBX3000A through a USB port.
is the top view of the TBX3000A, showing the Tektronix logo
The one next to the USB indicators is the WIFI indicator:
If it’s n ot on, it means the USB WIFI dongle is not installed or the WIFI
dongle is not compatible with the instrument.
If it blinks once at a time, it means the USB WIFI dongle is installed, but
TBX3000A is not connected to the WIFI.
If it blinks twice at a time, it means the USB WIFI dongle is installed, and
TBX3000A is connected to the WIFI.
The last indicator is the system indicator (SYS):
it blinks rhythmically, it means the power is on and the system is
If
functioning.
it’s not on, it means the power is not on or the system is malfunctioning.
If
If it blinks unrhythmically, it means the firmware is upgrading.
TekSmartLab User Manual 3
Page 24

TBX3000A
The figure below
Figure 4: Bottom view of TBX3000A
The part illustrated as 7 is a socket for USB WIFI dongle like TEK-USB-WIFI.
shows the bottom aspect of TBX3000A.
Configu
re the TBX3000A
When the TBX3000A is connected to the network, you can configure instrument
parameters. The default IP address for the instrument is 192.168.1.101. Enter the
defau
below is displayed.
Fi
Th
status, WIFI connection s tatus, and the hostname of the TBX3000A.
lt address into a web browser, press Enter, and the welcome page shown
gure 5: Welcome page for TBX3000A configuration
e Welcome page shows the firmware version, serial number, LAN connection
4 TekSmartLab User Manual
Page 25

TBX3000A
LAN Configuration
Click LAN Config
Configuration page.
uration in the navigation bar on the left to show the LAN
Figure 6: LAN Configuration
Click Modify to configuretheLANparametersandthehostname.
The default LAN configuration values are shown below:
Host Name Bench 1
TCP/IP Configuration Mode
IP Address 192.168.1.101
Subnet Mask
Default Gateway
Manual
255.255.255.0
192.168.1.1
TekSmartLab User Manual 5
Page 26

TBX3000A
WIFI Configuration
Click WIFI Confi
Configuration page.
guration in the navigation bar on the left to show the WIFI
Figure 7: TBX3000A WIFI Configuration
Click Modify to configure WIFI network parameters.
Click Scan AP to search for the SSID of the WIFI n etwork.
NOTE. The TBX3000A will connect to the WIFI network, only after the USB WIFI
dongle is installed on the instrument.
6 TekSmartLab User Manual
Page 27

TBX3000A
Set Password
Click Set Passw
for the instrument.
ord in the navigation bar on the left to change the password
Figure 8: Set Password
You can change the password on this page. The default password is admin.
TekSmartLab User Manual 7
Page 28

TSL3000B installation
TSL3000B inst
allation
Hardware and software requirements for the server
Hardware requirments
Software requirements
CPU: 2.3 GHz
Memory: 4 GB DDR3 or higher
Display: Resolution of 1366 by 768 or higher
Storage: 160 GB or higher
Operating system: Win7 Professional, Enterprise, or Ultimate
.Net fra
automatically if they are not available on the computer.
Intern
please refer to IIS installation and configuration(See page 27, IIS installation
and configuration.)
Database system: SQL Server 2014 Express or SQL Server 2014 Enterprise.
For installation instructions, please refer to Installing SQL server 2014 espress
(See page 9, Installing S QL server 2014 express.)
mework 4.5.2 and Visual C++ 2015 redistributable will be installed
et Information Service: IIS 6.0 or higher. For installation instructions,
dual-core or higher
Installing TSL3000B
Visit www.tek.com, and search for ‘TSL3000B’. Search through the results
and find the latest version of the software. Download and install the software,
following the software installation instructions on screen.
8 TekSmartLab User Manual
Page 29

TSL3000B installation
Installing SQ
Downloading the
installation pack
L server 2014 express
Visit http://www.microsoft.com/enin/
download/details.aspx?id=42299=rss_alldownloads_devresources, and choose
the installa
For example;
For 64-bit
64BIT\SQLEXPRWT_x64_ENU.exe
For 32-bit
32BIT\SQLEXPRWT_x86_ENU.exe
NOTE. The size of the installation pack is around 800MB.
The installation cannot be carried out if the bit number of the installation pack is
not consistent with your operation system.
tion pack consistent with the bit number of your operation system.
Win7, choose ExpressAndTools
Win7, choose ExpressAndTools
TekSmartLab User Manual 9
Page 30

TSL3000B installation
Installing the software
In this procedu
This section explains how to install the database system.
1. Double-click
extracted files. The following figure is displayed.
Figure 9: Extracting files
You may have to wait up to two minutes while the installer extracts the
TSL3000B
re, we use the 64-bit Win7 installation package as the example.
SQLEXPRWT_x64_ENU.exe, and choose the directory for
installation files. Then the following figure is displayed.
Figure 10: Installation center
10 TekSmartLab User Manual
Page 31
TSL3000B installation
2. Click New SQL se
existing installation. The following figure is displayed.
rver stand-alone installation or add features to a n
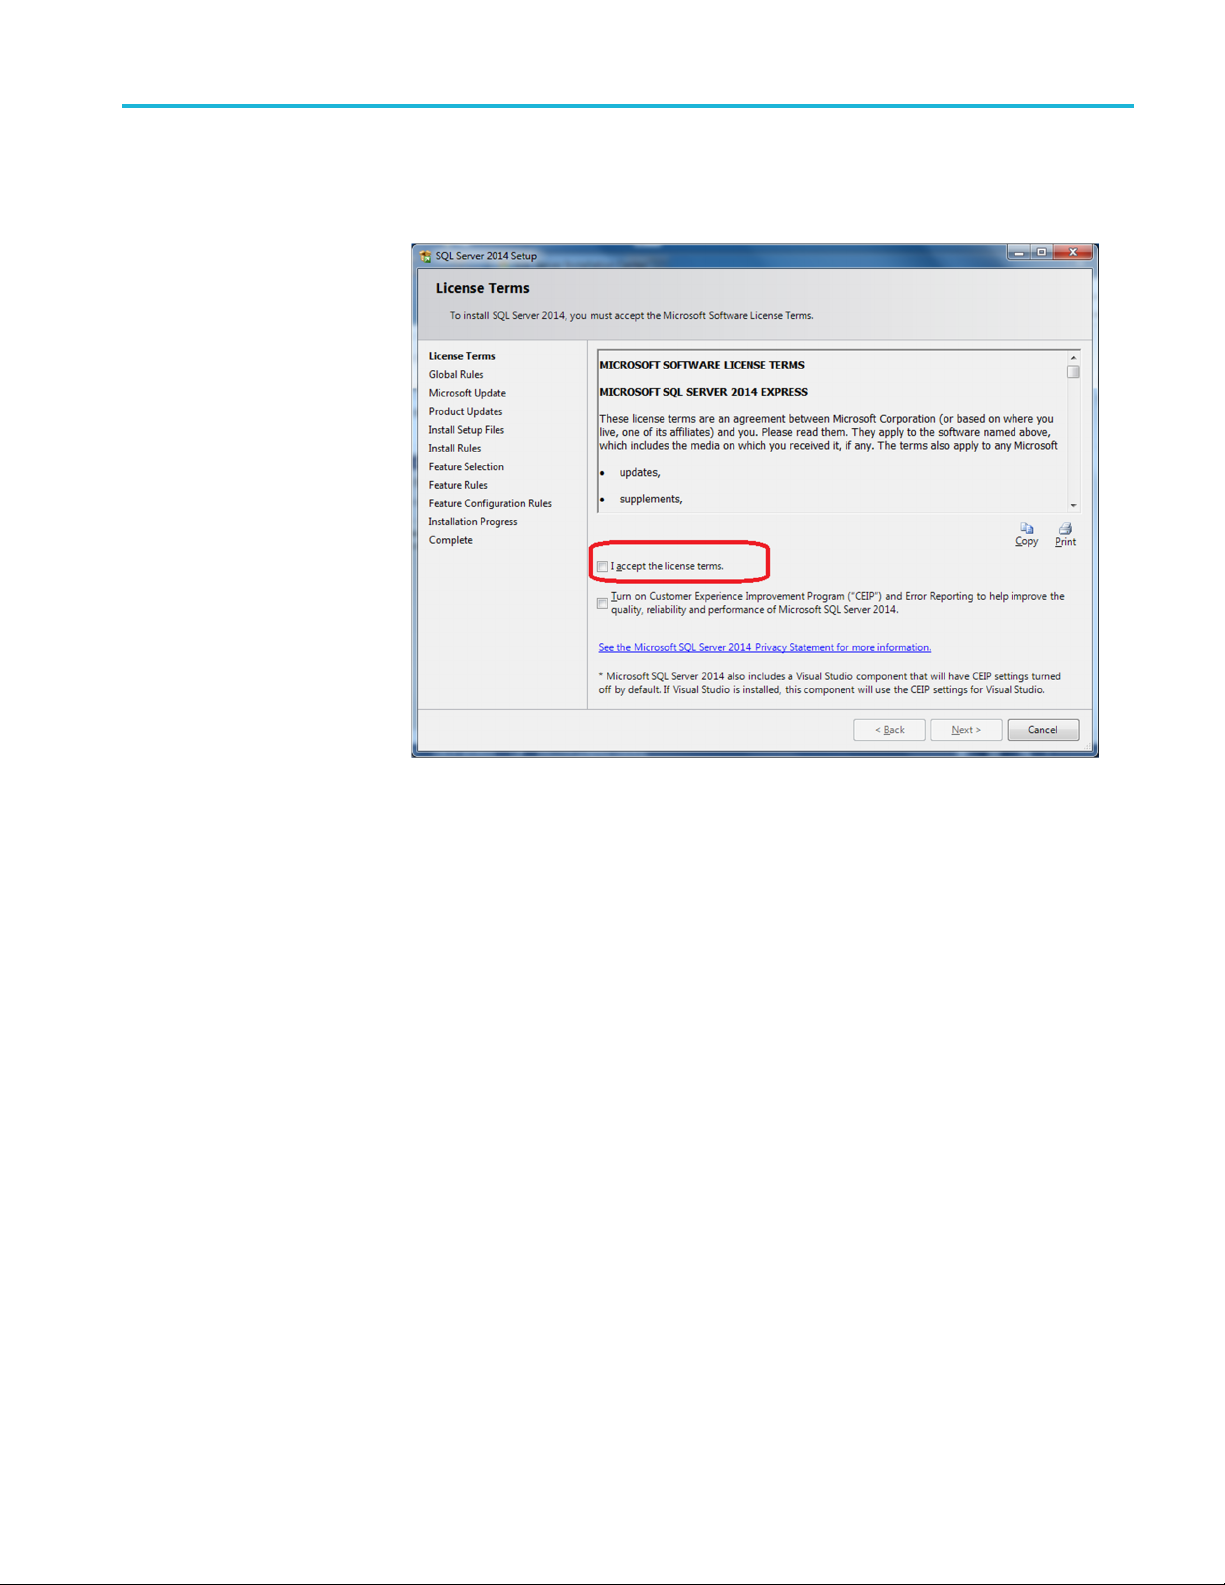
Figure 11: License terms
3. Select I accept the license terms.
TekSmartLab User Manual 11
Page 32
TSL3000B installation
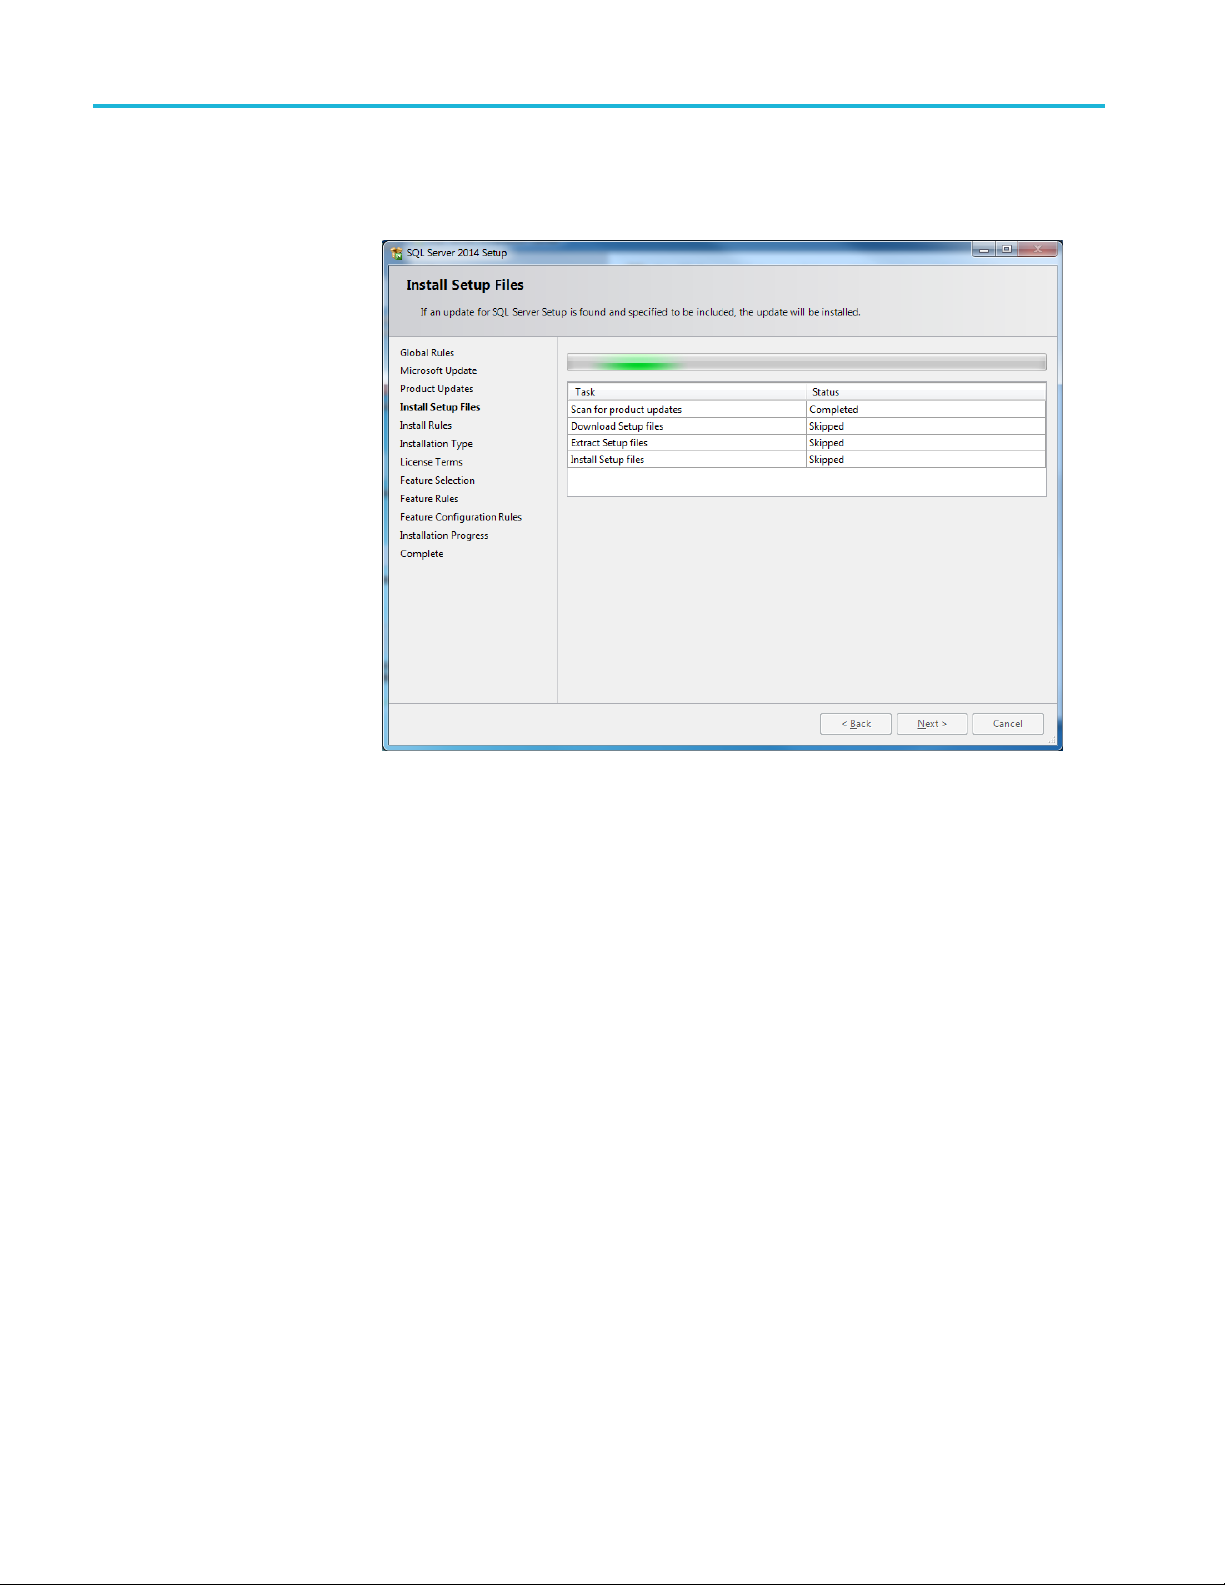
4. Click Next.The
correct.
program will check whether the files for installation are
Figure 12: Setup files check
12 TekSmartLab User Manual
Page 33
TSL3000B installation
After verifyin
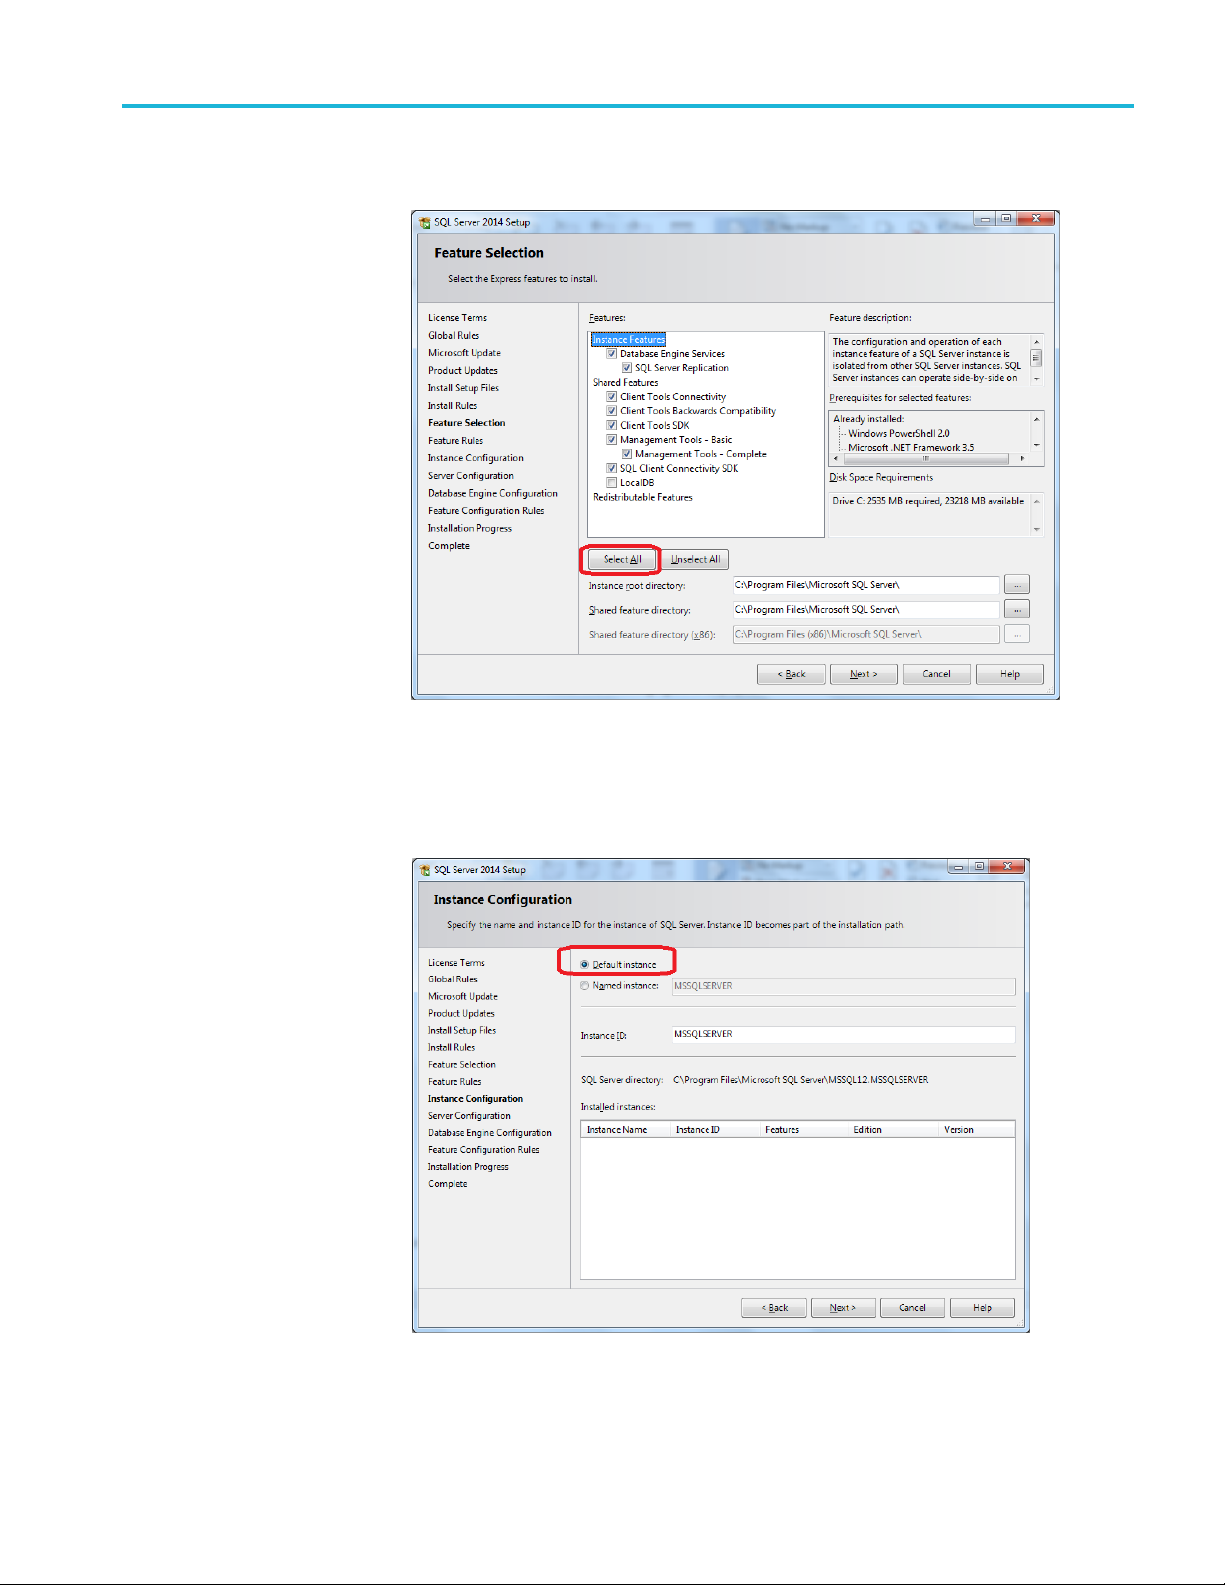
Figure 13: Feature selection
gthefiles, the following figure is displayed.
5. Click Select All.
6. Click Next. The following figure is displayed.
Figure 14: Instance configuration
TekSmartLab User Manual 13
Page 34
TSL3000B installation
7. Select Default
8. Click Next. The following figure is displayed.
Instance.
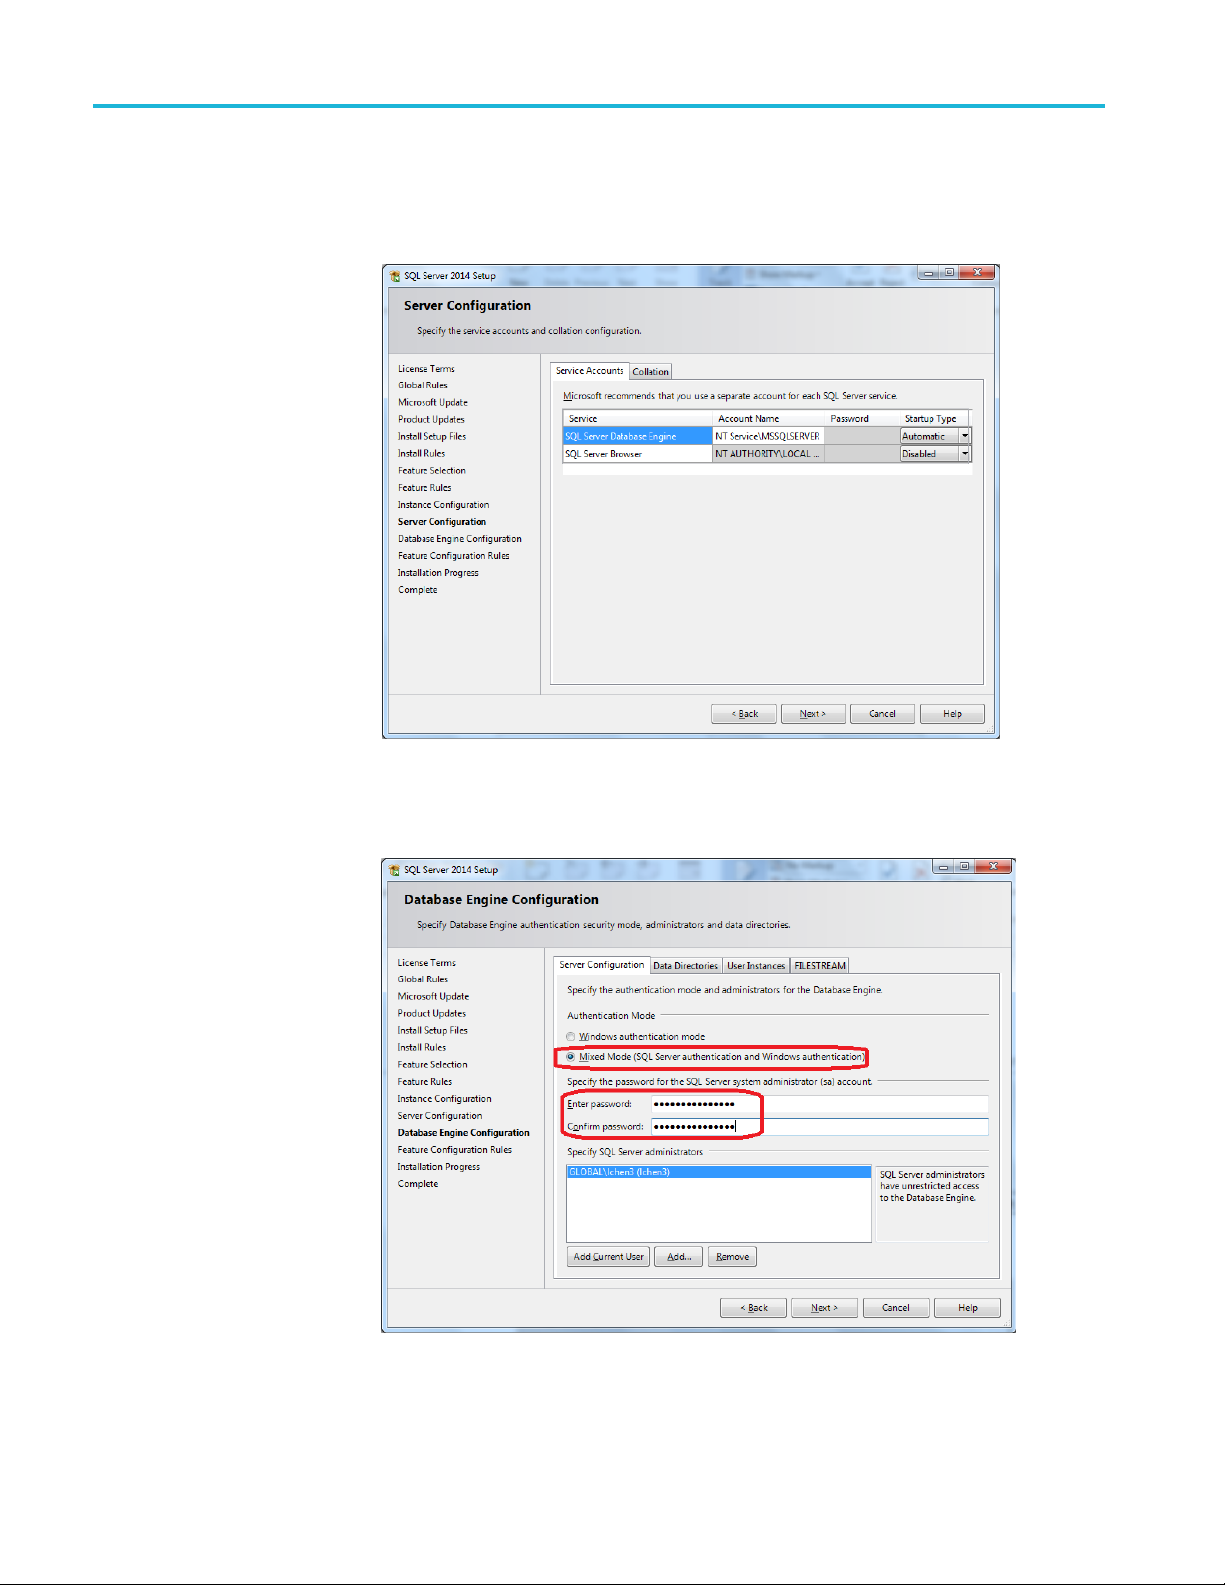
Figure 15: Server configuration
9. Click Next. The following figure is displayed.
Figure 16: Database engine configuration
14 TekSmartLab User Manual
Page 35
TSL3000B installation
10. For authentica
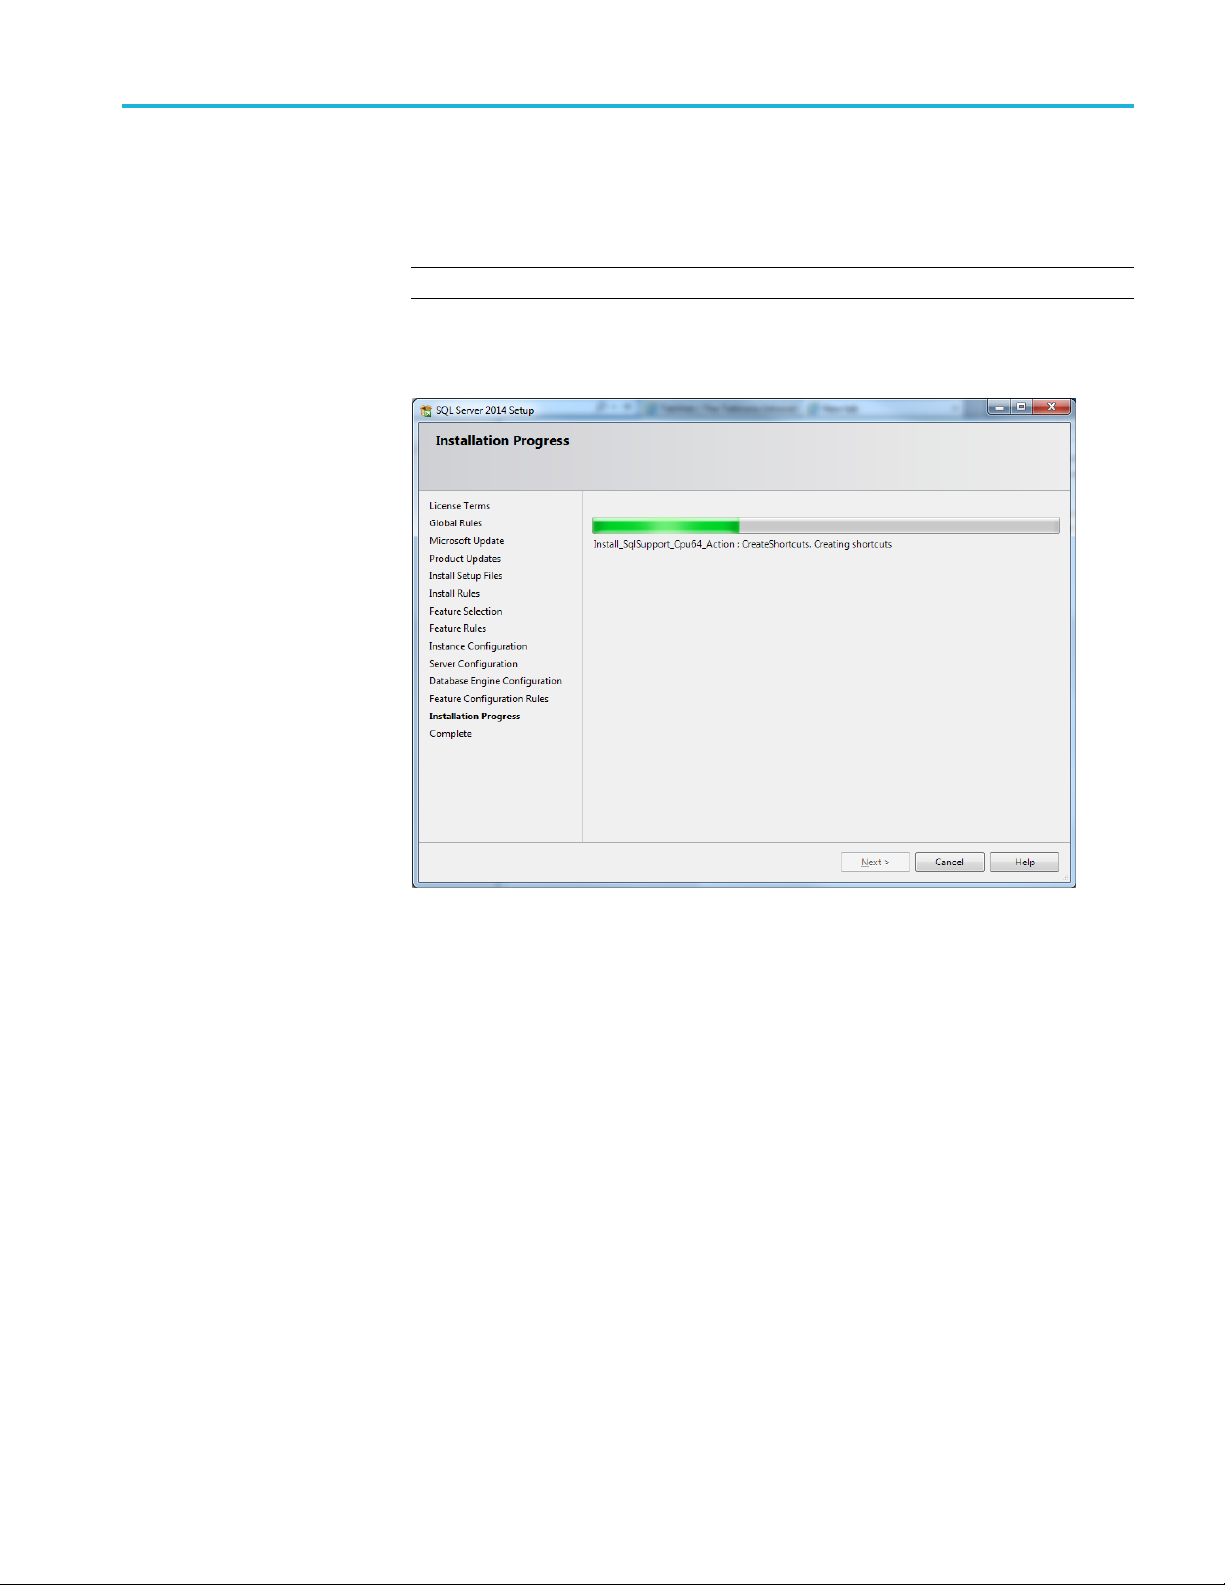
11. Input the system administrator (sa) password “TekSmartLab2015”.
NOTE. This pa
12. Click Next. The following figure is displayed.
tion mode, select Mixed Mode.
ssword is mandatory. Make sure that T, S, and L are all uppercase.
Figure 17: Installation progress
While this figure is being displayed, the database system is being installed.
This typically takes about 10 to 20 minutes to complete.
TekSmartLab User Manual 15
Page 36

TSL3000B installation
When complete,
Figure 18: Installation complete
the following figure is displayed.
13. Click Close.
The installation of the database system is complete.
16 TekSmartLab User Manual
Page 37

TSL3000B installation
Configuring the database
1. Select SQL Serv
Windows, as shown in the following figure.
Figure 19: Select configuration manager
Thepathtothislinkis:
Start >> All Program >> Microsoft SQL Server 2014 >> Configuration Tools
>> SQL Server 2014 Configuration Manager
2. In the SQL Server Configuration Manager, click SQL Server Network
Configuration >> Protocols for MSSQLSERVER, and then right-click
TCP/IP in the right panel as shown in the following figure.
er 2014 Configuration Manager in the Start menu of
Depending on the operating system, the SQL Server Network Configuration
link might be (32 bit) or (64 bit).
gure 20: Enable TCP/IP protocol
Fi
TekSmartLab User Manual 17
Page 38

TSL3000B installation
3. Select Enable i
The following figure is displayed after you enable TCP/IP.
Figure 21: TCP/IP protocol enabled
4. Click SQL Server Services in the left panel. The following figure is
displayed.
nthepop-upmenu.
Figure 22: SQL server services
5. Click SQL S erver (MSSQLSERVER) in the right panel.
6. Click
7. Close the window.
8. Click Start >> All Programs >> Microsoft SQL Server 2014 >> SQL Server
2014 Management Studio, a s shown in the following figure.
Figure 23: Select SQL server management studio
in the toolbar to restart the SQL server service.
18 TekSmartLab User Manual
Page 39
TSL3000B installation
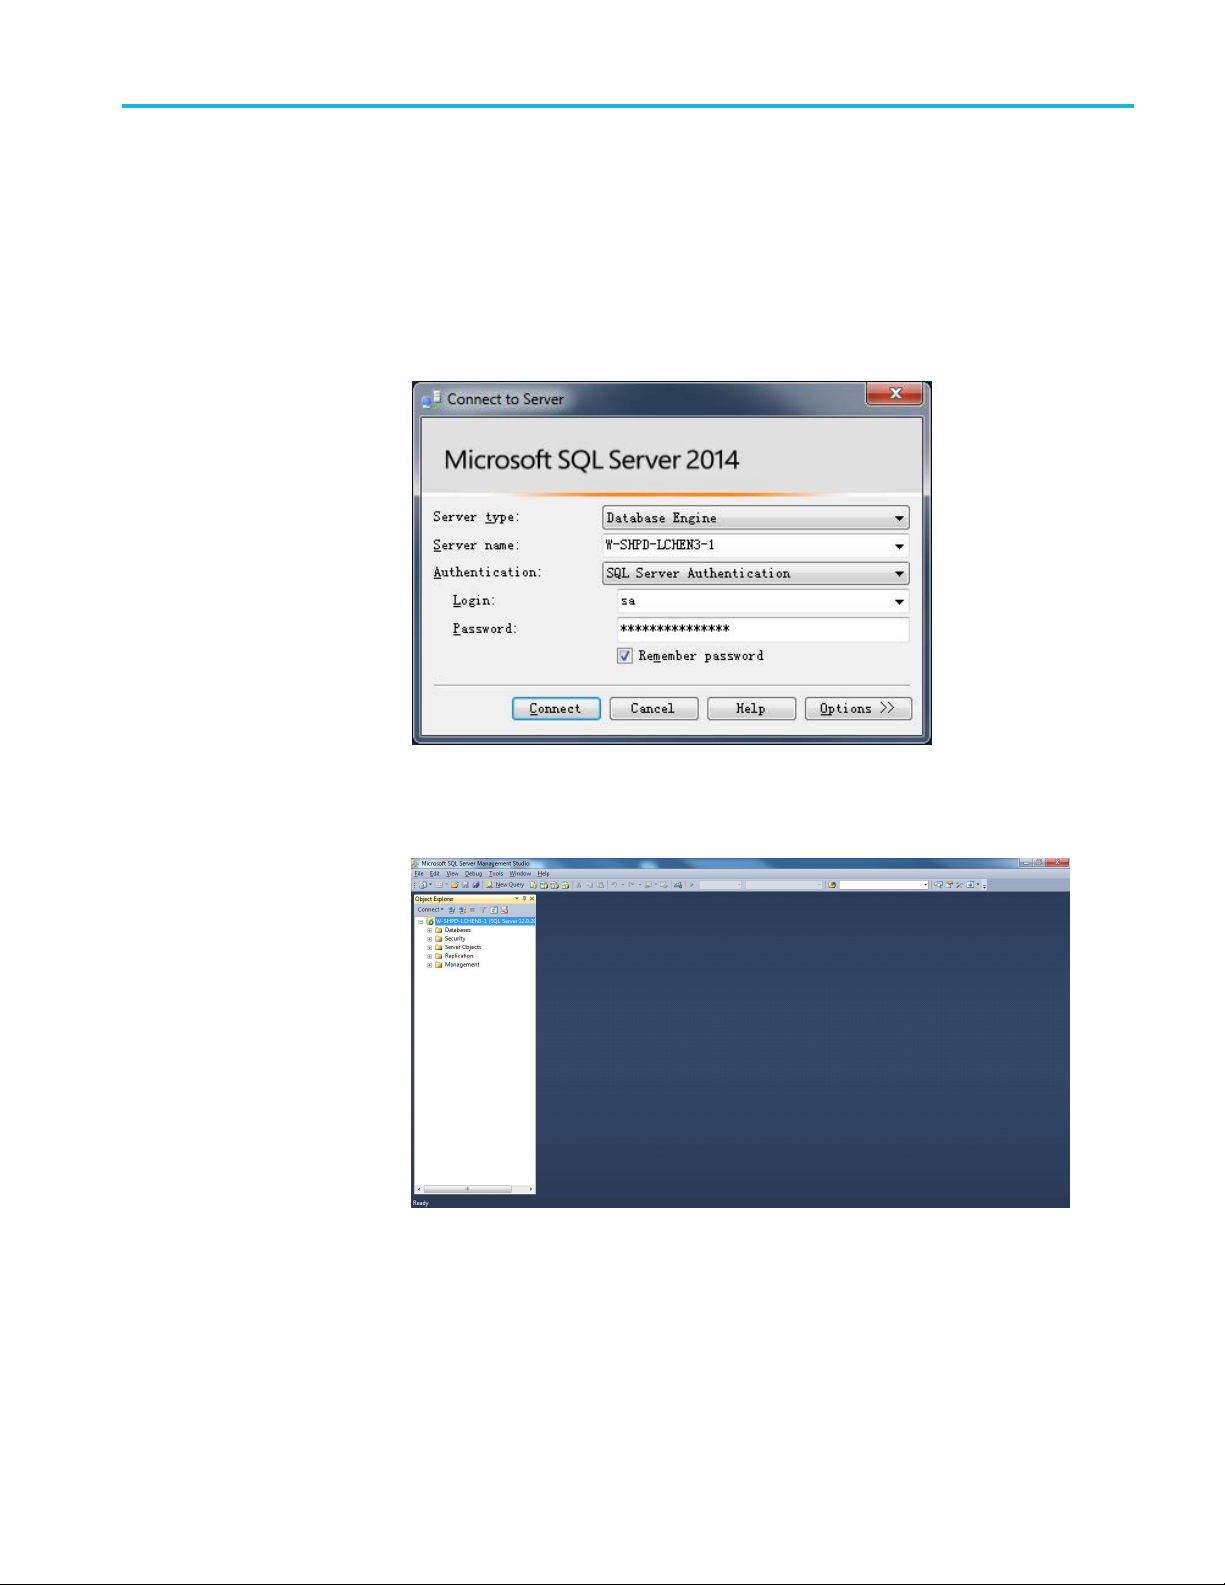
9. In the Connect t
10. Select the name of the computer for Server name.
11. Select SQL Server Authentication for Authentication.
12. Enter sa for Login.
13. Enter TekSmartLab2015 for Password, as shown in the following figure.
oServerwindow, select Database Engine forServertype.
Figure 24: Connect to server
14. Click Connect to log in. The following figure is displayed.
Figure 25: Main screen
15. In the left panel, right-click Database.
TekSmartLab User Manual 19
Page 40
TSL3000B installation
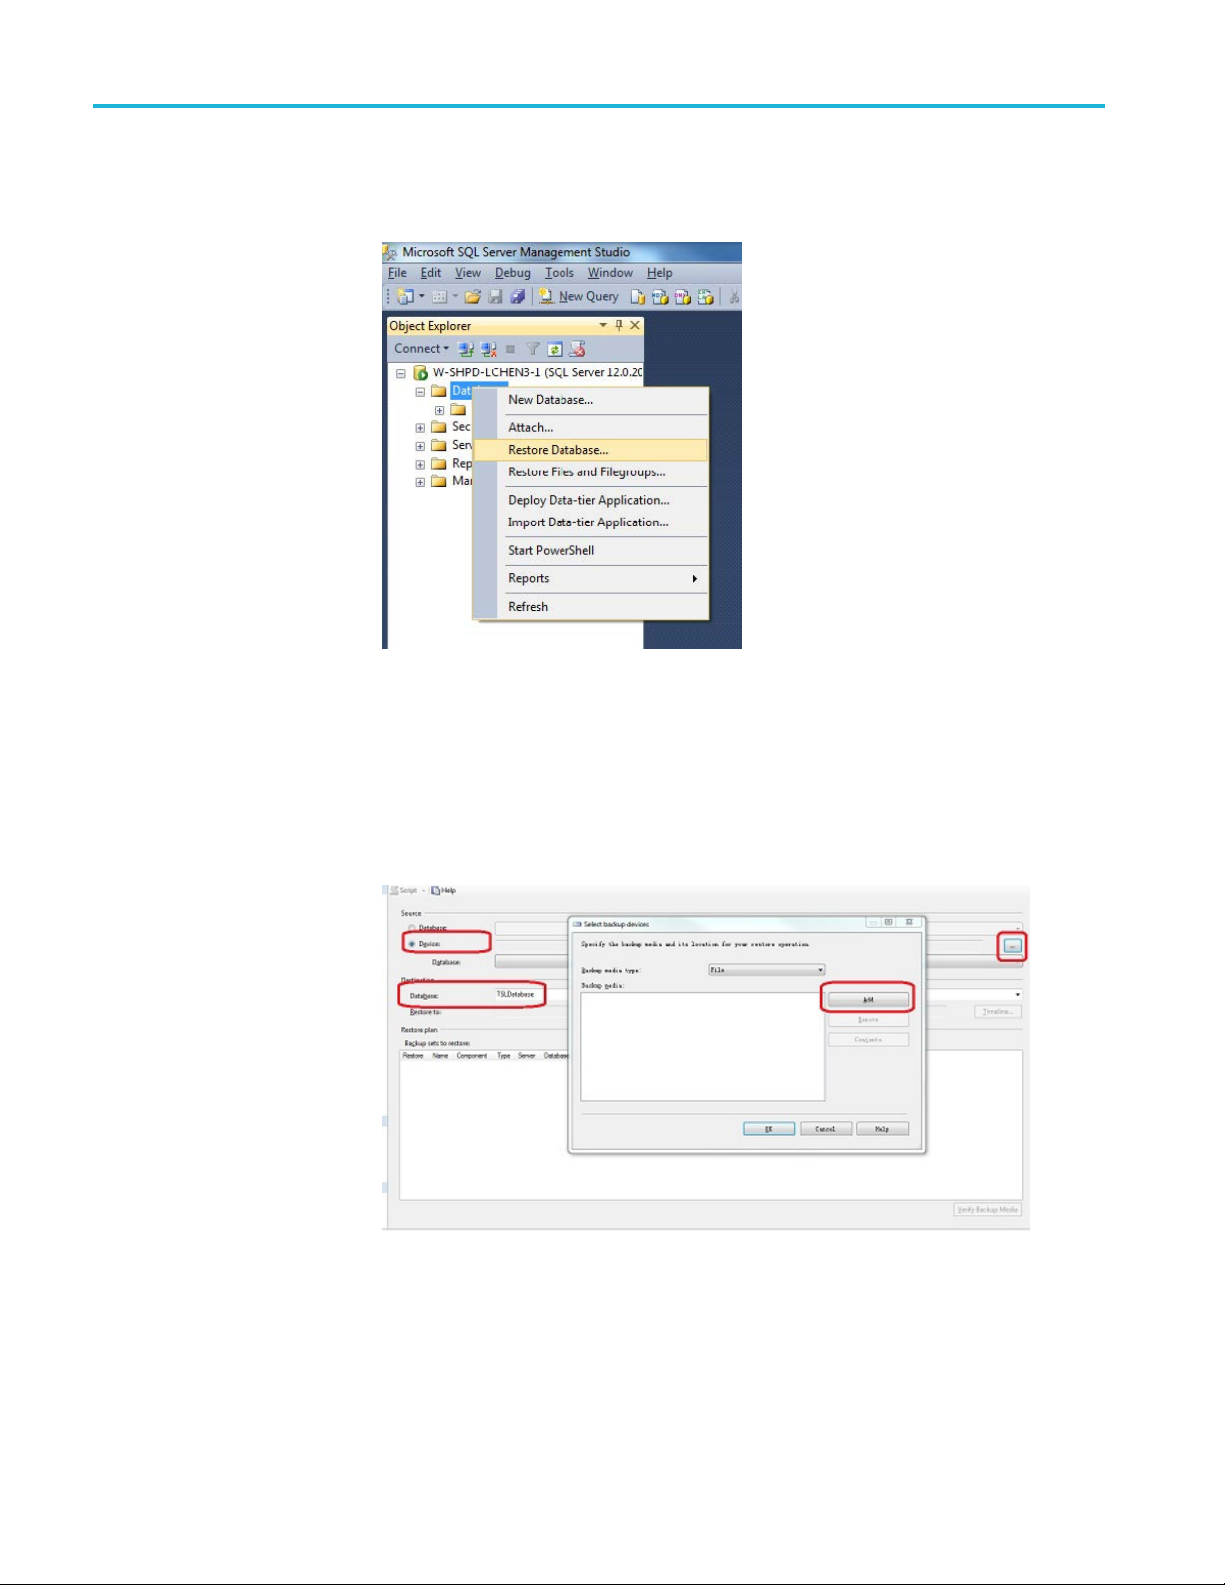
16. Select Restore
figure.
Figure 26: Restore database
17. Enter TSLDatabase next to Database.
Database from the popup menu, as shown in the following
18. Select Device.
19. Select
20. Click Add, as shown in the following figure.
Figure 27: Specify backup
‘…’.
20 TekSmartLab User Manual
Page 41
TSL3000B installation
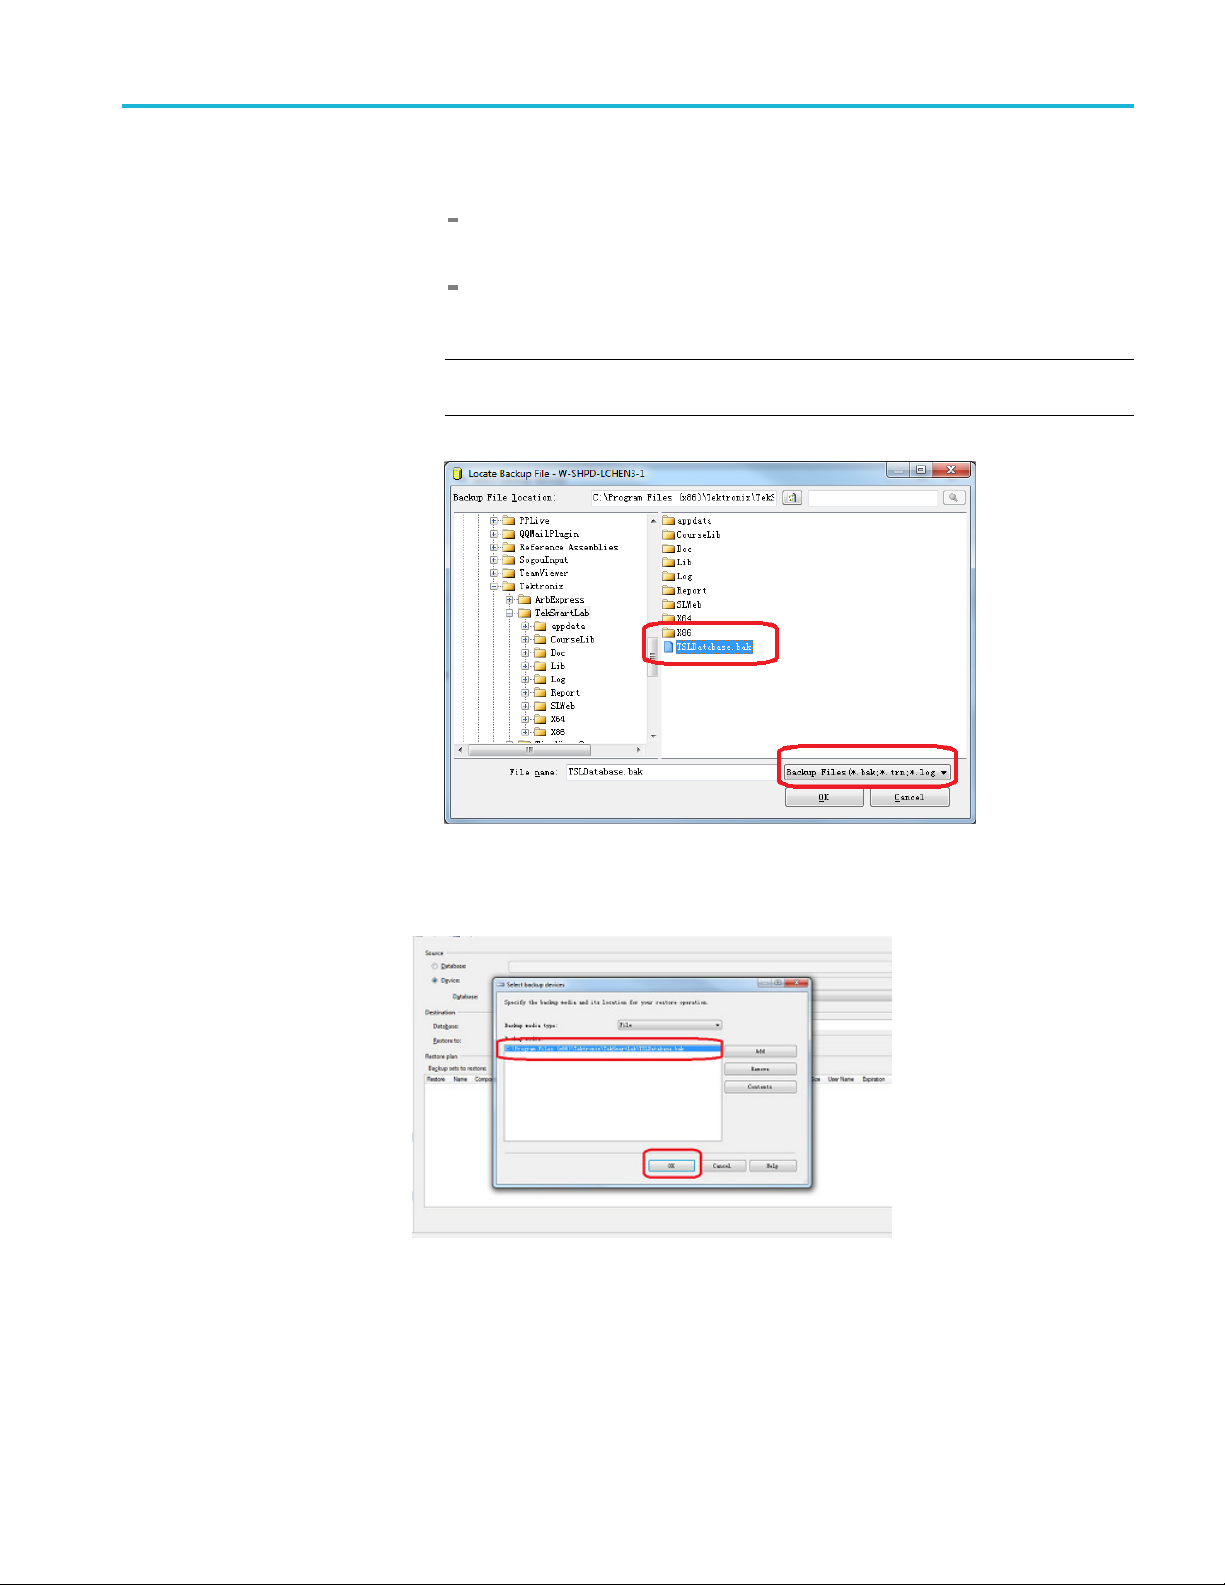
21. Find the file TSL
For 64-bit Win7: C:\Program Files (x86)\Tektronix\TekSmartLab\
TSLDatabse.b
For 32-bit Win7: C:\Program Files\Tektronix\TekSmartLab\
TSLDatabse
NOTE. If you are not able to find the file, select All Files next to Files of type,
as shown in the following figure.
Database.bak in one of the following directories:
ak
.bak
Figure 28: Change file type
22. Click OK after you find the file, and the following figure is displayed.
Figure 29: Backup file found
TekSmartLab User Manual 21
Page 42

TSL3000B installation
23. Select the file u
The following figure is displayed.
Figure 30: Select the most recent database
24. Click OK to complete the configuration and a confirmation message is
display
ed, as shown in the following figure.
sing the checkbox in the Restore column, and then click OK.
Figure 31: Database configuration complete
NOTE. If you had installed SQL Server 2008 R2 Express andrestoredthe
TSLDatabase.bak before, select Options andthenselectOverwrite the existing
database (WITH REPLACE) as below before restoring the file.
22 TekSmartLab User Manual
Page 43
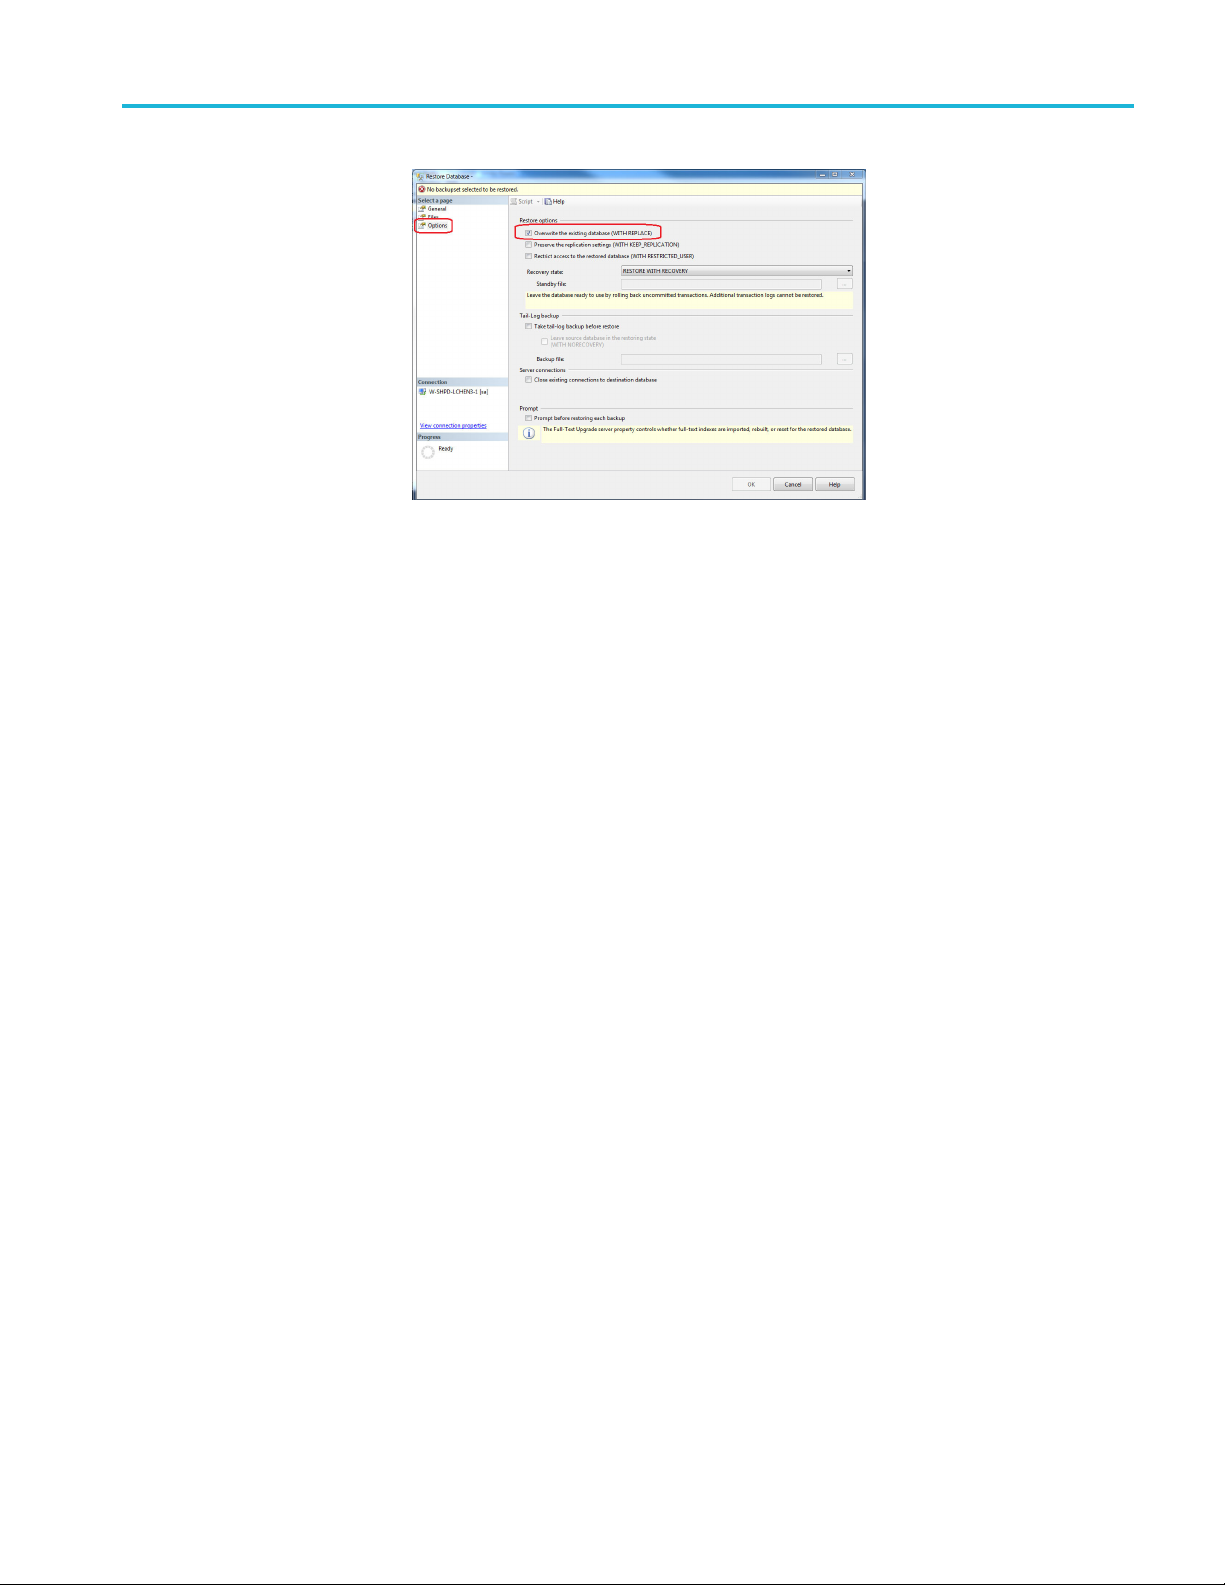
Figure 32: Overwrite the existing database
TSL3000B installation
TekSmartLab User Manual 23
Page 44

TSL3000B installation
Adding Inbound Rules
1. Open the firewal
System and Security >> Windows Firewall >> Advanced Setting’.
2. Double click I
menu.
3. Select New R
l setting s creen by navigating to Start >> Control Panel >>
nbound Rules and then right-click it to display the pop-up
ule…, as shown in the following figure.
Figure 33: Create new rule
4. Select Port, and click Next.
Figure 34: Select port
24 TekSmartLab User Manual
Page 45

TSL3000B installation
5. Select TCP,sel
Figure 35: Allow the connection
6. Select all the options and click Next.
ect special local ports and input 1433, then click Next..
Figure 36: Profile
TekSmartLab User Manual 25
Page 46

TSL3000B installation
7. . Input a Name, f
Figure 37: Input name
or example TSLSQL, and click Finish.
26 TekSmartLab User Manual
Page 47

TSL3000B installation
IIS installat
Installing IIS in Win7
ion and configuration
1. Click Start >> Control Panel >> Programs >> Turn Windows features on or
off, and then select Internet Information Services asshowninthefollowing
figure.
Figure 38: Select internet information services
NOTE. If you are installing IIS for the first time, make sure that you follow the
ructions above.
inst
2. Browse to World Wide Web Services >> Application D evelopment Features,
and then select the following:
.NET Extensibility
ASP.NET
I
CG
ISAP Extensions
ISAP Filters
Server-Side Includes
TekSmartLab User Manual 27
Page 48
TSL3000B installation
Installing IIS for web server
3. Browse to World
the following
Default Docum
Directory Browsing
HTTP Errors
HTTP Redirection
Static Content
4. Click OK.
NOTE. Make sure that Web Management Tools is selected by default.
After a few minutes, the installation will finish.
1. Open the Internet Information Services (IIS) Manager on your computer
one of t
he following two ways:
Click Start,andenterIIS in the search box. Then open the Internet
mation Services (IIS) Manager from the search results.
Infor
Wide Web Services >> Common HTTP Features, and select
ent
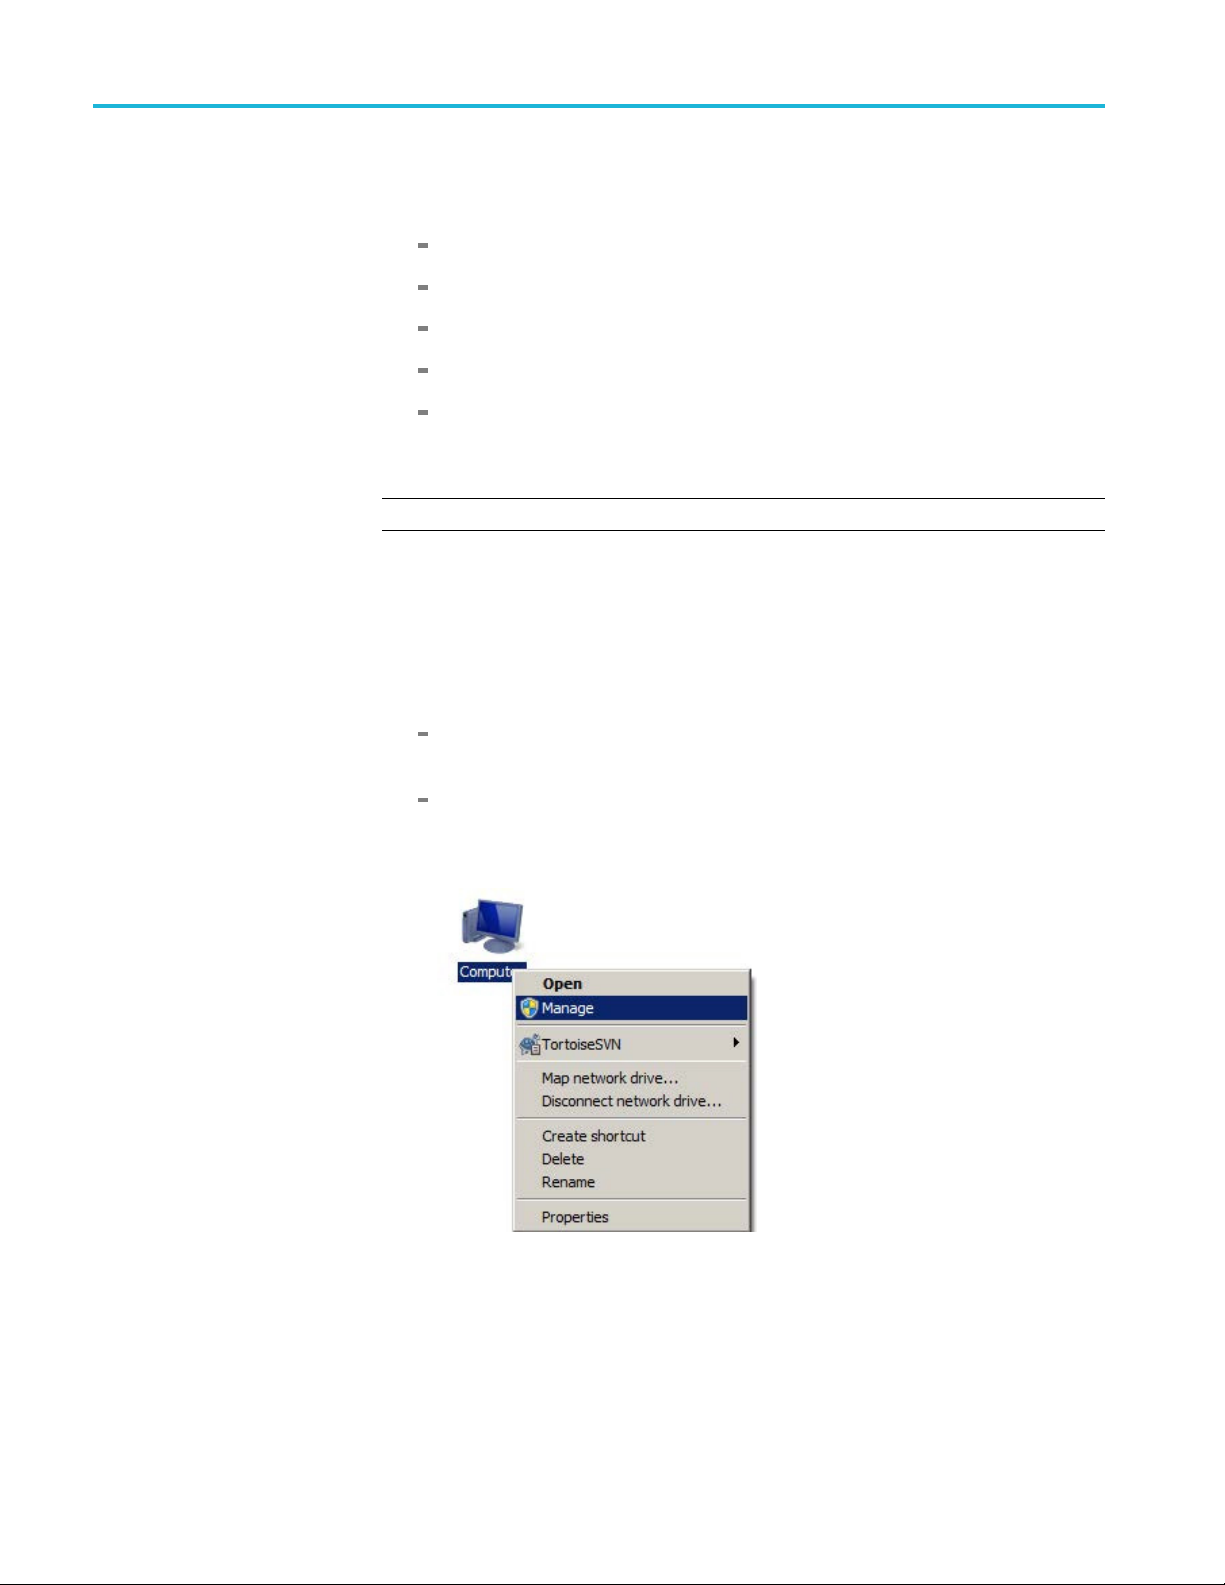
Right-click Computer, and then select Manage.Youcanfind Internet
rmation Services (IIS) Manager under Services and Applications,
Info
as shown in the following figure.
Figure 39: Open internet information services manager
28 TekSmartLab User Manual
Page 49

TSL3000B installation
2. Collapse the it
3. Under Sites,selectDefault Web Site.
4. Click Stop under Manage Web Site in the right panel, as shown in the
following figure.
ems in the left panel.
e 40: Internet Information Services (IIS) manager
Figur
TekSmartLab User Manual 29
Page 50

TSL3000B installation
5. Right-click Si
figure.
tes and select Add Web Site …, as shown in the following
Figure 41: Add a web site
30 TekSmartLab User Manual
Page 51

TSL3000B installation
6. Enter SLWeb und
7. Under Physical Path, select one of the two directories for the SLWeb file.
For 64-bit: C:\Program Files (x86)\Tektronix\TekSmartLab\SLWeb
For 32-bit: C:\Program Files\Tektronix\TekSmartLab\SLWeb
8. Click OK, as shown in the following figure, to finish.
er Site name.
Figure 42: Select the SLWeb fi le
TekSmartLab User Manual 31
Page 52
TSL3000B installation
Configuring ASP.NET 4.0
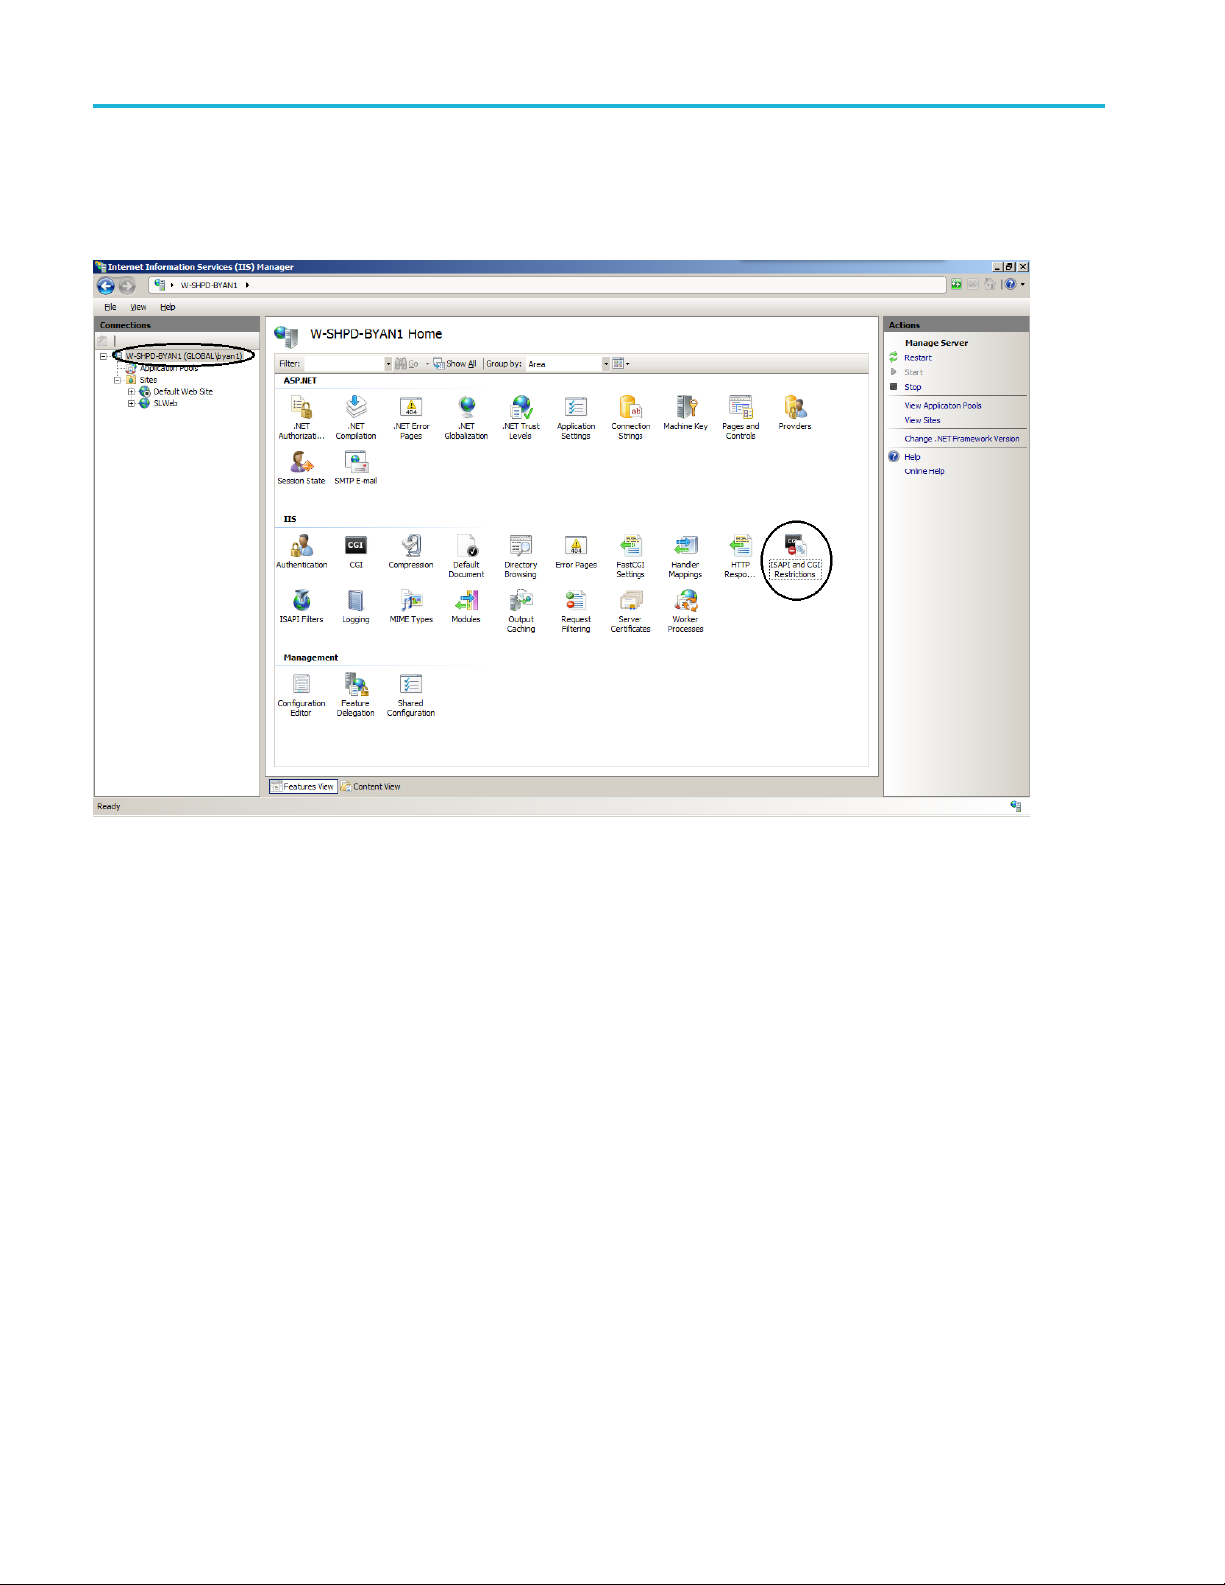
1. Open Internet I
2. Select the server name in the left panel (highlighted in the following figure).
nformation Services (IIS) Manager as described b efore.
Figure 43: IIS manager
3. Double-click ISAPI and GGI Restrictions in the middle panel.
32 TekSmartLab User Manual
Page 53

TSL3000B installation
Figure 44: Allow ASP .NET 4.0
4. Right-click th
Allowed, as shown in the following figure.
After you’ve changed the status of the two entries, the following figure is
display
ed.
e two ASP.NET 4.0 entries to change the restriction to be
Figure 45: ASP .NET 4.0 allowed
TekSmartLab User Manual 33
Page 54

TSL3000B installation
Figure 46: ASP .NET v4.0 not found
NOTE. Under some conditions, you may not be able to find ASP.NET v4.0, as
shown in the following figure.
In this ca se, you can solve the problem by using a DOS command (as
administrator).
a. Under Sta rt >> All Programs >>Accessories, right-click Command
Prompt.
b. Select Run as administrator.
c. Ente
You can also copy and paste the command in the window, as shown in the
following
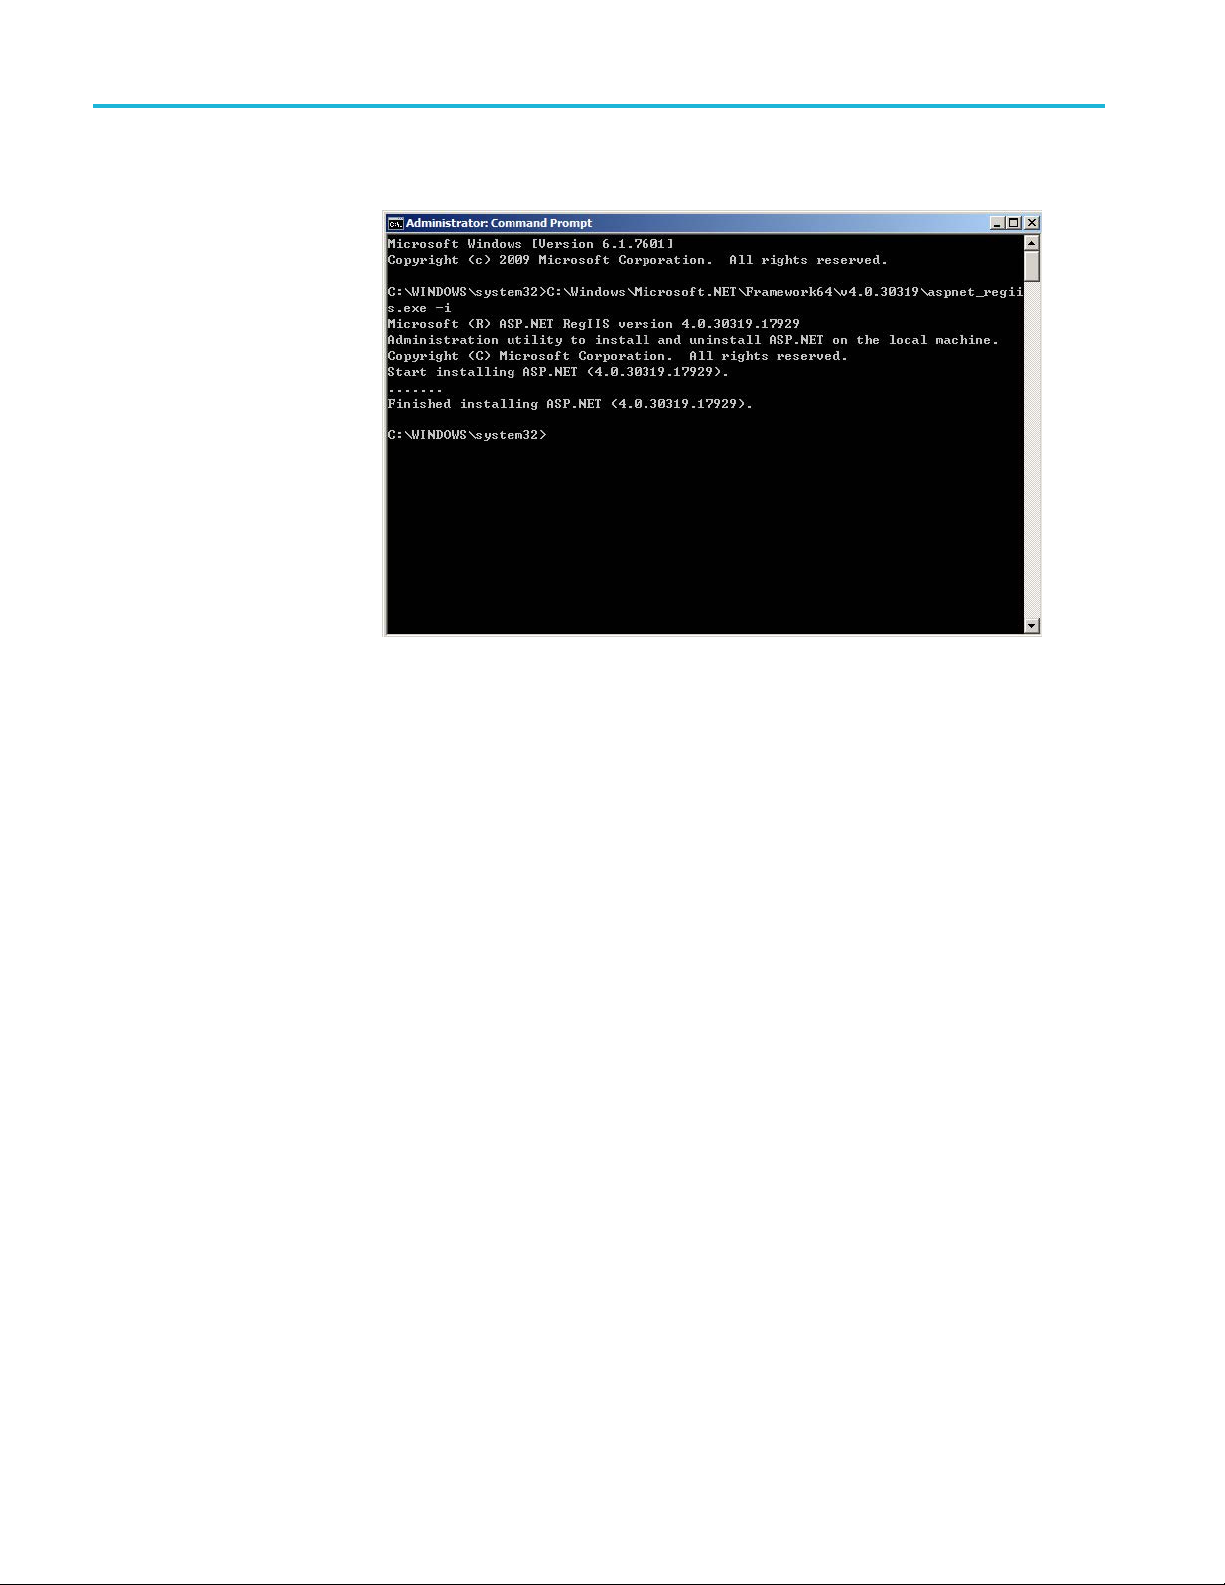
r one of the following commands in the window:
For 64-bit Win7:
C:\Windows\Microsoft.NET\Framework64\v4.0.30319\aspnet_regiis.exe –i
For 32-bit Win7:
C:\Windows\Microsoft.NET\Framework\v4.0.30319\aspnet_regiis.exe–i
34 TekSmartLab User Manual
Page 55
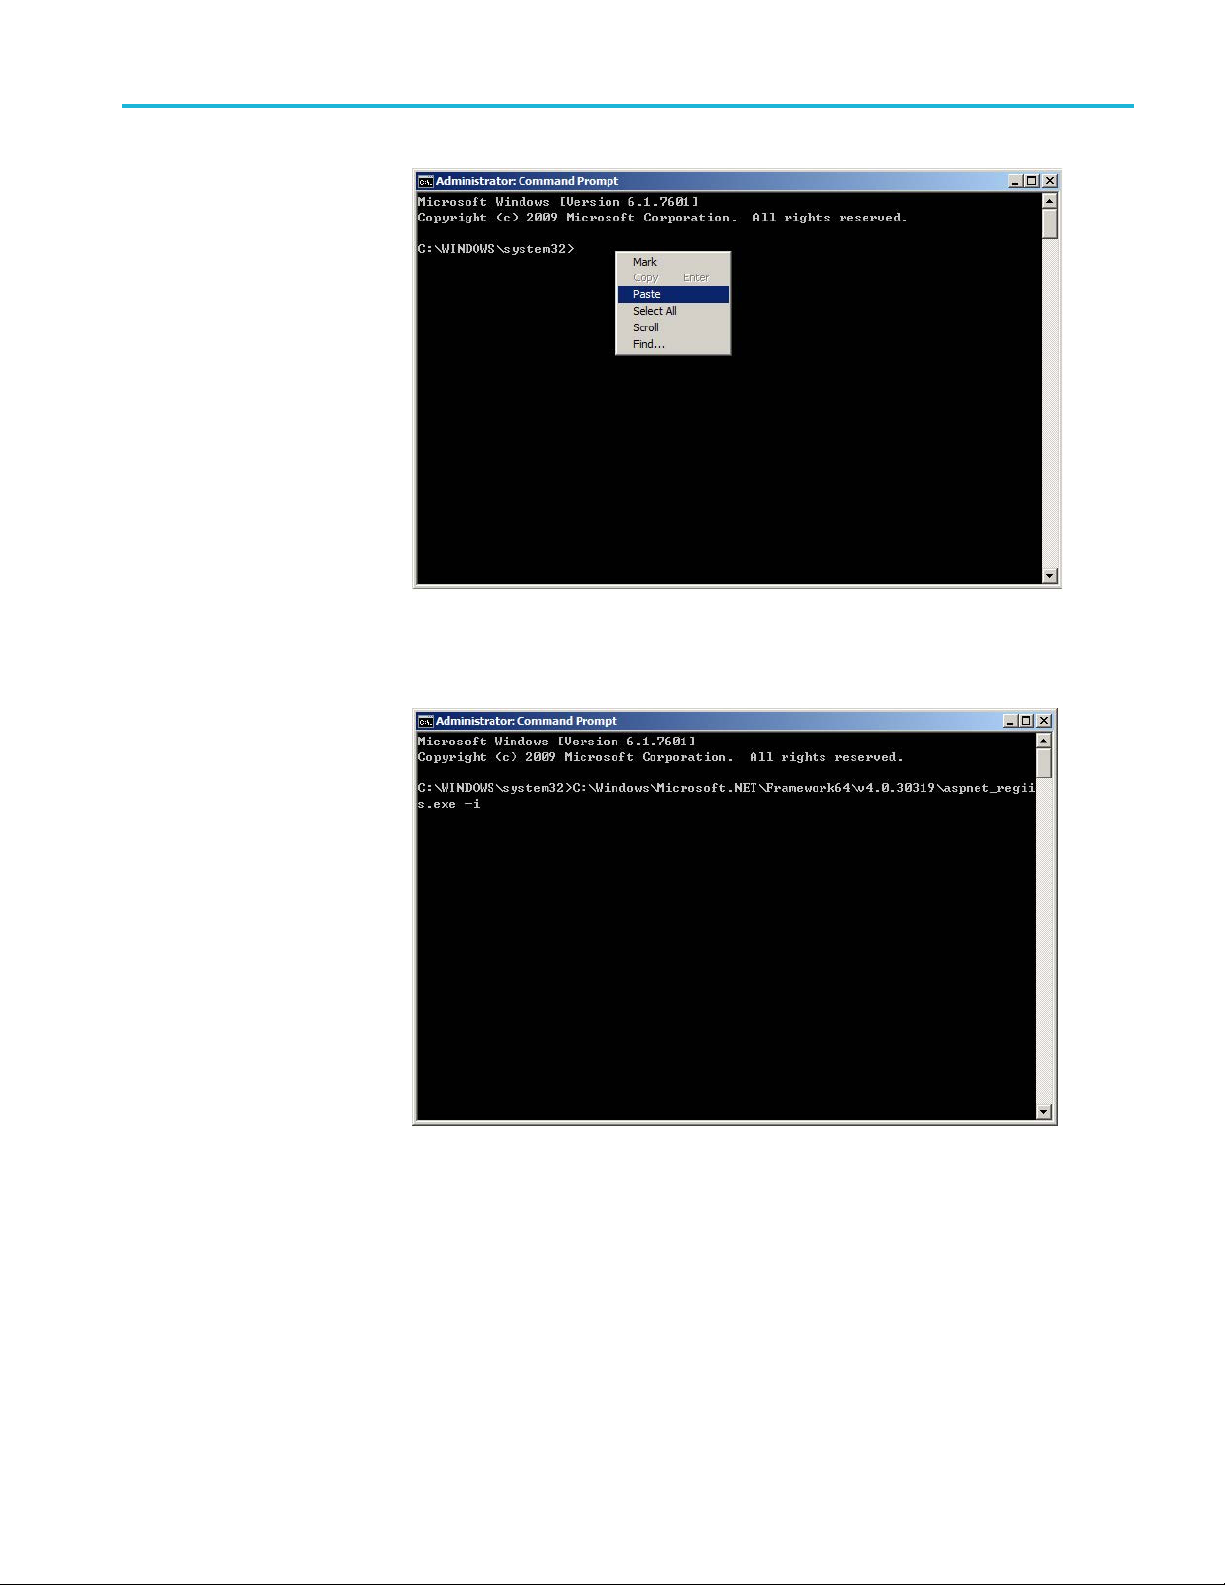
Figure 47: Paste command by right key
After you enter the command, the following figure is displayed.
TSL3000B installation
Figure 48: Command window after entering the command
TekSmartLab User Manual 35
Page 56
TSL3000B installation
Press Enter to r
Figure 49: Result of the c ommand running
As shown in the figure, ASP.NET v4.0 is installed. You should now be able to
configure ASP.NET v4.0 according to the procedures described in this section.
un the command, the following figure is displayed.
36 TekSmartLab User Manual
Page 57

TSL3000B installation
Configuring ASP.Net State
Server
1. On the desktop,
2. Select Manage. The Computer Management screen is displayed, as shown in
the following
right-click Computer.
figure.
Figure 50: Computer management
3. Select Computer Management (Local) >> Services and Applications >>
ices.
Serv
4. Select ASP.Net State Service in the right panel to confirm that the status is
arted’ and Startup Type is ‘Automatic’.
‘St
If not, change them by following these steps:
1. Right-click ASP.Net State Service.
2. Select Start or Restart.
3. Double-click ASP.Net State Service.
TekSmartLab User Manual 37
Page 58

TSL3000B installation
4. Change the Star
tup Type to Automatic, as shown in the following figure.
Figure 51: Configure ASP .Net State Service
5. Click OK to complete the setting.
6. Close the Computer Management screen.
38 TekSmartLab User Manual
Page 59
TSL3000B installation
Windows firewall
configuration
You can open the
>> System and Security >> Windows Firewall >> Advanced Setting’.
Adding inbound rules.
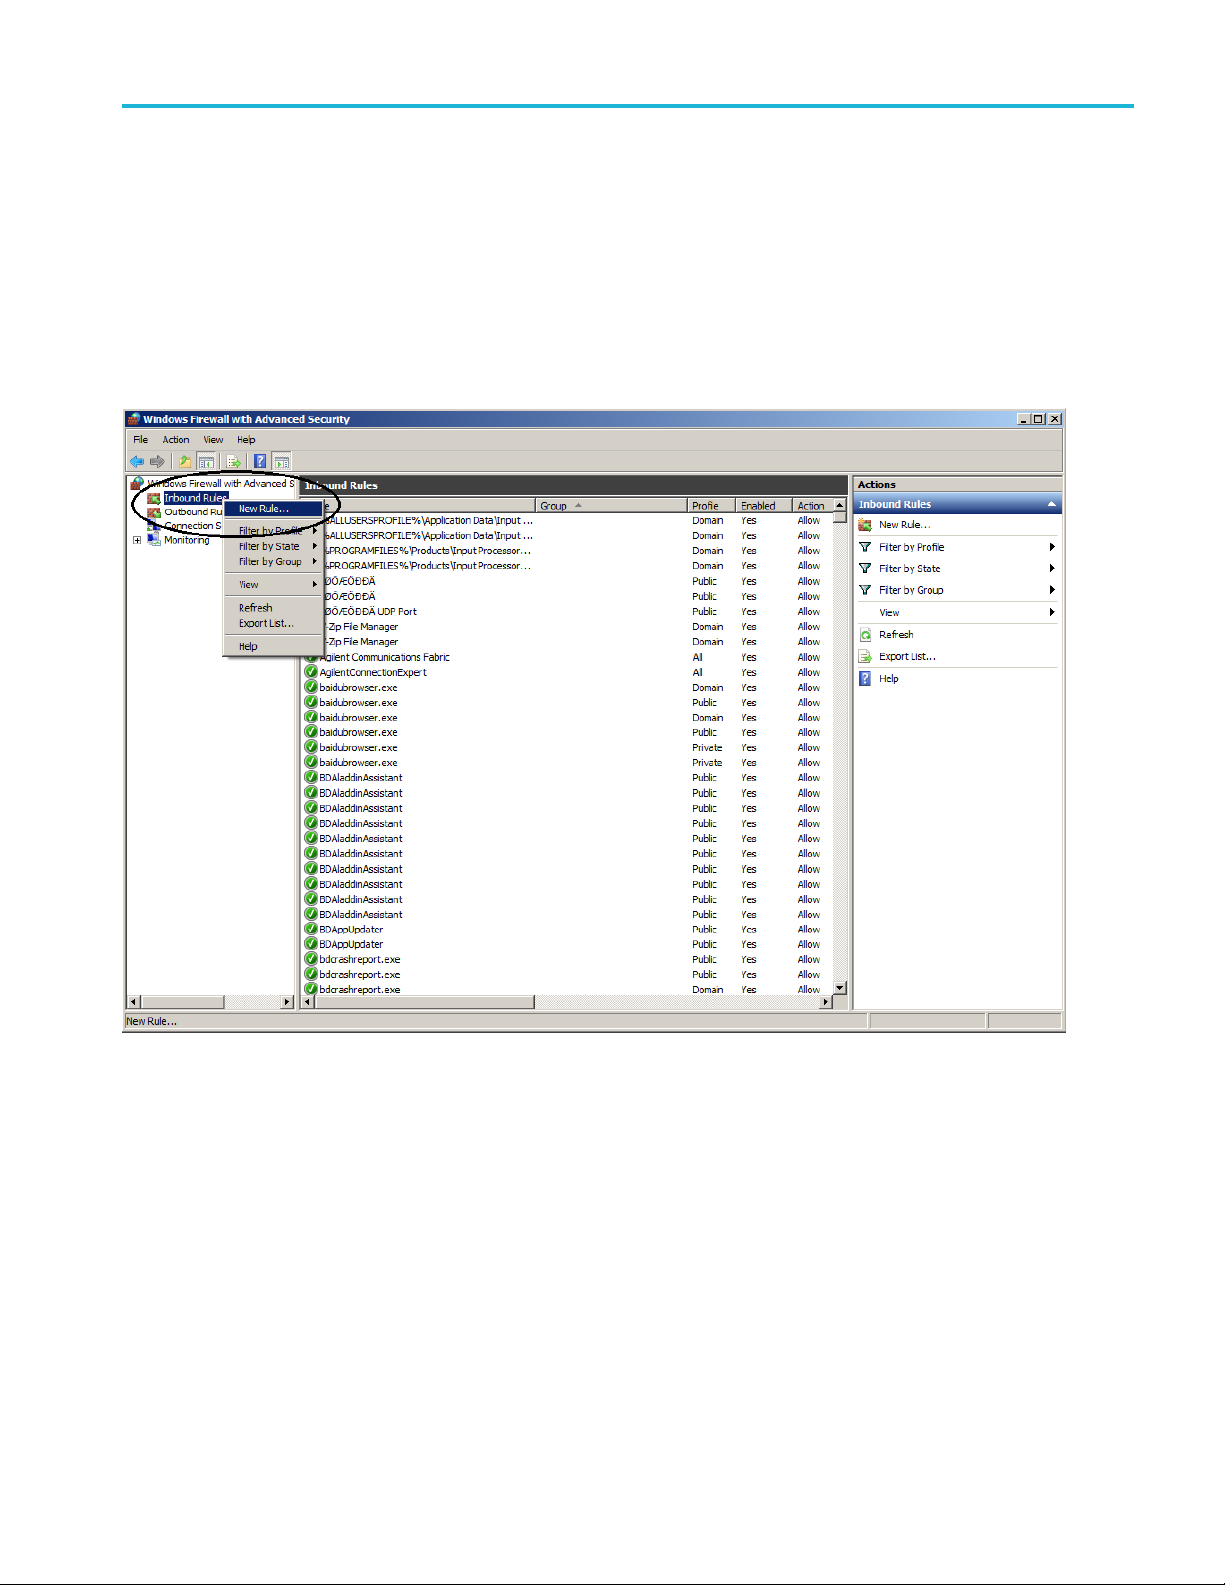
1. Double click
menu.
2. Select New R
firewall setting screen by navigating to Start >> Control Panel
Inbound Rules and then right-click it to display the pop-up
ule…, as shown in the following figure.
Figure 52: Add inbound rules
TekSmartLab User Manual 39
Page 60

TSL3000B installation
3. Select Port,an
dthenclickNext, a s shown in the following figure.
Figure 53: New inbound rule wizard
40 TekSmartLab User Manual
Page 61

4. Select TCP.
5. Select Specific Local ports .
6. Enter 80 next to Specific Local ports.
7. Click Next.
TSL3000B installation
Figure 54: Protocol and ports
TekSmartLab User Manual 41
Page 62

TSL3000B installation
8. Select Allow th
econnection, and then click Next.
Figure 55: Action
42 TekSmartLab User Manual
Page 63

TSL3000B installation
9. Select all thre
e checkboxes and click Next, a s shown in the following figure.
Figure 56: Profile
TekSmartLab User Manual 43
Page 64
TSL3000B installation
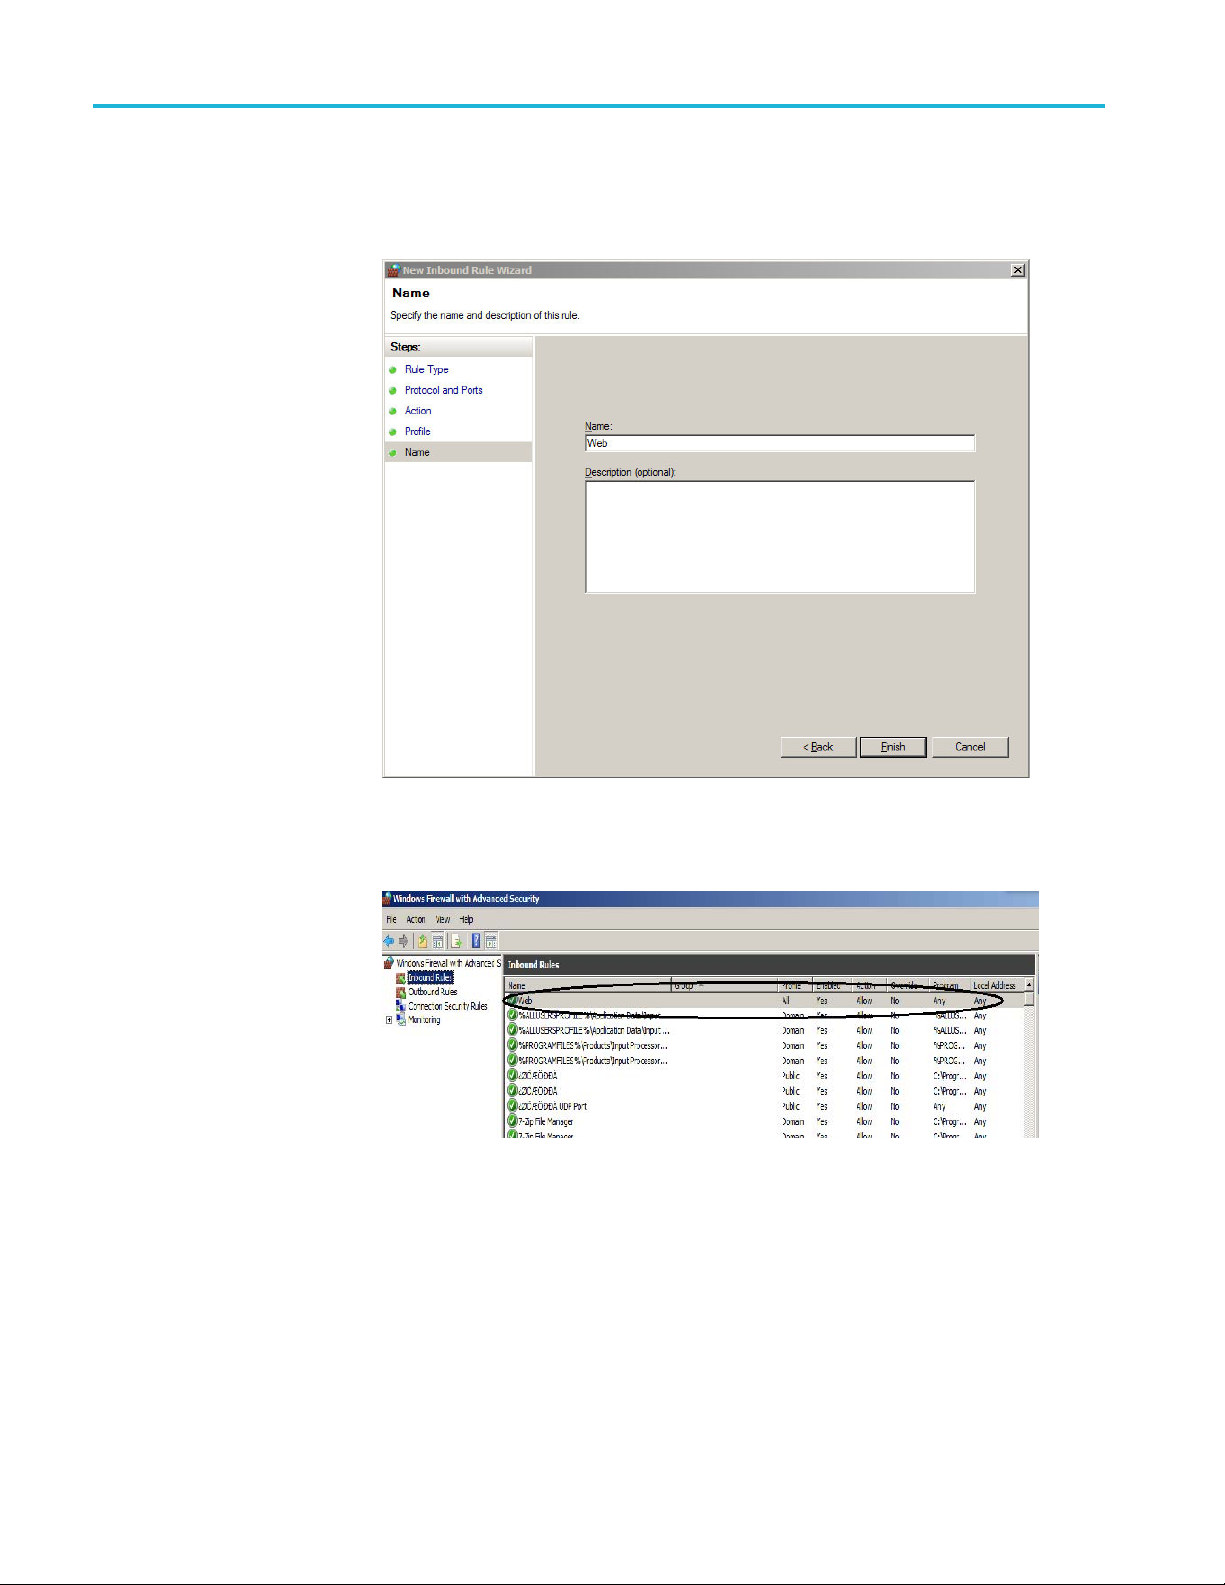
10. Enter Web under
11. Click Finish, as shown in the following figure.
Name.
Figure 57: Name
After you click Finish, the following figure is displayed.
Figure 58: Inbound rules added
44 TekSmartLab User Manual
Page 65

TSL3000B installation
Adding outboun
Repeat the steps for adding inbound rules to add outbound rules. The following
figure indicates that you have successfully added outbound rules.
Figure 59: Outbound rules added
Close all the windows once you are finished.
drules. Double-click Outbound Rules and right-click it again.
TekSmartLab User Manual 45
Page 66
TSL3000B installation
Testing the web server
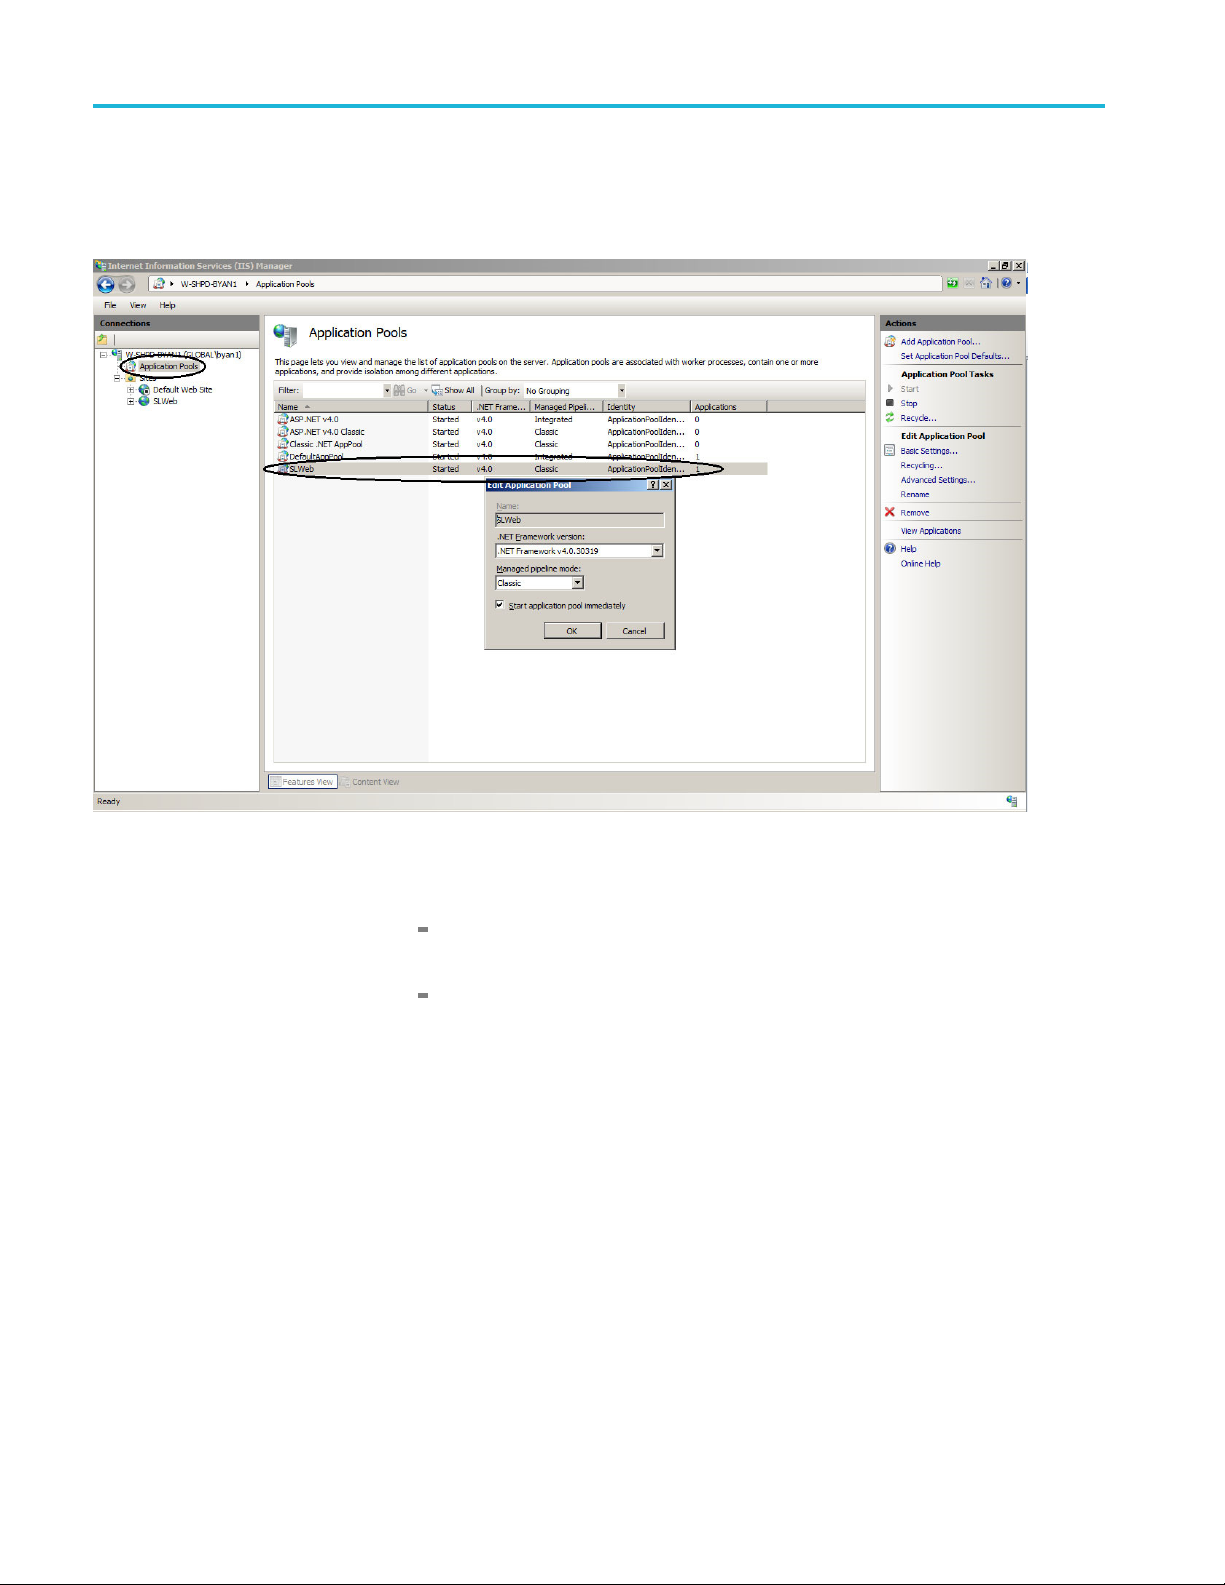
1. Open Internet I
2. Select Application Pools in the left panel, as shown in the following figure.
nformation Service (IIS) Manager as described before.
Figure
60: Application pools
3. Confir
The version of .NET Framework should be 4.0 (or a version consistent
with
Managed pipeline mode should be Classic.
If the parameters are something else, you can double-click the entry to
modify them.
m that the parameters of SLWeb in the right panel are correct:
what is installed).
46 TekSmartLab User Manual
Page 67
TSL3000B installation
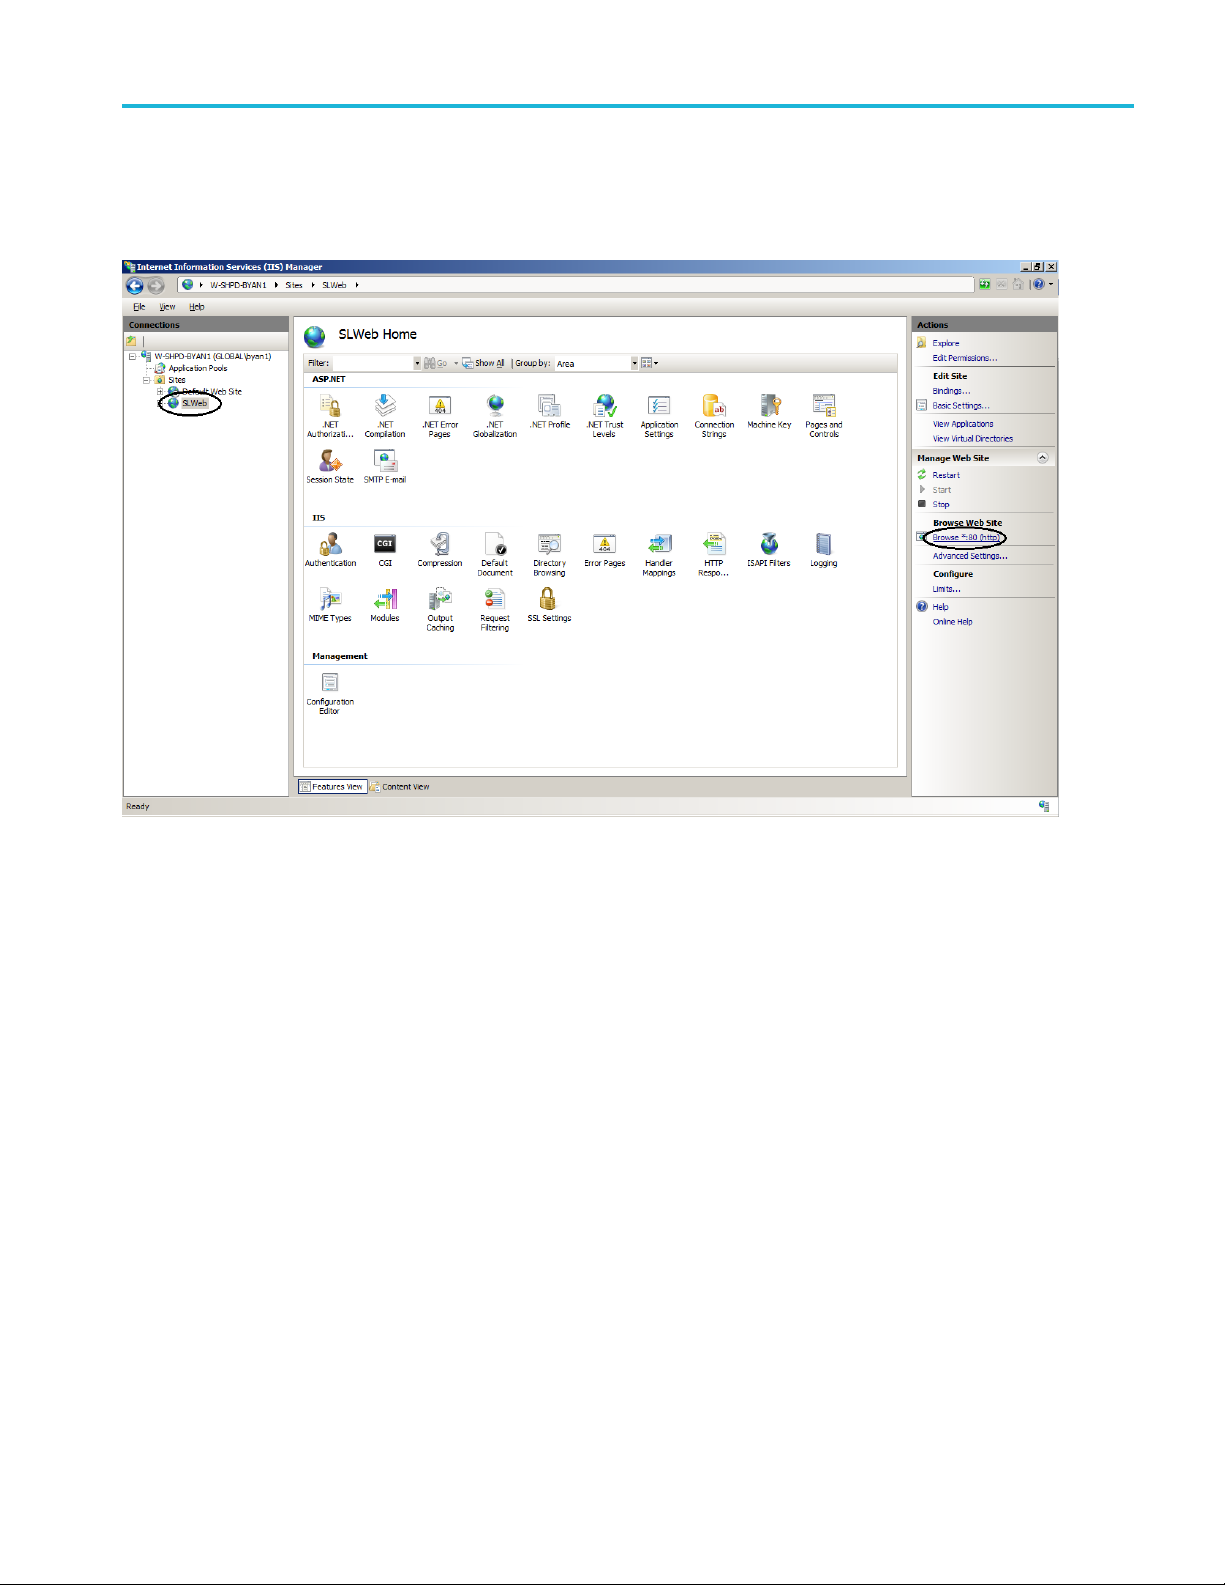
4. Click SLWeb in t
5. Click Browse*:80 (http) in the right panel, as shown in the following figure.
he left panel under Sites.
Figure 61: SLWeb home
TekSmartLab User Manual 47
Page 68

TSL3000B installation
Windows will au
also enter http://localhost/ or http://127.0.0.1/ in the address box of your Web
browser to visit the web page.
The following figure is the web page displayed.
tomatically open Internet Explorer to http://localhost/. You can
Figure 62: TekSmartLab web page
This web page indicates that the TekSmartLab web server works fine. (You can
ignore the caution message in the figure above. When you visit the web page
a QR code, you will not see this message.)
using
If you are not able to visit the web page, please refer to IIS installation and
guration(Seepage27,IIS installation and configuration.) and confirm that
confi
IIS is properly configured.
48 TekSmartLab User Manual
Page 69
TSL3000B
General information
TSL3000B
Home page
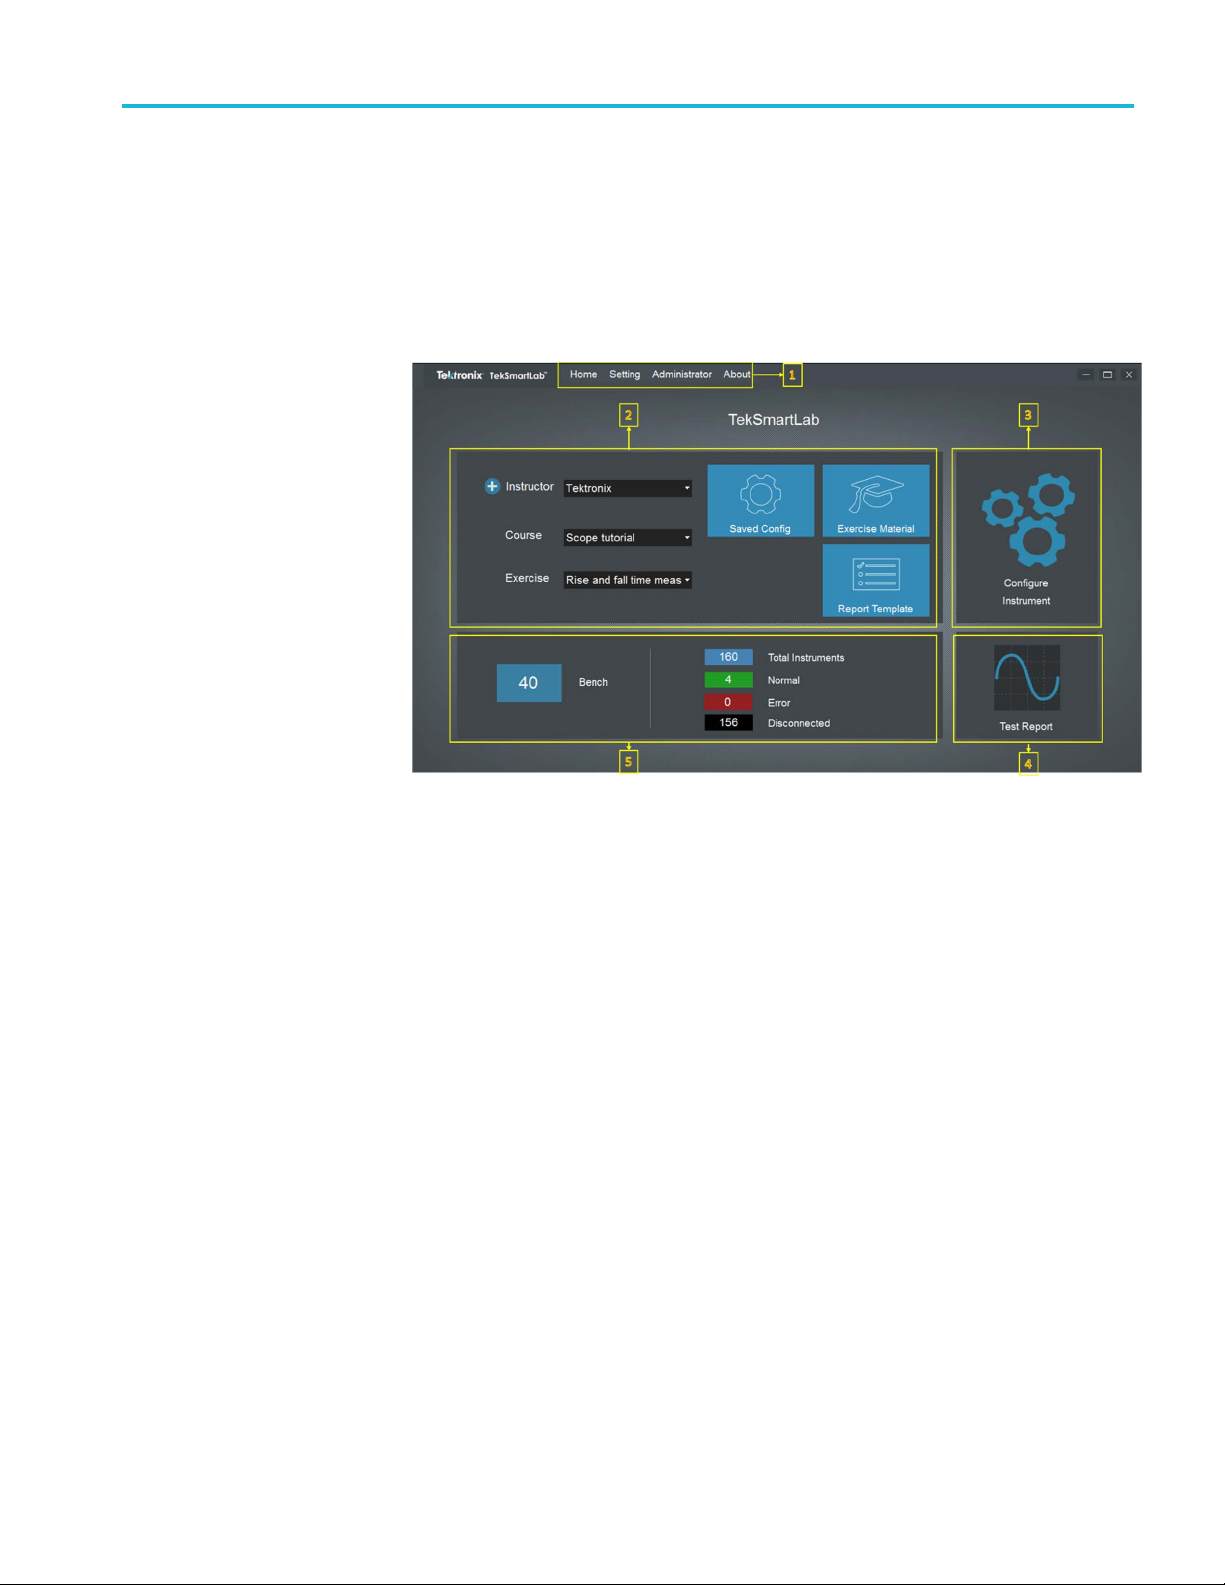
The TSL3000
Figure 63: Home page
1. The menu bar: Menus allowing you to configure the software.
2. Course and exercise information: Controls to create and configure the courses
and exercises in this area, as well as other related settings.
B home page is shown as in the following figure.
3. Configure instruments: Configure the instruments in batch by clicking this
area.
4. Test report: View the test report submitted by students by clicking this area.
b inform ation: Monitor and modify the parameters of instruments on
5. La
certain bench by clicking this area. Displays the bench status and instrument
status in the lab.
TekSmartLab User Manual 49
Page 70
TSL3000B
Menu bar
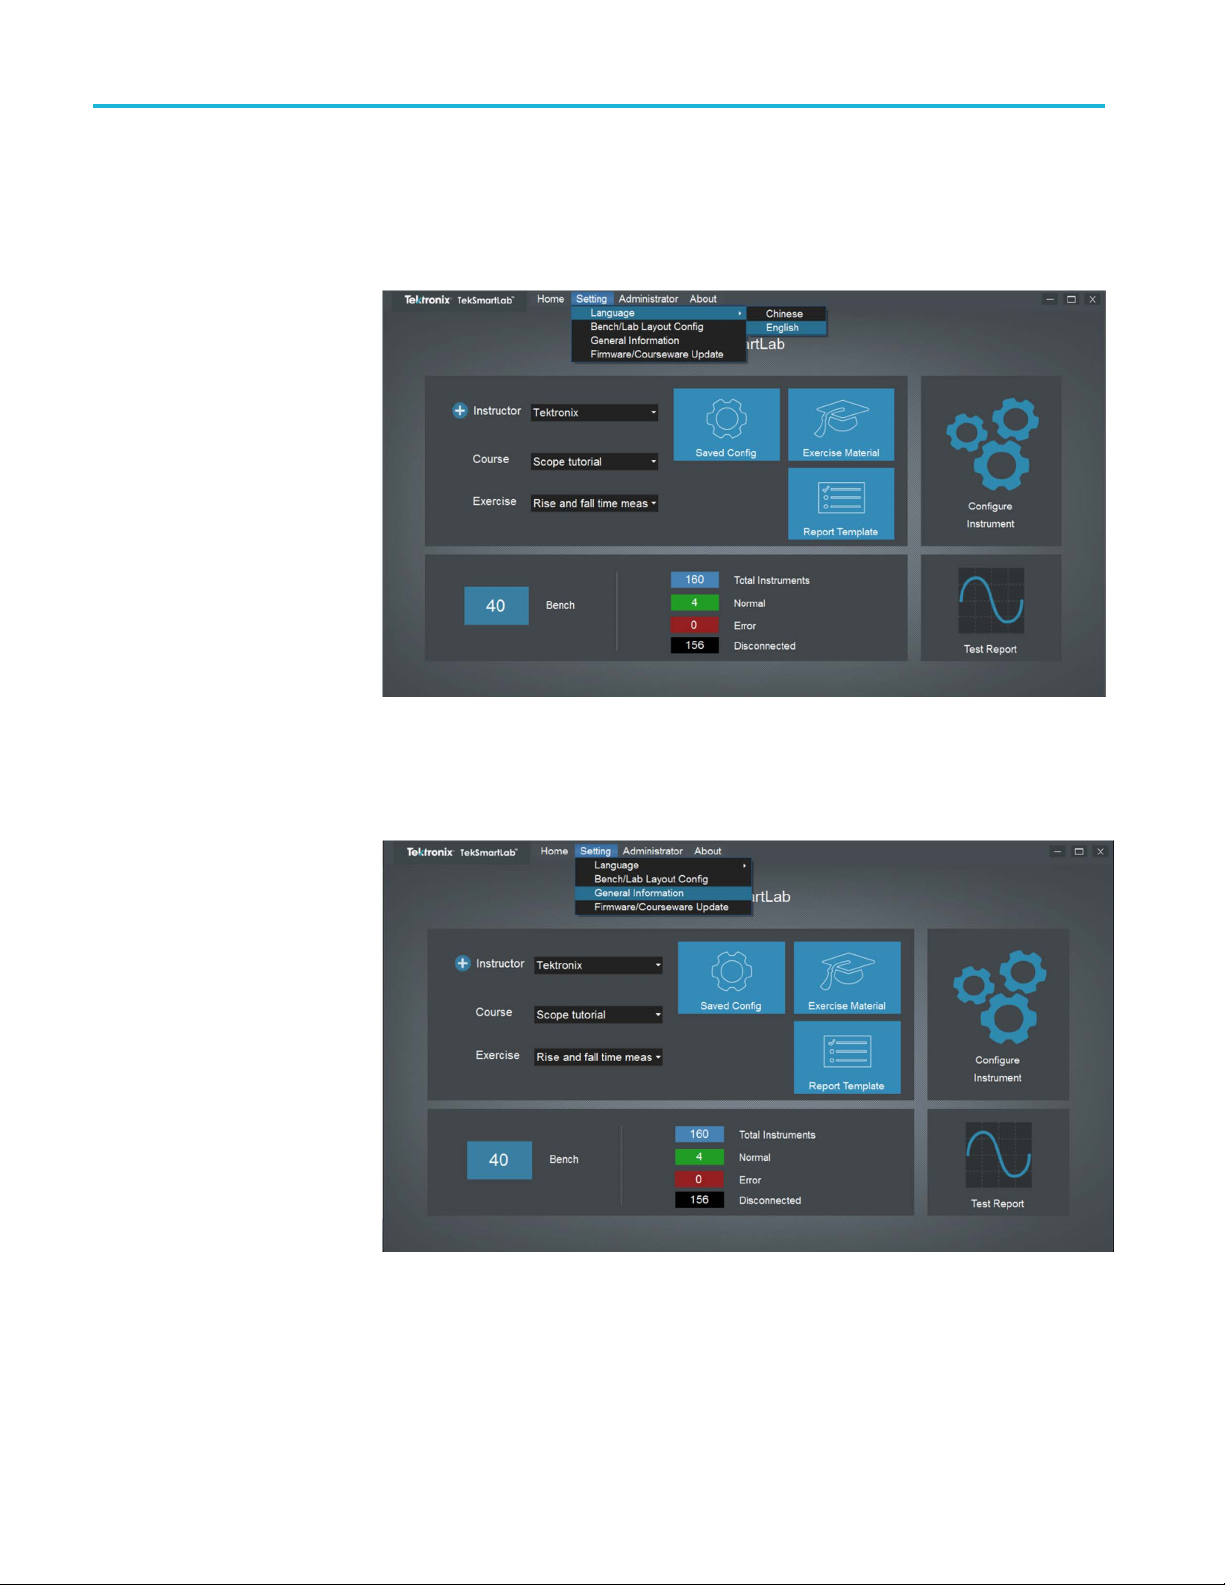
Click Home on th
Change language. Click Setting -> Language on the menu bar to change the
software language, as shown in the following figure.
Figure 64: Change language
e menu bar to return to the main page.
Lab general information. Click Setting -> General Information on the menu bar
to change the lab general information.
Figure 65: General i nformation
50 TekSmartLab User Manual
Page 71

TSL3000B
The following fi
change the lab name in the upper part of the page.
Figure 66: Edit general information
Change the password. Click Administrator -> Change Password on the menu
bar to change the password, and the f ollowing dialog box is displayed.
gure is displayed after you click General Information.Youcan
Figure 67: Change password
TekSmartLab User Manual 51
Page 72

TSL3000B
Input the old pa
password is “admin”.
Figure 6
8: Input new password
ssword, the following dialog box is displayed. The default
52 TekSmartLab User Manual
Page 73

TSL3000B
License Manag
ement
NOTE. In July 20
TekSmartLab™ software.
Thelegacysys
so you can use your current a ctivation code when upgrading to the latest version
software.
The new application license, with TSL3000B-FL, offer floating licenses (FL) that
can be checked in and out of the Tektronix Asset Management System on the
Tektronix.com Web site.
How to purchase. Contact your local Tektronix Account Manager to purchase
TSL3000B-FL. Aft
purchased with the URL to the Tektronix As set Management system that will
enable you to manage your licenses.
You can manage your licenses using the Tektronix Asset Management System
found athttp://www.tek.com/products/product-license.
The Tektronix Asset Management system provides an inventory of the license(s)
in your account. It enables you C heck-out or Check-in a license and view the
history of licenses.
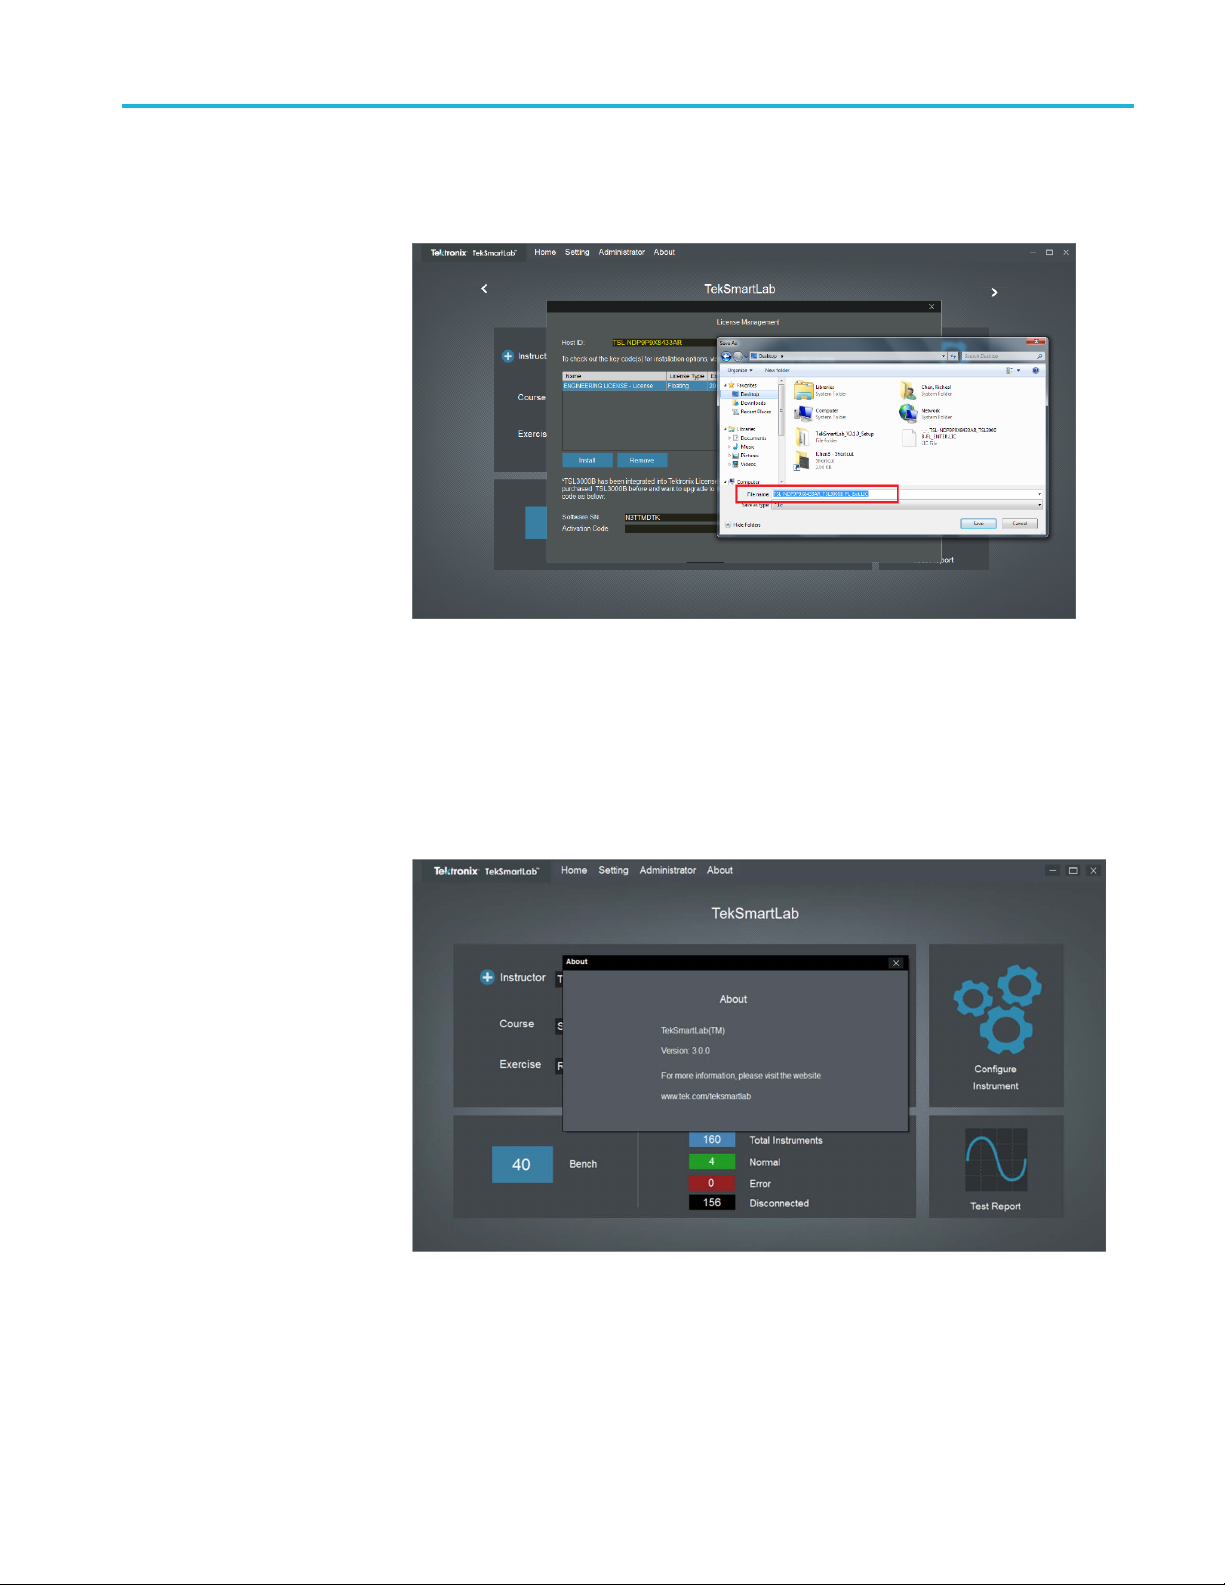
How to install. Click About -> License Management on the menu bar and the
following fi
17, the license policy and nomenclature was changed for
tem, with TSL3000B, will continue to be supported in the software,
er purchasing, you will receive an email listing the options
gure is displayed.
Figure 69: Install license
TekSmartLab User Manual 53
Page 74
TSL3000B
Click the Insta
is located. Select the license file and click Open. After the successful installation
is finished, the software is listed in the table.
Figure 70: License install finished
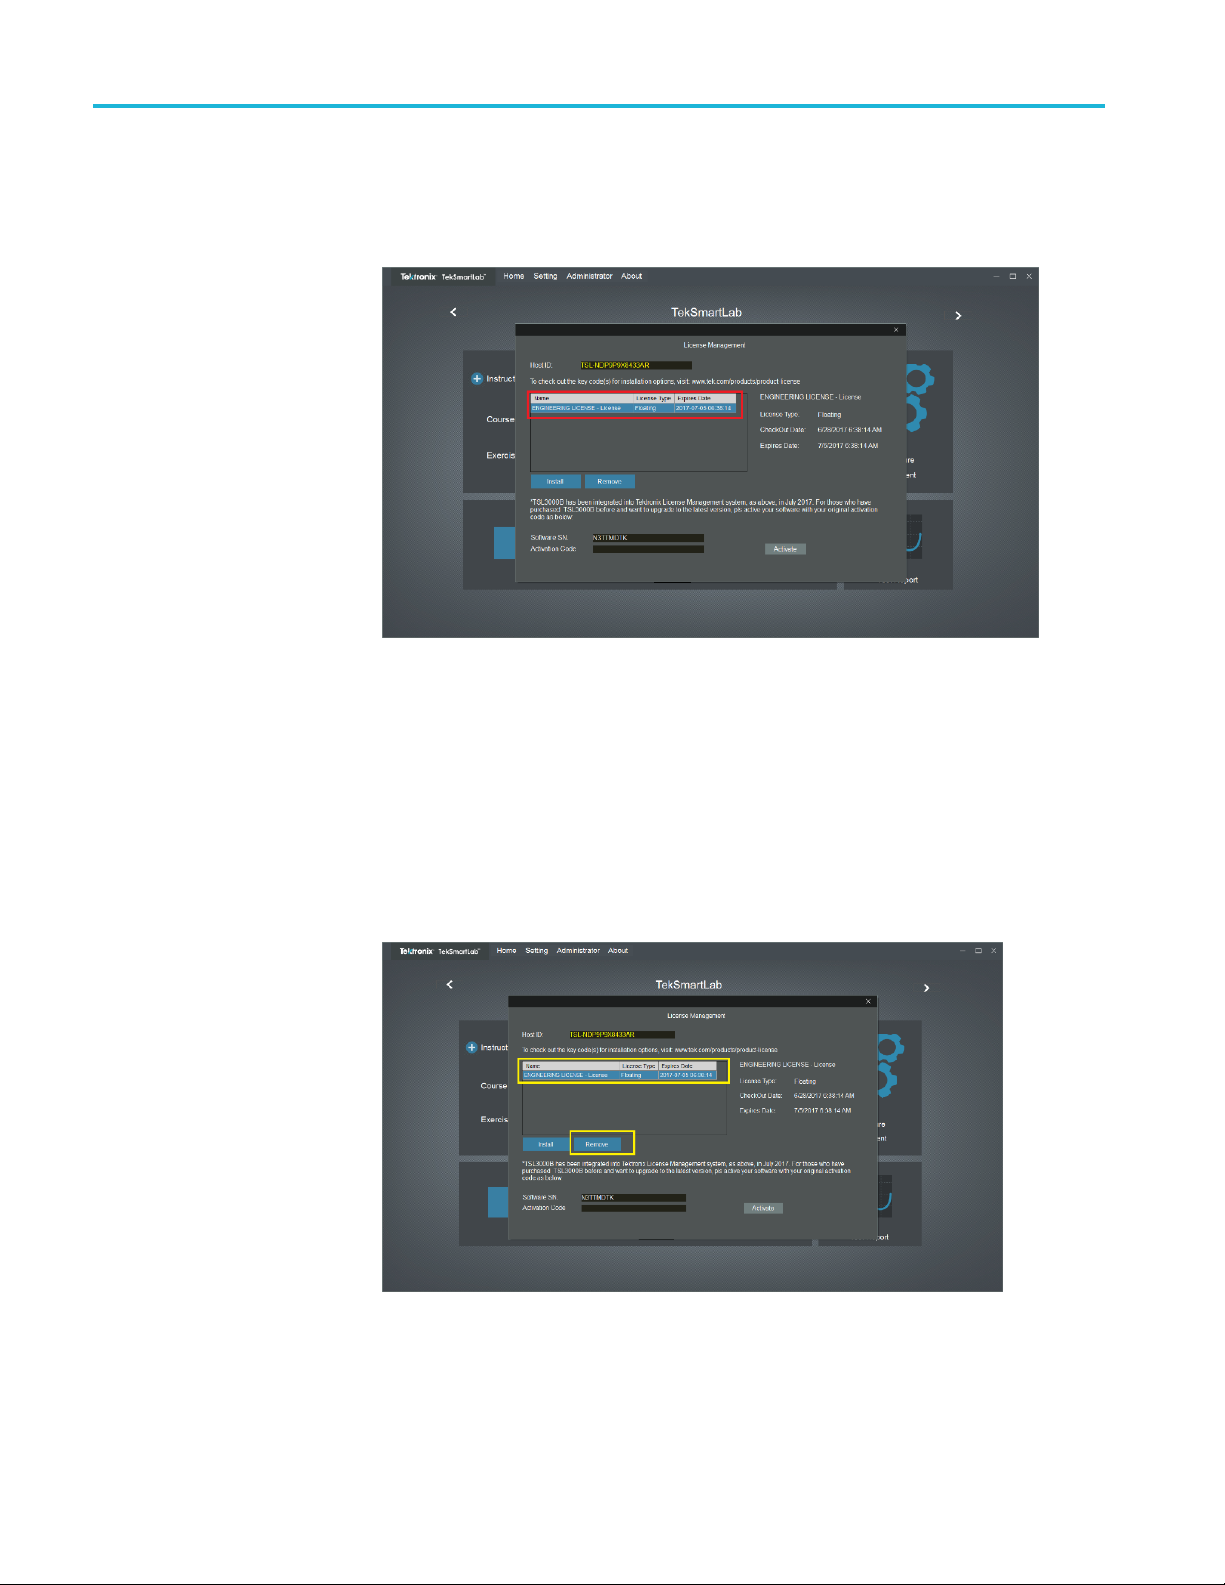
How to move the license to a different host. You can return the license purchased
and assign it to a different host on the other computer. TSL3000B-FL is a
floating license, and it can be returned unlimited number of times and assigned
to a different host.
ll License button and browse to the location where the license file
In order to move the license to a different host, follow these steps:
ClickAbout > License Management and select the license to return and click
Remove.
Figure 71: Select a license to remove
54 TekSmartLab User Manual
Page 75
TSL3000B
Browse to the lo
network drive or a USB memory stick), and click Save to generate the exit file.
Figure 72: Export the license file
Login to your account on TekAMS (Tektronix Asset Management system) and
upload t
to a computer with different host.
he exit file. Once the license is returned successfully, it can be re-assigned
cation where you would like to place the exit file (for example, a
About. Click About -> About on the menu bar to display the software
information, as shown in the following figure.
igure 73: Software information
F
TekSmartLab User Manual 55
Page 76

TSL3000B
Lab instrument management
This part describes how to manage the instruments in the lab more effectively
with TekSmartLab.
Configure bench and lab
layout
You can click Setting > Bench/Lab Layout Config to set the lab layout as well as
the bench layout.
Figure 74: Bench/Lab layout configuration
56 TekSmartLab User Manual
Page 77

TSL3000B
Bench layout setting
The following fi
The Bench Layout Configuration tab is chosen.
Figure 75: Bench layout configuration tab
You can choose the bench layout templates in the Bench Layout Configuration
tab. The Four-instrument layout template is chosen by default, as shown above.
gure is displayed when you click Bench/Lab Layout Config.
You can click the arrow in the upper right corner of the square representing each
instrument to choose the type of the instrument, as shown in the following figure.
Scope represents oscilloscope, AFG represents Arbitrary Function generator,
DMM re
Figure 76: Choose the instrument type
presents digital multimeter, and PWS represents power supply.
TekSmartLab User Manual 57
Page 78

TSL3000B
The following fi
Figure 77: Instrument chosen
You can click Apply in the upper right corner of the page to apply the settings to
all the other benches in the lab.
A dialog box for you to confirm is displayed. Click Ye s , the bench settings are
applied to all the benches in the lab.
gure shows the bench when four instruments are chosen.
Lab layout setting
If you try to apply the settings without choosing the instruments, a warning
pops up.
Select the Lab Layout Configuration tab, as shown in the following figure.
Figure 78: Lab layout configuration tab
58 TekSmartLab User Manual
Page 79

TSL3000B
You can arrange
Layout Configuration tab.
You can number
by rows in the figure below.
You can double-click a bench to delete it, as shown in the following figure. You
canalsodouble-clicktheblanktoaddthebenchback.
the layout by input the number of rows and columns in the Lab
the benches by rows or columns. The benches are numbered
Figure
NOTE. If you switch between numbering the benches b y row and by column, the
adding and deleting done previously will be canceled.
79: A rranging benches
TekSmartLab User Manual 59
Page 80

TSL3000B
You can also sel
following figure.
Figure 8
Make sur
warning pops up.
0: Number the benches manually
e you don’t number two benches with the same digit, or the following
ect Manual to number the benches manually, as shown in the
Figure 81: Two benches numbered the same
You can click Apply in the upper right corner of the page to apply the settings.
A dialog box for you to confirm the setting is popped up. Click Ye s to complete
the lab configuration.
60 TekSmartLab User Manual
Page 81
TSL3000B
Centralized instrument
configuration
You can configur
benches.
Configuring instruments. Take the following steps to configure the instruments:
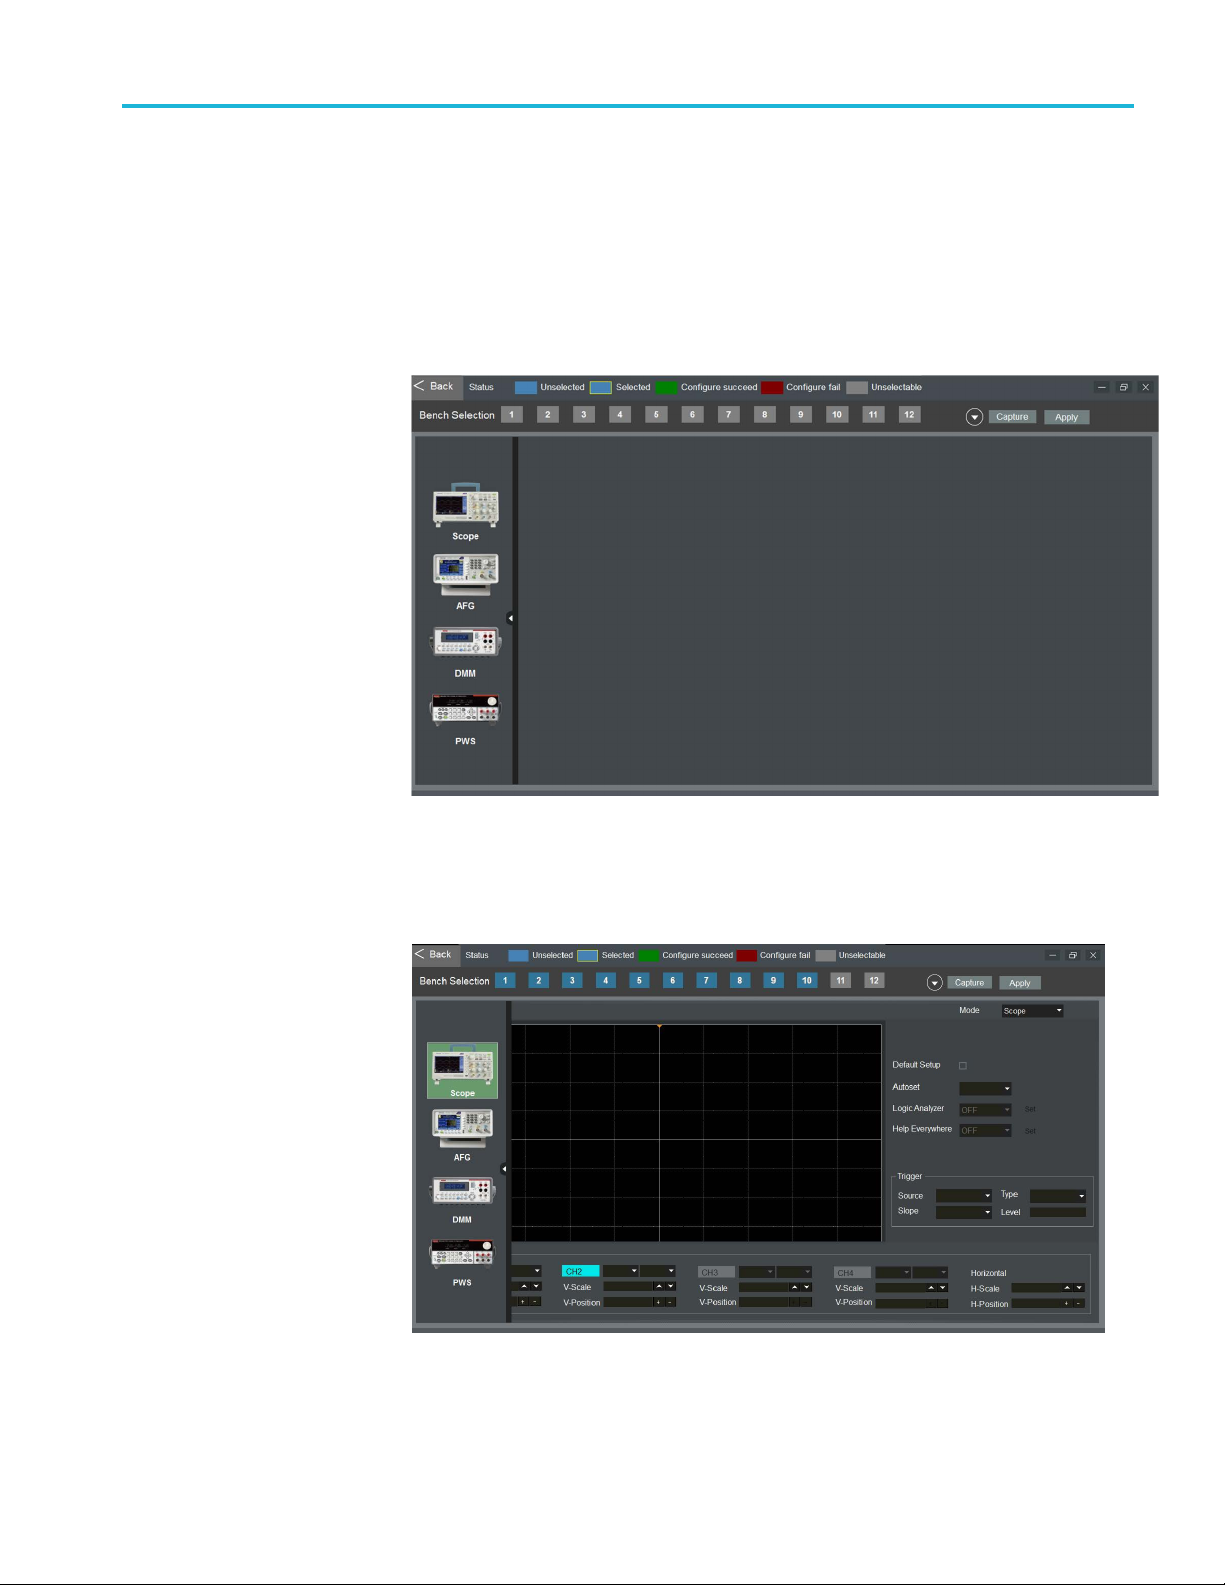
1. Click Configure Instrument pane on the home page. The following figure
is displaye
e the instruments and then distribute the settings to up to 100
d.
Figure 82: Configure instruments
2. Click the icon of an instrument to select it, and the following figure is
displayed.
Figure 83: Instrument selected
TekSmartLab User Manual 61
Page 82

TSL3000B
3. Set the paramet
NOTE. If you tick Default Setup, the instrument will be reset. Make sure you
leave all the parameters unconfigured.
If you tick Default Setup and configure some parameters, the instrument will be
reset and then the parameters will be configured.
NOTE. The parameters that can be set are based on the first such instrument
connected to the software. For example, if the first oscilloscope detected by the
system is two-channeled, the parameters for CH3 and CH4 cannot be configured.
4. Click the white arrow on the right side of the Bench Selection bar to collapse
it, and the following figure is displayed. The numbered bench icons in blue
is selectable.
ers of the instrument selected.
ure 84: Select bench
Fig
62 TekSmartLab User Manual
Page 83

TSL3000B
5. Select the benc
and the following figure is displayed. The numbered bench icon displayed in
green means the bench is successfully configured. If the icon turns red, select
the bench and repeat the configuration. If the icon stays red, please check the
cable connection, and then restart the instruments and TBX3000A. If the fault
is still not cleared, please perform a self-check of the instrument by referring
to the instr
h icon and click Apply on the upper right corner of the page,
ument user manual.
Figure 85: Bench configured
6. You can also click Capture to get the configurations from a configured bench
to distribute to other benches.
NOTE. If two of the same instrument types are placed in the same bench, the
configuration of one instrument will be applied to the other.
It is recommended that the same instrument types that are connected to the system
are of the same series, or even the same model. For example, if the system already
configurations for CH3 and CH4 for oscilloscope, the configuration won’t
has
succeed if one of the oscilloscope that is connected to the system is a two-channel
oscilloscope.
TekSmartLab User Manual 63
Page 84

TSL3000B
Firmware upgra
1. Select Setting -> Firmware/Courseware Update on the menu bar. The
following figu
Figure 86: Firmware upgrade
2. Choose the instrument type.
de. Take the following steps to upgrade the firmware:
re is displayed.
3. Choose
4. Choose the upgrade file.
5. Click Apply.
Firmware.
64 TekSmartLab User Manual
Page 85

TSL3000B
Centralized in
(Home) page. The following figure is displayed.
Figure 87: Lab overview
The status of the bench and instruments are represented by different colors, as
explained in the status bar in the upper part of the page. For example, in the above
figure, bench 1 is online, and the four instruments of bench 1 are working.
strument monitoring. Click the lab information area on the main
You can click the bench to enter the bench page and monitor the instruments, the
following figure is displayed.
Figure 88: Bench page
For the MDO3000 oscilloscope, you can switch between two modes: Scope
(oscilloscope) and SA (spectrum analyzer), as highlighted in the above figure.
TekSmartLab User Manual 65
Page 86
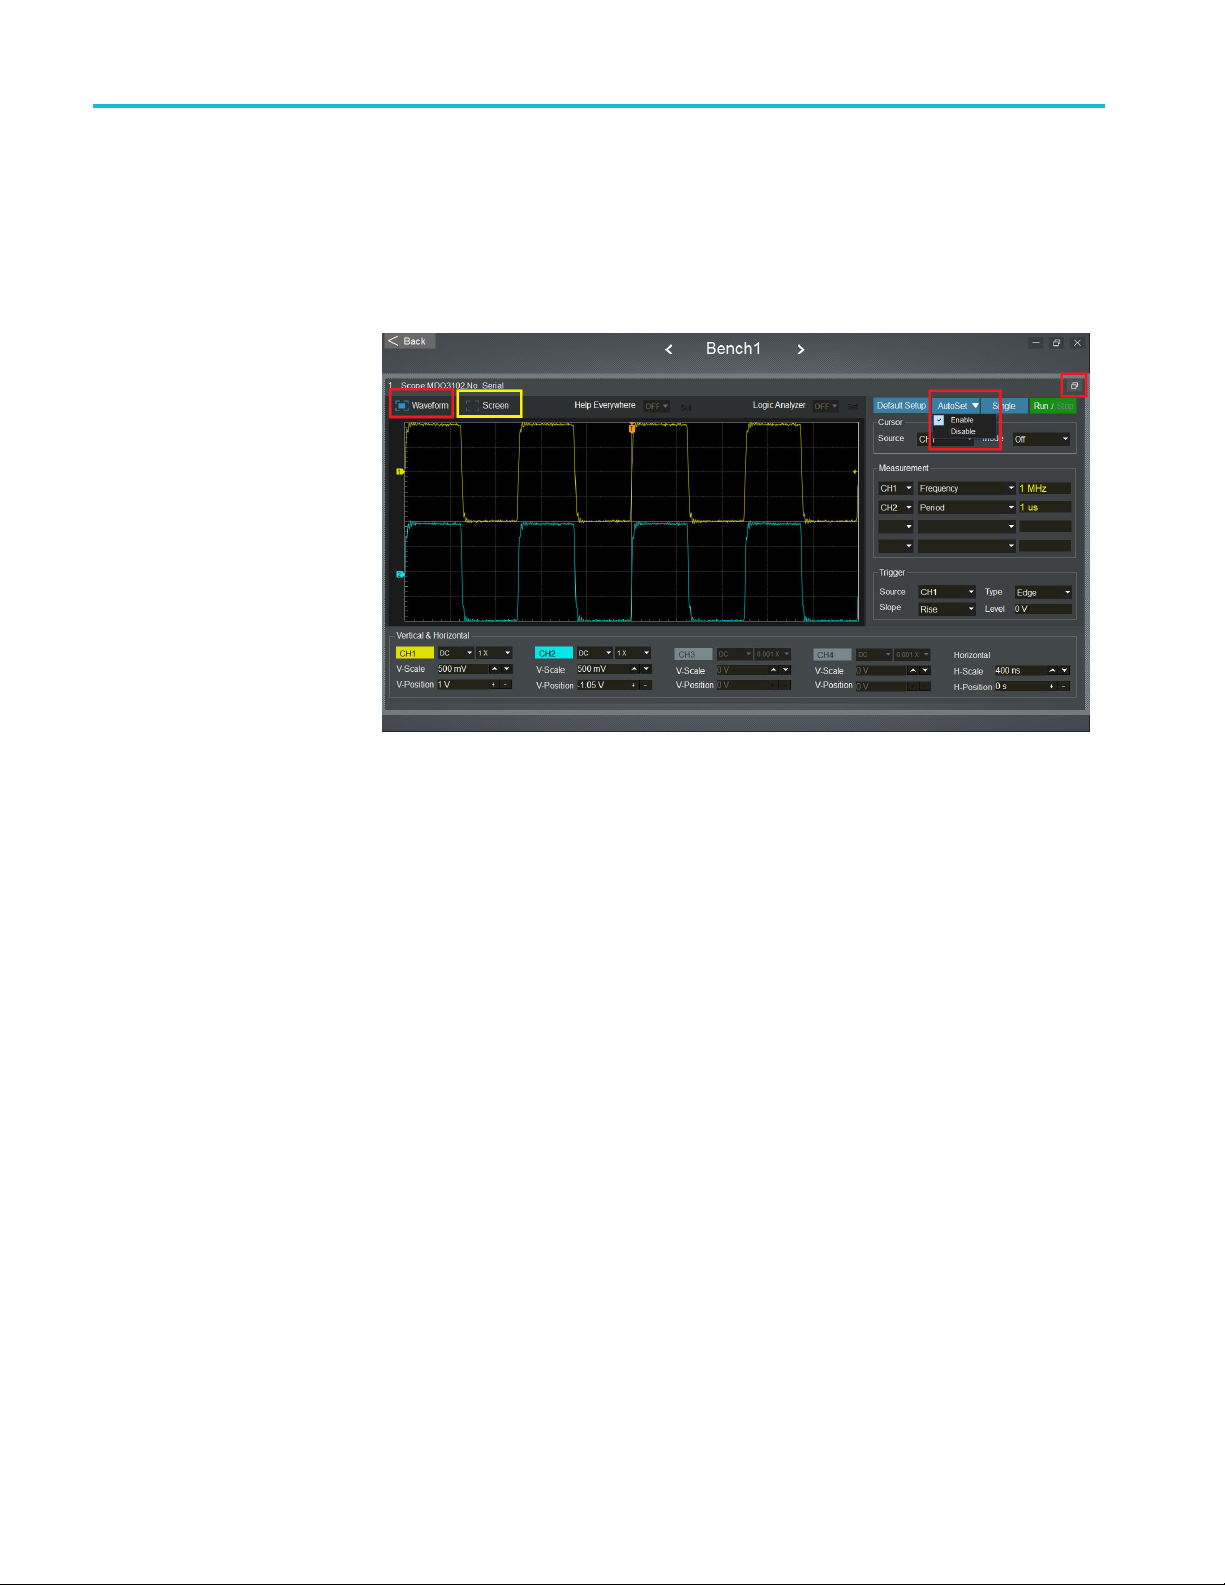
TSL3000B
You can monitor
icon (highlighted in yellow box) in the upper right corner on the instrument pane.
Usinganoscil
click the expanding icon. If you want to go back, click restore icon in the upper
right corner.
and control an instrument in detail by clicking the expanding
loscope as an example, the following page is displayed after you
Figure 89: Oscilloscope page
If you select Waveform, the waveform is displayed in real-time on this page.
If you select Screen, a snapshot of the waveform on the actual instrument is
displayed here. You can right-click on the waveform to save it. You can click
Screen again to take another snapshot.
You can disable Autoset on the upper right side of the page to have the students
practice setting parameters manually for the experiment. The Autoset button
isplayed in gray if you disable the function. If you enable the function, the
is d
Autoset button is displayed in blue. You can click the button to execute the
auto setting.
66 TekSmartLab User Manual
Page 87

TSL3000B
As shown in the f
the Vertical & Horizontal part of the page.
Figure 90: Vertical and horizontal settings
You can either input values into the boxes or click arrows or plus and minus
symbols to set the parameters. In addition, the highlighted number 1 in yellow,
number 2 in blue represents the V-position of the two channels; the highlighted
yellow
the values directly.
arrow represents trigger level. You can drag these symbols to change
ollowing figure, you can set the parameters for the waveforms in
e channels, DC is the mode of coupling, and 1X is the value for attenuation.
For th
TekSmartLab User Manual 67
Page 88

TSL3000B
Asshowninthef
on this page.
Figure 91: Cursors
Use these steps:
ollowing figure, you can also use cursors for measurements
1. Select the Source and Mode in the Cursor area.
2. If you select Time for the mode, cursors “a” and “b” are displayed on
the waveform. Move the cursors and the measurement result is displayed
automatically in the box at the upper right corner of the waveform display.
68 TekSmartLab User Manual
Page 89
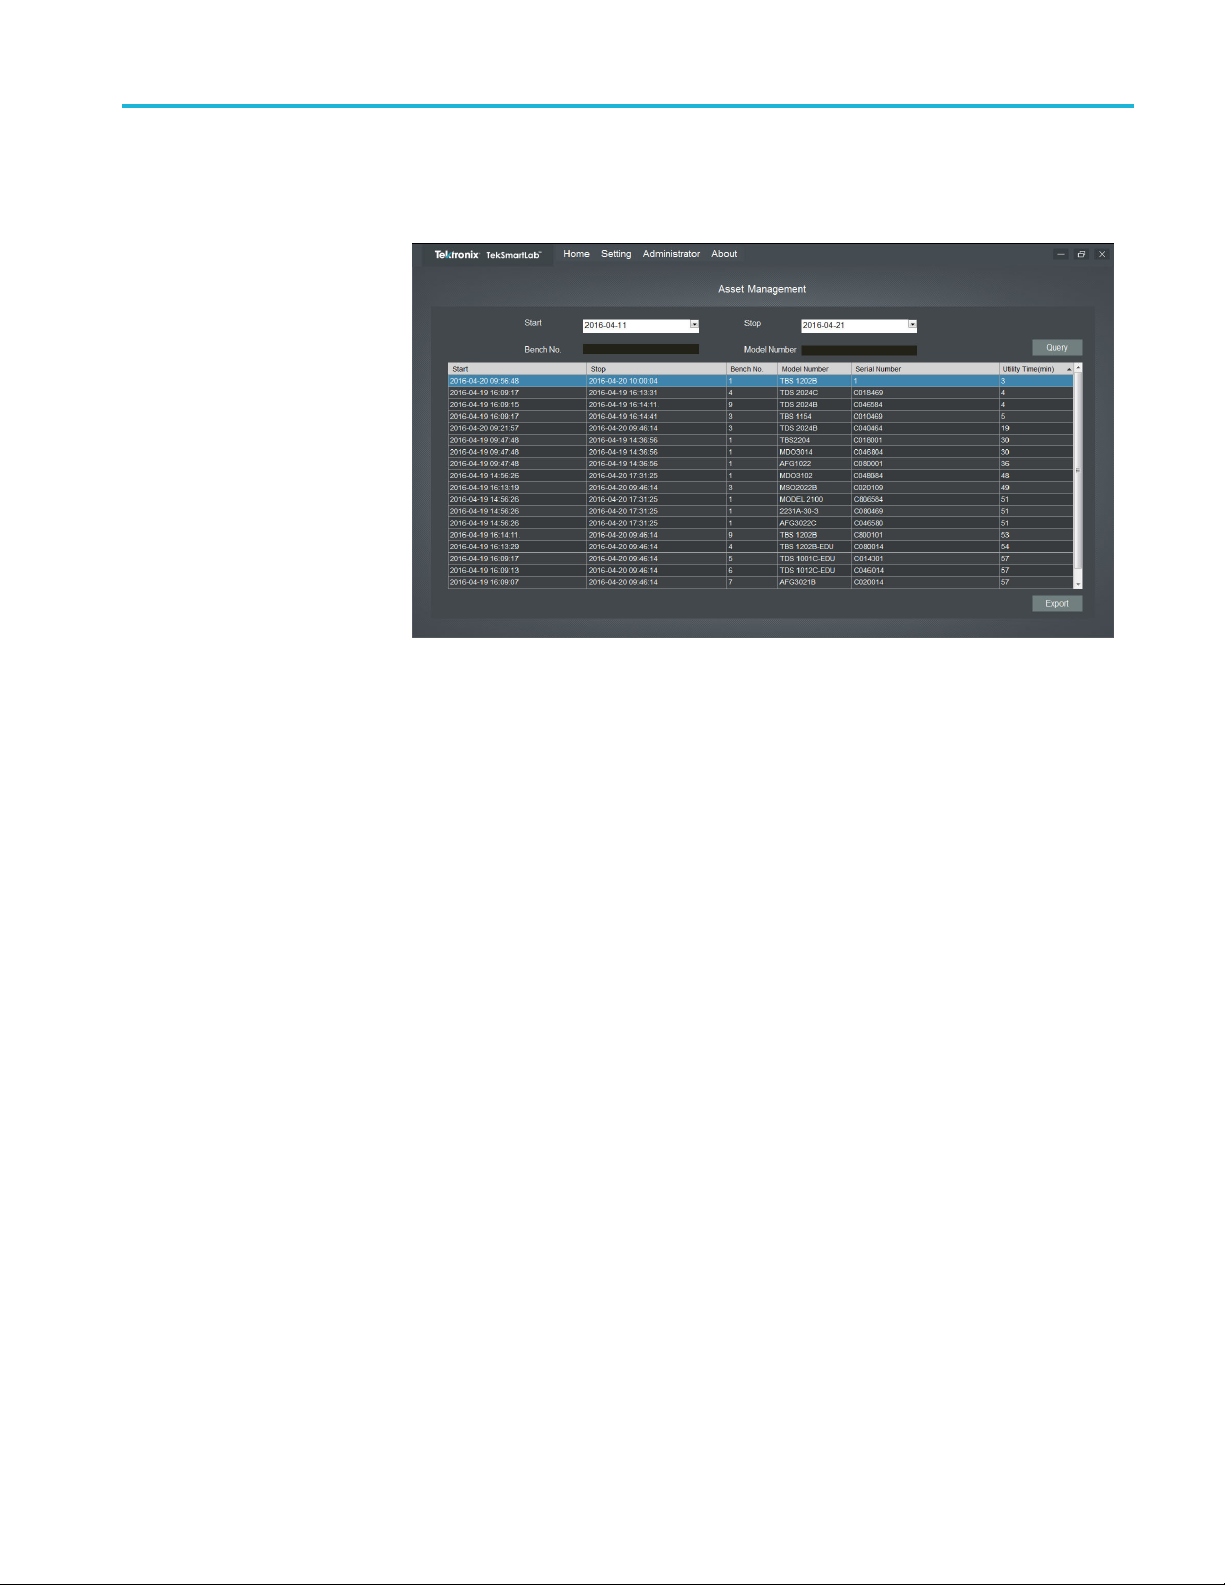
TSL3000B
Asset manageme
menu bar to manage the instruments. The following figure is displayed.
Figure 92: Asset management
You can set the parameters and then click Query to acquire the information
about the instruments. Then you can click Export to export the result as an
Excel document.
nt. You can select Ad ministrator -> Asset Management on the
TekSmartLab User Manual 69
Page 90
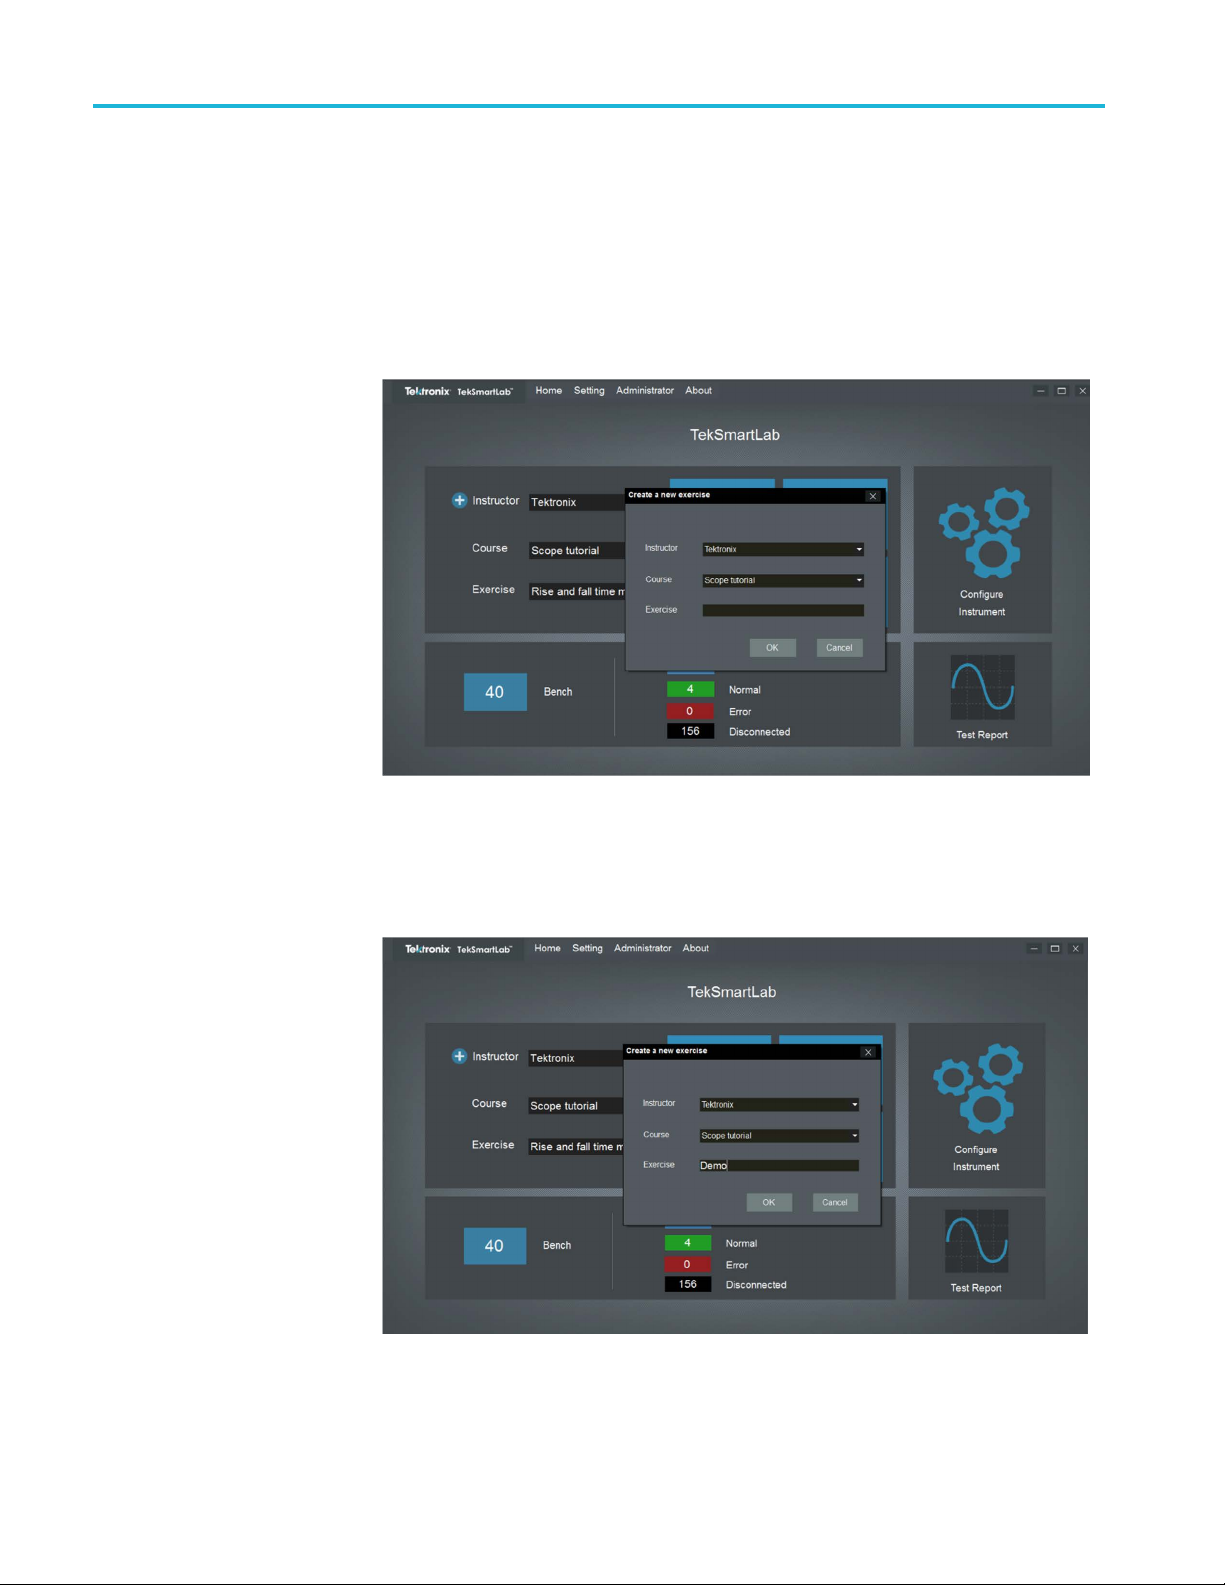
TSL3000B
Lab teaching fl
Create and select an
ow management
This section describes how the TekSmartLab helps optimize lab teaching flow.
Asshowninthefollowingfigure, you can click the plus symbol in the course
exercise
information area to create a new course. The dialog box pops up for you to input
the information.
Figure 93: Create a new course
You can input the name of the instructor, the name of the course, and the name of
the exercise, and then click Ok to save the exercise, as shown in the following
figure.
Figure 94: Create new exercise
70 TekSmartLab User Manual
Page 91
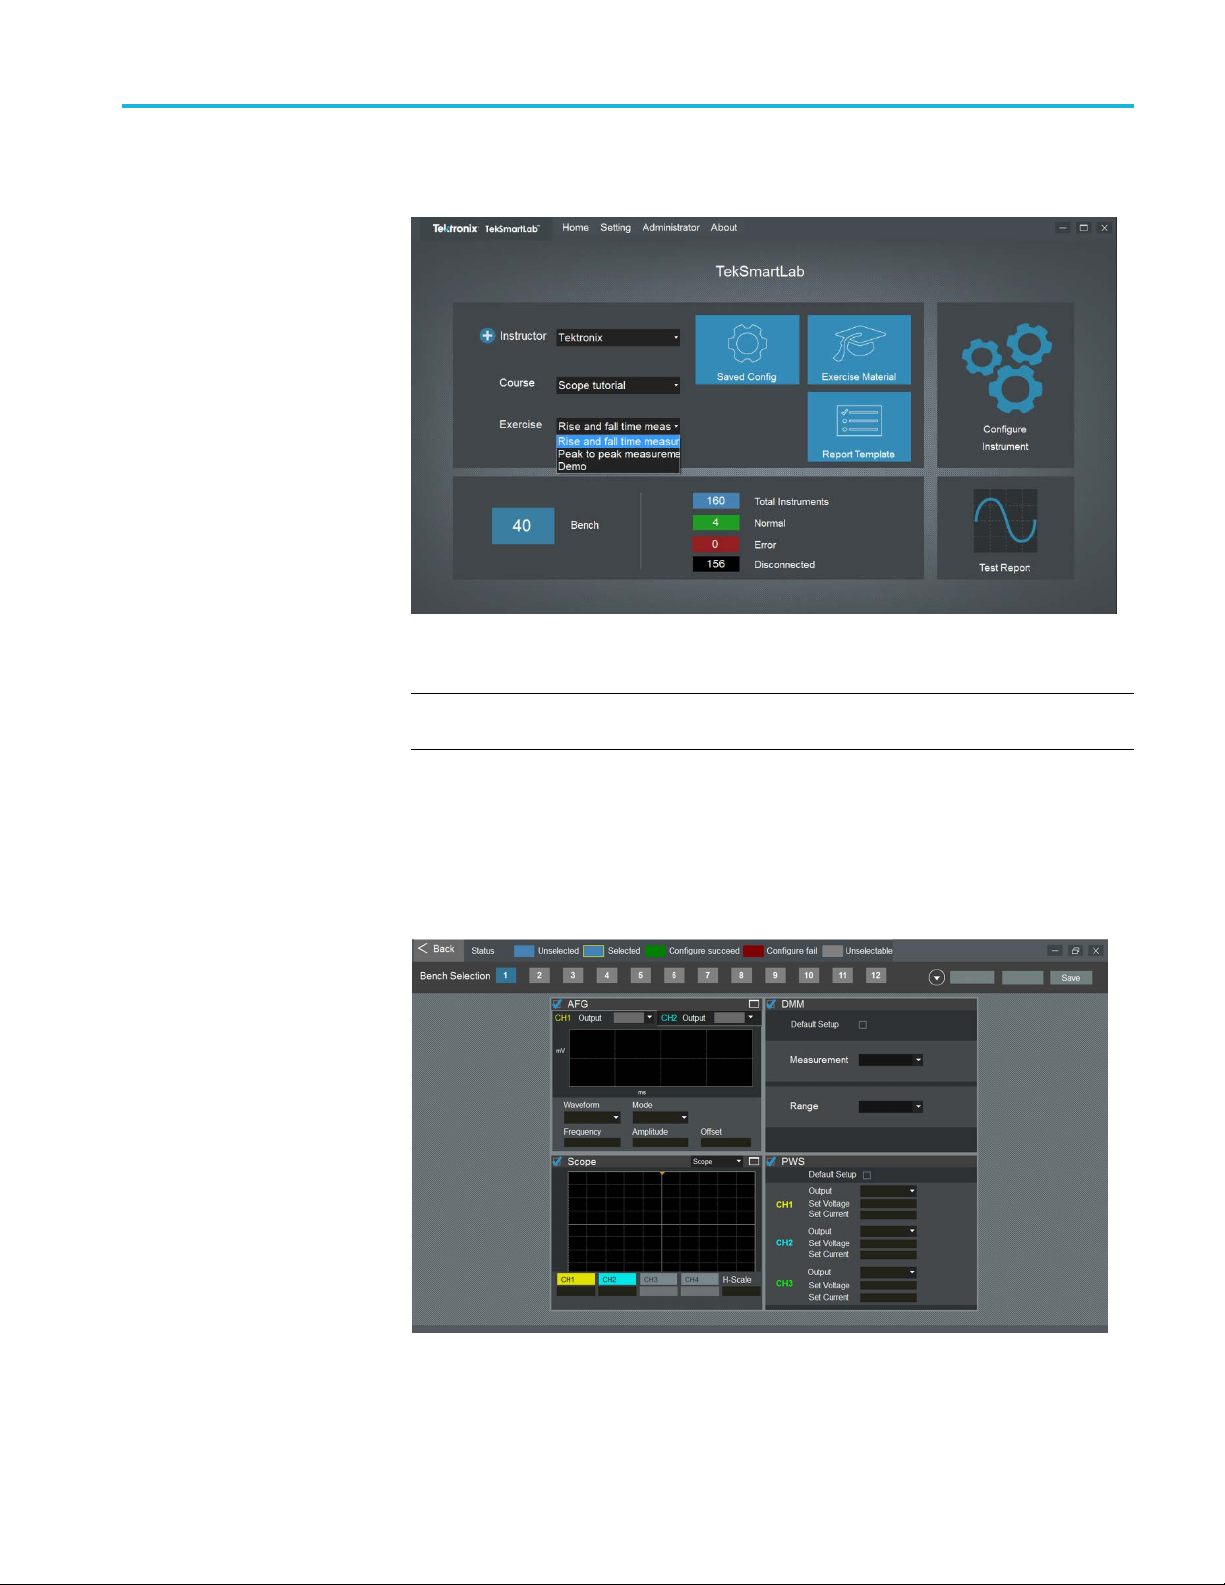
TSL3000B
You c a n select a
Figure 95: Select an existing exercise
NOTE. You can delete an exercise by clicking Administrator > Exercise
Management. Only the administrator has the access for deleting exercises.
n existing exercise, as shown in the following figure.
Save/recall instrument
configuration
This function allows you to save instrument configurations, or to recall instrument
configurations.
You can click the Saved Config area on the home page to configure the
instruments and then save the settings. The following fi gure is displayed.
Figure 96: Configure the instruments
TekSmartLab User Manual 71
Page 92

TSL3000B
Asshowninthep
software are displayed here. You can configure all the instrument types here as
long as you tick the box in the left upper corner of each instrument type.
NOTE. The differences between configuring instruments on the home page and
here are that:
•Theconfiguration can be done to four instrument types at the same time in
this page.
•Theconfiguration can be saved here and recalled for later use.
NOTE. If two of the same instrument types are placed in the same bench, the
configuration of one instrument will be applied to the other.
You can set the parameters for the instruments as shown in the following figure.
revious figure, all the instrument types that are supported by the
Figure 97: Config
NOTE. The parameters that can be configured are based on the first instrument of
the type that is detected by the system.
You can also select a preconfigured instrument in another bench and click
Capture to acquire its configurations to apply to the instrument you want to
configure. The waveform of the oscilloscope and arbitrary function generator will
only be displayed when you click Capture.
You can click Save to save the configuration for future use. You can also select
other benches to apply the configurations.
72 TekSmartLab User Manual
ure the instruments
Page 93

TSL3000B
Student access
This chapter in
the experiments on a webpage.
Generate QR codes for benches. The server generates a webpage for each bench
for students to access the exercise. The students can log in the webpage by
scanning the QR code generated for the webpage or the IP address.
Take the following steps to generate QR codes for the benches:
1. Select Setting -> General Information on the menu bar to generate QR
codes for the benches, as shown in the following figure.
troduces features that this software provides for students to access
Figure 98: Generating QR code
2. Set the server IP in the TekSmartLab network. You can choose WiFi, LAN, or
input the IP manually.
NOTE. The server should be set with static IP so that the address for each
webpage won’t change.
NOTE. If computers for students installed on the benches and TekSmartLab server
belong to the same campus network, then set the server IP as the IP address in
the campus network. Thus, the computers on the benches are able to access the
enchspecific IP address distributed by the server.
b
TekSmartLab User Manual 73
Page 94
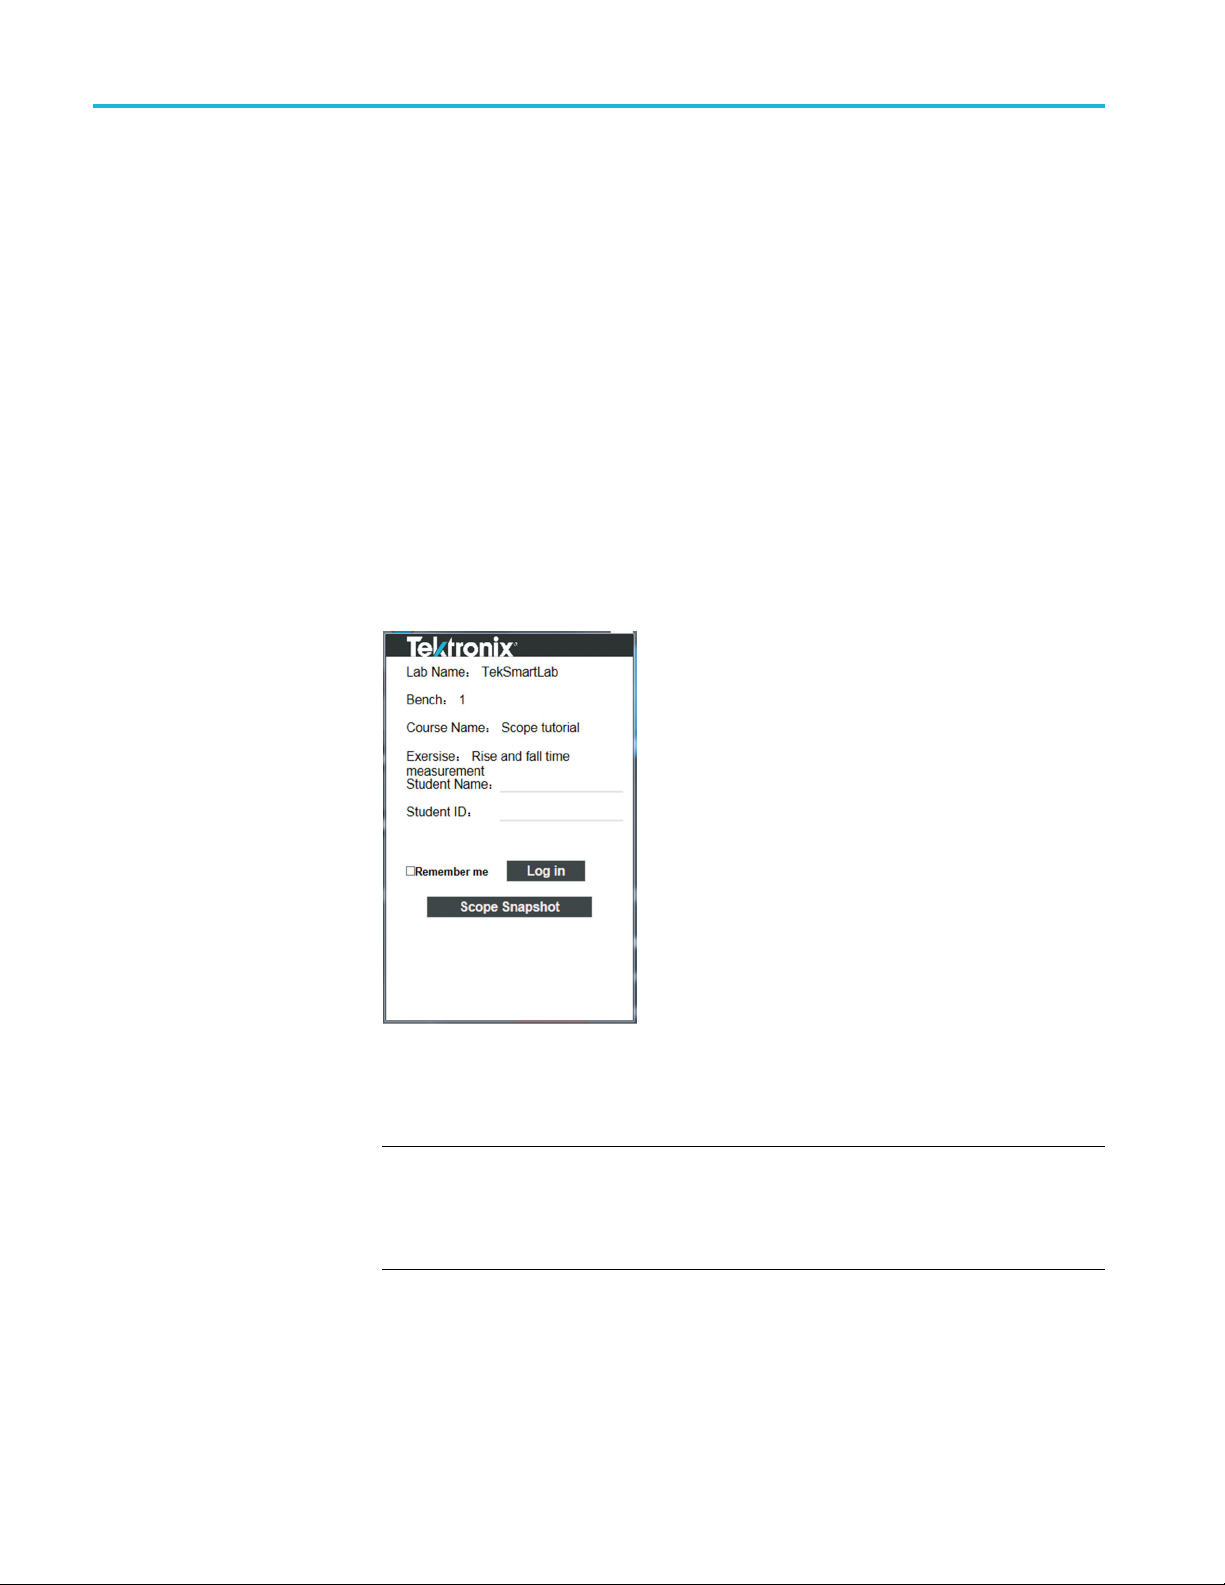
TSL3000B
3. Input the bench
benches, tick Batch, and then input the bench numbers.
4. Input comment
5. Click Print under the QR code preview to generate the codes.
You can paste the printed QR codes on their correspondent benches in the lab.
Accessing t
bench webpage:
1. Connect yo
are using the computer on the bench, and the bench and server are connected
to the campus network, then you are not required to be connected to the
TekSmartLab network.
2. Taking bench 1 as an example, scan the QR code, or input the address to log
onto the bench webpage. The following figure is displayed.
he webpage. Students can take the following steps to access the
number. If you want to generate the QR codes in batch for
s if necessary.
ur smart phone or computer to the TekSmartLab network. If you
Figure 99: Log in to the bench webpage
3. Input your name and ID to log in the webpage.
NOTE. Your Student ID should be unique, whereas Student Name does not need
o be unique.
t
You can also take a snapshot of the oscilloscope screen by clicking Scope
Snapshot on this page.
74 TekSmartLab User Manual
Page 95
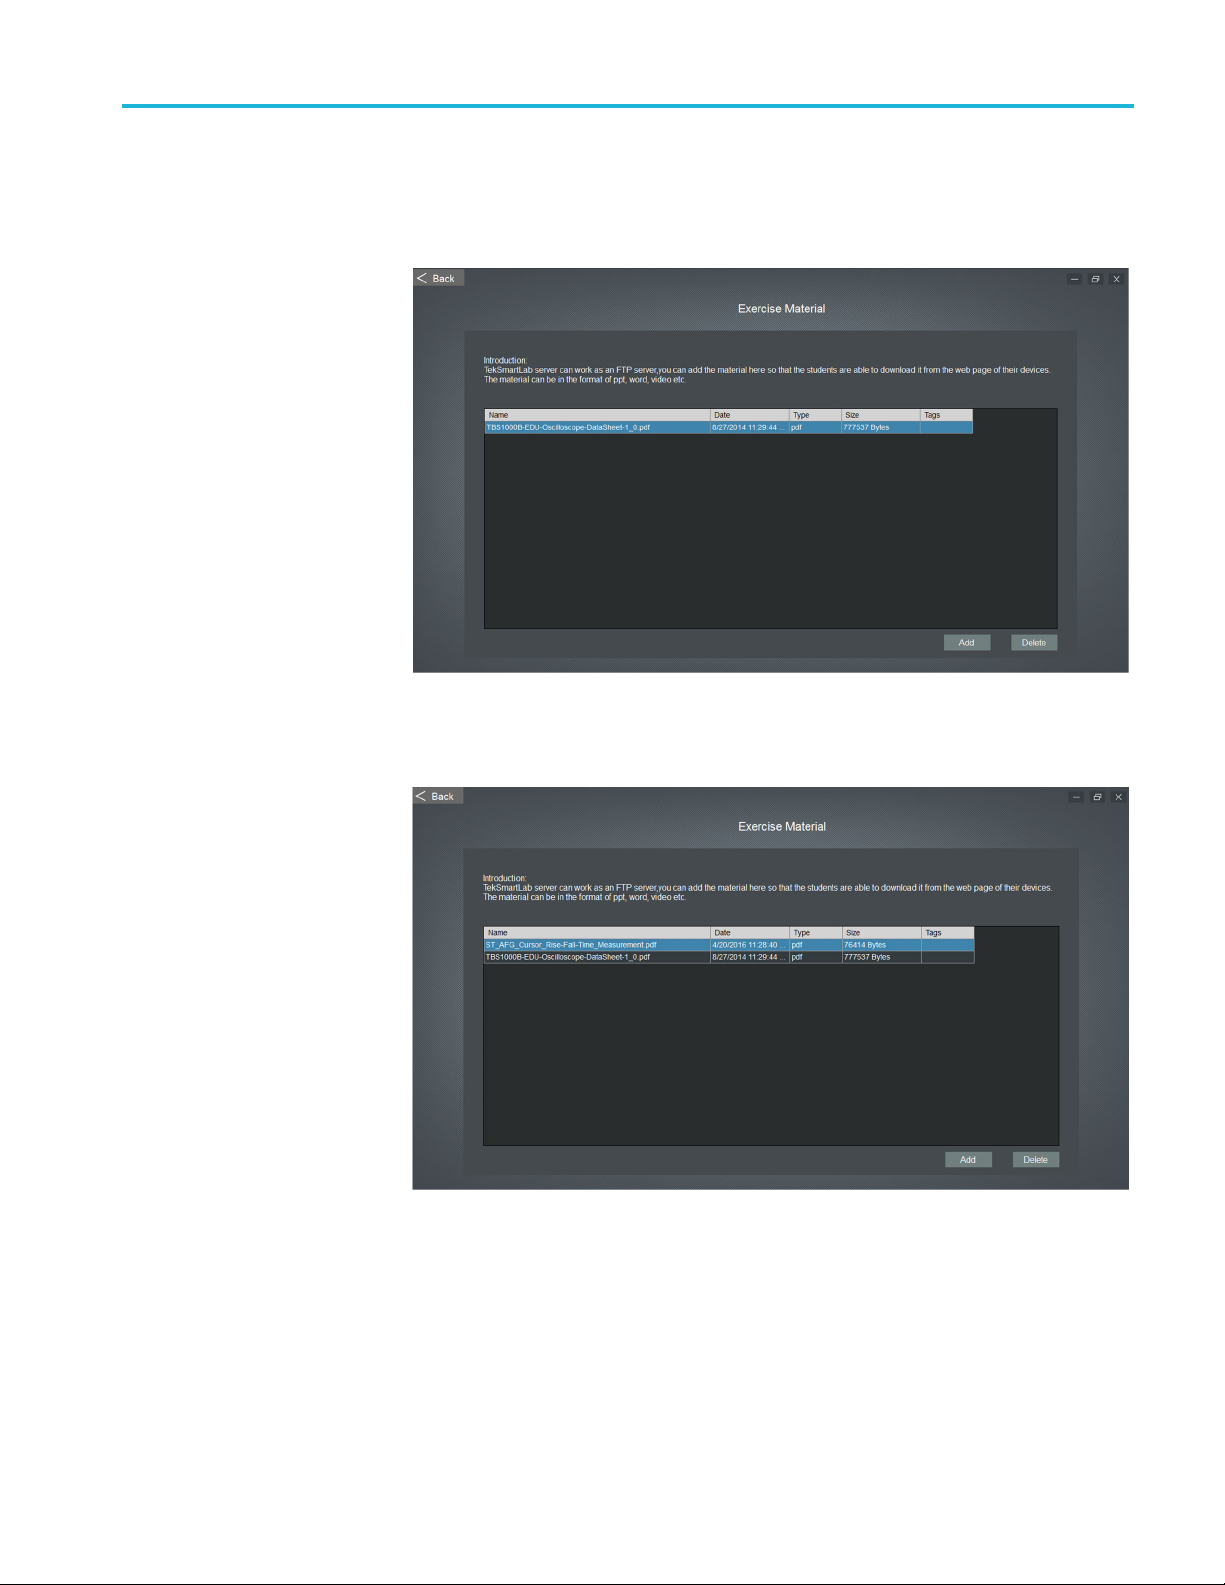
TSL3000B
Exercise material sharing
In the course in
main (Home) page to share the exercise material with students. The following
figureisdisplayed.
Figure 100: Edit exercise material
On this page, you can add or delete exercise material on the s erver.
formation area, you can click the Exercise Material area on the
gure 101: Add or delete exercise material
Fi
TekSmartLab User Manual 75
Page 96

TSL3000B
Test report editing
On a student’s s
material to their devices.
Figure 102: Download exercise material
In the co
test report template to the server. You can create a test report template by using
Microsoft word (only .docx format is supported) and then import the .docx file to
the server, as shown in the following figure.
urse information area, you can click Report Template button to import a
mart device, as shown below, students can download the exercise
gure 103: Importing test report template
Fi
he template is transformed into an HTML file once it’s imported to the server.
T
You can click Preview to see how it is displayed in HTML format.
76 TekSmartLab User Manual
Page 97

TSL3000B
On a student’s s
a new test report by clicking New Report.
Figure 10
When you
automatically loaded, as shown in the following figure.
mart device, as shown in the following figure, students can create
4: Create a new test report
create a new test report on your device, the defined template is
Figure 105: Create a new test report
TekSmartLab User Manual 77
Page 98

TSL3000B
You can edit the
to insert the oscilloscope snapshot into the test report, as shown in the following
figure.
Figure 106: Scope snapshot inserted
After you are finished editing the test report, you can click Submit to submit it.
You c a n
also download the test report locally to edit it in a Word file.
report and insert the test result. For example, click Scope Image
78 TekSmartLab User Manual
Page 99

TSL3000B
You can click Te
student’s test reports. The following figure is displayed.
Figure 107: Query test report
You can input the time next to Start and Stop and click Query to get the students’
report.
st Report on lower right side of the home page to check a
You can double-click a report to check it, or choose a report and click Detail to
check it.
You can click Export Report List to export the query result in an Excel document.
You can click Export Report Files to export all the text reports.
You can click Delete to delete the selected report.
TekSmartLab User Manual 79
Page 100
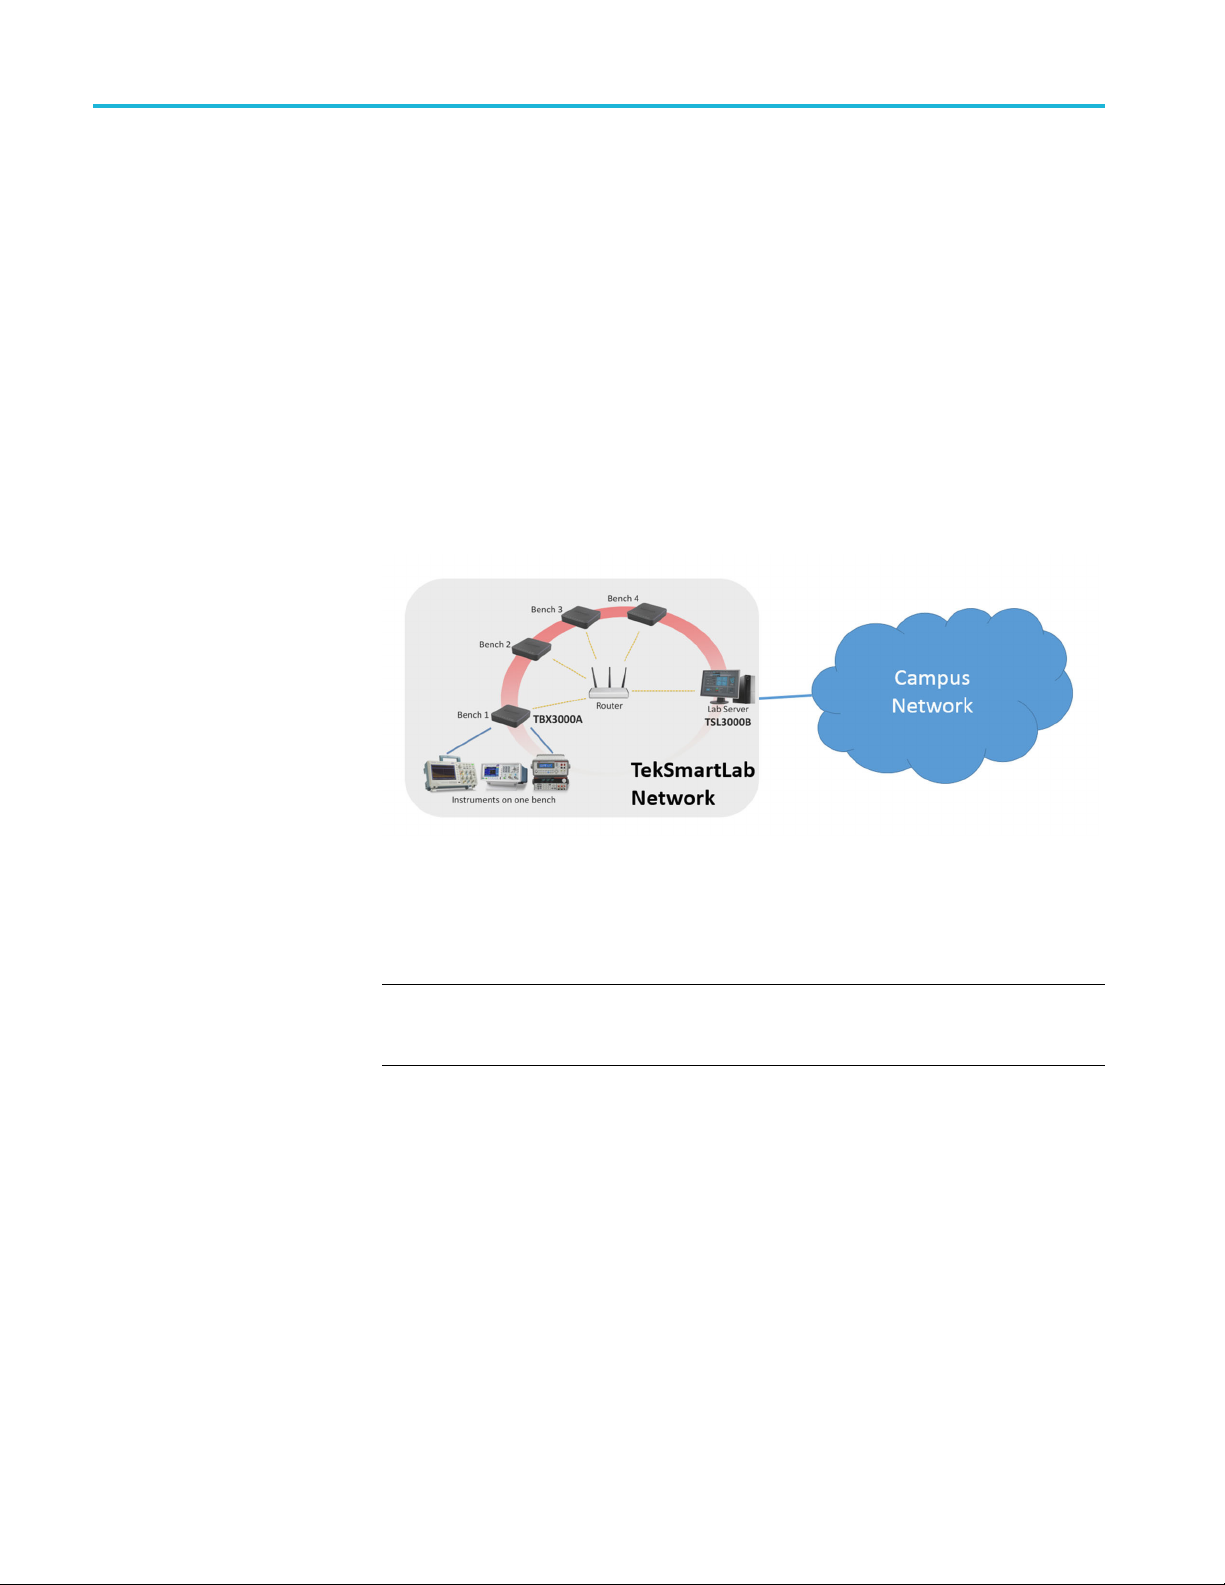
Case Study
Case Study
Set up a TekSmartLab network system
Introduction
In order to e
we should set up an independent network other than taking advantage of the
existing network, for example, the campus network. If the lab server is connected
to the campus network, we should add a network card or a USB WIFI dongle
for TekSmartLab network. Thus the server is working simultaneously with the
TekSmartLab network and the campus network.
The follo
network through Wi-Fi, and also connected to the campus network through LAN.
Figure 108: TekSmartLab
nsure the stability and security of running the TekSmartLab solution,
wing figure illustrates that the server is connected to the TekSmartLab
You can set up the TekSmartLab network wireless, through cables, or a mix of
both according to the actual lab requirements.
NOTE. Make sure that TBX3000As on each bench are in the same network with
e server at all times, which means that you can ping the IP address of the
th
TBX3000As on the s erver successfully.
80 TekSmartLab User Manual
 Loading...