

Tektronix TDSJIT3 v2 User manual

Online Help
TDSJIT3 v2 Jitter Analysis Application
PHP025510
Adapted from the TDSJIT3 v2 Help,Version 1.0.1 (November, 2004)
www.tektronix.com

Copyright © Tektronix, Inc. All rights reserved. Licensed software products are owned by Tektronix or its suppliers
and are protected by United States copyright laws and international treaty provisions.
Use, duplication, or disclosure by the Government is subject to restrictions as set forth in subparagraph (c)(1)(ii) of
the Rights in Technical Data and Computer Software clause at DFARS 252.227-7013, or subparagraphs (c)(1) and (2)
of the Commercial Computer Software -- Restricted Rights clause at FAR 52.227-19, as applicable.
Tektronix products are covered by U.S. and foreign patents, issued and pending. Information in this documentation
supercedes that in all previously published material. Specifications and price change privileges reserved.
Tektronix, Inc. P.O. Box 500, Beaverton, OR 97077
TEKTRONIX, TEK, and RT-Eye are registered trademarks of Tektronix, Inc.
TDSJIT3 v2 Jitter Analysis Online Help, OLH0255, Version 1.0.1

Table of Contents
General Safety Summary...................................................................... xi
Preface ..................................................................................................xiii
5-Time Free Trial.............................................................................................. xiii
Related Documentation..................................................................................... xiii
GPIB Information ..............................................................................................xiv
Relevant Web Sites............................................................................................xiv
Application CD Contents...................................................................................xiv
Conventions ........................................................................................................xv
Types of Online Help Information......................................................................xv
Using Online Help .............................................................................................xvi
Find Tab and Searches..................................................................................... xvii
Contacting Tektronix ....................................................................................... xvii
Feedback......................................................................................................... xviii
Getting Started
Operating Basics
Differences between TDSJIT3 v2 Advanced and TDSJIT3 v2 Essentials ...........1
Compatibility ........................................................................................................2
Requirements and Restrictions .............................................................................2
Accessories ...........................................................................................................2
Installation ............................................................................................................2
Connecting to a Device Under Test (DUT) ...................................................3
Deskewing Probes and Channels...................................................................3
General Information..............................................................................................5
Starting the TDSJIT3 v2 Application ............................................................5
Returning to the Application .........................................................................6
Minimizing and Maximizing the Application................................................6
Exiting the Application..................................................................................6
Application Directories and Usage ................................................................6
Tips on the TDSJIT3 v2 User Interface.........................................................8
How to Enter Numeric Values.......................................................................9
Virtual Keypad ..............................................................................................9
Using Basic Oscilloscope Functions............................................................10
File Menus ...................................................................................................10
Navigating the User Interface .............................................................................10
General Steps to Set Up the Application .....................................................11
Jitter Wizard ................................................................................................11
User Interface Information ..........................................................................13
Setting Up the Application for Analysis .............................................................15
Selecting Measurements ..............................................................................15
Configuring a Measurement ........................................................................19
Configuring Sources ....................................................................................36
Measurement Summaries.............................................................................48
TDSJIT3 v2 Jitter Analysis Online Help i

Table of Contents
Taking Measurements.........................................................................................48
Localizing Measurements ............................................................................49
About Sequencing........................................................................................49
Acquiring Data ............................................................................................49
New Acquisition Function of the Single Button ..........................................50
Control Panel Functions ..............................................................................50
Clearing Results...........................................................................................51
Results as Statistics .............................................................................................52
Viewing Equivalent Rj/Dj Results (TDSJIT3 v2 Advanced Only) .............52
Results as Plots ...................................................................................................53
Using a Separate Monitor to View Plots .....................................................54
Plot Usage....................................................................................................54
Creating Plots ..............................................................................................56
Configuring Plots.........................................................................................57
Working with Plots .............................................................................................62
Toolbar Functions in Plot Windows ............................................................63
Selecting and Viewing a Plot.......................................................................63
Moving and Resizing a Plot.........................................................................64
Deleting Plots ..............................................................................................64
Using Zoom in a Plot...................................................................................65
Using Cursors in a Plot ................................................................................66
Exporting Plot Files .....................................................................................69
Saving Information to Log Files.........................................................................71
Logging Statistics ........................................................................................71
Logging Measurements ...............................................................................72
Logging Worst Case Waveforms.................................................................73
File Names for Logging Worst Case Waveforms........................................74
Saving and Recalling Setup Files .......................................................................74
Saving a Setup File ......................................................................................74
Recalling a Saved Setup File .......................................................................75
Recalling the Default Setup .........................................................................76
Recalling a Recently Saved or Accessed Setup File....................................76
Recall Recent Files Example .......................................................................77
Recalling a Setup File from a Prior Version of Software ............................77
Docking and Undocking the Jitter Analysis Window..................................78
Acquisition Timeout Utility.........................................................................78
Warnings Utility ..........................................................................................78
Tutorial
ii
Setting Up the Oscilloscope................................................................................79
Starting the Application ...............................................................................79
Waveform Files ...........................................................................................79
Recalling a Waveform File ..........................................................................79
Taking a Clock Period Measurement..................................................................81
Setting Up a Period Measurement ...............................................................81
Taking a Period Measurement and Viewing Statistical Results ..................83
Viewing a Period Measurement as Plots .....................................................84
Ending a Tutorial Lesson ....................................................................................86
TDSJIT3 v2 Jitter Analysis Online Help

Table of Contents
Taking a Clock-to-Output Time Measurement ...................................................86
Setting Up and Taking a Clock-to-Output Time Measurement ...................86
Logging Statistics to a .CSV File ................................................................89
Logging Data Points as a Measurement Snapshot to a .CSV File ...............92
Logging Worst Case Waveforms to .WFM Files ........................................94
Lessons Learned .................................................................................................97
Application Examples
Recall Default Settings .......................................................................................99
Recall a Waveform and Start the Application ....................................................99
Application Example 1: Spectral Analysis .......................................................100
Set Up and Take Measurements for Example 1.........................................100
Approximate Pattern Length Measured with Cursors................................101
Measuring Rj/Dj and Tj @ BER................................................................102
Using Spectral Analysis to Find Jitter Sources..........................................103
Application Example 2: Trend Analysis...........................................................105
Set Up and Take Measurements for Example 2.........................................105
Using Trend Analysis to Find Jitter Amplitude and Anomalies................106
Algorithms
Oscilloscope Setup Guidelines .........................................................................109
Test Methodology.............................................................................................109
Timing Measurements ......................................................................................110
Rj/Dj Measurement (TDSJIT3 v2 Advanced Only) ..................................110
Spectrum Analysis Based Rj/Dj Separation ..............................................110
Arbitrary Pattern Analysis Based Rj/Dj Separation...................................111
BER and Tj Estimation (TDSJIT3 v2 Advanced Only) ............................112
Effective Rj and Tj Estimation (TDSJIT3 v2 Advanced only)..................113
Single Waveform Measurements......................................................................113
Clock Period Measurement........................................................................113
Clock Frequency Measurement .................................................................114
Clock TIE Measurement............................................................................114
Clock PLL TIE Measurement (TDSJIT3 v2 Advanced Only) ..................114
Data Period Measurement..........................................................................115
Data Frequency Measurement ...................................................................115
Data TIE Measurement..............................................................................115
Data PLL TIE Measurement (TDSJIT3 v2 Advanced Only) ....................115
Cycle-to-Cycle Measurement ....................................................................116
N-Cycle Measurement...............................................................................116
Positive and Negative Cycle-to-Cycle Duty Measurements......................116
Positive and Negative Duty Cycle Measurements .....................................117
Rise Time Measurement ............................................................................117
Fall Time Measurement .............................................................................117
Positive and Negative Width Measurements .............................................118
High Time Measurement ...........................................................................118
Low Time Measurement............................................................................118
TDSJIT3 v2 Jitter Analysis Online Help
iii

Table of Contents
Parameters
Dual Waveform Measurements ........................................................................119
Setup Time Measurement ..........................................................................119
Hold Time Measurement ...........................................................................119
Clock-to-Output Measurement ..................................................................120
Skew Measurement....................................................................................120
Crossover Voltage Measurement (TDSJIT3 v2 Advanced Only) .............120
Statistics............................................................................................................121
Maximum Value ........................................................................................121
Minimum Value.........................................................................................121
Mean Value ...............................................................................................121
Standard Deviation Value..........................................................................121
Maximum Positive and Maximum Negative Difference Values ...............122
Peak-to-Peak Value ...................................................................................122
Population Value .......................................................................................122
File Menus Parameters......................................................................................123
Control Panel Parameters..................................................................................124
Measurements Select ........................................................................................124
Configure Measurements..................................................................................125
Clock Recovery Parameters.......................................................................126
Advanced Clock Recovery Parameters......................................................127
Filters Parameters ......................................................................................127
Advanced Filter Parameters.......................................................................127
TIE: RjDj Analysis Parameters (TDSJIT3 v2 Advanced Only) ................128
Configure Sources ............................................................................................128
Summaries ........................................................................................................130
Results ..............................................................................................................130
Plots ..................................................................................................................130
Logs ..................................................................................................................132
Utilities .............................................................................................................133
Help ..................................................................................................................134
GPIB
Index
iv
Program Example .............................................................................................135
GPIB Reference Materials ................................................................................136
Starting and Setting Up the Application Using GPIB................................136
Variable:Value Command ................................................................................136
Measurements Results Queries .........................................................................142
TDSJIT3 v2 Jitter Analysis Online Help

Table of Contents
List of Figures
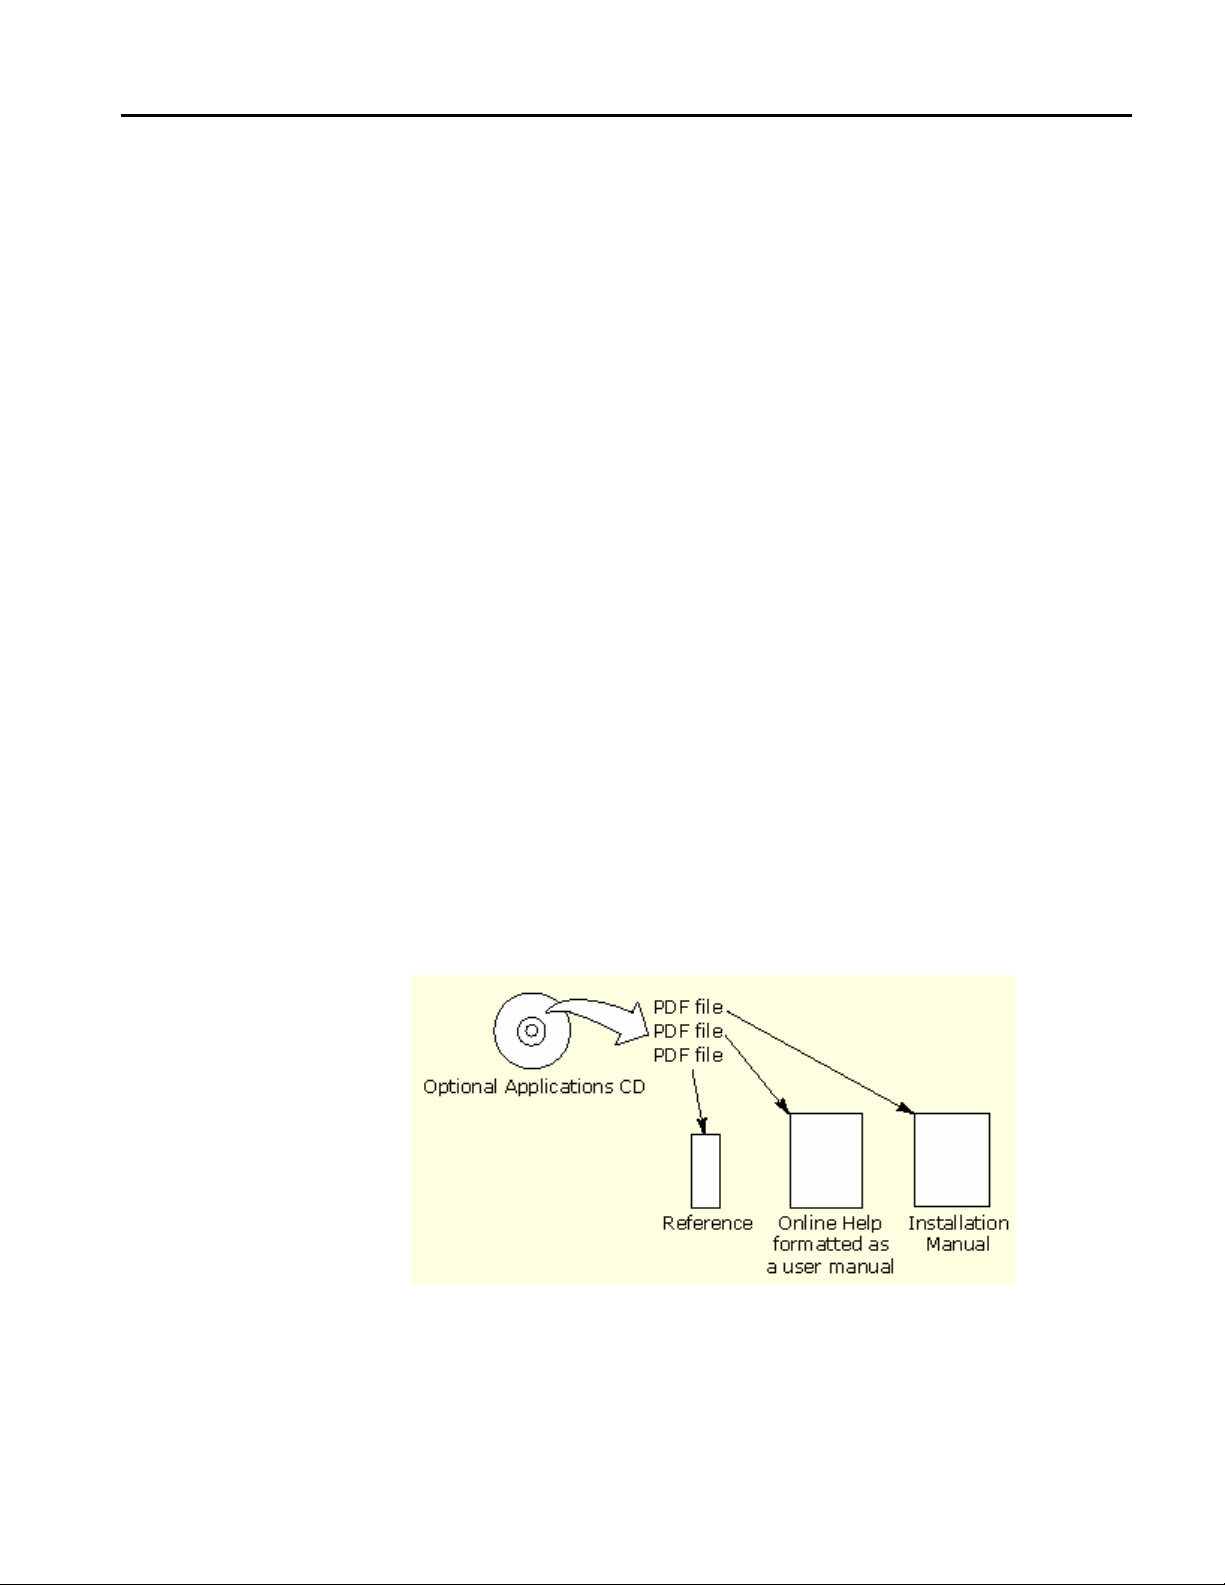
Figure 1: Contents of the application CD-ROM............................................ xiv
Figure 2: Deskew complete example.................................................................. 4
Figure 3: Deskew Summary example................................................................4
Figure 4: Starting the TDSJIT3 v2 application ................................................ 5
Figure 5: Returning to the application ..............................................................6
Figure 6: Directory structure ............................................................................7
Figure 7: On-screen keypad................................................................................ 9
Figure 8: General steps to set up the application........................................... 11
Figure 9: Jitter Wizard when launched........................................................... 12
Figure 10: Menu with user interface items...................................................... 14
Figure 11: Menu navigation tree...................................................................... 14
Figure 12: Measurements Select menu........................................................... 16
Figure 13: Select Source options by measurement category.......................... 16
Figure 14: Clock edge options ..........................................................................21
Figure 15: Active edge options.......................................................................... 21
Figure 16: Clock and Data edge options.......................................................... 22
Figure 17: From Edge and To Edge options ................................................... 22
Figure 18: Main edge options ........................................................................... 23
Figure 19: Meas Range Limits options ............................................................ 23
Figure 20: N-Cycle measurement options .......................................................24
Figure 21: Bathtub Curve and BER versus Decision Time ........................... 26
Figure 22: TIE: RjDj analysis options for Clock TIE and
Clock PLL TIE ...........................................................................................27
Figure 23: TIE: RjDj analysis options for Data TIE and Data PLL TIE.....27
Figure 24: Constant Clock Recovery concept .................................................28
Figure 25: Reference Clock Frequency options.............................................. 29
Figure 26: Phase-Locked Loop (PLL) Clock Recovery concept ................... 29
Figure 27: PLL Loop Bandwidth options........................................................ 30
Figure 28: Advanced Clock Recovery options ................................................ 32
Figure 29: Optional filters................................................................................. 32
Figure 30: Filter characteristics ....................................................................... 33
Figure 31: Band Pass filtering ..........................................................................33
Figure 32: Filters options.................................................................................. 34
Figure 33: Advanced Filter options..................................................................35
Figure 34: Effect of the Smoothing window .................................................... 36
Figure 35: Configure Sources Autoset options................................................39
Figure 36: Configure Sources Gating options................................................. 40
TDSJIT3 v2 Jitter Analysis Online Help
v

Table of Contents
Figure 37: Reference voltage levels diagram...................................................41
Figure 38: Example of Hysteresis on a noisy waveform................................. 42
Figure 39: Autoset Ref Levels options ............................................................. 45
Figure 40: Configure Sources Ref Levels options........................................... 47
Figure 41: Configure Sources Stat pop Limit options.................................... 48
Figure 42: Control Panel options ..................................................................... 51
Figure 43: Plots Create menu........................................................................... 57
Figure 44: Vert/Horiz menu for a Histogram plot.......................................... 58
Figure 45: Vert/Horiz menu for a Time Trend plot ....................................... 59
Figure 46: Vert/Horiz menu for a Spectrum plot........................................... 59
Figure 47: Vert/Horiz menu for a Bathtub plot.............................................. 60
Figure 48: Transfer Function Definition options............................................ 61
Figure 49: Vert/Horiz menu for a Transfer Function plot ............................61
Figure 50: Vert/Horiz menu for a Phase Noise plot........................................ 62
Figure 51: Locate Window At options............................................................. 63
Figure 52: File Save browser ............................................................................ 75
Figure 53: File Recall browser.......................................................................... 76
Figure 54: Recall Recent files example ............................................................ 77
Figure 55: Acquisition Timeout options .......................................................... 78
Figure 56: Oscilloscope Reference Memory options ......................................80
Figure 57: Clock Period measurement selected .............................................. 82
Figure 58: Configuration of a Period measurement....................................... 82
Figure 59: Configure Sources Ref Levels before an autoset.......................... 82
Figure 60: Configure Sources Ref Levels after an autoset............................. 83
Figure 61: Statistical results for a Clock Period measurement..................... 83
Figure 62: Min/Max statistical results for a Clock Period measurement..... 84
Figure 63: Mean/Std. Dev statistical results for a Clock Period
measurement............................................................................................... 84
Figure 64: Create plots of results ..................................................................... 85
Figure 65: Results as a Histogram plot............................................................ 85
Figure 66: Results as a Time Trend plot..........................................................85
Figure 67: Results as a Spectrum plot .............................................................86
Figure 68: Clock-to-Output measurement selected........................................ 87
Figure 69: Configuration of a Clock-to-Output measurement...................... 88
Figure 70: Statistical results for a Clock-to-Output measurement............... 88
Figure 71: Configure Sources Ref Levels for a Clock-to-Output
measurement............................................................................................... 88
Figure 72: Measurements Summary for a Clock-to-Output
measurement............................................................................................... 89
Figure 73: Ref Levels Summary for a Clock-to-Output measurement.........89
vi
TDSJIT3 v2 Jitter Analysis Online Help

Table of Contents
Figure 74: Log Statistics for a Clock-to-Output measurement ..................... 90
Figure 75: Log File Name dialog ...................................................................... 90
Figure 76: Path to the stats.csv log file............................................................. 91
Figure 77: Viewing statistics in a spreadsheet program.................................91
Figure 78: Log Measurement /configure menu for a Clock-to-Output
measurement............................................................................................... 92
Figure 79: Input Directory Name dialog ......................................................... 93
Figure 80: Save Current Measurements dialog .............................................. 93
Figure 81: Path to the TC01R1R2.csv log file................................................. 94
Figure 82: Viewing a data log file in a spreadsheet program ........................ 94
Figure 83: Log Worst Case Waveforms configuration for a
Clock-to-Output measurement ................................................................. 95
Figure 84: Log Worst Case Waveforms dialog............................................... 96
Figure 85: Path to the worse case .wfm log files .............................................96
Figure 86: Data Period results for example 1................................................101
Figure 87: Pattern Length for example 1 ...................................................... 102
Figure 88: Rj/Dj results for example 1...........................................................103
Figure 89: Spurs for example 1 ......................................................................104
Figure 90: Data Period results for example 2................................................106
Figure 91: Time Trend plot for example 2 .................................................... 107
TDSJIT3 v2 Jitter Analysis Online Help
vii

Table of Contents
List of Tables
Table 1: Directories and usage .........................................................................7
Table 2: File name extensions............................................................................8
Table 3: Entering numeric values .....................................................................9
Table 4: File menus...........................................................................................10
Table 5: User interface items...........................................................................13
Table 6: Measurement definitions ..................................................................17
Table 7: General measurement definitions ...................................................18
Table 8: File menus...........................................................................................19
Table 9: Configure Measurement menus and applicable
measurements....................................................................................................20
Table 10: N-Cycle measurement configuration .............................................24
Table 11: TIE: RjDj analysis configuration...................................................26
Table 12: Reference Clock Frequency configuration ....................................28
Table 13: PLL Loop Bandwidth configuration..............................................30
Table 14: Advanced Clock Recovery configuration ......................................31
Table 15: Filters configuration........................................................................34
Table 16: Advanced Filter configuration........................................................35
Table 17: Configure Sources menus ...............................................................37
Table 18: Configure Sources Autoset configuration .....................................38
Table 19: Optimize Horizontal For configuration.........................................39
Table 20: Configure Sources Gating configuration.......................................40
viii
Table 21: Configure Sources Qualify configuration......................................40
Table 22: Configure Sources Ref Levels Autoset configuration...................43
Table 23: Configure Sources Ref Levels Autoset configuration...................44
Table 24: Configure Sources Ref Levels configuration.................................46
Table 25: Configure Sources Stat pop Limit configuration..........................47
Table 26: Measurement Summaries menus ...................................................48
Table 27: Control Panel functions...................................................................50
Table 28: Statistics menus................................................................................52
Table 29: Plot types ..........................................................................................53
Table 30: Measurements and available plots .................................................54
Table 31: Plots Create menu options ..............................................................57
Table 32: Vert/Horiz axis options for a Histogram plot................................58
Table 33: Vert/Horiz axis options for a Time Trend plot .............................58
Table 34: Vert/Horiz axis options for a Spectrum plot.................................59
Table 35: Vert/Horiz axis options for a Bathtub plot....................................60
Table 36: Transfer Function Definition configuration..................................60
Table 37: Vert/Horiz axis options for a Transfer Function plot ..................61
TDSJIT3 v2 Jitter Analysis Online Help

Table of Contents
Table 38: Vert/Horiz axis options for a Phase Noise plot..............................62
Table 39: Log Statistics configuration ............................................................72
Table 40: Log Measurements configuration ..................................................73
Table 41: Log Worst Case Waveforms configuration ...................................74
Table 42: Single waveform measurements...................................................113
Table 43: Dual waveform measurements .....................................................119
Table 44: File menus parameters..................................................................123
Table 45: Select Source area parameters .....................................................124
Table 46: Math Defs area parameters ..........................................................125
Table 47: Waveform Edges parameters .......................................................125
Table 48: Measurement Range Limits parameters .....................................125
Table 49: N-Cycle measurement parameters...............................................126
Table 50: Clock Recovery: Reference Clock Frequency parameters ........126
Table 51: Clock Recovery: Loop BW parameters......................................126
Table 52: Advanced Clock Recovery parameters........................................127
Table 53: Filters parameters..........................................................................127
Table 54: Advanced Filter parameter...........................................................127
Table 55: TIE: RjDj Analysis parameters (TDSJIT3 v2 Advanced only).128
Table 56: Configure Sources Autoset parameters.......................................128
Table 57: Configure Sources Gate/Qualify parameters ..............................129
Table 58: Configure Sources Ref Levels parameters ..................................129
Table 59: Configure Stat Pop Limit parameters .........................................129
Table 60; Configure Ref Level Autoset Setup Menu parameters ..............130
Table 61 Histogram Vert/Horiz Axis menu parameters .............................131
Table 62: Time Trend Vert/Horiz Axis menu parameter...........................131
Table 63: Spectrum Vert/Horiz Axis menu parameters .............................131
Table 64: Bathtub Vert/Horiz Axis menu parameters................................131
Table 65: Transfer Function Vert/Horiz Axis menu parameters...............132
Table 66: Phase Noise Vert/Horiz Axis menu parameters..........................132
Table 67: Log Statistics menu parameters ...................................................132
Table 68: Log Measurements Configure menu parameters .......................133
Table 69: Log Worst Case Waveforms Configure menu parameters........133
Table 70: Deskew menu parameters .............................................................134
Table 71: Acq Timeout menu parameters....................................................134
Table 72: Variable:Value JITTER3 command arguments and queries
part 1 ...............................................................................................................135
Table 73: Variable:Value JITTER3 command arguments and queries
part 2................................................................................................................136
Table 74: Variable:Value JITTER3 command arguments and queries
part 3................................................................................................................137
TDSJIT3 v2 Jitter Analysis Online Help
ix

Table of Contents
Table 75: Variable:Value JITTER3 command arguments and queries
part 4................................................................................................................138
Table 76: Variable:Value JITTER3 command arguments and queries
part 5................................................................................................................141
Table 77: Measurement result queries..........................................................144
Table 78: Measurement names and keys......................................................144
Table 79: Source names and key..................................................................144
Table 80: Plot names and key ........................................................................144
Table 81: Error codes....................................................................................145
x
TDSJIT3 v2 Jitter Analysis Online Help

General Safety Summary
Review the following safety precautions to avoid injury and prevent damage to
this product or any products connected to it. To avoid potential hazards, use this
product only as specified.
Only qualified personnel should perform service procedures.
While using this product, you may need to access other parts of the system. Read
the General Safety Summary in other system manuals for warnings and cautions
related to operating the system.
To Avoid Fire or Personal Injury:
Connect and Disconnect Properly: Do not connect or disconnect probes or test
leads while they are connected to a voltage source.
Observe All Terminal Ratings: To avoid fire or shock hazard, observe all
ratings and markings on the product. Consult the product manual for further
ratings information before making connections to the product.
Do Not Operate With Suspected Failures: If you suspect there is damage to
this product, have it inspected by qualified service personnel.
Symbols and Terms: The following terms and symbols may appear in the online
help.
WARNING: Warning statements identify conditions or practices that could
result in injury or loss of life.
CAUTION: Caution statements identify conditions or practices that could
result in damage to this product or other property.
Terms on the Product: The following terms may appear on the product:
DANGER indicates an injury hazard immediately accessible as you read the
marking.
WARNING indicates an injury hazard not immediately accessible as you read
the marking.
CAUTION indicates a hazard to property including the product.
Symbols on the Product: The following symbol may appear in the product:
CAUTION Refer to Help
TDSJIT3 v2 Jitter Analysis Online Help xi

General Safety Summary
xii
TDSJIT3 v2 Jitter Analysis Online Help

Preface
5-Time Free Trial
The TDSJIT3 v2 application consists of two products: Jitter Analysis Advanced
and Jitter Analysis Essentials. These products are applications that enhance basic
capabilities of some Windows-based oscilloscopes from Tektronix. These jitter
analysis applications include the following features:
• Select and configure multiple measurements on more than one waveform
• Display statistical results for up to six measurements
• Perform random and deterministic jitter analysis including BER estimation
(TDSJIT3 v2 Advanced only)
• Show results as plots
• Save statistical results to a data log file
• Save individual data points to a measurement results file
• Save the worst case waveforms to .wfm files
A 5-time free trial is available for all applications in the "Applications on this CD
and Compatible Oscilloscope" table found in the Optional Applications Software
on a Windows Based Oscilloscope Installation Manual (accessible as a PDF file.)
You can start and exit an application up to five times to help you evaluate
Tektronix software solutions.
If an application becomes available after you receive your oscilloscope, you can
download the application as described in the installation manual to try the free
trial.
Related Documentation
Refer to the Optional Applications Software on a Windows-Based Oscilloscope
Installation Manual for the following information:
• Software warranty
• Software license agreement
• List of all available applications, compatible oscilloscopes, and relevant
• How to use the 5-time free trial
• Installation procedures
• How to enable an application
• How to download files from the Tektronix web site
software and firmware version numbers
Note: You can view PDF files of the reference guide and the installation manual
from the CD Installation Browser and from the Documents directory on the
Optional Applications Software on a Windows-Based Oscilloscope CD-ROM.
TDSJIT3 v2 Jitter Analysis Online Help xiii
Preface
GPIB Information
Relevant Web Sites
For information on how to operate the oscilloscope and use the applicationspecific GPIB commands, refer to the following items:
• The user manual for your oscilloscope provides general information on how to
operate the oscilloscope.
• The online help for your oscilloscope can provide details on how to use GPIB
commands to control the oscilloscope if you install the GPIB Programmer
guide (and code examples) from the oscilloscope CD-ROM.
• The example directory for programming examples of how to remotely control
the application. The default location for the example files is
C:\TekApplications\TDSJIT3v2\Examples\GPIB-Examples.
The Tektronix web site offers the following information:
• Understanding and Characterizing Jitter Primer, part number 55W-16146-0
• Jitter analysis details on the www.tektronix.com/jitter web page
You can also find useful information in the Fibre Channel - Methodologies for
Jitter and Signal Quality Specification – MJSQ on the www.t11.org web site.
Application CD Contents
The Optional Applications Software on a Windows Based Oscilloscope CD-ROM
includes files for the following types of documentation:
• Printable file of the TDSJIT3 v2 Jitter Analysis online help formatted to
• Reference guides
• Optional Applications Installation manual
resemble a user manual
xiv
Figure 1: Contents of the application CD-ROM
TDSJIT3 v2 Jitter Analysis Online Help

Preface
You can use the following methods to view most PDF files associated with this
application:
• Access a file in the Documents directory on the Optional Applications
Software on a Windows-Based Oscilloscope CD-ROM from any PC
• Access a file from the CD Installation Browser
• Select a file (except Reference guides) from the Start menu in the oscilloscope
task bar; you may need to minimize the oscilloscope and minimize the
application
• Use the Manuals Finder from the www.tektronix.com web site.
You can also use this additional method to view only the PDF file of the online
help:
• Select the shortcut on the desktop of the oscilloscope after you minimize the
oscilloscope
Note: If you do not have an Acrobat reader to view a PDF file, you can get a free
copy of the reader from the www.adobe.com/products/acrobat web page.
Conventions
Online help topics use the following conventions:
• The terms "TDSJIT3 v2 application" or "application" refer to the TDSJIT3 v2
Advanced or TDSJIT3 v2 Essentials Jitter Analysis Application (except when
noted as Advanced only)
• The term "oscilloscope" refers to any product on which this application runs.
• The term "select" is a generic term that applies to the two mechanical methods
of choosing an option: with a mouse or with the Touch Screen.
• The term "DUT" is an abbreviation for Device Under Test.
• User interface screen graphics are from a TDS7000 series oscilloscope; there
may be minor differences in the displays on other types of oscilloscopes.
• When steps require a sequence of selections using the application interface,
the ">" delimiter marks each transition between a menu and an option. For
example, one of the steps to recall a setup file would appear as File> Recall.
Types of Online Help Information
The online help contains the following types of information:
• A Getting Started group of topics briefly describes the application, contains
connection procedures, and includes a deskew procedure.
• An Operating Basics group of topics covers basic operating principles of the
application, including the Jitter Wizard. The sequence of topics reflects the
steps you perform to operate the application and includes definitions for all
menus and options.
• A Tutorial group of topics teaches you how to set up the application to acquire
a waveform, take a measurement, view the results, view a plot, and save data
to a file.
TDSJIT3 v2 Jitter Analysis Online Help
xv

Preface
Using Online Help
• An Application Examples group of topics demonstrates how to use jitter
measurements to identify a problem with a waveform. This should give you
ideas on how to solve your own measurement problems.
• A Reference group of topics specifies the minimum, maximum, incremental,
or list of choices, and the default values for all adjustable parameters.
• A Measurement Algorithms group of topics includes measurement guidelines
and information on how the application calculates each measurement.
• A GPIB Command Syntax group of topics contains a list of arguments and
values that you can use with the remote commands and their associated
parameters. The application includes simple remote interface programs to
show you how to operate the application using GPIB commands.
The application installs a desktop shortcut to access a PDF file of the help topics.
The file is printable and is formatted to resemble a user manual.
Online help has many advantages over a printed manual because of advanced
search capabilities. You can select Help> Topics on the right side of the
application menu bar to display the Help file.
The main (opening) Help screen shows a series of book icons and three tabs
along the top menu, each of which offers a unique mode of assistance:
• Table of Contents (TOC) tab - organizes the Help into book-like sections.
Select a book icon to open a section; select any of the topics listed under the
book.
• Index tab - enables you to scroll a list of alphabetical keywords. Select the
topic of interest to display the corresponding help page.
• Find tab - allows a text-based search. Follow these steps:
1. Type the word or phrase you wish to find in the search box.
If the word or phrase is not found, try the Index tab.
2. Select some matching words in the next box to narrow your search.
3. Choose a topic in the lower box, and then select the Display button.
Note: The Find tab function does not include words found in graphics. Refer to
the Find Tab and Searches topic for more information.
A Note: in the topic text indicates important information.
When you use a mouse, you can tell when the cursor is over an active
hyperlink because the arrow cursor changes to a small pointing hand cursor.
The light bulb icon and word Tip in the graphic above indicates additional
information to help you operate the application more efficiently.
xvi
TDSJIT3 v2 Jitter Analysis Online Help

Preface
Find Tab and Searches
Many online help topics only contain tables. To retain vertical and horizontal
lines, the tables are graphical objects. The Find tab in the online help does not
recognize words in these tables.
The online help is extensively indexed with the proper names of all menus and
options as they appear in the application and in the left column of graphical
tables.
Note: If you conduct a Find tab search with no results, try the Index tab instead.
Contacting Tektronix
Phone
Address
Web site
Sales support
Service support
Technical support
* This Telephone number is toll free in North America. After office hours, please leave
a voice mail message.
Outside North America, contact a Tektronix sales office or distributor; See the
Tektronix web site for a list of offices.
1-800-833-9200*
Tektronix, Inc.
Department or name (if known)
14200 SW Karl Braun Drive
P.O. Box 500
Beaverton, OR 97077
USA
www.Tektronix.com
1-800-833-9200, select option 1*
1-800-833–9200, select option 2*
www.tektronix.com/support
1-800-833-9200, select option 3*
6:00 a.m. - 5:00 p.m. Pacific time
TDSJIT3 v2 Jitter Analysis Online Help
xvii

Preface
Feedback
Tektronix values your feedback on our products. To help us serve you better,
please send us suggestions, ideas, or other comments you may have about your
application or oscilloscope.
You can email your feedback to techsupport@tektronix.com, FAX at (503) 6275695, or by phone. Please be as specific as possible and include the following
information:
General Information
• Oscilloscope model number and hardware options, if any
• Probes used
• Serial data standard
• Signaling rate
• Your name, company, mailing address, phone number, FAX number
Note: Please indicate if you would like to be contacted by Tektronix regarding
your suggestion or comments.
Application-Specific Information
• Software version number
• Description of the problem such that technical support can duplicate the
problem
• If possible, save the oscilloscope waveform file as a .wfm file
• If possible, save the oscilloscope and application setup files from the
application to obtain both the oscilloscope .set file and the application .ini file.
Refer to Saving a Setup File.
Once you have gathered this information, you can contact technical support by
phone or through e-mail. If using e-mail, be sure to enter "TDSJIT3 v2 Problem"
in the subject line, and attach the .set, .ini, and .wfm files.
To include screen shots, from the oscilloscope menu bar, select File>
Export. In the Export dialog box, enter a file name with a .bmp extension and
select Save. The file is saved in the C:\TekScope\Images directory. You can then
attach the file to your email (depending on the capabilities of your email editor).
xviii
TDSJIT3 v2 Jitter Analysis Online Help

Getting Started
The TDSJIT3 v2 application consists of two products: Jitter Analysis Advanced
and Jitter Analysis Essentials. These products are applications that enhance basic
capabilities of some Windows-based oscilloscopes from Tektronix. The
application includes a Wizard to help you quickly set up measurements and
obtain measurement results.
You can use this application to do the following tasks:
• Select and configure multiple measurements on one or more waveforms
• Display statistical results for up to six measurements
• Perform random and deterministic jitter analysis including BER estimation
(TDSJIT3 v2 Advanced only)
• Apply high pass and low pass filters to the measurements (TDSJIT3 v2
Advanced only)
• Display the results as Histogram, Time Trend, Cycle Trend, and Spectrum
plots; for TDSJIT3 v2 Advanced only, also display the results as Bathtub,
Transfer Function, and Phase Noise plots
• Export plots
• Log statistical results to a file
• Log individual data points to a measurement results file
• Log worst case waveforms to files
Note: There are no standard accessories for this product.
Differences between TDSJIT3 v2 Advanced and TDSJIT3 v2 Essentials
The TDSJIT3 v2 Advanced application provides the following features that are
not included in the TDSJIT3 v2 Essentials application:
• PLL-Based Clock Recovery
• Crossover Voltage Analysis
• Jitter separation (Rj/Dj analysis)
• Bit error rate estimation (BER)
• Filters
• Bathtub, Transfer Function, and Phase Noise plots
Features that are only available with the TDSJIT3 v2 Advanced application are
indicated as "TDSJIT3 v2 Advanced only."
TDSJIT3 v2 Jitter Analysis Online Help 1

Getting Started
Compatibility
For information on oscilloscope compatibility, refer to the product data sheet (use
the Search tool on the www.tektronix.com web site).
The setup files for TDSJIT3 v2 Advanced and TDSJIT3 v2 Essentials are
compatible with each other.
The TDSJIT3 v2 Advanced application will recall setup files made with previous
versions of TDSJIT3 and TDSJIT3E. To convert an existing setup file, recall it
and then save it again. If you wish to retain a copy of the original setup file, use a
different filename when saving. Note that setup files from previous versions may
include directory paths such as "C:\TekApplications\TDSJIT3\...", whereas the
v2 application defaults to "C:\TekApplications\TDSJIT3v2\...". If you would like
your converted setup files to use the TDSJITv2 directory, recall the existing
setup file, use the Graphical User Interface to change any file paths to use the
new directory structure, and then save the setup.
Requirements and Restrictions
The Sun Java Run-Time Environment (JRE) V1.4.2 must be installed on the
oscilloscope to operate the TDSJIT3 v2 application. When you install the
application, the InstallShield Wizard automatically installs the proper version of
the JRE. If the JRE is deleted, install TDSJIT3 v2 application again.
Accessories
Installation
Memory. A minimum of 512 MB PC memory is required and 1 GB PC memory
is highly recommended.
Keyboard. You will need to use a keyboard to enter new names for some file
save operations.
There are no standard accessories for this product. However, you can refer to the
product datasheet available on the Tektronix web site for information on optional
accessories relevant to your application.
Refer to the Optional Applications Software on a Windows-Based Oscilloscope
Installation Manual for the following information:
• List of available applications, compatible oscilloscopes, and version numbers
• How to use the 5-time free trials
• How to apply a new authorized Option Installation key label
• Installation procedures
• How to enable an application
• How to download updates from the Tektronix web site
2
TDSJIT3 v2 Jitter Analysis Online Help
Getting Started
Connecting to a Device Under Test (DUT)
You can use any compatible probes or cable interface to connect between your
DUT and oscilloscope. One connection is sufficient for most signals.
The Clock-to-Output, Skew, and Crossover Voltage (TDSJIT3 v2 Advanced
only) measurements require two input channels, two reference, or two Math
waveforms.
Warning: To avoid electric shock, remove power from the DUT before
attaching probes. Do not touch exposed conductors except with the properly rated
probe tips. Refer to the probe manual for proper use.
Refer to the General Safety Summary in your oscilloscope manual.
Deskewing Probes and Channels
To ensure accurate results for two-channel measurements, it is important to first
deskew the probes and oscilloscope channels before you take measurements from
your DUT.
The application includes an automated deskew utility that you can use to deskew
any pair of oscilloscope channels.
Note: To produce the best deskew results, you should connect the probes to the
fastest signal in your DUT.
Deskewing on Oscilloscopes with Bandwidth Extension
Some Tektronix oscilloscopes feature software-based bandwidth extension. The
bandwidth extension may be enabled on a per-channel basis.
Enabling or disabling bandwidth extension on any channel affects the skew on
that channel. Thus, you should deskew probes and channels after you make such
configuration changes.
Steps to Deskew Probes and Channels
To deskew a pair of probes and oscilloscope channels, follow these steps:
1. Refer to Connecting to a Device Under Test before starting the procedure.
2. Connect both probes to the fastest signal in your DUT.
Set up the oscilloscope as follows:
1. Use the Horizontal Scale knob to set the oscilloscope to an acquisition rate so
that there are two or more samples on the deskew edge.
2. Use the Vertical Scale and Position knobs to adjust the signals to fill the
display without missing any part of the signals.
3. Set the Record Length so that there are more than 100 edges in the
acquisition.
4. Start the TDSJIT3 v2 application.
5. Select Utilities> Deskew. The Deskew Utility menu appears.
6. Set the Reference Source option to Ch1. The Source waveform is the
reference point used to deskew the remaining channels.
TDSJIT3 v2 Jitter Analysis Online Help
3
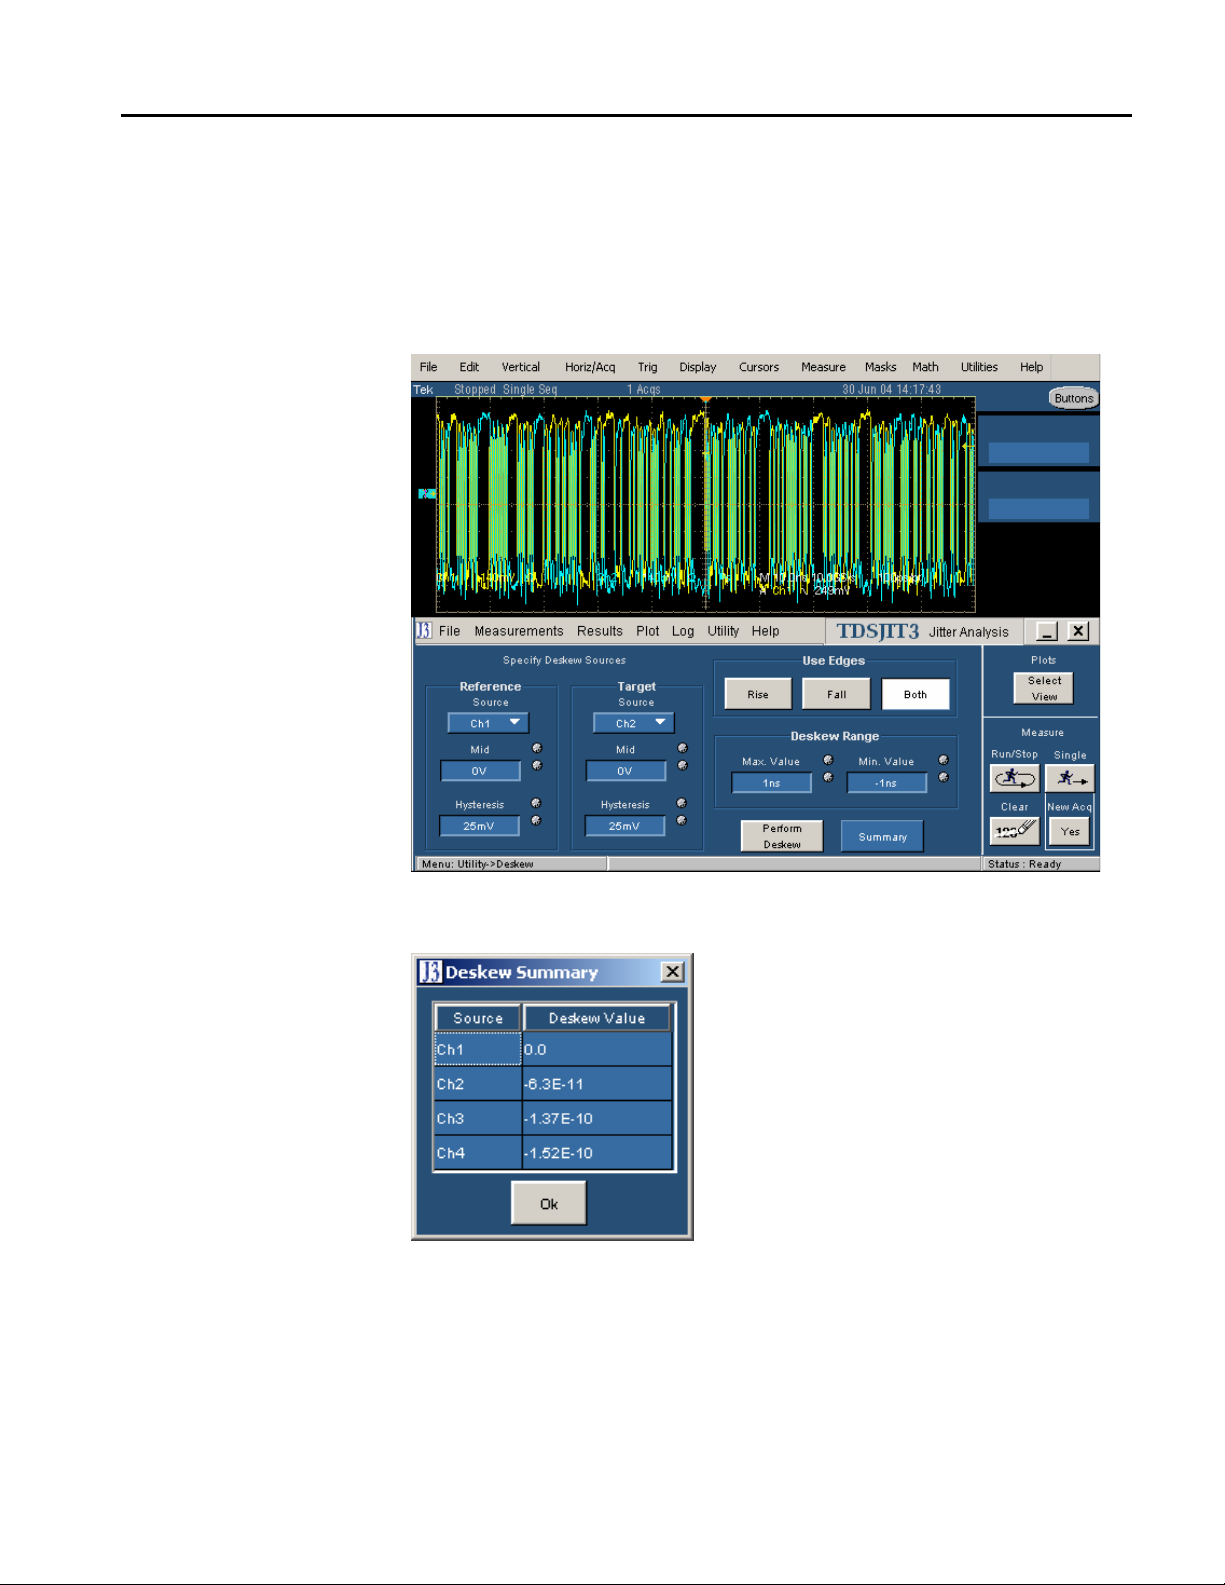
Getting Started
7. Set the Target Source option to Ch2. This is the channel that will be
deskewed.
8. To start the utility, select the Perform Deskew command button, and then
select Yes.
9. Repeat steps 7 and 8 for Ch3, and then for Ch4 to deskew those channels.
10. To view the deskew values, select the Summary button.
Figure 2: Deskew complete example
Figure 3: Deskew Summary example
4
TDSJIT3 v2 Jitter Analysis Online Help
Operating Basics
The topics in the Operating Basics book cover the following definitions and
tasks:
• General information, such as on navigating the user interface
• Setting up the application
• Taking measurements
• Viewing the measurement results as statistics or as plots
• Using the plot window zoom and cursors functions
• Exporting Plot Files
• Logging statistical results to a file
• Logging individual data points to a file
• Logging worst case waveforms to files
• Saving and recalling set up files
General Information
Starting the TDSJIT3 v2 Application
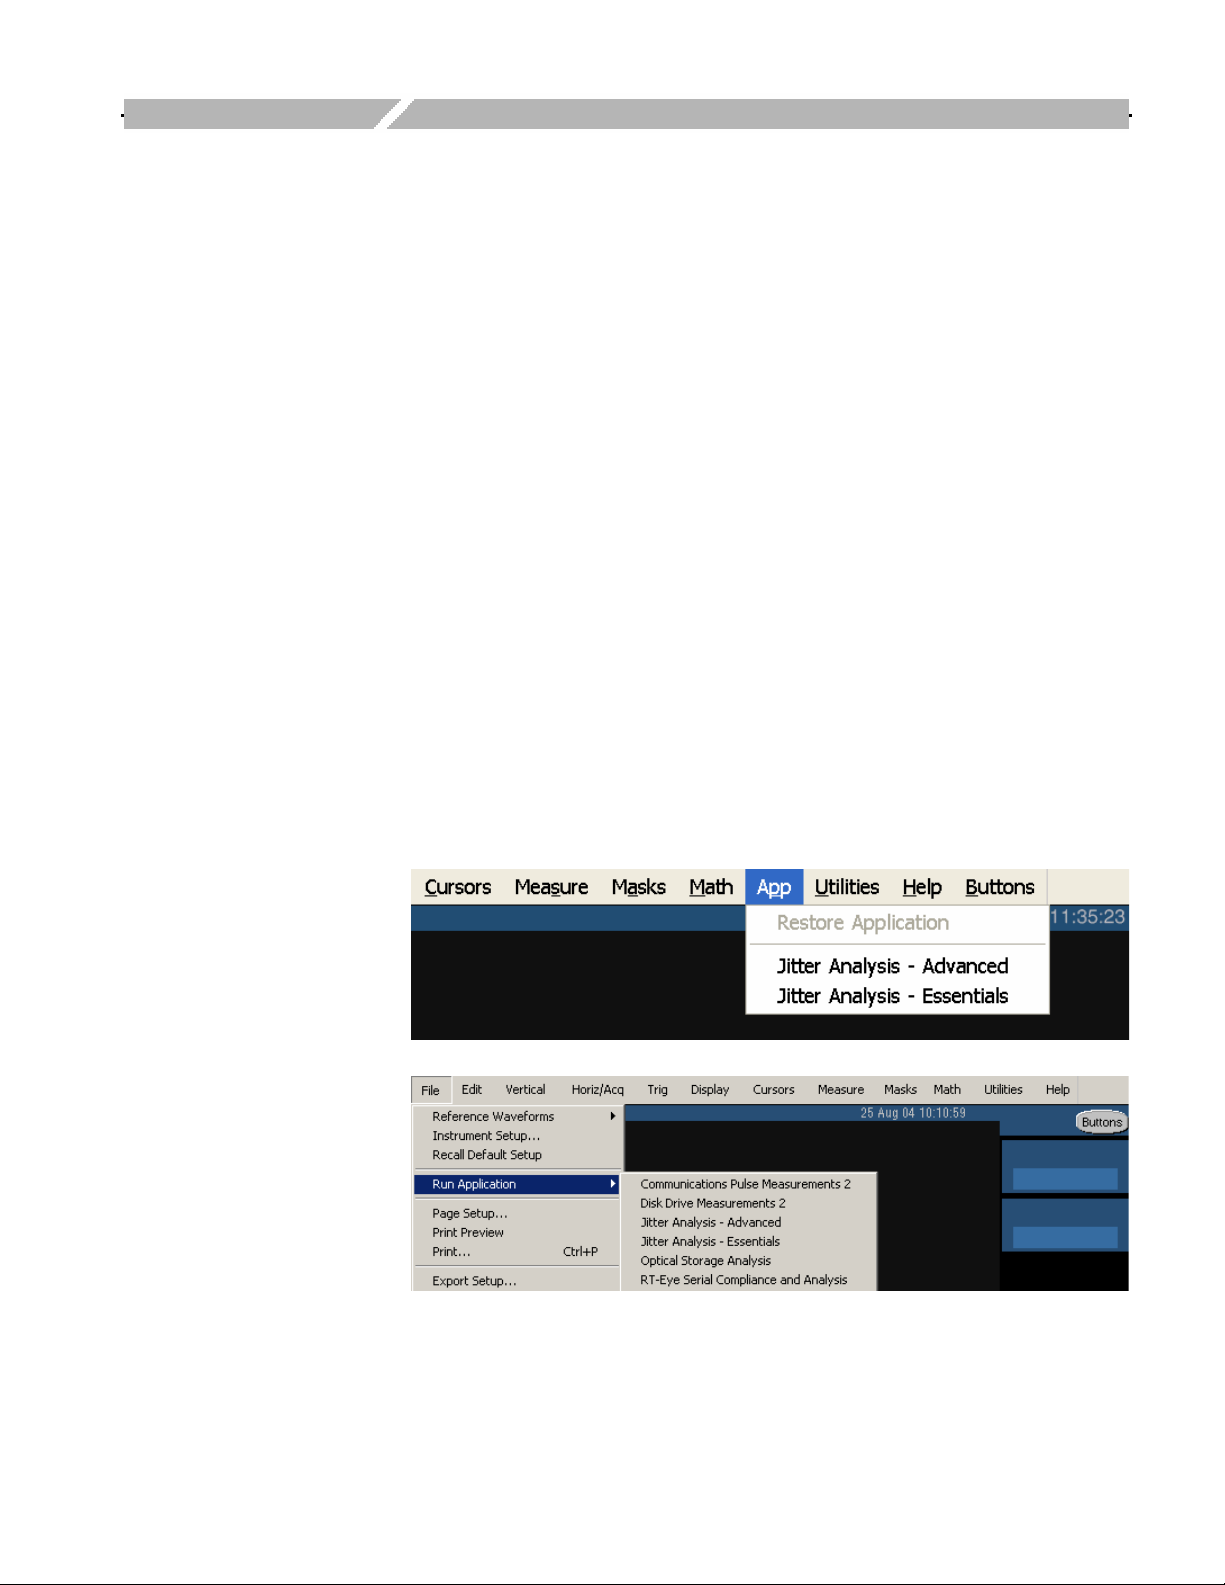
The way you start the application depends on the oscilloscope model. On the
oscilloscope menu bar, select App> Jitter Analysis - Advanced or select File>
Run Application> Jitter Analysis - Advanced. If you are using the TDSJIT3 v2
Essentials application, select Jitter Analysis - Essentials.
Figure 4: Starting the TDSJIT3 v2 application
TDSJIT3 v2 Jitter Analysis Online Help 5

Operating Basics
Returning to the Application
The way you return to the application depends on the oscilloscope model.
Figure 5: Returning to the application
Minimizing and Maximizing the Application
To minimize the application, select File> Minimize or the command button
in the application menu bar. When you minimize the application, the oscilloscope
fills the display.
To maximize the application, select
Exiting the Application
To exit the application, select File> Exit or the command button in the
application menu bar. When you exit the application, you can choose to keep the
oscilloscope setup currently in use with the application or to restore the
oscilloscope setup that was present before you started the application.
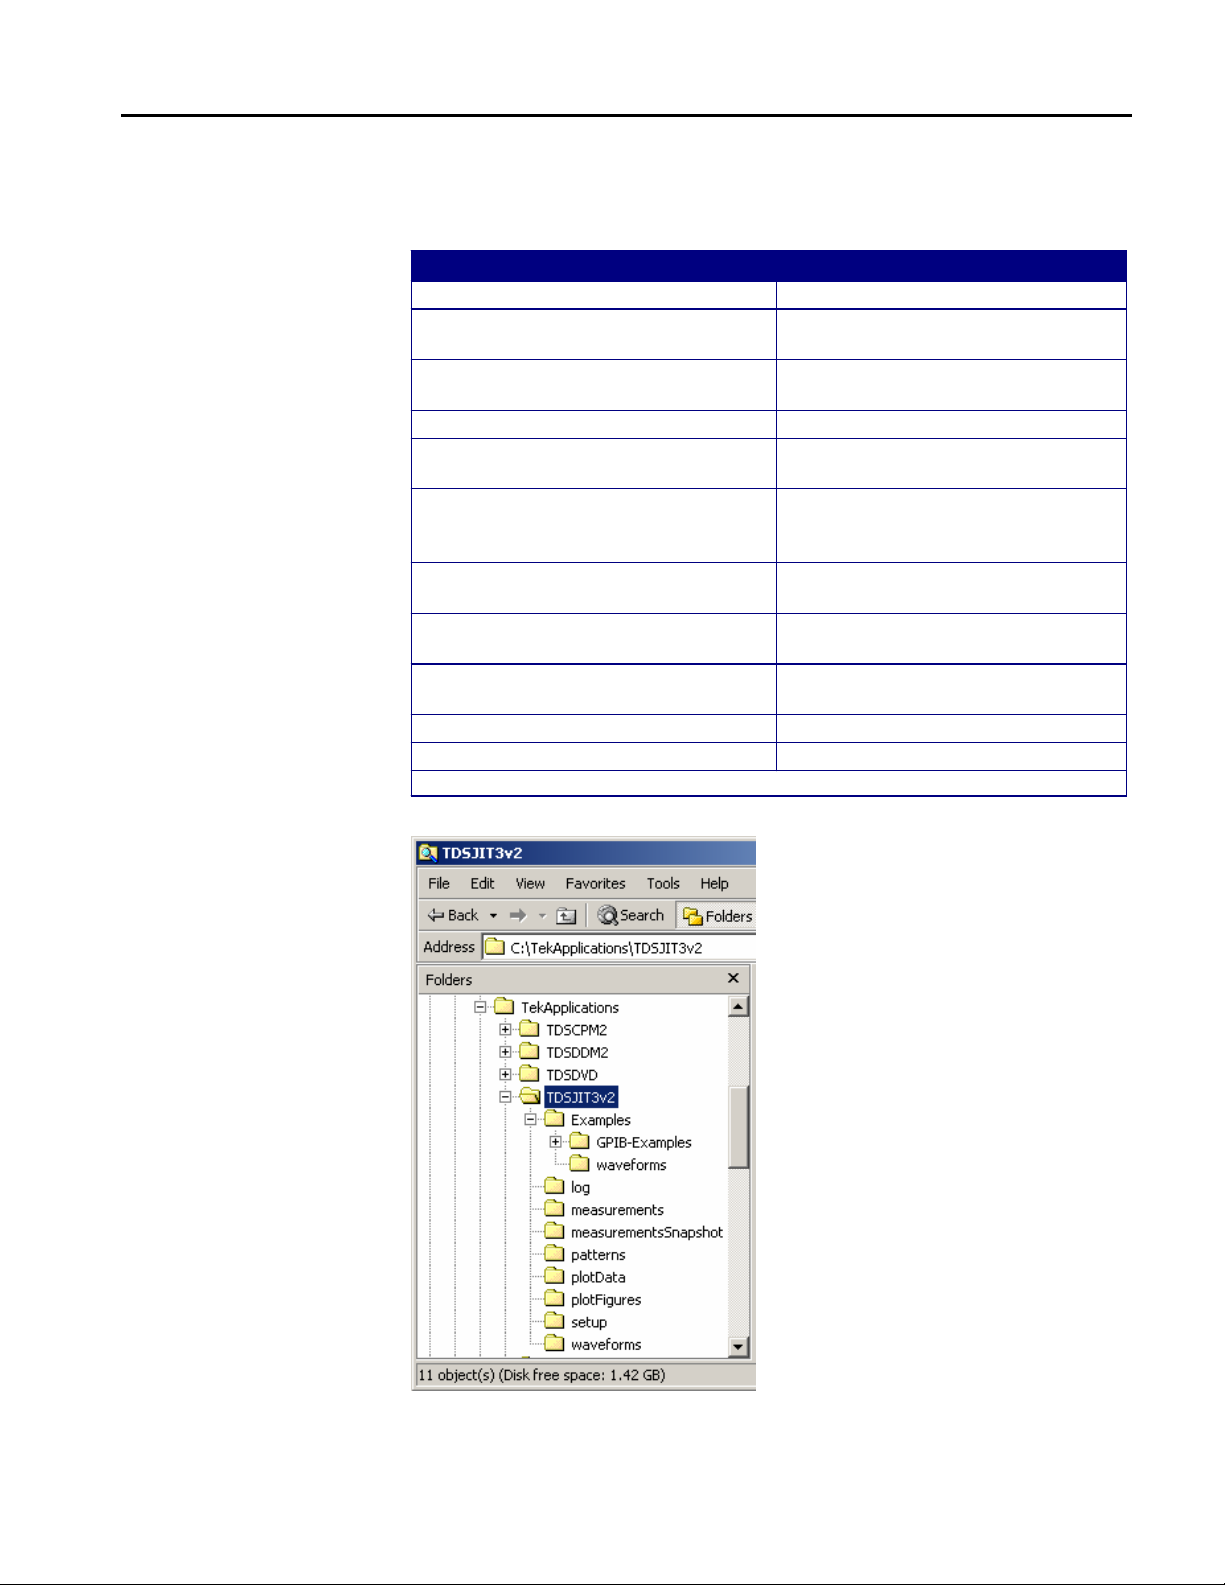
Application Directories and Usage
During installation, the application sets up directories for various functions, such
as to save setup files, and uses extensions appended to file names to identify the
file types.
in the oscilloscope task bar.
6
TDSJIT3 v2 Jitter Analysis Online Help
Operating Basic
Table 1: Directories and usage
Default directory names*
\TDSJIT3v2 Home location
\TDSJIT3v2\Examples\GPIB-Examples Examples of remote control programs
\TDSJIT3v2\Examples\waveforms Waveform files used in the tutorial
\TDSJIT3v2\log Statistics log files
\TDSJIT3v2\measurements Log files of data points for each
\TDSJIT3v2\measurementsSnapshot Measurement log files for the Save
\TDSJIT3v2\patterns Pattern files for the Advanced Clock
\TDSJIT3v2\plotData Data exported from measurement
\TDSJIT3v2\plotFigures Image files exported from
\TDSJIT3v2\setup Setup files
\TDSJIT3v2\waveforms Worst case waveforms files
* All subdirectories are located in the C:\TekApplications directory.
Directory use
that use GPIB commands
and application examples
selected measurement
Current Measurements option (Log
Measurements)
Recovery configuration
plots
measurement plots
Figure 6: Directory structure
TDSJIT3 v2 Jitter Analysis Online Help
7

Operating Basics
Table 2: File name extensions
Extension Description
.bmp File that uses a “bitmap” format
.csv File that uses a "comma separated value" format
.ini TDSJIT3 application setup file
.jpg File that uses a “joint photographic experts group” format
.mat File that uses native MATLAB binary format
.png File that uses a “portable network graphics” format
.set Oscilloscope setup file that is recalled with an application .ini file;
.txt File that uses an ASCII format
.wfm Waveform file; can be recalled into Reference memory
Tips on the TDSJIT3 v2 User Interface
Here are some tips to help you with the application user interface:
• Use the Jitter Wizard to set up and take one measurement from a set of
commonly used measurements
both files will have the same name
• Select a Source before selecting each measurement
• Select any waveform source and any measurement multiple times to use
different configuration options
• Use the Single run button
to obtain a single set of measurements from
a single run; push the button again to interrupt the acquisition
• Use the Run/Stop button
to acquire measurements from continuous
runs; push the button again to interrupt the current acquisition, or push the
Single button to stop sequencing when the current acquisition and
measurement cycle is complete
8
TDSJIT3 v2 Jitter Analysis Online Help
Operating Basic
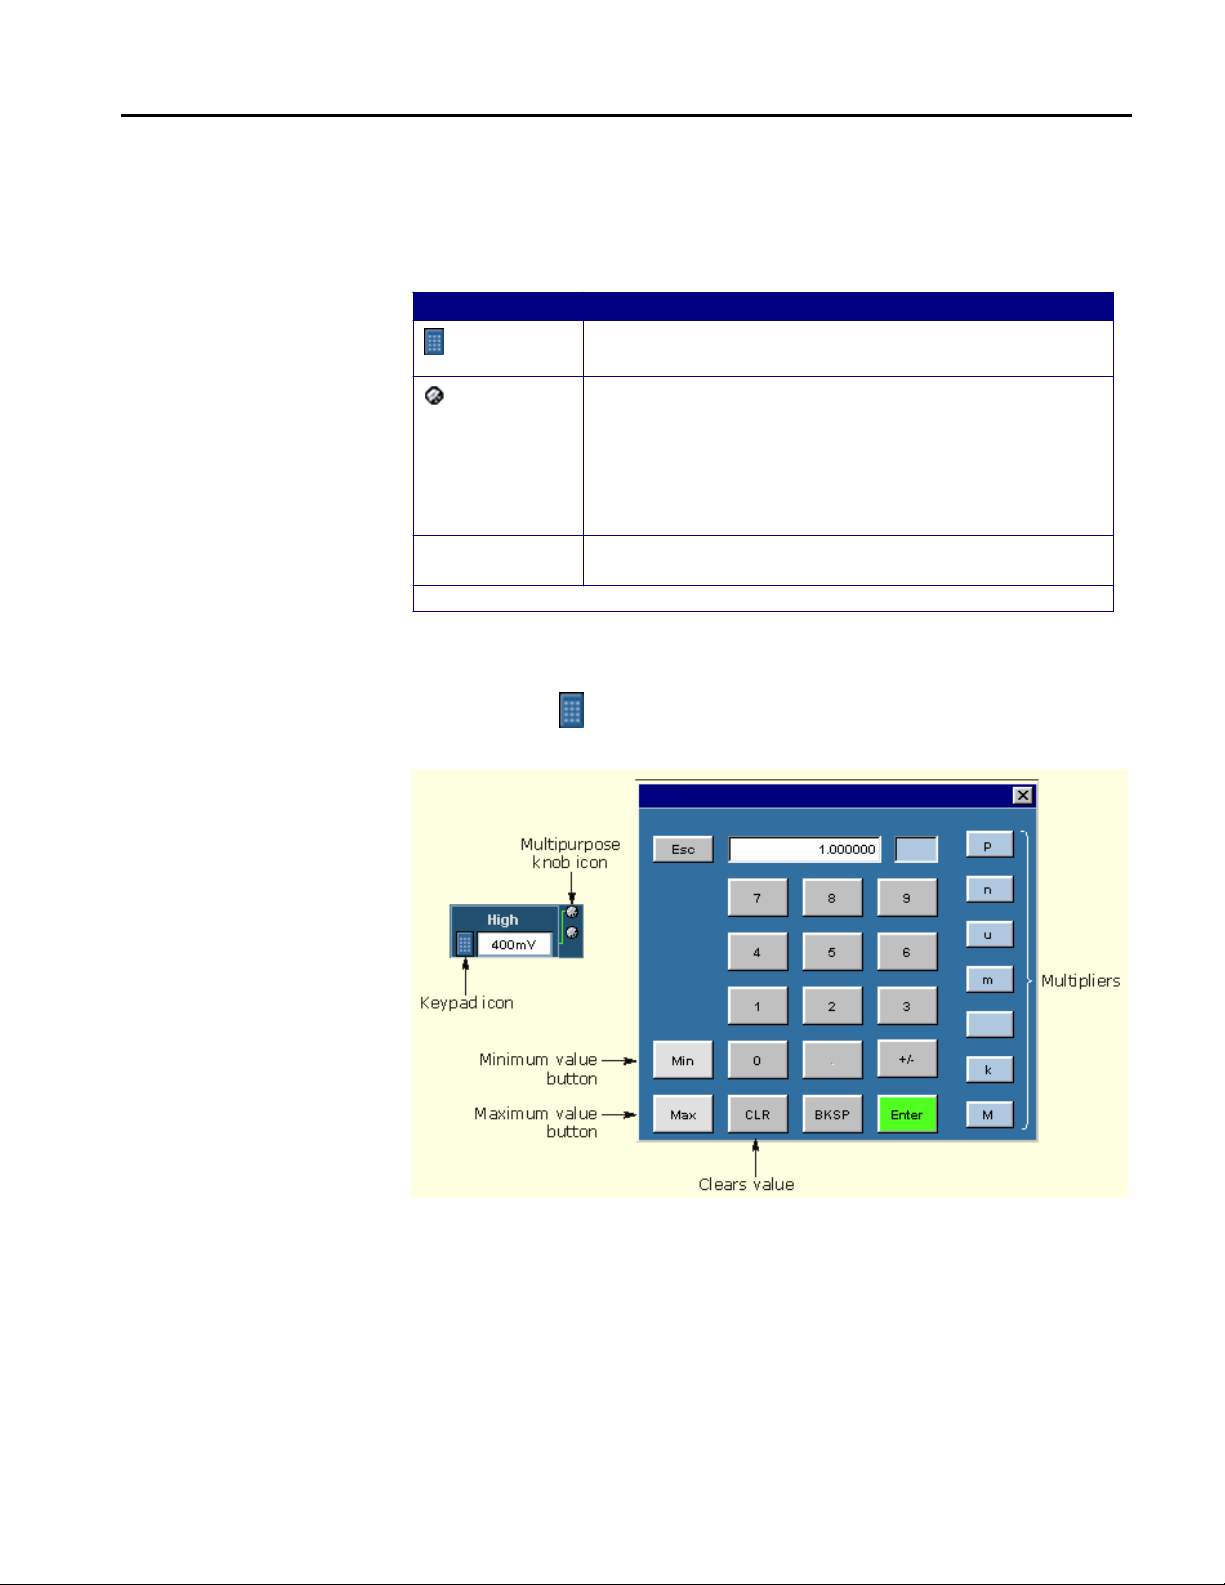
How to Enter Numeric Values
Table 3: Entering numeric values
Method Description
Virtual Keypad
Keypad
Multipurpose
knob*
Edit box*
* When selected twice, the Keypad appears.
Displays the virtual keypad (looks similar to a calculator);
use to enter a value
Displays a line between the icon and the option box to
indicate that either the upper or lower multipurpose knob
on the front panel of the oscilloscope is active; turn the
knob to select a value
Press the FINE button on the oscilloscope to enter or
select the smallest values or units
Type in a value from the physical keyboard and press the
Enter key
Note: Select the icon, and then use the virtual keypad to enter information,
such as reference voltage levels.
Figure 7: On-screen keypad
TDSJIT3 v2 Jitter Analysis Online Help
9

Operating Basics
Using Basic Oscilloscope Functions
You can use oscilloscope controls and functions while the application is running.
To do so, select a menu from the oscilloscope Menu bar (or Toolbar) and access
menus, or use the front-panel knobs and buttons. You can also use the
oscilloscope Help menu to access information about the oscilloscope and how to
use it.
When you access some oscilloscope controls, the oscilloscope fills the display.
File Menus
You can use the File menus to save and recall different application setups and
recently accessed files.
Do not edit a setup file or recall a file not generated by the application.
Table 4: File menus
Menu/function Description or function
Default Setup Recalls most default (startup) parameters
Recall*
Save*
Recent Files Select from a list of the four most recently accessed setup
Dock Positions and locks the TDSJIT3 v2 application in the lower
Undock Unlocks and allows you to move the TDSJIT3 v2 application
Minimize Minimizes the application
Exit Exits the application; you can choose to retain the current
*Save or Recall functions also save or recall the associated oscilloscope setup
file (.set); an oscilloscope file is recalled if the application finds a .set file with a
matching name.
Browse to select an application setup (.ini) file to recall;
restores the application to the values saved in the setup file
Saves the current application settings in a .ini file
files (saved or recalled) and recall that setup
half of the oscilloscope display and the oscilloscope
application in the upper half of the display
to another position in the oscilloscope display or to a second
monitor; the oscilloscope display returns to full size
oscilloscope settings or restore the oscilloscope to settings
prior to starting the application
Navigating the User Interface
The application provides you with several methods to set up the application:
• The Jitter Wizard
• The Measurement Setup Sequence buttons
• The menus available in the menu bar
10
TDSJIT3 v2 Jitter Analysis Online Help
 Loading...