

Page 1

Reference
CSA8000 Communications Signal Analyzer
TDS8000 Digital Sampling Oscilloscope
071-0437-00
*P071043700*
071043700
Page 2

Page 3
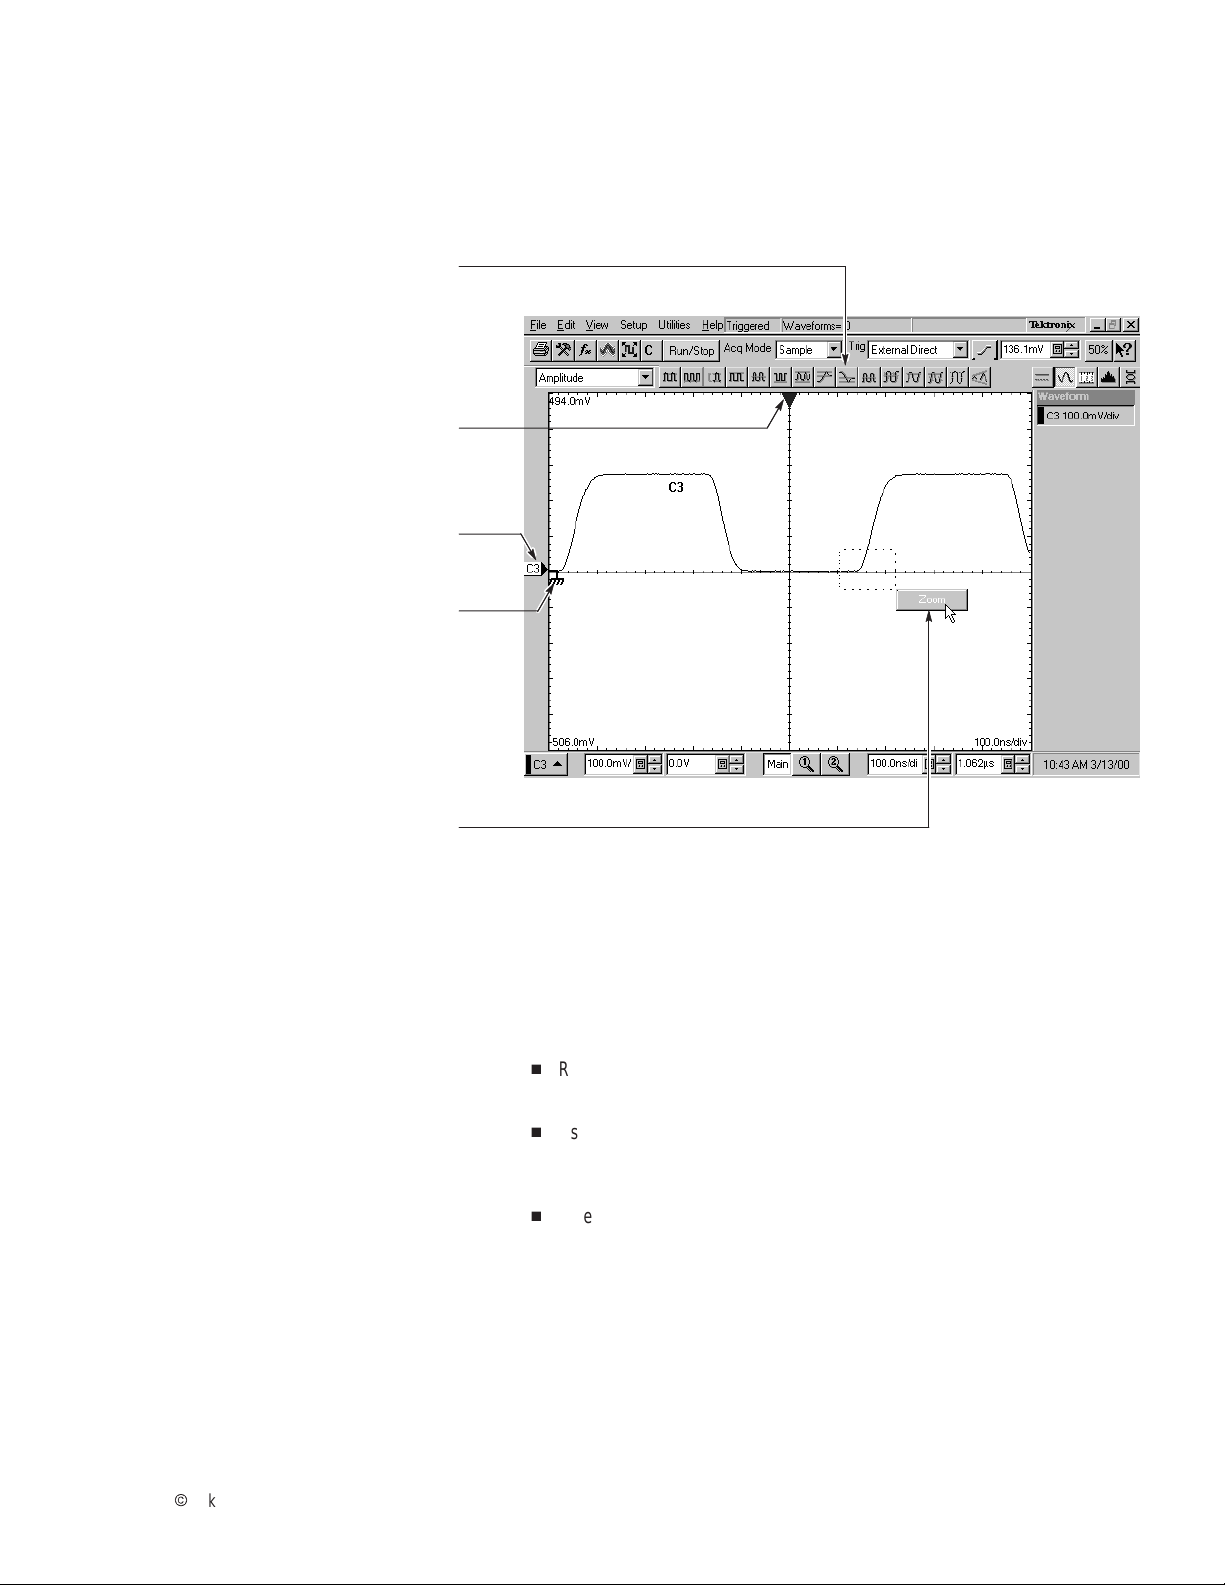
To Use the Screen Controls
Use the mouse to select waveforms, menus, and buttons. You can also
drag with the mouse to do the following operations.
Click a measurement icon to
take a measurement of the
currently selected waveform.
Drag the horizontal reference to move
the point around which horizontal scaling
expands and contracts the waveforms.
Drag waveform icon vertically to
position the waveform vertically.
Drag the zero-reference indicator
to add offset to a waveform.
Drag across a waveform segment
and click the Zoom button to expand
the selected waveform segment
horizontally to full-screen width.
Other Navigation Tips:
H
Right click on display items and readouts to find set-up
shortcuts and additional options.
H
Use the touch screen to make selections if a mouse is not
available. Push the front-panel
the touch screen on and off.
H
When using the touch screen, you can use your finger or the
touch-screen stylus that shipped with the product.
TOUCH SCREEN button to toggle
Copyright E Tektronix, Inc.
Page 4
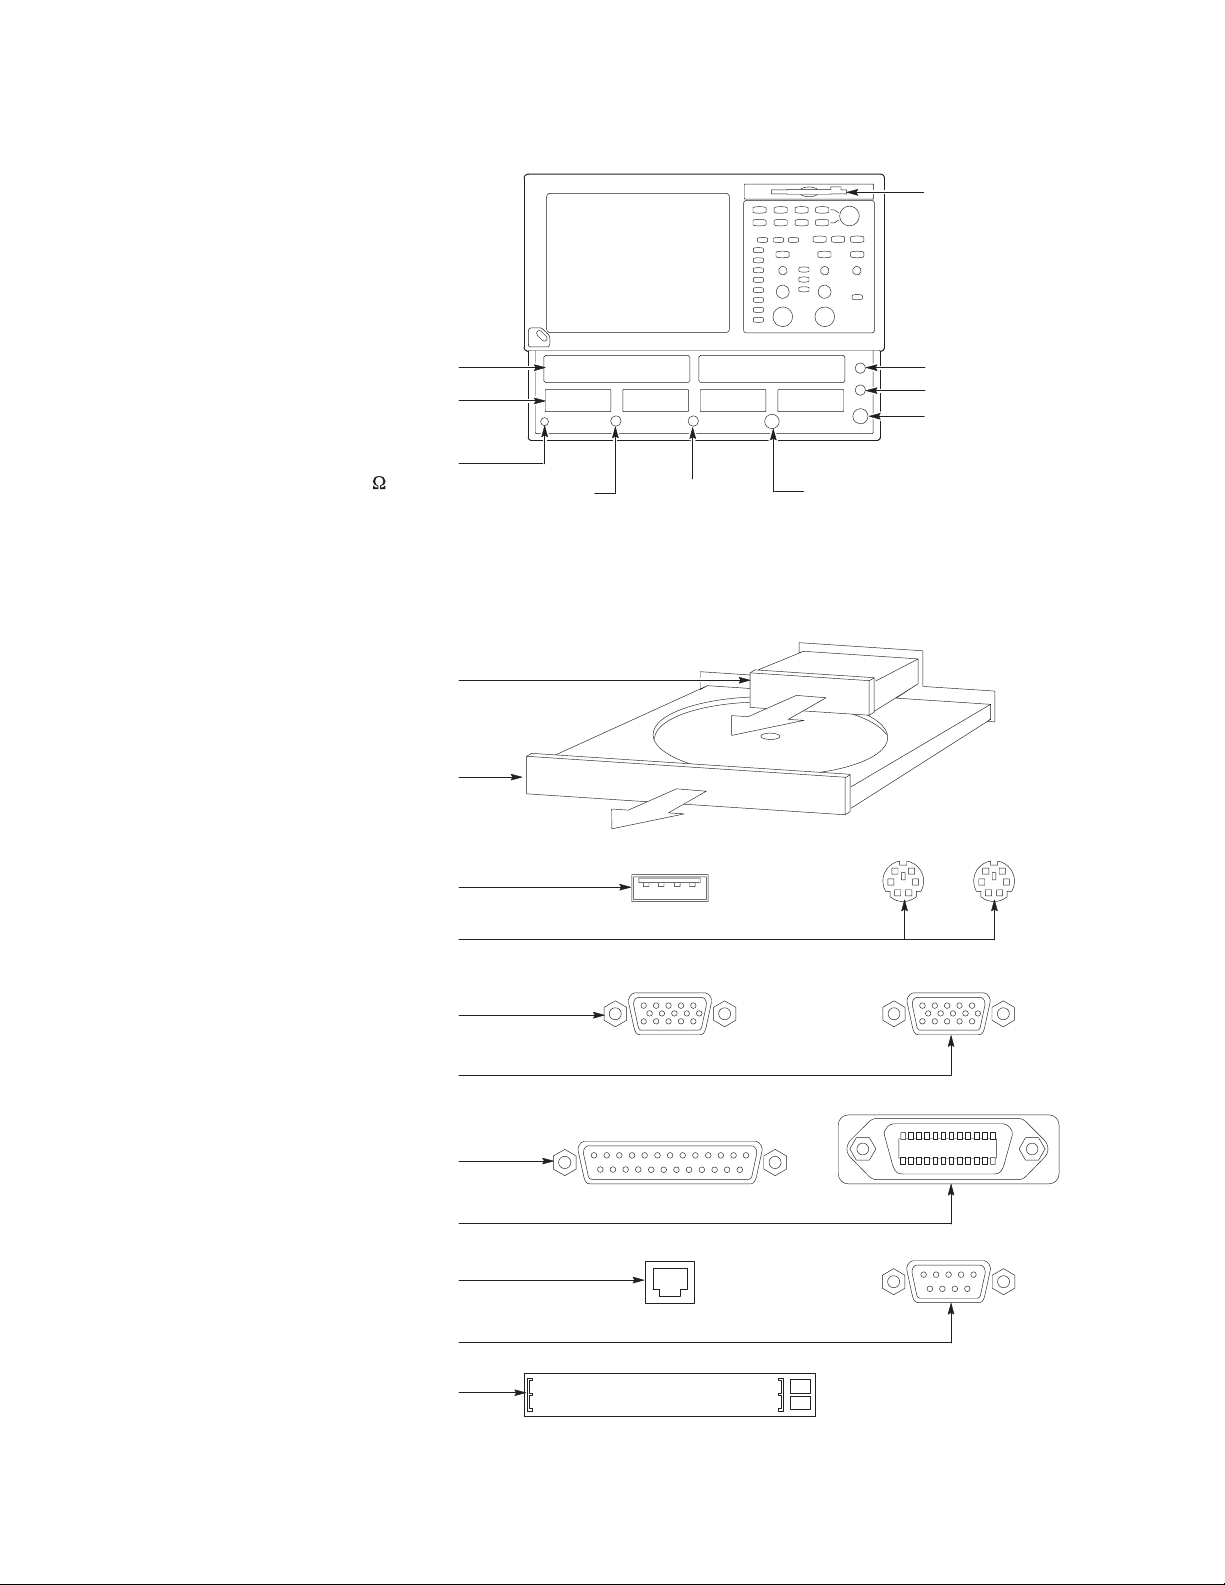
To Use Instrument I/O
On the Front Panel
Floppy disk drive accessible
from Windows 98
Accommodates optical and
electrical modules:
Compartments for large
modules, up to two channels
Compartments for small
modules, up to eight channels
Antistatic connection for wrist
strap, 1 MW to ground
Trigger
Prescale
Input
Trigger
Direct
Input
Trigger
Probe
Power
Internal Clock Output
DC Calibration Output
External 10 MHz Reference Input
On the Rear Panel
Removable hard disk drive to provide
individual environment for each user or to
secure data, press to release
CDROM drive accessible from
Windows 98, press to open
USB connector for mouse or
keyboard and mouse
PS-2 connectors for mouse and keyboard
Upper VGA port to connect a
monitor for side-by-side display
Lower VGA port to connect a
monitor for instrument display
Parallel port (Centronics) to
connect printer or other device
GPIB port to connect to controller
RJ-45 connector to connect to network
COM1 serial port
PCMCIA slots for two type-1 cards,
two type-2 cards, or one type-3 card
Page 5

To Access the Setup Dialog Boxes
Click the Setups icon to access
the setup dialog boxes with the
one last active selected.
Access any setup dialog
box from the Setup menu.
Push the
button to access the last
access the setup dialog box
SETUP DIALOG
active setup dialog box.
Push a MENU button to
for that control group.
Click on the tabs to
select among the
setup dialog boxes.
Page 6

To Display a Communication Signal
CAUTION. To prevent damage, make sure instrument power is turned off before
Carefully install the sampling module
in the instrument.
1
installing sampling modules. T o help prevent damage from ESD, always attach
and use the wrist strap while making any electrical signal connections.
Connect signals to your
sampling module.
Communication signal
Select the channel that you want to
display in the Mask setup dialog box.
Select the communication
Click Autoset in the Mask setup
dialog box or on the front panel.
2
Trigger
3
4
standard.
5
To Display Optical Signals:
H
Install up to two optical modules into the large-module compartments. These
optical inputs become channel 1 and channel 2. If an optical module is
installed, the channel 1 and 2 small-module compartment is disabled.
H
Use the Optical Clock Recovery option to obtain a stable trigger from an optical
data signal when using optical sampling modules that support clock recovery.
Page 7

To See More Waveform Detail
Drag across the segment of the waveform
that you want to see in greater detail.
Click the Zoom button.
See the waveform reacquired with
full horizontal resolution.
To Add Magnified Views
1
2
3
Click these buttons to add one or
two magnified time base views.
Drag the brackets in the main time
base to specify the position and scale
for the magnified view.
Drag the boundary between two
graticules to resize the graticules.
Click a button to select among the
displayed views. Horizontal scale,
position, and other controls operate
on the selected time base view.
1
2
Main View
3
Mag View
4
5
Click the magnified time base button again
to remove that view from the display. (First
click selects; the second dismisses.)
Page 8

To Analyze Communication Signals
Use Mask Testing
Use built-in masks to test to one of the com–
munication standards, or design your own mask.
Select a channel to mask test.
Select a standard mask in the Mask setup
dialog box.
If you want, disable mask counts.
(Selecting a mask in step 2
automatically enabled them.)
If you want, you can enable margins
to explore design margins of your
communications signal.
Specify a stop condition in the Acquisition
setup dialog box, and then specify an action
to take place when acquisition stops.
Read the mask-hits
count in the readout.
1
2
3
4
5
6
Use FrameScan
Use FrameScan to test a
specific bit (or range of bits)
in a repeating frame of data.
Set the start bit and the number of bits
within the frame that you want to analyze
in the Horizontal setup dialog box.
TM
Frame sync pulse
Repeating data stream
Page 9

To Take Measurements With Cursors
Push the CURSORS button to turn on the cursors
to measure the currently selected waveform.
Push the CURSORS button repeatedly to
toggle between cursor type: Vertical Bars,
Horizontal Bars, Waveform, and Off.
Push the SELECT button to toggle selection of
the active (adjustable) cursor between the pair.
Position the active cursor with the General
Purpose knob.
You can also drag each cursor to
place it relative to the waveform.
1
2
3
4
Cursor
readouts
5
Click this button to toggle the
cursor readouts on and off.
6
Other Cursor Measurement Tips:
H
You can assign each cursor to a different waveform to take
measurements between waveforms. Make these selections in the Cursor
setup dialog box.
H
If you use two magnified time base views, you can take precision timing
measurements between two distant points on a waveform. Magnify each
point of interest in a separate time base, and then place one cursor on
each point. The D-time cursor readout will then reflect the position and
resolution of the magnified time bases.
Page 10

To Take Automatic Measurements
Select one of the
measurement tool bars.
Click a measurement button to
take the measurement on the
currently selected waveform.
Or set up the measurement and
select the waveform to measure
in the Meas setup dialog box.
Read the measurement results
in the readouts.
The dialog box readout displays
results with full resolution.
1
2
3
4
Automatic Measurement Choices
Amplitude Timing Eye Pattern/Optical
High Min Cycle Mean Rise Time – Cross Burst Width Area Extinction % Crossing % RMS Jitter
Low Pk–Pk RMS Fall Time + Width Delay Cycle Area Extinction
Amplitude + Overshoot Cycle RMS Period – Width Phase Extinction
Max – Overshoot AC RMS Frequency + Duty Cycle Eye Height Pk–Pk Noise S/N Ratio
Mid Mean Gain + Cross – Duty Cycle Eye Width Q Factor
Ratio
dB (Sonet)
Duty Cycle
Distortion
Pk–Pk Jitter Average Op-
RMS Noise
tical Power
Page 11

To Customize an Automatic Measurement
Select Region tab and turn on gates
to isolate the measurement to a
specific part of the waveform.
Select the HiLow tab and choose a
method for determining reference levels.
Select the RefLevel tab and adjust the
measurement reference levels to different
relative or different absolute values.
Select Annotations to see where
the measurement is being taken
on the waveform.
Select
Statistics to see accumulated
statistics as the measurement is
being performed.
Page 12

To Use Math Waveforms
Click the
Select the math waveform you want to define.
Use the controls in the Define Math dialog
box to define the math expression. Build
the waveform expression using sources,
operators, constants, and functions.
Click to check the On box to display
f
button to display the
x
Define Math dialog box.
the math waveform.
A Math Waveform Example
Math expressions can combine waveforms with
measurement results, as shown in this example
(C1 minus the mean value of C1).
1
2
3
4
Define Meas1 as the Mean value of
C1 in the Meas setup dialog box.
Enter this sequence in the Define
Math dialog box to build the math
waveform expression.
1
2
Result:
,,
Page 13

To Use TDR
CAUTION. To help prevent damage from
ESD, always attach and use the wrist
strap while making electrical signal
connections.
Attach your network to TDR-capable
sampling modules.
Click the Preset button to automatically
display the incident and reflected steps by
automating the following tasks:
H
Turns on the channel
H
Turns on a step
H
Does a TDR autoset
Click the polarity button to toggle the
step edge to the polarity you chose.
Set the vertical scale Units to
V (volts), W (ohms), or r (rho).
If performing differential TDR, select a channel
pair for deskew adjustment from pulldown list
(even numbered channel gets adjusted).
1
2
3
4
6
Then use the box arrows (or click and the
keypad icon and use a virtual keypad) to
set the deskew percent value.
Select an internal clock rate from the pulldown
list. The instrument will generate TDR pulses at
this rate. Use a lower clock rate to examine
long cables or other interconnections.
7
8
Page 14

To Use Histograms
Select and enable a vertical or horizontal
histogram in the Hist(ogram) setup dialog box.
Click and drag the edges of the histogram
box to enclose a portion of the waveform.
The histogram displays at the edge of
the graticule. The histogram statistics
display in the readout.
Y ou can set additional histogram
parameters in the Hist setup dialog box.
1
2
3
Click here to assign the selected waveform to an
internal waveform database and to display the
waveform using color grading. Click the button
again to toggle display of color grading off.
Choose between varying color or intensity of
the waveform database to indicate how often a
data point occurs.
Set count emphasis, where higher values widen
the range between samples with low counts
(dimmer) and those with high counts.
To Use Color Grading
Page 15

To Document Your Results
To Save a setup or a waveform, click Save
or Save Waveform in the File menu.
Setup
To export waveform data into a
comma-separated ASCII file, click
Export Waveform in the File menu.
To print a hard copy to an attached printer
or a network printer, click the print icon in
the toolbar. If necessary, you can make
changes to the page orientation in the
Page Setup dialog box.
To copy a screen image into another
application, choose the Print to file option in
the print dialog. Save the screen image in a
format that is compatible with your
application, and then insert the screen
image into your document.
Page 16

To Access the Help System
Tool tips automatically identify many screen
controls when you point to them with the mouse.
Click the What’s This? icon in the main
window or the icon in a dialog box and then
click on any screen element.
A small window appears that provides a brief
description and sometimes links to additional
information about the screen element.
You can also right click on an element in any
setup dialog box to access What’s This? help
on that element.
1
2
Click the Help menu in the UI application
menu bar to access the Table of Contents
and the Index of the help system. If you
have a keyboard, you can enter keywords
to search for a help topic.
Click the Help button in a setup dialog box to
get help on that particular setup.
3
4
 Loading...