

Page 1

Instruction Sheet
¨
Phaser
Phaser
Phaser
200e
¨
200i
¨
220e
Upgrading a Phaser
to a Phaser
This kit contains the components necessary to upgrade a Phaser 200e, 200i or 220e to a Phaser 240 Color
Printer. Generally, this involves replacing the printerÕs old image processor board with a new image
processor board. In the case of the Phaser 200e and 200i, the printerÕs engine control board must also be
replaced with a new engine control board included in this kit. In all cases, the unused or replaced
components must be returned to Tektronix. This upgrade should only be installed by qualiÞed service
personnel.
¨
240
¨
200e, 200i or 220e printer
Kit contents
■
Phaser 240 image processor board
■
print engine controller board
■
8-Mbyte RAM SIMM
■
Ethernet card (Option P1)
Static electricity precautions
■
Plug in the ground adapter (003-1501-00) in an AC outlet. Connect the
anti-static mat (006-7056-00) to the adapterÕs groundplug.
■
Put on your anti-static wrist strap and connect it to the anti-static mat.
■
Leave the printer plugged into its power outlet; this preserves a
ground path for static discharges.
■
Touch the printer's bare metal frame often to discharge static
electricity from your body.
■
Handle the circuit board(s) by their edges only.
■
Do not lay the board(s) on a metal surface.
■
Avoid wearing nylon or polyester clothing; they generate static
electricity.
Copyright
©
1995 by Tektronix, Inc.. All rights reserved. 063-1865-AA
Page 2
1.
2.
3.
4.
Upgrading a Phaser¨ 200e, 200i or 220e printer to a Phaser¨ 240
Removing the old boards
Tools required
■
#1 POSIDRIV¨ screwdriver
Power down the printer. Leave the power cord plugged in to provide
a ground path for static discharges. Remove the interface cables.
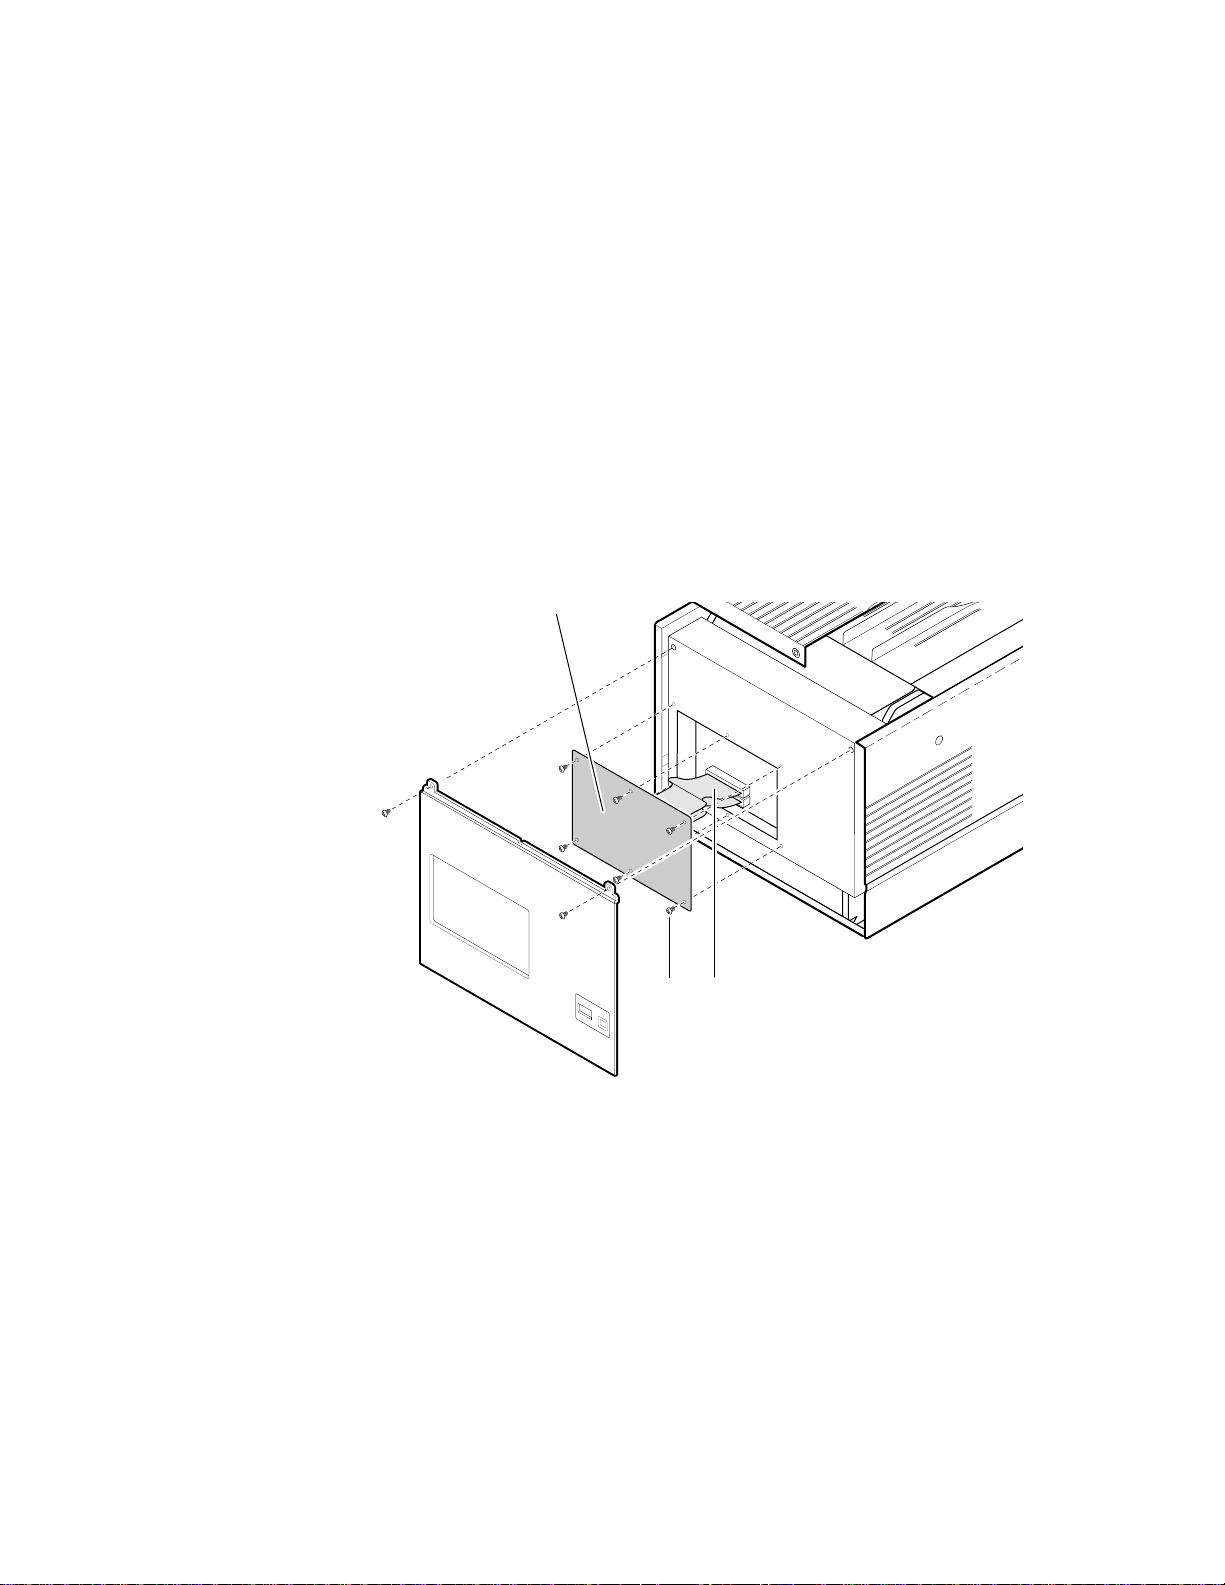
Remove the top-rear and rear cabinet panels.
Remove the screws securing the old I/O board to the card cage.
Disconnect the I/O boardÕs ribbon cable(s) from the image processor
board. The Phaser 220i and 200i I/O boards have two ribbon cables;
the Phaser 220e and 200e I/O boards have one ribbon cable. Remove
the I/O board.
I/O board
43
8699-64
Page 3

3
Upgrading a Phaser¨ 200e, 200i or 220e printer to a Phaser¨ 240
5.
6.
7.
31865-0
Remove the card cage top (3 screws).
Flip over the hinged card cage top.
Lift out the old image processor board.
Remove screws
Flip over
top
Lift out image
processor board
1
Page 4

8.
9.
Note
In the next step, it is only necessary to remove the old engine control
board from a Phaser 200e or Phaser 200i Color Printer.
Disconnect the wiring harnesses leading to the engine controlÊboard.
Card cage
Disconnect
harnesses
Lift out the engine control board.
Lift out
engine board
31865-02
31865-03
Page 5

5
Upgrading a Phaser¨ 200e, 200i or 220e printer to a Phaser¨ 240
1.
b
b
4.
SIMM installation on the new image processor board
If installed, remove the font module by spreading the pawls at each
end of the font module connector securing the module in place.
2. Installing the RAM SIMM.
tilt the card upright until it locks in place (
Insert the RAM SIMM in connector J7 ( a ), and
). When properly inserted,
a tab on each end of the connector slips into a hole on each end of the
card. Also, a pawl on each end of the connector latches around each
end of the card to lock it in place.
3. Installing the Ethernet card.
and tilt the card upright until it locks in place (
Insert the Ethernet card in connector J30 ( a ),
). When properly
inserted, a tab on each end of the connector slips into a hole on each
end of the card. Also, a metal pawl on each end of the connector
latches around each end of the card to lock it in place.
Standard
RAM SIMM
Optional
RAM SIMM
Font
module
Ethernet
card
ab
16-0
16-1
ab
I/O board
connector
16-3
16-2
00-3
00-2
00-1
00-0
31865-04
Reinstall the font module, if removed. Like the RAM SIMM, when
properly inserted, a tab on each end of the connector slips into a hole
on each end of the card. Also, a pawl on each end of the connector
latches around each end of the card to lock it in place.
Page 6

Upgrading a Phaser¨ 200e, 200i or 220e printer to a Phaser¨ 240
1.
2.
3.
New image processor install
Slide the new image processor board into its card cage slot.
Insert image
processor board
Close
card cage
top
Close the card cage cover and secure it in place.
Reinstall the printer covers.
Page 7

7
Upgrading a Phaser¨ 200e, 200i or 220e printer to a Phaser¨ 240
4.
5.
Connect the I/O boardÕs ribbon cable to the image processor boardÕs
I/O connector. Tilt the I/O board forward into place against the rear
of the printerÕs card cage. Secure the I/O board in place with the two
thumbscrews.
Install
I/O board
Install
ribbon cable
Reconnect the interface cables. Turn on the printer and examine the
startup page it should automatically print out. Refer to the
Color Printer User Manual
for details on connecting interface cables and
Phaser 240
making prints.
31865-06
Page 8

Upgrading a Phaser¨ 200e, 200i or 220e printer to a Phaser¨ 240
1.
2.
a.
b.
a.
b.
c.
Return the old boards to Tektronix
Repack the old image processor and engine board (new or old) in the
anti-static bags. Put the anti-static bags inside the shipping box.
In the U.S.A.:
Write the printerÕs original serial number on the shipping return
label. attach the shipping label to the box, covering the original
shipping label.
Securely tape the box closed and mail it to the pre-addresses
location. Postage is prepaid.
Outside the U.S.A.:
AfÞx the special international shipping return label, included with
this upgrade kit, to conceal the original U.S. shipping label.
Write the printerÕs serial number on the shipping return label.
Tape the box closed and ship the box to Tektronix, using you
respective countryÕs shipping method.
 Loading...