

Page 1

OWNER’S MANUAL
TM-882A (American Version)
June 12, 2002
INTRODUCTION
Your marine transceiver TM-882 represents the state-of-the-art in high-tech engineering. Designed
for US and international operation, plus 10 weather channels. This allows you to transmit and
receive on all US and international channels in the VHF marine band, as assigned by the
international Union (ITU). This unit is a quality piece of electronic equipment, skillfully constructed
with the finest components. It is approved with commercial-grade standards to give you clear,
reliable communication.
Your transceiver is designed for many years of reliable, trouble-free performance. It is under
control of a microprocessor resulting in enhanced features and performance. The microprocessor
controls not only the marine band tuning but also dual watch, memory channels, weather monitor,
and a host of other useful features.
Your transceiver has the following features:
Emergency Channel 16 Switch ---- provides quick access to channel 16, the universal marine
emergency channel.
Weather Channel Selection ---- lets you select from 10 weather channels for alert signal.
PLL (Phase Lock Loop) Controlled Circuitry ---- Provides accurate and stable channel
selection.
Squelch Adjustment ---- help eliminate noise between transmissions.
Mode Switch ---- lets you quickly select weather channel mode, the US channel mode and
international channel mode.
Key Lock ---- lets you lock the keypad in order to prevent the controls from accidental pressing.
Call Button ---- lets you store a priority channel.
High/Low Power Selection ---- lets you save power by selecting a suitable transmitting power for
long or short distances.
Battery Low Indicator ---- shows the battery pack’s condition.
Supplied Battery Charger ---- lets you conveniently recharge your transceiver’s battery pack.
Speaker and Microphone Jacks ---- let you use an earphone or external speaker or microphone
to help ensure understandable communication in noisy areas.
Backlit LCD Display ---- allows you to operate the transceiver in dark environment.
10 Memory Channels ---- lets you store 10 channels as memory channels.
TEKCOM Industries Limited
Page 1 of 11
Page 2
Dual/Scan Button ---- lets you to select the reception of a programmed channel or scan all the
channels for existing channels.
We recommend you record your transceiver’s serial number here. This number is on the
transceiver’s back panel.
Serial Number_______________________
SAFETY INFORMATION
Your hand-held marine VHF radio contains a low power transmitter. When the Push-To-Talk
(PTT) button is pushed it sends out radio frequency (RF) signals.
USING THE RADIO
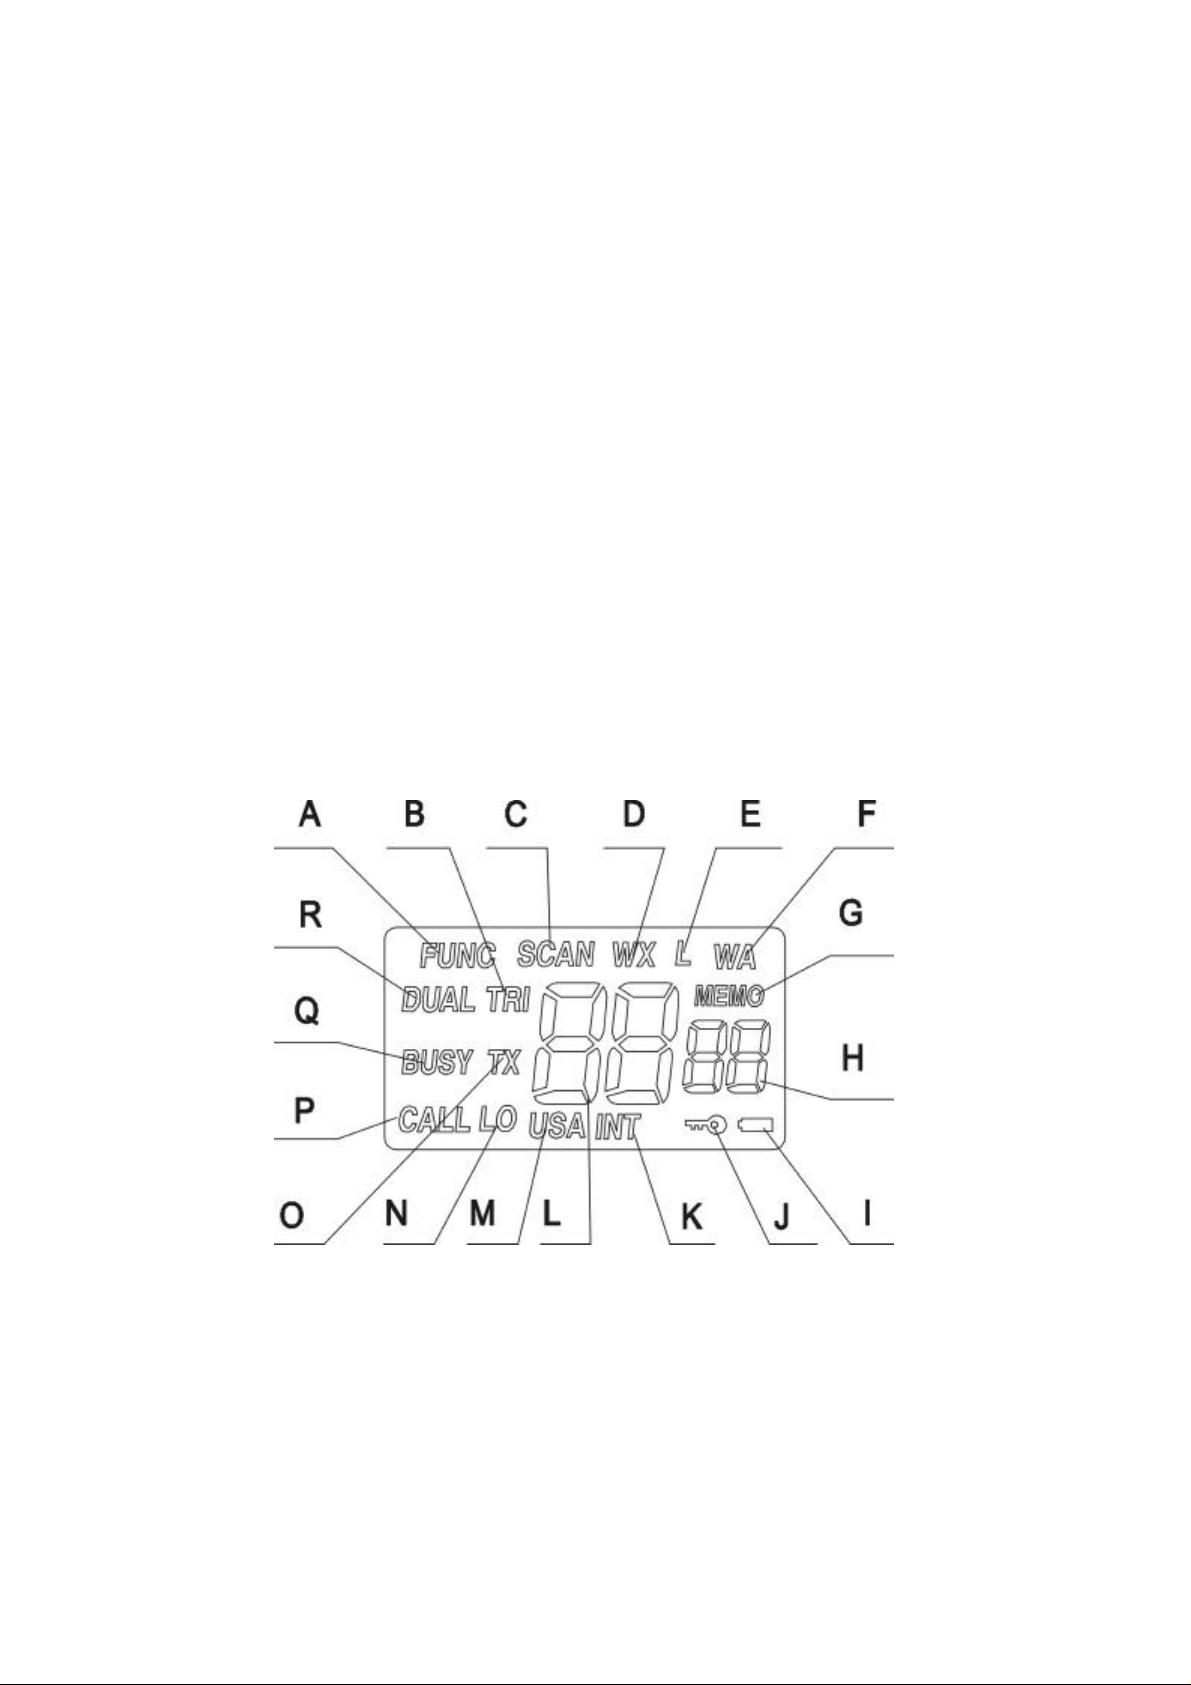
A. DISPLAY
Your radio comes with a multifunctional backlight display. By pressing LOCK/LIGHT key, it will
illuminate the backlight for 5 seconds; once more press will turn off the light.
A. Function is activated.
B. “TRI”: appears when the radio is in Triple Watch mode.
C. “SCAN”: appears when the radio is in Scan mode.
D. “WX” indicates that your radio is receiving weather alert signal.
E. “L” which means lockout appears to indicate the current channel you select is
overridden from scan.
TEKCOM Industries Limited
Page 2 of 11
Page 3

F. “WA” shows on LCD that there is Weather Alert signal received.
G. “MEMO” shows your radio being in memory function mode.
H. Small 2-bit digits show the memory channel location number or “SL” for squelch.
I. Battery icon: shows the battery is low.
J. Key lock icon: appears when key lock function is enabled.
K. “INT” shows the current channel is International channel.
L. The current selected channel number or squelch level.
M. “USA” shows the current channel is US channel.
N. “LO” shows the radio in low power mode.
O. “TX” appears if your radio is transmitting.
P. “CALL” shows that you are using CALL channel.
Q. When a signal is being received, your radio will have a “BUSY” appear on LCD.
R. “DUAL” indicates your radio is in Dual Watch mode.
B. FUNCTION AND LOCATION OF THE CONTROLS
TEKCOM Industries Limited
Page 3 of 11
Page 4

D. BASIC OPERATION
Before operating your transceiver, you should make the following preparations. You should install
the battery pack on to the main unit and fully charge your 7.2VDC Ni-CD battery pack, then you
can use it after making sure to attach the antenna on your radio.
Turning On/Off Your Transceiver
Rotate VOLUME knob to turn the transceiver on or off with an indicating voice of click. And adjust
the volume to a comfortable level.
Illuminating the Display
When your radio is on, push LOCK/LIGHT key once to illuminate the display for 5 seconds. Once
more press will turn off the backlight.
Monitor
The monitor function allows faint signals on a channel to be heard. To activate the monitor function,
press and hold the MONI button to hear all traffic on the current channel. Release the MONI
button when finish listening.
Using Key Lock
You can lock your radio keypad to avoid accidental pressing of keys by activating the key lock.
Pressing and holding MONI button then press the LOCK/LIGHT key can enable or disable the key
lock. Key lock icon will appear on LCD if it is enabled. The function is effective to all other
knobs/keys except MONI, PTT, 16 and LIGHT/LOCK buttons.
Selecting High/Low Power
In order to extend the battery life, you can also press HI/LO/BAND key while holding MONI button
to select the low power for your transceiver. If you want to send or hear long distance or weaker
signals, press the key combination again to select the high power. High power is 5.0 watts, and
low power is 1.0 watt. When the unit is operating at low power, “LO” appears on LCD and
disappears when operating at high power.
Selecting a Band
Three bands are available on the TM-882 – USA, International and Weather. The USA band are
frequencies for use in US boundaries. The International band are frequencies for use outside US
boundaries. The Weather band monitors weather broadcasts. To switch between bands, press the
HI/LO/BAND key until the desired band is reached. The band in use is indicated on the LCD by
USA, INT or WX.
Selecting a Channel
Select the appropriate band – USA, International or Weather. Once the band is selected, press the
CHL/SQL (UP/DOWN) button to scroll through the available channels.
Note: Not all channel numbers are available in all bands.
TEKCOM Industries Limited
Page 4 of 11
Page 5

Transmitting and Receiving
The PTT (Push-To-Talk) button is located on the side of the TM-882. Before transmitting, make
sure the channel is not a “receive-only” channel. To transmit a message, press and hold the PTT
button. Talk clearly into the speaker/microphone area of the radio. When finished, release the PTT
button. During a transmission, “TX” appears on the LCD. To receive a call, just release the PTT
button.
Adjusting Squelch
Squelch is used to eliminate static and background noise and allows for silent operation of the
TM-882 until a transmission is received. If the squelch is too high, only the strongest transmissions
are
heard, and when too low, intermittent static and noise are heard.
To adjust the squelch, press and hold the MONI button then press either the UP or DOWN for
CHL/SQL key until the background noise is quiet. The LCD displays the squelch setting from 00 to
08.
Channel 16
Channel 16 is the standard channel for placing a call or for an emergency broadcast. The 16
button selects Channel 16 immediately. To exit, press the 16 button again. Channel 16 is the same
frequency on both the USA and International bands.
Transmitting a Help Message on Channel 16
Press and hold the 16 key for several seconds. This starts the transmission of the emergency Help
signal. The Help code can be heard through the speaker. When in the emergency mode, “EMERG
(emergency)” appears on the LCD.
While the TM-882 is transmitting the Help message, it listens for anyone trying to respond and
interrupts transmission when a response is received.
During a Help transmission, no other transmission is possible. If a transmission is necessary, stop
the Help transmission by pressing the 16 button.
Programming the Call Channel
1. Press the CALL button. “CALL” appears on the LCD.
2. Press and hold the MONI button then press the CALL button. The display will flash. Release
all buttons.
3. Press UP or DOWN key to get the desired call channel.
4. Press and hold the MONI button then press the CALL button to store the Call Channel.
Note: The default value for CALL channel is 09.
Resetting the Radio
Provided that your radio can not work properly any longer, you can make it return to the original
TEKCOM Industries Limited
Page 5 of 11
Page 6

status by resetting. Turn on your radio while pressing and holding down MEMO/M.PRG or
LIGHT/LOCK key, the current channel for USA, INT and WX are all CH1, the CALL channel is
USA CH09, squelch level is 02, the default band is INT band, etc.
Charging and Attaching Your Battery Pack
The design of the battery pack let you can charge it either when it is attached on the radio or being
detached. You should use the supplied specialized charger to charge it for 14~15hrs. Before
attaching the pack, you should detach the belt clip first, then aligningly place the pack on the unit
and secure it using the supplied screw.
Using the Belt Clip
The supplied belt clip lets you easily attach the transceiver to your belt. To attach the belt clip, put
it onto the back of your transceiver aligning the fitting groove and use a standard PHILIP screw
driver to secure.
E. SCANNING FEATURES
Scanning All Channels
The TM-882 scans all channels in one of two modes: normal or priority scan. You may program
the TM-882 to scan in either mode.
In normal scanning, the radio rapidly scans through channels, either in the USA or International
band. It stops scanning on busy channels and remains stopped several seconds after the signal
disappears allowing time to answer the call if necessary.
In priority scanning, the scanning operation is the same as normal scanning except Channel 16 is
constantly checked for activity, allowing for much quicker response to Channel 16 traffic.
To scan channels, press and hold the SCAN/DUAL button for a few seconds. The TM-882 begins
scanning channels using the scan method programmed in the radio. The word “SCAN” appears on
the LCD. To stop scanning, press the SCAN/DUAL button, your radio will stop on the current
TEKCOM Industries Limited
Page 6 of 11
Page 7

arrived channel.
Programming for Normal or Priority Scan
1. Turn the unit off. Press and hold the MONI button while turning the power on until there are
characters appear on LCD. The unit displays “02” or “03”. Release the MONI button.
2. Press the MONI button again. The radio displays “n-sc” or “P-sc”.
3. Press UP or DOWN key to choose “n-sc” for normal scan, or “P-sc” for priority scan.
4. Press the 16 key once to store programming.
Deleting Channels from Scan
To delete a channel from scan, select the channel to be deleted. Press the MONI and
SCAN/DUAL button keys at the same time. “L” appears on the LCD, indicating the channel is
locked out of scan. This is useful for bypassing channels that are continuously busy. To activate a
skipped channel, select the channel to be activated then press the MONI and SCAN/DUAL keys
at the same time.
Dual and Triple Watch Scanning
To scan selected channels, there are three options: Dual Watch, Dual Watch with Weather Alert,
and Triple Watch.
In Dual Watch scanning, your radio toggles between Channel 16 and the current channel. In Dual
Watch with Weather Alert scanning, the TM-882 toggles between Channel 16, the current weather
channel, and the current VHF channel. In Triple Watch scanning, it toggles between Channel 16,
the Call Channel, and the current channel.
Programming for Dual, Dual with Weather, or Triple Watch Scanning
1. Turn the unit off. Press the MONI button while turning the power on until there are characters
appear on LCD. Release the MONI button.
2. Press the UP or DOWN key until “02du” (for Dual Watch), “03du” (for Dual Watch with
Weather Alert), or “03tr” (for Triple Watch) appears on the LCD.
3. Press the 16 key or turn off the radio to store programming.
To scan channels, press the SCAN/DUAL key. The radio begins scanning channels using the
scan method programmed in the radio. The characters “DUAL” or “TRI” appears on the LCD.
The TM-882 rapidly scans through channels, and stops scanning on busy channels. The radio
remains stopped several seconds after the signal disappears allowing time to answer the call if
necessary.
In Dual Watch scanning, the radio constantly monitors Channel 16 for an alert signal.
In Dual Watch with Weather Alert and Triple Watch scanning, the radio constantly monitors the
selected weather channel and Channel 16 for an alert signal.
TEKCOM Industries Limited
Page 7 of 11
Page 8

Press the SCAN/DUAL button again to exit.
F. MEMORY CHANNELS
Using Memory Channels
The radio has 10 memory locations (00-09), to quickly access frequently used channels.
To access the memory channels, press the MEMO/M.PRG button. The LCD displays the channel
number on the left, and the memory location in smaller numbers to the right. Turn the CHL/SQL
knob to select a memory channel. To exit the memory channel mode, press the MEMO/M.PRG
button again.
Programming Memory Channels
To enter channels into memory:
1. Press the MEMO/M.PRG button.
2. Press and hold the MONI button then press the MEMO/M.PRG button. The memory location
number begins to flash.
3. Press the UP or DOWN key to get the desired memory location.
4. Press the MEMO/M.PRG button. The channel number begins to flash.
5. Press the HI/LO/BAND key to select either the USA, Weather, or International band for the
channel you wish to store.
6. Press the UP or DOWN key to reach the desired channel for this memory location.
7. Press and hold the MONI button then press the MEMO/M.PRG button to save the memory
location and exit programming.
8. To store additional memory channels, repeat the above procedure.
Press the MEMO/M.PRG button to exit the memory channel mode.
Scanning Memory Channels
To scan the memory channels, press the MEMO/M.PRG button, then press and hold the
SCAN/DUAL key for a few seconds. “SCAN” appears on the LCD as the radio scans the memory
channels, stopping on an active channel. Press the SCAN/DUAL key again to exit.
TEKCOM Industries Limited
Page 8 of 11
Page 9

Loop
Ohm
THD
TECHNICAL SPECIFICATIONS
Channels………………………..…All USA and International Channels, Plus Ten Weather Channels
Frequency Method…………………………………………………………….………….Phase Lock
Frequency Range……………………………………………………………..TX 156.050~157.425 MHz
RX 156.050~163.275 MHz
Antenna Impedance………………………………………………………………………………....50
Power Supply………………………………………………………………………………...………7.2VDC
Operating Temperature………………………………………………………………….....-20 to +50
Dimensions (HWD)………………………………………………………………...…….112 62 39 mm
Weight (with Batteries)………………………………………………………………………..…….....300 g
TRANSMITTER
Power Output……………………………………………….…………0.6 or 2 Watts (Switch Selectable)
Modulation Type…………………………………………………………………………….…………….FM
Hum and Noise Attenuation……………………………………………………………………………34dB
Audio Distortion..................................................………….………………...…...........…...................5%
Spurious Suppression.................................................………….………………...….....….............60dB
RECEIVER
Sensitivity at 12dB Sinad............................................…….....………………...…………...….......0.5µV
S/N Ratio (20dB)....................................…….....………………...………………………………….0.8µV
Squelch Sensitivity....................…….....………………...…………...….......Threshold –12dBµV(EMF)
Adjacent Channel Rejection..........….......................………………..........…..........……..……….. 70dB
Audio Power Output………………………………….…………………………….…200mW at 10%
Spurious Response Attenuation………………………………………….…………………...………70dB
Hum and Noise Attenuation……………………………………………………………………………40dB
Modulation Acceptance Bandwidth…………………………………………………+/- 7.0KHz Minimum
Note: The data are typical, and the practical ones may be varied.
TEKCOM Industries Limited
Page 9 of 11
Page 10

FREQUENCY CHARTS Unit: MHz
TX RX TX RX
1 156.050 156.050 156.050 160.650
2 156.100 160.700
3 156.150 156.150 156.150 160.750
4 156.200 160.800
5 156.250 156.250 156.250 160.850
6 156.300 156.300 156.300 156.300
7 156.350 156.350 156.350 160.950
8 156.400 156.400 156.400 156.400
9 156.450 156.450 156.450 156.450
10 156.500 156.500 156.500 156.500
11 156.550 156.550 156.550 156.550
12 156.600 156.600 156.600 156.600
13 156.650 156.650 156.650 156.650
14 156.700 156.700 156.700 156.700
15 156.750 156.750 156.750
16 156.800 156.800 156.800 156.800
17 156.850 156.850 156.850 156.850
18 156.900 156.900 156.900 161.500
19 156.950 156.950 156.950 161.550
20 157.000 161.600 157.000 161.600
21 157.050 157.050 157.050 161.650
22 157.100 157.100 157.100 161.700
23 157.150 157.150 157.150 161.750
24 157.200 161.800 157.200 161.800
25 157.250 161.850 157.250 161.850
26 157.300 161.900 157.300 161.900
27 157.350 161.950 157.350 161.950
28 157.400 162.000 157.400 162.000
37 157.850 157.850
39 157.950 157.950
60 156.025 160.625
61 156.075 156.075 156.075 160.675
62 156.125 160.725
63 156.175 156.175 156.175 160.775
64 156.225 160.825 156.225 160.825
65 156.275 156.275 156.275 160.875
66 156.325 156.325 156.325 160.925
US INT
TEKCOM Industries Limited
Page 10 of 11
Page 11

67 156.375 156.375 156.375 156.375
68 156.425 156.425 156.425 156.425
69 156.475 156.475 156.475 156.475
70
71 156.575 156.575 156.575 156.575
72 156.625 156.625 156.625 156.625
73 156.675 156.675 156.675 156.675
74 156.725 156.725 156.725 156.725
77 156.875 156.875 156.875 156.875
78 156.925 156.925 156.925 161.525
79 156.975 156.975 156.975 161.575
80 157.025 157.025 157.025 161.625
81 157.075 157.075 157.075 161.675
82 157.125 157.125 157.125 161.725
83 157.175 157.175 157.175 161.775
84 157.225 161.825 157.225 161.825
85 157.275 161.875 157.275 161.875
86 157.325 161.925 157.325 161.925
87 157.375 161.975 157.375 161.975
88
157.425 157.425 157.425 162.025
Weather Channel Frequencies
Channel No.
WX0 163.275 163.275
WX1 162.550 162.550
WX2 162.400 162.400
WX3 162.475 162.475
WX4 162.425 162.425
WX5 162.450 162.450
WX6 162.500 162.500
WX7 162.525 162.525
WX8 161.650 161.650
WX9 161.775 161.775
US International
RX (MHz) RX (MHz)
TEKCOM Industries Limited
Page 11 of 11
 Loading...