

Page 1

OWNER’S MANUAL
FRS RADI O
WRF 108
INT RODUCT ION
Your FRS radio is a portable, easy-to-use, two-way radio with clock and NOAA receiver
that you can carry almost anywhere. It makes you can contact others as well as watching
NOAA WX broadcasts in one unit meanwhile grasping time. Use it at shopping malls,
amusement parks, sports events, or at the beach to contact family and friends, or for vital
co mmunic a ti o ns i n a ne ighbo r ho o d wa t c h.
Your radio has 14 channels and 38 different quiet codes. If someone else is using the
cha nnel y ou s ele ct ed a nd yo u do no t wa nt to hea r that pe rs on, se lec t ano the r c hanne l o r
use the quiet feature. You can talk with a person who has a FRS radio if both radios are
tune d t o the s a me c ha nne l a nd qui et c o de .
Your radio has auto-squelch (FRS only), which means you will not hear anything on a
channel unless someone is transmitting nearby on the same channel. You can turn off
auto-squelch to hear weaker, distant transmissions.
Also, if the radio is idle for a period of time of 2 hours, it automatically shuts off. It turns
on again when you press POWER/VOL key for 2 seconds.
You can connect an optional earphone/microphone and a charger (not supplied) to the
radio. And, the belt clip lets you take your radio almost anywhere.
FCC INFORM ATION
Important:
up to transmit a regulated signal on one of 14 assigned frequencies. It is against the law
to alter or adjust the settings inside the radio to exceed those limitations. Any
adjustments to your radio must be made by a qualified technician using the proper test
equipment .
To be safe and sure:
! Never open your radio’s case.
! Nev e r c ha nge o r r e pla c e any t hi ng i n y o ur r a di o ex c ept t he ba tt e ri e s .
Do not open your radio to make any internal adjustments. Your radio is set
Your radio might cause TV or radio interference even when it is operating properly. To
determine whether your radio is causing the interference, turn it off. If the interference
goes away, your radio is causing it. Try to eliminate the interference by:
1
Page 2

! moving your radio away from the receiver
! calling your local service store for help
If you cannot eliminate the interference, the FCC requires that you stop using the radio.
This device co mplies with Part 15 of the F CC Rules . Operation is subject to the following
two conditions: (1) This device may not cause harmful interference, and (2) this device
must accept any interference received, including interference that may cause undesired
operation.
SAFETY INFORMATION
Yo ur wir eles s hand-he ld por table tr ans ce iv er c ont ai ns a low po wer tr ans mit te r. W he n the
Push-to-Talk button is pushed it sends out radio frequency (RF) signals. The device is
aut horized to ope rate a t a duty f actor not to e xceed 50 %. In August 1996, the Federal
Communications Commission (FCC) adopted RF exposure guidelines with safety levels for
hand- he ld wi r ele s s de v i c e s .
CAUTI ON:
To maintain compliance with the FCC’s RF exposure guidelines, hold the transmitter and
antenna at least 2 inc h (5 centimeters) from your face and s peak in normal voice, with the
ant enna poi nted up a nd aw ay fro m the f ac e. I f yo u we ar t he ha ndse t on yo ur bo dy whi le
using the headset accessory, use only the supplied belt clip for this product and when
transmitting, take it out of the belt to ensure that the antenna is at least 1 inch (2.5
ce nt i met e rs ) fr o m yo u bo dy .
Use only the supplied antenna. Unauthorized antennas, modifications, or attachments
co uld da mage t he tr a ns mit te r a nd may v i o la te F CC re gula t i ons .
2
Page 3
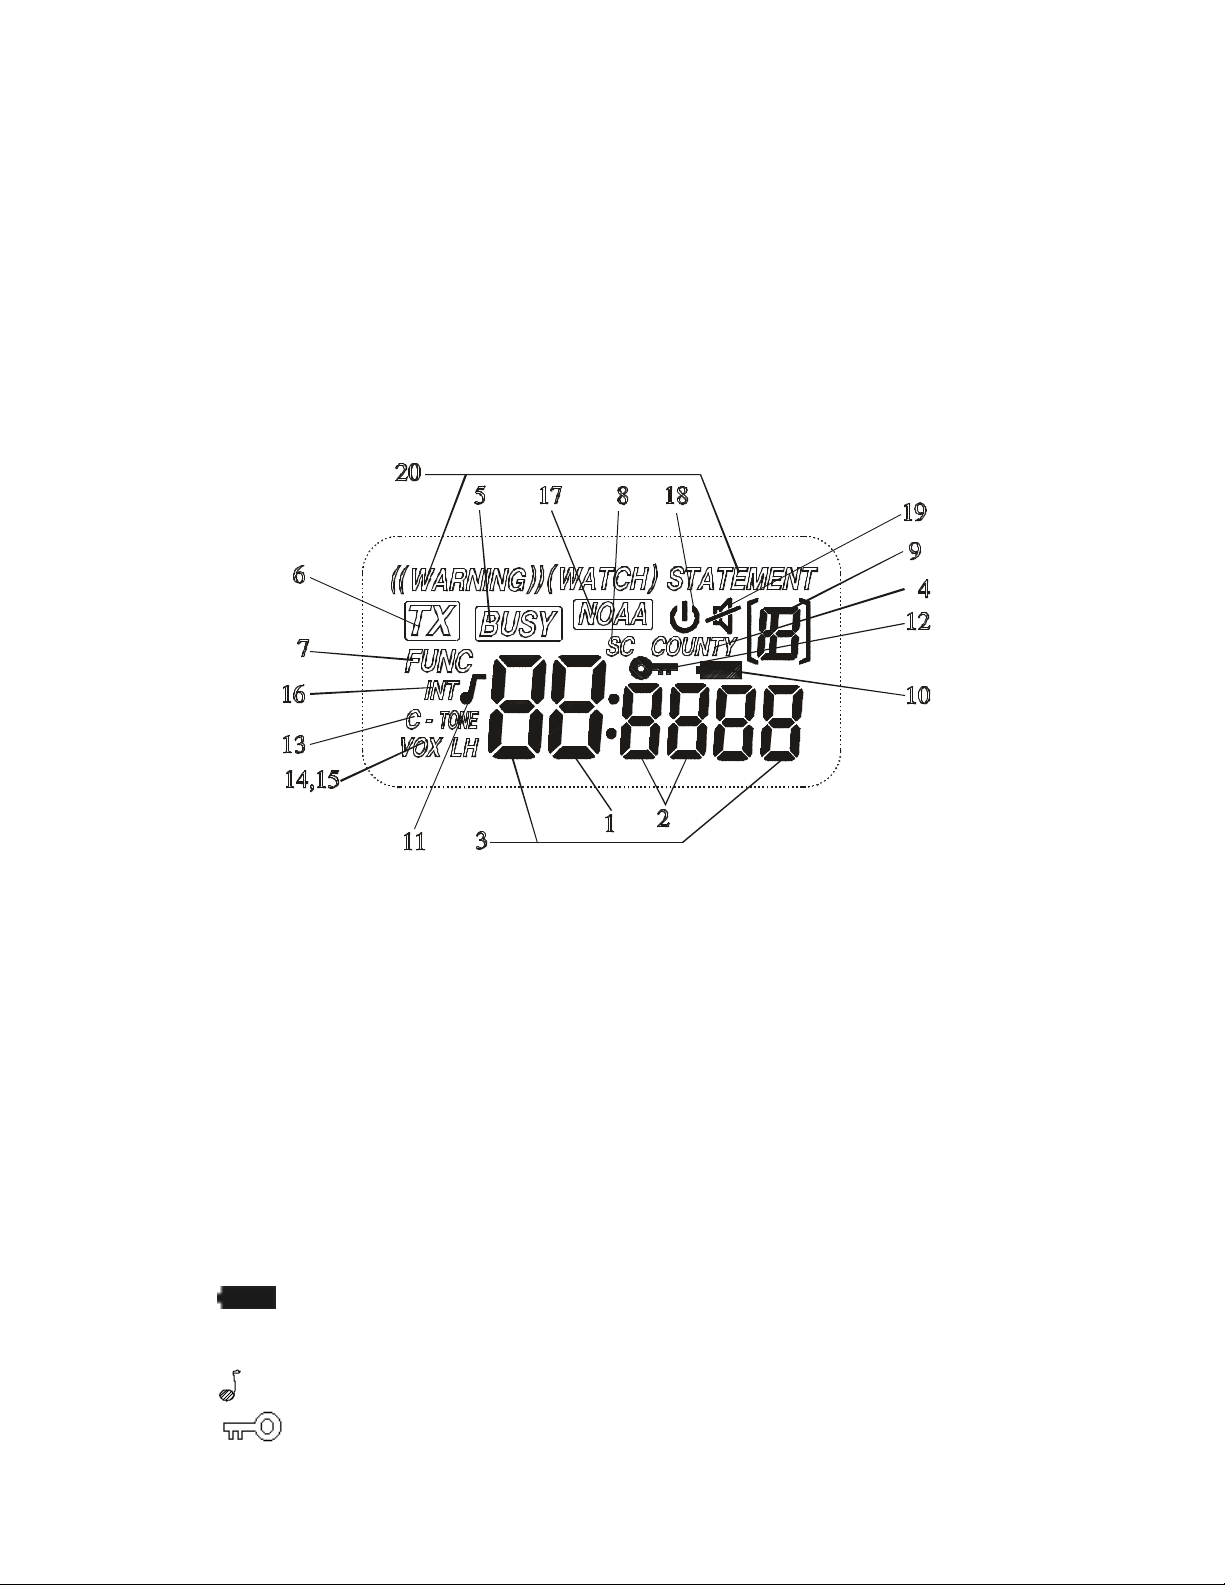
USING THE RADIO
A. DIS PLAY
Yo ur radi o co mes wi th a multif unct io n-ba ckli ghted di spla y. In c loc k mode be fo re turni ng on
your radio, pressing MONI/FUNC/NOAA or POWER/VOL button can illuminate the backlit
fo r 7 se co nds; i n wo rking mo de, B y pr es si ng any butto n exc ept the PTT, t he bac kli ght wi ll
illumi nate for 7 seconds.
1. Shows the selected channel number.
2. Shows the selected privacy code number.
3. Shows the selected county code for NOAA.
4. “
COUNTY
5. “
BUSY
6. “TX”: Displays when your radio is transmitting or the PTT but to n i s pr e s s ed.
7. “
FUNC
8. “SC”: Displays when the scan mode is acti vated.
9. Shows the sequence number of the county your entered or the pertinent NOAA
fr e quenc y c o de .
10. “ ”: The icon flashing Indicates the batteries are low. Replace the batteries
when it appears.
11. “
12. “
13. “
”:
C-TONE
”: Di s pla y s whe n y o ur ra di o i s in co unt y c o de e nt e ri ng mode .
”: Displays when a call is being received.
”: Displays when the seco ndary function is enabled.
Displays when the key tone function is activ ated.
”: Displays when the keypad lo ck is activ ated.
”: Displays when the courtesy tone function is ac tivated.
3
Page 4
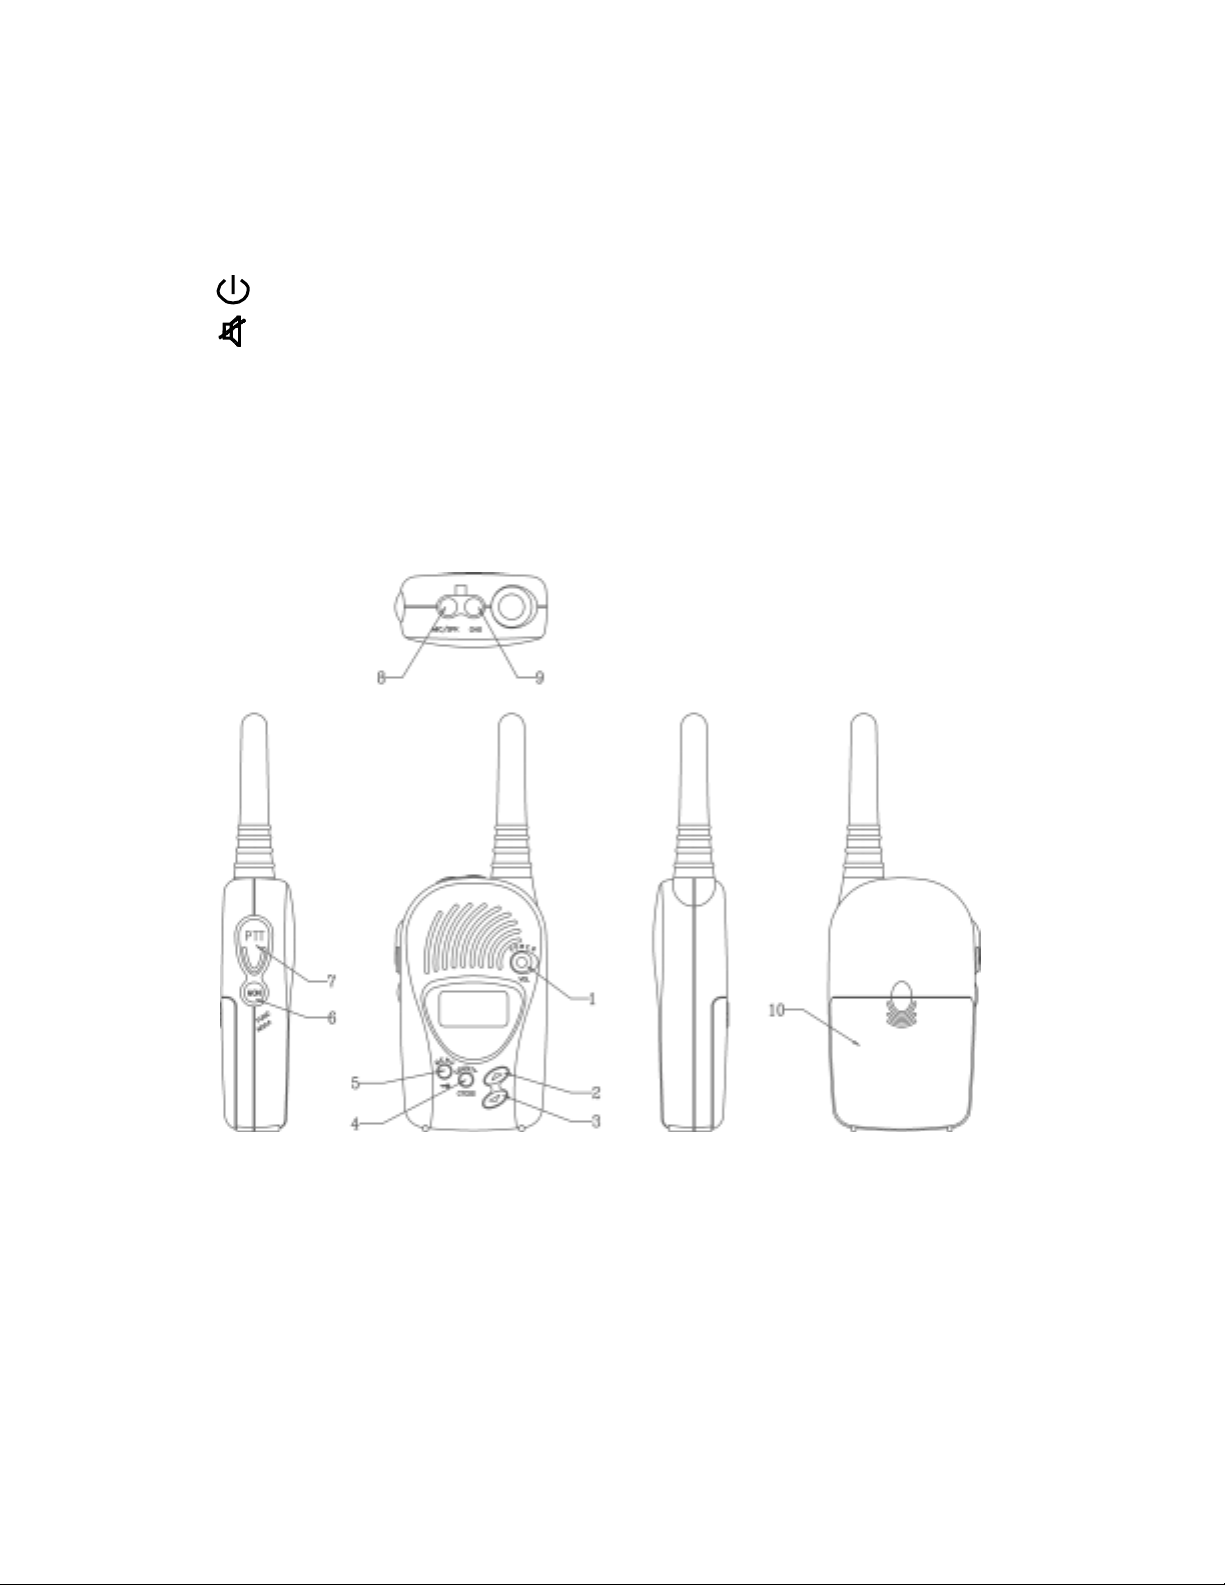
14. “
VOX L
”: Displays when VOX function is set to be low.
15. “
16. “
17. “
18. “ “: Displays when your radio stands by in NOAA mode.
19. “
20. “
VOX H
INT
used.)
NOAA
((WARNING)) (WATCH) STATEMENT
duri ng y o ur r a di os ’ s i n NOAA mode .
”: Displays when VOX function is set to be high.
”: Displays when intercom function is enabled. (Assume the intercom accessories are
”: Displays when your radio is in NOAA ON position.
“: Displays when your radio is mute in NOAA mode.
”: Displays when an alert signal is received
B. FUNCT ION AND L OCATION OF T HE CONTROL S
.
POWER/VOL Button
11.
.
UP Button
22.
.
DOWN Button
33.
.
COUNTY/ CTCSS Button
44.
.
MENU/KEY LOCK Button
55.
.
MONI/F UNC/NOAA Button
66.
.
PTT (P us h To Ta lk) But t o n
77.
.
External Speaker/Microphone Jack
88.
.
Charger Jack
99.
4
Page 5

.
Battery Compartment
1100.
C. F UNCTI ON AND OPERATION OF T HE F RS RADIO
Preparat i o n
Your radio uses four AAA batteries for power supply. W e recommend alkaline batteries.
However, you can use rechargeable batteries in the radio.
To start using your radio, insert four AAA batteries into the battery compartment, noting
the polarities.
As s oon as you connect the power, the unit will enter the cloc k mode and the cleared time
wi ll di s play o n L CD .
Note:
Once your batteries are used up, you should replace all the four alkaline batteries with new
ones. Then the clock will be cleared to zero, so you should re-adjust the clock.
Turning On/Off Your FRS Radio
Press and hold POWER/VOL button for about 2 seconds. An audible tone will sound to
indicate your FRS radio is on. (The unit will return to the last state before it was shut off)
Then same operation will make your unit exit the FRS radio to clock mode.
Illuminating the Display
Press any button except PTT to illumina te the displa y f or se ve n se co nds duri ng FR S ra dio
bei ng o n.
Adjusting Volume
When your radio is turned on, momentarily press POWER/VOL button to enter into the
vo lume-adjus ting mode. Repeatedly pres s UP or DOWN button t o adjus t volume unti l you
get a comfortable level. Once more momentary press on POWER/VOL butt on or no but ton
operation for 5 seconds will make the radio exit this mode.
Key Lo ckin g
Yo u c a n lo c k y o ur r a dio s e t t ing t o a v o i d ac c i de nt a l pre s s i ng o f ke y s by ac t i v a t i ng t he ke y pa d loc k .
Pres s and ho ld MENU/KEYLOCK button for more than 2 seconds to activate or deactivate the
keypad lock. The function is effective to all keys except the PTT key and 2 second-press of the .
MONI/F UNC/NOAA button for mo nitor func tion as well as the POWER/VOL key for turning
off the radio.
Setting VOX
Pressing UP ke y w hile holdi ng MONI/FUNC/NOAA button can toggle between VOX on/off.
If the UP key is held down for more than 1.5 seconds, the unit will enter the mode of
to ggle be tw e e n high a nd lo w lev e ls o f VOX c o nt r ol s e ns i t i v i ty .
5
Page 6
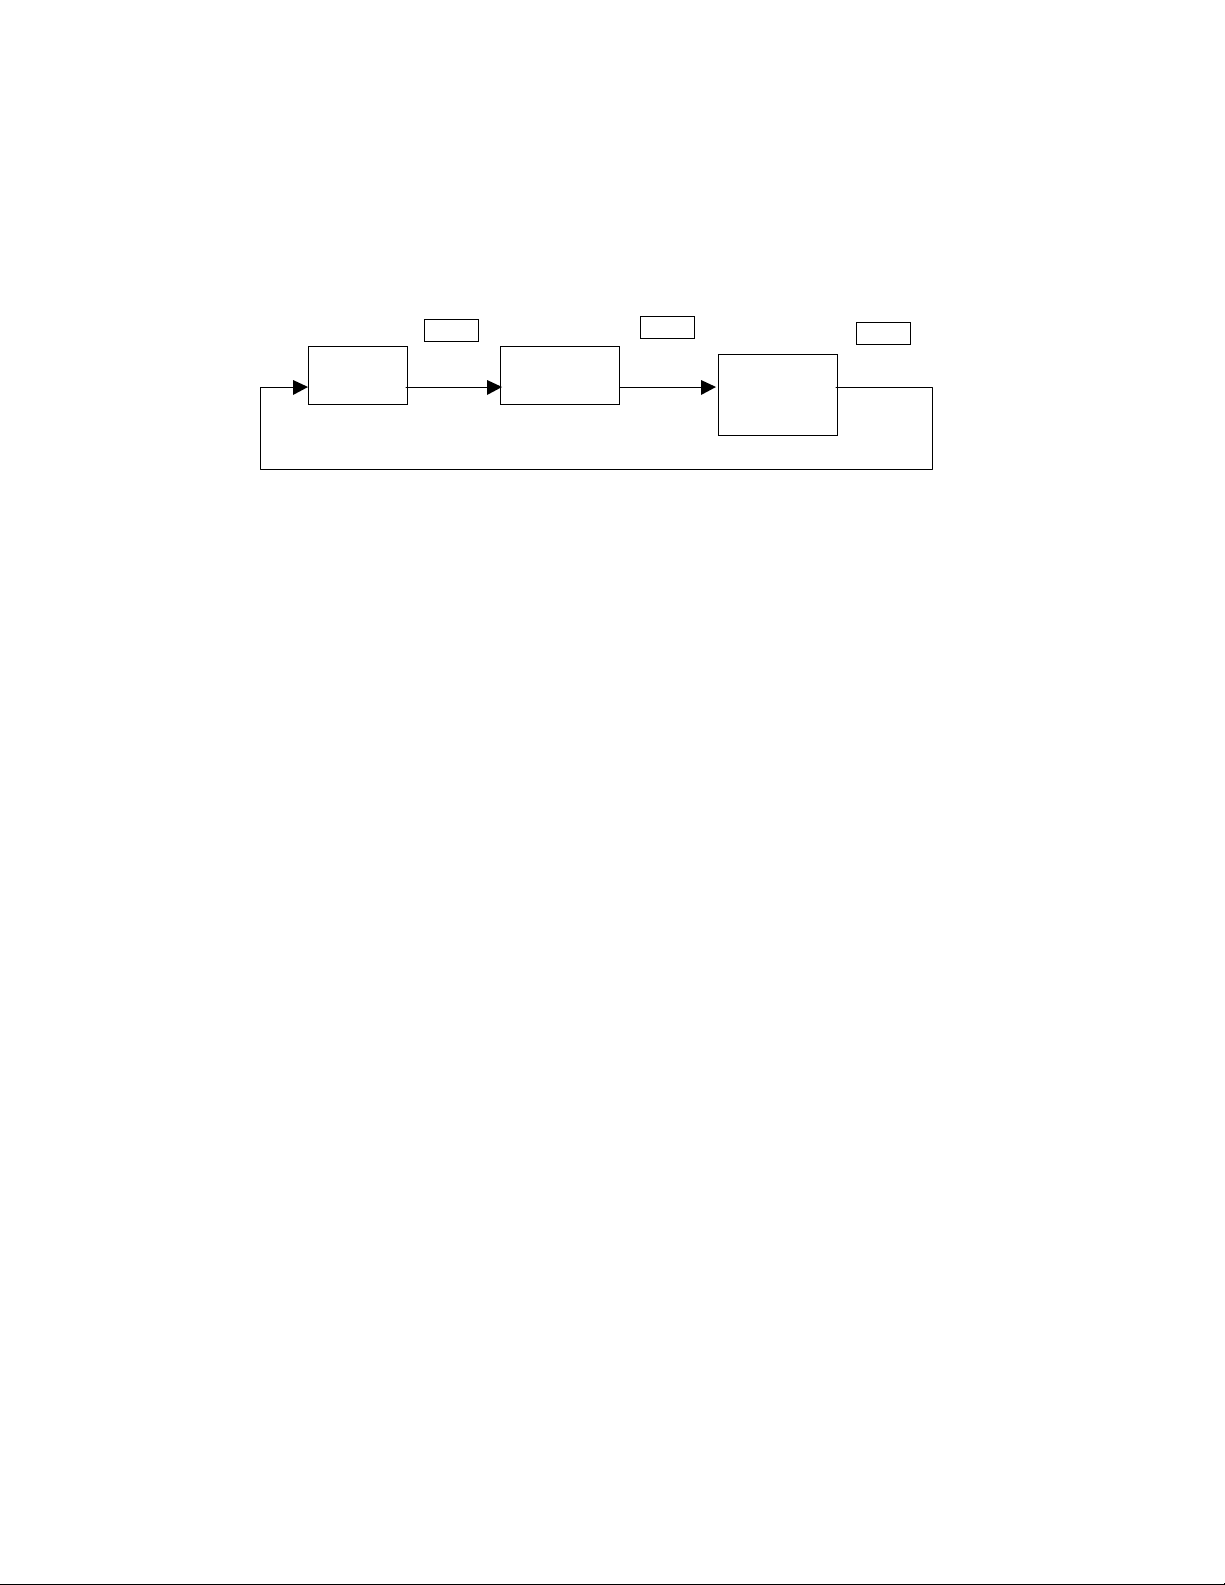
M od es Descrip tio n
1. Press MENU/KEYLOCK button to toggle among modes of FRS, NOAA and
FRS+NOAA.
MENU
FRS NOAA
MENU
MENU
FRS+
NOAA
2. FRS: FRS only.
NOAA: NOAA only.
FRS+NOAA: In FRS mode meanwhile keepi ng watchi ng si gnals on NOAA. When a
NOAA alert signal is received, FRS radio will automatically switch to
the NOAA mode.
FRS Op eratio n
Select the desired channel and/or quiet code. Press PTT button to transmit and to
receive, simply release the PTT button.
Monitor Function
To hear everything happening on a channel, including weak transmission, hold down
MONI/F UNC/NOAA button for more than 1.5 seconds. Release the MONI/FUNC/ NOAA
button to turn the auto-squelch back on.
(No CH scan function i n thi s mode)
Auto Power Save
W he n i n FR S mo de y o ur ra di o ha s a uni que c ir c ui t des i gne d t o e xt end t he ba t te r y li fe .
Selecting Channel and Channel Scan Function
1. Repeatedly press UP or DOWN button to s elec t the curre nt wor king cha nnel des ired.
The s e le c t ed c ha nne l number a ppe ar s .
2. Pres s and hold UP or DOWN button for more than 1.5 seconds to enter the channel
sc an mode and “SC” is displa yed o n LCD. The radio automati cally scans through the
channels and stops for about 5 seconds on each active channel. During scanning,
pressing UP or DOWN button can change the scan direction. Pressing any button
except COUNTY/ CTCSS , UP a nd DOWN will ma ke y our r adi o e xit the s ca nning mode
and s tay on the cur rent sc anned c hannel. If you want to exit sca nning while st ay on
the original channel before scanning, you can press COUNTY/ CTCSS key.
function i s effecti ve onl y i n FRS mode)
6
(CH scan
Page 7
Quiet Code Setting
Pr es s a nd hold COUNTY/CTCS S but ton f or abo ut 1. 5 s ec onds dur ing normal ope ra tio n t o
ent er the quiet code setti ng mode and the quie t c ode on LCD flas hes. Pre ss cont inually
the UP or DOWN button to select the desired quiet code. Once more press
COUNTY/CTCSS button to confirm and then exit.
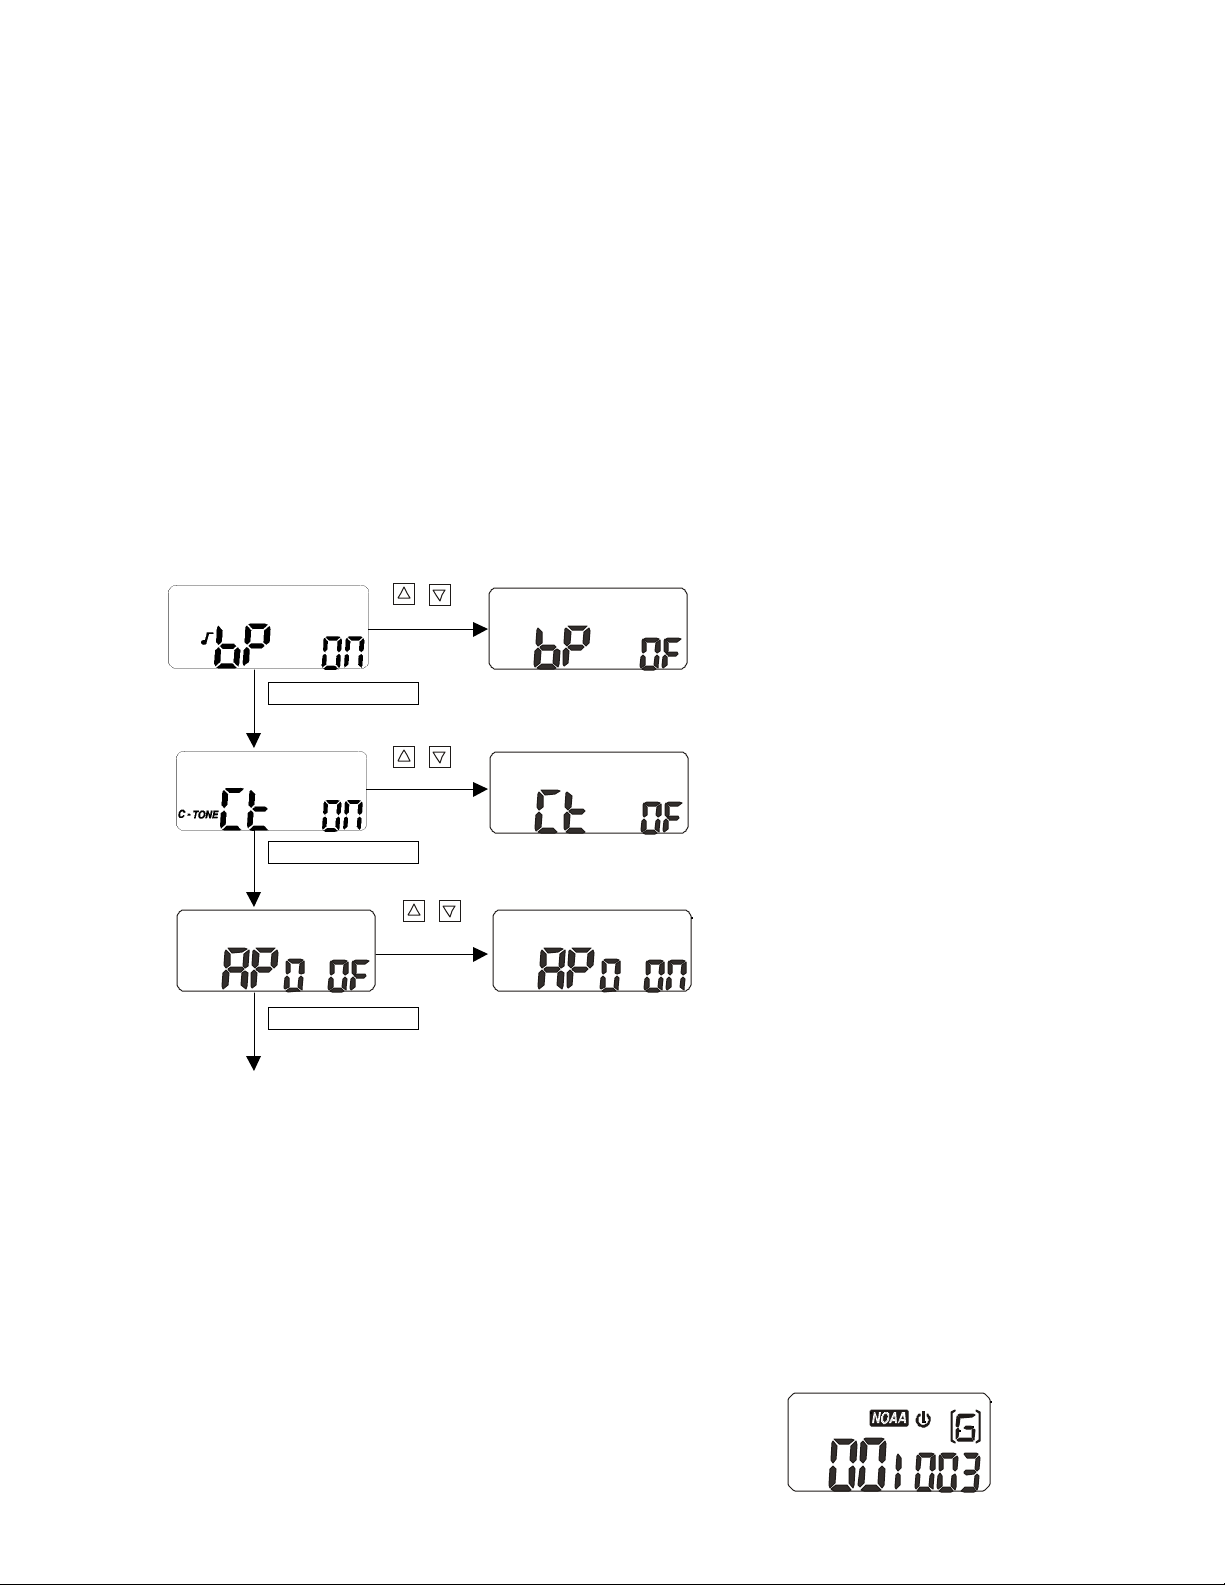
Other Settings of FRS Radio
When the last mode before you turned off your radio was FRS mode, hold down
COUNTY/CTCSS but t o n a nd po we r t he r adi o by pr e s s i ng POWER/VOL button to enter into
the setting mode. Repeatedly pressing COUNTY/CT CSS button can toggle among the
settings of KEY BEEP, C-TONE and AUTO POWER for editing. Furthermore, you can
make the desired selection with UP or DOWN but t on. P re s s i ng M ENU/KE YLOCK but to n or
no button operation for 10 seconds will store the setting and exit automatically the setting
mode. The following is the detailed flo w:
“
Key Beep”
COUNTY/QUIET
”C-Tone”
COUNTY/QUIET
“
Auto power Off”
COUNTY/QUIET
Press MENU/KEYLOCK but t o n or no button operation for 10 seconds will exit automatically the
set ting mode.
Note: *
*
You can only communi cate with another radi o that is usi ng the same channel and/or the same qui et
code as your radio.
The key beep function does not have effect on
PTT
MONI/FUNC/NOAA
and
buttons.
NOAA RECEIVE R
Press MENU/ KEYL OCK button to enter NOAA
mode, a nd L CD di s play s :
7
Page 8
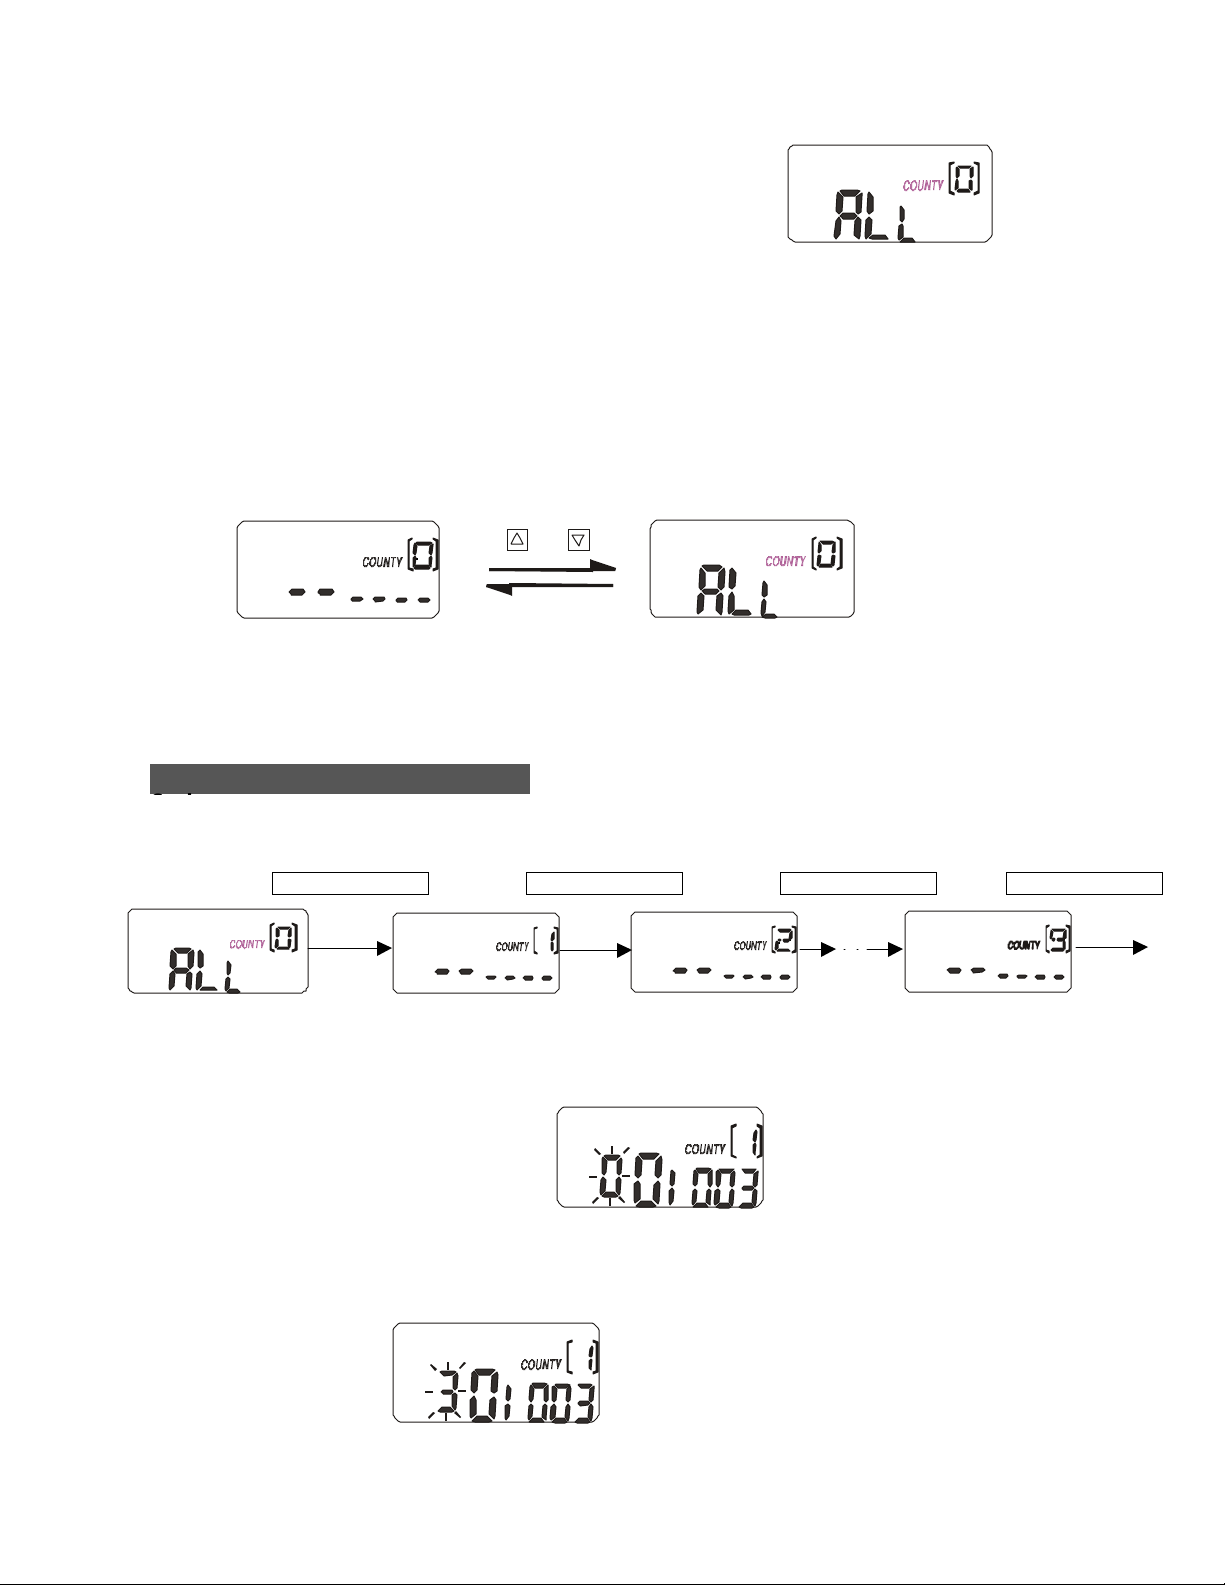
If COUNTY/CTCSS button is pressed, your
radio will enter county code that represents the
location from where you select to receive
wa rni ng a nd L CD di s play s :
You have altogether ten* locations to select, all county warnings [ALL] or warning from
nine specified local locations [------], which can be selected in sequence by momentary
press of COUNTY/CTCSS ke y .
The programmed county co de ca n be deac tiv ate d and re -acti vated by UP or DOWN key
(county 0 has a special selection of all warnings [ALL] that was set originally. LCD
displays:
or
NOTE:
If one of 1 to 9* [------] (specifi c l ocal l ocati ons) i s sel ected, i ts l ocal county code needs to be
programmed into your uni t.
Entering Appropriate County
You can to ggle different loca tion se lect ions by press COUNTY/ CTCSS button showed as
following.
COUNTY/CTCSSCOUNTY/CTCSSCOUNTY/CTCSSCOUNTY/CTCSS
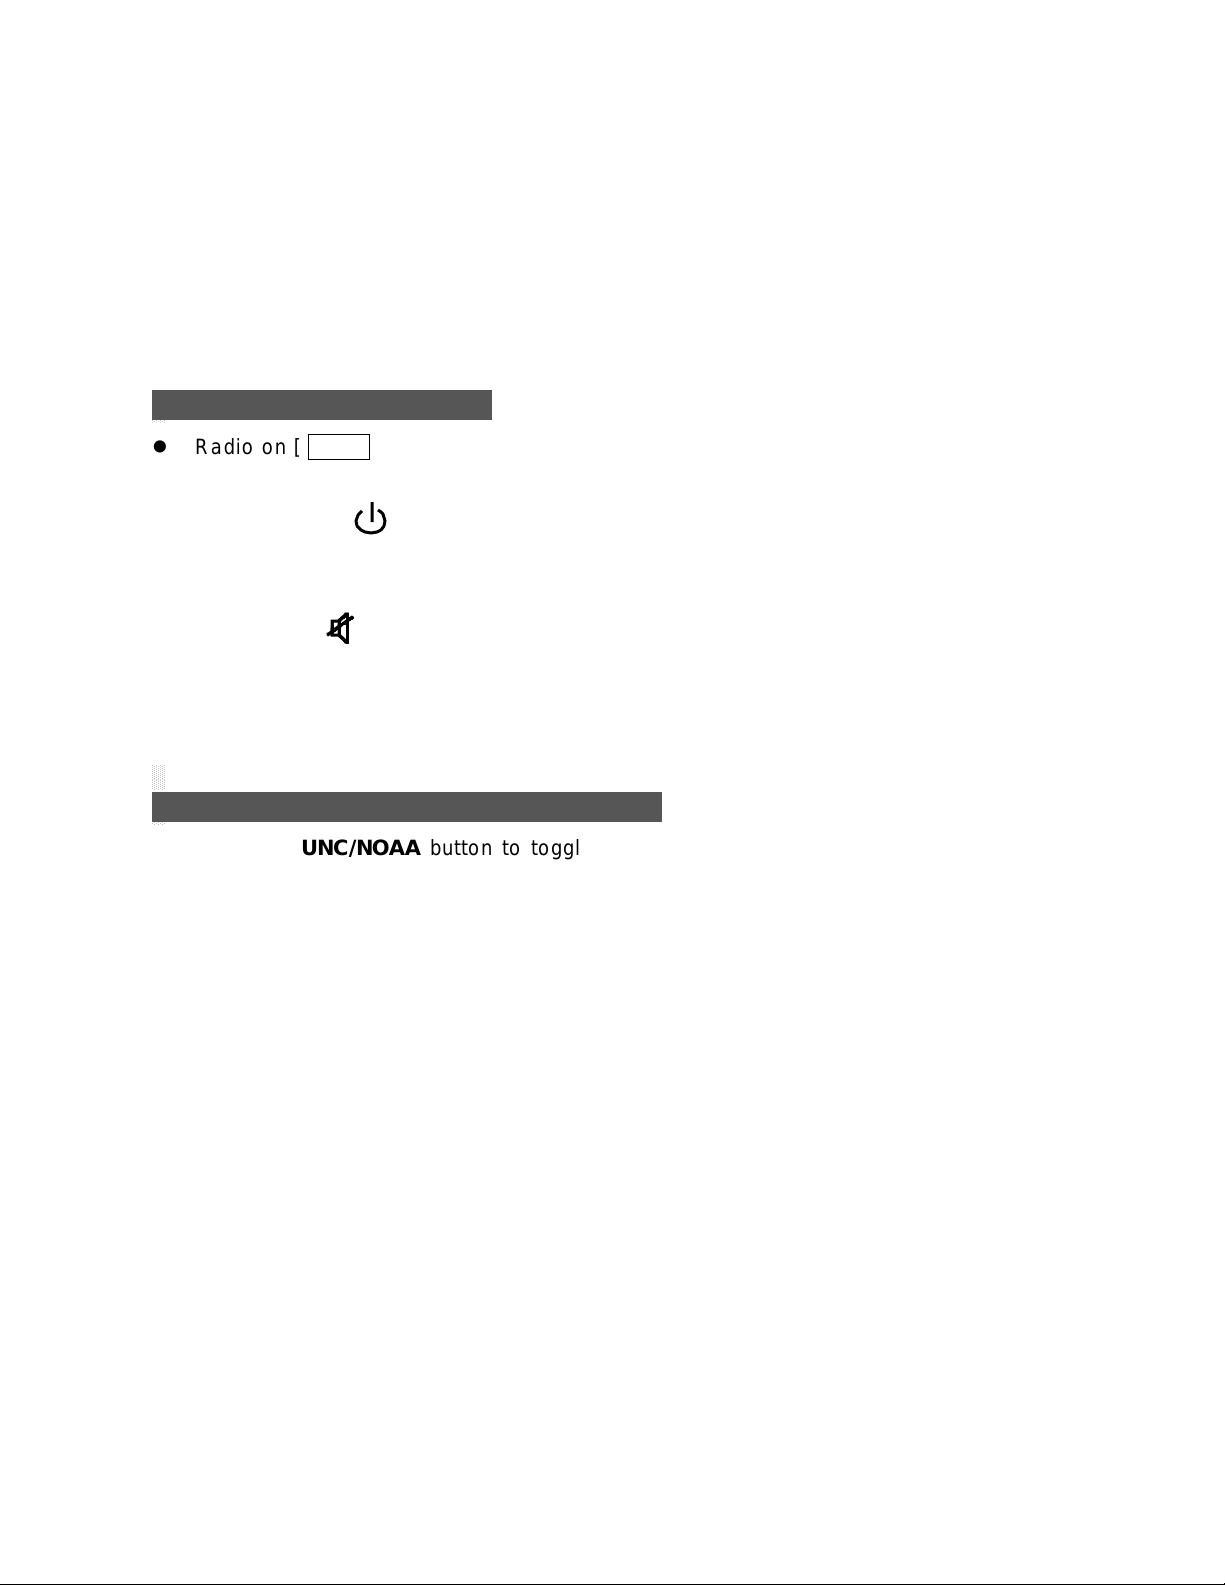
Once yo u ge t your desired se lect ion, you can ente r the co unty c ode s etting mode of this
selection by press and hold COUNTY/CTCSS button for 2 seconds. The extreme left
co unt y - c ode di gi t wi ll f la s h.
Use UP or DOWN but ton t o s ele ct the des ire d di git a nd pre ss COUNTY/ CTCSS button to
co nf i rm a nd the n a dv a nc e to t he f ollo w i ng digi t .
REMEMBE R:
Some counties has more than one transmi ssi on stati on and are subdi vi ded i nto several
8
Page 9
small er l ocal i zed sections. The extreme l eft di gi t represents the smal l er l ocal i zed section. If the county
has not been subdivi ded i nto smal l er secti ons, sel ect zero(0) in i t.
To enter the remaining five digits, follow the same precedure. Press COUNTY /CTCS S
butt o n fo llo w ed by UP or DOWN key .
When finished, press MENU/KEY LOCK button or wait for 10 seconds to store and return,
and COUNTY/CTCS S button to advance to the next county selection.
NOAA Receiver Status
! Radio on [ NOAA ]
The NOAA Re c e iv e r i s o n and br o a dc a s t v o i c e mes s a ge c a n be c ont i nuo us ly he a rd.
! Ra di o s t a ndby [ ]
The radio is in standby and will changed to the on position to hear voice message
when an alert signal is received.
! Radio mute [
]
The r adi o is in s ta ndby a nd the LCD will dis play “ WARN” , “ W ATCH” o r “ STATEMENT”
tha t the unit has rec eiv ed an alert s ignal. Voic e mess age c an not be hea rd until the
radio is switched to the ON position.
Toggle between various NOAA receiver
Press MONI/ FUNC/ NOAA button to to ggle the NOAA rec eiv er s tatus betwe en NOAA-ON,
NOAA-st a ndby , NOAA-mute.
Resetting the unit
Powering the unit whi le holdi ng down the MENU button can reset the your radio. As the
re s ult , t he c ha nne l wi ll be re s e t to C H1, qui e t c o de t o be numbe r 1 2 , C TCS S pr i v ac y mode
operation is deactivated, the automatic shut off timer continues, keypad lock disabled,
courtesy tone is off, key beep function is on, backli ght switched off and the NOAA channel
to be A with reset county code of “oooooo” for county1~9 and “ALL” for county 0.
CLOCK Setti ng
In clock mode:
Ho ld d o w n M ONI/ FUNC/ NOAA butt o n a nd pr es s UP button to adjus t the hour of the clock.
Ho ld do wn MONI/FUNC/NOAA but to n and pre ss DOWN button to adjust the minute of the
clock.
Note:
You can only communi cate wi th another radi o that i s usi ng the same channel and/or the same
quiet code as your radi o.
9
Page 10

Intercom
If yo ur radio is c onnec ted wi th the int ercom acc ess ori es through MIC/SPK jack, you can
use intercom function. In FRS mode, you can press UP button while holding down
MONI/F UNC/NOAA button to activate the intercom function. If there is no connection with
the c o rr e la ti v e a c c e s s o ri e s , a n er r or t o ne w i ll s o und.
Extern al SP K/M I C Jack and Charg er Jack
Connect an optional speaker/microphone or earphone in this jack.
You can recharge Ni-Cd batteries using an optional battery charger (not supplied). Plug
the charger’s barrel plug into the charger jack on the head of the unit, then connect the
charger to a standard AC outlet.
Caution
: Be sure the batteries i n the unit are rechargeable type before charging, or expl osion may
occur.
Belt Clip
To attach the belt clip, fix the base on the back of the unit with screw and mount the clip
until it clicks.
Battery Compartment
Pr es s a nd pus h ba c k t he ba tt e r y doo r t o re le a s e .
TE CHNICAL SPECIFICATI ONS
RX Frequency................................................................
MHz
Channels......................................................................................................
14
..
Modulation
type............................................................................................
Antenna impedance...............................................................................
Ohm
Microphone...............................................................................
10
462.5636-467. 7125
FM
50
condenser
Page 11
type
Power supply...........................................................................
Alkaline
Sens itivity at 12d B
0.5
V
Sinad...........................................................................
µµµµ
Adjacent Channel
Rejection.......................................................................
45dB
Audio Squelch
...................................................................……....................
Audio output power..................................................................
Ohm
Audio Dis tor tion
...........................................................................................
RF Output Power..............................................................
5%
500 mW ERP
@6VDC
Harmonic Emissions.................................................................
50dB
Dimen sions
4× AAA
Auto
200mW @ 8
more th an
(HWD)....................................................….......
100.0×58. 0× 29. 0mm
Weight (without
batteries)................................................................…........
CHANNEL F REQUENCI ES F requ ency: M Hz
1 = 462.5625 5 = 462.6625 9 = 467.5875 13 = 467. 6875
2 = 462.5875 6 = 462.6875 10 = 467.6125 14 = 467.7125
3 = 462.6125 7 = 462.7125 11 = 467.6375
95g
4 = 462.6375 8 = 467.5625 12 = 467.6625
11
Page 12
CTCSS PRIVACY CODES Frequency: Hz
1: 67. 0 11: 97. 4 21: 136. 5 31: 192. 8
2: 71. 9 12: 100. 0 22: 141.3 32: 203.5
3: 74. 4 13: 103. 5 23: 146.2 33: 210.7
4: 77. 0 14: 107. 2 24: 151.4 34: 218.1
5: 79. 7 15: 110. 9 25: 156.7 35: 225.7
6: 82. 5 16: 114. 8 26: 162.2 36: 233.6
7: 85. 4 17: 118. 8 27: 167.9 37: 241.8
8: 88. 5 18: 123. 0 28: 173.8 38: 250.3
9: 91. 5 19: 127. 3 29: 179.9
10: 94. 8 20: 131.8 30: 186. 2
NOAA Frequ ency co verage ( M Hz):
Channel 1…………………………………….162.400
Channel 2…………………………………….162.425
Channel 3…………………………………….162.450
Channel 4…………………………………….162.475
Channel 5…………………………………….162.500
Channel 6…………………………………….162.525
Channel 7…………………………………….162.550
12
 Loading...