

Tekcom 2101904 Users Manual

OWNER’S MANUAL
GMRS/FRS RADIO 21-1904
June 11, 2003
INTRODUCTION
Your GMRS/FRS radio is a portable, easy-to-use, two-way radio that you can carry almost
anywhere. Use it to contact family and friends at shopping malls, amusement parks, sports events,
or at the beach to, or for making vital communications in a neighborhood watch.
Your radio has 22 GMRS/FRS cha nnels, 38 CTCSS codes a nd 10 NOAA weather channels. If
someone else is using the same channel as you selected but you do not want to hear that person,
select another channel or use the CTCSS feature. You can talk with a person who has a
GMRS/FRS radio if both radios are tuned to the same channel and CTCSS code.
Your radio has auto-squelch, which means you will not hear anything on a channel unless
someone is transmitting nearby the same channel. You can turn off auto-squelch to hear weaker
and more distant transmissions.
Also, if the radio is idle for 30, 60 or 90 minutes, it will automatically shut off. It can be wakened
up when you press any key.
You can connect an optional speaker/microphone and earphone, charger (not supplied) to the radio.
In addition, the belt clip on the back of the radio makes you take it very conveniently, you can
carry it almost anywhere.
FCC INFORMATION
Caution: This two-way radio operates on GMRS (General Mobile Radio Service) frequencies
which require an FCC (Federal Communications Commission) license. A user must be licensed
prior to operating on channels 1 through 7 or 15 through 22, which comprise the GMRS channels
of this radio. Serious penalties could result for unlicensed use of GMRS channels, in violation of
FCC rules, as stipulated in the Communications Act’s Sections 501 and 502.
For licensing information and application forms, please call the FCC Hotline at 800-418-FORM.
Request form #159 and form #605. Questions regarding the license application should be
directed to the FCC at 888-CALL-FCC. Additional information is available on the FCC’s
website at www.fcc.gov.
Do not open your radio to make any internal adjustments. Your radio is set up to transmit a
regulated signal on one of 22 assigned frequencies. It is against the law to alter or adjust the
settings inside the radio to exceed those limitations. Any adjustments for your radio can only be
made by a qualified technician via using the proper test equipment.
1

To be safe and sure:
! Never open your radio’s case.
! Never change or replace anything in your radio except the batteries.
Your radio might cause interference with TV or radio even if it is being operated properly. To
determine whether your radio is causing the interference, you’d better turn it off. If the
interference goes away, your radio is causing it. You can try to eliminate the interference by:
! moving your radio away from the receiver
! calling your local RadioShack store for help
If you cannot eliminate the interference, the FCC requires that you stop using the radio.
This device complies with Part 15 of the FCC Rules. Operation is subject to the following tw o
conditions: (1) this device may not cause harmful interference, and (2) this device must accept any
interference received, including interference that may cause undesired operation.
SAFETY INFORMATION
Your wireless hand-held portable transceiver contains a low power transmitter. When the
Push-to-Talk button is pushed, it will send out radio frequency (RF) signals. The device is
authorized to operate at a duty factor not to exceed 50%. In August 1996, the Federal
Communications Commissions (FCC) adopted RF exposure guidelines with safety levels for
hand-held wireless devices.
CAUTION:
To maintain compliance with the FCC’s RF exposure guidelines, you should hold the transmitter
and antenna at least 2 inch (5 centimeters) from your face and speak in normal voice, with the
antenna pointed up and away from the face. If you wear the handset on your body while using the
headset accessory, only the supplied belt clip for this product can be used, and when transmitting,
take it out of the belt to ensure that the antenna is at least 1 inch (2.5 centimeters) from you body.
Only the supplied antenna can be used, any unauthorized antennas, modifications, or attachments
could damage the transmitter and may violate FCC regulations.
LCD DISPLAY :
Your radio is designed to have a mul tifunctional backlight display. By pressing any button except
the CALL and PTT, the backlight will illuminate for 5 seconds.
2
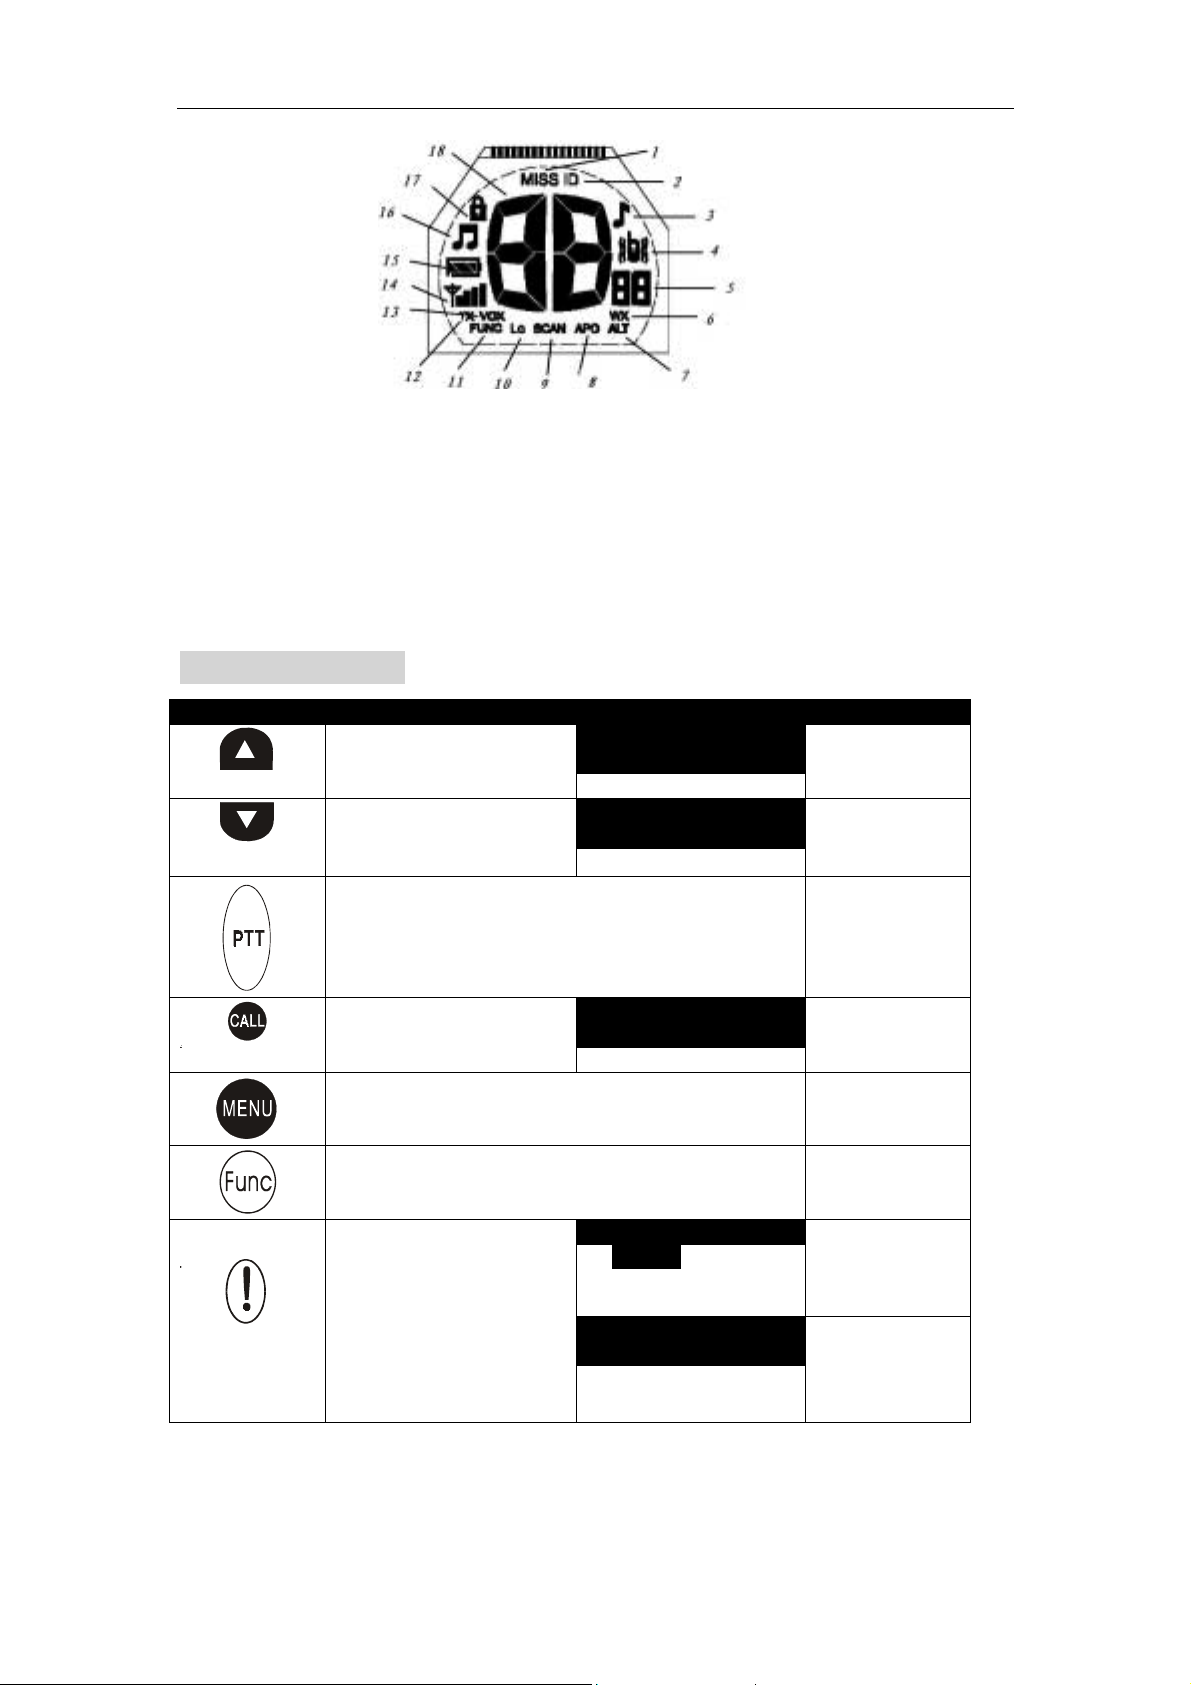
1. Miss a call Indicator 2. Call ID Indicator
3. C-Tone Indicator 4. Vibrator Indicator
5. CTCSS code Indicator 6. Weather Indicator
7. Alert Indicator 8. Auto Power Off
9. Scan Indicator 10. Lo Power Indicator
11. Function activated Indicator 12. Transmit Indicator
13. Voice Operated transmitter Indicator 14. RX Signal Strength Indicator
15. Battery Level Indicator 16. Key Beep Indicator
17. Keypad Lock Indicator 18. Channel Indicator
Key Configuration
Tap Hold Function+
Channel Up /
Setting Up
Channel Down /
Setting Down
Tx / Save Setting
Transmit Caller ID
Enter menu / Next menu
Function
Within vibration period,
Stop Panic Function
Press and hold down 2
seconds
Scan Up
Press and hold down 2
seconds
Scan Down
Press and hold down 2
seconds
Set Caller ID
Press and hold down 0.5
second
Trigger Panic Function
Press and hold down 2
seconds
Stop Panic Function
CTCSS Up
CTCSS Down
Lock /Unlock
Set Home ID
3

Turn On Wx
Alert ON/OFF
USING THE RADIO
In order to use your new radio properly, please read this reference guide completely before
attempting to operate the unit.
1. Turning the radio ON and adjusting the Volume
1) Rotate the ON/OFF/Volume control switch counterclockwise to turn the unit ON and increase
the speaker volume.
2) Rotate the ON/OFF/Volume control clockwise to decrease the speaker volume and turn the
unit OFF.
2. Setting the Channel
To choose a channel:
• Press Up/Down key to increase or decrease the Channel Number displayed.
3. Setting the CTCSS code
Each of the channels 1-22 may have any one of the codes 0-38 selected. Code “0” means no
CTCSS code was selected and your radio can receive a signal regardless of the code settings of the
transmitting radio. When setting CTCSS code 0, the unit does not display CTCSS code.
To set a CTCSS code:
• Press and hold down Function key first and then press Up/Down key to change CTCSS code.
4. Scan Feature
Your radio has a channel scan feature that allows you to scan through all CTCSS codes while
scanning through all channels. The CTCSS code feature automatically turns on and the backlight
will illuminate 5 seconds when a signal is detected on an active channel and CTCSS code, and turns
off after signal disappears.
• Press and hold down Up/Down key to scan Channel & CTCSS code.
• While scanning, press Up/Down to change the scanning direction
• To stay on the active channel and CTCSS codes, press PTT to exit scanning before the signal
disappears.
5. Keypad Lock/Unlock
You can lock your radio setting to avoid accidental pressing of keys by activating the keypad lock.
When keypad is locked, user can still transmit signal, send a Call, run Panic or temporarily
enable/disable VOX function (short press PTT key when VOX level is 1-4).
To Lock/Unlock keypad:
• Press and hold down Function key first and then press PTT key to Lock/Unlock the keypad.
6. Talking on your radio
To talk to others using the radio:
• Press and hold down PTT key and speak in a clear, normal voice with your mouth about 2-3
inches away from the microphone, when the TX icon is displayed.
• When you have finished speaking, release the PTT button, then you can just receive incoming
4
calls.
skipped Ca
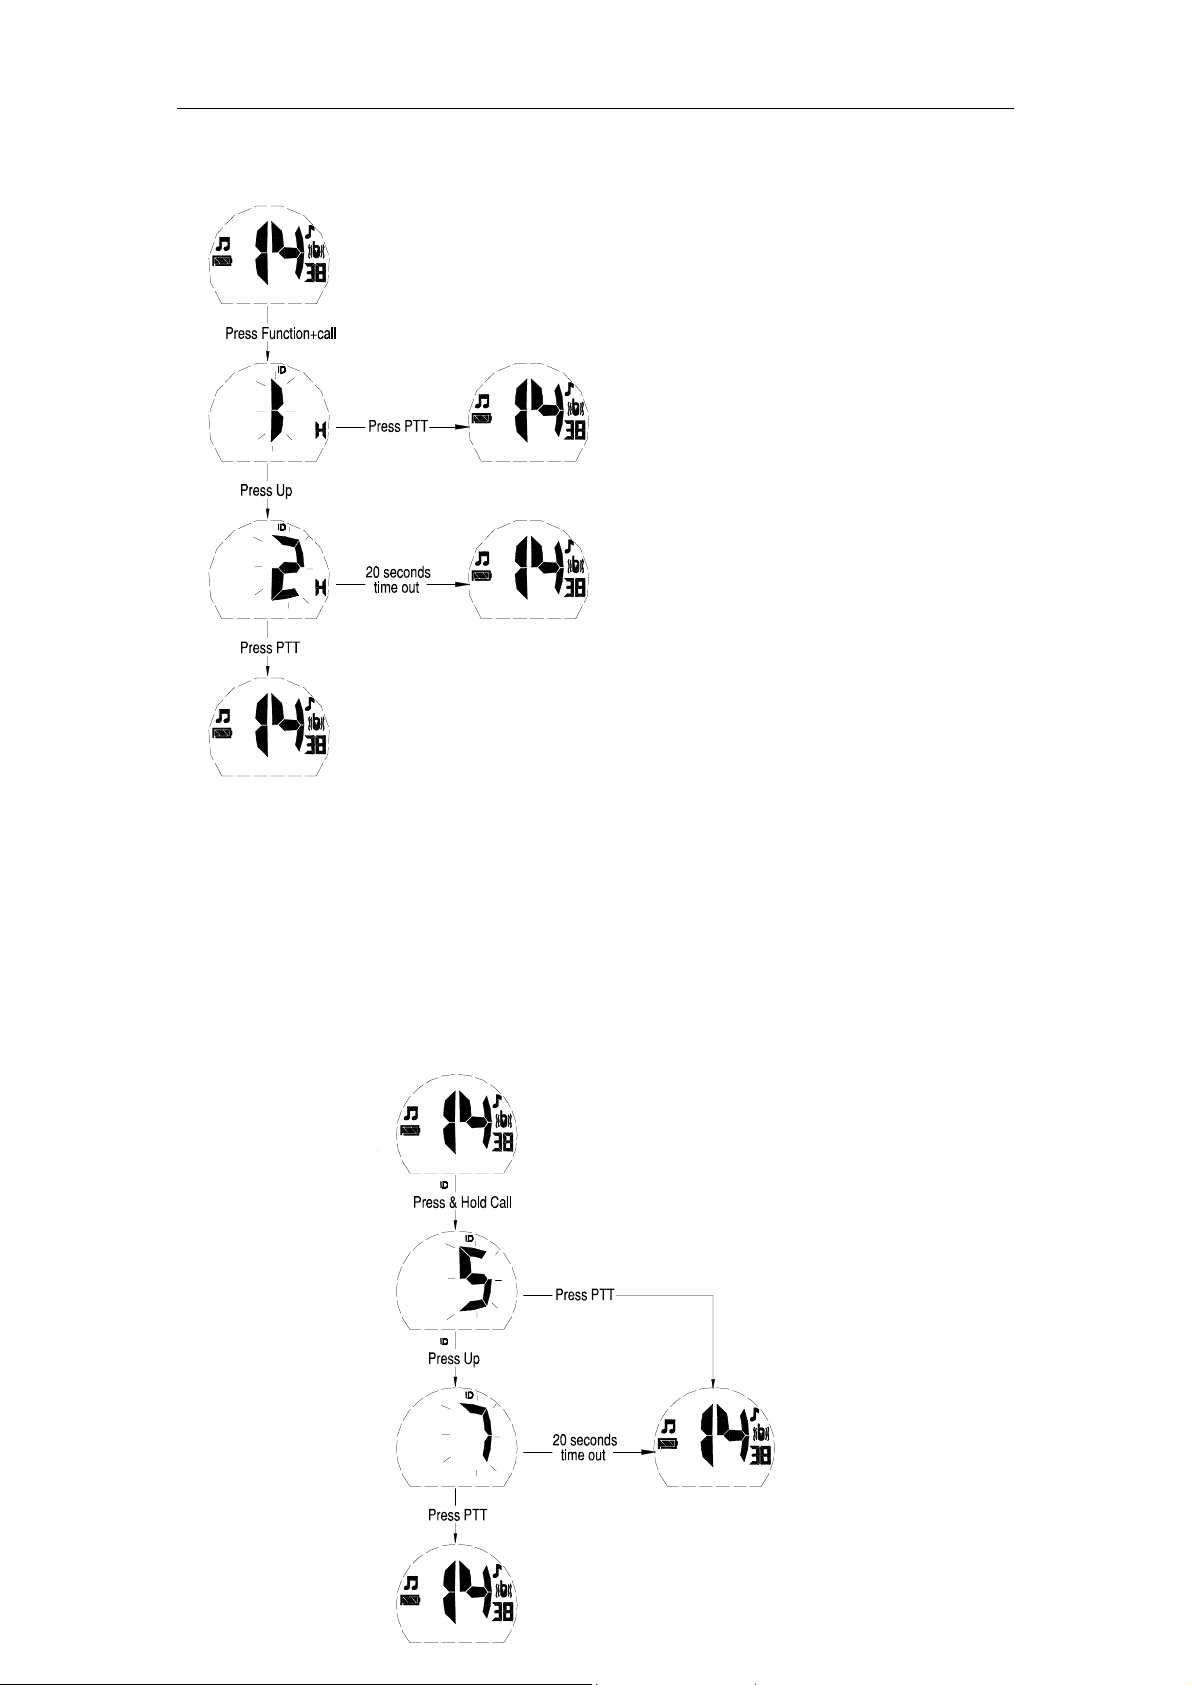
7. Setting Home ID
The radio ID setting
VOX
APO
ALT
LO
ID
ID
Home ID---1
Call ID------5
The radio ID setting
VOX
APO
ALT
LO
Home ID---1
Call ID------5
The radio ID setting
Home ID---1
VOX
APO
ALT
LO
Call ID--5(Group Call)
The radio ID setting
Home ID---2
VOX
APO
ALT
LO
Call ID--gP(Group Call)
The CALL ID is call type that let user call every desired individual within a group just through
inputting their ID code, the operation of which is as convenient as that of traditional telephone and
mobile phone, and at the same time it can also support the call type of one-to-all. The Home ID is
call sending transceiver’s ID code, the Caller ID is call receiving transceiver’s ID code. User can
select CALL ID 1-16 or CALL ID gP (group call).
To set Home ID:
• Press and hold down Function key first and then press Call key.
• Press Up/Down key to change Home ID number.
• Press PTT key to save and exit setting Home ID mode.
Note:
The Caller ID will automatically reset to Group Call (gP) when user press PTT key to confirm the
Home ID setting.
8. Setting Caller ID
VOX
APO
ALT
LO
The radio automatically
ll ID 6
The radio ID setting
The radio ID setting
Home ID---6
Home ID---6
Call ID------5
Call ID------5
VOX
ALT
APO
LO
5
VOX
ALT
APO
LO
The radio ID setting
Home ID---6
 Loading...