

Page 1
Bedienungsanweisung DE
Instructions for Use EN
Mode d’Emploi FR
MWL 20 BIS
Cód.: 1831229
Page 2

DE
Verehrter Kunde,
zunächst möchten wir Ihnen dafür danken, dass
Sie unserem Produkt den Vorzug gegeben haben.
Wir sind sicher, dass dieser moderne und
praktische Mikrowellenherd - hergestellt aus
Materialien bester Qualität - Ihre Erwartungen
erfüllen wird.
Wir bitten Sie um aufmerksame Lektüre der
Anweisungen in diesem Heft und des beigefügten
Faltblatts, damit Sie beim Gebrauch Ihres
Mikrowellenherdes beste Resultate erzielen.
BEWAHREN SIE DIESE UNTERLAGEN FÜR
SPÄTERES NACHSCHLAGEN AUF
ACHTUNG!
Gebrauchsanleitung griffbereit aufbewahren
und bei Weitergabe des Gerätes bitte mit
übergeben!
Hinweise zum Umweltschutz
Verpackungsentsorgung
Die Verkaufsverpackung trägt den Grünen Punkt.
Zur Entsorgung aller Verpackungsmaterialien wie
Pappe oder Folien dienen die entsprechenden
regionalen Wertstoff- Sammelbehälter. Dadurch
ist die Verwertung der Packstoffe sichergestellt.
Entsorgung von Elektroaltgeräten
Gemäß der Europäischen Richtlinie 2002/96/EC
über Elektro - und Elektronik-Altgeräte (WEEE)
dürfen Elektrohaushalts-Altgeräte nicht über den
herkömmlichen Haushaltsmüllkreislauf entsorgt
werden. Altgeräte müssen separat gesammelt
werden, um die Wiederverwertung und das
Recycling der beinhalteten Materialien zu
optimieren und die Einflüsse auf die Umwelt und
die Gesundheit zu reduzieren. Das Symbol
„durchgestrichene Mülltonne“ auf jedem Produkt
erinnert Sie an Ihre Verpflichtung, dass
Elektrohaushaltsgeräte gesondert entsorgt
werden müssen.
Endverbraucher können sich an Abfallämter der
Gemeinden wenden, um mehr Informationen über
die korrekte Entsorgung ihrer
Elektrohaushaltsgeräte zu erhalten.
Bevor Sie Ihr Gerät entsorgen, machen Sie es
vorher unbrauchbar. Deshalb Netzstecker ziehen,
Netzkabel abschneiden und beseitigen.
1
Page 3

Inhaltsverzeichnis
Sicherheitshinweise ........................................................................................................................... 3
Installationsanleitung ......................................................................................................................... 5
Gerätebeschreibung ........................................................................................................................... 6
Einstellen der Uhr ............................................................................................................................. 6
Die Vorteile eines Mikrowellengerätes .............................................................................................. 7
Funktionsweise des Mikrowellengerätes .......................................................................................... 7
Wie sich die Speisen erwärmen ....................................................................................................... 7
Bedienungsanleitung ......................................................................................................................... 8
Funktion: Mikrowelle ......................................................................................................................... 8
Funktion: Grill ................................................................................................................................... 9
Funktion: Kombinationsbetrieb Mikrowelle + Grill ............................................................................. 9
Funktion: Auftauen nach Gewicht (Automatisch) .............................................................................. 9
Funktion: Auftauen nach Zeit (Manuell) .......................................................................................... 10
Sonderfunktion: Getränke ............................................................................................................... 10
Sonderfunktion: Pizza ..................................................................................................................... 10
Sonderfunktion: Hahnchen ............................................................................................................. 10
DE
Programmierung des Mikrowellengerätes ...................................................................................... 11
Sicherheitssperre ............................................................................................................................ 11
Während des Betriebs... ................................................................................................................... 12
Unterbrechung der Funktion ........................................................................................................... 12
Programmende ............................................................................................................................... 12
Energie sparen ............................................................................................................................... 12
Auftauen ............................................................................................................................................ 13
Allgemeine Hinweise zum Auftauen ............................................................................................... 14
Programmablauf des Mikrowellengerätes ...................................................................................... 15
Worauf Sie achten müssen!............................................................................................................ 16
Tabellen und Tipps – Garen von Gemüse ...................................................................................... 17
Tabellen und Tipps – Garen von Fisch ........................................................................................... 17
Programmablauf Grill ....................................................................................................................... 18
Tabellen und Tipps – Grillen ohne Mikrowelle ................................................................................ 19
Tabellen und Tipps – Mikrowelle und Grill ...................................................................................... 20
Welches Geschirr kann verwendet werden? .................................................................................. 21
Mikrowellenbetrieb .......................................................................................................................... 21
Mikrowellengeschirrtest .................................................................................................................. 21
Grillbetrieb ...................................................................................................................................... 21
Kombibetrieb .................................................................................................................................. 21
Aluminiumschalen/Alufolie .............................................................................................................. 21
Deckel ............................................................................................................................................ 21
Geschirrtabelle ............................................................................................................................... 22
Reinigung und Instandhaltung des Mikrowellengerätes ............................................................... 23
Was tun bei Störungen? ................................................................................................................... 24
Technische Eigenschaften ............................................................................................................... 25
Funktionsbeschreibung .................................................................................................................. 25
Leistungsbeschreibung ................................................................................................................... 25
2
Page 4

DE
Sicherheitshinweise
• Achtung! Zur Vermeidung von Feuer, das
Mikrowellengerät nur unter Aufsicht betreiben.
Zu hohe Leistungsstufen oder zu lange
Garzeiten können das Gargut überhitzen und
Feuer verursachen.
• Wenn Rauch bzw. Brand beobachtet wird,
muss die Tür des Gerätes geschlossen bleiben,
um evtl. vorhandene Flammen zu ersticken.
Das Gerät ausschalten und die Verbindung zur
Stromversorgung unterbrechen.
• Achtung! Kindern darf die Benutzung des
Gerätes ohne Aufsicht nur erlaubt werden,
wenn eine ausreichende Anweisung gegeben
wurde, die das Kind in die Lage versetzt, das
Gerät in sicherer Weise zu bedienen und die
Gefahren einer falschen Bedienung verstehen
zu können.
• Achtung! Beim Grillbetrieb ist erhöhte Vorsicht
geboten. Kinder müssen ferngehalten werden!
• Unsere Geräte entsprechen den einschlägigen
Bestimmungen und dem Gesetz über
technische Arbeitsmittel. Diese decken jedoch
nicht in jedem Falle alle möglichen Unfallrisiken
ab.
• Beim Erwärmen oder Kochen von Speisen in
brennbaren Materialien, wie Kunststoff - oder
Papierbehälter, muss das Mikrowellengerät
häufig wegen der Möglichkeit einer Entzündung
überwacht werden.
• Vor Gebrauch ist vom Benutzer zu prüfen, ob
Geschirr und Gefäße für den Gebrauch im
Mikrowellengerät geeignet sind. Benutzen Sie
nur Mikrowellengeeignetes Geschirr.
• Die Netzanschlussleitung darf nicht mit
Feuchtigkeit, mit scharfen Gegenständen oder
mit dem heißen Gerät in Berührung kommen.
• Bei Anschluss von Elektrogeräten in
Gerätenähe darauf achten, dass deren
Anschlussleitungen nicht mit dem heißen Gerät
in Berührung kommen oder unter der heißen
Gerätetür eingeklemmt werden, um
Beschädigung und Gefährdung zu vermeiden.
• Achten Sie auf Fehlfunktionen. Das Gerät darf
nicht benutzt werden, wenn:
- die Tür nicht richtig schließt
- die Türscharniere beschädigt sind
- die Dichtflächen an der Tür beschädigt sind
- das Sichtfenster beschädigt ist
- häufige Funkenüberschläge im Garraum
auftreten, ohne dass sich Metallteile darin
befinden.
• Die Lüftungsöffnungen des Gerätes dürfen
nicht bedeckt sein.
Reinigung/Wartung:
• Vor Wartungs- und Reinigungsarbeiten
Netzstecker ziehen.
• Bitte Reinigungshinweise im Absatz „Reinigung
und Pflege“ beachten.
• Die Dichtflächen (vierseitig um den Garraum
und an der Türinnenseite) müssen besonders
sauber gehalten werden, um ein sicheres
Funktionieren des Gerätes zu gewährleisten.
Reinigen Sie die Dichtflächen mit einem milden
Reinigungsmittel und einem nicht kratzenden
oder scheuernden Reinigungstuch.
• Achtung: Benutzen Sie das Gerät auf keinen
Fall, wenn die Dichtflächen beschädigt sind.
Nehmen Sie das Gerät erst dann wieder in
Betrieb, wenn eine Instandsetzung durch einen
geschulten Kundendiensttechniker erfolgt ist.
3
Page 5

Sicherheitshinweise
So vermeiden Sie Schäden am Gerät:
• Das Gerät nicht ohne Drehteller und Rollenring
betreiben.
• Schalten Sie das Gerät nicht im leeren Zustand
ein. Ohne Speisen im Garraum könnte das
Gerät überlastet werden.
• Benutzen Sie nur Mikrowellengeeignetes
Geschirr.
• Bewahren Sie keine brennbaren Gegenstände
im Garraum auf. Sie können sich beim
Einschalten entzünden.
• Eier mit Schale oder ganze hartgekochte Eier
sollen nicht im Mikrowellengerät erwärmt
werden, da sie explodieren können.
• Reiner Alkohol bzw. alkoholhaltige Getränke
nicht im Mikrowellengerät erhitzen. ES
BESTEHT ENTZÜNDUNGSGEFAHR.
• Achtung: Flüssigkeiten oder andere Speisen
dürfen nicht in verschlossenen Behältern
erwärmt werden, da sie leicht explodieren
können.
DE
Vorsicht!
• Um Überhitzung und Entzündungsgefahr von
Speisen zu vermeiden, ist unbedingt darauf zu
achten, dass beim Erwärmen kleiner
Speisemengen die Zeit- und
Leistungseinstellung nicht zu hoch gewählt
wird. So kann sich z.B. ein Brötchen innerhalb
von 3 Min. entzünden, wenn die Leistung zu
hoch eingestellt wird.
• Toasten darf nur in der Betriebsart Grill und
unter Aufsicht durchgeführt werden. Beim
Toasten im Kombi-Betrieb (Mikrowelle mit Grill)
kann sich das Brot in kürzester Zeit entzünden.
• Erwärmen Sie Babynahrung in Gläsern oder
Flaschen immer ohne Deckel oder Sauger.
Nach dem Erwärmen müssen Sie die
Babynahrung gut umrühren oder schütteln,
damit sich die Wärme gleichmäßig verteilt.
Überprüfen Sie die Temperatur der Speise,
bevor Sie sie dem Kind geben.
Verbrennungsgefahr!
Im Reparaturfall:
Vorsicht beim Erwärmen von Flüssigkeiten!
Beim Erwärmen von Flüssigkeiten (Wasser,
Kaffee, Tee, Milch usw.) kann durch Siedeverzug
die Flüssigkeit im Gerät oder bei der Entnahme
schlagartig verdampfen und aus dem Gefäß
geschleudert werden. Dies kann zu Verletzungen
und Verbrennungen führen!
Zur Vermeidung dieses physikalischen Vorganges
muss beim Erwärmen von Flüssigkeiten immer
ein Kunststofflöffel oder ein Glasstab in das
Gefäß gestellt werden.
• Achtung - Mikrowellenenergie! Das
Gehäuse darf nicht entfernt werden.
Wartung oder Reparatur von
Mikrowellengeräten durch andere Personen als
vom Hersteller geschulte
Kundendiensttechniker ist gefährlich.
• Achtung: Die Garraumlampe darf nur vom
Kundendienst ausgetauscht werden.
• Bei Beschädigung der Anschlussleitung darf
die vorhandene Gerätezuleitung nur gegen
eine baugleiche vom Kundendienst
ausgetauscht werden, um Gefährdungen zu
vermeiden.
• Reparaturen und Wartungen insbesondere an
Stromführenden Teilen, dürfen nur durch vom
Hersteller geschulte Elektrofachleute
durchgeführt werden.
4
Page 6
DE
Installationsanleitung
Mit der Türöffnungstaste bzw. durch Ziehen an
der Tür, die Tür öffnen und alles
Verpackungsmaterial entnehmen. Danach den
Garraum und die Zubehörteile mit einem feuchten
Tuch reinigen und Trockenwischen. Keine
Scheuermittel und keine Starkriechenden Mittel
verwenden.
Überprüfen Sie den einwandfreien Zustand
folgender Teile:
• Tür und Scharniere
• Gerätefront
• Innen- und Außenflächen des Gerätes
Sollten Sie einen Defekt an einem dieser Teile
feststellen, BENUTZEN SIE DAS GERÄT NICHT
und wenden Sie sich an den Teka-Kundendienst.
Stellen Sie das Gerät auf eine ebene und
gewichtsstabile Oberfläche.
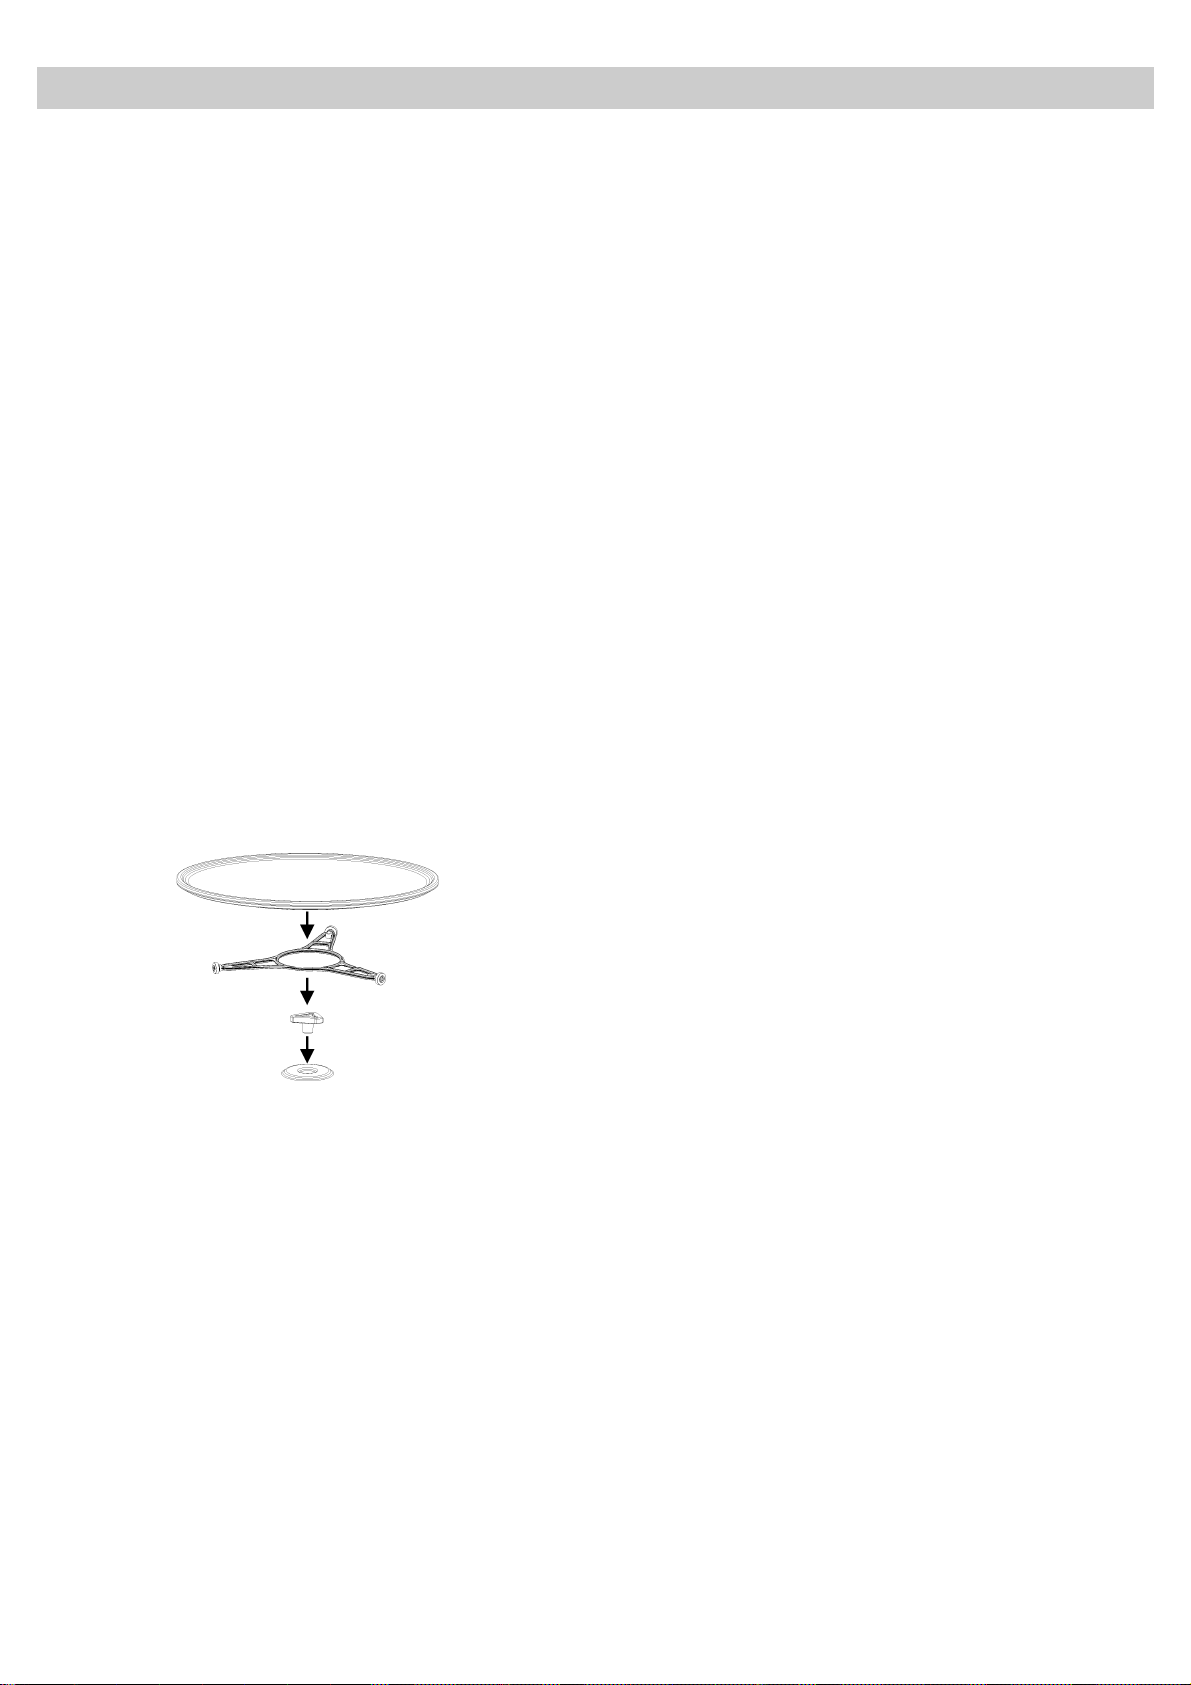
Den Drehteller-Führungsring in die Mitte des
Garraums geben und den Drehteller aufsetzen bis
er einrastet. Drehteller und DrehtellerFührungsring müssen bei jeder Betriebsfunktion
im Gerät bleiben. Der Drehteller dreht sich sowohl
im Uhrzeigersinn als auch gegen den
Uhrzeigersinn.
Zur Gewährleistung einer guten Kühlung des
Geräts wird empfohlen, das Mikrowellengerät
in ein Küchenmöbel mit einer Öffnung auf der
Oberseite einzubauen (siehe gesonderte
Einbauanleitung).
Achtung: Es muss nach Einbau des
Mikrowellengerätes Zugriff zum Stecker
gewährleistet sein.
Achten Sie bei der Installation des
Mikrowellengerätes darauf, dass das
Netzkabel nicht mit der Rückseite des Gerätes
in Berührung kommt, die auftretenden hohen
Temperaturen können das Kabel beschädigen.
Werden Mikrowellengerät und Elektroherd
übereinander installiert, darf das
Mikrowellengerät nicht unterhalb des
Elektroherdes angeordnet werden, da es sonst
in diesem zur Bildung von Kondenswasser
kommen kann.
Das Gerät ist mit einem Elektrokabel und einem
Stecker für Einphasenstrom ausgestattet.
Das Gerät sollte nicht in unmittelbarer Nähe von
Heizkörpern, Rundfunk- und Fernsehgeräten
eingebaut werden.
Achtung! Das Gehäuse des Mikrowellengerätes
kann mit einer Schutzfolie versehen sein. Ziehen
Sie diese Folie sorgfältig vor der ersten
Inbetriebnahme ab, indem Sie an der unteren
Randseite beginnen.
ACHTUNG: DAS MIKROWELLENGERÄT DARF
NUR AN GEERDETE STECKDOSEN
ANGESCHLOSSEN WERDEN.
Fabrikant und Händler lassen Beanstandungen im
Störungsfall oder bei Personen-Unfallmeldungen
nicht gelten, wenn diese auf die Nichtbeachtung
der Installationsanleitung zurückzuführen sind.
5
Page 7
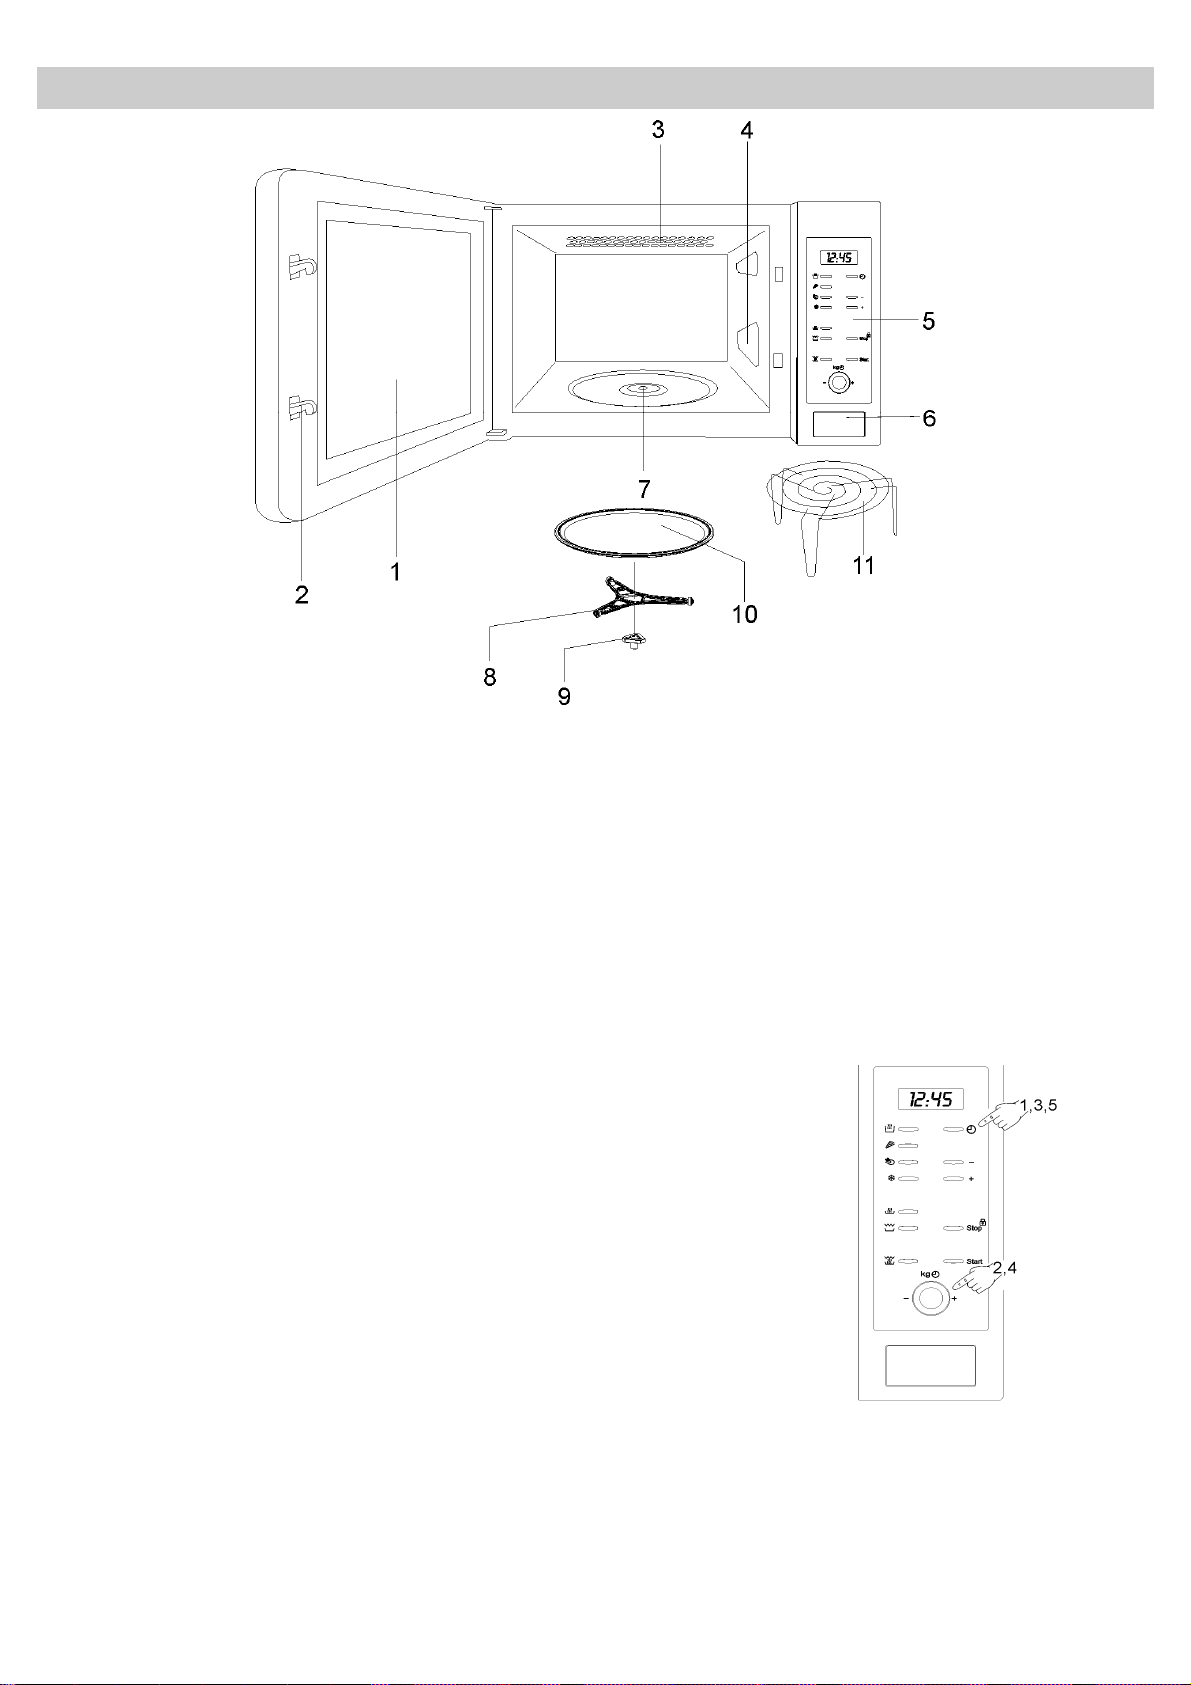
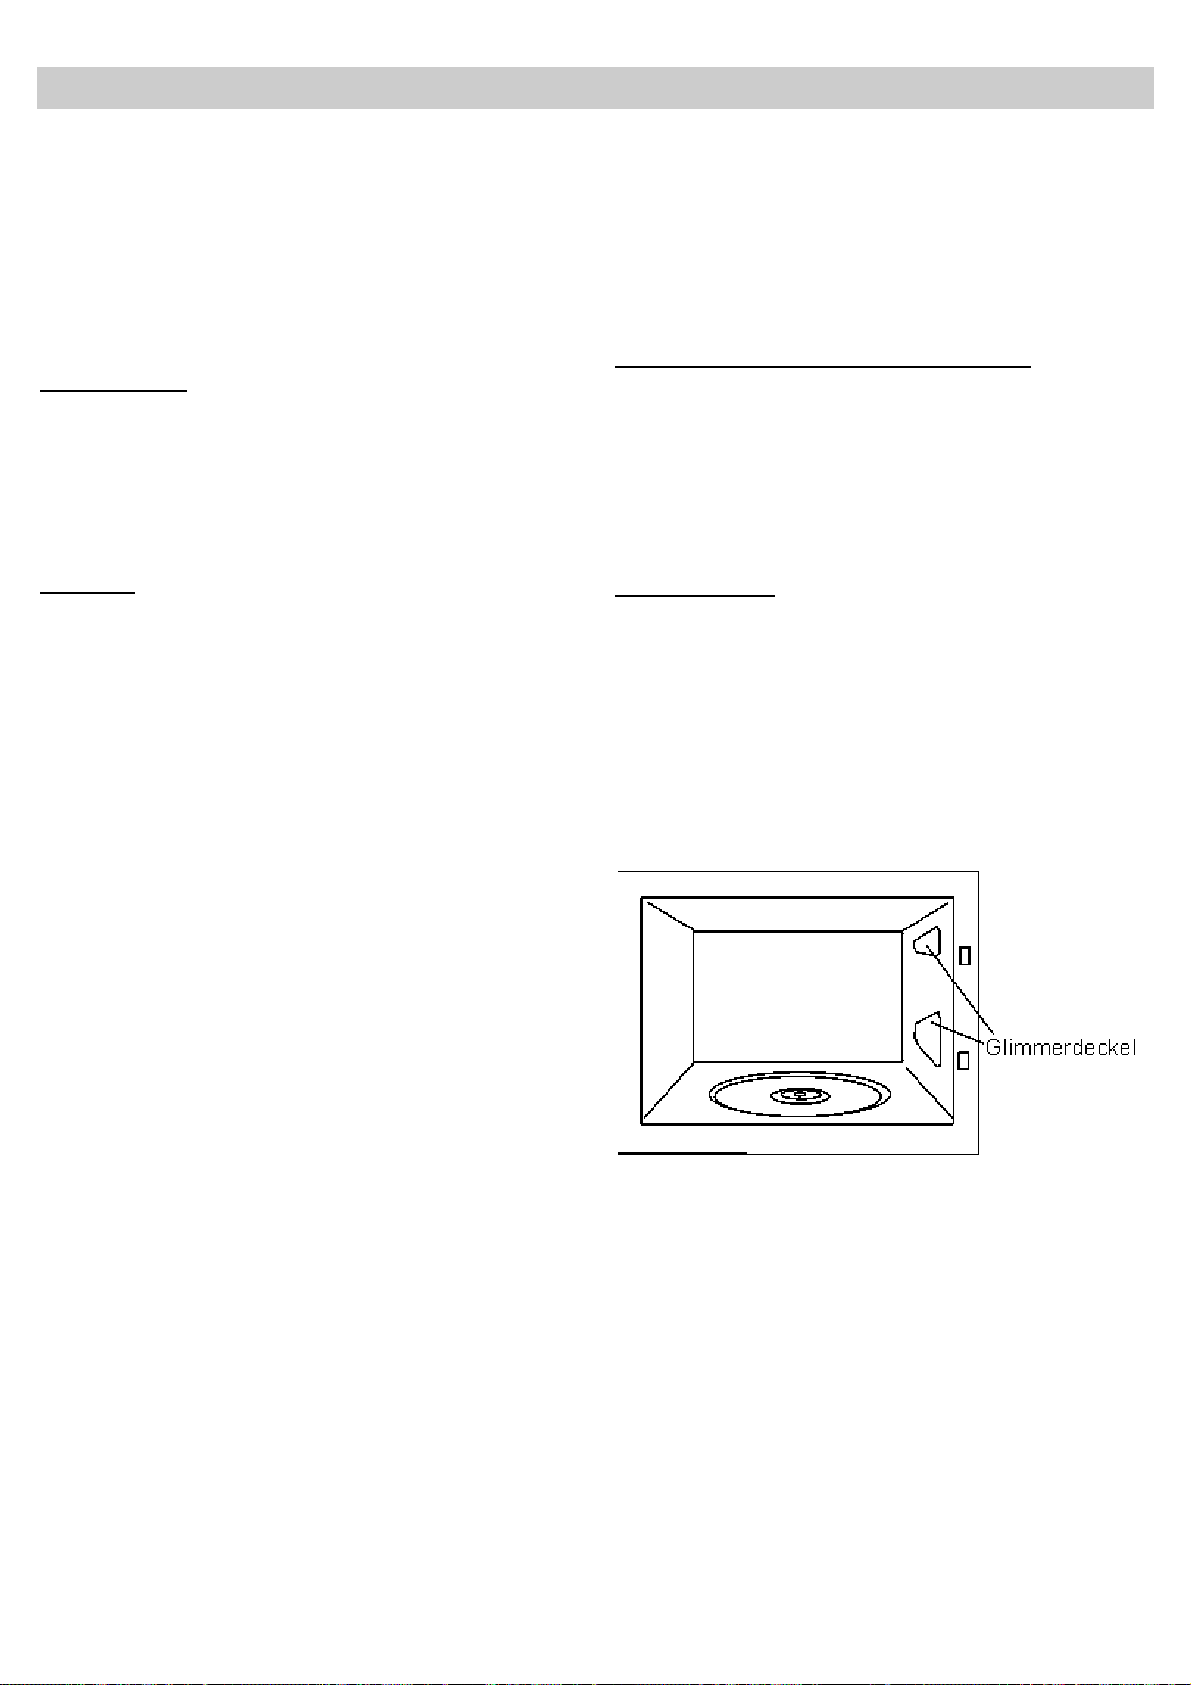
Gerätebeschreibung
DE
1. Tür mit Sichtfenster 6. Türöffnungstaste
2. Sicherheitsverriegelung 7. Drehteller-Antriebsachse
3. Quarzgrill 8. Drehteller-Führungsring
4. Glimmerdeckel 9. Drehteller-Mitnehmer
5. Bedienblende 10. Drehteller
11. Rost
Einstellen der Uhr
1. Drücken Sie die Taste UHR so oft, bis die Ziffern blinken.
2. Geben Sie die Stunden ein indem Sie den DREHKNOPF in eine
der beiden Richtungen drehen.
3. Drücken Sie erneut die Taste UHR und stellen Sie die Minuten
ein.
4. Geben Sie die Minuten ein indem Sie den DREHKNOPF in eine
der beiden Richtungen drehen.
5. Drücken Sie zum Schluss nochmals die Taste UHR.
6
Page 8

DE
Die Vorteile eines Mikrowellengerätes
In einem herkömmlichen Gerät durchdringt die
von Widerständen oder Gasbrennern
ausgestrahlte Wärme die Speisen langsam von
außen nach innen. Daher entstehen große
Energieverluste, weil die Luft, Geräteteile und die
Behältnisse miterwärmt werden.
Im Gegensatz dazu wird im Mikrowellengerät die
Wärme in den Speisen selbst erzeugt, d.h. die
Wärme breitet sich von innen nach außen aus. Es
entstehen keine Energieverluste, denn die
Mikrowellen geben keine Energie an die Luft, die
Garraumwände und die Behältnisse (falls
mikrowellengeeignet) ab, d.h. die genannten
Elemente werden nicht miterhitzt.
Die Vorteile im Überblick:
1. Zeitersparnis; im allgemeinen wird die Garzeit
im Verhältnis zur herkömmlichen Zubereitung
um 3/4 reduziert.
2. Superschnelles Auftauen von Speisen. Dieses
verringert die Gefahr von Bakterienbildung.
3. Energieeinsparung
4. Aufgrund der verkürzten Garzeit bleiben die
Nährstoffe in den Lebensmitteln erhalten.
Die Reibung der Moleküle erzeugt Wärme, die für
das Ansteigen der Temperatur in den
Lebensmitteln sorgt. Je nachdem dient dieser
Vorgang zum Auftauen, Garen oder Warmhalten
von Speisen.
Aufgrund der Wärmeverbreitung in den
Lebensmitteln ergeben sich folgende Vorteile:
• die Speisen benötigen für den Garvorgang
keine bzw. nur wenig Flüssigkeit oder Fett;
• im Vergleich zum herkömmlichen Herd: kürzere
Zeitvorgaben für das Auftauen, Erwärmen und
Garen im Mikrowellengerät;
• Vitamine, Mineral- und Nährstoffe bleiben
weitgehend erhalten;
• die natürliche Farbe und das Aroma gehen
nicht verloren.
Die Mikrowellen durchdringen Porzellan, Glas,
Pappe und Kunststoff, aber kein Metall. Benutzen
Sie daher keine Metallbehälter oder Behälter mit
Metallkomponenten.
Die Mikrowellen werden vom Metall reflektiert...
Funktionsweise des Mikrowellengerätes
Im Mikrowellengerät befindet sich ein
Hochspannungsgenerator, das als MAGNETRON
bezeichnet wird. Es wandelt elektrische Energie in
Mikrowellen um. Die elektromagnetischen Wellen
werden durch einen Wellenleiter in den Garraum
geleitet und breiten sich durch einen
Metallverteiler oder einen Drehteller aus.
Im Garraum breiten sich die Mikrowellen in alle
Richtungen aus und werden von den
Metallwänden reflektiert. Dadurch wird das Gargut
gleichmäβig erhitzt.
Wie sich die Speisen erwärmen
Lebensmittel enthalten mehrheitlich Wasser,
dessen Moleküle durch Einwirkung der
Mikrowellen in Schwingung geraten.
... durchdringen Glas und Porzellan...
... und werden von den Lebensmitteln absorbiert.
7
Page 9
Bedienungsanleitung
Achtung! Das Mikrowellengerät nie leer, d.h. nie ohne
Lebensmittel betreiben.
Um das Gerät zu nutzen gehen Sie wie folgt vor:
1. Schlieβen Sie das Gerät an eine geeignete Steckdose an
(siehe: Leistungsbeschreibung).
2. Öffnen Sie die Tür, drücken Sie hierzu die Türöffnungstaste.
Die Innenbeleuchtung des Mikrowellengerätes muss sich
einschalten.
3. Stellen Sie das Gefäβ mit den Speisen auf den Drehteller oder
den Grillrost.
4. Wählen Sie die gewünschte Funktion und Garzeit entsprechend
der Beschreibung in den nachstehenden Abschnitten.
5. Schlieβen Sie die Tür und drücken Sie die Taste START.
6. Das Mikrowellengerät wird damit in Betrieb gesetzt. Auf dem
digitalen Display wird die verbleibende Funktionsdauer
angezeigt.
DE
WICHTIGER HINWEIS
Die Tasten der Bedienelementeleiste sind zur Erleichterung der Programmierung beleuchtet. Alle
Tasten, die betätigt werden können, sind grün beleuchtet. Wird eine davon betätigt, wechselt die Farbe
auf rot.
Funktion: Mikrowelle
1. Drücken Sie die Taste MIKROWELLE. Diese Anzeige leuchtet
während des gesamten Vorgangs weiter.
2. Geben Sie die Funktionsdauer (zum Beispiel 10 Minuten) ein,
indem Sie den DREHKNOPF in eine der beiden Richtungen
drehen.
3. Zur Veränderung der Leistung der Mikrowelle drücken Sie die
Tasten „-“ und „+“. Ohne Betätigung dieser Tasten arbeitet das
Gerät mit maximaler Leistung. Im Display wird die gewählte
Leistungsstufe (P 01 - P 05) angezeigt. Siehe hierzu auch
Kapitel „Technische Eigenschaften".
4. Drücken Sie die Taste START. Das Mikrowellengerät wird damit
in Betrieb gesetzt.
8
Page 10
DE
Bedienungsanleitung
Funktion: Grill
1. Drücken Sie die Taste GRILL. Die Anzeige leuchtet.
2. Geben Sie die Funktionsdauer (zum Beispiel 10 Minuten) ein,
indem Sie den DREHKNOPF in eine der beiden Richtungen
drehen.
3. Drücken Sie die Taste START. Das Mikrowellengerät wird damit
in Betrieb gesetzt.
Funktion: Kombinationsbetrieb Mikrowelle + Grill
1. Drücken Sie die Taste MIKROWELLE + GRILL. Die Anzeige
leuchtet.
2. Geben Sie die gewünschte Funktionsdauer ein (z.B. 10 min), in
dem Sie den DREHKNOPF vor- oder zurückdrehen.
3. Zur Veränderung der Leistung der Mikrowelle drücken Sie die
Tasten „-“ und „+“. Ohne Betätigung dieser Tasten arbeitet das
Gerät mit maximaler Leistung. Im Display wird die gewählte
Leistungsstufe (P 01-P 05) angezeigt. Siehe hierzu auch Kapitel
„Technische Eigenschaften".
4. Drücken Sie die Taste START. Das Mikrowellengerät wird damit
in Betrieb gesetzt.
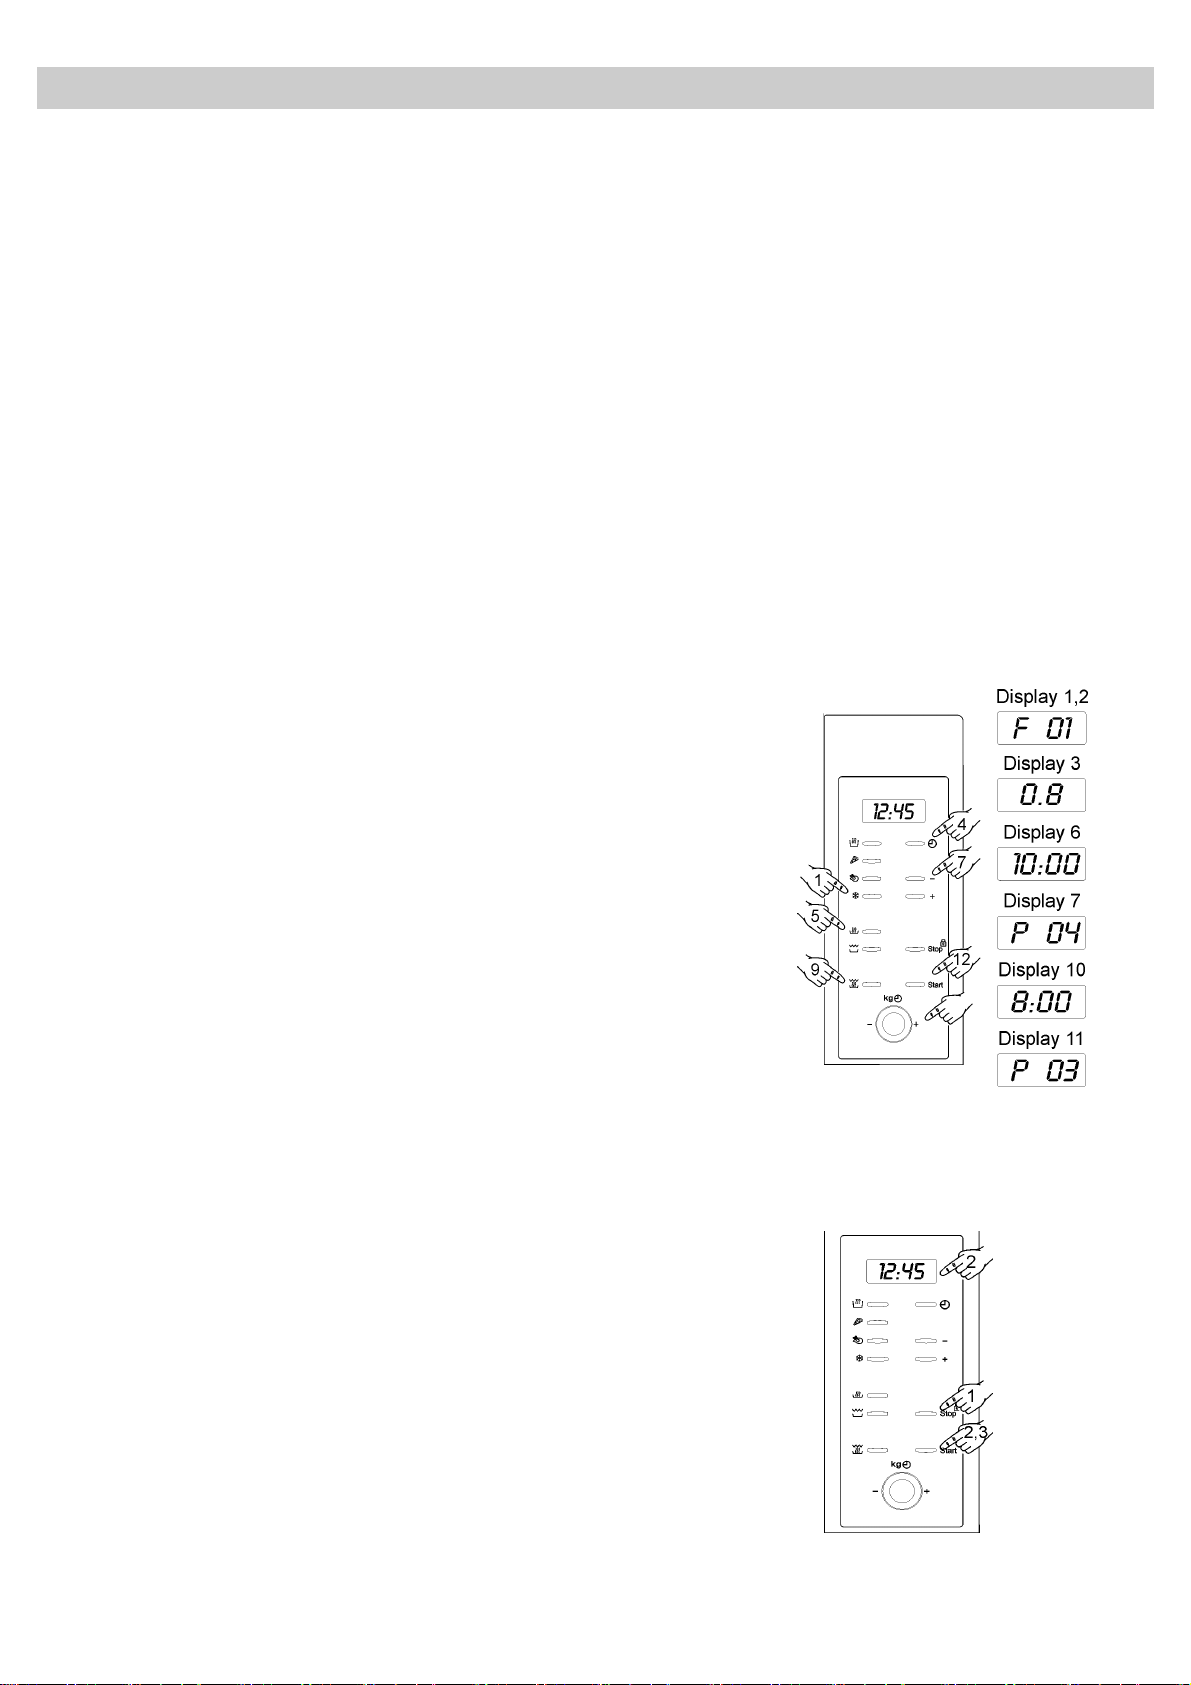
Funktion: Auftauen nach Gewicht (Automatisch)
1. Drücken Sie die Taste AUFTAUEN. Die Anzeige leuchtet.
2. Geben Sie mittels der Tasten „-“ und „+“ die Art des Gargutes an
(siehe untenstehende Liste). Falls Sie nichts angeben arbeitet
das Gerät voreingestellt auf dem Programm „1“ (Fleisch).
3. Geben Sie das Gewicht des Lebensmittels (z.B. 1,2 kg) durch
Drehen des DREHKNOPFES in beide Richtungen ein.
4. Drücken Sie die Taste START. Die Mikrowelle schaltet ein.
5. Abhängig von der Gesamtgarzeit ertönt nach einer bestimmten
Zeit ein Signalton. Das Auftaugut kann nun umgerührt oder
gewendet werden. Zum Fortsetzen des Betriebes die
Mikrowellentür schließen und die START-Taste drücken.
Die nachfolgende Tabelle beschreibt die hinterlegten Programme der Funktion Auftauen nach Gewicht,
mit Angabe der Gewichtsintervalle, Auftauzeitintervalle und Wartezeiten (um eine einheitlichere
Temperatur des Auftaugutes zu gewährleisten).
Programm Lebensmittel Gewicht Zeit Wartezeit
Pr 1 Fleisch 0,1 – 1,5 kg 4 – 45 min 20 – 30 min
Pr 2 Geflügel 0,1 – 1,5 kg 4 – 50 min 20 – 30 min
Pr 3 Fisch 0,1 – 1,5 kg 4 – 45 min 20 – 30 min
Pr 4 Obst 0,2 – 0,5 kg 2 – 13 min 5 – 10 min
Pr 5 Brot 0,1 – 0,8 kg 2 – 19 min 5 – 10 min
9
Page 11
Bedienungsanleitung
Funktion: Auftauen nach Zeit (Manuell)
1. Drücken Sie 2 x auf die Taste AUFTAUEN. Die Anzeige leuchtet.
2. Geben Sie die Zeitvorgabe für das Auftauen ein (z.B. 10 min.) und
drehen sie den DREHKNOPF vor und zurück.
3. Drücken Sie die START-Taste. Das Gerät ist nun in Betrieb.
4. Abhängig von der Gesamtgarzeit ertönt nach einer bestimmten Zeit
ein Signalton. Das Auftaugut kann nun umgerührt oder gewendet
werden. Zum Fortsetzen des Betriebes die Mikrowellentür schließen
und die START-Taste drücken.
Sonderfunktion: Getränke
1. Stellen Sie das Getränk (150 ml bis 30 ml Kaffee, Tee, Wasser, Milch
usw.) in einem wärmebeständigen Gefäß auf die Schale.
2. Betätigen Sie die Taste für die Sonderfunktion GETRÄNKE. Diese
Taste leuchtet jetzt rot.
3. Sie können die Zeit in Schritten zu 30 s erhöhen, indem Sie die Taste
für die Sonderfunktion GETRÄNKE erneut betätigen. Sie können die
Einstellung ebenfalls am DREHKNOPF vornehmen.
DE
4. Betätigen Sie die Taste START. Das Gerät ist nun in Betrieb.
Sonderfunktion: Pizza
1. Stäuben Sie etwas Mehl auf die Schale und legen Sie die Pizza direkt
darauf.
2. Betätigen Sie die Taste für die Sonderfunktion PIZZA. Diese Taste
leuchtet jetzt rot.
3. Betätigen Sie die Taste START. Der Herd wird damit in Betrieb
gesetzt.
4. Zum Schluss wird eine Wartezeit von 2 Minuten durchlaufen, der Herd
ist weiterhin in Betrieb und auf dem Display wird die Sonderfunktion
PIZZA blinkend dargestellt
Sonderfunktion: Hahnchen
1. Das Hähnchen in Stücke teilen (400 bis 500 g) und in einem
wärmebeständigen Gefäß auf die Schale stellen. Öl, Gewürze, Salz
und sonstige gewünschte Zutaten hinzugeben.
2. Betätigen Sie die Taste für die Sonderfunktion HÄHNCHEN. Diese
Taste leuchtet jetzt rot.
3. Betätigen Sie die Taste START. Der Herd wird damit in Betrieb
gesetzt.
4. Die gesamte Zubereitungsdauer beträgt 30 Minuten und ist in vier
Abschnitte zu 7,5 Minuten unterteilt. Am Ende jedes der ersten drei
Abschnitte hält der Herd an und gibt ein akustisches Signal ab.
Drehen Sie die einzelnen Stücke um und betätigen Sie die Taste
START, um die Zubereitung fortzusetzen.
5. Zum Schluss wird eine Wartezeit durchlaufen, der Herd ist weiterhin in
Betrieb und auf dem Display wird die Sonderfunktion HÄHNCHEN
blinkend dargestellt
10
Page 12
DE
Programmierung des Mikrowellengerätes
Die normalen Funktionen (Mikrowelle, Grill,
Mikrowelle + Grill, Auftauen nach Gewicht und
Auftauen nach Zeit) können nacheinander
programmiert werden, es sind maximal 3
Funktionen möglich.
Zum Beispiel für das Auftauen von 800 g Fleisch,
10 Minuten Garen im Mikrowellengerät mit
Leistung 4 und abschlieβender Nutzung der
Funktion Mikrowelle + Grill für 8 Minuten mit
Leistung 3 wie folgt vorgehen:
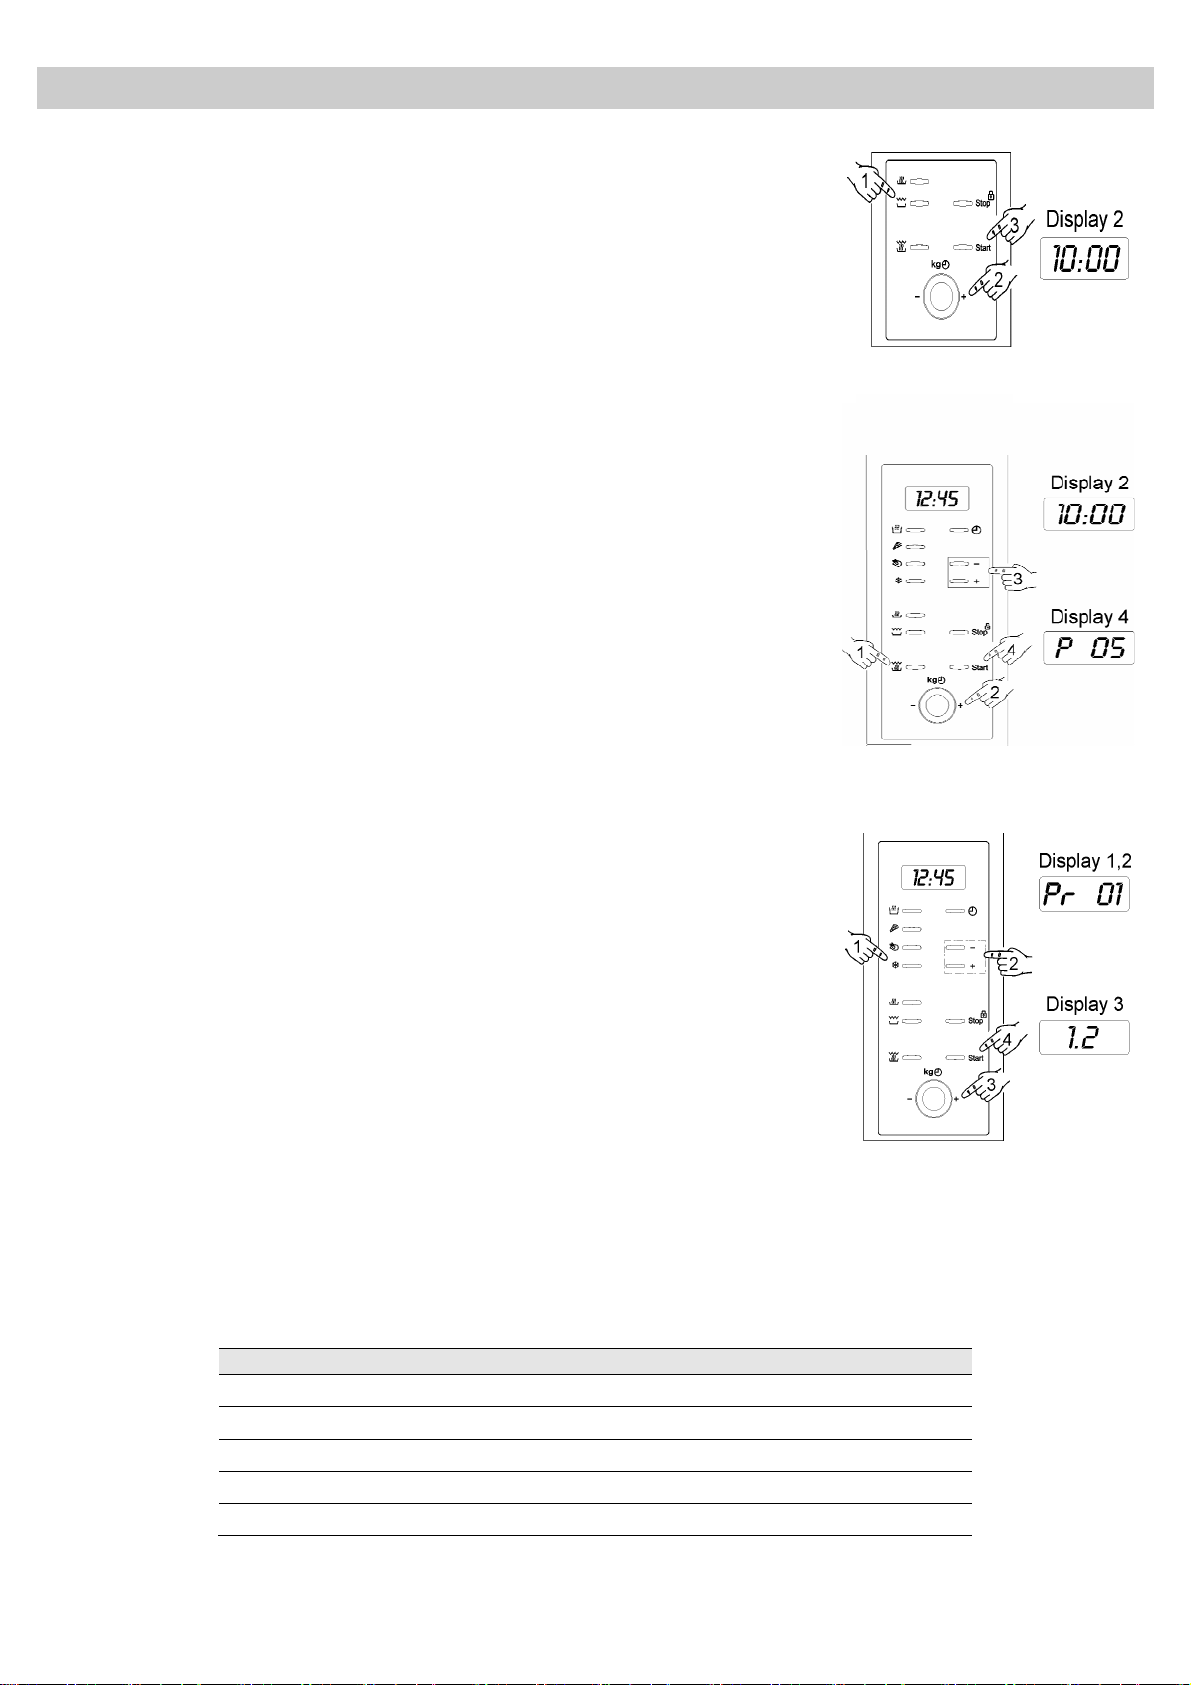
1. Drücken Sie die Taste AUFTAUEN. Die
Anzeige leuchtet auf.
2. Die Nahrungsmittelart Fleisch (Typ 1) ist bereits
aktiviert.
3. Geben Sie das Gewicht des Garguts ein (0,8
kg), indem Sie den DREHKNOPF vor und
zurückdrehen.
4. Drücken Sie nun die Taste
UHR/PROGRAMMABLAUF und stellen Sie
den nächsten Programmablauf ein.
9. Drücken Sie die Taste MIKROWELLE +
GRILL. Die Anzeige leuchtet auf.
10. Geben Sie durch Drehen des
DREHKNOPFES die gewünschte Garzeit ein
(8 min).
11. Drücken Sie 2 x die Taste „-“, um die
Mikrowelle auf die Leistungsstufe 3
einzustellen.
12. Drücken Sie auf die START-Taste. Das Gerät
ist nun in Betrieb.
13. Wird die Gesamtzeit des Kochvorgangs
angezeigt. Wechselt der Kochvorgang von
einer Funktion (Auftauen) zur nächsten
(Mikrowelle bzw. Grill), so ertönt ein Signal.
14. Wenn das Mikrowellengerät ein akustisches
Signal abgibt, öffnen Sie die Tür und drehen
Sie die Speisen um. Schlieβen Sie die Tür
erneut und drücken Sie die Taste START.
5. Drücken Sie die Taste MIKROWELLE. Die
Anzeige leuchtet auf.
6. Geben Sie durch Drehen des DREHKNOPFES
die gewünschte Garzeit ein (10 min).
7. Drücken Sie die Taste „-“, um die Mikrowelle
auf die Leistungsstufe 4 einzustellen.
8. Drücken Sie nun die Taste
UHR/PROGRAMMABLAUF und stellen Sie
den nächsten Programmablauf ein.
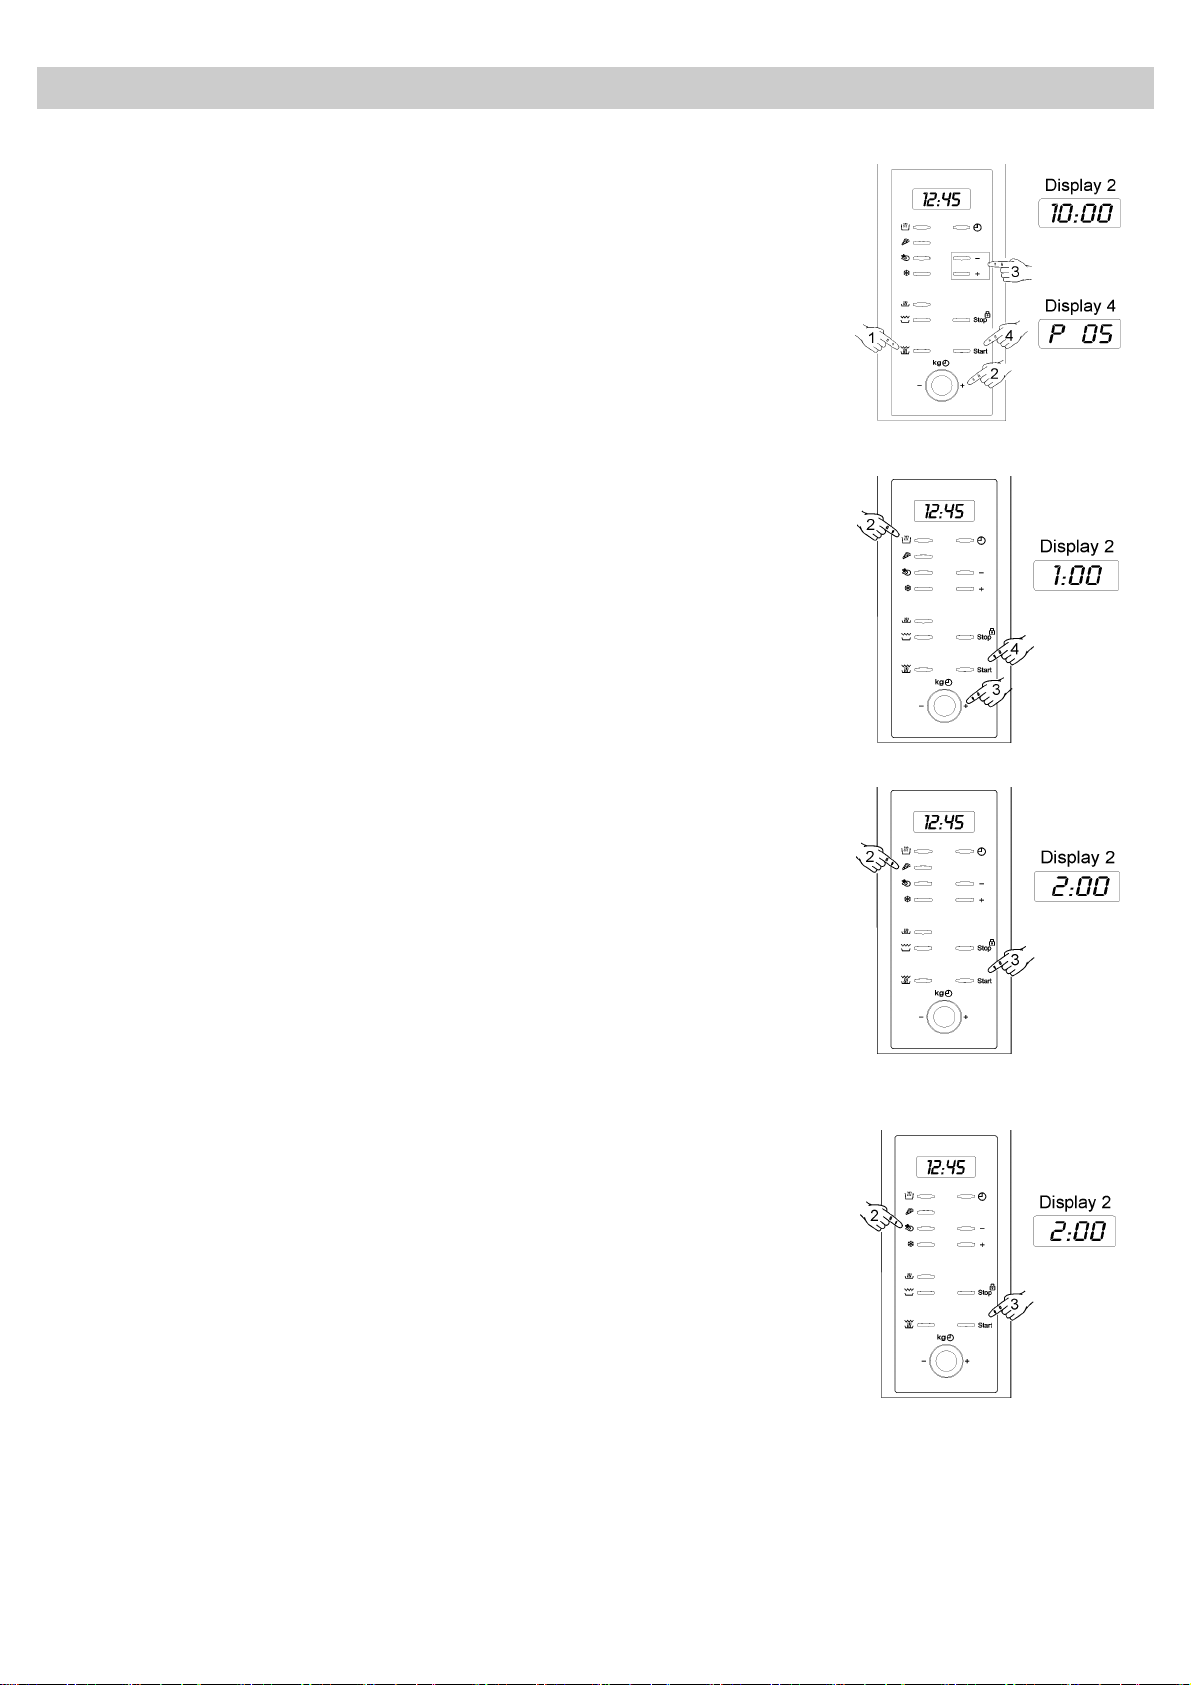
Sicherheitssperre
1. Der Betrieb des Gerätes kann gesperrt werden (um zum
Beispiel dessen Benutzung durch Kinder zu verhindern), hierzu
die STOP-Taste drei Sekunden lang drücken. Danach wird ein
akustisches Signal ausgegeben und das Gerät ist gesperrt.
2. Die Uhrzeit wird weiterhin angezeigt. Die STOP Anzeige
leuchtet auf.
3. Zur Freigabe des Mikrowellengerätes erneut die Taste STOP
drei Sekunden lang gedrückt halten. Danach wird ein
akustisches Signal ausgegeben und die Anzeige der
Sicherheitssperre schaltet aus.
11
Page 13

Während des Betriebs...
Sie können während der Zubereitungsdauer der
Speisen die Tür jederzeit öffnen, in diesem Fall:
• WIRD DIE MIKROWELLENERZEUGUNG
SOFORT UNTERBROCHEN.
• Der Grill wird abgeschaltet und verbleibt auf
hoher Temperatur.
• Die Zeitschaltuhr wird angehalten und zeigt die
verbleibende Funktionsdauer an.
Falls gewünscht können Sie dann:
1. Die Speisen wenden oder umrühren, um einen
gleichmäβigeren Garvorgang zu erreichen.
2. Die Leistung der Mikrowelle mit den Tasten „-“
oder „+“ verändern.
3. Mit den Funktionstasten eine andere Funktion
einstellen.
4. Die restliche Funktionsdauer durch Drehen des
KNOPFS einstellen.
Schlieβen Sie die Tür erneut und drücken Sie die
Taste START. Das Gerät wird damit wieder in
Betrieb gesetzt.
DE
Programmende
Nach dem Programmablauf wird 3 x ein
akustisches Signal abgegeben und das Display
zeigt „End“ an. Die Signale ertönen im Abstand
von 30 Sekunden bis die Tür geöffnet wird bzw.
ein Tastendruck auf „STOP“ erfolgt.
Energie sparen
Dieser Herd besitzt eine spezielle
Energiesparfunktion, die automatisch
eingeschaltet wird, wenn 10 Minuten lang keine
Aktivität zu verzeichnen war.
In der Energiesparfunktion sind alle Tasten
dunkel, auf dem Display werden nur zwei Punkte
dargestellt, die in Intervallen von 10 s blinken.
Durch kurzes Betätigen der Taste START wird die
Uhrzeit angezeigt.
Die Energiesparfunktion wird bei Betätigen einer
Funktionstaste sofort unterbrochen.
Unterbrechung der Funktion
Soll das Programm vor dem vollständigen Ablauf
unterbrochen werden, drücken Sie auf die STOP-
Taste oder öffnen Sie die Tür des Gerätes.
Wenn Sie den Garvorgang vorzeitig abbrechen
möchten, schließen Sie wieder die Tür und
drücken erneut die STOP-Taste. Ein Signal ertönt
und auf dem Display erscheint die Uhrzeit.
12
Page 14
DE
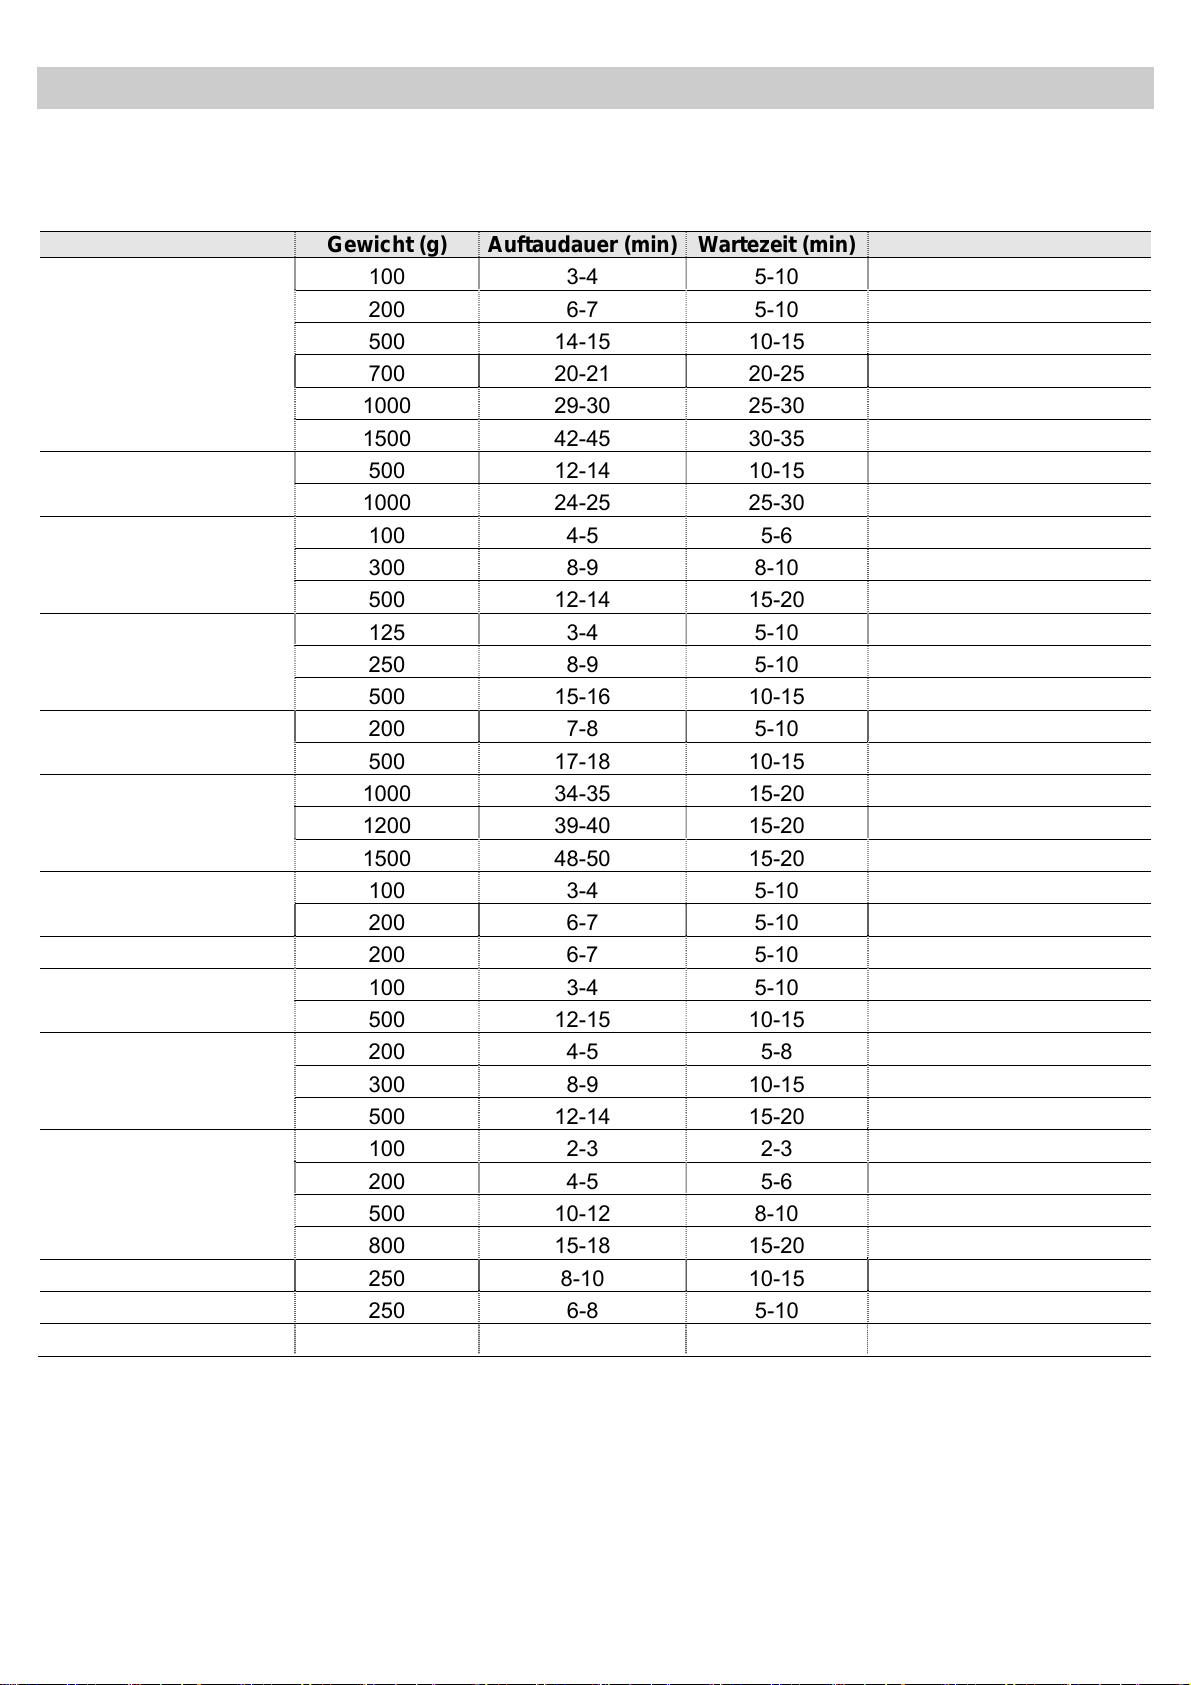
Auftauen
Die nachfolgende Tabelle gibt Ihnen eine
Übersicht über die verschiedenen Auftau- und
Wartezeiten (um eine einheitlichere Temperatur
Lebensmittel Gewicht (g) Auftaudauer (min) Wartezeit (min) Anmerkung
100 3-4 5-10 1 x wenden
200 6-7 5-10 1 x wenden
Fleisch am Stück,
Kalb, Rind, Schwein
Gulasch
Hackfleisch
Bratwurst
Geflügel, Geflügelteile
Hähnchen, Poularde
Fisch
Forelle 200 6-7 5-10 1 x wenden
Krabben
Obst
Brot
Butter 250 8-10 10-15 1 x wenden, abgedeckt
Quark 250 6-8 5-10 1 x wenden, abgedeckt
Sahne 250 7-8 10-15 Deckel abziehen
500 14-15 10-15 2 x wenden
700 20-21 20-25 2 x wenden
1000 29-30 25-30 3 x wenden
1500 42-45 30-35 3 x wenden
500 12-14 10-15 2 x wenden
1000 24-25 25-30 3 x wenden
100 4-5 5-6 1 x wenden
300 8-9 8-10 2 x wenden
500 12-14 15-20 2 x wenden
125 3-4 5-10 1 x wenden
250 8-9 5-10 1 x wenden
500 15-16 10-15 1 x wenden
200 7-8 5-10 1 x wenden
500 17-18 10-15 2 x wenden
1000 34-35 15-20 2 x wenden
1200 39-40 15-20 2 x wenden
1500 48-50 15-20 2 x wenden
100 3-4 5-10 1 x wenden
200 6-7 5-10 1 x wenden
100 3-4 5-10 1 x wenden
500 12-15 10-15 2 x wenden
200 4-5 5-8 1 x wenden
300 8-9 10-15 2 x wenden
500 12-14 15-20 3 x wenden
100 2-3 2-3 1 x wenden
200 4-5 5-6 1 x wenden
500 10-12 8-10 2 x wenden
800 15-18 15-20 2 x wenden
des Auftaugutes zu gewährleisten) und, abhängig
von Art und Gewicht der Speisen, entsprechende
zusätzliche Empfehlungen.
13
Page 15

Auftauen
Allgemeine Hinweise zum Auftauen
1. Verwenden Sie nur Mikrowellen geeignetes
Geschirr zum Auftauen (Porzellan, Glas,
Mikrowellen geeigneter Kunststoff).
2. Die Funktion Auftauen nach Gewicht und die
Tabellen beziehen sich auf das Auftauen von
rohen Lebensmitteln.
3. Die Auftauzeit ist von der Menge und der Höhe
des Auftaugutes abhängig. Kleinere Mengen
tauen schneller auf als große. Denken Sie
deshalb beim Einfrieren schon ans Auftauen.
Portionieren Sie das Gefriergut ihren
Schüsselgrößen entsprechend.
4. Die Speisen möglichst gleichmäßig im Garraum
verteilen. Fisch oder Hähnchenschenkel so
anordnen, dass die dickeren Teile nach außen
liegen. Empfindliche Teile können mit Alufolie
vor dem Überhitzen geschützt werden.
Wichtig: Die Alufolie darf die Garraumwand
nicht berühren, das es sonst zu
Funkenüberschlag kommt.
DE
8. Legen Sie Geflügel auf eine umgedrehte
Untertasse. So kann der Fleischsaft beim
Auftauen besser abtropfen.
9. Brot sollte in eine Serviette eingewickelt
werden, um ein Austrocknen zu verhindern.
10. Gefriergut aus der Verpackung nehmen,
Metallclipse unbedingt entfernen. Bei
Gefrierdosen, die auch zum Erwärmen und
Garen geeignet sind, den Deckel entfernen.
Ansonsten in Mikrowellengeeignetes Geschirr
umfüllen.
11. Auftauflüssigkeit u.a. von Geflügel sorgfältig
weggießen und auf keinen Fall mit anderen
Lebensmittel in Berührung bringen.
12. Beachten Sie, dass auch bei der
Auftauautomatik eine Ruhezeit notwendig ist,
bis die Speise vollständig aufgetaut ist. In der
Regel sollte sie 15 bis 20 Minuten betragen.
5. Wenden Sie kompakte Stücke mehrmals.
6. Verteilen Sie das Gefriergut möglichst
gleichmäßig, denn flache Speisen tauen
schneller auf als hohe.
7. Fettreiche Lebensmittel wie Butter, Quark und
Sahne sollten nicht ganz aufgetaut werden. Bei
Raumtemperatur sind sie in wenigen Minuten
servierfähig. Tief gekühlte Sahne sollte
geschlagen werden, wenn noch kleine
Eisstückchen vorhanden sind.
14
Page 16

DE
Programmablauf des Mikrowellengerätes
Bevor Sie ein Behältnis benutzen, prüfen Sie, ob
es für Mikrowellengeräte geeignet ist (siehe:
Welches Geschirr kann verwendet werden?).
Schneiden Sie das Gargut vor der Zubereitung
an.
Wenn Sie Flüssigkeiten erwärmen, benutzen Sie
Gefäße mit einer großen Öffnung, damit der
entstehende Dampf gut abziehen kann.
Bereiten Sie die Speisen nach den Angaben vor
und halten Sie sich an die in den Rezepten und
Tabellen angegeben Garzeiten und
Leistungsstufen.
Beachten Sie, dass es sich bei den Angaben um
Richtwerte handelt, die je nach Ausgangszustand,
Temperatur, Feuchtigkeitsgrad und Speiseart
variieren können. Es empfiehlt sich, die
Zeitangaben und Leistungsstufen dem jeweiligen
Vorgang individuell anzupassen. Je nach Zustand
des Nahrungsmittels müssen die Garzeiten
verlängert bzw. verkürzt werden oder die Leistung
erhöht bzw. verringert werden.
Zur Erinnerung: Garen mit Mikrowelle...
1. Je größer die Speisemenge, desto länger die
2. Je niedriger die Temperatur der Lebensmittel,
3. Weniger feste Lebensmittel werden schneller
4. Eine gute Verteilung der Speisen auf dem
5. Die Tür des Gerätes kann jederzeit geöffnet
Garzeit. Bitte folgende Faustregel beachten:
• doppelte Menge - doppelte Zeit
• halbe Menge - halbe Zeit
desto länger die Garzeit.
erwärmt.
Drehteller begünstigt gleichmäßiges Garen.
Wenn Sie die festeren Speisen auf den
äußeren Rand und die weniger festen auf die
Tellermitte legen, können Sie verschiedenes
Gargut gleichzeitig zubereiten.
werden. Das Gerät schaltet dabei automatisch
ab. Es arbeitet erst wieder, wenn die Tür
geschlossen wurde und die START- Taste
betätigt wunde.
Zwischendurch den Garprozess kontrollieren und
eine Nachgarzeit, d.h. eine Ruhezeit nach dem
Garen einplanen, in der sich die Temperatur
ausgleichen kann und die Speisen noch
nachgaren können.
6. Zugedeckte Speisen verkürzen die Garzeit.
Außerdem behält die Speise mehr
Eigenflüssigkeit. Der Deckel muss
mikrowellendurchlässig sein und eine kleine
Öffnung für den Dampfaustritt besitzen.
15
Page 17

Programmablauf des Mikrowellengerätes
Worauf Sie achten müssen!
• Kochen Sie keine Eier mit Schale im
Mikrowellengerät, da der in der Schale
entstehende Druck das Ei zum Platzen bringt.
Bei Spiegeleiern den Eidotter mehrmals
anstechen.
• Lebensmittel mit fester Schale oder Haut (z.B.
Äpfel, Tomaten, Kartoffeln, Würstchen) vor
dem Erwärmen oder Garen anstechen, damit
diese nicht platzen.
• Beim Zubereiten von Speisen mit geringer
Feuchtigkeit (z.B. beim Auftauen von Brot,
Erhitzen von Popcorn u.ä.) wird die
Feuchtigkeit sehr schnell entzogen. Das Gerät
wird dann ohne Last (leer) betrieben und das
Lebensmittel kann verkohlen. Dadurch können
Schäden am Gerät und am Geschirr auftreten.
Deshalb nur die benötigte Zeit einstellen und
den Vorgang beobachten.
• Das Erhitzen von größeren Mengen Speiseöl
(Frittieren) darf im Mikrowellengerät nicht
vorgenommen werden.
• Keine Flüssigkeiten in fest verschlossenen
Behältern erhitzen. Explosionsgefahr!
• Alkoholische Getränke dürfen nicht zu hoch
erhitzt werden. Deshalb nur die benötigte Zeit
einstellen und den Vorgang beobachten.
• Keine explosiven Stoffe bzw. Flüssigkeiten im
Mikrowellengerät erhitzen.
• Erwärmen Sie Babynahrung in Gläsern oder
Flaschen immer ohne Deckel oder Sauger.
Nach dem Erwärmen die Babynahrung gut
umrühren oder schütteln, damit sich die Wärme
gleichmäßig verteilt. Durch das Erwärmen im
Mikrowellengerät wird die Nahrung wesentlich
heißer als es die Außentemperatur des
Gefäßes erahnen lässt. Bevor die Nahrung
dem Kind gegeben wird, ist deshalb die
Temperatur der Speise unbedingt zu
überprüfen, um Verbrennungen zu vermeiden.
• Kunststoffbeutel nicht mit Drahtklammern,
sondern nur mit Kunststoffklammern
verschließen. Dabei mehrmals anstechen,
damit der sich schnell entwickelnde Dampf
entweichen kann.
• Bitte sicherstellen, dass die Speisen beim
Garen und Erhitzen eine Mindesttemperatur
von 70°C erreichen.
• Während des Betriebes kann sich durch
Verdampfen von Feuchtigkeit auf dem
Sichtfenster Kondenswasser niederschlagen
und eventuell unter der Tür abtropfen. Dieser
Vorgang ist normal und kann verstärkt bei
niedrigen Raumtemperaturen auftreten. Die
Sicherheit des Gerätes ist dadurch nicht
beeinträchtigt. Bitte nach dem Betrieb das
Kondenswasser abwischen.
DE
• Fertiggerichte vor dem Garen aus der
Verpackung nehmen, da diese meistens nicht
hitzebeständig ist. Die Zubereitungshinweise
des Herstellers sind zu beachten.
• Mehrere Gefäße wie z.B. Tassen sollten
gleichmäßig auf dem Drehteller verteilt werden.
16
Page 18
DE
Programmablauf des Mikrowellengerätes
Tabellen und Tipps – Garen von Gemüse
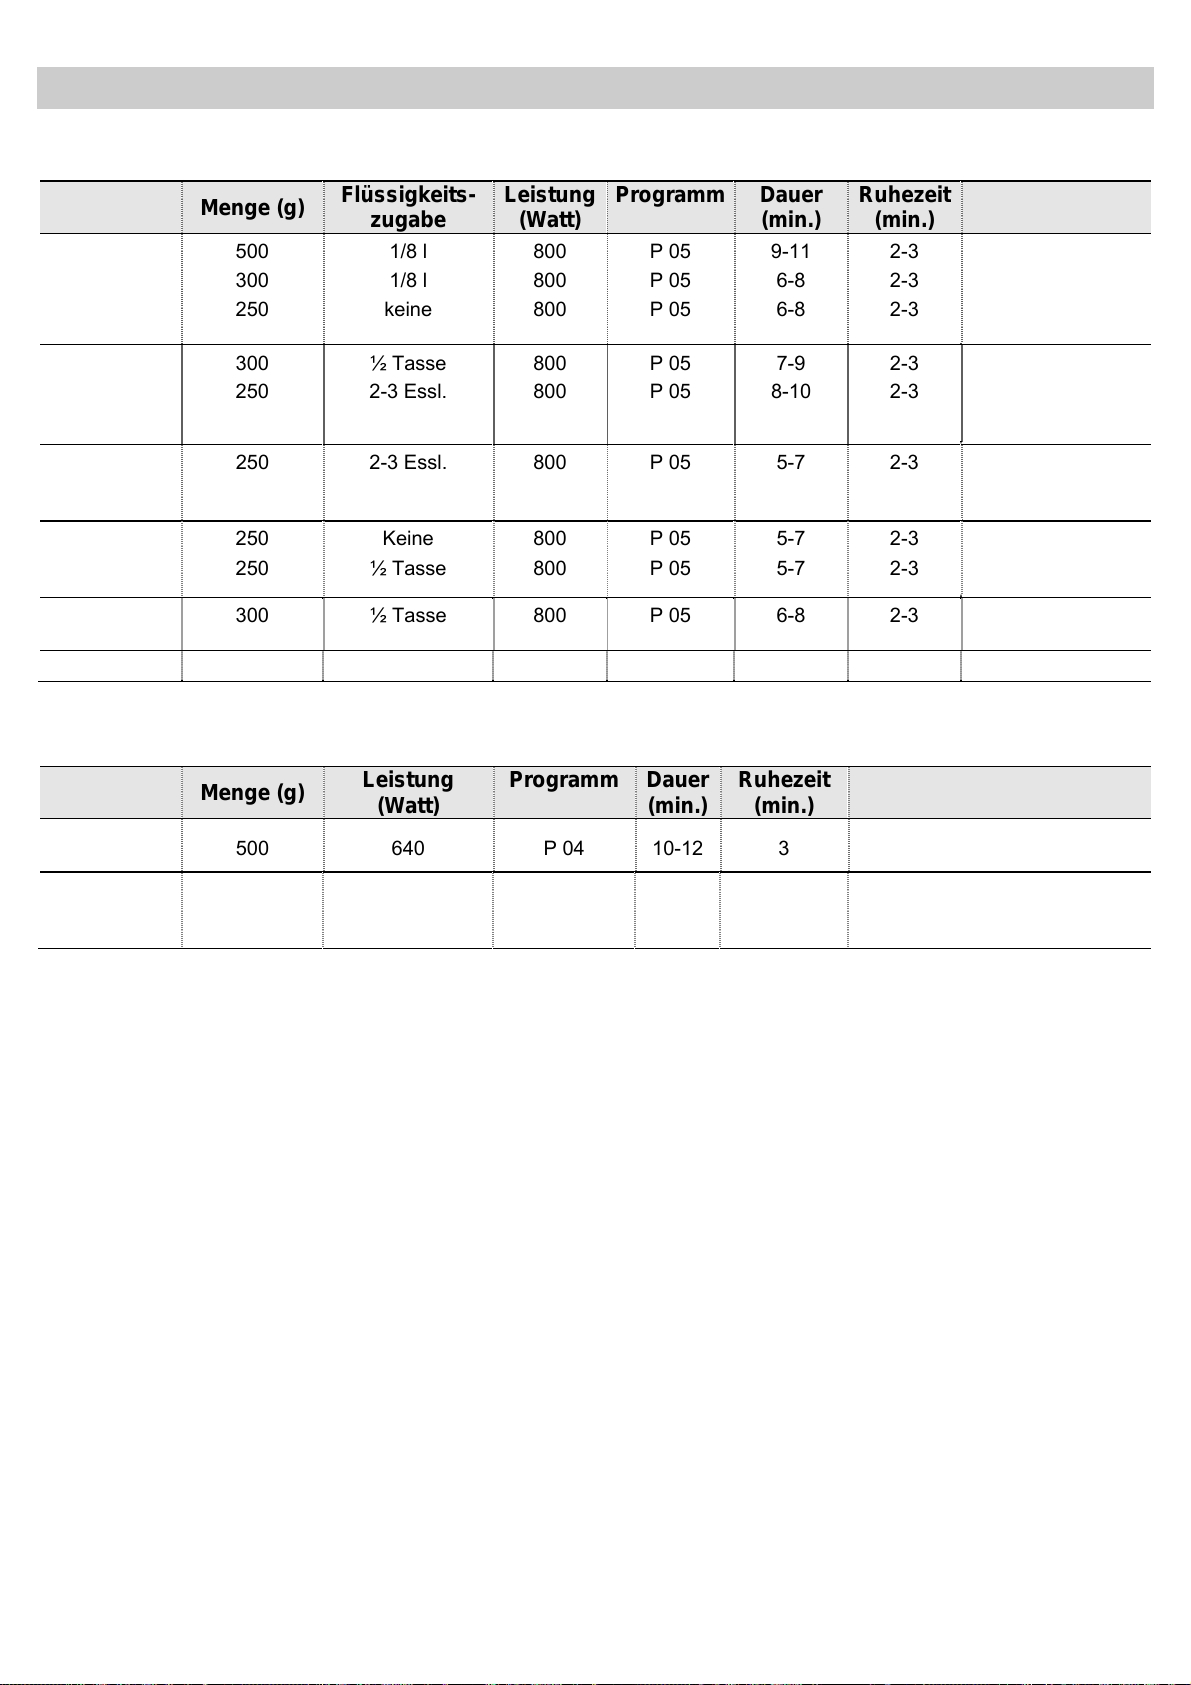
Gericht Menge (g)
Blumenkohl
Brokkoli
Champignons,
Pilze
Erbsen &
Karotten,
gefrorene
Karotten
Kartoffeln 250 2-3 Essl. 800 P 05 5-7 2-3 Schälen, in gleich
Paprika
Porree/Lauch
Rosenkohl,
gefroren
Sauerkraut 250 ½ Tasse 800 P 05 8-10 2-3
500
300
250
300
250
250
250
300 ½ Tasse 800 P 05 6-8 2-3
Flüssigkeits-
zugabe
1/8 l
1/8 l
keine
½ Tasse
2-3 Essl.
Keine
½ Tasse
Leistung
(Watt)
800
800
800
800
800
800
800
Programm Dauer
(min.)
P 05
P 05
P 05
P 05
P 05
P 05
P 05
9-11
6-8
6-8
7-9
8-10
5-7
5-7
Ruhezeit
(min.)
2-3
2-3
2-3
2-3
2-3
2-3
2-3
Tipps/Hinweise
Oben m. Butter
bestreichen. In
Scheiben
schneiden.
In Würfel oder
Scheiben
schneiden.
große Viertel oder
Hälften schneiden.
In Stifte oder
Scheiben
schneiden.
Tabellen und Tipps – Garen von Fisch
Gericht Menge (g)
Fischfilet 500 640 P 04 10-12 3
Fisch im
Ganzen
800
Leistung
(Watt)
800
480
Programm Dauer
(min.)
P 05
P 03
3-5
10-12
Ruhezeit
(min.)
2-3 Zugedeckt garen. Nach halber
Tipps/Hinweise
Zugedeckt garen. Nach halber
Garzeit wenden.
Garzeit wenden. Schwanz
eventuell bedecken.
17
Page 19

Programmablauf Grill
Um mit dem Grill optimale Ergebnisse zu erzielen,
benutzen Sie den mit dem Gerät mitgelieferten
Rost.
Setzen Sie den Rost so ein, dass er mit den
Metalloberflächen des Garraums nicht in
Berührung kommt, sonst besteht die Gefahr
des Funkenüberschlags, was wiederum zu
Beschädigungen Ihres Geräts führen kann.
WICHTIGE HINWEISE:
1. Bei der ersten Benutzung des Grills ist eine
Rauch- und Geruchsentwicklung auf Grund
2. Während des Grillbetriebs erreichen die
Wände des Garraums und der Grillrost sehr
hohe Temperaturen. Es wird die Benutzung
von Küchenhandschuhen empfohlen.
3. Während einer längerdauernden Nutzung des
Grills ist es normal, dass sich die
Heizwiderstände auf Grund des
Sicherheitsthermostats für einen kurzen
Zeitraum abschalten.
DE
der während des Fertigungsprozesses
verwendeten Öle normal.
5. Nach den ersten Benutzungen des Grills ist es
normal, dass sich der perforierte Bereich, der
die Heizstäbe schützt, verformt und goldgelb
anläuft. Dies ist durch die hohen
Betriebstemperaturen des Grills bedingt.
6. Die Glastür erreicht während des Grillbetriebs
sehr hohe Temperaturen. Damit das Gerät
außerhalb der Reichweite von Kindern bleibt,
sollte das Gerät auf einer Mindesthöhe von 80
cm vom Boden installiert werden.
den Grillbetrieb geeignet sein. Siehe
Geschirrtabelle!
7. Beim Grillen können Fettspritzer an den
Heizkörper gelangen und verbrennen. Dies ist
ein natürlicher Vorgang und stellt keine
Fehlfunktion dar.
8. Nach jedem Garvorgang den Garraum und
das Zubehör reinigen, damit sich der Schmutz
erst gar nicht festsetzen kann.
4. Wichtig: Wenn die Speisen in Gefäßen gegrillt
oder überbacken werden, müssen diese für
18
Page 20
DE
Programmablauf Grill
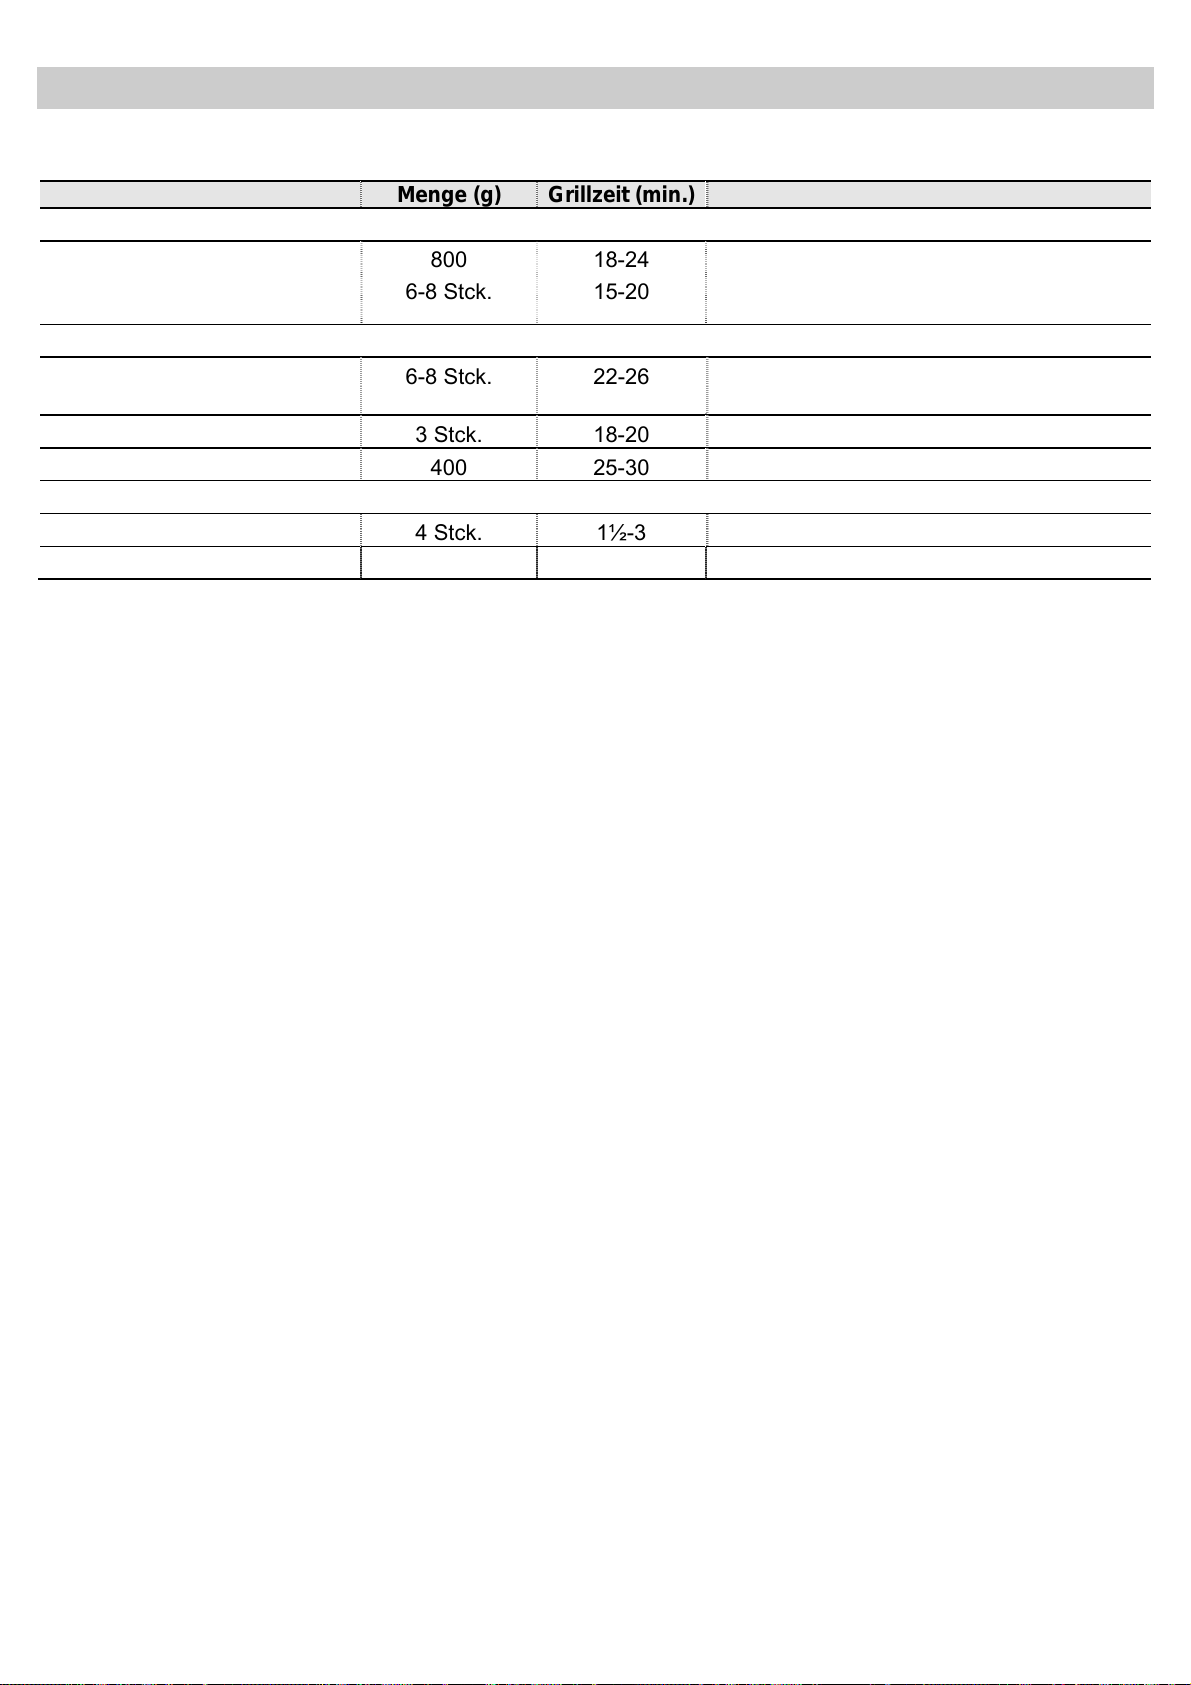
Tabellen und Tipps – Grillen ohne Mikrowelle
Gericht Menge (g) Grillzeit (min.) Tipps/Hinweise
Fisch
Goldmakrelen
Sardinen/Rötlinge
Fleisch
Bratwurst 6-8 Stck. 22-26 Nach Hälfte der Grillzeit anstechen und
Hacksteak tiefgefroren 3 Stck. 18-20
Rumpsteak (ca. 3 cm dick) 400 25-30 Nach Hälfte der Grillzeit ölen und wenden.
Sonstiges
Toast 4 Stck. 1½-3 Bräunung beobachten.
Belegte Toast überbacken 2 Stck. 5-10 Bräunung beobachten.
800
6-8 Stck.
18-24
15-20
Leicht mit Butter bestreichen oder ölen.
Nach Hälfte der Grillzeit wenden und mit
Gewürz bestreichen.
wenden.
Grill 2 Minuten vorheizen. Wenn nicht anders
angegeben, wird auf dem Grillrost gearbeitet. Die
Grillzeiten stellen nur Richtwerte dar und sind von
der Zusammensetzung und Menge des Gargutes
sowie der gewünschten Beschaffenheit abhängig.
Fisch und Fleisch bekommt einen besonders
guten Geschmack, wenn man sie vor dem Grillen
mit einer Marinade aus Pflanzenöl, Gewürzen und
Kräutern einpinselt und einige Stunden
durchziehen lässt. Salz sollte erst nach dem
Grillen verwendet werden.
Würstchen platzen nicht, wenn sie vorher mit
einer Gabel eingestochen wurden.
Nach der halben Grillzeit das Grillgut kontrollieren,
gegebenenfalls wenden oder mit Öl bepinseln
Grillen eignet sich besonders für flache Fleischund Fischstücke. Flache Fleischstücke müssen
Sie nur einmal wenden, größere, runde Stücke
mehrmals. Fische legen Sie am besten immer
Kopf an Schwanz auf den Grillrost.
19
Page 21
Programmablauf Grill
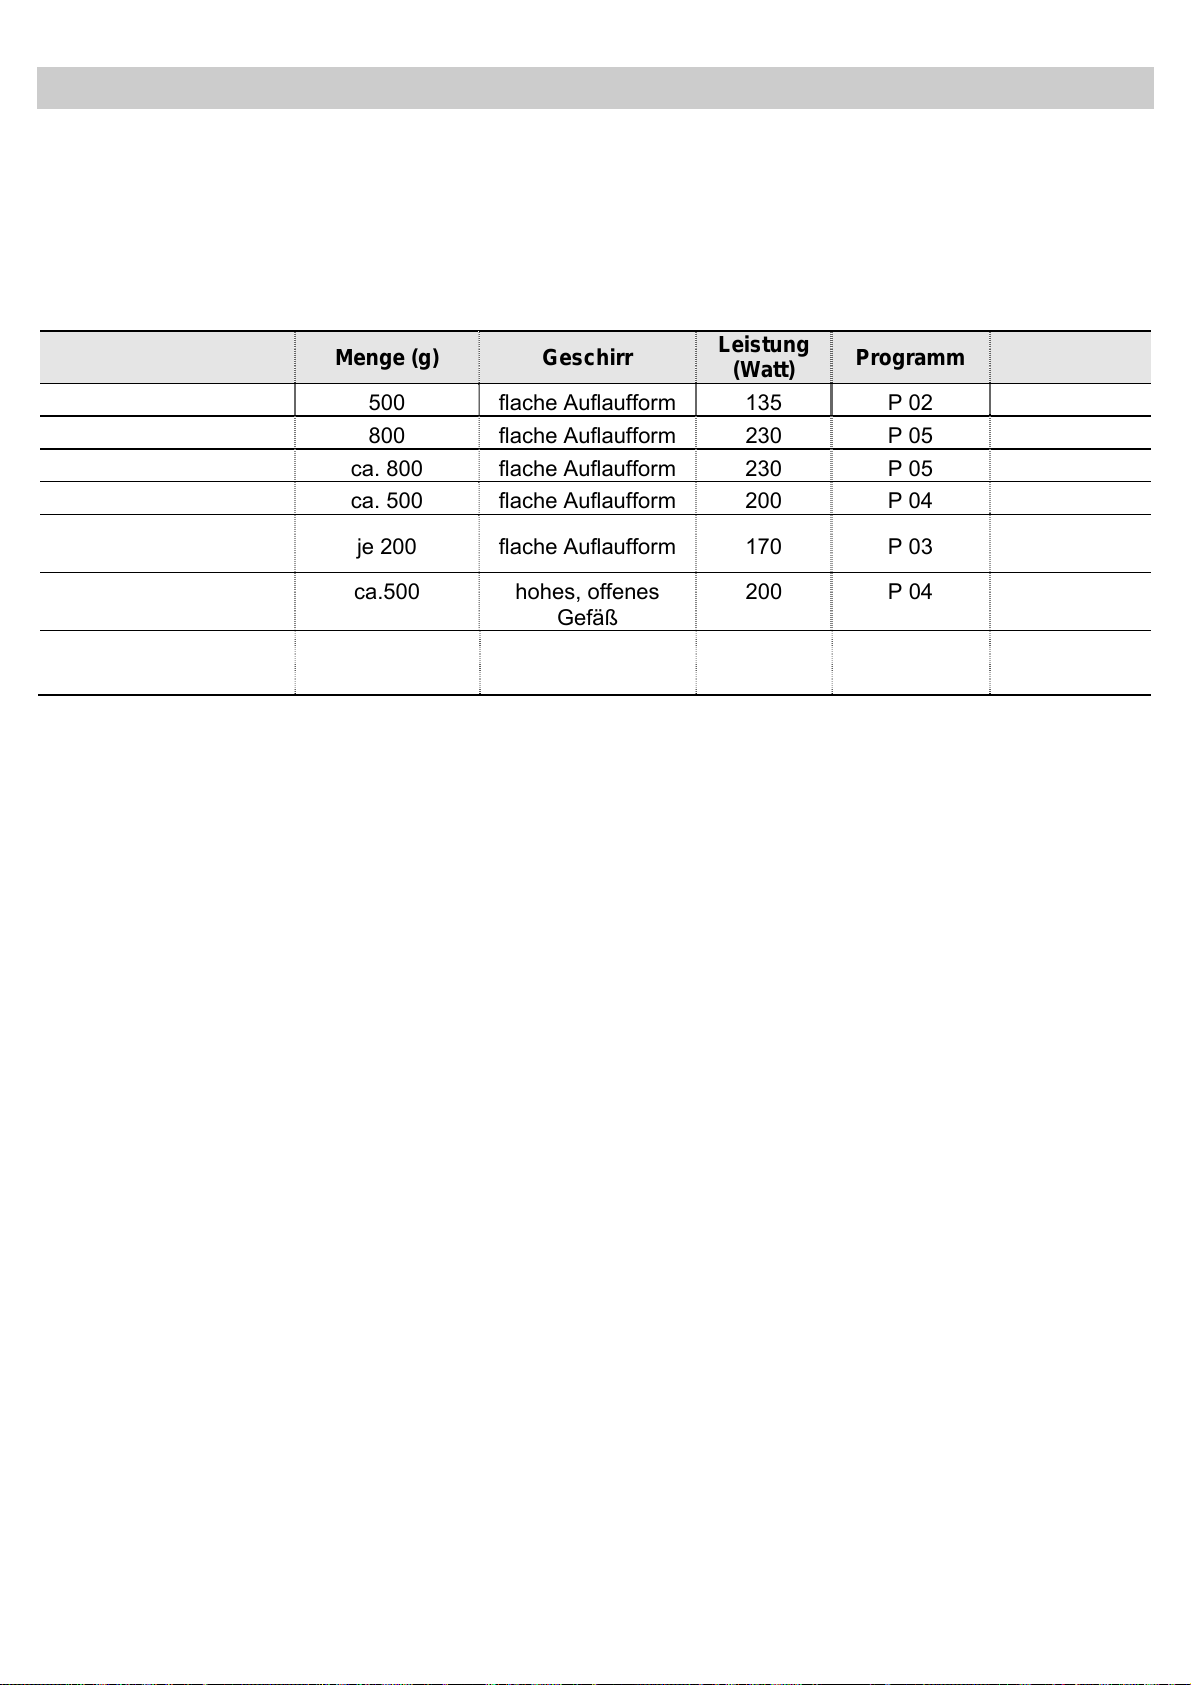
Tabellen und Tipps – Mikrowelle und Grill
Die Kombination Mikrowelle mit Grill ist ideal für
das schnelle Garen und gleichzeitige Bräunen von
Fleisch oder Geflügel. Außerdem eignet sie sich
auch zum Überbacken und gleichzeitigen Garen
von Aufläufen und Gratins.
Gericht Menge (g) Geschirr
Nudelauflauf 500 flache Auflaufform 135 P 02 12-17
Kartoffelgratin 800 flache Auflaufform 230 P 05 20-22
Lasagne ca. 800 flache Auflaufform 230 P 05 15-20
Quarkauflauf ca. 500 flache Auflaufform 200 P 04 18-20
2 Hähnchenkeulen,
frisch (auf dem Grillrost)
Hackbraten ca.500 hohes, offenes
Gratinieren von
Zwiebelsuppe
je 200 flache Auflaufform 170 P 03 8-10
2 Tassen von
200 g
Suppentassen 170 P 03 2-4
Mikrowelle und Grill sind abwechselnd in Betrieb.
So gart die Mikrowelle von innen heraus und der
Grill sorgt für eine knusprige Bräunung.
Leistung
(Watt)
200 P 04 17-19
Gefäß
Programm
Dauer
(min.)
DE
Wichtig Für den Kombibetrieb muss das Geschirr
sowohl für den Grillbetrieb als auch für den
Mikrowellenbetrieb geeignet sein. Siehe
Geschirrtabelle!
Die angegebenen Zeiten stellen nur Richtwerte
dar und sind von der Zusammensetzung und
Menge des Gargutes sowie der gewünschten
Beschaffenheit abhängig.
Reicht die Bräunung nicht aus, im Anschluss das
Gericht mit Grillbetrieb ca. 5 bis 10 Min.
nachbräunen lassen.
Lassen Sie vor allem Aufläufe, Gratins und
Geflügel 3 bis 5 Min. nachgaren, damit sich die
Temperatur gleichmäßig verteilen kann.
Wenn nicht anders angegeben, wird auf dem
Drehteller gearbeitet.
Die Tabellen gelten, sofern nicht anders
angegeben, für das Einsetzen in den kalten
Garraum (Vorheizen des Gerätes ist nicht nötig).
20
Page 22

DE
Welches Geschirr kann verwendet werden?
Mikrowellenbetrieb
Beim Mikrowellenbetrieb muss beachtet werden,
dass Mikrowellen von metallischen Flächen
zurückgeworfen werden. Glas, Porzellan,
Keramik, Kunststoffe, Papier dagegen lassen die
Mikrowellen ungehindert durch.
Deshalb sind Kochtöpfe und Kochgeschirr aus
Metall oder Gefäße mit Metallteilen und -dekor
für den Mikrowellenbetrieb nicht geeignet.
Auch Glas und Keramik mit metallischen
Verzierungen und Bestandteilen (z.B.
Bleikristall) darf nicht verwendet werden.
Ideal für das Mikrowellengaren sind feuerfestes
Glas, Porzellan, Keramik und hitzebeständige
Kunststoffe. Es ist empfehlenswert, sehr feines
und empfindliches Glas und Porzellan nur zum
Auftauen und kurzzeitigen Erwärmen von bereits
gegarten Lebensmitteln zu verwenden.
Mikrowellengeschirrtest
Stellen Sie Ihr Geschirr leer ca. 20 Sek. in das
Gerät bei höchster Einstellung. Bleibt das
Geschirr kalt oder wird es nur handwarm, ist es
geeignet. Wird es jedoch sehr heiß oder
entstehen Funken, ist es nicht geeignet.
Erhitzte Speisen geben Wärme an das Geschirr
ab. Es kann dadurch sehr heiß werden. Benutzen
Sie deshalb immer Topflappen!
Grillbetrieb
Für den Grillbetrieb muss das Geschirr
temperaturbeständig bis mindestens 250°C sein.
• Die Hersteller-Empfehlungen auf der
Verpackung sind zu beachten.
• Die Aluschalen dürfen nicht höher als 3 cm sein
und dürfen die Garraumwand nicht berühren
(Abstand mind. 3cm). Aludeckel müssen
entfernt werden.
• Die Aluschale direkt auf den Drehteller stellen.
Bei Verwendung der Roste, die Aluschale auf
einen Porzellanteller stellen. Die Schale nie
direkt auf den Rost stellen!
• Die Garzeit verlängert sich um einige Minuten,
da die Mikrowellen nur von oben in die Speisen
eindringen können. Im Zweifelsfall deshalb in
mikrowellengeeignetes Geschirr umfüllen.
• Alufolie kann gezielt eingesetzt werden, um die
Mikrowellen beim Auftauen abzuschirmen.
Empfindliche Lebensmittel wie Geflügel oder
Rinderhack können so durch Abdecken der
Flügelenden oder der Randteile vor dem
Überhitzen geschützt werden.
• Wichtig: Die Alufolie darf die Garraumwand
nicht berühren, das es sonst zu
Funkenüberschlag kommen kann.
Deckel
Es empfiehlt sich die Benutzung von Glas- oder
Kunststoffdeckeln bzw. Plastikfolie, denn:
1. Sie verhindern übermäßigen Dampfaustritt
(besonders bei langen Garzeiten);
2. Der Garungsprozess wird beschleunigt;
3. Das Austrocknen der Speisen wird verhindert;
Kunststoffgeschirr ist nicht geeignet.
Kombibetrieb
Für die Kombi-Betriebsarten muss das Geschirr
sowohl für den Mikrowellen- als auch für den
Grillbetrieb geeignet sein.
Aluminiumschalen/Alufolie
Fertiggerichte in Aluschalen oder Alufolie können
im Mikrowellengerät ohne Bedenken eingesetzt
werden, wenn folgende Punkte beachtet werden:
21
4. Das Aroma bleibt erhalten.
Deckel müssen mit Öffnungen ausgestattet sein,
damit kein Druck entstehen kann. Plastiktüten
müssen ebenfalls über Öffnungen verfügen.
Babyflaschen und Gläser mit Babybrei sowie
ähnliche Behältnisse dürfen nur ohne Deckel bzw.
Verschluss erwärmt werden,- sie können sonst
platzen.
Die folgende Tabelle gibt einen Überblick,
welches Geschirr für welche Anwendung geeignet
ist.
Page 23
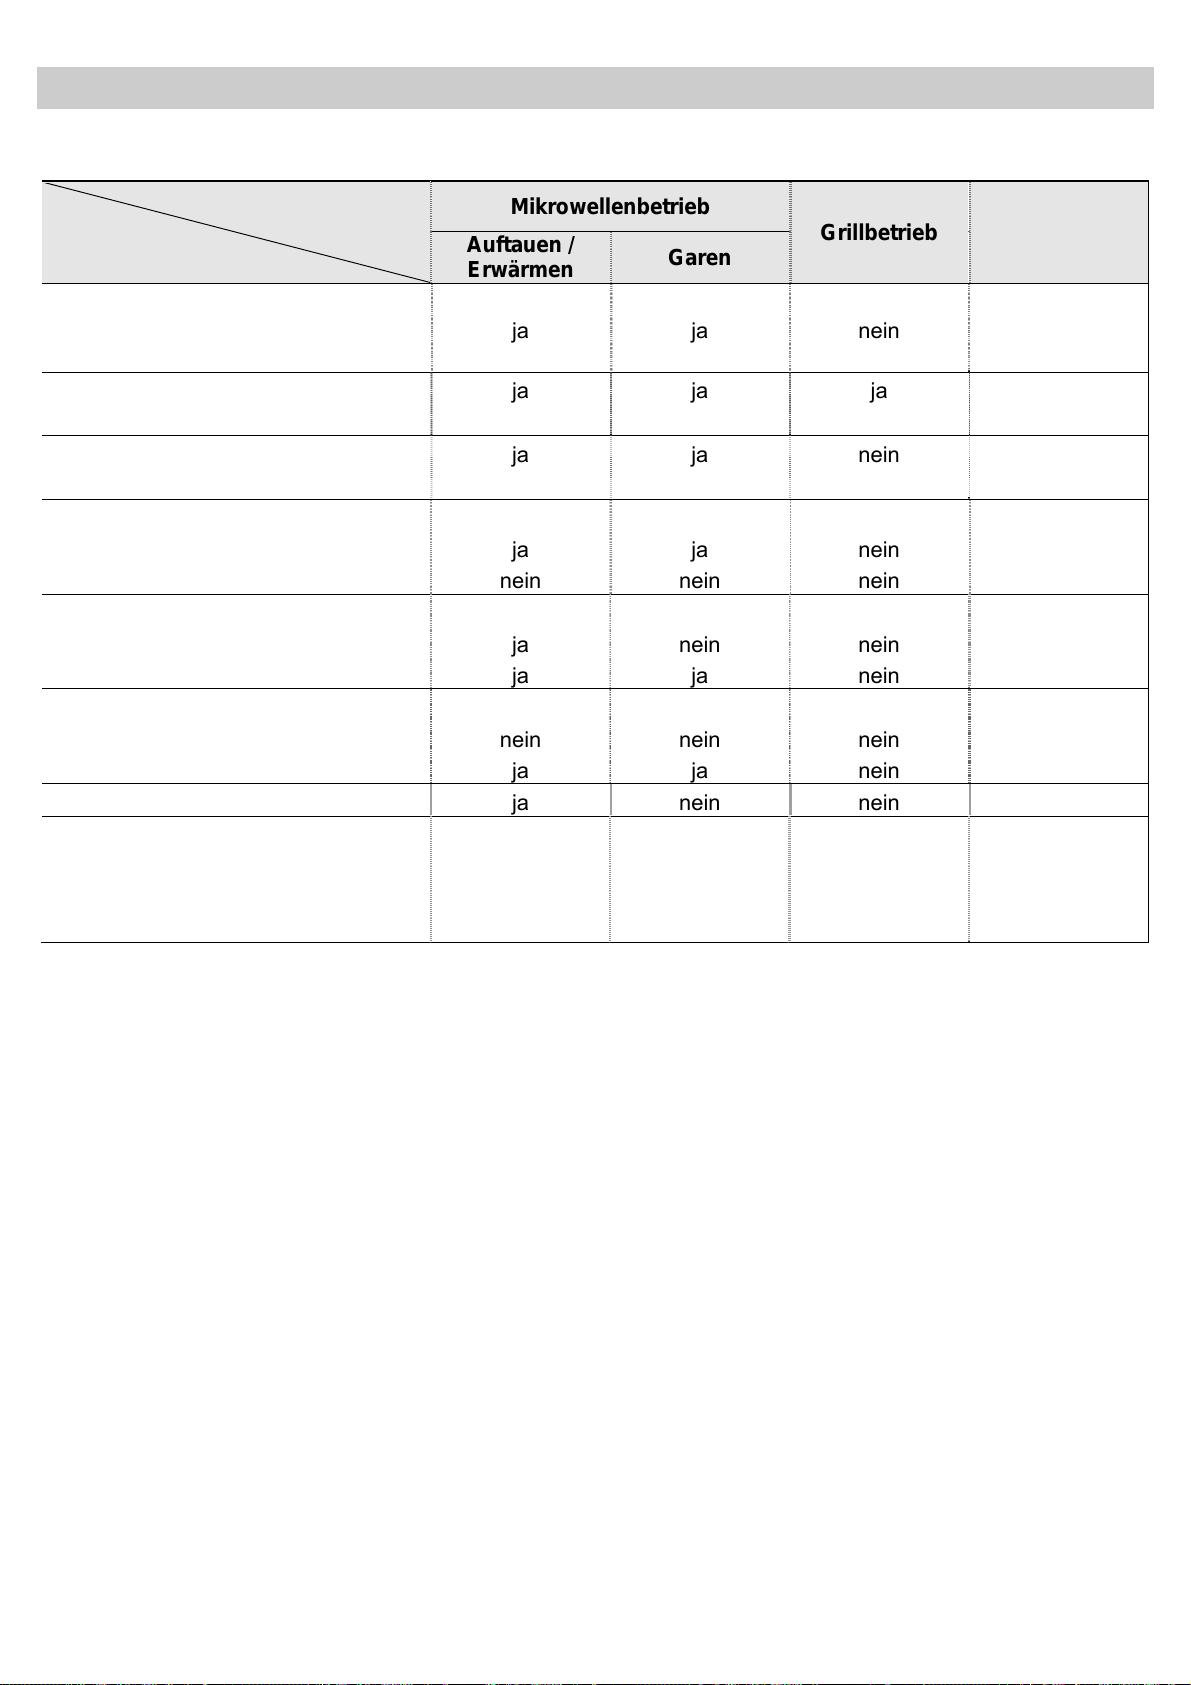
Welches Geschirr kann verwendet werden?
Geschirrtabelle
Betriebsart
Geschirrart
Glas und Porzellan 1)
haushaltsüblich, nicht feuerfest,
spülmaschinenfest
Glaskeramik
feuerfestes Glas und Porzellan
Keramik, Steingut 2)
ohne metallhaltige Glasuren
Tongeschirr 2)
glasiert
nicht glasiert
Kunststoff-Geschirr 2)
hitzebeständig bis 100°C
hitzebeständig bis 250°C
Kunststoff-Folien 3)
Frischhaltefolie
Mikrowellenfolie
Papier, Pappe, Pergament 4)
Metall
Alufolie
Aluschalen
Zubehörteile (Rost)
5)
Mikrowellenbetrieb
Auftauen /
Erwärmen
ja ja nein nein
ja ja ja ja
ja ja nein nein
ja
nein
ja
ja
nein
ja
ja nein nein nein
ja
nein
nein
Garen
ja
nein
nein
ja
nein
ja
nein
ja
nein
DE
Grillbetrieb Kombibetrieb
nein
nein
nein
nein
nein
nein
ja
ja
ja
nein
nein
nein
nein
nein
nein
nein
ja
ja
1. Ohne Gold- und Silberrand, kein
Bleikristall.
2. Herstellerangaben beachten!
3. Keine Metallclipse zum Verschließen von
Beuteln verwenden, Beutel anstechen,
Mikrowellenfolie nur zum Abdecken
verwenden.
4. Keine Wachs-Pappteller.
5. Nur flache Aluschalen ohne Deckel, Alu
darf Garraumwand nicht berühren.
22
Page 24
DE
Reinigung und Instandhaltung des Mikrowellengerätes
BEVOR SIE DAS MIKROWELLENGERÄT
REINIGEN, VERGEWISSERN SIE SICH, DASS
DER STECKER AUS DER STECKDOSE
HERAUSGEZOGEN IST.
Nach dem Betrieb das Gerät auskühlen lassen.
Zum Reinigen des Gerätes kein scheuerndes
Putzmittel, kratzende Topfreiniger oder spitze
Gegenstände verwenden.
Auβenflächen:
1. Reinigen Sie die Auβenflächen mit einer
lauwarmen Spülmittellauge und einem feuchten
Tuch.
4. Zubehörteile nach jeder Benutzung reinigen.
Bei starker Verschmutzung empfiehlt sich ein
Einweichen in Spülwasser und anschließende
Reinigung mit Bürste und Schwamm. Die
Zubehörteile sind Spülmaschinengeeignet. Achten
Sie darauf, dass der Drehteller und der Rollenring
immer sauber sind.
Tür, Türscharnier und Gerätvorderseite:
1. Diese Teile müssen immer sauber sein,
besonders die Kontaktflächen zwischen der Tür
und der Gerätevorderseite, damit die
Abdichtung des Gerätes gewährleistet ist.
2. Achten Sie darauf, dass kein Wasser in das
Innere des Gehäuses gelangt.
Garraum:
1. Reinigen Sie die Innenwände nach jedem
Gebrauch mit einem feuchten Wischtuch.
2. Achten Sie darauf, dass kein Wasser in die
Lüftungsöffnungen der Gerätevertiefung gerät.
3. Sollte seit der letzten Reinigung bereits eine
geraume Zeit verstrichen und die
Geräteinnenflächen verschmutzt sein, stellen
Sie ein Glas Wasser auf das Backblech und
lassen das Mikrowellengerät 4 min. lang auf
Höchststufe laufen. Der freigesetzte Dampf
weicht die Verschmutzungen auf, die
anschließend mit einem weichen Tuch entfernt
werden können.
Wichtig! Das Gerät darf nicht mit einem
Heißdampf- oder Dampfstrahlreiniger gereinigt
werden. Der Dampf kann an
Spannungsführende Teile des
Mikrowellengerätes gelangen und einen
Kurzschluss auslösen.
Stärkere Verschmutzungen der
Edelstahlflächen können mit einem
Edelstahlputzmittel entfernt werden.
Anschließend sollte jedoch gründlich mit
warmem Wasser nachgewischt und
trockengerieben werden.
2. Benutzen Sie eine lauwarme Spülmittellauge
und ein weiches Tuch zum Trocknen.
Glimmerdeckel
Die Glimmerdeckel müssen immer sauber
gehalten werden. Speisereste an den Deckeln
können durch Verbrennung zu einer
Verformung führen oder Funken auslösen.
Bitte deshalb die Glimmerdeckel regelmäßig
reinigen, jedoch nicht mit scheuernden
Putzmitteln oder spitzen Gegenständen
behandeln. Die Deckel nicht abnehmen, um
Gefährdungen zu vermeiden.
23
Page 25

Was tun bei Störungen?
Das Gerät arbeitet nach beschriebener
Einstellung nicht:
• Steckt der Netzstecker richtig in der
Steckdose?
• Ist die Tür völlig geschlossen? Die Tür muss
hörbar einrasten.
• Befinden sich Fremdkörper zwischen Tür und
Rahmen?
Die Speisen werden zu langsam oder
überhaupt nicht heiß:
• Verwenden Sie versehentlich Metallgeschirr im
Mikrowellenbetrieb?
• Haben Sie Betriebszeit und Leistungsstufe
korrekt gewählt?
• Haben Sie eine größere Menge oder kältere
Speisen als sonst in das Mikrowellengerät
gestellt?
Die Speise ist überhitzt, ausgetrocknet oder
verbrannt:
• Haben Sie Betriebszeit und Leistungsstufe
korrekt gewählt?
Das Gerät arbeitet mit ungewohnten
Nebengeräuschen:
DE
• Berührt das Geschirr die Garraumwand?
• Berühren sich lose Gegenstände wie
Fleischspieße oder Löffel im Garraum?
Die Innenbeleuchtung schaltet sich nicht ein:
• Falls das Gerät weiter funktioniert ist es
möglich das die Lampe nicht mehr in Ordnung
ist. Sie können das Gerät weiterhin nutzen.
• Dieser Eingriff kann nur durch den
Kundendienst ausgeführt werden, da
Spezialwerkzeuge eingesetzt werden müssen.
Der Stromversorgungskabel ist zerstört:
• Dieser Eingriff kann nur durch den
Kundendienst ausgeführt werden, da
Spezialwerkzeuge eingesetzt werden müssen.
Bei allen anderen Störungen den Servicedienst
verständigen.
ACHTUNG!
Reparaturen dürfen nur von einem geschulten
Kundendienst-Techniker durchgeführt werden.
• Springen im Garraum Funken zu Metallteilen
über?
24
Page 26

DE
Technische Eigenschaften
Funktionsbeschreibung
Symbol Beschreibung Leistungsstufe Anwendung
P 01 ---------- 160W
P 02 ---------- 320W
P 03 ---------- 480W
Mikrowelle
P 04 ---------- 640W
P 05 ---------- 800W
Schonendes Auftauen empfindlicher Speisen,
Warmhalten
Schwaches Fortkochen, Ausquellen von Reis
Schnelles Auftauen
Schmelzen von Butter
Erwärmen von Babynahrung
Garen von Gemüse und Lebensmitteln
Schonendes Garen und Erhitzen,
Erhitzen und Garen von kleinen Mengen
Erwärmen von empfindlichen Speisen
Schnelles Garen und Erhitzen von Flüssigkeiten
und fertigen Gerichten,
Überbacken von Toast
Grillen von Geflügel und Fleisch
Garen von Aufläufen und Gratins
Zubereiten von Hackbraten
Kartoffelgratin
Speisen grillen
Mikrowelle + Grill
Grill
P 01 ---------- 95W
P 02 ---------- 135W
P 03 ---------- 170W
P 04 ---------- 200W
P 05 ---------- 230W
---
Leistungsbeschreibung
• Wechselspannung ........................................................................................ Siehe: Typenschild
• Sicherung. .................................................................................................... 12 A / 250 V
• Eingangsleistung .......................................................................................... 1200 W
• Grillleistung. .................................................................................................. 1000 W
• Mikrowellenausgangsleistung. ...................................................................... 800 W
• Mikrowellenfrequenz ...… ............................................................................. 2450 MHz
• Außenabmessungen (B×H×T). ..................................................................... 595 × 390 × 350 mm
• Innenabmessungen (B×H×T). ....................................................................... 305 × 210 × 305 mm
• Fassungsvermögen. ..................................................................................... 20 l
• Gewicht ........................................................................................................ 18,6 kg
25
Page 27

Dear Customer:
First of all, we would like to thank you for
preferring our product. We are sure that this
modern, functional and practical microwave oven,
manufactured with the highest quality materials,
will live up to your expectations.
Please read the instructions in this book carefully,
as they will help you to get better results in using
your microwave oven.
PLEASE KEEP THE DOCUMENTATION ON
THIS PRODUCT FOR FUTURE REFERENCE.
Keep your instructions manual close at hand.
If you give the appliance to another person,
remember to give them the corresponding
manual as well!
EN
Tips on environmental protection
Eliminating the packaging
The packaging carries the Green Dot. Use the
right bins when discarding all of the packaging
materials, such as the cardboard, styrene and
plastic films. This will ensure that the packaging
materials are recycled.
Disposal of old electrical appliances
The European Directive 2002/96/EC on Waste
Electrical and Electronic Equipment (WEEE),
requires that old household electrical appliances
must not be disposed of in the normal unsorted
municipal waste stream. Old appliances must be
collected separately in order to optimise the
recovery and recycling of the materials they
contain and reduce the impact on human health
and the environment.
The crossed out “wheeled bin” symbol on the
product reminds you of your obligation, that when
you dispose of the appliance it must be separately
collected.
Consumers should contact their local authority or
retailer for information concerning the correct
disposal of their old appliance.
Before you dispose of your appliance, remove the
power cable, cut it and dispose of it.
26
Page 28

EN
Table of contents
Safety tips .......................................................................................................................................... 28
Installation instructions ................................................................................................................... 30
Description of the appliance ............................................................................................................ 31
Setting the clock ............................................................................................................................. 31
Advantages of the microwave oven ................................................................................................ 32
Microwave oven operating mode .................................................................................................... 32
Why the food is heated ................................................................................................................... 32
Instructions for use .......................................................................................................................... 33
Function: Microwave ....................................................................................................................... 33
Function: Grill ................................................................................................................................. 34
Function: Microwave + Grill ............................................................................................................ 34
Function: Defrosting by weight (automatic) .................................................................................... 34
Function: Defrosting by time (manual) ............................................................................................ 35
Special functions: DRINKS ............................................................................................................. 35
Special functions: PIZZA ................................................................................................................ 35
Special functions: CHICKEN .......................................................................................................... 35
Programming the microwave ........................................................................................................... 36
Safety lock ...................................................................................................................................... 36
During operation... ............................................................................................................................ 37
Function interruption ....................................................................................................................... 37
End of programme .......................................................................................................................... 37
Energy Saving ................................................................................................................................ 37
Defrosting .......................................................................................................................................... 38
General tips for defrosting .............................................................................................................. 39
Cooking with microwaves ................................................................................................................ 40
Important tips! ................................................................................................................................. 41
Tables and suggestions – Cooking vegetables .............................................................................. 42
Tables and suggestions – Cooking fish .......................................................................................... 42
Cooking with Grill ............................................................................................................................. 43
Tables and suggestions – Grill without microwave ......................................................................... 44
Tables and tips – Microwave and grill ............................................................................................. 45
What type of containers may be used? .......................................................................................... 46
Microwave function ......................................................................................................................... 46
Test the dishes ............................................................................................................................... 46
Grill function .................................................................................................................................... 46
Combined function .......................................................................................................................... 46
Aluminium containers and foils ....................................................................................................... 46
Lids ................................................................................................................................................. 46
Table – dishware ............................................................................................................................ 47
Cleaning and care ............................................................................................................................. 48
Troubleshooting ............................................................................................................................... 49
Technical Features ........................................................................................................................... 50
Description of functions of buttons .................................................................................................. 50
Specifications ................................................................................................................................. 50
27
Page 29

Safety tips
• Warning! In order to avoid any type of flame,
only use the microwave when you are there to
supervise. Very high power levels or very long
cooking times may heat the food to excess and
cause fires.
• If you see smoke or fire, keep the door closed,
to put out the flames. Switch off the appliance
and remove the plug from the socket.
• Warning! Children may only use the appliance
under supervision, or if they have been given
instructions, so that they may use the
appliance safely and identify the dangers in
case of incorrect use.
• Warning! Considerable care is required when
the grill is functioning. Keep children away from
the appliance!
• Our appliances meet the necessary regulations
and rules for technical equipment. However,
these do not cover all the possible accident
risks.
• When using inflammable materials, such as
plastics or paper containers, to heat or cook
foods, the cooking process must be monitored
on a continuous basis, because of the risk of
fire.
• Before using dishes or containers in the
microwave, check if they are microwave-saveOnly use microwave-safe dishes.
• The power cable should not touch damp,
sharp-edged objects or the appliance when it is
hot.
EN
• When connecting electrical appliances in the
vicinity of the microwave, ensure that the
power cables do not touch the microwave
when it is hot and that they do not get caught in
the oven door, in order to avoid damage and
danger.
• Pay attention to operating faults. The appliance
may not be used in the following cases:
- If the door does not close properly;
- If the door-hinges are damaged;
- If the contact surfaces between the door and
the front are damaged;
- If the glass in the window is damaged;
- If there is often an electrical arch inside the
oven, without the presence of any metallic
object.
• The ventilation holes may not be covered.
Cleaning/ maintenance:
• Before carrying out any maintenance or
cleaning, remove the plug from the socket.
• Please remember the cleaning tips contained
in the section “Cleaning and care”.
• The contact surfaces (the front of the cavity
and the inside of the door) must be kept quite
clean in order to guarantee correct functioning.
Clean the contact surfaces with a neutral
detergent and a cloth that does not scratch or
cause any type of friction.
• Warning: Never use the appliance if the
contact surfaces are damaged. Only use the
appliance again if it has been repaired by a
technician from the Technical Support Service.
28
Page 30

EN
Safety tips
The following tips avoid damage to the
appliance:
• Do not switch on the appliance without the
rotating base and respective plate.
• Do not switch on the appliance when it is
empty. This may result in overload, if there is
no food inside.
• Only use microwave-safe dishes.
• Do not keep any inflammable object inside the
oven, because it may go on fire when the oven
is switched on.
• Eggs with shells and whole boiled eggs should
not be heated in microwave ovens because
they may explode.
• Do not heat pure alcohol or alcoholic drinks in
the microwave.
THIS IS A FIRE HAZARD.
• Warning: do not heat liquids or other foods in
closed containers, because they could easily
explode.
Be careful when heating liquids!
• When heating liquids (water, coffee, tea, milk,
etc.), they may almost reach boiling point
inside the appliance and if they are removed
suddenly, may fly out of the container. This
may cause injuries and burns!
• In order to avoid this type of situations, put a
plastic spoon or glass rod in the container
when heating liquids.
Be careful!
• When heating small amounts of food, it is
very important not to select long periods of time
or very high power levels, because the food
may overheat or burn. For example, bread may
burn after 3 minutes if a very high power level
is selected.
• To toast, only use the grill function and
supervise the oven at all times. If you are using
the combined function (microwave and grill) to
toast, the bread will go on fire in a very short
period of time.
• Always heat baby food in jars or bottles
without lids or teats. After heating the food,
shake or stir it well to ensure that the heat is
uniformly distributed. Check the temperature of
the food before giving it to the child, Burning
hazard!
In case of repair:
• ¡Warning – Microwaves! The outer
protection should not be removed. Any
repair or maintenance carried out by persons
that have not been authorised by the
manufacturer is dangerous.
• Warning: The light bulb may only be replaced
by the Technical Support Service.
• If the power cable is damaged, only the
Technical Support Service may replace it with
one of the same characteristics, in order to
avoid damage.
• Repairs and maintenance, especially of
charged parts, may only be carried out by
technicians that have been authorised by the
manufacturer.
29
Page 31

Installation instructions
Use the “open” button to open the door and
remove all packaging materials. Then clean the
inside and the accessories with a damp cloth
and dry them. Do not use abrasive or strongsmelling products.
Ensure that the following parts are in good
condition:
• Door and hinges
• Front of the microwave
• Inner and outer surfaces of the appliance
DO NOT USE THE APPLIANCE if you notice
any kind of defect in the aforementioned parts. If
this occurs, contact the After Sales Service.
Place the appliance on a stable, flat surface.
Fit the rotating base in the centre of the
microwave cavity and place the rotating plate on
top until it clicks into position. Whenever the
microwave is used, both the rotating plate and
the respective base must be inside the oven and
correctly positioned. The rotating plate turns
clockwise and anti-clockwise.
EN
first time, carefully remove this film, starting at
the underside.
In order to ensure proper ventilation for the
appliance, install the microwave in a kitchen
unit with an opening on the top (see attached
sheets).
Warning: after installing the microwave, it is
necessary to guarantee access to the
electrical socket.
During installation, ensure that the power
cable does not come into contact with the
back of the appliance, because the high
temperatures may damage the cable.
If you are installing a microwave and a
conventional oven in the same column, the
microwave must not be placed under the
oven, because of the formation of
condensation.
The appliance must not be placed in the vicinity
of heating elements, radios or television sets.
Warning! The microwave oven may be wrapped
in a protective film. Before switching it on for the
The appliance is equipped with a power cable
and a plug for single phase current.
WARNING: The microwave MUST ONLY BE
CONNECTED TO GROUNDED ELECTRICAL
SOCKETS.
In case of fault, the manufacturer and the seller
will not accept any responsibility if the
installation instructions have not been properly
followed.
Description of the appliance
30
Page 32

EN
Description of the appliance
1. Glass window on the door 6. Open button
2. Catch 7. Slot for rotating base
3. Quartz grill 8. Rotating base
4. Mica covers 9. Turntable support
5. Control panel 10. Rotating plate
11. Grill
Setting the clock
1. Press the CLOCK button until the numbers start to flash.
2. Enter the time value by turning the ROTATING BUTTON, in any
direction.
3. Press the CLOCK button again to set the minutes.
4. Enter the minute’s value by turning the ROTATING BUTTON, in
any direction.
5. To finish, press the CLOCK button again.
31
Page 33

Advantages of the microwave oven
In a conventional cooker, the heat that is radiated
through the resistances or gas burners slowly
penetrates the foods from the outside in.
Therefore, there is a great loss of energy in
heating the air, the oven components and the
containers holding the food.
In the microwave, the heat is generated by the
foods themselves, i.e. the heat goes from the
inside out. There is no loss of heat to the air, the
walls of the cavity or the containers (as long as
they are microwave-safe containers). This means
that only the food is heated.
To sum up, microwave ovens have the following
advantages:
1. Savings in cooking time; in general, there is a
¾ reduction in time compared to conventional
cooking.
2. Ultra fast defrosting of foods, thus reducing the
danger of bacteria developing.
3. Energy-saving.
The friction between the molecules generates
heat, which raises the temperature of the foods,
defrosting or cooking them or keeping them hot.
Because heat is formed inside the foods:
• The foods may be cooked without any liquids
• Defrosting, heating or cooking in the
• The vitamins, minerals and nutritious
• Neither the natural colour nor the aroma are
The microwaves go through porcelain, glass,
cardboard or plastic, but not trough metal. For this
reason, metallic containers or containers with
metallic parts should not be used in the
microwave oven.
Microwaves are reflected by metal...
EN
or oils, or with very little of these;
microwave oven is faster than in a conventional
oven;
substances are conserved;
altered.
4. Conservation of the nutritional value of foods
due to the reduction in cooking time.
5. Easy cleaning.
Microwave oven operating mode
The microwave oven contains a high voltage
valve called a Magnetron, which converts the
electrical energy into microwave energy. These
electromagnetic waves are channelled towards
the inside of the oven by a wave guide and
distributed using a metallic disperser or a rotating
plate.
Inside the oven, the microwaves are propagated
in all directions and reflected by the metallic walls,
thus uniformly penetrating the foods.
Why the food is heated
Most foods contain water and the water
molecules vibrate with the microwaves.
... they go through glass and porcelain...
... and are absorbed by the foods.
32
Page 34

EN
Instructions for use
Warning! Never use the microwave when it is empty, i.e. when it
does not contain any food.
To operate the microwave, proceed as follows:
1. Plug the appliance into an appropriate electrical socket (see tips
on the last page).
2. To open the door, press the OPEN BUTTON. The inside lighting
of the microwave comes on.
3. Place the container with the food on the plate or on the grille.
4. Select the function and the cooking time, according to the
description contained in the following sections.
5. Close the door and press the start button.
6. The microwave starts to function. The screen shows the
operating time that is left.
IMPORTANT NOTE
The keys on the panel light up to assist you in setting the microwave. At any point in the setting process,
only the buttons that may be enabled will be lit up in green. When a function is selected, the
corresponding button lights up in red.
Function: Microwave
1. Press the MICROWAVE button. The button indicator lights up. It
stays on for the duration of the cooking time.
2. Enter the operating time (e.g., 10 minutes) with the help of the
ROTATING BUTTON, turning it in any direction.
3. To change the power of the microwave, press the “–” and
“+”buttons. If the buttons are not pressed, the appliance
functions at the maximum power. The screen shows the power
level selected (“P 01” – “P 05”). See the section on “Technical
Characteristics”.
4. Press the START button. The microwave starts to function.
33
Page 35

Instructions for use
Function: Grill
1. Press the grill button. The button indicator lights up.
2. Enter the operating time (for example, 10 minutes) with the help
of the ROTATING BUTTON, by turning it in any direction.
3. Press the START button. The microwave starts to function.
Function: Microwave + Grill
1. Press the MICROWAVE + GRILL button. The button indicator
lights up.
2. Enter the operating time (e.g., 10 minutes) with the help of the
ROTATING BUTTON, turning it in any direction.
3. To change the power of the microwave, press the “–” and “+”
buttons. If the buttons are not pressed, the appliance functions
at the maximum power. The screen shows the power level
selected (P 01 - P 05). See the section on “Technical
Characteristics”.
EN
4. Press the START button. The microwave starts to function.
Function: Defrosting by weight (automatic)
1. Press the button DEFROSTING. The button indicator lights up.
2. Use the “–” and “+” buttons to indicate the type of food (see the
following list). If you do not indicate any type of food, the
appliance will function on default programme 1 (meat).
3. Indicate the weight of the food (e.g. 1.2 kg) using the
ROTATING BUTTON, by turning it in any direction.
4. Press the START button. The microwave starts to function.
5. When the oven stops and starts to beep, move or turn the foods.
To continue, close the door of the microwave and press the start
button, to continue the defrosting process.
The following table shows the programmes for the defrosting by weight function, indicating the weight
ranges, defrosting and resting times (to ensure that the food reaches a uniform temperature).
Programme Food Weight Time Resting time
Pr 1 Meat 0.1 – 1.5 kg 4 – 45 min 20 – 30 min
Pr 2 Poultry 0.1 – 1.5 kg 4 – 50 min 20 – 30 min
Pr 3 Fish 0.1 – 1.5 kg 4 – 45 min 20 – 30 min
Pr 4 Fruit 0.2 – 0.5 kg 2 – 13 min 5 – 10 min
Pr 5 Bread 0.1 – 0.8 kg 2 – 19 min 5 – 10 min
34
Page 36

EN
Instructions for use
Function: Defrosting by time (manual)
1. Press the DEFROST button twice. The button indicator lights up.
2. Indicate the defrosting time (for example, 10 min.) using the
ROTATING BUTTON, turning it in any direction.
3. Press the START button. The microwave starts to function.
4. When the oven stops and starts to beep, move or turn the foods. To
continue, close the door of the microwave and press the start button,
to continue the defrosting process.
Special functions: DRINKS
1. Place the drink (150ml to 30ml of coffee, tea, water or milk etc.) in a
heatproof container on the tray.
2. Press the special function DRINKS button. The button indicator
lights up.
3. The time of this function may be increased in intervals of thirty
seconds by successively pressing the special function button
DRINKS. This may also be performed by turning the ROTATING
BUTTON, in any direction.
4. Press the START button. The microwave starts to function.
Special functions: PIZZA
1. Sprinkle a little flour on the tray and place the pizza directly on it.
2. Press the special function PIZZA button. The button indicator lights
up.
3. Press the START button. The microwave starts to function.
4. At the end, there is a wait period of two minutes during which the oven
will continue operation and the button function will flash special
function button PIZZA.
Special functions: CHICKEN
1. Cut up the chicken (400 to 500 g) and place it in a heatproof dish on
the tray. Add oil, spices, salt and other ingredients that are considered
necessary.
2. Press the special function CHICKEN button. The button indicator
lights up.
3. Press the START button. The microwave starts to function.
4. The Total preparation time is thirty minutes divided into four periods of
seven and half minutes. At the end of each of the first three periods,
the oven will switch itself off and beep. Turn the pieces of chicken
over and press the START button in order to continue cooking.
5. At the end, there is a wait period, during which the oven will continue
operation and the button function will flash special function button
CHICKEN.
35
Page 37

Programming the microwave
The normal functions (microwave, grill, microwave
+ grill, defrosting by weight and defrosting by time)
may be programmed one after each other, up to a
maximum of 3 functions.
For example, to defrost 800 g. of meat, cook it for
10 minutes at power 4 of the microwave function
and then for 8 minutes at power 3 of the
microwave+ grill, proceed as follows:
1. Press the DEFROST button. The button
indicator lights up.
2. The type of food Meat (Type 1) is already
enabled.
3. Use the ROTATING BUTTON to indicate the
weight of the food (0.8 kg).
4. Press the CLOCK/PROGRAMME button and
select the next function.
EN
10. Use the ROTATING BUTTON to indicate
the desired cooking time (8 min).
11. Press the “–” button twice, to set the
microwave to power 3.
12. Press the start button. The microwave
starts to function.
13. The appliance beeps when it goes from
one function (defrosting) to another
(microwave or grill).
14. When the microwave beeps, open the door
and turn the food around. Close the door
again and press the start button.
5. Press the MICROWAVE button. The button
indicator lights up.
6. Use the ROTATING BUTTON to indicate the
desired cooking time (10 min).
7. Press the “–” button to select the microwave at
power 4.
8. Press the CLOCK/PROGRAMME button and
select the following programme.
9. Press the MICROWAVE + GRILL button. The
button indicator lights up.
Safety lock
1. It is possible to block functioning of the appliance (for example,
to prevent it being used by children); to do so, press the STOP
button for 3 seconds. The microwave will beep and the
appliance will be locked. The screen will display four lines and
oven operation will be blocked.
2. The clock may be displayed at any time by pressing the START
button.
3. In order to unlock the microwave, press the START button for 3
seconds. The microwave will beep and the screen will display
the clock again.
36
Page 38
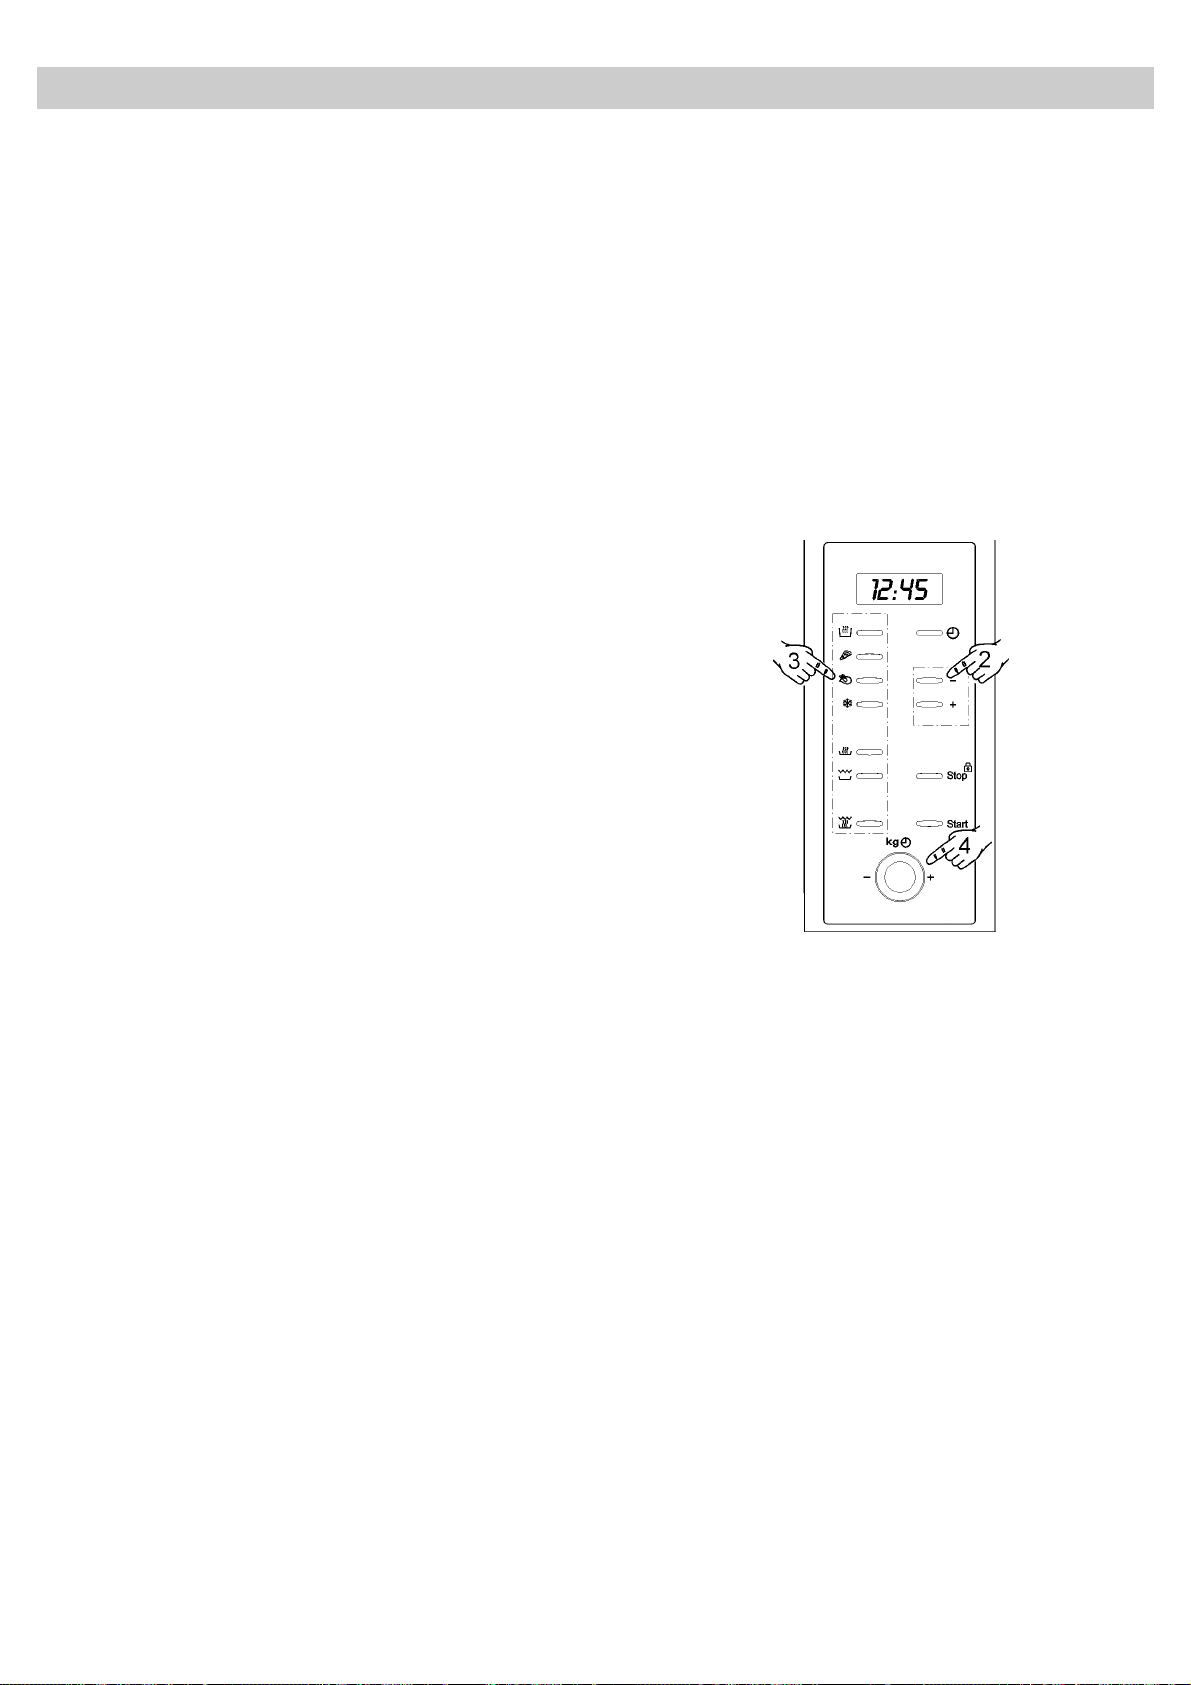
EN
During operation...
During the cooking process, you may open the
door at any moment, as:
• THE PRODUCTION OF MICROWAVES IS
IMMEDIATELY INTERRUPTED.
• The grill is deactivated and remains at a high
temperature.
• The timer stops and the screen shows the
operating time that is left.
If you wish, you may:
1. Turn around or move the foods to ensure
uniform cooking.
2. Change the power of the microwave, using
the “–” and “+” buttons.
3. Select another function, using the function
buttons.
4. Adjust the operating time that is left, by using
the ROTATING BUTTON.
Close the door again and press the start button.
The appliance will start to function again.
Energy Saving
This microwave oven has a special energy
saving mode which is automatically activated at
the end of a ten-minute period of inactivity.
In the energy saving mode, all keys are switched
off and the Display only show two dots which
flash every ten seconds.
The clock may be displayed at any time by
pressing the START key.
The energy saving mode is immediately
deactivated when a function key is pressed.
Function interruption
To interrupt the programme, press the STOP
button or open the door of the appliance.
If you wish to cancel the cooking process, close
the door again and press the STOP button. The
oven will beep and the screen will display the
time.
End of programme
When the programme is finished, the microwave
beeps 3 times and the screen displays “End”.
The beeps are repeated every 30 seconds, until
the door is opened or the “STOP” button is
pressed.
37
Page 39

EN
Defrosting
The following table is a general guideline for the
various defrosting and resting times required (to
guarantee that the food reaches a uniform
Food Weight (g)
Pieces of meat, veal,
beef, pork
Stewed meat 500 12-14 10-15 Turn around 2 x
Minced meat 100 4-5 5-6 Turn around 1 x
Sausage 125 3-4 5-10 Turn around 1 x
Poultry, poultry parts 200 7-8 5-10 Turn around 1 x
Chicken 1000 34-35 15-20 Turn around 2 x
Fish 100 3-4 5-10 Turn around 1 x
Trout 200 6-7 5-10 Turn around 1 x
Shrimps 100 3-4 5-10 Turn around 1 x
Fruit 200 4-5 5-8 Turn around 1 x
Bread 100 2-3 2-3 Turn around 1 x
Butter 250 8-10 10-15 Turn around 1 x, keep
Cottage cheese 250 6-8 5-10 Turn around 1 x, keep
Cream 250 7-8 10-15 Remove the lid
100 3-4 5-10 Turn around 1 x
200 6-7 5-10 Turn around 1 x
500 14-15 10-15 Turn around 2 x
700 20-21 20-25 Turn around 2 x
1000 29-30 25-30 Turn around 3 x
1500 42-45 30-35 Turn around 3 x
1000 24-25 25-30 Turn around 3 x
300 8-9 8-10 Turn around 2 x
500 12-14 15-20 Turn around 2 x
250 8-9 5-10 Turn around 1 x
500 15-16 10-15 Turn around 1 x
500 17-18 10-15 Turn around 2 x
1200 39-40 15-20 Turn around 2 x
1500 48-50 15-20 Turn around 2 x
200 6-7 5-10 Turn around 1 x
500 12-15 10-15 Turn around 2 x
300 8-9 10-15 Turn around 2 x
500 12-14 15-20 Turn around 3 x
200 4-5 5-6 Turn around 1 x
500 10-12 8-10 Turn around 2 x
800 15-18 15-20 Turn around 2 x
Defrosting Time
(min)
temperature) according to the type and weight of
the foods. It also contains the respective
recommendations for defrosting different foods.
Resting time (min) Comment
covered
covered
38
Page 40

EN
Defrosting
General tips for defrosting
1. Only use microwave-safe dishes for defrosting
(porcelain, glass, suitable plastic).
2. The defrosting by weight function and the
tables refer to defrosting of raw foods.
3. The defrosting time depends on the quantity
and the height of the food. When freezing
foods, prepare for the defrosting process.
Distribute the food in parts that match the size
of the container.
4. Distribute the food as well as possible inside
the microwave. The thickest parts of the fish or
the chicken legs should be placed on top. The
most delicate parts may be protected using
aluminium foil. Important: the aluminium foil
should not come in contact with the walls of the
cavity, as this could cause an electrical arch.
5. The most dense parts should be turned around
several times.
6. Distribute the frozen food in the most uniform
manner possible, because the thin, narrow
parts defrost fast than the thickest parts at the
top.
8. Place poultry on a turn over plate so that the
juices may drain more easily.
9. Bread should be wrapped in a napkin so that it
does not get too dry.
10. Remove frozen foods from its packaging and
do not forget to remove any metal clips. If the
containers that are used to keep the foods in
the freezer may also be used for heating and
cooking, just remove the lid. Otherwise, place
the foods in containers that are suitable for
microwave ovens.
11. The liquid that results in the defrosting
process, particularly in the case of poultry,
should be discarded and under no
circumstances should it come in contact with
other foods.
12. Bear in mind that a resting period is required
in automatic defrosting function, so that the
food is totally defrosted. This normally takes
between 15 to 20 minutes.
7. Foods that are rich in fats, such as butter,
cottage cheese and cream, should not be
entirely defrosted. If they are at room
temperature, they will be ready to serve within
a few minutes. In the case of deep-frozen
cream, if there are little bits of ice, the cream
should be whipped before eating.
39
Page 41

Cooking with microwaves
Before using a container, check if it is suitable for
using in a microwave oven (see: “What kind of
containers may be used?”).
Cut the food before starting to prepare it.
When heating liquids, use containers with a large
neck, so that the steam may evaporate easily.
Prepare foods according to the tips and pay
attention to the cooking times and power levels
indicated in the tables.
Remember that the values given are merely a
guideline and that they may vary depending on
the initial state, temperature, humidity and type of
food. We recommend that the times and power
levels be adjusted to each situation. Depending
on the food, the cooking time should be extended
or shortened and the power level should be raised
or reduced.
Cooking with microwaves...
EN
2. The lower the temperature, the longer the
cooking time.
3. Liquid foods heat faster.
4. Proper distribution of the food on the rotating
plate facilitates uniform cooking. If the solid
foods are placed on the outer part of the plate
and the least solid in the middle of the plate, it
will be possible to heat different kinds of food at
the same time.
5. The door of the appliance may be opened at
any time. The appliance is automatically
switched off. The microwave only continues to
function if the door is closed.
6. Foods that are covered require less cooking
time and their characteristics are better
preserved. The lid must allow the microwaves
to pass through and should have little openings
to allow the steam to come out
1. The greater the quantity of food, the longer the
cooking time. Remember the following rules:
• Double the quantity - double the time
• Half the quantity – half the time
.
40
Page 42

EN
Cooking with microwaves
Important tips!
• Eggs with shells and whole eggs should not be
heated in microwave ovens as they may
explode.
• Before heating or cooking foods with shells or
skin (e.g., apples, tomatoes, potatoes,
sausages) prick them wi th a fork so that they
do not open up.
• When foods are prepared with very little
humidity (e.g. defrosting bread, making
popcorn, etc.), the humidity evaporates very
fast. The appliance then functions with a
vacuum and the food may be carbonised. This
situation may cause damage to the appliance
and to the container being used. Therefore, the
oven should be set only for the necessary time
and the cooking process should be supervised.
• It is not possible to heat large quantities of oil
(fry) in the microwave.
• Do not heat liquids in airtight containers.
Explosion hazard!
• Alcoholic drinks may not be heated to high
temperatures. Therefore, the oven should be
set only for the necessary time and the cooking
process should be supervised.
• If there are various different containers,
such as cups for example, place them
uniformly on the rotating plate.
• Always heat baby bottles or jars of baby food
without lids or teats. After heating, shake or stir
it well to ensure that the heat is uniformly
distributed. The temperature of the containers
is considerably lower than that of the heated
food. Check the temperature of the food before
giving it to the child, to avoid burns.
• Plastic bags should not be closed with metal
clips, but with plastic ones. The bag should be
perforated several times so that the steam may
come out easily.
• When heating or cooking foods, ensure that
they reach a minimum temperature of 70°C.
• During the cooking process, water vapour
may form on the glass window of the door and
may drip down after a time. This is a normal
situation and may even be significant if the
room temperature is low. This does not
represent a hazard for the safety of the
appliance. After cooking, clean the water
resulting from the condensation.
• Do not heat any kind of explosive material or
liquid in the microwave.
• Remove precooked foods from the
packaging, because the latter is not always
heat-resistant. Follow the manufacturer’s
instructions.
41
Page 43

Cooking with microwaves
Tables and suggestions – Cooking vegetables
Food Quantity (g) Added liquid
Cauliflower
Broccoli
Mushrooms
Peas &
carrots, frozen
carrots
Potatoes 250 2-3 soup-
Peppers
Leeks
Frozen
Brussels
sprouts
Cabbage 250 ½ cup 800 P 05 8-10 2-3
500
300
250
300
250
250
250
300 ½ cup 800 P 05 6-8 2-3
1/8 l
1/8 l
-
½ cup
2-3 soup-
spoonfuls
spoonfuls
-
½ cup
Power
(Watt)
800
800
800
800
800
800 P 05 5-7 2-3 Peel, cut in
800
800
Program
P 05
P 05
P 05
P 05
P 05
P 05
P 05
Time
(min.)
9-11
6-8
6-8
7-9
8-10
5-7
5-7
Resting time
(min.)
2-3
2-3
2-3
2-3
2-3
2-3
2-3
EN
Tips
Spread some
butter on top.
Cut in slices.
Cut in cubes
or slices.
equal- sized
parts.
Cut in pieces
or slices.
Tables and suggestions – Cooking fish
Food Quantity (g)
Fillets of fish 500 640 P 04 10-12 3 Cook with the lid on. Turn
Whole fish 800 800
Power
(Watt)
480
Program
P 05
P 03
Time
(min.)
3-5
10-12
Resting
time (min.)
them around when half the
time has elapsed.
2-3 Cook with the lid on. Turn
them around when half the
time has elapsed. It may be
necessary to cover the ends
of the fish.
Tips
42
Page 44

EN
Cooking with Grill
In order to get the best results from the grill, use
the grille that is supplied along with the appliance.
Place the grille in such a position so that it
does not come into contact with the metallic
surfaces of the cavity, as there is the danger
of an electrical arch being formed, which
could damage the appliance.
IMPORTANT TIPS:
1. When the microwave is being used for the first
time, it produces some smoke and a smell,
which occur because of the use of oils during
the manufacture process.
2. After the grill has been used for the first time, it
is normal that the area with the holes that
protects the grill resistances should start to
deform slightly and turn a golden colour, due to
the high temperatures.
3. The glass in the door reaches very high
temperatures while the grill is being used. In
order that the appliance be out of reach of
children, it should be situated at a minimum
height of 80 cm.
4. While the grill is operating, the walls of the
cavity and the grille reach very high temperatures.
The use of oven gloves is recommended.
5. During a longer use of the grill, it is normal for
the resistances to switch off on a temporary
basis, due to the safety thermostat.
6. Important: when the food is grilled or cooked in
containers, it is important to check if the
container is suitable or not. See the table on
the types of dishes!
7. When using the grill, the splashes of grease
may reach the resistance and be burned. This
is a normal situation and does not represent
any operating fault.
8. After each cooking process, clean the inside
and the accessories, to prevent the dirt from
sticking.
43
Page 45

EN
Cooking with Grill
Tables and suggestions – Grill without microwave
Food Quantity (g) Time (min.) Tips
Fish
Dorada
Sardine/red scorpion fish
Meat
Sausage 6-8 pcs 22-26 Prick with a fork half way through the
Frozen hamburger 3 pcs 18-20
Entrecote (approx. 3 cm thick) 400 25-30 Half way through the process, spread a little
Others
Toast 4 pcs 1½-3 Supervise the browning process.
Grilled sandwiches 2 pcs 5-10 Supervise the browning process.
Heat the grill for 2 minutes before use. If there is
no reason not to do so, use the grille. The times
that are indicated are merely indicative and they
may vary depending on the composition and the
quantity of food, as well as on the desired results.
Fish and meat will taste best if they are coated in
a little vegetable oil, herbs and spices and left to
marinade for a few hours before being grilled. The
salt should only be added after cooking on the
grill.
Sausages will not open if they are picked with a
fork before being grilled.
800
6-8 pcs
18-24
15-20
Spread a light layer of butter on the fish.
When half the time has elapsed, turn them
around and sprinkle condiments.
cooking process and turn them around.
oil or butter on it and turn it around.
Half way through the grill process, supervise the
cooking and if necessary, turn the food around or
add a little more oil.
The grill is particularly suitable for preparing thin
pieces of meat and fish. Thin pieces of meat need
only be turned once, while larger pieces will need
to be turned several times. In the case of fish, we
recommend that the two ends of the fish be joined
together, the mouth and the tail before placing on
the grill.
44
Page 46

EN
Cooking with Grill
Tables and tips – Microwave and grill
The microwave with grill function is ideal for
cooking fast and browning meat at the same time.
It may also be used to prepare foods “au gratin”.
The microwave and the grill function on an
alternate basis. The microwaves cook and the grill
browns the food.
Dish Quantity (g) Type of container
Pasta “au gratin” 500 Low dish 135 P 02 12-17
Potatoes “au gratin” 800 Low dish 230 P 05 20-22
Lasagne approx. 800 Low dish 230 P 05 15-20
Cottage cheese “au gratin” approx. 500 Low dish 200 P 04 18-20
2 fresh chicken drumsticks
(on the grille)
Meat round approx. 500 Tall, wide container 200 P 04 17-19
Onion soup “au gratin” 2 200g cups Soup bowls 170 P 03 2-4
200 g each Low dish 170 P 03 8-10
Power
(Watts)
Program Time (min.)
Before using dishes and containers in the
microwave, check that they are microwave-safe.
Only use dishes that are microwave-safe.
The dishes used in the combined function must
be suitable for both microwave and grill. See the
table on the types of dishes to be used.
“Au gratin” dishes and poultry require between 3
and 5 minutes more cooking time, so that the
temperature is distributed uniformly in the food.
If there are no instructions to the contrary, the
rotating plate should be used in the cooking
process.
Remember that the values provided are merely
indicative in nature and that they may vary
depending on the initial state, the temperature,
humidity and the type of food.
If the time is not sufficient to brown the food
properly, set the grill function for 5 or 10 minutes
more.
The values indicated in the tables are valid for
when the cavity is cold (no preheating required in
advance).
45
Page 47

What type of containers may be used?
Microwave function
In the microwave function, it is important to
remember that the microwaves are reflected by
metallic surfaces. Glass, porcelain, ceramic,
plastic and paper will allow the microwaves to
pass through.
Therefore, metallic pans and dishes for
cooking or containers with metallic
components or decorations may not be used
in the microwave. Glassware and ceramic with
metallic decorations or parts (e.g. lead glass)
may not be used.
The ideal materials to be used for cooking in a
microwave oven are refractory, heat-resistant
glass, porcelain or ceramic. Very fine crystal and
porcelain should only be used for a short time, to
defrost or reheat foods that have already been
cooked.
• Pay attention to the manufacturer’s instructions
that are printed on the packaging,
• Aluminium containers should not be higher
than 3 cm and they should not come into
contact with the walls of the cavity (minimum
distance 3 cm). The aluminium lid should be
removed.
• Place the aluminium container directly on the
rotating plate. If the grille is used, the container
should be placed on a porcelain plate. Never
put the container directly on the grille!
• The cooking time will be longer because the
microwaves only enter the food from above. In
case of doubt, only use microwave-safe dishes.
• Aluminium foil may be used to reflect the
microwaves during the defrosting process.
Delicate foods, such as poultry or minced
meat, may be protected from excessive heat by
covering the respective ends.
EN
Test the dishes
Place the dish inside the oven at the maximum
power level for 20 seconds. If it is cold or not very
hot, it is suitable. However, if it gets very hot or
causes an electrical arch, it is not suitable.
Hot foods transmit heat to the dish, which may
become very hot. Therefore, always use a glove!
Grill function
In the case of the grill function, the dish must be
resistant to temperatures of at least 250ºC.
Plastic dishes are not suitable.
Combined function
In the combined function, the dishes that are used
must be suitable for both microwave and grill
cooking.
Aluminium containers and foils
Precooked foods in aluminium containers or
wrapped in aluminium foil may be placed in the
microwave oven if the following instructions are
followed:
• Important: the aluminium foil must not come
into contact with the walls of the cavity, as this
could cause an electrical arch.
Lids
The use of glass or plastic lids or adherent film is
recommended, for the following reasons:
1. They prevent excessive evaporation (especially
in very long cooking periods);
2. The cooking process is faster;
3. The food does not go dry;
4. The aroma is preserved.
The lid should have holes to avoid any type of
pressure from building up. Plastic bags should
also have openings. Baby bottles and baby food
jars and other similar containers must only be
heated without the lid, as they might explode if it
is left on.
The following table gives general guidelines on
the type of dishes that are suitable for each
situation.
46
Page 48

EN
What type of containers may be used?
Table – dishware
Operating mode
Type of dish
Glass and porcelain 1)
Domestic, non fire-resistant, may be
washed in dishwasher
Glazed ceramic
Fire-resistant glass and porcelain
Ceramic, earthenware dishes
unglazed
glazed without metallic decorations
Earthenware dishes
glazed
unglazed
Plastic dishes 2)
heat-resistant up to 100°C
heat-resistant up to 250°C
Plastic films 3)
Cling film
Cellophane
Paper, cardboard, parchment 4)
Metal
Aluminium foil
Aluminium containers 5)
Accessories (grille)
Microwave
Grill
Defrost / heat Cook
yes yes no no
yes yes yes yes
yes yes no no
yes
no
yes
yes
no
yes
yes no no no
yes
no
no
yes
no
no
yes
no
yes
no
yes
no
no
no
no
no
no
no
yes
yes
yes
Microwave +
Grill
no
no
no
no
no
no
no
yes
yes
1. No golden or silver edges and no lead glass.
2. Remember the manufacturer’s tips!
3. Do not use metal clips to close the bags.
Perforate the bags. Use films only to cover
foods.
4. Do not use paper plates.
5. Only shallow aluminium containers without lids.
The aluminium must not come into contact with
the walls of the cavity.
47
Page 49

Cleaning and care
BEFORE CLEANING the microwave, ENSURE
THAT THE PLUG IS NOT IN THE SOCKET.
After using the appliance, let it cool off. Do not
clean the appliance with abrasive cleaning
products, scourers that will scratch the surface or
sharp objects.
Outer surface:
1. Clean the outer surface with a neutral
detergent, lukewarm water and a damp cloth.
2. Do not allow water to pass through the outer
structure.
Inside
1. After each use, clean the inside walls with a
2. Do not allow water to enter the ventilation holes
3. If it has been some time since the last cleaning
:
damp cloth.
of the microwave oven.
and the cavity of the microwave oven is dirty,
put a glass of water on the tray and connect
the microwave at maximum power for 4
minutes. The steam that is released will soften
the dirt, which will be easy to clean with a soft
cloth.
EN
4. Clean accessories after each use. If they are
very dirty, steep them first and then use a
brush and a sponge. The accessories may be
washed in the dishwasher. Ensure that the
rotating plate and respective base are always
clean.
Door, door-hinges and front of the appliance
1. These parts must always be clean,
especially the contact surfaces between the
door and the front of the appliance, so that
there are no leaks.
2. To clean, use a neutral detergent and
lukewarm water. Dry with a soft cloth.
Mica covers:
Always keep the mica covers clean. Food
remaining in the covers may deform it or
produce sparks if they go on fire. Therefore,
they should be cleaned on a regular basis, but
abrasive cleaning products or sharp objects
should not be used. Do not remove the
covers, to avoid any risk.
:
Important! The appliance should not be
cleaned with steam cleaning machines. The
steam may reach the charged parts and cause
a short circuit.
The most soiled stainless steel surfaces may
be cleaned using a non-abrasive cleaning
product.
Then they should be rinsed with hot water and
dried well.
48
Page 50

EN
Troubleshooting
The appliance does not function properly:
• Is the power plug correctly inserted in the
socket?
• Is the door properly closed? The door should
make an audible click when it closes.
• Are there any foreign bodies between the door
and the ring?
The foods do not heat up or they heat very
slowly:
• Did you use a metallic dish by mistake?
• Did you select the right operating time and
power level?
• Did you place a larger or colder amount of food
than usual in the microwave?
The food is too hot, dry or burned:
• Did you select the right operating time and
power level?
The inside lighting does not come on:
• If all of the functions are operating correctly,
the bulb is probably blown. You may continue
to use the appliance.
• The light bulb may only be replaced by the
Technical Support Service.
The power cable is damaged
• The power cable must be replaced by the
manufacturer, authorised agents or technicians
that are qualified to perform this task, in order
to avoid dangerous situations and because
special tools are needed.
If any other type of fault is noticed, contact the
Customer Support Service.
All repairs must be performed by specialised
technicians.
There are noises while the appliance is in
operation:
• Is there an electrical arch inside the
microwave?
• Is the dish coming into contact with the walls of
the cavity?
• Are there loose skewers or spoons inside the
microwave?
49
Page 51

Technical Features
Description of functions of buttons
Symbol Description Power Foods
Slow defrosting for delicate foods, keeping food
hot
Cooking at low heat, boiling rice
Fast defrosting
Melting butter
Heating baby food
Cooking vegetables and other foods
Cooking and heating carefully,
Heating and cooking small quantities
Heating delicate foods
Cooking and heating liquids and other foods fast
Browning toast
Grilling poultry and meat
Cooking meatloaves and “au gratin” dishes
Preparing meat round
Potatoes “au gratin”
Grill all sorts of foods
Microwave
Microwave + Grill
Grill
P 01 ---------- 160W
P 02 ---------- 320W
P 03 ---------- 480W
P 04 ---------- 640W
P 05 ---------- 800W
P 01 ---------- 95W
P 02 ---------- 135W
P 03 ---------- 170W
P 04 ---------- 200W
P 05 ---------- 230W
---
EN
Specifications
• AC voltage .................................................................................................... See characteristics plate
• Fuse. ............................................................................................................ 12 A / 250 V
• Power required ............................................................................................. 1200 W
• Grill power. ................................................................................................... 1000 W
• Microwave output power. .............................................................................. 800 W
• Microwave frequency… ................................................................................ 2450 MHz
• Outer dimensions (W×A×D). ......................................................................... 595 × 390 × 350 mm
• Cavity dimensions (W×A×D). ........................................................................ 305 × 210 × 305 mm
• Oven capacity. .............................................................................................. 20 l
• Weight .......................................................................................................... 18.6 kg
50
Page 52

FR
Cher Client,
Avant toute chose, nous souhaitons vous
remercier d’avoir choisi notre produit. Nous
sommes sûrs que ce four micro-ondes, moderne,
fonctionnel et pratique, fabriqué à partir de
matériaux de première qualité, satisfera toutes
vos attentes.
Nous vous prions de lire attentivement les
instructions qui figurent dans ce manuel car elles
vous assureront de meilleurs résultats lors de
l’utilisation de votre four micro-ondes.
CONSERVEZ LA DOCUMENTATION DE CE
PRODUIT POUR TOUTE RÉFÉRENCE
FUTURE.
Gardez le manuel d’instructions à portée de
main. Si vous cédez l’appareil à un tiers,
veuillez lui remettre également le manuel.
Indications sur la protection de
l’environnement
Élimination de l’emballage
L’emballage porte la marque Point Vert. Pour
éliminer les matériaux d’emballage, comme le
carton, le polyuréthane et les films plastiques,
utilisez des conteneurs adéquats. Vous
garantissez ainsi la réutilisation des matériaux
d’emballage.
Enlèvement des appareils ménagers
usagés
La Directive Européenne 2002/96/EC sur les
Déchets des Equipements Electriques et
Electroniques (DEEE), exige que les appareils
ménagers usagés ne soient pas jetés dans le flux
normal des déchets municipaux. Les appareils
usagés doivent être collectés séparément afin
d’optimiser le taux de récupération et le recyclage
des matériaux qui les composent et réduire
l’impact sur la santé humaine et l’environnement.
Le symbole de la ‘‘poubelle barrée’’ est apposée
sur tous les produits pour rappeler les obligations
de collecte séparée.
Les consommateurs devront contacter les
autorités locales ou leur revendeur concernant la
démarche à suivre pour l’enlèvement de leur vieil
appareil.
Avant d’éliminer votre appareil, rendez-le
inutilisable. Tirez le câble d’alimentation, coupezle et jetez-le.
51
Page 53

Table des matières
Consignes de sécurité...................................................................................................................... 53
Instructions d’installation ................................................................................................................ 55
Description de l’appareil .................................................................................................................. 56
Réglage de l’horloge ....................................................................................................................... 56
Les avantages du four micro-ondes ............................................................................................... 57
Mode de fonctionnement du four micro-ondes ............................................................................... 57
Comment les aliments chauffent .................................................................................................... 57
Instructions d’utilisation .................................................................................................................. 58
Fonction: Micro-ondes .................................................................................................................... 58
Fonction: Grill ................................................................................................................................. 58
Fonction: Micro-ondes + Grill .......................................................................................................... 59
Fonction: Décongélation par poids (automatique) .......................................................................... 59
Fonction: Décongélation par temps (manuelle) .............................................................................. 59
Fonction spéciale: BOISSON ......................................................................................................... 60
Fonction spéciale: PIZZA ............................................................................................................... 60
Fonction spéciale: POULET ........................................................................................................... 60
FR
Programmation du micro-ondes ..................................................................................................... 61
Blocage de sécurité ........................................................................................................................ 61
Pendant le fonctionnement... ........................................................................................................... 62
Interruption de la fonction ............................................................................................................... 62
Fin du programme .......................................................................................................................... 62
Économie d’énergie ........................................................................................................................ 62
Décongélation ................................................................................................................................... 63
Indications générales pour la décongélation .................................................................................. 64
Cuisiner avec micro-ondes .............................................................................................................. 65
Cuisiner avec un micro-ondes... ..................................................................................................... 65
Indications importantes ................................................................................................................... 66
Tableaux et suggestions – Cuire des légumes ............................................................................... 67
Tableaux et suggestions – Cuire du poisson .................................................................................. 67
Cuisiner avec Grill ............................................................................................................................ 68
Tableaux et suggestions – Grill sans Micro-ondes ......................................................................... 69
Tableaux et conseils – Micro-ondes et Grill .................................................................................... 70
Quel type de vaisselle peut être utilisé? ......................................................................................... 71
Fonction Micro-ondes ..................................................................................................................... 71
Testez la vaisselle .......................................................................................................................... 71
Fonction Grill .................................................................................................................................. 71
Fonction Combinée ........................................................................................................................ 71
Récipients et papier d’aluminium .................................................................................................... 71
Couvercle ....................................................................................................................................... 71
Tableau – Vaisselle ........................................................................................................................ 72
Nettoyage et Maintenance du micro-ondes .................................................................................... 73
Que faire en cas de problème de fonctionnement? ....................................................................... 74
Caractéristiques techniques ............................................................................................................ 75
Description des fonctions ............................................................................................................... 75
Spécifications ................................................................................................................................. 75
52
Page 54

FR
Consignes de sécurité
• Attention: N’utilisez pas le bac de cuisson avec
la fonction micro-ondes ou la fonction microondes combiné.
• Attention ! Ne laissez jamais le four sans
surveillance, surtout lorsque vous utilisez du
papier, du plastique ou d’autres matériaux
combustibles. Ces matériaux peuvent
charbonner et s’incendier. RISQUE
D’INCENDIE!
• Attention ! Si vous voyez de la fumée ou du feu,
laissez la porte fermée pour étouffer les
flammes. Éteignez le four et retirez la fiche de la
prise ou coupez le courant du four.
• Attention ! Ne réchauffez pas de l’alcool pur ni
des boissons alcooliques dans le micro-ondes.
RISQUE D’INCENDIE!
• Attention ! Ne réchauffez pas de liquides ni
d’autres nourritures dans des récipients fermés
puisqu’ils pourront exploser.
• Attention ! Cet appareil n’est pas destiné à être
utilisé par des personnes (y compris des
enfants) qui auraient des capacités physiques,
sensorielles ou mentales diminuées; ou qui ne
possèderaient pas l’expérience et la
connaissance nécessaire, à moins qu’elles ne
soient supervisées ou que des instructions ne
leur aient été fournies par une personne
responsable de leur sécurité, pour l’utilisation
appropriée de l’appareil.
• Attention ! Il est nécessaire de surveiller les
enfants pour s’assurer qu’ils ne jouent pas avec
l’appareil.
• Attention ! Si le four a un mode de fonction
combinée (micro-ondes avec d’autres fonctions
de réchauffement), les enfants ne doivent pas
être autorisés à se servir du four sans la
surveillance d’un adulte à cause des
températures élevées.
• Attention ! N'utilisez pas le four si:
- La porte n’est pas correctement fermée;
- Les charnières de la porte sont abîmées;
- Les surfaces de contact entre la porte et la
partie frontale du four sont abîmées;
- La porte vitrée est abîmée;
- Il y a souvent un amorçage électrique à
l’intérieur du four même sans la présence
d'objets métalliques.
• Le four ne pourra être réutilisé que lorsqu'il
aura été réparé par un technicien du Service de
l’Assistance Technique.
• Au cours de l’utilisation, l’appareil devient chaud.
Il faut faire attention à ne pas toucher les
éléments de chauffage à l’intérieur du four.
• Attention: Au cours de l’utilisation, il est possible
que des parties accessibles deviennent
chaudes. Les jeunes enfants doivent être tenus
à l’écart.
Faites attention!
• Ne réchauffez jamais des aliments ou des
boissons pour nourrissons dans des
bouteilles ou dans des bocaux ayant des
tétines ou des couvercles. Après avoir
réchauffé la nourriture, mélangez-la ou
secouez-la bien afin de répandre la chaleur
uniformément. Vérifiez la température de la
nourriture avant de la donner à l’enfant.
RISQUE DE BRÛLURES!
• Pour éviter le surchauffement ou la combustion
de la nourriture, il est primordial de ne pas
sélectionner de longues périodes de temps ou
des niveaux de puissance trop élevés lorsque
vous réchauffez de petites quantités de
nourriture. Par exemple, si la puissance
sélectionnée est trop élevée, le pain peut brûler
au bout de 3 minutes.
• Pour gratiner, il vous suffit d’utiliser la fonction
grill et de surveiller constamment le four. Si vous
utilisez une fonction combinée pour griller du
pain, celui-ci brûlera en peu de temps.
•
Assurez-vous de ne jamais saisir les câbles
d'alimentation d'autres appareils électriques sur
la porte chaude ou du four. Le câble isolant peut
décongeler. Risque de court-circuit!
Faites attention lorsque vous réchauffez des
liquides!
Lorsque des liquides (de l’eau, du café, du thé, du lait,
etc.) sont sur le point de bouillir à l’intérieur du four et
qu’ils sont soudainement retirés, ils peuvent
s’échapper de leurs récipients. RISQUES DE
BLESSURES ET DE BRÛLURES!
Pour éviter que cette situation ne se produise, mettez
une cuillère à café ou une baguette en verre à
l’intérieur du récipient pour réchauffer des liquides
53
Page 55

Consignes de sécurité
Ce four est exclusivement destiné à une utilisation
domestique!
N’utilisez le four que pour préparer des repas.
Évitez d’abîmer le four ou toutes autres situations
dangereuses en appliquant les instructions
suivantes:
• N’allumez pas le four si le support et l’anneau
de la plaque tournante, ainsi que le plat
correspondant ne sont pas à leur place.
• N’allumez jamais le micro-ondes lorsque celui-ci
est vide. S’il n’y a pas de nourriture à l’intérieur
du four, il pourra y avoir une surcharge
électrique et celui-ci pourra s’abîmer. RISQUE
DE DÉTÉRIORATION!
• Pour mener à bien des tests de
programmation du four, mettez un verre d’eau
à l’intérieur de celui-ci. L’eau absorbera les
micro-ondes et le four ne sera pas abîmé.
• Ne recouvrez pas ou n’obstruez pas les
ouvertures de ventilation.
• N’utilisez que des plats adéquats pour les
micro-ondes. Vérifiez si vos plats et récipients
sont adéquats avant de les utiliser au microondes (voir la section sur les types de plats).
• Ne retirez jamais le couvercle mica du
plafond intérieur du four! Ce couvercle
empêche que les graisses et les restes de
nourriture n'abîment le générateur de microondes.
• Ne conservez aucun objet inflammable à
l'intérieur du four, celui-ci pourra brûler si le four
est allumé.
• N’utilisez pas le four comme un garde-manger.
• Les œufs avec leurs coquilles ainsi que des
œufs durs ne doivent pas être réchauffés dans
les fours à micro-ondes puisqu’ils peuvent
exploser.
• N’utilisez pas le four pour frire des aliments
puisqu’il est impossible de contrôler la
température de l’huile chauffée par les microondes.
• Pour éviter de vous brûler, utilisez toujours
des gants pour manipuler les plats et les
récipients ainsi que pour toucher le four.
• Vous ne devez ni vous appuyez ni vous
asseoir sur la porte ouverte du four. Ceci
FR
pourrait abîmer le four, notamment la zone de
charnière. La porte peut supporter un poids
maximum de 8 kg.
• La plaque tournante et les grills peuvent
supporter un poids total de 8 kg. Pour ne pas
abîmer le four, ne dépassez pas ce poids.
Nettoyage:
• Attention ! Vous devez nettoyer régulièrement
votre four à micro-ondes. Vous devez enlever
tous les restes de nourriture (voir la section sur
le Nettoyage du Four). Si le four à micro-onde
n’est pas propre, sa surface pourra se détériorer,
pouvant ainsi diminuer la durée de vie du
four et pouvant également résulter en une
situation dangereuse.
• Attention ! Ne pas utiliser de détergents
abrasifs ou de grattoirs en métal tranchant pour
nettoyer le porte vitrée du four car ils
risqueraient de rayer la surface, qui pourrait
ensuite voler en éclat.
• Les surfaces de contact de la porte (la partie
frontale de la cavité et la partie intérieure des
portes) doivent être impeccables pour assurer le
fonctionnement correct du four.
• Veuillez suivre les instructions qui concernent le
nettoyage dans la section « Nettoyage et
Entretien du Four».
Réparations:
• Attention – Micro-ondes! Vous ne devez pas
enlever la protection externe du four. Les
travaux de réparation ou de manutention
effectués par toute personne non autorisée par
le fabricant pourront se révéler dangereux.
• En cas de détérioration du câble d’alimentation,
celui-ci devra être remplacé par le fabricant, par
des agents autorisés ou encore par des
techniciens qualifiés à fin d’éviter des situations
dangereuses. De plus, cette tâche exige des
outils spéciaux.
• Les travaux de réparation et de manutention,
surtout ceux qui concernent les parties sous
tension, ne peuvent être menés à bien que par
des techniciens autorisés par le fabricant.
54
Page 56

FR
Instructions d’installation
À l’aide du bouton d’ouverture, ouvrez la porte,
puis retirez tout le matériau de protection.
Ensuite, nettoyez l’intérieur du four et les
accessoires à l’aide d’un linge humide, puis
séchez-les. N’utilisez pas de produits abrasifs ni à
odeur forte.
Assurez-vous que les parties suivantes sont en
parfait état:
• Porte et charnières;
• Panneau frontal du micro-ondes;
• Surfaces intérieures et extérieures de
l’appareil.
N’UTILISEZ PAS L’APPAREIL si vous observez
un défaut au niveau des parties mentionnées cidessus. Si tel est le cas, contactez le Service
d’assistance technique.
Placez l’appareil sur une surface plane et stable.
Emboîtez le support du plateau tournant au
centre du micro-ondes, puis emboîtez le plateau
tournant dans son support. À chaque fois que
vous utilisez le micro-ondes, il est nécessaire que
le plateau tournant et son support soient
correctement installés à l’intérieur. Le plateau
tournant tourne aussi bien dans le sens des
aiguilles d’une montre que dans le sens contraire.
Afin de garantir une bonne ventilation de
l’appareil, installez le micro-ondes dans un
meuble de cuisine présentant une ouverture
dans sa partie supérieure (voir les feuilles cijointes).
Attention: l’emplacement du micro-ondes doit
permettre l’accès à la prise de courant.
Lors de l’installation, assurez-vous que le
câble d’alimentation n’entre pas en contact
avec la partie arrière de l’appareil car de
hautes températures peuvent endommager le
câble.
Si vous installez un micro-ondes et un four
traditionnel l’un au-dessus de l’autre, le microondes ne peut pas être placé en dessous du
four conventionnel pour des raisons de
condensation.
L’appareil ne doit pas être placé à proximité de
sources de chaleur, de radios et de téléviseurs.
L’appareil est équipé d’un câble et d’une prise
d’alimentation pour courant monophasé.
Attention: l’extérieur du micro-ondes peut être
enveloppé d’un film de protection. Avant la
première mise en marche, retirez soigneusement
ce film, en commençant par la partie inférieure.
ATTENTION: LE MICRO-ONDES NE DOIT
ÊTRE BRANCHÉ QUE DANS DES PRISES DE
COURANT AVEC MISE À LA TERRE.
En cas de problème, le fabricant et les vendeurs
déclinent toute responsabilité s’il s’avère que les
instructions d’installation n’ont pas été observées.
55
Page 57

Description de l’appareil
FR
1. Vitre de la porte 6. Bouton d’ouverture
2. Languette 7. Orifice pour le support du plateau tournant
3. Grill en quartz 8. Support du plateau tournant
4. Cache en mica 9. Accouplement de moteur
5. Panneau de commandes 10. Plateau tournant
11. Grille
Réglage de l’horloge
1. Appuyez sur la touche de l’HORLOGE jusqu’à
ce que les chiffres se mettent à clignoter.
2. Indiquer la valeur de l’heure en tournant la
BOUTON ROTATIF dans un sens ou dans
l’autre.
3. Appuyez à nouveau sur la touche de
l’HORLOGE pour régler les minutes.
4. Indiquer la valeur de l’heure en tournant la
BOUTON ROTATIFdans un sens ou dans
l’autre.
5. Pour terminer, appuyez à nouveau sur la
touche de l’HORLOGE.
56
Page 58

FR
Les avantages du four micro-ondes
Dans les fours conventionnels, la chaleur
dégagée par les résistances ou les brûleurs à gaz
pénètre lentement dans les aliments de l’extérieur
vers l’intérieur. Il existe, de ce fait, une grande
perte d’énergie due au chauffage de l’air, des
composants du four et des récipients.
Dans le micro-ondes, la chaleur est générée par
les propres aliments, c’est-à-dire que la chaleur
passe de l’intérieur vers l’extérieur. Il n’existe
aucune perte de chaleur vers l’air, les parois
intérieures du four ou les récipients (si ceux-ci
sont appropriés pour les fours micro-ondes). Bref,
seul l’aliment chauffe.
En résumé, les fours micro-ondes présentent les
avantages suivants:
1. Temps de cuisson plus rapide. En général, on
observe une réduction de 3/4 du temps par
rapport à la cuisson conventionnelle.
2. Décongélation ultrarapide des aliments, ce qui
réduit le risque de développement de
bactéries.
3. Économie d’énergie.
4. Conservation de la valeur nutritive des aliments
en raison de la réduction du temps de cuisson.
Le frottement entre les molécules entraîne la
formation de chaleur qui élève la température des
aliments, les décongelant, les cuisant ou les
gardant chauds.
Puisque la chaleur se forme à l’intérieur des
aliments:
• ceux-ci peuvent être cuisinés sans ou avec
peu de liquide ou de graisse;
• décongeler, chauffer ou cuire dans le four
micro-ondes est plus rapide que dans un
four conventionnel;
• les vitamines, les minéraux et les
substances nutritives sont conservés;
• la couleur et l'arôme naturels ne sont pas
altérés.
Les micro-ondes passent à travers la porcelaine,
le verre, le carton ou le plastique, mais ne
traversent pas le métal. C’est pour cette raison
qu’il ne faut pas utiliser dans le four micro-ondes
des récipients en métal ou des récipients
possédant des parties métalliques.
Les micro-ondes sont réfléchies par le métal...
5. Nettoyage facile.
Mode de fonctionnement du four microondes
Les fours micro-ondes possèdent une soupape à
haute tension, appelée Magnétron, qui convertit
l’énergie électrique en énergie micro-ondes. Ces
ondes électromagnétiques sont canalisées vers
l’intérieur du four à travers un guide d’ondes et
sont distribuées par un dispositif de dispersion
métallique ou à l’aide d’un plateau tournant.
Dans le four, les micro-ondes se propagent dans
tous les sens et sont réfléchies par les parois
métalliques de celui-ci, permettant une
pénétration uniforme dans les aliments.
Comment les aliments chauffent
La plupart des aliments contiennent de l’eau, dont
les molécules vibrent sous l’action des microondes.
... traversent le verre et la porcelaine...
... et sont absorbées par les aliments.
57
Page 59

Instructions d’utilisation
Attention: n’utilisez jamais le micro-ondes à vide, à savoir sans aliments.
Pour utiliser le micro-ondes, procédez comme suit:
1. Branchez l’appareil dans une prise de courant adéquate (voir
les indications de la dernière page).
2. Pour ouvrir la porte, appuyez sur le BOUTO N D’OUVERTURE.
La lampe du micro-ondes s’allume.
3. Placez le récipient contenant l’aliment sur le plateau ou sur la
grille.
4. Sélectionnez la fonction et le temps de cuisson souhaités,
comme décrit dans les sections suivantes.
5. Fermez la porte, puis appuyez sur la touche START.
6. Le micro-ondes se met en marche. L’écran indique le temps de
fonctionnement restant.
FR
REMARQUE IMPORTANTE
Les touches du panneau de commandes s’illuminent afin de faciliter la programmation du four microondes. Par défaut, les touches susceptibles d’être actionnées resteront illuminées en vert. Quand l’une
d’elles est sélectionnée, elle est alors illuminée en rouge.
Fonction: Micro-ondes
1. Appuyez sur la touche MICRO-ONDES. L’indicateur de la
fonction s’illumine en rouge.. Il reste illuminé pendant toute la
durée de la cuisson.
2. Indiquez le temps de fonctionnement (par exemple, 10 minutes)
en tournant le BOUTON ROTATIF.
3. Pour modifier le niveau de puissance du four micro-ondes,
appuyez sur les touches – et +. Si vous n’appuyez pas sur ces
touches, le four fonctionnera par défaut à la puissance
maximale.
4. Appuyez sur la touche START. Le micro-ondes se met en
marche.
Fonction: Grill
1. Appuyez sur la touche GRILL. L’indicateur de la fonction
s’illumine en rouge.
2. Indiquez le temps de fonctionnement (par exemple, 10 minutes)
en tournant le BOUTON ROTATIF.
3. Appuyez sur la touche START. Le micro-ondes se met en
marche.
58
Page 60

FR
Instructions d’utilisation
Fonction: Micro-ondes + Grill
1. Appuyez sur la touche MICRO-ONDES + GRILL. L’indicateur de la
fonction s’illumine en rouge.
2. Indiquez le temps de fonctionnement souhaité (par exemple, 10
minutes) en tournant le BOUTON ROTATIF.
3. Pour modifier le niveau de puissance du four micro-ondes, appuyez
sur les touches – et + Si vous n’appuyez pas sur ces touches, le four
fonctionnera par défaut à la puissance maximale.
4. Appuyez sur la touche START. Le micro-ondes se met en marche.
Fonction: Décongélation par poids (automatique)
1. Appuyez sur la touche DÉCONGÉLATION. L’indicateur de la fonction
s’illumine en rouge.
2. Indiquez le type d’aliment, en appuyant sur les touches – et +. Si vous
n’appuyez pas sur ces touches, le four sélectionnera par défaut le
type d’aliment 1.
3. Indiquez le poids de l’aliment (par exemple, 1,2kg) en tournant le
BOUTON ROTATIF.
4. Appuyez sur la touche START. Le micro-ondes se met en marche.
5. Lorsque le four s’arrête et se met à sonner, remuez ou retournez les
aliments. Pour continuer le processus de décongélation, refermez la
porte du micro-ondes, puis appuyez sur la touche START.
Le tableau suivant présente les programmes de la fonction Décongélation par poids, avec les intervalles
de poids, les temps de décongélation et les temps de repos (pour garantir que l’aliment présente une
température uniforme).
Programme Aliment Poids Temps
Pr 1 Viande 0,1 - 1,5 kg 4 - 45 min 20 - 30 min
Pr 2 Volaille 0,1 - 1,5 kg 4 - 50 min 20 - 30 min
Pr 3 Poisson 0,1 - 1,5 kg 4 - 45 min 20 - 30 min
Pr 4 Fruits 0,2 - 0,5 kg 2 - 13 min 5 - 10 min
Pr 5 Pain 0,1 - 0,8 kg 2 - 19 min 5 - 10 min
Temps de
repos
Fonction: Décongélation par temps (manuelle)
1. Appuyez 2 fois sur la touche DÉCONGELER. L’indicateur de la
fonction s’illumine en rouge.
2. Indiquez le temps de décongélation (par exemple, 10 minutes) en
tournant le BOUTON ROTATIF.
3. Appuyez sur la touche START. Le micro-ondes se met en marche.
4. Lorsque le four s’arrête et se met à sonner, remuez ou retournez les
aliments. Pour continuer le processus de décongélation, refermez la
porte du micro-ondes, puis appuyez sur la touche START.
59
Page 61

Instructions d’utilisation
Fonction spéciale: BOISSON
1. Placez la boisson (150 ml à 30 ml de café, de thé, d’eau, de lait,
etc.) dans un récipient résistant à la chaleur sur le plateau.
2. Appuyez sur la touche Fonction spéciale BOISSON. Cette
touche s’illuminera en rouge.
3. Vous pouvez augmenter le temps de cette fonction par
intervalles de 30 secondes en appuyant de façon répétée sur la
touche Fonction spéciale BOISSON. Vous pouvez également le
faire en tournant la BOUTON ROTATIF dans un sens ou dans
l’autre.
4. Appuyez sur la touche START. Le micro-ondes se met en
marche.
Fonction spéciale: PIZZA
1. Saupoudrez avec un peu de farine le plateau, puis placez la
pizza directement sur celui-ci.
FR
2. Appuyez sur la touche Fonction spéciale PIZZA. Cette touche
s’illumine en rouge.
3. Appuyez sur la touche START. Le four commence à
fonctionner.
4. À la fin de la cuisson, il y a une période d’attente de 2 minutes
pendant laquelle le four continuera à fonctionner et où l’écran
affichera l’indicateur de la fonction spéciale PIZZA en clignotant.
Fonction spéciale: POULET
1. Découpez le poulet (400 à 500 g), puis placez-le sur un récipient
résistant à la chaleur sur le plateau. Ajouter de l’huile, des épices,
du sel et tout autre ingrédient de votre choix.
2. Appuyez sur la touche Fonction spéciale POULET. Cette touche
s’illumine en rouge.
3. Appuyez sur la touche START. Le four commence à fonctionner.
4. Le temps total de cuisson est de 30 minutes divisé en 4 périodes
de 7,5 minutes. À la fin de chacune des 3 premières périodes, le
four s’arrêtera et émettra un signal sonore. Retournez les
morceaux de poulet, puis appuyez sur la touche START pour
continuer la cuisson.
5. À la fin de la cuisson, il y a une période d’attente pendant laquelle
le four continuera à fonctionner et où le cadran affichera
l’indicateur de la fonction spéciale POULET en clignotant.
60
Page 62

FR
Programmation du micro-ondes
Les fonctions normales (Micro-ondes, Grill, Microondes + Grill, Décongélation par poids et
Décongélation par temps) peuvent être
programmées à la suite, une à une, jusqu’à un
maximum de 3 fonctions.
Par exemple, pour décongeler 800 g de viande,
cuire pendant 10 minutes avec la fonction Microondes à la puissance 4, puis pendant 8 minutes
avec la fonction Micro-ondes + Grill à la
puissance 3, procédez comme suit :
1. Appuyez sur la touche DÉCONGELER.
L’indicateur de la fonction s’illumine en rouge.
2. Le type d’aliment Viande (Type 1) est déjà
sélectionné.
3. À l’aide du BOUTON ROTATIF, indiquez le
poids de l’aliment (0,8 kg).
4. Appuyez sur la touche
HORLOGE/PROGRAMME, puis sélectionnez
le programme suivant.
10. À l’aide du BOUTON ROTATIF, indiquez le
temps de cuisson souhaité (8 min).
11. Appuyez 2 fois sur la touche «-» pour régler
le micro-ondes sur la puissance 3.
12. Appuyez sur la touche START. Le micro-
13. L’appareil émet un signal sonore lorsqu’il
14. Lorsque le micro-ondes émet un signal
ondes se met en marche.
passe d’une fonction (Décongélation) à une
autre (Micro-ondes ou Grill).
sonore, ouvrez la porte et retournez les
aliments. Refermez la porte, puis appuyez sur
la touche START.
5. Appuyez sur la touche MICRO-ONDES.
L’indicateur de la fonction s’illumine en rouge.
6. À l’aide du BOUTON ROTATIF, indiquez le
temps de cuisson souhaité (10 min).
7. Appuyez sur la touche «-» pour sélectionner la
fonction Micro-ondes à la puissance 4.
8. Appuyez sur la touche HORLOGE/
PROGRAMME, puis sélectionnez le
programme suivant.
9. Appuyez sur la touche MICRO-ONDES +
GRILL. L’indicateur de la fonction s’illumine en
rouge.
Blocage de sécurité
1. Le fonctionnement du four peut être bloqué (par exemple, pour
éviter son utilisation par des enfants) en appuyant sur la touche
STOP pendant 3 secondes. À la fin de ce temps, un signal
sonore retentit. L’écran affichera 4 lignes et le four se bloquera.
2. Vous pouvez afficher l’horloge à tout moment en appuyant
brièvement sur la touche START.
3. Pour débloquer le four, appuyez sur la touche START pendant
3 secondes. À la fin de ce temps, un signal sonore retentit et
l’écran affichera à nouveau l’horloge.
61
Page 63

Pendant le fonctionnement...
Lors du processus de cuisson, vous pouvez ouvrir
la porte quand bon vous semble. Si vous le faites:
• LA PRODUCTION DE MICRO-ONDES
S’INTERROMPT IMMÉDIATEMENT.
• Le grill se désactive mais reste toutefois à une
température élevée.
• Le temporisateur s’arrête et l’écran indique le
temps de fonctionnement restant.
Si vous le souhaitez, vous pouvez:
1. Retourner ou remuer les aliments afin d’obtenir
une cuisson uniforme.
2. Modifier le niveau de puissance du four microondes en appuyant sur la touche – ou +.
3. Sélectionner une autre fonction à l’aide des
boutons de fonction.
4. Modifier le temps de fonctionnement restant,
en tournant le BOUTON ROTATIF.
FR
Économie d’énergie
Ce four micro-ondes possède un mode spécial
d’économie d’énergie qui est activé
automatiquement à la fin d’une période de 10
minutes d’inactivité.
Dans le mode d’économie d’énergie, toutes les
touches restent éteintes et le cadran affiche
seulement deux points qui clignotent en
intervalles de 10 secondes.
Vous pouvez afficher l’horloge à tout moment en
appuyant brièvement sur la touche START.
Le mode d’économie d’énergie sera
immédiatement désactivé si vous appuyez sur
une touche de fonction.
Refermez la porte, puis appuyez sur la touche
START. De cette façon, l’appareil se remet en
marche.
Interruption de la fonction
Pour interrompre le programme, appuyez sur la
touche STOP ou ouvrez la porte de l’appareil.
Si vous souhaitez annuler le processus de
cuisson, refermez la porte, puis appuyez sur la
touche STOP. Un signal sonore est alors émis et
l’écran indique l’heure
.
Fin du programme
Une fois le programme terminé, le signal sonore
retentit 3 fois et l’écran indique «End». Les
signaux sonores se répètent toutes les 30
secondes jusqu’à ce que vous ouvriez la porte ou
que vous appuyiez sur la touche «STOP».
62
Page 64

FR
Décongélation
Le tableau suivant présente, de façon générale,
les différents temps de décongélation et temps de
repos (pour garantir que l’aliment présente une
Aliment Poids
Morceaux de viande
(veau, bœuf, porc)
Viande en sauce 500 g 12 - 14 min 10 - 15 min Retournez 2 x
Viande hachée 100 g 4 - 5 min 5 - 6 min Retournez 1 x
Saucisse 125 g 3 - 4 min 5 - 10 min Retournez 1 x
Volaille, pièces de volaille 200 g 7 - 8 min 5 - 10 min Retournez 1 x
Poulet 1000 g 34 - 35 min 15 - 20 min Retournez 2 x
Poisson 100 g 3 - 4 min 5 - 10 min Retournez 1 x
Truite 200 g 6 - 7 min 5 - 10 min Retournez 1 x
Crevettes 100 g 3 - 4 min 5 - 10 min Retournez 1 x
Fruits 200 g 4 - 5 min 5 - 8 min Retournez 1 x
Pain 100 g 2 - 3 min 2 - 3 min Retournez 1 x
Beurre 250 g 8 - 10 min 10 - 15 min Retournez 1 x, couvrir
Fromage 250 g 6 - 8 min 5 - 10 min Retournez 1 x, couvrir
Crème fraîche 250 g 7 - 8 min 10 - 15 min Retirer le couvercle
100 g 3 - 4 min 5 - 10 min Retournez 1 x
200 g 6 - 7 min 5 - 10 min Retournez 1 x
500 g 14 - 15 min 10 - 15 min Retournez 2 x
700 g 20 - 21 min 20 - 25 min Retournez 2 x
1 000 g 29 - 30 min 25 - 30 min Retournez 3 x
1500 g 42 - 45 min 30 - 35 min Retournez 3 x
1000 g 24 - 25 min 25 - 30 min Retournez 3 x
300 g 8 - 9 min 8 - 10 min Retournez 2 x
500 g 12 - 14 min 15 - 20 min Retournez 2 x
250 g 8 - 9 min 5 - 10 min Retournez 1 x
500 g 15 - 16 min 10 - 15 min Retournez 1 x
500 g 17 - 18 min 10 - 15 min Retournez 2 x
1200 g 39 - 40 min 15 - 20 min Retournez 2 x
1500 g 48 - 50 min 15 - 20 min Retournez 2 x
200 g 6 - 7 min 5 - 10 min Retournez 1 x
500 g 12 - 15 min 10 - 15 min Retournez 2 x
300 g 8 - 9 min 10 - 15 min Retournez 2 x
500 g 12 - 14 min 15 - 20 min Retournez 3 x
200 g 4 - 5 min 5 - 6 min Retournez 1 x
500 g 10 - 12 min 8 - 10 min Retournez 2 x
800 g 15 - 18 min 15 - 20 min Retournez 2 x
Temps de
décongélation
Température uniforme) en fonction du type et du
poids des aliments, ainsi que les
recommandations applicables.
Temps de
repos
Recommandations
63
Page 65

Décongélation
Indications générales pour la décongélation
1. Pour la décongélation, n’utilisez que de la
vaisselle apte pour micro-ondes (porcelaine,
verre, plastique approprié).
2. La fonction Décongélation par poids et les
tableaux correspondants font référence à la
décongélation d’aliments crus.
3. Le temps de décongélation dépend de la
quantité et de la taille de l’aliment. Lorsque
vous congelez des aliments, pensez au
processus de décongélation. Répartissez
l’aliment en parties égales à la taille du
récipient à utiliser.
4. Distribuez le mieux possible l’aliment à
l’intérieur du micro-ondes. Les parties les plus
épaisses de poisson ou des cuisses de poulet
doivent être placées vers l’extérieur. Vous
pouvez protéger les parties les plus délicates
avec du papier aluminium. Important: le papier
aluminium ne doit pas entrer en contact avec
les parois intérieures afin d’éviter la formation
d’étincelles.
5. Les pièces les plus denses doivent être
retournées plusieurs fois.
FR
8. Placez les volailles sur une assiette retournée
afin que le jus de la viande puisse s’écouler
plus facilement.
9. Le pain doit être enveloppé dans un linge pour
qu’il ne se dessèche pas trop.
10. Retirez l’aliment congelé de l’emballage sans
oublier d’enlever les liens ou attaches en
métal, le cas échéant. Dans le cas des
récipients qui servent à garder les aliments
dans le congélateur et qui peuvent également
être utilisés pour chauffer et cuire, ne retirez
que le couvercle. Dans les autres cas, mettez
les aliments dans des récipients aptes pour
fours micro-ondes.
11. Le liquide résultant de la décongélation,
principalement celui des volailles, doit être
jeté et ne doit en aucun cas entrer en contact
avec les autres aliments.
12. Notez qu’avec la fonction de décongélation
automatique, un temps de repos est
nécessaire pour que l’aliment soit
complètement décongelé, ce qui se produit
normalement au bout de 15 à 20 minutes.
6. Distribuez l’aliment congelé de la façon la plus
uniforme possible car les parties les plus fines
se décongèlent plus vite que les parties plus
épaisses.
7. Les aliments riches en graisse, comme le
beurre, le fromage et la crème fraîche, ne
doivent pas être totalement décongelés. S’ils
sont laissés quelques minutes à température
ambiante, ils seront prêts à servir. Dans le cas
de la crème fraîche surgelée, si vous observez
de petits morceaux de glace, battez-la avant de
la consommer.
64
Page 66

FR
Cuisiner avec micro-ondes
Avant d’utiliser un récipient, vérifiez si celui-ci est
apte pour micro-ondes (voir Quel type de
vaisselle peut être utilisé?).
Coupez l’aliment avant de commencer à le cuire.
Lorsque vous chauffez des liquides, utilisez des
récipients à grande ouverture pour que la vapeur
puisse s’évaporer facilement.
Préparez les aliments en suivant les indications et
tenez compte des temps de cuisson et des
niveaux de puissance indiqués dans les tableaux.
Tenez compte du fait que les valeurs indiquées
sont seulement données à titre d’information et
qu’elles peuvent varier en fonction de l’état initial,
de la température, de la teneur en eau et du type
d’aliment. Il est conseillé d’adapter les temps et
niveaux de puissance à chaque situation. Selon
l’aliment, il convient d’augmenter ou de réduire le
temps de cuisson, ou d’augmenter ou de réduire
le niveau de puissance.
Cuisiner avec un micro-ondes...
1. Plus la quantité d’aliments est grande, plus le
temps de cuisson est long. Tenez compte des
règles suivantes:
• double de la quantité – double du temps
• moitié de la quantité – moitié du temps
2. Plus la température est faible, plus le temps de
cuisson est long.
3. Les aliments liquides chauffent plus vite.
4. Une bonne distribution des aliments sur le
plateau tournant favorise une cuisson
uniforme. Si vous placez les aliments denses
sur la partie extérieure du plateau et les moins
denses au centre, vous pouvez chauffer
différents types d’aliment simultanément.
5. Vous pouvez ouvrir la porte de l’appareil quand
bon vous semble. L’appareil se déconnecte
alors automatiquement. Le micro-ondes ne
continue à fonctionner que si vous refermez la
porte.
6. Les aliments couverts requièrent un temps de
cuisson plus court et, de plus, préservent
mieux leurs caractéristiques. Le couvercle doit
laisser passer les micro-ondes et avoir de
petits orifices permettant la sortie de la vapeur.
65
Page 67

Cuisiner avec micro-ondes
Indications importantes
• Les œufs avec leur coquille et les œufs durs
entiers ne doivent pas être chauffés dans le
four micro-ondes car ils pourraient éclater.
• Avant de chauffer ou de cuire des aliments
avec une coquille ou de la peau (par exemple,
des pommes, des tomates, des pommes de
terre ou des saucisses), piquez-les avec une
fourchette pour qu’ils n’éclatent pas.
• Lorsque vous chauffez des aliments qui
contiennent peu d’eau (par exemple, lorsque
vous décongelez du pain ou que vous faites
du pop-corn) une évaporation rapide se
produit. L’appareil fonctionne alors comme s’il
était à vide et l’aliment peut se carboniser.
Cette situation peut causer des dommages à
l’appareil et au récipient utilisé. Il convient donc
de régler juste le temps nécessaire et de
surveiller la cuisson.
• Il ne faut pas chauffer de grandes quantités
d’huile (frire) dans le micro-ondes.
• Ne chauffez pas de liquides dans des
récipients hermétiques. Il existe un danger
d’explosion.
• Les boissons alcoolisées ne doivent pas être
chauffées à haute température. Réglez juste le
temps nécessaire et surveillez la cuisson.
FR
• Retirez toujours la tétine ou le couvercle des
biberons et des petits pots pour bébés avant
de les chauffer. Après les avoir chauffés,
remuez ou agitez bien le contenu pour que la
chaleur se distribue uniformément. La
température des récipients est plus faible que
celle des aliments qu’ils contiennent. Vérifiez la
température des aliments avant de les servir
afin d’éviter toute brûlure.
• Ne fermez pas les sacs en plastique avec des
liens ou attaches métalliques, mais utilisez des
pinces en plastique. Perforez le sac plusieurs
fois pour que la vapeur puisse sortir facilement.
• Lorsque vous chauffez ou cuisez des aliments,
assurez-vous qu’ils atteignent une température
minimale de 70°C.
• Pendant la cuisson, il peut se former de la
vapeur d’eau sur la vitre de la porte qui peut
ensuite former des gouttes. Cette situation est
normale et peut y compris s’accentuer si la
température ambiante est basse. Il n’y a aucun
risque pour la sécurité de l’appareil. Après la
cuisson, épongez l’eau provenant de la
condensation.
• Ne chauffez aucun type de matériel ou de
liquide explosif dans le micro-ondes.
• Retirez les plats pré-cuisinés de leur
emballage car ceux-ci ne sont pas toujours
résistants à la chaleur. Suivez les indications
du fabricant.
• Si vous avez plusieurs récipients, comme
par exemple des tasses, disposez-les
uniformément sur le plateau tournant.
66
Page 68

É
FR
Cuisiner avec micro-ondes
Tableaux et suggestions – Cuire des légumes
Temps de
repos
(min)
2 - 3
2 - 3
2 - 3
2 - 3
2 - 3
2 - 3
2 - 3
Aliment Quantité (g)
Choux-fleurs
Brocolis
Champignons
Petits pois et
carottes
Carottes
surgelées
Pommes de terre 250 2-3 cuillères
Poivrons
Poireaux
Choux de
Bruxelles
surgelés
Choux 250 ½ tasse 800 P 05 8 - 10 2 - 3
500
300
250
300
250
250
250
300 ½ tasse 800 P 05 6 - 8 2 - 3
Ajout de
liquides
1/8 l
1/8 l
-
½ tasse
2-3 cuillères
à soupe
à soupe
-
½ tasse
Puissance
(Watt)
800
800
800
800
800
800 P 05 5 - 7 2 - 3 Épluchez,
800
800
Programme
P 05
P 05
P 05
P 05
P 05
P 05
P 05
Temps
(min)
9 - 11
6 - 8
6 - 8
7 - 9
8 - 10
5 - 7
5 - 7
Indications
Beurrez la partie
supérieure.
Coupez en
rondelles.
Coupez en
cubes ou en
rondelles.
coupez en
morceaux de
même taille.
Coupez en
morceaux ou en
rondelles.
Tableaux et suggestions – Cuire du poisson
Aliment Quantité (g)
Filets de poisson 500 640 P 04 10 - 12 3 Couvrez. Retournez une fois
Poisson entier 800 800
Puissance
(Watt)
480
Programme
P 05
P03
Temps
(min)
3 - 5
10 - 12
Temps de
repos
(min)
la moitié du temps écoulée.
2 - 3 Couvrez. Retournez une fois
la moitié du temps écoulée.
ventuellement, couvrez les
extrémités du poisson.
Indications
67
Page 69

Cuisiner avec Grill
Pour obtenir de bons résultats avec le grill,
utilisez la grille fournie avec l’appareil.
Placez la grille de sorte qu’elle n’entre pas en
contact avec les surfaces métalliques de
l’intérieur afin d’éviter tout risque d’étincelle,
ce qui pourrait endommager l’appareil.
INDICATIONS IMPORTANTES:
1. Lorsque le micro-ondes est utilisé pour la
première fois, il dégage de la fumée et une
odeur caractéristique, dues à l’utilisation
d’huiles lors du processus de fabrication.
2. Après la première utilisation du grill, il est
normal que la zone à orifices qui protège les
résistances du grill commence à se déformer et
à brunir légèrement en raison des
températures élevées.
3. La vitre de la porte atteint des températures
très élevées lors de l’utilisation du grill. Pour
que l’appareil soit hors de portée des enfants,
placez-le à une hauteur minimale de 80 cm.
FR
4. Lors du fonctionnement du grill, les parois
intérieures et la grille atteignent des
températures très élevées. L’utilisation de
gants de cuisine est conseillée.
5. Pendant une utilisation prolongée du grill, il est
normal que les résistances se déconnectent
temporairement sous l’action du thermostat de
sécurité.
6. Important: lorsque les aliments sont cuits au
grill dans des récipients, il faut vérifier si le
récipient est approprié ou non. Voir le tableau
sur la vaisselle.
7. Lorsque vous utilisez le grill, il est possible que
des éclaboussures de graisse atteignent la
résistance et brûlent. Il s'agit d'une situation
normale qui ne représente aucun type de
problème de fonctionnement.
8. Après chaque utilisation, nettoyez l’intérieur du
four et les accessoires pour que la saleté ne
s’incruste pas.
68
Page 70

FR
Cuisiner avec Grill
Tableaux et suggestions – Grill sans Micro-ondes
Aliment Quantité (g) Temps (min) Indications
Poisson
Dorade
Sardine
Viande
Saucisse 6 - 8 unités 22 - 26 Une fois la moitié du temps écoulée, piquez
Hamburger congelé 3 unités 18 - 20
Entrecôte (environ 3 cm
d’épaisseur)
Autres
Toasts 4 unités 1½ - 3 Surveillez.
Gratiner un sandwich 2 unités 5 - 10 Surveillez.
800-
6 - 8 unités
400 25 - 30 Une fois la moitié du temps écoulée,
18 - 24
15 - 20
Beurrez légèrement. Une fois la moitié du
temps écoulée, retournez et assaisonnez.
avec une fourchette et retournez.
beurrez et retournez.
Préchauffez le grill pendant 2 minutes. Sauf
indication contraire, utilisez la grille. Les temps
indiqués sont donnés à titre d’information et
peuvent varier en fonction de la composition et de
la quantité de l’aliment, ainsi que du degré de
cuisson souhaité. Le poisson et la viande
acquièrent une saveur optimale s’ils sont
badigeonnés d’huile végétale, assaisonnés avec
des épices et des herbes, et laissés à mariner
pendant quelques heures avant de les cuire au
grill. N’ajoutez le sel qu’après la cuisson au grill.
Les saucisses n’éclatent pas si elles sont piquées
au préalable avec une fourchette.
Une fois la moitié du temps écoulée, surveillez la
cuisson et, si nécessaire, retournez ou
badigeonnez d’huile.
Le grill est particulièrement indiqué p\our cuire de
petits morceaux de viande et de poisson. Les
petits morceaux de viande ne doivent être
retournés qu’une seule fois, les plus grands
plusieurs fois. Dans le cas du poisson, il est
conseillé d’unir les deux extrémités de celui-ci, la
tête avec la queue, et de le placer sur la grille.
69
Page 71

Cuisiner avec Grill
Tableaux et conseils – Micro-ondes et Grill
La fonction Micro-ondes + Grill est idéale pour
cuire rapidement de la viande, tout en la dorant.
Elle est également utile pour gratiner des
aliments.
Plat Quantité (g) Vaisselle
Pâtes gratinées 500 g Forme basse 135 P 02 12 - 17
Pommes de terre gratinées 800 g Forme basse 230 P 05 20 - 22
Lasagne environ 800 g Forme basse 230 P 05 15 - 20
Fromage gratiné environ 500 g Forme basse 200 P 04 18 - 20
2 cuisses de poulet frais
(sur la grille)
Rôti environ 500 g Récipient haut et
Gratiner une soupe à
l'oignon
environ 200 g Forme basse 170 P 03 8 - 10
2 bols de 200 g Bols de soupe 170 P 03 2 - 4
Les micro-ondes et le grill fonctionnent
alternativement. Les micro-ondes cuisent et le
grill gratine.
Puissance
(Watt)
200 P 04 17 - 19
large
Programme Temps (min)
FR
Avant d’utiliser de la vaisselle et des récipients
dans le micro-ondes, vérifiez si ceux-ci sont aptes
pour cet emploi. N’utilisez que la vaisselle apte
pour micro-ondes.
La vaisselle à utiliser avec la fonction Combinée
doit être apte pour micro-ondes et pour grill. Voir
le tableau sur la vaisselle.
Tenez compte du fait que les valeurs indiquées
sont seulement données à titre d’information et
qu’elles peuvent varier en fonction de l’état initial,
de la température, de la teneur en eau et du type
d’aliment.
Si le temps s’est avéré insuffisant pour bien dorer
l’aliment, mettez-le pendant 5 ou 10 min de plus
sur la fonction Grill.
Les gratins et les volailles requièrent un temps de
cuisson extra, de 3 à 5 min, pour que la
température se distribue uniformément.
Sauf indication contraire, utilisez le plateau
tournant pour cuire.
Les valeurs qui figurent dans les tableaux sont
indiquées pour un four froid (il n’est pas
nécessaire de préchauffer).
70
Page 72

FR
Quel type de vaisselle peut être utilisé?
Fonction Micro-ondes
Avec la fonction Micro-ondes, tenez compte du
fait que les micro-ondes sont réfléchies par les
surfaces métalliques. En revanche, le verre, la
porcelaine, la terre cuite, le plastique et le papier
laissent passer les micro-ondes.
C’est pourquoi, les casseroles et la vaisselle de
cuisine en métal ou les récipients avec des
parties ou des décorations métalliques ne
doivent pas être utilisées dans le microondes. Le verre et la terre cuite avec des
décorations ou parties métalliques (par ex.,
verre de plomb) ne doivent pas non plus être
utilisés.
L’idéal pour cuisiner dans le four micro-ondes est
d’utiliser le verre, la porcelaine ou la terre cuite
réfractaires, ainsi que le plastique résistant à la
chaleur. Le verre et la porcelaine très fins et
fragiles doivent être utilisés pendant des temps
courts, pour décongeler ou chauffer des aliments
déjà cuisinés.
Testez la vaisselle
Placez la vaisselle à l’intérieur du four pendant 20
secondes à température maximale. Si elle est
froide ou tiède, elle est apte. En revanche, si elle
chauffe beaucoup ou provoque des étincelles,
elle n’est pas apte.
Les aliments chauds transmettent la chaleur à la
vaisselle, qui peut devenir très chaude. C’est
pourquoi il faut toujours utiliser un gant.
Fonction Grill
• Tenez compte des recommandations du
fabricant qui figurent sur l’emballage.
• Les récipients en aluminium ne doivent pas
avoir une hauteur supérieure à 3 cm ni entrer
en contact avec les parois de l’intérieur du four
(distance min. de 3 cm). Le couvercle en
aluminium doit être retiré.
• Placez le récipient en aluminium directement
sur le plateau tournant. Si vous utilisez la grille,
placez le récipient sur un plateau en
porcelaine. Ne mettez jamais le récipient
directement sur la grille!
• Le temps de cuisson est plus long car les
micro-ondes pénètrent dans les aliments
seulement par le haut. En cas de doute, utilisez
seulement la vaisselle apte pour micro-ondes.
• Le papier aluminium peut être utilisé pour
réfléchir les micro-ondes lors du processus de
décongélation. Les aliments délicats, tels que
la volaille ou la viande hachée, peuvent être
protégés de la chaleur excessive en couvrant
les extrémités.
• Important: le papier aluminium ne doit pas
entrer en contact avec les parois de l’intérieur
du four afin d’éviter la formation d’étincelles.
Couvercle
Il est recommandé d’utiliser des couvercles en
verre, en plastique ou du film transparent, car ils
offrent les avantages suivantes:
1. Ils empêchent une évaporation excessive (en
particulier lors des cuissons très longues);
Dans le cas de la fonction Grill, la vaisselle doit
résister à des températures d’au moins 250°C.
La vaisselle en plastique n’est pas adéquate.
Fonction Combinée
Avec la fonction Combinée, la vaisselle à utiliser
doit être apte tant pour le micro-ondes que pour le
grill.
Récipients et papier d’aluminium
Les plats pré-cuisinés dans des récipients en
aluminium ou recouverts de papier aluminium
peuvent être mis dans le micro-ondes à condition
de respecter les points suivants:
71
2. Le processus de cuisson est plus rapide;
3. Les aliments ne se dessèchent pas;
4. L’arôme est conservé.
Le couvercle doit avoir des orifices pour qu’il ne
se forme aucun type de pression. Les sacs en
plastique doivent aussi être ouverts. Les biberons
tout comme les petits pots pour bébés et autres
récipients similaires ne doivent être chauffés que
sans couvercle, car ils pourraient exploser.
Le tableau suivant vous donne une idée générale
du type de vaisselle approprié pour chaque
situation.
Page 73

Quel type de vaisselle peut être utilisé?
Tableau – Vaisselle
Mode de
fonctionnement
Type de vaisselle
Verre et porcelaine 1)
domestique, non résistant au feu,
lavable au lave-vaisselle.
Céramique vitrifiée
verre et porcelaine résistant au feu
Céramique, vaisselle en grès 2)
non vitrifiée
vitrifiée sans décorations métalliques
Vaisselle en terre cuite 2)
vitrifiée
non vitrifiée
Vaisselle en plastique 2)
résistant à la chaleur jusqu’à 100°C
résistant à la chaleur jusqu’à 250°C
Films plastiques 3)
Film pour la conservation des
aliments
Cellophane
Papier, carton 4)
Métal
Papier aluminium
Emballages en aluminium 5)
Accessoires (grille)
Décongeler /
chauffer
Micro-ondes
Cuire
oui oui non non
oui oui oui oui
oui oui non non
oui
non
oui
oui
non
oui
oui non non non
oui
non
non
oui
non
non
oui
non
oui
non
oui
non
Grill
non
non
non
non
non
non
oui
oui
oui
FR
Micro-ondes +
Grill
non
non
non
non
non
non
non
oui
oui
1. Sans bord doré ou argenté et sans verre de
plomb.
2. Suivez les indications du fabricant.
3. N’utilisez pas de liens ou attaches métalliques
pour fermer les sacs. Perforez les sacs.
4. N’utilisez pas d’assiettes en papier.
5. Seulement les emballages en aluminium peu
profonds et sans couvercle. L’aluminium ne doit
pas entrer en contact avec les parois
intérieures du four.
N’utilisez les films que pour couvrir.
72
Page 74

FR
Nettoyage et Maintenance du micro-ondes
AVANT DE NETTOYER LE MICRO-ONDES,
ASSUREZ-VOUS QU’IL EST DÉBRANCHÉ DE
LA PRISE DE COURANT.
Après avoir utilisé l’appareil, laissez-le refroidir.
Ne nettoyez pas l’appareil avec des produits de
nettoyage abrasifs, des matériaux qui rayent ou
des objets pointus.
Surface extérieure:
4. Nettoyez les accessoires après chaque
utilisation. S’ils sont sales, mettez les d’abord à
tremper, puis utilisez une brosse et une éponge.
Les accessoires peuvent être mis dans le lavevaisselle. Assurez-vous que le plateau tournant et
son support soient toujours propres.
Porte, charnières de la porte et panneau frontal
de l’appareil:
1. Nettoyez la surface extérieure avec un
détergent neutre, de l’eau tiède et un linge
humide.
2. Évitez l’entrée d’eau à l’intérieur de la
carcasse.
Intérieur:
1. Après chaque utilisation, nettoyez les parois
intérieures à l’aide d’un linge humide.
2. Évitez l’entrée d’eau dans les orifices de
ventilation du micro-ondes.
3. Si un certain temps s’est écoulé depuis le
dernier nettoyage et que l’intérieur du four
micro-ondes est sale, placez un verre d’eau sur
le plateau et faites fonctionner le four microondes pendant 4 minutes à puissance
maximale. La vapeur libérée facilitera le
nettoyage de la saleté incrustée, qui partira
facilement à l’aide d’un linge doux.
Important: l’appareil ne doit jamais être
nettoyé avec des dispositifs de nettoyage à
vapeur. La vapeur peut arriver jusqu’aux
parties sous tension et provoquer un courtcircuit.
Les surfaces en acier inoxydable les plus sales
peuvent être nettoyées à l’aide d’un produit de
nettoyage non abrasif.
1. Ces parties doivent être toujours propres,
surtout les surfaces de contact entre la
porte et le panneau frontal de l’appareil,
pour qu’il n’y ait pas de fuites.
2. Pour nettoyer, utilisez un détergent neutre et
de l’eau tiède. Séchez avec un linge doux.
Cache en mica:
Maintenez le cache en mica toujours propre.
Les restes d’aliments sur le cache peuvent,
par combustion, le déformer ou provoquer
des étincelles. Il faut donc le nettoyer
régulièrement, mais sans utiliser de produits
de nettoyage abrasifs ni d’objets pointus. Ne
retirez pas le cache afin d’éviter tout risque
d’accident.
Ensuite, nettoyez soigneusement avec de l’eau
chaude, puis séchez bien.
73
Page 75

Que faire en cas de problème de fonctionnement?
L’appareil ne fonctionne pas correctement:
• L’appareil est branché correctement dans la
prise de courant?
• La porte est complètement fermée? La porte
doit être fermée de façon audible.
• Il y a des corps étrangers entre la porte et le
four?
Les aliments ne chauffent pas ou chauffent
très lentement:
• Vous avez utilisé par inadvertance de la
vaisselle en métal?
• Vous avez sélectionné le temps de
fonctionnement et le niveau de puissance
adéquats?
• Vous avez placé à l’intérieur du micro-ondes
une quantité d’aliments plus importante ou plus
froide que d’habitude?
Lors du fonctionnement de l’appareil, vous
entendez des bruits:
• Il y a des étincelles dans le four micro-ondes?
• La vaisselle entre en contact avec les parois
intérieures?
• Il y a des cafards ou autres insectes à
l’intérieur du micro-ondes?
La lampe intérieure ne s’allume pas:
• Si toutes les fonctions marchent correctement,
il est probable que la lampe soit grillée. Vous
pouvez continuer d’utiliser l’appareil.
• La lampe du micro-ondes ne peut être
remplacée que par le Service d’assistance
technique.
Le câble d’alimentation est endommagé
FR
L’aliment est excessivement chaud, sec ou
brûlé:
• Vous avez sélectionné le temps de
fonctionnement et le niveau de puissance
adéquats?
• Le câble d’alimentation doit être remplacé par
le fabricant, des agents agréés ou des
techniciens qualifiés pour cette tâche, de façon
à éviter des situations dangereuses. De plus,
des outils spéciaux sont nécessaires.
Si vous observez tout autre type de problème,
contactez le Service d’assistance au client.
Les réparations ne peuvent être réalisées que
par des techniciens spécialisés.
74
Page 76
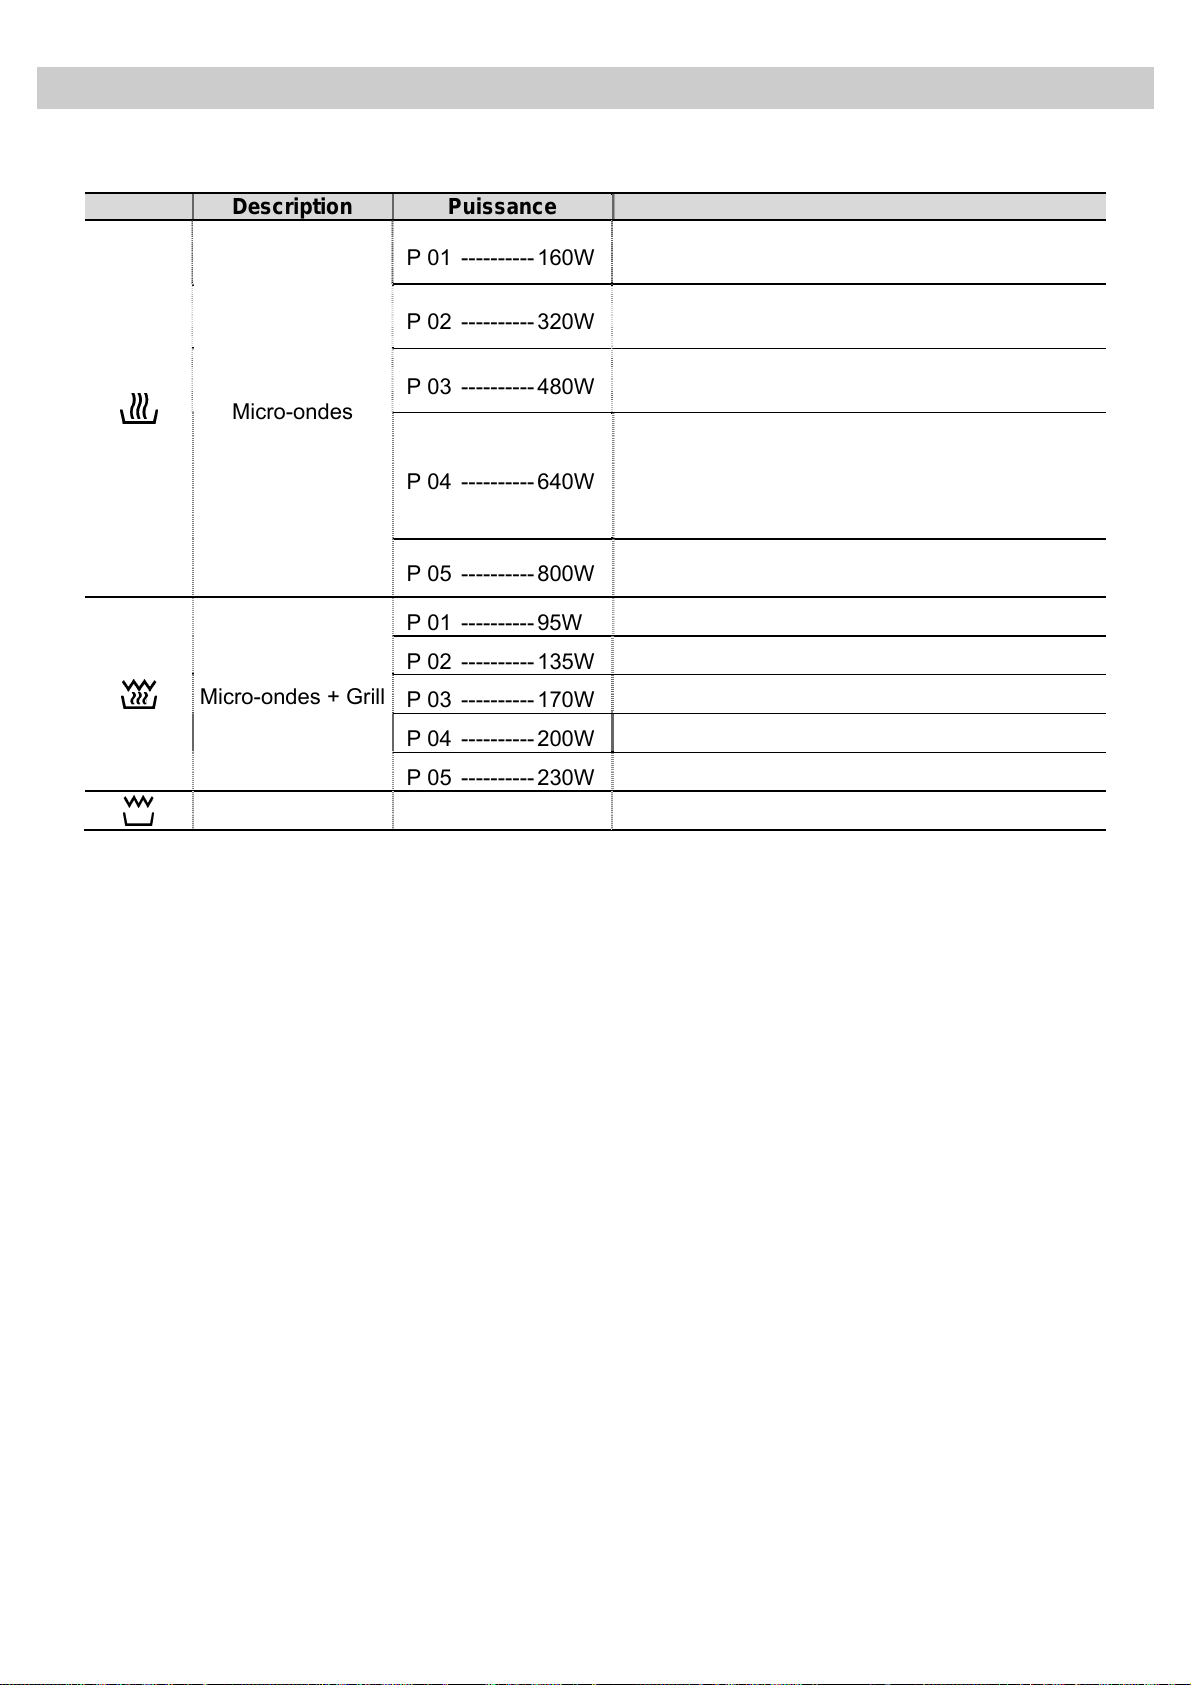
FR
Caractéristiques techniques
Description des fonctions
Symbole Description Puissance Aliments
Décongélation lente pour les aliments délicats.
Garder chaud.
Cuire à chaleur douce, faire revenir du riz.
Décongélation rapide.
Faire fondre du beurre.
Chauffer des aliments pour bébés.
Cuire des légumes et des aliments.
Cuire et chauffer délicatement.
Chauffer et cuire de petites quantités.
Chauffer des aliments délicats.
Cuire et chauffer rapidement des liquides et
aliments pré-cuisinés.
Gratiner des toasts.
Cuire au grill de la volaille et de la viande.
Cuire des tourtes et des gratins.
Préparer des rôtis.
Cuire des gratins de pommes de terre.
Griller
Micro-ondes
Micro-ondes + Grill
Grill
P 01 ---------- 160W
P 02 ---------- 320W
P 03 ---------- 480W
P 04 ---------- 640W
P 05 ---------- 800W
P 01 ---------- 95W
P 02 ---------- 135W
P 03 ---------- 170W
P 04 ---------- 200W
P 05 ---------- 230W
---
Spécifications
• Tension AC………… .................................................................................... Voir plaque de caractéristiques
• Fusible. ......................................................................................................... 12 A / 250 V
• Puissance requise ........................................................................................ 1200 W
• Puissance du grill. ........................................................................................ 1000 W
• Puissance de sortie micro-ondes. ................................................................. 800 W
• Fréquence de micro-ondes… ....................................................................... 2450 MHz
• Dimensions extérieures (L×H×P). ................................................................. 595 × 390 × 350 mm
• Dimensions intérieures (L×H×P). .................................................................. 305 × 210 × 305 mm
• Capacité du four. .......................................................................................... 20 l
• Poids ............................................................................................................ 18,6 kg
75
Page 77

Page 78

Page 79

Page 80

Teka Subsidiaries
Country Subsidiary Address City Phone
Austria
Küppersbusch Austria
Belgium
Küppersbusch Belgium S.P.R.L.
Bulgaria
Teka Bulgaria EOOD
Chile
Teka Chile S.A.
China
Teka International Trading (Shanghai) Co. Ltd.
Czech Republic
Teka CZ S.R.O.
Denmark
Juvél A/S
Ecuador
Teka Ecuador S.A.
Germany
Teka Küchentechnik GmbH
Great Britain
Teka Products Ltd.
Greece
Teka Hellas A.E.
Hungary
Teka Hungary Kft.
Indonesia
PT Teka Buana
Malaysia
Teka Küchentechnik (Malaysia) Sdn Bhd
Mexico
Teka Mexicana S.A. de C.V.
Morocco
Teka Maroc S.A.
Netherlands
Teka B.V.
Norway
Intra, A.S
Poland
Teka Polska Sp. ZO.O.
Portugal
Teka Portugal S.A.
Romania
S.C. Teka Küchentechnik Romania S.R.L.
Russia
Teka Rus LLC
Singapore
Teka Singapore PTE Ltd
Spain
Teka Industrial, S.A.
Sweden
Intra Mölntorp AB
Thailand
Teka (Thailand) Co. Ltd.
Turkey
Teka Teknik Mutfak Aletleri Sanayi Ve
Ukraine
Teka Ukranie LLC
United Arab Emirates
Teka Middle East Fze
United Arab Emirates
Teka Küchentechnik U.A.E LLC
Venezuela
Teka Andina S.A.
Vietnam
TEKA Vietnam Co., Ltd.
Eitnergasse, 13
Doomveld Industrie, Asse 3, No. 11 - Boite 7
Blvd. “Tsarigradsko Shosse” 135
Avd El Retiro Parque los Maitenes, 1237. Parque Enea
6/F. Datong Business Center, No. 369 Fuxing Middle Rd.
V Holesovickách, 593
Københavnsvej 222
Parque Ind. California 2, Via a Daule Km 12
Sechsheldener Str. 122
177 Milton Park
Thesi Roupaki - Aspropyrgos
Bajcsy Zsilinszky u. 53
Jalan Menteng Raya, Kantor Taman A9 Unit A3
10 Jalan Kartunis U1/47, Temasya Park, Off Glenmarie
Ferrocarril 200, Esquina Norte 29, Col. Moctezuma
73, Bd. Slimane, Depôt 33, Route de Ain Sebaa
Wijkermeerstraat, 34
Storsand
ul. 3-go Maja 8 / A2
Estrada da Mota - Apdo 533
Sevastopol str., no 24, 5th floor, of. 15
Barklaya str. 6, bld. 3, Barklay plaza center, office 402
Clemenceau Avenue, 83, 01-33/34 UE Square
C/ Cajo,17
Säbyvägen, 8
364/8 Sri-Ayuttaya Road, Phayathai, Ratchatavee
Büyükdere Cad. 24/13
86-e, Bozhenko Str .2nd floor,4th entrance
Building LOB 16, Office 417
Bin Khedia Centre
Ctra. Petare-Santa Lucia, km 3 (El Limoncito)
803 Dai Minh Convention Tower, 8th Floor
1231 Wien
1731 Zellik
1784 Sofia
Pudahuel, Santiago de Chile
200025 Shanghai
182 00 Praha 8 - Liben
DK-4600 Køge
Guayaquil
35708 Haiger
OX14 4SE Milton, Abingdon
193 00 Athens
1065 Budapest
12950 Jakarta
40150 Shah Alam, Selangor Darul Ehsan
15500 Mexico D.F.
Casablanca
2131 HA Hoofddorp
7563 Malvik
05-800 Pruszków
3834-909 Ilhavo, Aveiro
010992 Bucharest Sector 1
121087 Moscow ∙ Russia
239920 Singapore
39011 Santander
734 93 Kolbäck
10400 Bangkok
80290 Mecidiyeköy, Istanbul
03150 Kyiv
P.O. Box 18251 Dubai
P.O. Box 35142 Dubai
racas
1070 Ca
77 Hoang Van Thai, District 7, Ho Chi Minh
+43 18 668 022
+32 24 668 740
+359 29 768 330
+ 56 24 386 000
+86 2 153 076 901
+420 284 691 940
+45 36 340 288
+593 42 100 311
+49 27 713 950
+44 1 235 861 916
+30 2 109 760 283
+36 13 542 110
+62 215 762 272
+60 376 201 600
+52 5 551 330 493
+212 22 674 462
+ 31 235 656 480
+47 73 980 100
+48 227 383 270
+35 1 234 329 500
+40 212 334 450
+7 4 956 450 064
+65 67 342 415
+34 942 355 050
+46 22 040 300
+66 -26 424 888
+90 2 122 883 134
+380 444 960 680
+971 48 872 912
+971 42 833 047
+58 2 122 912 821
+84 854 160 646
05/2012
www.teka.com
“for further information and updated contact adresses,
please refer to the corporate website”
 Loading...