

Page 1

HDL-718 / HDL-888
Hoja de Características
Folha de Características
Technical Specifications
Fiche de caractéristiques
Datenblatt
3172713-001 16/12/14 12:04 Página 1
Page 2
3172713-001 16/12/14 12:04 Página 2
Page 3

3
ESPAÑOL
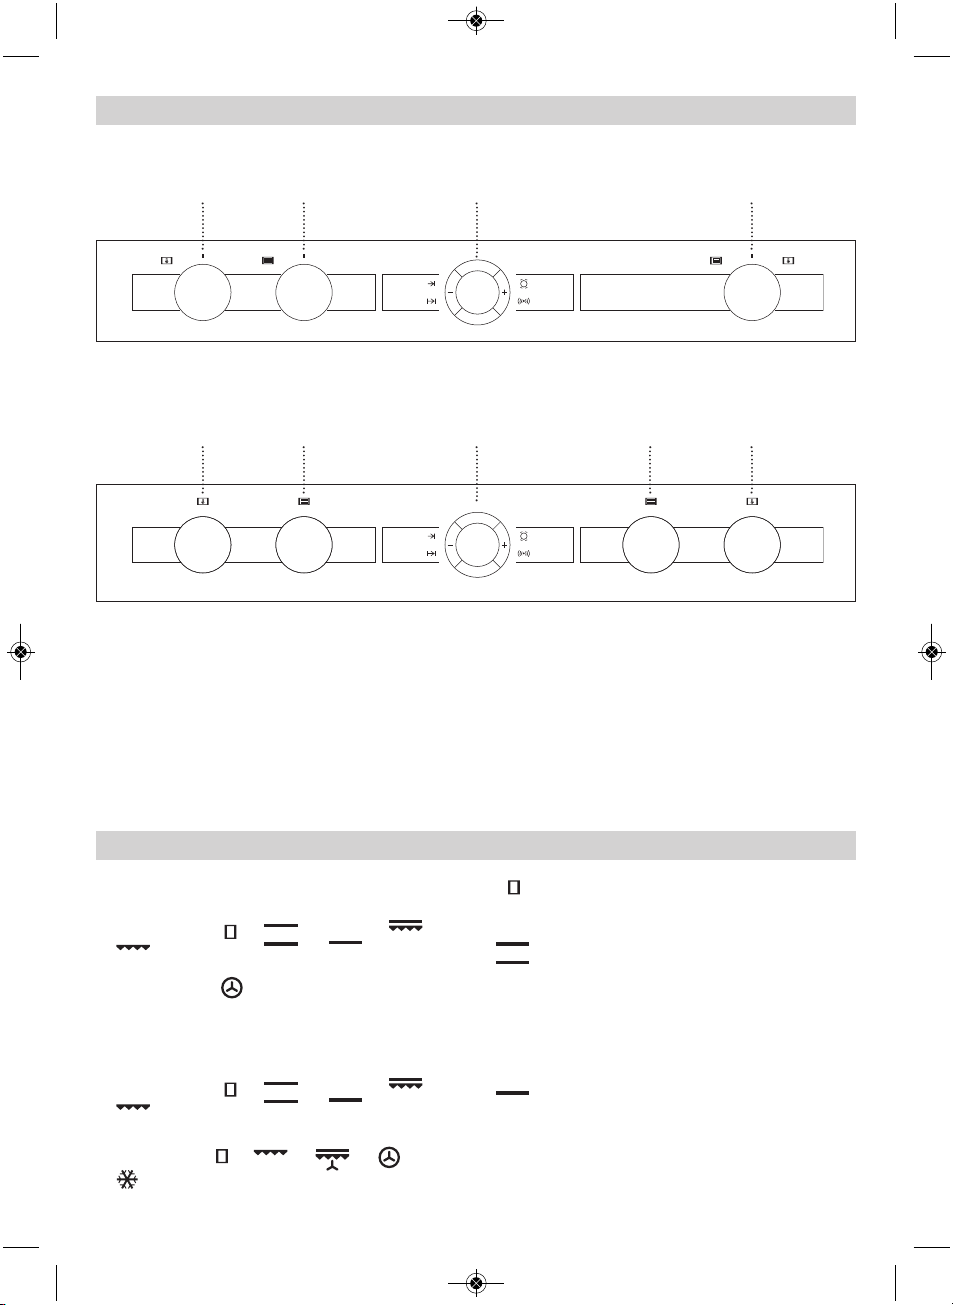
321 6
321 54
CAVIDAD SUPERIOR
1 Selector de temperaturas
2 Selector de funciones
3 Reloj electrónico
CAVIDAD INFERIOR
4 Selector de funciones
5 Selector de temperaturas
6 Turbo + Selector de temperaturas
Modelo HDL-718
Modelo HDL-888
Frontal de Mandos
Funciones del horno
Modelo HDL-718
Cavidad superior: / / /
/
Cavidad inferior:
Modelo HDL-888
Cavidad superior: / / /
/
Cavidad inferior: / / /
/
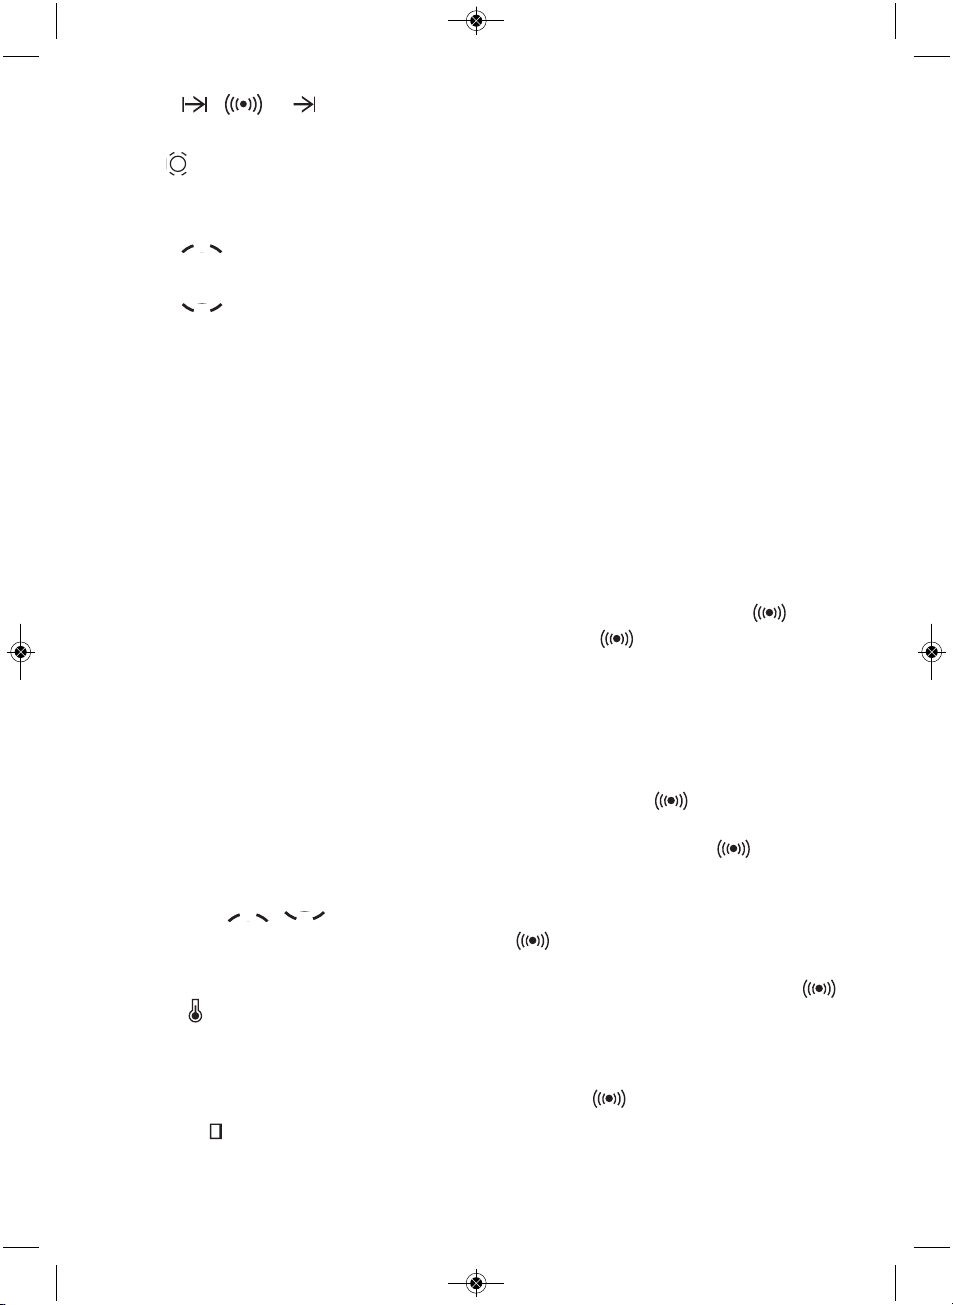
Desconexión del horno
Convencional
Se usa en bizcochos y tartas en los que el
calor recibido debe ser uniforme y para que
consigan una textura esponjosa.
Solera
Calor sólo desde la parte inferior. Apropiado
para calentar platos o levantar masas de
repostería y afines.
3172713-001 16/12/14 12:04 Página 3
Page 4

4
Manejo del horno
Descripción del Reloj Electrónico
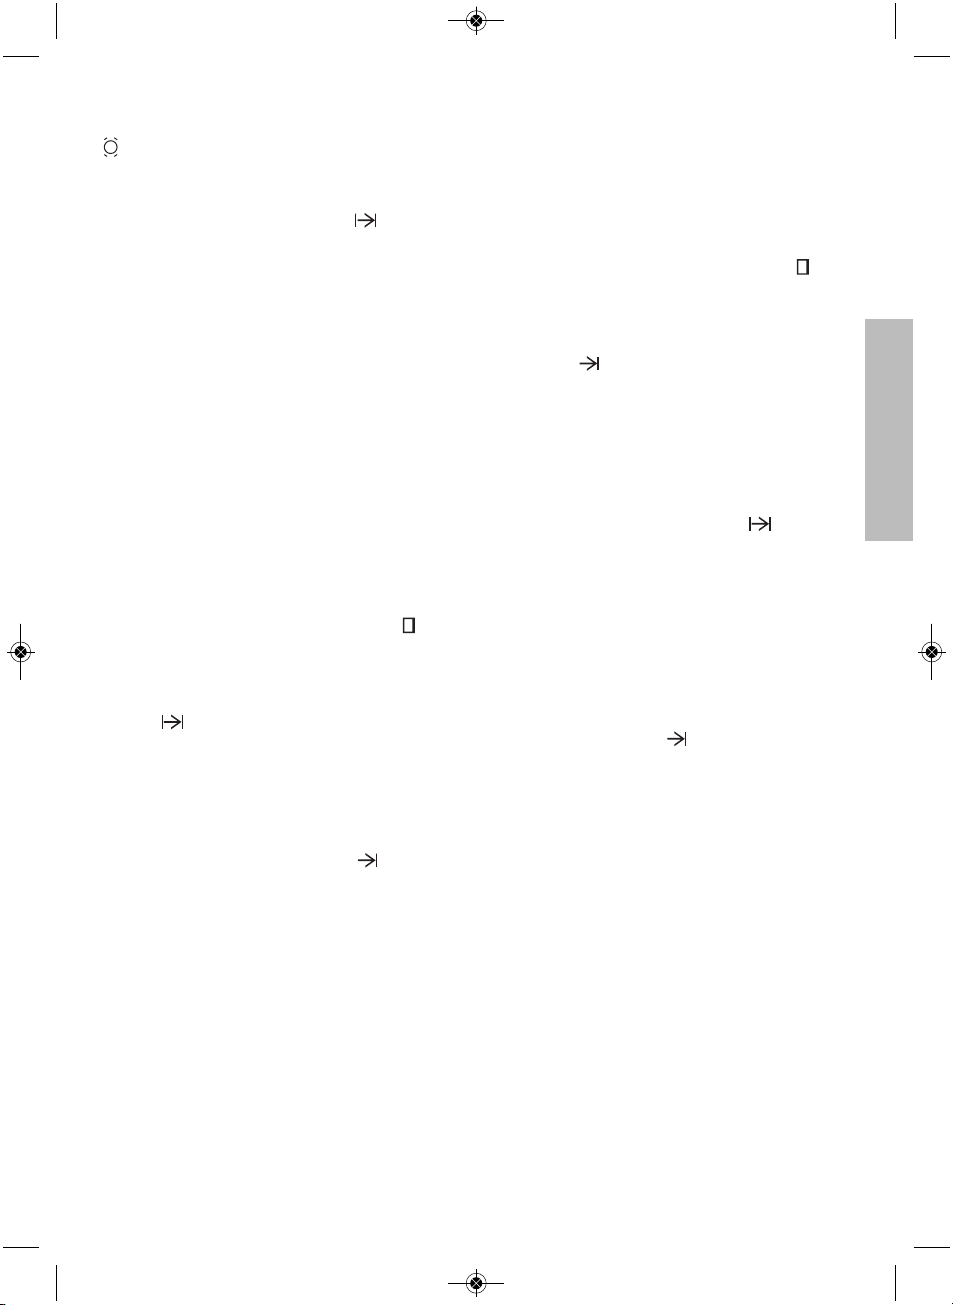
Símbolo : Iluminado al seleccionar la función avisador del reloj.
Símbolo : Iluminado para indicar que el
horno está programado.
Símbolo : Indica que el horno está transmitiendo calor al alimento.
Sensores + / – : Permiten seleccionar tiempo.
Atención
Su reloj electrónico incorpora tecnología TouchControl. Para manejarlo es suficiente con tocar
los símbolos del cristal con su dedo.
La sensibilidad del Touch-Control se adapta continuamente a las condiciones ambientales. Al
conectar el horno a la red tenga la precaución
que la superficie del cristal del frontal de mandos esté limpia y libre de cualquier obstáculo.
Si al tocar el cristal, el reloj no responde correctamente entonces es necesario que desconecte el horno de la red eléctrica y tras un instante
vuelva a conectarlo. De esta forma los sensores se habrán ajustado automáticamente y
reaccionarán de nuevo al tocar con el dedo.
MaxiGrill
Permite el gratinado en mayores superficies
que en Grill, así como una mayor potencia de
gratinado, obteniendo un dorado del alimento
de forma más rápida.
Grill
Gratinado y asado superficial. Permite el
dorado de la capa exterior sin afectar al interior
del alimento. Indicado para piezas planas
como bistec, costillas, pescado, tostadas.
MaxiGrill con Turbina
Permite el asado uniforme al mismo tiempo
que dora superficialmente. Ideal para
parrilladas. Especial para piezas con gran
volumen como aves, caza,... Se recomienda
colocar la pieza de carne sobre la parrilla del
horno y la bandeja por debajo, para el
escurrido de jugos o grasa.
Atención
Durante el uso de la función Grill, MaxiGrill o
MaxiGrill con Turbina la puerta debe mantenerse cerrada.
Turbo
La turbina reparte el calor que proviene de
una resistencia situada en la parte trasera del
horno. Por la uniformidad de la temperatura
que se produce, permite cocinar en 2 alturas
al mismo tiempo.
Descongelación
Esta función es apropiada para descongelaciones
suaves de alimentos. En especial aquellos que
son consumidos sin calentar, por ejemplo cremas,
pastas, tartas, pasteles, etc.
Nota
La lámpara permanece encendida en cualquier
función de cocinado.
3172713-001 16/12/14 12:04 Página 4
Page 5

5
ESPAÑOL
Sensores , y : Permiten la programación de las funciones del reloj electrónico.
Sensor : Permite intercambiar la información visible y la selección de las funciones del
reloj entre las cavidades superior e inferior.
Símbolos : Iluminados al seleccionar la
cavidad superior.
Símbolos : Iluminado al seleccionar la
cavidad inferior.
Puesta en Hora
•
Al conectar su horno, observará que en el
reloj aparece parpadeando la indicación
12:00.
•
Tocando con el dedo los sensores + ó –
pondrá el reloj en hora; a continuación
escuchará 2 beep seguidos como confirmación de la hora elegida.
•
Si desea modificar la hora, toque a la vez
los sensores + y –. A continuación parpadeará la hora actual en la pantalla. Tocando
los sensores + ó – podrá modificarla. Finalmente escuchará 2 beep seguidos como
confirmación del cambio realizado.
NOTA
Su reloj posee el modo de iluminación nocturna, de forma que disminuirá la intensidad de
luz de la pantalla entre las 00:00 y las 6:00
horas.
Funcionamiento Manual
•
Tras poner el reloj en hora, su horno está
listo para cocinar. Seleccione una función
de cocinado y una temperatura.
•
Se iluminaran los símbolos
según elija las funciones de la cavidad
superior o cavidad inferior.
•
Durante el cocinado observará que el símbolo se ilumina para indicar la transmisión de calor al alimento.
•
Este símbolo se apaga cuando se alcanza
la temperatura seleccionada.
•
Para apagar el horno, ponga los mandos en
posición .
Funciones del Reloj Electrónico
Avisador: Genera una señal acústica al cabo
del tiempo, para ello no es necesario que el
horno esté cocinando.
Duración del Cocinado (cavidad superior e
inferior): Permite cocinar durante un tiempo
seleccionado, a continuación el horno se apagará de forma automática.
Hora de Finalización del Cocinado (cavidad
superior e inferior): Permite cocinar hasta una
hora establecida, a continuación el horno se
apagará de forma automática.
Duración y Fin del Cocinado (cavidad superior e inferior): Permite programar la duración
y la hora de finalización del cocinado. Con esta
función el horno se pondrá en marcha de forma automática para cocinar durante el tiempo
seleccionado (Duración) y finalizando de forma
automática a la hora que le hayamos indicado
(Fin del Cocinado).
Programación del Avisador
1. Toque con el dedo el sensor hasta
que parpadee el símbolo en la pantalla, viéndose además la indicación 00:00.
2. Seleccione el tiempo tras el cual desea que
el reloj avise, tocando los sensores + ó –.
3. Posteriormente sonarán 2 beep seguidos
como confirmación, se mostrará la cuenta
atrás a partir del tiempo seleccionado y el
símbolo parpadeará lentamente.
4. Transcurrido el tiempo programado, sonará
una señal acústica y el símbolo parpadeará rápidamente.
5. Toque cualquier sensor para detener la
señal acústica, en ese momento el símbolo
se apagará.
Si desea modificar el tiempo del avisador, sólo
tiene que tocar con el dedo el sensor y
posteriormente tocar los sensores + ó –. A
continuación sonarán 2 beep seguidos como
confirmación del cambio, se mostrará la
cuenta atrás a partir del nuevo tiempo y el
símbolo parpadeará lentamente.
NOTA
Con la función Avisador, no es posible visualizar la hora actual en la pantalla.
3172713-001 16/12/14 12:04 Página 5
Page 6

6
5. Alcanzada la hora de finalización progra-
mada, el horno se desconectará, sonará
una señal acústica y el símbolo AUTO parpadeará rápidamente.
6. Toque cualquier sensor para detener la
señal acústica y apagar el símbolo AUTO,
encendiéndose el horno de nuevo.
7. Ponga los mandos en posición para apa-
gar el horno.
En cualquier momento usted puede modificar
la hora de fin de cocinado, tocando con el
dedo el sensor hasta que el símbolo AUTO
parpadee rápidamente y vea la hora de finalización en la pantalla. A continuación tocando
los sensores + ó – ya puede modifi-car la hora.
Programación de la Duración y Fin del
Cocinado
1. Toque con el dedo el sensor hasta que
empiece a parpadear el símbolo AUTO y
aparezca 00:00 en la pantalla.
2. Seleccione la duración del cocinado, tocan-
do los sensores + ó –.
3. Posteriormente sonarán 2 beep seguidos,
se mostrará el tiempo restante de cocinado en la pantalla y el símbolo AUTO parpadeará lentamente.
4. Toque el sensor hasta que el símbolo
AUTO empiece a parpadear rápidamente.
En la pantalla se mostrará la hora actual
más la duración del cocinado que habíamos programado.
5. Seleccione la hora de finalización del coci-
nado, tocando los sensores + ó –.
6. Posteriormente sonarán 2 beep seguidos,
se mostrará la hora actual en la pantalla y
el símbolo AUTO permanecerá iluminado.
7. Seleccione una función y una temperatura
de cocinado.
8. El horno permanecerá desconectado y con
el símbolo AUTO iluminado. Su horno está
programado.
9. Cuando se alcance la hora de comienzo
del cocinado, el horno se pondrá en marcha y se realizará el cocinado durante el
tiempo seleccionado.
NOTA: Para cambiar entre la programación de
la cavidad inferior o superior, toque el sensor
Programación de la Duración del Cocinado
1. Toque con el dedo el sensor hasta que
empiece a parpadear el símbolo AUTO y
aparezca 00:00 en la pantalla.
2. Seleccione la duración, tocando los sen-
sores + ó –.
3. Posteriormente sonarán 2 beep seguidos,
el símbolo AUTO parpadeará lentamente y
se mostrará en la pantalla el tiempo restante hasta que el horno se apague de
forma automática.
4. Seleccione una función y una temperatura
de cocinado.
5. Transcurrida la duración del cocinado, el
horno se desconectará, sonará una señal
acústica y el símbolo AUTO parpadeará rápidamente.
6. Toque cualquier sensor para detener la
señal acústica y apagar el símbolo AUTO,
encendiéndose el horno de nuevo.
7. Ponga los mandos en posición para apa-
gar el horno.
En cualquier momento usted puede modificar
el tiempo restante de cocinado, tocando con el
dedo el sensor hasta que el símbolo AUTO
parpadee rápidamente. A continuación tocando los sensores + ó – ya puede modificar el
tiempo.
Programación de la Hora de Finalización del
Cocinado
1. Toque con el dedo el sensor hasta que
empiece a parpadear el símbolo AUTO.
2. Seleccione la hora de finalización del coci-
nado, tocando los sensores + ó –.
3. Posteriormente sonarán 2 beep seguidos,
se mostrará en la pantalla la hora actual y
el símbolo AUTO parpadeará lentamente
indicado que el horno se apagará de forma
automática.
4. Seleccione una función y una temperatura
de cocinado.
3172713-001 16/12/14 12:04 Página 6
Page 7

7
ESPAÑOL
10.Durante el cocinado se mostrará el tiempo
restante de cocinado y el símbolo AUTO
parpadeará lentamente.
11.Alcanzada la hora de finalización que se
había programado, el horno se desconectará, sonará una señal acústica y el símbolo AUTO parpadeará rápidamente.
12.Toque cualquier sensor para detener la
señal acústica y apagar el símbolo AUTO,
encendiéndose el horno de nuevo.
13.Ponga los mandos en posición para
apagar el horno.
Si mientras cocina el horno desea modificar el
tiempo restante de cocinado, toque con el
dedo el sensor hasta que el símbolo
AUTO parpadee rápidamente. A continuación
toque los sensores + ó – para modificar el
tiempo.
Función Seguridad niños
Esta función se puede seleccionar en cualquier momento durante el uso del horno.
Para activar la función, toque a la vez los sensores + y – de forma prolongada hasta que
escuche 1 beep sonoro y vea la indicación
SAFE en la pantalla. El reloj está bloqueado.
Si el horno está apagado y activa la seguridad
niños, el horno no cocinará aunque seleccione
una función de cocinado.
Si mientras cocina con el horno activa esta
función, sólo bloqueará la manipulación del
reloj electrónico.
Estando activado el seguro de niños, si se
toca cualquier sensor del reloj, se visualizará
SAFE en la pantalla. El reloj está bloqueado.
Para desactivar la función, toque a la vez los
sensores + y – de forma prolongada hasta
que escuche 1 beep sonoro.
Atención
En caso de un corte de suministro eléctrico,
se borrará toda la programación de su reloj
electrónico y aparecerá parpadeando la indicación 12:00 en el reloj. Deberá ponerlo en
hora y programarlo de nuevo.
3172713-001 16/12/14 12:04 Página 7
Page 8
8
321 6
321 54
CAVIDADE INFERIOR
1 Selector de temperaturas
2 Selector de funções
3 Relógio electrónico
CAVIDADE SUPERIOR
4 Selector de funções
5 Selector de temperaturas
6 Turbo + Selector de temperaturas
Modelo HDL-718
Modelo HDL-888
Painel de Comandos
Funções do Forno
Modelo HDL-718
Forno superior: / / /
/
Forno inferior:
Modelo HDL-888
Forno superior: / / /
/
Forno inferior: / / /
/
Desconexão do forno
Convencional
Usado em bolos e tartes nos quais o calor
recebido deve ser uniforme para que adquiram uma textura esponjosa.
Resistência Inferior
Calor somente na parte inferior. Apropriado
para aquecer pratos ou levantar massas de
confeitaria e semelhantes.
3172713-001 16/12/14 12:04 Página 8
Page 9

9
PORTUGUÉS
Utilização do forno
Descrição do Relógio Electrónico
Símbolo : Iluminado ao seleccionar a função de aviso do relógio.
Símbolo : Iluminado para indicar que o
forno está programado.
Símbolo : Indica que o forno está a transmitir calor ao alimento.
Sensores + / – : Permitem seleccionar tempo.
Atenção
O relógio electrónico incorpora tecnologia
Touch-Control. Para o controlar basta tocar nos
símbolos do vidro com o dedo.
A sensibilidade do Touch-Control adapta-se
continuamente às condições ambientais. Ao
ligar o forno à corrente, é necessário ter o cuidado de garantir que a superfície do vidro da
parte da frente dos comandos está limpa e
livre de qualquer obstáculo.
Se ao tocar no vidro, o relógio não responde
correctamente, então é necessário desligar o
forno da rede eléctrica e após alguns instantes voltar a ligá-lo. Desta forma os sensores
ajustar-se-ão automaticamente e reagirão
novamente ao tocar com o dedo.
MaxiGrill
Permite gratinar superfícies maiores que com
o Grill, bem como gratinar com maior potência, alourando assim o alimento de forma
mais rápida.
Grill
Gratina e assa superficialmente. Permite alourar a camada exterior sem afectar o interior
do alimento. Indicado para pedaços planos
como filetes, costelas, peixe, tostas.
MaxiGrill com Turbina
Permite assar de modo uniforme ao mesmo
tempo que aloura superficialmente. Ideal para
churrascos. Especial para pedaços com grande volume como aves, caça,... Recomenda-se
colocar a porção de carne sobre a grelha do
forno com a bandeja por baixo, para recolher
os molhos ou gorduras.
Atenção
Durante o uso da função Grill, MaxiGrill ou
MaxiGrill com Turbina deve-se manter a porta
fechada.
Turbo
A turbina reparte o calor que provém de uma
resistência situada na parte de atrás do forno. Devido à uniformidade da temperatura
produzida permite cozinhar em 2 alturas ao
mesmo tempo.
Descongelação
Esta função é apropriada para a descongelação leve de alimentos. En especial alimentos
sem aquecer, por exemplo, cremes, natas,
pastas, tartes, biscoitos, frutas...
Nota
A lâmpada permanece acesa em qualquer
função de cozinhado.
3172713-001 16/12/14 12:04 Página 9
Page 10
10
Sensores , e : Permitem a programação das funções do relógio electrónico.
Sensor : Permite alternar a informação
visível e a selecção das funções do relógio
entre as cavidades superior e inferior.
Símbolos : Iluminados ao seleccionar a
cavidade superior.
Símbolos : Iluminados ao seleccionar a
cavidade inferior.
Acerto
•
Ao ligar o forno, observará que no relógio
aparece a piscar a indicação 12:00.
•
Tocando com o dedo nos sensores + ou –
acertará o relógio; seguidamente escutará
2 beep seguidos como confirmação da hora
escolhida.
•
Caso pretenda modificar a hora, toque nos
sensores + e – em simultâneo. Seguidamente a hora actual irá piscar no visor. Tocando
nos sensores + ou – poderá modificá-la.
Finalmente, escutará 2 beep seguidos como
confirmação da alteração realizada.
NOTA
O relógio possui o modo de iluminação nocturna, pelo que irá diminuir a intensidade da
luz do visor entre as 00:00 e as 6:00 horas.
Funcionamento Manual
•
Após acertar a hora do relógio, o seu forno
está pronto para cozinhar. Seleccione uma
função de cozinhado e uma temperatura.
•
Os símbolos irão acender-se
de acordo com as funções da cavidade
seleccionada, superior ou inferior.
•
Durante o cozinhado poderá observar que o
símbolo se ilumina para indicar a transmissão de calor ao alimento.
•
Este símbolo apaga-se quando é alcançada
a temperatura seleccionada.
•
Para apagar o forno, coloque os comandos
na posição .
Funções do Relógio Electrónico
Avisador: Gera um sinal sonoro no final do
tempo, não sendo para isso necessário que o
forno esteja a cozinhar.
Duração do Cozinhado (cavidade superior e
inferior): Permite cozinhar durante um tempo
seleccionado e a seguir o forno apagar-se-á de
forma automática.
Hora de Finalização do Cozinhado (cavidade
superior e inferior): Permite cozinhar até uma
hora estabelecida e a seguir o forno apagar-seá de forma automática.
Duração e Finalização do Cozinhado (cavidade
superior e inferior): Permite programar a dura-
ção e a hora de finalização do cozinhado. Com
esta função o forno entrará em funcionamento
de forma automática para cozinhar durante o
tempo seleccionado (Duração) e finalizando de
forma automática à hora que tenhamos indicado
(Finalização do Cozinhado).
Programação do Avisador
1. Toque com o dedo no sensor até que
o símbolo pisque no visor, e a indicação 00:00 seja apresentada.
2. Seleccione o tempo após o qual deseja que
o relógio avise, tocando nos sensores + ou –.
3. Posteriormente, soarão 2 beep seguidos
como confirmação, será mostrada a contagem decrescente a partir do tempo seleccionado e o símbolo piscará lentamente.
4. Decorrido o tempo programado, soará um
sinal sonoro e o símbolo piscará rapidamente.
5. Toque em qualquer sensor para parar o
sinal sonoro. Nesse momento o símbolo
apagar-se-á.
Se pretende modificar o tempo do avisador, só
tem que tocar com o dedo no sensor e
posteriormente tocar nos sensores + ou – .
Em seguida, soarão 2 beep seguidos como
confirmação da alteração, será mostrada a
contagem decrescente a partir do novo tempo
e o símbolo piscará lentamente.
NOTA
Com a função Avisador, não é possível visualizar a hora actual no visor.
3172713-001 16/12/14 12:04 Página 10
Page 11
11
PORTUGUÉS
5. Alcançada a hora de finalização programa-
da, o forno desligar-se-á, soará um sinal
sonoro e o símbolo AUTO piscará rapidamente.
6. Toque em qualquer sensor para parar o
sinal sonoro e apagar o símbolo AUTO,
acendendo-se o forno novamente.
7. Coloque os comandos na posição para
apagar o forno.
A qualquer momento pode modificar a hora de
finalização do cozinhado, tocando com o dedo
no sensor até que o símbolo AUTO pisque
rapidamente e veja a hora de finalização no
visor. Em seguida, toque nos sensores + ou –
para modificar a hora.
Programação da Duração e Finalização do
Cozinhado
1. Toque com o dedo no sensor até que o
símbolo AUTO comece a piscar e apareça
00:00 no visor.
2. Seleccione a duração do cozinhado, tocan-
do nos sensores + ou –.
3. Posteriormente, soarão 2 beep seguidos,
será mostrado o tempo restante de cozinhado no visor e o símbolo AUTO piscará
lentamente.
4. Toque no sensor até que o símbolo
AUTO comece a piscar rapidamente. No
visor será mostrada a hora actual mais a
duração do cozinhado programada.
5. Seleccione a hora de finalização do cozi-
nhado, tocando nos sensores + ou –.
6. Posteriormente soarão 2 beep seguidos,
será mostrada a hora actual no visor e o
símbolo AUTO permanecerá iluminado.
7. Seleccione uma função e uma temperatura
de cozinhado.
8. O forno permanecerá desligado e com o
símbolo AUTO iluminado. O seu forno está
programado.
9. Quando for alcançada a hora de início do
cozinhado, o forno entrará em funcionamento e o cozinhado decorrerá durante o
tempo seleccionado.
NOTA: Para alternar entre a programação da
câmara inferior ou superior, toque no sensor
Programação da Duração do Cozinhado
1. Toque com o dedo no sensor até que o
símbolo AUTO comece a piscar e apareça
00:00 no visor.
2. Seleccione a duração, tocando nos senso-
res + ou – .
3. Posteriormente, soarão 2 beep seguidos, o
símbolo AUTO piscará lentamente e será
mostrado no visor o tempo restante até que
o forno se desligue de forma automática.
4. Seleccione uma função e uma temperatura
de cozinhado.
5. Decorrida a duração do cozinhado, o forno
desligar-se-á, soará um sinal sonoro e o
símbolo AUTO piscará rapidamente.
6. Toque em qualquer sensor para parar o
sinal sonoro e apagar o símbolo AUTO,
acendendo-se o forno novamente.
7. Coloque os comandos na posição para
apagar o forno.
A qualquer momento pode modificar o tempo
restante de cozinhado, tocando com o dedo no
sensor até que o símbolo AUTO pisque
rapidamente. Em seguida, toque nos sensores
+ ou – para modificar o tempo.
Programação da Hora de Finalização do
Cozinhado
1. Toque com o dedo no sensor até que o
símbolo AUTO comece a piscar.
2. Seleccione a hora de finalização do cozi-
nhado, tocando nos sensores + ou –.
3. Posteriormente, soarão 2 beep seguidos,
será mostrada no visor a hora actual e o
símbolo AUTO piscará lentamente , indicando que o forno se desligará de forma automática.
4. Seleccione uma função e uma temperatura
de cozinhado.
3172713-001 16/12/14 12:04 Página 11
Page 12

12
10.Durante o cozinhado será mostrado o tem-
po restante de cozinhado e o símbolo
AUTO piscará lentamente.
11.Alcançada a hora de finalização programa-
da, o forno desligar-se-á, soará um sinal
sonoro e o símbolo AUTO piscará rapidamente.
12.Toque em qualquer sensor para parar o
sinal sonoro e apagar o símbolo AUTO,
acendendo-se o forno novamente.
13.Coloque os comandos na posição para
apagar o forno.
Caso, enquanto o forno está a cozinhar, pretenda modificar o tempo restante de cozinhado, toque com o dedo no sensor até que
o símbolo AUTO pisque rapidamente. Em
seguida, toque nos sensores + ou – para
modificar o tempo.
Função Segurança Crianças
Esta função pode ser seleccionada a qualquer
momento durante a utilização do forno.
Para activar a função, toque em simultâneo
nos sensores + e – de forma prolongada até
ouvir 1 beep e ver a indicação SAFE no ecrã.
O relógio está bloqueado.
Se o forno estiver apagado e activar a função
segurança de crianças, o forno não irá cozinhar mesmo que seleccione uma função de
cozinhado.
Se enquanto cozinha com o forno, activar esta
função, só bloqueará a manipulação do relógio electrónico.
Estando activada a segurança para crianças,
caso se toque em qualquer sensor do relógio,
visualizar-se-á SAFE no visor. O relógio está
bloqueado.
Para desactivar a função, toque simultaneamente nos sensores + e – de forma prolongada até ouvir 1 beep.
Atenção
No caso de um corte de corrente eléctrica,
será apagada toda a programação do relógio
electrónico e aparecerá a piscar no relógio a
indicação 12:00. Deverá acertar a hora e programá-lo de novo.
3172713-001 16/12/14 12:04 Página 12
Page 13

13
ENGLISH
321 6
321 54
TOP CAVITY
1 Temperature control dial
2 Function control dial
3 Electronic clock/timer
BOTTOM CAVITY
4 Function control dial
5 Temperature control dial
6 Turbo + Temperature control dial
Model HDL-718
Model HDL-888
Control Panel
Oven Functions
Model HDL-718
Top cavity: / / /
/
Main cavity:
Model HDL-888
Top cavity: / / / /
Main cavity: / / / /
Switch off oven
Conventional
It is used for sponges and cakes where the
heat received must be uniform to achieve a
spongy texture.
Lower Element
Heats only from beneath. Suitable for heating
dishes and raising pastry and similar.
3172713-001 16/12/14 12:04 Página 13
Page 14

14
Oven Use
Electronic Clock/Timer Settings
Symbol: lights up when the clock/timer
is selected.
Symbol: lights up to indicate that the
oven is programmed.
Symbol: indicates that the oven is trans-
mitting heat to the food.
+ / – Sensors: enable you to select a time.
Caution
The electronic clock features touch control
technology. To operate, simply touch the glass
control symbols with your fingertip.
The touch control sensitivity continuously
adapts to the ambient conditions. Make sure
the glass surface of the control panel is clean
and free of obstacles when plugging in the
oven.
If the clock does not respond correctly when
you touch the glass, unplug the oven for a few
seconds and then plug it in again. Doing this
causes the sensors to adjust automatically so
that they will react once more to fingertip control.
MaxiGrill
Allows greater surfaces to be prepared, than
with the grill, together with higher power
reducing the time required for browning of the
food.
Grill
For preparing dishes with superficial roasting.
It allows the outer layer to be browned without
affecting the inside of the food. Ideal for flat
food, such as steaks, ribs, fish, toast.
MaxiGrill with fan
Allows uniform roasting at the same time as
surface browning. Ideal for grills. Special for
large volume pieces, such as poultry game
etc. It is recommended to put the item on a
rack with a tray beneath to collect the stock
and juices.
Caution
While using the Grill, MaxiGrill or MaxiGrill with
fan, the door must be kept closed.
Turbo
The fan distributes the heat produced by an
element located at the rear of the oven. Due
to the uniform heat distribution, it allows
roasting and baking to take place on two
levels at the same time.
Defrosting
This cooking mode is suitable for gentle
defrosting of delicate food to be consumed
unheated, e.g.: cream, custard, pastry, tarts,
cakes, fruit,...
Note
The pilot light remains on in any cooking
function.
3172713-001 16/12/14 12:04 Página 14
Page 15

15
ENGLISH
, and Sensors: enable you to
programme the electronic clock/timer functions.
Sensor: enables you to change visible
information and select clock/timer settings
between the top and bottom cavities
Symbols: Lights up when the top cavity
is chosen.
Symbols: lights up when the bottom
cavity is chosen
Setting the Time
•
When you plug in the oven, you will see the
clock flashing 12:00.
•
Set the clock by touching the + or – sensor.
You will hear 2 beeps confirming that the
time has been set.
•
To change the time, touch the + and – symbols together until the indicated time flashes on the display. Change the time by pressing the + or – sensors. Two beeps will then
confirm that the new time has been set.
NOTE
The clock light has a night mode so the display light will dim between 00:00 and 6:00
hours.
Manual Operation
•
After setting the clock, the oven is ready for
use. Select a cooking function and temperature.
•
The symbols will light up
depending on the top and bottom cavity
functions.
•
During cooking, the symbol will light up
to indicate that heat is being transmitted to
the food.
•
This symbol disappears when the selected
temperature has been reached.
•
Set the controls to to turn off the oven.
Electronic Clock/Timer Settings
Timer Alarm: The alarm will go off at the pro-
grammed time, even if the oven is not in use.
Cooking Time (top and bottom cavity): This
function allows you to programme the cooking
time, after which the oven will turn off automatically.
Cooking Stop Time (top and bottom cavity):
This setting allows you to programme the time
for cooking to stop, after which the oven will
turn off automatically.
Cooking Time and Cooking Stop Time (top
and bottom cavity): This setting allows you to
programme the cooking time and cooking stop
time. The oven switches on automatically at
the set time and operates for the selected
cooking time (Cooking Time). It then switches
off automatically at the indicated time (Cooking Stop Time).
Programming the Timer Alarm
1. Touch the sensor with your fingertip
until the symbol starts flashing on the
display. The clock will also flash 00:00.
2. Select the time after which you want the
alarm to sound by pressing the + or –
sensor.
3. You will hear 2 beeps to confirm that the
time has been set. The clock will start
counting down from the selected time and
the symbol will flash slowly.
4. When the time is up, the alarm will go off
and the symbol will flash quickly.
5. Touch any sensor to stop the alarm. The
symbol will then disappear.
If you want to change the timer alarm, simply
touch the sensor with your fingertip and
then press the + or – sensor. You will hear 2
beeps to confirm that the time has been
changed. The clock will then start counting
down from the new time and the symbol
will flash slowly.
NOTE
You cannot see the current time on the display
when the timer alarm is set.
3172713-001 16/12/14 12:04 Página 15
Page 16
16
You can change the stop cooking time at any
time by touching the sensor with your fingertip until the AUTO symbol starts to flash
quickly and you see the stop time on the display. Now press the + or – sensor to change
the time.
Programming Cooking Time and Cooking
Stop Time
1. Touch the sensor with your fingertip
until the AUTO symbol starts to flash and
00:00
2. Select the cooking time by pressing the + or
– sensor.
3. You will hear 2 beeps, the display will show
the remaining cooking time, and the AUTO
symbol will flash slowly.
4. Touch the sensor until the AUTO symbol
starts to flash quickly. The display will show
the current time and the programmed cooking time.
5. Select the cooking stop time by pressing
the + or – sensor.
6. This will be confirmed by two beeps. The
current time will show on the display and
the AUTO symbol will remain lit.
7. Select a cooking function and temperature.
8. The oven will remain off and the AUTO light
will be on. The oven is now programmed.
9. When it is time to start cooking, the oven
will turn on and will operate for the programmed cooking time.
10.While cooking, the display will show the
cooking time remaining and the AUTO symbol will flash slowly.
11.When the cooking time is up, the oven will
turn off, an alarm will sound, and the AUTO
symbol will flash quickly.
12.Touch any sensor to stop the alarm and to
turn off the AUTO symbol. The oven will
switch on again.
13.Set the controls to to turn off the oven.
NOTE: To switch between programming the
lower or upper chamber, touch the sensor
Programming Cooking Time
1. Touch the sensor with your fingertip
until the AUTO symbol starts to flash and
00:00 appears on the display.
2. Select the cooking time by pressing the + or
– sensor.
3. You will hear 2 beeps, the AUTO symbol will
flash slowly and the display will show the
time left before the oven switches off automatically.
4. Select a cooking function and temperature.
5. Once the cooking time is up, the oven will
turn off, an alarm will sound and the AUTO
symbol will flash quickly.
6. Touch any sensor to stop the alarm and to
turn off the AUTO symbol. The oven will
switch on again.
7. Set the controls to to turn off the oven.
You can change the remaining cooking time at
any time by touching the sensor with your
fingertip until the AUTO symbol starts to flash
quickly. Now press the + or – sensor to change
the time.
Programming the Cooking Stop Time
1. Touch the sensor with your fingertip
until the AUTO symbol starts to flash.
2. Select the cooking stop time by pressing
the + or – sensor.
3. You will hear 2 beeps, the display will show
the current time and the AUTO symbol will
flash slowly to indicate that the oven will
switch off automatically.
4. Select a cooking function and temperature.
5. When the cooking time is up, the oven will
turn off, an alarm will sound and the AUTO
symbol will flash quickly.
6. Touch any sensor to stop the alarm and to
turn off the AUTO symbol. The oven will
switch on again.
7. Set the controls to to turn off the oven.
3172713-001 16/12/14 12:04 Página 16
Page 17
17
ENGLISH
If you want to change the remaining cooking
time while the oven is on, press the sensor until the AUTO symbol starts to flash
quickly. Now press the + or – sensor to
change the time.
Child Safety Function
This function can be selected at any time
while using the oven.
To activate the function, press the + and –
sensors at the same time for several seconds. You will hear a beep and see the word
SAFE on the display. The clock/timer is
locked.
If the oven is off and you activate the child
safety function, the oven will not work even if
a cooking function is selected.
If this function is activated while you are cooking, it will only lock the electronic clock/timer
settings.
If any clock/timer sensor is touched while the
child safety function is on, the word SAFE will
appear on the display. The clock/timer is
locked.
To disable the function, press the + and – sensors at the same time for several seconds
until you hear a beep.
Caution
In the event of a power failure, your electronic
clock/timer settings will be erased and 12:00
will flash on the clock display. Reset it and
programme again.
3172713-001 16/12/14 12:04 Página 17
Page 18

18
321 6
321 54
CAVITÉ INFÉRIEURE
1 Sélecteur de températures
2 Sélecteur de fonctions
3 Horloge électronique
CAVITÉ SUPÉRIEURE
4 Sélecteur de fonctions
5 Sélecteur de températures
6 Turbo + Sélecteur de températures
Modèle HDL-718
Modèle HDL-888
Panneau frontal de commande
Fonctions du four
Modèle HDL-718
Four superieure: / / /
/
Four inferieure:
Modèle HDL-888
Four superieure: / / /
/
Four inferieure: / / /
/
Arrêt du four
Conventionnel
Utiliser pour les gâteaux et les tartes qui
doivent recevoir une chaleur uniforme et pour
obtenir une texture moelleuse.
Résistance Inférieure
La chaleur provient seulement de la partie
inférieure. Approprié pour réchauffer des plats
ou faire lever des pâtes pour pâtisseries et
analogues.
3172713-001 16/12/14 12:04 Página 18
Page 19

19
FRANÇAIS
Fonctionnement du four
Description de l’Horloge Électronique
Symbole : Allumé lorsque la fonction de
l’avertisseur de l’horloge est sélectionnée.
Symbole : Allumé pour indiquer que le
four est programmé.
Symbole : Indique que le four transmet
actuellement de la chaleur à l’aliment.
Capteurs + / – : Permettent de sélectionner la
durée.
Mise en garde
L’horloge électronique est équipée de la technologie Touch-Control. Pour la manipuler, il suffit
d’appuyer sur les symboles représentés sur la
vitre.
La sensibilité du Touch-Control s’adapte
constamment aux conditions ambiantes.
Lorsque vous branchez le four au secteur électrique, veillez à ce que la surface vitrée du
tableau de commande soit propre et sans
aucun obstacle.
Si l’horloge ne répond pas correctement
lorsque vous touchez la vitre avec le doigt, il
faut débrancher le four du secteur électrique
et de le rebrancher après un court instant.
Ceci permet de régler automatiquement les
capteurs qui réagiront de nouveau lorsque
vous toucherez les commandes tactiles.
MaxiGrill
Permet de gratiner des surfaces plus grandes
qu'avec le Grill avec une puissance pour
gratiner supérieure, qui permet ainsi de dorer
l'aliment de façon plus rapide.
Grill
Pour gratiner et rôtir superficiellement. Permet
de dorer la couche extérieure sans affecter
l'intérieur de l'aliment. Indiqué pour les pièces
plates telles que les beefsteaks, les côtelettes,
les poissons, les toasts.
MaxiGrill avec turbine
Permet en même temps de rôtir de façon
uniforme et de dorer superficiellement. Idéal
pour les grillades. Spécial pour les pièces
volumineuses telles que les volailles, le gibier.
Il est recommandé de placer la pièce de
viande sur la grille du four et la lèchefrite endessous pour recueillir les jus de cuisson ou
la graisse.
Attention
Quand on utilise la fonction Grill, MaxiGrill ou
MaxiGrill avec Turbine, la porte doit rester fermée.
Turbo
La turbine répartit la chaleur qui provient
d’une résistance située à la partie arrière du
four. Grâce à l’uniformité de la chaleur
produite, on peut cuisiner à 2 hauteurs en
même temps.
Décongeler
Cette fonction permet de décongeler
doucement des mets. Spécialement mets qui
ne doivent pas être chauffés, comme p.ex.
crème chantilly, crème vanille, pâtes, gâteaux,
fruits,...
Attention
La lampe reste allumée pendant toutes les
fonctions de cuisson.
3172713-001 16/12/14 12:04 Página 19
Page 20
20
Capteurs , et : Permettent de
programmer les fonctions de l’horloge électronique.
Capteur : Permet d'échanger les informations visibles et la sélection des fonctions de
l’horloge entre les cavités supérieures et inférieures.
Symboles : Allumés lorsque la cavité
supérieure est sélectionnée.
Symboles : Allumés lorsque la cavité
inférieure est sélectionnée.
Réglage de l’Heure
•
Lorsque le four est branché, l’indication
12:00 se met à clignoter sur l’horloge.
•
Appuyez sur les capteurs + ou – pour
mettre l’horloge à l’heure. 2 bips sonores
consécutifs sont alors émis pour confirmer
le réglage.
•
Si vous voulez modifier l’heure, appuyez sur
les deux capteurs + et – en même temps,
jusqu’à ce que l’heure affichée sur l’écran
se mette à clignoter. Appuyez sur les capteurs + ou – pour la modifier. 2 bips sonores
consécutifs sont alors émis pour confirmer
la modification effectuée.
REMARQUE
L’horloge est dotée du mode d'éclairage nocturne. L’intensité de l’éclairage de l’écran
diminuera donc entre 00:00 et 6:00 heures.
Fonctionnement Manuel
•
Une fois l’horloge réglée, votre four est prêt
à fonctionner. Sélectionnez une fonction de
cuisson et une température.
•
Les symboles s’allumeront
selon que vous choisissez les fonctions de
la cavité supérieure ou inférieure.
•
Pendant la cuisson, le symbole s’allume pour indiquer que de la chaleur est
transmise à l’aliment.
•
Ce symbole s’éteint lorsque la température
sélectionnée est atteinte.
•
Pour éteindre le four, placez les commandes
sur la position .
Fonctions de l’Horloge Électronique
Avertisseur : émet un signal sonore lorsque la
durée sélectionnée est écoulée. Pour l’utiliser,
il n’est pas nécessaire que le four soit en
cours de cuisson.
Durée de Cuisson (cavité supérieure et inférieure): permet de régler le temps de cuisson.
Lorsque la durée sélectionnée est écoulée, le
four s’éteint automatiquement.
Heure de Fin de Cuisson (cavité supérieure et
inférieure): permet de régler le temps de cuis-
son jusqu’à une certaine heure. Lorsque l’heure sélectionnée est atteinte, le four s’éteint
automatiquement.
Durée et Fin de Cuisson (cavité supérieure et
inférieure): permet de programmer la durée et
l’heure de fin de cuisson. Cette fonction permet de mettre automatiquement le four en
marche afin que celui-ci fonctionne pendant le
temps de cuisson sélectionné (durée). Le four
s'éteint automatiquement à l'heure indiquée
(fin de cuisson).
Programmation de l'Avertisseur
1. Appuyez sur le capteur jusqu’à ce que
le symbole se mette à clignoter et que
l’indication 00:00 s’affiche à l’écran.
2. Sélectionnez la durée au bout de laquelle
vous souhaitez que l'horloge sonne en
appuyant sur les capteurs + ou –.
3. 2 bips sonores consécutifs sont alors émis
à titre de confirmation, le compte à rebours
s’affiche à l’écran et le symbole se
met à clignoter lentement.
4. Après écoulement de la durée programmée,
un signal sonore retentit et le symbole
se met à clignoter rapidement.
5. Appuyez sur n’importe quel capteur pour
couper le signal sonore. Le symbole
s’éteint.
Si vous souhaitez modifier la durée de l’avertisseur, il vous suffit d’appuyer sur le capteur
puis d’utiliser les capteurs + ou –. 2 bips
sonores consécutifs sont alors émis pour
confirmer la modification, le nouveau compte à
rebours s’affiche à l’écran et le symbole
se met à clignoter lentement.
3172713-001 16/12/14 12:04 Página 20
Page 21
21
FRANÇAIS
3. 2 bips sonores consécutifs sont alors émis.
L’heure actuelle s’affiche à l’écran et le
symbole AUTO se met à clignoter lentement
pour indiquer que le four va s’éteindre automatiquement.
4. Sélectionnez une fonction et une tempéra-
ture de cuisson.
5. Après atteinte de l’heure de fin de cuisson
programmée, le four s’éteint, un signal
sonore retentit et le symbole AUTO se met
à clignoter rapidement.
6. Appuyez sur n’importe quel capteur pour
couper le signal sonore et éteindre le symbole AUTO. Le four se remet alors sous tension.
7. Placez les commandes sur la position
pour éteindre le four.
L’heure de fin de cuisson peut être modifiée à
tout moment en appuyant sur le capteur
jusqu’à ce que le symbole AUTO se mette à clignoter rapidement et que l’heure de fin de
cuisson s’affiche à l’écran. Appuyez ensuite
sur les capteurs + ou – pour modifier l’heure.
Programmation de la Durée et de la Fin de
Cuisson
1. Appuyez sur le capteur jusqu’à ce que
le symbole AUTO se mette à clignoter et
que l’indication 00:00 s’affiche à l’écran.
2. Sélectionnez la durée de cuisson en
appuyant sur les capteurs + ou –.
3. 2 bips sonores consécutifs sont alors émis,
le temps de cuisson restant s'affiche à
l’écran et le symbole AUTO se met à clignoter lentement.
4. Appuyez sur le capteur jusqu’à ce que
le symbole AUTO se mette à clignoter rapidement. L’heure actuelle ainsi que la durée
de cuisson programmée s’affichent alors à
l’écran.
5. Sélectionnez l'heure de fin de la cuisson en
appuyant sur les capteurs + ou –.
6. 2 bips se font alors entendre. L’heure
actuelle s’affiche à l'écran et le symbole
AUTO reste allumé.
REMARQUE
Lorsque la fonction d’Avertisseur est sélectionnée, l’affichage de l’heure actuelle à
l’écran est impossible.
REMARQUE: Pour basculer entre la
programmation de la chambre inférieure ou
supérieure, touchez le capteur
Programmation de la Durée de Cuisson
1. Appuyez sur le capteur jusqu’à ce que
le symbole AUTO se mette à clignoter et
que l’indication 00:00 s’affiche à l’écran.
2. Sélectionnez la durée en appuyant sur les
capteurs + ou – .
3. 2 bips sonores consécutifs sont alors émis.
Le symbole AUTO se met à clignoter lentement et le temps restant avant que le four
ne s’éteigne automatiquement s’affiche à
l'écran.
4. Sélectionnez une fonction et une tempéra-
ture de cuisson.
5. Une fois la durée de cuisson écoulée, le
four s’éteint, un signal sonore retentit et le
symbole AUTO se met à clignoter rapidement.
6. Appuyez sur n’importe quel capteur pour
couper le signal sonore et éteindre le symbole AUTO. Le four se remet alors sous tension.
7. Placez les commandes sur la position
pour éteindre le four.
Le temps de cuisson restant peut être modifié
à tout moment en appuyant sur le capteur
jusqu’à ce que le symbole AUTO se mette à clignoter rapidement. Appuyez ensuite sur les
capteurs + ou – pour modifier la durée.
Programmation de l'Heure de Fin de Cuisson
1. Appuyez sur le capteur jusqu’à ce que
le symbole AUTO se mette à clignoter.
2. Sélectionnez l'heure de fin de la cuisson en
appuyant sur les capteurs + ou –.
3172713-001 16/12/14 12:04 Página 21
Page 22
22
7. Sélectionnez une fonction et une tempéra-
ture de cuisson.
8. Le four reste éteint et le symbole AUTO res-
te allumé. Votre four est programmé.
9. Après atteinte de l’heure de début de cuis-
son, le four se met en marche et la cuisson
s’effectue pendant la durée sélectionnée.
10.Pendant la cuisson, le temps de cuisson
restant s’affiche à l’écran et le symbole
AUTO clignote lentement.
11.Après atteinte de l’heure de fin de cuisson
programmée, le four s’éteint, un signal
sonore retentit et le symbole AUTO se met
à clignoter rapidement.
12.Appuyez sur n’importe quel capteur pour
couper le signal sonore et éteindre le symbole AUTO. Le four se remet alors sous tension.
13.Placez les commandes sur la position
pour éteindre le four.
La durée de cuisson restante peut être modifiée en appuyant sur le capteur jusqu’à ce
que le symbole AUTO se mette à clignoter
rapidement. Appuyez ensuite sur les capteurs
+ ou – pour modifier la durée.
Fonction de Sécurité enfants
Cette fonction peut être sélectionnée à tout
moment pendant l’utilisation du four.
Pour activer la fonction, appuyez de façon
simultanée et prolongée sur les capteurs + et
–, jusqu’à ce qu’un bip sonore retentisse et
que l’indication SAFE s’affiche à l’écran. Ce
message indique que l’horloge est verrouillée.
Si la fonction de sécurité enfants est activée
lorsque le four est éteint, l’appareil ne fonctionne pas même si une fonction de cuisson
est sélectionnée.
Si cette fonction est activée pendant que vous
cuisinez avec le four, seule la manipulation de
l’horloge électronique sera verrouillée.
Lorsque la fonction de sécurité enfants est
activée, l’indication SAFE s’affiche à l’écran à
chaque fois qu’un capteur de l’horloge est
enfoncé. Ce message indique que l’horloge
est verrouillée. Pour désactiver la fonction,
maintenez les capteurs + et – enfoncés jusqu’à ce qu’un bip sonore retentisse.
Mise en garde
En cas de coupure de courant, toute la programmation de l’horloge électronique est
annulée et l’indication 12:00 se met à clignoter sur l‘écran de l’horloge. Il vous faudra
remettre l’horloge à l’heure et procéder à une
nouvelle programmation.
3172713-001 16/12/14 12:04 Página 22
Page 23

23
DEUTSCH
321 6
321 54
UNTERER GARRAUM
1 Temperaturwahlschalter
2 Funktionswahlschalter
3 Elektronikuhr
OBERER GARRAUM
4 Funktionswahlschalter
5 Temperaturwahlschalter
6 Turbo + Temperaturwahlschalter
Modell HDL-718
Modell HDL-888
Bedienfeld
Backofenfunktionen
Modell HDL-718
Übere Herd: / / /
/
Untere Herd:
Modell HDL-888
Übere Herd: / / /
/
Untere Herd: / / /
/
Ausschalten des Herds
Normal
Verwendung für Kuchen und Tortenböden, bei
denen die Wärmeeinwirkung gleichmäßig sein
muß, damit diese gut aufgehen.
Unterhitze
Es wird nur von der Unterseite Wärme zugeführt. Geeignet zum Anwärmen von Tellern,
zum Aufgehen von Teigmassen oder für ähnliche Anwendungen.
3172713-001 16/12/14 12:04 Página 23
Page 24

24
Bedienung des Backofens
Beschreibung der Elektronikuhr
Symbol : Leuchtet, wenn die Timer-Funktion gewählt wird.
Symbol : Leuchtet, um anzuzeigen, dass
der Backofen programmiert ist.
Symbol : Zeigt an, dass der Ofen die Speisen erhitzt.
Sensoren + / – : Ermöglichen die Auswahl der
Garzeit.
Achtung
Ihr Backofen ist mit Touch-Control-Technologie
ausgestattet. Um sie zu bedienen, genügt es,
die Symbole auf dem Glas mit dem Finger zu
berühren.
Die Empfindlichkeit der Touch-Control passt
sich fortwährend den Umgebungsbedingungen
an. Beim Anschließen des Backofens an das
Stromnetz achten Sie bitte darauf, dass die
Glasoberfläche der Vorderseite der Bedienelemente sauber und frei von jeglichen Verunreinigungen ist.
Wenn die Uhr beim Berühren des Glases mit
dem Finger nicht richtig reagiert, muss der
Backofen vom Stromnetz getrennt und nach
einem kurzen Augenblick wieder angeschlossen werden. Dadurch werden die Sensoren
automatisch justiert und reagieren wieder auf
die Fingerberührung.
MaxiGrill
Grillen auf größerer Oberfläche und mit größerer Leistung als mit dem Grill, hierdurch erfolgt
ein schnelleres Bräunen der Speisen.
Grill
Gratinieren und Anbräunen. Gestattet das
Anbräunen der Außenschicht, ohne das Innere
der Nahrungsmittel zu beeinflussen. Geeignet
für flache Stücke wie Beefsteak, Rippchen,
Fisch, Toastbrot.
MaxiGrill mit Umluft
Gestattet gleichzeitig ein gleichmäßiges
Garen und Anbräunen der Oberfläche. Ideal
zum Grillen. Besonders für große Stücke wie
Geflügel, Wild usw. Es wird empfohlen, das
Stück auf den Rost zu legen und die Auffangschale darunter einzusetzen, um Bratensaft
und Fett aufzufangen.
Achtung
Bei Benutzung der Funktionen Grill, MaxiGrill
oder MaxiGrill mit Umluft muß die Herdtür
geschlossen sein.
Turbo
Der Lüfter verteilt die von einem an der Rükkseite des Herds angeordneten Heizwiderstand erzeugte Wärme. Auf Grund der erzeugten gleichmäßigen Temperatur verteilung ist
ein Garen in 2 Etagen gleichzeitig möglich.
Auftauen
Ideal für schonendes Auftauen von feinen
Speisen, die kalt verwendet werden, wie z. B.
Sahne, Vanillesoße, Teig, Kuchen, Obst...
Achtung
Die Beleuchtung ist bei allen Kochfunktionen
eingeschaltet.
3172713-001 16/12/14 12:04 Página 24
Page 25

25
DEUTSCH
Sensoren , und : Ermöglichen
das Programmieren der Funktionen des
elektronischen Timers.
Sensor : Zum Wechseln zwischen den
sichtbaren Informationen und der Funktionsauswahl der Uhr des oberen und unteren Garraums.
Symbole : Leuchten, wenn der obere
Garraum gewählt wird.
Symbole : Leuchten, wenn der untere
Garraum gewählt wird.
Zeiteinstellung
•
Wenn Sie den Backofen an das Netz
anschließen, blinkt auf der Uhr die Anzeige
12:00.
•
Die Uhrzeit wird eingestellt durch Berühren
der Sensoren + oder –; danach hören Sie
zwei aufeinander folgende Pieptöne zur
Bestätigung der gewählten Uhrzeit.
•
Zur Änderung der Uhrzeit müssen Sie gleichzeitig die Symbole + und – drücken.
Anschließend blinkt die aktuelle Zeit auf
dem Display. Durch Berühren der Sensoren
+ oder –, kann die Uhrzeit geändert werden.
Abschließend ertönen 2 aufeinanderfolgende Pieptöne zur Bestätigung der Änderung.
ANMERKUNG
Ihre Uhr verfügt über eine Nacht-Beleuchtungsfunktion, so dass das Display zwischen 00:00
und 6:00 Uhr schwächer leuchtet.
Manueller Betrieb
•
Nach Einstellung der Uhrzeit ist der Bakkofen funktionsbereit. Wählen Sie eine Garfunktion und eine Temperatur.
•
Danach leuchten die Symbole
, je nach Auswahl der Funktion des oberen
oder unteren Garraums.
•
Während des Garens leuchtet das Symbol
, um anzuzeigen, dass das Gargut erhitzt
wird.
•
Dieses Symbol erlischt, wenn die gewählte
Temperatur erreicht ist.
•
Zum Ausschalten des Backofens bringen
Sie die Schalter in die Position .
Funktionen der Elektronikuhr
Timer: Erzeugt ein Signal am Ende der einge-
stellten Zeit, unabhängig davon, ob der Bakkofen heizt oder nicht.
Dauer des Garvorgangs (oberer und unterer
Garraum): Ermöglicht das Garen während der
gewählten Zeit, danach schaltet sich der Bakkofen automatisch aus.
Zeitpunkt der Beendigung des Garvorgangs
(oberer und unterer Garraum): Ermöglicht das
Garen bis zu einer vorgewählten Uhrzeit,
danach schaltet sich der Backofen automatisch aus.
Dauer und Beendigung des Garvorgangs (oberer und unterer Garraum): Ermöglicht die Ein-
stellung der Dauer und Endzeit des Garvorgangs. Mit dieser Funktion schaltet sich der
Backofen automatisch zu der passenden Uhrzeit für die vorgewählte Garzeit (Dauer) ein und
schaltet sich automatisch beim Erreichen der
eingestellten Zeit (Garzeit-Ende) ab.
Programmierung des Timers
1. Berühren Sie mit den Finger den Sensor
, bis das Symbol auf dem Display
blinkt und außerdem 00:00 zu sehen ist.
2. Wählen Sie die Zeitdauer, nach deren Ablauf
der Timer ertönen soll, indem Sie die Symbole + oder – drücken.
3. Danach ertönen zur Bestätigung 2 aufein-
ander folgende Pieptöne, der Countdown ab
dem gewählten Zeitpunkt wird gezeigt und
das Symbol blinkt langsam.
4. Nach Ablauf der eingestellten Zeit ertönt
ein akustisches Signal und das Symbol
blinkt schnell.
5. Berühren Sie irgendeinen Sensor, um das
akustische Signal zu stoppen. Im selben
Moment schaltet sich das Symbol
aus.
Wenn Sie die Zeit des Timers ändern möchten,
müssen Sie nur den Sensor und
anschließend die Sensoren + oder – mit dem
Finger berühren. Danach ertönen zur Bestätigung 2 aufeinander folgende Pieptöne, der
Countdown ab dem neuen Zeitpunkt wird
gezeigt und das Symbol blinkt langsam.
3172713-001 16/12/14 12:04 Página 25
Page 26

26
3. Danach hören Sie 2 aufeinander folgende
Pieptöne, auf dem Display wird die aktuelle
Zeit angezeigt und das Symbol AUTO blinkt
langsam und zeigt damit an, dass sich der
Backofen automatisch abschaltet.
4. Wählen Sie eine Garfunktion und eine Tem-
peratur.
5. Nach Ablauf der programmierten Zeit schal-
tet sich der Backofen aus, es ertönt ein
akustisches Signal und das Symbol AUTO
blinkt schnell.
6. Berühren Sie irgendeinen Sensor, um das
akustische Signal zu stoppen und das
AUTO-Symbol auszuschalten. Der Backofen
schaltet sich wieder ein.
7. Stellen Sie die Schalter auf Position , um
den Ofen auszuschalten.
Sie können Sie den Beendigungszeitpunkt des
Garvorgangs jederzeit ändern, wenn sie den
Sensor mit dem Finger berühren, bis das
AUTO-Symbol schnell blinkt und Sie auf dem
Display den Beendigungszeitpunkt sehen.
Wenn Sie daraufhin die Sensoren + oder –
berühren, können Sie die Zeit ändern.
Programmierung der Gardauer und des
Garzeit-Endes
1. Berühren Sie mit dem Finger den Sensor
, bis das Symbol AUTO blinkt und 00:00
auf dem Display erscheint.
2. Wählen Sie die Gardauer, indem Sie die
Sensoren + oder – berühren.
3. Danach hören Sie 2 aufeinander folgende
Pieptöne, auf dem Display wird die Restzeit
des Garvorgangs angezeigt und das AUTOSymbol blinkt langsam.
4. Berühren Sie den Sensor , bis das
AUTO-Symbol anfängt schnell zu blinken.
Auf dem Display werden die aktuelle Uhrzeit
und die eingestellte Garzeit angezeigt.
5. Wählen Sie das Garzeit-Ende, indem Sie
die Sensoren + oder – berühren.
6. Danach hören Sie 2 aufeinander folgende
Pieptöne, auf dem Display wird die aktuelle
Uhrzeit angezeigt und das Symbol AUTO
leuchtet weiter.
ANMERKUNG
Mit der Funktion Timer ist die aktuelle Uhrzeit
nicht auf dem Display zu sehen.
ANMERKUNG: Um zwischen der
Programmierung der unteren oder oberen
Kammer wechseln, berühren Sie den Sensor
Programmierung der Gardauer
1. Berühren Sie mit dem Finger den Sensor ,
bis das Symbol AUTO blinkt und 00:00 auf
dem Display erscheint.
2. Wählen Sie die Gardauer, indem Sie die
Sensoren + oder – berühren.
3. Danach sind 2 aufeinander folgende Pieptö-
ne zu hören, das Symbol AUTO blinkt langsam und das Display zeigt die verbleibende
Zeit bis zum automatischen Abschalten des
Backofens an.
4. Wählen Sie eine Garfunktion und eine Tem-
peratur.
5. Nach Ablauf der Garzeit schaltet sich der
Backofen aus, es ertönt ein akustisches
Signal und das Symbol AUTO blinkt schnell.
6. Berühren Sie irgendeinen Sensor, um das
akustische Signal zu stoppen und das
AUTO-Symbol auszuschalten. Der Backofen
schaltet sich wieder ein.
7. Stellen Sie die Schalter auf Position , um
den Ofen auszuschalten.
Sie können jederzeit die restliche Gardauer
ändern, indem Sie den Sensor berühren,
bis das AUTO-Symbol schnell blinkt. Wenn Sie
daraufhin die Sensoren + oder – berühren,
können Sie die Zeit ändern.
Programmierung des Garzeit-Endes
1. Berühren Sie mit dem Finger den Sensor
, bis das Symbol AUTO anfängt zu
blinken.
2. Wählen Sie das Garzeit-Ende, indem Sie die
Sensoren + oder – berühren.
3172713-001 16/12/14 12:04 Página 26
Page 27
27
DEUTSCH
Kindersicherung
Diese Funktion kann während des Backofenbetriebs jederzeit gewählt werden.
Um die Funktion zu aktivieren, berühren Sie
gleichzeitig die Sensoren + und – einige Augenblicke, bis Sie einen Piepton hören und auf
dem Display die Anzeige SAFE sehen. Die Uhr
ist somit blockiert.
Wenn der Backofen ausgeschaltet ist und Sie
die Kindersicherung aktivieren, gart der Backofen auch dann nicht, wenn Sie eine Garfunktion wählen.
Wenn Sie diese Funktion aktivieren, während
Sie mit dem Ofen backen oder braten, blockieren Sie nur die Handhabung des elektronischen Timers.
Wenn die Kindersicherung aktiviert ist und
irgendein Sensor des Zeitschalters berührt
wird, erscheint SAFE auf dem Display. Die Uhr
ist blockiert.
Um die Funktion auszuschalten, berühren Sie
gleichzeitig für einige Augenblicke die Sensoren + und –, bis Sie 1 Piepton hören.
Achtung
Im Falle eines Stromausfalls wird die gesamte
Programmierung der Elektronikuhr gelöscht,
und es erscheint die blinkende Anzeige 12:00
auf der Uhr. Sie müssen die Uhr wieder einstellen und erneut programmieren.
7. Wählen Sie eine Garfunktion und eine Tem-
peratur.
8. Der Backofen bleibt ausgeschaltet und das
Symbol AUTO leuchtet. Der Backofen ist
nun programmiert.
9. Wenn die eingestellte Uhrzeit des Gar-
Beginns erreicht ist, schaltet sich der Backofen ein und führt den Garvorgang während
der vorgewählten Zeit durch.
10.Während des Garvorgangs wird die Rest-
garzeit angezeigt und das Symbol AUTO
blinkt langsam.
11.Nach Ablauf der programmierten Zeit schal-
tet sich der Backofen aus, es ertönt ein
akustisches Signal und das Symbol AUTO
blinkt schnell.
12.Berühren Sie irgendeinen Sensor, um das
akustische Signal zu stoppen und das
AUTO-Symbol auszuschalten. Der Backofen
schaltet sich wieder ein.
13.Stellen Sie die Schalter auf Position , um
den Ofen auszuschalten.
Wenn Sie während des Backens oder Bratens
die restliche Gardauer ändern möchten, berühren Sie den Sensor , bis das AUTO-Symbol
schnell blinkt. Berühren Sie daraufhin die Sensoren + oder –, um die Zeit zu ändern.
3172713-001 16/12/14 12:04 Página 27
Page 28

3172713-001 16/12/14 12:04 Página 28
Page 29

3172713-001 16/12/14 12:04 Página 29
HDL-718
31
–
107,4
45 kg
kWh/cycle*
kWh/cycle*
2
0.73
L
*
*
Page 30

3172713-001 16/12/14 12:04 Página 30
HDL-718
38
kWh/cycle*
–
L
*
*
0.63
kWh/cycle*
88,7
2
45 kg
Page 31

3172713-001 16/12/14 12:04 Página 31
HDL-888
31
–
54 kg
kWh/cycle*
kWh/cycle*
94,1
2
0.64
L
*
*
Page 32

Nuestra aportación a la protección del medio-ambiente: utilizamos papel reciclado.
A nossa contribuição para a protecção do ambiente: utilizamos papel reciclado.
Our contribution to protecting the environment - we use recycled paper.
Notre contribution à la protection de l’environnement : nous utilisons du papier recyclé.
Unser Beitrag zum Umweltschutz: Wir verwenden wiederverwertetes Papier.
Cod.: 3172713-001
3172713-001 16/12/14 12:04 Página 32
HDL-888
57
kWh/cycle*
–
L
0.84
*
*
kWh/cycle*
106,3
2
54 kg
 Loading...