

Page 1
Manual de Mantenimiento e Instalación
Manual da Manutenção e Instalação
Maintenance and Installation Manual
Manual d’Entretien et Installation
Instandhaltung Buch
3172111-ABB00 resto 20/3/06 11:43 Página 101
Page 2

25
ENGLISH
Index
Before Using your Oven
for the First Time Page 25
Ecological Packaging 25
Important Safety Instructions 26
Coocking Tables 27
Cleaning and Maintenance 31
Trouble Shooting 33
Technical Information 34
Installation
34
Before Using your Oven
for the First Time
Carefully read this Instruction Manual to
achieve the best results from your oven.
Due to the manufacturing process there may
be residues of grease and other substances.
To eliminate these, proceed as follows:
• Remove all the packaging material,
including the protective plastic, if included.
• Select the or function at 200ºC for
one hour. To do so, consult the feature list
provided with this manual.
• To cool the oven open the door to allow
ventilation and odours to escape from
inside.
• After cooling, clean the oven and the
accessories.
During the first use, fumes and odours may
occur and the kitchen should therefore be well
ventilated.
Ecological Packaging
The packaging materials are completely recyclable and can be used again. Check with
your local authority on the regulations for
disposing of this material.
CAUTION
The symbol on the product or on its
packaging indicates that this product may not
be treated as household waste. Instead it
shall be handed over to the applicable
collection point for the recycling of electrical
and electronic equipment. By ensuring this
product is disposed of correctly, you will help
prevent potential negative consequences for
the environment and human health, wich
could otherwise be caused by inappropriate
waste handling of this product. Please contact
your local city office, your household waste
disposal service or the shop where you
purchased the product
3172111-ABB00 esp.port 20/3/06 11:41 Página 25
Page 3

26
Electrical Safety
• All adjustments to or repair of the appliance,
including replacement of the power lead,
must be carried out by authorised Technical
Assistance Service staff using original spare
parts. Repairs or alterations carried out by
persons other than Technical Assistance
Service staff may result in the malfunctioning
of or damage to the appliance, representing a
risk to your personal safety.
• Disconnect your oven if it breaks down.
Safety for Children
• Do not allow children to approach the oven
while it is in use, as high temperatures can
be reached.
Oven Safety in Use
• The oven must not be operated with the
door open.
• The manufacturer will not be held
responsible if this oven is used for anything
other than domestic purposes.
• Only use the oven when it is installed within
kitchen units.
• Do not store oils, fats or inflammable
materials inside the oven, as it could be
dangerous if the oven is switched on.
• Do not lean or sit on the open door of the
oven as it could damage the door and be
dangerous for you.
Important Safety
Instructions
• Do not cover the bottom of the oven with
aluminium foil, as it could affect cooking
and damage the interior enamelling of the
oven.
• To use the oven, insert the tray or rack
supplied onto the side guides inside the
oven. The trays and racks are fitted with a
system to facilitate partial extraction and
make handling easier.
• Do not put containers or food on the floor of
the oven. Always use the trays and grids.
• Do not spill water on the floor of the oven
while it is working as this could damage the
enamel.
• While using the oven, open the door as little
as possible to reduce electricity
consumption.
• Use protective gloves if you need to work
inside the hot oven.
• To cool the oven, open the door to allow
ventilation and odours to escape from
inside.
• In recipes with a high liquid content, it is
normal for condensation to form on the
oven door.
Important
On ovens which use telescopic guides to
extract the grid and the tray, position 1 (starting from the bottom) is designed for the grid
with the oven tray underneath or only the tray.
3172111-ABB00 resto 20/3/06 11:43 Página 26
Page 4

27
ENGLISH
Coocking Tables
The Cooking Tables show examples of temperature ranges and approximate cooking times. The
cooking mode depends on the model. For the best results we recommend the oven to be
preheated with the function or . The preheating time finishes when the heating pilot
light switches off.
You are recommended to place the tray beneath the grid when cooking on the latter in order to
collect the juices produced. The grid should be inserted the side with the reinforcement bar first.
Pasty
Tray
Pizza
Grid
Quiche
Quiche Mould
1,2
2
Intermediate
2
Intermediate
Intermediate
Intermediate
Intermediate
160-180
190-210
170-190
30-40
160-180 30-35
15-20
170-190
15-20
30-35
160-180 30-40
STARTERS
Weight
Tray Position
Cooking Temperat. Time Receptacle
160-180 40-45
3172111-ABB00 resto 20/3/06 11:43 Página 27
Page 5

28
FISH
Weight
Tray Position
Cooking
Mode
Temperat. Time Receptacle
Salmon in greased
paper
Tray
180-200 20-25
2 Intermediate
170-190 15-20
Trout Tray
190-210 20-25
2 Intermediate
180-200 15-20
Salted Dorado
Tray
190-210 25-30
2 Intermediate
180-200 25-30
180-200 20-25
3172111-ABB00 resto 20/3/06 11:43 Página 28
Page 6
29
ENGLISH
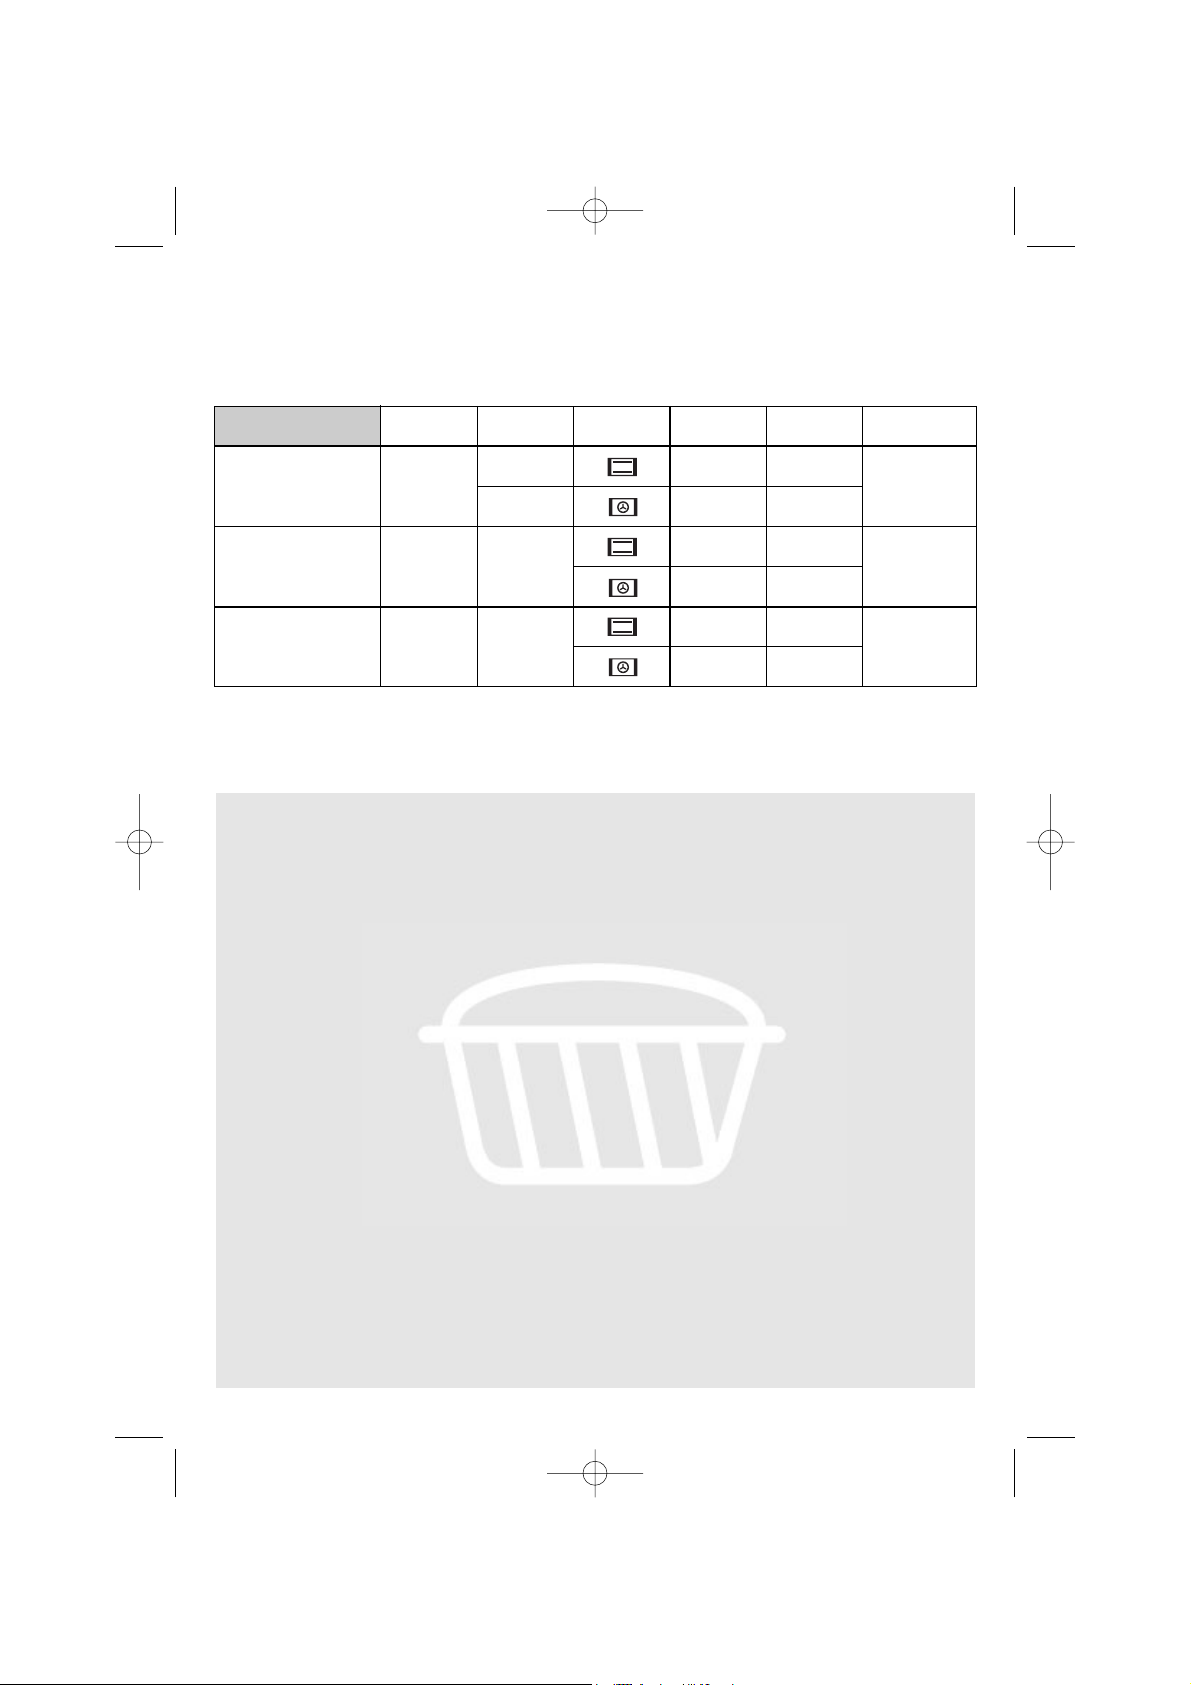
MEAT
Weight
Tray Position
Cooking Temperat. Time Receptacle
Chicken Tray
Lamb
Tray
190-210
190-210
60-65
3 Intermediate 170-190 50-55
180-200 45-50
50-55
3 Intermediate
170-190 45-50
Suckling Pig
Tray
Rabbit
Tray
180-200 60-65
170-190 75-85
4 Intermediate 160-180 75-85
160-180 80-90
3 Intermediate
160-180 45-50
170-190 45-50
3172111-ABB00 resto 20/3/06 11:43 Página 29
Page 7
30
Intermediate
Intermediate
CAKES AND DESSERTS
Weight
Tray Position
Cooking Temperat. Time Receptacle
Flan
Bread Mould
160-170 60-65
1
140-160 40-45
Cup Cakes
Tray
160-180 30-35
1 Intermediate
140-160 25-30
Cheesecake
Cheescake Mould
45-50
2 Intermediate
160-180 30-40
180-200
3172111-ABB00 resto 20/3/06 11:43 Página 30
Page 8

31
ENGLISH
Cleaning and Maintenance
Instructions for Removing the Side Supports
for Trays
1 Remove the accessories from inside the
oven.
2 Unthread the nut (B) to release the side
supports.
3 To assemble, fit the supports and screw
the front.
Clean the outside of the oven and the
accessories with warm soapy water or with a
mild detergent.
Commercial products to clean stainless steel
surfaces are available for purchase on the
market.
Caution
Never use metallic scouring pads or
commercial or scouring powders that could
scratch the enamel. For stainless steel
surfaces, proceed with care and only use
sponges or cloths that cannot scratch them.
Cleaning the Oven Exterior
and Accessories
A
Caution
Before carrying out any work, the appliance
must be disconnected from the mains electricity
supply.
• The inside of the oven should be cleaned to
remove food and grease deposits, which
can give off smoke or odours and cause
stains to appear.
• With the oven cold and for enamelled
surfaces (e.g. the floor of the oven) use a
nylon brushe or sponge with warm soapy
water. If using special oven cleaning
products, use only on enamelled surfaces
and follow the manufacturer’s instructions.
Caution
Do not clean the inside of your oven with a
steam or pressurised water jet. Do not use
either metallic scouring pads or any material
that could scratch the enamel.
Use of the Fold-down Grill (Depending on
Model)
To clean the upper part of the oven,
• Wait until the oven is cold.
• Turn the screw (A) and lower the grill
element as far as possible.
• Clean the upper part of the oven and return
the grill element to its original position.
Cleaning the Inside of the Oven
B
3172111-ABB00 resto 20/3/06 11:43 Página 31
Page 9

32
.
Depending on the oven model, you can remove
the door to simplify its cleaning. To do so:
1 Open the door fully.
2 Completely turn the two clips (C).
3 Hold the sides of the oven door with both
hands and close it slowly. The hinges are
released from their fixtures when the door
is approximately half-open/half-closed.
4 It is then possible to remove the oven door.
To assemble the door:
1 Hold the sides of the oven door with both
hands and insert the hinges into the holes
on the front of the oven.
Cleaning the Oven Door
2 Slowly open the oven door completely.
3 Lower the hinge clips again.
4 Close the oven door.
Warning
Danger: do not touch the hinges when opening
or closing the oven door.
Caution
To change the bulb, first ensure that the oven
is disconnected from the power supply.
1 Unscrew the side support for trays.
2 Remove the glass shade by carefully leve-
ring it with a screwdriver.
3 Unscrew the faulty bulb and screw a new
one in.
Changing the Oven Bulb
4 Replace the glass shade by pressing it in
until it is fully housed.
The replacement bulb must be temperature
resistant to 300ºC. These can be ordered
from the Technical Service Department.
C
3172111-ABB00 resto 20/3/06 11:43 Página 32
Page 10

33
ENGLISH
Trouble Shooting
The oven does not work
PROBLEM
Change the bulb.
Check its assembly in accordance
with the instruction manual.
Select a temperature.
Select a setting.
It should only light up while the oven is heating
up to its set working temperature.
This is normal during its first use.
Periodically clean the oven.
Reduce the amount of grease
or oil added to the tray.
Do not use higher temperature settings
than those in the cooking tables.
SOLUTION
The inside light of the oven does not work
The heating indicator light does not work
Smoke is given off while the oven is working
Expected cooking results are not achieved
NB
If, despite these recommendations, the problem continues, contact our Technical Assistance
Service.
Check the connection to the electrical circuit.
Check the fuses and current limiter
of your installation.
Ensure the clock is in the manual
or programmed mode.
Check the position of the function
and temperature selectors
Review the cooking tables to obtain guidance on
the working of your oven.
3172111-ABB00 resto 20/3/06 11:43 Página 33
Page 11

34
If the equipment does not work, please
contact the Technical Service Department and
advise them of the problem, indicating:
1 Serial number (S-No)
2 Appliance model. (Model)
You will find this information on the rating
plate on the lower part of the oven when the
door is opened.
To help identify the oven, we recommend you
write down the following data:
S-No:
Technical Information
Mod:
The item that you have bought meets the
European directives on electrical material
safety (73/23/CEE) and electromagnetic compatibility (89/336/CEE).
AENOR certifies the aptitude of this appliance
for the function and guarantees the truthfulness of all data shown in the energy card.
Installation
This information is intended for the installer,
as the person responsible for assembly and
electrical connection. If you install the oven
yourself, the manufacturer will not be held
responsible for any possible damage.
• To unpack the oven, pull the tab at the
bottom of the box and move it by holding
the sides, not the door handle.
• A niche is required in the kitchen unit as
per the dimensions shown on the figure,
providing a minimum depth of 550 mm.
(See figure).
• The adhesive used for the plastic covering
of kitchen furniture must be able to
withstand temperatures up to 85ºC.
Before Installation. Comments
3172111-ABB00 resto 20/3/06 11:43 Página 34
Page 12

35
ENGLISH
• The electrical connection has adequate
earthing in accordance with regulations in
force.
• The connection must be carried out with an
omnipolar switch, of an adequate size for
the current drawn. There must be a
minimum aperture between contacts of 3
mm to enable disconnection in the case of
emergency, cleaning or bulb exchange.
Under no circumstances must the earth
wire pass through this switch.
• This switch may be replaced with a plug,
which must always be accessible in normal
working conditions.
After connecting the electricity, check that all
the electrical parts of the oven are working.
For all ovens and after carrying out the electrical connection,
1 Insert the oven in the kitchen unit, making
sure the power lead is not trapped or in
contact with hot parts of the oven.
2 Secure the oven in the kitchen unit using
the 2 screws supplied, screwing them
through the holes in the top corners of the
oven.
3 Check that the oven housing is not in contact
with the sides of the unit and that there is at
least 2 mm separating the neighbouring
units.
Installing the Oven
The installer must check that:
• The voltage and cycles of the mains supply
correspond to that indicated on the rating
plate.
• The electrical installation can stand the
maximum power indicated on the rating
plate.
• To connect the oven to the electrical circuit,
the installer must use a T150 type supply
cable. The connection diagram is shown in
the following figure:
Electrical Connection.
Legal Requirements
3172111-ABB00 resto 20/3/06 11:43 Página 35
230 V 1
3 x 1,5mm2 T 150
N
L
Page 13

Hoja de Características
Folha de Caracteristicas
Feature List
Feuille de Caractéristiques
Datenblatt
HA-900/HA-935
116
HI 900
Page 14

FICHA / FICHA / BROCHURE / FICHE / DATENBLATT
Fabricante Fabricante Manufacturer Fabricant Hersteller TEKA TEKA
Modelo Modelo Model Modèle Modell
Clase de
eficiencia
energética,
en una escala
que abarca
de A (más
eficiente)
a G (menos
eficiente).
Función de
calentamiento.
Calentamiento
convencional.
Convección
forzada.
Consumo
de energía.
Calentamiento
convencional.
Convección
forzada.
Volumen neto
(litros).
Tipo:
Pequeño
Medio
Grande
Classe de eficiência energética, numa
escala de A
(eficiente) a G
(ineficiente).
Função de
aquecimento.
Convencional.
Convecção
forçada de ar.
Consumo
de energia.
Convencional.
Convecção
forçada de ar.
Volume útil
(litros).
Tipo:
Pequeno
Médio
Grande
Energy
efficiency
class on a
scale of A
(more efficient)
to G (less
efficient).
Heating
function.
Conventional.
Forced air
convection.
Energy
consumption.
Conventional.
Forced air
convection.
Usable volume
(litres).
Size:
Small
Medium
Large
Classement
selon son
efficacité
énergétique
sur une
échelle
allant de A
(économe) à G
(peu économe).
Fonction
chauffage.
Classique.
Convection
forcée.
Consommation
d´énergie.
Classique.
Convection
forcée.
Volume utile
(litres).
Type:
Faible volume
Volume moyen
Grand volume
Energieeffizienzklasse auf
einer Skala
von A
(niedriger
Verbrauch)
bis G (hoher
Verbrauch).
Beheizung.
Konventionelle
Beheizung.
Umluft /
Heißluft.
Energieverbrauch.
Konventionelle
Beheizung.
Umluft /
Heißluft.
Netto-volumen
(liter).
Typ:
Klein
Mittel
Groß
HA-900 HA-935
B
1,15
Kwh
1,10
Kwh
69
1,15
Kwh
1,13
Kwh
69
B
Tiempo de
cocción con
carga normal.
Calentamiento
convencional.
Convección
forzada.
Superficie de
cocción.
Ruido (dB (A)
re 1 pW).
Tempo de
cozedura da
carga-padrão.
Convencional.
Convecção
forçada de ar.
Zona de
cozedura.
Nível de ruído
dB(A) re 1 pW.
Time to cook
standard load.
Conventional.
Forced air
convection.
Baking area.
Noise (dB (A)
re 1 pW).
Temps de
cuisson en
charge normale.
Classique.
Convection
forcée.
Surface de
cuisson.
Bruit (dB (A) re
1 pW).
Kochzeit bei
Standardbeladung.
Konventionelle
Beheizung.
Umluft /
Heißluft.
Backfläche
Geräusch (dB
(A) re 1 pW).
43 min.
43 min.
1860 cm
47
43 min.
46 min.
2
1860 cm
47
2
Nuestra aportación a la protección del medio-ambiente: utilizamos papel reciclado.
A nossa contribução para a protecção do ambiente: utilizamos papel reciclado.
Our contribution to enviromental protection: we use recycled paper.
Notre contribution à la protection de l’environnement : nous utilisons du papier recyclé.
Unser Beitrag zum Umweltschutz: wir verwenden umweltfreundliches Papier.
Cod.: 3172116/83172116/ABB00
Page 15

Model HA-900
1
2
3
4
5
6
7
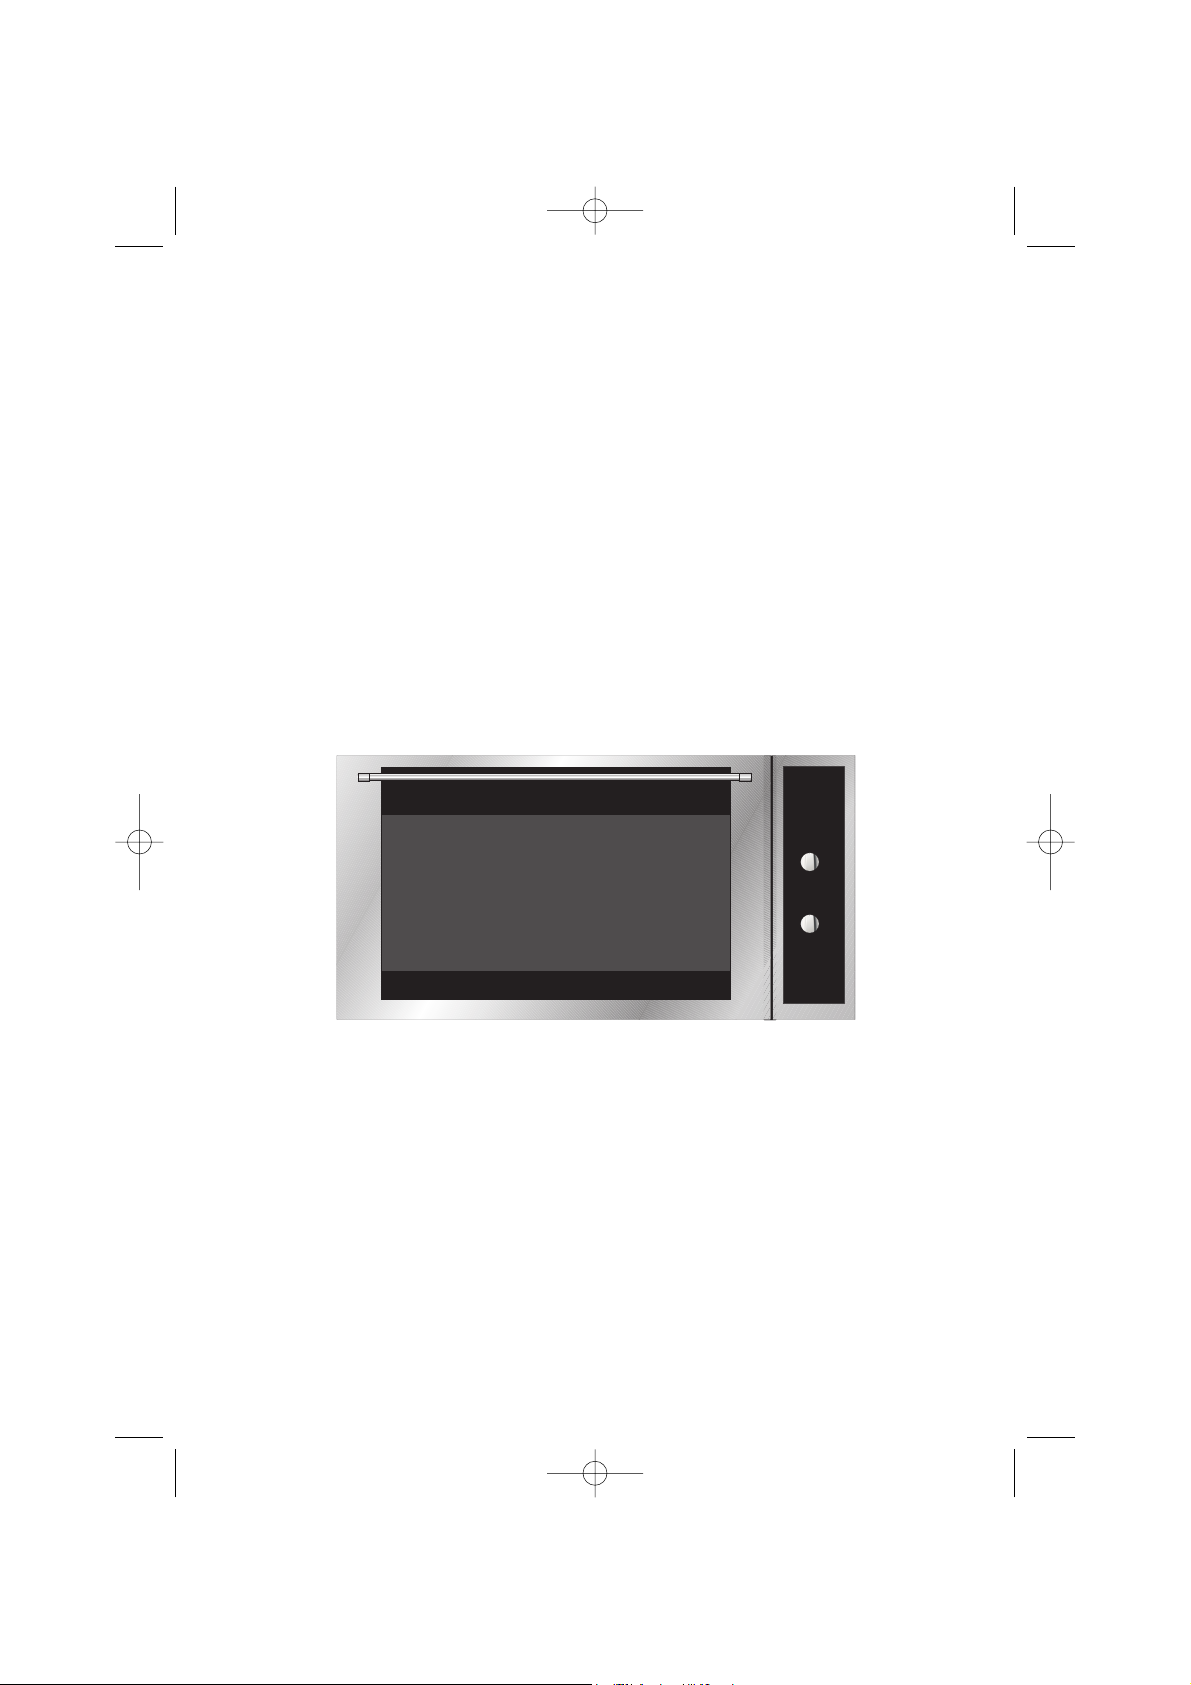
Oven Description
10
11
8
9
Model HA-935
1
2
3
4
5
6
7
8
9
HI 900
4056-01
10
11
HI 900
4056-01
1 Fixing to Unit
2 Air Outlet
3 Fold-down Grill element
4 Chromed Support/
Telescopic Guide
14
5 Fan
6 Grid
7 Roasting Tray
8 Hinge
Door
9
10 Control Panel
11 Light
Page 16

Control Panel
Model HA-900 Model HA-935
HA 900
1 Minute timing switch.
2 Electronic timer.
3 Oven pilot light.
4 Function selector.
1
3
4
5
6
HA 935
2
3
4
5
6
ENGLISH
5 Heating indicator light. Indicates that heat is
being passed to the food and it goes out
when the set temperature is reached.
6 Temperature selector.
15
Page 17

Oven Functions
Model HA-900
/ / / /
/ /
Model HA-935
/ / / /
/ / / /
Switch off oven
Conventional
It is used for sponges and cakes where the
heat received must be uniform to achieve a
spongy texture.
Conventional with fan
Appropriate for roasts and cakes. The fan
spreads the heat uniformly inside the oven.
Grill
For preparing dishes with superficial roasting.
It allows the outer layer to be browned without
affecting the inside of the food. Ideal for flat
food, such as steaks, ribs, fish, toast.
MaxiGrill
Allows greater surfaces to be prepared, than
with the grill, together with higher power
reducing the time required for browning of the
food.
MaxiGrill with fan
Allows uniform roasting at the same time as
surface browning. Ideal for grills. Special for
large volume pieces, such as poultry, game etc.
It is recommended to put the item on a rack with
a tray beneath to collect the stock and juices.
Caution
While using the Grill, MaxiGrill or MaxiGrill with
fan, the door must be kept closed.
Turbo
The fan distributes the heat produced by an
element located at the rear of the oven. Due
to the uniform heat distribution, it allows
roasting and baking to take place at two
heights at the same time.
This cooking mode allows defrosting of food.
To do this, set the temperature selector to
position.
Lower element
Heats only from beneath. Suitable for heating
dishes and raising pastry and similar.
Lower element with fan
It distributes the heat from the lower part of
the oven and is ideal for cakes with jam or
fruit filling, which only require heating from
beneath. Pre-heating is always necessary.
Grill and Lower element
Special for roasts. It can be used for any
piece, whatever its size.
Note
The pilot light remains on in any cooking
function.
16
Page 18

Use of the Oven
Model HA-900
Manual use of the oven
1 Turn the timing switch to the left to the
position .
2 Select a temperature and a cooking
function.
3 Set the controls in position to switch off
the oven.
Using the timer switch
Allows cooking during a pre-established time.
To do this,
1 Select the function and the cooking
temperature.
2 Turn the timer control clockwise as far as
the position “120 minutes” and then turn it
backwards to the required cooking period.
3 When the time has finished, there will be an
acoustic signal and the oven will stop
heating.
4 Set the controls to the position to switch
off the oven.
Model HA-935
Setting the time on the Electronic Clock
When the oven is connected to the power supply,
the indication 00:00 flash on the display. Press
or to set the time on the clock. The clock
beeps twice to confirm the selected time.
If you wish to modify the time, press or
until the current time flash on the screen.
Press . Then press or to modify
the time. The clock beeps twice to confirm the
modification.
Manual Operation
The oven is ready to be used when the clock
has been set. Select a cooking function and a
temperature.
When you begin cooking, symbol lights
up to indicate that the oven is heating the contents; the symbol goes out when the
selected temperature is reached.
Set the controls to to turn the oven off.
Functions of the Electronic Clock
Alarm: Creates an alarm signal when the peri-
od of time finishes; the oven does not need to
be in use in order to use this function.
Cooking Time: To cook for a selected length of
time; the oven turns itself off automatically
when the time finishes.
End Cooking Time: To cook until a set time;
the oven turns itself off automatically when
the time finishes.
Cooking time and End Cooking Time: To cook
for a selected length of time and end at a set
time. When this function is set, the oven
comes on automatically at the time required in
order to cook for the set length of time
(Cooking time) and end automatically at the
indicated time (End Cooking Time).
Programming the Alarm
1 Press until symbol lights up. Press
OK.
2 Set the period of time after which you wish the
alarm to sound by pressing or .
ENGLISH
17
Page 19

3 The clock beeps twice, the countdown to the
alarm is displayed and symbol flashes.
If you wish to modify the time set, press OK
until the current time appears. Press until
symbol lights up permanently and press OK.
Then use and to change the set time.
4 When the set period of time comes to an end,
the alarm sounds and symbol starts to
flash faster.
5 Press any button to turn the alarm off.
Setting the Cooking Time
1 Press or until symbol lights up.
Press .
2 Select the period of time you wish to cook for
by pressing or .
3 The clock beeps twice, the countdown to the
end of the cooking time is displayed and
symbol lights up permanently.
If you wish to modify the time set, press or
until the current time appears and symbol
starts to flash. Press OK. The time can
then be adjusted by pressing or .
4 Select a cooking function and a temperature.
5 When the cooking time comes to an end, the
alarm sounds, End is displayed on the screen
and symbol starts to flash.
6 Press any button to stop the alarm. The oven
turns itself back on again.
7 Set the controls to to turn the oven off.
Setting the End Cooking Time
1 Press or until symbol lights up.
Press .
2 Select the time you wish the cooking process
to finish at by pressing or .
3 The clock beeps twice, the countdown to the
end of the cooking time is displayed and
symbol lights up permanently.
If you wish to modify the time set, press or
until the current time appears and symbol
starts to flash. Press OK. The time can
then be adjusted by pressing or .
4 Select a cooking function and a temperature.
5 When the cooking time comes to an end, the
alarm sounds, End is displayed on the screen and symbol starts to flash.
6 Press any button to stop the alarm. The oven
turns itself back on again.
7 Set the controls to to turn the oven off.
Setting the Cooking Time and the End
Cooking Time
1 Press or until symbol lights up.
Press OK.
2 Select the period of time you wish to cook for
by pressing or .
3 The clock beeps twice, the countdown to the
end of the cooking time is displayed and
symbol lights up permanently.
4 Press or until symbol lights up.
Press OK.
5 Select the time you wish the cooking process
to finish at by pressing or .
6 The clock beeps twice, Auto is displayed on
the screen and symbols and light
up permanently. The clock is set and the
oven remains off.
If you wish to modify the cooking time, press
or until the current time appears and symbol
starts to flash. If you wish to modify the end
cooking time, press or until the current
time appears and symbol starts to flash.
Press OK. The time selected can then be adjusted by pressing or .
7 Select a cooking function and a temperature.
8 When the time to start cooking is reached,
the oven starts up and the remaining time is
displayed on the screen.
9 When the time to end cooking is reached,
the oven turns itself off, the alarm sounds,
End is displayed on the screen and symbols
and start to flash.
10 Press any button to stop the alarm. The oven
turns itself back on again.
11 Set the controls to to turn the oven off.
18
Page 20

Important
In the event of a power cut, all the electronic
clock settings are deleted and the indication
00:00 flashes on the display. It is necessary
to set the time and programme the clock
again.
19
ENGLISH
Page 21

TEKA GROUP
COMPANY COUNTRY CC PHONE FAX
TEKA FRANCE SARL Paris, FRANCE 33 1 - 48.91.37.88 1 - 48.91.29.73
TEKA HELLAS A.E. Athens, GREECE 30 1 - 973.70.57 1 - 971.27.25
TEKA HUNGARY KFT. Budapest, HUNGARY 36 1 - 111.58.03/04 1 - 111.58.05
TEKA BV Amsterdam, THE NETHERLANDS 31 23 - 565.73.99 23 - 565.03.96
TEKA POLSKA SPOLKA Z O.O. Warszawa, POLAND 48 22 - 652.18.94 22 - 654.22.66
TEKA PORTUGUESA LTDA. Ilhavo, PORTUGAL 351 34 - 32.95.00 34 - 32.54.57
TEKA PRODUCTS (UK) LTD. Abingdon, U.K. 44 1235 - 86.19.16 1235 - 83.21.37
TEKA TEKNIK MUTFAK A.S. Istanbul, TURKEY 90 212 - 274.61.04 212 - 274.56.86
MARMICOC S.A. Rio de Janeiro, BRASIL 55 21 - 671.01.88 21 - 772.16.37
TEKA CHILE LTDA. Santiago de Chile, CHILE 56 2 - 273.34.68 2 - 273.10.88
TEKA MEXICANA S.A. DE C.V. Mexico D.F., MEXICO 52 5 - 762.04.90 5 - 762.05.17
P.T. TEKA BUANA Jakarta, INDONESIA 62 21 - 39052 - 74 21 - 39052 - 79
TEKA CHINA LIMITED HONG KONG 852 2865 - 7336 2861 - 2507
TEKA CHINA LTD. Shanghai, CHINA 86 21 - 6210 - 1699 21 - 6212 - 9604
(SHANGHAI OFFICE)
TEKA (THAILAND) CO. LTD. Bangkok, THAILAND 66 2 - 693.32.37/41 2 - 693.32.42
THIELMANN TEKA PTE. LTD. SINGAPORE 65 734.24.15 734.68.81
TEKA KÜCHENTECHNIK Kuala Lumpur, MALAYSIA 60 3 - 747.56.00 3 - 747.56.01
(MALAYSIA) SDN.BHD
Teka Industrial, S.A.
Cajo, 17 • 39011 SANTANDER (SPAIN)
Tel.: 34 - 42 - 33 51 00
Fax: 34 - 42 - 33 69 77
34 - 42 - 34 76 64
Teka Küchentechnlk GmbH
Sechsheldener Strasse 122
D - 35708 HAIGER (GERMANY)
Telefon: 49 - 2771 3950 39
Telefax: 49 - 2771 3953 64
 Loading...