

Teka FGKST 58 Series, FGKST 75 Series, GKST 90-35, GKST 90W, GKST 90N Instructions For Fitting And Use
...
223279 1
GEBRAUCHS- UND
MONTAGEANWEISUNG
INSTRUCTIONS FOR FITTING AND USE
INSTRUCTIONS DE MONTAGE ET D’UTILISATION
ISTRUZIONI PER L’USO ED IL MONTAGGIO
INSTRUCCIONES PARA EL USO Y MONTAJE
MANUAL DE INSTRUÇÕES DE USO E DE MONTAGEM
¢¥¡§£±µ¯¥±¥±¨§±³«¯ª©¡¥±¥±
INSTRUKCJA OBSŁUGI I MONTAŹU
HASZNÁLATI ÉS BESZERELÉSI UTASÍTÁS
Einbau-Glaskeramik-Kochfeld mit Touch-Control-Bedienung
Built-in glass ceramic hob with Touch-Control switches
Plaque de cuisson vitrocéramique à encastrer avec commande Touch-Control
Piano di cottura da incasso in vetroceramica con comandi Touch Control
Encimera vitrocerámica de encastrar con mando Touch Control
Placa de cozinhar em vitrocerâmica, integrável e com comando Touch-Control
£ЛТНЗХЗДЪКГЛНУ¿ЙНИГП¿КЗИЪОГВ½НК¿БГЗП»К¿ТНРКГХГЗПЗСТ¼ПЗН¿Ф¼Р
Kuchenka szkło-ceramiczna z systemem obsługi Touch Control
Beépíthető kerámia-üveg főzőlap touch-control-kezeléssel
D
GB
F
I
P
D
GB
F
I
P

GB
12 223279
You now own a glass ceramic hob with Touch-Control switches.
Chapters 2 and 3 of these Operating Instructions contain information on how you can make sure that your hob
provides many years of service.
These Operating Instructions are for use with several types of hobs. The nameplate on the front of these
Instructions will show you which type you have bought.
Contents
1. Operations
1.1 Your new hob
1.2 Touch-Control switches
1.3 Touch-Control operations
2. Things to watch out for
2.1 Notes on the right types of saucepans
2.2 Important
3. Cleaning and Care
4. Fitting
4.1 Electrical connection
4.2 Maintenance and repair work
4.3 Section of oven work surface
4.4 Installation
223279 13
GB
1. Operations
1.1 Your new hob with Touch-Control operation
This manual covers the models: FGKST 58.., FGKST 75.., .GKST 58.. and .GKST 75...
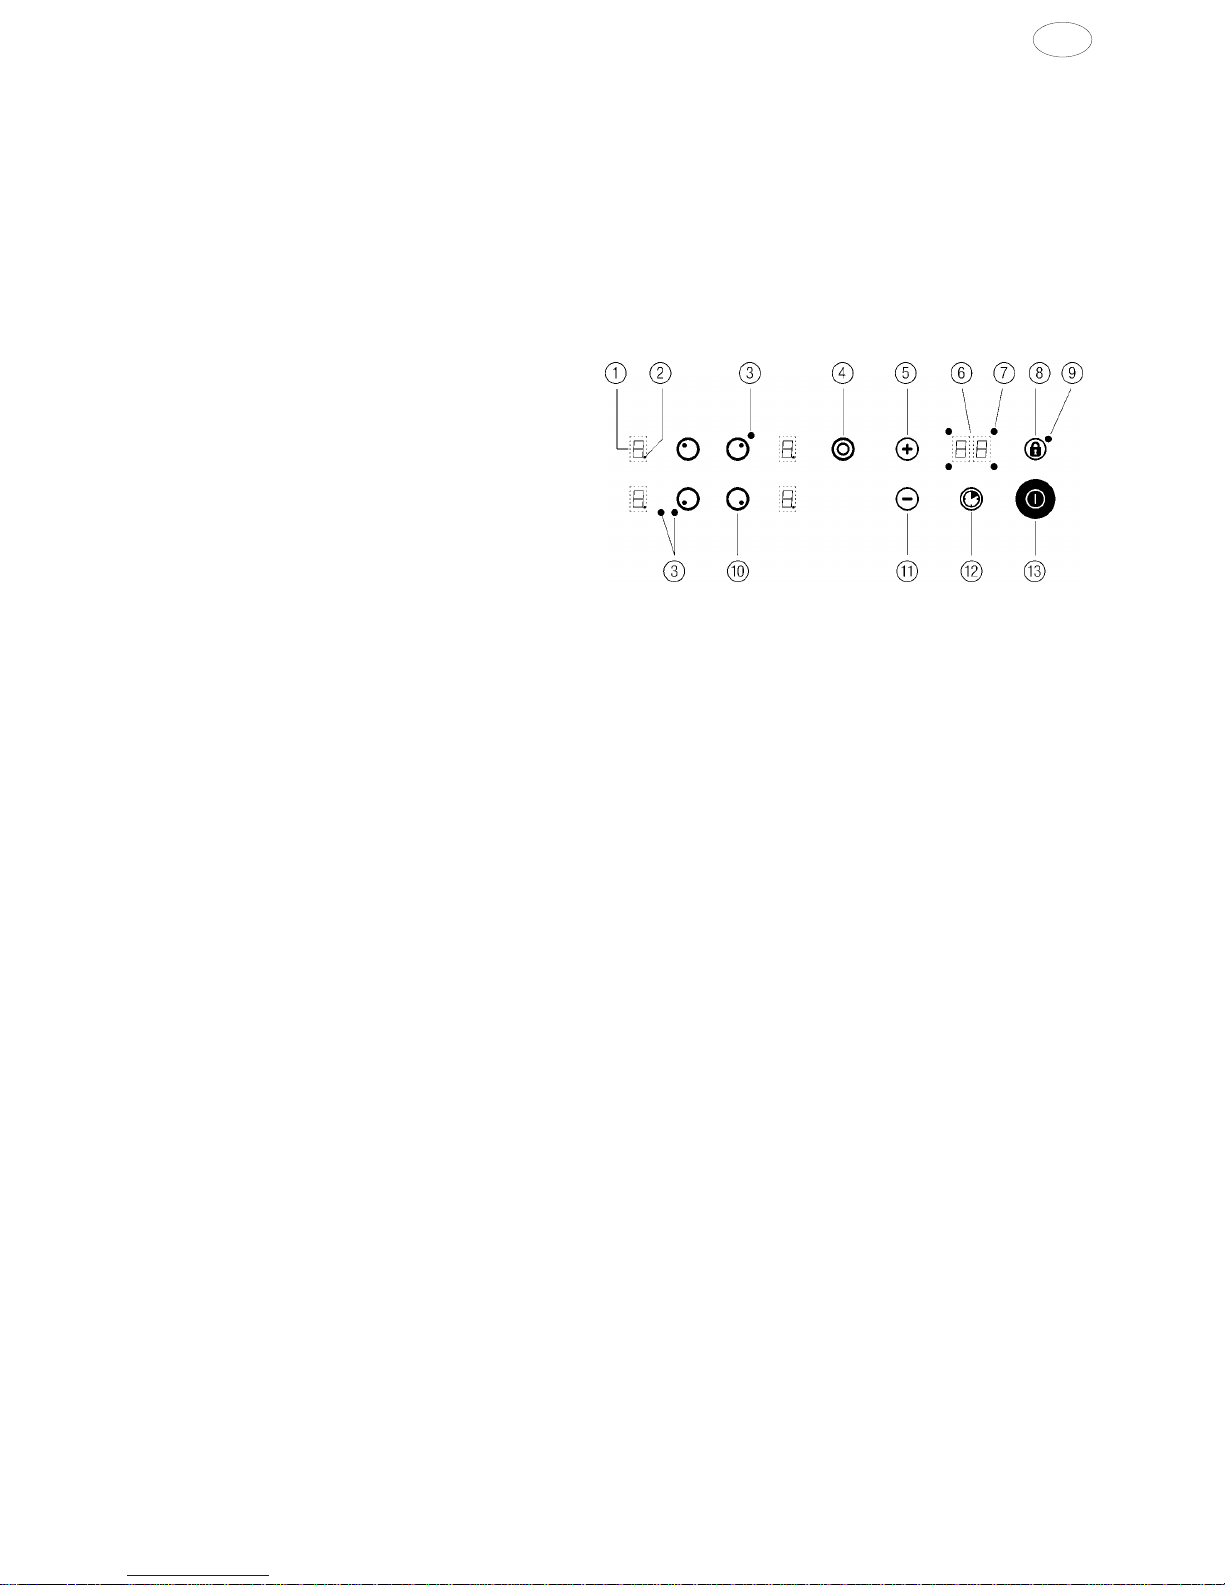
1.2 Touch-Control operating panel
After the supply voltage has been connected (mains connection), a self-test is carried out which is concluded when
a short acoustic signal is to be heard.
Cooking level display
Readiness point for cooking zone
(lit: cooking zone can be used)
Multi-circuit control lamp
Multi-circuit key
Plus key
Time display
Timer control lamp
Locking key
Control lamp lock (control)
! Cooking zone key
" Minus key
# Timer key
$ On/Off switch (control)
1.3 Touch-Control operations
Each key operation is always confirmed by an acoustic signal.
Pressing the On/Off switch key
$ switches on the control system: Put your finger on the button until a “0” lights
up at all of the cooking level displays and the cooking zone standby dot
flashes. The next action must be carried
out within ten seconds, otherwise the control system will automatically switch off again.
To switch on a cooking zone, press the corresponding cooking zone key
! of the required cooking zone. The
appropriate stand-by dot cooking zone
of the activated cooking zone lights up.
Select a cooking level from 1 to 9 by means of the Minus or Plus keys
"/. When switched on, each cooking zone
can be switched off again at any time. To do this, the required cooking zone must be activated, the stand-by dot
lights up.
The Minus key
" can be used to turn the cooling level down to “0”; if the Minus and Plus keys "+ are pressed
at the same time, the cooling level can be switched off directly.
In all cases the complete control system can be switched off at any time by pressing the on/off key
$: To switch
off the entire cooking range place your finger briefly on the On/Off switch
$ until the control lights go out.
Pressing locking key
prevents all the keys - with the exception of the On/Off key $ from being operated by
mistake. Successful locking is indicated by the control lamp
. Pressing the locking key cancels this command
again.
Residual heat display Residual heat display
The residual heat display is by means of an illuminated “H” on the appropriate cooking level display .
GB
14 223279
Parboiling boost
Switch on the cooking zone by means of corresponding
cooking zone button
!. Press the Minus key " and select
cooking level 9. Then switch on the parboiling boost by means
of the Plus key
. During the parboiling stage, the cooking
level display
switches continuously between the “A” sign
(parboiling boost) and the cooking level which has been set.
Now you can select the subsequent cooking level 1 - 8. If you
quit cooking level 9 without selecting a subsequent cooking
level from 1-8, then the parboil boost is shut off automatically
after 10 seconds. The parboiling boost time depends on the
subsequent cooking level which has been selected. Details
are given in the accompanying time chart.
If the Plus key
is selected after the required subsequent
cooking level has been selected, the parboiling boost time is
adjusted upwards in accordance with the time chart. If the
Minus key
" is pressed after the required subsequent cooking
level has been deselected, the parboiling boost is stopped
beforehand.
Two-circuit- / three-circuit connection
Two-circuit- / three-circuit connection of the respective cooking zone can only be effected after the corresponding
cooking zone has been activated and switched on.
Select the desired cooking level 1-9 . Switch on the second heating element by means of the Multi-circuit key
.
The control lamp
of the selected cooking zone lights up. Connect the third heating circuit by pressing the Multi-
circuit key
once again. The second control lamp lights up. The corresponding cooking zone must also be
activated in order to switch off the two-circuit- / three-circuit connection. The outer heating circuits are switched off
by pressing the Multi-circuit key
once again. The control lamps are then no longer lit.
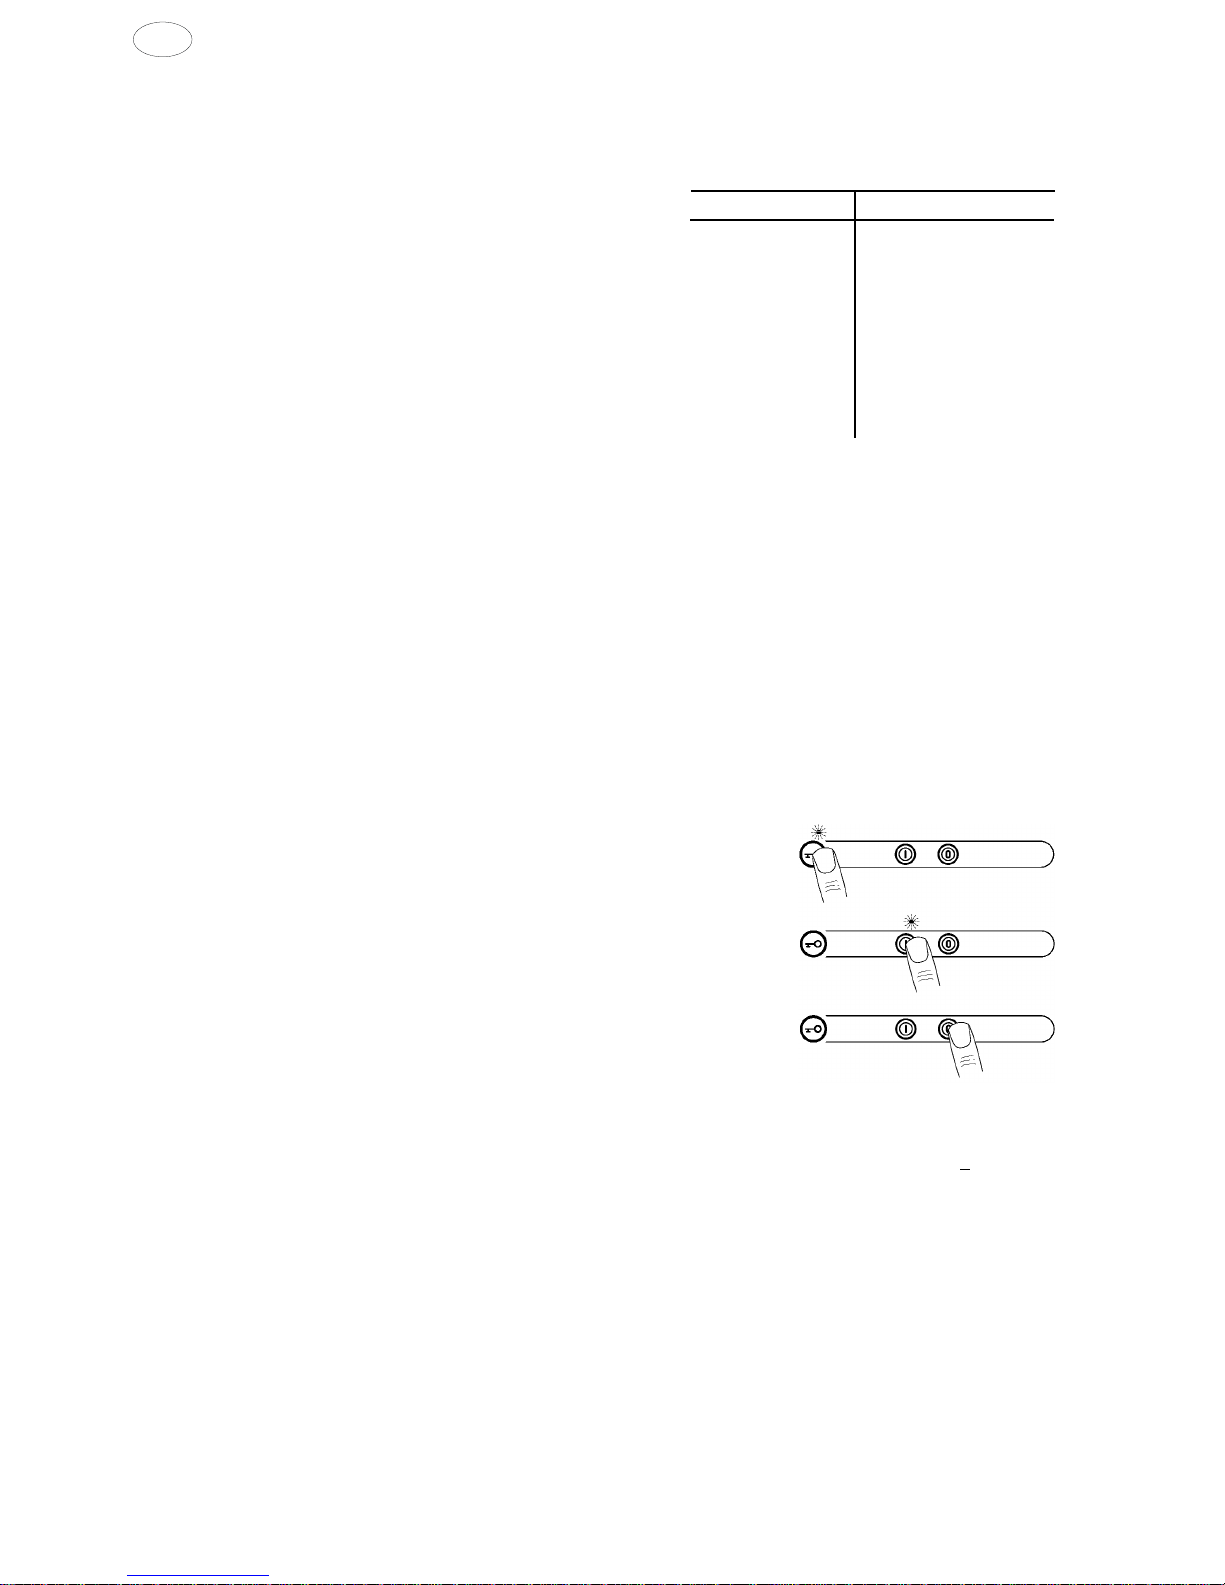
Warming zone
The warming zone is suitable for foods that have finished cooking and
which should be covered to keep them warm.
Operation of the warming zone is carried out with the Touch-Control switch.
Two keys have to be pressed in successive in order to switch on the
warming zone. First the
key button has to be pressed (LED-1 lights up).
Now the
I-key must be pressed within 6 seconds (LED-1 goes out/ LED-2
is lit), and the warming zone is switched on.
By pressing the
0-key the warming zone is then switched off again (LED-2
goes out).
Pot Recognition (PR)
If your range is equipped with Pot Recognition the PR will check whether a
metal pot is on the cooking zone after a cooking level has been selected. If no pot is recognized, a
u will appear
in the display and the heating element will remain inactive. If a pot is now placed on the cooking zone within 10
minutes, the heating element will turn itself on and the selected cooking level will appear in the display. Cooking
zones with two-circuit heating or frying zone will automatically be re-powered, i.e., the PR also recognizes the size
of the pot. If no pot is placed on the cooking zone, the range will turn off after 10 minutes for safety reasons.
The PR recognizes only metal pots. To be able to cook with non-metallic cooking ware, as well, the PR can be
turned off for each cooking zone. To do this, the required cooking zone
! must be activated and a cooking level
selected. Now the Multi-circuit key
and then the corresponding cooking zone key ! should be pressed. Cooking
can now be done without PR. The two-circuit heating or frying zone can now be re-powered by means of the Multicircuit key
.
To reactivate PR, turn off the cooking zone. When the cooking zone is turned on again, PR will again be active.
Tabl
e of times
PB = Parboiling boost,
time in minutes, seconds
Cooking level PB (min:sec)
101:00
203:00
304:48
406:30
508:30
602:30
703:30
804:30
9 —:—
 Loading...