

Page 1
EN
ZH
TH
MS
FR
EL
AR
FA
User's Guide - 使用者指南 -
คู่มือการใช้งาน - Panduan Pengguna -
Οδηγός χρήσης - -
œ∞Oq «ùß∑FLU‰
¸«≥MLUÈ ØU¸°d
www.tefal.com
Page 2
lastic modelStainless steel model
P
1
1
2
2
3*
16
4
6
8
15
13
12
* depending on model - * 視乎型號 - * เฉพาะรุ่น - * bergantung pada model -
16
4
5*
7
9
10
11
14
(ανάλογα με το μοντέλο) -
(°d ©∂o ±b‰) - (•ºV «∞Luœ¥q)
Page 3
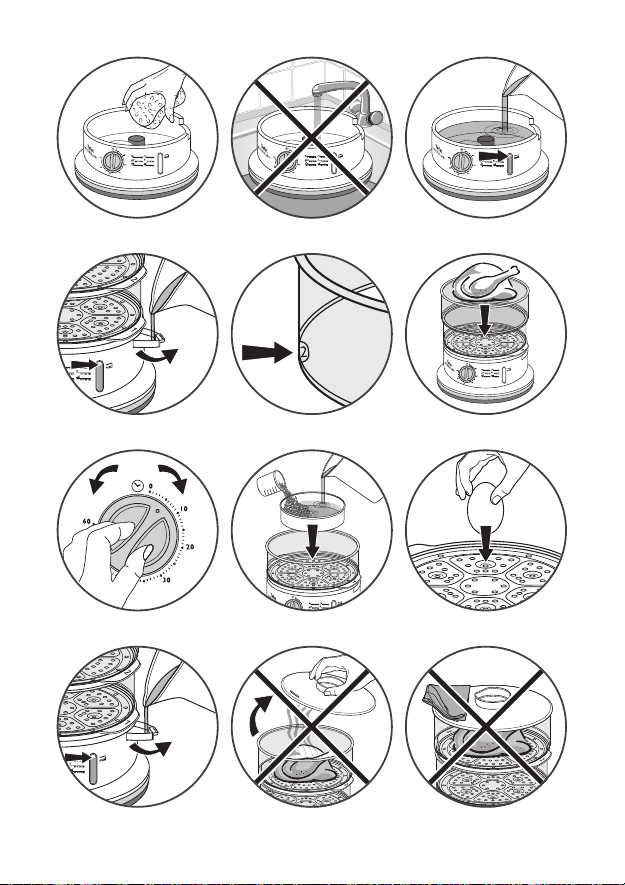
fig. 1 fig. 2 fig. 3-A
fig. 3-B fig. 4 fig. 5
fig. 6 fig. 7 fig. 8
fig. 9 fig. 10 fig. 11
Page 4
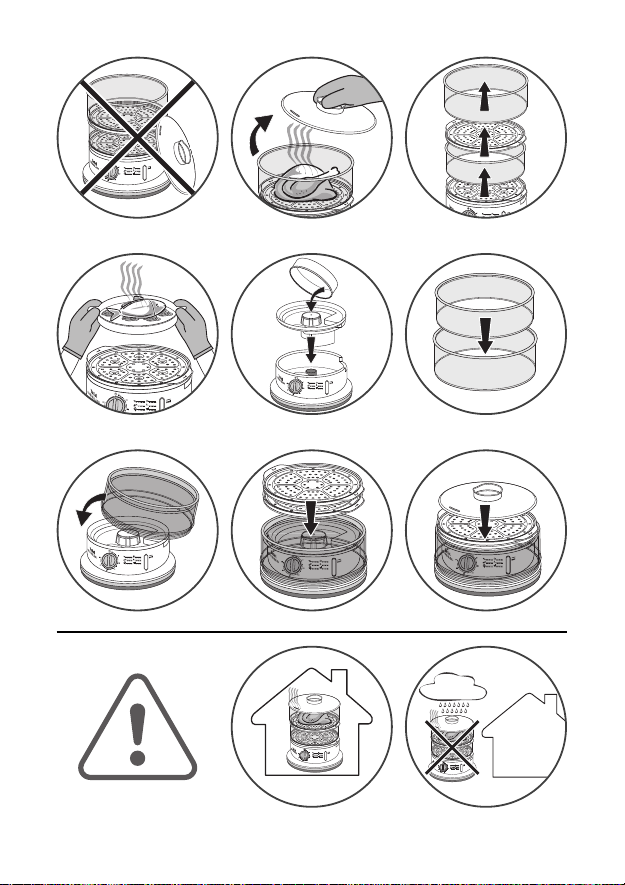
fig. 12 fig. 13 fig. 14
1
2
fig. 15 fig. 16 fig. 17
fig. 18 fig. 19 fig. 20
Page 5

Description
EN
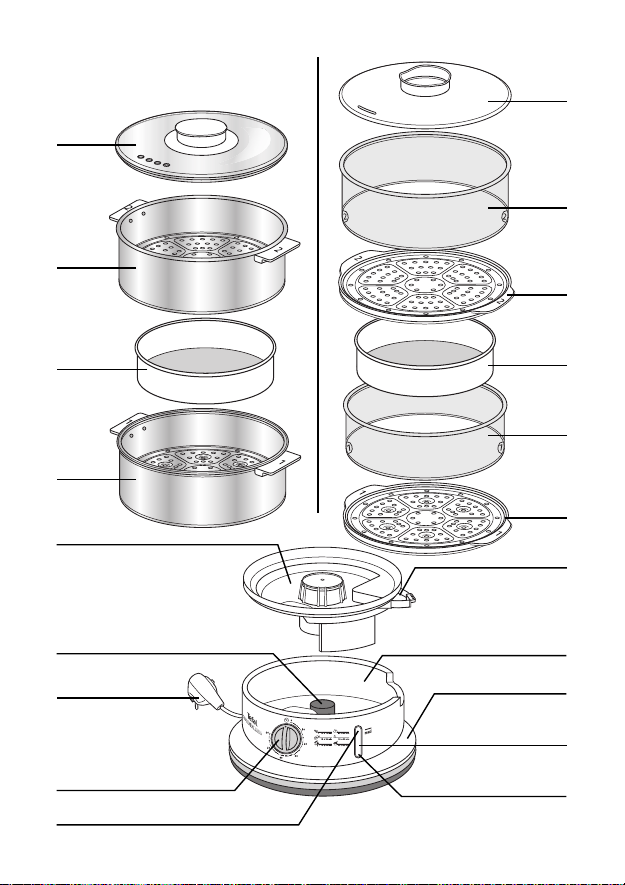
1. Lid
2. Steam basket N°2
3. Removable grid N°2
4. Steam basket N°1
5. Removable grid N°1 and built-in
egg holder
6. Juice collector
7. Water-refilling drawer
(depending on model)
(depending on model)
Preparation
Before use
• Wipe with a damp non-abrasive sponge to
clean the water tank - Fig. 1.
• Wash all removable parts with warm water
and washing up liquid, rinse and dry.
Preparing the steam cooker
• Place the base unit on a stable surface.
Filling the water tank
• There are two ways to fill the water tank:
A. Pour the water directly into the water tank
up to the maximum level - Fig. 3-A.
B. Open the water-fill drawer and pour water
in up to the maximum level
• Fit the juice collector to the tank ensuring that
it is firmly in place.
• Use fresh water with each use.
- Fig. 3-B.
8. Heating element
9. Water tank
10.Base
11.Visible water level
12.Maximum water level
13.Timer
14.Orange On indicator light
15.Plug
16.rice bowl
Do not immerse the
electric base unit
- Fig. 2.
Move away any
items likely to be damaged by the steam.
Do not use seasoning or any liquid
other than water in
the tank.
Make sure that there
is water in the tank
before switching on
the appliance.
1
Page 6

Positioning the removable grids and the baskets
(depending on model)
• The baskets have grids which can be removed
to obtain a larger cooking area or to cook
larger items of food.
- Always place grid N°1 on the juice collector
You can use the
appliance with 1
basket or 2 depending on your needs.
Place the baskets in
the right order.
For best results, do
not put too much
food in the baskets.
- Then place basket N°1
- Next place grid N°2.
- Then basket N°2
• Put the lid on (the lid fits on all baskets).
To cook large items of food:
- Remove grid N°2
- Place basket N°2 directly on basket N°1
- Put the food inside
- Put the lid on.
- Fig. 5.
Steam cooking
Choose the cooking time
• Plug in the appliance.
• Set the timer for the recommended time
- Fig. 6 (see table of cooking times).
• The orange indicator light comes on.
• The steam cooking has begun.
For cooking times of less than 15 min, turn
the timer to 30 min and then turn it
backwards to the required time.
The appliance must
be plugged in for
the timer to be set.
To cook rice:
• Put the water and the rice in the rice bowl.
• Place the rice bowl in the steam basket - Fig. 7.
• Set the timer to the recommended time (see
cooking times table).
2
Page 7

To cook eggs:
• Place the eggs in the built-in egg holders
- Fig. 8.
• Set the timer to the recommended time (see
cooking times table).
• Check the water level by looking at the visible
water level.
• If necessary, add water through the water-fill
If there is no more
water, the appliance
will not produce any
more steam and will
no longer continue
cook the food.
drawer - Fig.9.
During cooking, make sure not to open the lid
- Fig. 10. Also make sure not to obstruct the
steam outlet on the lid. Fig. 11
Do not stand the lid upright to avoid warping
- Fig. 12.
At the end of cooking
• The appliance switches off automatically.
• The timer beeps and the indicator light goes out.
• To stop the appliance before the end of
installed cooking time, turn the timer to the
Off position.
• You can reheat food.
EN
During cooking
Reheating
Removing the food from the steam baskets
• Remove the lid by the handle - Fig. 13.
• Remove the steam basket N°2, the grid N°2
and the steam basket N°1 - Fig. 14.
• Remove the food using oven gloves - Fig. 15.
Use oven gloves to handle the baskets,
handle, bases and lid - Fig. 15.
The use of metal
accessories for lifting out food is not
recommended.
3
Page 8

Check that the juice
collector has cooled
sufficiently before
removing it.
• Unplug the appliance.
• Leave it to cool completely before cleaning.
Cooking times table
Cooking times are given as a guideline for
cooking using the lower basket. They may vary
according to the size of the food, the space
between the food, the amount of food; using a
different basket level and individual preferences.
Adjust the cooking times according to the
amount of food used. Cooking times must also
be increased when using more than one basket
to steam food.
After use
For food with different cooking times: place the
food that requires longest time in the lower
basket. During cooking, add the second basket
with the food that requires less cooking time.
4
Use oven gloves to
handle the baskets
and lid during
cooking.
Page 9

Cooking times using basket N°1
Vegetables
Food Type Amount Cooking time (min)
Artichokes fresh 1 45-55
Asparagus fresh 550gr 30-35
Broccoli
Carrots (thinly sliced 3mm) fresh 300gr 20-25
Mushrooms fresh 500gr 20-25
Cabbage (80g quarters) fresh 600gr 25-30
Cauliflower fresh 1 average size 30-35
Spinach
Flageolet beans fresh 400gr 15-21
Runner beans
Leeks fresh 500gr 35-40
Peppers fresh 250gr 20-25
Garden peas in rice
bowl
Small white onions fresh 250gr 15-20
Potatoes fresh 600gr 40-45
Zucchini fresh 600gr 30-35
Sweetcorn fresh - whole 500gr 35-40
Aubergines fresh 600gr 20-25
fresh 500gr 30-35
frozen 400gr 25-31
fresh 300gr 15-20
frozen 300gr 15-20
fresh 450gr 35-40
frozen 400gr 30-35
fresh 300gr 50-55
frozen 300gr 50-55
Fruit
Food Type Amount Cooking time (min)
Pears fresh 4 30-35
Bananas fresh 4 15-20
Peaches fresh 4 15-20
Apples fresh 4 15-20
EN
5
Page 10

Fish - Shellfish
Food Type Amount Cooking time (min)
Fillet of fish
Whole fish fresh 600gr 30-35
Mussels fresh 1kg 20-25
Steak of coal-fish fresh 300gr 15-20
Prawns fresh 200gr 20-25
scallop shell fresh 100gr 20-25
Salmon fresh 550gr 15-20
fresh 350gr 10-15
frozen 400gr 15-20
Meat- Poultry
Food Type Amount Cooking time (min)
Chicken thigh joints fresh - whole 4 35-40
Chicken escalope fresh 450gr 20-25
Turkey escalope - 400gr 20-25
Pork fillet - 600gr 35-40
Sausages - 6 20-25
Beef patties
frozen 8 20-25
fresh 8 15-20
Eggs
Food Type Amount Cooking time (min)
Hard-boiled eggs - 6 20-25
Rice - Pasta- Grains
Food Type Amount Cooking time (min)
White rice long grain 125g 200ml 30-35
Bulgar wheat 125g 200ml 15-20
Grains 125g 300ml 40-45
6
Page 11

Cleaning and maintenance
Cleaning your appliance
• Unplug the appliance after use.
• Leave it to cool completely before cleaning.
• Check that the appliance has cooled down
sufficiently before emptying the juice
collector and the water tank.
• Wash all removable parts in warm water and
washing up liquid, rinse and dry.
• All parts except the electric base unit can be
put in the dishwasher.
To avoid these stains appearing, clean these
parts often and immediately after use.
Do not immerse the electric base unit in water.
Do not use abrasive cleaning products.
Removing scale build-up from your appliance
For optimum operation of your appliance,
remove scale build-up every 8 uses. To do this:
• Remove the juice collector.
• Pour 1 L of water into the water tank.
• Add 2 glasses (around 300 ml) of white
vinegar.
• Leave to work cold overnight.
• Rinse the inside of the water tank several
times with warm water.
Storing the baskets and removable grids
(depending on model)
• After cleaning all the parts, store your
appliance as follows:
• Put the juice collector in the water tank.
The rice bowl could be turned over on the juice
collector
• Stack steam basket N°1 inside steam basket
N°2 - Fig. 17 (depending on model).
- Fig. 16.
EN
7
Page 12

• Turn the two baskets over on the base unit
- Fig. 18 (depending on model).
• Stack grid N°1, grid N°2. Place the grids on the
base unit - Fig. 19 (depending on model).
• Place the lid on top - Fig. 20.
Technical troubleshooting guide
• Do not dismantle the appliance, if your appliance stops working, take it to
one of our approved service centres for repair.
Fault Reason Solution
Plug in the appliance and
turn the timer.
At the end of the cooking
time, the light goes off
automatically.
Contact our after-sales
service.
The orange indicator
light does not come
on.
The timer has not been set.
Cooking has ended.
The parts are damaged.
The orange indicator
light comes on but
the appliance does
not heat up.
The timer gets stuck.
Water is leaking from
the base.
The food takes longer
to cook than usual.
Steam escapes along
the sides of the
appliance.
8
Fault in the heating element.
Cooking time set to a low
value.
Leak coming from the heating
element.
Heating element has scale
build-up.
Baskets/grids not fitted
together properly.
Water-fill drawer located
under juice collector is open.
Contact our after-sales
service.
For the cooking time lower
than 15 mn, turn the
button until at least 30 mn
and return to the cooking
time needed.
Contact our after-sales
service.
Remove scale build-up
from the heating element.
Check that the
baskets/grids are fitted
together properly and in
the right order.
Check its position.
Page 13

TEFAL / T-FAL* INTERNATIONAL LIMITED GUARANTEE
: www.tefal.com
This product is repairable by TEFAL / T-FAL, during and after the guarantee period.
The Guarantee
This product is guaranteed by TEFAL / T-FAL (company address and details included in the
country list of the TEFAL / T-FAL International Guarantee) against any manufacturing
defect in materials or workmanship during the guarantee period within those countries
as stated in the Country List on the last page of the user manual, starting from the initial
date of purchase.
The international manufacturer's guarantee by TEFAL / T-FAL is an extra benefit which
does not affect consumer's Statutory Rights.
The international manufacturer’s guarantee covers all costs related to restoring the
proven defective product so that it conforms to its original specifications, through the
repair or replacement of any defective part and the necessary labour. At TEFAL / T-FAL’s
choice, a replacement product may be provided instead of repairing a defective product.
TEFAL / T-FAL ’s sole obligation and your exclusive resolution under this guarantee are
limited to such repair or replacement.
Conditions & Exclusions
The international TEFAL / T-FAL guarantee only applies within the guarantee period and
for those countries listed in the Country List attached and is valid only on presentation of
a proof of purchase. The product can be taken directly in person to an authorised service
centre or must be adequately packaged and returned, by recorded delivery (or equivalent
method of postage), to a TEFAL / T-FAL authorised service centre. Full address details for
each country’s authorised service centres are listed on TEFAL / T-FAL website
(www.tefal.com
List to request the appropriate postal address.
TEFAL / T-FAL shall not be obliged to repair or replace any product which is not
accompanied by a valid proof of purchase.
This guarantee will not cover any damage which could occur as a result of misuse,
negligence, failure to follow TEFAL / T-FAL instructions, use on current or voltage other
than as stamped on the product, or a modification or unauthorised repair of the product.
It also does not cover normal wear and tear, maintenance or replacement of consumable
parts, or the following:
) or by calling the appropriate telephone number as set out in the Country
-using the wrong type of water or consumable
-scaling (any de-scaling must be carried out according to the instructions
for use)
-ingress of water, dust or insects into the product
-mechanical damages, overloading
-damages or bad results due to wrong voltage or frequency
-accidents including fire, flood, thunderbolt, etc
-professional or commercial use
-damage to any glass or porcelain ware in the product
-replacement of consumables
EN
9
Page 14

This guarantee does not apply to any product that has been tampered with, or to
damages incurred through improper use and care, faulty packaging by the owner or
mishandling by any carrier.
The international TEFAL / T-FAL guarantee applies only for products purchased in one of
the countries listed, and used for domestic purposes only in one of the countries listed on
the Country List. Where a product purchased in one listed country and then used in
another listed country:
a) The international TEFAL / T-FAL guarantee duration is the one in the country
of usage of the product, even if the product was purchased in another listed
country with different guarantee duration.
b) The international TEFAL / T-FAL guarantee does not apply in case of non
conformity of the purchased product with the local standards, such as
voltage, frequency, power plugs, or other local technical specifications.
c) The repair process for products purchased outside the country of use may
require a longer time if the product is not locally sold by TEFAL / T-FAL.
d) In cases where the product is not repairable in the new country, the
international TEFAL / T-FAL guarantee is limited to a replacement by a similar
product or an alternative product at similar cost, where possible
Consumer Statutory Rights
This international TEFAL / T-FAL guarantee does not affect the statutory rights a
consumer may have or those rights that cannot be excluded or limited, nor rights against
the retailer from which the consumer purchased the product. This guarantee gives a
consumer specific legal rights, and the consumer may also have other legal rights which
vary from State to State or Country to Country. The consumer may assert any such rights
at his sole discretion.
Additional information
Accessories, consumables and end-user replaceable parts can be purchased, if locally
available, as described on the TEFAL / T-FAL internet site.
.
* TEFAL household appliances appear under the T-FAL brand in some territories like America and Japan.
TEFAL/T-FAL are registered trademarks of Groupe SEB.
10
Page 15

說明
1. 蓋
2. 二號蒸籃
3. 二號活動隔(視乎型號)
4. 一號蒸籃
5. 一號活動隔及內置蛋座(視乎型號)
6. 集汁器
7. 添水格
8. 發熱器
準備
使用前
• 用濕的不磨損海綿清潔水箱 – 圖1。
• 用暖水和清潔液清洗所有活動組件,沖淨
後吹乾。
• 將底座放在穩固的平面上。
注水入水箱
• 有兩個方法注水:
A. 將水直接倒入水箱,直至最高水位 -圖
3-A。
B. 拉開添水格注入水,直至最高水位 - 圖
3-B。
• 將集汁器安裝在水箱,請確保牢插妥當。
• 每次請注入清水。
9. 水箱
10. 底座
11. 可見水位
12. 最高水位
13. 計時器
14. 橙色顯示燈
15. 插頭
16. 米碗
切勿將電底座浸入
水中– 圖 2。
請移走所有可能被蒸
汽 損毀的物品。
切勿在水箱注入調味
料或清水以外的任何
液體。
開動蒸爐之前務必確
定水箱內已注水。
ZH
準備蒸爐
11
Page 16

您可以使用一個或
兩個蒸籃,視乎需
要。
安放活動隔和蒸籃 (視乎型號)
• 蒸籃有可移除的活動隔,方便提供更大的
蒸煮空間或蒸煮大件食物。
- 一號活動隔必須放在集汁器上。
- 接著放上一號蒸籃。
- 接著放上二號活動隔。
- 接著放上二號蒸籃。
• 放上蓋(蓋適用於所有蒸籃)。
請依正確次序安放
蒸籃。
要達致最佳效果,
請勿在蒸籃內放入
太多食物。
蒸煮大件食物:
- 移除二號活動隔
- 將二號蒸籃直接放在一號蒸籃上
- 將食物放在裏面 - 圖5
- 放上蓋.
蒸煮
選定烹調時間
• 插入插頭。
• 按照建議的時間設定計時器 -圖6 (參閱烹調
時間附表)。
• 橙色顯示燈會亮起。
• 蒸煮程序開始。
若所需的烹調時間少於15分鐘,請將計時器
扭至30分鐘,再向後扭至所需時間。
• 在米碗內放入水和米。
• 將米碗放在蒸籃內 - 圖7。
• 將計時器設定在建議的時間(參閱烹調時間
附表)。
12
必需連接電源才設
定計時器時。
煮飯
Page 17

蒸蛋
• 將蛋放在內置蛋座 - 圖8。
• 將計時器設定在建議的時間(參閱烹調時間
附表)。
• 檢視可見水位查看水位高度。
• 若有需要可從添水格加 - 圖9。
ZH
烹調期間
若沒有水,蒸爐不
會產生蒸汽,亦不
會繼續烹調食物。
烹調期間切勿打開蓋 - 圖10。
同時切勿阻塞蓋上的蒸汽出口。 圖11
為免蓋變形,切勿將蓋垂直放置 - 圖9。
烹調完畢
• 蒸爐會自動關掉。
• 計時器會鳴響,顯示燈會熄掉。
• 若需要在設定的烹調時間結束之前關爐,
請將計時器扭至關機(Off)位置。
• 本蒸爐可以翻熱食物。
將食物移離蒸籃
• 利用把手將蓋移離 - 圖13。
• 移除二號蒸籃,接著移除二號活動隔和一
號蒸籃 - 圖14。
利用焗爐手套移離食物 - 圖15。
處理蒸籃、把手、底座和蓋時請利用焗爐手
套 - 圖15。
翻熱食物
不建議利用金屬配
件拿取食物。
13
Page 18

移離集汁器之前請
先檢查集汁器是否
已經放涼。
• 拔掉插頭。
• 待至機器完全放涼才進行清潔。
烹調時間附表
所有烹調時間只供指南用途,並以下格蒸籃
蒸煮計算。時間可能會因為食物大小、食物
之間的空間、食物份量、蒸籃位置和個別人
士喜好而有不同。請根據烹煮的食物份量調
節烹調時間。若使用一個蒸籃以上,必須加
長烹調時間。
蒸煮需時不同的食物:將需時最長的食物放
在下格蒸籃。在蒸煮期間,在第二個蒸籃內
放入需時較短的食物。
使用後
在蒸煮期間,處理
蒸籃和蓋時請用焗
爐手套。
14
Page 19

烹調時間(使用一號蒸籃)
蔬菜
食物 類別 份量
朝鮮薊 新鮮 1 45-55
蘆筍 新鮮 550克 30-35
西蘭花
甘筍 (3毫米薄片) 新鮮 300克 20-25
蘑菇 新鮮 500克 20-25
捲心菜 (80克夸特) 新鮮 600克 25-30
花椰菜 新鮮 1 個中型 30-35
菠菜
笛豆 新鮮 400克 15-21
花菜豆
韭蔥 新鮮 500克 35-40
椒 新鮮 250克 20-25
甜豆蒸飯
小白洋蔥 新鮮 250克 15-20
馬鈴薯 新鮮 600克 40-45
美洲南瓜 新鮮 600克 30-35
甜玉米 新鮮 - 整個 500克 35-40
茄子 新鮮 600克 20-25
新鮮 500克 30-35
急凍 400克 25-31
新鮮 300克 15-20
急凍 300克 15-20
新鮮 450克 35-40
急凍 400克 30-35
新鮮 300克 50-55
急凍 300克 50-55
烹調時間(分鐘)
水果
食物 類別 份量
梨 新鮮 4 30-35
蕉 新鮮 4 15-20
桃 新鮮 4 15-20
蘋果 新鮮 4 15-20
烹調時間(分鐘)
ZH
15
Page 20
魚類 - 貝類
食物 類別 份量
魚柳
整條魚 新鮮 600克 30-35
淡菜 新鮮 1公斤 20-25
黑雪魚扒 新鮮 300克 15-20
對蝦 新鮮 200克 20-25
扇貝 新鮮 100克 20-25
三文魚 新鮮 550克 15-20
新鮮 350克 10-15
急凍 400克 15-20
烹調時間(分鐘)
肉類 - 家禽
食物 類別 份量
雞腿 新鮮 - 整個 4 35-40
薄雞片 新鮮 450克 20-25
薄火雞片 - 400克 20-25
豬柳 - 600克 35-40
香腸 - 6 20-25
牛肉小餡餅
急凍 8 20-25
新鮮 8 15-20
烹調時間(分鐘)
蛋
食物 類別 份量
水煮蛋 - 6 20-25
烹調時間(分鐘)
飯 - 麵糰 - 穀類
食物 類別 份量
長粒白米 125克 200毫升 30-35
保加利亞小麥 125克 200毫升 15-20
穀類 125克 300毫升 40-45
烹調時間(分鐘)
16
Page 21

清潔及保養
清潔蒸爐
• 使用後請拔掉插頭。
• 完全放涼才進行清潔。
• 清倒集汁器和水箱之前先檢查蒸爐是否已
經放涼。
• 用暖水和清潔液清洗所有活動組件,沖淨
後吹乾。
• 除電子座之外,所有組件均可放入洗碗碟
機清洗。
為免有漬,請在使用後立刻清洗所有組件。
切勿將電子座浸入水中。
切勿用會磨損的清潔產品。
為保持最佳操作狀態,每使用8次便須清除積
垢一次。清除法如下:
• 移除集汁器。
• 將一公升清水倒入水箱。
• 加入兩水杯(約300毫升)白醋。
• 浸過夜。
• 用暖水沖淨水箱內部數次。
存放蒸籃和活動隔 (視乎型號)
• 清潔所有組件後按以下指示存放蒸爐:
• 將集汁器放在水箱內。將米碗倒轉放在集
汁器上 - 圖16。
• 將一號蒸籃放在二號蒸籃內 - 圖17 (視乎型
號) 。
ZH
清除蒸爐的積垢
17
Page 22

• 將兩個蒸籃倒轉放在底座 - 圖18 (視乎型號).
• 將一號和二號活動隔叠在一起放在底座上 -
圖19 (視乎型號)。
• 將蓋放在最上面 - 圖20。
技術問題處理指南
• 若蒸爐失靈,切勿自行拆開,請送往我們的認可服務中心維修。
問題 理由 解決方法
尚未設定時間器。 接上電源然後設定時間器。
橙色顯示燈不亮起。
橙色顯示燈亮起但爐
不發熱。
計時器扭不動。 烹調時間已設定在最低值。
底座漏水。 發熱器漏水。
食物較平時需時更長
才烹調好。
蒸汽沿著爐 兩邊漏
掉。
烹調時間已結束。
組件壞了。
發熱器有問題。
發熱器積了垢。 請清除發熱器的積垢。
蒸籃/活動隔沒有妥當裝配
一起。
安裝在集汁器下的添水格打
開了。
18
烹調結束後顯示燈會自動熄
滅。
請跟我們的認可服務中心聯
絡
請跟我們的售後服務部聯
絡。
若所需烹調時間少於15分
鐘,請將按鈕扭至至少30
分鐘,再向後扭至所需時
間。
請跟我們的售後服務部聯絡
。
檢查蒸籃/活動隔是否按照
正確次序妥當裝配一起。
檢查位置。
Page 23

TEFAL / T-FAL* 國際有限保用證
: www.tefal.com
在保用期內及後,TEFAL / T-FAL 會為您提供產品的維修服務。
保用證
TEFAL/T-FAL (TEFAL/T-FAL國際保用證中的國家列表所列的公司地址詳細資料)根據
使用手冊中最後一頁的國家列表中所載之國家,在保用期內(由購買日起計)提供
任何材料或工藝缺陷的保用。
TEFAL/T-FAL的國際生產商保用證是一項額外權益,並不影響消費者的法定權利。
生產商國際保用證涵蓋與已證明缺陷產品維修(恢復產品的本來規)相關的所有費
用,包括維修或更換任何缺陷零件以及必要
的人力。TEFAL/T-FAL有權選擇更換產 品而不維修缺陷 產品。本保用證 下TEFAL/TFAL的唯一責任及您的專享解決方法只限於更換零件或維修產品。
條款及免責
TEFAL/T-FAL國際保用證只適用於保用期內的產品以及隨附的國家列表中所載之國家
,並必須出示購買證明方為有效。產品可直接送交TEFAL/T-FAL授權的售後服務中心
,或必須妥善包裝並以掛號形式(或其他同等郵遞方式)送交至經TEFAL/T-FAL授權
的售 後服 務中 心。 各國獲授權的售 後服 務中 心之 詳細 地址請見TEFAL/T-FAL網址
(www.tefal.com),或可致電國家列表中的相關電話查詢郵寄地址。
TEFAL/T-FAL不會維修或更換未能出示有效購買證明的產品。
本保用證不包括任何因錯誤使用、疏忽、未有遵從TEFAL/T-FAL使用說明、使用非產
品規定的電壓或電流、或更改或未經授權而維修產品的損毀。保用證亦不包括正常
的磨、耗材的維修或更換,及以下情況:
- 使用不適當的水
- 生銹(如需去銹,必須根據使用說明進行)
- 產品內入水、灰塵或昆蟲
- 機件故障負荷過重
- 由電壓過大或頻率錯誤引起的損壞或不良結果
- 火災、水災及電擊等意外
- 專業或商業用途
- 產品上任何玻璃或瓷器的損壞
本保用證不適用於任何經胡亂改裝的部份,或由於使用不當及疏忽、持有人的包裝
不當或運送途中的處理不當所引起的損壞。
ZH
19
Page 24

TEFAL/T-FAL國際保用證只適用於列舉國家中購買,並且於國家列表所載的國家中只
用於住宅用途的產品。倘產品購自其中一個列舉國而在另一列舉國家使用:
a)儘管產品的購買國家有不同保用證,TEFAL/T-FAL國際保用證的限期仍
需按產品使用國家的規定。
b)TEFAL/T-FAL國際保用證不適用於所購買的產品不符合當地標準,例如
電壓、頻率、電源插頭和其他地方技術的規定。
c)倘產品不是購自當地的TEFAL/T-FAL,在使用地以外所買的產品則需要
較長的維修時間。
d)在新的國家中產品不能修復, TEFAL/T-FAL國際保用證只限於更換同類產
品或類似價錢的其他產品(如適用) 。
消費者法定權利
TEFAL/T-FAL國際保用證並不影響消費者的法定權益利,這些權利不排除也不局限於
產品銷售商。本保用證給予消費者特定
合法權益,而消費者於不同州或國家或會享有其他合法權益。消費者可根據個人判
斷維護任何有關權利。
補充資料
產品的附件、耗材和更換零件可於當地購買(如有售),詳細請瀏覽TEFAL/T-FAL網
站。
*TEFAL/T-FAL 為SEB集團的註冊商標。
20
Page 25

คำอธิบาย
1. ฝา
2. ชั้นนึ่ง N°2
3. ตะแกรงแบบถอดได้ N°2 (เฉพาะรุ่น)
4. ชั้นนึ่ง N°1
5. ตะแกรงแบบถอดได้ N°1
พร้อมหลุมวางไข่ในตัว (เฉพาะรุ่น)
6. ชั้นรองน้ำหยด
7. ช่องเติมน้ำ
8. ตัวทำความร้อน
การเตรียม
ก่อนใช
เช็ดด้วยฟองน้ำชุบน้ำหมาดๆ
เพื่อทำความสะอาดชั้นเก็บน้ำ – รูปที่ 1
เช็ดชิ้นส่วนที่ถอดออกได้ทั้งหมดด้วยน้ำอุ่นและน้ำยา
ล้างจาน และเช็ดให้แห้ง
วางฐานเครื่องบนพื้นผิวที่มั่นคง
การเติมน้ำในช่องเก็บน้ำ
มีสองวิธีในการเติมน้ำในช่องเก็บน้ำ:
1. เทน้ำลงในช่องเก็บน้ำโดยตรงจนถึงระดับสูงสุด –
รูปที่ 3-A
2. เปิดช่องเติมน้ำแล้วเทน้ำจนถึงระดับสูงสุด – รูปที่
3-B
ประกอบชั้นรองน้ำหยดลงในช่องเก็บน้ำ
ตรวจสอบว่าอยู่ในตำแหน่งอย่างแน่นหนา
ใช้น้ำเปล่าทุกครั้ง
9. ชั้นเก็บน้ำ
10. ฐาน
11. ช่องมองระดับน้ำ
12. ระดับน้ำสูงสุด
13. ตัวตั้งเวลา
14. ไฟสีส้มแสดงการทำงาน
15. ปลั๊ก
16. โถข้าว
อย่านำส่วนที่เป็นเครื่อง
ไฟฟ้าจุ่มน้ำ - รูปที่ 2
การเตรียมหม้อนึ่งไอน้ำ
นำสิ่งของที่อาจจะเสีย
หายเมื่อโดนไอน้ำออก
อย่าใช้เครื่องปรุงรส
หรือของเหลวชนิดอื่น
นอกจากน้ำเติมลงไปใ
นช่องเก็บน้ำ
ตรวจสอบให้แน่ใจว่ามี
น้ำในช่องเก็บน้ำก่อน
กดสวิตช์เปิดเครื่อง
TH
21
Page 26

การวางตำแหน่งตะแกรงและตะกร้า
ชั้นนึ่งมีตะแกรงซึ่งสามารถถอดออกได้เพื่อให้มีพื้นที่ใ
นประการประกอบอาหารเพิ่มขึ้นหรือเพื่อประกอบอา
คุณสามารถใช้ชั้นนึ่ง
เพียง 1 หรือ 2 ชิ้นได้
ขึ้นอยู่กับความต้องการ
วางชั้นนึ่งในลำดับที่ถูก
ต้อง
เพื่อให้ได้ผลดีที่สุด
อย่าใส่อาหารในชั้นนึ่ง
มากเกินไป
หารที่มีขนาดใหญ่ขึ้นได้
- วางตะแกรง N°1 บนชั้นรองน้ำหยด
- จากนั้นวางชั้นนึ่ง N°1
- แล้ววางตะแกรง N°2
- แล้ววางชั้นนึ่ง N°2
ปิดฝา (ฝาปิดบนชั้นนึ่งทั้งหมด)
สำหรับการประกอบอาหารที่มีขนาดใหญ่:
- นำตะแกรงออก N°2
- วางชั้นนึ่ง N°2 บนชั้นนึ่ง N°1 โดยตรง
- วางอาหารข้างใน – รูปที่ 5
- ปิดฝา
การนึ่ง
เลือกเวลาประกอบอาหาร
เสียบปลั๊กเครื่อง
ตั้งเวลาตามที่แนะนำ - รูปที่ 6
(ดูตารางเวลาการประกอบอาหาร) ไฟสีส้มติดขึ้น
การนึ่งเริ่มทำงาน
สำหรับเวลาการประกอบอาหารน้อยกว่า 15
ให้ตั้งเวลาไว้ 30 นาที
แล้วหมุนกลับไปยังเวลาที่ต้องการ
(เฉพาะรุ่น)
ต้องเสียบปลั๊กเครื่อง
เพื่อตั้งเวลา
22
การหุงข้าว
ใส่น้ำและข้าวในโถข้าว
วางโถข้าวในชั้นนึ่ง – รูปที่ 7
ตั้งเวลาตามที่แนะนำ (ดูตารางเวลาประกอบอาหาร)
Page 27

การต้มไข
วางไข่หลุมวางไข่ - รูปที่ 8
ตั้งเวลาตามที่แนะนำ (ดูตารางเวลาประกอบอาหาร)
ระหว่างการประกอบอาหาร
ตรวจสอบระดับน้ำโดยดูที่ระดับน้ำที่มองเห็น
หากจำเป็น ให้เติมน้ำผ่านช่องเติมน้ำ – รูปที่ 9
ระหว่างประกอบอาหาร อย่าเปิดฝา รูปที่ 10
หากไม่มีน้ำ
เครื่องจะไม่ผลิตไอน้ำ
และจะไม่ทำงานต่อ
อย่าให้มีสิ่งกีดขวางช่องทางออกของไอน้ำบนฝา รูปที่
11
อย่าวางฝาในแนวตั้งเพื่อหลีกเลี่ยงการโค้งงอเสียรูป
รูปที่ 12
เมื่อสิ้นสุดการประกอบอาหาร
เครื่องปิดอัตโนมัติ
ตัวตั้งเวลาส่งเสียงดังปี๊บและไฟสัญญาณดับ
หยุดเครื่องก่อนสิ้นสุดเวลาประกอบอาหารที่ตั้งไว้
หมุนตัวตั้งเวลาไปยังตำแหน่ง ปิด
สามารถอุ่นอาหารได้
นำอาหารออกจากตะกร้านึ่ง
นำฝาออกจากที่จับ – รูปที่ 13
นำชั้นนึ่ง N°2 ตะแกรง N°2 และชั้นนึ่ง N°1ออก –
รูปที่ 14
นำอาหารออกโดยใช้ถุงมือสำหรับเตาอบ – รูปที่ 15
ใช้ถุงมือสำหรับเตาอบเพื่อจับชั้นนึ่ง ที่จับ ฐาน
และฝา – รูปที่ 15
TH
การอุ่น
ไม่ควรใช้ชิ้นส่วนที่เป็น
โลหะสำหรับนำอาหาร
ออก
23
Page 28

ตรวจสอบว่าชั้นรองน้ำ
หยดเย็นพอที่จะนำออก
มาได
ถอดปลั๊กเครื่อง
ปล่อยไว้ให้เย็นสนิทก่อนทำความสะอาด
ตารางเวลาการประกอบอาหาร
เวลาประกอบอาหารที่ให้ไว้เป็นแนวทางสำหรับการป
ระกอบอาหารโดยใช้ตะกร้าใบที่อยู่ต่ำ
อาจแตกต่างกันขึ้นกับขนาดของอาหาร
พื้นที่ว่างระหว่างอาหาร ปริมาณอาหาร
การใช้ระดับตะแกรงที่แตกต่างกันและความชอบส่ว
นบุคคล
ปรับเวลาประกอบอาหารตามปริมาณของอาหารที่ใช้
ต้องเพิ่มเวลาในการประกอบอาหารเมื่อใช้ตะกร้ามาก
กว่าหนึ่งใบในการนึ่งอาหาร
สำหรับอาหารที่เวลาในการประกอบอาหารแตกต่างกัน:
วางอาหารที่ต้องใช้เวลานานที่สุดในตะกร้าใบที่อยู่ต่ำ
กว่า ระหว่างการประกอบอาหาร
ให้ใส่ตะกร้าใบที่สองซึ่งมีอาหารที่ใช้เวลาในการประ
กอบอาหารต่ำกว่าลงไป
หลังใช้งาน
ใช้ถุงมือสำหรับเตาอบเ
พื่อจับตะกร้าและฝาระ
หว่างการประกอบ
อาหาร
24
Page 29

เวลาการประกอบอาหารโดยใช้ชั้นนึ่ง N°1
ผัก
อาหาร ประเภท ปริมาณ
อาร์ติโชก สด 1 45-55
หน่อไม้ฝรั่ง สด 550กรัม 30-35
บร็อคโคลี่
แครอท สด 300กรัม 20-25
เห็ด สด 500กรัม 20-25
กะหล่ำปลี (80 กรัม หนึ่งในสี่) สด 600กรัม 25-30
กะหล่ำหัว สด
ผักโขม
ถั่วฟลาเชโล สด 400กรัม 15-21
ถั่วฝัก
ต้นหอม สด 500กรัม 35-40
พริกไทย สด 250กรัม 20-25
ข้าวอบถั่วลันเตา
หอมหัวใหญ่ขนาดเล็ก สด 250กรัม 15-20
มันฝรั่ง สด 600กรัม 40-45
ซูกินี สด 600กรัม 30-35
ข้าวโพดหวาน สด – ทั้งฝัก 500กรัม 35-40
มะเขือ สด 600กรัม 20-25
ผลไม
อาหาร ประเภท ปริมาณ
ลูกแพร์ สด 4 30-35
กล้วย สด 4 15-20
ลูกพีช สด 4 15-20
แอปเปิ้ล สด 4 15-20
สด 500กรัม 30-35
แช่แข็ง 400กรัม 25-31
ขนาดปานกลาง 1
หัว
สด 300 กรัม 15-20
แช่แข็ง 300กรัม 15-20
สด 450กรัม 35-40
แช่แข็ง 400กรัม 30-35
สด 300กรัม 50-55
แช่แข็ง 300กรัม 50-55
เวลาประกอบอาหาร (นาที)
30-35
เวลาประกอบอาหาร (นาที)
TH
25
Page 30

ปลา – หอย
อาหาร ประเภท ปริมาณ
ปลาไม่มีก้าง
ปลาทั้งตัว สด 600กรัม 30-35
หอยแมลงภู่ สด 1kg 20-25
สเต็กปลาโคล สด 300กรัม 15-20
กุ้ง สด 200กรัม 20-25
หอยแครง สด 100กรัม 20-25
ปลาแซลมอน สด 550กรัม 15-20
สด 350กรัม 10-15
สด 400กรัม 15-20
เวลาประกอบอาหาร (นาที)
เนื้อ- สัตว์ปีก
อาหาร ประเภท ปริมาณ
ข้อไก่ สด – ทั้งชิ้น 4 35-40
ไก่ไม่มีกระดูก สด 450กรัม 20-25
ไก่งวงไม่มีกระดูก - 400กรัม 20-25
สันในหมู - 600กรัม 35-40
ไส้กรอก - 6 20-25
พายเนื้อสับ
แช่แข็ง 8 20-25
สด 8 15-20
เวลาประกอบอาหาร (นาที)
ไข่
อาหาร ประเภท ปริมาณ
ไข่ต้มสุก - 6 20-25
เวลาประกอบอาหาร (นาที)
ข้าว – พาสต้า- ธัญพืช
อาหาร ประเภท ปริมาณ
ข้าวขาวเมล็ดยาว 125กรัม 200มล. 30-35
ข้าวสาลีบัลการ์ 125กรัม 200มล. 15-20
ธัญพืช 125กรัม 300มล. 40-45
เวลาประกอบอาหาร (นาที)
26
Page 31

การทำความสะอาดและการบำรุงรักษา
การทำความสะอาดเครื่อง
ถอดปลั๊กเครื่องหลังใช้งาน
ปล่อยไว้ให้เย็นสนิทก่อนทำความสะอาด
ตรวจสอบว่าเครื่องเย็นพอก่อนที่จะนำชั้นรองน้ำหยด
และช่องเก็บน้ำออก
ล้างชิ้นส่วนที่ถอดได้ทั้งหมดด้วยน้ำอุ่นและน้ำยาล้างจ
าน และเช็ดให้แห้ง
สามารถใช้เครื่องล้างจานกับชิ้นส่วนทุกชิ้นยกเว้นฐา
นเครื่องที่เป็นไฟฟ้า
อย่าให้มีคราบเกิดขึ้น
ทำความสะอาดชิ้นส่วนเหล่านี้อยู่เสมอและทันทีหลังใ
ช้งาน
อย่านำฐานเครื่องที่เป็นไฟฟ้าจุ่มลงในน้ำ
อย่าใช้ผลิตภัณฑ์ทำความสะอาดสำหรับขัดถู
การกำจัดตะกรันที่เกาะติดออกจากเครื่อง
เพื่อให้ใช้งานได้อย่างดี กำจัดตะกรันออกทุก 8
ครั้งที่ใช้ โดย:
นำชั้นรองน้ำหยดออก
รินน้ำ 1 ลิตรลงในช่องเก็บน้ำ
เติมน้ำส้มสายชู 2 แก้ว (ประมาณ 300 มล.)
ทิ้งไว้ค้างคืน
ล้างภายในช่องเก็บน้ำหลายครั้ง
การจัดเก็บตะกร้าและตะแกรงที่ถอดออกได้
(เฉพาะรุ่น)
หลังทำความสะอาดชิ้นส่วนทั้งหมด
ให้เก็บเครื่องดังต่อไปนี้:
ใส่ชั้นรองน้ำหยดในช่องเก็บน้ำ
สามารถวางโถข้าวหงายบนชั้นรองน้ำหยดได้ – รูปที่
16
วางชั้นนึ่ง N°1 ซ้อนในชั้นนึ่ง N°2 – รูปที่ 17
(เฉพาะรุ่น)
วางชั้นนึ่งทั้งสองหงายบนฐานเครื่อง - รูปที่ 18
(เฉพาะรุ่น)
TH
27
Page 32

วางตะแกรง N°1, ตะแกรง N°2 ซ้อนกัน
วางตะแกรงบนฐานเครื่อง – รูปที่ 19 (เฉพาะรุ่น)
วางฝาไว้ด้านบน – รูปที่ 20
แนวทางการแก้ปัญหาทางเทคนิค
อย่าถอดเครื่องออก
หากเครื่องไม่ทำงานให้นำไปยังศูนย์บริการที่ได้รับการรับรองเพื่อดำเนินการซ่อม
ข้อผิดพลาด สาเหตุ การแก้ปัญหา
ไม่ได้ตั้งเวลา
เสียบปลั๊กเครื่องแล้วหมุนตัวตั้งเ
วลา
ไฟสัญญาณสีส้มไม่ติด
ไฟสัญญาณสีส้มติดแต่
เครื่องไม่ร้อน
ตัวตั้งเวลาค้าง ตั้งเวลาประกอบอาหารไว้ต่ำ
น้ำรั่วออกจากฐาน รั่วออกจากส่วนทำความร้อน ติดต่อฝ่ายให้บริการหลังการขาย
ใช้เวลาประกอบอาหารนา
นกว่าปกติ
มีไอน้ำรั่วออกทางด้านข้าง
ของเครื่อง
สิ้นสุดการประกอบอาหาร
ชิ้นส่วนชำรุด ติดต่อฝ่ายให้บริการหลังการขาย
เกิดข้อผิดพลาดในส่วนทำความร้อน ติดต่อฝ่ายให้บริการหลังการขาย
ส่วนทำความร้อนมีตะกรันเกาะ
ประกอบชั้นนึ่ง/ตะแกรงไม่แน่น
ช่องเติมน้ำใต้ชั้นรองน้ำหยดเปิด ตรวจสอบตำแหน่ง
เมื่อสิ้นสุดเวลาประกอบอาหาร
ไฟดับอัตโนมัติ
สำหรับเวลาการประกอบอาหารที่
น้อยกว่า 15 นาที
ให้หมุนปุ่มอย่างน้อยที่ 30
นาทีแล้วหมุนเวลาประกอบ
อาหารกลับตามต้องการ
กำจัดตะกรันที่เกาะติดอยู่ออก
จากส่วนทำความร้อน
ตรวจสอบว่าประกอบชั้นนึ่ง/
ตะแกรงไว้แน่นและอยู่ในลำดับที่
ถูกต้อง
28
Page 33

ซูพอร์ เงื่อนไขการรับประกันทั่วโลกของผลิตภัณฑ์ซูพอร์
: www.tefal.com
ผลิตภัณฑ์ของท่านสามารถรับการดูแลจากศูนย์บริการซูพอร์ระหว่างและหลังสิ้นสุดระยะเวลารับป
ระกันตามเงื่อนไขที่กำหนด
การรับประกัน
ผลิตภัณฑ์ทีฟาล์วของท่านได้การรับประกันสำหรับกรณีของความเสียหายที่เกิดกับผลิตภัณฑ์อันมี
เหตุเนื่องมาจากความบกพร่องจากการผลิตของโรงงาน
(รายละเอียดระยะเวลารับประกันและที่อยู่ของบริษัทฯในแต่ละประเทศตามรายละเอียดแนบท้าย)
นับจากวันที่ซื้อผลิตภัณฑ์
เงื่อนไขการรับประกันทั่วโลกจากโรงงานผู้ผลิตทีฟาล์วถือเป็นสิทธิ์ประโยชน์เพิ่มเติม
ซึ่งไม่มีผลเกี่ยวเนื่องต่อสิทธิทางกฎหมายอื่นของผู้บริโภค
เงื่อนไขการรับประกันนี้ครอบคลุมค่าใช้จ่ายทั้งหมดที่จะเกิดขึ้นเพื่อทำให้ผลิตภัณฑ์ที่อยู่ภายใต้การ
รับประกันดังกล่าวสามารถกลับมาใช้งานได้ในสถานะปกติ (ไม่ว่าเป็นการซ่อมแซม,
เปลี่ยนชิ้นส่วน ค่าแรงหรือการเปลี่ยนสินค้า)
สัญญาผูกมัดต่อทีฟาล์วและการตัดสินใจใดๆของท่านภายใต้การรับประกันนี้จะจำกัดเฉพาะการซ่อ
มแซมผลิตภัณฑ์หรือการเปลี่ยนผลิตภัณฑ์ดังกล่าว
เงื่อนไขการรับประกันและข้อยกเว้น
ผลิตภัณฑ์จะได้รับการรับประกันจากทีฟาล์วเมื่อแสดงผลิตภัณฑ์พร้อมหลักฐานในการซื้อและเมื่อ
อยู่ภายในระยะเวลาการรับประกัน เงื่อนไขการรับประกันและใช้ในประเทศที่มีรายชื่อตามแนบท้าย
ท่านสามารถนำผลิตภัณฑ์ไปติดต่อยังศูนย์บริการหรือสามารถส่งทางไปรษณีย์โดยบรรจุหีบห่อที่เห
มาะสม ที่อยู่ของศูนย์บริการที่ได้รับการแต่งตั้งของทีฟาล์วมีรายละเอียดในเว็บไซต์
(www.tefal.com)
หรือติดต่อที่เบอร์โทรศัพท์ของแต่ละประเทศตามระบุแนบท้ายเพื่อตรวจสอบที่อยู่ของศูนย์บริการ
ทีฟาล์วไม่มีสัญญาผูกมัดในการซ่อมแซมหรือเปลี่ยนสินค้าที่ไม่มีหลักฐานในการซื้อมาแสดง
การรับประกันนี้ไม่ครอบคลุมถึง
ความชำรุดเสียหายที่เกิดจากการใช้งานผิดวิธี การใช้งานโดยความประมาท
การไม่ปฏิบัติตามคู่มือการใช้งานทีฟาล์ว
การเชื่อมต่อกระแสไฟฟ้าหรือแรงดันไฟฟ้าที่ไม่สอดคล้องกับผลิตภัณฑ์
ผลิตภัณฑ์ถูกปรับแต่งหรือซ่อมแซมแก้ไขโดยผู้ซื้อหรือศูนย์บริการที่ไม่ได้รับการแต่งตั้งจากบริษัท
ฯ อีกทั้งไม่ครอบคลุมถึงกรณีชิ้นส่วนและอุปกรณ์ที่เกิดรอยขูดขีด เสียหายหรือซีดตามการใช้งาน
การซ่อมหรือเปลี่ยนวัสดุอะไหล่และอุปกรณ์ที่สึกหรอหรือหมดอายุตามการใช้งาน
และกรณีอื่นๆดังต่อไปนี้
- การใช้ผลิตภัณฑ์กับน้ำผิดประเภท
- ประสิทธิภาพของผลิตภัณฑ์ลดลงเนื่องจากตะกรัน (หากผลิตภัณฑ์เกิดคราบตะกรัน
โปรดปฏิบัติตามคำแนะนำในคู่มือการใช้งานอย่างสม่ำเสมอ)
- ความเสียหายที่เกิดจากน้ำ ฝุ่น หรือแมลงเข้าไปภายในตัวผลิตภัณฑ์
- การใช้งานเกินขนาด
ความเสียหายจากการเชื่อมต่อแรงดันไฟฟ้าที่ไม่สอดคล้องกับผลิตภัณฑ์
- ความเสียหายที่เกิดจากอุบัติเหตุ ภัยธรรมชาติ ต่างๆ เช่น อัคคีภัย น้ำท่วม ฟ้าผ่า เป็นต้น
- การใช้งานที่นอกเหนือจากการใช้งานภายในครัวเรือนหรือเป็นการใช้งานเชิงพาณิชย์
- อุปกรณ์เสริมต่างๆ ที่มาพร้อมกับผลิตภัณฑ์ เช่น เครื่องแก้วหรือกระเบื้อง
TH
29
Page 34

- ความเสียหายที่เกิดจากการใช้งานและดูแลไม่เหมาะสม
ความเสียหายจากการบรรจุหีบห่อเพื่อการขนส่งที่ไม่เหมาะสม
- การเปลี่ยนวัสดุ อุปกรณ์สึกหรอตามการใช้งาน
การรับประกันทั่วโลกของผลิตภัณฑ์ทีฟาล์วมีผลใช้กับผลิตภัณฑ์ทีฟาล์วที่ซื้อในประเทศที่ระบุไว้ตา
มแนบท้ายและผลิตภัณฑ์ดังกล่าวถูกใช้งานในครัวเรือนเป็นหลักในประเทศที่มีรายชื่อตามระบุแน
บท้าย
หากมีการซื้อผลิตภัณฑ์ในประเทศหนึ่งที่อยู่ในรายชื่อแต่นำไปใช้งานในอีกประเทศหนึ่งที่อยู่ในรา
ยชื่อ มีรายละเอียดเพิ่มเติมดังนี้
a) ระยะเวลาการรับประกันทั่วโลกของผลิตภัณฑ์ทีฟาล์วถือตามประเทศที่นำไปใช้งาน
แม้ว่าระยะเวลาการรับประกันของประเทศที่ซื้อผลิตภัณฑ์ดังกล่าวมาจะแตกต่างกัน
b) การรับประกันทั่วโลกของผลิตภัณฑ์ทีฟาล์วไม่รวมถึงความไม่สอดคล้องกันของผลิตภัณ
ฑ์ที่ซื้อกับมาตรฐานการจ่ายไฟฟ้าของประเทศที่นำไปใช้งาน เช่น แรงดันไฟฟ้า
คลื่นความถี่ ปลั๊กไฟ หรือข้อกำหนดทางเทคนิคอื่นๆ
c) ระยะเวลาในการซ่อมอาจนานขึ้น
หากซื้อผลิตภัณฑ์จากประเทศอื่นที่มิใช่ประเทศที่นำไปใช้งาน
ซึ่งในประเทศที่นำไปใช้งานนั้น ผลิตภัณฑ์ทีฟาล์วไม่ได้จำหน่ายโดยตัวแทนของบริษัทฯ
d) ในกรณีที่ไม่สามารถซ่อมได้
การรับประกันนี้จะจำกัดขอบเขตการรับประกันอยู่ที่การเปลี่ยนเป็นผลิตภัณฑ์ที่เหมือนกั
นหรือคล้ายคลึงกันหรือราคาใกล้เคียงกัน แล้วแต่กรณีใดจะสามารถทำได้
สิทธิทางกฎหมายของผู้บริโภค (Consumer Statutory Rights)
การรับประกันทั่วโลกของผลิตภัณฑ์ทีฟาล์วไม่มีผลเกี่ยวเนื่องต่อสิทธิทางกฎหมายอื่นของผู้บริโภค
ที่พึงมีหรือสิทธิที่ผู้ค้าปลีกมีต่อผู้บริโภคที่ซื้อผลิตภัณฑ์
การรับประกันนี้เป็นการให้สิทธิประโยชน์ที่เฉพาะเจาะจงแก่ผู้บริโภคและผู้บริโภคอาจได้รับสิทธิทา
งกฎหมายอื่นๆซึ่งแตกต่างไปตามแต่ละรัฐหรือแต่ละประเทศ
ผู้บริโภคอาจพิจารณาสิทธิทางกฎหมายอื่นใด(หากมี) ซึ่งขึ้นกับดุลยพินิจของผู้บริโภค
ข้อมูลเพิ่มเติม
อะไหล่ ชิ้นส่วน อุปกรณ์ที่สึกหรอหรือหมดอายุจากการใช้งาน
ผู้บริโภคสามารถติดต่อเพื่อตรวจสอบข้อมูลและซื้อได้ที่ศูนย์บริการที่ได้รับการแต่งตั้งจากบริษัทฯ
* ผลิตภัณฑ์ทีฟาล์ว TEFAL อาจอยู่ภายใต้เครื่องหมายทางการค้า T-FAL ในบางประเทศหรือภูมิภาค เช่น
อเมริกาและญี่ปุ่น. TEFAL/T-FAL เป็นเครื่องหมายทางการค้าที่จดทะเบียนของ Groupe SEB
30
Page 35

Penerangan
1. Penutup
2. Bakul kukus N°2
3. Grid mudah alih N°2 (bergantung
pada model)
4. Bakul kukus
5. Grid mudah alih N°1 dan pemegang
telur terbina dalam
6. Pengumpul Jus
7. Laci mengisi air
(bergantung pada model)
Persediaan
Sebelum penggunaan
• Lap dengan span lembap tidak melelas untuk
bersihkan tangki air – Rajah.1
• Cuci semua bahagian yang mudah dialih
dengan air suam dan sabun pencuci pinggan
mangkuk, bilas dan keringkan.
Menyediakan Pengukus
• Letakkan tapak unit di permukaan yang stabil.
Mengisi tangki air
• Ada dua cara untuk mengisi tangki air:
A.Tuang air langsung ke dalam tangki air
sehingga paras maksima – Rajah. 3-A
B. Buka laci isi air dan tuang air sehingga
paras maksima – Rajah. 3-B.
• Pasang pemegang jus kepada tangki sambil
memastikan ia padat di tempatnya.
• Gunakan air baru setiap kali.
8. Elemen Memanas
9. Tangki Air
10. Tapak
11. Paras Air boleh dilihat
12. Paras air maksima
13. Penentu masa
14. Lampu Penunjuk
15. Palam
16. Mangkuk nasi
Jangan rendam
unit tapak elektrik
- Rajah.2.
Alihkan sebarang
barang yang mungkin
boleh dirosakkan
oleh wap.
Jangan gunakan
sebarang bahan
perasa atau cecair
selain daripada air
dalam tangki.
Pastikan ada air
dalam tangki.
sebelum
menghidupkan
peralatan.
MS
31
Page 36

Meletakkan posisi grid dan bakul mudah alih
Anda boleh
gunakan peralatan
dengan 1 atau 2
bakul bergantung
kepada keperluan
anda.
Letakkan bakul
dalam susunan
yang betul.
Untuk hasil terbaik,
jangan letak terlalu
banyak makanan
dalam bakul.
• Bakul mempunyai grid yang mudah dialih
untuk mendapat ruang memasak yang lebih
besar atau untuk memasak bahan makanan
yang lebih besar.
- Selalu letak grid N°1 pada pengumpul jus
- Kemudian letak bakul N°1
- Selepas itu letak grid N°2.
- Kemudian bakul N°2
• Letak penutup (penutup muat semua bakul).
Untuk memasak bahan makanan besar:
- Alih grid N°2
- Letak bakul N°2 langsung di atas bakul N°1
- Letak makanan di dalam – Rajah. 5.
- Letakkan penutupnya.
Mengukus
Pilih masa memasak
• Pasang palam kepada peralatan.
• Tetapkan penentu masa untuk tempoh yang
disarankan - Rajah. 6 ((lihat jadual masa
memasak)
• Lampu hidup jingga akan menyala.
• Pengukusan sudah bermula.
Untuk masa memasak kurang daripada 15
minit, putar penentu masa kepada 30 minit
dan kemudian pusingkannya ke belakang
mengikut masa yang diperlukan.
(bergantung pada model)
Peralatan mesti
dipasang palamnya
untuk menentukan
masa.
32
Untuk Memasak nasi
• Letakkan air dan beras ke dalam mangkuk nasi
• Letakkan mangkuk nasi dalam bakul wap -
Rajah. 7.
• Tetapkan penentu masa kepada masa yng
disarankan (lihat jadual masa memasak).
Page 37

Untuk Memasak telur
• Letakkan telur dalam pemegang telur yang
dibina dalam – Rajah. 8.
• Tetapkan penentu masa kepada masa yang
disarankan (lihat jadual masa memasak).
• Periksa paras air dengan melihat tanda paras
air yang nampak.
Jika tiada lagi air,
peralatan tidak
akan mengeluarkan
sebarang wap dan
tidak lagi akan
terus memasak
makanan.
• Jika perlu, tambah air melalui laci mengisi air
– Rajah. 9.
Semasa memasak, pastikan anda tidak
membuka penutup – Rajah. 10. Pastikan
juga jangan halang saluran keluar wap pada
penutup - Rajah. 11
Jangan biarkan penutup menegak untuk
mengelakkan pengewapan - Rajah. 12.
Di akhir masa memasak
• Peralatan akan padam secara automatik
• Penentu masa akan berbunyi dan lampu
penunjuk akan padam sendiri.
• Untuk menghentikan peralatan sebelum
masa memasak yang ditentukan, putar
penentu masa kepada posisi “Off”
• Anda boleh memanas semula makanan.
Semasa memasak
MS
Memanas semula
Mengeluarkan makanan dari bakul kukus
• Alihkan penutup dengan alat pemegang -
Rajah. 13.
• Alihkan bakul kukus N°2, grid N°2 dan bakul
kukus N°1- Rajah. 14.
• Alihkan makanan menggunakan sarung
tangan ketuhar - Rajah. 15.
Gunakan sarung tangan ketuhar untuk
mengendali bakul, pemegang, tapak dan
penutup - Rajah. 15
Penggunaan
aksesori besi untuk
mengeluarkan
makanan tidak
disyorkan.
33
Page 38

Pastikan pemegang
jus telah sejuk
secukupnya
sebelum
membukanya.
• Cabut palam peralatan.
• Biarkan ia sejuk seluruhnya sebelum
membasuhnya
Jadual masa memasak
Jadual masa memasak diberikan sebagai garis
panduan untuk menggunakan bakul di sebelah
bawah. Masa ini boleh berubah mengikut saiz
makanan, ruang di antara makanan, jumlah
makanan; menggunakan tingkat bakul berbeza
dan pilihan individu. Sesuaikan masa memasak
menurut jumlah makanan yang digunakan.
Masa memasak mestilah juga dinaikkan bila
menggunakan lebih daripada satu bakul untuk
mengukus makanan.
Selepas penggunaan
Untuk makanan yang memerlukan masa masak
berbeza; letak makanan yang memerlukan
masa yang paling lama dalam bakul bawah.
Semasa memasak, tambah bakul kedua yang
mempunyai makanan yang perlu kurang masa
memasak.
34
Gunakan sarung
tangan ketuhar
untuk mengendali
bakul dan penutup
semasa memasak.
Page 39

Masa memasak menggunakan bakul N°1
Sayur-sayuran
Makanan Jenis Jumlah
Articok segar 1 45-55
Asparagus segar 550gr 30-35
Brokoli
Lobak (dihirs halus 3mm) segar 300gr 20-25
Cendawan segar 500gr 20-25
Kobis (sebesar 80g ) segar 600gr 25-30
Bunga kobis segar 1 saiz purata 30-35
Bayam
Kekacang Flageolet segar 400gr 15-21
Kekacang Runner
Daun kucai segar 500gr 35-40
Lada benggala segar 250gr 20-25
Semangkuk beras
kacang pis
Bawang putih kecil segar 250gr 15-20
Kentang segar 600gr 40-45
Zukini segar 600gr 30-35
Jagung manis Segar - seluruhnya 500gr 35-40
Terung segar 600gr 20-25
segar 500gr 30-35
beku 400gr 25-31
segar 300gr 15-20
beku 300gr 15-20
segar 450gr 35-40
beku 400gr 30-35
segar 300gr 50-55
beku 300gr 50-55
Masa memasak
(min)
Buah-buahan
Makanan Jenis Jumlah
Pear segar 4 30-35
Pisang segar 4 15-20
Pic segar 4 15-20
Epal segar 4 15-20
Masa memasak
(min)
MS
35
Page 40

Ikan – Kerang-kerangan
Makanan Jenis Jumlah
Filet ikan
Seluruh ikan segar 600gr 30-35
Kupang segar 1kg 20-25
Stik ikan segar 300gr 15-20
Udang segar 200gr 20-25
Kekapis segar 100gr 20-25
Salmon segar 550gr 15-20
segar 350gr 10-15
Beku 400gr 15-20
Masa memasak
(min)
Daging – Ayam itik
Makanan Jenis Jumlah
Paha ayam segar - seekor 4 35-40
Eskalop ayam segar 450gr 20-25
Eskalop ayam belanda - 400gr 20-25
Filet babi - 600gr 35-40
sosej - 6 20-25
Daging burger lembu
beku 8 20-25
segar 8 15-20
Masa memasak
(min)
Telur
Makanan Jenis Jumlah
Telur rebus - 6 20-25
Masa memasak
(min)
Beras – Pasta - Bijian
Makanan Jenis Jumlah
Beras panjang putih 125g 200ml 30-35
Gandum Bulgar 125g 200ml 15-20
Bijian 125g 300ml 40-45
Masa memasak
(min)
36
Page 41

Membersih dan menyenggara
Membersih peralatan anda
• Cabut palam peralatan setelah digunakan
• Biarkan ia sejuk seluruhnya sebelum membersihkannya
• Pastikan peralatan sudah cukup sejuk sebelum
mengosongkan pemegang jus anda dan tangki air.
• Cuci semua bahagian dalam air suam dan sabun
pencuci pinggan mangkuk, bilas dan keringkan.
• Semua bahagian, kecuali tapak elektrik, boleh
dimasukkan ke dalam mesin pencuci pinggan
mangkuk.
Untuk mengelakkan tanda kotoran dari timbul,
selalu bersihkan bahagian ini sejurus selepas
menggunakannya.
Jangan rendam tapak elektrik dalam air.
Jangan gunakan produk menyental yang kasar.
Membersihkan pengumpulan
karat dari peralatan anda
Untuk operasi optima peralatan anda, bersihkan
pengumpulan karat selepas setiap 8 kali digunakan.
Untuk lakukan ini:
• Alihkan pemegang jus.
• Tuang 1 liter air ke dalam tangki air.
• Campur 2 gelas (kira-kira 300ml) cuka putih.
• Biarkan semalaman.
• Bilas bahagian dalam tanki air beberapa kali
dengan air suam.
MS
Menyimpan bakul dan grid mudah alih
(bergantung pada model)
• Selepas membersihkan semua bahagian, simpan
peralatan anda seperti berikut:
• Letakkan Pengumpul jus dalam tangki air.
Mangkuk beras boleh diterbalikkan pada
Pengumpul jus - Rajah. 16.
• Tingkatkan bakul kukus N°1 dalam bakul kukus
N°2 - Rajah. 17. (bergantung pada model).
37
Page 42

• Terbalikkan dua bakul ini pada tapak peralatan –
(bergantung pada model). - Rajah. 18
• Tingkatkan grid N°1, grid N°2. Letakkan grid pada
tapak peralatan - - Rajah. 19 (bergantung pada
model).
• Letakkan penutupnya di atas - Rajah. 20.
Panduan penyelesaian masalah teknikal
• Jangan buka peralatan, jika peralatan anda tidak berfungsi, hantar kepada
pusat perkhidmatan kami yang diluluskan untuk dibaiki.
Kerosakan Sebab Huraian
Lampu penunjuk
jingga tidak hidup
Lampu penunjuk
jingga hidup tapi
peralatan tidak
panas.
Penentu masa
tersekat
Air mengalir dari
tapak.
Makanan mengambil
masa lebih dari biasa
untuk di masak.
Wap keluar daripada
bahagian tepi
peralatan.
Penentu masa belum
ditetapkan.
Proses memasak telah
berakhir,
Bahagian rosak.
Kerosakan pada elemen
memanas.
Masa memasak ditetapkan
pada paras yang rendah.
Kebocoran dari elemen
memanas.
Elemen memanas
menpunyai pengumpulan
kerak.
Bakul/grid tidak dipasang
dengan betul.
Laci diisi air yang berada di
bawah pemegang jus
terbuka.
Pasangkan palam peralatan
dan putar penentu masa.
Di akhir masa memasak, lampu
padam secara automatik.
Hubungi perkhidmatan
selepas jualan kami
Hubungi perkhidmatan
selepas jualan kami.
Untuk masa memasak kurang
daripada 15 min, putar
butang sekurang-kurangnya
30 minit kemudian kembali
kepada masa memasak yang
diperlukan.
Hubungi perkhidmatan
selepas jualan kami.
Bersihkan pengumpulan
kerak dari elemen memanas.
Pastikan bakul/grid dipasang
dengan betul dan dalam
susunan yang betul.
Periksa kedudukannya.
38
Page 43

JAMINAN ANTARABANGSA TERHAD TEFAL / T-FAL
: www.tefal.com
Produk ini boleh diperbaiki oleh Tefal / T-Fal, semasa dan selepas tamat jaminan.
Jaminan
Produk ini adalah di bawah jaminan Tefal / T-Fal (alamat syarikat disertakan di dalam senarai negara yang terdapat pada Jaminan Antarabangsa Tefal / T-Fal) daripada sebarang
kerosakan semasa pengeluaran yang dikesan pada bahan-bahan atau kemahiran kerja
semasa tempoh jaminan di negara-negara yang disenaraikan pada helaian terakhir manual pengguna, bermula daripada tarikh pembelian.
Jaminan antarabangsa pengilang yang dikeluarkan oleh Tefal / T-Fal adalah faedah tambahan yang tidak menjejaskan hak pengguna berdasarkan undang-undang.
Jaminan antarabangsa pengilang merangkumi semua kos yang berkaitan dengan pembaikian kerosakan produk agar ia kembali ke spesikasi asal, seperti pembaikian atau
penggantian bahagian-bahagian yang rosak dan usaha kerja yang berkaitan. Tefal / T-Fal
berhak menukar produk yang rosak dengan produk baru tanpa membaiki produk yang
rosak tersebut. Tanggungjawab Tefal / T-Fal dan resolusi eksklusif anda di bawah jaminan
ini adalah terhad kepada pembaikan sebegini atau penggantian sahaja.
Syarat-syarat dan Pengecualian
Jaminan antarabangsa Tefal / T-Fal hanya sah semasa tempoh jaminan dan di negara-negara yang tersenarai di dalam Senarai Negara yang disertakan dan hanya sah dengan
bukti pembelian. Produk boleh dibawa terus ke pusat servis yang sah atau hendaklah dibungkus dan dikembalikan dengan servis penghantaran yang telah direkodkan (atau kaedah pos yang sepertinya) ke pusat servis Tefal / T-Fal yang sah. Alamat penuh pusat servis
bagi setiap negara boleh diperolehi daripada laman web Tefal / T-Fal ( www.tefal.com
atau dengan menghubungi nombor telefon berkenaan yang boleh diperolehi daripada
Senarai Negara untuk mendapatkan alamat pos.
Tefal / T-Fal tidak bertanggungjawab untuk membaiki atau mengganti mana-mana produk yang tidak disertakan dengan bukti pembelian.
Jaminan ini tidak merangkumi sebarang kerosakan yang timbul akibat penyalahgunaan,
kecuaian, penggunaan yang tidak mengikut arahan, penggunaan pada voltan yang berlainan daripada yang dinyatakan pada produk atau pengubahsuaian atau pembaikan
oleh agen yang tidak sah. Ia juga tidak merangkumi kekoyakan dan kelusuhan normal,
penyeleggaraan dan penggantian bahagian-bahagian yang boleh lusuh dan perkara-perkara berikut:
• Penggunaan jenis air yang salah
• Proses membuang keladak (sebarang proses membuang keladak perlu dilakukan
mengikut arahan penggunaan)
• Memasukkan air, debu atau serangga ke dalam produk
• Kerosakan mekanikal atau lebih muatan
MS
)
39
Page 44

• Kerosakan akibat frekuensi atau voltan yang salah
• Kemalangan termasuk kebakaran, banjir, kilat dan lain-lain
• Penggunaan profesional atau komersial
• Kerosakan akibat kaca dan porselin dimasukkan ke dalam produk
Jaminan ini tidak merangkumi mana-mana produk yang telah melalui proses meningkatkan kekerasan atau kerosakan akibat penggunaan yang tidak betul, pembungkusan
yang tidak betul oleh pemilik dan pengendalian yang salah oleh pembawa.
Jaminan antarabangsa Tefal / T-Fal hanya sah untuk produk yang dibeli di salah sebuah negara yang disenaraik an dan
yang disenaraikan. Sekiranya produk dibeli di negara yang disenaraikan dan kemudian
digunakan di negara lain yang disenaraikan:
a) Tempoh jaminan antarabangsa Tefal / T-Fal adalah di negara di mana produk
digunakan walaupun produk dibeli di negara lain yang disenaraikan dengan
tempoh jaminan yang berbeza.
b) Jaminan antarabangsa Tefal / T-Fal tidak sah sekiranya produk tidak berse-
suaian dengan standard tempatan seperti voltan, frekuensi, plag kuasa atau
spesikasi teknikal tempatan yang lain.
c) Proses pembaikan produk yang dibeli di luar negara mungkin mengambil
masa yang lebih lama sekiranya produk tersebut tidak dijual oleh Tefal / TFal di pasaran tempatan.
d) Sekiranya terdapat kes-kes di mana produk tidak dapat dibaiki di negara
baru, jaminan antarabangsa Tefal / T-Fal adalah terhad kepada penggantian
dengan produk yang sama atau produk alternatif dengan kos yang sama,
yang mana mungkin
Hak Pengguna berdasarkan Undang-undang
Jaminan antarabangsa Tefal / T-Fal tidak mengganggu hak pengguna berdasarkan undang-undang atau hak yang tidak boleh disertakan atau terhad, atau hak terhadap peruncit di mana pengguna membeli produk tersebut. Jaminan ini memberikan pengguna
hak undang-undang spesik dan pengguna juga mungkin mempunyai hak undang-undang lain yang mungkin berlainan dari negeri ke negeri dan negara ke negara. Pengguna
boleh menegaskan hak-hak sebegini atas kebijaksanaan mereka sendiri.
Maklumat tambahan
Aksesori, bahagian-bahagian yang boleh lusuh dan bahagian-bahagian yang boleh dibeli sekiranya ia sedia ada di pasaran tempatan, seperti yang dihuraikan di laman web
Tefal / T-Fal.
digunakan untuk penggunaan domestik sahaja di negara
.
*Tefal / T-Fal adalah tanda perdagangan Groupe SEB yang sah.
40
Page 45

Description
1. Couvercle
2. Bol vapeur n° 2
3. Grille amovible n° 2
4. Bol vapeur n° 1
5. Grille amovible n° 1 et support
à œufs intégré
6. Récupérateur à jus
7. Trappe de remplissage d’eau
8. Elément chauffant
(selon modèle)
(selon modèle)
9. Réservoir à eau
10.Base
11.Indicateur niveau d'eau
12.Niveau de remplissage maxi intérieur
13.Minuterie
14.Voyant orange de fonctionnement
15.Cordon fixe
16.Bol à riz
Préparation
Avant utilisation
• Passez une éponge non abrasive humidifiée
pour nettoyer le réservoir à eau - Fig. 1.
• Lavez toutes les pièces amovibles à l’eau tiède
avec du liquide vaisselle, rincez et séchez.
Mettez en place le cuiseur vapeur
• Placez la base du produit sur une surface stable.
Remplissez le réservoir à eau
• Pour remplir le réservoir à eau, deux
possibilités :
A. Versez de l’eau directement dans le
réservoir à eau jusqu’au niveau maximum
- Fig. 3-A.
B. Ouvrez la trappe de remplissage de
l’appareil et versez-y de l’eau jusqu’au
niveau maximum - Fig. 3-B.
• Placez le récupérateur à jus dans le réservoir
en vous assurant qu’il soit bien positionné.
• Renouvelez l’eau avant chaque utilisation.
FR
N’immergez pas la
base électrique
- Fig. 2.
Eloignez les objets
susceptibles d’être
endommagés par la
vapeur.
N’utilisez pas d’assaisonnement ou de
liquide autre que de
l’eau dans le
réservoir.
Assurez-vous de la
présence d’eau dans
le réservoir avant la
mise en marche.
41
Page 46

Placez les grilles amovibles et les bols
• Les bols sont équipés de grilles amovibles qui
permettent d’agrandir l’enceinte de cuisson
et de cuire des aliments volumineux.
- Placez toujours la grille n° 1 sur le récupérateur
Vous pouvez utiliser
le produit avec 1 ou
2 bols selon vos
besoins.
Respectez l’ordre de
placement des bols.
Pour un résultat
optimal, ne surchargez pas les bols
d’aliments.
à jus
- Placer ensuite le bol n° 1
- Placez ensuite la grille n° 2
- Puis le bol n° 2
• Posez le couvercle qui s’adapte sur tous les bols.
Pour cuire des aliments volumineux :
- Enlevez la grille n° 2
- Placez directement le bol n° 2 sur le bol n° 1
- Mettez les aliments dedans
- Puis posez le couvercle.
Cuisson vapeur
Sélectionnez le temps de cuisson
• Branchez l’appareil.
• Réglez la minuterie selon les temps
recommandés - Fig. 6 (voir tableau de temps
de cuisson).
• Le voyant orange de fonctionnement s’allume.
• La cuisson vapeur commence.
Pour les temps de cuisson inférieurs à 15mn,
tourner la minuterie au moins jusqu‘à 30mn
et revenir en arrière sur le temps désiré.
(selon modèle)
- Fig. 5.
L’appareil doit être
branché avant
d’actionner la
minuterie.
42
Cuisson du riz :
• Mettez le riz et l’eau dans le bol à riz.
• Placez le bol à riz dans le bol vapeur
• Réglez la minuterie selon les temps recommandés
(voir tableau de temps de cuisson).
- Fig. 7.
Page 47

Cuisson des œufs :
• Placez les œufs dans les supports à œufs
intégrés prévus à cet effet - Fig. 8.
• Réglez la minuterie selon les temps recommandés
(voir tableau de temps de cuisson).
• Vérifiez le niveau d’eau grâce à l’indicateur de
niveau d’eau extérieur.
• Si nécessaire, remettez de l’eau par la trappe
de remplissage - Fig.9.
S’il n’y a plus d’eau,
l’appareil ne
produit plus de
vapeur et ne cuit
plus vos aliments.
Pendant la cuisson veillez à ne pas ouvrir le
couvercle
pas obstruer l’encoche vapeur qui se trouve
sur ce couvercle - Fig. 11.
Ne mettez pas le couvercle debout pour éviter
la déformation - Fig. 12.
- Fig. 10. Veillez également à ne
Fin de cuisson
• L’appareil s’arrête automatiquement.
• La minuterie bip et le voyant s’éteint.
• Pour arrêter volontairement l’appareil, tournez
la minuterie jusqu’à la position éteint.
• Vous pouvez réchauffer les aliments.
FR
Pendant la cuisson
FR
Réchauffage
Retirez les aliments des bols vapeur
• Retirez le couvercle par sa poignée - Fig. 13.
• Retirez le bol vapeur n°2, la grille n°2 et le bol
vapeur n°1 - Fig. 14.
• Retirez les aliments en mettant les gants de
protection - Fig. 15.
Utilisez des gants de protection pour
manipuler les bols, la poignée, les grilles et le
couvercle
- Fig. 15.
Il est déconseillé
d’utiliser des accessoires métalliques
pour retirer les
aliments.
43
Page 48

Après utilisation
Vérifiez que le récupérateur à jus a
suffisamment
refroidi avant de le
retirer.
• Débranchez l’appareil.
• Laissez-le refroidir complètement avant le
nettoyage.
Tableau de temps de cuisson
Les temps sont donnés à titre indicatif sur la
base d’une cuisson dans le premier bol
vapeur.Ils peuvent varier en fonction de la taille
des aliments, de l’espace laissé entre les
aliments, des quantités; de l’utilisation d’un
autre niveau de cuisson et du goût de chacun.
Ajustez le temps de cuisson en fonction de la
quantité des aliments utilisés. Vous devrez aussi
augmenter le temps de cuisson si vous utilisez
plus d’un bol vapeur pour faire cuire vos
aliments.
Pour les aliments avec un temps de cuisson
différent : placez ceux qui mettent le plus de
temps à cuire dans le bol inférieur. En cours de
cuisson, ajoutez le second bol avec les aliments
à cuisson plus rapide.
44
Utilisez des gants
de protection pour
manipuler les bols
et le couvercle en
cours de cuisson.
Page 49

Temps de cuisson avec utilisation du bol 1
Légumes
Préparation Type Quantité Temps de cuisson (mn)
Artichaut frais 1 45-55
Asperges fraîches 550 gr 30-35
Brocolis
Carottes (emincées 3mm) frais 300 gr 20-25
Champignons frais 500 gr 20-25
Choux (quartiers 80g) frais 600 gr 25-30
Choux fleur frais 1 moyen 30-35
Epinard
Flageolet frais 400 gr 15-21
Haricots verts
Poireaux frais 500 gr 35-40
Poivrons frais 250 gr 20-25
Petits pois dans bol à riz
Petits oignons blancs frais 250 gr 15-20
Pomme de terre fraîches 600 gr 40-45
Courgettes fraîches 600 gr 30-35
Maïs frais entier 500 gr 35-40
Aubergine fraîches 600 gr 20-25
frais 500 gr 30-35
surgelés 400 gr 25-31
frais 300 gr 15-20
surgelés 300 gr 15-20
frais 450 gr 35-40
surgelés 400 gr 30-35
frais 300 gr 50-55
surgelés 300 gr 50-55
Fruits
Préparation Type Quantité Temps de cuisson (mn)
Poires fraîches 4 30-35
Bananes fraîches 4 15-20
Pêches fraîches 4 15-20
Pommes fraîches 4 15-20
FR
FR
45
Page 50

Poissons - crustacés
Préparation Type Quantité Temps de cuisson (mn)
Filet de poisson
Poisson entier frais 600 gr 30-35
Moules fraîches 1 kg 20-25
Steack de lieu frais 300 gr 15-20
Crevettes frais 200 gr 20-25
Coquilles Saint-Jacques fraîches 100 gr 20-25
Saumon frais 550 gr 15-20
frais 350 gr 10-15
surgelé 400 gr 15-20
Viandes - volailles
Préparation Type Quantité Temps de cuisson (mn)
Cuisses de poulet frais entier 4 35-40
Escalope de poulet fraîche 450 gr 20-25
Escalope de dinde - 400 gr 20-25
Filets de porc - 600 gr 35-40
Saucisses - 6 20-25
Boulettes de bœuf
surgelées 8 20-25
fraîches 8 15-20
Œufs
Préparation Type Quantité Temps de cuisson (mn)
Œufs durs - 6 20-25
Riz - pâtes - céréales
Préparation Type Quantité Temps de cuisson (mn)
Riz blanc long grain 125 g 200 ml 30-35
Semoule 125 g 200 ml 15-20
Céréales 125 g 300 ml 40-45
46
Page 51

Entretien et nettoyage
Nettoyez l’appareil
• Après chaque utilisation, débranchez l’appareil.
• Laissez refroidir complètement avant le
nettoyage.
• Vérifiez que l’appareil a suffisamment refroidi
avant de vider le récupérateur à jus et le
réservoir à eau.
• Lavez toutes les pièces amovibles à l’eau tiède
avec du liquide vaisselle, rincez et séchez.
• Vous pouvez mettre au lave vaisselle tous les
éléments sauf la base électrique.
Afin d’éviter l’apparition de ces tâches,
nettoyez ces pièces fréquemment et
immédiatement après utilisation.
N’immergez pas la base électrique.
N’utilisez pas de produits d’entretien abrasifs.
Détartrez votre appareil
Pour un fonctionnement optimal de votre
appareil, détartrez-le toutes les 8 utilisations.
Pour cela :
• Retirez le récupérateur à jus.
• Versez 1 L d’eau dans le réservoir à eau.
• Rajoutez 2 verres (environ 300 ml) de vinaigre
blanc.
• Laissez agir à froid pendant une nuit.
• Rincez l’intérieur du réservoir à eau plusieurs
fois avec de l’eau tiède.
FR
FR
Rangement des bols et grilles amovibles
(selon modèle)
• Après avoir nettoyé toutes les pièces, rangez
votre appareil de la façon suivante :
• Mettez le récupérateur à jus sur le réservoir à
eau. Le bol de riz peut être remis sur le
récupérateur à jus
• Empilez le bol vapeur n° 1 dans le bol vapeur
n° 2 - Fig. 17 (selon modèle).
- Fig. 16.
47
Page 52

• Retournez les deux bols sur la base - Fig. 18
(selon modèle).
• Empilez la grille n° 1, la grille n° 2. Posez les
grilles sur la base - Fig. 19 (selon modèle).
• Posez le couvercle au-dessus - Fig. 20.
Tableau de localisation des pannes
• Ne pas démonter l'appareil, si votre appareil ne fonctionne plus, l’amener à
l'un de nos centres de services agréés pour la réparation.
Panne Raison Solution
Le voyant orange de
fonctionnement ne
s’allume pas.
Le voyant orange de
fonctionnement
allume, mais l’appareil
ne chauffe pas.
La minuterie se
bloque.
De l’eau coule du
socle.
Les aliments cuisent
moins rapidement
qu’avant.
De la vapeur
s’échappe sur les
cotés du produit.
La minuterie n’est pas mise
en route.
La cuisson est terminée.
Les pièces sont endommagées.
Défaut de l’élément
chauffant.
Le temps de cuisson ajusté sur
une faible valeur.
Fuite au niveau de l’élément
chauffant.
Element chauffant entartré.
Bol/grilles mal enclenchés
entre eux.
Trappe de remplissage située
sur le récupérateur à jus est en
position ouverte.
Brancher l’appareil
et tourner la minuterie.
A la fin de cuisson,
le voyant s’éteint
automatiquement.
Contactez notre service
après ventes.
Contactez notre service
après ventes.
Pour les temps de cuisson
inférieurs à 15mn, tourner
la minuterie au moins
jusqu‘à 30mn et revenir en
arrière sur le temps désiré.
Contactez notre service
après ventes.
Procédez au détartrage de
l’élément chauffant.
Check that the
baskets/grids are fitted
together properly and in
the right order.
Vérifier sa position.
48
Page 53

TEFAL / T-FAL* GARANTIE INTERNATIONALE
: www.tefal.com
Ce produit est réparable par TEFAL / T-FAL, pendant et après la période de garantie..
La Garantie
Ce produit est garanti par TEFAL / T-FAL (adresse et contacts dans la liste des pays de la
Garantie Internationale TEFAL/T-FAL) contre tout défaut de fabrication ou de matière,
pendant la période de garantie à partir de la date d'achat et dans les pays précisés, tel
que définis dans la liste en dernière page du mode d'emploi.
Cette Garantie Internationale du fabricant TEFAL/T-FAL vient en complément des droits
des consommateurs.
La Garantie Internationale du fabricant couvre tous les coûts de remise en état d'un
produit reconnu défectueux pour redevenir conforme à ses spécifications d'origine, par la
réparation, la main d'œuvre, et le remplacement éventuel de pièces défectueuses. Au
choix de TEFAL/T-FAL, un produit de remplacement peut être proposé à la place de la
réparation du produit défectueux. Les obligations de TEFAL/T-FAL dans le cadre de cette
garantie se limitent exclusivement à cette réparation ou ce remplacement.
Conditions & Exclusions
La Garantie Internationale de TEFAL/T-FAL ne s'applique que pendant la période définie
pour les pays cités dans la Liste des Pays jointe, et n'est valable que sur présentation d'un
justificatif d'achat. Le produit peut être déposé directement chez un réparateur agréé, ou
peut y être envoyé en recommandé après avoir été emballé de manière adéquate. La
liste complète des réparateurs agréés dans chaque pays, avec leurs coordonnées
complètes, est disponible sur le site de TEFAL/T-FAL (www.tefal.com
numéro du Service Consommateur précisé dans la Liste des Pays.
TEFAL/T-FAL n'a aucune obligation de réparer ou d'échanger un produit qui ne serait pas
accompagné d'un justificatif d'achat
Cette garantie ne couvre pas les dommages qui seraient le résultat d'une mauvaise
utilisation, d'une négligence, du non respect des instructions d'utilisation et de
maintenance, de l'utilisation avec une alimentation électrique non conforme à celle
spécifiée sur la plaque signalétique, ou d'une modification ou d'une réparation non
autorisée du produit. Elle n'inclut également pas l'usure normale du produit, ni la
maintenance ou le remplacement de pièces consommables, ni les cas suivant :
-utilisation d'une eau non adaptée
- entartrage (tout détartrage doit être réalisé conformément aux
instructions dans le mode d'emploi)
- entrée d'eau, de poussière, d'insectes … dans le produit
- dommages dus à un choc, ou une surcharge
- tous accidents liés à un feu, une innondation, la foudre …
- usage professionnel ou sur un lieu de travail
- verre ou céramique endommagé
), ou en appelant le
FR
49
Page 54

Cette garantie ne s'applique pas aux produits choqués, ou aux dommages résultant d'une
utilisation impropre ou sans entretien, aux problèmes d'emballage ou de transport
pendant l''expédition du produit par son propriétaire.
La Garantie Internationale de TEFAL/T-FAL couvre exclusivement les produits achetés
dans un des pays listés, et utilisé à des fins domestiques également dans un des pays
listés dans Liste des Pays. En cas d'utilisation dans un pays différent du pays d'achat :
a) La durée de la Garantie Internationale de TEFAL/T-FAL est celle du pays
d'utilisation du produit, y compris dans le cas où le produit aurait été acquis
dans un pays listé avec une durée de garantie différente.
b) La Garantie Internationalde de TEFAL/T-FAL ne s'applique qu'en cas
d'adéquation du produit avec les standards et normes locales, tels que le
voltage, la fréquence électrique, le type de prise électrique, ou toute autre
spécification locale.
c) Le traitement de la Garantie Internationale peut prendre un temps supérieur
aux conditions locales de réparation si la référence du produit n'est pas ellemême commercialisée par TEFAL/T-FAL dans le pays d'emploi
d) Au cas où le produit ne serait pas réparable dans le pays d'emploi, la
Garantie Internationale de TEFAL/T-FAL est limitée au remplacement par un
produit équivalent ou un produit alternatif de même valeur si c'est possible
Droits des Consommateurs
Cette Garantie Internationale de TEFAL/T-FAL n'affecte ni les droits légaux dont bénéficie
tout consommateur localement, qui ne sauraient être exclus ou limités, ni les droits légaux
envers un distributeur auprès de qui aurait été acheté un produit. Cette Garantie donne
au consommateur des droits spécifiques, et le consommateur peut par ailleurs bénéficier
des droits particuliers en fonction du Pays, de l'Etat ou de la Province. Le consommateur
peut faire usage de ces droits de son seul fait.
Informations complémentaires
Les accessoires, consommables, et autres pièces remplaçables directement par
l'utilisateur, peuvent être achetées, si elles sont disponibles localement, tel que décrit sur
le site internet www.tefal.com.
.
* La marque de produits TEFAL apparait dans certains pays comme le Japon ou les USA sout la forme T-FAL.
TEFAL/T-FAL sont des marques déposées du Groupe SEB
50
Page 55

Περιγραφή
1. Καπάκι
2. Καλάθι ατμού αρ. 2
3. Αφαιρούμενο πλέγμα αρ. 2
(ανάλογα με το μοντέλο)
4. Καλάθι ατμού αρ. 1
5. Αφαιρούμενο πλέγμα αρ. 1 και
ενσωματωμένη βάση για αυγά
(ανάλογα με το μοντέλο)
6. Λιποσυλλέκτης
7. Συρτάρι γεμίσματος νερού
Προετοιμασία
8. Στοιχείο θέρμανσης
9. Δοχείο νερού
10. Βάση
11. Ορατή στάθμη νερού
12. Μέγιστη στάθμη νερού
13. Χρονοδιακόπτης
14. Πορτοκαλί φωτεινή ένδειξη On
15. Βύσμα
16. μπολ ρυζιού
Πριν από τη χρήση
• Σκουπίστε με ένα νωπό και μαλακό σφουγγάρι
για να καθαρίσετε το δοχείο νερού -Εικ. 1
• Πλύνετε όλα τα αφαιρούμενα μέρη
χρησιμοποιώντας ζεστό νερό και υγρό πιάτων,
ξεβγάλετε και στεγνώστε.
Προετοιμασία του ατμομάγειρα
• Τοποθετήστε την κεντρική μονάδα επάνω σε
μία σταθερή επιφάνεια.
Γέμισμα του δοχείου νερού
• Το δοχείο νερού γεμίζει με δύο τρόπους:
A.Χύστε το νερό απευθείας μέσα στο δοχείο
νερού ως τη μέγιστη στάθμη
B. Ανοίξτε το συρτάρι γεμίσματος νερού και
χύστε το νερό ως τη μέγιστη στάθμη
3-Β
.
• Τοποθετήστε το λιποσυλλέκτη στο δοχείο και
βεβαιωθείτε ότι είναι καλά στη θέση του.
• Χρησιμοποιείτε καινούργιο νερό με κάθε
χρήση.
- Εικ. 3-A
.
- Εικ.
Μην βυθίζετε σε
νερό την ηλεκτρική
κεντρική μονάδα -
Εικ. 2.
Απομακρύνετε τα
αντικείμενα που
ενδέχεται να
υποστούν βλάβη από
τον ατμό.
Μην βάζετε
καρυκεύματα ή άλλα
υγρά, εκτός από νερό,
μέσα στο δοχείο.
Βεβαιωθείτε ότι
υπάρχει νερό μέσα
στο δοχείο πριν να
ενεργοποιήσετε τη
συσκευή.
EL
51
Page 56

Τοποθέτηση των αφαιρούμενων πλεγμάτων και των
καλαθιών (ανάλογα με το μοντέλο)
Μπορείτε να
χρησιμοποιήσετε
τη συσκευή με 1 ή 2
καλάθια, ανάλογα
με τις ανάγκες σας.
Τοποθετήστε τα
καλάθια με τη
σωστή σειρά.
Για καλύτερα
αποτελέσματα, μην
τοποθετείτε πάρα
πολλά τρόφιμα
μέσα στα καλάθια.
• Τα καλάθια έχουν καλάθια, τα οποία μπορούν να
αφαιρεθούν για να προκύψει μεγαλύτερος χώρος
για μαγείρεμα ή για να μαγειρέψετε μεγάλα
τεμάχια τροφίμων.
- Τοποθετείτε το πλέγμα αρ. 1 πάντοτε επάνω στο
λιποσυλλέκτη
- Κατόπιν τοποθετήστε το καλάθι αρ. 1
- Στη συνέχεια το πλέγμα αρ. 2.
- Μετά το καλάθι αρ. 2
• Βάλτε το καπάκι (το καπάκι ταιριάζει με όλα τα
καλάθια).
Για να μαγειρέψετε μεγάλα τεμάχια τροφίμων:
- Αφαιρέστε το πλέγμα αρ. 2
- Τοποθετήστε το καλάθι αρ. 2 απευθείας επάνω στο
καλάθι αρ. 1
- Βάλτε μέσα τα τρόφιμα
- Βάλτε το καπάκι.
- Εικ. 5
.
Μαγείρεμα στον ατμό
Επιλέξτε το χρόνο μαγειρέματος
• Βάλτε τη συσκευή στην πρίζα.
• Ρυθμίστε το χρονοδιακόπτη για το
συνιστώμενο χρόνο
χρόνους μαγειρέματος).
• Ανάβει η πορτοκαλί φωτεινή ένδειξη.
• Το μαγείρεμα στον ατμό ξεκίνησε.
Για χρόνους μαγειρέματος μικρότερους από
15 λεπτά, θέστε το χρονοδιακόπτη στα 30
λεπτά, κατόπιν στρέψτε τον προς τα πίσω
στον επιθυμητό χρόνο.
52
- Εικ. 6
(βλ. πίνακες για
Για να ρυθμίσετε το
χρονοδιακόπτη, η
συσκευή πρέπει να
είναι στην πρίζα.
Για να μαγειρέψετε ρύζι:
• Βάλτε το νερό και το ρύζι μέσα στο δοχείο ρυζιού.
• Βάλτε το δοχείο ρυζιού μέσα στο καλάθι ατμού
Εικ. 7
.
• Ρυθμίστε το χρονοδιακόπτη για το συνιστώμενο
χρόνο (βλ. χρόνους μαγειρέματος παρακάτω).
-
Page 57

Για να βράσετε αυγά:
• Βάλτε τα αυγά μέσα στις ενσωματωμένες βάσεις
αυγών
- Εικ. 8
• Ρυθμίστε το χρονοδιακόπτη για το συνιστώμενο
χρόνο (βλ. χρόνους μαγειρέματος παρακάτω).
.
Κατά το μαγείρεμα
• Ελέγχετε τη στάθμη νερού μέσω της ορατής
στάθμης νερού.
Αν δεν έχει
απομείνει νερό, η
συσκευή δεν θα
παράγει ατμό και το
φαγητό θα
σταματήσει να
μαγειρεύεται.
• Αν είναι απαραίτητο, προσθέστε νερό μέσω
του συρταριού πλήρωσης νερού - Εικ.9.
Μην ανοίγετε το καπάκι κατά το μαγείρεμα
- Εικ. 10
. Επίσης, φροντίστε να μην φράζεται
η έξοδος ατμού στο καπάκι
Μην ακουμπάτε όρθιο το καπάκι για να μην
στραβώσει
- Εικ. 12
.
- Εικ. 11
Στο τέλος του μαγειρέματος
• Η συσκευή απενεργοποιείται αυτόματα.
• Ο χρονοδιακόπτης εκπέμπει ηχητικό σήμα και
η φωτεινή ένδειξη σβήνει.
• Για να σταματήσετε τη συσκευή πριν από το
τέλος του ρυθμισμένου χρόνου μαγειρέματος,
στρέψτε το χρονοδιακόπτη στη θέση OFF.
Ζέσταμα
• Μπορείτε να ζεστάνετε φαγητό.
Αφαίρεση του φαγητού από τα καλάθια ατμού
• Βγάλτε το καπάκι πιάνοντάς το από τη λαβή
.
13
• Βγάλτε το καλάθι ατμού αρ. 2, το πλέγμα αρ. 2 και
το καλάθι ατμού αρ. 1
• Αφαιρέστε το φαγητό χρησιμοποιώντας πυρίμαχα
γάντια
- Εικ. 15
Χρησιμοποιείτε πυρίμαχα γάντια για να
πιάσετε τα καλάθια, τη λαβή, τις βάσεις και
το καπάκι
- Εικ. 15
- Εικ. 14
.
.
.
- Εικ.
Δεν συνιστάται η
χρήση μεταλλικών
αντικειμένων για να
πιάσετε τα
τρόφιμα.
.
EL
53
Page 58

Μετά τη χρήση
Ελέγξτε αν ο
λιποσυλλέκτης έχει
κρυώσει αρκετά
πριν να τον
αφαιρέσετε.
• Βγάλτε τη συσκευή από την πρίζα.
• Αφήστε την να κρυώσει εντελώς πριν να την
καθαρίσετε.
Πίνακας χρόνων μαγειρέματος
Οι χρόνοι μαγειρέματος δίνονται ενδεικτικά για
μαγείρεμα στο κάτω καλάθι. Ενδέχεται να
διαφέρουν ανάλογα με το μέγεθος των
τροφίμων, το χώρο μεταξύ τους, την ποσότητά
τους, τη χρήση διαφορετικού επιπέδου
καλαθιού και τις προσωπικές σας προτιμήσεις.
Ρυθμίστε τους χρόνους μαγειρέματος, ανάλογα
με την ποσότητα τροφίμων που χρησιμοποιείτε.
Οι χρόνοι μαγειρέματος πρέπει επίσης να
αυξηθούν αν χρησιμοποιείτε περισσότερα από
ένα καλάθια για να μαγειρέψετε τρόφιμα στον
ατμό.
Για τρόφιμα με διαφορετικούς χρόνους
μαγειρέματος: τοποθετήστε το τρόφιμο που
απαιτεί περισσότερο χρόνο στο κάτω καλάθι.
Κατά τη διάρκεια του μαγειρέματος, προσθέστε
το δεύτερο καλάθι με το τρόφιμο που απαιτεί
λιγότερο χρόνο μαγειρέματος.
54
Χρησιμοποιείτε πυρίμαχα γάντια για
να πιάσετε τα καλάθια και το καπάκι
κατά τη διάρκεια
του μαγειρέματος.
Page 59

Χρόνοι μαγειρέματος με το καλάθι αρ. 1
Λαχανικά
Τρόφ Τύπος Ποσότητα Χρόνος
Αγκινάρες φρέσκες 1 45-55
Σπαράγγια φρέσκα 550gr 30-35
Μπρόκολο
Καρότα (σε λεπτές φέτες 3mm) φρέσκα 300gr 20-25
Μανιτάρια φρέσκα 500gr 20-25
Λάχανο (τέταρτα 80g) φρέσκο 600gr 25-30
Κουνουπίδι φρέσκο 1 μεσαίου μεγέθους 30-35
Σπανάκι
Φασόλια φρέσκα 400gr 15-21
Πράσινα φασολάκια
Πράσα φρέσκα 500gr 35-40
Πιπεριές φρέσκες 250gr 20-25
Αρακάς στο δοχείο
ρυζιού
Μικρά ξανθά κρεμμύδια φρέσκα 250gr 15-20
Πατάτες φρέσκες 600gr 40-45
Κολοκυθάκια φρέσκα 600gr 30-35
Καλαμπόκι φρέσκο - ολόκληρο 500gr 35-40
Μελιτζάνες φρέσκες 600gr 20-25
φρέσκο 500gr 30-35
κατεψυγμένο 400gr 25-31
φρέσκο 300gr 15-20
κατεψυγμένο 300gr 15-20
φρέσκα 450gr 35-40
κατεψυγμένα 400gr 30-35
φρέσκος 300gr 50-55
κατεψυγμένος 300gr 50-55
Φρούτα
Τρόφ Τύπος Ποσότητα Χρόνος
Αχλάδια φρέσκα 4 30-35
Μπανάνες φρέσκα 4 15-20
Ροδάκινα φρέσκα 4 15-20
Μήλα φρέσκα 4 15-20
EL
55
Page 60

Ψάρια - Οστρακοειδή
Τρόφ Τύπος Ποσότητα Χρόνος
Φιλέτο ψαριού
Ολόκληρο ψάρι φρέσκο 600gr 30-35
Μύδια φρέσκα 1kg 20-25
Φέτα μπακαλιάρου φρέσκο 300gr 15-20
Γαρίδες φρέσκες 200gr 20-25
Χτένια φρέσκα 100gr 20-25
Σολωμός φρέσκος 550gr 15-20
φρέσκο 350gr 10-15
κατεψυγμένο 400gr 15-20
Κρεατικά - Πουλερικά
Τρόφ Τύπος Ποσότητα Χρόνος
Μπούτια από κοτόπουλο
Φιλέτο από κοτόπουλο φρέσκο 450gr 20-25
Φιλέτο από γαλοπούλα - 400gr 20-25
Χοιρινό φιλέτο - 600gr 35-40
Λουκάνικα - 6 20-25
Κρεατόπιτες
φρέσκα -
ολόκληρα
κατεψυγμένες 8 20-25
φρέσκες 8 15-20
4 35-40
Αυγά
Τρόφ Τύπος Ποσότητα Χρόνος
Σφιχτά βραστά αυγά - 6 20-25
Ρύζι - Ζυμαρικά - Σπόροι
Τρόφ Τύπος Ποσότητα Χρόνος
Μακρύκοκκο λευκό ρύζι 125g 200ml 30-35
Πλιγούρι 125g 200ml 15-20
Σπόροι 125g 300ml 40-45
56
Page 61

Καθαρισμός και συντήρηση
Καθαρισμός της συσκευής σας
• Βγάλτε τη συσκευή από την πρίζα μετά τη χρήση.
• Αφήστε την να κρυώσει εντελώς πριν να την
καθαρίσετε.
• Ελέγξτε αν η συσκευή έχει κρυώσει εντελώς πριν
να αδειάσετε το λιποσυλλέκτη και το δοχείο νερού.
• Πλύνετε όλα τα αφαιρούμενα μέρη
χρησιμοποιώντας ζεστό νερό και υγρό πιάτων,
ξεβγάλετε και στεγνώστε.
• Όλα τα μέρη, εκτός από την ηλεκτρική κεντρική
μονάδα, πλένονται στο πλυντήριο πιάτων.
Για να μην εμφανιστούν λεκέδες, καθαρίζετε τα
εξαρτήματα συχνά και αμέσως μετά τη χρήση.
Μην βυθίζετε σε νερό την ηλεκτρική κεντρική
μονάδα.
Μην χρησιμοποιείτε διαβρωτικά καθαριστικά.
Αφαλάτωση της συσκευής σας
Για βέλτιστη λειτουργία της συσκευής σας, αφαιρείτε
τα άλατα κάθε 8 χρήσεις. Για να το πετύχετε αυτό:
• Αφαιρέστε το λιποσυλλέκτη.
• Χύστε 1 λίτρο νερό στο δοχείο νερού.
• Προσθέστε 2 ποτήρια (περίπου 300 ml) λευκό ξύδι.
• Αφήστε το μίγμα να δράσει μέσα στη συσκευή όλη
τη νύχτα.
• Ξεβγάλετε το εσωτερικό του δοχείου νερού πολλές
φορές χρησιμοποιώντας ζεστό νερό.
EL
Αποθήκευση καλαθιών και αφαιρούμενων
πλεγμάτων (ανάλογα με το μοντέλο)
• Αφού καθαρίσετε όλα τα εξαρτήματα, αποθηκεύστε τη
συσκευή σας ως εξής:
• Βάλτε το λιποσυλλέκτη μέσα στο δοχείο νερού. Το
δοχείο ρυζιού μπορείτε να το γυρίσετε πάνω στον
λιποσυλλέκτη
• Τοποθετήστε το καλάθι ατμού αρ. 1 μέσα στο καλάθι
ατμού αρ. 2
- Εικ. 16
.
- Εικ. 17
(ανάλογα με το μοντέλο).
57
Page 62

• Γυρίστε τα δύο καλάθια πάνω από την κεντρική
μονάδα
- Εικ. 18
(ανάλογα με το μοντέλο).
• Στοιβάξτε τα πλέγματα αρ. 1 και αρ. 2. Τοποθετήστε τα
επάνω στην κεντρική μονάδα
- Εικ. 19
(ανάλογα με το
μοντέλο).
• Τοποθετήστε από πάνω το καπάκι
- Εικ. 20
.
Οδηγός αντιμετώπισης τεχνικών
προβλημάτων
• Μην αποσυναρμολογείτε τη συσκευή. Αν η συσκευή σας σταματήσει να λειτουργεί,
πάρτε την για επισκευή σε ένα από τα εγκεκριμένα κέντρα σέρβις της εταιρείας μας.
Βλάβη Αιτία Λύση
Δεν ανάβει η
πορτοκαλί φωτεινή
ένδειξη.
Η πορτοκαλί φωτεινή
ένδειξη ανάβει αλλά η
συσκευή δεν
ζεσταίνεται.
Ο χρονοδιακόπτης
κολλάει.
Βγαίνει νερό από τη
βάση.
Τα τρόφιμα απαιτούν
περισσότερο χρόνο
μαγειρέματος απ' ό,τι
συνήθως.
Διαφεύγει ατμός από
τα πλάγια της
συσκευής.
Δεν έχει ρυθμιστεί ο
χρονοδιακόπτης.
Το μαγείρεμα ολοκληρώθηκε.
Τα εξαρτήματα έχουν υποστεί
βλάβη.
Βλάβη του θερμαινόμενου
στοιχείου.
Ο χρόνος μαγειρέματος
ορίστηκε σε πολύ χαμηλή τιμή.
Διαρροή από το θερμαινόμενο
στοιχείο.
Συσσώρευση αλάτων στο
θερμαινόμενο στοιχείο.
Τα καλάθια/ τα πλέγματα δεν
εφαρμόζουν καλά μεταξύ τους.
Το συρτάρι πλήρωσης νερού
που βρίσκεται κάτω από το
λιποσυλλέκτη είναι ανοιχτό.
Βάλτε τη συσκευή στην πρίζα και
στρέψτε το χρονοδιακόπτη.
Στο τέλος του χρόνου
μαγειρέματος, η φωτεινή ένδειξη
σβήνει αυτομάτως.
Επικοινωνήστε με την υπηρεσία
υποστήριξης της εταιρείας μας.
Επικοινωνήστε με την υπηρεσία
υποστήριξης της εταιρείας μας.
Για χρόνο μαγειρέματος μικρότερο
από 15 λεπτά, στρέψτε το πλήκτρο
τουλάχιστον ως τα 30 λεπτά και
μειώστε το στον απαιτούμενο
χρόνο μαγειρέματος.
Επικοινωνήστε με την υπηρεσία
υποστήριξης της εταιρείας μας.
Αφαιρέστε τα άλατα από το
θερμαινόμενο στοιχείο.
Ελέγξτε αν τα καλάθια/ τα
πλέγματα εφαρμόζουν καλά
μεταξύ τους και αν έχουν
τοποθετηθεί με τη σωστή σειρά.
Ελέγξτε τη θέση του.
58
Page 63

TEFAL/T-FAL* ΔΙΕΘΝΗΣ ΠΕΡΙΟΡΙΣΜΕΝΗ ΕΓΓΥΗΣΗ
: www.tefal.com
Το συγκεκριμένο προϊόν επιδιορθώνεται από την TEFAL / T-FAL, κατά τη διάρκεια και μετά
τη λήξη της περιόδου εγγύησης.
ΕΓΓΥΗΣΗ
Αυτό το προϊόν έχει την εγγύηση της TEFAL / T-FAL (τη διεύθυνση της εταιρείας και περισσότερα στοιχεία θα βρείτε στον πίνακα με χώρες όπου ισχύει η Διεθνής Εγγύηση TEFAL
/ T-FAL) καλύπτοντας κάθε αποδεδειγμένο ελάττωμα κατασκευής ή υλικών, κατά τη διάρκεια της περιόδου εγγύησης για τις χώρες που αναγράφονται στον πίνακα της τελευταίας
σελίδας του οδηγού χρήσης, ορίζοντας σαν έναρξη εγγύησης την ημερομηνία αγοράς.
Η Διεθνής Εγγύηση κατασκευαστή TEFAL / T-FAL είναι ένα επιπλέον προνόμιο το οποίο
δεν επηρεάζει τα θεσπισμένα δικαιώματα του καταναλωτή.
Η Διεθνής Εγγύηση κατασκευαστή καλύπτει όλα τα έξοδα που σχετίζονται με την επιδιόρθωση του αποδεδειγμένα ελαττωματικού προϊόντος, έτσι ώστε να λειτουργεί σύμφωνα με τις προδιαγραφές του, επιδιορθώνοντας ή αντικαθιστώντας όποιο ελαττωματικό
εξάρτημα και συμπεριλαμβάνοντας το κόστος εργασίας. Είναι στην αποκλειστική κρίση
της TEFAL / T-FAL η αντικατάσταση αντί επιδιόρθωσης ελαττωματικού προϊόντος. Η μόνη
υποχρέωση της TEFAL / T-FAL και η αποκλειστική σας αξίωση στην παρούσα εγγύηση περιορίζονται στην συγκεκριμένη επιδιόρθωση ή αντικατάσταση των ελαττωματικών εξαρτημάτων.
ΣΥΝΘΗΚΕΣ ΚΑΙ ΕΞΑΙΡΕΣΕΙΣ
Η διεθνής εγγύηση TEFAL / T-FAL εφαρμόζεται μόνο για την συγκεκριμένη περίοδο ισχύος
και για τις χώρες που αναγράφονται στον επισυναπτόμενο Πίνακα Κρατών και είναι έγγυρη μόνο μετά από επίδειξη της απόδειξης αγοράς. Το προϊόν μπορεί να μεταφερθεί
απ’ευθείας σε οποιοδήποτε εξουσιοδοτημένο τεχνικό κέντρο ή να συσκευαστεί προσεκτικά και να επιστραφεί, με συστημένο δέμα (ή αντίστοιχο τρόπο ταχυδρόμησης), σε ένα
επίσημο τεχνικό κέντρο της TEFAL / T-FAL. Η εταρεία δεν αναλαμβάνει σε καμία περίπτωση τα έξοδα μεταφοράς των συσκευών. Οι διευθύνσεις των επίσημων τεχνικών κέντρων ανά τη χώρα, βρίσκονται στην ιστοσελίδα της TEFAL / T-FAL (www.tefal.com
καλέστε τον κατάλληλο αριθμό τηλεφώνου όπως αναφέρεται στον Πίνακα Κρατών και θα
σας ενημερώσουν για την διεύθυνση αποστολής.
Η TEFAL / T-FAL δεν έχει την υποχρέωση να αναλάβει την επιδιόρθωση ή αντικατάσταση
προϊόντος που δεν συνοδεύεται από απόδειξη αγοράς.
Η συγκεκριμένη εγγύηση δεν καλύπτει οποιοδήποτε ελάττωμα μπορεί να προκληθεί από
κακό χειρισμό, από απροσεξία, ή αδιαφορία προς τις οδηγίες χρήσης της TEFAL / T-FAL,
από χρήση σε λάθος τάση ρεύματος από αυτή που αναγράφεται πάνω στο προϊόν, ή από
τροποποίηση ή μη εξουσιοδοτημένη επιδιόρθωση του προϊόντος. Επίσης δεν καλύπτει
φυσική φθορά, σπάσιμο, χειρισμό ή αντικατάσταση αναλώσιμων στοιχείων, καθώς και
τα παρακάτω:
χρήση λάθος τύπου νερού
αφαλάτωση και βλάβη από συσσωρευμένα άλατα (κάθε αφαλάτωση θα πρέπει να
γίνεται σύμφωνα με τις οδηγίες χρήσης)
εισροή νερού, σκόνης ή εντόμων εντός του προϊόντος
EL
) ή
59
Page 64

μηχανικές βλάβες λόγω υπερφόρτωσης
βλάβες λόγω λάθος τάσης ή συχνότητας
ατυχήματα όπως πυρκαγιά, πλημμύρα, ηλεκτροπληξία κλπ.
επαγγελματική ή εμπορική χρήση
ζημιά σε οποιαδήποτε γυάλινη ή πορσελάνινη επιφάνεια του προϊόντος
αντικατάσταση αναλώσιμων υλικών
Αυτή η εγγύηση δεν εφαρμόζεται σε οποιοδήποτε προϊόν έχει τροποποιηθεί, ή σε ζημιές
που προκλήθηκαν από ακατάλληλη χρήση και συντήρηση, σε λάθος συσκευασία του προϊόντος από τον αγοραστή ή σε κακή μεταφορά του.
Η διεθνής εγγύηση της TEFAL / T-FAL εφαρμόζεται μόνο σε προϊόντα αγορασμένα σε χώρα
από αυτές που αναγράφονται στον σχετικό πίνακα, και
κιακή χρήση εντός χώρας του Πίνακα Κρατών. Σε περίπτωση που ένα προϊόν αγοράστηκε
σε μία από τις αναγραφόμενες χώρες και τέθηκε σε χρήση σε άλλη αναγραφόμενη χώρα:
Η διεθνής εγγύηση TEFAL / T-FAL ακολουθεί την διάρκεια που ισχύει στην χώρα
όπου χρησιμοποιήθηκε το προϊόν, ακόμη κι εάν το προϊόν αγοράστηκε σε άλλη
αναγραφόμενη χώρα που όμως ισχύει διαφορετική διάρκεια εγγύησης
Η διεθνής εγγύηση TEFAL / T-FAL δεν ισχύει σε περιπτώσεις μη συμβατότητας
του προϊόντος που αγοράστηκε με τα τοπικά χαρακτηριστικά της χώρας, όπως
τάση, συχνότητα, επαφές ρεύματος, ή λοιπές τεχνικές προδιαγραφές.
Η διαδικασία επιδιόρθωσης για προϊόντα αγορασμένα από το εξωτερικό μπορεί
να απαιτεί μεγαλύτερη χρονική διάρκεια εάν το προϊόν δεν διανέμεται στην το-
πική αγορά από την TEFAL / T-FAL.
Σε περιπτώσεις που το προϊόν δεν δύναται επιδιόρθωσης στην χώρα που ο αγο-
ραστής το μετέφερε, η διεθνής εγγύηση TEFAL / T-FAL περιορίζεται σε αντικα-
τάσταση του προϊόντος από κάποιο αντίσ τοιχο ή σε αντίστοιχη τιμή προϊόν,
όταν αυτό είναι δυνατόν
ΘΕΣΠΙΣΜΕΝΑ ΔΙΚΑΙΩΜΑΤΑ ΚΑΤΑΝΑΛΩΤΗ
Η παρούσα διεθνής εγγύηση της TEFAL / T-FAL δεν επηρεάζει τα θεσπισμένα δικαιώματα
του καταναλωτή ή τα δικαιώματα εκείνα που δεν μπορούν να εξαιρεθούν ή να περιοριστούν, αλλά ακόμη δεν επηρεάζει τα δικαιώματα του λιανέμπορου που επέλεξε ο καταναλωτής να αγοράσει το προϊόν. Η παρούσα εγγύηση δίνει συγκεκριμένα νομικά
δικαιώματα στον καταναλωτή και ο καταναλωτής μπορεί να διατηρήσει όλα τα νομικά δικαιώματα που μπορεί να ισχύουν στις επιμέρους τοπικές αγορές. Ο καταναλωτής μπορεί
να κάνει χρήση των δικαιωμάτων του κατά την δική του κρίση.
ΠΡΟΣΘΕΤΕΣ ΠΛΗΡΟΦΟΡΙΕΣ
Εξαρτήματα, αναλώσιμα και τελικής χρήσης ανταλλακτικά μπορεί να αγοραστούν, εάν
διανέμονται στην τοπική αγορά, όπως περιγράφεται στην ιστοσελίδα της TEFAL / T-FAL.
.
χρησιμοποιούνται μόνο για οι-
*Τα είδη οικιακής χρήσης Τ Ε F A L εμφανίζονται και με την γραφή μάρκας Τ - F A L σε κάποιες χώρες όπως η
Αμερική και Ιαπωνία. Οι TEFAL / T-FAL είναι μάρκες κατοχυρωμένες από την Groupe SEB.
60
Page 65

¥∂Dq ±HFu‰ ≥cÁ «∞CLU≤W _Í ±M∑Z îCl ∞K∑GOOd, √Ë «ÅOV °U_´DU‰ ≤∑OπW ∞ºu¡ «ùß∑FLU‰ Ë´bÂ
«∞FMU¥W, √Ë °º∂V «∞∑GKOn «∞ªU©v¡ °u«ßDW «∞LU∞p √Ë °º∂V ßu¡ «∞MIq °u«ßDW √Í §NW ∞K∑uÅOq.
LAF-T/ LAFET «∞bË∞OW ≠Ij ∞KLM∑πU‹ «∞LÔA∑d«… ±s √•b «∞∂Kb«Ê «∞LcØu¸…
¥ºdÍ ±HFu‰ {LU≤W "¢OHU‰"
≠w «∞IUzLW, ËÆb ¢r «ß∑FLU∞NU ∞ú¨d«÷ «∞LMe∞OW ≠Ij ≠w √•b «∞∂Kb«Ê «∞LcØu¸… ≠w «∞IUzLW √¥CUÎ.
≠w •U‰ ¢r ®d«¡ ±M∑Z ±s °Kb ±U, Ë«ß∑FLq ≠w °Kb ¬îd :
a) ±Ôb… {LU≤W "¢OHU‰" LAF-T/ LAFET «∞bË∞OW ≥w ≤HºNU ≈Ê ØUÊ ≠w «∞∂Kb «∞cÍ ¢r ≠Ot «ß∑FLU‰
«∞LM∑Z, √Ë ≠w «∞∂Kb «∞LcØu¸ ≠w ÆUzLW «∞∂Kb«Ê «∞cÍ ¢r «∞Ad«¡ ±Mt, •∑v Ë∞u ØU≤X ®dË◊ «∞CLU≤W
¢ª∑Kn °U∞Lb… ±s °Kb üîd.
b) ¥∂Dq ±HFu‰ {LU≤W "¢OHU‰" LAF-T/ LAFET «∞bË∞OW ´s «∞LM∑Z «∞cÍ ¢r ®d«ƒÁ, ≠w •U‰ ´bÂ
«ù∞∑e«Â °U∞Iu«≤Os «∞L∫KOW, ±∏q «∞Hu∞DOW, «∞∑dœœ «∞JNd°Uzw, ±Pîc «∞∑uÅOq °U∞∑OU¸ «∞JNd°Uzw,
√Ë °QÍ ±u«ÅHU‹ ¢IMOW √îdÈ.
c) ¥∑DKÒV ¢BKO` «∞LM∑πU‹ «∞LA∑d«… ±s îU¸Ã «∞∂Kb «∞cÍ ¢º∑FLq ≠Ot, ËÆ∑UÎ √©u‰ ≠w «∞∑BKO`
LAF-T/ LAFET.
≈–« ØUÊ «∞LM∑Z ∞r ¥Ô∂UŸ ±∫KOUÎ °u«ßDW "¢OHU‰"
d) ≠w •U‰ ´b «∞∑LJs ±s ¢BKO` «∞LM∑Z ≠w «∞∂Kb «∞πb¥b , ¥∑FOÒs ´Kv {LU≤W "¢OHU‰" LAF-T/
LAFET
«∞bË∞OW «ß∑∂b«‰ «∞LM∑Z °LM∑Z ¬îd √Ë «ß∑∂b«∞t °LM∑Z ¥u«“¥t ±s •OY «∞∑JKHW, Ë•ºV
«ù±JU≤OW.
•Iu‚ «∞Lº∑NKp «∞IU≤u≤OW
AR
LAF-T/ LAFET «∞bË∞OW ´Kv «∞∫Iu‚ «∞IU≤u≤OW «∞∑w ≥w •o ∞KLº∑NKp √Ë ¢Kp
ô ¢R£d {LU≤W "¢OHU‰"
«∞∫Iu‚ «∞∑w ô ¥LJs «ß∑∏MU¡≥U √Ë ¢∫b¥b≥U . ¢ÔFDw ≥cÁ «∞CLU≤W ∞KLº∑NKp •Iu‚ ±Ô∫bœ… Ë ±AdË´W, ØLU
¥JuÊ ∞KLº∑NKp •Iu‚ ±AdË´W √îdÈ ¢ª∑Kn ±s °Kb ≈∞v ¬îd, ˱s œË∞W «∞v œË∞W. Æb ¥ÔBUœ‚ «∞Lº∑NKp
´Kv «Í •Iu‚ ±AU°NW •ºV «î∑OU¸Á.
±FKu±U‹ ≈{U≠OW
«∞LK∫IU‹ , «_§e«¡ «∞Lº∑NKJW, Ë«_§e«¡ «∞IU°KW ∞ûß∑∂b«‰ ¥LJs ®d«zNU , ≈–« ØU≤X ±∑u≠d… ±∫KOUÎ •ºV
LAF-T/ LAFET ´Kv «ù≤∑d≤X .
±U ≥u ±u{Ò` ≠w ±uÆl "¢OHU‰"
* ≈Ê ±M∑πU‹ ¢OHU‰ ∞ú§Ne… «∞LMe∞OW ¢ENd ¢∫X ´ö±W LAF-T/ LAFET ≠w °Fi «∞bˉ Ë«∞LIU©FU‹ •u‰
LAF-T/ LAFET ≥w ´ö±W ±ÔºπKW ∞bÈ ±πLu´W BES.
«∞FU∞r ±∏q √±OdØU Ë«∞OU°UÊ, Ë∞c∞p ≠SÊ
61
Page 66

{LU≤W ¢OHU‰ «∞bË∞OW «∞L∫bËœ… *LAF-T / LAFET
: moc.lafet.www
LAF-T / LAFET, √£MU¡ Ë°Fb ≠∑d… «∞CLU≤W.
≥c« «∞LM∑Z ÆU°q ∞K∑BKO` °u«ßDW "¢OHU‰"
«∞CLU≤W :
LAF-T/ LAFET (´Mu«Ê «∞AdØW ±Ô∑CLMUÎ «∞∑HUÅOq ≠w ÆUzLW «ßLU¡ «∞∂Kb«Ê,
≥c« «∞LM∑Z ¢CLMt "¢OHU‰"
¢∫X ´Mu«Ê: {LU≤W ¢OHU‰ «∞bË∞OW) {b √¥W ´Ou» ¢BMOFOW ≠w «∞Lu«œ √Ë ≠w «∞∑BMOl îö‰ ≠∑d… «∞CLU≤W
∞K∂Kb«Ê «∞LcØu¸… ≠w «∞IUzLW ≠w «∞BH∫W «_îOd… ±s œ∞Oq «ùß∑FLU‰, «´∑∂U¸«Î ±s ¢U¸¥a «∞Ad«¡.
LAF-T/ LAFET «∞bË∞OW ∞K∑BMOl, ≥w ±ÔπdÒœ ≈≠Uœ… ≈{U≠OW, Ëô ¢R£Òd ´Kv «∞∫Iu‚
≈Ê {LU≤W "¢OHU‰"
«∞IU≤u≤OW ∞KLº∑NKp.
≈Ê «∞CLU≤W «∞bË∞OW ∞KLÔBMÒl, ¢ÔGDw §LOl «∞∑JU∞On «∞LÔ∑FKÒIW °U∞LM∑Z «∞cÍ ¥ENd ≠Ot ´OV, °∫OY ¢R≥q ≥c«
«∞LM∑Z ∞OÔDU°o «∞Lu«ÅHU‹ «_ÅKOW ±s îö‰ ≈Åö•t √Ë «ß∑∂b«‰ √Í §e¡ ≠Ot. Ë¥∂Iv «∞ªOU¸ ±s •o
"¢OHU‰"
LAF-T/ LAFET , ≠w «ß∑∂b«‰ «∞LM∑Z °bôÎ ´s ≈ÅöÕ «_´DU‰ ≠Ot. ≈Ê «∞∑e«Â "¢OHU‰" LAF-T/
LAFET
ËÆd«¸„ «∞∫BdÍ ≠w ≥cÁ «∞CLU≤W ≥LU ±∫bËœ«Ê °U∞Mº∂W ∞∑BKO` «∞LM∑Z √Ë ≈ß∑∂b«∞t.
«∞AdË◊ Ë«ùß∑∏MU¡«‹
LAF-T/ LAFET «∞bË∞OW ≠w «∞∂Kb«Ê «∞u«¸œ… √ßLUƒ≥U ≠w «∞IUzLW «∞Ld≠IW,
¥ºdÍ ±HFu‰ {LU≤W "¢OHU‰"
îö‰ ≠∑d… «∞CLU≤W «∞L∫bœ…, Ë´Mb «°d«“ ±U ¥Ô∏∂X ®d«¡ «∞LM∑Z. ¥LJs «¸ßU‰ «∞LM∑Z ±∂U®d… °u«ßDW
®ªh «∞v ±dØe îb±W ±ÔF∑Lb, √Ë ≈´Uœ… ¢GKOHt °AJq §OÒb Ë≈¸§U´t °u«ßDW «¸ßU∞OW ±ÔºπÒKW (√Ë ±U
LAF-T/ LAFET «∞LF∑Lb. ÆUzLW
LAF-T/ LAFET ´Kv
¥u«“¥NU °U∞∂d¥b «∞LCLuÊ ±l «®FU¸ °Uùß∑öÂ) «∞v ±dØe îb±W "¢OHU‰"
«∞FMUË¥s «∞LÔHBKÒW ∞Ld«Øe «∞ªb±W «∞LÔF∑Lb… ±s ¢OHU‰ ±u§uœ… ´Kv ±uÆl "¢OHU‰"
«ù≤∑d≤X (
moc.lafet.www), √Ë °Uù¢BU‰ °dÆr ≥U¢n «∞∂Kb {Ls ÆUzLW «∞∂Kb«Ê «∞LÔb¸§W, ∞ûß∑HºU¸ ´s
«∞FMu«Ê «∞∂d¥bÍ.
LAF-T/ LAFET ¢BKO` √Ë «ß∑∂b«‰ _Í ±M∑Z ±U∞r ¥Js ±Ôd≠IUÎ °LU ¥Ô∏∂X Å∫ÒW ®d«¡Á {Ls
∞s ¢I∂q "¢OHU‰"
±NKW «∞CLU≤W.
∞s ¢ÔGDw ≥cÁ «∞CLU≤W √¥W √´DU‰ ¢M∑Z ´s ßu¡ «ùß∑FLU‰, √Ë «ù≥LU‰, √Ë «∞HAq ≠w «¢∂UŸ ≈¸®Uœ«‹
LAF-T/ LAFET, √Ë ¢AGOq «∞LM∑Z °∑OU¸ ØNd°Uzw ¥ª∑Kn ´LU ≥u
≈ß∑FLU‰ «∞LM∑Z «∞Ld≠IW ±s "¢OHU‰"
±Ô∂OÒs ≠Ot, √Ë ≈•b«À √Í ¢BKO` √Ë ¢Fb¥q ≠w «∞LM∑Z ¨Od ±F∑Lb ±s ¢OHU‰. ØLU ô ¢ÔGDw ≥cÁ «∞CLU≤W
´u«±q «∞∑IUœÂ «∞D∂OFOW, «∞BOU≤W, √Ë «ß∑∂b«‰ «_§e«¡ «∞LÔº∑NKJW , °Uù{U≠W «∞v ±U¥Kw:-
- «ß∑FLU‰ ≤uŸ ±s «∞LU¡ ô ¥MUßV «∞LM∑Z
- «∞∑JKÒf (√Í ´LKOW ≈“«∞W ∞K∑JKf , ¥πV ≈§d«ƒ≥U •ºV «ù¸®Uœ«‹ «∞u«¸œ… ≠w ©d¥IW
«ùß∑FLU‰);
- œîu‰ «∞LU¡ , «∞G∂U¸ √Ë «∞∫Ad«‹ ≠w «∞LM∑Z ;
- «_´DU‰ «∞LOJU≤OJOW, «∞∑AGOq «∞LHd◊ .
- «_´DU‰ √Ë «∞M∑UzZ «∞ºK∂OW «∞MU¢πW ´s «∞ªDQ ≠w «∞∑OU¸ «∞JNd°Uzw √Ë «∞∑dœœ
- «∞∫u«œÀ °LU ≠ONU «∞∫d«zo, «∞HOCU≤U‹, «∞Bu«´o .. «∞a.
- «ùß∑FLU‰ «ù•∑d«≠w √Ë «∞∑πU¸Í
-«∞∑Kn _Í §e¡ “§U§w √Ë îe≠w ≠w «∞LM∑Z
- «ß∑∂b«‰ «_§e«¡ «∞LÔº∑NKJW
62
Page 67

> ¢ÔIKV ßK∑w «∞∂ªU¸ ´Kv Ë•b… «∞IU´b… - ®Jq 81
(•ºV «∞Luœ¥q).
>
¢ÔJbÒ” «∞A∂JW ¸Ær 1 ≠u‚ «∞A∂JW ¸Ær 2. Ë¢u{l «∞A∂J∑UÊ
´Kv Ë•b… «∞IU´b… - ®Jq 91 (•ºV «∞Luœ¥q).
> ¥
®Jq 02
.
Ôu{l «∞GDU¡ ≠u‚ «∞πLOl -
œ∞Oq «ß∑JAU· «_´DU‰
> ¥Ôd§v ´b ¢HJOp «∞LM∑Z °MHºp, ≠w •U‰ ¢uÆn «∞LM∑∑Z ´s «∞FLq , ¥Ôd§v ´d{t ´Kv √•b
±d«Øe «∞ªb±W «∞LÔF∑Lb¥s ù§d«¡ «∞∑BKO∫U‹.
«∞∫Ku‰
√ËÅq «∞LM∑Z °U∞∑OU¸ «∞JNd°Uzw Ë®GÒq
«∞LRÆÒX.
´Mb «≤∑NU¡ ËÆX «∞DNw, ¥ÔDHQ «∞LR®d
«∞Cuzw √Ë¢u±U¢OJOUÎ.
¥Ôd§v «ù¢BU‰ °LdØe îb±W ±U °Fb «∞∂Ol.
¥Ôd§v «ù¢BU‰ °LdØe îb±W ±U °Fb «∞∂Ol.
«_ß∂U» «∞LÔ∫∑LKW
∞r ¥∑r {∂j «∞LRÆÒX.
«≤∑NX ´LKOW «∞DNw.
«_§e«¡ ≠ONU √´DU‰ √Ë ¢Kn.
±ÔAJKW ≠w ´MBd «∞∑ºªOs.
«_´DU‰
«∞LR®d «∞Cuzw «∞∂d¢IU∞w
«∞KuÊ ô ¥ÔCw¡.
AR
¥ÔCw¡ «∞LR®d «∞Cuzw
«∞∂d¢IU∞w «∞KuÊ, Ë∞Js
«∞LM∑Z ô ¥ºªs.
_ËÆU‹ «∞DNw «∞∑w ¢Iq ±b¢NU ´s 51 œÆOIW,
¥ÔC∂j «∞LRÆÒX ´Kv 03 œÆOIW √ËôÎ, £r ¥ÔFbÒ‰
«∞C∂j «∞v √Æq ±s 03 œÆOIW •ºV «∞uÆX
«∞LÔ∫bœ
¥Ôd§v «ù¢BU‰ °LdØe îb±W ±U °Fb «∞∂Ol.
¥Ôd§v ¢MEOn ´MBd «∞∑ºªOs ±s «∞∑JKf
«∞L∑d«Ør.
¥Ôd§v «∞∑QØb °QÊ «∞ºö‰/«∞A∂JU‹ Æd ¸ÔØÒ∂X
°AJq Å∫O` Ë°U∞∑d¢OV «∞B∫O`.
¢QØb ±s ˧uœÁ ≠w ±uÆFt «∞B∫O`.
{Ô∂j ËÆX «∞DNw ´Kv •d«¸…
±M∫HCW.
«∞∑ºd» ÅUœ¸ ´s ´MBd
«∞∑ºªOs.
¢d«Ør «∞∑JKf ´Kv ´MBd
«∞∑ºªOs.
«∞ºKW/«∞A∂JW ¨Od ±ÔdØÒ∂∑UÊ ±l
°FCNLU °AJq Å∫O`.
œ¸Ã ¢F∂µW «∞LU¡ «∞Lu§uœ ¢∫X
±ÔπLÒl «∞FBUzd ±H∑uÕ.
«∞LRÆX Æb ¢uÆn ´s «∞FLq.
«∞LU¡ ¥∑ºdÒ» ±s «∞IU´b….
«∞DFU ¥º∑Gd‚ ËÆ∑UÎ √©u‰
±s «∞LF∑Uœ ∞Jw ¥MCZ.
«∞∂ªU¸ ¥∑ºd» ´s §u«≤V
«∞LM∑Z.
63
Page 68

«∞‡‡‡∑‡‡M‡‡‡E‡‡‡O‡‡‡n Ë«∞B‡‡O‡‡U≤‡‡‡W
¢‡‡M‡‡‡E‡‡‡O‡‡‡n «∞LM∑Z
> «≠Bq «∞LM∑Z ´s «∞∑OU¸ «∞JNd°Uzw °Fb «ùß∑FLU‰.
> ¥Ô∑d„ «∞LM∑Z ∞Jw ¥∂dœ ¢LU±UÎ Æ∂q «∞∑MEOn.
> ¥Ôd§v «∞∑QØb °QÊ «∞LM∑Z Æb °dœ °LU ≠Ot «∞JHU¥W Æ∂q ¢Hd¥m
±ÔπLÒl «∞FBUzd ËîeÒ«Ê «∞LU¡.
>
¢ÔGºq §LOl «_§e«¡ «∞IU°KW ∞KHp Ë«∞∑dØOV °U∞LU¡ «∞b«≠v¡
ËßUzq «∞∑MEOn «∞FUœÍ, £r ¢ÔGºq °U∞LU¡ Ë ¢ÔπHÒn.
> §LOl «_§e«¡ ¥LJs ¢MEOHNU ≠w §ö¥W «∞B∫uÊ,
°Uß∑∏MU¡ «∞IU´b… «∞JNd°UzOW.
∞Jw ¢∑πMV ™Nu¸ «∞KDªU‹ ´Kv √§e«¡ «∞LM∑W , ¥Ôd§v ≈§d«¡
´LKOW «∞∑MEOn ≠u¸«Î °Fb «ùß∑FLU‰.
ô ¢GLd «∞IU´b… «∞JNd°UzOW ≠w «∞LU¡.
ô ¢º∑FLq ±u«œ «∞∑MDOn «∞JU®DW √Ë «∞∫U¸ÆW.
≈“«∞W «∞∑JKf «∞L∑d«Ør ≠w «∞LM∑Z
∞K∫Bu‰ ´Kv √≠Cq ¢AGOq ±∏U∞w ∞KLM∑Z , ¥πV ≈“«∞W
«∞∑JKºU‹ «∞L∑d«ØLW ≠Ot Øq 8 «ß∑FLUô‹. ∞KIOUÂ °c∞p, ¥Ôd§v
«¢∂UŸ «∞ªDu«‹ «∞∑U∞OW :
>
¥ÔHBq ±ÔπLÒl ´BUzd «∞DFUÂ ´s «∞LM∑Z.
>
¥ÔºJV 1 ∞∑d ±s «∞LU¡ ≠w «∞ªe«Ê.
>
¥ÔCU· «∞Ot Øu°UÊ (2) (•u«∞w 006 ±KK∑d) ±s «∞ªq
«_°Oi.
>
¥Ô∑d„ ±MIu´UÎ ©u«‰ «∞KOq.
>
¥ÔGºq «∞πe¡ «∞b«îKw ∞Kªe«Ê °U∞LU¡ «∞b«≠v¡ ´b… ±d«‹.
64
¢ªe¥s ßö‰ «∞∂ªU¸ Ë «∞A∂JU‹ «∞IU°KW ∞KHBq
(•ºV «∞Luœ¥q)
>
°Fb ¢MEOn §LOl «_§e«¡, ¥LJMp ¢ªe¥s «∞LM∑Z •ºV
«∞ªDu«‹ «∞∑U∞OW :
>
¥u{l ±ÔπLÒl ´BUzd «∞DFU œ«îq «∞ªe«Ê. Ë¥ÔIKV Ë´U¡
®Jq 61
.
®Jq
«_¸“ ´Kv ±ÔπLÒl «∞FBUzd -
>
¢Ôu{l ßKW «∞∂ªU¸ ¸Ær 1œ«îq ßKÒW «∞∂ªU¸ ¸Ær 2-
71
(•ºV «∞Luœ¥q).
Page 69

«∞ºLp - «∞LÔ∫U¸
±Ôb… «∞DNw (°U∞bÆUzo)
01 - 51
51 - 02
03 - 53
02 - 52
51 - 02
02 - 52
02 - 52
51 - 02
«∞JLOÒW
053 §d«Â
004 §d«Â
006 §d«Â
1 ØKZ
003 §d«Â
002 §d«Â
001 §d«Â
055 §d«Â
«∞MuŸ
©U“Ã
±Ô∏KÒπW
©U“§W
©U“Ã
©U“§W
©U“Ã
©U“Ã
©U“Ã
«∞DFUÂ
≠OKOt ßLp
ßLJW ØU±KW
°K` «∞∂∫d
®d¥∫W ßLp
¸Ë°OUÊ
≈ßJU∞u»
ßLp ßKLuÊ
«∞K∫u - «∞DOu¸
±Ôb… «∞DNw (°U∞bÆUzo)
53 - 04
02 - 52
02 - 52
02 - 52
02 - 52
51 - 02
«∞JLOÒW
4 √≠ªU–
054 §d«Â
004 §d«Â
006 §d«Â
8
8
«∞MuŸ
©U“§W - ØU±KW
©U“Ã
-
±Ô∏KZ
©U“Ã
«∞DFUÂ
√≠ªU– «∞b§UÃ
AR
«ßJU∞u» «∞b§UÃ
«ßJU∞u» «∞∫∂g
ßπo
≠DUzd ∞∫r «∞∂Id
«∞∂Oi
±Ôb… «∞DNw (°U∞bÆUzo)
«∞JLOÒW
6 02 - 52
«∞MuŸ
-
«∞DFUÂ
°Oi ±ºKu‚
«_¸“ - «∞LFJdË≤W - «∞∫∂u»
±Ôb… «∞DNw (°U∞bÆUzo)
03 - 53
51 - 02
04 - 54
«∞JLOÒW
002 ±KK∑d
002 ±KK∑d
003 ±KK∑d
«∞MuŸ
521 §d«Â
521 §d«Â
521 §d«Â
«∞DFUÂ
√¸“ «°Oi •∂W ©u¥KW
ÆL` °u∞πU¸
•∂u»
65
Page 70

66
§bˉ √ËÆU‹ «∞DNw ´Mb «ß∑FLU‰ «∞ºKW ¸Ær 1
«∞ªÔCU¸
±Ôb… «∞DNw (°U∞bÆUzo)
54 - 55
03 - 53
03 - 53
52 - 13
02 - 52
02 - 52
52 - 03
03 - 53
51 - 02
51 - 02
51 - 12
53 - 04
03 - 53
53 - 04
02 - 52
05 - 55
05 - 55
51 - 02
04 - 54
03 - 53
53 - 04
02 - 52
«∞JLOÒW
1
055 §d«Â
005 §d«Â
004 §d«Â
003 §d«Â
005 §d«Â
006 §d«Â
1 ±∑ußDW «∞∫πr
003 §d«Â
003 §d«Â
004 §d«Â
054 §d«Â
004 §d«Â
005 §d«Â
052 §d«Â
003 §d«Â
003 §d«Â
052 §d«Â
006 §d«Â
006 §d«Â
005 §d«Â
006 §d«Â
«∞MuŸ
©U“Ã
©U“Ã
©U“Ã
«∞DFUÂ
îd®u·
≥KOuÊ
°dËØKw
±Ô∏KÒZ
©U“Ã
©U“Ã
©U“Ã
©U“Ã
©U“Ã
§e¸ (®d•U‹ 3 ±Kr)
≠Dd
±KHu· (√¸°UŸ 08 §d«Â)
Æd≤∂Oj
ß∂U≤a
±Ô∏KÒZ
©U“§W
©U“§W
±Ô∏KÒπW
©U“Ã
©U“§W
©U“Ã
±Ô∏KÒπW
©U“Ã
©U“§W
©U“§W
©U“Ã - ØU±KW
©U“Ã
≠UÅu∞OU °OCU¡
∞u°OU¡
Ød«À
≠KOHKW
°U“ô¡ ≠w Ë´U¡ «_¸“
°Bq «°Oi ÅGOd
°DU©f
ØußU îCd«¡
–¸… •Ku…
°U–≤πUÊ
«∞Hu«Øt
±Ôb… «∞DNw (°U∞bÆUzo)
53 - 03
51 - 02
51 - 02
51 - 02
«∞JLOÒW
4
4
4
4
«∞MuŸ
©U“Ã
©U“Ã
©U“Ã
©U“Ã
«∞DFUÂ
≈§U’
±u“
œÔ¸Ò«‚
¢ÔHUÒÕ
Page 71

°‡‡‡‡F‡‡‡b «ù߇‡‡‡∑F‡‡L‡‡‡‡U‰
>
«≠Bq «∞LM∑Z ´s «∞∑OU¸ «∞JNd°Uzw.
>
¥Ôd§v ¢d„ «∞LM∑Z «∞v √Ê ¥∂dœ ¢LU±UÎ Æ∂q ¢MEOHt.
¥Ôd§v «∞∑QØb √Ê ±ÔπLÒl
«∞FBUzd Æb °dœ °LU ≠Ot
«∞JHU¥W, Æ∂q ≤e´t ±s
«∞LM∑Z.
§‡‡‡bˉ √ËƇ‡‡‡‡U‹ «∞‡‡D‡‡N‡‡‡w
√ËÆU‹ «∞DNw «∞u«¸œ… ≥w ±ÔπdÒœ ±IUœ¥d ≈¸®Uœ¥W ∞∑Ôº∑FLq
≠w ßKW «∞∂ªU¸ «∞ºHKOW. ËÆb ¢ª∑Kn ≥cÁ «_ËÆU‹ •ºV
•πr «∞DFU √Ë °∫ºV «∞LºU≠U‹ °Os ÆDl «∞DFU ≤Hºt,
Ë Øc∞p °U∞Mº∂W ùß∑FLU‰ ßö‰ °ªU¸ ±Ôª∑KHW ˱MU≥Z
AR
©Nw ±ª∑KHW √¥CUÎ.
¢ÔC∂j √ËÆU‹ «∞DNw •ºV ØLOW «∞DFU «∞LÔFbÒ. Ë¥πV √Ê
¢Ôº∑FLq ÆÔHÒU“‹ «∞HdÊ ∞d≠l
ßö‰ «∞∂ªU¸ Ë«∞GDU¡ √£MU¡
«∞DNw
¢Ôe«œ ±b… «∞DNw ´Mb «ß∑FLU‰ √Ø∏d ±s ßKW °ªU¸ Ë«•b…
∞KDNw ´Kv «∞∂ªU¸.
∞ú©FLW «∞∑w ¢∫∑Uà √ËÆU‹ ©Nw ±Ôª∑KHW : ¥u{l «∞DFUÂ
«∞cÍ ¥º∑Gd‚ ËÆ∑UÎ √©u‰ ≠w «∞DNw ≠w ßKW «∞∂ªU¸
«∞ºHKOW. Ë√£MU¡ «∞DNw, ¢ÔCU· «∞ºKW «∞∏U≤OW «∞∑w ¢∫∑uÍ
´Kv «∞DFUÂ «∞cÍ ¥∫∑UÃ ±b… ©Nw «ÆBd.
67
Page 72

∞ºKo «∞∂Oi :
> ¥u
®Jq 8
.
{l «∞∂Oi ≠w •U±KW «∞∂Oi «∞Lb±πW -
> ¥Ô
C∂j «∞LRÆÒX ´Kv «∞uÆX «∞LÔ∫bœ («≤Ed §bˉ √ËÆU‹
«∞DNw)
√£MU¡ «∞DNw
>
¥Ôd§v «∞∑QØb ±s ±º∑uÈ «¸¢HUŸ «∞LU¡ ±s îö‰ «∞LR®d
«∞Ldzw ∞Lº∑uÈ «∞LU¡.
>
®Jq 9
.
®Jq 01.
¥ÔLJs ≈{U≠W «∞LU¡ ±s îö‰ œ¸Ã ¢F∂µW «∞LU¡ -
√£MU¡ «∞DNw, ¥Ôd§v «∞∫d’ √Ê ô ¥ÔH∑` «∞GDU¡ ØLU ¥Ôd§v «∞∫d’ √¥CUÎ √Ê ô ¥Ôºb ±ªdà «∞∂ªU¸ ≠w
«∞GDU¡
-
®Jq 11.
ô ¢Cl «∞GDU¡ ≠w Ë{FOW ´Luœ¥W •∑v ô ¥ÔBU» °Uù∞∑u«¡
-
®Jq 21.
≈–« ≠d⁄ «∞LU¡ ±s «∞LM∑Z,
≠S≤t ßu· ¥∑uÆn ´s
¢u∞Ob «∞∂ªU¸, Ë°U∞∑U∞w
¢∑uÆn ´LKOW ©Nw
«∞DFUÂ
´Mb «≤∑NU¡ «∞DNw
> ¥∑uÆn «∞LM∑Z √Ë¢u±U¢OJOUÎ ´s «∞FLq.
> ¥ÔDKo «∞LRÆÒX ≈®U¸… Åu¢OW ¢M∂ONOW Ë¥ÔDHQ «∞LR®d
«∞Cuzw.
> ∞Jw ¢uÆn «∞LM∑Z Æ∂q «≤∑NU¡ ËÆX «∞DNw, {l «∞LRÆX
≠w ±uÆl «∞∑uÆn "FFO"
≈´Uœ… «∞∑ºªOs
>
¥ÔLJMp ≈´Uœ… ¢ºªOs «∞DFU ≠w «∞LM∑Z.
68
¸≠l «∞DFU ±s ßKÒW «∞∂ªU¸
-
®Jq 31.
-
ô ≤MB` °Uß∑FLU‰
®Jq 51.
«∞LÔK∫IU‹ «∞LFb≤OW ∞d≠l
«∞DFU ±s ßKÒW «∞∂ªU¸.
> ≈¸≠l «∞GDU¡ °u«ßDW «∞LI∂i
> ≈¸≠l ßKÒW «∞∂ªU¸ ¸Ær 2, «∞A∂JW ¸Ær 2 ËßKW «∞∂ªU¸ ¸Ær
1- ®Jq 41.
> ≈¸≠l «∞DFU °Uß∑FLU‰ ÆÔHÒU“«‹ «∞HdÊ
¢Ôº∑FLq ÆÔHÒU“‹ «∞HdÊ ∞d≠l ßö‰ «∞∂ªU¸, «∞LIU°i, «∞IU´b…,
«∞GDU¡
-
®Jq 51.
Page 73

¢dØOV «∞A∂JU‹ «∞IU°KW ∞KMeŸ Ë«∞∑dØOV Ë «∞ºö‰
(•ºV «∞Luœ¥q)
>
∞Kºö‰ ®∂JU‹ ¥LJs ≤e´NU ù¢U•W ±ºU•W √Ø∂d ∞KDNw √Ë
∞DNw ±JuÒ≤U‹ Ø∂Od… ±s «∞DFUÂ.
¸Ær 1 ´Kv ±ÔπLÒl «∞FBUzd.
2
- {l œ«zLUÎ «∞A∂JW
- £r {l «∞ºKW ¸Ær 1
- £r ¢u{l «∞A∂JW ¸Ær 2
- Ë°Fb≥U ¢u{l «∞ºKW ¸Ær 2
>
{l «∞GDU¡ (¥LJs ¢dØOV «∞GDU¡ ´Kv §LOl «∞ºö‰).
∞DNw ±JuÒ≤U‹ Ø∂Od… ±s «∞DFUÂ:
- ¢ÔMeŸ «∞A∂JW ¸Ær
- ¢u{l «∞ºKW ¸Ær 2 ±Ô∂U®d… ´Kv «∞ºKW ¸Ær 1
- ¥u{l «∞DFUÂ ≠w «∞b«îq - ®Jq 5.
- {l «∞GDU¡
¥ÔLJMp «ß∑FLU‰ ßKW
Ë«•b… √Ë ßK∑Os ≠w
«∞LM∑Z , •ºV «∞∫U§W
«∞v –∞p.
¢u{l «∞ºö‰ •ºV
«∞∑d¢OV «∞B∫O`.
_≠Cq «∞M∑UzZ, ô ¢Cl
«∞J∏Od ±s «∞DFUÂ ≠w
«∞ºKW.
AR
«∞‡‡‡D‡‡N‡‡w ´Kv «∞‡∂‡‡ª‡‡‡U¸
≈î∑d ËÆX «∞DNw
> √ËÅq «∞LM∑Z °U∞∑OU¸ «∞JNd°Uzw.
-
®Jq 6
(«≤Ed §bˉ
¥πV ¢uÅOq «∞LM∑Z
°U∞∑OU¸ «∞JNd°Uzw ∞Jw
¢∑LJs ±s {∂j «∞LRÆÒX
∞DNw «_¸“:
> «{∂j «∞LRÆÒX ´Kv «∞uÆX «∞LÔ∫bœ
√ËÆU‹ «∞DNw).
>
ßu· ¥ÔCU¡ «∞LR®d «∞Cuzw «∞∂d¢IU∞w «∞KuÊ.
>
«∞DNw ´Kv «∞∂ªU¸ Æb °b√ «üÊ.
_ËÆU‹ «∞DNw «∞∑w ¢Iq ±b¢NU ´s 51 œÆOIW, ¥ÔC∂j «∞LRÆÒX
´Kv 03 œÆOIW √ËôÎ, £r ¥ÔFbÒ‰ «∞C∂j «∞v √Æq ±s 03 œÆOIW
•ºV «∞uÆX «∞LÔ∫bœ.
>
{l «∞LU¡ Ë«_¸“ ≠w Ë´U¡ «_¸“.
>
®Jq 7
.
{l Ë´U¡ «_¸“ ≠w ßKW «∞∂ªU¸ -
>
«{∂j «∞LRÆÒX ´Kv «∞uÆX «∞LÔ∫bœ («≤Ed §bˉ √ËÆU‹
«∞DNw)
69
Page 74

ËÅn √§e«¡ «∞LM∑Z
8 ´MUÅd «∞∑ºªOs
9 îe«Ê «∞LU¡
01 «∞IU´b…
11 ±º∑uÈ ±dzw ∞KLU¡
(•ºV «∞Luœ¥q)
21 ±º∑uÈ «∞∫b «_ÆBv ∞KLU¡
31 ±RÆÒX
41 ±R®Òd {uzw °d¢IU∞w «∞KuÊ
(•ºV «∞Luœ¥q)
51 ±I∂f ØNd°Uzw
61 Ë´U¡ «_¸“
1 ¨DU¡
2 ßKÒW «∞∂ªU¸ ¸Ær 2
3 ®∂JW ÆU°KW ∞KHBq ¸Ær 2
4 ßKÒW «∞∂ªU¸ ¸Ær 1
5 ®∂JW ÆU°KW ∞KHBq ¸Ær 1
Ë•U±KW ±b±πW ∞K∂Oi
6 ±ÔπLÒl «∞FBUzd
7 œ¸Ã ≈´Uœ… ¢F∂µW «∞LU¡
«∞‡‡‡∑‡∫‡‡C‡‡O‡‡d
Æ∂q «ùß∑FLU‰
ô ¢GLd Ë•b… «∞IU´b…
«∞JNd°UzOW ≠w «∞LU¡
- ®Jq 2
¢∫COd ©∂ÒUŒ «∞∂ªU¸
>
{l ÆU´b… «∞u•b… «∞JNd°UzOW ´Kv ßD` £U°X ˱Ժ∑Id.
¥Ôd§v ≈“«∞W √Í √®OU¡ Æb
¢∑FdÒ÷ ∞K∑Kn °º∂V
«∞∂ªU¸.
ô ¢º∑FLq ±Ju≤U‹
«∞∑∑∂Oö‹ √Ë √Í ßUzq
¬îd ¨Od «∞LU¡ ≠w
«∞ªe«Ê.
¥Ôd§v «∞∑QØb œ«zLUÎ ±s
˧uœ «∞LU¡ ≠w «∞ªeÒ«Ê
Æ∂q ¢AGOq «∞LM∑Z.
®Jq B-3.
> «±º` îeÒ«Ê «∞LU¡ °u«ßDW «ßHMπW ¨Od ±Fb≤OW ∞∑MEOHt
- ®Jq 1.
> «¨ºq «_§e«¡ «∞IU°KW ∞KHp Ë«∞∑dØOV °U∞LU¡ «∞b«≠v¡
ËßUzq «∞∑MEOn, £r «¨ºq ˧Hn.
¢F∂µW îeÒ«Ê «∞LU¡
> ¢u§b ©d¥I∑UÊ ∞∑F∂µW «∞LU¡ ≠w «∞ªe«Ê :
A. ¥ÔºJV «∞LU¡ ±Ô∂U®d… ≠w «∞ªe«Ê ∞GU¥W ±º∑uÈ «∞∫b
«_ÆBv - ®Jq A-3.
B. «≠∑` œ¸Ã ¢F∂µW «∞LU¡ Ë«ßJV «∞LU¡ ≠Ot ∞GU¥W ±º∑uÈ
«∞∫b «_ÆBv -
> ¸ØÒV ±ÔπLÒl «∞FBUzd «∞v «∞ªe«Ê ±l «∞∑QØb °Q≤t ±Ô∫Jr
«∞∑dØOV ≠w ±JU≤t.
> «ß∑FLq ±U¡Î ©U“§UÎ ≠w Øq ±d… ¢º∑FLq ≠ONU «∞LM∑Z.
70
Page 75

±∫Bu∞v Øt œß∑JU¸È ®bÁ, |U °d«È îºU¸¢NUÈ ≤U®v «“ «ß∑HUœÁ Ë ≤~Nb«¸È «®∑∂UÁ, °º∑t °MbÈ ≤UÆh
¢ußj œ«¸≤bÁ œß∑~UÁ |U •Lq «®∑∂UÁ ¢ußj •U±q, ¢∫X Äu®g {LU≤X ≤ªu«≥b °uœ.
LAF-T/ LAFET ≠Ij °d«È ±∫Buô‹ îd|b«¸È ®bÁ œ¸ |Jv «“ ØAu¸≥UÈ ±u§uœ
{LU≤X °}s «∞LKKv
œ¸ ∞}ºX, Ë ±u¸œ «ß∑HUœÁ °d«È ±IUÅb œ«îKv œ¸ |Jv «“ ØAu¸≥UÈ –Ød ®bÁ œ¸ ∞}ºX ØAu¸ °t ØU¸
°dœÁ ±v ®uœ. œ¸ §Uzv Øt ¥J‡ ±∫Bu‰ œ¸ ¥J‡ ØAu¸ –Ød ®bÁ îd|b«¸È ®uœ Ë ßáf œ¸ ØAu¸ œ|~d
–Ød ®bÁ ±u¸œ «ß∑HUœÁ Æd«¸ Ö}dœ :
a) ±b‹ “±UÊ {LU≤X °}s «∞LKKv LAF-T/ LAFET ±d°u◊ °t ØAu¸ ±u¸œ «ß∑HUœÁ «“ ±∫Bu‰
«ßX, •∑v «Öd ±∫Bu‰ œ¸ ØAu¸ œ|~d ≠NdßX ®bÁ °U ±b‹ “±UÊ ±ª∑Kn {LU≤X îd|b«¸È
®bÁ °U®b.
b) {LU≤X °}s «∞LKKv LAF-T/ LAFET œ¸ Åu¸‹ ´b «≤D∂U‚ ±∫Bu‰ îd|b«¸È ®bÁ °U
«ß∑U≤b«¸œ≥UÈ ±∫Kv, ±U≤Mb Ë∞∑U˛, ≠dØU≤f, Äd|e °d‚, |U ßU|d ±AªBU‹ ≠Mv ±∫q; ÆU°q
«§d« ≤ªu«≥b °uœ.
c)
≠d¬|Mb ¢FL}d °d«È ±∫Buô‹ îd|b«¸È ®bÁ œ¸ îU¸Ã «“ ØAu¸ «ß∑HUœÁ, ±LJs «ßX ≤}U“ °t
LAF-T/ LAFET °t Åu¸‹ ±∫Kv °t ≠dË‘ ≤dßb.
“±UÊ ©uô≤v ¢d œ«®∑t °U®b «Öd ±∫Bu‰
d)
œ¸ ±u«¸œÈ Øt ±∫Bu‰ œ¸ ØAu¸ §b|b ÆU°q ¢FL}d ≤∂U®b, {LU≤X °}s «∞LKKv LAF-T/ LAFET
±∫bËœ °t §U|~e|Mv °U |J‡ ±∫Bu‰ ±AU°t |U |J‡ ±∫Bu‰ œ|~d °U ≥e|Mt ±AU°t, œ¸ Åu¸‹ ∞eËÂ
±v Ödœœ.
•Iu‚ ÆU≤u≤v ±Bd· ØMMbÁ
LAF-T/ LAFET, °d •Iu‚ ÆU≤u≤v ±Bd· ØMMbÁ |U •IuÆv Øt ≤Lv ¢u«≤b «≤∫BU¸È
{LU≤X °}s «∞LKKv
|U ±∫bËœ °U®b Ë •Iu‚ ±Bd· ØMMbÁ œ¸ °d«°d îdœÁ ≠dË®v Øt ±∫Bu‰ ¸« «“ ËÈ îd|b«¸È ≤LuœÁ,
FA
¢U£}dÈ ≤ªu«≥b œ«®X. «“ ©d|o «|s {LU≤X, •Iu‚ ÆU≤u≤v îU’ °t ±Bd· ØMMbÁ œ«œÁ ®bÁ Øt ©v ¬Ê
±Bd· ØMMbÁ ±v ¢u«≤b «“ ßU|d •Iu‚ ÆU≤u≤v Øt «“ «|U∞X °t «|U∞X Ë ØAu¸ °t ØAu¸ ±∑HUË‹ îu«≥b °uœ,
°NdÁ °∂dœ. ±Bd· ØMMbÁ ±LJs «ßX ≥d¥J‡ «“ •Iu‚ ¸« œ¸ Åö•b|b îuœ ±b´v ®uœ.
«©ö´U‹ «{U≠t
∞u«“ §U≤∂v, ØUô≥UÈ ±Bd≠v Ë ÆDFU‹ ÆU°q ¢Fu|i ØU¸°d¸ ≤NUzv ÆU°q îd|bÊ îu«≥b °uœ, œ¸ Åu¸¢}Jt
LAF-T/ LAFET, œ¸ œ«îq ±u§uœ °U®b.
°d©∂o «©ö´U‹ ßU|X «|M∑d≤∑v
* ∞u«“ îU≤~v LAF-T/ LAFET ¢∫X ≤U ¢πU¸È LAF-T œ¸ °dîv «“ ±MU©o ±U≤Mb ¬±d|JU Ë ˛«Äs ™U≥d
±v ®uœ.
LAF-T/ LAFET ´özr ¢πU¸È £∂X ®bÁ BESpuorG ±v °U®Mb.
71
Page 76

ÖU¸«≤∑v ±∫bËœ °}s «∞LKKv *LAF-T / LAFET
: moc.lafet.www
LAF-T / LAFET, ÆU°q ¢FL}d «ßX.
«|s ±∫Bu‰ œ¸ îö‰ Ë °Fb «“ œË¸Á ÖU¸«≤∑v, °U
{LU≤X :
LAF-T / LAFET (°d©∂o ¬œ¸” ®dØX Ë §ez}U‹ ±Mb¸Ã œ¸ ∞}ºX ØAu¸≥UÈ ¢∫X
LAF-T / LAFET) œ¸ °d«°d ≥dÖu≤t ´}V œ¸ ±BU∞` |U ßUîX œ¸ ¢u∞}b °d«È ±b‹
«|s ±∫Bu‰ «“ ©d·
{LU≤X °}s «∞LKKv
{LU≤X ¢F}}s ®bÁ Ë ØAu¸≥UÈ ±Mb¸Ã œ¸ ∞}ºX œ¸ ÅH∫t ¬îd Ø∑U» ¸«≥MLUÈ ØU¸°d, °d©∂o «Ë∞}s
¢U¸|a îd|b, ¢CL}s ±v ®uœ.
LAF-T / LAFET°t ±IU°t ¥J‡ ±MHFX «{U≠t ±v °U®b Øt ¢U£}dÈ
{LU≤X °}s «∞LKKv ¢u∞}b ØMMbÁ «“ ©d·
°d •Iu‚ ÆU≤u≤v ±Bd· ØMMbÁ ≤ªu«≥b œ«®X.
{LU≤X °}s «∞LKKv ¢u∞}bØMMbÁ ØK}t ≥e|Mt ≥UÈ ±d°u◊ °t ¢d±}r ´}u» ±∫Bu‰ ¸« Äu®g ±v œ≥b, °Du¸|Jt
Äf «“ ¢FL}d |U ¢Fu|i ÆDFU‹ ≤UÆh Ë ØU¸≥UÈ ô“Â, °U ±AªBU‹ «ÅKv ±∫Bu‰ ±DU°IX œ«®∑t
°U®b.
°U «≤∑ªU»
LAF-T / LAFET, ¥J‡ ±∫Bu‰ §b|b °πUÈ ¢FL}d ±∫Bu‰ ±F}u», §U|~e|s ±v Ödœœ. ¢FNb
LAF-T / LAFET Ë ¢BL}r ±M∫Bd °Hdœ ®LU ¢∫X «|s {LU≤X, ±AdË◊ °t ¢FL}d |U
±M∫Bd °Hdœ
§U|~e|Mv îu«≥b °uœ.
®d«|j Ë ±u«¸œ «ß∑∏MU¡
{LU≤X °}s «∞LKKv LAF-T / LAFET, °d©∂o ±b‹ ¢CL}s Ë ØAu¸≥UÈ ±Mb¸Ã œ¸ ∞}ºX Ë «¸«zt °dÖt îd|b,
ÆU°q «ß∑HUœÁ îu«≥b °uœ. ±∫Bu‰ ¸« ±v ¢u«Ê ±º∑I}LU" °t |J‡ ±dØe îb±U‹ ±πU“ °dÖdœ«≤b Ë |U °U ¥J‡ °º∑t
LAF-T / LAFET «¸ßU‰
LAF-T / LAFET
°MbÈ ±MUßV °uß}Kt ¢∫u|q ßHU¸®v (|U ĺX ±AU°t), °t |J‡ ±dØe îb±U‹ ±πU“
≤Luœ. §ez}U‹ ØU±q ≤AU≤v ±d«Øe îb±U‹ ±πU“ ≥d ØAu¸ «“ ©d|o Ë» ßU|X
(moc.lafet.www), |U ¢LU” °U ®LU¸Á ≥UÈ ±Mb¸Ã œ¸ ∞}ºX ØAu¸≥U œ¸ œß∑d” îu«≥b °uœ.
LAF-T / LAFET ±Ke ≤ªu«≥b °uœ Øt °t ¢FL}d |U §U|~e|Mv ±∫Bu∞v Øt œ«¸«È ±b¸Ø‡ ±F∑∂d îd|b ≤Lv
°U®b, «Æb«Â ≤LU|b.
«|s {LU≤X îºU¸¢NUÈ ≤U®v «“ ±u«¸œ –|q ¸« Äu®g ≤ªu«≥b œ«œ: ßu¡ «ß∑HUœÁ, ¨HKX, Øu¢U≥v œ¸
LAF-T / LAFET, «ß∑HUœÁ °U §d|UÊ °d‚ |U Ë∞∑U˛ ±∑HUË‹ «“ ¬≤ât °d ¸ËÈ
Ä}dËÈ «“ œß∑u¸«∞FLKNUÈ
±∫Bu‰ œ¸Ã ®bÁ, «ÅöÕ Ë ¢FL}d ¨}d ±πU“ ±∫Bu‰. «ß∑Nö؇ ≤d±U‰, ≤~Nb«¸È |U §U|~e|Mv
ÆDFU‹ ±Bd· ®b≤v Ë ±u«¸œ –|q ¢∫X Äu®g ®dØX ≤ªu«≥b °uœ:
- «ß∑HUœÁ «“ ¬» ±Bd≠v ≤U±MUßV
- ¸ßu» Öc«¸È (≥dÖu≤t §d Ö}dÈ °U|b °d©∂o œß∑u¸«∞FLKNUÈ «ß∑HUœÁ «≤πU ®uœ)
- ˸˜ ¬», ¨∂U¸ |U •Ad«‹ °t œ«îq ±∫Bu‰
- îºU¸¢NUÈ ±JU≤OJv, «{U≠t ™d≠}X
- îºU¸‹ |U ≤∑U|Z °b ≤U®v «“ Ë∞∑U˛ |U ≠dØU≤f «®∑∂UÁ
- ËÆU|Fv ≤E}d ¬¢g ßu“È, ß}q, ÅU´It
- «ß∑HUœÁ •d≠t «È |U ¢πU¸È
- îºU¸‹ °t ±u«œ ®}At «È |U Ç}Mv œ¸ ±∫Bu‰
- §U|~e|Mv ±u«œ ±Bd≠v
72
Page 77

> œË ß∂b ¸« °d ¸ËÈ Ë«•b ÄU|t °âdîU≤}b - ¢Bu|d 81
(°d©∂o ±b‰).
> ®∂Jt 1°N ®∂Jt 2°N ¸« «≤∂U®∑t ØM}b. ®∂Jt ≥U ¸«
œ¸ Ë«•b ÄU|t Æd«¸ œ≥}b - ¢Bu¥d 91 (°d©∂o ±b‰).
> œ¸» ¸« œ¸ °Uô Æd«¸ œ≥}b - ¢Bu|d 02.
¸«≥MLUÈ ≠Mv ´}V |U°v
> œß∑~UÁ îuœ ¸« œ¸ Åu¸‹ ±∑uÆn ®bÊ ØU¸ ØdœÊ, «“ °}s ≤∂d|b, ¬Ê ¸« °t |Jv «“ ±d«Øe
îb±U‹ ±πU“ §NX ¢FL}d «¸ßU‰ ØM}b.
¸«Á •‡‡‡‡q
œß∑~UÁ ¸« °t °d‚ ËÅq ØM}b Ë ¢U|Ld ¸«
°âdîU≤}b.
œ¸ ÄU|UÊ “±UÊ ÄªX Ë Äe, ≤u¸ °t Åu¸‹
îuœØU¸ îU±u‘ ±v ®uœ.
œ∞‡‡‡‡O‡‡‡q
¢U|Ld ¢ME}r ≤AbÁ «ßX.
ĪX Ë Äe °t ÄU|UÊ ¸ß}bÁ «ßX.
‡D‡‡U
≤u¸ ®Uîh ≤U¸≤πv
Äb|b«¸ ≤Lv ®uœ.
°U îb±U‹ Äf «“ ≠dË‘ ±U ¢LU” °~}d|b.
°U îb±U‹ Äf «“ ≠dË‘ ±U ¢LU” °~}d|b.
°d«È “±UÊ ÄªX Ë Äe ØL∑d «“, œØLt ¸« ¢U
•b«Æq 51 œÆOIt °âdîU≤}b Ë °t “±UÊ 03
œÆOIt ≤}U“ ĪX Ë Äe °dÖdœ|b.
°U îb±U‹ Äf «“ ≠dË‘ ¢LU” °~}d|b.
§d ßUî∑t ®bÁ ¸« «“ «∞LMX Öd±U|Av
°dœ«¸|b.
°d¸ßv ØM}b Øt ß∂b≥U / ®∂Jt ≥U °U ≥r °t
œ¸ß∑v ≤BV ®bÁ Ë œ¸ ±uÆF}X Å∫}`
Æd«¸ Öd≠∑t «ßX.
±uÆF}X ¬Ê ¸« °d¸ßv ØM}b.
ÆDFU‹ ¬ß}V œ|bÁ «ßX.
≤u¸ ®Uîh ≤U¸≤πv
FA
´}V œ¸ «∞LMX Öd±U|Av
“±UÊ ÄªX Ë Äe œ¸ •b Ør ¢ME}r
Äb|b«¸ ±v ®uœ «±U
œß∑~UÁ Öd ≤Lv ØMb.
¢U|Ld Ö}d ±v ØMb.
®bÁ «ßX.
ÇJt «“ «∞LMX Öd±U|Av ±v ¬|b.
œ¸ «∞LMX Öd±U|Av §d ßUî∑t
®bÁ «ßX.
ß∂b / ®∂Jt °U ≥r °t œ¸ß∑v
≤BV ≤AbÁ «≤b.
ØAuÈ Äd ØdœÊ Ë«Æl œ¸ “|d §Ll
ØMMbÁ ¬» °U“ «ßX.
¬» «“ ÄU|t ÇJt ±v ØMb.
©∂a ±u«œ ¨c«zv °}A∑d «“
•b ±FLu‰ ©u‰ ±v ØAb.
°ªU¸ «“ «©d«· œß∑~UÁ
îU¸Ã ±v ®uœ.
73
Page 78

≤‡‡E‡‡‡U≠‡‡X Ë ≤‡‡~‡‡‡N‡‡‡b«¸È
¢L}e ØdœÊ œß∑~UÁ ®LU
> œß∑~UÁ ¸« Äf «“ «ß∑HUœÁ «“ ß}r °d‚ °JA}b.
> Æ∂q «“ ¢L}e ØdœÊ, °~c«¸|b Øt ØU±ö" ßdœ ®uœ.
> Æ∂q «“ ¢ªK}t §Ll ØMMbÁ ¬» Ë ±ªeÊ ¬», °d¸ßv ØM}b
Øt œß∑~UÁ °t «≤b«“Á ØU≠v ßdœ ®bÁ «ßX.
> ¢LU ÆDFU‹ ±∑∫d؇ ¸« œ¸ ¬» ÖdÂ Ë ±U|l ®u|MbÁ
°Auz}b, ¬°JAv ØdœÁ Ë îAJ‡ ≤LUz}b.
> ¢LU ÆDFU‹ °t ¨}d «“ Ë«•b ÄU|t °d‚ ±v ¢u«≤b œ¸ ±U®}s
™d≠Auzv Æd«¸ °~}dœ.
°d«È §KuÖ}dÈ «“ ™U≥d ®bÊ «|s ∞Jt ≥U, «|s ÆDFU‹ ¸«
«¨KV Ë Äf «“ «ß∑HUœÁ ¢L}e ØM}b.
«“ ≠dË °dœÊ Ë«•b ÄU|t °d‚ œ¸ ¬» îuœœ«¸È ØM}b.
«“ «ß∑HUœÁ «“ ±∫Buô‹ ¢L}e ØdœÊ ßU|MbÁ îuœœ«¸È
ØM}b.
«“ °}s °dœÊ §d ßUî∑t ®bÁ «“ œß∑~UÁ ®LU
°d«È °NdÁ °dœ«¸È °N}Mt «“ œß∑~UÁ ®LU, §d ßUî∑t
®bÁ ¸« œ¸ ≥d 8 œ≠Ft «ß∑HUœÁ «“ °}s °∂d|b. °d«È «≤πUÂ
«|s ØU¸:
> §Ll ØMMbÁ ¬» ¸« °dœ«¸|b.
> 1 ∞}∑d ¬» œ¸ ±ªeÊ ¬» °d|e|b.
> 2 ∞}u«Ê (•bËœ 003 ±}Kv ∞}∑d) ßdØt ßH}b «{U≠t
ØM}b.
> °~c«¸|b œ¸ ©v ®V °t ©u¸ ßdœ ØU¸ ØMb.
> œ«îq ±ªeÊ ¬» ¸« ÇMb œ≠Ft °U ¬» Öd ®º∑Au œ≥}b.
74
–î}dÁ ßU“È ß∂b≥U Ë ®∂Jt ≥UÈ ±∑∫d؇
(°d©∂o ±b‰)
> Äf «“ ¢L}e ØdœÊ ¢LU ÆDFU‹, œß∑~UÁ îuœ ¸« °t ®dÕ
–|q –î}dÁ ßU“È ØMOb:
> §Ll ØMMbÁ ¬» ¸« œ¸ ±ªeÊ ¬» Æd«¸ œ≥}b. ØUßt °d≤Z
±v ¢u«≤b °d ¸ËÈ §Ll ØMMbÁ ¬» °âdîb - ¢Bu¥d 61.
> ß∂b °ªU¸ 1°N ¸« œ¸ œ«îq ß∂b °ªU¸ 2°N «≤∂U®∑t
ØMOb - ¢Bu¥d 71 (°d©∂o ±b‰).
Page 79

±‡‡U≥v - ҇b·
“±UÊ ÄªX ¨c« (œÆOIt)
01 - 51
51 - 02
03 - 53
02 - 52
51 - 02
02 - 52
02 - 52
51 - 02
±Ib«¸
053 ÖdÂ
004 ÖdÂ
006 ÖdÂ
1 ØOKu ÖdÂ
003 ÖdÂ
002 ÖdÂ
001 ÖdÂ
055 ÖdÂ
≤uŸ
¢U“Á
±MπLb
¢U“Á
¢U“Á
¢U“Á
¢U“Á
¢U“Á
¢U“Á
¨c«
≠OKt ±U≥v
±U≥v ØU±q
Åb·
«ß∑OJ‡ ±U≥v ¢OdÁ ¸≤@
±O~u
Åb· «ßJU∞uÛ
±U≥v ¬“«œ
Öu®X - ©Ou¸
(ϮOIt)
“±UÊ ÄªX ¨c«
53 - 04
02 - 52
02 - 52
02 - 52
02 - 52
51 - 02
±Ib«¸
4
054 ÖdÂ
004 ÖdÂ
006 ÖdÂ
8
8
≤uŸ
ØU±ö" - ¢U“Á
¢U“Á
-
±MπLb
¢U“Á
¨c«
±HBq ¸«Ê ±d⁄
«ßJU∞uÛ ±d⁄
«ßJU∞uÛ °uÆKLuÊ
FA
ßußOf
ÄUÈ Öu®X ÖUË
¢ªr ±‡‡d⁄
(ϮOIt)
“±UÊ ÄªX ¨c«
±Ib«¸
6 02 - 52
≤uŸ
-
¨c«
¢ªr ±d⁄ ßHX Äe
°d≤Z - ÄUß∑U - ¨ö‹
(ϮOIt)
“±UÊ ÄªX ¨c«
03 - 53
51 - 02
04 - 54
±Ib«¸
002 ±OKv ∞O∑d
002 ±OKv ∞O∑d
003 ±OKv ∞O∑d
≤uŸ
521 ÖdÂ
521 ÖdÂ
521 ÖdÂ
¨c«
°d≤Z ßHOb œ«≤t °KMb
ÖMb °KGU¸
¨ö‹
75
Page 80

76
“±UÊ ÄªX Ë Äe °U «ß∑HUœÁ «“ ß∂b 1°N
ß∂e¥πU‹
“±UÊ ÄªX ¨c« (œÆOIt)
54 - 55
03 - 53
03 - 53
52 - 13
02 - 52
02 - 52
52 - 03
03 - 53
51 - 02
51 - 02
51 - 12
53 - 04
03 - 53
53 - 04
02 - 52
05 - 55
05 - 55
51 - 02
04 - 54
03 - 53
53 - 04
02 - 52
±Ib«¸
1
055 ÖdÂ
005 ÖdÂ
004 ÖdÂ
003 ÖdÂ
005 ÖdÂ
006 ÖdÂ
1 «≤b«“Á ±∑ußj
003 ÖdÂ
003 ÖdÂ
004 ÖdÂ
054 ÖdÂ
004 ÖdÂ
005 ÖdÂ
052 ÖdÂ
003 ÖdÂ
003 ÖdÂ
052 ÖdÂ
006 ÖdÂ
006 ÖdÂ
005 ÖdÂ
006 ÖdÂ
≤uŸ
¢U“Á
¢U“Á
¢U“Á
±MπLb
¢U“Á
¢U“Á
¢U“Á
¢U“Á
¢U“Á
±MπLb
¢U“Á
¢U“Á
±MπLb
¢U“Á
¢U“Á
¢U“Á
±MπLb
¢U“Á
¢U“Á
¢U“Á
ØU±ö" - ¢U“Á
¢U“Á
¨c«
ØM~d≠d≤~v
±U¸Çu°t
ØKr °dËØKv
≥u|Z
(°d‘ ≤U“؇ 3 ±}Kv ±∑dÈ)
ÆU¸ı
ØKr (¥J‡ ÇU¸Ø‡ 08 Öd±v)
Öq ØKr
«ßHMUÃ
∞u°}U ≤v ∞∂J‡
∞u°}UÈ Ä}ê
¢dÁ ≠d≤~v
≠KHq
≤ªuœ ≠d≤~v °U⁄ œ¸
ØUßt °d≤Z
Ä}U“ ßH}b ØuÇJ‡
ß}V “±}Mv
ØbË ß∂e
–¸‹
°Uœ≤πUÊ
±‡‡O‡‡uÁ
“±UÊ ÄªX ¨c« (œÆOIt)
53 - 03
51 - 02
51 - 02
51 - 02
±Ib«¸
4
4
4
4
≤uŸ
¢U“Á
¢U“Á
¢U“Á
¢U“Á
¨c«
Öö°v
±u“
≥Ku
ßOV
Page 81

°‡‡F‡‡‡b «“ «ß‡‡‡∑‡‡H‡‡‡‡‡UœÁ
> ß}r °d‚ œß∑~UÁ ¸« Äd|e °d‚ °JA}b.
> °~c«¸|b œß∑~UÁ Æ∂q «“ ¢L}e ØdœÊ ØU±ö" ßdœ ®uœ.
°d¸ßv ØM}b Øt §Ll
ØMMbÁ ¬» Æ∂q «“ °dœ«®∑s
¬Ê °t «≤b«“Á ØU≠v ßdœ
®bÁ «ßX.
§‡‡bˉ “±‡‡UÊ Äª‡X Ë Ä‡e
“±UÊ ÄªX Ë Äe °t ´Mu«Ê |J‡ œß∑u¸«∞FLq °d«È ĪX Ë Äe
°U «ß∑HUœÁ «“ ß∂b ÄUz}s ¢d œ«œÁ ±v ®uœ. ¬≤NU ±LJs
«ßX °U ¢u§t °t «≤b«“Á ¨c«, ≠UÅKt “±U≤v °}s ¨c«, ±Ib«¸
¨c«; «ß∑HUœÁ «“ ßD` ß∂b≥UÈ ±ª∑Kn Ë «Ë∞u|X ≥UÈ
≠dœÈ ±∑HUË‹ °U®Mb.
“±UÊ ÄªX Ë Äe ¸« °d©∂o ±Ib«¸ ¨c« ¢ME}r ØM}b. “±UÊ
«“ œß∑Jg ≠d °d«È
œßX “œÊ °t ß∂b Ë œ¸»
œ¸ ©u‰ ĪX Ë Äe
«ß∑HUœÁ ØM}b.
ĪX Ë Äe ≤}e °U|b ≥M~U «ß∑HUœÁ «“ °}g «“ |J‡ ß∂b °d«È
FA
¨c«È °ªU¸Äe «≠e«|g |U°b.
°d«È ±u«œ ¨c«zv °U “±UÊ ≥UÈ ±ª∑Kn ĪX Ë Äe: ±u«œ
¨c«zv Øt ≤}U“ °t ©uô≤v ¢d|s “±UÊ œ«¸≤b, œ¸ ß∂b ÄUz}s
¢d Æd«¸ œ≥}b. œ¸ ©u‰ ĪX Ë Äe, œË±}s ß∂b °U ¨c«zv Øt
≤}U“ °t “±UÊ ØL∑dÈ °d«È ĪX Ë Äe œ«¸œ «{U≠t ØM}b.
77
Page 82

°d«È Ī∑s ¢ªr ±d⁄:
> ¢ªr ±d⁄ ¸« œ¸ ≤~t œ«¸≤bÁ ¢uØU¸ ¢ªr ±d⁄ Æd«¸ œ≥}b
- ¢Bu¥d 8.
> ¢U|Ld ¸« œ¸ “±UÊ ¢uÅ}t ®bÁ ¢ME}r ØM}b (°t §bˉ
“±UÊ Äª∑s ≤~UÁ ØM∂b).
œ¸ ©u‰ ĪX Ë Äe
> ßD` ¬» ¸« °U ≤~UÁ ØdœÊ °t ßD` ÆU°q ¸Ë|X ¬»
°d¸ßv ØMOb.
> œ¸ Åu¸‹ ∞eËÂ, ¬» ¸« «“ ©d|o ØAuÈ Äd ØdœÊ ¬»
«{U≠t ØM}b - ¢Bu¥d 9.
œ¸ ©u‰ ĪX Ë Äe, «“ °U“ ≤JdœÊ œ¸» ±DLµs ®u|b -
¢Bu¥d 01. ≥LâM}s «“ ±ºbËœ ≤AbÊ îd˧v °ªU¸ °d
¸ËÈ œ¸» ±DLµs ®u|b - ¢Bu¥d 11.
°d«È §KuÖ}dÈ «“ ØZ ®bÊ, œ¸» ¸« °t ©u¸ ´Luœ Æd«¸
≤b≥}b - ¢Bu|d 21.
«Öd ¬» °}A∑dÈ Ë§uœ
≤b«¸œ, œß∑~UÁ °ªU¸
°}A∑dÈ ¢u∞}b ≤ªu«≥b
Ødœ Ë œ|~d °t ©∂a ¨c«
«œ«±t ≤ªu«≥b œ«œ.
œ¸ ÄU|UÊ ÄªX Ë Äe
> œß∑~UÁ °t ©u¸ îuœØU¸ îU±u‘ ±v ®uœ.
> ¢U|Ld °u‚ ±v “≤b Ë Çd«⁄ ≤AU≤~d îU±u‘ ±v ®uœ.
> °d«È ±∑uÆn ØdœÊ œß∑~UÁ Ä}g «“ ÄU|UÊ ≤BV “±UÊ
ĪX Ë Äe, ¢U|Ld ¸« °t ßuÈ ±uÆF}X îU±u‘ "FFO"
°âdîU≤}b.
œË°U¸Á Öd ØdœÊ
> ®LU ±v ¢u«≤}b œË°U¸Á ¨c« ¸« Öd ØM}b.
78
°dœ«®∑s ¨c« «“ ß∂b °ªU¸
> œ¸» ™d· ¸« °U œß∑t °dœ«¸|b - ¢Bu|d 31.
> ß∂b °ªU¸ 2°N, ®∂Jt 2°N Ë ß∂b °ªU¸ 1°N ¸«
°dœ«¸|b - ¢Bu|d 41.
«ß∑HUœÁ «“ ∞u«“ §U≤∂v
≠KeÈ °d«È °dœ«®∑s ¨c«
¢uÅ}t ≤Lv ®uœ.
> ¨c« ¸« °U «ß∑HUœÁ «“ œß∑Jg ≠d °dœ«¸|b - ¢Bu¥d 51.
«“ œß∑Jg ≠d °d«È œßX “œÊ °t ß∂b, œß∑t, ÄU|t Ë
œ¸» «ß∑HUœÁ ØM}b - ¢Bu|d 51.
Page 83

(°d©∂o ±b‰)
> ß∂b≥U œ«¸«È ®∂Jt ≥Uzv «ßX Øt ±v ¢u«≤b °d«È
°bßX ¬Ë¸œÊ ±JUÊ ÄªX Ë Äe °e¸¯ ¢d |U ©∂a ±u«œ
¨c«zv °}A∑d, °dœ«®∑t ®uœ.
-
≥L}At ®∂Jt 1°N ¸« œ¸ §Ll ØMMbÁ ¬» Æd«¸ œ≥}b
-
ßáf ß∂b 1°N ¸« Æd«¸ œ≥}b
-
°Fb«" ®∂Jt 2°N ¸« Æd«¸ œ≥}b
-
ßáf ß∂b 2°N
> œ¸» ¸« Æd«¸ œ≥}b (œ¸» °U ≥Lt ß∂b≥U ¢MUßV œ«¸œ).
©∂a «Æö “|UœÈ «“ ±u«œ ¨c«zv :
-
®∂Jt 2°N ¸« °dœ«¸|b
- ß∂b 2°N ¸« °t ©u¸ ±º∑I}r œ¸ ß∂b 1°N Æd«¸ œ≥}b
- ±u«œ ¨c«zv ¸« œ¸ œ«îq Æd«¸ œ≥}b - ¢Bu|d 5.
- œ¸» ¸« Æd«¸ œ≥}b.
®LU ±v ¢u«≤}b «“
œß∑~UÁ °U 1 |U 2 ß∂b
°º∑t °t ≤}U“ ®LU
«ß∑HUœÁ ØM}b.
ß∂b≥U ¸« œ¸ ±∫q
±MUßV Æd«¸ œ≥}b.
°d«È °N∑d|s ≤∑}πt, «“
Æd«¸ œ«œÊ °}g «“ •b
±u«œ ¨c«zv œ¸ ß∂b≥U
îuœœ«¸È ØM}b.
°‡‡ª‡‡U¸ 懇‡e ؇‡‡‡‡dœÊ
FA
“±UÊ ÄªX Ë Äe ¸« «≤∑ªU» ØMOb
> œß∑~UÁ ¸« °t °d‚ ËÅq ØMOb.
> ¢U¥Ld ¸« °d«È “±UÊ ¢uÅ}t ®bÁ ¢ME}r ØM}b - ¢Bu|d 6
(°t §bˉ “±UÊ ÄªX Ë Äe ≤~UÁ ØMOb).
Æd«¸ œ«œÊ ®∂Jt ≥U Ë ß∂b≥UÈ ÆU°q •Lq
œß∑~UÁ °d«È ¢ME}r
¢U|Ld °U|b °t °d‚ ËÅq
®uœ.
> Çd«⁄ ≤AU≤~d ≤U¸≤πv Äb|b«¸ ±v ®uœ.
> °ªU¸Äe ØdœÊ ¬¨U“ ®bÁ «ßX.
°d«È “±UÊ ÄªX Ë Äe ØL∑d «“ 51 œÆ}It, ¢U|Ld ¸« °t
03 œÆ}It °âdîU≤}b Ë ßáf °t ßLX ´IV °t
ßuÈ “±UÊ ±u¸œ ≤}U“ °âdîU≤}b.
°d«È ©∂a °d≤Z :
> ¬» Ë °d≤Z ¸« œ¸ ØUßt °d≤Z Æd«¸ œ≥Ob.
> ØUßt °d≤Z ¸« œ¸ ß∂b °ªU¸ Æd«¸ œ≥}b - ¢Bu|d 7.
> ¢U|Ld ¸« œ¸ “±UÊ ¢uÅ}t ®bÁ ¢ME}r ØM}b (°t §bˉ
“±UÊ ÄªX ≤~UÁ ØM}b).
79
Page 84

®‡‡‡‡dÕ
8 «∞LMX Öd±U|Av
9 ±ªeÊ ¬»
01 ÄU¥t
11 ßD` ÆU°q ¸Ë|X ¬»
(°d ©∂o ±b‰)
21 •b«Ø∏d ßD` ¬»
31 ¢U¥Ld
41 ¸≤@ ≤U¸≤πv œ¸ Çd«⁄ ≤AU≤~d
(°d ©∂o ±b‰)
51 Äd|e °d‚
61 ØUßt °d≤Z
1 œ¸»
2 ß∂b °ªU¸ 2°N
3 ®∂Jt ±∑∫d؇ 2°N
4 ß∂b °ªU¸ 1°N
5 ®∂Jt ±∑∫d؇ 1°N
Ë ≤~Nb«¸≤bÁ ¢uØU¸ ¢ªr ±d⁄
6 §Ll ØMMbÁ ¬»
7 ØAuÈ Äd ØdœÊ ±πbœ ¬»
¬±‡‡‡UœÁ ߇‡‡‡U“È
Æ∂q «“ «ß∑‡‡H‡‡UœÁ
«“ ≠dË °dœÊ Ë«•b ÄU|t
°d‚ îuœœ«¸È ØMOb -
¢Bu¥d 2.
¬±UœÁ ßU“È °ªU¸Äe
> Ë«•b ÄU|t ¸« œ¸ |J‡ ßD` ÄU|b«¸ Æd«¸ œ≥}b.
«Æö±v ¸« Øt «•∑LUô" °U
°ªU¸ ¬ß}V œ|bÁ «ßX
ØMU¸ °~c«¸|b.
«“ «ß∑HUœÁ «“ ÇU®Mv |U
≥dÖu≤t ±U|l ¨}d «“ ¬»
œ¸ ±ªeÊ îuœœ«¸È ØM}b.
Æ∂q «“ ¸Ë®s ØdœÊ
œß∑~UÁ, «©L}MUÊ •UÅq
ØM}b Øt ¬» œ¸ ±ªeÊ
˧uœ œ«¸œ.
¢Bu¥d B-3.
> °d«È ¢L}e ØdœÊ ±ªeÊ ¬», ¬Ê ¸« °U ¥J‡ «ßHMZ ±d©u»
¨Od ßU¥MbÁ ÄU؇ ØMOb - ¢Bu¥d 1.
> ¢LU ÆDFU‹ ±∑∫d؇ ¸« °U ¬» ÖdÂ Ë ±U|l ®º∑Au
°Auz}b, ¬°JAv ØdœÁ Ë îAJ‡ ØMOb.
Äd ØdœÊ ±ªeÊ ¬»
> œË ¸«Á °d«È Äd ØdœÊ ±ªeÊ ¬» ˧uœ œ«¸œ:
A. ¬» ¸« °t ©u¸ ±º∑I}r ¢U ßD` •b«Ø∏d œ¸ ±ªeÊ ¬»
°d|e|b - ¢Bu¥d A-3.
B. ØAuÈ Äd ØdœÊ ¬» ¸« °U“ ØM}b Ë ¬» ¸« ¢U ßD`
•b«Ø∏d °d|e|b -
> §Ll ØMMbÁ ¬» ¸« œ¸ ±ªeÊ §UßU“È ØM}b °t ©u¸È Øt
«©L}MUÊ •UÅq ®uœ Øt °t Åu¸‹ ÄU|b«¸ Ë ±∫Jr œ¸
§UÈ îuœ Æd«¸ Öd≠∑t «ßX.
> ¬» ¢U“Á ¸« °U ≥d ØU¸°dœ «ß∑HUœÁ ØM}b.
80
Page 85

EN p. 1 - 10
ZH p. 11 - 20
TH p. 21 - 30
MS p. 31 - 40
FR p. 41 - 50
EL p. 51 - 60
AR p. 70 - 61
FA p. 80 - 71
www.tefal.com
March 2013 - Réf. : NC00118075 - réalisation : Espace Graphique
 Loading...