

Page 1
EN
FR
ZH
MS
AR
FA
IT84XX
www.tefal.com
Page 2

Page 3
1
2*
4
12*
13*
14*
3
10
11
17*
15*
16*
5
7*
9
* EN Depending on model / FR Selon le modèle / ZH 好ḵ❲噆/ MS Bergantung pada model / AR ﻞﻳدﻮﳌا ﺐﺴﺣ
/ FA
لﺪﻣ ﻪﺑ ﻪﺘﺴﺑ
6
8
Page 4

PRODUCT DESCRIPTION / DESCRIPTION DU PRODUIT
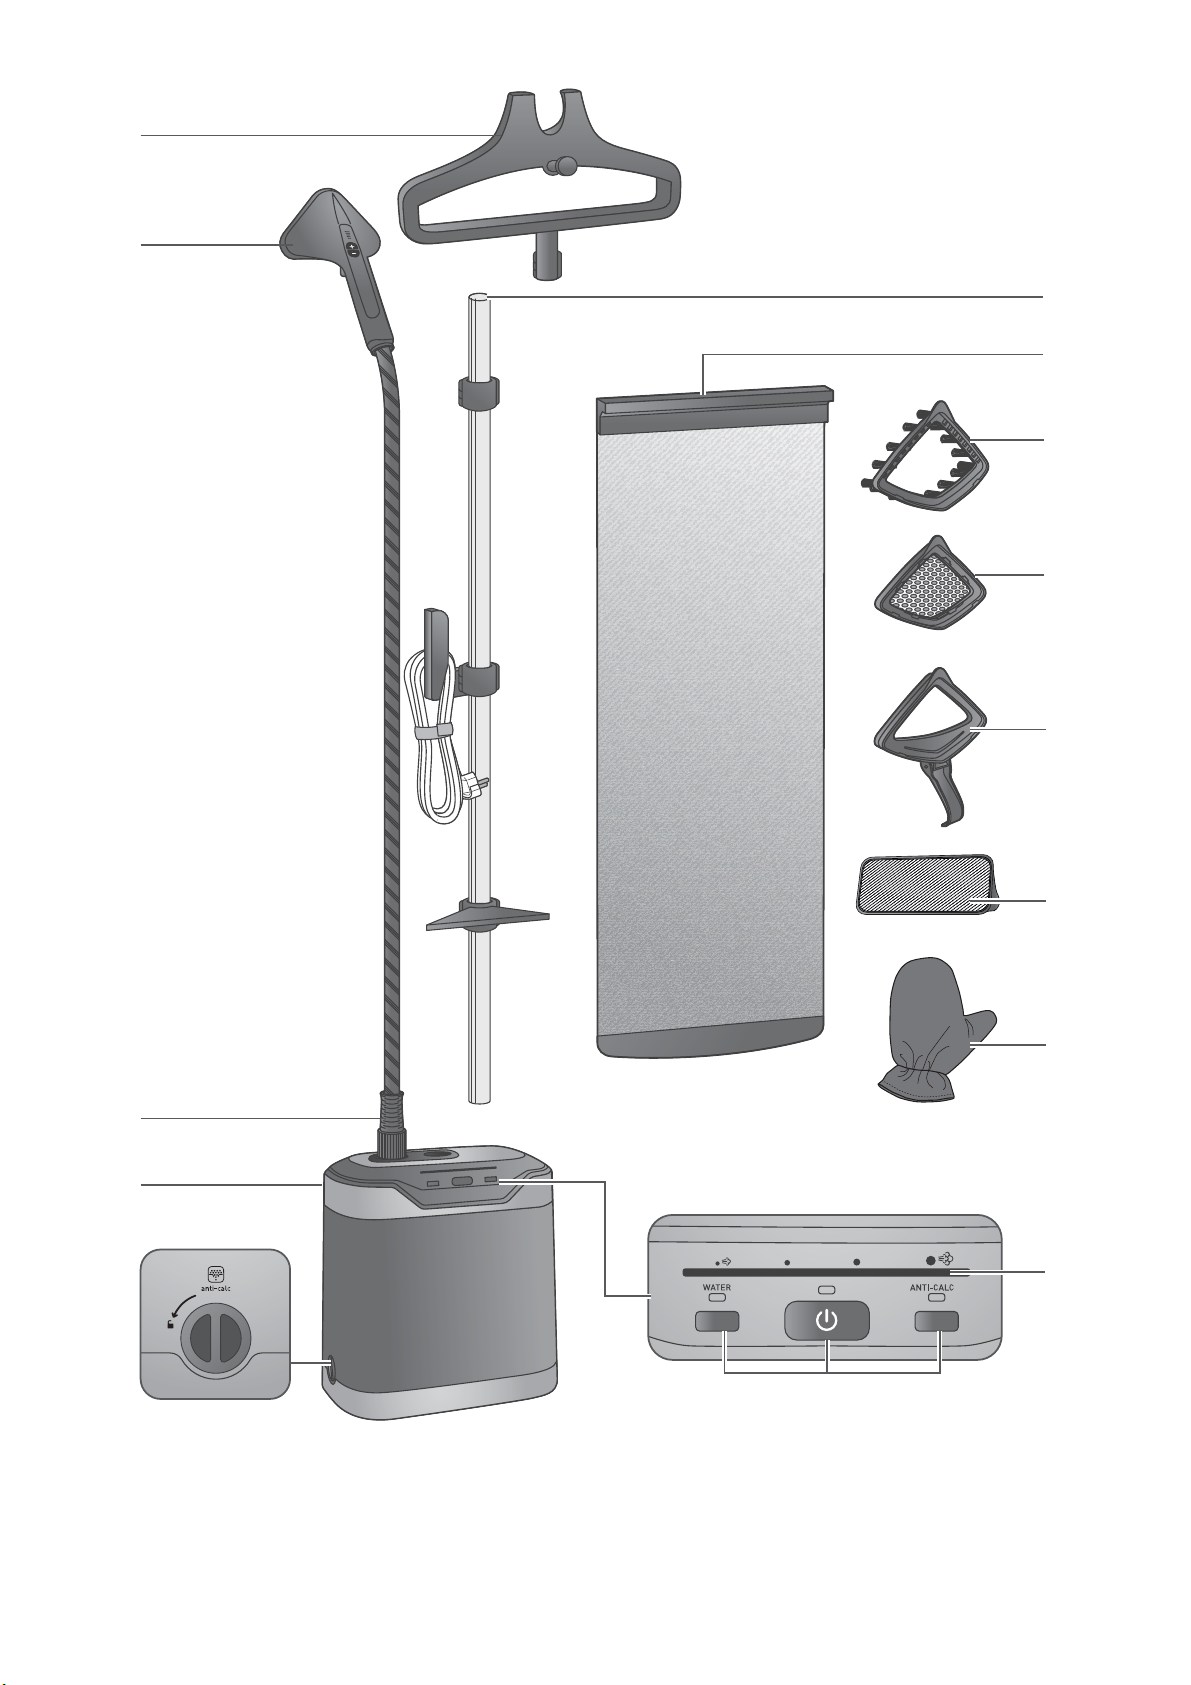
1. EN Hanger + hanger hook
FR Cintre + crochet
2. EN Steam Head*
FR Tête vapeur*
3. EN Steam Hose
FR Cordon vapeur
4. EN Adjustable pole +
adjustable vertical support
hook* + Power cord hook
FR Pole ajustable + crochet
ajustable du support
vertical* + crochet du
cordon d'alimentation
9. EN Water tank button
FR Bouton réservoir
10. EN Removable Water tank
FR Réservoir amovible
11. EN Draining Cap
FR Ouverture anti-calc
12. EN Removable vertical
support*
FR Support vertical amovible*
13. EN Fabric Brush *
FR Brosse pour tissu *
5. EN Control pannel
FR Panneau de contrôle
6. EN ON/OFF button
FR Bouton ON/OFF
7. EN Steam level led*
FR Led niveau de vapeur*
8. EN Anti-calc button
FR Bouton anti-calc
14. EN Steam bonnet*
FR Protège-tissu*
15. EN Lint pad*
FR Brosse anti-peluches*
16. EN Glove*
FR Gant*
17. EN Crease attachement*
FR Pince à pli*
* EN Depending on model / FR Selon le modèle
Page 5
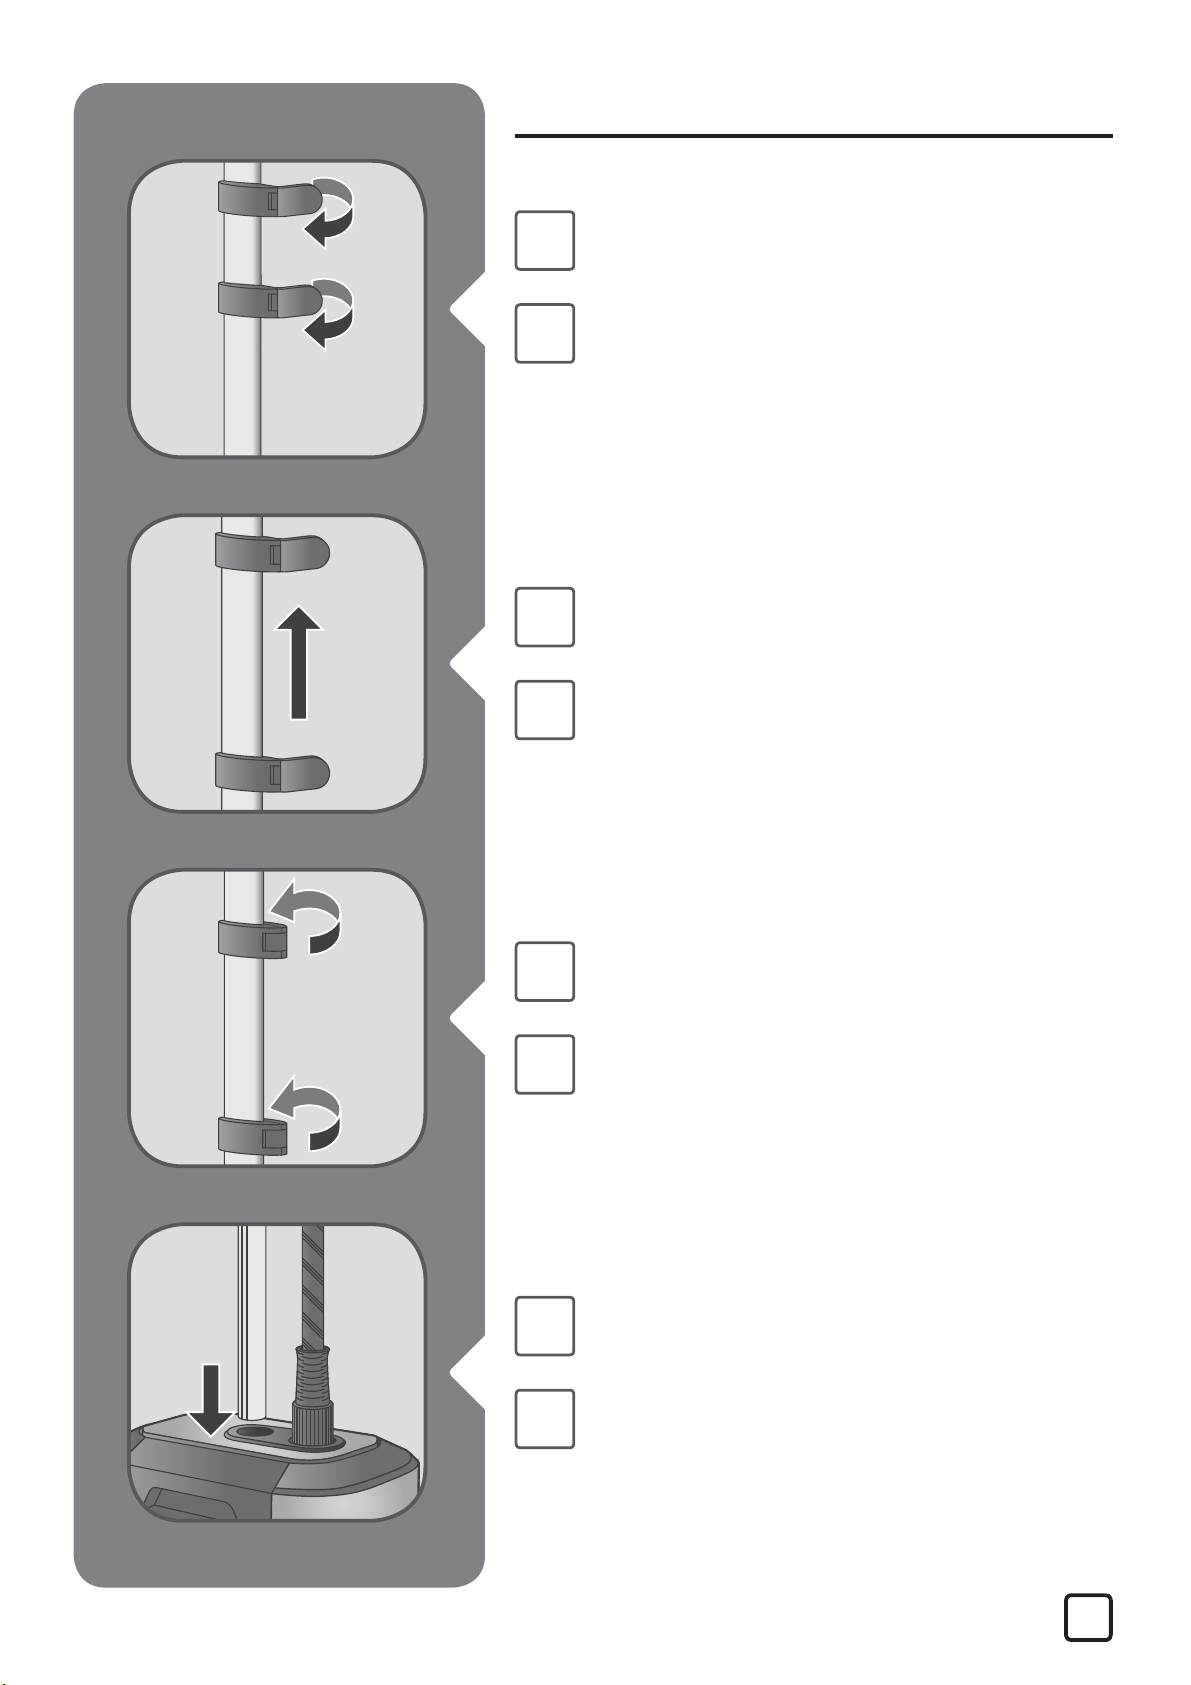
1. ASSEMBLY / ASSEMBLAGE
EN
FR
EN
FR
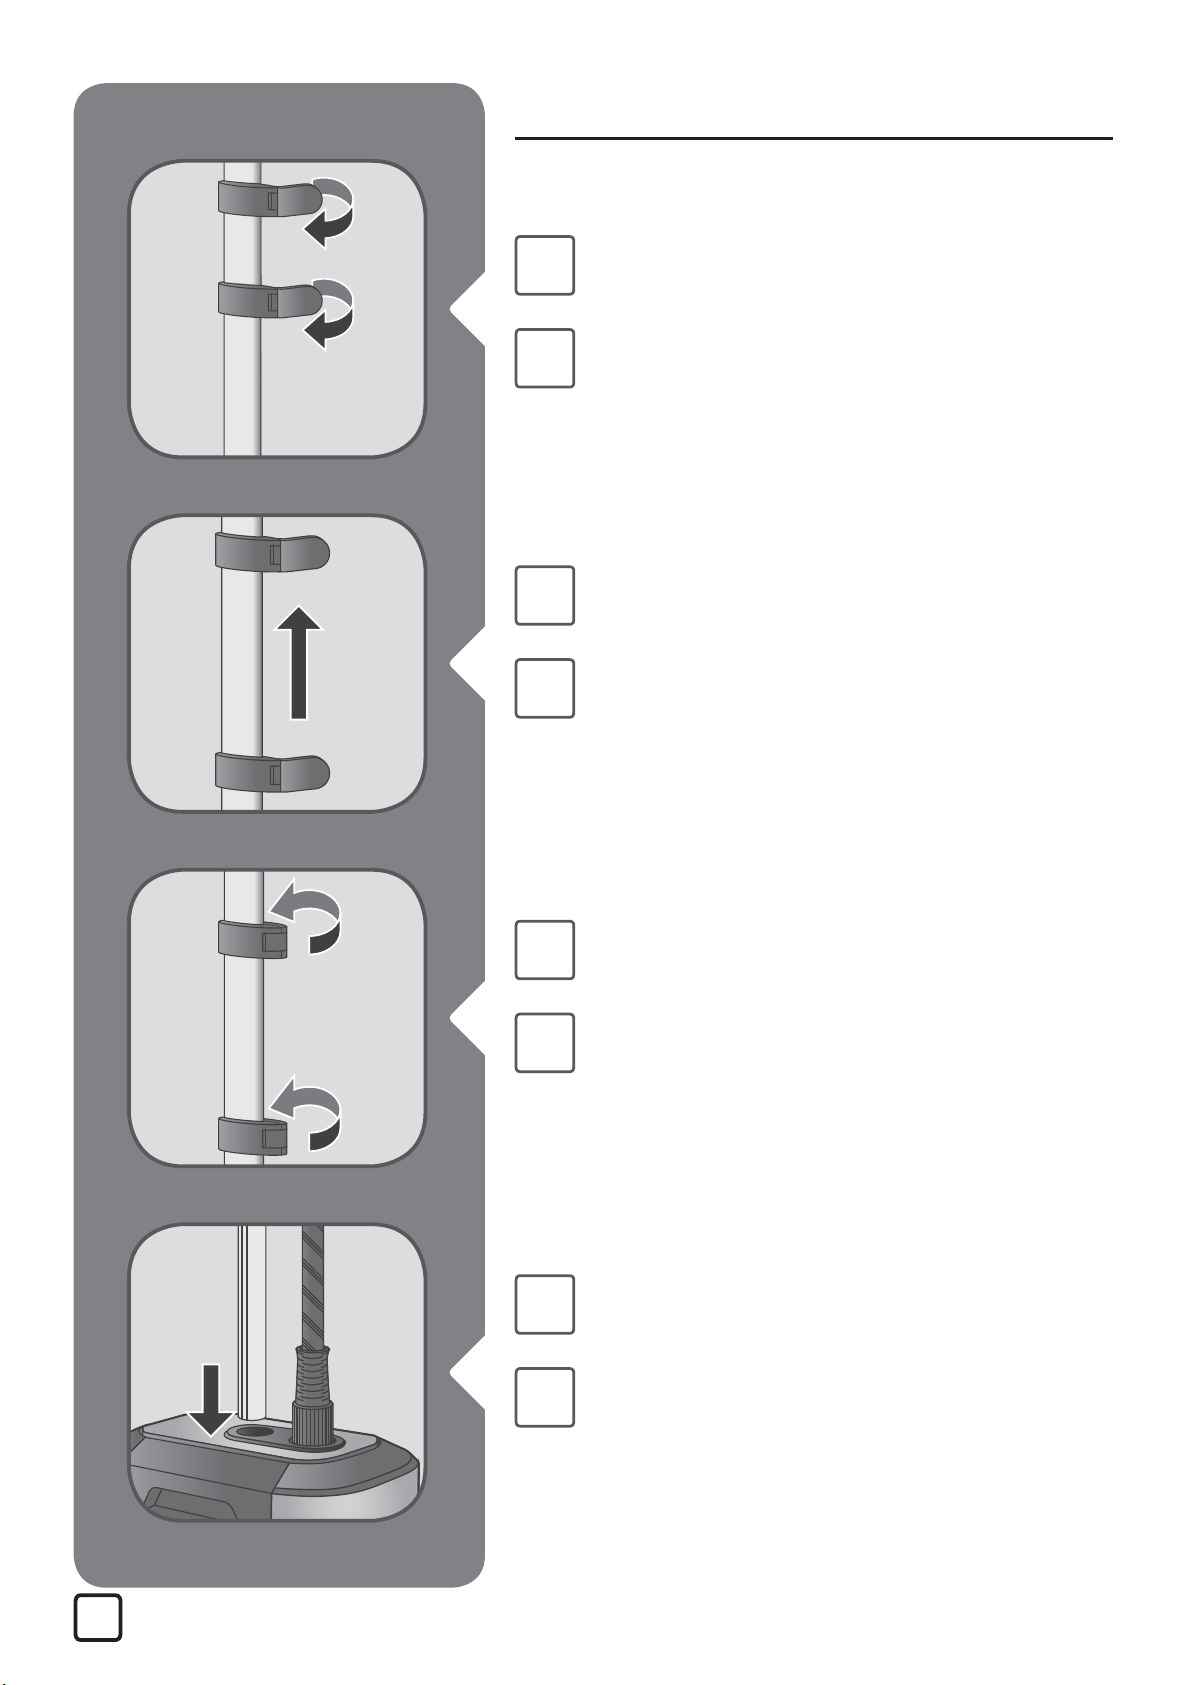
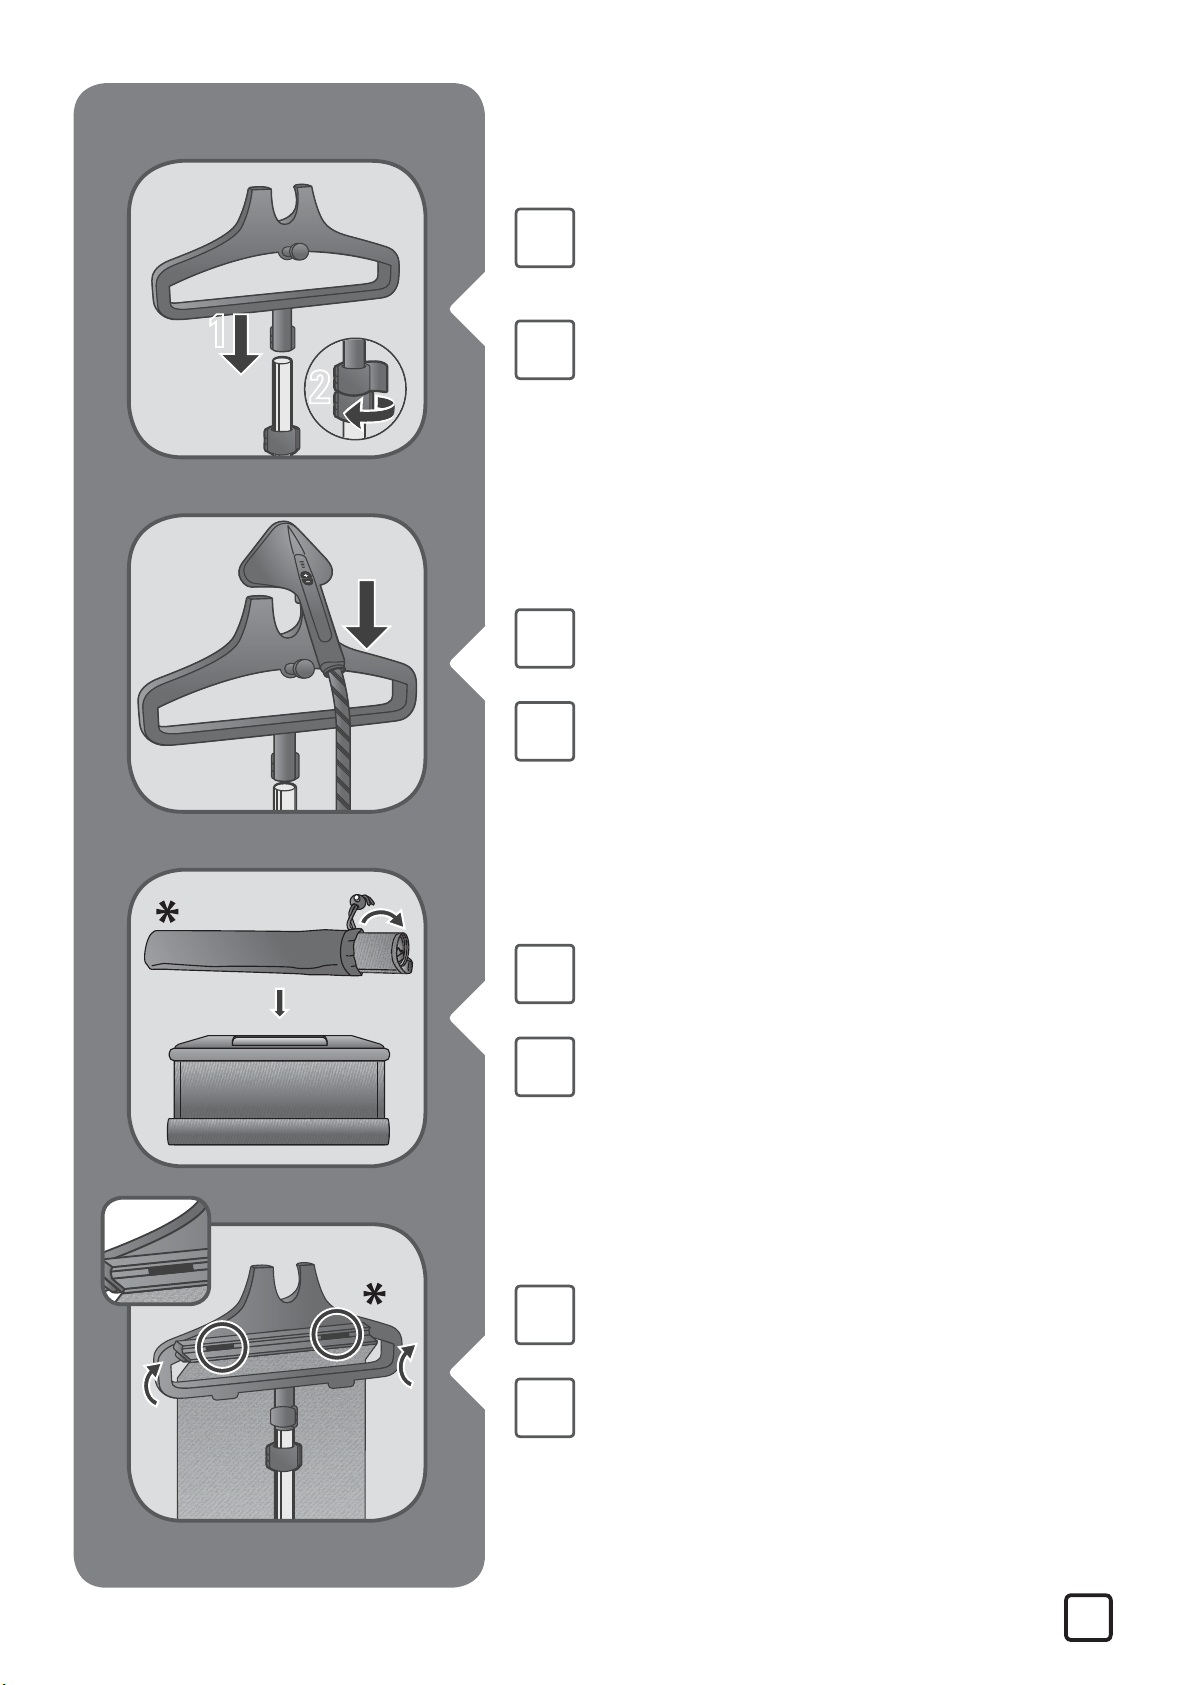
Open the two pole locks.
Ouvrez les deux verrous du tube.
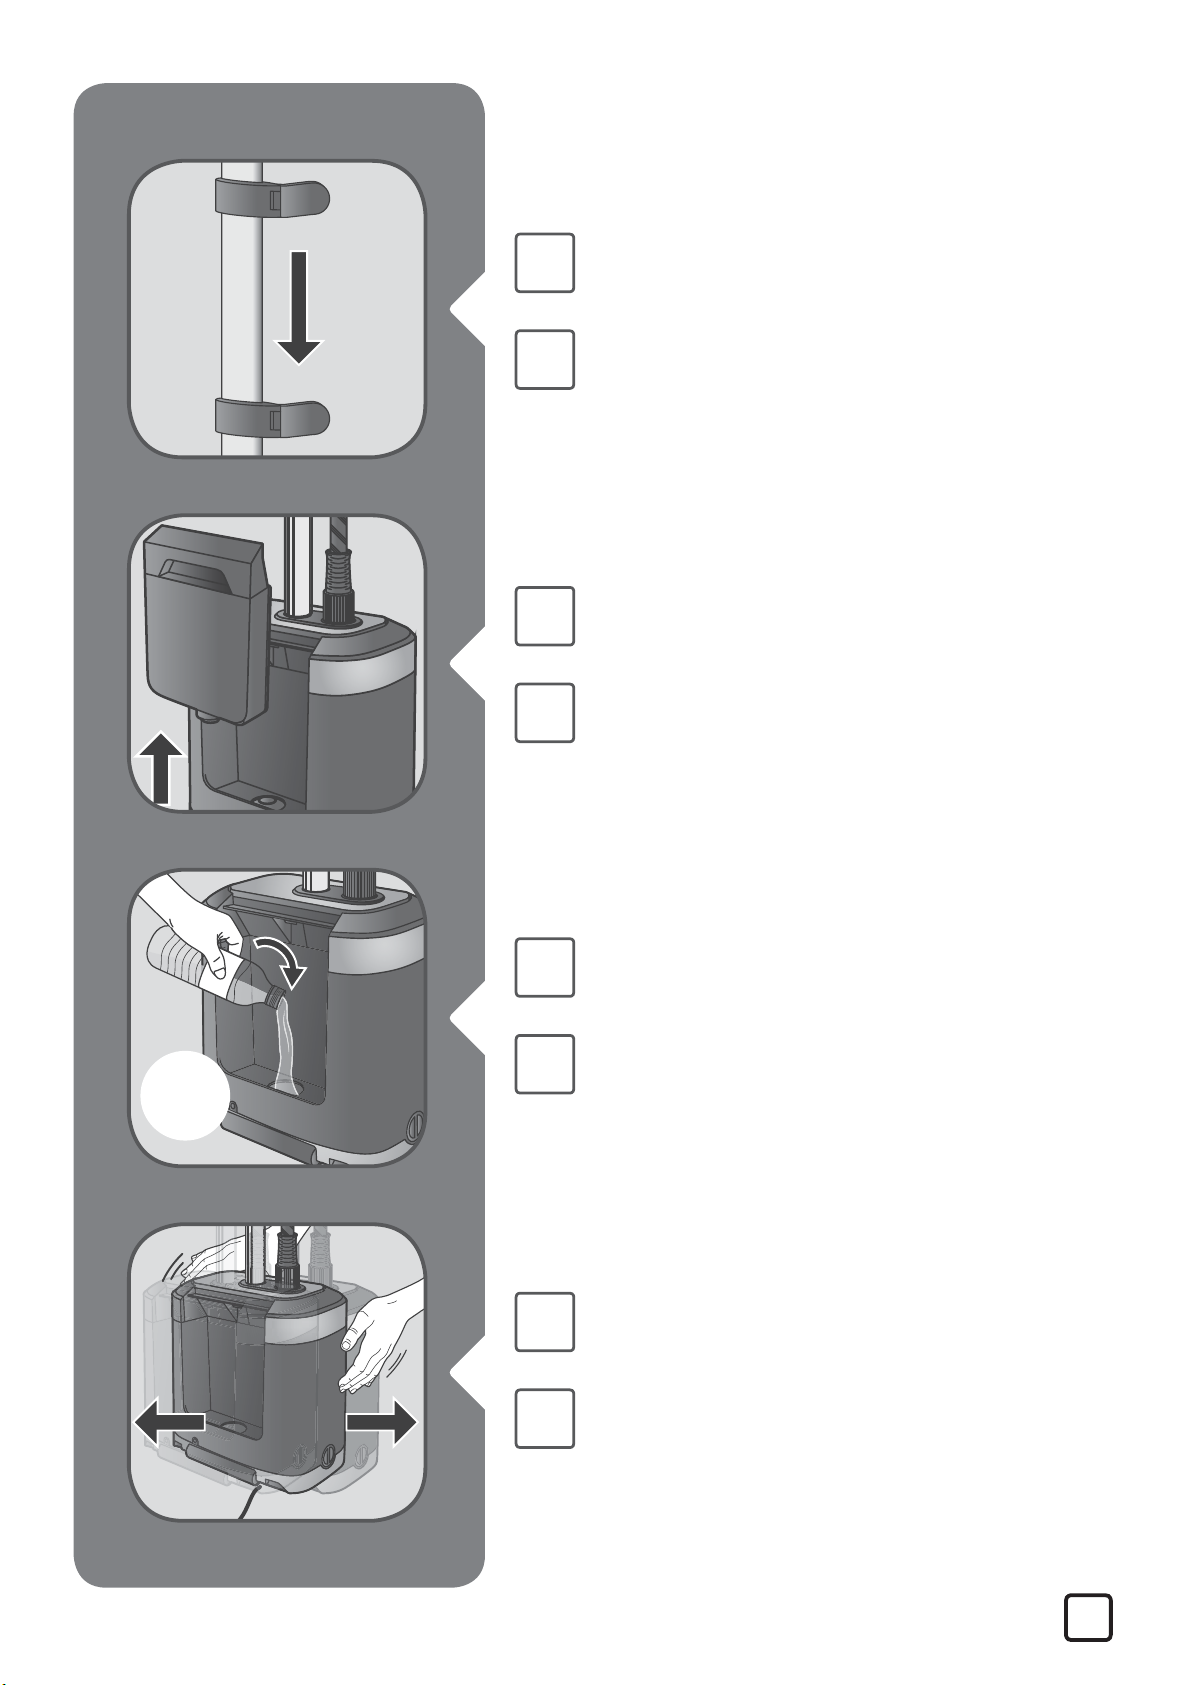
Extend the pole fully.
Étirez entièrement le tube.
EN
FR
EN
FR
Close the two locks.
Fermez les deux verrous du tube.
Insert the pole in the housing untill
you hear a "click".
Insérez le tube dans le boîtier jusqu’à
ce que vous entendiez un clic.
5
Page 6
1
2
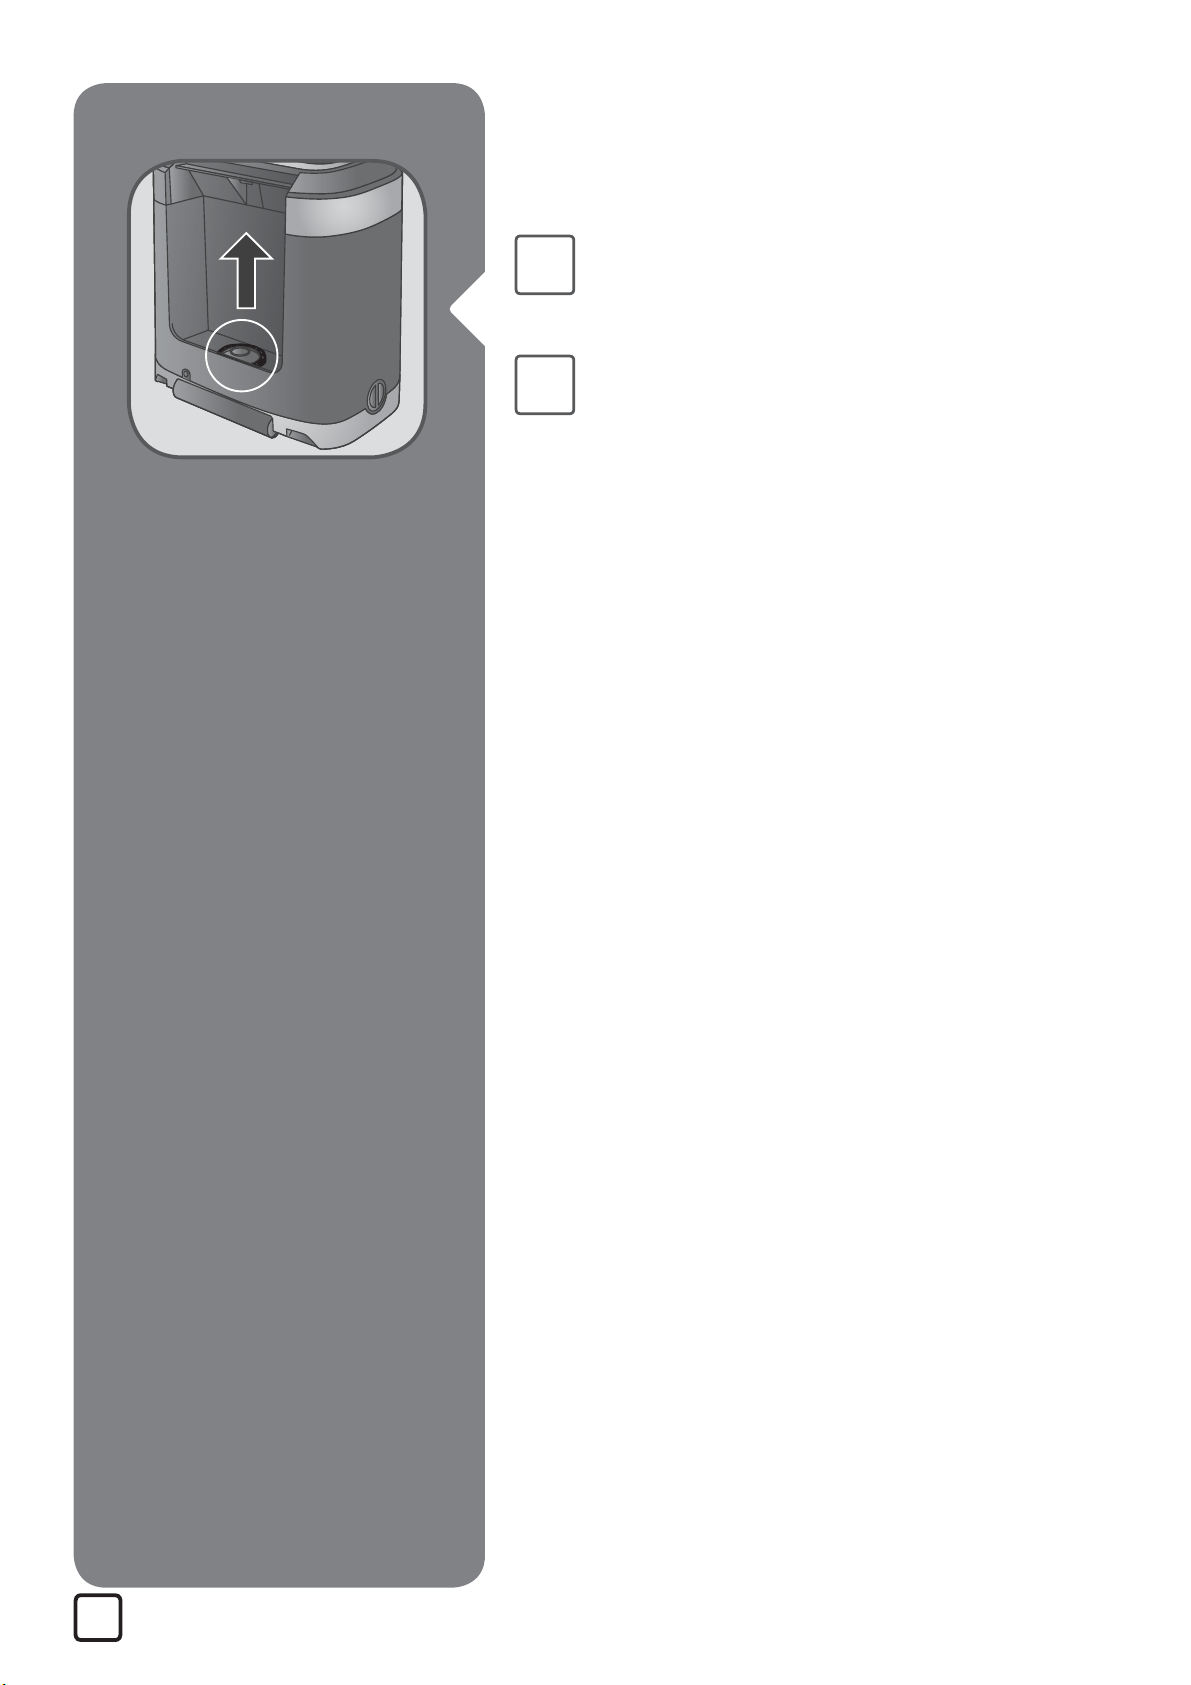
EN
FR
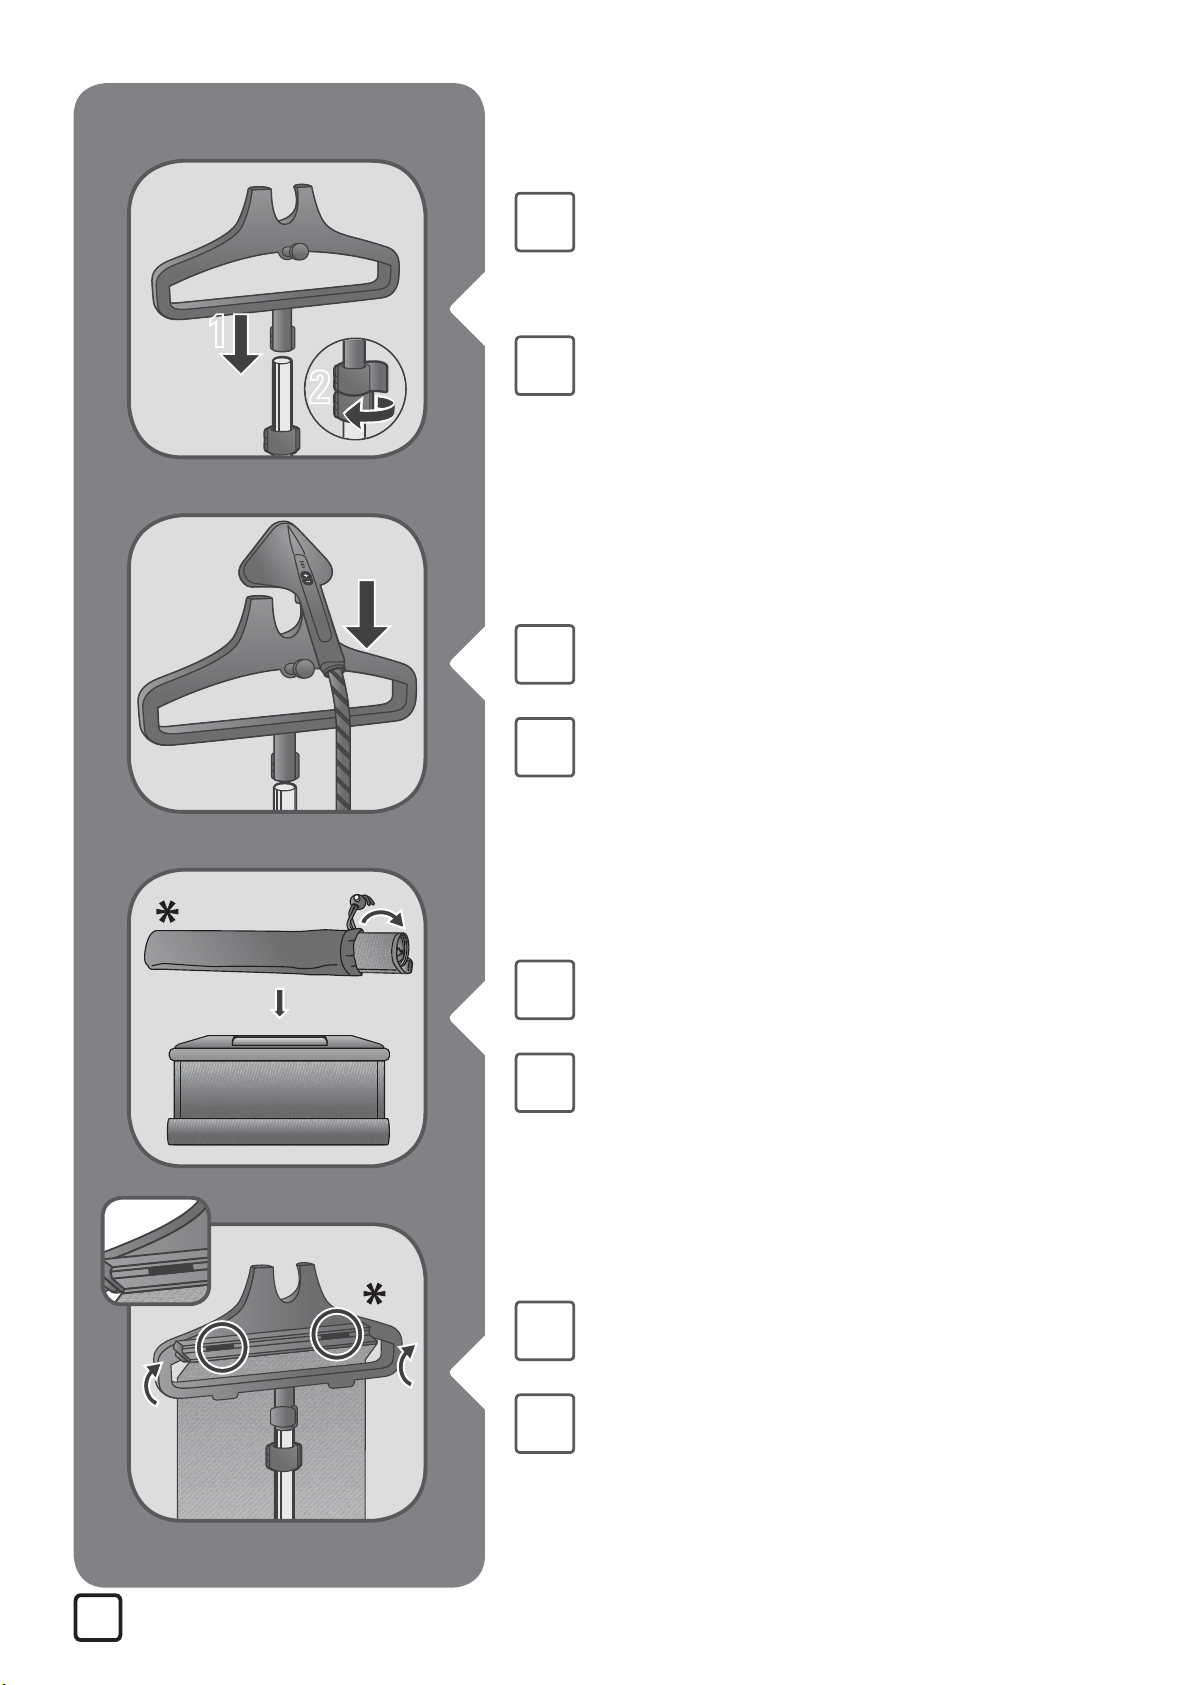
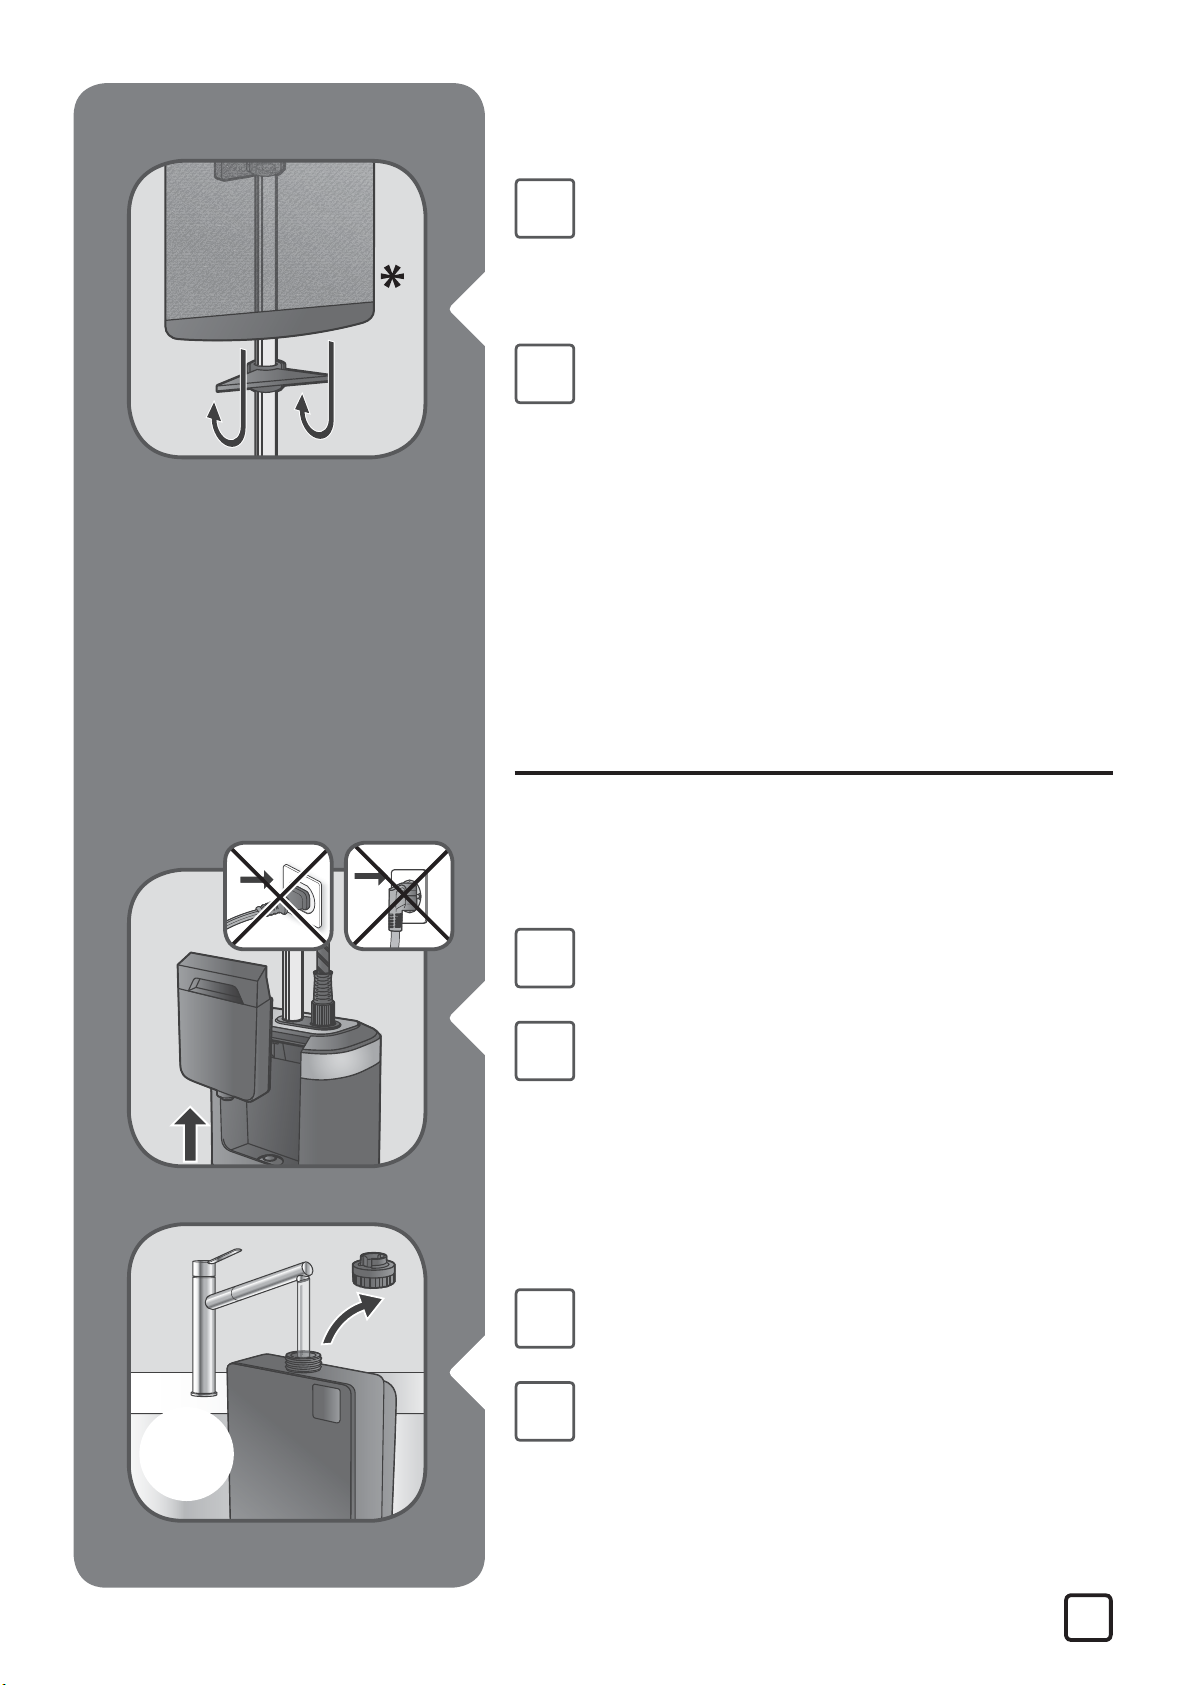
Unlock the hanger and fully insert it
vertically on top of the pole and lock
it.
Déverrouillez le cintre, puis insérez
complètement le cintre verticalement
en haut du tube et verrouillez le.
EN
FR
EN
FR
Position the steam head on its craddle.
Positionnez la tête vapeur sur son
support.
Take out the vertical support* from its
bag and unroll it.
Sortez le support vertical* de son sac
et déroulez-le complètement.
Hook the upper part of the vertical
EN
FR
6
support* on rear hanger.
Accrochez la partie supérieure du
support vertical* à l'arrière du cintre.
* EN Depending on model / FR Selon le modèle
Page 7
1,3L
44OZ
MAX
Unwind the support and insert it in
EN
FR
the adjustable hook, by adjusting the
tension with the dedicated hook and
lock it.
Déroulez le support et attachez-le,
en réglant la tension avec l'accroche
prévue à cet eet. Puis verrouillez.
2. BEFORE USE / AVANT L'UTILISATION
EN
FR
EN
FR
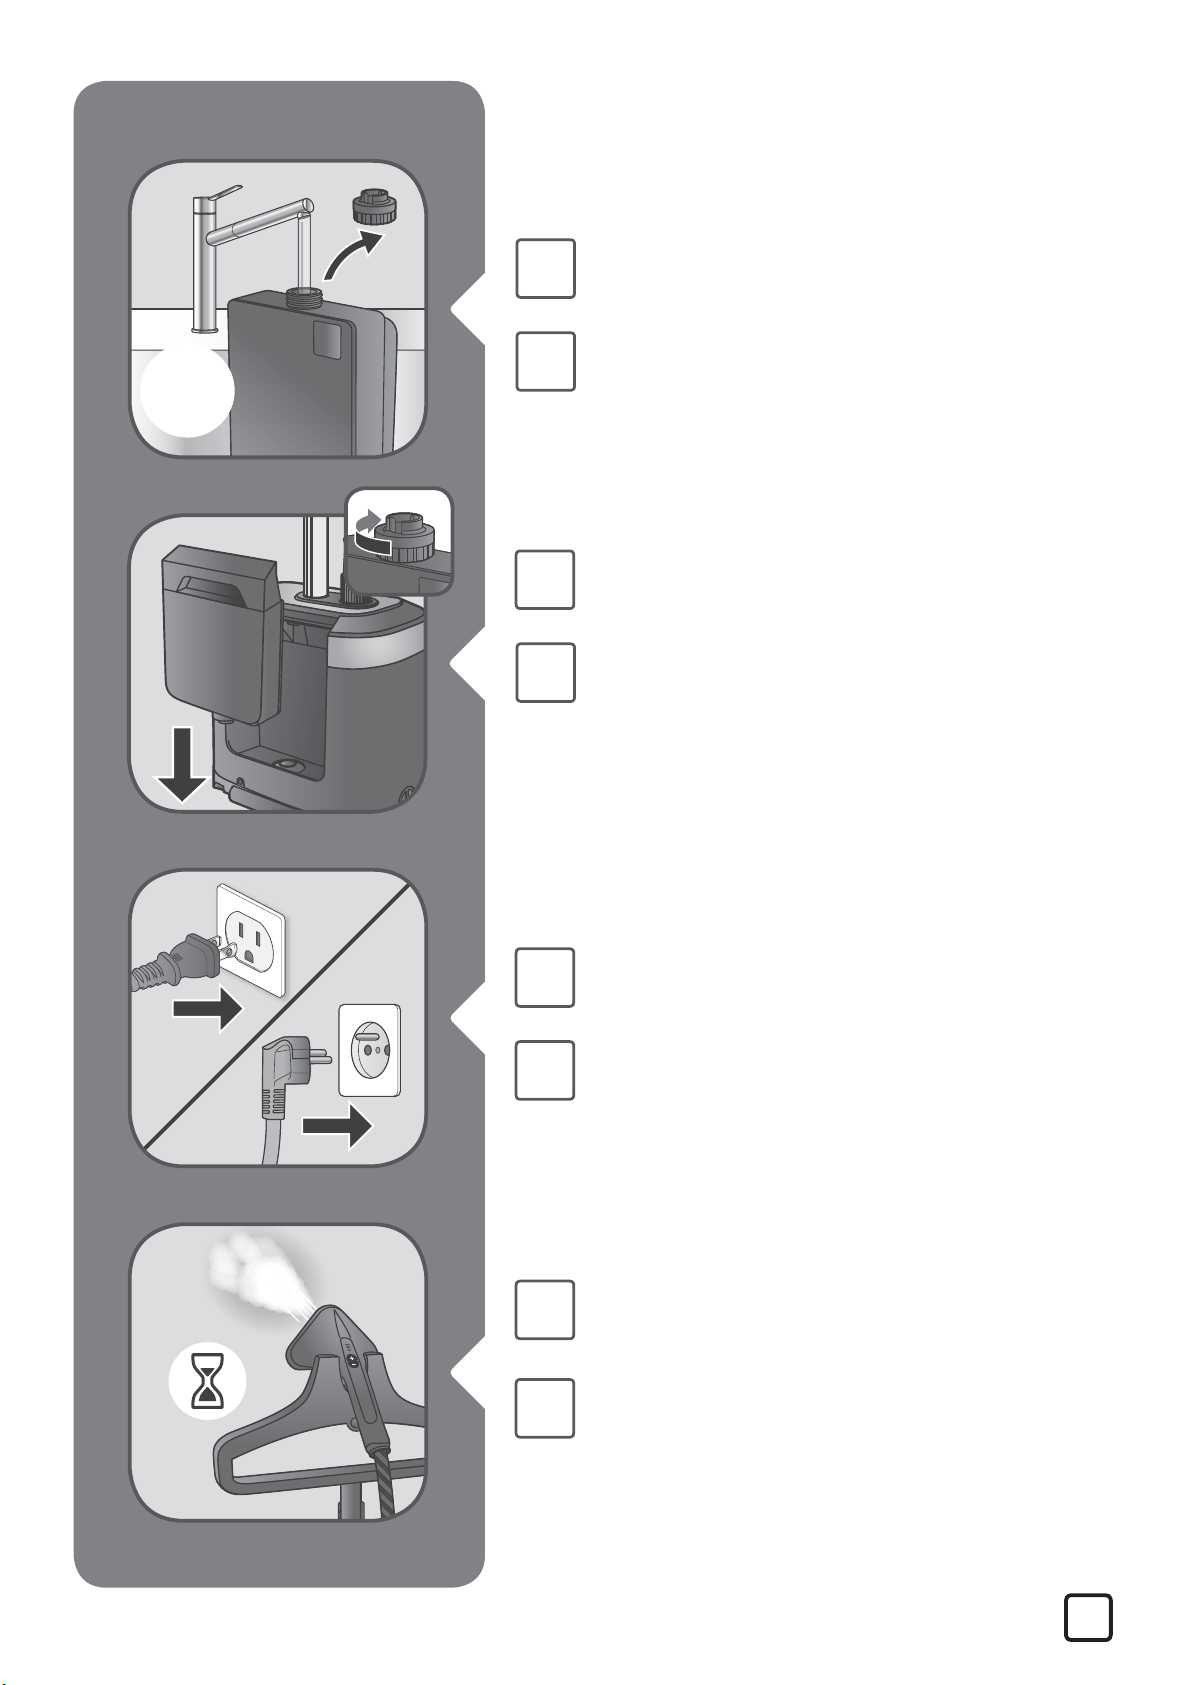
Remove the water tank.
Retirez le réservoir d'eau.
Remove the cap and ll in the water
tank.
Retirez le bouchon puis remplissez le
réservoir d'eau.
* EN Depending on model / FR Selon le modèle
7
Page 8
EN
FR
EN
FR
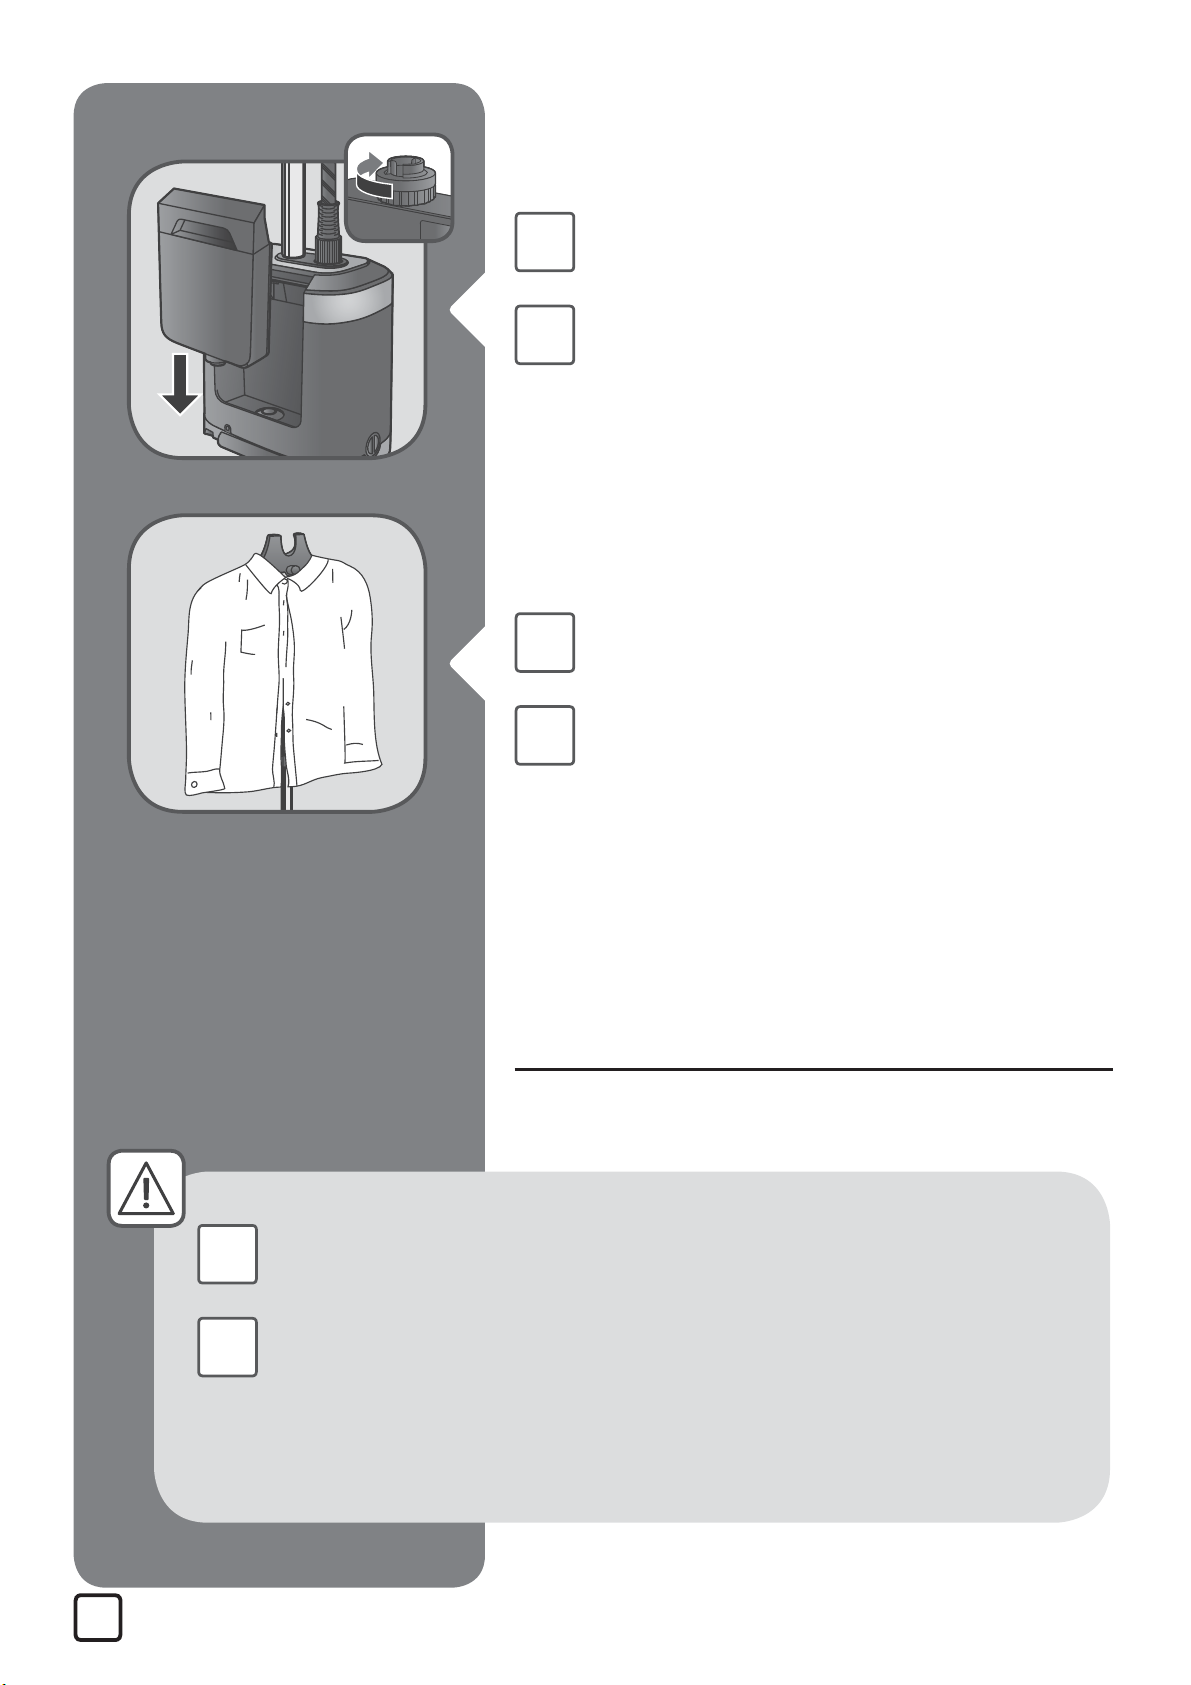
Fully screw the water tank cap and
insert tank back in appliance.
Vissez complètement le bouchon du
réservoir d'eau et replacez le réservoir
dans l'appareil.
Add the clothe of your choice on the
hanger.
Ajoutez le vêtement de votre choix sur
le cintre.
3. ACCESSORIES / ACCESSOIRES
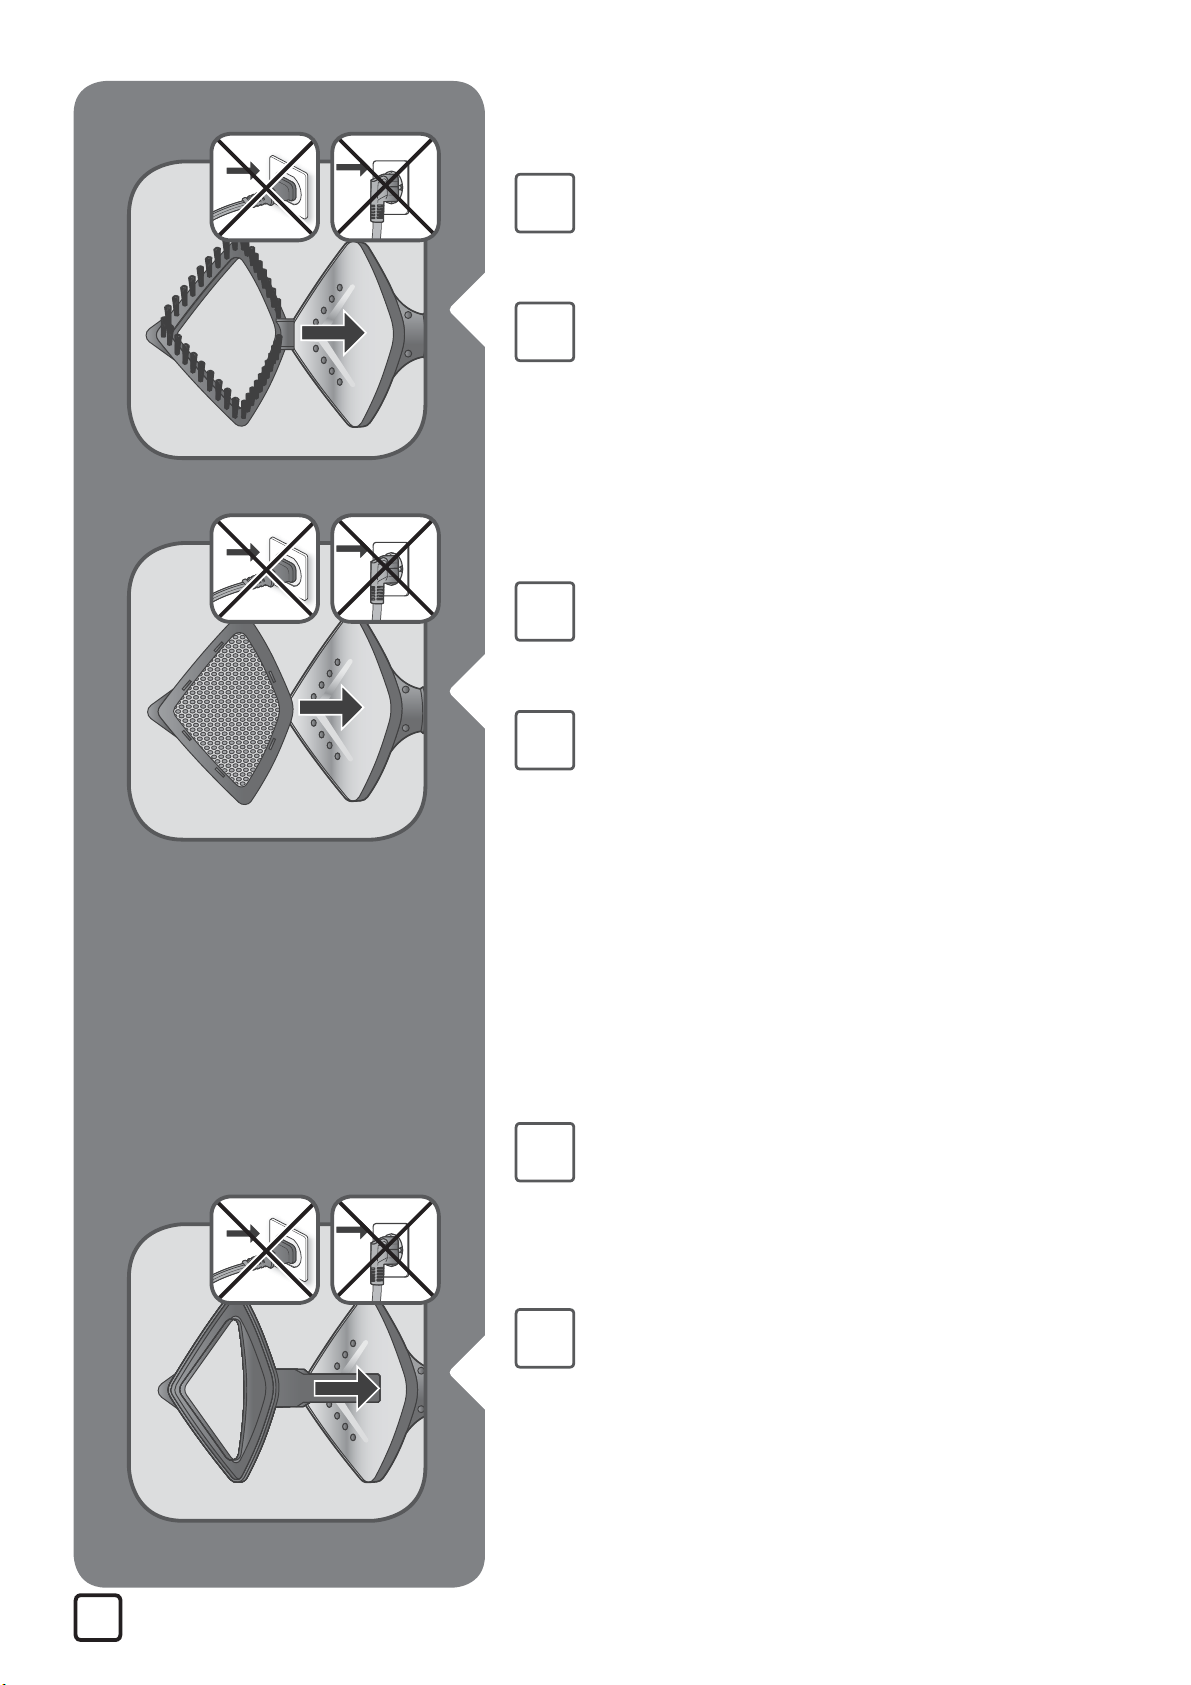
Accessories must be settled when appliance is cold and not
EN
FR
8
running.
Les accessoires doivent être installés lorsque l'appareil est
froid et n'est pas en fonctionnement.
* EN Depending on model / FR Selon le modèle
Page 9

*
*
EN
FR
EN
FR
The fabric brush opens the weaves
of the fabrics for better steam
penetration.
La brosse à tissu ouvre le tissage des
tissus pour une meilleure pénétration
de la vapeur.
The steam bonnet lters water
impurities and protects fabrics from
water drips.
Le protège-tissu ltre les impuretés de
l'eau et protège le textile des gouttes
*
EN
d'eau.
The crease attachment is used to make
pant creases easily or to remove stubborn
wrinkles. Put your fabric in the space
between the two accessory parts. Move
the crease attachment in a downwards
motion starting from the top.
* EN Depending on model / FR Selon le modèle
FR
La pince à pli est utilisée pour faire les plis
des pantalons ou enlever plus facilement
les plis persistants. Mettez votre textile
entre les deux parties de l'accessoire et
faite un geste de haut en bas.
9
Page 10
4. USE / UTILISATION
45s
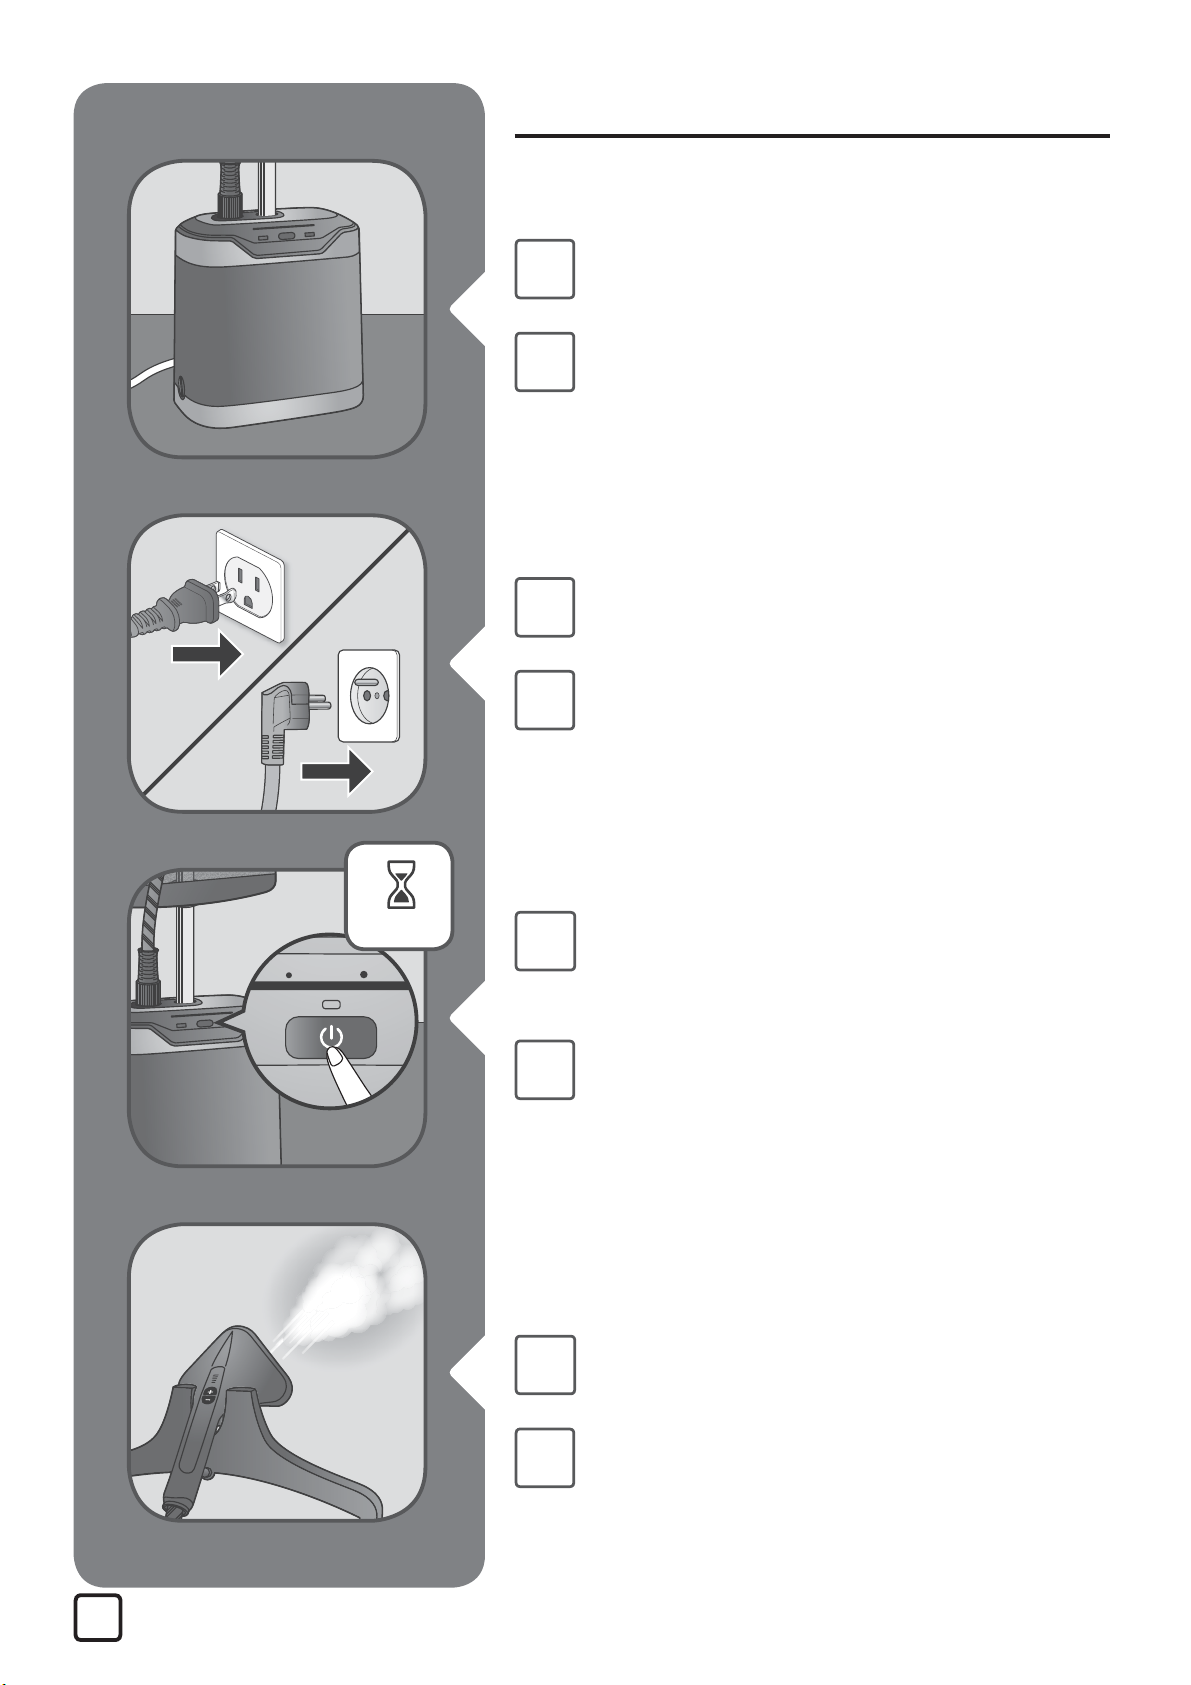
The appliance must remain in a
EN
FR
EN
FR
horizontal position on the oor.
L'appareil doit rester posé
horizontalement sur le sol.
Totally unroll the cord and plug the
appliance.
Déroulez totalement le câble
d'alimentation et branchez l'appareil.
EN
FR
EN
FR
Push the ON/OFF button, in order to
switch on the appliance. The leds will
ash for approx 45 seconds.
Tournez le bouton ON/OFF an
d'allumer l'appareil. Les leds vont
clignoter pendant environ 45 secondes.
After 45 seconds approximately, steam
will come out.
Après environ 45 secondes, la vapeur
sera émise.
10
Page 11
*
*
EN
FR
EN
FR
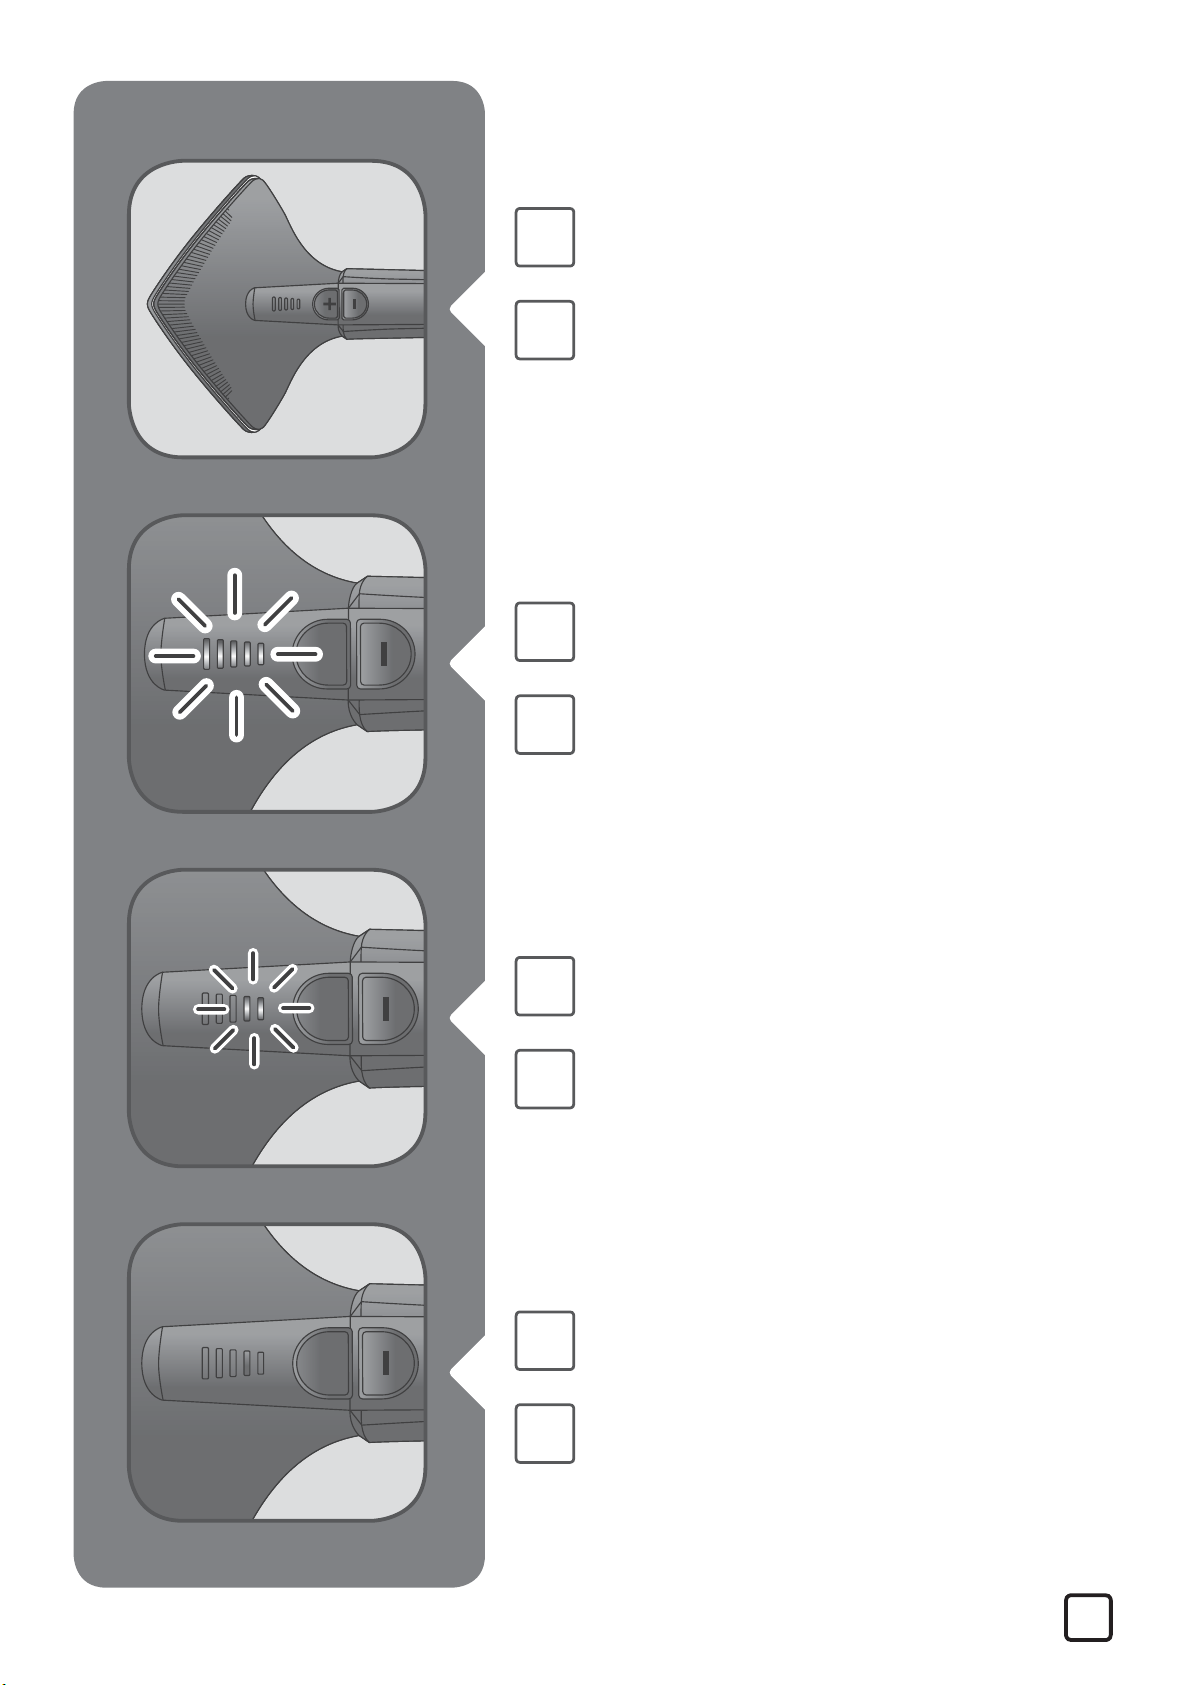
Adjust steam output by pushing the
buttons + and - on the steam head.
Ajustez le niveau de vapeur en
appuyant sur les commandes + et - sur
la tête vapeur.
Level max = all leds are bright = steam
max
Niveau max = toutes les leds sont
allumées = niveau maximal de vapeur
*
*
EN
FR
EN
FR
level 2 = 2 led bright = steam low
Niveau 2 = 2 leds sont brillantes =
vapeur faible
level 0 = no led bright = no steam
Niveau 0 = aucune led allumée = pas
de vapeur
* EN Depending on model / FR Selon le modèle
11
Page 12
EN
FR
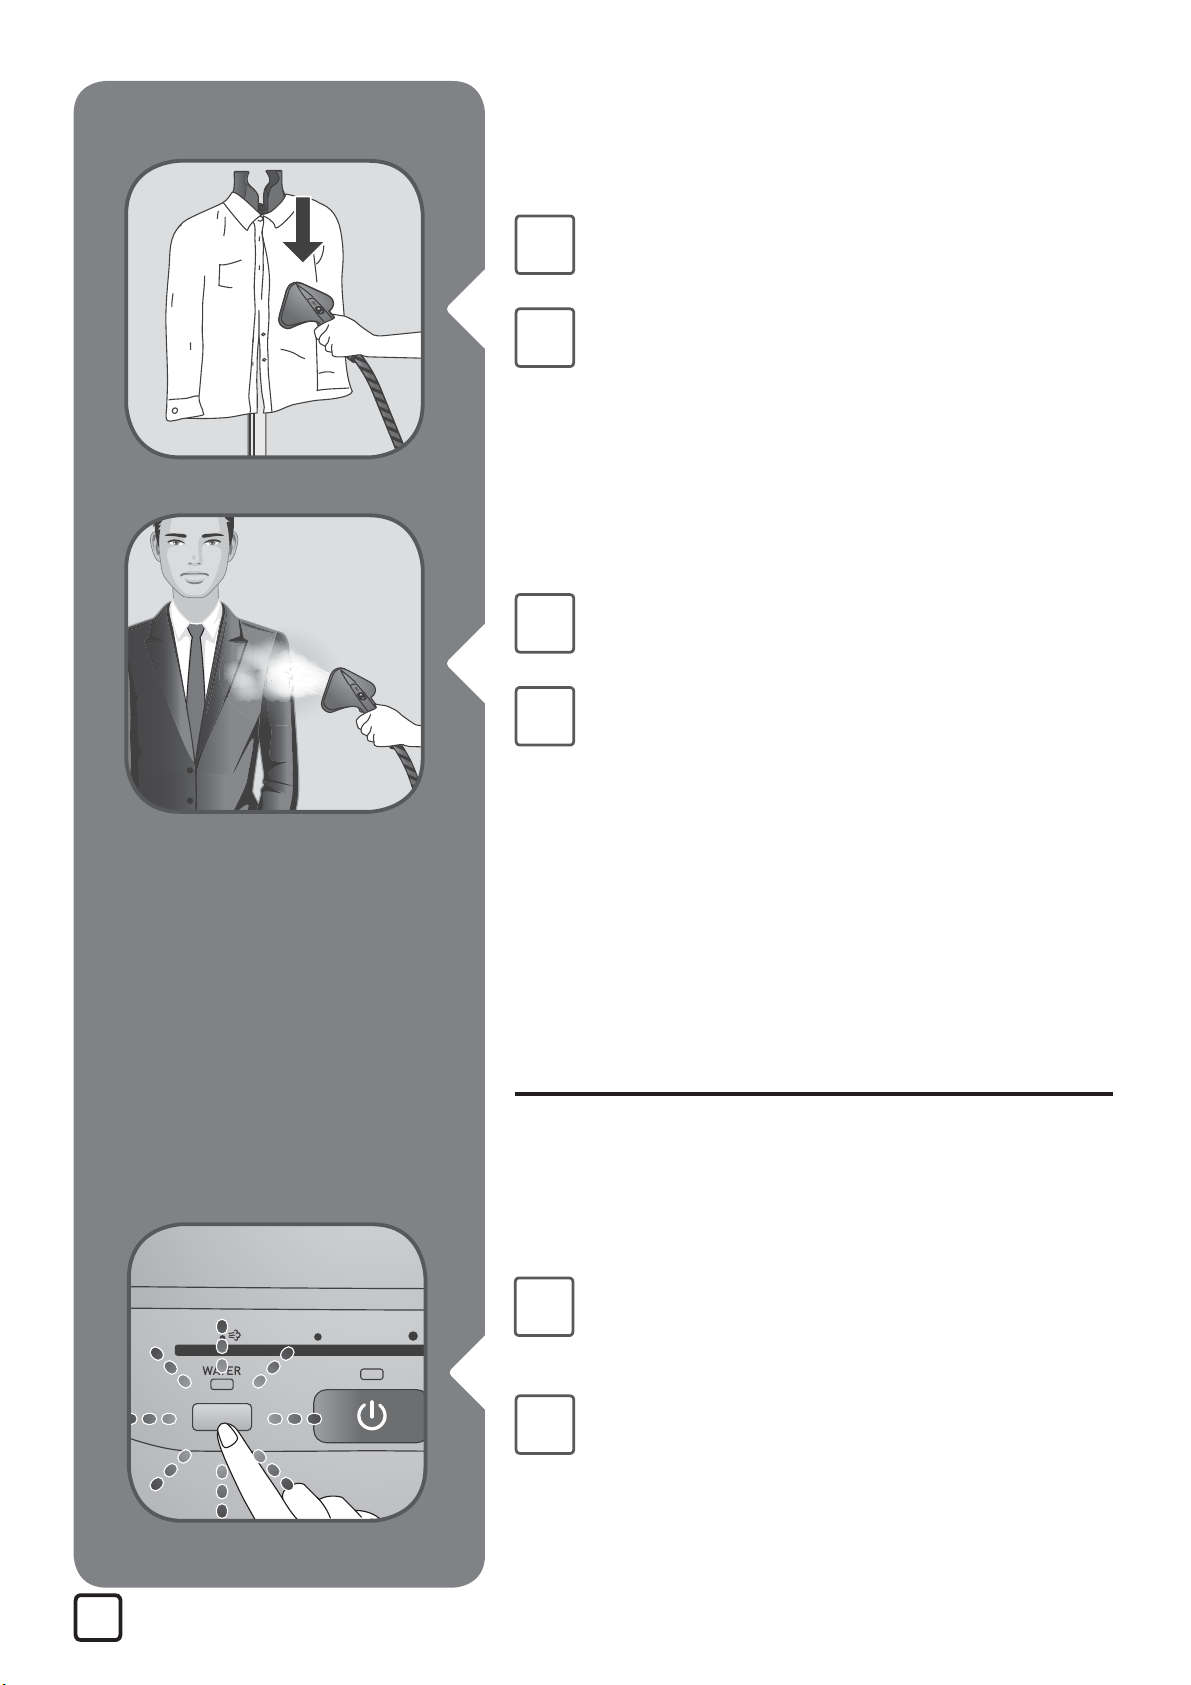
For optimal use, press the steam jets
on your garment from top to bottom.
Pour une utilisation optimale, passez
les jets de vapeur sur votre vêtement
de haut en bas.
EN
FR
Never steam directly on people.
Ne dirigez jamais la vapeur
directement vers des personnes.
5. DURING USE / DURANT
L'UTILISATION
12
EN
FR
If "WATER" button is ashing, the level
of water in the water tank is low and
must be lled.
Si le bouton "Water" s'allume, le niveau
d'eau dans le réservoir est faible et
doit être rempli.
Page 13
1,3L
44OZ
MAX
EN
FR
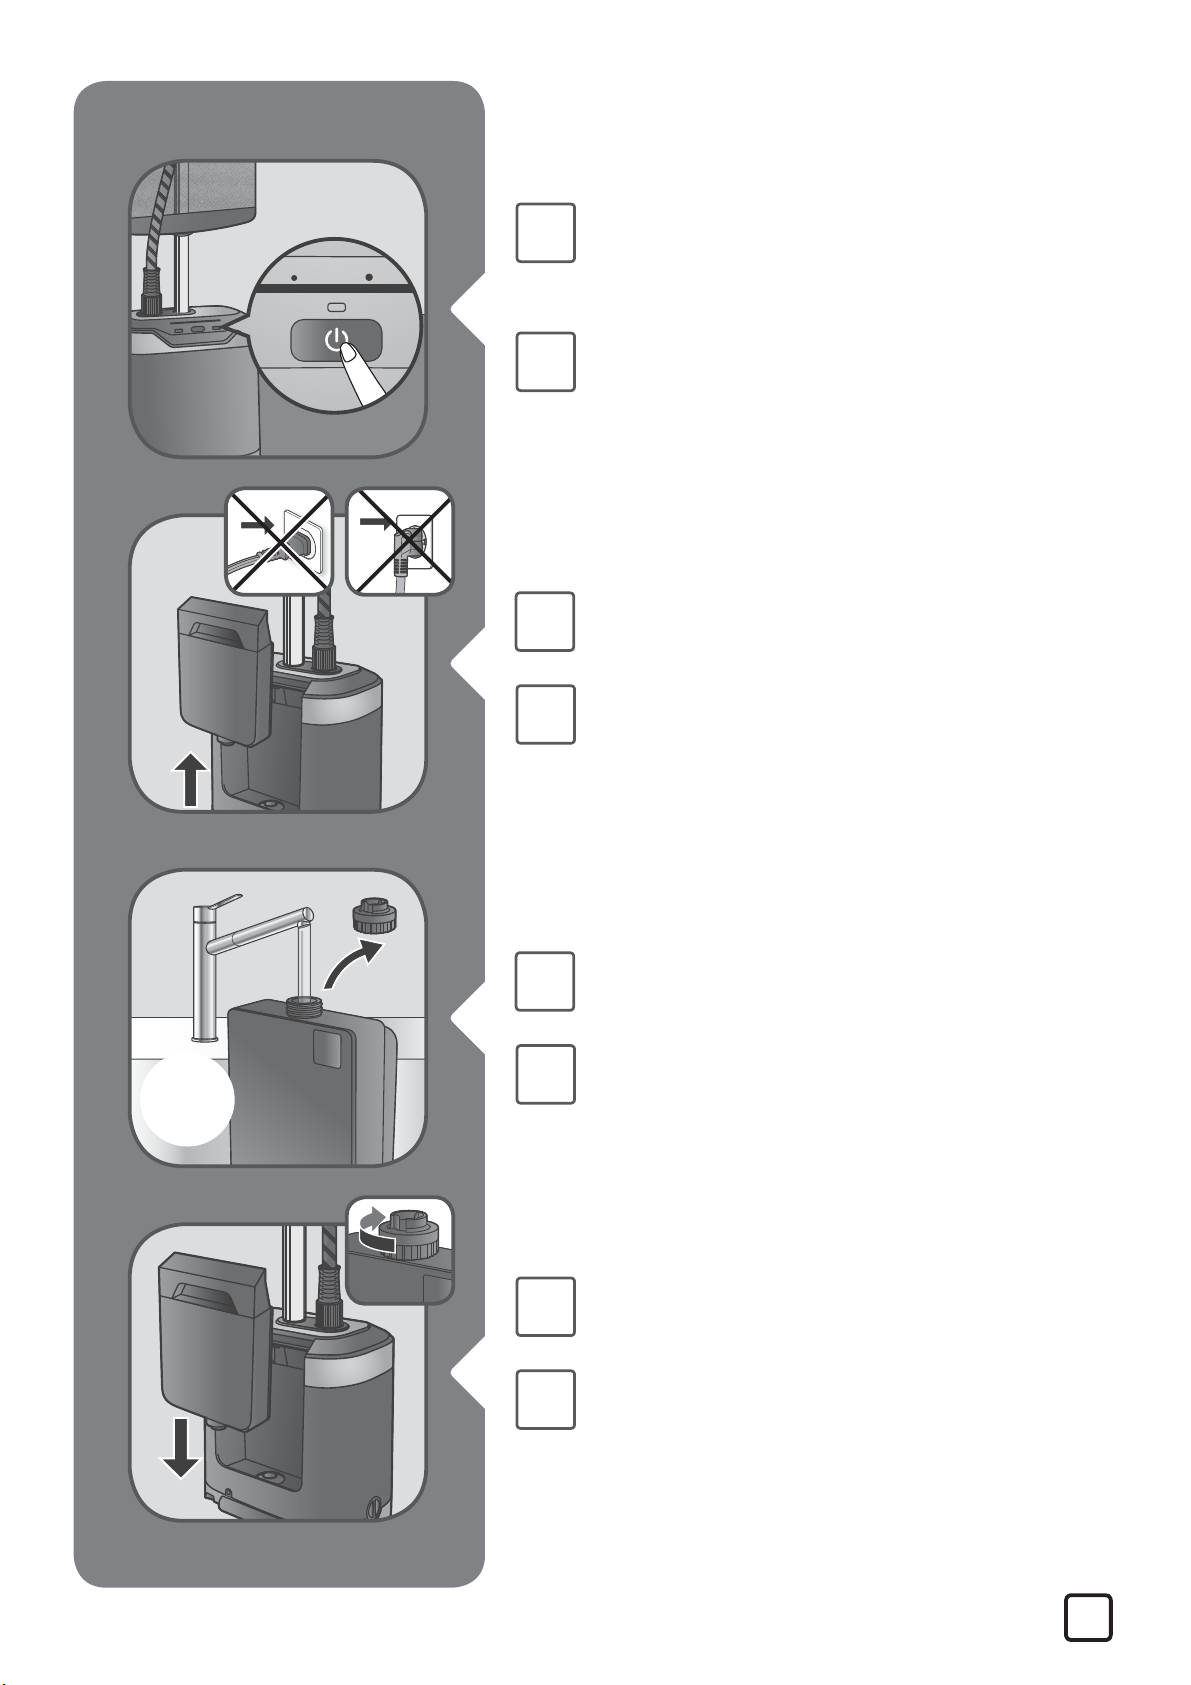
The appliance must be switched o,
push the ON/OFF button in order to
switch it o.
L'appareil doit être éteint, appuyez
sur le bouton ON/OFF an d'éteindre
l'appareil.
EN
FR
EN
FR
Unplug, then remove the water tank.
Débranchez l'appareil, et retirez le
réservoir d'eau.
Remove the cap then ll in the water
tank.
Retirez le bouchon puis remplissez le
réservoir d'eau.
EN
FR
Fully screw the water tank cap and
insert tank back in appliance.
Vissez complètement le bouchon du
réservoir d'eau et replacez le réservoir
dans l'appareil.
13
Page 14
45s
EN
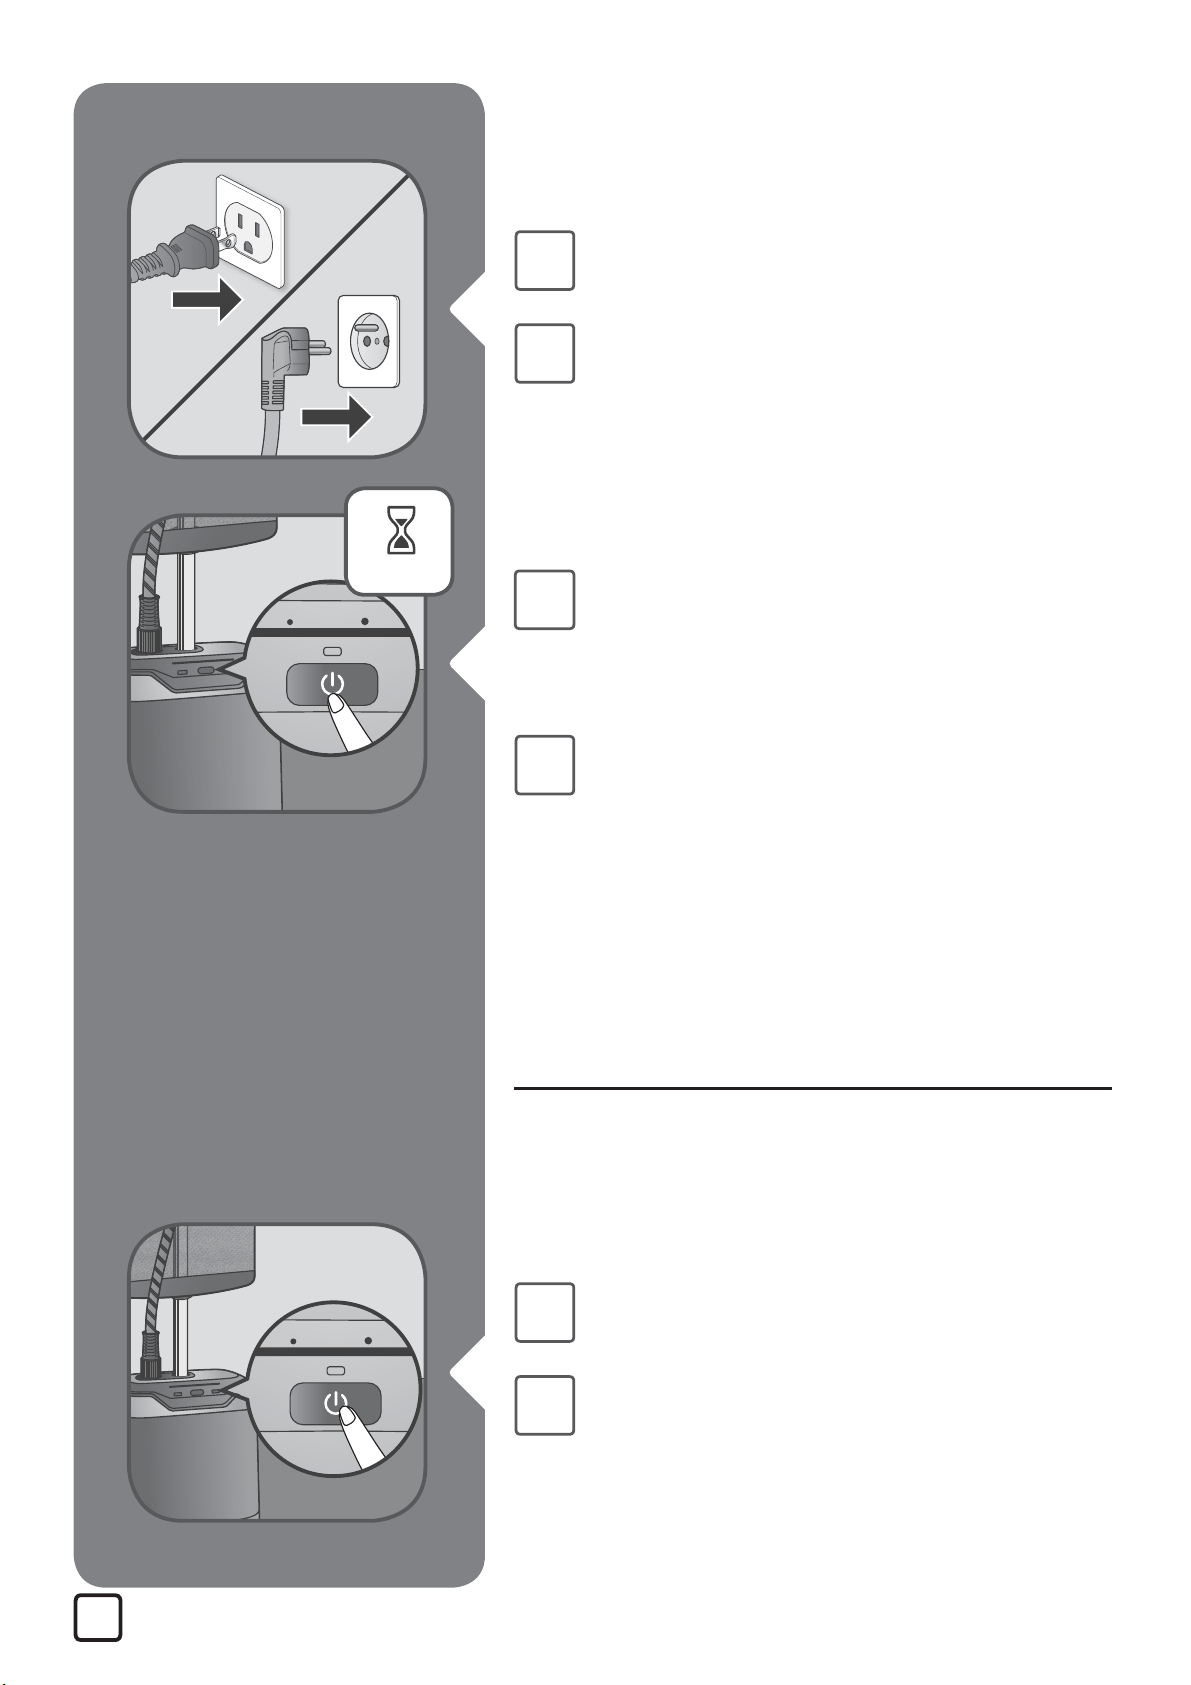
Plug on the appliance.
FR
EN
FR
Branchez l’appareil.
Push the ON/OFF button in order to
switch on the appliance.The steam
level will ash on maximum level for
45 secondes.
Appuyez sur le bouton ON/OFF
an d'allumer l'appareil. Les leds
vont clignoter pendant environ 45
secondes.
14
6. AFTER USE / APRÈS L'UTILISATION
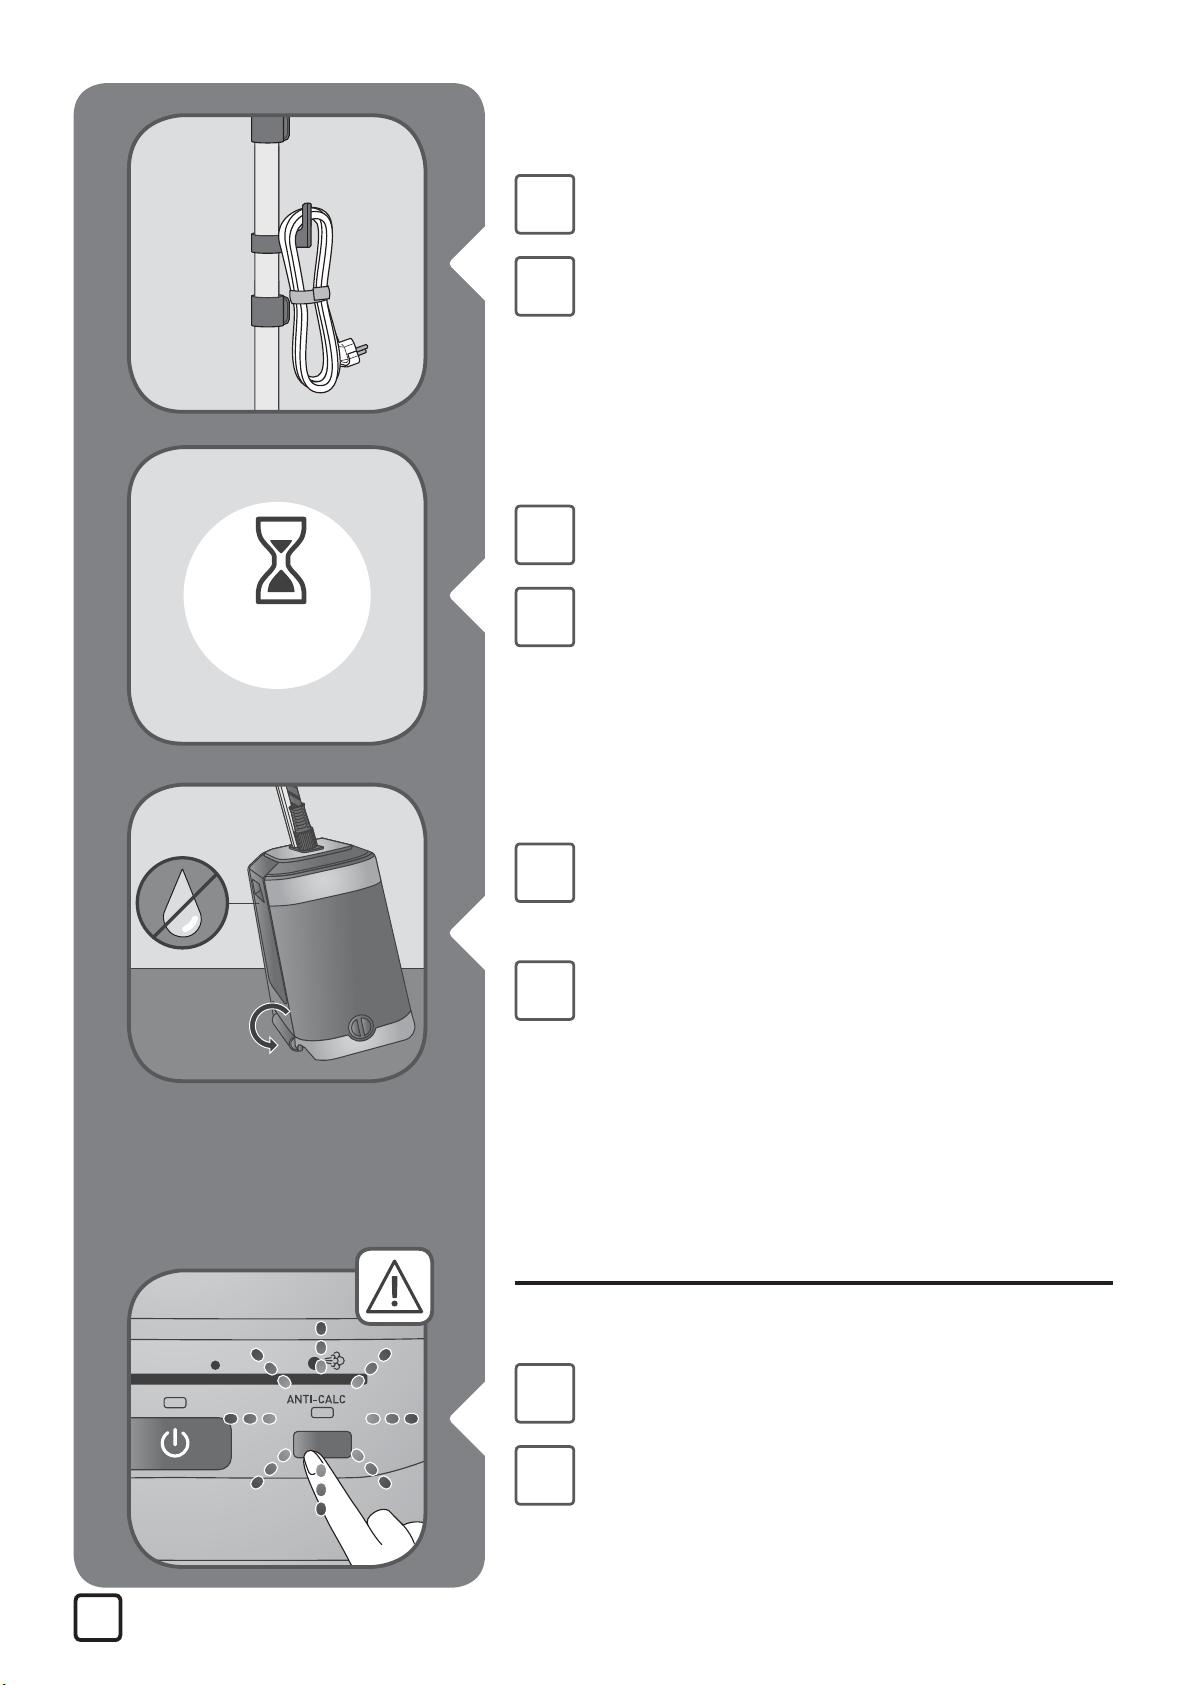
Long push the ON/OFF button in order
EN
FR
to switch o the appliance.
Appuyez longtemps sur le bouton ON/
OFF an d'éteindre l'appareil.
Page 15
EN
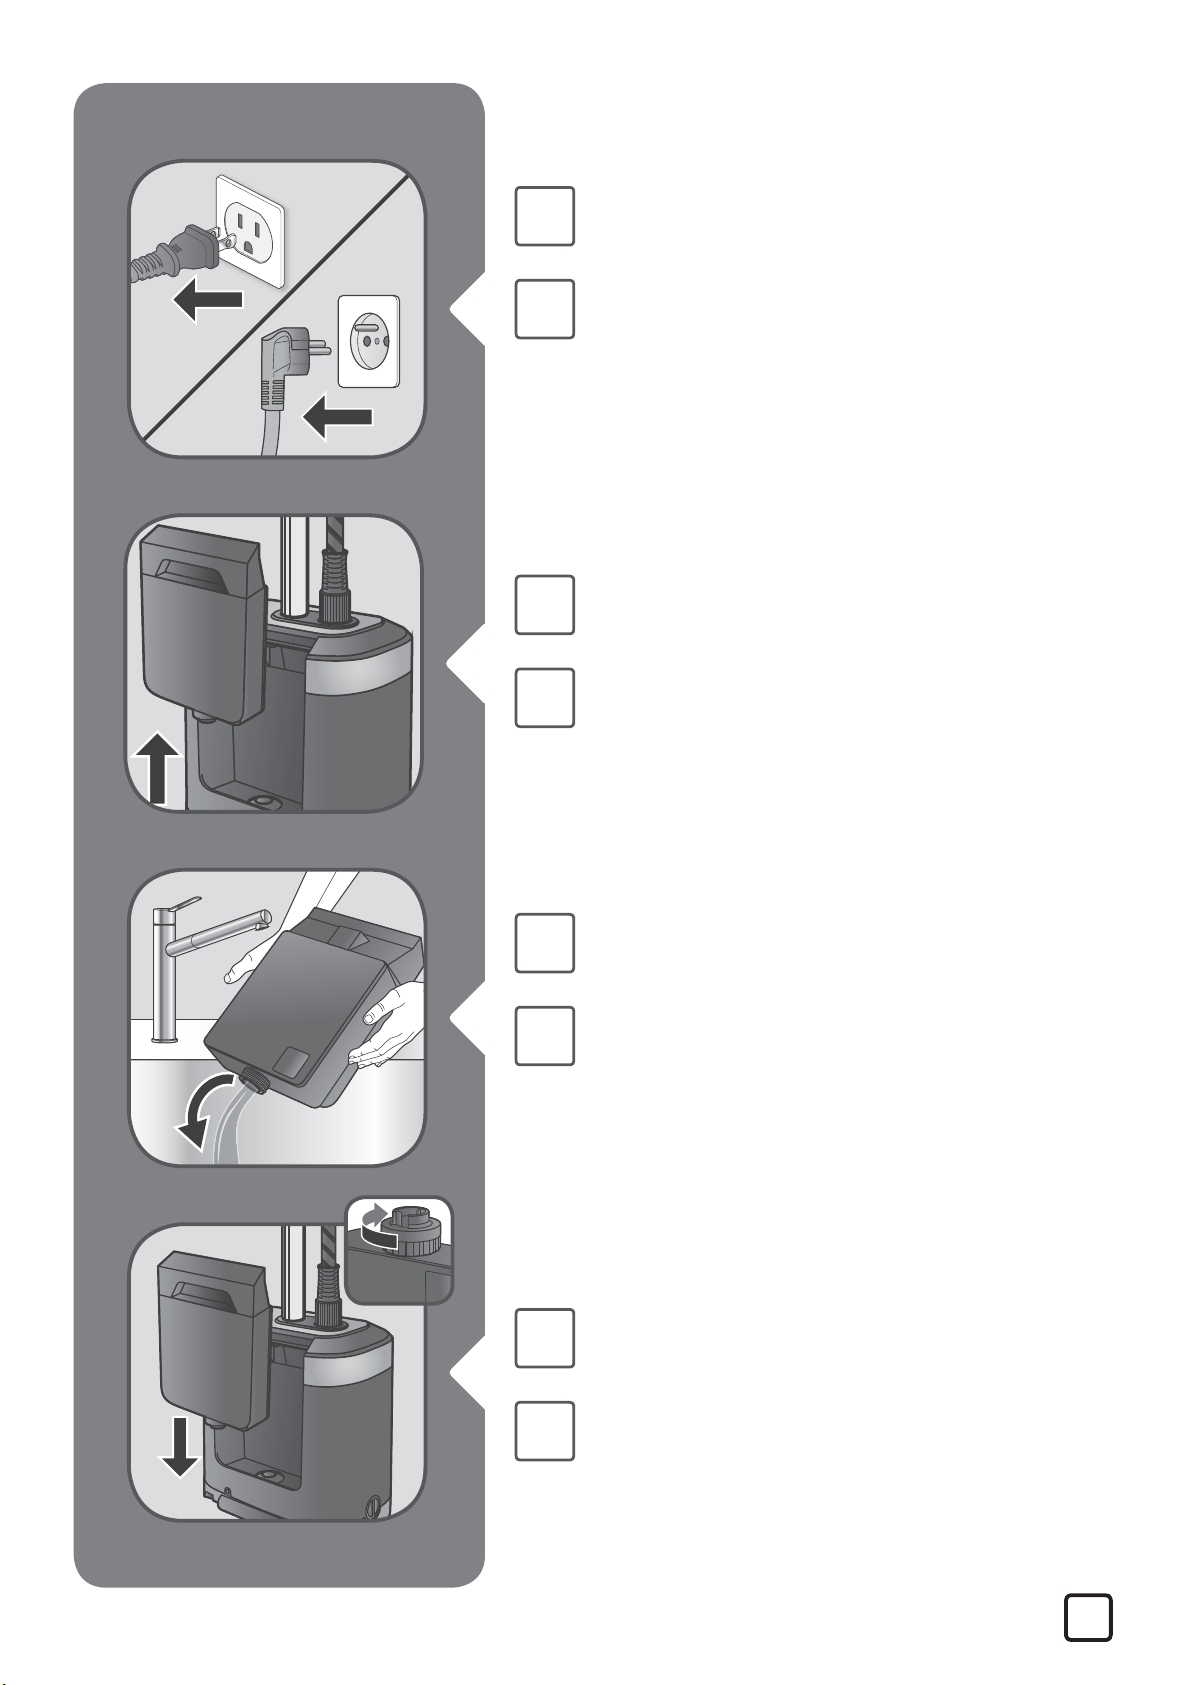
Unplug the appliance.
FR
EN
FR
Débranchez l'appareil.
Remove the water tank.
Retirez le réservoir d'eau.
EN
FR
EN
FR
Unscrew the cap and then empty the
water tank completely in a sink.
Dévissez le bouchon puis videz
complètement le réservoir d'eau dans
un évier.
Screw back the cap and place the
water tank back to its appliance.
Revissez le bouchon du réservoir et
replacez le réservoir dans l'appareil.
15
Page 16
1h
EN
FR
EN
FR
Roll up the power cord and place it on
its power cord hook.
Enroulez le câble d'alimentation et
placez-le sur son crochet.
Wait for an hour for your appliance to
cool before storing.
Attendez une heure pour que votre
appareil refroidisse avant de le ranger.
Make sure the water tank is empty
EN
before moving the appliance on its
wheel.
Assurez-vous que le réservoir d’eau est
FR
vide avant de déplacer l’appareil sur
sa roue.
7. DESCALING PROCEDURE /
PROCÉDURE DE DÉTARTRAGE
To apply when the "anti-calc" button
EN
is ashing.
16
FR
A faire dès que le bouton "Anti-calc"
clignote.
Page 17
Water
0.5 L
17OZ
1h
EN
FR
EN
FR
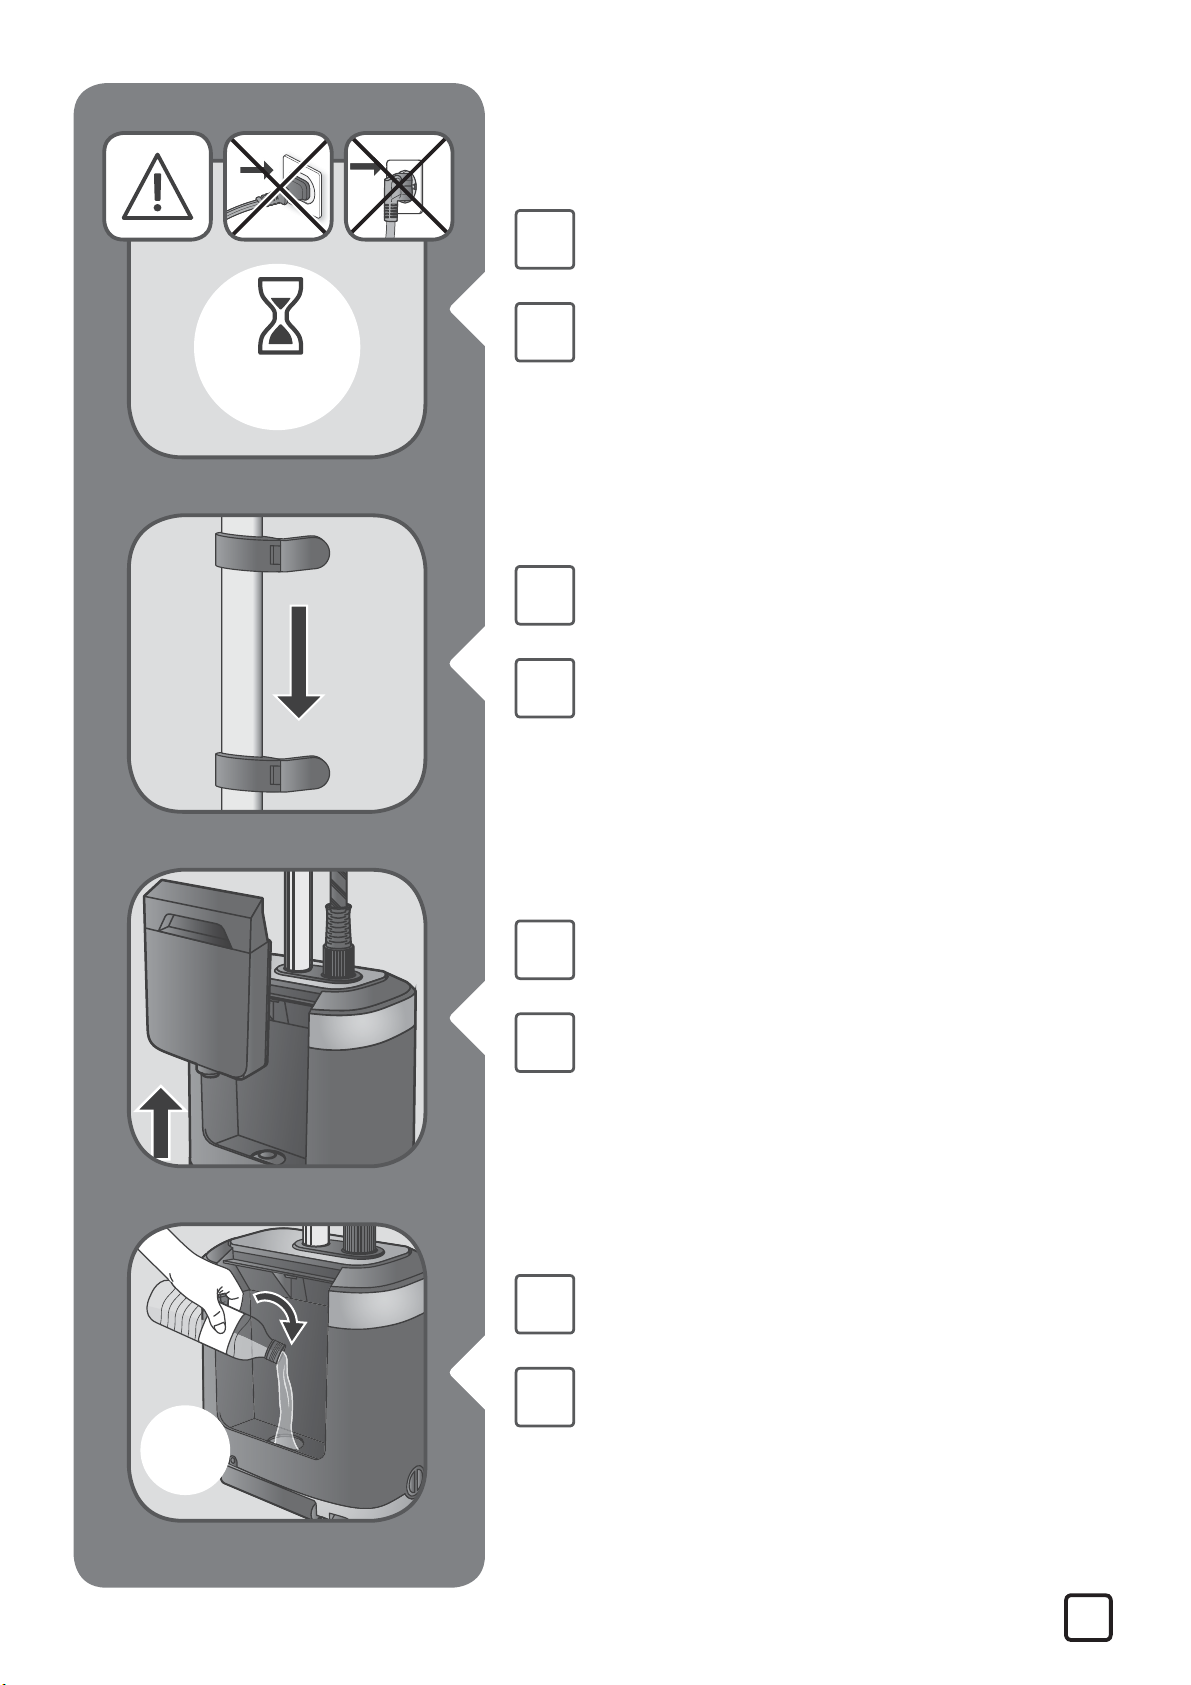
WARNING! Wait for an hour that
appliance completely cools down.
AVERTISSEMENT ! Attendez une
heure an que l'appareil refroidisse
complètement.
Unlock and half collapse the pole,
lock it.
Retirez la tête vapeur du support,
débloquez et retractez de moitié le pole.
EN
FR
EN
FR
Remove the water tank.
Retirez le réservoir d'eau.
Fill in 0.5L(litre) of water in the
appliance tank inlet.
Versez 0,5 L(litre) d'eau dans l'orice
du réservoir de l'appareil.
17
Page 18
EN
FR
EN
FR
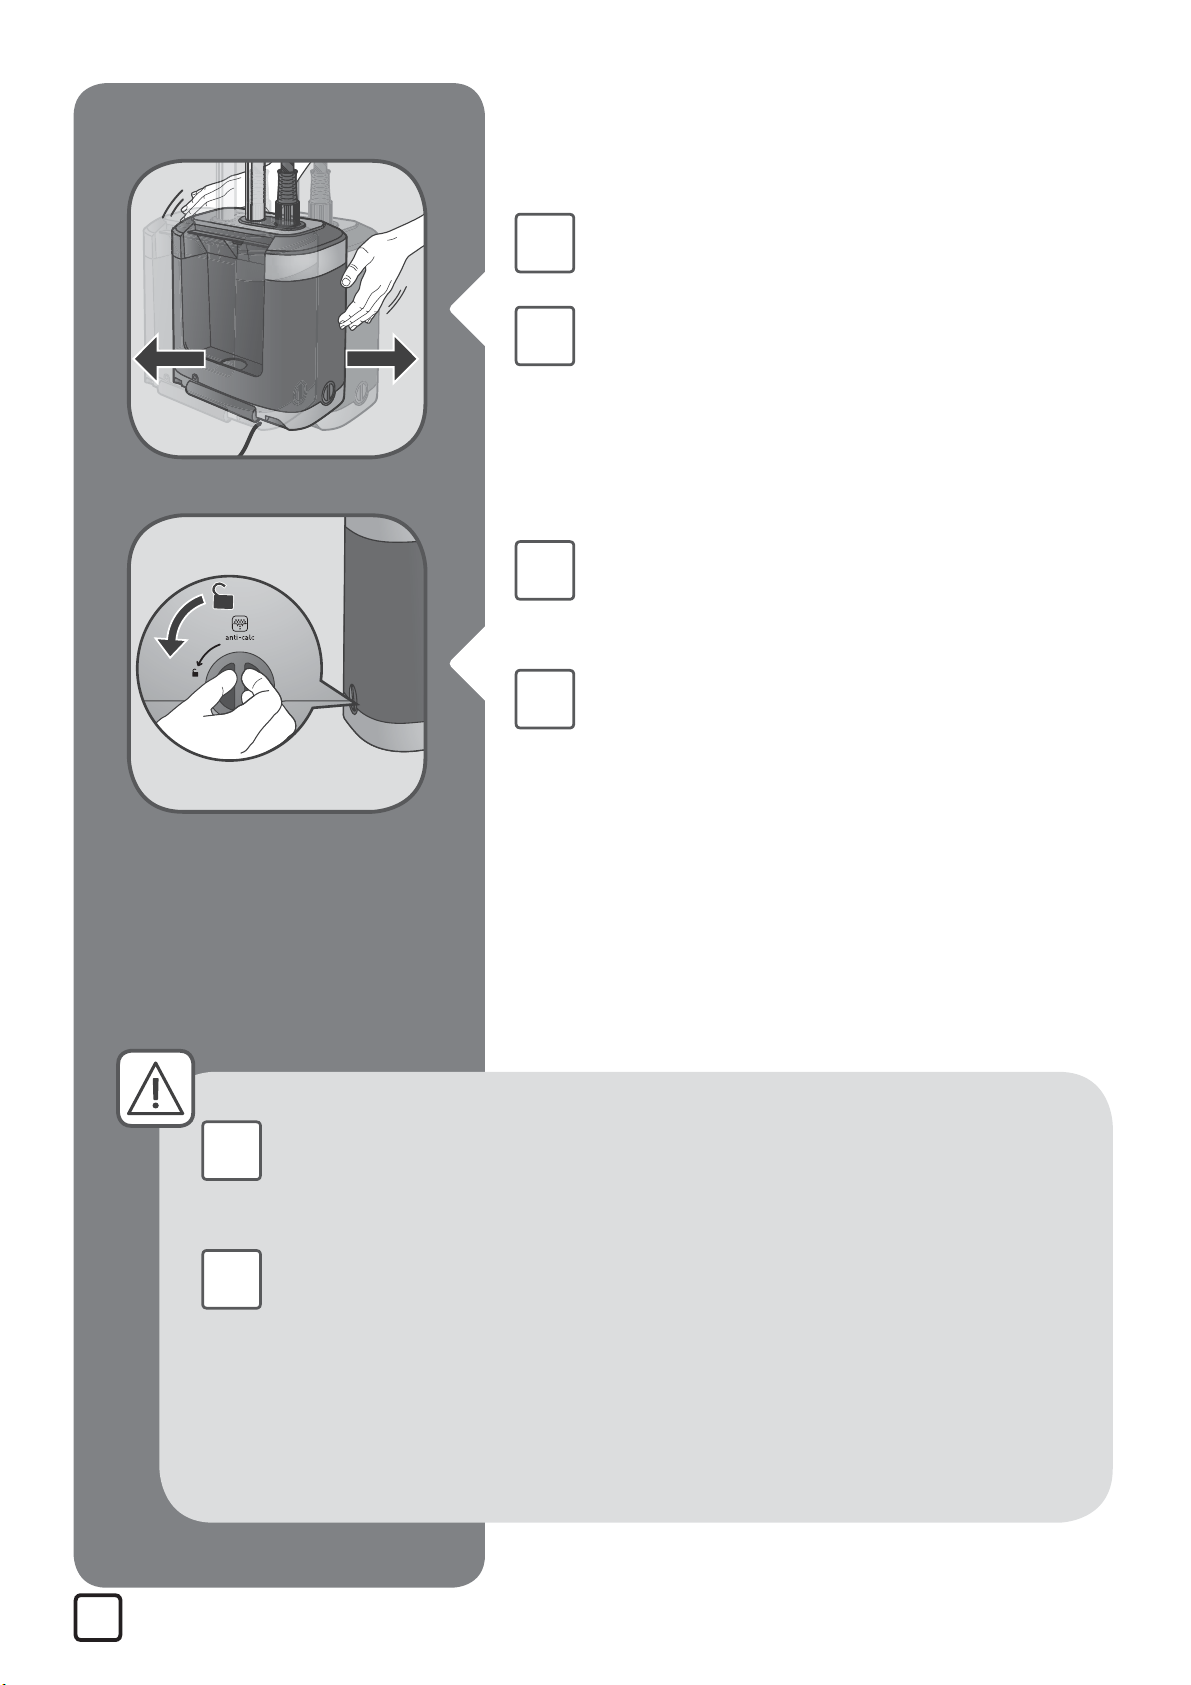
Shake gently the appliance to remove
the main particles.
Secouez doucement l'appareil pour
retirer les particules principales.
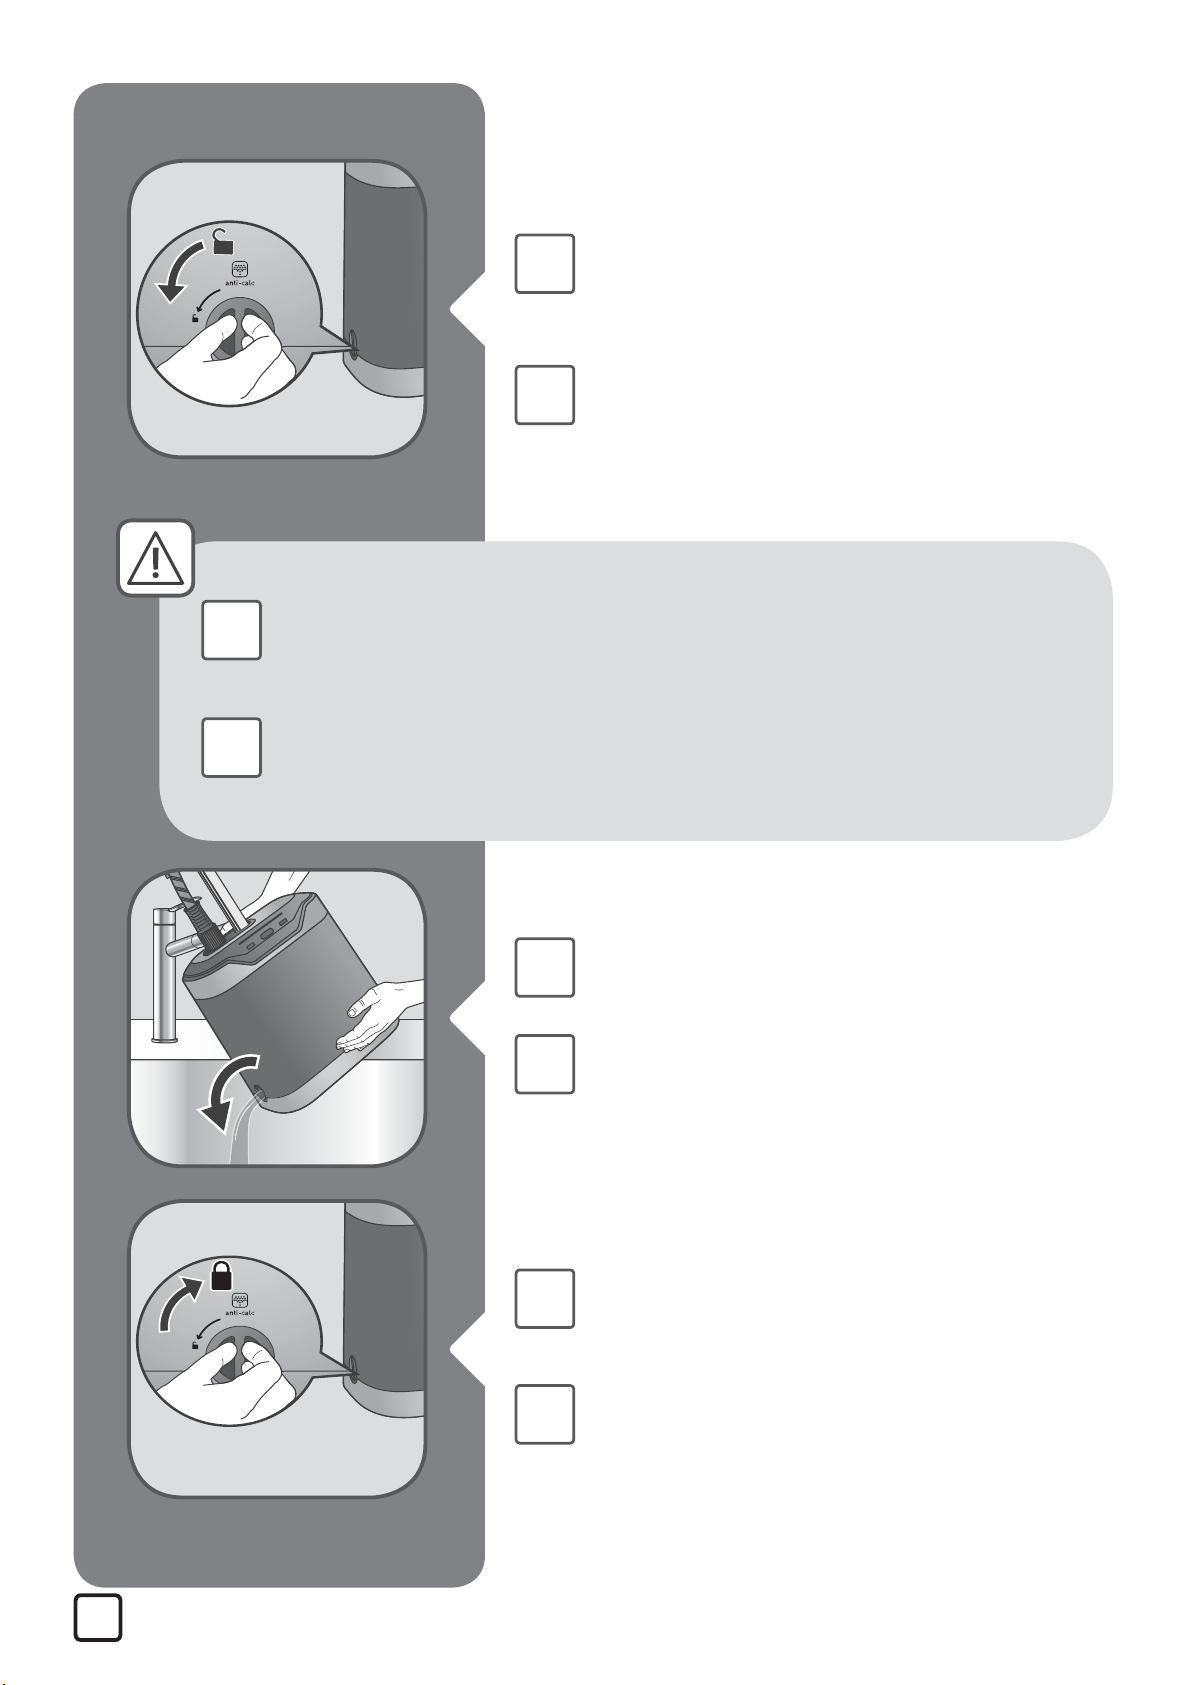
Place the appliance over a sink &
unscrew the «Anti calc» cap by turning
it anti clockwise.
Placez l’appareil au-dessus d’un lavabo
et dévissez le bouchon «anti calcaire»
en le tournant dans le sens antihoraire.
18
EN
FR
Be careful , water might be hot.
Never unscrew the cap when the appliance is in use.
Wait for full cool down.
Ne jamais dévisser le bouton pendant que l'appareil est en
utilisation. Attendez qu'il soit complètement froid.
Page 19

EN
FR
EN
FR
Tilt the appliance to empty mix in a
sink.
Inclinez l'appareil pour vider le
mélange dans un évier.
Set back the draining cap, fully screw
it until complete locking and check
there is no leakage.
Remettez le bouchon anti-calcaire sur
sa base, vissez le complètement et
vériez qu'il n'y a pas de fuite.
EN
FR
EN
FR
Unlock the pole , uncollapse, lock.
Déverrouillez le tube, étirez-le et
verrouillez-le.
Place the steam head on its craddle.
Positionnez la tête vapeur sur son
support.
19
Page 20

1,3L
44OZ
MAX
EN
FR
EN
FR
Remove the cap then ll in the water
tank.
Retirez le bouchon puis remplissez le
réservoir d'eau.
Fully screw the water tank cap and
insert tank back in appliance.
Vissez complètement le bouchon du
réservoir d'eau et replacez le réservoir
dans l'appareil.
EN
FR
EN
FR
Plug in the appliance.
Branchez l’appareil.
Let the appliance run until water tank
is emptied completely.
Laissez l'appareil fonctionner jusqu'à
ce que le réservoir d'eau se vide
complètement.
20
Page 21

8. CLEANING / NETTOYAGE
1h
EN
FR
EN
FR
Wait an hour for complete cool down.
Attendez une heure an que l'appareil
refroidisse complètement.
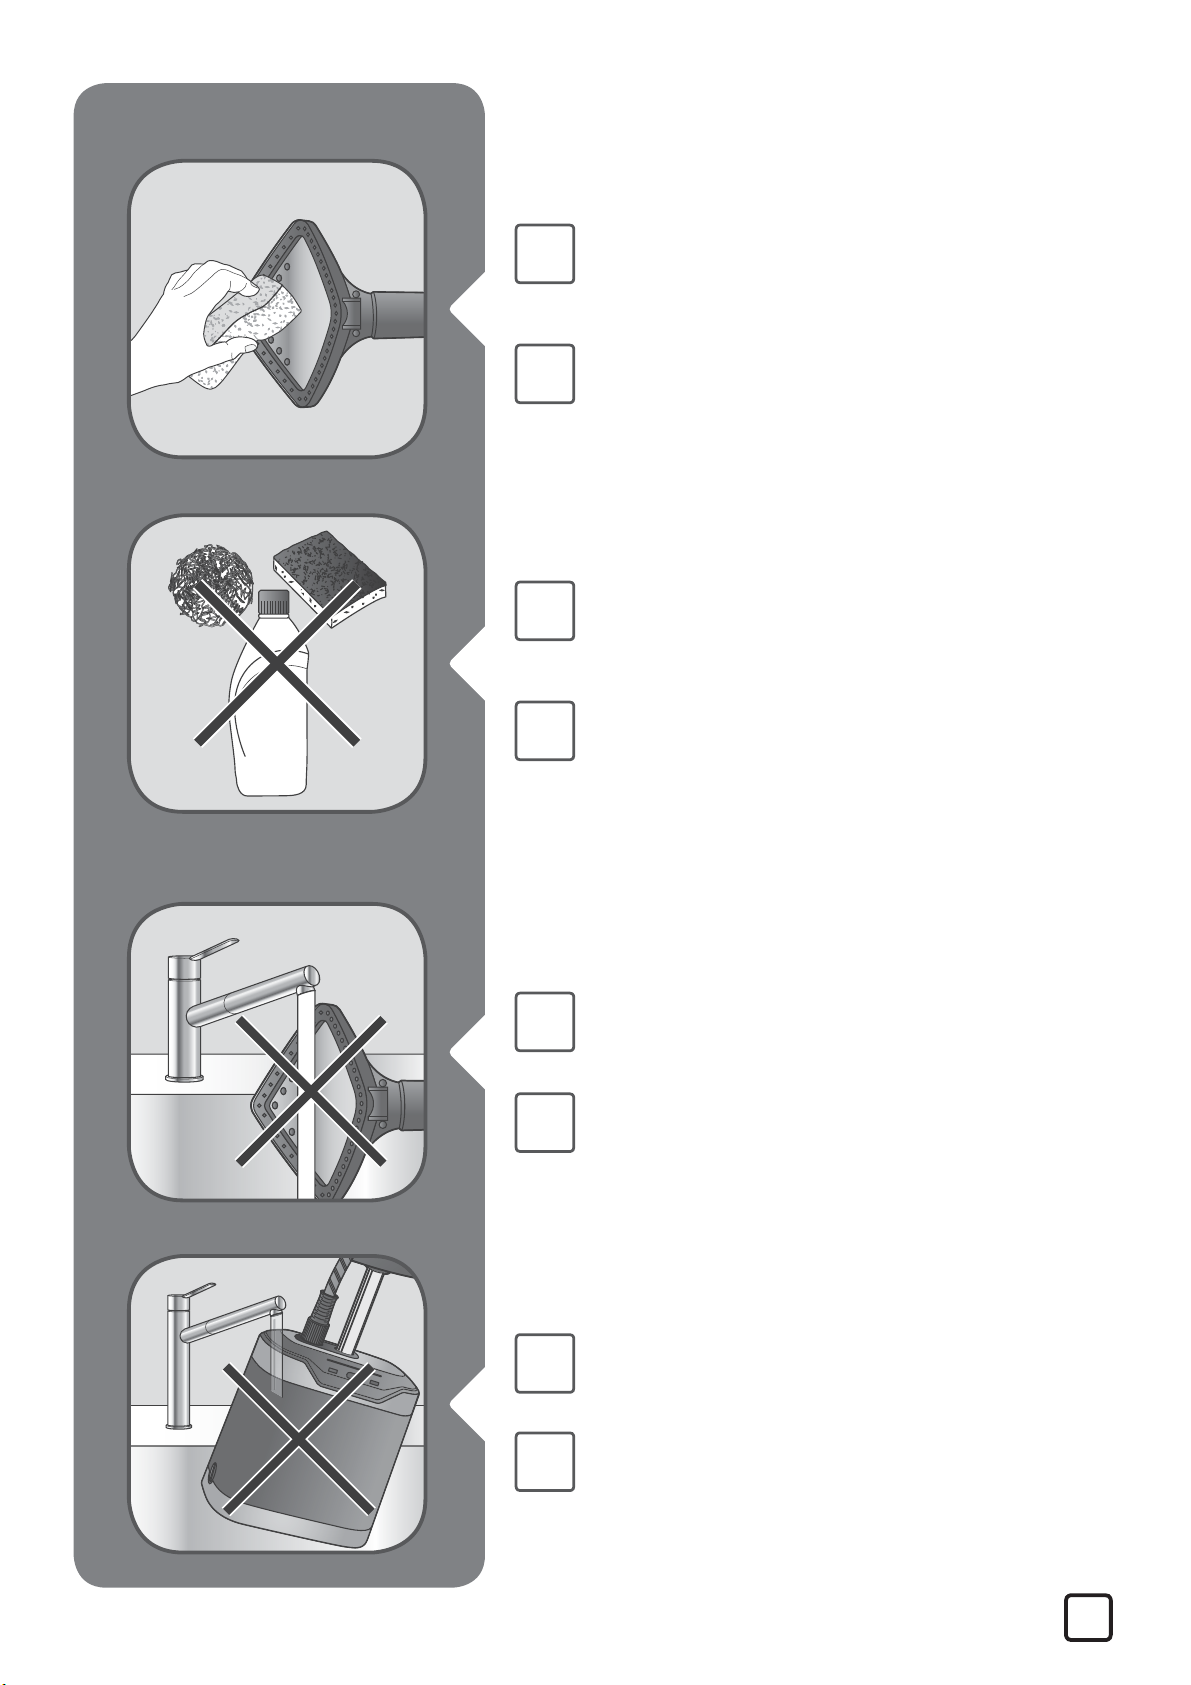
Only use a sponge with water to clean
the base. Never put water on control
panel.
Utilisez une éponge uniquement avec
de l'eau pour nettoyer la base.
EN
FR
EN
FR
Only use a sponge with water to clean
the steam head. Never put water on
+/- buttons and leds
Utilisez une éponge uniquement avec
de l'eau pour nettoyer la tête vapeur.
Never use detergents when cleaning
your appliance.
N’utilisez jamais de détergents pour
nettoyer votre appareil.
21
Page 22

EN
FR
EN
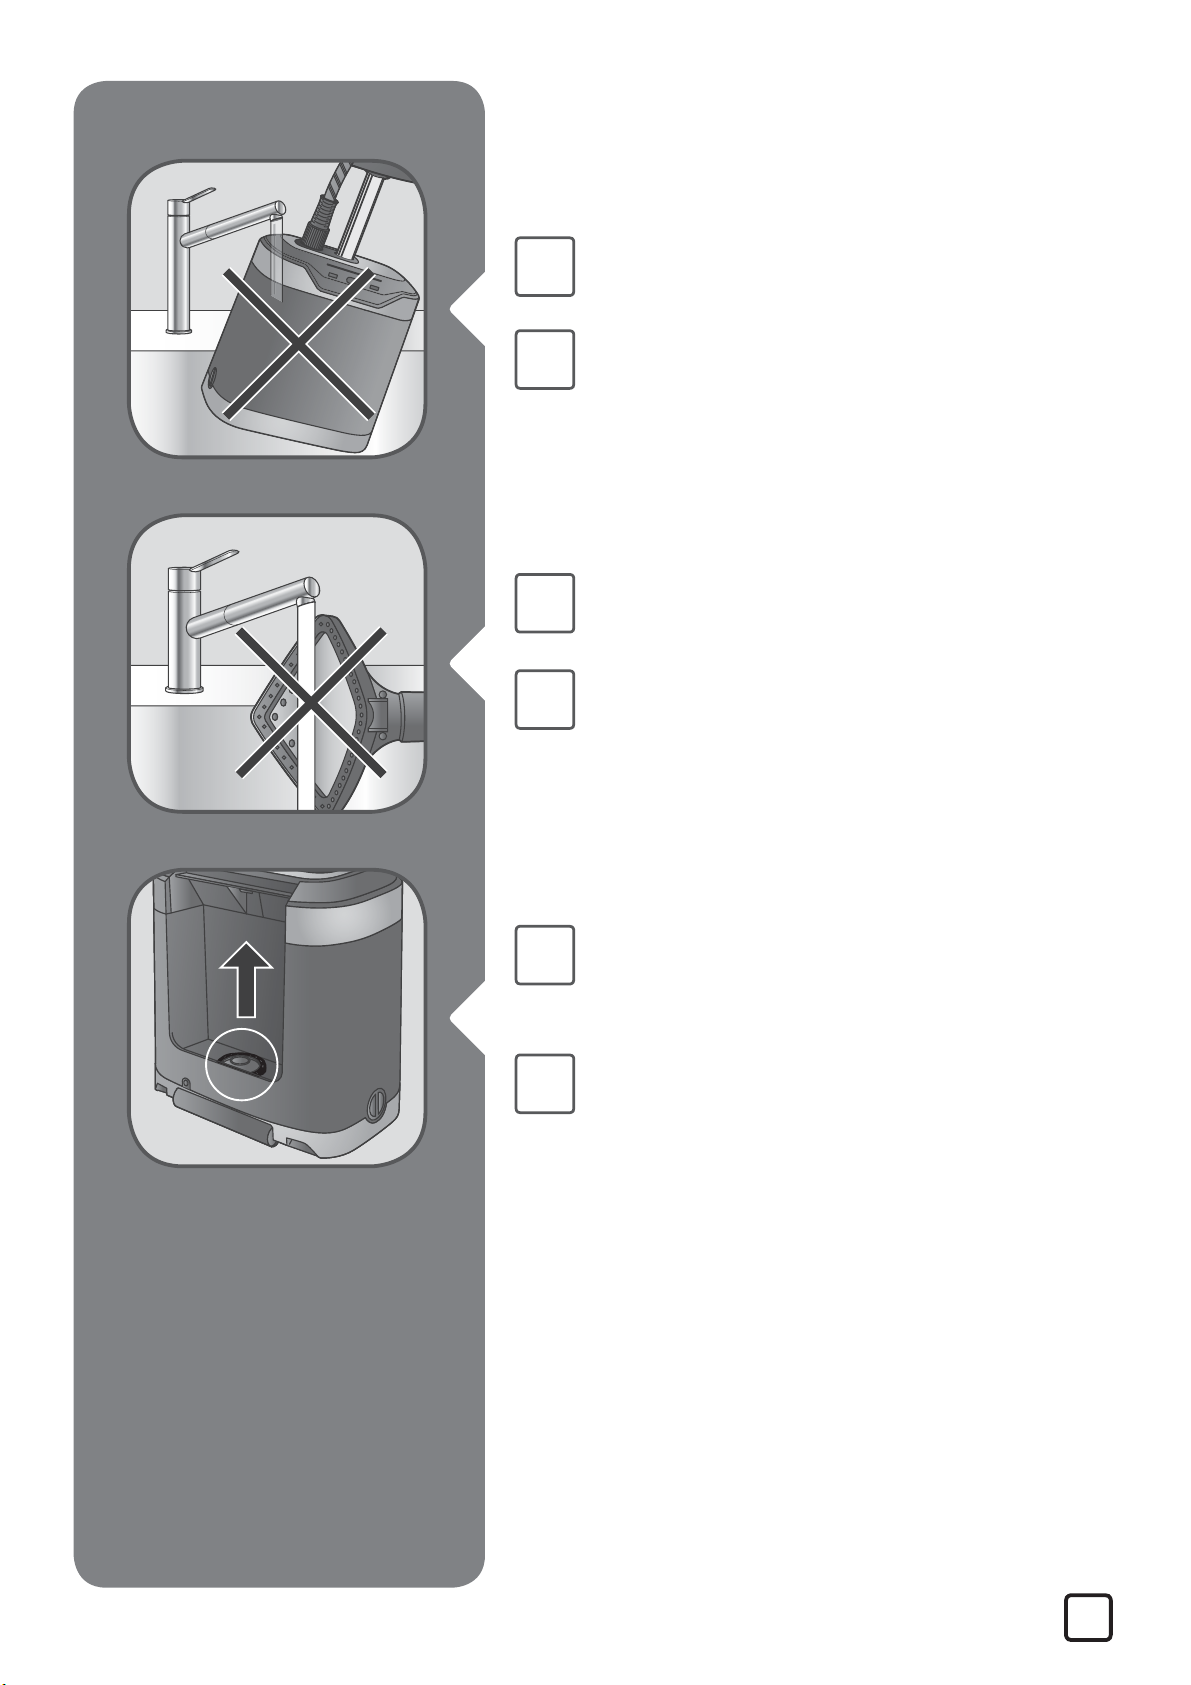
Never wash or rinse appliance directly
over a sink.
Ne lavez ni ne rincez jamais l'appareil
directement au-dessus d'un évier.
Never wash or rince the steam head
directly over a sink.
FR
EN
FR
Ne lavez ni ne rincez jamais la tête
vapeur directement au-dessus d'un
évier.
The sponge below the water tank can
be removed and cleaned with tap
water.
L'éponge située sous le réservoir d'eau
peut être retirée et nettoyée à l'eau du
robinet.
22
Page 23

䏠⍿㊍庮PENERANGAN PRODUK
1. ZH ㎂㞝㎂⋥
MS Penyangkut + cangkuk
penyangkut
2. ZH 咟㱤♛☛
MS Kepala Stim*
3. ZH 咟㱤䮈
MS Hos Stim
4. ZH 丕㡦⏖⌮昴㉦㈿䰥⋥
曢䷁㎂⋥
MS Tiang boleh laras + cangkuk
sokongan menegak boleh
laras* + Cangkuk kord kuasa
5. ZH ㎎∝㝦
9. ZH 㰛䮘㋰懼
MS Butang tangki air
10. ZH ⏖㊭㰛䮘
MS Tangki Air Boleh Tanggal
11. ZH ⎢㰛咲
MS Penutup Pengering
12. ZH ⏖㊭㉦㈿䰥
MS Sokongan menegak boleh
tanggal*
13. ZH 塊䉐乽䶔∞
MS Berus Fabrik *
14. ZH 咟㱤䶙咲
MS Panel kawalan
6. ZH 敲旃∝
MS Butang HIDUP/MATI
7. Z H 咟㱤憶㋮䤡䆯
MS Penunjuk paras stim*
8. ZH ˥$ Q W L F D O F˦Ƌ晋 㰛 ➉ 捜ƌ
MS Butang anti-kalsium
MS Bonet Stim*
15. ZH 䵏㯂⡱
MS Pad lint*
16. ZH ㈲⤾
MS Sarung tangan*
17. ZH 䚡㑡⢺䆏愴ờ
MS Lekapan lipatan*
* ZH 好ḵ❲噆 / MS Bergantung pada model
Page 24
1. 䰂垛PEMASANGAN
ZH
MS
ZH
MS
㈺敲⅐ῲ丕㡦捽˛
Buka pengunci dua tiang.
⯮丕㡦⭳⅏ⰼ˛
Tarik tiang sepenuhnya.
ZH
MS
ZH
MS
⯮⅐ῲ捽㉊䶱˛
Tutup kedua-dua pengunci.
⯮丕㡦㎹⅌⺎Ə䛛凚偤∗˥⑻˦
偙˛
Masukkan tiang dalam rumah
sehingga anda mendengar bunyi
"klik".
24
Page 25
1
2
ZH
MS
櫭敲塊㞝Ə❩䛛⭳⅏⤾⅌丕㡦柩䫖˛
Buka kunci penyangkut dan masukkan
penyangkut sepenuhnya secara
menegak pada bahagian atas tiang
dan kuncikannya.
ZH
MS
ZH
MS
⯮咟㱤♛☛㎂✏㈿㞝˛
Letakkan kepala stim pada
penyangganya.
⯮㉦㈿䰥⾅㔝䳴塲Ḕ⎽⇡ḍ㔋敲˛
Keluarkan penyokong* menegak
daripada begnya dan buka
gulungannya.
* ZH 好ḵ❲噆 / MS Bergantung pada model
ZH
MS
⯮㉦㈿⺰䙫柩䫖㎂✏塊㞝⽳˛
Cangkuk bahagian atas penyokong*
menegak pada penyangkut belakang.
25
Page 26

1,3L
44OZ
MAX
ZH
MS
⯮㉦㈿䰥⽧㊰Ə㉊✏⏖⌮昴㎂⋥Ə
䄝⽳䔏㎂⋥媦㕛櫭䶱Əⅴ⯮⅝捽䶱˛
Rungkaikan sokongan dan sisipkannya
ke dalam cangkuk boleh laras,
dengan melaraskan tegangan dengan
cangkuk khas dan kuncikannya.
2. ḽ䏦ℋSEBELUM
MENGGUNAKAN
ZH
MS
ZH
MS
㊭⇡㰛䮘˛
Tanggalkan tangki air.
㉔敲㰛䮘咲ḍ㳏㰛˛
Buka penutup, kemudian isi air ke
dalam tangki air.
26
* ZH 好ḵ❲噆 / MS Bergantung pada model
Page 27

ZH
MS
⯮㰛䮘咲⭳⅏㉔䶱Ə䄝⽳⯮㰛䮘㔥⛅
Ḣ㩆˛
Skrukan penutup tangki air dan
masukkan tangki semula ke dalam alat
perkakas.
ZH
MS
⯮塊㛴㎂✏塊㞝˛
Tambahkan pakaian pilihan anda pada
penyangkut.
3. 怋ᶴAKSESORI
ZH
MS
* ZH 好ḵ❲噆 / MS Bergantung pada model
愴ờ䙫壄㊭⾬柯✏壄何↞⍢⎱旃㩆⽳怙堳˛
Aksesori harus dipasang apabila alat perkakas sejuk dan
tidak beroperasi.
27
Page 28
*
ZH
塊䉐乽䶔∞⏖㢚櫭塊䉐乽䶔Əị咟㱤㛛
㗺䩦忶塊䉐˛
*
MS
ZH
MS
Berus fabrik membuka alunan fabrik
untuk stim yang lebih berkesan.
咟㱤䶙咲⏖怵㿥㰛Ḕ曃峑Əḍ恦ℴ㛰㰛
㻛∗塊䉐˛
Bonet stim menapis kekotoran air dan
melindungi fabrik daripada air titisan.
28
*
ZH
MS
ὦ䔏䚡㑡⢺䆏愴ờƏ⏖廼櫭✏敞夙䆏
⇡㑡䖼Əㇽ䆏⹚柸⛡䙫䚡㑡˛⯮塊䉐⤥
✏愴ờ⅐惏⇭Ḳ敺䙫䩡暀Ḕ˛䔘俳
䧢⊼䚡㑡⢺䆏愴ờ˛
Lekapan lipatan digunakan untuk
menjadikan seluar mudah dilipat
atau untuk menghilangkan kedutan
yang degil. Letakkan fabrik anda di
ruang antara dua bahagian aksesori.
Gerakkan lekapan lipatan dalam
pergerakan ke bawah yang bermula
dari bahagian atas.
* ZH 好ḵ❲噆 / MS Bergantung pada model
Page 29

4. ㎋ḚPENGGUNAAN
45s
ZH
MS
ZH
MS
Ḣ㩆⾬柯⹚㔥✏✗㝦˛
Perkakas mesti kekal pada posisi
melintang di atas lantai.
⯮曢㹷䷁⾠㔋敲Ə䄝⽳㎹曢㹷˛
Buka gulungan kord sepenuhnya dan
pasangkan palam perkakas.
ZH
MS
ZH
MS
㋰敲旃∝Ə╆⊼Ḣ㩆˛Ḣ㩆䙫/('䆯
㛪敪⊼⤎䳫䦹˛
Tekan butang HIDUP/MATI untuk
mematikan perkakas. Led akan
berkelip selama kira-kira 45 saat.
䳫䦹⽳Ə咟㱤♛☛㛪♛⇡咟㱤˛
Selepas lebih kurang 45 saat, stim
akan keluar.
29
Page 30

*
*
ZH
MS
㋰咟㱤♛☛䙫⎱捜⏖媦䮧咟㱤
弟⇡˛
Laraskan keluaran stim dengan
menekan butang + dan - pada kepala
stim.
*
ZH
MS
ZH
MS
㛧檿䴁 ㈧㛰/('䆯ẕ嵞 㛧⤎咟㱤憶
Tahap maksimum = semua led terang
= stim maksimum
䴁 ῲ/('䆯ẕ嵞 ἵ咟㱤憶
tahap 2 = 2 led terang = stim rendah
30
*
ZH
MS
䴁 䄈/('䆯ẕ嵞 䄈咟㱤
tahap 0 = tiada led terang = tiada stim
* ZH 好ḵ❲噆 / MS Bergantung pada model
Page 31

ZH
MS
䂡总∗㛧㔯㞃Ə媲⏸吾塊䉐䔘俳
䧢⊼♛☛˛
Untuk kegunaan optimum, biarkan jet
stim pada pakaian anda dari atas ke
bawah.
ZH
MS
⇮⋦䛛㎌⯮咟㱤♛⏸ạ˛
Jangan guna stim terus pada orang
ramai.
5. ḽ䏦㗝摑KETIKA
PENGGUNAAN
ZH
MS
⥩˥: $ 7 ( 5 ˦Ƌ⊇ 㰛ƌ捜敪 ⊼ƏỊ 塏 㰛
䮘㰛憶ἵƏ⾬柯㳏㰛˛
Jika butang “AIR” berkelip, tahap air
di dalam tangki air adalah rendah dan
mestilah diisikan.
31
Page 32

1,3L
44OZ
MAX
ZH
MS
㳏㰛∴Ḣ㩆曢㹷⾬柯ℯ旃˛㋰敲旃
∝⏖旃Ḣ㩆˛
Perkakas mesti dimatikan, tekan
butang HIDUP/MATI untuk mematikan
perkakas.
ZH
MS
ZH
MS
㊻晋曢㹷㎹栔Ə䄝⽳㊭⇡㰛䮘˛
Cabut palam kuasa, kemudian
tanggalkan tangki air.
㉔敲㰛䮘咲ḍ㳏㰛˛
Buka penutup, kemudian isikan tangki
air.
32
ZH
MS
⯮㰛䮘咲⭳⅏㉔䶱Ə䄝⽳⯮㰛䮘㔥⛅
Ḣ㩆˛
Skrukan penutup tangki air dan
masukkan tangki semula ke dalam alat
perkakas.
Page 33

45s
ZH
㎹曢㹷˛
MS
ZH
MS
Pasangkan palam perkakas.
㋰ 敲 旃 ∝ ㈺ 敲 壄 何 曢 㹷˛咟 㱤 憶 媦 凚
㛧檿㘩Ə/('㛪敪⊼䦹
Tekan butang “HIDUP/MATI untuk
menghidupkan perkakas. Tahap stim
akan berkelip pada tahap maksimum
selama 45 saat.
6. ḽ䏦⹊SELEPAS PENGGUNAAN
ZH
MS
敞㋰敲旃∝Ə旃壄何曢㹷˛
Tekan lama butang HIDUP/MATIuntuk
mematikan perkakas.
33
Page 34

ZH
㊻晋㎹栔˛
MS
ZH
MS
Tanggalkan palam perkakas.
㊭⇡㰛䮘˛
Tanggalkan tangki air.
ZH
MS
ZH
MS
㉔敲㰛䮘咲Ə⯮㰛⅏惏Ό怙抬䛋˛
Buka penutup dan kosongkan tangki
air sepenuhnya dalam sinki.
㉔䶱㰛䮘咲Ə⯮㰛䮘㔥⛅㩆庒˛
Tutup semula penutup dan letakkan
kembali tangki air pada alat perkakas.
34
Page 35

1h
ZH
MS
ZH
MS
㍙嵞曢㹷䷁Ə㎂✏曢㹷䷁㎂⋥˛
Gulung kord kuasa dan letak pada
penyangkutnya.
ℯ孺壄何↞⍢⯶㘩Əⅴ⯮壄何⬿㔥
⥤˛
Tunggu sejam untuk perkakas
menyejuk sebelum menyimpannya.
ZH
MS
䔏㻥弑䧢⊼Ḣ㩆∴Əㆰ䢡⮁㰛䮘ⷙ䩡˛
Pastikan tangki air kosong sebelum
mengalihkan perkakas pada rodanya.
7. 攢㫲♠㨣椝PROSEDUR
NYAHKERAK
䕝˥D Q W L F D O F ˦Ƌ晋 ➉ƌ捜✏ 敪 ⊼ 㘩
ZH
MS
㋰˛
Untuk menggunakan selepas butang
“anti-calc” berkelip.
35
Page 36

Water
0.5 L
17OZ
1h
ZH
MS
ZH
MS
孍Ƅℯ敹何壄何⯶㘩Ə⽬⅝⭳⅏
↞⍢˛
AMARAN! Tunggu sejam untuk alat
perkakas disejukkan sepenuhnya.
櫭敲丕㡦⛡⮁⤥Ə⯮丕㡦昴凚
⌱Ə䄝 ⽳ ㉊ 䶱˛
Buka kunci dan pendekkan tiang
menjadi separuh, kuncikannya.
ZH
MS
ZH
MS
㊭⇡㰛䮘˛
Tanggalkan tangki air.
⾅㳏㰛⏊㳏⅌⌮㰛˛
Masukkan 0.5L air ke dalam saluran
masuk tangki perkakas.
36
Page 37

ZH
MS
ZH
MS
廼廼㏽⊼Ḣ㩆Ə晋⎢廪⤎栭䱹˛
Goncang secara perlahan perkakas
untuk mengeluarkan partikel utama.
⯮Ḣ㩆㔥✏抬䛋㖨恱Əḍ忭㘩懄㉔敲
˥$QWLFDOF˦Ƌ⎢ 㰛 ➉ƌ冇 咲˛
Letak perkakas di atas sinki & buka
penutup <Anti Calc> dengan
memutarnya berlawanan arah jam.
ZH
MS
⯶⾪䆘㰛˛
⇮⋦✏壄何怲ὃ㜆敺㉔敲冇咲˛
ㆰℯ⽬⅝⭳⅏↞⍢˛
Berhati-hati, air mungkin panas.
Jangan sekali-kali buka penutup perkakas yang sedang
digunakan.
Tunggu sehingganya menjadi sejuk sepenuhnya.
37
Page 38

ZH
MS
ZH
MS
⯮㩆庒❩䛛₥⁛Ə⯮㈧㛰㰛Ό怙抬䛋˛
Condongkan perkakas untuk
mengosongkan campuran ke dalam
sinki.
⯮冇咲㔥✏㳏㰛⏊ḍ⭳⅏㉔䶱Ə㪉㟌
㘖␍㛰㻶㰛˛
Letakkan semula penutup pengering,
skru ia sepenuhnya sehingga
mengunci sepenuhnya dan periksa
sama ada terdapat kebocoran atau
tidak.
ZH
MS
ZH
MS
姊敲丕㡦捽˚ⰼ敲˚捽䶱˛
Buka kunci tiang, panjangkandan
kunci.
⯮咟㱤♛☛㎂✏㈿㞝˛
Letakkan kepala stim pada
penyangganya.
38
Page 39
1,3L
44OZ
MAX
ZH
MS
ZH
MS
㉔敲㰛䮘咲ḍ㳏㰛˛
Buka penutup, kemudian isikan tangki
air.
⯮㰛䮘咲⭳⅏㉔䶱Ə䄝⽳⯮㰛䮘㔥⛅
Ḣ㩆˛
Skrukan penutup tangki air dan
masukkan tangki semula ke dalam alat
perkakas.
ZH
MS
ZH
MS
㎹曢㹷˛
Pasangkan palam perkakas.
㈺敲壄何怲堳Ə䛛∗㰛䮘⅏䩡˛
Biar perkakas berjalan sehingga air
tangki habis sepenuhnya.
39
Page 40

8. 㳃㸒MEMBERSIH
1h
ZH
MS
ZH
MS
权何⯶㘩Ə孺壄何⭳⅏↞⍢˛
Tunggu sejam untuk menyejuk
sepenuhnya.
晋㵞䶦⎱㰛⣽Ə㷬㼻⺎㘩媲⋦ὦ䔏
⅝ẽⷌ⅞˛⇮⋦孺㎎∝㝦㲥㰛˛
Hanya gunakan span dengan air untuk
membersih bahagian bawah. Jangan
letakkan air pada panel kawalan.
ZH
MS
ZH
MS
晋㵞䶦⎱㰛⣽Ə媲⋦ὦ䔏⅝ẽⷌ⅞㷬
㼻咟㱤♛☛˛⇮⋦孺捜⎱/('䆯㎌
姟∗㰛˛
Hanya gunakan span dengan air
untuk membersih kepala stim. Jangan
letakkan air pada butang +/- dan led
⇮⋦ὦ䔏㷬㼻≸㷬㳾㩆庒˛
Jangan gunakan cecair pembersih
untuk membersih peralatan anda.
40
Page 41
ZH
MS
ZH
MS
⇮⋦䛛㎌⯮㩆庒㔥✏抬䛋㱽㳾˛
Jangan basuh atau bilas perkakas
secara terus di dalam sinki.
⇮⋦䛛㎌⯮咟㱤♛☛㔥✏抬䛋㷬㳾
ㇽ㱽㳾˛
Jangan basuh atau bilas kepala stim
terus di dalam sinki.
ZH
MS
㰛䮘䙫㵞䶦⏖㊭⇡ḍ䔏凑Ὥ㰛㷬
㳾˛
Span di bawah tangki air boleh
dikeluarkan dan dibersihkan dengan
air paip.
41
Page 42
AR
FA
ءﺎ ﺎﻬﻔﻴﻈﻨﺗو ءﺎﳌا ناﺰﺧ ﻞﻔﺳأ ةدﻮﺟﻮﳌا ﺔﺠﻨﻔﺳﻹا ﺔﻟازإ ﻦﻜ
.رﻮﺒﻨﺼﻟا
ﯽﺸﮐ ﻪﻟﻮﻟ بآ ﺎﺑ و دﺮﮐ اﺪﺟ ناﻮﺗ ﯽﻣ ار بآ نﺰﺨﻣ ﺮﯾز ﺞﻨﻔﺳا
.ﺖﺴﺷ
42
Page 43
AR
ءﺎﳌا ﻊﻀﺗ ﻻ .رﺎﺨﺒﻟا سأر ﻒﻴﻈﻨﺘﻟ ءﺎﳌاو ﺔﺠﻨﻔﺳﻹا ﻂﻘﻓ مﺪﺨﺘﺳا
.ﺔﻴﺋﻮﻀﻟا تاﴍﺆﳌاو -/+ رارزأ ﲆﻋ
هدﺎﻔﺘﺳا بآ ﺎﺑ ﺞﻨﻔﺳا ﮏﯾ زا ﻂﻘﻓ ،رﺎﺨﺑ یﴎ ندﺮﮐ ﺰﯿ یاﺮﺑ
FA
AR
FA
بآ ،ﺮﮕﻧﺎﺸﻧ یﺎﻫ غاﺮﭼ و -/+ یﺎﻫ ﻪﻤﮐد یور ﺰﮔﺮﻫ .ﺪﯿﻨﮐ
ﺪﯾﺰﯾﺮﻧ
.زﺎﻬﺠﻟا ﻒﻴﻈﻨﺗ ﺪﻨﻋ ﻒﻴﻈﻨﺘﻟا داﻮﻣ ﺎًﻘﻠﻄﻣ مﺪﺨﺘﺴﺗ ﻻ
هدﺎﻔﺘﺳا هﺪﻨﯾﻮﺷ هدﺎﻣ زا ﺰﮔﺮﻫ ،هﺎﮕﺘﺳد ندﺮﮐ ﺰﯿ یاﺮﺑ
.ﺪﯿﻨﮑﻧ
AR
FA
AR
FA
.ضﻮﺤﻟا قﻮﻓ ةﴍﺎﺒﻣ ﻪﻔﻄﺸﺗ وأ رﺎﺨﺒﻟا سأر ﻞﺴﻐﺗ ﻻ
ﯽﺸﮑﺑآ ﺎﯾ ﺪﯿﯾﻮﺸﻧ ﮏﻨﯿﺳ رد ًﯿﻘﺘﺴﻣ ار هﺎﮕﺘﺳد ﺰﮔﺮﻫ
.ﺪﯿﻨﮑﻧ
.ضﻮﺤﻟا قﻮﻓ ةﴍﺎﺒﻣ زﺎﻬﺠﻟا ﻒﻄﺸﺗ وأ ﻞﺴﻐﺗ ﻻ
ﯽﺸﮑﺑآ ﺎﯾ ﺪﯿﯾﻮﺸﻧ ﮏﻨﯿﺳ رد ًﯿﻘﺘﺴﻣ ار رﺎﺨﺑ یﴎ ﺰﮔﺮﻫ
.ﺪﯿﻨﮑﻧ
43
Page 44

1h
AR
.ﺎﺑﺮﻬﻜﻟا رﺎﻴﺘﻟﺎﺑ زﺎﻬﺠﻟا ﻞﺻوأ
FA
AR
FA
.ﺪﯿﻨﮐ ﻞﺻو قﺮﺑ ﻪﺑ ار هﺎﮕﺘﺳد
.ﺎًﻣﺎ ءﺎﳌا ناﺰﺧ ﻎﻳﺮﻔﺗ ﻢﺘﻳ ﻰﺘﺣ ﻞﻤﻌﻳ زﺎﻬﺠﻟا عد
.دﻮﺷ ﯽﻟﺎﺧ ًﻼﻣﺎﮐ ﻪﮐ ﯽﺘﻗو ﺎﺗ ﺪﻨﮐ رﺎﮐ هﺎﮕﺘﺳد ﺪﯾراﺬﮕﺑ
ﺖﻓﺎﻈﻧ / ﻒﻴﻈﻨﺘﻟا .8
AR
FA
AR
FA
.ًﺎﻣﺎ زﺎﻬﺠﻟا دﱪﻳ ﻰﺘﺣ ﺔﻋﺎﺳ ةﺪﳌ ﺮﻈﺘﻧا
.دﻮﺷ ﮏﻨﺧ ًﻼﻣﺎﮐ هﺎﮕﺘﺳد ﺎﺗ ﺪﯿﻨﮐ ﱪﺻ ﺖﻋﺎﺳ ﮏﯾ
ﲆﻋ ءﺎﳌا ﻊﻀﺗ ﻻ .ةﺪﻋﺎﻘﻟا ﻒﻴﻈﻨﺘﻟ ءﺎﳌاو ﺔﺠﻨﻔﺳﻹا ﻂﻘﻓ مﺪﺨﺘﺳا
.ﻢﻜﺤﺘﻟا ﺔﺣﻮﻟ
هدﺎﻔﺘﺳا بآ ﺎﺑ ﺞﻨﻔﺳا ﮏﯾ زا ﻂﻘﻓ ،ﻪﻧﺪﺑ ندﺮﮐ ﺰﯿ یاﺮﺑ
.ﺪﯾﺰﯾﺮﻧ بآ لﱰﻨﮐ ﻞﻧﺎﭘ یور ﺰﮔﺮﻫ .ﺪﯿﻨﮐ
44
Page 45

1,3L
44OZ
MAX
AR
FA
.ﻪﻠﻔﻗا ﻢﺛ ﻪﻌﻓراو دﻮﻤﻌﻟا رﺮﺣ
هرﺎﺑود و ﺪﯿﻫد ﺶﯾاﺰﻓا ار نآ لﻮﻃ ،ﺪﯿﻨﮐ زﺎﺑ ار ﻪﺘﺳد ﻞﻔﻗ
.ﺪﯿﻨﮐ ﻞﻔﻗ
AR
FA
AR
FA
.ﻪﺗﺪﻋﺎﻗ ﲆﻋ رﺎﺨﺒﻟا سأر ﻊﺿ
.ﺪﯿﻫد راﺮﻗ دﻮﺧ یﺎﺟ رد ار رﺎﺨﺑ یﴎ
.ءﺎﳌا ناﺰﺧ ﻸﻣا ﻢﺛ ةداﺪﺴﻟا عﺰﻧإ
.ﺪﯿﻨﮐ ﺮﭘ ار بآ نﺰﺨﻣ و ﺪﯾرادﺮﺑ ار شﻮﭘرد
AR
FA
ىﺮﺧأ ةﺮﻣ ناﺰﺨﻟا ﻞﺧدأو ﺎًﻣﺎ ءﺎﳌا ناﺰﺧ ةداﺪﺳ ﺖﻴﺒﺜﺘﺑ ﻢﻗ
.زﺎﻬﺠﻟا ﰲ
راﺮﻗ هﺎﮕﺘﺳد رد ار نآ و ﺪﯾﺪﻨﺒﺑ ًﻼﻣﺎﮐ ار بآ نﺰﺨﻣ شﻮﭘرد
.ﺪﯿﻫد
45
Page 46
AR
FA
ﻖﻳﺮﻃ ﻦﻋ «ﺲﻠﻜﺘﻟا ﻊﻨﻣ» ةداﺪﺳ ﻚﻓو ﺔﻠﺴﻐﳌا ﲆﻋ زﺎﻬﺠﻟا ﻊﺿ
AR
ﺪﺿ» شﻮﭘرد نﺪﻧﺎﺧﺮﭼ ﺎﺑ و ﻪﺘﺷاﺬﮔ ﮏﻨﯿﺳ یور ار هﺎﮕﺘﺳد
FA
.ﺪﯿﻨﮑﻧ زﺎﺑ ار نآ شﻮﭘرد ،ﺖﺳا هدﺎﻔﺘﺳا لﺎﺣ رد هﺎﮕﺘﺳد ﯽﺘﻗو ﺰﮔﺮﻫ
.ﺪﯿﻨﮐ زﺎﺑ ار نآ ،ﺖﻋﺎﺳ یﺎﻫ ﻪﺑﺮﻘﻋ ﺖﻬﺟ فﻼﺧ رد «بﻮﺳر
.ﺪﺷﺎﺑ غاد ﺖﺳا ﻦﮑﻤﻣ بآ ،ﺪﯿﻨﮐ طﺎﯿﺘﺣا
.دﻮﺷ ﮏﻨﺧ ًﻼﻣﺎﮐ هﺎﮕﺘﺳد ﺎﺗ ﺪﯿﻧﺎ ﺮﻈﺘﻨﻣ
.ﺔﻋﺎﺴﻟا برﺎﻘﻋ هﺎﺠﺗا ﺲﻜﻌﺑ ﺎﻬﺗرادإ
.ﺎﻨﺧﺎﺳ ءﺎﳌا نﻮﻜﻳ ﺪﻗ ، ارﺬﺣ ﻦﻛ
.زﺎﻬﺠﻟا ماﺪﺨﺘﺳا ﺪﻨﻋ ةداﺪﺴﻟا ﻚﻔﺗ ﻻ
.ﺎًﻣﺎ دﱪﻳ ﻰﺘﺣ ﺮﻈﺘﻧا
AR
FA
AR
FA
.ضﻮﺤﻟا ﰲ ﺞﻳﺰﳌا ﻎﻳﺮﻔﺘﻟ زﺎﻬﺠﻟا ﺔﻟﺎﻣﺈﺑ ﻢﻗ
.ﺪﯿﯾﺎ ﻪﯿﻠﺨﺗ ﮏﻨﯿﺳ رد و ﺪﯿﻨﮐ ﺞﮐ ﯽﻤﮐ ار هﺎﮕﺘﺳد
ًﺎﻣﺎ ﻞﻔﻘﺗ ﻰﺘﺣ ﻞﻣﺎﻜﻟا ﻞﻜﺸﺑ ﺎﻬﺒﻛرو ، ﻒﻳﴫﺘﻟا ةداﺪﺳ ﺖّﺒﺛ
.بﴪﺗ دﻮﺟو مﺪﻋ ﻦﻣ ﻖﻘﺤﺗو
ﺎﺗ ﺪﯾﺪﻨﺒﺑ ًﻼﻣﺎﮐ ار نآ و ﺪﯾراﺬﮕﺑ ﺶﯾﺎﺟ ﴎ ار ﻪﯿﻠﺨﺗ شﻮﭘرد
.دراﺪﻧ ﯽﺘﺸﻧ ﻪﮐ ﺪﯾﻮﺷ ﱧﻤﻄﻣ و دﻮﺷ ﻞﻔﻗ
46
Page 47
Water
0.5 L
17OZ
AR
FA
.ﻪﻠﻔﻗا ﻢﺛ ﻒﺼﻨﻟا ﱃا ﻪﻀﻔﺧاو دﻮﻤﻌﻟا رﺮﺣ
ﺪﻌﺑ ،ﺪﯿﻨﮐ هﺎﺗﻮﮐ ﻪﻤﯿﻧ ﺎﺗ ار نآ و ﺪﯿﻨﮐ زﺎﺑ ار ﻪﺘﺳد ﻞﻔﻗ
.ﺪﯿﻨﮐ ﻞﻔﻗ ار نآ هرﺎﺑود
AR
FA
AR
FA
.ءﺎﳌا ناﺰﺧ ﻞﺼﻓا
.ﺪﯿﻨﮐ اﺪﺟ ار بآ نﺰﺨﻣ
.زﺎﻬﺠﻟا ناﺰﺧ ﺔﺤﺘﻓ ﰲ ءﺎﳌا ﻦﻣ (ﱰﻟ) ﱰﻟ 0.5 ﻸﻣا
.ﺪﯾﺰﯾﺮﺑ هﺎﮕﺘﺳد نﺰﺨﻣ رد بآ ﱰﯿﻟ 0.5
AR
FA
.ﺔﻴﺴﻴﺋﺮﻟا تﻴﺴﺠﻟا ﺔﻟازﻹ ﻖﻓﺮﺑ زﺎﻬﺠﻟا ﺰﻫ
.ﺪﻧﻮﺷ اﺪﺟ ﺖﺷرد تارذ ﺎﺗ ﺪﯿﻫد نﺎﮑﺗ ﯽﻣارآ ﻪﺑ ار هﺎﮕﺘﺳد
47
Page 48

1h
AR
1h
FA
.ﻦﻳﺰﺨﺘﻟا ﻞﺒﻗ زﺎﻬﺠﻟا دﱪﻳ ﻰﺘﺣ ﺔﻋﺎﺳ ةﺪﳌ ﺮﻈﺘﻧا
ﮏﻨﺧ ﺎﺗ ﺪﯿﻨﮐ ﱪﺻ ﺖﻋﺎﺳ ﮏﯾ ،هﺎﮕﺘﺳد ﺷاﺬﮔ رﺎﻨﮐ زا ﻞﺒﻗ
.دﻮﺷ
AR
FA
ﻪﺘﻠﺠﻋ ﲆﻋ زﺎﻬﺠﻟا ﻚﻳﺮﺤﺗ ﻞﺒﻗ غرﺎﻓ ءﺎﳌا ناﺰﺧ نأ ﻦﻣ ﺪﻛﺄﺗ
ﺪﯾﻮﺷ ﱧﻤﻄﻣ ،ﺎﻫ خﺮﭼ یور هﺎﮕﺘﺳد نداد ﺖﮐﺮﺣ زا ﻞﺒﻗ
.ﺖﺳا ﯽﻟﺎﺧ نآ بآ نﺰﺨﻣ
ﯽﯾادز بﻮﺳر هﻮﺤﻧ / تﺎﺒﺳﱰﻟا ﺔﻟازإ تاءاﺮﺟإ .7
AR
ﮏﻤﺸﭼ لﺎﺣ رد «بﻮﺳر ﺪﺿ» ﻪﻤﮐد ﯽﺘﻗو هدﺎﻔﺘﺳا یاﺮﺑ
FA
."anti-calc" رﺰﻟا ﺾﻴﻣو ﺪﻨﻋ تاءاﺮﺟﻹا ﻖّﺒﻄُﺗ
.ﺖﺳا ندز
48
AR
FA
.ﺎًﻣﺎ زﺎﻬﺠﻟا اﺬﻫ دﱪﻳ ﻰﺘﺣ ﺔﻋﺎﺳ ةﺪﳌ ﺮﻈﺘﻧا !ﺮﻳﺬﺤﺗ
.دﻮﺷ ﮏﻨﺧ ًﻼﻣﺎﮐ هﺎﮕﺘﺳد ﺎﺗ ﺪﯿﻨﮐ ﱪﺻ ﺖﻋﺎﺳ ﮏﯾ !راﺪﺸﻫ
Page 49

AR
.ءﺎﳌا ناﺰﺧ ﻞﺼﻓا
FA
AR
FA
.ﺪﯿﻨﮐ اﺪﺟ ار بآ نﺰﺨﻣ
.ضﻮﺤﻟا ﰲ ﺎًﻣﺎ ءﺎﳌا ناﺰﺧ غﺮﻓأو ةداﺪﺴﻟا عﺰﻧا
ﮏﻨﯿﺳ رد ًﻼﻣﺎﮐ ار بآ نﺰﺨﻣ ﺪﻌﺑ و ﺪﯿﻨﮐ زﺎﺑ ار شﻮﭘرد
.ﺪﯿﻨﮐ ﻪﯿﻠﺨﺗ
AR
FA
AR
FA
ىﺮﺧأ ةﺮﻣ ءﺎﳌا ناﺰﺧ ﻊﺟرأو ىﺮﺧأ ةﺮﻣ ناﺰﺨﻟا ﱃا ةداﺪﺴﻟا ﻊﺟرا
.زﺎﻬﺠﻟا ﱃإ
ﻪﯿﺒﻌﺗ دﻮﺧ یﺎﺟ رد ار بآ نﺰﺨﻣ و ﺪﯾﺪﻨﺒﺑ هرﺎﺑود ار شﻮﭘرد
.ﺪﯿﻨﮐ
ﺎﺑﺮﻬﻜﻟا ﻚﻠﺴﻟا فﺎﻄﺧ ﲆﻋ ﻪﻌﺿو ﺎﺑﺮﻬﻜﻟا ﻚﻠﺴﻟا ّﻒﻟ
.ﻪﺑ صﺎﺨﻟا
.ﺪﯿﻫد راﺮﻗ صﻮﺼﺨﻣ بﻼﻗ یور و ﺪﯿﻨﮐ ﻊﻤﺟ ار قﺮﺑ ﻢﯿﺳ
49
Page 50

45s
AR
.ﺎﺑﺮﻬﻜﻟا رﺎﻴﺘﻟﺎﺑ زﺎﻬﺠﻟا ﻞﺻوأ
FA
AR
FA
.ﺪﯿﻨﮐ ﻞﺻو قﺮﺑ ﻪﺑ ار هﺎﮕﺘﺳد
ﺾﻣﻮﻴﺳ .زﺎﻬﺠﻟا ﻞﻴﻐﺸﺘﻟ فﺎﻘﻳﻹا / ﻞﻴﻐﺸﺘﻟا رز ﲆﻋ ﻂﻐﺿا
.ﺔﻴﻧﺎﺛ 45 ةﺪﳌ ﴡﻗﻷا ﺪﺤﻟا ﲆﻋ رﺎﺨﺒﻟا ىﻮﺘﺴﻣ
.دﻮﺷ ﻦﺷور هﺎﮕﺘﺳد ﺎﺗ ﺪﯿﻫد رﺎﺸﻓ ار شﻮﻣﺎﺧ/ﻦﺷور ﻪﻤﮐد
ﺢﻄﺳ ﮐاﺪﺣ یور ﻪﯿﻧﺎﺛ 45 تﺪﻣ ﻪﺑ رﺎﺨﺑ ﺮﮕﻧﺎﺸﻧ غاﺮﭼ
.دز ﺪﻫاﻮﺧ ﮏﻤﺸﭼ
هدﺎﻔﺘﺳا زا ﺪﻌﺑ / لﻌﺘﺳﻹا ﺪﻌﺑ .6
AR
FA
AR
FA
ﻞﻴﻐﺸﺗ فﺎﻘﻳﻹ ﺔﻠﻳﻮﻃ ةﺪﳌ فﺎﻘﻳﻹا / ﻞﻴﻐﺸﺘﻟا رز ﲆﻋ ﻂﻐﺿا
.زﺎﻬﺠﻟا
ﺎﺗ ﺪﯿﻫد رﺎﺸﻓ ﯽﻧﻻﻮﻃ تﺪﻣ ﻪﺑ ار شﻮﻣﺎﺧ/ﻦﺷور ﻪﻤﮐد
.دﻮﺷ شﻮﻣﺎﺧ هﺎﮕﺘﺳد
.ﺎﺑﺮﻬﻜﻟا رﺎﻴﺘﻟا ﻦﻋ زﺎﻬﺠﻟا ﻞﺼﻓا
.ﺪﯿﺸﮑﺑ قﺮﺑ زا ار هﺎﮕﺘﺳد
50
Page 51

AR
1,3L
44OZ
MAX
FA
فﺎﻘﻳإ / ﻞﻴﻐﺸﺗ رز ﲆﻋ ﻂﻐﻀﻟاو ،زﺎﻬﺠﻟا ﻞﻴﻐﺸﺗ فﺎﻘﻳإ ﺐﺠﻳ
.ﻪﻠﻴﻐﺸﺗ فﺎﻘﻳﻹ
شﻮﻣﺎﺧ هﺎﮕﺘﺳد ﺎﺗ ﺪﯿﻫد رﺎﺸﻓ ار شﻮﻣﺎﺧ/ﻦﺷور ﻪﻤﮐد ﺪﯾﺎﺑ
.دﻮﺷ
AR
FA
AR
FA
.هﺎﻴﳌا ناﺰﺧ جﺮﺧأ ﻢﺛ ،ﺎﺑﺮﻬﻜﻟا رﺎﻴﺘﻟا ﻦﻋ زﺎﻬﺠﻟا ﻞﺼﻓا
.ﺪﯿﻨﮐ اﺪﺟ ار بآ نﺰﺨﻣ و ﺪﯿﺸﮑﺑ قﺮﺑ زا ار نآ ﺪﻌﺑ
.ءﺎﳌا ناﺰﺧ ﻸﻣا ﻢﺛ ةداﺪﺴﻟا عﺰﻧا
.ﺪﯿﻨﮐ ﺮﭘ ار بآ نﺰﺨﻣ و ﺪﯾرادﺮﺑ ار شﻮﭘرد
AR
FA
ىﺮﺧأ ةﺮﻣ ناﺰﺨﻟا ﻞﺧدأو ﺎًﻣﺎ ﺎﻬﺘﺒﺛو ءﺎﳌا ناﺰﺧ ةداﺪﺳ ﻊﺟرا
.زﺎﻬﺠﻟا ﰲ
راﺮﻗ هﺎﮕﺘﺳد رد ار نآ و ﺪﯾﺪﻨﺒﺑ ًﻼﻣﺎﮐ ار بآ نﺰﺨﻣ شﻮﭘرد
.ﺪﯿﻫد
51
Page 52

*
AR
FA
AR
FA
رﺎﺨﺒﻟا ﻻ = ةءﺎﻀﻣ ﺔﻴﺋﻮﻀﻟا تاﴍﺆﻣ ﻻ = 0 ىﻮﺘﺴﳌا
رﺎﺨﺑ نوﺪﺑ = شﻮﻣﺎﺧ غاﺮﭼ = 0 ﺢﻄﺳ
ﲆﻋ يرﺎﺨﺒﻟا ﺚﻔﻨﻟا ﲆﻋ ﻂﻐﺿا ، ﻞﺜﻣﻷا ماﺪﺨﺘﺳﻻا ﻞﺟأ ﻦﻣ
.ﻞﻔﺳﻷا ﱃإ ﲆﻋﻷا ﻦﻣ ﺲﺑﻼﳌا
یور ﻦﯿﯾﺎﭘ ﻪﺑ ﻻﺎﺑ زا ار رﺎﺨﺑ یﺎﻫ ﺖﺟ ،ﻪﺠﯿﺘﻧ ﻦﯾﱰﻬﺑ یاﺮﺑ
.ﺪﯿﺸﮑﺑ دﻮﺧ سﺎﺒﻟ
AR
FA
AR
FA
صﺎﺨﺷﻷا ﲆﻋ ةﴍﺎﺒﻣ رﺎﺨﺒﻟا ﻪّﺟﻮﺗ ﻻ
.ﺪﯾﺮﯿﮕﻧ ﯽﺴﮐ ﺖﻤﺳ ﻪﺑ ًﯿﻘﺘﺴﻣ ار رﺎﺨﺑ ﺰﮔﺮﻫ
هدﺎﻔﺘﺳا لﺎﺣ رد / لﻌﺘﺳﻹا ءﺎﻨﺛأ .5
هﺎﻴﳌا ناﺰﺧ ﰲ ءﺎﳌا ىﻮﺘﺴﻣ نﺈﻓ ، ﺾﻣﻮﻳ "WATER" رز نﺎﻛ اذإ
.ﻸُ نأ ﺐﺠﻳو ﺾﻔﺨﻨﻣ
نﺰﺨﻣ رد بآ ﺢﻄﺳ ،ﺪﻧز ﯽﻣ ﮏﻤﺸﭼ "WATER" ﻪﻤﮐد ﺮﮔا
.ﺪﯿﻨﮐ ﺮﭘ ار نآ ﺪﯾﺎﺑ و ﺖﺳا ﻢﮐ
52
لﺪﻣ ﻪﺑ ﻪﺘﺴﺑ FA / ﻞﻳدﻮﳌا ﺐﺴﺣ AR *
Page 53

AR
.رﺎﺨﺒﻟا جﺮﺨﻴﺳ ، ﺎًﺒﻳﺮﻘﺗ ﺔﻴﻧﺎﺛ 45 ﺪﻌﺑ
*
*
FA
AR
FA
.ﺪﯾآ ﯽﻣ نوﺮﯿﺑ رﺎﺨﺑ ،ﻪﯿﻧﺎﺛ 45 دوﺪﺣ زا ﺪﻌﺑ
سأر ﲆﻋ - و + رارزﻷا ﲆﻋ ﻂﻐﻀﻟا ﺔﻄﺳاﻮﺑرﺎﺨﺒﻟا جﺮﺨﻣ ﻂﺒﺿا
.رﺎﺨﺒﻟا
راﺪﻘﻣ ،رﺎﺨﺑ یﴎ یور _ و + یﺎﻫ ﻪﻤﮐد نداد رﺎﺸﻓ ﺎﺑ
.ﺪﯿﻨﮐ ﻢﯿﻈﻨﺗ ار رﺎﺨﺑ ﯽﺟوﺮﺧ
*
AR
FA
AR
FA
رﺎﺨﺑ = ةءﺎﻀﻣ ﺔﻴﺋﻮﻀﻟا تاﴍﺆﳌا ﻊﻴﻤﺟ = ﴡﻗﻷا ىﻮﺘﺴﳌا
.ﴡﻗﻷا ﺪﺤﻟﺎﺑ
ﮐاﺪﺣ = ﺪﻧﻮﺷ ﯽﻣ ﻦﺷور یﺎﻫ غاﺮﭼ ﻪﻤﻫ = ﺢﻄﺳ ﮐاﺪﺣ
رﺎﺨﺑ
ﺾﻔﺨﻨﻣ رﺎﺨﺑ = ةءﺎﻀﻣ ﺔﻴﺋﻮﻀﻟا تاﴍﺆﳌا ﻦﻣ 2 = 2 ىﻮﺘﺴﳌا
ﻢﮐ رﺎﺨﺑ = دﻮﺷ ﯽﻣ ﻦﺷور غاﺮﭼ 2 = 2 ﺢﻄﺳ
لﺪﻣ ﻪﺑ ﻪﺘﺴﺑ FA / ﻞﻳدﻮﳌا ﺐﺴﺣ AR *
53
Page 54

45s
*
ﺔﻟازﻹ وأ ﺔﻟﻮﻬﺴﺑ ﺪﻴﻋﺎﺠﺘﻟا ﺔﻟازﻺﻟ ﺪﻴﻋﺎﺠﺘﻟا ﻖﺤﻠُﻣ ﻞﻤﻌﺘﺴُﻳ
AR
FA
AR
FA
كّﺮﺣ .ﻖﺤﻠﳌا ﺰُﺟ ﺑ غاﺮﻔﻟا ﰲ شﻘﻟا ﻊﺿﻮﻳ .ةﺪﻴﻨﻌﻟا ﺪﻴﻋﺎﺠﺘﻟا
.ﻞﻔﺳﻷا ﱃا ﲆﻋﻷا ﻦﻣ ﺪﻴﻋﺎﺠﺘﻟا ﻖﺤﻠﻣ
فﺮﻃﺮﺑ ﺎﯾ راﻮﻠﺷ یﻮﺗا ﻂﺧ نﺎﺳآ ﻊﻓر یاﺮﺑ کوﺮﭼ ﻊﻓر ﻪﻌﻄﻗ
رد ار دﻮﺧ ﻪﭼرﺎﭘ .دﻮﺷ ﯽﻣ هدﺎﻔﺘﺳا ﺖﺨﺳﴎ یﺎﻫ کوﺮﭼ ندﺮﮐ
و ﺪﯿﻨﮐ عوﴍ ﻻﺎﺑ زا .ﺪﯿﻫد راﺮﻗ ﻪﻌﻄﻗ ِﺖﻤﺴﻗ ود ﻦﯿﺑ یﺎﻀﻓ
.ﺪﯿﺸﮑﺑ ﻦﯿﯾﺎﭘ ﺖﻤﺳ ﻪﺑ ار کوﺮﭼ ﻊﻓر ﻪﻌﻄﻗ
هدﺎﻔﺘﺳا / لﻌﺘﺳﻹا .4
.ضرﻷا ﲆﻋ ﻲﻘﻓأ ﻊﺿو ﰲ زﺎﻬﺠﻟا ﻰﻘﺒﻳ نأ ﺐﺠﻳ
.ﺪﺷﺎﺑ ﻪﺘﺷاد راﺮﻗ ﻦﯿﻣز یور ﯽﻘﻓا ﺖﯿﻌﺿو رد ﺪﯾﺎﺑ هﺎﮕﺘﺳد
AR
FA
AR
FA
.رﺎﻴﺘﻟﺎﺑ زﺎﻬﺠﻟا ﻞﺻوأو هﺮﺧﻵ ﺎﺑﺮﻬﻜﻟا ﻚﻠﺴﻟا دﺪﻣ
.ﺪﯿﻨﮐ ﻞﺻو ﺰﯾﺮﭘ ﻪﺑ و ﺪﯿﺸﮑﺑ نوﺮﯿﺑ ًﻼﻣﺎﮐ ار قﺮﺑ ﻢﯿﺳ
ﺾﻣﻮﺗ فﻮﺳ .زﺎﻬﺠﻟا ﻞﻴﻐﺸﺘﻟ ، ON / OFF رﺰﻟا ﲆﻋ ﻂﻐﺿا
.ًﺎﺒﻳﺮﻘﺗ ﺔﻴﻧﺎﺛ 45 ةﺪﳌ ﺔﻴﺋﻮﻀﻟا تاﴍﺆﳌا
.دﻮﺷ ﻦﺷور هﺎﮕﺘﺳد ﺎﺗ ﺪﯿﻫد رﺎﺸﻓ ار شﻮﻣﺎﺧ/ﻦﺷور ﻪﻤﮐد
.ﺪﻧز ﯽﻣ ﮏﻤﺸﭼ ﻪﯿﻧﺎﺛ 45 تﺪﻣ ﻪﺑ هﺎﮕﺘﺳد غاﺮﭼ
54
لﺪﻣ ﻪﺑ ﻪﺘﺴﺑ FA / ﻞﻳدﻮﳌا ﺐﺴﺣ AR *
Page 55

AR
.ﺔﻗﻼﻌﻟا ﲆﻋ ﺎﻫرﺎﺘﺨﺗ ﻲﺘﻟا ﺲﺑﻼﳌا ﻊﺿ
AR
FA
FA
.ﺪﯿﻫد راﺮﻗ ﺰﯾوآ یور ار دﻮﺧ ﺮﻈﻧ درﻮﻣ سﺎﺒﻟ
تﺎﻌﻄﻗ / تﺎﻘﺤﻠﳌا .3
.ﻞﻴﻐﺸﺘﻟا ﺪﻴﻗ ﺲﻴﻟو اًدرﺎﺑ زﺎﻬﺠﻟا نﻮﻜﻳ ﺎﻣﺪﻨﻋ تﺎﻘﺤﻠﳌا ﻞﺼﻓ وأ ﺐﻴﻛﺮﺗ ﺐﺠﻳ
.ﺪﯿﻨﮐ ﻞﺻو ار تﺎﻌﻄﻗ ﺪﯾﺎﺑ ﺖﺴﯿﻧ رﺎﮐ لﺎﺣ رد و ﺖﺳا دﴎ هﺎﮕﺘﺳد ﯽﺘﻗو
*
*
AR
FA
AR
FA
ﲆﻋ لﻮﺼﺤﻠﻟ ﺞﻴﺴﻨﻟا ﺔﺠﺴﻧأ ﺢﺘﻓ ﲆﻋ ﺔﻴﺷﻘﻟا ةﺎﺷﺮﻔﻟا ﻞﻤﻌﺗ
.رﺎﺨﺒﻠﻟ ﻞﻀﻓأ قاﱰﺧا
ﱰﻬﺑ رﺎﺨﺑ ﺎﺗ ﺪﻨﮐ ﯽﻣ زﺎﺑ ار ﻪﭼرﺎﭘ یﺎﻫ ﻪﻧزور ،یا ﻪﭼرﺎﭘ سﺮﺑ
.ﺪﻨﮐ ذﻮﻔﻧ
ﻲﻤﺤﺗو ءﺎﳌا ﺐﺋاﻮﺷ ﺔﻴﻔﺼﺗ ﲆﻋ رﺎﺨﺒﻟا تﺎﺤﺷﺮﻣ ﺔﻴﻄﻏأ ﻞﻤﻌﺗ
.ءﺎﳌا تاﺮﻄﻗ ﻦﻣ ﺔﺸﻤﻗﻷا
زا ار ﻪﭼرﺎﭘ و هدﺮﮐ ﱰﻠﯿﻓ ار بآ یﺎﻫ ﯽﺼﻟﺎﺧﺎﻧ ،رﺎﺨﺑ ﮏﻫﻼﮐ
.دراد ﯽﻣ ﻪﮕﻧ نﻮﺼﻣ بآ تاﺮﻄﻗ و ﻪﮑﻟ
55
Page 56

1,3L
44OZ
MAX
AR
ﻖﻳﺮﻃ ﻦﻋ ،ﻞﻳﺪﻌﺘﻠﻟ ﻞﺑﺎﻘﻟا فﺎﻄﺨﻟا ﰲ ﺎﻬﻠﺧدأو ﺔﻣﺎﻋﺪﻟا مﺮﺑا
.ﺎﻬﻠﻔﻗأو ،فﺎﻄﺨﻟا ﻂﺒﺿ
بﻼﻗ ﺎﺑ رﺎﺸﻓ ﻢﯿﻈﻨﺗ ﻖﯾﺮﻃ زا و ﺪﯿﻨﮐ زﺎﺑ ار هﺎﮔ ﻪﯿﮑﺗ ﭻﯿﭘ
FA
AR
FA
راﺮﻗ ﻢﯿﻈﻨﺗ ﻞﺑﺎﻗ بﻼﻗ رد ار نآ ،ﺶﻧدﺮﮐ ﻞﻔﻗ و صﻮﺼﺨﻣ
.ﺪﯿﻫد
هدﺎﻔﺘﺳا زا ﻞﺒﻗ / لﻌﺘﺳﻹا ﻞﺒﻗ .2
.ءﺎﳌا ناﺰﺧ عﺰﻧا
.ﺪﯿﻨﮐ اﺪﺟ ار بآ نﺰﺨﻣ
AR
FA
AR
FA
.ءﺎﳌﺎﺑ ناﺰﺨﻟا ﻸﻣاو ءﺎﻄﻐﻟا عﺰﻧا
.ﺪﯿﻨﮐ ﺮﭘ بآ زا ار نﺰﺨﻣ و ﺪﯾرادﺮﺑ ار شﻮﭘرد
.زﺎﻬﺠﻟا ﰲ ىﺮﺧأ ةﺮﻣ ناﺰﺨﻟا ﻞﺧدأو ﺎًﻣﺎ ءﺎﳌا ناﺰﺧ ةداﺪﺳ ﺖّﺒﺛ
راﺮﻗ هﺎﮕﺘﺳد رد ار نآ و ﺪﯾﺪﻨﺒﺑ ًﻼﻣﺎﮐ ار بآ نﺰﺨﻣ شﻮﭘرد
.ﺪﯿﻫد
56
لﺪﻣ ﻪﺑ ﻪﺘﺴﺑ FA / ﻞﻳدﻮﳌا ﺐﺴﺣ AR *
Page 57

1
2
AR
FA
.ﺎﻬﻠﻔﻗاو دﻮﻤﻌﻟا قﻮﻓ ﳼأر ﻞﻜﺸﺑ ﻞﻣﺎﻜﻟﺎﺑ ﺎﻬﻠﺧدأو ﺔﻗﻼﻌﻟا رﺮﺣ
ﻪﺘﺳد یور یدﻮﻤﻋ ترﻮﺻ ﻪﺑ ار نآ و ﺪﯿﻨﮐ زﺎﺑ ار ﺰﯾوآ ﻞﻔﻗ
.ﺪﯿﻨﮐ ﻞﻔﻗ و ﺪﯿﻫد راﺮﻗ
AR
FA
AR
FA
.ﻪﺗﺪﻋﺎﻗ ﲆﻋ رﺎﺨﺒﻟا سأر ﻊﺿ
.ﺪﯿﻫد راﺮﻗ دﻮﺧ یﺎﺟ رد ار رﺎﺨﺑ یﴎ
.ﺎﻫدﺪﻣو ﻪﺒﻴﻘﺤﻟا ﻦﻣ * ﺔﻴﺳأﺮﻟا ﺔﻣﺎﻋﺪﻟا جﺮﺧأ
.ﺪﯿﻨﮐ زﺎﺑ ار نآ و جرﺎﺧ شا ﻪﺴﯿﮐ زا ار *یدﻮﻤﻋ هﺎﮔ ﻪﯿﮑﺗ
لﺪﻣ ﻪﺑ ﻪﺘﺴﺑ FA / ﻞﻳدﻮﳌا ﺐﺴﺣ AR *
AR
FA
.ﺔﻴﻔﻠﺨﻟا ﺔﻗﻼﻌﻟا ﲆﻋ * ﺔﻴﺳأﺮﻟا ﺔﻣﺎﻋﺪﻟا ﻦﻣ يﻮﻠﻌﻟا ءﺰﺠﻟا ﻖّﻠﻋ
.ﺪﯿﻨﮐ ناﺰﯾوآ ﺰﯾوآ ﺖﺸﭘ ار *یدﻮﻤﻋ هﺎﮔ ﻪﯿﮑﺗ یﻻﺎﺑ ﺖﻤﺴﻗ
57
Page 58

تﺎﻌﻄﻗ ﻞﺻو / ﺐﻴﻛﱰﻟا .1
AR
FA
AR
FA
.دﻮﻤﻌﻟا ﲇﻔﻗ ﺢﺘﻓا
.ﺪﯿﻨﮐ زﺎﺑ ار ﻪﺘﺳد ِﻞﻔﻗ ود
.ﺔﻳﺎﻬﻨﻟا ﱃا دﻮﻤﻌﻟا دﺪﻣ
.ﺪﯿﺸﮑﺑ نوﺮﯿﺑ ًﻼﻣﺎﮐ ار ﻪﺘﺳد
AR
FA
AR
FA
.دﻮﻤﻌﻟا ﲇﻔﻗ ﻞﻔﻗا
.ﺪﯾﺪﻨﺒﺑ ار ﻞﻔﻗ ود
."ﻚﻴﻠﻛ" تﻮﺻ ﻊﻤﺴﺗ ﻰﺘﺣ وﺪﻋﺎﻘﻟا ﰲ دﻮﻤﻌﻟا ﻞﺧدأ
.ﺪﯾﻮﻨﺸﺑ «ﮏﯿﻠﮐ» یاﺪﺻ ﺎﺗ ﺪﯿﻫد راﺮﻗ دﻮﺧ یﺎﺟ رد ار ﻪﺘﺳد
58
Page 59

لﻮﺼﺤﻣ تﺎﺼﺨﺸﻣ
/ ﺞﺘﻨﳌا ءاﺰﺟأ ﻒﺻو
ءﺎﳌا ناﺰﺧ رز AR .9
بآ نﺰﺨﻣ ﻪﻤﮐد FA
ﻞﺼﻔﻠﻟ ﻞﺑﺎﻗ ءﺎﻣ ناﺰﺧ AR .10
ﯽﻧﺪﺷاﺪﺟ بآ نﺰﺨﻣ FA
ﻒﻳﴫﺘﻟا ةداﺪﺳ AR .11
ﻪﯿﻠﺨﺗ شﻮﭘرد FA
*ﻞﺼﻔﻠﻟ ﺔﻠﺑﺎﻗ ﺔﻳدﻮﻤﻋ ﺔﻣﺎﻋد AR .12
*ﯽﻧﺪﺷاﺪﺟ یدﻮﻤﻋ هﺎﮔ ﻪﯿﮑﺗ FA
*شﻗ ةﺎﺷﺮﻓ AR .13
* یا ﻪﭼرﺎﭘ سﺮﺑ FA
*رﺎﺨﺒﻠﻟ ءﺎﻄﻏ AR .14
*رﺎﺨﺑ ﮏﻫﻼﮐ FA
ﺔﻗﻼﻌﻟا فﺎﻄﺧ + ﺔﻗّﻼﻋ AR .1
ﺰﯾوآ بﻼﻗ + ﺰﯾوآ FA
*رﺎﺨﺒﻟا سأر AR .2
*رﺎﺨﺑ یﴎ FA
رﺎﺨﺒﻟا مﻮﻃﺮﺧ AR .3
رﺎﺨﺑ ﮓﻨﻠﺷ FA
ﺔﻳدﻮﻤﻌﻟا ﺔﻗﻼﻌﻟا ﺔﻣﺎﻋد + ﻞﻳﺪﻌﺘﻠﻟ ﻞﺑﺎﻗ دﻮﻤﻋ AR .4
ﺎﺑﺮﻬﻜﻟا ﻚﻠﺴﻟا ﺔﻗﻼﻋ + *ﻞﻳﺪﻌﺘﻠﻟ ﺔﻠﺑﺎﻘﻟا
ﻢﯿﻈﻨﺗ ﻞﺑﺎﻗ بﻼﻗ + ﻢﯿﻈﻨﺗ ﻞﺑﺎﻗ ﻪﺘﺳد
قﺮﺑ ﻢﯿﺳ بﻼﻗ + *یدﻮﻤﻋ هﺎﮔ ﻪﯿﮑﺗ
ﻢﻜﺤﺘﻟا ﺔﺣﻮﻟ
لﱰﻨﮐ ﻞﻧﺎﭘ FA
FA
AR .5
*ﺮﺑﻮﻟا ةدﺎﺳو AR .15
*نﺎﺘﮐ ﺪ ﭘ FA
*زﺎّﻔﻗ AR .16
*ﺶ ﮑ ﺘ ﺳ د FA
*ﺪﻴﻋﺎﺠﺘﻟا ﻖﺤﻠ
*کوﺮﭼ ﻊﻓر ﻪﻌﻄﻗ FA
ﻣ AR .17
ُ
فﺎﻘﻳإ/ﻞﻴﻐﺸﺗ حﺎﺘﻔﻣ AR .6
شﻮﻣﺎﺧ/ﻦﺷور ﻪﻤﮐد FA
*رﺎﺨﺒﻟا ىﻮﺘﺴﻣ ﴍﺆﻣ AR .7
*رﺎﺨﺑ ﺢﻄﺳ ﺮﮕﻧﺎﺸﻧ غاﺮﭼ FA
تﺎﺒﺳﱰﻟا ﺪﺿ رز AR .8
بﻮﺳر ﺪﺿ ﻪﻤﮐد FA
لﺪﻣ ﻪﺑ ﻪﺘﺴﺑ FA / ﻞﻳدﻮﳌا ﺐﺴﺣ AR *
Page 60

9100033607
 Loading...