

Page 1
Réf. 2551162 - 2/2012
ESPACE GRAPHIQUE
www.tefal.com
User Guide
A
B
C
D
E
F
G
A1
H
TE_SORBETIERE_NORD_EN_2551162_NORD 23/02/12 09:19 PageC1
Page 2
4
Fig. 1
1
2
1
1
2
2
Fig. 3
Fig. 4
1
2
Fig. 5
1
2
Fig. 7
Fig. 8
Fig. 2
Fig. 6
1
1
Fig. 9
Congratulations on becoming the owner of a Tefal ice cream maker!
Your machine will enable you to effortlessly prepare ice cream, iced yogurts,
and sorbets. So now’s the time to really let your imagination run away with
you…
Safety recommendations
• Read the instructions for use carefully before using your appliance for the
first time: the manufacturer does not accept responsibility for use that
does not comply with the instructions.
• For your safety, this appliance conforms with applicable standards and regulations (Directives on low voltage, electromagnetic compatibility,
materials in contact with foodstuffs, environment, etc.).
• This appliance is not intended for use by persons (including children) with
reduced physical, sensory or mental capacities, or lack of experience and
knowledge, unless they have been given supervision or instruction concerning
use of the appliance by a person responsible for their safety. Children should
be supervised to ensure that they do not play with the appliance.
• Before plugging the appliance in, make sure that the power it uses corresponds
to your electrical supply system and that the outlet is earthed.
• Any error in the electrical connection will negate your guarantee.
• Do not place the appliance on a hot surface (a hot-plate, for example) or
leave it near an open flame.
• Do not heat the cooling bowl to a temperature of more than 40°C. Do not put
in a dishwasher, oven or microwave oven and do not fill with a hot liquid.
• Unplug from the mains power supply if the appliance fails during operation
and each time you remove the lid.
• Never put your fingers or a utensil in the filling hole.
• Your appliance is designed for domestic use only. Any commercial use, inappropriate use or failure to comply with the instructions, the manufacturer
accepts no responsibility and the guarantee will not apply.
• Unplug the appliance when you have finished using it and when you clean
it.
• Do not use the appliance if it is not working properly or if it has been
damaged. If this occurs, contact an authorised service centre.
• All interventions other than cleaning and everyday maintenance by the
customer must be performed by an authorised service centre.
• Do not use the appliance if the power cord or plug is damaged. The power
cord must be replaced by an authorised centre to prevent any danger.
• Do not immerse the appliance, power cord or plug in water or any other liquid.
• Do not leave the power cord within reach of children.
EN
TE_SORBETIERE_NORD_EN_2551162_NORD 23/02/12 09:19 PageC4
Page 3

5
• The power cord must never be close to or in contact with the hot parts of your
appliance, near a source of heat or over a sharp edge.
• For your safety, only use the manufacturer’s accessories and spare parts
designed for your appliance.
• Do not pull on the cord to unplug the appliance.
• All appliances are subject to strict quality control procedures. These include
actual usage tests on randomly selected appliances, which would explain any
traces of use.
• This appliance is intended to be used only in the household. It is not intended
to be used in the following applications, and the guarantee will not apply for:
- staff kitchen areas in shops, offices and other working environments;
- farm houses;
- by clients in hotels, motels and other residential type environments;
- bed and breakfast type environments.
SAVE THESE INSTRUCTIONS
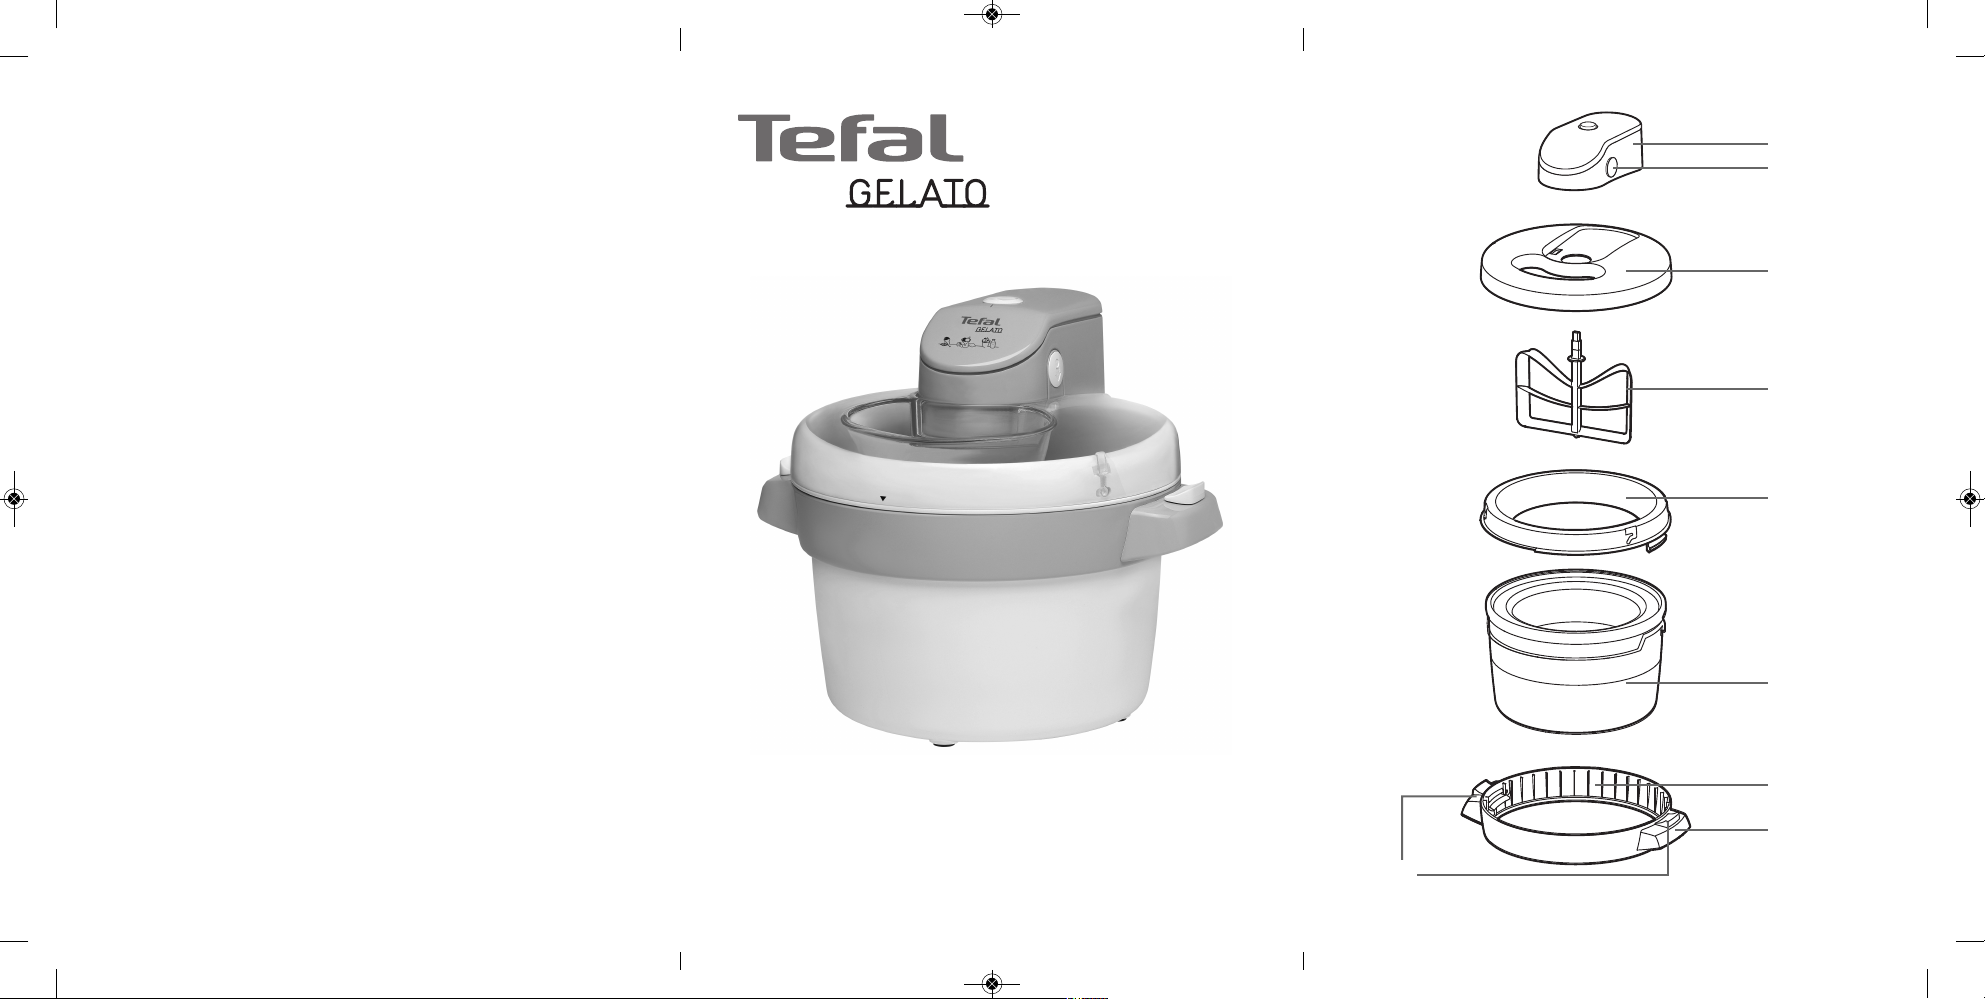
Description
A. Motor unit with on/off switch
A1. Release button to detach motor unit from lid
B. Lid
C. Paddle
D. Upper ring
E. Cooling bowl
F. Lower ring
G. Lower ring grip handles
H. Release levers on handle
Before using for the first time
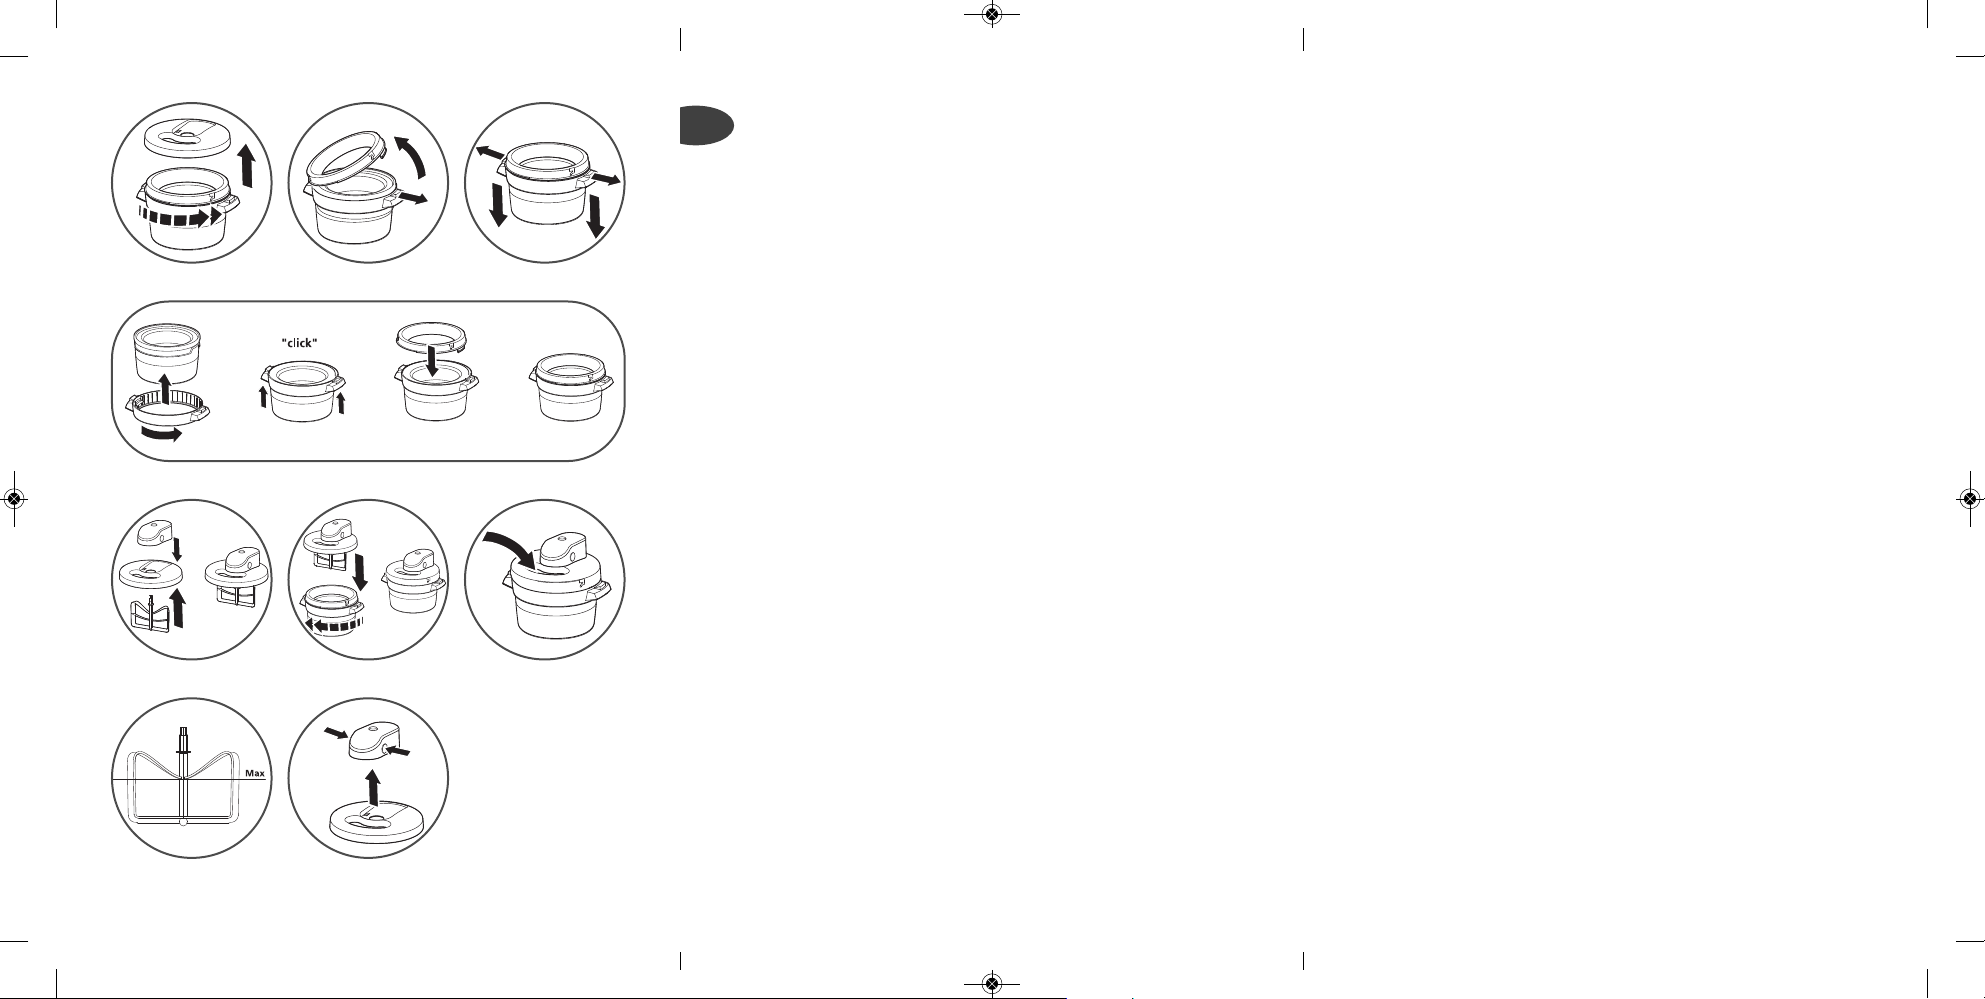
TAKING APART
• Turn the lid slightly anti-clockwise to unlock and lift it
off (Fig. 1). Remove the motor unit located under the
bowl and set it aside.
• Disassemble the upper ring by pushing or pressing on
one of the release levers (H) on the handle (Fig. 2).
Remove the upper ring with your other hand.
• Disassemble the lower ring by pushing or pressing on
BOTH levers of the handle, and pressing downwards
(Fig. 3).
EN
TE_SORBETIERE_NORD_EN_2551162_NORD 23/02/12 09:18 Page5
Page 4

6
CLEANING
• Before using the ice cream maker, clean it to eliminate
any residues from manufacturing, as directed below.
• Never immerse the motor unit in water. Just clean it with a
damp cloth.
• Clean the cooling bowl, lid, rings and paddle with warm
water.
• NEVER clean parts with abrasive or harsh products. You
could damage them.
• Carefully dry all parts before use.
• Only the lid and paddle can be cleaned in a dishwasher.
Freezing the cooling bowl
• Remove the upper and lower rings from the cooling bowl.
Make certain that the bowl is perfectly dry inside and out
before leaving the empty bowl to freeze for at least 24
hours in a freezer at a temperature of –18°C or colder. The
freezing time may be longer in a combination refrigerator/freezer. Make sure the bowl is upright to ensure an even
distribution of the liquid between the walls when it freezes.
• You can check that your freezer is at the right temperature
using the indicator symbol located on the bowl: a snow
flake with green arrows around it will appear about 6 hours
after the container has been placed in the freezer compartment
and it shows that your bowl is in the process of freezing. If
nothing appears after around 10 hours, try lowering the
temperature of your freezer.
• Do not remove the cooling bowl from the freezer until just
before you want to churn the prepared mixture.
Preparing the mixture
• Prepare the ice cream mix (see separate recipe leaflet). The
colder your freezer is, the faster your ice cream maker will
work and the better the results will be. For recipes that
require heating the ingredients, remember to allow time for
your mixture to cool completely before churning! For best
results we recommend chilling the prepared mixture in a
refrigerator set at 4°C for at least 12 hours. For recipes using
EN
You can if you
wish leave your
freezing bowl in
the freezer
permanently so
that you can
make your
desserts as and
when you feel
like it. Keep it
inside a sealed
polythene
freezer bag.
TE_SORBETIERE_NORD_EN_2551162_NORD 23/02/12 09:18 Page6
Page 5

EN
7
fresh unheated ingredients remember that the colder your
mixture is, the faster the ice cream freezes and the better
the results.
• As the mixture will increase in volume during preparation,
do not exceed total quantity of ingredients - 1 kg for sorbets
and 1 litre for ice cream - and do not exceed maximum level
mark on Fig. 8.
Assembling the ice cream maker
• Make certain the appliance is unplugged and start assembling
the components. When removing the bowl from the freezer,
take care to protect your hands with a towel or oven gloves
to prevent freezer burn.
a) - Place the frozen cooling bowl in the lower ring.
(Fig. 4).
- Holding it by its handles, lift up the ring then turn it
until it gets to the notches: and click, its attached.
- Take the upper ring and whilst still holding the lower
ring by its handles, clip it in place (align the arrows on
the upper ring with the handles on the lower ring).
(Fig. 4).
b) Secure the motor unit to the lid and fit the paddle into
the motor unit (Fig. 5). Make certain the motor unit is
securely attached.
c) Place the lid (with the motor unit positionned at the
back) on the bowl and turn slightly clockwise to lock it
(Fig. 6). Make certain that the 4 notches are properly
engaged.
Churning the ice cream
• Connect the ice cream maker and run it immediately
before pouring in the mixture so the paddle turns, otherwise
the mixture will freeze onto the sides of the cooling container
immediately and the paddle will not turn.
• Once your appliance is running, pour the mixture through
the filling opening. (Fig. 7).
• Other ingredients can be added through the opening in the
lid (chocolate chips, small sweets, dried fruit, chopped nuts)
The paddle will
stir your
mixture
regularly so
that bowl is
uniformly cold
from its walls to
its centre. This
is to make sure
that air gets
into the dessert
(expansion) and
prevents the
formation of
crystals,
allowing you to
produce a
dessert which is
nice and
creamy.
TE_SORBETIERE_NORD_EN_2551162_NORD 23/02/12 09:18 Page7
Page 6

8
with the machine running. This is best done when the
mixture is nearly frozen so that the ingredients mix in
before it is too stiffly frozen. Do not switch off the ice
cream maker when adding additional ingredients.
• It will take between 10 and 30 minutes to make a delicious,
soft Italian style ice cream or sorbet. The exact time will
depend on the recipe, the quantity of ice cream, the room
temparature and initial temperature of the ingredients. Once
you have obtained the desired consistency, turn off the appliance and unplug it. Then immediately remove the paddle.
• When the ice cream or sorbet starts to melt at the sides of
the bowl or on the surface, it is ready. So as not to put a
strain on the motor, the appliance will change the direction
of rotation when the mix becomes too compact. If this
occurs repeatedly, this means the ice cream preparation is
ready. Press the ON/OFF button to turn the appliance off.
The light will go off. Unplug the appliance.
• Remove the lid, raising the motor unit slightly and turn
anti-clockwise. Remove the paddle. Disassemble the motor
unit by pressing down on the two release buttons (A1).
(Fig. 9).
• Using metal utensils could damage the cooling bowl. Only
use a wooden or plastic spatula to remove the ice cream.
• The ice cream can be kept in the cooling bowl before
serving for a maximum of 5 minutes, with the paddle
removed, or transferred to a storage container with a lid
and placed in the freezer for 30 min - 4 hours to harden,
depending on the type of ice cream or sorbet.
Making a second batch of ice cream or
sorbet
• Wash the bowl in warm water and dry thoroughly. Do not
use very hot or boiling water as the sudden temperature
change could damage the bowl. Return to the freezer. The
bowl will be partially chilled, so it will require less time in the
freezer, about 4-6 hours.
EN
WARNING!
The cooling
bowl is not
suitable for
storing the ice
cream for a
long time in the
freezer as the
ice cream will
become too
hard. To store
the ice cream,
transfer to a
storage
container with
a lid.
TE_SORBETIERE_NORD_EN_2551162_NORD 23/02/12 09:18 Page8
Page 7

9
Safety features
• The product is equipped with a safety device that stops the
appliance automatically if it overheats. Overheating may
occur if the recipe you are preparing is very thick or if the ice
cream maker runs for too long or if the ingredients added
(e.g. nuts, etc.) are not chopped finely enough. To start the
ice cream maker again, press the ON/OFF button and let it
cool down. After a few minutes you can start it up again.
• Do not run the ice cream maker longer than necessary.
Cleaning instructions
• Disassemble the appliance.
• Only the lid (without the motor unit) and the paddle can be
washed in the upper rack of the dishwasher.
• The bowl and rings can be cleaned in warm water and
washing up liquid (do not use hot or boiling water as it
could lead to expansion and damage the cooling bowl).
• The motor unit must not be washed in the dishwasher. Just
wipe it with a damp cloth.
• Never clean the parts with abrasive products, as this could
damage them.
• Dry the bowl thoroughly before putting it back in the freezer
(without the rings). If you are not returning it to the frezzer,
leave the cooling bowl to thaw at room temperature in the
sink, then dry thoroughly before storing.
Advice and tips
PREPARATION
• Ice cream preparations containing a high proportion of
sugar, fats or alcohol may require more time to freeze or
may even not stiffen.
• Alcohol inhibits the freezing process so we advise you only
add alcohol once the ice cream maker is running and the
preparation is already half frozen.
• We advise you to prepare the ingredients before taking the
bowl out of the freezer so that the bowl will be as cold as
possible on start-up.
EN
CAUTION:
Do not run the
ice cream
maker inside
the freezer or
the refrigerator.
TE_SORBETIERE_NORD_EN_2551162_NORD 23/02/12 09:18 Page9
Page 8

10
• Any preparation poured into the cooling bowl must be liquid
and cold. Do not use stiff ingredients like whipped cream or
already frozen liquids to prepare the ice cream.
• Plan your ice cream or sorbet making the previous day.
Some recipes require the ingredients to be chilled for a minimum of 12 hours in the refrigerator, before transferring to
the ice cream maker for freezing.
• Some recipes require the milk to be heated to just below
boiling point, then it is whisked into the beaten eggs and
sugar, similar to making homemade custard. The mixture is
then returned to the heat, stirring constantly, until it thickens
slightly and forms a film over the back of a wooden spoon.
Do not let it boil or the mixture will separate. If the mixture
curdles at any stage during preparation it can be processed
in a blender or food processor for one minute, to make it
smooth.
• When making ice cream hygiene is of the utmost importance.
Make sure that the ice cream maker is thoroughly clean,
especially the parts that come in contact with the mixture,
and all the equipment and utensils used when preparing
the mixture. Always use fresh ingredients that are within
there best before date, especially eggs, milk and cream.
• Add additional ingredients like chopped chocolate or
chocolate chips, finely chopped nuts, raisins, through the
lid aperture when the mixture just starts to freeze. If the
pieces are too large they may obstruct the paddle from
turning.
STORING & SERVING
• Ice cream or sorbet can be stored in the freezer in the
covered cooling bowl for about 5 minutes after it is ready,
but make sure the paddle has been removed. If you want to
make it firmer in consistency, transfer it to a separate
container with a lid and leave in the freezer for about two to
four hours depending on the ingredients in the recipe.
• The maximum recommend storage times in sealed container
are:
- Ice cream made with fresh, raw ingredients:
up to 1 week.
EN
IMPORTANT:
Defrosted or
partially
defrosted ice
cream must
never be
re-frozen.
TE_SORBETIERE_NORD_EN_2551162_NORD 23/02/12 09:18 Page10
Page 9

11
- Sorbet, frozen yogurt or yoghurt based ice cream:
1 to 2 weeks.
- Ice cream made with semi-cooked ingredients (such as
custard based ice creams):
1 to 2 weeks.
Ice cream tastes best when freshly made, and will lose its
texture and fresh flavour if kept too long.
• Home-made ice cream will harden during storage in the
freezer and the texture is different from the original soft,
spoonable consistency. To make serving stored ice cream
easier, remove from the freezer about 15–30 minutes beforehand and store in the refrigerator to allow it to soften
slightly. Remember sorbets defrost quicker than ice cream.
• Ice cream and sorbet tastes best when freshly made, and
will lose its texture and fresh flavour if kept too long.
• Defrosted or partially defrosted ice cream must never be re-
frozen.
• Ice cream or sorbet that contains raw or partially cooked
eggs should not be given to young children, pregnant
women, the elderly or people who are generally unwell.
For recipe ideas please refer to the separate booklet.
Environment protection first !
HELPLINE:
If you have any product problems or queries, please contact our Customer
Relations Team first for expert help and advice:
0845 602 1454 – UK
(01) 677 4003 – Ireland
Or consult our web site: www.tefal.co.uk
HELP PROTECT THE ENVIRONMENT!
Your appliance contains valuable materials which can be
recovered or recycled.
Leave it at a local civic waste collection point.
EN
Remember ice
cream or sorbet
that contains
raw or partially
cooked eggs
should not be
given to young
children,
pregnant
women, the
elderly or
people who are
generally
unwell.
TE_SORBETIERE_NORD_EN_2551162_NORD 23/02/12 09:18 Page11
Page 10

TE_SORBETIERE_NORD_EN_2551162_NORD 23/02/12 09:18 Page12
 Loading...