

Page 1
DIGITAL W A TCH BABYPHONE
WATCH BABYPHONE
Transmitter - Emisor
иЛВПМЛН - Verici
Receiver - Receptor
艇ژËÍ - Al›c›
Transmitter - Emisor
иЛВПМЛН - Verici
Receiver - Receptor
艇ژËÍ - Al›c›
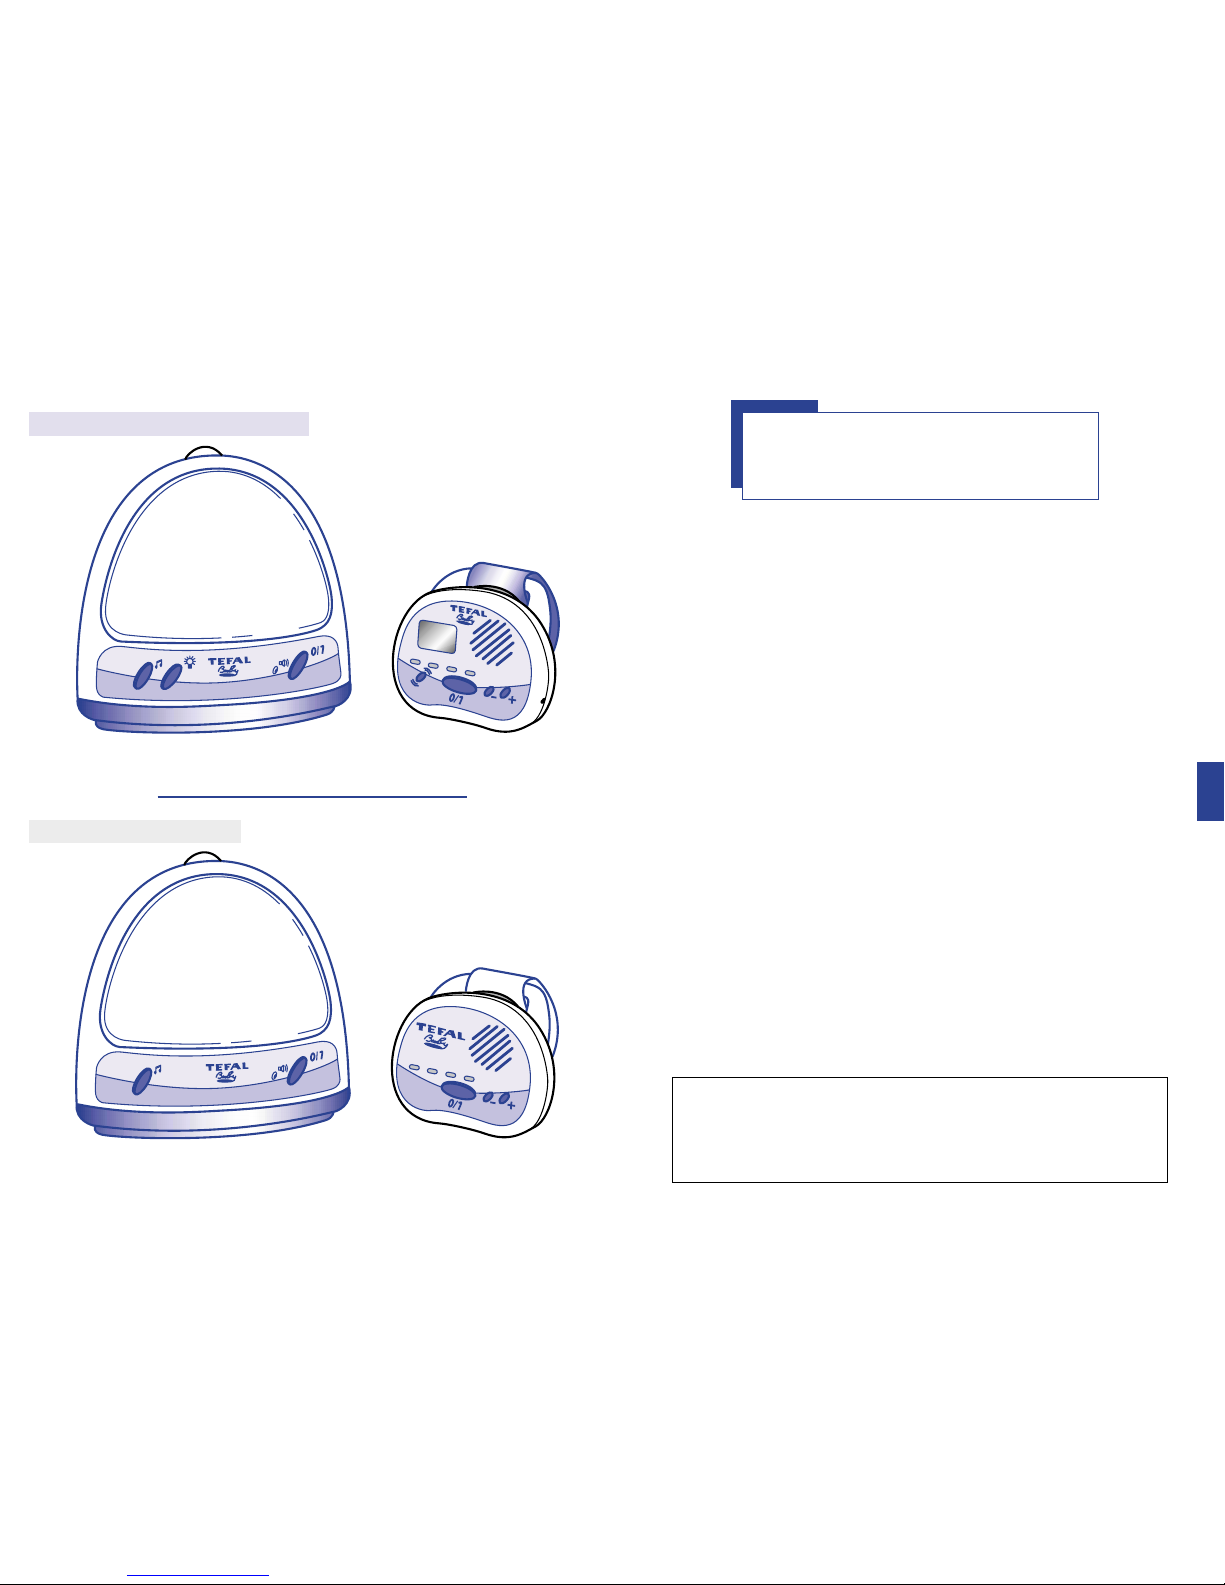
DIGIT AL WATCH BABYPHONE
& WATCH BABYPHONE
TEFAL has created devices to simplify the lives of young mothers. They
combine advanced technology and practical use. They are both attractive
and intelligent. BABYPHONE by TEFAL, with its “transmitter – receiver
duo”, is a high performance, reliable and clever device to watch over
your baby when sleeping or playing. Its musical function will allow you
to put baby to sleep gently.
With the portable receiver wrist attachment and its long functional
endurance, BABYPHONE is a mobile product; you may thus remain in
contact with your child while moving around in your home.
How to use this device.
BEFORE USING FOR THE FIRST TIME,
READ THE INSTRUCTIONS CAREFULLY.
SAFETY INSTRUCTIONS
IN NO CASE CAN THIS PRODUCT REPLACE ADULT SUPERVISION OF
A CHILD.
❤
Keep the transmitter and receiver away from children.
❤
Never place the transmitter in the child’s bed or play pen. ❤Place both
devices away from sources of heat or water projection. ❤Only use the
adapter supplied with the device. Any other power source may damage
the product. ❤Do not use an extension cord ❤Allow for space around
the devices and the adapter for correct ventilation. The adapter must be
easily accessible and the electric wire must be kept out of passageways
and out of reach of children. ❤Do not pull on the wire to disconnect.
❤
If not used for a long period of time, disconnect the transmitter and
remove the batteries from the transmitter and receiver (for the WATCH
BABYPHONE Model). ❤When the transmitter batteries are down, replace
all of them with new batteries. ❤Never disassemble the devices.
FRA
ENG
In compliance with the new regulations which no longer authorise
continuous transmission of noise, the transmitter is only triggered by
a minimum sound level.
It is therefore normal that the receiver remain completely silent when
the transmitter is on stand-by and when its green light is blinking.
Page 2
1 – INSTALLING THE BABYPHONE
The BABYPHONE by TEFAL is
composed of 2 elements : a
transmitter which receives and
sends out sounds and which is to
be placed near the baby, and a
receiver which restores the
message at a distance and which
you must keep near you.
Installing the transmitter
• It must be connected to the
power network at all times.
The adapter (“transmitter” is
marked on its label) connects
under the
base of the
device; its
wire must
be fully
extended.
To ensure the relay in case of a
power failure, or to occasionally
use BABYPHONE where there is
no electricity , 4 AAA LR03 1.5 volt
alkaline batteries may be placed in
the device. During normal
operation, i.e. for 10 to 12 hours
per day, the batteries have a service
life of approximately 10 days.
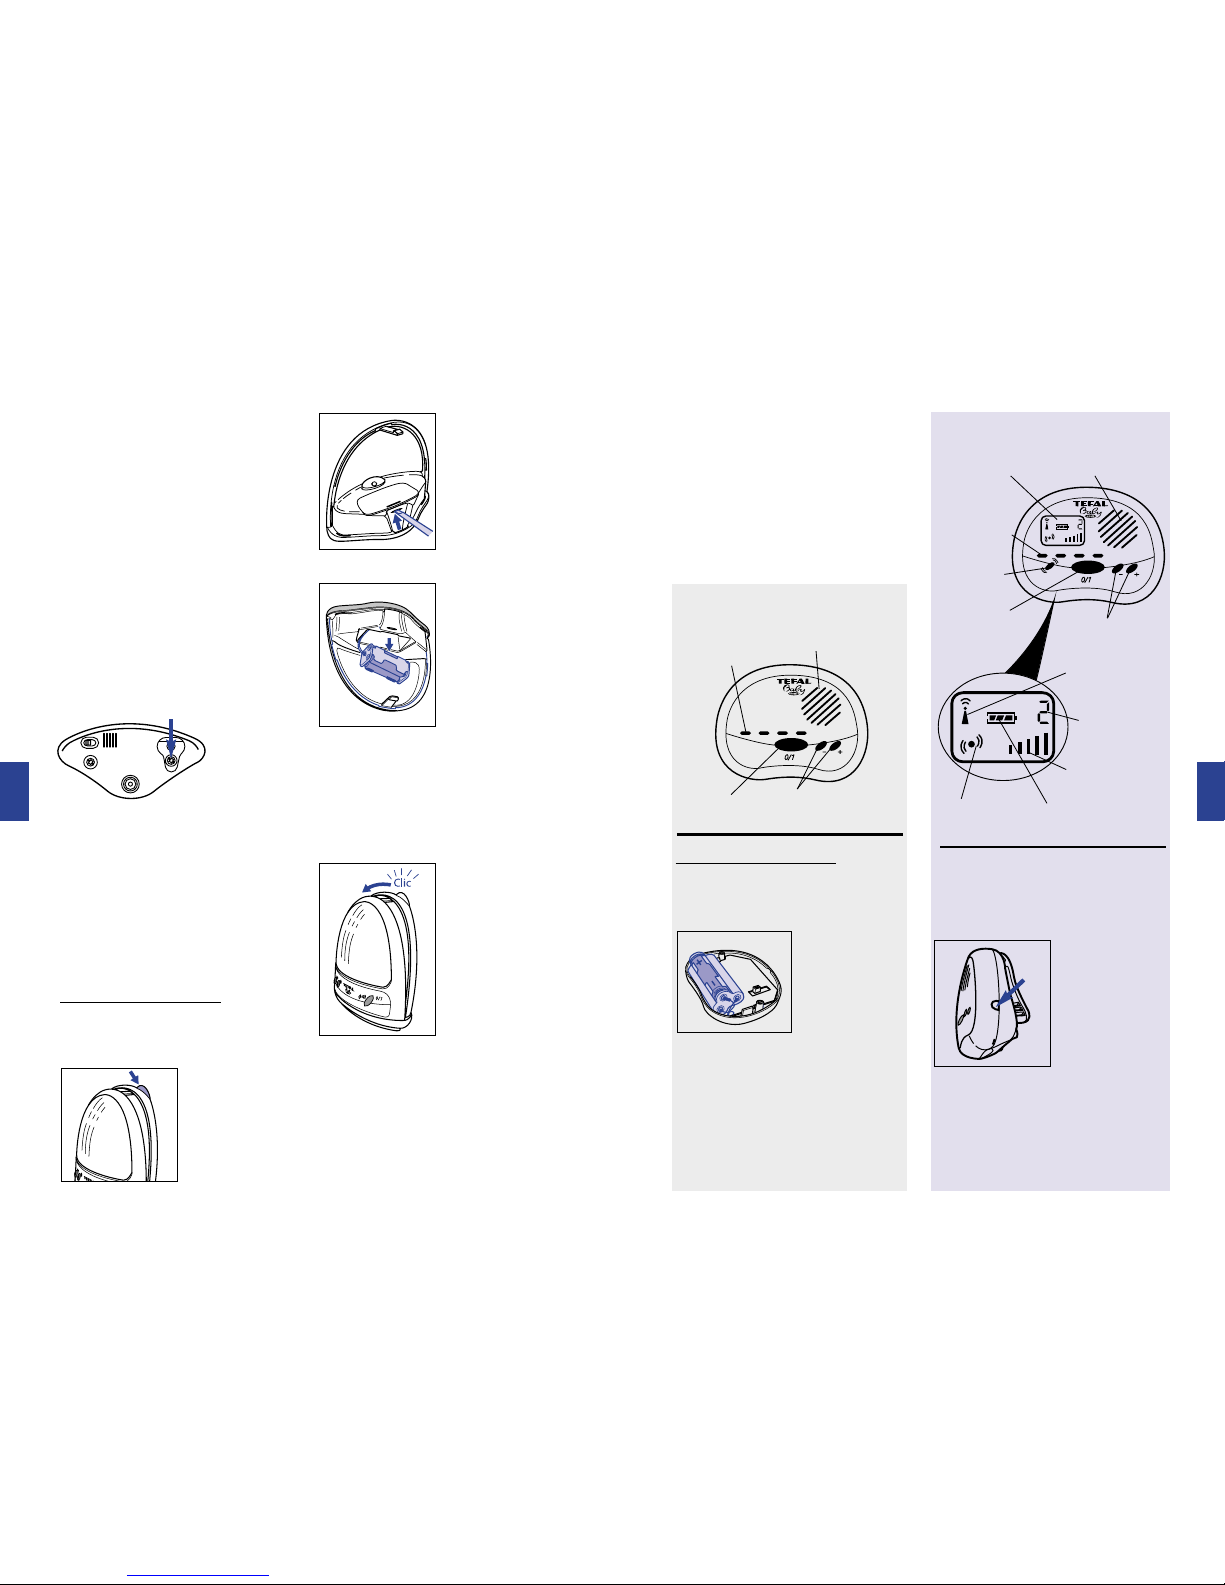
Inserting the batteries :
- Disconnect from the power
network before inserting the
batteries.
- Open the back
of the device by
pressing the
large button at
the top.
- Insert a
screwdriver in
the slit of the
compartment
to unclip the
small cover.
- Turn the device over to remove
the black box
from its lodging
more easily .
- Position the
batteries in
the box,
matching the
+ and – marks
indicated (the negative end of the
battery is always placed on the
spring side).
- Reposition the black box in its
lodging.
- Clip on the cover.
- Reposition the
back of the
device and
press the 2
parts together
until a “click”
is heard.
• The transmitter must be installed
at a certain height, in an upright
position, at a distance of 1 metre
minimum and 3 metres
maximum from the child.
• Put into operation by pressing
the 0/1 button.
ENG
ENG
Installing the receiver
The WATCH BABYPHONE
model operates on alkaline
batteries, which are not supplied.
The DIGITAL WATCH
BABYPHONE model operates on
rechargeable batteries (already
inserted in the device).
• Putting the DIGITAL WATCH
BABYPHONE model into operation
When using for the first time,
the device must be recharged for
12 hours :
- Connect the adapter (“receiver”
is indicated on
its label) on the
left side of the
receiver.
- Connect to
the power
network.
When putting the device into
operation, the battery indicator
of the digital display indicates the
battery charge level; when using
for the first time, it is important
that they be fully charged.
• Putting the WATCH BABYPHONE model into operation
Inserting the batteries :
- Open the rear shell of the
receiver by removing the two
screws with a screwdriver.
- Position 3
AAA type
LR03 batteries
in the box,
matching the
+ and – marks
indicated on the battery box (the
negative end of the battery is
always placed on the spring side).
- Close and screw the rear shell
back down.
Warning : after the batteries have
been inserted, your device turns
on automatically.
1
2
3
LoudspeakerVisual
monitoring
Sound volume
adjustment
On / off
button
Loudspeaker
Visual
monitoring
Sound volume
adjustment
On / off
button
Vibrator
button
Digital
display
Reception
indicator
Sound level
indicator
Batteries
indicator
Vibrator
function
Selected
channel n°
Page 3

Operating possibilities
BABYPHONE is a portable
product which offers several
operating possibilities to meet
your needs with regards to
mobility or discretion :
- may be installed, preferably in
an elevated position,
- may be attached to your belt,
- may be worn on your wrist,
with the bracelet delivered with
the device.
Imply clip the
receiver to the
plastic support
and position on
your wrist;
attach the
bracelet using
the pin on the
plastic support.
• Put into operation by pressing
the 0/1 button.
Selecting the channels
The transmission principle is that
of radio waves; the two devices
can only function if they are
adjusted to the same channel.
There are 3 different channels;
select the channel which offers
the best reception quality,
depending on the circumstances.
If reception is poor or if you
receive neighbouring noises,
change the transmission channel
of the receiver (at the back of the
device) and that of the transmitter
(under the device).
2 – OPERATING THE BABYPHONE
The transmitter
• ON / OFF = 0/1 BUTTON
Press the 0/1 button : it will put the
device into operation.
If the light is :
- blinking green : the device is on
standby (no noise is detected in the
room),
- constantly on : noise is detected and
transmitted,
- off : neither the battery nor the power
network function,
- blinking red : the battery is down
and the power network is not
connected.
To stop the device, press the 0/1
button again.
• MUSICAL FUNCTION
It helps baby to fall asleep.
Press the button : it triggers a
melody which lasts 4 minutes and
stops automatically .
T o stop, press again.
ENG
ENG
1
2
3
1
2
3
• NIGHTLIGHT FUNCTION
Press the button : it triggers the
nightlight which turns off after 10
minutes and lights again as soon
as the child cries.
To stop the nightlight, press the
button again.
The receiver
• ON / OFF = 0/1 BUTTON
Press the 0/1 button : it puts the
device into operation.
- The 1st indicator on the left
blinks green as soon as the device
is operating. If it blinks very
rapidly :
- change the batteries for the
WATCH BABYPHONE model,
- recharge the device for
the DIGITAL WATCH
BABYPHONE model.
To stop the receiver, press the 0/1
button again. All of the indicators
turn off.
• SUPERVISING MODES
There are two supervising modes :
sound and visual (plus a vibrator
function for the DIGITAL
WATCH BABYPHONE model).
V
isual supervision :
The 4 indicators light progressively when the device receives
a transmission. They provide the
amplitude of the noise
transmitted.
Sound supervision :
The sound is adjusted using the
+ / – buttons.
(on the DIGITAL WATCH
BABYPHONE
model, visual
bars indicate
the intensity of
the sound).
• STORING THE RECEIVER
INSIDE THE TRANSMITTER
To transport the device easily and
to optimise its storage, the
transmitter may be lodged inside
the receiver (devices off) :
- Open the back of the transmitter
by pressing the large button at
the top,
- Install the receiver on its bracelet,
- Hook the receiver and bracelet
inside the rear shell, folding the
bracelet carefully.
- Close the
device until
you hear a
“click”.
Clic
Page 4

TROUBLESHOOTING
ENG
Supervising with the vibrator
function :
Only on the DIGITAL WATCH
BABYPHONE model
This function offers a supervising
mode which is discrete under all
circumstances.
Press the button : it activates
the vibrator function which
appears on the screen. As soon
as a sound is received, the device
vibrates. To stop, press the
button again.
The maximum range is 400 m
without obstacles. Like all devices
which use radio waves, the range
of the BABYPHONE depends on
its environment, which is variably
favourable to correct propagation
of waves. Thus, in certain places,
its range may be greatly reduced.
3 – INSTRUCTIONS
BATTERIES
Do not throw batteries into a fire.
Batteries must be
recycled. They must
not be thrown in
trash cans, but put in
recipients to this
effect.
• For the DIGITAL
WATCH BABYPHONE model
Using batteries :
The receiver is powered by
rechargeable AAA type LR03
1.2 volt Ni Mh batteries.
Only recharge the batteries
with the adapter delivered with
your device. Any other means of
charging may damage the device.
Do not leave the batteries
connected to the adapter at all
times; overcharging may shorten
their service life.
Charging and discharging the
batteries :
New batteries only reach their
maximum performance potential
after having been charged and
discharged completely two or three
times.
They may be charged and discharged hundreds of times, but
they wear down with time. When
the operating endurance is shorter
than normal, you must purchase
new batteries.
If they remain unused, batteries
discharge after a certain amount of
time.
Adapter
Disconnect the adapter when not
in use.
The receiver may be used when it
is being charged (except when
using for the first time, when the
device must be charged for
approximately 12 hours before
putting it into service).
MAINTENANCE
Use a slightly damp cloth without
detergent.
Do not allow any liquid to enter
the inside of the devices.
QUESTIONS
There is no sound.
Reception is weak.
The receiver transmits a high
pitched whistling sound
(Larsen effect).
Reception is poor or other
signals are received.
• A beep sounds on the
receiver level.
• On the DIGITAL WATCH
BABYPHONE model, the
reception indicator blinks.
ANSWERS
• Check that the device is turned
on correctly (the indicators
should be lit).
• At the transmitter level : check
that the adapter is connected and
that the power network is
operating.
• Check that the sound volume of
the receiver is not at minimum
and that both devices are placed
on the same channel.
• Reduce the distance between the
transmitter and the receiver or
move the receiver.
• Move the transmitter away from the
receiver .
• Lower the volume of the receiver.
• Change the channel of the
transmitter and the receiver.
Make certain they are on the
same channel.
• Reduce the distance between the
transmitter and the receiver.
• Move the receiver (away from
televisions, stereos, video
recorders...).
• No transmission : check that the
transmitter is in operation.
• Move closer to the transmitter (the
sound signal will stop) since you
moved out of the receiving field
and were no longer in contact with
your transmitter (lost the radio
connection).
• Check that the transmitter and the
receiver are on the same channel.
ENG
Page 5

2 YEAR GUARANTEE : as of the date of purchase, against any defect in manufacturing.
The guarantee does not cover deterioration due to abnormal or abusive use, nor to
disassembly of the device. The power and voltage are indicated on the device.
If a power supply cable is damaged, it must only be replaced by a repair workshop
recognised by the manufacturer, since special tools are necessary. The Tefal
company reserves the right to modify the characteristics or components of the
product at any time, in the interest of the consumer.
ENG
TROUBLESHOOTING
QUESTIONS
The light indicator of the
transmitter 0/1 button
blinks red.
• On the receiver , the 1 light
indicator on the left blinks
rapidly.
•The battery indicator blinks
and/or the vibrator no
longer operates on the
DIGITAL W ATCH
BABYPHONE model.
•The sound lever cannot be
adjusted.
ANSWERS
• Check that the adapter is
correctly connected to the
power network and/or change
the batteries.
• The batteries are down, they
must be changed. (WATCH
BABYPHONE).
• Recharge your device for
10 hours (DIGITAL WATCH
BABYPHONE).
TEFAL S.A.
BP 89 – ZI des Granges
74156 RUMILLY CEDEX
FRANCE
TEFAL S.A.
BP 89 – ZI des Granges
74156 RUMILLY CEDEX
FRANCE
Digital Watch Babyphone and Watch Babyphone
Scheme 7005 edition A
DECLARATION OF CONFORMITY
AT THE EUROPEAN DIRECTIVE 99/5/CE
PRESENTER'S NAME :
MANUFACTURER'S NAME :
DESCRIPTION OF THE EQUIPMENT :
(Edition, scheme n°…)
I undersigned,
M. P. de WASSEIGE
Standards Manager
declare that the equipment above-mentioned is in conformity with the
European directive 99/5/CE (R & TTE)
These products are in compliance with the EC standards EN 301 489-3
(ed 00) and EN 301 357-1 (ed 01)
These products are in compliance with the ERC Decision of 12 March 2001
on harmonised frequencies, technical characteristics and exemption from
individual licensing of Short range devices used for Wireless Audio
Applications operating in the frequency 863 – 865 Mhz (ERC/DEC/(01)18)
and the harmonised frequencies used is include the frequencies band for
Babyphone (864.800 to 865 Mhz)
They were the subject of an opinion by the notified body n° 0413
Signed at RUMILLY, on June 30th2002
P. de WASSEIGE
Standards Manager
 Loading...