

Page 1
R
Page 2
1
2
3
4
5
6
7
8
9
10
TECHNICAL SPECIFICATIONS
Components
1. Painted steel body
2. Fixed reflector
3. Liftable heating element
4. Adjustable thermostat
5.Thermoplastic feet and handles
6.Remov ab le cooking dish with Tefal non-stick coating
7. Glass lid
Depending on model :
8. Pilot light
9. Removable drip tray
10. Removable grill plate with Tefal non-stick coating
Electrical details
• Power and voltage are indicated on the appliance.
• Fixed cord.
If the power supply cord is damaged, it must be replaced by the manufacturer or its service
agent or a similarly qualified person in order to avoid a hazard.
BEFORE FIRST USE
1. Remove all packing materials from the outside and
inside of the barbecue.
2. Clean the cooking dish, the drip tray and the grill
plate (depending on model) with hot water and wipe
it with care.
3. Wipe the interior of the dish
and the grill plate (depending
on model) with a soft coth and
a little vegetable oil.
PLUGGING - PRE-HEATING
1. Check that the voltage of your appliance is the same
as your mains.
2. Before each use, unwind the flex completely.
3. If you want to use your appliance with the grill plate
(depending on model), place the drip tray in the
appliance.
If you use your appliance in casserole function, do
not place the drip tray in the appliance.
4. Place the cooking dish or the grill plate (depending
on model) on the base of the appliance and make
sure it is stable and well positioned.
5. Switch on at the mains.
In case an extension cable is necessary, it must be
earthed, and its cross section must be at least 1 mm
When using an extension cable, secure it safely so
that people do not trip over it.
6. Set the thermostat to the position of your choice (the
ENG
positions indicated in recipes can be adjusted depen-
TEFALSA has an ongoing policy of research and development and may modify these products without prior notice.
2
.
ding on your own taste).
Note :If you use your appliance
in grill function, pre-heat it for 8
to 10 minutes at thermostat 4.
For other functions, pre-heating
is not necessary.
Warning : never put the lid on
when pre-heating the appliance empty.
The pilot light (depending to
model) switchs off when the
temperature is reached.
• N.B. : on first use, it is normal
for the heating element to give
off a small amount of smoke
and odour.
Page 3

ASSEMBLING THE APPLIANCE
1,3 l
MAX
Depending on the accessories supplied with your appliance, you can try
3 kinds of cooking :
casserole grilling steam cooking (1)
(depending on model) (depending on model)
a. We recommend you add water in the bottom
the cooking dish and the glass lid
Note :
of the cooking dish, up to the maximum
mark :
can also be used in the oven
but they must never be used
on any other heat source.
b. Make sure you do not cover the openings
of the grill plate with food to be cooked.
SAFETY W ARNINGS
• Always unplug the appliance when not in use.
• Use only one appliance per plug and always use an
earthed extension cable, with cross section of at least
2
.
1 mm
• Never place aluminium foil or any other object between
the cooking dish or the grill plate (depending on model)
and the heating element.
• Place the appliance on a firm table : avoid using it on
a soft base.
• Do not use any other cooking dish than the one supplied with the appliance.
• Never touch the metallic parts (body or grill plate) while
the appliance is in use as they can become very hot.
• We recommend you always using gloves when
handling the cooking dish, the lid and the grill
plate (depending on model) : steam emission can
come out when opening de lid.
• Do not move your appliance when cooking in order to
prevent any risk of burning.
• Never place your appliance on a fragile surface (glass
NOTTOBEDONE !
Warning :
never use the glass
lid as a dish on the
base of the appliance.
(1) For steam cooking :
table, piece of furniture...).
• Do not place anything bet-
ween the grill plate (depending on model) and the food
(e.g. dish, aluminium foil...).
• To keep the benefits of the nonstick coating inside the cooking
dish :
- never heat for more than a
few minutes when empty
(respect the time of preheating if this one is necessary) ;
- use wooden utensils to stir
food ;
- do not cut directly in the
cooking dish.
• Before switching off at the
mains, turn the thermostat to
the stop position (0).
ENG
Page 4

USE OF ADJUSTABLE THERMOSTAT
N: Blue
or black
E: Green and
yellow or green
L: Brown
or red
Fit correct
fuse(13 amp)
Use cable
gripper
01234
stop
keep warm /
simmer fry seal
re-heat
Note :You can adjust the ther mostat depending on the dishes to be cooked. With smaller quantities of food, it may be necessary to reduce the thermostat to a lower number.
CLEANING
• Unplug and leave the appliance to cool.
• The body of the appliance and the fixed reflector
can be cleaned with a sponge and washing-up liquid.
Avoid using an abrasive scouring pad.
N.B. : to easily clean the fixed reflector, raise the liftable heating element.
• The heating element does not require cleaning, but
when cold, it can be rubbed with a dry cloth to remove
any food deposits.
• The cooking dish, the lid, grill plate and the drip
tray (depending on model) must be cleaned after
each use with normal washing-up liquid or in a dish-
washer. Scouring powders and
scouring pads are not recommended.
Note : if food has burned, leave
the cooking dish to soak a little
while before cleaning.
• NEVER IMMERSE THE
APPLIANCE WITH HEATING
ELEMENT AND CORD IN
WATER.
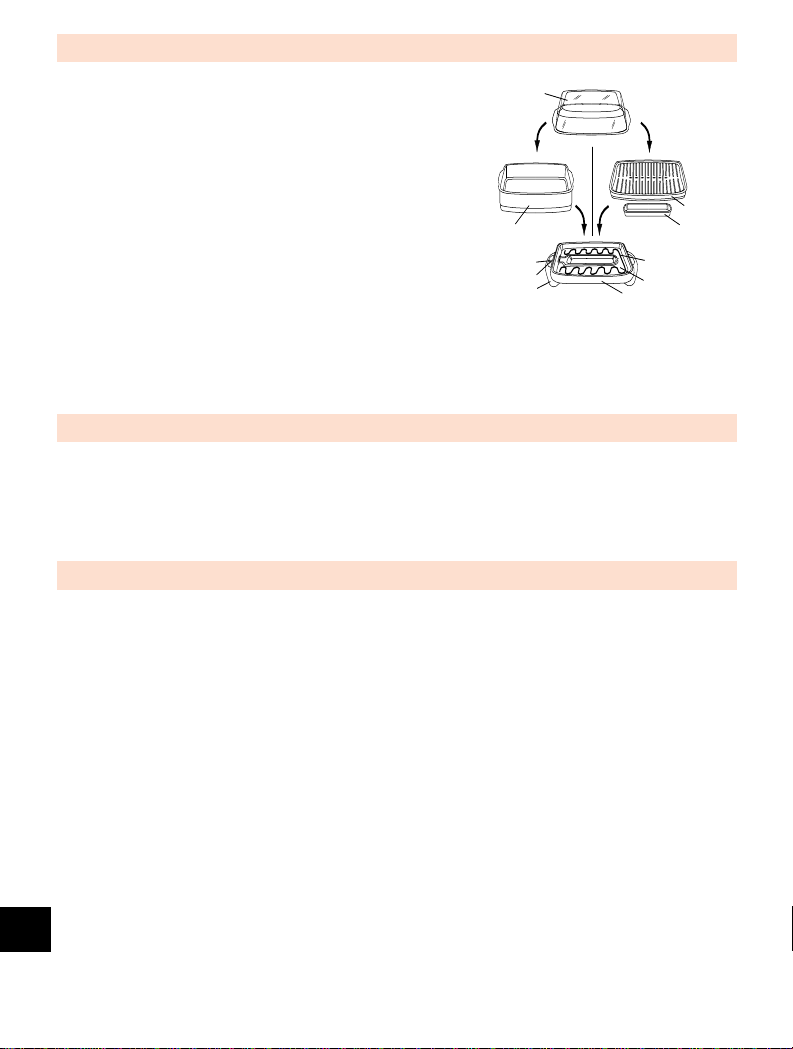
STORING THE APPLIANCE
So that the appliance does not take too much place in
your cupboard, we advise you to stock the different
accessories as indicated on the following drawing :
(some accessories are supplied
depending on model)
ADDITIONAL INFORMATION AND INSTRUCTIONS
WIRING INSTRUCTIONS
WARNING :ALL APPLIANCES MUST BE EARTHED.
IMPORTANT : the wires in this lead are coloured in accordance
with the following codes.
Green and Yellow : Earth
Blue : Neutral
Brown : Live
Connect the Green/Yellow wire to the terminal in the plug marked “E” (or by the
earth symbol) or coloured Green and
Yellow.
Connect the Brown wire to the terminal in
the plug marked “L” or coloured Red.
ENG
Connect the Blue wire to the terminal in
the plug marked “N” or coloured Black.
Seek professional advice if you are unsure of the correct procedure
for the above.
ABOUT YOUR FACTORY FITTED PLUG
The cord is already fitted with a plug incorporating an appropriate fuse. If the plug does not fit your socket outlet, see paragraph below.Should you need to replace the fuse in the plug
FOR U.K. USERS ONLY :
supplied, an appropriately rated
approved BS 1362 fuse must be used
(refer to electrical specification for
fuse rating).
If the plug supplied does not fit your
socket outlet, it should be removed
from the mains lead and disposed of
safely. The flexible cord insulation
should be stripped back as appropriate and a suitable alternative plug fitted. The replacement plug must be
equipped with an appropriate fuse. If
the plug has external access to the
fuse (non-rewirable type plug) please
note that the fuse cover is an important part of the plug. Please ensure
that it is always refitted correctly. If
you lose this cover, please do not use
the plug. You may contact Tefal U.K.
Limited for a replacement.
 Loading...