

Page 1
TASC PRINTER MODULE
INSTALLATION AND OPERATION
MANUAL
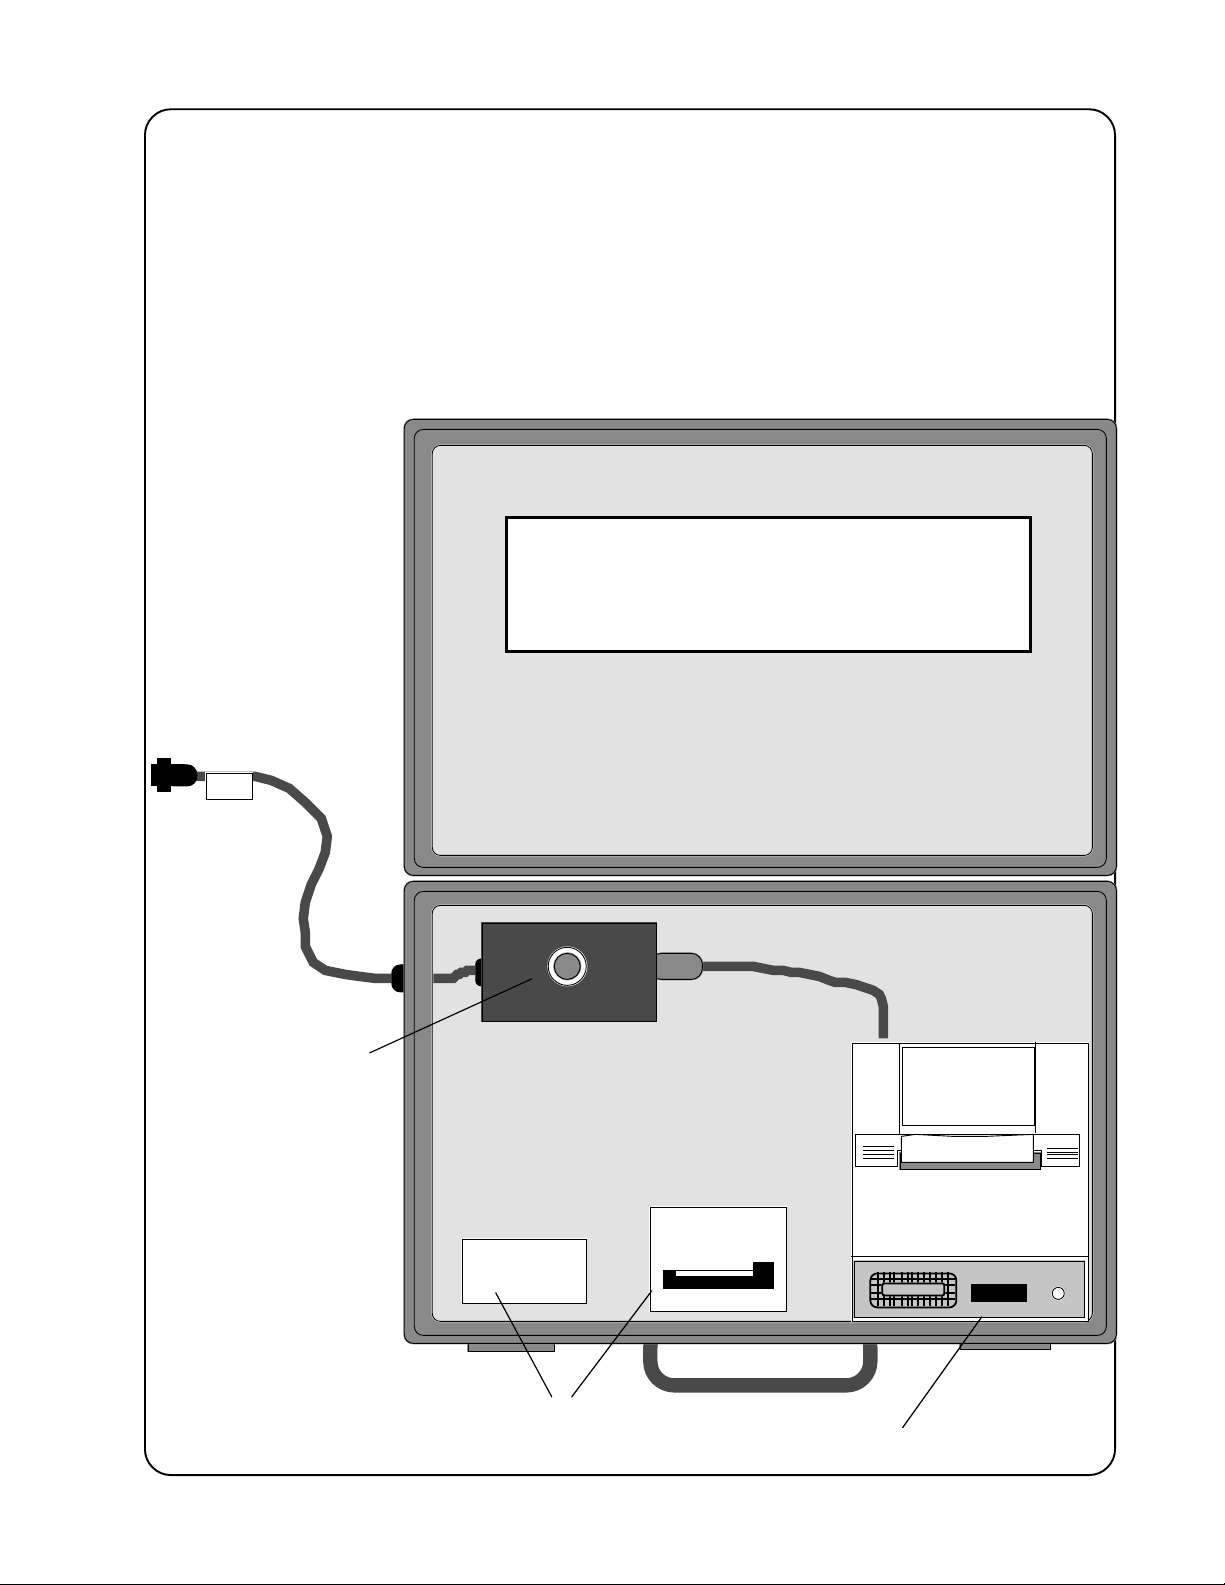
TASC PRINTER MODULE
Connect To
Serial I/O
PRINT REQUEST SWITCH
999-1521
MIDWEST TECHNOLOGIES, INC
MID-TECH
ONOFF FEED
Spare Ribbon And Paper
PRINTER (OFF / ON / FEED) SWITCH
MIDWEST TECHNOLOGIES INC. - 2733 East Ash Street- Springfield, ILL. - 62703
1
POWER
R1
VER 3.0
Page 2

TASC PRINTER MODULE INSTALLATION AND OPERATION MANUAL
TABLE OF CONTENTS
INTRODUCTION ........................................................................... 3
INSTALLATION ............................................................................. 4
SWITCHES AND CONTROLS ....................................................... 4
OPERATION .................................................................................. 4
APPLICATIONS ............................................................................. 4
MAINTENANCE
GENERAL ................................................................................. 5
REPLACING PRINTER PAPER ................................................ 5
REPLACING RIBBON CARTRIDGE ........................................ 7
TROUBLESHOOTING ................................................................... 8
999-1521
2
R1
VER 3.0
Page 3

INTRODUCTION
The TASC Printer Module has been designed so that it is simple to install and operate and rugged enough to stand up to
normal field usage. The Printer Module provides an easy method for the operator to check the application rates entered
in the TASC Console before starting spraying operations. The printer also provides a convenient written record of the
spraying operation once it is completed. The written record can be retained in an appropriate file for future reference.
The TASC Printer Module is completely self-contained. The Module is enclosed in a molded plastic carrying case. The
case protects the printer mechanism and provides a convenient location to store extra printer paper and ribbon cartridges.
A compact, dot matrix printer is secured to the molded case with high strength velcro fasteners. The velcro keeps the
printer from shifting about in the carrying case, yet allows it to be removed for servicing , if required. Permanently
attached to the carrying case is an interface box with a single, momentary contact, push switch. An interface cable
penetrates the side of the carrying case. The printer itself is attached to the interface box with a short cable inside the
carrying case. When closed, the carrying case measures approximately 12 inches by 8 inches by 4 inches.
The format of the actual printed record depends on the model number of the TASC Console being used. The three
different formats are as follows:
MIDWEST TECHNOLOGIES, INC.
TASC-6600 SPRAY CONTROL
APPLICATION RATES:
CHEM. 1 = XXXX.X OZ/AC
CHEM. 2 = XXXX.X OZ/AC
CHEM. 3 = XXXX.X OZ/AC
CHEM. 4 = XXXX.X OZ/AC
CHEM. 5 = XXXX.X OZ/AC
CHEM. 6 = XXXX.X OZ/AC
CARRIER = XXXX.X GAL/AC
VOLUME APPLIED:
CHEM. 1 = XXXX.X OZ (GAL)
CHEM. 2 = XXXX.X OZ (GAL)
CHEM. 3 = XXXX.X OZ (GAL)
CHEM. 4 = XXXX.X OZ (GAL)
CHEM. 5 = XXXX.X OZ (GAL)
CHEM. 6 = XXXX.X OZ (GAL)
CARRIER = XXXX.X GAL
AREA COVERED:
FIELD = XXX.XX AC
TOTAL = XXXX.X AC
CHEM. DESCRIPTION:
CHEM. 1 = ...................
CHEM. 2 = ...................
CHEM. 3 = ...................
CHEM. 4 = ...................
CHEM. 5 = ...................
CHEM. 6 = ...................
WEATHER DATA:
TEMP. ...... %-HUMD. .......
WIND SPEED ..... DIR. ......
FIELD# ..........................
REF# ..........................
DATE: .../.../... TIME: ....:....
OPER. ..........................
MIDWEST TECHNOLOGIES, INC.
TASC-6300 SPRAY CONTROL
APPLICATION RATES:
CHEM. 1 = XXXX.X OZ/AC
CHEM. 2 = XXXX.X OZ/AC
CHEM. 3 = XXXX.X OZ/AC
CARRIER = XXXX.X GAL/AC
VOLUME APPLIED:
CHEM. 1 = XXXX.X OZ (GAL)
CHEM. 2 = XXXX.X OZ (GAL)
CHEM. 3 = XXXX.X OZ (GAL)
CARRIER = XXXX.X GAL
AREA COVERED:
FIELD = XXX.XX AC
TOTAL = XXXX.X AC
CHEM. DESCRIPTION:
CHEM. 1 = ...................
CHEM. 2 = ...................
CHEM. 3 = ...................
WEATHER DATA:
TEMP. ...... %-HUMD. .......
WIND SPEED ..... DIR. ......
FIELD# ..........................
REF# ..........................
DATE: .../.../... TIME: ....:....
OPER. ..........................
NOTES:
(Gal) indicates units roll over to GAL.
Units are shown in English
Units will match the console unit selection
MIDWEST TECHNOLOGIES, INC.
TASC-6000 SPRAY CONTROL
APPLICATION RATES:
CHEM.1 = ..................
CHEM.2 = ..................
CHEM.3 = ..................
CARRIER = XXXX.X GAL/AC
VOLUME APPLIED:
CHEM.1 = ..................
CHEM.2 = ..................
CHEM.3 = ..................
CARRIER = XXXX.X GAL
AREA COVERED:
FIELD = XXX.XX AC
TOTAL = XXXX.X AC
CHEM. DESCRIPTION:
CHEM.1 = ...................
CHEM.2 = ...................
CHEM.3 = ...................
WEATHER DATA:
TEMP. ...... %-HUMD. .......
WIND SPEED ..... DIR. ......
FIELD# ..........................
REF# ..........................
DATE: .../.../... TIME: ....:....
OPER. ..........................
999-1521
3
VER 3.0
R1
Page 4

INSTALLATION
Installing the TASC Printer Module is a simple matter of plugging the interface cable from the carrying case into the I/O
port on the back of the TASC Console. The TASC Printer Module receives its power as well as data through the interface
cable.
SWITCHES AND CONTROLS
There are only two switches and a power indicator light on the TASC Printer Module.
1. A rocker type switch on the printer is used to select printer "ON" or "OFF" or "Paper Feed". When the printer
has been turned "ON" with this swich, and power is available from the TASC Control Console, the red LED
Power indicator light will come on. The "Paper Feed position" is a momentary contact switch. When the rocker
switch is held in the "Paper Feed" position, the printer will advance paper without printing.
2. The "Print Request Switch" is located on the printer interface box. It is a momentary contact push type
switch. Pushing the Print Request Switch once will initiate the printing sequence.
OPERATION
The TASC Printer Module is easily operated. To start printing, first be sure the TASC Control Console is turned "ON".
Next, using the rocker switch on the printer, turn the printer "ON". The red LED power indicator light on the printer will
light up and the printer will print the message "Ready", signifying that the unit is ready to receive and print data from the
TASC Control Console. The printer paper may be advanced, without printing, by holding the rocker switch to the "Paper
Feed" position until enough clean paper has advanced through the printer. Now the Module is ready to print a data
record.
With the sprayer stopped, push the Print Request Switch once and the printer will print its report. Once printing has
commenced, the printer must be allowed to print the complete record before spraying can begin again. The TASC Control
Console will display a "Print" display depicted below.
- - - - -
P
REMEMBER: The TASC Control Console can not control the sprayer and send data to the printer module at the same
time. To initiate the printing of a data record, the sprayer must be stopped, or all booms turned off, so the Control
Console is dormant. Once printing has commenced, the Control Console will remain in a dormant state until the printed
record is complete.
APPLICATIONS
Reviewing the data residing in the TASC Control Console prior to spraying: The operator can use the Printer Module to
quickly review the data entered in the TASC Control Console before he starts spraying a field. The printed record will tell
him at a glance the application rates selected for each of the pumps and the carrier. Accumulated volumes and acres will
also be displayed on the printed record, the operator can check to be sure he has reset the appropriate registers to zero
before starting his spraying.
Printing a permanent record of the spraying operation: When a field has been completed, the TASC Printer Module can
be used to prepare a permanent record of the chemicals applied and the acres covered during the operation. After the
record is printed, the operator can then write in :
Chemical descriptions defining the chemicals being pumped by each pump
Weather data for future reference
Field identification information, date, time and operator
If the spraying is being done on a custom basis, two records can be printed, one for the customer and one for the
operator's files. To print two copies, merely press the "Print Request Switch" again after the first record has been printed.
999-1521
4
VER 3.0
R1
Page 5

MAINTENANCE
General: Keep the printer and its connections clean. Close the carrying case when the printer is not being used. If the
sprayer will not be used for some time, remove the TASC Printer Module and store it indoors (be sure to replace the dust
cover on the Serial I/O Port on the back of the TASC Control Console if the printer is not plugged in).
Replacing the printer paper: A red border on the paper tape used in the printer indicates it is time to change to a fresh roll
of paper.
To remove the old roll before it has run completely out, first use the "Paper Feed" switch to advance the paper about one
inch beyond the paper cutter. Turn the printer "OFF". Remove the clear plastic cover over the paper roll by lifting it
straight up. Lift the exposed paper roll away from the printer housing and, with a scissor, cut the paper feeding into the
printer. Pull the paper remnant in the printer through the printer mechanism in the forward direction. Be sure to pull the
paper from the front (paper cutter side). WARNING! Pulling the paper out the back of the printer will damage the print
mechanism.
To insert a new paper roll proceed as follows:
a. Be sure the printer power switch is "OFF". Remove the print compartment cover by pushing down on the
grooved areas on either side of the paper cutter. Now remove the ribbon cartridge by pushing down on the right edge of
the cartridge until it pops out of place and gently slide it up and over the paper. Set the cartridge aside if it is to be used
again.
b. Unroll several inches of paper from the new roll and trim to a straight edge to facilitate the entry of the end of
the paper into the printer.
c. Slide the paper through the slot connecting the paper compartment and the printer compartment. The paper
should slide in about one-quarter inch before it stops.
d. Turn the printer power switch "ON" and wait a few seconds.
e. While holding the paper in place, press the power switch to the "Paper Feed" position. The printer will
activate and a rubber roller will pull the paper into the printer compartment. Hold the switch in the "Paper Feed" position
until the paper emerges from the top of the printer, then release the switch.
999-1521
5
R1
VER 3.0
Page 6

f. Pull the paper through the printer, until several inches are exposed. Carefully slide the ribbon cartridge over
the paper and reinsert it into the print compartment.
g. Slide the paper through the slot in the print compartment cover.
h. Push the back of the print compartment cover down and into place.
i. Press the front of the print compartment cover down until it locks into place.
j. Finally, turn the new paper roll to take up any slack in the paper feeding to the printer and lay the roll in the
paper compartment. Replace the clear plastic cover over the paper compartment. Make sure the roll of paper is free to
rotate. If the paper roll is not free to rotate, it may jam and cause damage to the printer mechanism.
999-1521
6
R1
VER 3.0
Page 7

Replacing the ribbon cartridge: An Epson Hx-20 ribbon cartridge is used in the printer. When the printing becomes faint
or difficult to see, the ribbon cartridge should be replaced.
NOTE: If the printer is used infrequently, the print mechanism sometimes becomes weak because the ribbon dries out. If
printed material is difficult to read and you suspect this is the cause of the problem, advance to a properly inked portion of
the ribbon by pressing the power switch into the "Paper Feed" position.
To insert a new ribbon cartridge proceed as follows:
a. Be sure the printer power switch is "OFF". Remove the print compartment cover by pushing down on the
grooved areas on either side of the paper cutter. Now remove the ribbon cartridge by pushing down on the right edge of
the cartridge until it pops out of place and gently sliding it up and over the paper.
b. Install the new cartridge by sliding it carefully over the paper then being sure it is inserted firmly to prevent
weak or irregular printing. The cartridge must be properly seated and aligned for best printing.
c. Turn the cartridge rewind "knob" (marked with an arrow) clockwise to stretch the ribbon.
d. Slide the paper through the slot in the print compartment cover.
e. Push the back of the print compartment cover down and into place.
f. Press the front of the print compartment cover down until it locks into place.
NOTE: If you get ribbon ink on the printer's plastic case, wipe it off immediately. Once the ink dries it is very difficult to
remove.
999-1521
7
R1
VER 3.0
Page 8

TROUBLESHOOTING
a. Printer power light will not come on when the printer is turned "ON".
1. Check to be sure the TASC Control Console is turned "ON".
2. Check to be sure the interface cable is plugged in to the Serial I/O Port of the TASC Control Console.
b. The TASC Control Console momentarily displays ERROR Message Err P when the print request switch is
activated. The printer can receive no data from the TASC Control Console because it is busy controlling the
sprayer. Spraying operations must stop before printing is possible.
c. Red border on the paper tape, change the paper roll.
d. Faint printing, change the ribbon cartridge.
999-1521
8
R1
VER 3.0
 Loading...