

Page 1
Legacy 6000
MID-TECH
ESC
RMS-Office
User Guide
Roadway Management
S Y S T E M
TM
98-05065
®
Page 2

Page 3

Roadway Management
S Y S T E M
TM
RMS-Office
USER GUIDE
PN - 98-05065
RO
Page 4

Page 5

RMS Office
Software Version 3.10
Chapter 1 - RMS Office Introduction.............................................................................. 1-1
RMS Office Introduction .............................................................................................. 1-2
Additional RMS Features Include ....................................................................... 1-2
Starting RMS Office ...................................................................................................... 1-3
Profiles Menu Page....................................................................................................1-4
Tools Menu Page ....................................................................................................... 1-5
RMS Office System Menu Page.................................................................................... 1-7
System Setup-Main.................................................................................................... 1-8
Unit of Measure Menu Field................................................................................ 1-8
RMS Folders................................................................................................................. 1-10
The Bin Folder ......................................................................................................... 1-10
The Base Maps Folder ............................................................................................. 1-10
The Names Database Folder .................................................................................... 1-10
The Profiles Folder .................................................................................................. 1-10
The Data Folder ....................................................................................................... 1-10
Chapter 2 - RMS Profiles................................................................................................. 2-1
About RMS Profiles....................................................................................................... 2-2
The Agency Profile......................................................................................................... 2-4
Creating a New Agency Profile ................................................................................. 2-5
The Chemical Profile ..................................................................................................... 2-7
Creating a New Chemical Profile.............................................................................. 2-8
The Chemical Mixture Profile .................................................................................... 2-10
Creating a New Chemical Mixture Profile .............................................................. 2-11
The RMS Chemical Calculator................................................................................ 2-11
Krovar plus Oust Mixture Example................................................................... 2-11
The Main Page ................................................................................................... 2-19
The Personnel Profile .................................................................................................. 2-20
Creating a New Personnel Profile............................................................................ 2-21
The Vehicle Profile....................................................................................................... 2-23
Creating a New Vehicle Profile............................................................................... 2-24
The Spray Configuration Profile................................................................................ 2-28
Creating a New Spray Configuration Profile........................................................... 2-29
Chapter 3 - RMS Tools.................................................................................................... 3-1
RMS Tools Introduction ............................................................................................... 3-2
Export ............................................................................................................................. 3-3
Export Steps:........................................................................................................ 3-3
Name Manager............................................................................................................... 3-5
Name Database File Format ................................................................................ 3-5
1-1
Page 6

RMS Office
Software Version 3.10
Report Wizard................................................................................................................ 3-7
Generating a Session Report with Report Wizard..................................................... 3-8
Select Spray Session ............................................................................................ 3-8
Report Information .............................................................................................. 3-9
Spray Campaign................................................................................................. 3-11
Spray Swath Map............................................................................................... 3-13
Post Session Notes............................................................................................. 3-14
Report Banner.................................................................................................... 3-15
Output Report .................................................................................................... 3-18
Opening a Finished Report in Other Applications............................................. 3-18
Sample Report 140999-01 ....................................................................................... 3-19
Section Notes ................................................................................................................ 3-29
Chapter 4 - RMS Map Manager ...................................................................................... 4-1
About RMS Map Manager 3.10 ................................................................................... 4-2
What’s New in RMS Map Manager 3.10 .................................................................. 4-3
New Explorer File Tree in Map Manager............................................................ 4-3
New Shp File Import and Export Functions ........................................................ 4-3
Drawing Tools ..................................................................................................... 4-3
Text Tool.............................................................................................................. 4-3
RMS Data and Map Types............................................................................................ 4-4
Viewing Data............................................................................................................. 4-5
Base Maps.................................................................................................................. 4-6
Object Information Query.......................................................................................... 4-7
The RMS Map Manager Tool Bar ............................................................................... 4-9
The Text Tool .......................................................................................................... 4-12
The File Menu.......................................................................................................... 4-13
The Layers Menu..................................................................................................... 4-14
The View Menu ....................................................................................................... 4-15
The File Tree Menu ................................................................................................. 4-17
The Edit Objects Menu............................................................................................ 4-18
The Tools Menu....................................................................................................... 4-19
Printing Maps in Map Manager................................................................................. 4-20
Shape File Conversion ................................................................................................. 4-22
New Changes to the Shape file Conversion Process ............................................... 4-22
Exporting RMS Data to Shape File Format.............................................................4-23
The Export to Shape Dialog............................................................................... 4-23
The Export to Shape Setup Dialog .................................................................... 4-25
The Export to Shape Template Dialog .............................................................. 4-28
Importing Shape Files to RMS Data Files............................................................... 4-30
The Import from Shape Dialog.......................................................................... 4-30
The Import Setup Dialog ................................................................................... 4-32
1-2
Page 7

RMS Office
Software Version 3.10
The Import Template Dialog ............................................................................. 4-34
Convert Templates................................................................................................... 4-36
Setting Up A Field Transfer Template .............................................................. 4-37
Configuring A Field Transfer ............................................................................ 4-38
1-3
Page 8

RMS Office
Software Version 3.10
1-4
Page 9

Chapter 1 - RMS Office Introduction
An overview of RMS-Office.
RMS-Office Version 3.10
Midwest Technologies LLC
RMS Office
Page 10

RMS Office
Software Version 3.10
RMS Office Introduction
Welcome to the Mid-Tech Roadway Management System (RMS) Office Suite. The Mid-Tech RMS
Office product is a comprehensive software package designed specifically for the support of roadway spraying applications, using the Mid-Tech Legacy 6000 console. The Legacy 6000 console
must be loaded with RMS Application Rate Management software.
With RMS Office, roadway applications are more effectively managed. RMS Office allows the
building of specific profiles (small data bases) for company, personnel, contracting agencies,
chemicals, and chemical mixes, as well as vehicle and spray configurations. The Export function
allows this profile information to be transferred to the Legacy 6000 console via a PC card.
When installed on the Legacy 6000, profile informatio n is combined with a GPS based map, created during the actual application process, to produce final roadway application data. The data
from a completed roadway application session is then transferr ed back to RMS Off ice where Application reports are generated. Maps included with the reports show all spray activity, including
boom and channel activity, for an entire roadway spraying session.
This User Guide is broken into the following components that make up the RMS Office Suite:
• Chapter 2: Profiles - Building small data bases for Personnel, Agencies, Vehicles, Chemicals,
and Spray Configurations.
• Chapter 3: Tools - Several useful utilities. Report Generator allows the buildi ng of a final re port
for a spraying session.
• Chapter 4: Map Manager - A data viewing and management tool. Although part of Tools, Map
Manager needs a chapter to itself.
Additional RMS Features Include
Base Map Images
You can now view Geo-Tif (DRG) image files in the background of most RMS real-time mapping
applications, such as RMS Mapper and RMS Record Spray Session, as well as RMS Map Man-
ager.
Names Database Manager
This is a new utility application, found under the RMS Launcher-Tools menu. The Names Manager
allows the construction of a list of commonly used attribute names. You can access any names
database from any of the real-time mapping applica tions .
Export Application
This utility allows the transfer of profiles from RMS-Office to a Legacy 6000 console. This helps
keep the Legacy 6000 profiles up to date and in-sync with the office.
1-2 Chapter 1 - RMS Office Introduction
RMS Office Introduction
Page 11

RMS Office
Software Version 3.10
Starting RMS Office
To start RMS Office, double click on the RMS Office icon, located on the de sktop of your
computer (The installation process automatically puts the RMS Office icon on the desktop of your computer.)
RMS Office is divided into three menu pages: the Profiles menu, the System menu, and the Tools
menu. You can access these menu pages using the menu tabs located at the bottom of the
Launcher window . The nu mber on each t ab indicates t he function key that you can press to access
that page. Figure 1-1 shows RMS-Offi ce Profiles.
Figure 1-1: Mid-Tech RMS Program Launcher
Chapter 1 - RMS Office I ntroduct ion 1-3
Starting RMS Office
Page 12

RMS Office
Software Version 3.10
Profiles Menu Page
The Profiles Menu Page (Figure 1-2) contains the Agency, Personnel, Vehicle, Chemical, Chemical Mix, and Spray Configuration profiles. These profiles are small data bases that must be populated prior to running the RMS Record Spray Session application. For more information on
Profiles, see Chapter 2 - RMS Profiles of this user guide.
Figure 1-2: RMS Office Profiles Menu Page
1-4 Chapter 1 - RMS Office Introduction
Starting RMS Office
Page 13

RMS Office
Software Version 3.10
Tools Menu Page
The Tools Menu Page (Figure 1-3) contains utility programs, such as Report Wizard, Export, Map
Manager , and Name Manager dat abase builder. This user’s guide will co ver each Tools program in
more detail later (see Chapter 3 - RMS Tools of this user’s guide).
Figure 1-3: RMS Office Tools Menu
Chapter 1 - RMS Office I ntroduct ion 1-5
Starting RMS Office
Page 14

RMS Office
Software Version 3.10
Tool Description
Export The Export tool allows Profiles to be transferred to a Legacy
6000.
You cannot copy Profiles and Names files directly to a Legacy
6000 console. You must use the Export program.
Map Manager
Name Manager
Report Wizard
This is a data editing, viewing, and printing application. This version of
Map Manager now includes Layering and a full suite of drawing tools.
You can build Name databases for specific mapping themes, such as
weed mapping and spray route campaigns. A names database specific to weed mapping, contains the names of the most commonly
encountered weeds for your region. Instead of typing in the name of a
weed each time it is mapped, the name can easily be selected from
the existing weeds database. For more details, see Chapter 4 - RMS
Map Manager.
This application allows a detailed report to be generated from roadside applications. It incorporates the Profiles information, and any
information entered by the operator during the actual roadside application.
Table 1-1: RMS Office Tools Description
1-6 Chapter 1 - RMS Office Introduction
Starting RMS Office
Page 15

RMS Office
Software Version 3.10
RMS Office System Menu Page
The System Menu Page (Figure 1-4) contains the Syst em Setup application. The un its of measur e
for the RMS-Office software are set here. To start System Setup, highlight System Setup in the
System launcher page and press enter.
Figure 1-4: RMS Office System Menu Page
Chapter 1 - RMS Office I ntroduct ion 1-7
RMS Office System Menu Page
Page 16

RMS Office
Software Version 3.10
System Setup-Main
You must run System Setup (Figure 1-5) the first time Mid-Tech RMS Office software is started. It
should be necessary to run System Setup once unless changes are made to the system units.
Switching from English units to Metric is an example of when you would run System Setup again.
Figure 1-5: The System Setup Page
Unit of Measure Menu Field
This menu item allows the selection of the measurement unit that the mapping software displays.
There are two choices: ENGLISH and METRIC. Selecting ENGLISH units displays all dist ances in
feet and miles, areas in square feet and acres, vehicle speed in miles per hour, liquid volume in
ounces and gallons, and weight in Pounds. Selecting METRIC units displays distances in meters
and kilometers, areas in square meters and hectar es, vehicle speed in Kilometers per hour, liquid
volume in liters, and weight in Kilograms (see Table 1-2).
1-8 Chapter 1 - RMS Office Introduction
RMS Office System Menu Page
Page 17

RMS Office
Software Version 3.10
Unit Name Description
English
Metric
Selecting English sets Distance to Feet (F) and Miles (Mi), Area to Ft.squared and Ac, Speed to Mile per Hour (m.p.h.), liquid volume to
ounces (oz) and gallons (gal), and Weights to Pounds (lb).
Selecting Metric sets Distance to Meters (M) and Kilometers (Km),
Area to Square Meters and Hectares (H), Speed to Km per Hour, liquid volume to litres, and Weights to Kilograms (Kg).
Table 1-2: Unit of Measure Description
Chapter 1 - RMS Office I ntroduct ion 1-9
RMS Office System Menu Page
Page 18

RMS Office
Software Version 3.10
RMS Folders
The following folders are in the RMS folder of the computer that RMS Office is installed on. The
default location is the root directory of the hard drive unless reassigned during installation.
The Bin Folder
The RMS bin folder contains all of RMS Office program executables. All files, locate d in this f older
at the time of installation, must remain in this folder for the RMS Office applications to work properly. You can place shortcuts, to the application executables in this folder, on the desktop for easy
access. For example, to place a shortcut to Map Manager on the desk top, look for the Map Manager executable in this folder.
The Base Maps Folder
All of the base map images, to be displayed in the background of the mapping software applications, are stored in the Basemaps f older of the RMS f older. This version of RMS allows the displaying of a Digital Raster Graphics (DRG) image file, in the fo rm of a Tagged Image File Format (TIF)
also known as a Geo-Tif. This image data is useful as a backdrop onto which other real-time collected data, such as spray routes, no spray zones, and weed patch locations, can be overlaid.
The Names Database Folder
A feature of RMS Office is the ability to construct names databases. You can access a names
database from any of the RMS re al-time mapping a ppli cations tha t requ ire th e inpu t of an attribut e
name for a graphical object, such as a point. You can build Name databases for specific mapping
themes, such as weed mapping and spray route campaigns. A names database, specific to weed
mapping, would contain the names of the most commonly encountered weeds for the region.
Instead of typing in the name of a weed each time it is mapped, you can easily select it from the
existing weeds database. All names databases created are stored in the Names folder. For more
information on the Name Manager application, see Chapter 3 of this User Guide.
The Profiles Folder
All Profiles are stored here.
The Data Folder
This is a suggested location for storing Roadside data. Our application allows other folder locations to be browsed.
1-10 Chapter 1 - RMS Office Introduction
RMS Folders
Page 19

Chapter 2 - RMS Profiles
Chemical, vehicle, and personnel management.
RMS-Office Version 3.10
Midwest Technologies LLC
RMS Office
Page 20
RMS Office
Software Version 3.10
About RMS Profiles
Profiles are small databases, created to store typical information pertaining to Chemicals, Personnel, Vehicles, and Agencies, used during a roadside application session. Use this profile information to generate spray application reports, when a spray session is completed. There are six
different profiles needed to su ccessfully start a roadside application session, using the Mid-Tech
RMS Application Rate Management (ARM) software.
Create all profiles in RMS-Office an d t r ansfer t hem, via the PC car d, t o the Leg acy 60 00
console running RMS-EXT software. Transfer the profiles using the RMS-Office Export
program (see Chapter 3 - RMS Tools).
Access each of these profiles through the RMS Launcher Profiles page. Create, edit, and delete
any profile. You only need to create a profile once. After that, select a specific profile required to
build the spray session setup.
Profile Description
Agency contains information about the agency contract ing the spraying
services.
Chemical contains a list of chemicals commonly used in a spraying a ppli-
cation.
Chemical Mixture contains a list of chemical tank mixes commonly used in a
spraying application.
Personnel contains information about vehicle drivers and operators.
Spray Configuration allows the setup of boom, tank, and channe l confi gurat ions for
vehicles.
Vehicle allows the configuring, of a particular vehicle, with specific
spray configurations.
Table 2-1: RMS Profiles
2-2 Chapter 2 - RMS Profiles
About RMS Profiles
Page 21

RMS Office
Software Version 3.10
Figure 2-1: RMS Office Profile Menu Page
Chapter 2 - RMS Profiles 2-3
About RMS Profiles
Page 22

RMS Office
Software Version 3.10
The Agency Profile
The Agency Profile contains information about the ag ency or org ani za tion t hat is contracting the services. To create or edit an Agency profile, select the Agency Profile
located in the RMS Launcher Profiles page. The first page displayed is a list of agencies currently entered into the Agency Profile database (see Figure 2-2). If you have
not entered any agencies the profile yet, this is empty. T o create a new agency, press
the New button. To edit an existing agency, sele ct the desired agency fr om the list of ag encies and
press Enter, or double click on the agency name using the mouse. To delete an existing agency,
highlight the desired agency name, and press the Delete But ton.
When finished creating a new agency, press the OK button to save and add this new agency into
the agency profile list. If you decide not to add the agency being created, simply press the Cancel
button to return to the Agency Profile list.
To Exit the Agency Profile, press the Exit Button. The program returns to the RMS Launcher Profiles page.
All profiles are created in RMS-Office and then transferred, via the PC card, to the Legacy 6000 console running RMS-EXT software. Transfer Profiles using the RMS Office
Export program (see Chapter 3 - RMS Tools).
2-4 Chapter 2 - RMS Profiles
The Agency Profile
Figure 2-2: Agency Profiles
Page 23

RMS Office
Software Version 3.10
Creating a New Agency Profile
There are three agency profile p ag es that make u p a comp let e a gen cy pr ofile: t he Ma in Pag e, th e
Contact Page, and the Admin Page. See Table 2-2 for more details about each page.
The Main Page (see Figure 2-3) contains the name and address information specific to the contracting agency. The Contact Page contains information about the contact person at the agency.
Press the Contact Tab to access this page. The Admin Page contain s the Active and Hidde n selections.
Figure 2-3: The Main Agency Page
Chapter 2 - RMS Profiles 2-5
The Agency Profile
Page 24

RMS Office
Software Version 3.10
Profile Field Description
The Main Page
Agency ID
A unique identification used to identify a specific agency.
Agency Name The name of the agency
Division The agency division
Street The agency street address.
City The city where the agency is located.
County/MD The county where the agency is located.
State/Province
Country
Zip / Postal Code
The state or province where the agency is located.
The country where the agency is located.
The zip or postal code for the agency.
Contact Page
Contact Name
Phone Number
The name of person at agency who can be contacted.
The phone number of the contact person
Admin Page
Record Status
Setting a profile to Active makes that profile viewable and selectable
when transferred to the Legacy 6000. Setting a profile to Hidden prevents it’s being selectable or viewable to the operator, when it is transferred to a Legacy 6000. This allows a manager to limit the number of
in-field selections an operator must make while in the field.
Table 2-2: Agency Profile Description
2-6 Chapter 2 - RMS Profiles
The Agency Profile
Page 25

RMS Office
Software Version 3.10
The Chemical Profile
The Chemical Profile is a database containing the name and manufacturer of all the
chemicals used in a roadside spraying application. To access the Chemical Profile
page, select the Chemical Profile located in the RMS Launcher Pro files page. The
first page displayed is a list of chemicals currently entered into the Chemical Profile
database (see Figure 2-4). If you have not entered any chemicals into the profile yet,
this page is empty. To enter a new chemical, press the New button. To edit an existing chemical,
select the desired chemical from the list of chemicals, and press Enter or double click on the
chemical name, using the mouse. To delete an existing chemical, highlight the desired chemical
name and press the Delete Button.
When finished entering a new chemical, press the OK butt on to sav e an d ad d this new c hem ical
into the Chemical Profile list. If you decide not to add the chemical, simply press the Cancel button
to return to the Chemical Profile list.
To Exit the Chemical Profile, press the Exit Button. The program ret urns to the RMS Launche r Profiles page.
Create all profiles in RMS Office and tr ansfer, via a PC card, to the Legacy 6000 console
running RMS-EXT software. T ransfer profiles using the RMS-Of fice Export program (see
Chapter 3 - RMS Tools).
Figure 2-4: The Chemical Profiles Page
Chapter 2 - RMS Profiles 2-7
The Chemical Profile
Page 26

RMS Office
Software Version 3.10
Creating a New Chemical Profile
To enter a new chemical, press the New button, which brings up the main chemical editing page
(see Figure 2-5). The Main page, denoted by the Main tab located at the bottom of the page, contains the following menu fields (see Table 2-3). The Admin page contains the Active and Hidden
selections.
Figure 2-5: The Main Chemical Editing Page
2-8 Chapter 2 - RMS Profiles
The Chemical Profile
Page 27
RMS Office
Software Version 3.10
Profile Field Description
The Main Page
Chemical Name
Manufacturer
EPA Reg#
Com Code
The name of the chemical being entered into the Chemical profile.
The name of the chemical manufacturer.
The chemical EPA registration number.
The chemical commodity code.
Type The type of chemical being entered. When entering this menu
item, a pick dialog box appears, with a list of chemical types:
Dry, Liquid or Dry Flowable.
Measurement Unit The unit of measure associated with the chemical being
entered. When this menu item is selected, a Unit of Measure
Maximum Mix Ratio
dialog appears, containing a list of units to choose from
The maximum concentration of dry material in a single gallon of liquid
carrier. This menu field is active only if the chemical type is Dry or Dry
Flowable.
.
Displacement The amount of liquid displaced by a unit of dry material in a
single gallon of carrier. This menu field is active only if the
chemical type is Dry or Dry Flowable. A typical displacement
unit would be liquid ounces.
Admin Page
Record Status
Setting a profile to Active makes that profile viewable and selectable,
when transferred to the Legacy 6000. Setting a profile to Hidden prevents it’s being selected or viewed by the operator, when it is transferred to a Legacy 6000. This allows a manager to limit the number of
in-field selections an operator must make while in the field.
Table 2-3: Chemical Profile Description
Chapter 2 - RMS Profiles 2-9
The Chemical Profile
Page 28

RMS Office
Software Version 3.10
The Chemical Mixture Profile
The Chemical Mixture Profile contains specific chemica l tank mixtures created. Enter
the Chemicals, used in this profile, into the Chemical Profile p rior to creating a mixture
profile. To access the Chemical Mixture Profile page, select the Chemical Mixture
Profile, located in the RMS Launcher Profiles page. The first page displayed is a list of
chemical mixes currently entered into the Che m ica l Mixtu re Prof ile da tabase (see
Figure 2-6). If you have not entered any chemical mixes into the profile yet, this page is empty. To
enter a new mixture, press the New button. To edit an existing chemical mixture, select the desired
mixture from the list of mixes, and press Enter or double click on the mixture name, using the
mouse. To delete an existing mixture, highlight the desired mixture name and press the Delete
Button.
When finished entering a new chemical mixture, press the OK button to save and add this new mix
into the Chemical Mixture Profile list. I f you de cide not to ad d th e mixt ure, simply press t he Cancel
button to return to the Chemical Mixture Profile list.
To Exit the Chemical Mixture Profile, press the Exit Button. The program returns to the RMS
Launcher Profiles page.
Create all profiles in RMS Office and transfer t hem, via t he PC card, t o th e Legacy 600 0
console running RMS-EXT software. Transfer the Profiles using the RMS-Office Export
program (see Chapter 3 - RMS Tools).
Figure 2-6: The Chemical Mixture Profile Page
2-10 Chapter 2 - RMS Profiles
The Chemical Mixture Profile
Page 29

RMS Office
Software Version 3.10
Creating a New Chemical Mixture Profile
To create a new chemical mixture, use the RMS Chemical Calculator. The Chemical Calculator is
accessed through the Mixture Name menu field, located on the Chemical Mixture Main menu page
(see The Main Page on page 2-19). It is best to understand the Chemical Calculator prior to
reviewing any of the Chemical Mixture profile pages.
The RMS Chemical Calculator
The RMS Chemical Calculator is a powerful chemical mix utility program, used to combine up to
three chemicals, plus a carrier, into a single mixture. The chemicals in the mixture must appear in
the Chemical Profile (see The Chemical Profile on page 2-7) prior to adding them into a mixture.
The Chemical Calculator accesses the Chemical Profile for informa tion, such as chemical type
and unit, for each chemical added to the mixt ure. The Chemical Ca lculat or requ ires an applicat ion
rate for each chemical in the mixture, as well as the tank volume or amount of mi xture to be made .
When the chemicals are added to the mix, the Chemical Calculator determ ines the amount of each
chemical and carrier required for the mixture t ank volume.
Krovar plus Oust Mixture Example
To demonstrate the Chemical Calculator, consider a mixture of Krovar (Dry Flowable), mixed with
Oust, with water as a carrier. The application rate for the Krovar is 8 Pounds/Acre and the application rate for the Oust is 3 Oz./Acre. Both chemicals have been entered into the Chemical Profile
and therefore can be selected directly from the Chemical Calculator. The tank volume for the mixture is 50 Gallons.
Starting Up the Chemical Calculator
To enter the Chemical Calculator, select the Mixture Name menu field, located on the Main menu
page. Press enter, or double click with the mouse on th e Mi xt ur e Na me men u field , to acti va t e the
Chemical Calculator dialog (see Figure 2-7).
Entering Krovar DF as the First Chemical
To enter Krovar as the first chemical, place the cursor in the Chemical 1 menu field and press
enter. This activates the Select Chemical 1 dialog (see Figure 2-8). Move through the list of chemicals, select Krovar, and press enter. To move through the chemical list rapidly, type in the first letter of the chemical to be entered. This causes the program to jump down the chemical list to the
first chemical name beginning with the letter ente red. All of the chemicals listed in th is dialog were
entered using the Chemical Profile.
Entering the Krovar Application Rate
Select the chemical and enter the chemical application r ate. Tab the cursor over to the Chemical 1
Application Rate menu field and press enter. This activates the Chemical 1 Rate dialog box (see
Figure 2-9). In the example, the application rat e for Krovar is 8 Poun ds/Acre. Notice th at the unit of
pounds is already set in the Rate dialog box. The rate unit for Krovar is contained in the Chemical
Profile and retrieved by the calculator. This eliminates the need to remember or look up the
required rate unit for each chemical. Enter 8 Pounds/Acre in the dialog and press enter. Krovar is
now entered as the first chemical in the mixture. Now enter the second chemica l, Oust.
Chapter 2 - RMS Profiles 2-11
The Chemical Mixture Profile
Page 30

RMS Office
Software Version 3.10
Figure 2-7: The Chemical Calculator Dialog
Figure 2-8: The Select Chemical 1 (Krovar DF) Dialog
2-12 Chapter 2 - RMS Profiles
The Chemical Mixture Profile
Page 31

RMS Office
Software Version 3.10
Figure 2-9: The Select Chemical Rate Dialog
Chapter 2 - RMS Profiles 2-13
The Chemical Mixture Profile
Page 32

RMS Office
Software Version 3.10
Figure 2-10: Krovar DF Entered into Calculator
Entering Oust as the Second Chemical
To enter Oust as the second chemical, place the cursor in the Chemical 2 menu field and press
enter. This activates the Select Chemical 2 dialog. Move through the list of chemicals, select Oust,
and press enter. To move through the chemical list rapidly, type in the first letter of the desired
chemical. The program jumps down the ch emical list t o the first chemi cal name beginnin g with the
letter entered. All of the chemicals listed in this dialog are contained in the Chemical Profile.
Entering the Oust Application Rate
After selecting the chemical, enter the chemical application rate. Tab the cursor to the Chemical 2
Application Rate menu field and press enter. This activates the Chemical 2 Rate dialog box (see
Figure 2-11). In the example, the application rate for Oust is 3 Oz./Acre. Notice that the unit of
Ounces is already set in the Rate dialog box. The rate unit for Oust is contained in the Chemical
Profile and retrieved by the calculator. This eliminates the need to remember or look up the
required rate unit for each chemical. Enter 3 Oz./Acre in the dialog and press enter. Oust is now
entered as the second chemical in the mixture (see Figure 2-12).
2-14 Chapter 2 - RMS Profiles
The Chemical Mixture Profile
Page 33

RMS Office
Software Version 3.10
Figure 2-11: The Chemical Rate Dialog for Oust
Figure 2-12: Oust Entered into the Chemical Calculator
Chapter 2 - RMS Profiles 2-15
The Chemical Mixture Profile
Page 34

RMS Office
Software Version 3.10
Entering the Total Mix Volume
When both chemicals are entered into the calculator, enter the total mix volume. Place the cursor
in the Total Volume menu field and press enter. This activates the Total Mix Volume dialog box
(see Figure 2-13). In this example, the total mix volume entered is 50 gallons (see Figure 2-14).
Figure 2-13: The Total Mix Volume Dialog
2-16 Chapter 2 - RMS Profiles
The Chemical Mixture Profile
Page 35

RMS Office
Software Version 3.10
Figure 2-14: Total Mix Volume Entered
Calculating the Mixture
Now that you have entered the two chemicals, the chemical application rates, and the total mix
volume, the next step is to calculate the mixture. To calculate the mixture, press the Calculate button located at the lower left co rner of th e Chemic al Calculator dialog. The Chemical Calculator calculates the following values:
• Mid-Tech Console Rate.
• Quantity of required material for chemical 1.
• Quantity of required material for chemical 2.
• Quantity of required carrier.
• Application rate of the carrier (calculated from the Maximum Mix Ratio entered for the Dry
material in Chemical Profile).
• Area that this mixture can cover based on chemical application rates.
See Figure 2-15 for the calculated results of this example. When satisfied with the calculation ,
press the OK button to return to the Chemical Mixture Main menu page (see Figure 2-16). Notice
that, on the Main page, all of the appropriate menu fields have been automatically filled in, including the mixture name.
If you know the average boom width and average speed of the vehic l e durin g the ap p lica tion process, enter these values into the Chemical Calculator and calculate the total distance you can
cover as well as the Average Pump Flow Rate.
Chapter 2 - RMS Profiles 2-17
The Chemical Mixture Profile
Page 36

RMS Office
Software Version 3.10
Figure 2-15: Mix Calculation Results
Figure 2-16: The Main Page after Mix Calculation
2-18 Chapter 2 - RMS Profiles
The Chemical Mixture Profile
Page 37

RMS Office
Software Version 3.10
The Main Page
Pressing the New button, to enter a new chemical mixtu re, brings up the main mixtur e editing page
(see Figure 2-16). The Main page, denoted by the Main t ab located at th e bottom of th e pa ge, contains the following menu fields.
Profile Field Description
The Main Page
Mixture Name
Chemical #1
Concentration
Target Rate
Chemical #2
Concentration
Target Rate
Chemical #3
Concentration
Target Rate
The name of the mixture being created. When you enter this menu
field, the RMS Chemical Calculator appears (see Figure 2-7). Filling
in this menu field is optional. When you complete the calculation for a
mixture, the system fills in the Mixture Name menu fiel d au toma tical ly.
The name of the first chemical in the mix.
The concentration of chemical 1 used in the mixture. The Chemical
Calculator fills in this menu field automatically.
The target rate entered into the Chemical Calculator for chemical 1.
The Chemical Calculator fills in this menu field automatically.
The name of the second chemical used in the mixture. The Chemical
Calculator fills in this menu field automatically.
The concentration of chemical 2 used in the mixture. The Chemical
Calculator fills in this menu field automatically.
The target rate entered into the Chemical Calculator for chemical 2.
The Chemical Calculator fills in this menu field automatically.
The name of the third chemical used in the mixture. The Chemical
Calculator fills in this menu field automatically.
The concentration of chemical 3 used in the mixture. The Chemical
Calculator fills in this menu field automatically.
The target rate entered into the Chemical Calculator for chemical 3.
The Chemical Calculator fills in this menu field automatically.
Record Status
Admin Page
Setting a profile to Active makes that profile viewable and selectable
when transferred to the Legacy 6000. Setting a profile to Hidden prevents it’s being selected or viewed by the operator, when it is transferred to a Legacy 6000. This allows a manager to limit the number of
in-field selections an operator must make while in the field.
Table 2-4: Chemical Mix Profile Description
Chapter 2 - RMS Profiles 2-19
The Chemical Mixture Profile
Page 38

RMS Office
Software Version 3.10
The Personnel Profile
The Personnel Profile is a database cont aining a record of th e employees associate d
with a spraying application. Typically a personnel profile is created for vehicle drivers
and sprayer operators. To access the Personnel Profile page, select the Personnel
Profile located in the RMS Launcher Profiles pa ge. The first p age disp layed is a list of
profiles, currently entered into the Personnel Profile database (see Figure 2-17). If
you have not entered any profiles yet, this pa ge is empty. T o enter a new profile press th e New button. To edit an existing profile, select the desired profile from the list of profiles, and press Enter, or
double click on the profile name using the mouse. To delete an existing profile, highlight the
desired profile name and press the Delete Button.
When finished entering a new profile, press the OK button to save and add this new profile into the
Personnel Profile list. If you decide not to add the profile, simply press the Cancel button to return
to the Personnel Profile list.
To Exit the Personnel Profile, press the Exit Button. This returns the program to the RMS Launche r
Profiles page.
Create all profiles in RMS Office and tran sfer, via a PC card, to the Legacy 6000 console
running RMS-EXT software. Transfer the profiles using the RMS-Office Export program
(see Chapter 3 - RMS Tools).
Figure 2-17: The Personnel Profile Page
2-20 Chapter 2 - RMS Profiles
The Personnel Profile
Page 39

RMS Office
Software Version 3.10
Creating a New Personnel Profile
Pressing the New button, to create a new Person nel Profile, brings up the Main Personnel Profile
editing page (see Figure 2-18). The Admin page contains the Active and HIdden selections.
Table 2-5 contains a description of the Personnel profile fields. When all fields are filled in, press
OK to save the profile.
Figure 2-18: The Main Personnel Profile Page
Chapter 2 - RMS Profiles 2-21
The Personnel Profile
Page 40

RMS Office
Software Version 3.10
.
Profile Field Description
The Main Page
Last Name
First Name
Employee ID
SSN (SIN)
Pesticide Lic #
Expiration
Driver’s Lic #
Supervisor
Phone
Record Status
The last name of the employee.
The first name of the employee.
The employee’s identification number.
The employee’s Social Security Number or Social Insurance Number.
The employee’s pesticide license number.
The pesticide license expiration date.
The employee’s drivers license number.
The employee’s supervisor.
A telephone number where the supervisor or employee can be con-
tacted.
Admin Page
Setting a profile to Active makes that profile viewable and selectable
when transferred to the Legacy 6000. Setting a profile to Hidden prevents it’s being selected or viewed by the operator, when it is transferred to a Legacy 6000. This allows a manager to limit the number of
in-field selections an operator must make while in the field.
Table 2-5: Personnel Profile Description
2-22 Chapter 2 - RMS Profiles
The Personnel Profile
Page 41

RMS Office
Software Version 3.10
The Vehicle Profile
The Vehicle Profile contains information associated with the vehicle delivery system:
spray controller, tank volumes, and tank to channel assignment. Create a profile for
each vehicle used in a roadside spraying application. To access the Vehicle Profile
page, select the Vehicle Profile located in the RMS Launcher Profiles page. The first
page displayed is a list of profiles currently ente red into the Vehicle database (see
Figure 2-19). If you have not entered any profiles yet, this page is empty. To enter a new profile,
press the New button. To edit an existing profile select the desired profile, from the list of profiles,
and press Enter , or double click on the profile name using the mouse. To delete an existing profile,
highlight the desired profile name and press the Delete Button.
When finished entering a new profile, press the OK button to save and add th is new profile into the
Vehicle list. If you decide not to add the profile, simply press the Cancel button to return to the
Vehicle Profile list.
To Exit the Vehicle Profile, press the Exit Button. This returns the program to the RMS Launcher
Profiles page.
Create all profiles in RMS-Office and transfer them, via a PC card, to the Legacy 6000
console running RMS-EXT software. Transfer profiles using the RMS-Office Export program (see Chapter 3 - RMS Tools).
Figure 2-19: The Vehicle Profile List
Chapter 2 - RMS Profiles 2-23
The Vehicle Profile
Page 42

RMS Office
Software Version 3.10
Creating a New Vehicle Profile
Press the New button to create a new Vehicle Profile. This brings up the main profile editing page
(see Figure 2-20). There are three additiona l page tabs: Tanks, Channels, and Admin. The menu
items found on each of these menu pages must be filled in.
The Main page contains vehicle identification information. The tank unit and volumes are entered
in the Tanks page. The Tank to Pump association is made in the Channels page. The Admin p a ge
contains the Active and HIdden selections. Table 2-6 contains a description of the Vehicle profile
fields. When you complete all fields, press OK to save the prof ile.
2-24 Chapter 2 - RMS Profiles
The Vehicle Profile
Figure 2-20: The Main Page
Page 43

RMS Office
Software Version 3.10
Profile Field Description
The Main Page
Vehicle ID
Controller
Volume Unit
Carrier
Tank #1 - #8
Carrier
Pumps #1 - #9
A unique identifier for the vehicle being entered.
Selecting this controller menu item brings up a Controller dialog box
(see Figure 2-21). This dialog contains a list of Mid-Tech controller
drivers that are compatible with the RMS software. Select the controller driver that matches the rate controller installed on the vehicle.
The Tanks Page
Enter the unit of volume used in this profile. Selecting this menu field
activates a Volume Units dialog. Pick the volume unit used from this
dialog.
Enter the volume of the Carrier tank.
The menu fields for Tanks 1 though 8 are identical. Enter the volume
for each tank installed on the vehicle. If the vehicle does not have 8
tanks, leave any non-existent tank menu fields blank.
The Channels Page
This is the pump associated with the carrier tank. Typically, select the
carrier tank from the Carrier Assignment dialog.
Selecting any of these Pump menu fields activates a Pump dialog box
(see Figure 2-23). From the dialog box, select the desired tank for the
pump. Pumps and tanks can be mixed and matched (e.g. Pump 2 can
have Ta nk 3 assigned to it). Do not assign a tank to more than one
pump.
Record Status
Admin Page
Setting a profile to Active makes that profile viewable and selectable
when transferred to the Legacy 6000. Setting a profile to Hidden prevents it’s being selected or viewed by the operator, when it is transferred to a Legacy 6000. This allows a manager to limit the number of
in-field selections an operator has to make while in the field.
Table 2-6: Vehicle Profile Description
Chapter 2 - RMS Profiles 2-25
The Vehicle Profile
Page 44

RMS Office
Software Version 3.10
Figure 2-21: The Rate Controller Dialog
2-26 Chapter 2 - RMS Profiles
The Vehicle Profile
Figure 2-22: The Tanks Page
Page 45

RMS Office
Software Version 3.10
Figure 2-23: The Pump Dialog Box
Figure 2-24: The Channels Page
Chapter 2 - RMS Profiles 2-27
The Vehicle Profile
Page 46

RMS Office
Software Version 3.10
The Spray Configuration Profile
The Spray Configur at ion Prof ile allows t he creat ion of different spray boom configurations for the fleet. When the actual spray application session is started, select the
specific spray boom configuration for your vehicle.
To access the Spray Configuration Profile page, select the Spray Configuration Profile, located in the RMS Launcher Profiles p age. The fir st p a ge is a list of pr ofiles curre ntly entered
into the Spray Configuration database (see Figure 2-25). If you have not entered any profiles yet,
this page is empty. To enter a new profile, press the New button. To edit an existing profile select
the desired profile, and press Enter or double click on th e profile name using the mouse. To delete
an existing profile, highlight the desired profile name and press the Delete Button.
When finished entering a new profile, press the OK button to save and add this new profile into the
Spray Configuration list. If you decide not to add the profile to the profile database, simply press
the Cancel button to return to the Spray Configuration Profile list.
To Exit the Spray Configuration Profile, press the Exit Button. T his returns the program to t he RMS
Launcher Profiles page.
Create all profiles in RMS-Of fice and tr ansfer it, via the PC card, to the Lega cy 6000 console running RMS-EXT software. Transfer profiles using the RMS-Office Export program
(see Chapter 3 - RMS Tools).
Figure 2-25: The Spray Configuration Profile Page
2-28 Chapter 2 - RMS Profiles
The Spray Configuration Profile
Page 47

RMS Office
Software Version 3.10
Creating a New Spray Configuration Profile
Press the New button to create a new Spray Configuration Profile. This brings up the main profile
editing page (see Figure 2-26). Notice that there are three additional page tabs; 3 - 6, 7 - 10 and
Admin. The Admin page contains the Active and Hidden selections.
It is not necessary to fill in menu items found on each of these menu pages (seeTable 2-7).
Figure 2-26: Spray Config Main Page
The Spray Configuration Profile
Chapter 2 - RMS Profiles 2-29
Page 48

RMS Office
Software Version 3.10
Profile Field Description
The Main Page
Spray Config Name
Hand Gun
Boom 1 Width
Offset
Enter the name of the new spray configuration. Try to use a name that
best describes the configuration.
Selecting this menu field activates the Hand Gun dialog box. If using a
hand gun, select Yes. If not using a hand gun, select No.
Selecting this menu field activates the Boom Width dialog. Enter the
width of Boom 1 in inches. When entered, the boom section is drawn
in the vehicle diagram located at the bottom of the page.
Selecting this menu field activates the Boom Offset dialog. Enter the
offset distance, from the center line of the vehicle to the closest point
in the boom you are programming. Select which direction (Left or
Right) from center line of the vehicle to place the boom. If the boom is
to be centered on the vehicles center line, select CENTER for the offset direction. Always use the vehicle graphic at the bottom of the page
to ensure that the created the boom section is in the proper location.
Boom 2 Width See Boom Width description above.
Offset
See Offset description above.
The 3-6 Page
Boom 3 - 6 Width
Offsets 3 - 6
See Boom width description above.
See Offset description above.
The 7 - 10 Page
Booms 7 - 10
Offsets 7 - 10
Record Status
Table 2-7: Spray Config Profile Description
RMS does not proceed with the spraying unless the boom widths, programmed into the
selected Sp ray Configuration, are the same as those programmed into the TASC rate
controller.
2-30 Chapter 2 - RMS Profiles
The Spray Configuration Profile
See Boom width description above.
See Offset description above.
Admin Page
Setting a profile to Active makes that profile viewable and selectable
when transferred to the Legacy 6000. Setting a profile to Hidden prevents it’s being selected or viewed by the operator, when it is transferred to a Legacy 6000. This allows a manager to limit the number of
in-field selections an operator has to make while in the field.
Page 49

Chapter 3 - RMS Tools
Tools and utilities to help make your life easier.
RMS-Office Version 3.10
Midwest Technologies LLC
RMS Office
Page 50

RMS Office
Software Version 3.10
RMS Tools Introduction
This chapter covers several utility applications that can make your life a little bit easier. Currently
RMS - Tools consists of four applications: Export, Map Manager, Name Manager, and Report Wiz-
ard. All Tools are accessed from the RMS Office Tools Menu (see Figure 3-1).
Tool Description
Export
Map Manager
Name Manager
Report Wizard
3-2 Chapter 3 - RMS Tools
RMS Tools Introduction
Figure 3-1: RMS Tools Launcher
The Export tool allows the transfer of Profiles and Names files to a
Legacy 6000 console.
The Map Manager Tool is covered in Chapter 4 of this User’s Guide.
Name Manager allows you to build attribute databases, used for nam-
ing objects during the real-time mapping process.
The Report Wizard Tool allows you to generate a detailed report of a
roadside spray application or session.
Table 3-1: RMS Tools Description
Page 51

RMS Office
Software Version 3.10
Export
Use the Export tool (Figure 3-2) to tran sfer Profiles and Name files between RMS
Office and a Legacy 6000. As your Profile information changes over time, you must
keep your Legacy 6000 up to date. Information on Profiles are found in Chapter 2 of
this User’s Guide. For more information on Names files, see Name Manager on page
3-5.
You cannot directly copy the Profiles and Names files directly to the PC card. You must
use the Export tool to compress and reformat them, to run in the Windows CE environment. You can directly copy RMS data files such as (.RCD), (.GMF ), (.E VP) an d (. TI F)
between RMS Office (your PC) and a Legacy 6000 console.
Export Steps:
• When you have finished making change s to any Profiles or Names files, insert a PC card into
your PC card drive and run the Export tool.
• Select the PC card drive by using the Browse button, (Figure 3-3).
• Select the profiles that you want to export to the PC card, by clicking in the select box to the
left of the Profile name.
• Select the Names files that you want to export to the PC card, by clicking in the select box to
the left of the Name Files name.
• Press the Export button to begin file transfer to the PC card. An IMPORT folder is created on
the PC card. Profiles and Names files a exported to sub folders of the IMPORT folder. Do not
move or modify these files on the PC card.
• Safely remove the PC card from the drive.
• Insert the PC card into the Legacy 6000 that you want to update. Turn the console on.
• The Legacy 6000 will detect new Profile and Names files on the PC card and ask if yo u would
like to import these new files. Use the Arrow keys to make the appropriate selection.
• The import process performs a file comparison with all modified files. Files are updated with
new information and not over-written. The import process moves files from the PC card to the
console flash memory. You cannot directly copy these files to the appropriate location. The
import process must be used.
Chapter 3 - RMS Tools 3-3
Export
Page 52

RMS Office
Software Version 3.10
Figure 3-2: The Export Dialog
3-4 Chapter 3 - RMS Tools
Export
Figure 3-3: The Browse Dialog
Page 53

RMS Office
Software Version 3.10
Name Manager
The Name Manager application (Figure 3-4) allows you to construct a database of
commonly used attribute names. These databases can be accessed from any of the
Mid-Tech RMS real-time applications, such as RMS - Mapper, RMS - EXT, or RMS CAN. Using a names database helps you to efficiently store, select, and name map-
ping objects, while out in the field. Database file names can be named for a specific task or theme,
such as Road Signs. Figure 3-4 shows the Name Manager, with the Weeds database highlighted.
The attribute names, contained in the W eeds dat abase, are co mmonly used during poten tial spray
route weed mapping campaigns wit h RMS - Mapper. Utility inventory is another mapping task that
requires unique names and naming schemes. These names and schemes are stored in a names
database. Roadside mapping or route scouting could have several associated name databases.
You must use the Export tool to export Names files to the Legacy 6000 console (see
Export on page 3-3).
To start Name Manager, select “Name Manager” in the RMS Program Launcher Tools Menu (Fig-
ure 3-1).
Name Database File Format
Name database files are ASCII text f iles, (.T XT). You can create these files in several different editors, spread sheets, and word processors. A single column of names, typed into an Excel spread
sheet, can be copied to the Windows clipboard and pasted into any names database file. This
makes it easy to move existing attribute information into the names data base f ile forma t. You may
find it easier to simply type name attributes, one nam e pe r line , into a word pr oc ess or or edito r,
and save that file as a text file with the extension (.TXT).
All name databases, that you want to export to a Legacy 6000 console, must be kept in the
C:\RMS\NAMES directory. Do not store name databases in any other folder. The program automatically alphabetizes names entered into a database. The following few lines represent a typical
names database, used in roadside mapping tasks.
Channel 1
Channel 2
Channel 3
Intersection
Mailbox.
Mile Marker
Mustard
No Spray
Spray On
Spray Off
Thistle
Chapter 3 - RMS Tools 3-5
Name Manager
Page 54

RMS Office
Software Version 3.10
Directory path to your
name databases.
To create a new name database, file click here.
To rename a name database file, click here.
To delete an existing name
database file, click here.
All existing name database
files, for the current directory, are displayed here.
To add a new name to the
current name database,
click here.
Using the Cut, Copy, and Paste buttons, you can
move names form one database file to another.
Figure 3-4: The Names Database Dialog
To rename a name in the
database file, click here.
To delete a name in the current database, click here.
All attributes for roadside
database are listed here.
To Exit the Name Manager, click on
the Close button.
3-6 Chapter 3 - RMS Tools
Name Manager
Page 55

RMS Office
Software Version 3.10
Report Wizard
Report Wizard compiles all information, map data, and profiles, associated with a spraying session, into an organized spray session report. This final report can contain all profiles associated with the spray session, as well as any maps created during the spray
session. You can customize the final report by adding different map views, and also by
adding your company logo and address to the front page of the report. To start Report Wizard,
select “Report Wizard” from the RMS Program Launcher Tools Menu (Figure 3-5).
Figure 3-5: RMS - Report Wizard
Chapter 3 - RMS Tools 3-7
Report Wizard
Page 56

RMS Office
Software Version 3.10
Generating a Session Report with Report Wizard
Generating a final spray session report is easy using Report Wizard. You must have a completed
spray session, with all associated data, prior to generatin g a final report. Your data is collected and
stored on the PC card, under the Job Id folder name for that session. You can either transfer the
session folders from the PC card to your off ice computer, or you can generate reports directly from
the PC card, while it is inserted into the PC card slot, on your office computer. It is recommended
that you copy the job folders from th e PC card t o a fold er o n your Office computer. This provides a
backup for your data, as well as freeing up space on the PC card. The C:\RMS\data folder is the
recommended location for your job folders , on th e office PC.
When you have started Report Wizard from the RMS Pro gram Launcher, the first Report Wizard
dialog appears (Figure 3-6).
Select Spray Session
The first step is to select the spray session you want t o generate a repo rt for. Figure 3-6 shows the
Report Wizard Session dialog. First browse to the location of your Job or session folders. Da ta can
also reside on the PC card. Next select the existing spray session from the list, in the pull down
menu field. Spr ay Session 140999-01 is used as the example spray session that we want to generate a report for. This session is highlighted in Figure 3-6. With the desired session selected,
press the “next” button in the lower right corner.
Figure 3-6: Report Wizard Session Dialog
3-8 Chapter 3 - RMS Tools
Report Wizard
Page 57

RMS Office
Software Version 3.10
Report Information
The report information dialog allows you to customize your final spra y session report. With this dialog, you can select the session profile information to include in the report. You can also select the
units to present the report in. In the 140999-01 example, we are selecting the full report option.
The full report option includes all profiles associated with the 140999-01 spray session. If you
select the custom option, small check boxes appear next to each item, listed in the report information scroll menu (see Figure 3-8). To select or de-select information, simply click in the check box
next to the associated menu item. Figure 3-8 shows the Agency/Company information deselected.
Figure 3-7: Report Wizard - Report Information Dialog
Chapter 3 - RMS Tools 3-9
Report Wizard
Page 58

RMS Office
Software Version 3.10
Figure 3-8: Customizing Report Information
When you have selected the proper choices in the Report Information dialog, press the “next” button, to continue to the next Report Wizard dialog. A status box appears after you press the “next”
button. Report Wizard is loading the various session and profile information that you selected in
the Report Generation dialog. This may take a few seconds and you can see, in the status box,
which profile and session information is being loaded.
3-10 Chapter 3 - RMS Tools
Report Wizard
Page 59

RMS Office
Software Version 3.10
Spray Campaign
The Report Wizard Spray Campaign dialog displays the session (.EVP) map (see Figure 3-9). You
also have the option to display a background map, if one is ava ilable. In our example session
140999-01, there is a background map used during the spray session . Figure 3-10 shows the
background map selection and completed Spray Campaign dialog, with backgroun d map displayed. When you complete the S pray Camp aign dialog options, press the “ next” button to move to
the next Report Wizard dialog.
Figure 3-9: Report Wizard Spray Campaign Map
Chapter 3 - RMS Tools 3-11
Report Wizard
Page 60

RMS Office
Software Version 3.10
Figure 3-10: Viewing the Background Map
3-12 Chapter 3 - RMS Tools
Report Wizard
Page 61

RMS Office
Software Version 3.10
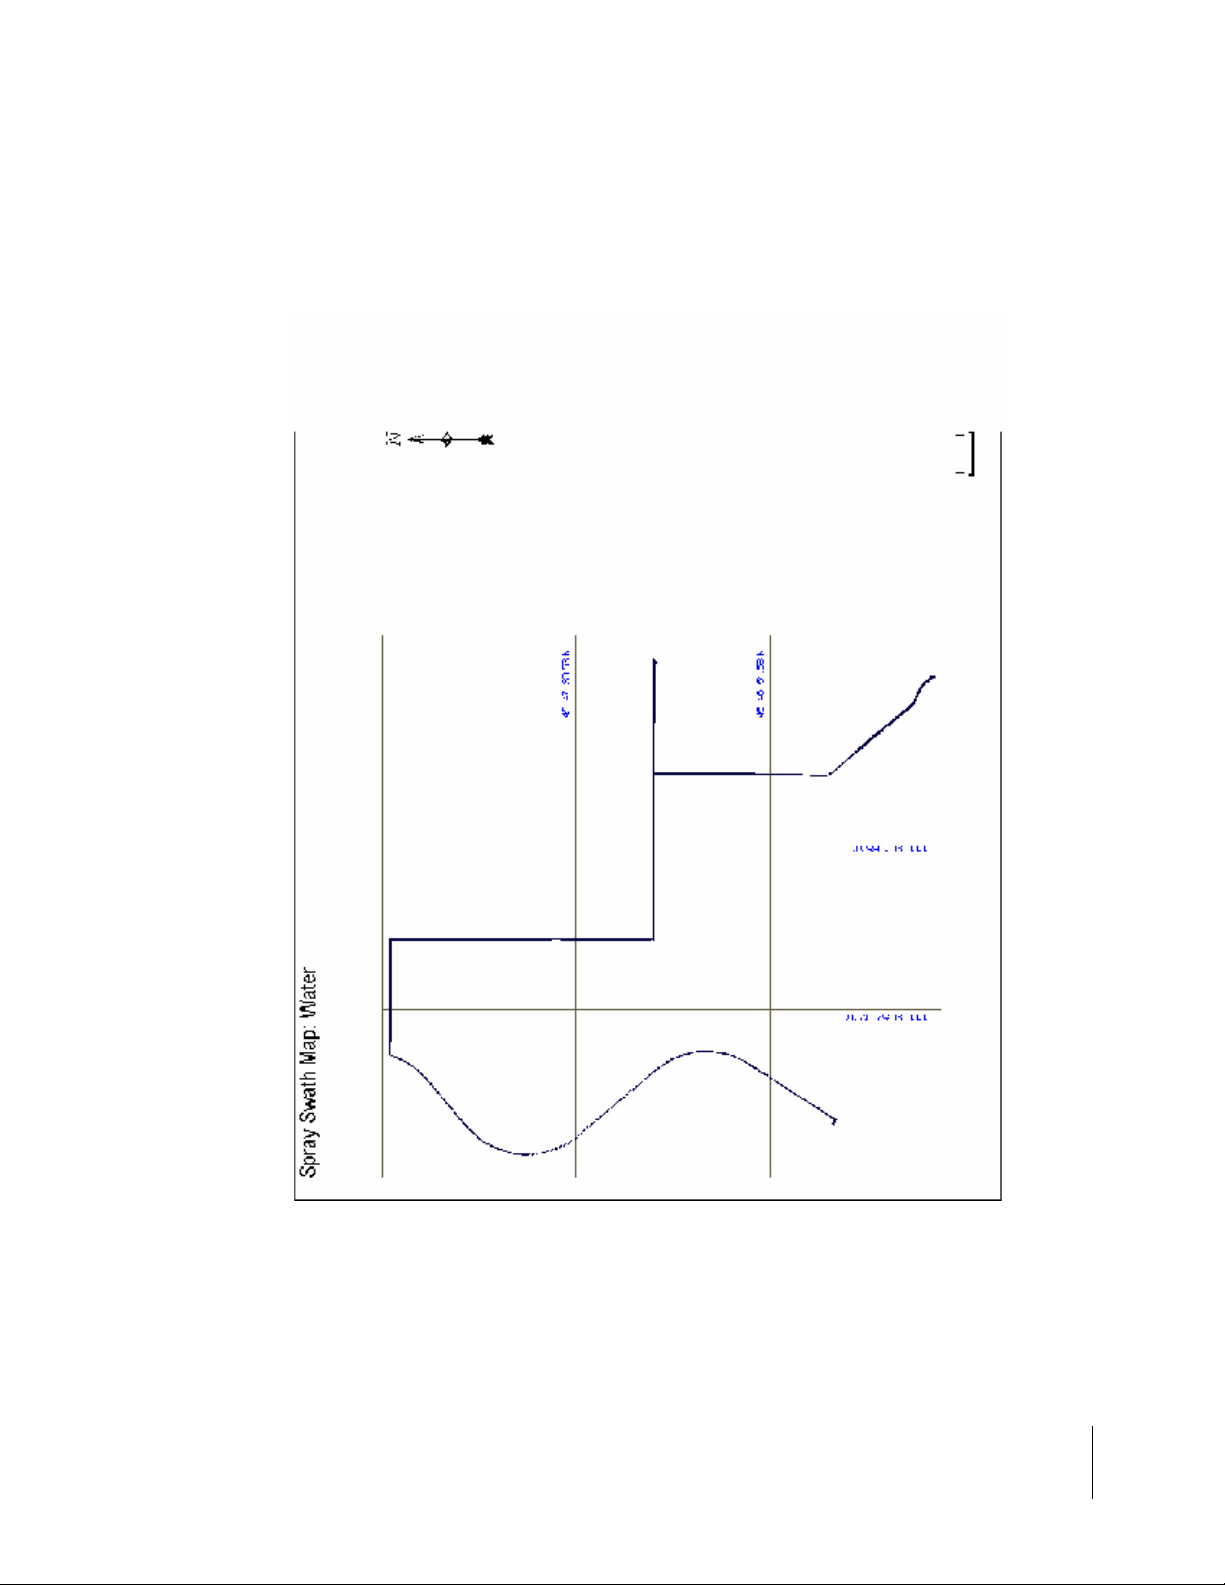
Spray Swath Map
The Spray Swath Map dialog allo ws you to select and de-sele ct the various spray swath map dat a,
that was collected during your spray session. The spray swath data is contained in the RMS
(.RCD) file type. There should be a (.RCD) file, and therefore a spray swath map, for each product
or mixture, including carrier, applied during a spray session. In our example of spray session
140999-01, there were two products, RoundUp and Karmex, and one mixture, Krovar + Oust,
applied (see Figure 3-11). There is an additional selection; t he session map. This is the e vent map
(.EVP) created during the spray session. A separate map is created, in the report, for each spray
swath map you select in this dialog. To view a spray swath map, prior to selecting or de-selecting,
simply highlight the map name with the mouse. The map that appears to the left is the one that you
highlighted. In Figure 3-11, the session map name is highlighted and the map, to the left, is the
session map. In our example, we are selecting all map s available to us: Session , W ate r, Roundup,
Krovar+Oust, and Karmex. This results in five maps in the final report.
Y o u can also select the gr id coordinate unit s, for t he back ground grid. The curr ent two choice s are
Latitude and Longitude or UTM.
With the desired spray swath maps selected, press the “next” button, to move to the next Report
Wizard dialog.
Figure 3-11: Report Wizard Spray Swath Maps
Chapter 3 - RMS Tools 3-13
Report Wizard
Page 62

RMS Office
Software Version 3.10
Post Session Notes
The Post Session Notes dialog allows you to enter any notes that you want appended t o end of the
report. This is a free form edit box, so you can type any information that you wan t included in the
final report. In our example,Figure 3-12, the contracting spraying company requires that the person who generates the final report enter their name in the post session notes.
Once you complete this dialog, press the "next" button to move to the next Report Wizard dialog.
Figure 3-12: Report Wizard Post Session Notes Dialog
3-14 Chapter 3 - RMS Tools
Report Wizard
Page 63

RMS Office
Software Version 3.10
Report Banner
The report Banner dialog allows you to add any info rmation, such as your company logo and
address, to the first page of t he fin al r epo rt . I n ou r e x amp le we h ave a dde d t he co mpany logo and
address (see Figure 3-13). If you have your compan y logo in a Bitma p fi le fo rma t (. BM P), you ca n
insert that image into the banner. See “Customizing your Report Banner" below.
When the Report Banner dialog is complete, press the "next" button to move to the next Report
Wizard dialog.
Figure 3-13: Report Wizard Report Banner Dialog
Customizing your Report Banner
To customize your report banner , pr ess th e “ban ner” butt on in the uppe r ri ght corn er (see Figure 313”. This pops up a word processor, like Edit Banner window (see Figure 3-14). This figure shows
an empty Edit Banner window . This e dit window has many fea tures similar to a word processor. T o
add text, just start typing. To insert a logo, place your cursor at the desired logo location, click on
the “Insert” pull down menu and select picture. This pops up a Windows explorer browse dialog
(see Figure 3-15). Move to the folder that contains your log o in bitma p fo rm (.BM P). Selec t the
desired bitmap file and press the open button in the browser dialog box. Your logo should now
appear at the cursor position in the Banner Edit window. In our example, we selected the bitmap
file Roadside Spraying Ser vices.bmp (Figure 3-15), and can now view it in the Banner Edit wind ow
(Figure 3-16).
Chapter 3 - RMS Tools 3-15
Report Wizard
Page 64

RMS Office
Software Version 3.10
Figure 3-14: Edit Banner Window
Figure 3-15: Selecting Company Logo Bitmap
3-16 Chapter 3 - RMS Tools
Report Wizard
Page 65

RMS Office
Software Version 3.10
Figure 3-16: Edit Banner Window with Company Logo
When the logo is located where you want it, in the Edit Banner win dow, you can type in any additional text, such as company name and address. Use the Paragraph menu, located in the Edit
Banner window menu bar to, Left, Right, or Center justify your logo and text. In our example (Figure 3-17), we added the company name and address and Center justified the logo and text.
Figure 3-17: Customized Report Banner
When you have the logo and text for your cust omized banner, save it to a file using the File menu
item Copy to File. Selecting this menu item brings up a prompt asking for a file name for your customized logo. If you want your custom banner to be the default banner for all of your repo rts, select
the Save Banner menu item from the File pull down menu. To return to the Report Wizard Report
Banner dialog, select Exit from the File pull down menu.
Chapter 3 - RMS Tools 3-17
Report Wizard
Page 66

RMS Office
Software Version 3.10
Output Report
After completing the Report Banner dialog, the final Repor t Wiza rd dia log is the Out put Rep ort dialog. From this dialog, you can preview, print, or save the report (Figure 3-18). Previewing the
report is always a good idea, before printing or saving the report.
Printing the Report
To print the report, press the Print button in the Output Report dialog. Th is prints the report to an
attached printer. Report Wizard only prints reports in Landscape orientation on 8-1/2 by 11 in.
paper. Do not try to print your report in any other paper orientation.
Saving the Report
To save the report, press the “save” button. A Windows Explorer dialog appears. Using this dialog,
name the report and select the folder to store the repor t in. You can only save the report in rich text
(.RTF) format.
Opening a Finished Report in Other Applications
Because the Report Wizard saves your r eports in (.R TF) format, you can open and edit your rep ort
in several word processors (Microsoft Word, WordPad, NotePad, Adobe PageMaker, WordPerfect, Corel, and more) on the market. You may find this a more convenient way to edit or add to
your finished report.
3-18 Chapter 3 - RMS Tools
Report Wizard
Figure 3-18: Output Report Dialog
Page 67

RMS Office
Software Version 3.10
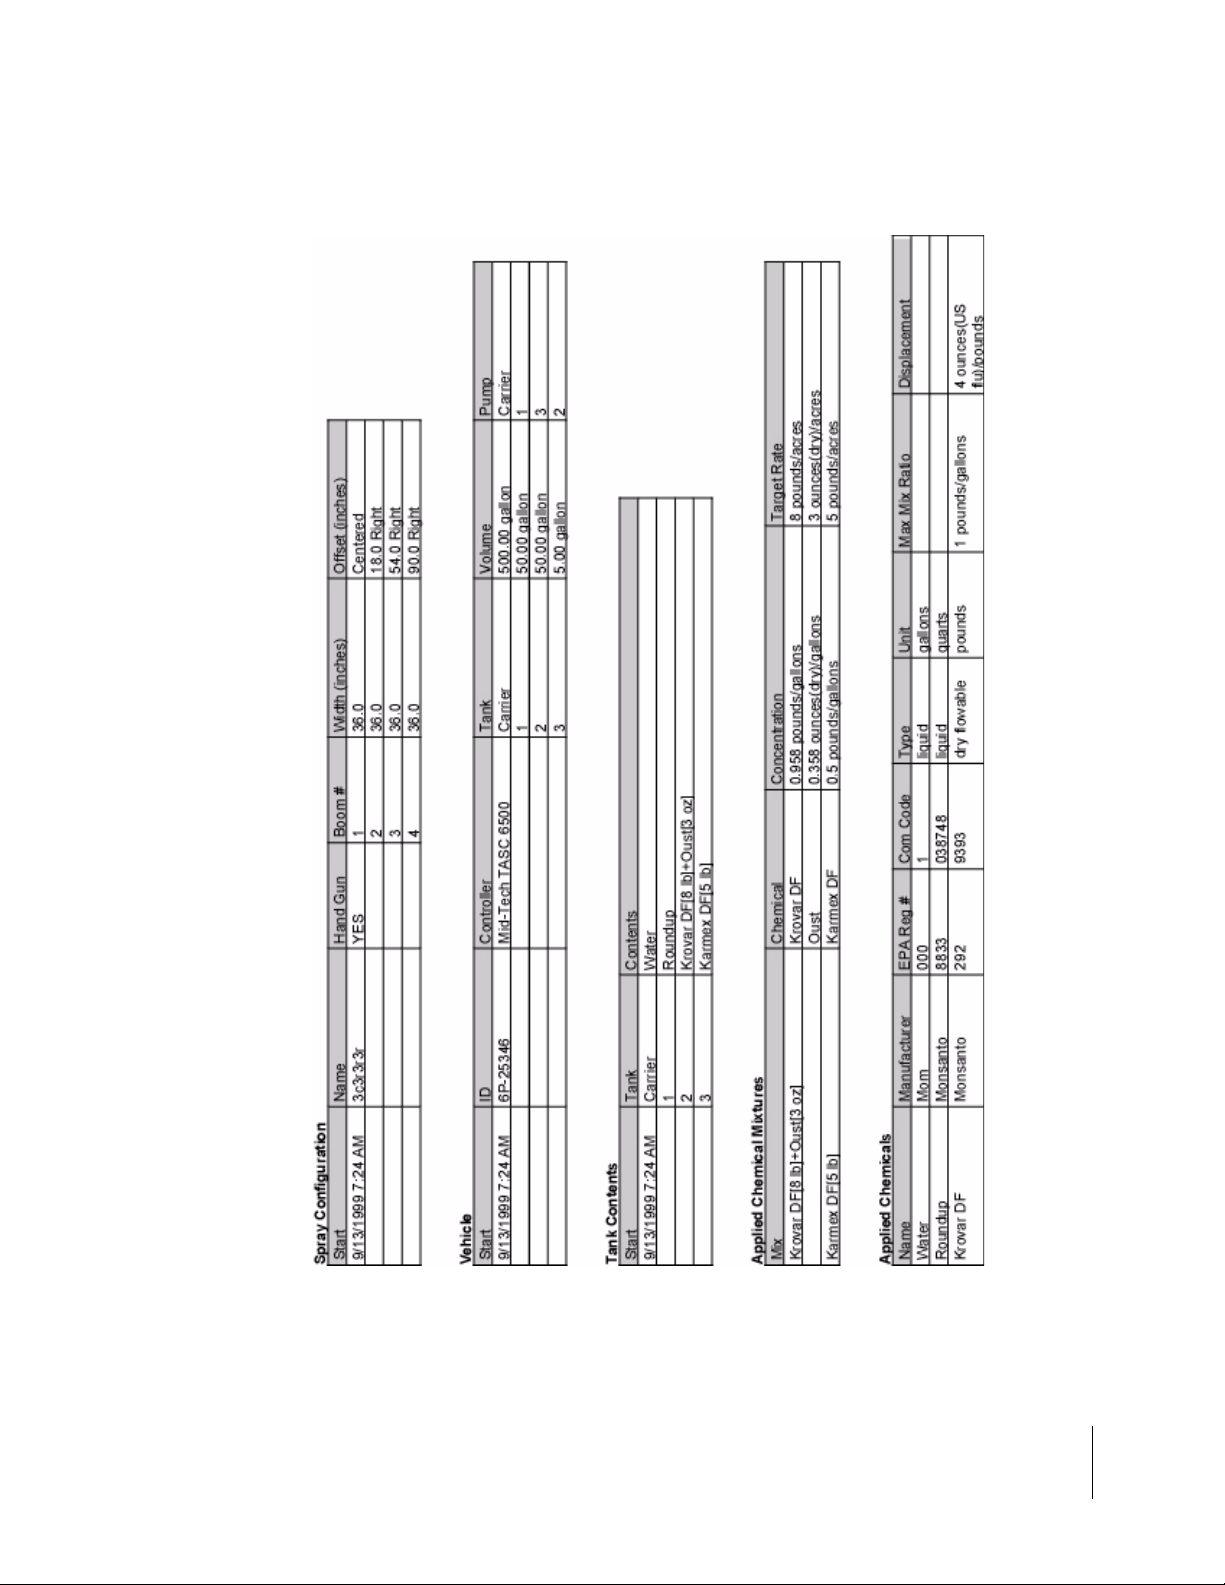
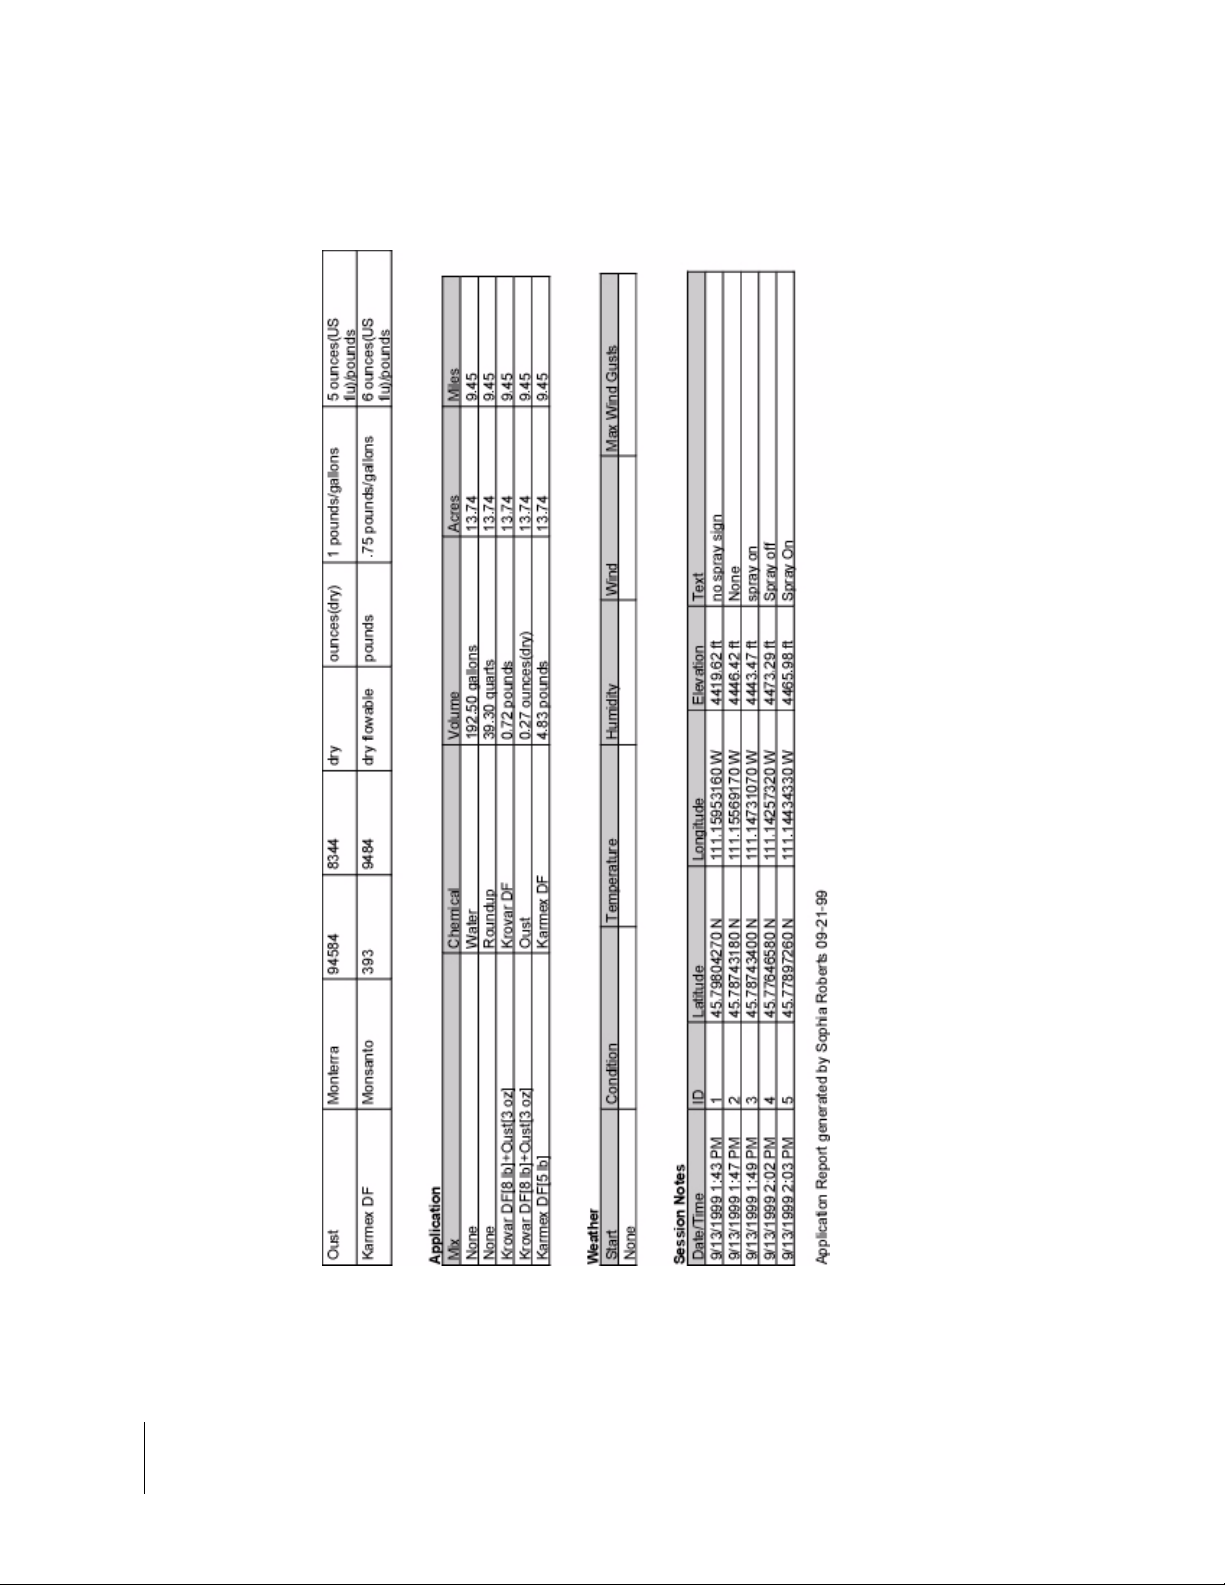
Sample Report 140999-01
The following nine pages are final report generate d for spray session 140999-01. The first three
pages contain all of the profile information associated with th e spra y sess ion (se e Fig u re 3-1 9
through Figure 3-21).
Page four is the S pray Camp ai gn map (see Figu re 3-22). This m ap, genera ted as th e event record
(.EVP) during the actual spraying process shows the entire spray route traveled during the spray
session 140999-01.
Pages five through nine are the individual Spray Swath maps, starting with the entire Session
Swath map (see Figure 3-23 through Figure 3-27). There is a Spray Swath map for each product
or mixture plus carrier, applied during the spray session.
Chapter 3 - RMS Tools 3-19
Report Wizard
Page 68

RMS Office
Software Version 3.10
3-20 Chapter 3 - RMS Tools
Report Wizard
Figure 3-19: Report 140999-01 Page 1
Page 69
RMS Office
Software Version 3.10
Figure 3-20: Report 140999-01 Page 2
Chapter 3 - RMS Tools 3-21
Report Wizard
Page 70
RMS Office
Software Version 3.10
3-22 Chapter 3 - RMS Tools
Report Wizard
Figure 3-21: Report 140999-01 Page 3
Page 71

RMS Office
Software Version 3.10
Figure 3-22: Report 140999-01 Page 4
Chapter 3 - RMS Tools 3-23
Report Wizard
Page 72

RMS Office
Software Version 3.10
3-24 Chapter 3 - RMS Tools
Report Wizard
Figure 3-23: Report 140999-01 Page 5
Page 73
RMS Office
Software Version 3.10
Figure 3-24: Report 140999-01 Page 6
Chapter 3 - RMS Tools 3-25
Report Wizard
Page 74

RMS Office
Software Version 3.10
3-26 Chapter 3 - RMS Tools
Report Wizard
Figure 3-25: Report 140999-01 Page 7
Page 75

RMS Office
Software Version 3.10
Figure 3-26: Report 140999-01 Page 8
Chapter 3 - RMS Tools 3-27
Report Wizard
Page 76

RMS Office
Software Version 3.10
3-28 Chapter 3 - RMS Tools
Report Wizard
Figure 3-27: Report 140999-01 Page 9
Page 77

RMS Office
Software Version 3.10
Section Notes
Chapter 3 - RMS Tools 3-29
Section Notes
Page 78

RMS Office
Software Version 3.10
3-30 Chapter 3 - RMS Tools
Section Notes
Page 79

Chapter 4 - RMS Map Manager
Roadside data viewing, editing and management tool.
RMS-Office Version 3.10
Midwest Technologies LLC
RMS Office
Page 80

RMS Office
Software Version 3.10
About RMS Map Manager 3.10
RMS Map Manager 3.10 is a data file viewing, editing, and management tool. Map Manager allows the viewing of all roadside application data collected using a Legacy 6000
and RMS software. You can can also convert RMS data to the ESRI (.SHP) file format,
using Map Manager. To start Map Manager, select “Map Manager” from the RMS Office
Tools Menu (Figure 4-1).
Figure 4-1: Starting Map Manager from RMS Office
4-2 Chapter 4 - RMS Map Manager
About RMS Map Manager 3.10
Page 81

RMS Office
Software Version 3.10
What’s New in RMS Map Manager 3.10
We have added several new features to version 3.10 to help view , edit, analyze, and manage RMS
data better.
New Explorer File Tree in Map Manager
The Map Manager view now has a fully loaded, explorer style, f ile tree. This eliminates the o ld root
directory method used in previous versions. The file tree allows for full file control, including new
file, delete, copy, cut, paste, and rename.
Files or folders can be dragged to a different location in the file tree. If the item is dragged to a different drive, a copy of the item is made; if th e same drive, th e item is moved. Drag files t o the view
window to open them in a text editor.
Valid layer types now have check boxes. Checking the box opens the layer. Un-checking a box
removes the layer from the map-view.
New Shp File Import and Export Functions
Greatly improved from previous versions of Map Manager, the new File Convert routine allows
batch processing of shape file imports and exports. RMS objects can be in separate shp files or
multiple object types can be stored in a single (.SHP) file.
Drawing Tools
RMS Map manager now has point, polyline, and polygon drawing tools. You can now add drawing
objects to (.GMF) files. Drawing tools also include a Circle tool. All drawing objects have full edit
capabilities.
Text Tool
A new text tool allows you to add text to any (.GMF). Cr eating a n ew (.GMF) layer over a roadside
(.EVP) or (.RCD) file, allows for post session annotation.
Chapter 4 - RMS Map Manager 4-3
About RMS Map Manager 3.10
Page 82

RMS Office
Software Version 3.10
RMS Data and Map Types
The following data files can be viewed in Map Manager:
Data Type Description
GMF
RCD
EVP
SHP
ARM
General Mapping File.
Record file containing vehicle trajectory and application rates.
Event file
ESRI shape file
Prescription map file (not implemented yet).
Table 4-1: RMS Data Type Description
4-4 Chapter 4 - RMS Map Manager
RMS Data and Map Types
Page 83

RMS Office
Software Version 3.10
Viewing Data
The current version of Map Manager ca n view any combinat ion of RMS file types, as well as zoom,
pan, and print. Figure 4-2 shows a roadsid e trajectory in the form of a (.EVP) file, and a spra y campaign map in the form of a (.GMF) file, in a single Map Manager view. The left side of the Map
Manager window is the directory and file tree, and the right side is the data viewing window. Data
files are loaded into the view window by double clicking on the file in th e directory and file tre e. You
can view files from different spray sessions within the same view window. Each map file, loaded
into the view page, is considered a single layer.
Figure 4-2: Map Manager
Chapter 4 - RMS Map Manager 4-5
RMS Data and Map Types
Page 84

RMS Office
Software Version 3.10
Base Maps
Background base maps, such as USGS topography ma ps, can be viewed in Geo- Tif formats. Base
maps are typically stored in the C:/RMS/basemaps folder. Figure 4-3 shows a base map behind
the (.EVP) and (.GMF) files shown in Figure 4-2 .
Figure 4-3: Viewing Base Maps
4-6 Chapter 4 - RMS Map Manager
RMS Data and Map Types
Page 85

RMS Office
Software Version 3.10
Object Information Query
It is now possible to query any type of data that appears in Map Manager. Using the pointer tool,
click on the area of the view that contain s the desired info rmation. The area select ed changes to a
fluorescent green color, and an Object information dialog box appears on the left side of the Map
Manager window. The object information dialog box displays a variety of information about the
object selected, such as position and name. Figure 4-4 shows an information query on an Event
(.EVP) map hazard, named Spray Off. Figure 4-5 shows a close up of the Object Information dialog box for the S pray Of f no te query. If multiple objects are stacked on to p of each ot her, view information, for each object selected, by clicking on the arrow in the Objects Found dialog and
selecting the object number of the information desired.
Object Selected
Figure 4-4: Object Information Query Feature
Chapter 4 - RMS Map Manager 4-7
RMS Data and Map Types
Page 86

RMS Office
Software Version 3.10
Figure 4-5: Object Information Dialog
4-8 Chapter 4 - RMS Map Manager
RMS Data and Map Types
Page 87
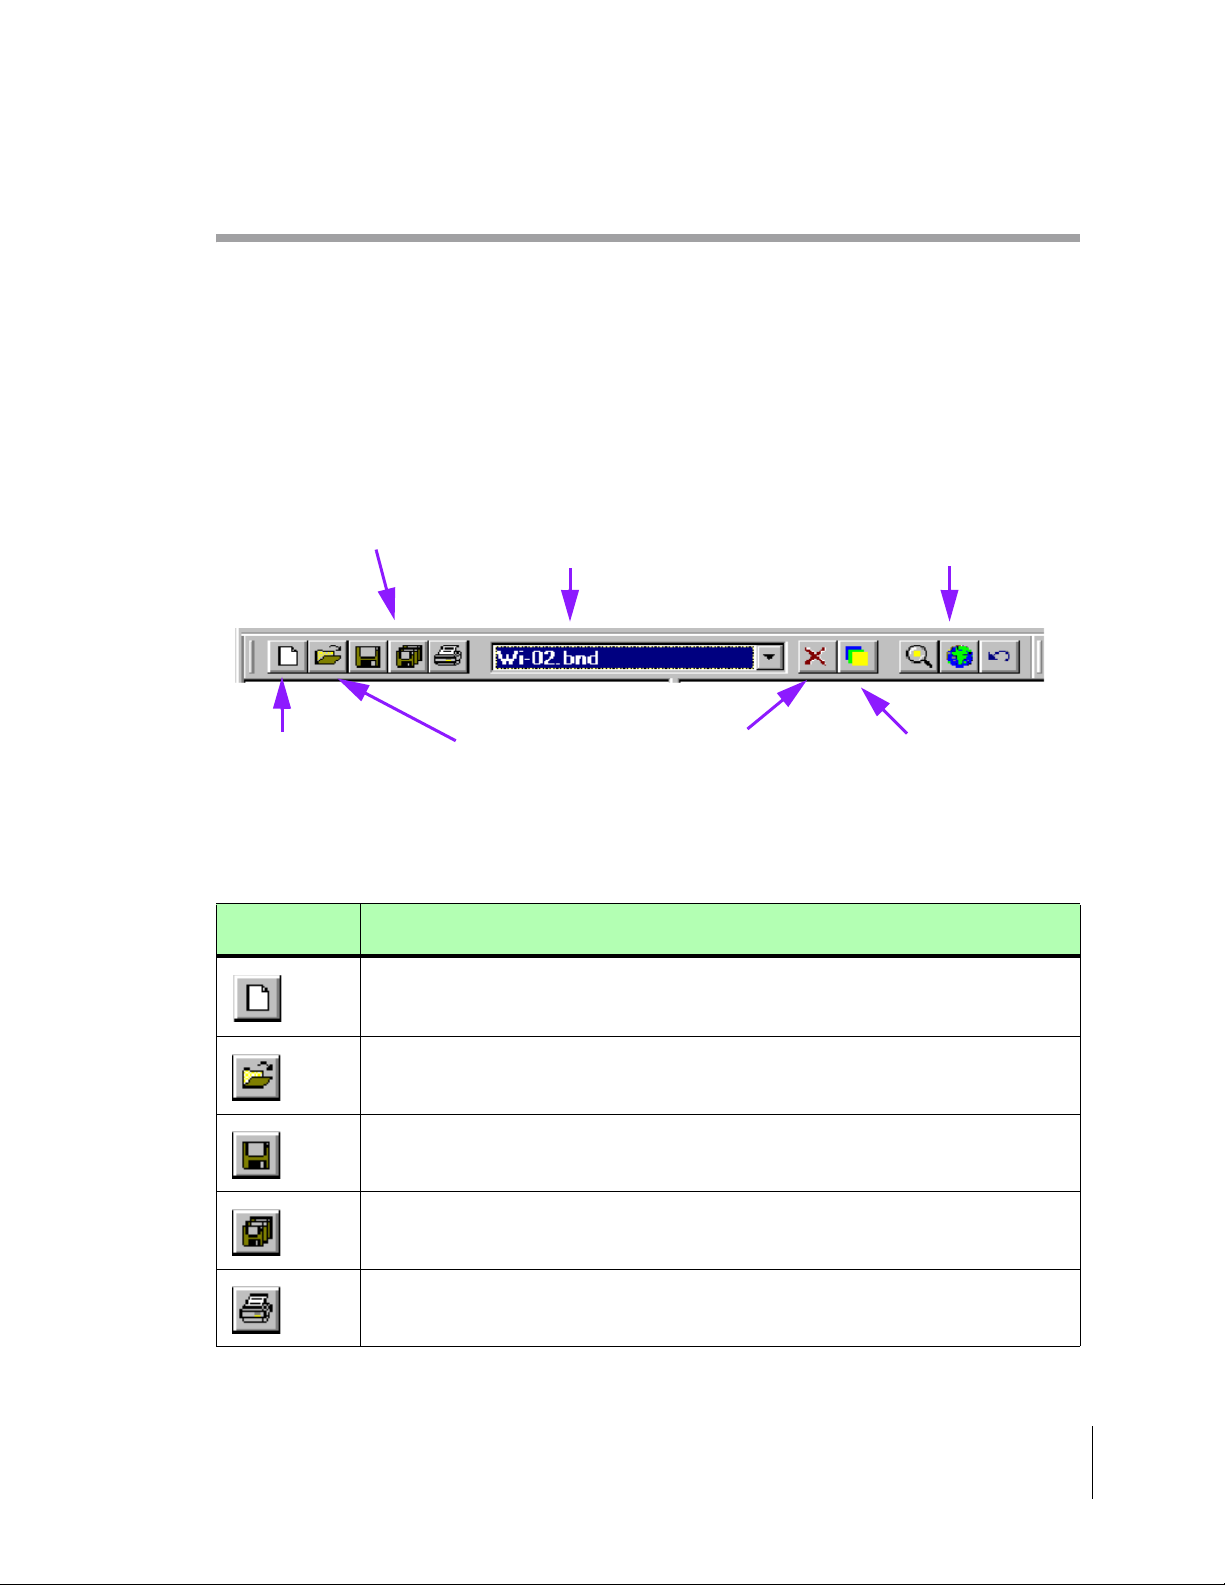
RMS Office
Software Version 3.10
The RMS Map Manager Tool Bar
The tool bar allows the manipulation of how you view the data in t he window. Drawing tools are
accessed from the Tool bar, as well as zoom, pan, and measure. You can add, remove, and unload
layers from the view. The current or active layer is the layer that sits on top of all other layers. To
remove or unload a layer, make it the current layer and click on the remove current layer button.
Only the current layer can be removed.
All Map Manager Tool Bar buttons are described in Table 4-2.
File Saving
New File (Layer)
Open Existing File
Current (top) Layer
Remove Current Layer
Figure 4-6: The Map Manager Tool Bar
Button Description
New File (Layer) - creates a new file (layer) and places it at the current (top) layer in the
map view. A prompt asks for the new file name.
Open Existing File (Layer) - An Open File dialog allows the selection of an existing file
(Layer), in the top layer of the map view.
Zoom to Extents
Layers On/Off
Save File (Layer) - save the current (top) layer in the map view.
Save All - save all files (layers) displayed in the map view.
Print - prints the current map view, with all visible layers.
Table 4-2: Map Manager Tool Bar Button Descriptions
Chapter 4 - RMS Map Manager 4-9
The RMS Map Manager Tool Bar
Page 88

RMS Office
Software Version 3.10
Button Description
Remove Layer - press to remove (not delete) current (top) layer from the view. This does
not delete the file.
Layers On/Off - press to bring up the layers On/Off dialog box. Turn layers on and off
from this dialog box.
Zoom to Current Layer - zooms to the data extents of the current (top) layer.
Zoom to Extent - zooms to the data extents of all visible layers.
Undo Zoom - returns to the previous zoom state.
Selection Arrow - activates the selection arrow (pointer).
Zoom In - enlarges (magnifies) the map view. There are two modes: drag box, and point
and click.
Zoom Out - increase area displayed in the map view. There are two modes: drag box,
and point and click.
Pan - select this button, place the hand in the map vi ew, and hold down left mouse but-
ton. Moving the hand with left mouse button depressed moves the contents of the map
view in a panning fashion.
Point Object - select this button and left click in the map view to place a point object in
the view. Highlight this object and right click with mouse to edit the object properties.
Hazard Object - select this button and left click in the map view to place a hazard object
in the view. In real time applications, the user is notified when approaching a hazard.
Highlight this object, and right click with the mouse, to edit the obje ct properties.
Polyline Object - select and draw a polyline in the map view. Double click the left mouse
button to stop drawing. This object has two modes: Mark and Stream. Highlight this
object, and right click with the mouse, to edit the object properties.
Polygon Object - select and draw a polygon object in the map view . Double click the left
mouse button to close and stop drawing the polygon. This Object has two modes: Mark
and Stream. Highlight this object, and right click with the mouse, to edit the object prop-
erties.
Table 4-2: Map Manager Tool Bar Button Descriptions
4-10 Chapter 4 - RMS Map Manager
The RMS Map Manager Tool Bar
Page 89
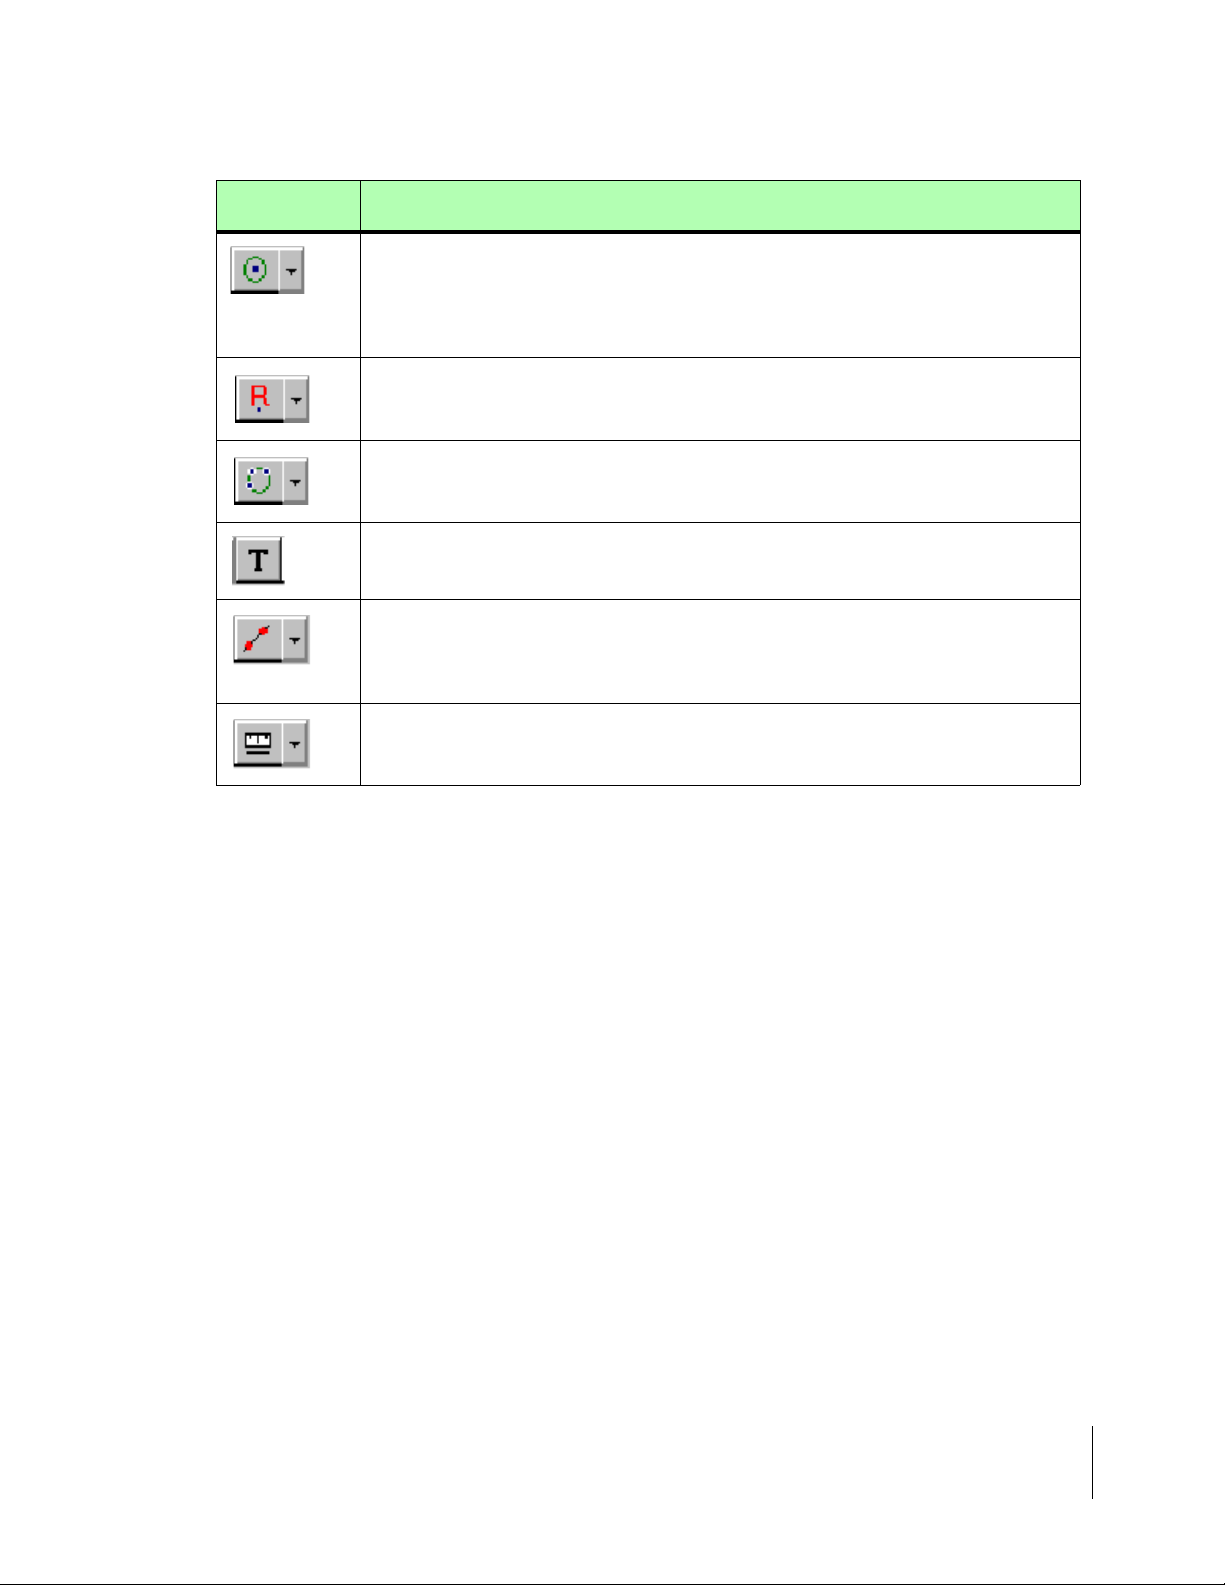
RMS Office
Software Version 3.10
Button Description
Circle Tool (Drag Option) - select this, to draw a circle by pressing and holding down the
left mouse button. Drag the mouse with left button depressed to create the desired
radius. Release the left mouse button to create circle object. Select and hold down the
left mouse button on the circle tool ,and two other circle drawing options (Radius and 3Point) appear in the drop down tool.
Circle Tool (Radius Option) - select, and click the left mouse button at center location of
desired circle in the map view. A small Radius dialog box appears. Enter the desired circle radius and click OK.
Circle Too l (3-Point Op tion) - select, and click left mouse button on three different locations that the circle perimeter is to intersect. When you select the third point, the circle is
drawn.
Text Tool - select this to add text to the maps. See The Text Tool on page 4-12.
Guideline Tool - select this to build a guideline file in Map Manager. A - B lines can be
constructed, either by clicking on the start and end points of the line with the mouse, or
by entering the coordinates of the start and end points. A (.GLN) file must be the top
layer.
Measuring Tool - select this to measure the distance between two points. There are two
modes: mark and stream. Mark mode returns the distance between end points (straight
lines only), and stream mode returns the length of line distance (curved lines).
Table 4-2: Map Manager Tool Bar Button Descriptions
Chapter 4 - RMS Map Manager 4-11
The RMS Map Manager Tool Bar
Page 90

RMS Office
Software Version 3.10
The Text Tool
The Text Tool allows you to add text to any RMS (.GMF) generated map. To add text,
select the Text Tool from the Tools menu bar. Left click the mouse, at the location in the
map, where you want to place the text. The Text Tool dialog appears (Figure 4-7). Type
the desired text into the Text Tool dialog window. The Text Tool dialog allows the editing of the text
object properties, such as change font, size, and color. When the desired text is entered, press the
apply button to view the text in the map view.
Figure 4-7: The Text Tool Dialog
4-12 Chapter 4 - RMS Map Manager
The RMS Map Manager Tool Bar
Page 91

RMS Office
Software Version 3.10
The File Menu
Almost all tool button functionality can be duplicated in the drop down menus. The File Menu
allows various file related actions, such as, edit, save, delete , print, convert, and exit Map Man-
ager, be performed (Table 4-3).
Figure 4-8: The File Menu
Menu Item File Menu Item Description
New
Open
Save
Save As
Save All
Convert
Print
Delete
Properties
Exit
New File (Layer) - Creates a new file (layer) and places it at the current (top) layer in the
map view. A prompt asks for the new file name.
Open Existing File (Layer) - An Open File dialog allows the selection of an existing file
(Layer), which appears as the top layer in the map view.
Save File (Layer) - Saves the current (top) layer in the map view.
Saves current (top) layer file with a different file name. A Save As dialog box prompts for
the new file name.
Save All - Saves all files (layers) displayed in the map view.
Starts the convert application which allows the conversion of RMS data files to ESRI
shape files, and vise-versa.
Prints the current map view, with all visible layers.
Deletes a highlighted file in the file tree.
Displays the file properties for a highlighted file in the file tree.
Exits the Map Manager Program
Table 4-3: Map Manager File Menu Item Descriptions
Chapter 4 - RMS Map Manager 4-13
The RMS Map Manager Tool Bar
Page 92

RMS Office
Software Version 3.10
The Layers Menu
The Layers Menu allows the manipulation a nd querying of information, associated with a map
layer in the map view window (Table 4-4).
Figure 4-9: The Layers Menu
Menu Item Layer Menu Item Description
Select Current
Properties
Remove Current
Remove All
On/Off
Allows the selection of the current (Top) layer. You can also accomplish this
from the Tool s menu bar (se e Table 4-2).
Activates the Layers Properties dialog box.
Removes the current layer. You can also accomplish this from the Tools menu
bar (see Tabl e 4-2).
Removes all layers from the map view.
Activates the Layers On/Off dialog box. You can also accomplish this from the
Tools menu bar (see Table 4-2).
Table 4-4: The Layer Menu Item Descriptions
4-14 Chapter 4 - RMS Map Manager
The RMS Map Manager Tool Bar
Page 93

RMS Office
Software Version 3.10
The View Menu
The View menu sets up the Map Manager window (Table 4-5).
Figure 4-10: The View Menu
Menu Item View Menu Item Description
Tool Bar
Status Bar
Split
Zoom to
Current
Zoom to
Extent
Zoom
Previous
Show Tags
Show Scale
Bar
Adds or removes the To ol bar in the Map Manager window.
Adds or removes the Status bar at the bottom of the Map Manager window, and displays
the current action, as well as the real world coordinate position of the pointer.
Activates the split screen function, allowing the resizing of the map view and file tree.
Zooms to the current layers data extents. You can also accomplish this from the Tools
menu bar (see Table 4-2).
Zooms to the data extents of all visible layers. You can also accomplish this from the
Tools menu bar (see Table 4-2).
Returns to the previous zoom state. You can also accomplish this from the Tools menu
bar (see Tabl e 4-2).
Displays a small yellow tag next to each object in the map view. The tag contains information about the object.
A map scale dialog appears in the map view (Figure 4-12).
Show Rates
Bar
Selecting this, when viewing a (.RCD) file, causes a rates scale dialog to appear in the
map view (Figure 4-12).
Table 4-5: The View Menu Item Descriptions
Chapter 4 - RMS Map Manager 4-15
The RMS Map Manager Tool Bar
Page 94

RMS Office
Software Version 3.10
Menu Item View Menu Item Description
Options
Show All
Files
Brings up the Options dialog, allowing you to change the system units and coordinate
system (see Figure 4-11).
Allows the file tree to display all file types. When de-selected, the file tree only shows
RMS file types.
Table 4-5: The View Menu Item Descriptions
Figure 4-11: The View Options Dialog
Figure 4-12: The Scale and Rates Bars
4-16 Chapter 4 - RMS Map Manager
The RMS Map Manager Tool Bar
Page 95

RMS Office
Software Version 3.10
The File Tree Menu
This drop down menu allows you to control which file types are viewed in the file tree (Table 4-7).
Figure 4-13: The File Tree Menu
Menu Item Edit Menu Item Descriptions
Filter On
Modify File Fil-
ter
The file tree displays only the files selected in the File Filter.
Allows the selection of the files viewed when the filter is On.
Table 4-6: File Tree Menu Item Descriptions
Chapter 4 - RMS Map Manager 4-17
The RMS Map Manager Tool Bar
Page 96

RMS Office
Software Version 3.10
The Edit Objects Menu
This drop down menu covers most graphical object editing functions such as cut, copy, and paste
(Table 4-7). You can al so access many of the edit menu items by selecting an object in the map
view and pressing the right mouse button.
Figure 4-14: The Edit Objects Menu
Menu Item Edit Menu Item Descriptions
Undo Delete Undeletes a previously deleted object.
Redo Undoes a redo.
Cut Cuts a highlighted object from the view.
Copy Makes a copy of a highlighted object. To place the copy in the view, use paste.
Paste Pastes a copy of an object that has previously been copied or cut.
Delete Deletes a highlighted object.
Edit Activates the Edit dialog box, which allows you to modify object attributes, such as
object names. Figure 4-15 shows an edit dialog box for a point object.
Properties Displays the Object Informati on dialog (see Figure 4-5).
Table 4-7: Edit Menu Item Descriptions
4-18 Chapter 4 - RMS Map Manager
The RMS Map Manager Tool Bar
Page 97

RMS Office
Software Version 3.10
Figure 4-15: The Edit Box for a Boundary Polygon Object
The Tools Menu
Currently the Tools menu has only one tool; Snap. The snap tool has two modes On or Off. When
set to On, the snap tool snaps any mouse click in the map view to the nearest object. A good use
of the snap tool is to find the distance between two points.
Figure 4-16: The Tools Menu
Chapter 4 - RMS Map Manager 4-19
The RMS Map Manager Tool Bar
Page 98

RMS Office
Software Version 3.10
Printing Maps in Map Manager
Version 3.10 of RMS Map Manager brings improved printing capabilities. Pressing the print button
in the button bar, or selecting print from the file menu, b rings up the Print Sett ings d ialog (Figure 4-
17). You can control the look and layout of the printed map from this dialog. So me of the Print Setting features are listed in Table 4-8
Setting Description
Portrait
Landscape
Show Preview
Legend Text
Logo
Scale Bar
Rate Bar
Target Bar
Displays the map in portrait mode.
Displays the map in landscape mode.
Displays a preview of the printed map in the Map Manager Map View. This is
recommended.
Add a Map title and additional text to the printed map. To add text, start typing
in the Legend text window.
Include a company logo in the printed map. To add a logo, press the browse
button and select the logo image file.
Include a distance scale bar in the printed map.
Include a Rates legend in the printed map. The map view must contain an
(.RCD) file.
Include a distance Application Target Rate legend in the printed map. The map
view must contain an (.ARM) file.
Table 4-8: Print Setting Descriptions
4-20 Chapter 4 - RMS Map Manager
Printing Maps in Map Manager
Page 99

RMS Office
Software Version 3.10
Figure 4-17: The Print Settings Dialog
Chapter 4 - RMS Map Manager 4-21
Printing Maps in Map Manager
Page 100

RMS Office
Software Version 3.10
Shape File Conversion
Map Manager contains a file option named Convert, which provides a means of transferring data
between RMS data files and ESRI Shape files. Convert was designed to be both flexible and simple. It allows beginning users to perform conversions in several simple steps, while offering
advanced users full control over the data transfer process. The following example illustrates the
steps required to convert a file. A later example shows how Convert can be used to perform custom data transfers.
The conversion process is broken into two processes: export ing RM S data files to shape files and
importing shape files to RMS data files.
Shape files must be in NAD83 or WGS84 Lat/Long coordinates. No other projections or datums
are supported. ESRI shape files consist of (.shp), (.shx), and (.dbf) files, all sharing the same file
name.
New Changes to the Shape file Conversion Process
• Batch file and Folder processing.
• Create custom templates.
• Automatically generate an Import template when performing an Export.
• Automatically generate an Export template when performing an Import.
• Select chemical names as an exportable polyline record field. You must create a template to
suite the particular needs of the conversion. Use t hese templates when exportin g all files into a
single file.
• Improved error messages
• Select chemical names as a Handgun polyline field.
• Export a new TYPENAME field from all objects. The field names the type of RMS object
exported. For example, when exporting a point to shape, the TYPENAME field contains Point.
This new field is useful when merging Points, Arcs, and Polygons or performing “All Files into
1 file” conversions. The default templates shipped with the product include this field.
• Spray Swaths (Recor d polylines) includes new UNITS field . This is a string describing the units
that the ACTUAL and TARGET rate fields are measured in. The default templates shipped
with the product include this field.
• Export Weather points and Handgun polylines.
4-22 Chapter 4 - RMS Map Manager
Shape File Conversion
 Loading...