

Page 1
Instruction Sheet
PROPER USE GUIDELINES
Cumulative Trauma Disorders can result from the prolonged use of manually powered hand tools. Hand tools are intended for occasional use
and low volume applications. A wide selection of powered application equipment for extended-use, production operations is available.
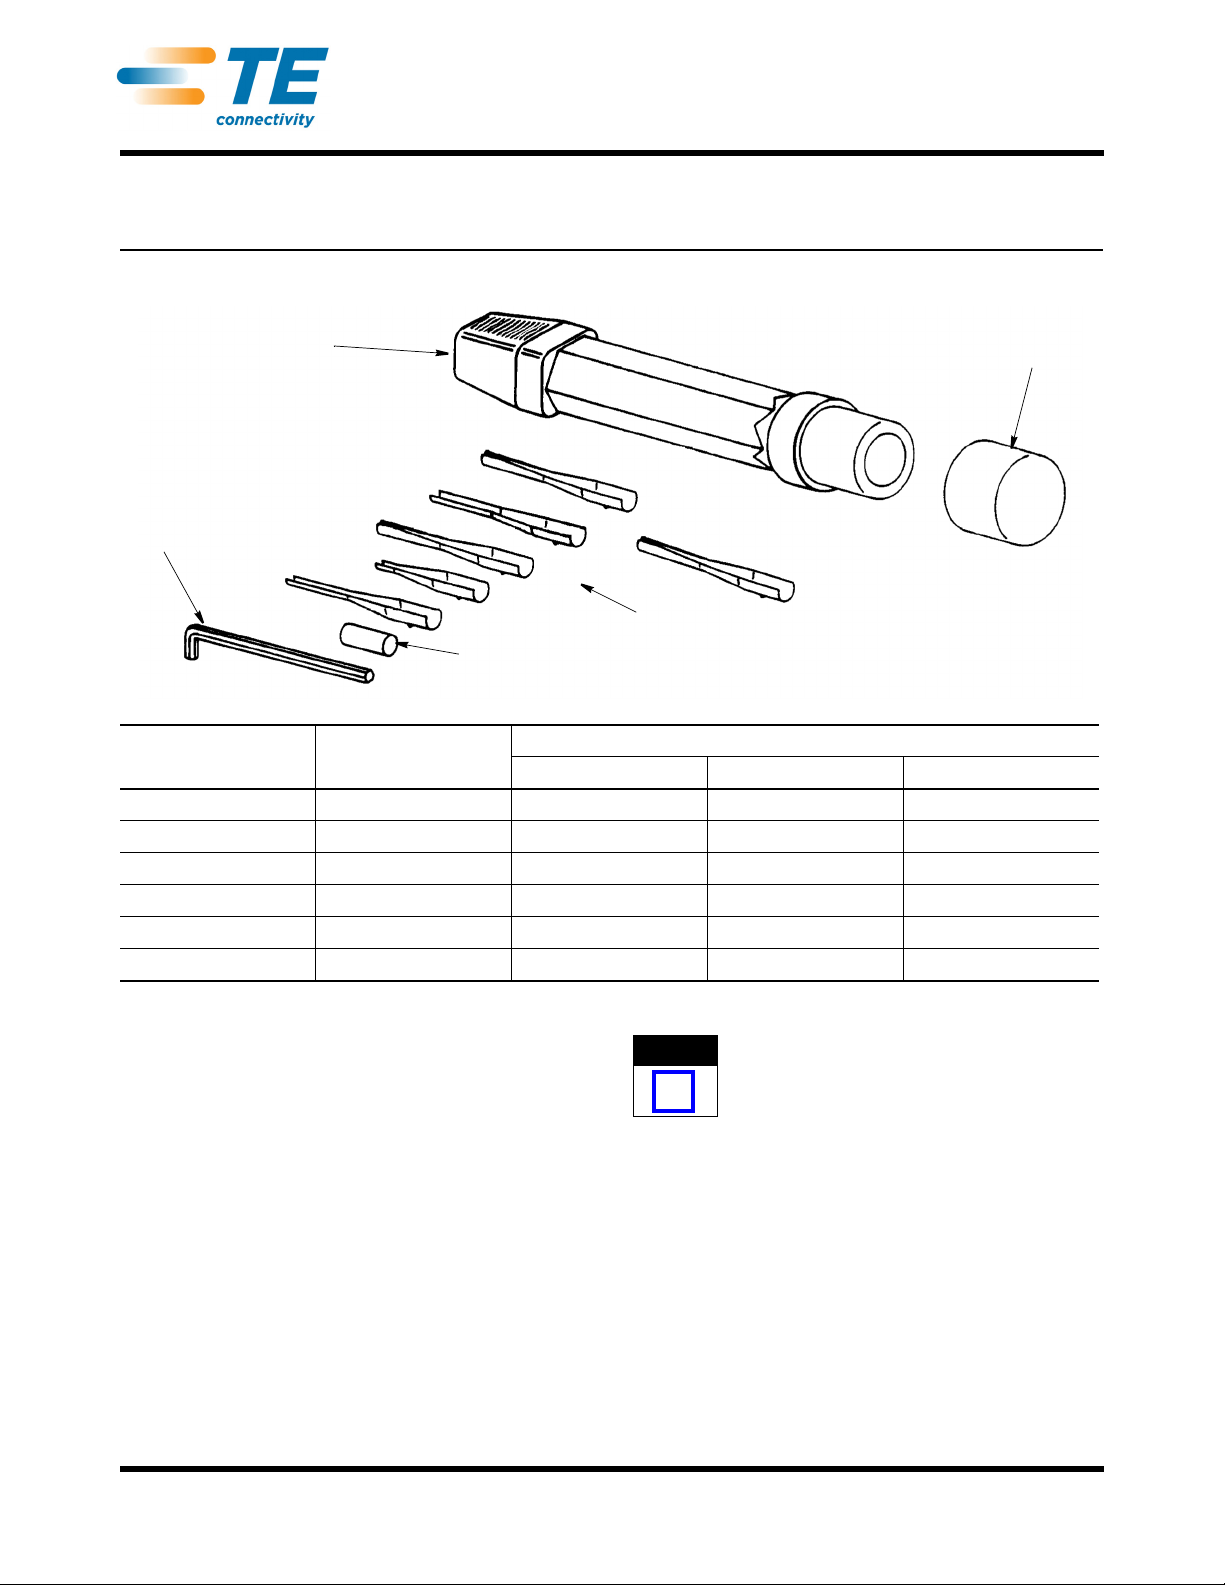
[.050 In.] Hex
Wrench
Insertion/Extraction
Handle
Plug
Insertion/Extraction Tips
Cap
NOTE
i
Insertion/Extraction Tool 91285-1
and Replacement Tip Kits 543382-[ ]
408-9404
19 JUN 12 Rev C
CONTACT SIZE WIRE SIZE (AWG)
HD-20 28-20 Yellow Insertion 543382-5
HD-20 24-18 Red Extraction 1-543382-0
HD-20 28-24 Brown Extraction 1-543382-1
HD-20 Posted Blue Extraction 543382-6
HD-20 Posted Black Insertion 543382-7
HD-20 28-22 Green Insertion/Extraction 543382-8
COLOR CODE TYPE PART NUMBER
Figure 1
1. INTRODUCTION
This instruction sheet covers the use of Insertion/ Extraction Tool 91285-1 and Replacement Tip Kits 543382 shown in Figure 1. The tool is designed to insert and extract HD-22 and HD-20 contacts used in AMPLIMITE* High Density (HD) Connectors.
For information concerning the assembly of AMPLIMITE HD connectors, refer to the instruction sheet packaged with the connector.
Read these instructions thoroughly before using the tool.
See Section 6, REVISION SUMMARY, for revision information.
INSERTION/EXTRACTION TIPS
All dimensions on this document are in metric units
[with U.S. customary units in brackets]. Figures and
illustrations are for reference only and are not
drawn to scale.
2. DESCRIPTION (Figure 1)
The insertion/extraction tool consists of a handle, a
cap, six insertion/extraction tips, a plug, and a
[.050 in.] hex wrench. The handle of the tool provides
storage for the tips, plug, and hex wrench. The
insertion/extraction tips convert the tool for the
appropriate product and are used to insert or extract
connector contacts. Each tip is color coded according
to specific type and wire size. The plug is inserted into
the widest end of the tip to prevent damage to the tip
when it is secured in the tool handle. The hex wrench
is used to tighten the setscrew which secures the tip in
the tool handle.
©2011 Tyco Electronics Corporation, a TE Connectivity Ltd. Company
All Rights Reserved
TE logo is a trademark.
*Trademark. Other products, logos, and company names might be trademarks of their respective owners.
TOOLING ASSISTANCE CENTER
PRODUCT INFORMATION
1-800-522-6752
1-800-722-1111
This controlled document is subject to change.
For latest revision and Regional Customer Service,
visit our website at www.te.com
1 of 6
LOC B
Page 2
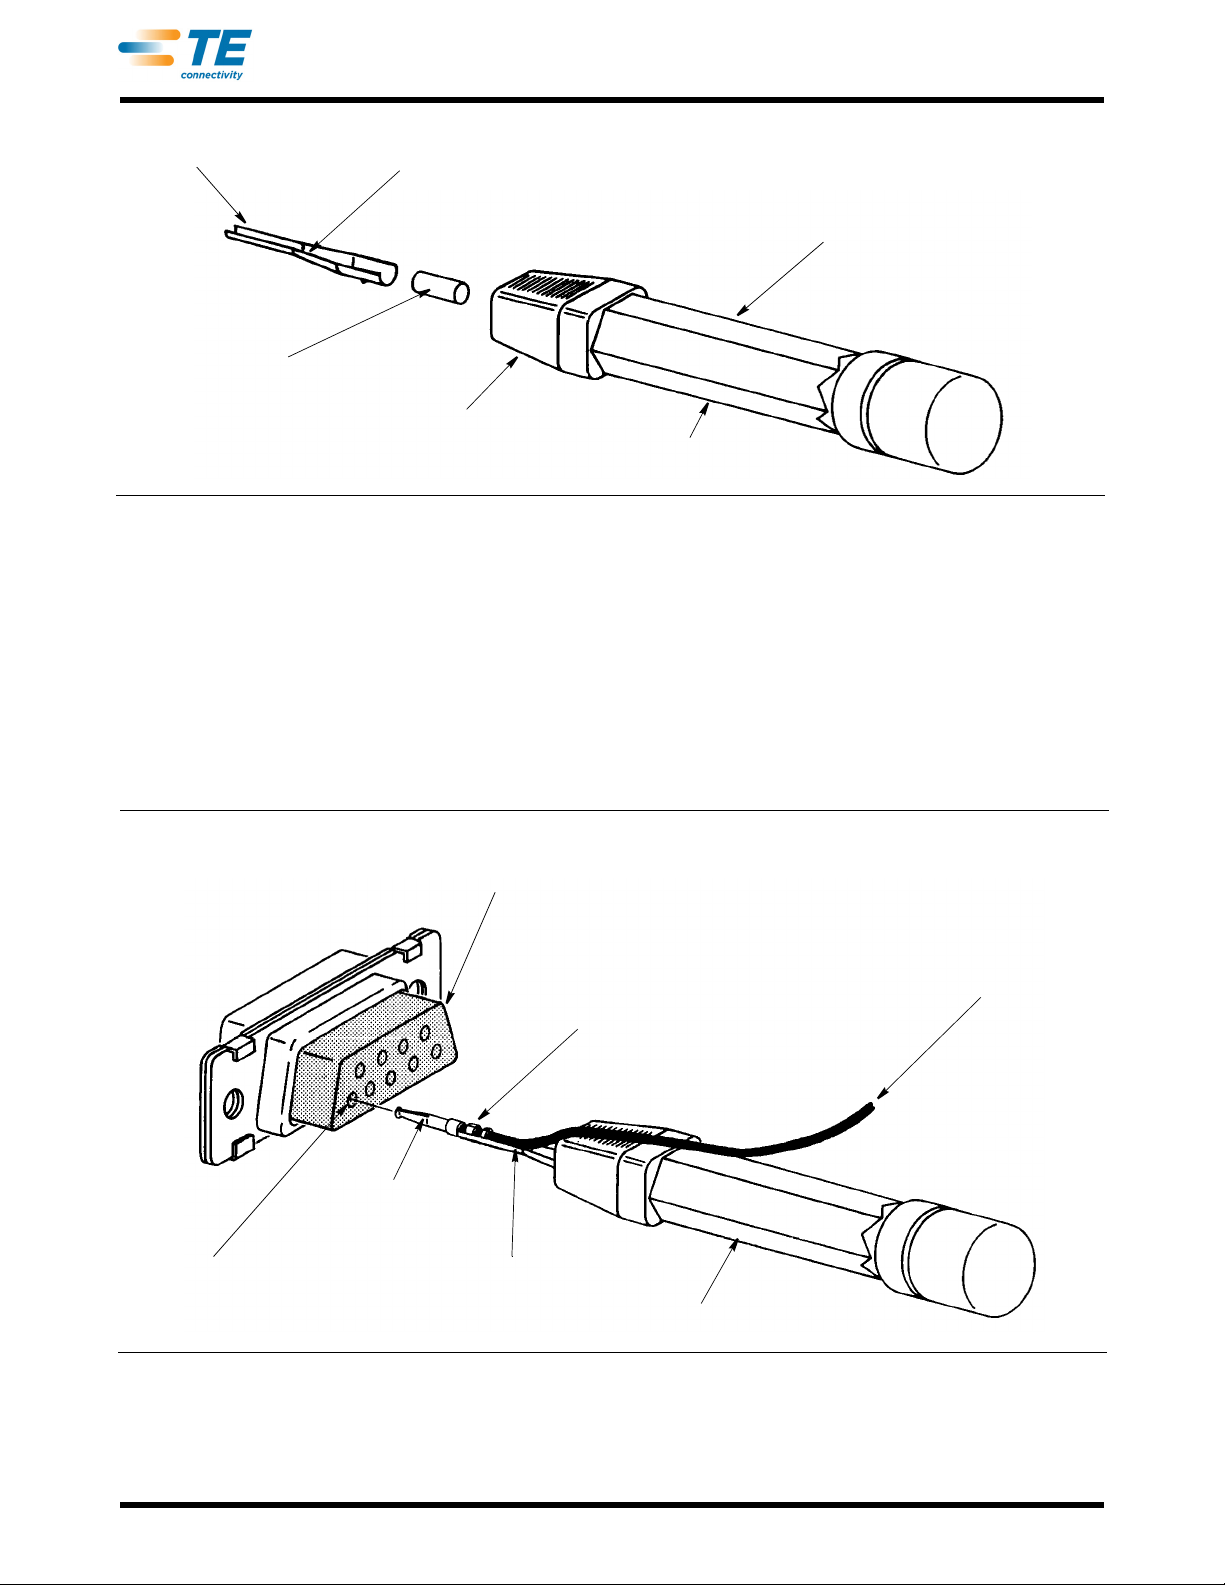
Figure 2
Insertion/Extraction Tip
Wire Slot
(Ref)
Plug
Setscrew (Ref)
Bottom of Tool
(Ref)
Insertion/Extraction
Handle
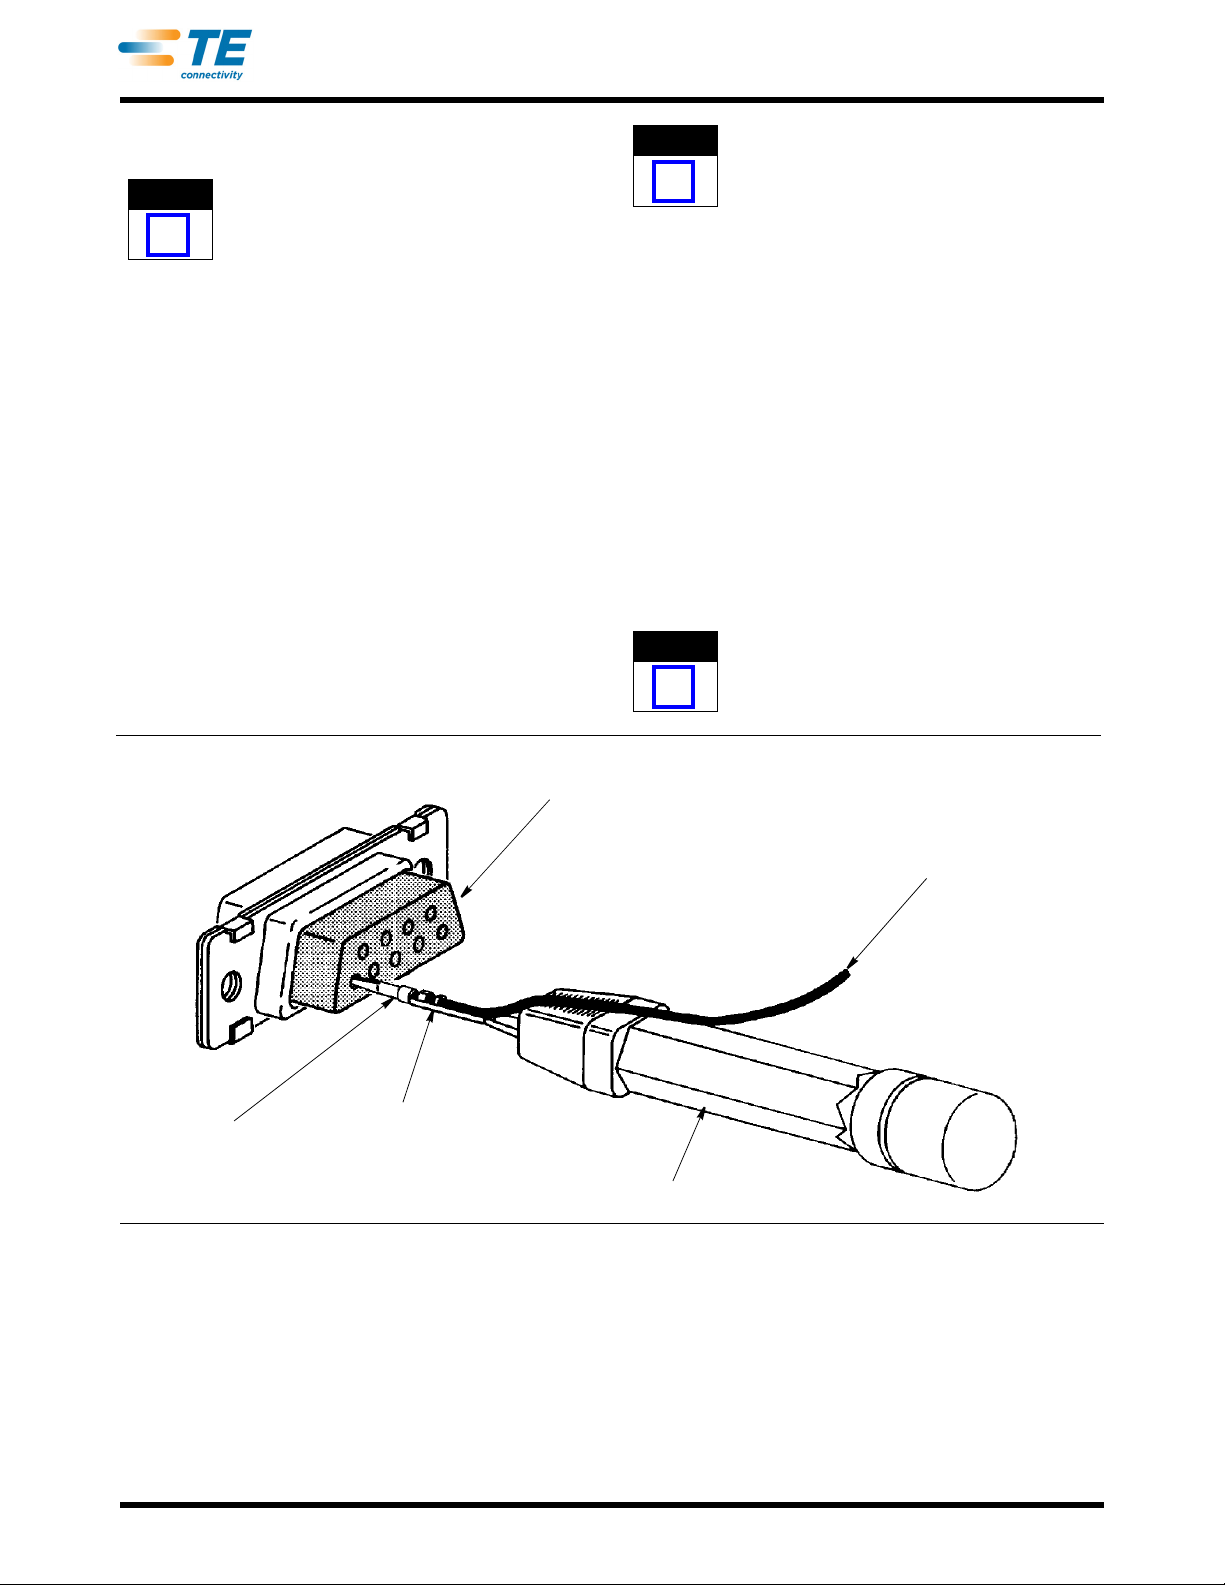
Contact Cavity
Insertion Tip
Wire Slot
Insertion Handle
Wire
Butt Tool Tip Against
Contact Shoulder
Back of Receptacle
Connector 205439-1
408-9404
3. TOOL ASSEMBLY (Figure 2)
Refer to Figure 1 and select the appropriate contact, wire size, and insertion/extraction tip. Proceed as follows:
1. Insert plug into the widest end of the insertion/ extraction tip.
2. Slide the insertion/extraction tip into the end of the tool handle with the orientation latch positioned toward the bottom of the tool.
3. Using the hex wrench, tighten the setscrew to secure the tip in the tool handle.
4. INSERTION/EXTRACTION PROCEDURES
4.1. Inserting A Wire Crimped Contact
1. Position tool handle between thumb and fingertips, then place wire over the wire slot of the tip. Hold wire in this position with your thumb.
(Figure 3)
Rev C
Figure 3
2 of 6
Page 3
408-9404
NOTE
i
NOTE
i
NOTE
i
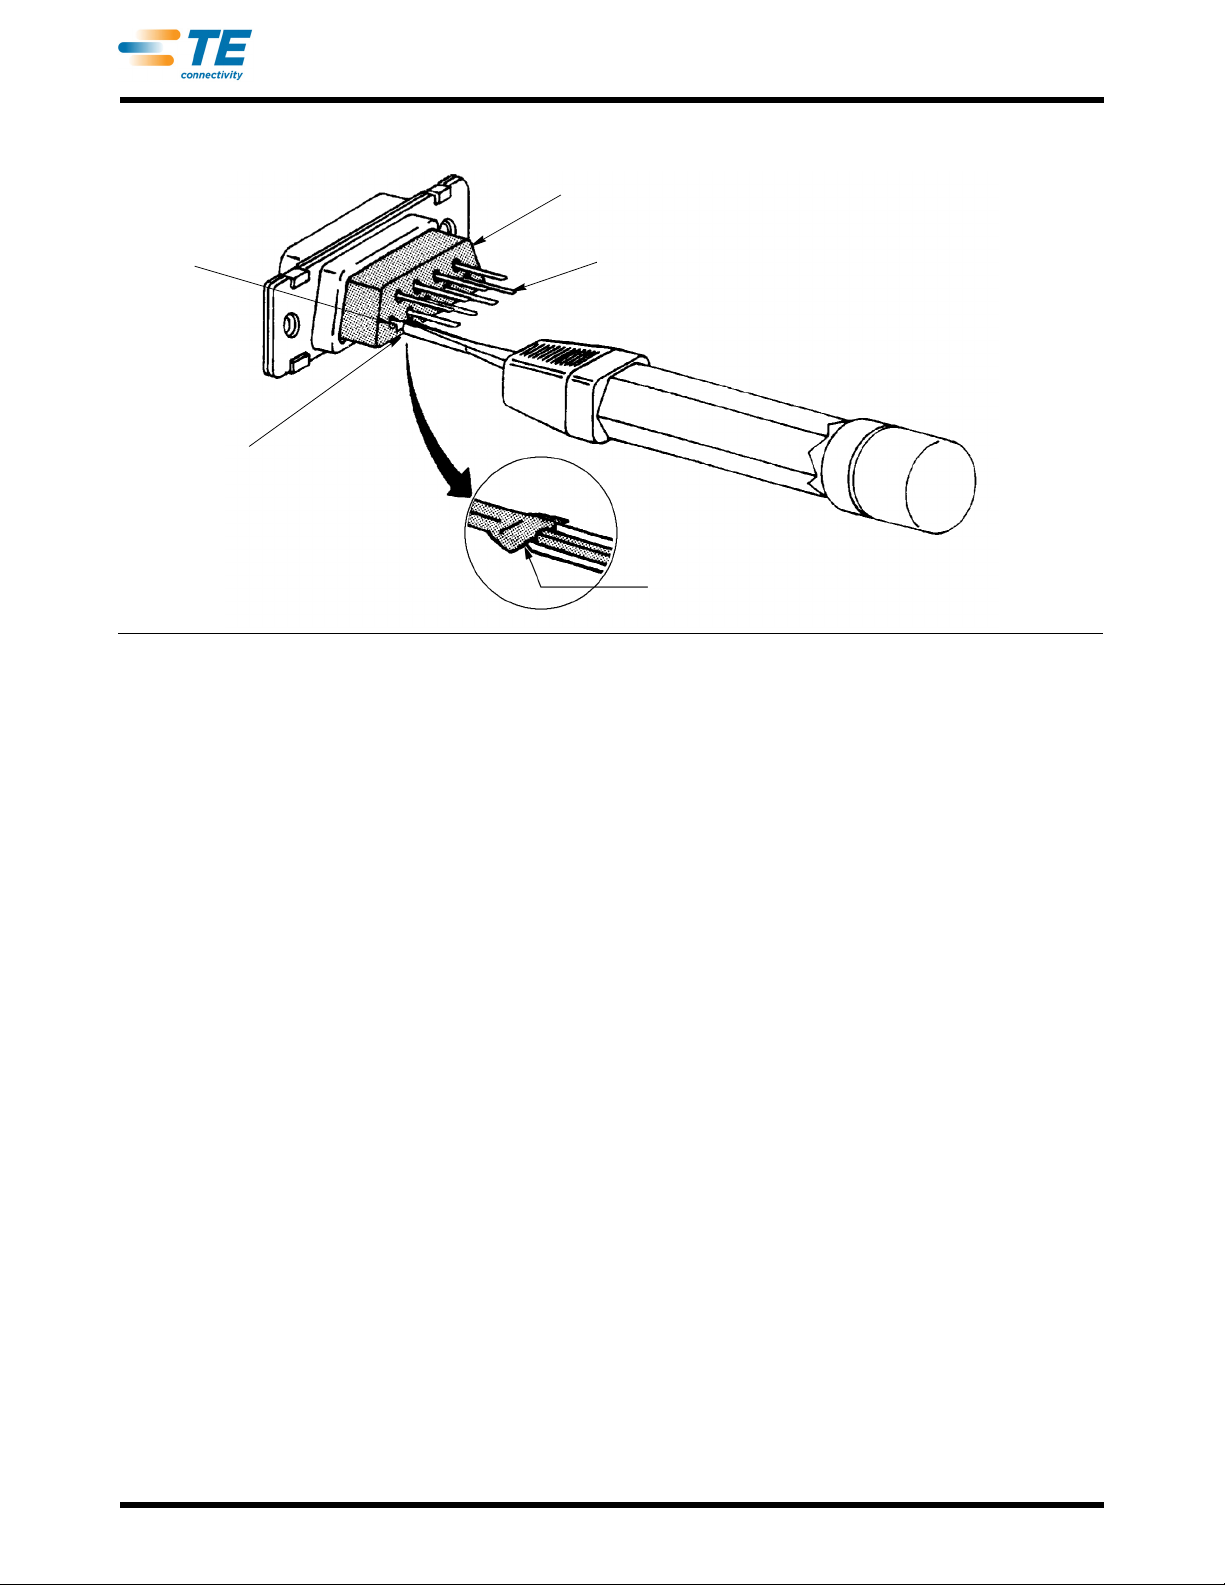
Back of Receptacle
Connector 205439-1 (Ref)
Wire
Slot
Slide Extraction Tip Over
Contact Post or Crimp
Barrel
Extraction Handle
Wire
2. Slide thumb over the wire toward the end of the tip.
The wire must be positioned inside the wire slot of
the tip.
3. Slide tip over contact wire barrel until the tip butts against the contact shoulder.
4. Align contact with the BACK of the contact cavity. Push contact straight into the contact cavity until the contact bottoms.
5. Remove the insertion tool; then pull back on the wire to ensure that the contact is locked into the contact cavity.
4.2. Extracting A Wire Crimped Contact (Figure 4)
1. Position tool handle between thumb and fingertips, and align contact wire with the wire slot on the tip. Hold wire in this position with your thumb.
2. Slide your thumb over the wire toward the end of the insertion tip.
The wire must be positioned inside the wire slot of
the tip.
3. Place tip over the contact post or crimp barrel and slide the tip straight into the contact cavity until the tip bottoms against the contact shoulder.
4. Holding the wire tight against the tool handle, pull back on the tool handle to extract the contact. If you experience difficulty in extracting the contact, repeat Steps 1 through 4.
4.3. Inserting A Posted Contact (Figure 5)
1. Place the contact in the contact cavity. Do NOT push on the contact post.
2. Position the tip over the contact post. Move the tool along the post until the tip butts against the contact stabilizer. Align the tip on the stabilizer as shown in Figure 5.
3. Hold the tool handle, and push the contact post to make certain that the contact is locked in the cavity.
Contacts with tail lengths longer than 10.85 mm
[.427 in.] must use yellow color coded insertion tips
Rev C
Figure 4
3 of 6
Page 4
408-9404
CUSTOMER SERVICE (038-035)
TYCO ELECTRONICS CORPORATION
PO BOX 3608
HARRISBURG PA 17105-3608
Back of Connector (Ref)
Contact Post
Contact
Cavity
Insertion Tip
Butt Tool Tip
Against Contact
Stabilizer
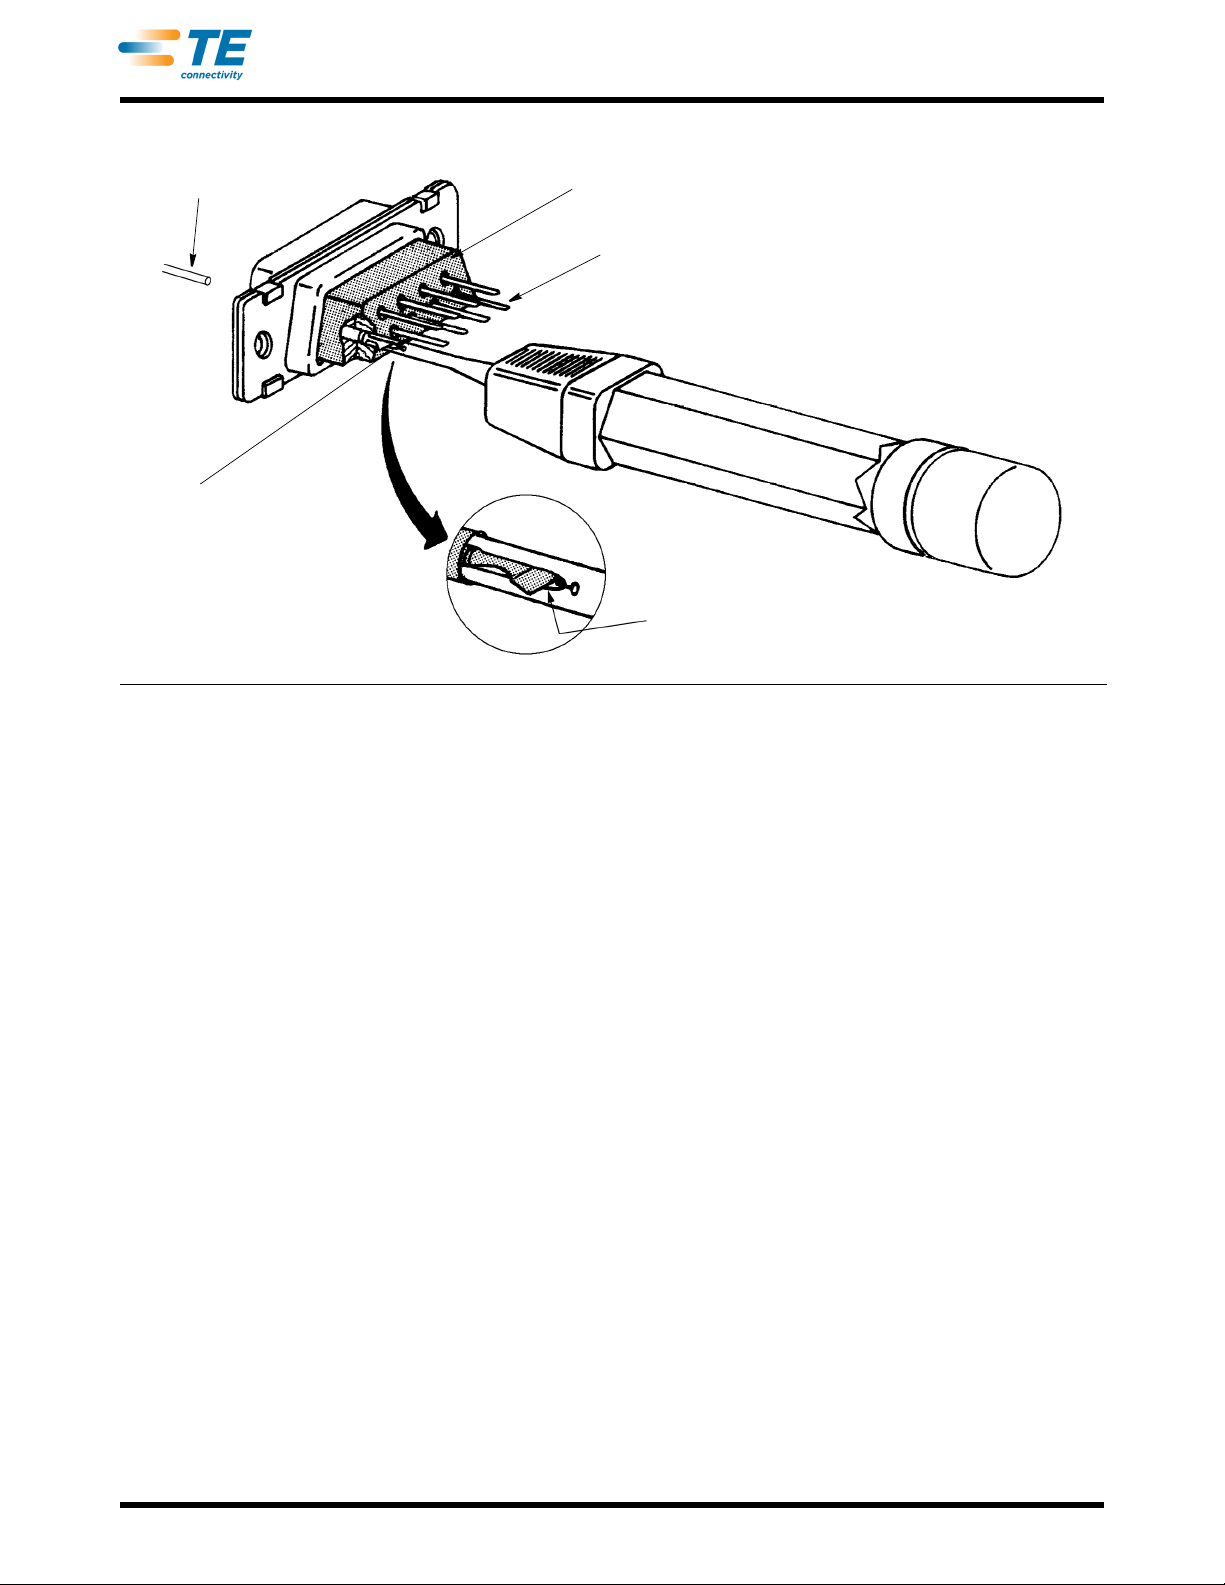
4.4. Extracting A Posted Contact (Figure 6)
1. Place the extraction tip over the contact post. Move the tool along the post until the tip enters the contact cavity.
2. Align the groove of the extraction tip with the contact stabilizer as shown in Figure 6.
3. Push the tip past the stabilizer and straight into the cavity until it bottoms.
4. For a receptacle style connector, insert a 1.02 mm [.040 in.] diameter pin straight into the FRONT of the contact cavity. For a plug style connector, push on mating tip of contact with a suitable device.
5. Apply pressure to remove the contact and tool from the contact cavity.
Figure 5
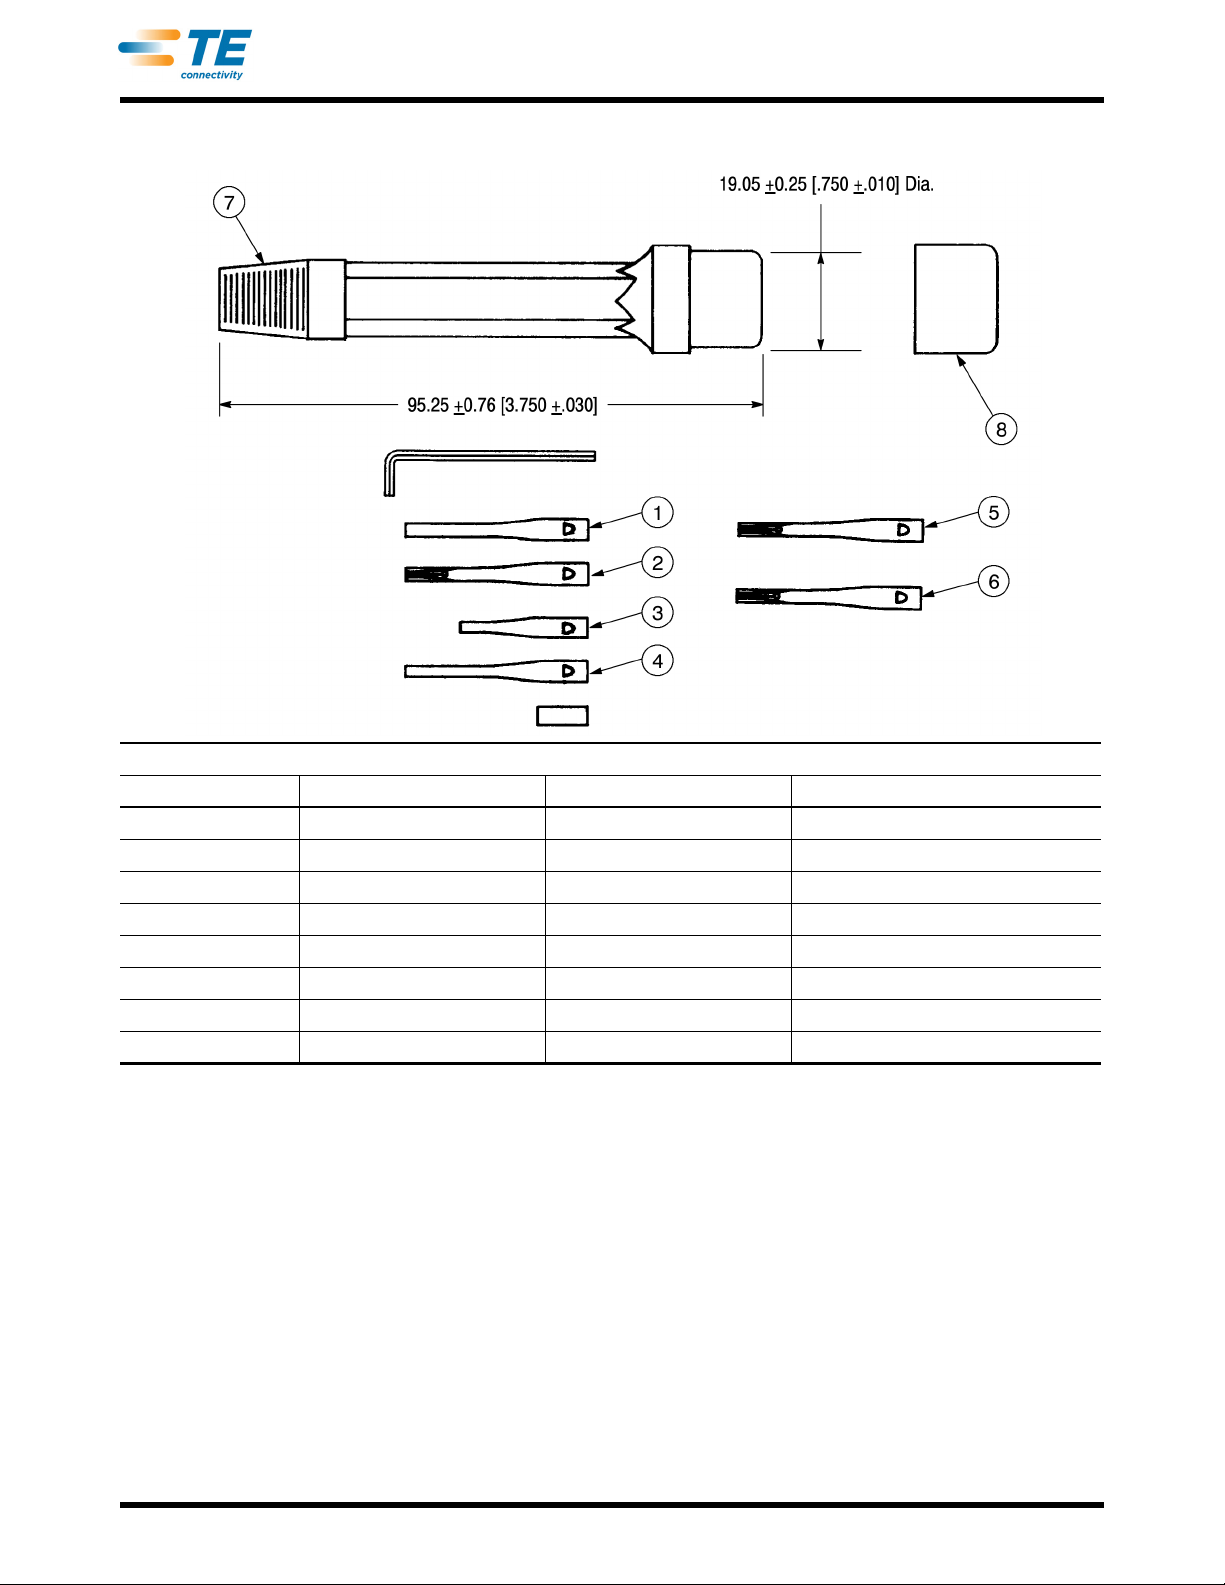
5. TOOL INSPECTION/REPLACEMENT (Figure 7)
Insertion/Extraction Tool is inspected before shipment.
Tyco Electronics recommends that the tool be
inspected immediately upon its arrival to ensure that
the tool has not been damaged during shipment, and
that the tool conforms to the dimensions provided in
Figure 7.Customer-replaceable parts are provided in
Figure 7. If the tool becomes broken or damaged,
replacement and/or spare parts can be purchased by
contacting:
For tool repair service, please contact an Tyco Electronics Representative at 1-800-526-5136.
6. REVISION SUMMARY
Since the previous release, the TE Connectivity logo has been applied.
Rev C
4 of 6
Page 5
408-9404
1.02 [.040] Pin Dia.
Back of Connector
Contact Post
Extraction Tip
Groove of Extraction Tip Aligned
with Contact Stabilizer
Figure 6
Rev C
5 of 6
Page 6
408-9404
REPLACEMENT PARTS†
ITEM COLOR CODE PART NUMBER DESCRIPTION
1 Yellow 543382-5 TIP, Insertion
2 Blue 543382-6 TIP, Extraction
3 Black 543382-7 TIP, Insertion
4 Green 543382-8 TIP, Insertion/Extraction
5 Red 1-543382-0 TIP, Extraction
6 Brown 1-543382-1 TIP, Extraction
7 ----- 2-21006-0 SCREW, Set No. 4-40 X .180 Lg.
8 ----- 2-26538-5 CAP
† Available in packs of 25 only (one plug included in each packet).
Figure 7
Rev C
6 of 6
 Loading...