

Page 1

INSTALLATION MANUAL
VideoCrypt
Receiver
vc xs-1
CONTROL LAYOUT
SEl-l-ING
GENERAL USE
CHANGING
INDEX
.................................................................................................................
........................................................................................................
UP
.................................................................................................
FACTORY-SEllINGS
CONTENTS
.............................................................................................
.ll
...................................................................
2
4
.14
19
Page 2
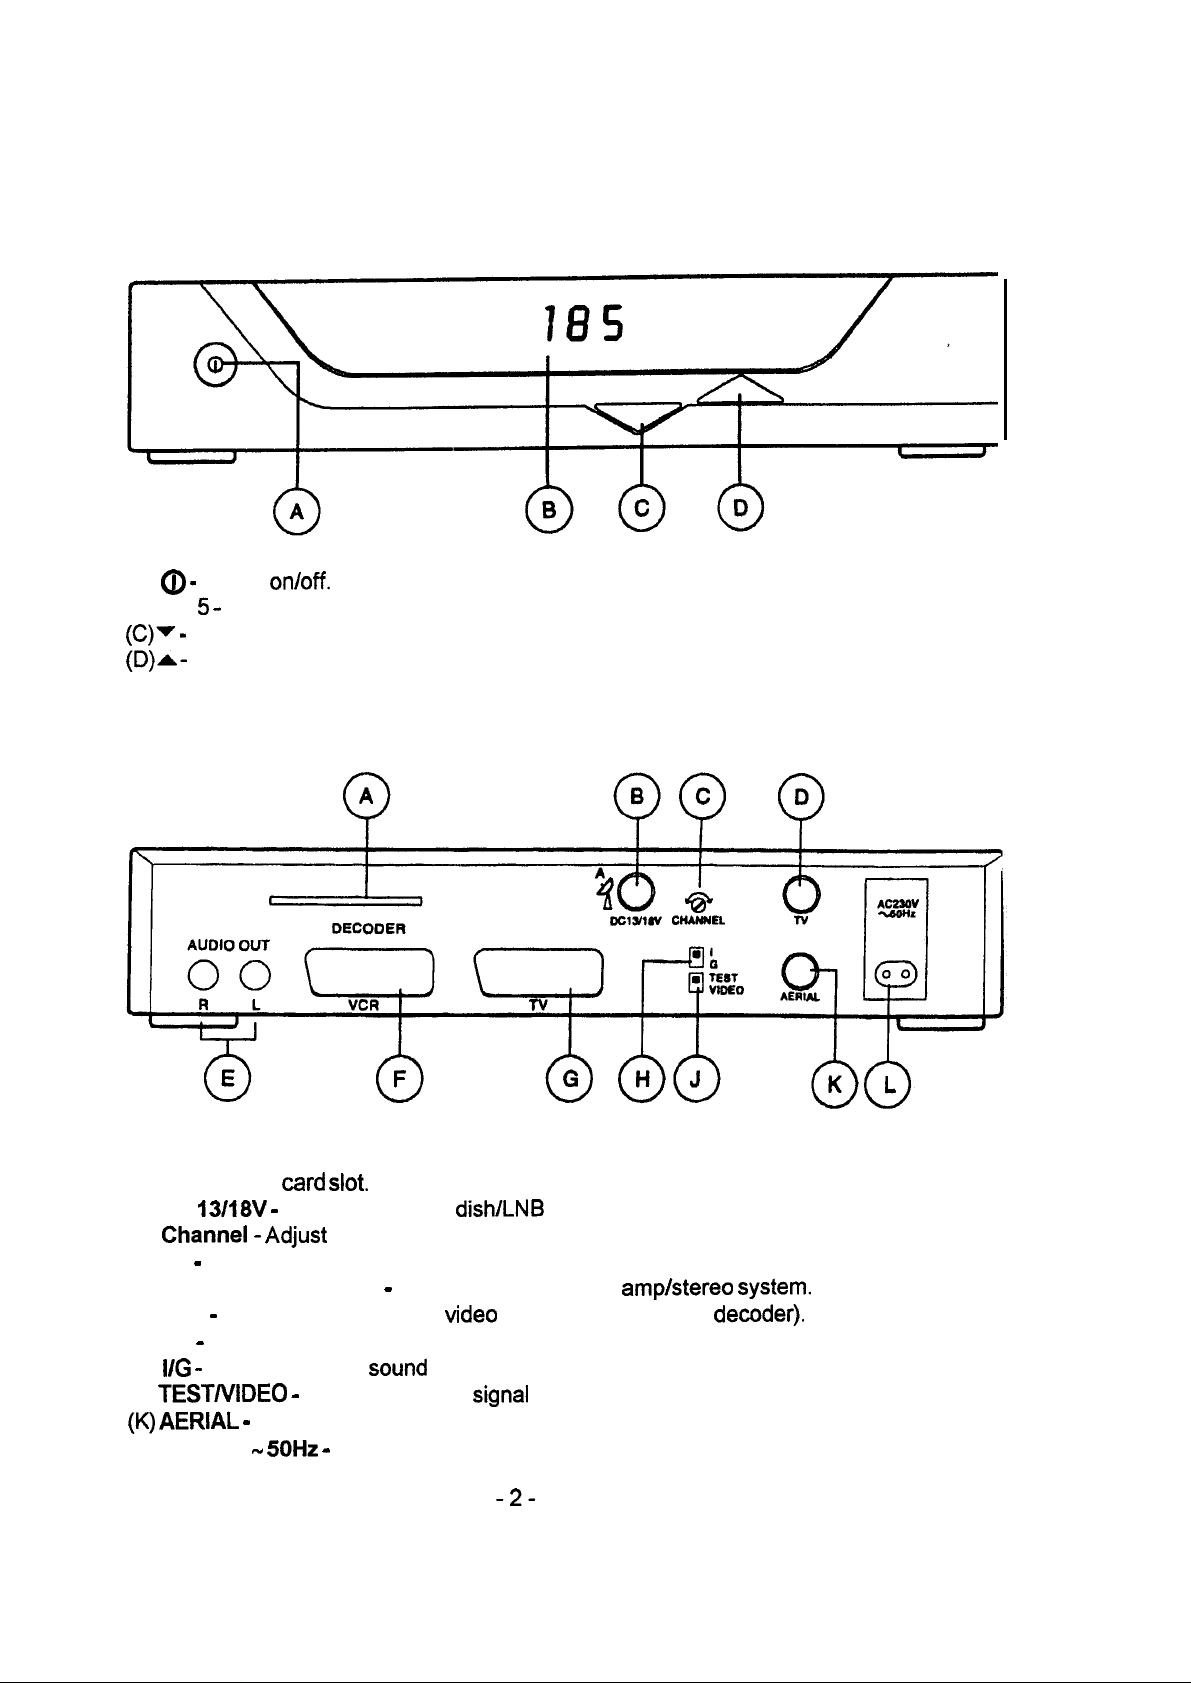
CONTROL LAYOUT
FRONT PANEL
(A) @ - Power
(B) 1 8
(C)v (D)A-
5 -
Display.
Programme down.
Programme up.
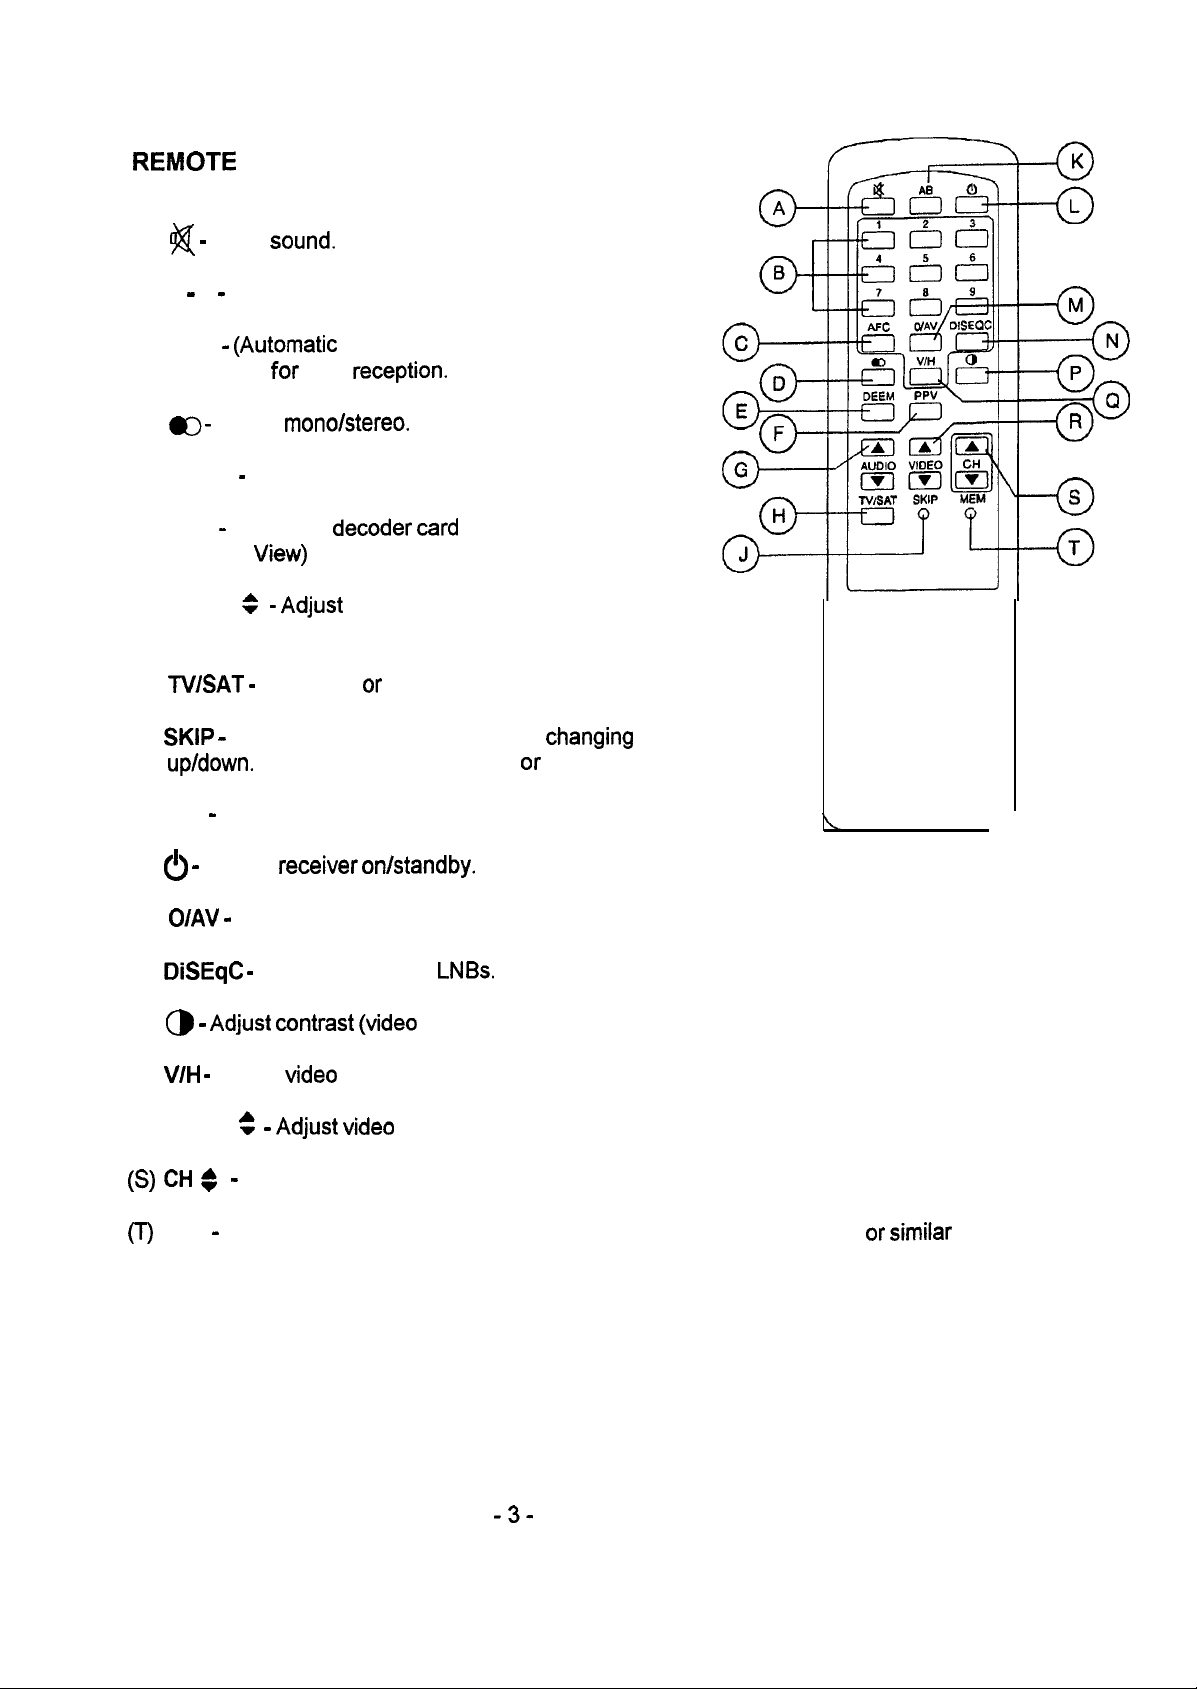
BACK PANEL
on/off.
(A) DECODER
(B) DC 13/18V - Connection from
(C)
Channel- Adjust
(D) TV - UHF connection to TV (or video recorder).
(E) AUDI0 OUT (R and L) - Connections to audio
(F) VCR - SCART connection to
(G) TV - SCART connection to TV.
(H)
l/G -
Selects PAL TV
(J)
TESTIVIDEO (K) AERIAL -
(L) AC 230V w
card slot.
dish/LNB
RF output channel.
Video
recorder (or extemal
Sound
Standard.
Switches on test
Connection from UHF aerial.
5OHz -
Connection to mains supply.
Signal
or selects normal output.
-2-
(Low Noise Block).
ampktereo System.
decoder).
Page 3
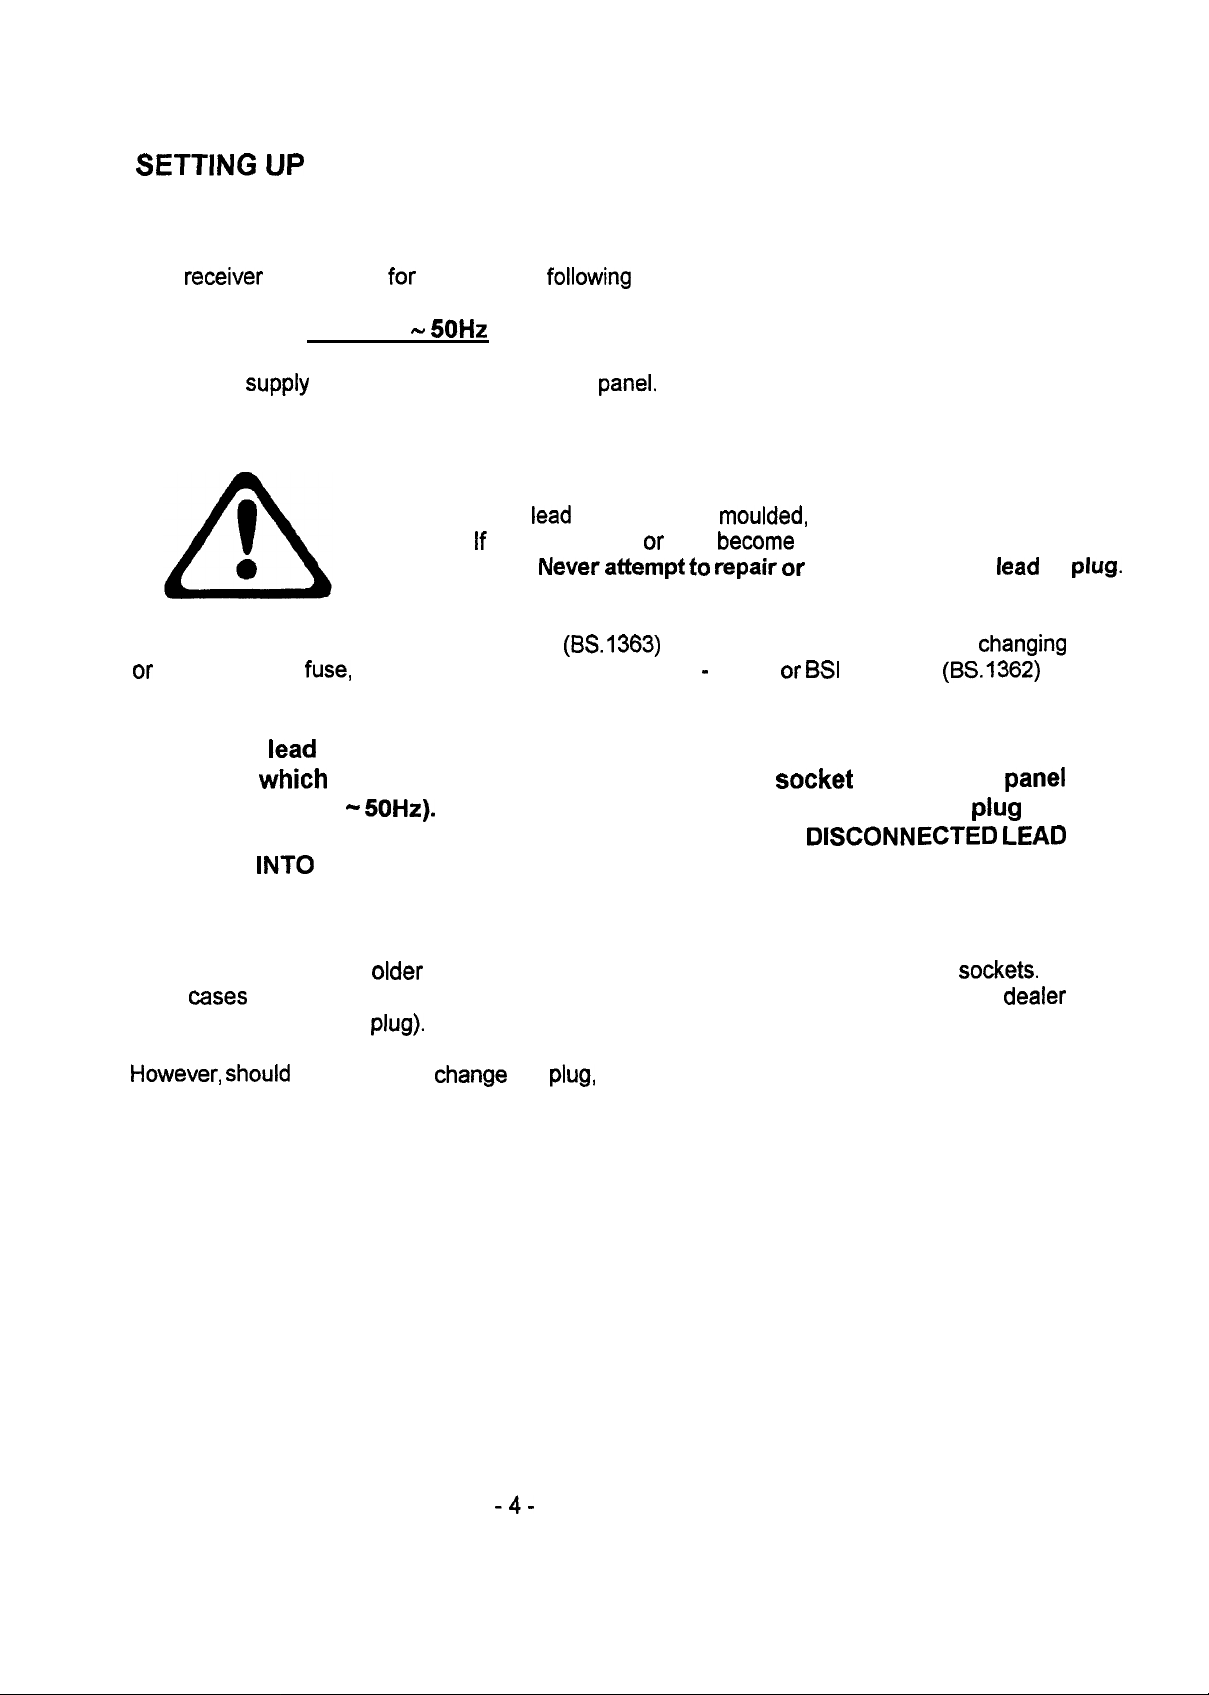
REMOTE
(A)
#$
(B) 0 - 9 - Select Programme number.
CONTROL
-
Mute
Sound.
(C) AFC -
Fine-tune
(D) m- Select
(E) DEEM - Select audio deemphasis.
(F) PPV - Authorise
(Pay Per
(G) AUDI0
subcarrier frequency.
(H)
TWSAT -
(J)
SKIP -
up/down.
(K) A B - Select language on bilingual Soundtrack.
(L) 6 - Switch
(M)
O/AV -
(Automatic
for
View)
- Adjust
+
Select TV or satellite (SCART TV only).
Skip Programme number when
(Operate by ball-point pen or similar Object.)
Select VCR SCART input.
Frequency Control)
best
reception.
mono/stereo,
decoder card
Programme.
audio
receiver on/standby.
debit on PPV
changing
channel
(N)
DiSEqC -
(P) @ -
(Q)
(R) VIDEO
W
(T)
Adjust contrast (Video
V/H -
Select
ai
:
MEM
-
Store Programme settings in memory. (Operate by ball-point pen or
Switch up to four
Video
Polarisation.
:
-
Adjust Video
-
Change Programme channel.
LNBs.
bandwidth).
frequency.
-3-
simiiar
Object.)
Page 4
SETTING
UP
SAFETY INFORMATION
This
receiver
is designed for use with the
following
mains supply:
The mains
suppiy
AC 230V -
rating is printed on the back
5OHz
Panel.
DO not use any other type of mains supply.
The mains
plug. lf the mains lead or plug
a new one. Never
The mains plug is a Standard 13 amp type
or
examining the
fuse,
make sure the correct 3 amp type - ASTA or
lead
is fitted with a
atkmpt
(BS.1363)
moulded,
become
to
repair or
nonrewireable mains
damaged, replace it by
modify the mains
fitted with a 3 amp fuse. When
BSI
approved
(BS.1362)
changing
fitted.
The mains
connector which is to be plugged info the mains input
(marked AC 230V -
lead
supplied with this apparatus is terminated at one end with a
5OHz).
socket
Plug the lead into the receiver BEFORE you
on the back
piug
other end into the mains supply. NEVER LEAVE A DISCONNECTED
PLUGGED INTO THE MAINS SUPPLY.
lead
or
is
Panel
the
LEAD
plug.
The 13 amp plug is the most widely used in the UK and should be suitable for most users.
Some locations (mainly
such
cases
it is recommended that a suitable plug adaptor be purchased from your
(rather than remove the
However, should
you decide to
older
buildings) may not be equipped with normal 13 amp
plug).
Change
the
piug,
please follow the instructions below:
sockets.
dealer
In
-4-
Page 5
IMPORTANT
The
wires
in the mains
lead
are coloured in accordance with the
:
Blue
Neutral
Brown : Live
foliowing Code:
As the colours of the
coloured markings identifying the terminals in your
The
wire which is coloured BLUE must be connected to the terminal which is marked with
letter N or coloured
The
wire which is coloured BROWN must be connected to the terminal which is marked
the
letter L or coloured red.
4 5 amp fuse must be fitted either in the plug or
30
NOT MAKE ANY
3R
BY THE SYMBOL+ OR COLOURED GREEN
wires
in the mains lead of this apparatus may not correspond with
black.
CONNECTION
plug,
proceed as follows:
adaptor,
or at the
distribution
TO THE LARGER PIN MARKED
OR
GREEN-AND-YELLOW.
board.
WITH
THE
DO not attempt to remove any screws or gain access inside receiver. No
user-serviceable Parts
the back
Panel:
RISK
inside. For your safety, always obey the waming on
CAUTION!
OF
ELECTRIC
SHOCK
DO NOT OPEN!
Remove the mains plug from the supply
socket during
electrical
storms,
or when you are
using the receiver for a few days or more.
LEl-rER
th6
thc
Witt
E
not
Ensure adequate Ventilation for receiver. DO not block the air flow through the receiver.
During
that the Ventilation
DO not
Operation
subject
the receiver to excessively
don’t place
Slots
the receiver on a soft surface (such as a carpet). Make sure
in the cabinet are not covered.
bot, cold, damp,
or dusty conditions.
REMOTE CONTROL
DO
not
lose
the
remote
control handset -
most receiver
functions cannot
be used
without it.
l
Unwrap
l Remove exhausted batteries as soon as possible. Replace with leakproof batteries (type
l
new batteries and fit them in accordance with the diagram inside
compartment.
number:
Remove batteries if not using
(To
open compartment
AAA,
UM-4 or equivalent).
handset
door, place
thumb in Cut-out, then
for a few weeks or more.
battery
squeeze
and lift.)
-5-
Page 6

CONNECTING
TO YOUR TV
lf you wish to connect a
SATELLITE
Video recorder
EIWL (AMENNA) SOCKET
as
weil,
skip to next
section
instead.
t
l Connect
l Connect your normal
l Connect receiver’s
outer
J
feeder cable (from your dish)
nut by
band -
TV
DISH I LNB
do not use a
(terrestrial)
socket to your
TV
%
to receiver’s IX
spanner
or
aerial
to receiver’s
television’s
pliers.
TERRESTRIAL AERIAL
13/18V
AERIAL
AERIAL (ANTENNA) socket
socket. Tighten the
socket.
cable’s
Ir.
-6-
Page 7
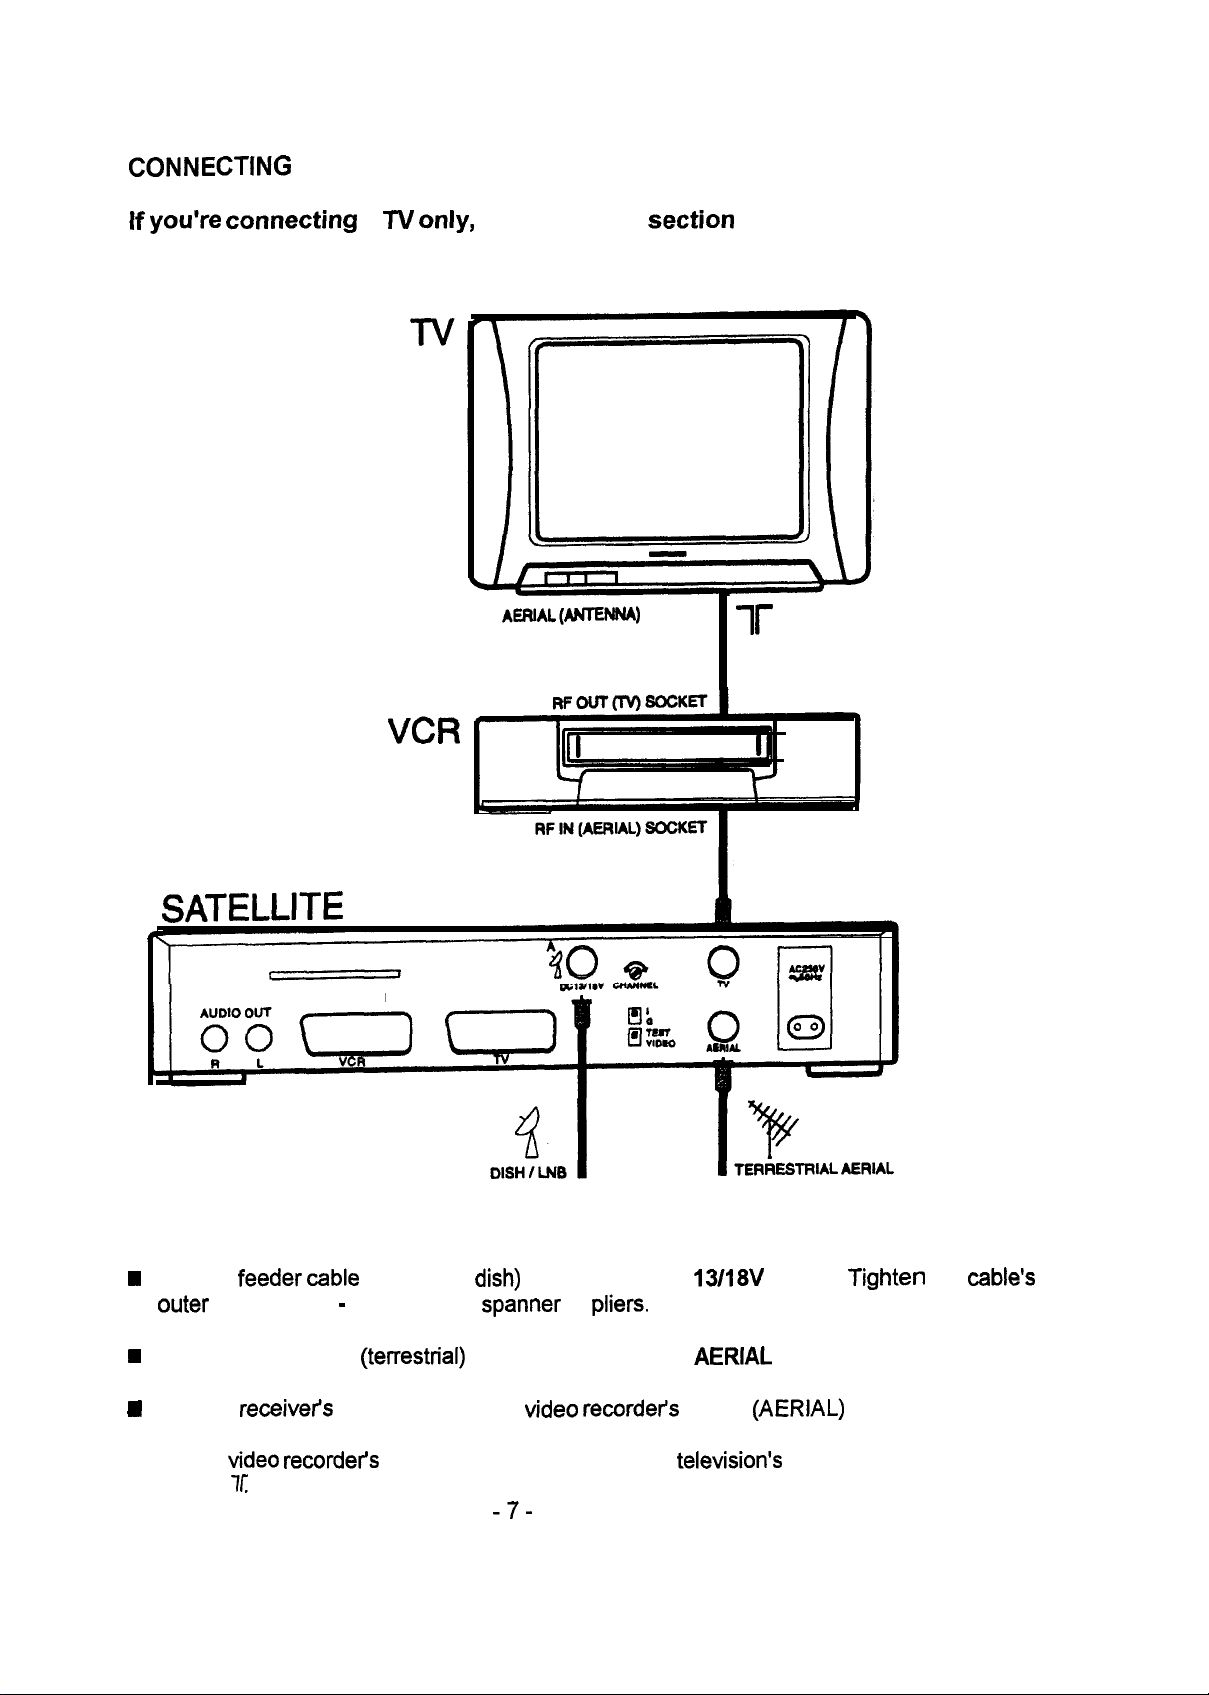
CONNECTING
lf
you’re comecting
YOUR TV AND VIDEO RECORDER
a N
only,
read previous
section
instead.
SATELLITE
e
DECODER
AEFUL(ANTENNA)
SOCKET
ir
W
Connect
outer
H
Connect your normal
H
Connect
l Connect
socket,
feeder cable
nut by hand - do not use a
receiver’s
Video recordet-3
7L
(from your
(terrestrial)
TV socket to your
RF OUT (TV) socket to your
dish)
to receiver’s DC
spanner
TV aerial to receiver’s
-7-
or
Video recordefs
pliers.
13/18V
AERIAL
RF IN
television’s
socket.
socket.
(AERIAL)
Tighten
socket
AERIAL (ANTENNA)
the
cable’s
Page 8

/f
your
fe/evision has
N
SCART. This will
a
spare
SCART
resulf
in improved picture and
sockef,
we recommend
Sound qualify
you
connect if fo fhe
channels.
tf
your
Video recorder
teceivePs
safellife
channels.
VCR SCART. This will
has a spare SCART sockef, we recommend
resulf
in improved picture and
Sound qualify
CONNECTING EXTERNAL DECODER (OPTIONAL)
Only
necessary if you wish to receive Nagravision scrambled channels.
Note
this
receiver
scrambled
such as UK Gold, VH-1, Bravo, Discovery and Granada channels.
spotts
already
and movie channels, as
has a built-in
VideoCrypt
weil as
decoder enabling you to receive
many others in the Multi-Channel
when
you
receivers
wafching safellife
connect it to the
when recording
Sky’s
package
In addition
System.
socket.
Consult
however,
To do this, connect the proper decoder (with its key) to receiver’s VCR (DECODER)
your decodefs user
you
tan
receive broadcasts which are scrambled using the Nagravision
insfructions
for
full details.
CONNECTING A STEREO SYSTEM (OPTIONAL)
To feed
from receiver’s AUDI0 OUT L and R sockets to the
System.
receivet% Sound
through your stereo
System,
TUNING-IN YOUR TV
1.
Connect receiver to
2.
Make
displayed on front
to switch receiver on.)
sure
receiver is switched on by
3. On receiver back
mains
supply and
Panel.
(lf just a dash - is displayed,
Panel,
set
TESTAIIDEO
press 0
button on front
checking
switch
to TEST.
that a Programme number (eg. 2)
connect an audio
auxiliary
press
input sockets of your stereo
Panel
(to the in Position).
red button on remote control
cable
(twin-phono)
is
4. Select a spare
channel*
on your TV and tune it in to receive the following picture:
Page 9

5.
Once you’ve tuned-in
for
the best possible picture, set the
VIDEO (don’t switch it yet if you still have to tune-in
*
Having tuned-in your TV, you should
set
it to this new channel whenever you want to
satellite Programmes.
The
full
tuning-in
procedure for your
TV will be
found
your Video
in its
User,
TEST/VlDEO
recorder).
instmction book.
switch back
watch
t0
NOTE - lf receiver’s RF output
Signal
interferes with an adjacent TV channel (eg. Channel 5)
other equipment, then using a small screwdriver,
Panel
by approximateiy a
quarter
of a turn and re-tune TV. Consult your
to have difficulty tuning-in.
TUNING-IN YOUR VIDEO RECORDER
Previous
1. Set TV to satellite channel
displayed (if
2. Now set
3. On the
section
not,
your
Video
must be carried out before
(which
set
TESTMDEO
TV to the channel you
you just tuned-in) and check that previous picture is still
switch to TEST on receiver back
normally
use for
recorder, select a spare channel and tune that in to receive the same picture:
adjust
CHANNEL control on receiver back
this
dealer
section.
if you continue
Panel).
Video
playback.
or
4.Once
Having tuned-in your
all tuning-in is finished, set
Video
recorder, you should set it to this new channel whenever you want
TESTMDEO
switch back to VIDEO.
to record satellite Programmes.
The
full
tuning-in
NOTE - lf receiver’s RF output
procedue
for
your Video tecorder
Signal
interferes with an adjacent TV channel (eg. Channel 5)
other equipment, then using a small screwdriver,
Panel
by approximately a
your
dealer
if you continue to have difficulty tuning-in.
quarter
of a turn and re-tune both TV and video recorder. Consult
-9-
will be found in its user
adjust
CHANNEL control on receiver back
instruction
book.
or
Page 10

ALIGNING
For
full
installation
YOUR
DISH
details,
refer to instructions provided with your dish.
To receive satellite broadcasts,
the
receiver must be connectecl to a suitable
LNB
mounted on
a dish antenna. Make sure your LNB and dish are suitable for the satellite you wish to receive
(eg. Astra).
To avoid accident and potential
injury
when installing your
dish,
we strongly recommend you
employ a trained professional installation engineer. This is particularly important if you are
inexperienced at working from ladders or at height.
lf
in
doubt,
contact
Note that accurate alignment and stability of dish has a
CA/
(Confedemtion of
Aetial lnstallets)
on
0181
902 8998.
direct
bearing on satellite picture
quality.
DIRECTION (LEFT/RlGHT)
Once dish has been
location (see
table
installed,
it must be set to correct angle of elevation for your
or map accompanying your dish).
particular
Having installed the dish and connected it to the receiver, the last step to receiving satellite
broadcasts is directing the dish towards the satellite in
space
(eg. longitude 19.2“
east
for
Astra).
Use the following instructions (for Astra) to set dish
neighbouring Astra dish
1.
Siightly
2.
Switch
3.
Switch
4.
Slowly
loosen nuts
on receiver and select Programme 2.
on your TV and set it to satellite.
and carefully turn dish eastwards until picture appears on TV
the best Position, tighten nuts
installations -
securing
dish so it
securing
your dish should
tan
be tumed.
(You
dish. (Check for good picture quality on a few other
Programmes also.)
lf
picture is
not satisfactory,
try rotating LNB to improve picture.
try re-adjusting angle of elevation.
YOU
HAVE NOW COMPLETED THE
TO
THIS SECTION AGAIN
WHEN YOU
SETTING
WISH
TO CHANGE AN
UP
TV, VIDEO RECORDER, ETC.).
Use the 0 mains power button on the front
button is in, the front
appear;
if the receiver is in
Panel
display will light. lf the receiver is
standby,
a dash
Panel
to
-
will appear. (Standby means
switch On’.)
direction.
face
(Also, if possible, take a look at
the same way.)
Face
dish
South.
will see 2 displayed on front
lf
picture is still not satisfactory,
OPERATIONS.
YOU NEED ONLY REFER
ITEM
switch
receiver on and off. Whenever the
on,
the Programme number will
Screen.
OF
When you find
EQUIPMENT
Panel.)
(EG.
‘standing-by to
-
lO-
Page 11

You
tan
use the
red c!)
button on the remote control to switch between standby and on.
When you’ve finished using the receiver for the
CD
mains power button in
Order
to save energy.
day,
we recommend you switch it off using the
PROGRAMME SELECTION
Before you ca.n receive any satellite broadcasts, your dish must be aligned.
Certain safe//ife
appropriate
Once the receiver is switched
channels
arc scrambled.
card. For full defails,
To watch these
see
secfion eM/ed ‘Scmmbled
on,
satellite Programmes are selected in either of the following
you
will need fo
channels’
insert
(Page 11).
ways:
l Use CH $ on remote control
l Use buttons 0
-
9 to select Programme number directly. (Note when selecting a two-digit
three-digit number, press the
(erdvon
second or
front
Panel) or
to
Change
Programme up or down.
third digit within 3 seconds of the previous digit.)
MUTE
the
or
To mute the
On front
Mufe
has no efiecf on
being
muted
Sound,
press the
Panel display,
on any video
I$$
button (press again to
a dot to the right of the Programme number indicates that mute is on.
the Signa/
coming out of
mcotding you’t~
SWITCHING BETWEEN TV AND
Only
applicable
When receiver is switched
if receiver is connected to TV using a SCART cable.
on,
TV picture will automatically
to satellite.
To
Change
manually between
terrestrial
PARENTAL LOCK
You
tan leck
the receiver off so that
fhe
making.
SATELLITE
TV and satellite,
children can’t
watch it.
restore Sound).
VCR
socket.
Change
simpiy
This is fo
from normal
press
TVBAT.
prevenf the Sound
(terrestrial)
TV
To do
red
this,
first check receiver is on (Programme number should be
c!r
button on remote control to switch receiver to standby (- should be displayed).
-ll-
displayed),
then press the
Page 12

Once you’ve done this, the receiver
the front
confm/
Panel
buttons will not operate. At this
from children.
tan oniy
be switched on again using the remote
Point therefore,
you should withhold the
control -
femofe
See also the
SCRAMBLED
Some Astra channeis are scrambled. The
channels) are scrambled using the
section
entitled ‘Programme
CHANNELS
Skip’ (Page ‘l3).
majority
VideoCrypt system-
VideoCrypt l decoder.
Scrambled channels are available by
appropriate viewing
To obtain a Sky viewing
card.
ca@
contact your
subscription.
dealer
Sky Customer Services
PO
Box
43
LIVINGSTON
West
lothian
Scotland
EH54 7DD
Telephone 01506 434777
of these (including
Sky’s
sports and movie
This receiver incorporates a built-in
To view them you need to obtain the
or Sky Television as
foilows*:
l
(correct
at time of printing)
VIEWING
Select required
INSERT
Fully
The
CARD.
insert your
amw on
After a few seconds, the picture will
Note you must leave
all the
The receiver will not
necessary,
entitled
time.)
‘Contrast (Video bandwidth)’
channel.
card
the
ca& f? shouid
press a
A scrambled picture will appear together with the message PLEASE
into the DECODER slot on the back
be
täce up
de-scramble
card
inserted while viewing. (lf
deecramble
to
Change
to
narrow
on page
and pointing
and be
channels if
bandwidth.
15.
Panel.
towards
the
clear.
desired,
you’ve sekcted
you
tan
For further details,
mceiveK
leave your
wide bandwidth.
card inserted
see the
Sedia
lf
-12-
Page 13

CARD INFORMATION
-
DO not bend
-
DO not
-
DO not remove and
card, especially
allow card
to
come
re-insert card
its
metal
contacts.
into contact with any liquid. Never
unnecessarily.
immerse
it in
water.
Note that
lf card
if replacement
PPV (PAY PER
Certain broadcasts such as major spotting events are available on a PPV basis for
credits tan
(like a
(P P U will be displayed on the front
Holding in the PPV button
SCREEN MESSAGES
PLEASE INSERT CARD - Make sure
PLEASE
few seconds.
YOUR CARD IS INVALID - Make sure correct
way round. lf message persists,
cards
are designed to work for a limited period only.
is lost or
phonecard)
stolen,
card
be purchased from Sky. When a PPV Programme
WAIT - lf card
contact Sky Customer Services. (Note handling
has to be issued.)
VIEW)
by holding in the PPV button for 2 seconds or more to
Panel).
tan
also be
is valid for selected Programme,
card
used
to check the
card
is
fully
in slost.
card
is
may be damaged - contact Sky Customer Services.
Starts,
card’s
debit
de-scrambled
inserted,
the right way up and the right
Charge
your
Status.
picture will appear in a
may be payable
card tan
tonfirm
be debited
the
purchase
which
PROGRAMME
present
INSERT
INSERT OLD CARD - Old
YOUR CARD HAS
Services.
THIS
INCORRECT
CARD
PLEASE CALL SKY - There is a
Services.
card
VIEWING
CHANNEL IS BLOCKED - Your
RESTRICTED -
RESTRICTED -
and
insert
keycard.
CARD - Remove present
EXPIRED -
CARD - Your
There is a
Programme has parental control viewing
card
must be inserted before new
A replacement
card
(or issue of
Problem
card
subscription
card)
with your
Problem
-13-
with your
restriction. Remove
and insert viewing
card tan
card
is needed - contact Sky Customer
is not valid for this channel.
is not valid for this Programme.
card -
contact Sky Customer Services.
subscription -
card.
be activated.
contact Sky Customer
Page 14

PLEASE CALL (telephone no.)
displayed.
There is a
-
Problem
with your
card.
Phone the number
YOUR BILL IS OVERDUE - Contact Sky Customer Services
tut
Off.
P (number) T (number) -
Card
debit
Status
message. (May appear
and/or
pay
during card
bill
to avoid Service
insertion or PPV
purchase.)
Nofe
if any of
(Messages may appear
This
receiver will decode
tune-in to any other type of scrambled broadcast, no messages will appear on Screen,
and your
fhe
above messages appear on
card
will have no
Screen
occasionaly, especially
only broadcasts scrambled using
effect.
when
for a few seconds
changing pmgtammes.)
only - ignore
VideoCrypt
l
System. lf
fhem.
you
CHANGING FACTORY-SETTINGS
This receiver
Eutelsat Hotbird
them, you
Note
reception
(Some broadcasts may require an additional
installation
Comes
tan
skip this whole
factory-set for Astra satellite channels (as
13OE).
lf you’re happy with the factory-settings and don’t
section.
from other satellites will depend on your location,
decoder.)
information.
size
of dish and type of LNB.
Consult your
weil
as some from
Want
to
local
satellite expert for
Change
PROGRAMME
To
Speed
up Programme
SKIP
selection,
you
tan
arrange for unwanted Programmes to be skipped
by the CH $ buttons on the remote control (and
select the Programme you want to skip.
the
small
SKIP
button on the remote
Then,
control
using a ball-point pen or similar Object, press in
so that -
(instead of the Programme number).
That Programme will now be skipped by CH
*
number buttons 0 - 9).
To
resfore
Programme number will be restored on the front
You tan use
for fhe
fhe
chi/dren.
CUSTOMISING
For
each
a skipped Programme, select it using the number
Panel
Programme skip fo ptvvide a
selecfive
programmes you don‘f wanf children fo wafch,
A PROGRAMME
Programme you wish to customise, you
by&w on the front
-
-
appears on the front
(although it
tan
buttons,
display.)
parental leck.
fhen
tan adjust
wifhhold
the following:
Panel).
still be
seiected
then press in
Simply
fhe
sef
remofe confrol
To do
Panel
using the
SKIP. (The
SKIP
this,
first
display
fo - -
from
-
- 14-
Page 15

-
Video frequency and AFC
-
Polarisation
- Contrast (Video
-
Audio
-
Audio settings
subcanier
bandwidth)
frequency
(mono/stereo, de-emphasis,
language)
-
22 kHz tone and
DiSEqC
switching
When customising Programmes, it is
LNB fitted
IF
YOU DON’T KNOW THE FREQUENCY, DON’T TRY CUSTOMISING A PROGRAMME.
to
your
dish. For Astra
Set the receiver to the Programme number you
adjustment(s) as shown below, then
Programme in
will be
l3efore
lost1
starfing customisation, make
necessaty, press
Note you
memory’ (Page
@to remove
tan
abandon customisation at any
17). lf you don’t
the mute dot.)
First, set receiver to the Programme
Programme number in
VIDEO FREQUENCY AND AFC
lf you
don’t wish to
Make a note of the
in various
that Sky One
satellite
has
a
which you’re
adjust Video fmquency,
official channel
publications). For
channel
frequency of 11.318 GHz.
vitally
LNBs
finish by going to the section
sute
important that you know the frequency of the
the frequency will usually be 9.75 GHz or IO GHz
wish
to customise, make the required
entitled Storing
fmish
in this way, any adjustments you make
that no dots appear on the front
Point
by pressing one of the CH $ buttons.
you’re about
to customise (eg. 99). Note
going to store the settings you now make.
skip to the
frequency you
example,
if you were going to
nexf
wish
to set (you
section.
tan
look up
store
Sky
Panel
this
information
One, you’d
custom
display.
this is
the
find
-
if
Now
this is where
be subtracted from the
you need to know your LNB frequency because the LNB frequency
channel
frequency. For
need to do the following calculation:
11.318 -9.75 = 1.568
.
..which is
Press
one or two
follows: the
indicates the
the display
To
enter
One (for
receiver and
the
Video
frequency you have to set the receiver to.
the VIDEO A button. On the front
dots),
for example 0. 1.4 From this you
three numbers
first
represents
a new
which
Video
the
press
digit (in
a
frequency,
Video
the
indicate the
this example,
Video
frequency of 2.014 in real
frequency was calculated as
numbers
1 5 6 8 so that 5.6 8 appears on the display.
Panel
two dots
first press
- 15-
example,
display
three
final digits
Shows
the VIDEO
if you have a 9.75 GHz
you’ll
see
three numbers
tan
work out the
(014) while
that the
first
digit is 2).
Video
the number of dots
terms.
b
button.
1,588), Point
Using
the example of Sky
the remote
has
LNB,
(possibly with
frequency
Hence
0. 1.4 on
control
at the
to
you
as
Page 16

lnstead
VIDEO $
You
of
enterIng
buttons.
tan
switch AFC
the
numbers ditectly, you tan simply up/down
(Automatic
Frequency Control) on or off. When AFC is on, the receiver
constantly fine-tunes itself for the best
reception,
the
ftequency using
even if the frequency is mis-adjusted.
the
To switch AFC on or off, press the AFC button. On the front
Panel,
you’ll see either
l or0
l
displayed. Note that:
ll indicates AFC on
0 indicates AFC off
Now carry out any other custom settings you need to make (described below), then skip
to the section entitled ‘Storing custom Programme in
POLARISATION
lf you
don’t wish to
Change polarjsation,
skip to the next section.
Determine the polarisation of the channel you wish to store (as
information in
satellite
publications). Taking the example of Sky
memory’ (Page ‘f7)
before,
you
One,
the polarisation is
tan
find out this
vertical.
Now press the
V/H
button. On the front
l
3 indicates
l
8 indicates horizontal polarisation
vertical
Panel,
you’ll
Polarisation
see either l 3 or l 8 displayed. Note that:
To
Change
V/H
until l 3 is displayed to indicate
lf you
This is explained in the section
Now carry out any other custom
to the seclion entitled ‘Storing custom Programme in
CONTRAST (VIDEO
lf you
Note that Astra channels (eg. Sky One) require a high
Video
contrast
Don’t
scrambled channels.
Polarisation, press the
V/H
button. Continuing with the example of Sky One, press
vertical.
press UH
don’t wish to
bandwidth. Broadcasts from most other
repeatedly, you
will
entit/ed
seHings
BANDWIDTH)
Change contrast (Video
notice
that a dot sometimes
‘22 kHz tone and
you need to make (described below), then skip
DiSEqC
memory’ (Page
appears
switching’
bandwidth), skip to the next section.
European
contrast
satellites (eg. Eutelsat require a low
setting as they have a narrow
after the /ast
(Page
17).
17).
setting as they have a wide bandwidth.
select wide bandwidth for Astra otherwise the receiver will NOT de-scramble
-16-
digit.
Page 17

To
Change
l l
displayed. Note that:
Now
the contrast, press the @ button. On the front
l l l l
l l l
indicates wide bandwidth (low contrast)
caq
out any
other
to the section entitled
Panel,
you’ll see either
l
l indicates
narrow
bandwidth (high contrast)
custom settings you need to make (described below), then skip
‘Storing
custom Programme in memory’
(Page
17).
i l l
l l l or
l
AUDI0
H you don’t wjsh
Make a note of the audio subcarrier frequency you wish to set (as before, you
information in satellite publications).
SUBCARRIER
to
adjust audio subcatier fmquency, skjp
FREQUENCY
Again,
to the
next
section.
taking the example of Sky
tan
find out this
One,
the audio
subcarrier frequency is 7.02 MHz (left) and 7.20 MHz (right). On this recelver, you need only
set the left frequency - the right follows automatically (at
*
To
adjust
three
the frequency, press the
numbers,
for example 5 8 0
AUDI0
which
means the audio subcarrier frequency is 5.80 MHz.
To enter a new frequency, first press the AUDI0
(for
which
the audio subcarrier frequency is 7.02 MHz),
button. On the front
b
+0.18
MHz).
Panel
display you’ll see
button. Still using the example of Sky One
Point
the remote control at the
receiver
and press the numbers 7 0 2 so that 7 0 2 appears on the display.
lnstead
AUDI0 $
of
entering
buttons.
the
numbers directly,
you
tan simpiy upidown
the frequency
using
the
Now carry out any other custom settings you need to make (described below), then skip
to the section entitled
‘Storing
custom Programme in memory’
(Page
17).
AUDI0 SETTINGS
In addition to audio subcarrier frequency adjustment, you
mono/stereo
bilingual Soundtrack (eg. Eurosport), you
lf
you
donV wish
To
switch
see either - o - or o
To
Change
and audio de-emphasis. Additionally, where Programmes are
tan
select the required language.
to
Change
any of these settings,
skip
to the next section.
between mono and stereo, press the m button repeatedly. On the
-
o displayed. Note that:
-oo-
indicates mono
o indicates stereo
the audio de-emphasis, press the DEEM button repeatedly. On the front
you’ll see either 5 0 or 1 7 displayed. Note that:
5
0 indicates
50~s
de-emphasis
1 7 indicates J17 de-emphasis
- 17-
tan Change
the settings for
broadcast with a
front
Panel,
you’ll
Panel,
Page 18

To select language on a bilingual Soundtrack, press the A B button repeatedly. On the front
Panel,
you’ll see either o - - or - - o
--
0
--
indicates the
o indicates the alternative language
displayed.
defauft
Note that:
language
Now carry out any
to the section entitled
22kHz
lf you don’t
custom
TONE AND DiSEqC
wish to
programme
The built-in 22 kHz tone generator enables you to connect two
other
custom settings you need to make (described below), then skip
‘Storing
se/ect
22 kHz tone or DiSEqC switching, skip to the next section:
in memofy!
custom Programme in memory’
SWITCHING
(Page
LNBs
17).
(in
Order
‘Stofing
to receive
broadcasts from two different satellites) via a switching box.
lgnore
When the 22 kHz tone is off,
(eg. for Astra). When the 22 kHz tone is
alternative LNB (eg. for Eutelsat Hotbird
To set the 22 kHz tone on or off, press the
polarisation)
or 1
this section if you
haven’t
the
and check whether or not
8. then the 22 kHz tone is on.
connected a switching box to the
switching box is set to receive its
on,
the switching box is receive its
13’E).
V/H
button repeatedly (to select required
there’s
a
dot after
the last digit. lf there is a
receiver.
Signal
from the main LNB
Signal
from the
dot,
eg. 1 3.
In addition to 22 kHz tone switching, the built-in DiSEqC generator enables you to connect a
further
special
two
LNBs
making four in total (for four different satellites). This is achieved using a
DiSEqC switching box (not supplied).
To make the
either P
further
o.A or
LNB selections, press the DiSEqC button. On the front
P o.b displayed. Note that:
P
o.A
indicates LNB A
P o.b indicates LNB B
Now go to the section below: ‘Storing custom Programme in memory’.
STORtNG
Once
the
receiver’s
Using a ball-point pen or similar Object, press in the
On the front
CUSTOM PROGRAMME IN MEMORY
you’ve
customised the Programme to your
memory.
Panel display, 5
P (store Programme) will appear for a few seconds.
requlrements,
small
MEM button on the remote
you will be ready to store it in
- l8-
Panel,
you’ll see
control.
Page 19

SATELLITE
Every sateiiite channel is broadcast with its Soundtrack on an audio subcarrier. On many
RADIO CHANNELS
channels this is accompanied by additional subcaniers containing one or more radio stations.
To customise a new Programme number for a sateiiite radio channei,
instructions
(as if for a
satellite
7V
chartnel),
but set
tbe
audio subcarrier frequency to that
simply
follow the above
published for the accompanying radio channel.
For examp/e, fo
prugtamme numbec
audio
LNB
subcanier
VOLTAGE
For some SMATV
l
receiver
installation,
1.
does not supply a DC voltage to the
Switch
off the
customise a
set its video frequency and
frequency to 7.56 MHz.
(DISTRIBUTION SYSTEMS)
installations
you
tan switch
receiver
2. Point the remote control at the
3. Continue to hold down
The front
To set LNB
Panel
display will indicate o F
voltage
back to on when it’s 0%
then indicate o n).
lf you set
Sound.
LNB
voltage
channei
for
UCB
(United Christian
poiarisation
(Finally, pmss MEM
and multiple-property distribution
LNB. lf
your
off the LNB supply as follows:
using the 0 mains power button-
receiver
V/H whiie
and hold down the
switching the
receiver
F.
repeat Steps 1.
to off for a normal installation you
to 3. Above
Bmadcasting), selecf
as for
to store the
Systems
receiver
V/H
button.
on using
won’t
recelve satellite
a spare
Sky
Sports,
but set
the
pmgtamme.)
it is required that
the
is to be part of such an
mains power button.
(tint Panel dispiay
picture
will
or
-lQ-
Page 20

Page 21

Page 22

 Loading...