

Page 1

Operating Manual
DDIIGGIITTYY CCII
With PCMCIA interface to accommodate a single
CA module. Provides reception of unencrypted
and encrypted (e.g. VIACCESS, IRDETO,
CRYPTOWORKS, SECA etc.) ASTRA and
EUTELSAT DVB programmes.
features motor control and
software update via satellite
DDiiSSEEqqCC
1.2
bed_anl_DIGITY CI_Quark3_en.qxd 31.01.03 16:47 Seite 1
Page 2

1 Contents
1 Contentst . . . . . . . . . . . . . . . . . . .2, 5
2 Illustrations . . . . . . . . . . . . . . . . . . .3
3 Please read this first . . . . . . . . . . .6
Safety notes! . . . . . . . . . . . . . . . . .7
4 Connections . . . . . . . . . . . . . . . . . .8
4.1 Mains power connection . . . . . . . . . . . . . . .9
4.2 External unit . . . . . . . . . . . . . . . . . . . . . . . . .9
4.3 Connection to a television set . . . . . . . . . . .9
4.4 Video cassette recorder (VCR) . . . . . . . . . .9
4.5 Amplifier . . . . . . . . . . . . . . . . . . . . . . . . . . .10
4.6 Serial interface . . . . . . . . . . . . . . . . . . . . . .10
5 Installation . . . . . . . . . . . . . . . . . .10
5.1 OSD- labguage selection . . . . . . . . . . . . . .10
5.2 Basic settings . . . . . . . . . . . . . . . . . . . . . . .10
5.2.1 Child-proof mode . . . . . . . . . . . . . . . . . . . .11
5.2.2/3 Time . . . . . . . . . . . . . . . . . . . . . . . . . . . . . .11
5.3 Audio/Video settings . . . . . . . . . . . . . . . . .11
5.3.1 Image format . . . . . . . . . . . . . . . . . . . . . . .12
5.3.2 Language . . . . . . . . . . . . . . . . . . . . . . . . . .12
5.3.3 SCART mode . . . . . . . . . . . . . . . . . . . . . . .12
5.4 LNB setting/Satellite selection . . . . . . . . . .12
5.4.1 Switching the DiSEqC on or off . . . . . . . . .13
5.4.2 Setting the switching matrix and
LNB properties . . . . . . . . . . . . . . . . . . . . . .13
5.4.3 Additional properties . . . . . . . . . . . . . . . . .14
5.4.4 Rotating installation . . . . . . . . . . . . . . . . . .15
6 Operation . . . . . . . . . . . . . . . . . . . .15
6.1 Switching on and off . . . . . . . . . . . . . . . . .15
6.2 Programme selection . . . . . . . . . . . . . . . . .15
6.3 Volume control . . . . . . . . . . . . . . . . . . . . . .17
6.4 Reception of encrypted programmes. . . . .17
6.4.1 Multifeed options . . . . . . . . . . . . . . . . . . . .18
6.4.2 Near Video On Demand (time control) . . .18
6.5 Selecting another language . . . . . . . . . . . .18
6.6 TV/Radio switching . . . . . . . . . . . . . . . . . .19
6.7 Back to previous programme. . . . . . . . . . .19
6.8 Display time and programme inform. . . . . .19
6.9 Additional programme information . . . . . . .19
6.10 Transponder information . . . . . . . . . . . . . .20
6.11 Electronic Programme Guide . . .20
6.11.1 Calling up Electronic Programme Guide . .20
6.11.2 Programme preview following days . . . . . .20
6.11.3 EPG information . . . . . . . . . . . . . . . . . . . . .20
6.11.4 Switching off the EPG . . . . . . . . . . . . . . . .20
2
bed_anl_DIGITY CI_Quark3_en.qxd 31.01.03 16:47 Seite 2
Page 3
6.12 Timer . . . . . . . . . . . . . . . . . . . . . . .21
6.12.1 Programming via EPG . . . . . . . . . . . . . . .21
6.12.2 Manual Programming . . . . . . . . . . . . . . . . .21
6.13 Video text . . . . . . . . . . . . . . . . . . .23
7 Changing basic programming . . . .24
7.1 Configuring programme list . . . . . . . . . . . .24
7.1.1 Calling up programme list . . . . . . . . . . . . .24
7.1.2 Adding programmes to programme list . . .24
7.1.3 Deleting programmes . . . . . . . . . . . . . . . . .25
7.1.3.1 Deleting from Favourites list . . . . . . . . . . .25
7.1.3.2 Deleting from Total list . . . . . . . . . . . . . . . .25
7.1.4 Sorting programmes . . . . . . . . . . . . . . . . .26
7.1.5 Blocking acces (parental control) . . . . . . . .26
7.2 Changin the PIN . . . . . . . . . . . . . . . . . . . .27
7.3 Unblocking access to individual
programmes . . . . . . . . . . . . . . . . . . . . . . . .27
7.4 Programme search . . . . . . . . . . . . . . . . . .28
7.4.1 Satellite . . . . . . . . . . . . . . . . . . . . . . . . . . .28
7.4.2 Transponder . . . . . . . . . . . . . . . . . . . . . . . .29
7.4.3 Manual search . . . . . . . . . . . . . . . . . . . . . .30
7.4.4 Accepting programmes after search . . . . .30
7.5 Restoring basic programming/ delete all . .31
7.5.1 Activate default setting . . . . . . . . . . . . . . . .31
7.5.2 Delete all programmes . . . . . . . . . . . . . . . .32
7.5.3 Software update . . . . . . . . . . . . . . . . . . . . .32
7.6 System configuration . . . . . . . . . . . . . . . . .33
7.7 Encryption system . . . . . . . . . . . . . . . . . . .33
8 Operating a rotating installation .33
8.1 East and West limits . . . . . . . . . . . . . . . . .33
8.2 Geo-positioning . . . . . . . . . . . . . . . . . . . . .35
8.3 Setting satellite position . . . . . . . . . . . . . . .36
8.3.1 Selecting satellite position . . . . . . . . . . . . .36
8.3.2 Adjusting satellite antenna . . . . . . . . . . . . .37
8.3.3 Storing satellite position . . . . . . . . . . . . . . .38
8.4 Current satellite list . . . . . . . . . . . . . . . . . .38
8.5 Deleting satellite position . . . . . . . . . . . . . .39
8.6 Rotating to reference position . . . . . . . . . .39
9 Technical terms . . . . . . . . . . . . . .40
10 Technical data . . . . . . . . . . . . . . . .43
11 Trouble-shooting guide . . . . . . . . .45
12 Annexure . . . . . . . . . . . . . . . . . . . .47
5
bed_anl_DIGITY CI_Quark3_en.qxd 31.01.03 16:47 Seite 3
Page 4
3
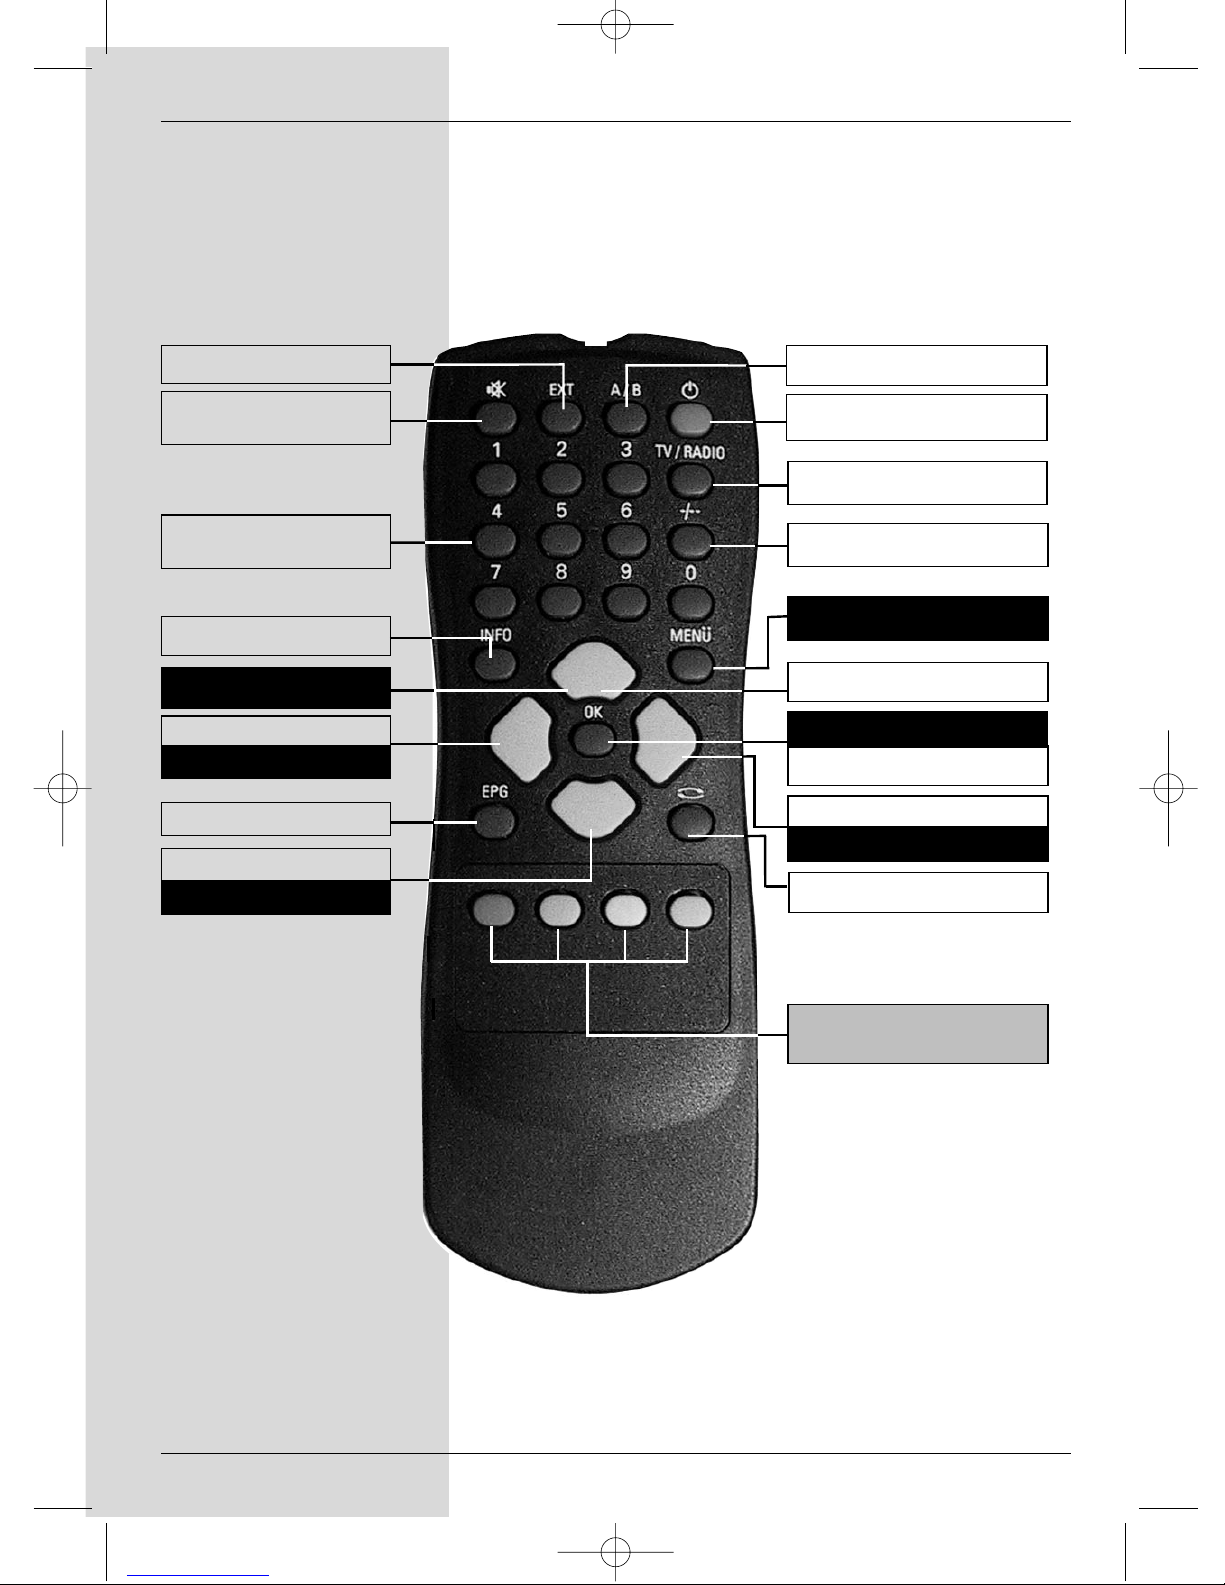
On/Standby
Numeric keys
Programme list on/off
Back
Menu on/off
Sound on/off
EXTERNAL
Language selection
Programme -
Multi-function keys
Volume +
Programme +
TV/Radio operation
EPG
MONO1/MONO2
OK
Volume -
Arrow key right
Arrow key left
Arrow key up
Arrow key down
Info
2 Illustrations
Remote control
bed_anl_DIGITY CI_Quark3_en.qxd 31.01.03 16:47 Seite 4
Page 5
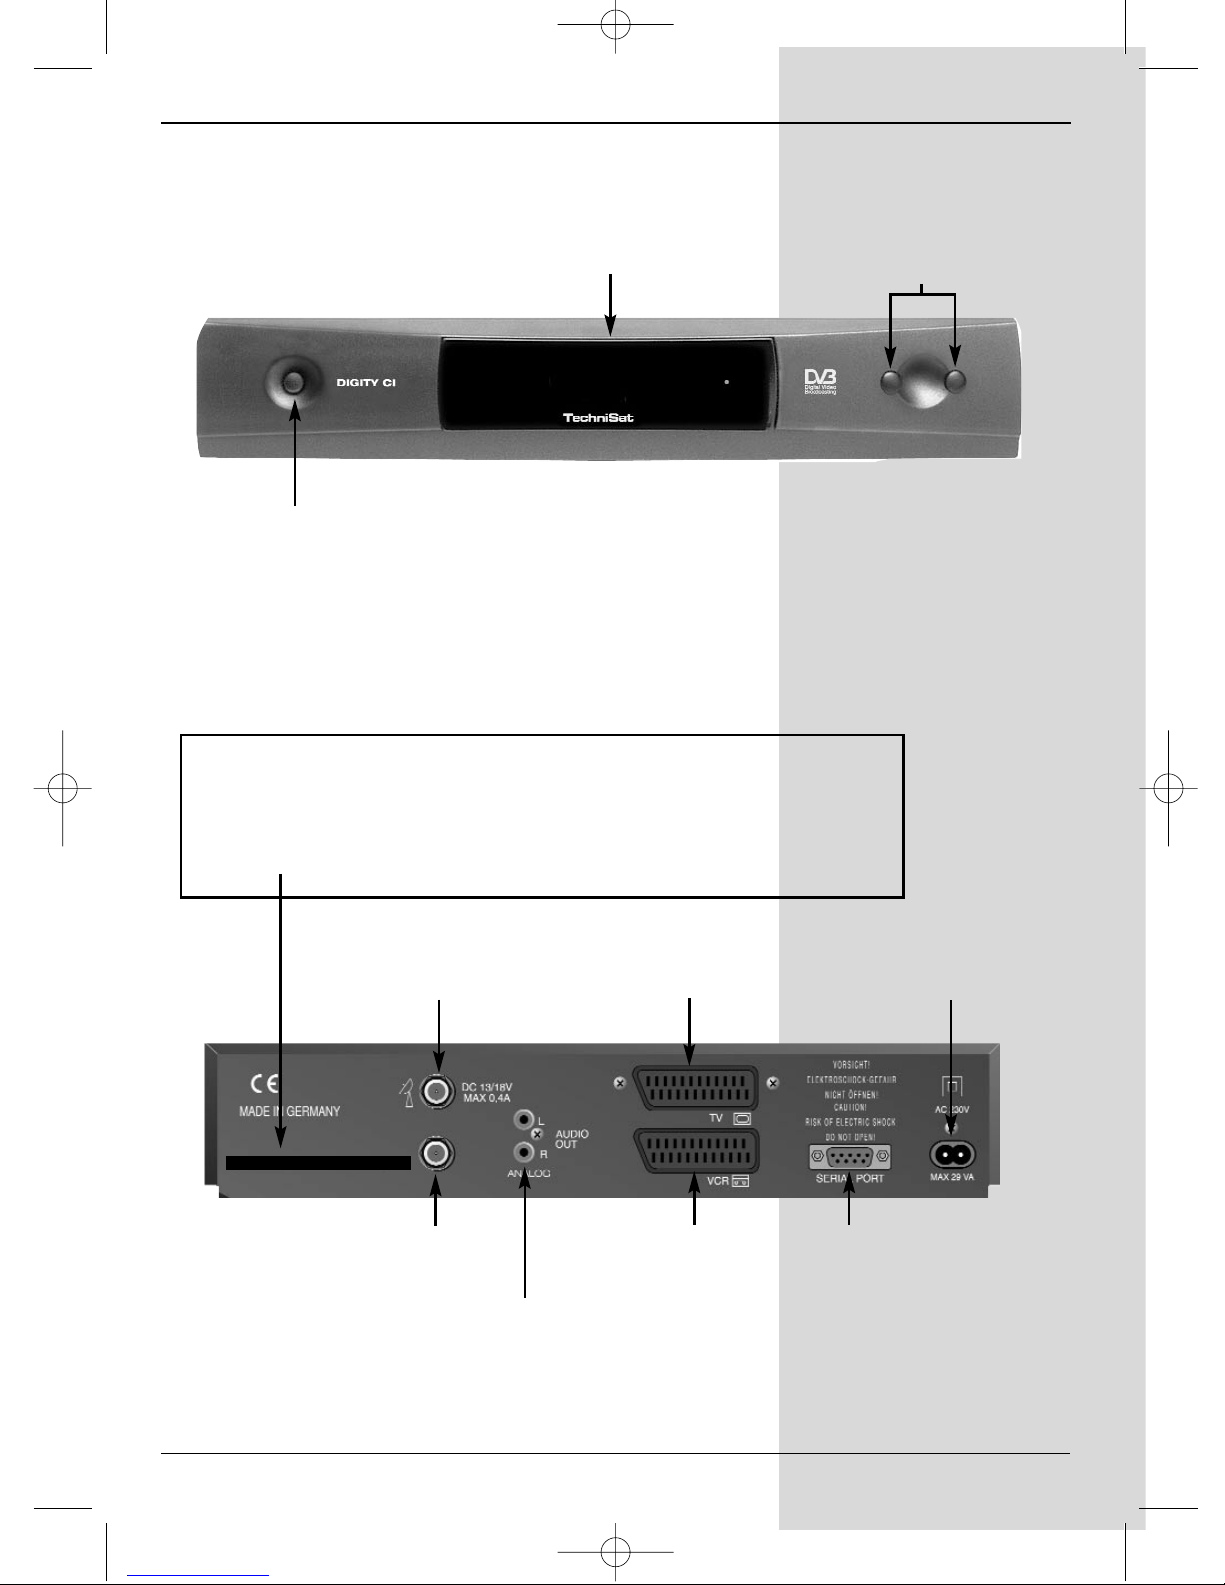
Mains power
connection
SCART socket
VCR
Audio output
left/right
RS 232 interface
LNB
output
LNB input
On/Standby
LED display
Programme selection
up/down
SCART socket TV
Inserting the CA module:
> Please follow the instructions of the card and module manufacturer.
> Insert the smartcard selected in the appropriate CA module.
> Now insert the module carefully in the slot, in the direction of the arrow
(arrow facing up.
4
Front panel
Rear panel
bed_anl_DIGITY CI_Quark3_en.qxd 31.01.03 16:47 Seite 5
Page 6

6
3 Please read this first
> Before commencing operation of the unit, please
check that you have received all the parts intended.
You should have the following:
1 Receiver, 1 mains power cable, 1 remote control
unit,
1 operating manual, 1 guarantee card, 2 batteries
(1,5V microcells).
> Insert the batteries supplied in the battery
compartment of the remote control unit, ensuring
correct polarity as indicated.
> Before connecting the receiver, please read the
security notes in Chapter 3.
> Chapters 4 and 5 describe connecting the receiver,
and how to adapt the settings correctly for your
external unit (dish antenna, LNB, etc.) as well as for
the television set, VCR, etc.
> Chapter 6 describes all the functions necessary for
day-to-day operation, e.g. programme selection or
volume adjustment.
> In Chapter 7 you will find information on how to
install new programmes or how to change the order of
programmes in the list.
Chapter 8 describes the settings to be made when
using a rotating antenna installation.
> The key technical terms used in this operating manual
are explained in Chapterl 9.
> Technical data can be found in Chapter 10.
> Assistance in finding and correcting problems can be
found in Chapter 11.
Important operating information
The implementation of an "On Screen Display" (information
displayed on the TV screen, see example) simplifies the
operation of the receiver, and reduces the number of keys
required on the remote control. All functions are displayed on
the screen, and can be set or changed with a few keystrokes.
Related functions are grouiped together in “Menues”. The
selected function will be highlighted in colour. In the bottom
line, coloured bars depict the function keys red, yellow, green
and blue. These colour bars represent different functions in
different menues, which can be executed by pressing the
appropriate coloured key (multi-function key) on the remote
control unit. The function keys are only active when a brief
description is displayed in the appropriate field.
Help function:
Where available.in a menu,pressing the blue function key
will display a help text - press again to close the display
window.
bed_anl_DIGITY CI_Quark3_en.qxd 31.01.03 16:47 Seite 6
Page 7
Key description and terms that appear in the OSD menu are
denoted in this manual in bold type.
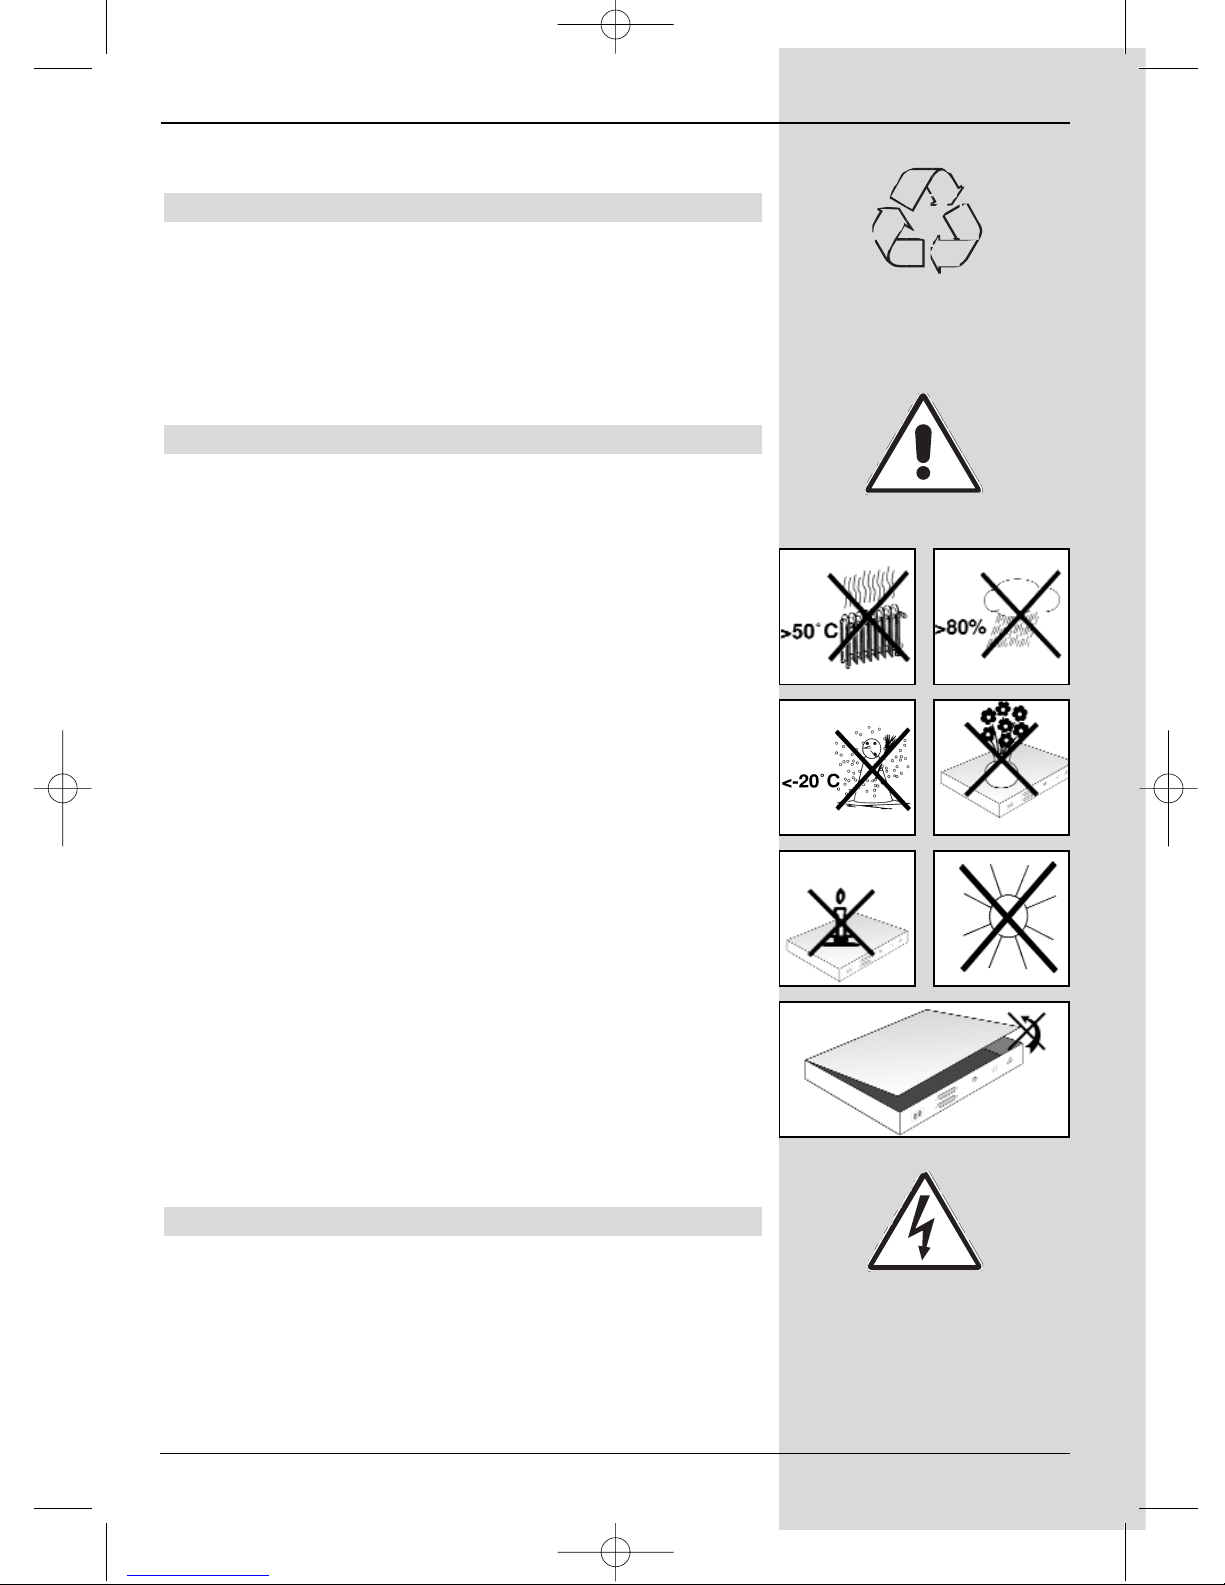
Environmental note:
The packaging of your unit consists exclusively of recyclable
materials. Please dispose of the packaging in the appropriate
manner (Dual System in Germany).
Please ensure that spent batteries from the remote control as
well as any electronic components are not disposed of in
domestic refuse, but are dealt with appropriately (disposal
through retailer, local authority).
Safety Note:
For your own protection, you should read these security
notes carefully before you commence operating your new
receiver.
The manufacturer accepts no liability for damage caused by
inappropriate handling or through failure to observe the security precautions.
> In order to ensure adequate ventilation, place the unit
on a smooth, straight and level surface, and do not
place any objects on top of the unit. Ventilation slits
are provided on top of the unit to allow warm air to
radiate out of the unit.
> Do not place any burning items, such as lighted cand-
les, on top of the unit.
> Do not expose the unit to dripping water or water
sprays, and do not place any vases or other
receptacles filled with water on top of the set.
> The unit should only be operated in a temperate
climate.
> Do not open the unit housing! You are in danger of
receiving an electric shock. If it is necessary to open
the housing, this should be effected by trained personnel only.
In the following cases you should disconnect the unit
from the power mains and consult a trained specialist:
> when the mains cable or the mains plug are damaged
> if the unit was exposed to humidity or liquid, or if liquid
has entered the housing
> in case of significant external damage
When not in operation:
During electric storms, or when the unit is not being used for
an extended period of time, it should be disconnected from
the mains power.
7
bed_anl_DIGITY CI_Quark3_en.qxd 31.01.03 16:47 Seite 7
Page 8
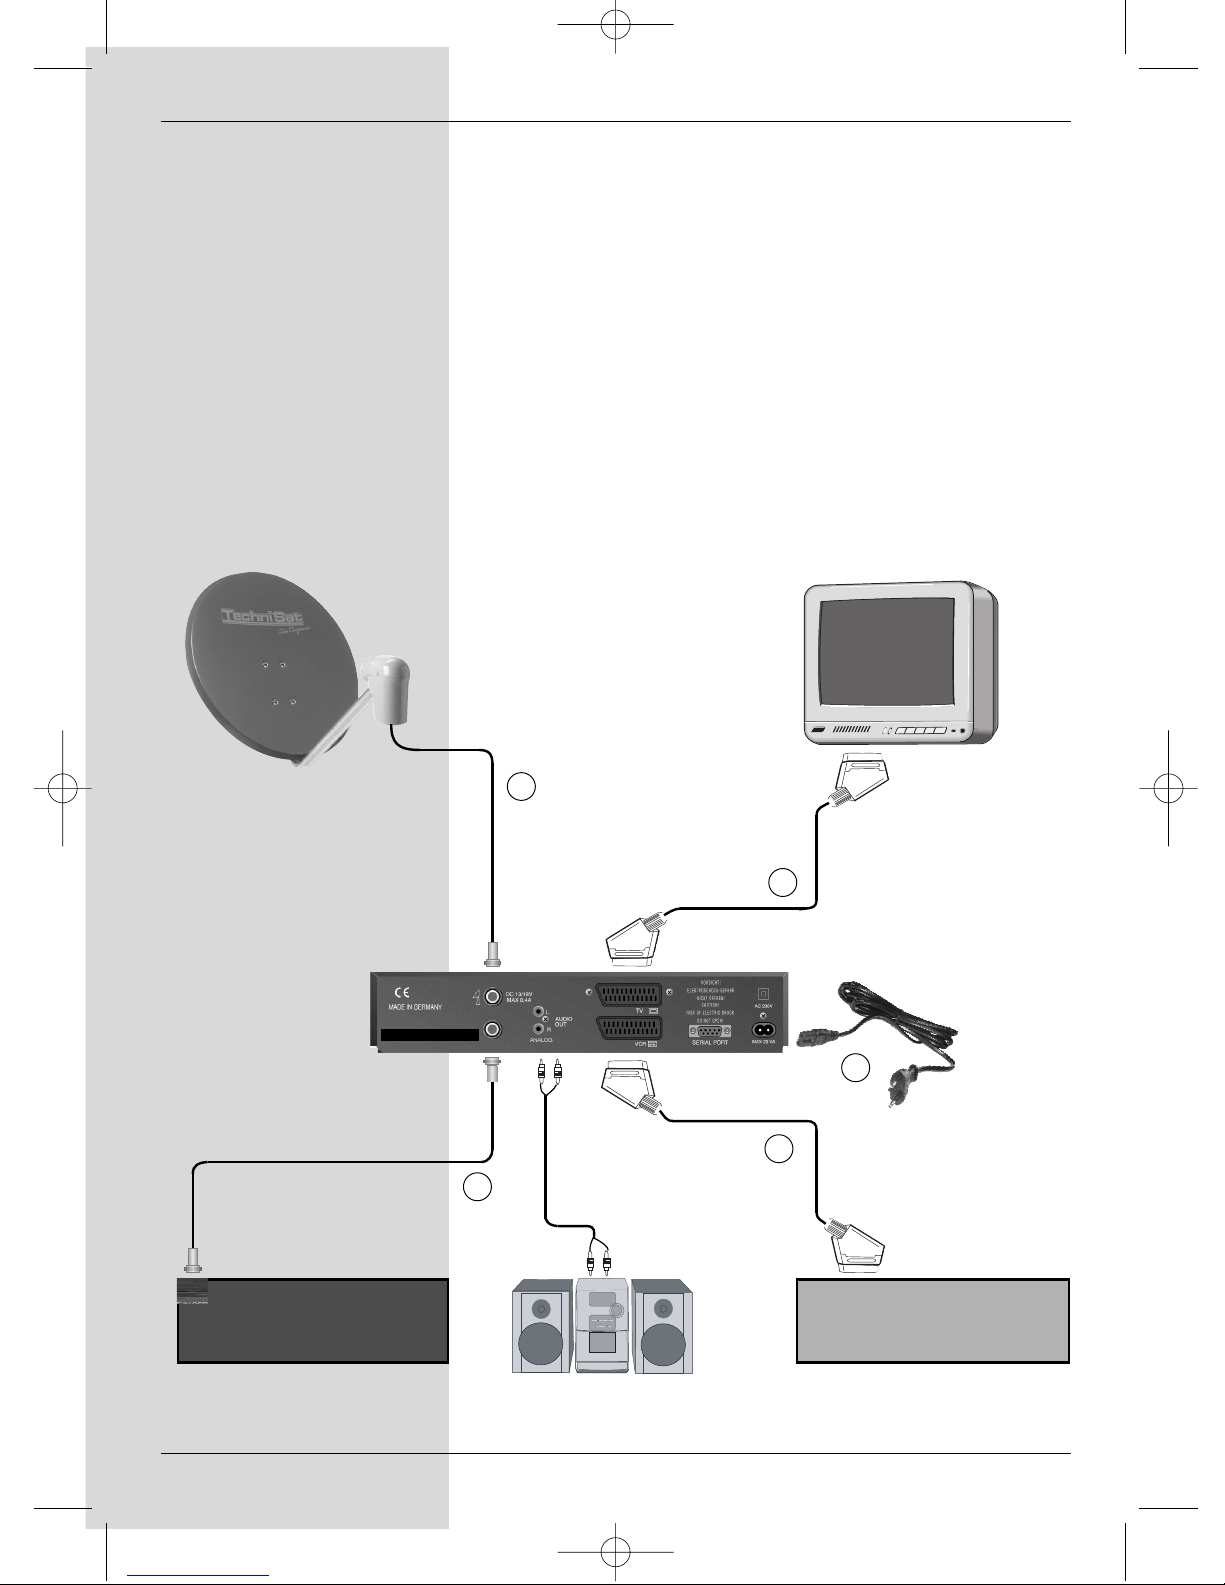
a. Connect the LNB to the LNB input (LNB IN)of the
DVB receiver.
b. Mains power connection
c. Connect the SCART output of a video recorder to the VCR
Scart socket of the DVB receiver.
d. Connect the Scart connection of the DVB receiver with the
television set.
e. Connect the LNB output (LNB OUT) to the LNB input of
an analogue receiver.
Connecting the DVB receiver to a satellite
installation
8
VCRAnalogue Receiver
a
e
c
d
b
bed_anl_DIGITY CI_Quark3_en.qxd 31.01.03 16:47 Seite 8
Page 9

9
4 Connections
The references a b c etc. below refer to the illustration on
page 8.
4.1 Mains power connection
The receiver should be connected to the mains power supply
only once all other connections with the approrpiate units
have been made. This will ensure that the receiver and the
other components are not damaged.
b When you have made all the above connections, use
the enclosed mains power cable to connect the
receiver to a mains power outlet with 230V/50 Hz AC
power.
4.2 External unit
4.2.1 Single unit operation
a Using a suitable coaxial cable, connect the LNB
input of the receiver with the LNB of your external
unit. Also note Point 5 "Installation".
4.2.2 Operating an additional receiver in a singlereceiver installation
e If you wish to operate another appliance in a single-
receiver installation (e.g. analogue receiver or ADR
receiver),you may connect the LNB input of the
additional receiver with the LNB output of the DVB
receiver by means of a suitable coaxial cable. In order
for the satellite signal to be available to the additional
receiver, your DVB receiver must be set to standby
mode. If the DVB receiver is switched on, this will
receive signal priority from the LNB control.
4.3 Connection to a television set
d Use a SCART cable to connect the receiver (SCART
socket TV) and the television set (SCART socket).
If your television set is equipped for this, it will switch
automatically to AV mode, and thus to satellite
reception, when switched on.
4.4 Video cassette recorder (VCR)
c Connect the video recorder to the SCART socket
VCR . In playback mode the video recorder will
supply a switching signal to the receiver.
The video recorder signal will then be fed
automatically to the TV set.
bed_anl_DIGITY CI_Quark3_en.qxd 31.01.03 16:47 Seite 9
Page 10
10
If your video recorder does not provide an electric
signal, use the EXTERN key to switch your receiver
to the external VCR input. Pressing this key again will
revert to normal operation.
4.5 Hi-fi amplifier
To achieve the best sound quality, the receiver can be
connected to a hi-fi amplifier. To do this, connect the Audio
R and Audio L cinch sockets of the receiver with a suitable
input of your hi-fi amplifier, e.g. CD or AUX, using a suitable
cable. Note that the Phono imput is not suitable!.
4.6 Serial interface RS 232
The RS 232 interface serves to update the operating
software, and to facilitate pre-programming by means of a
PC.
5 Installation
Once you have connected your receiver, and have
commenced operation, you can proceed to optimize the
settings for your personal preferences, if you wish.
5.1 OSD language
This feature gives you the opportunity to set the menu
language in accordance with your preferences.
To change the OSD language, proceed as follows:
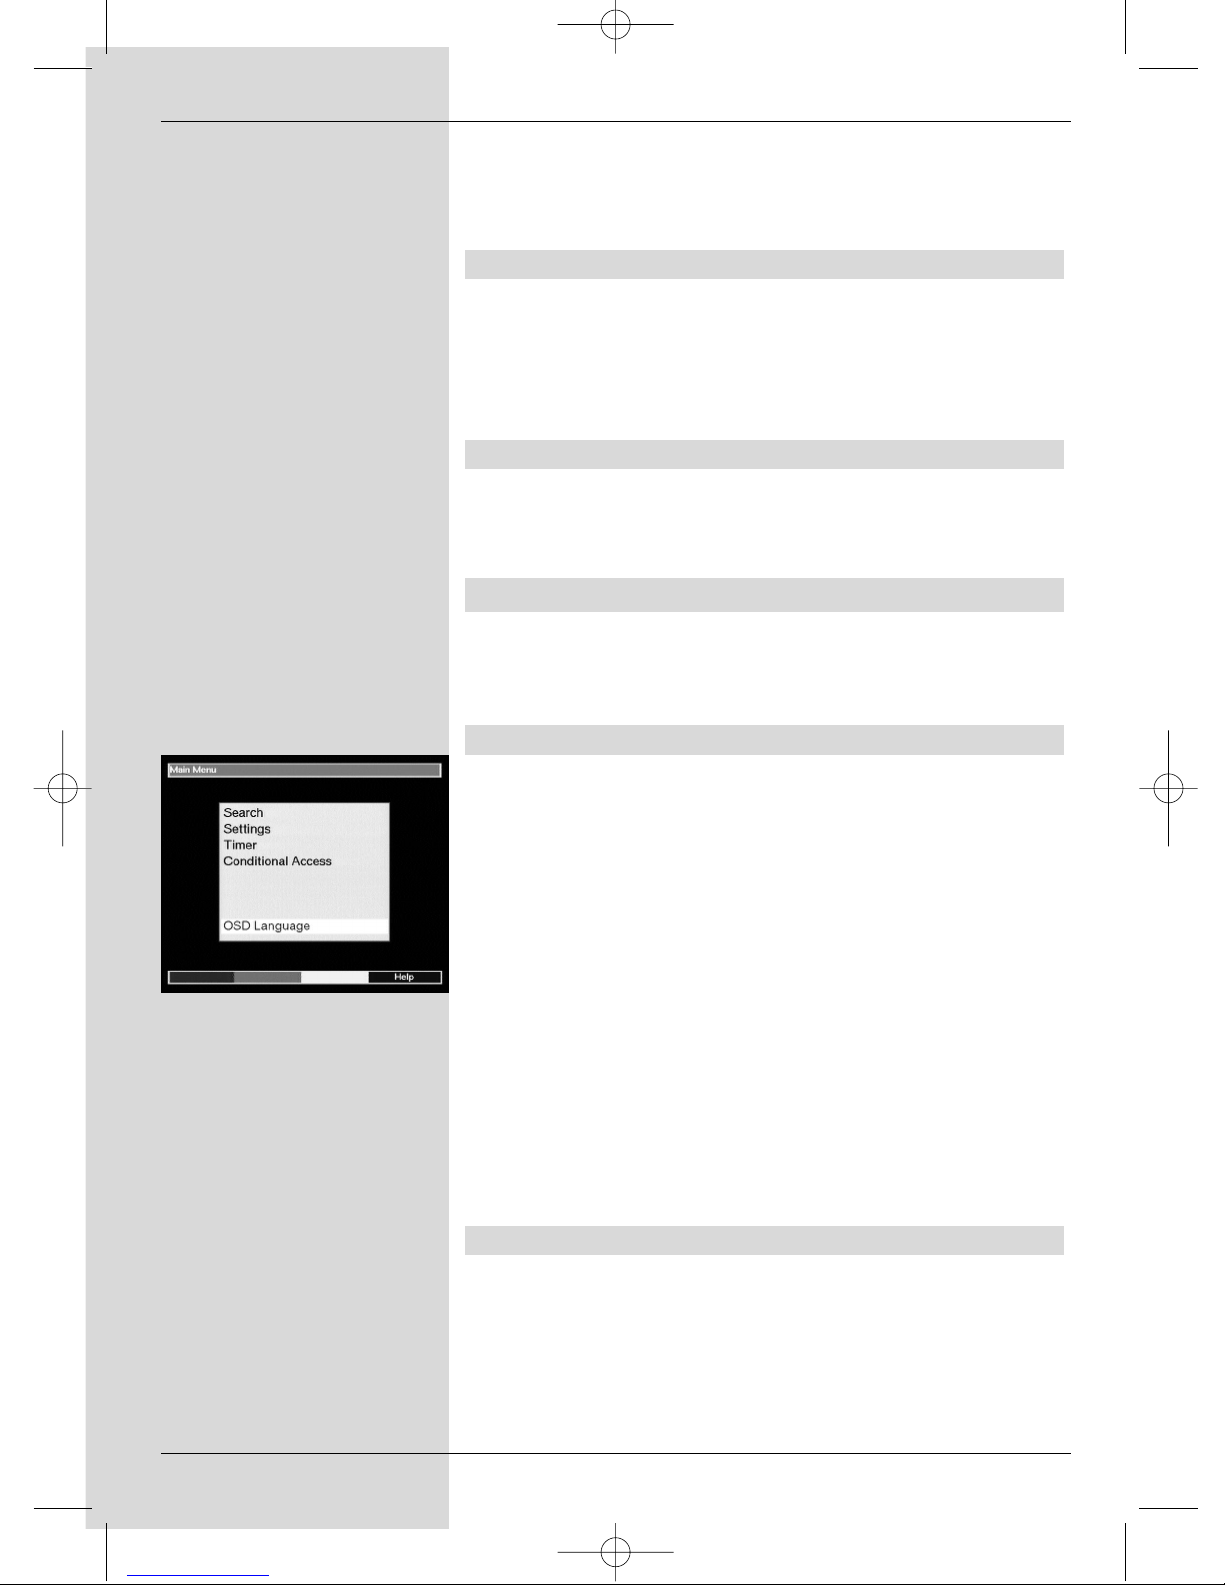
> Press the Menu key to display the Main Menu
(Fig.
5-1)
.
> Now use the arrow keys up/down to select the menu
item OSD language.
> Confirm by pressing OK.
The sub-menu OSD language will be displayed.
> Use the arrow up/down keys to select the desired
language. Use the arrow up/down keys to move
the marker up or down one line at a time, use the
arrow keys left/right to move forward or back one
page at a time.
> Store your selection in memory by pressing OK.
> Press the Back key to return to the Main Menu.
5.2 Basic settings
In order to gain optimum enjoyment from your DVB receiver,
you may still have to adjust some settings to your individual
preferences.
> Press the Menu key to display the Main Menu.
> Use the arrow keys up/down to select the line
Settings.
(Fig. 5-1)
bed_anl_DIGITY CI_Quark3_en.qxd 31.01.03 16:47 Seite 10
Page 11
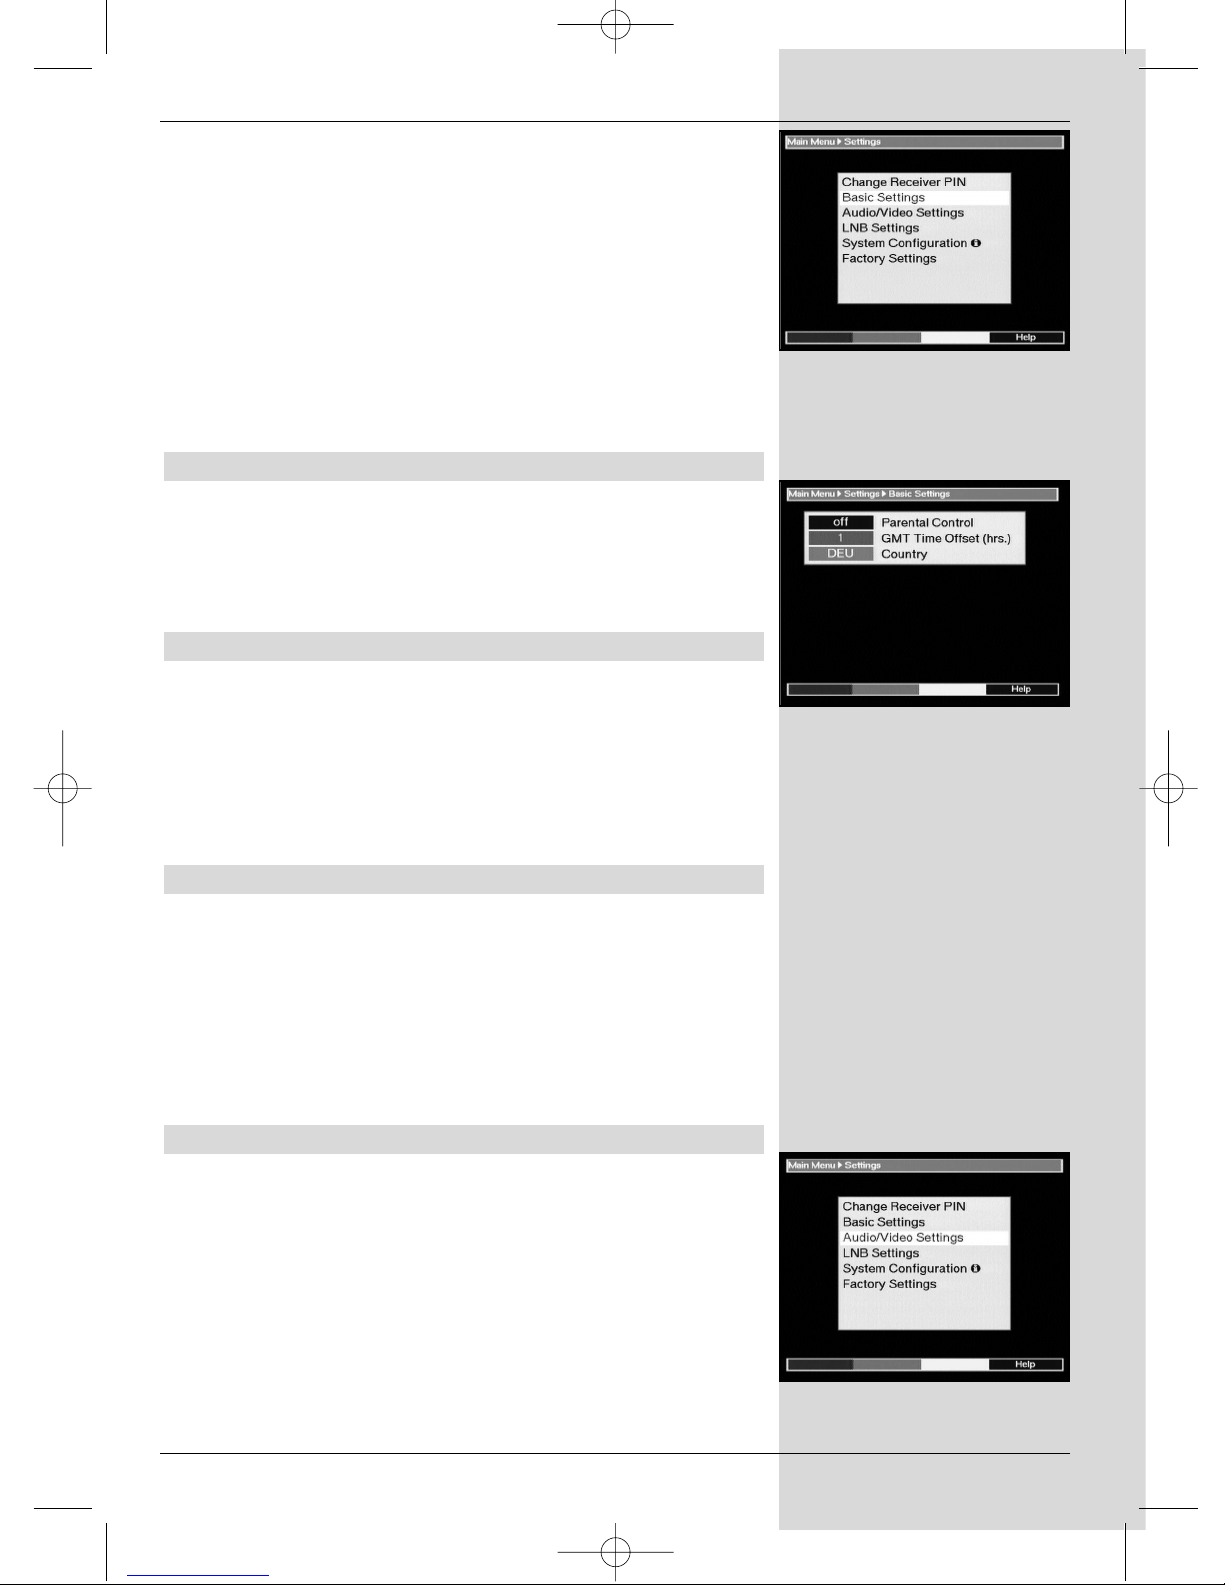
> Confirm by pressing OK. The sub-menu Settings will
be displayed.
(Fig. 5-2)
> Now use the arrow keys up/down to select the entry
Basic Settings.
> Confirm by pressing OK. The menu Basic Settings
will be displayed.
(Fig. 5-3)
> Use the arrow keys up/down to move the marker
around within this menu, and to make changes in
individual positions according to your preference.
When selecting a menu item please also note any
help text displayed.
The following settings can be customized:
5.2.1 Parental control
Your unit is equipped with a child-proof function. This means
that any programmes that you have blocked from access as
described under Points 7.1.5 and 7.2 can only be selected
after entering a four-digit PIN code. In this line you can press
the OK key to switch the child-proof feature on or off.
5.2.2 Time difference GMT (hours)
Your unit is equipped with an integrated clock. This is set via
satellite reception to Greenwich Mean Time. If you have
select None under Country (see 5.2.3), you merely need to
use the arrow keys right/left or the OK key to correct the
clock to your local time. In Germany the difference for
standard time is +1 hour, for daylight savings time the
difference is +2 hours.
5.2.3 Country
This function provides for automatic change-overs from
daylight saving time to standard time. Enter your home
country in the line Country, using the arrow keys left/right
to select the appropriate country.
> Press the Back key to return to the menu Settings, or
press the Menu key to return to normal operation. The
settings will be automatically stored in memory.
5.3 Audio/Video settings
In order to optimize the receiver in cojunction with your
television set, you can effect the following settings in the
menu Audio/Video Settings.
> Press the Menu key to display the Main Menu.
> Use the arrow keys up/down to select the line
Settings.
> Confirm by pressing OK. The sub-menu Settings will
be displayed.
(Fig. 5-4)
> Now use the arrow keys up/down to mark the line
Audio/Video Settings.
11
(Fig. 5-3)
(Fig. 5-2)
(Fig. 5-4)
bed_anl_DIGITY CI_Quark3_en.qxd 31.01.03 16:47 Seite 11
Page 12
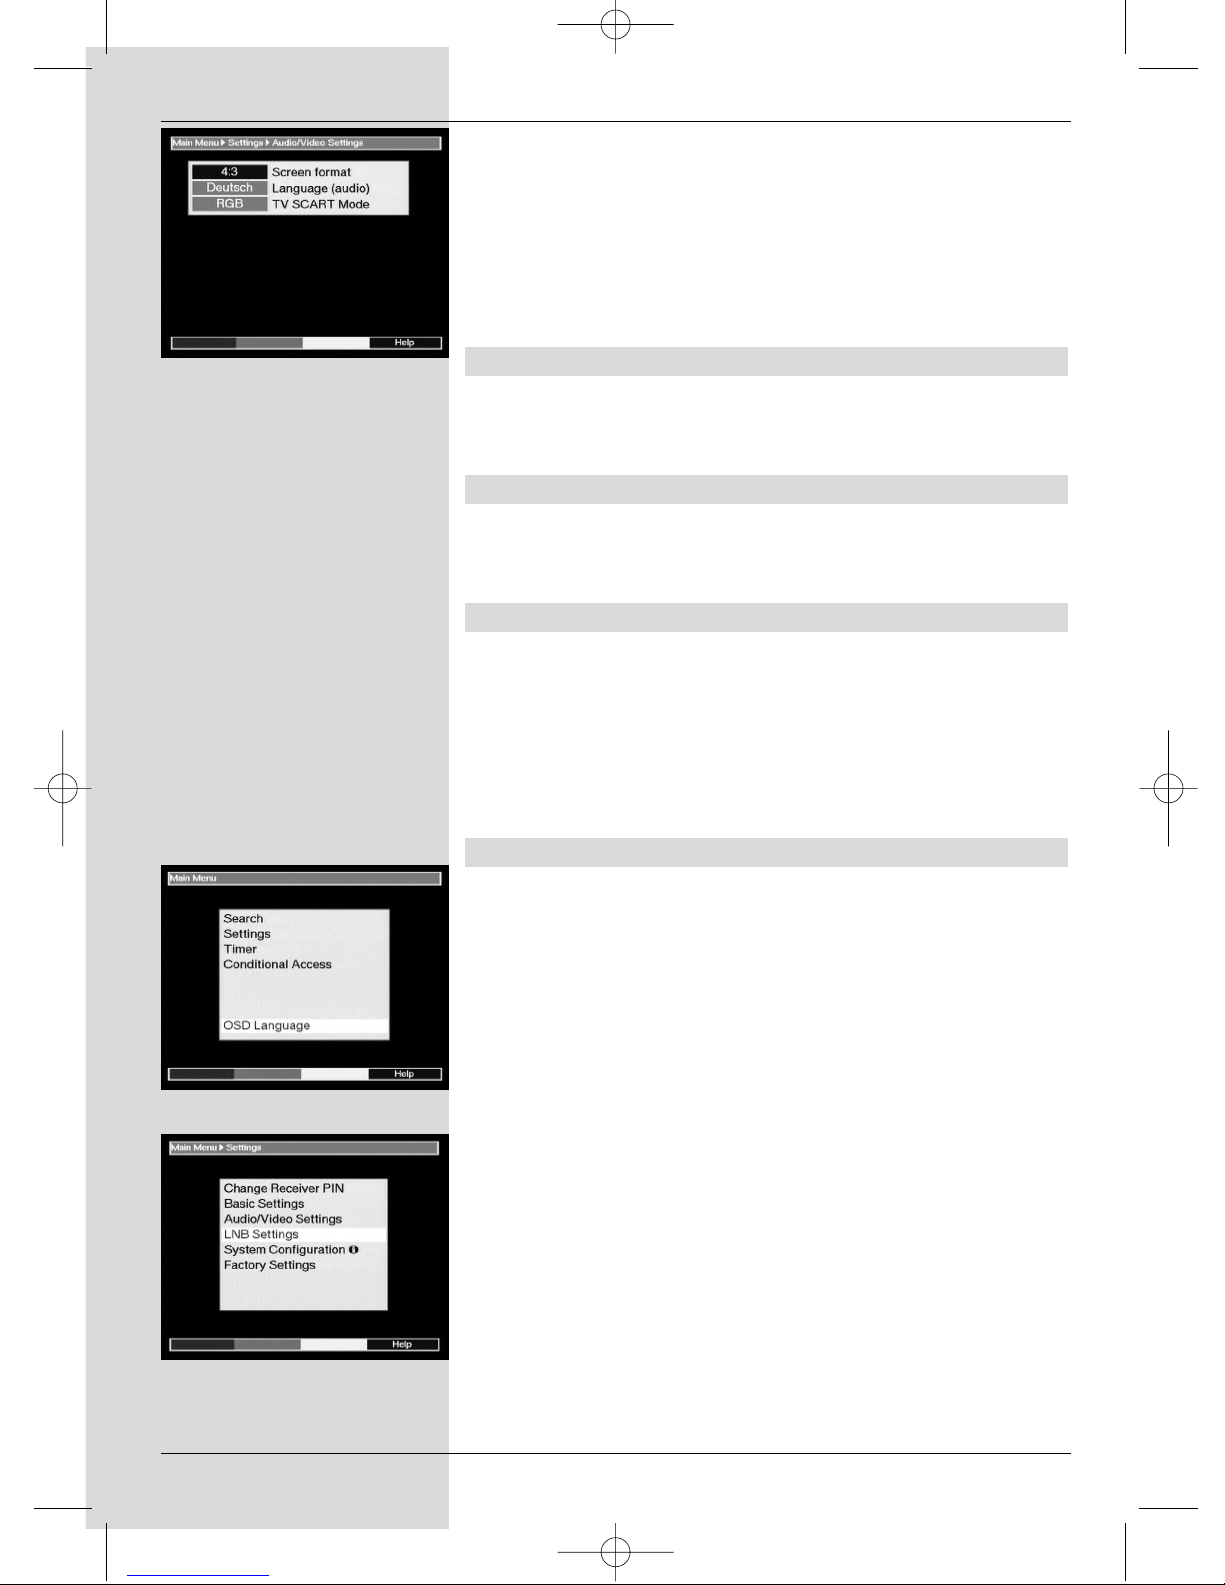
> Confirm by pressing OK.
The menu Audio/Video Settings will be displayed.
(Fig. 5-5)
> Use the arrow keys up/down to move around in this
menu, and to change the individual items as indicated.
Where indicated, please take note of the help text
displayed in conjunction with your selection.
The following settings can be effected:
5.3.1 Image format TV set:
Use the arrow keys up/down to set the appropriate image
format for your TV set: 4:3 or 16:9. This function allows the
image format to be adapted to your TV set automatically.
5.3.2 Language (Audio signal)
Use the arrow keys left/right in this line to select your
preferred language. Whenever this is broadcast (dual-tone
broadcasts) this will be selected automatically.
5.3.3 SCART mode
Use the arrow keys left/right in this line to select the setting
appropriate for your TV set, FBAS or RGB. For standard
sets retain the default setting RGB.
> Press the Back key to return to the menu Settings, or
press the Menu key to return to normal operation. The
settings will be automatically stored in memory.
5.4 LNB setting/Adjusting to external
unit/Satellite selection
When you have completed customizing the settings of your
receiver to your preferences, it may be necessary to adjust
the receiver to your antenna. The receiver is programmed at
the factory with all the ASTRA and EUTELSAT programmes,
and configured for a Universal LNB (see Anexure Technical
terms). These programmes can be received via an
appropriate antenna immediately after commencing operation
of your receiver, without any further adjustments.
If you wish to receive signals from other satellites, or if you
are using a different type of LNB,. you can make the
necessary adjustments to your receiver settings as follows:
> Press the Menu key to display the Main Menu.
(Fig.
5-6)
> Use the arrow keys up/down to select the line
Settings.
> Confirm by pressing OK.
The menu Settings will be displayed.
(Fig. 5-7)
> Now use the arrow keys up/down to select the line
LNB Settings.
12
(Fig. 5-5)
(Fig. 5-6)
(Fig. 5-7)
bed_anl_DIGITY CI_Quark3_en.qxd 31.01.03 16:47 Seite 12
Page 13
13
> Confirm by pressing OK. The menu LNB Settings
will be displayed.
(Fig. 5-8)
The following settings can be effected in this sub-menu:
5.4.1 Switching DiSEqC on and off
DiSEqC (Digital Satelliten Equipment Control) is a digital
switching signal used to control DiSEqC-compatible
components via the antenna connection.
If your external unit is equipped with DiSEqC componen ts
you must activate the DiSEqC switching:
> In this line, use the OK key to switch the DiSEqC on
or off.
As only one LNB can be controlled when the DiSEqC
switching is not activated, the menu will be restricted
to the configuration of a single LNB.
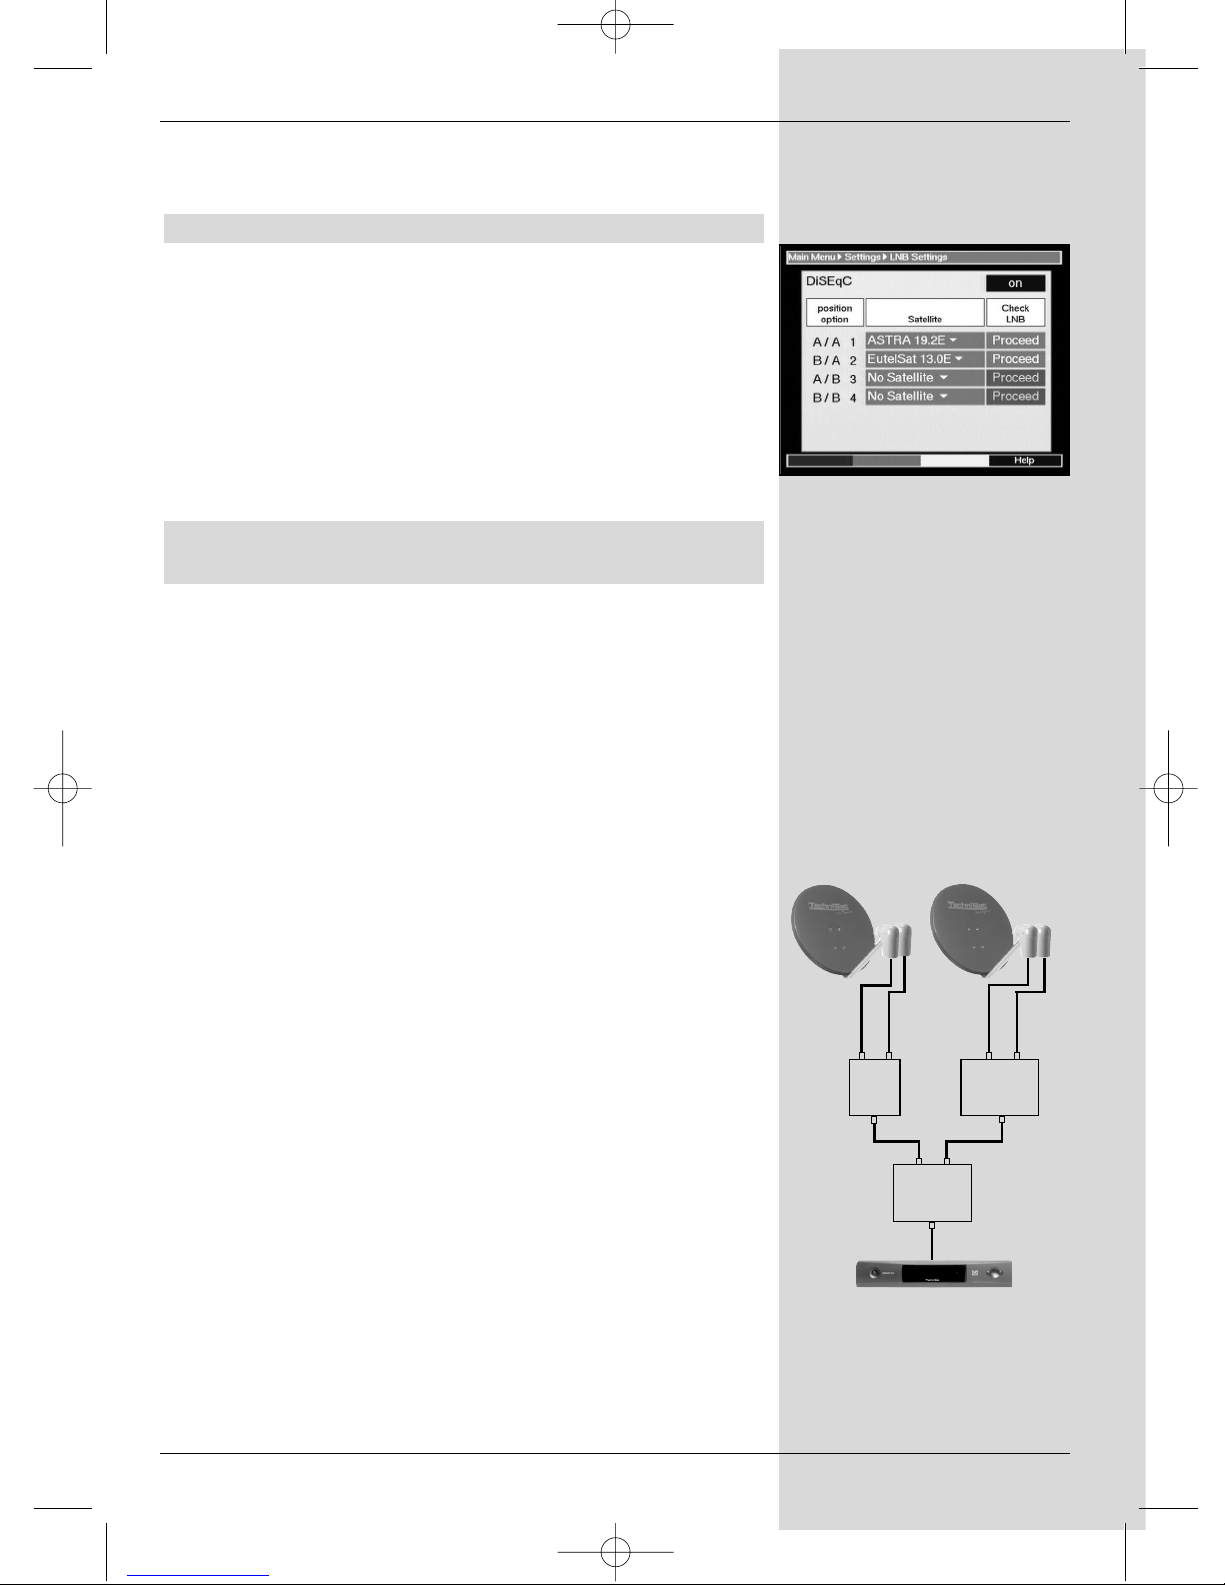
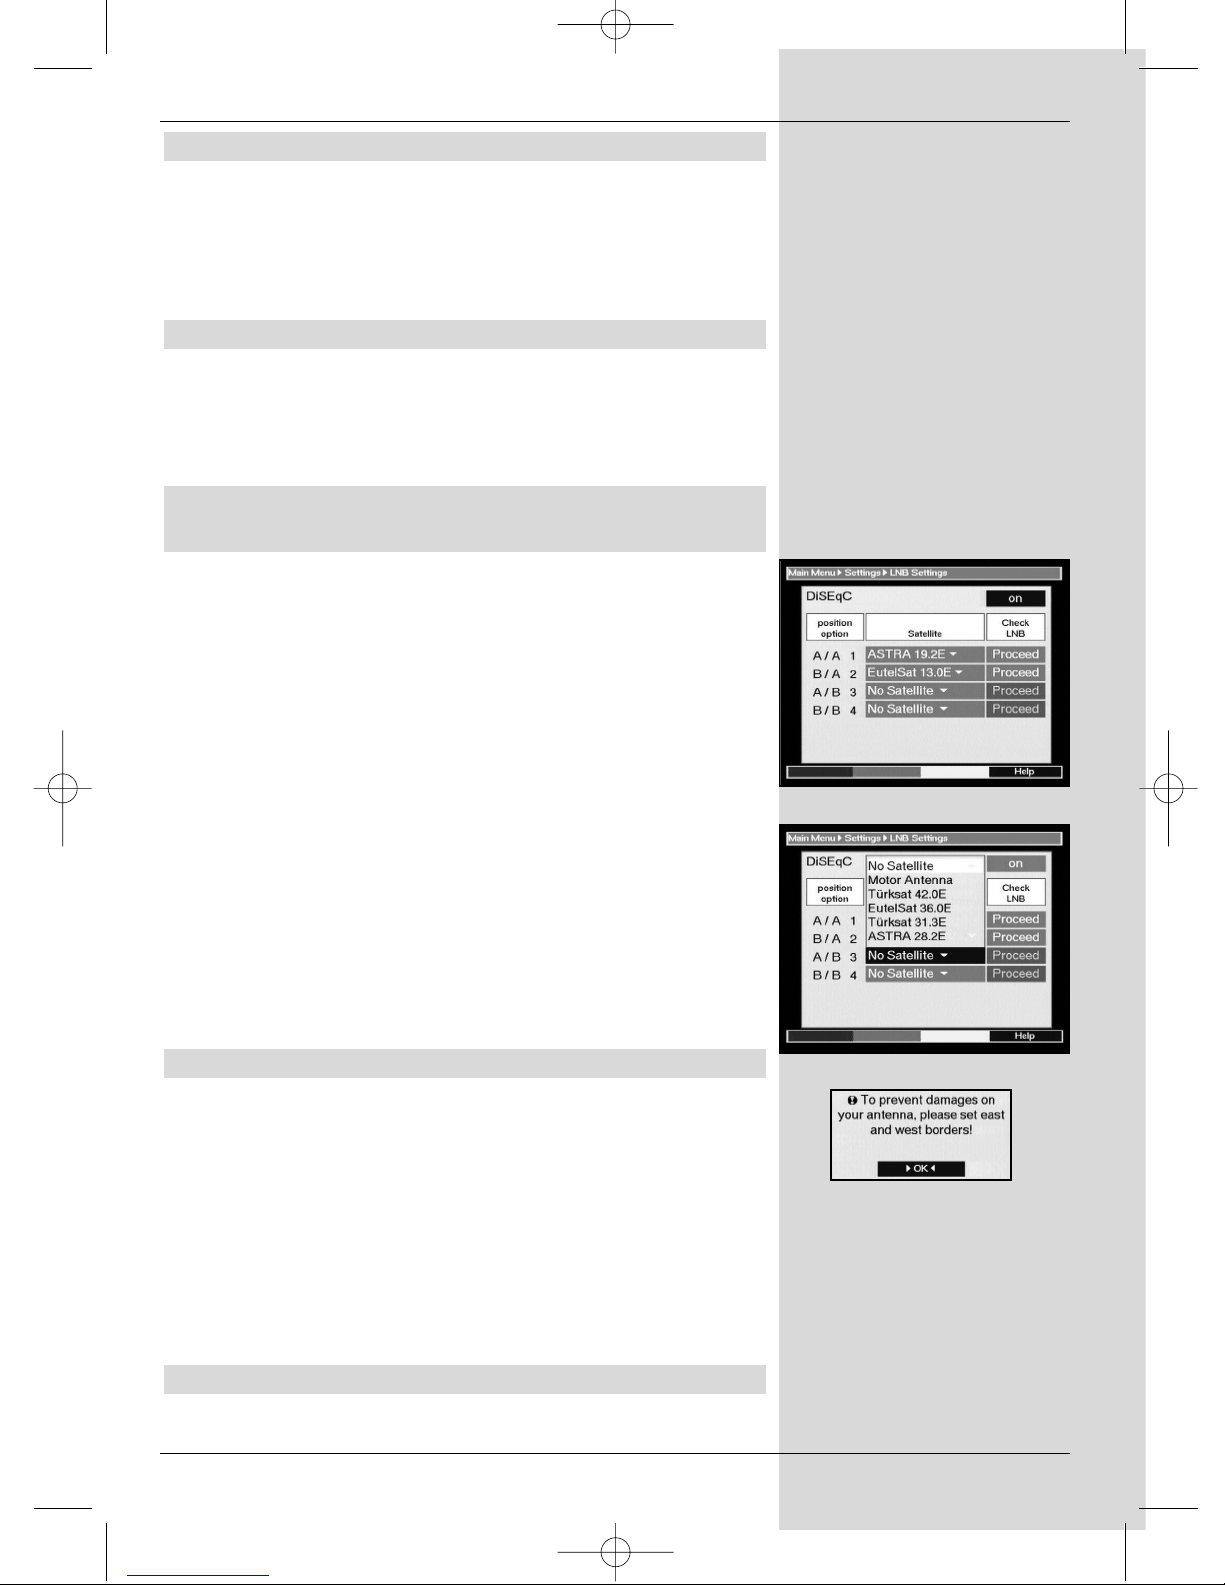
5.4.2 Setting the switching matrix and the LNB
characteristics
The menu lists the four switching criteria of the DiSEqC
switching feature.
Your unit is pre-programmed so that ASTRA will be received
in switch position A/A and Eutelsat will be received on switch
position B/A of a multi-switch. Should the switching matrix of
your receiving installation be configured differently, or if you
wish to receive other satellites, you can adjust your receiver
to the parameters of your receiving installation as follows.
> Use the arrow keys up/down to select the DiSEqC
switch position (1-4) to which you wish to assign a
satellite, by marking this line in blue (e.g.. A/B 3 No
Satellite).
> Press OK.
A table showing the satellites available for selection
will be displayed.
> Use the arrow keys up/down to mark the required
satellite.
Use the arrow keys up/down to move up or down the
menu one line at a time, use the arrow keys left/right
to move forward or back one page at a time.
Should the satellite you require not be listed, please
select one of the reserve slots, designated User1 to
User 14.
> Confirm by pressing OK. The selected satellite will
now be inserted at the previously marked poosition in
the menu LNB Settings.
You should now proceed to work through the menu LNB
Settings, until the settings in this menu correspond with the
characteristics of your receiving installation. In the case of
any switching criteria you do not require, select the option
No Satellite.
(Fig. 5-8)
A B
Position
Output
A B
Position
Output
A B
Option
Output
Example:
bed_anl_DIGITY CI_Quark3_en.qxd 31.01.03 16:47 Seite 13
Page 14
5.4.3 Additional Settings
Once you have adjusted the switching matrix of your DVB
receiver to the requirements of your receiving installation,
you should now check and, if necessary, correct the other
settings relating to your receiving unit.
> Use the arrow keys left/right to move the marker to
the item LNB Test.
> Now, in the line whose setting you wish to change, use
the arrow keys up/down to select the field
Continue.
> Confirm by pressing OK. The menu LNB Settings
will be displayed.
(Fig. 5-9)
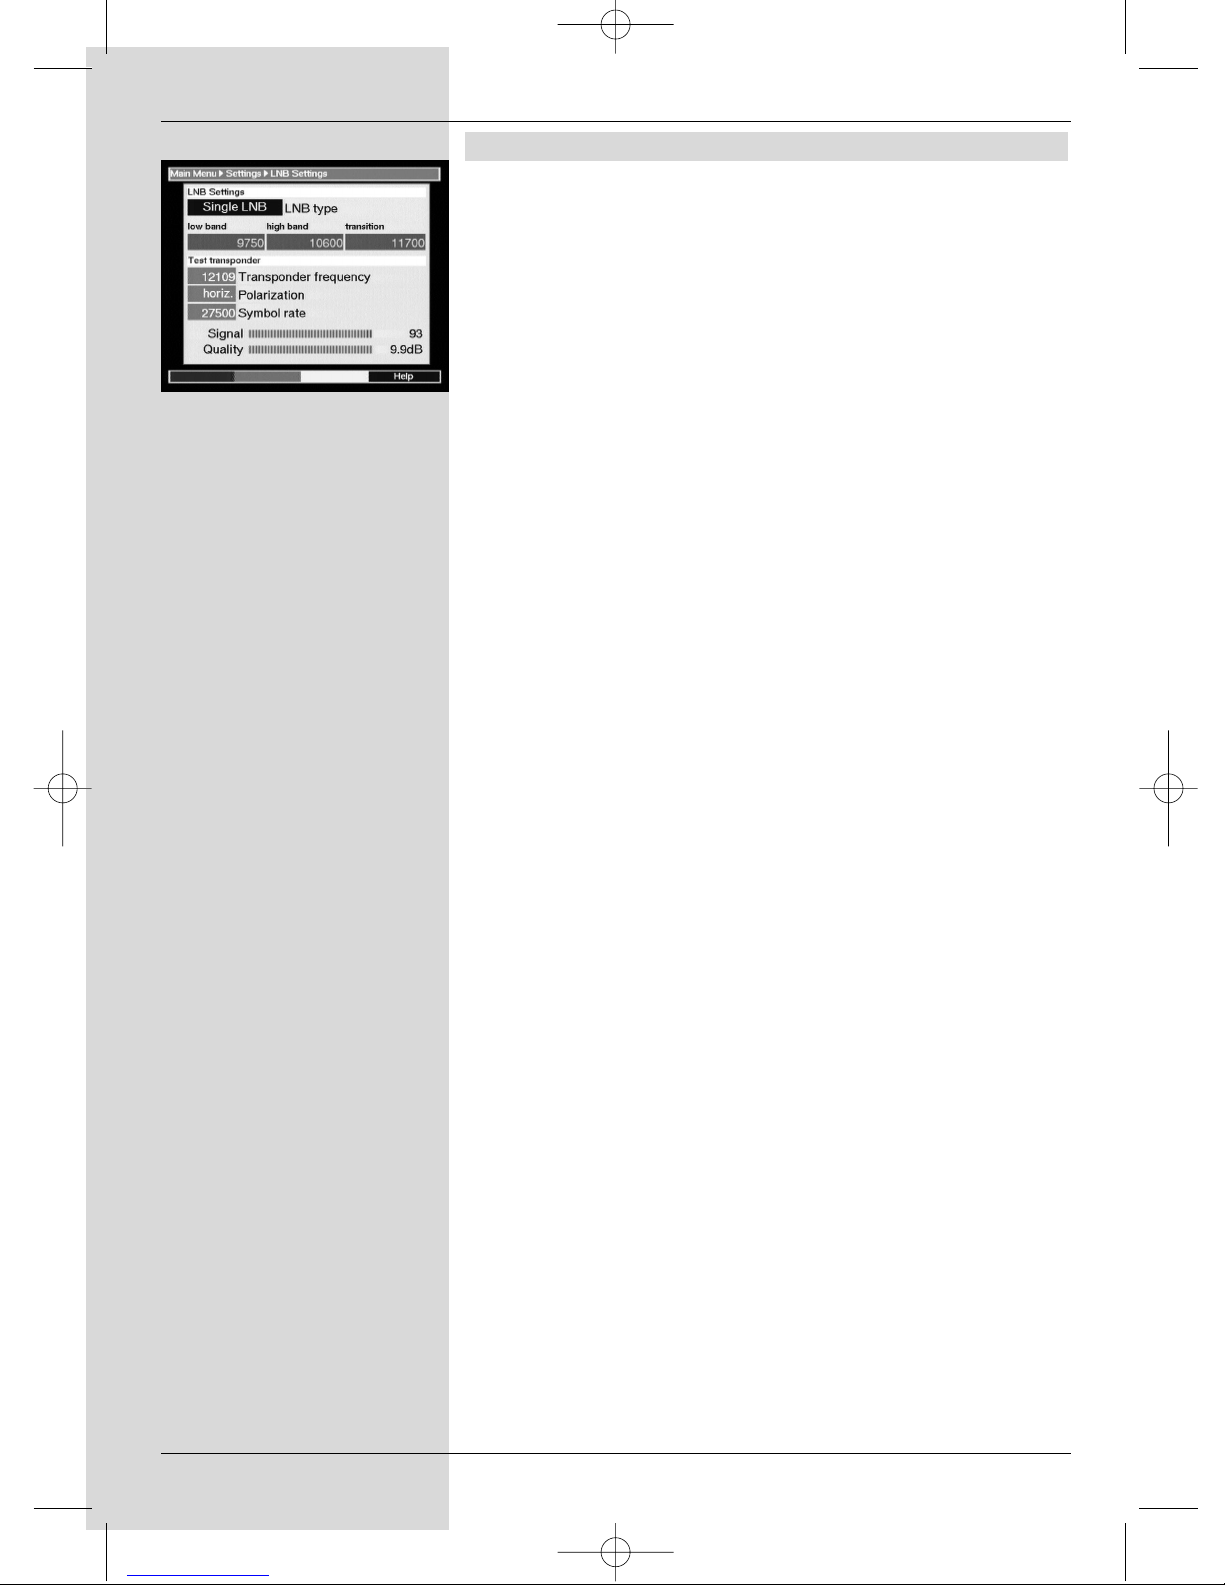
The following settings can be effected in this menu:
DiSEqC Type
> In this line, use the arrow keys left/right to select the
type of LNB you are using. You can choose from
Single LNB, Quatro LNB, DisiCon 1 LNB,
DisiCon 2 LNB, DisiCon 4 LNB, C-Band LNB
and a User LNB, for manual entry of LNB data.
> Press OK to accept the setting and store it in memory.
Test Transponder
The following items of this menu should only be entered when
you wish to test the signal of a particular satellite.
Transponder frequency
In this line, use the numeric keys to enter a frequency on
which digital programmes are broadcast.
Polarisation
Use the arrow keys up/down to enter the desired polarisation plane (horizontal or vertical).
Symbol rate
The symbol rate indicates the volume of data transmitted per
second. For example, this could be 27500 (27500 symbols
per second). Use the numeric keys to enter the appropriate
value.
User LNB
If you have selected the DiSEqC Type User LNB, you can
select further parameters:
LOF low band
LOF (Local oscillator frequency) is the frequency used to
convert the received frequency into the so-called 1.
intermediate frequency, which can then be interpreted by the
receiver. So-called Universal LNBs utilize 2 LOFs to cover the
entire reception range of 10.7 to 11,8 GHz (low-band) and
11,7 to 12,75 GHz (high band).
> In this line, use the numeric keys to enter the LOF of
the low band of your LNB.
14
(Fig. 5-9)
bed_anl_DIGITY CI_Quark3_en.qxd 31.01.03 16:47 Seite 14
Page 15
15
LOF high band
In this line, use the numeric keys to enter the LOF of the
high band of your LNB.
Switchover LOF low//high
In this line, use the numeric keys to enter the frequency at
which your LNB switches from the low band to the high band.
Press OK to accept the setting and store it in memory.
Signal/Quality
If you have entered the parameters of the test transponder
correctly, this line will indicate the signal strength and quality.
5.4.4 Rotating antenna
If you are operating the receiver in conjunction with a rotating
antenna driven by a DiSEqC motor ( Level 1.2), switch the
DiSEqC Control (Point 5.4.1) on and please note Point
8 of the operating manmual.
6 Operation
6.1 Switching on and off
> Switch the receiver on by pressing the On/Standby
key on the front panel of the unit, or on the remote
control.
> Pressing the same key again - on the unit or on the
remote control - will switch the receiver off again.
> The unit is now in standby mode, ready for use.
Please note:
When switching the receiver off, all current settings are
automatically stored in memory. For this reason the
unit can only be switched on again after a period of
approx. 15 seconds.
6.2 Programme selection
6.2.1 Using the Programme keys up/down
> You can switch from one programme to another, one
slot at a time, using the programme keys up/down
either on the receiver itself or on the remote control
unit.
6.2.2 Using the numeric keys
> You can use the numeric keys to enter the desired
programme number directly.
For example:
1 for programme slot 1
1, then 4 for programme slot 14
2, then 3, then 4 for programme slot 234
bed_anl_DIGITY CI_Quark3_en.qxd 31.01.03 16:47 Seite 15
Page 16

When entering programme numbers with several digits, you
have approx. 3 seconds time after pressing a key to complete
the entry.
If you wish to enter a number consisting of a single or two
digits, you can speed up the switching process by keeping the
last digit depressed. for a few seconds.
6.2.3 Using the programme list
> Press the OK key.
The programme list will now be displayed.
(Fig. 6-1)
In TV mode, only TV programmes will be displayed, and in
Radio mode only radio programmes will be shown. The
programme currently selected will be highlighted in yellow.
> You can now highlight the desired programme, using
the arrow keys up/down.
> Press OK to switch to the selected programme.
> Use the arrow keys up/down to move up or down in
the list one slot at a time.
> Use the arrow keys left/right to move through the list
one page at a time.
6.2.3.1 Selecting a list
In order to facilitate the easy location of programmes, the
receiver features several programme lists. You can use a list
of your own personal Favourites (see Point 7.1), or you can
have the programmes displayed alphabetically or sorted
according to providers.
> Press OK. The active programme list will be
displayed.
> Now press the red function key to open a window
showing the types of programme list available
(Favourites List, Providers and ABC ...).The
active programme list type is highlighted.
(Fig. 6-2)
> Use the arrow keys up/down to select, for instance,
the programme list type ABC and confirm by
pressing OK.
The alphabetically sorted programme list will be
displayed, containing all programmes.
(Fig. 6-3)
> Use the arrow keys up/down to mark the programme
you wish to view.
> Confirm by pressing OK.
6.2.4 Calling up blocked programmes
If a programme is selected that is protected by the parental
control function, a window will be displayed on the screen
“Enter PIN” .
> Use the numeric keys to enter your PIN code.
The selected programme can now be viewed.
16
(Fig. 6-1)
(Fig. 6-2)
(Fig. 6-3)
bed_anl_DIGITY CI_Quark3_en.qxd 31.01.03 16:47 Seite 16
Page 17

17
To make operation more convenient, you will only be asked to
enter the PIN code once while the receiver is in operation, the
programme remains unblocked for the remainder of the
session. The parental control feature only becomes active
again the next time the receiver is switched on.
6.2.5 Information box
Each time you switch programmes, an information box will be
displayed briefly (Fig. 6-4) showing the programme slot and
the programme name. In addition, other programme characteristics are indicated, such as TxT for vide otext, 16/9 for a
programme in 16/9 format, A/B for various audio channels
(e,g, a film synchronised in several languages, or various
radio programmes) and a key symbol to indicate encrypted
programmes.
6.3 Volume control
You have the facility to vary the volume of your receiver. This
makes for easy, convernient operation, since all important
functions are thus combined on one remote control, so that
you willhave to use the remote control of your television set
only rarely. When the receiver is switched on, sound will be
reproduced at the volume level last selected.
> Use the keys Volume + (louder) and Volume - (softer)
to regulate the volume of your receiver.
> Press the key Sound on/off to switch the sound off
(mute), press the key again to switch sound on again.
6.4 Reception of encrypted programmes
Your receiver is equipped with a Common Interface. To
receive encrypted programmes with this, you must obtain a
CA module as well as a valid smart card, and insert these in
the appropriate slot provided on the rear panel:
> Insert a CA module in the slot.
> Insert the smart card in the card slot of the CA
module. Ensure that the gold-coloured chip of the
smart card is located on the upper side of the card, in
the direction in which it is inserted.
> If an encrypted programme is selected for viewing, the
receiver will automatically check the card slot, and will
display the programme in unencrypted form, provided
that a corresponding CA module and the
corresponding valid smart card are inserted.
(Fig. 6-4)
bed_anl_DIGITY CI_Quark3_en.qxd 31.01.03 16:47 Seite 17
Page 18
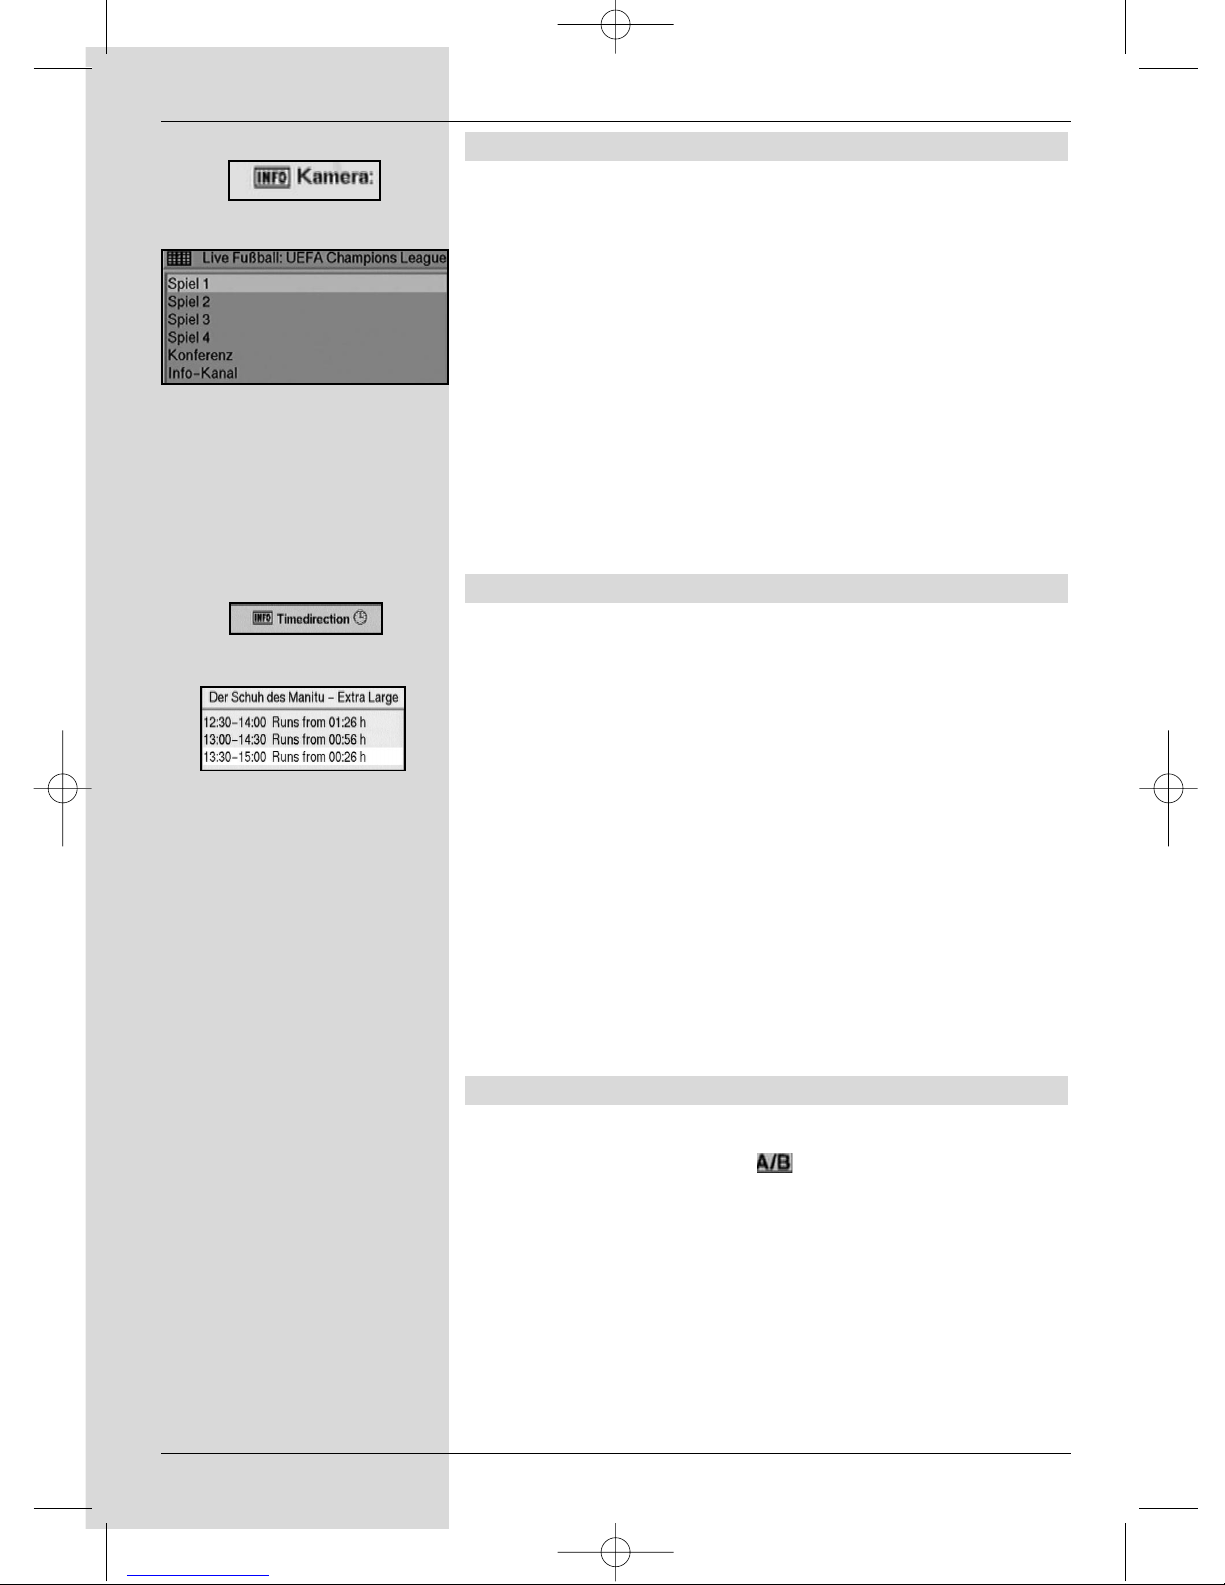
6.4.1 Multifeed options
Some programmes (e.g. Premiere Sport) provide the option of
multifeed reception. This feature allows you, for instance, to
view a sports event from the viewpoint of various camera
angles, which you can select at will (e.g. Formula 1 racing) or
to switch to various locations for the same sport (e.g. National
Football League games). Where a programme, e.g. Sport 1,
offers multifeed options, the window Camera
(Fig. 6-5)
will be
displayed.
> To select one of the available options, press the Info
key. An information window with the available options
will be displayed.
(Fig. 6-6)
> Use the arrow keys up/down to select the desired
option.
> Confirm by pressing OK.
Your receiver will now display the selected option.
6.4.2 Time control (Near Video On Demand)
Other channels (e.g. the PREMIERE DIREKT channels) offer
the facility of time control. In this case, movies are available
round the clock at staggered starting times.
Where a programme provides time control, this will be
indicated by the display of an information window Time
Control
(Fig. 6-7)
.
> To select on of the starting times available, press the
Info key.
A window showing the available starting times will be
displayed
(Fig. 6-8)
.
> Use the arrow keys up/down to select the desired
starting time.
> Confirm by pressing OK.
If the programme availability has been confirmed, you
will be able to view it at the selected starting time. Also
refer to the programme guide of your provider for
details.
6.5 Selecting a different language
Where a programme is broadcast in several languages, or
with several sound channels ( in the information window)
you can select a different language or a different sound
channel as follows:
> Press the key Language Select. Where available, a
list of the currently broadcast languages will be
displayed on the TV screen.
> Use the arrow keys up/down to select the preferred
language.
> Confirm by pressing OK.
You can now enjoy the programme in the desired language.
You receiver is also equipped to receive mono broadcasts.
18
(Fig. 6-5)
(Fig. 6-6)
(Fig. 6-7)
(Fig. 6-8)
bed_anl_DIGITY CI_Quark3_en.qxd 31.01.03 16:47 Seite 18
Page 19

6.6 Switching between TV and Radio
The pre-programming feature includes television programmes
as well as radio programmes. If the latter are selected, the
TV image is switched off, and the screen displays only the
programme name.
> Use the TV/Radio key to switch the receiver into
radio mode. The receiver will go to the last radio
programme selected.
> Pressing the TV/Radio key again will return you to
the television programme last viewed.
6.7 Return to previous programme
> Press the Back key on the remote control to return to
the previously selected programme.
> Press the key again to revert to the programme
viewed before the switch.
6.8 Display clock and programme information
This function allows you to display programme information
related to the programme currently selected.
> Press the blue function key to display information for
the programme currently selected.
On the lower half of the screen you will see a display showing
the current time, the name of the current programme,
including the start and end times of the programme, where
these are broadcast by the provider.
> Where the information is available from the provider,
pressing the blue function key again will display
information relating to the following programme.
6.9 Additional programme information
Where broadcast by the provider, you can obtain additional
programme information by pressing the function
Programme info.
> Press the yellow function key to open an additional
information window.
This will again display information relating to the
current programme.
> Press the yellow function key again to display
information on the following programme.
> Press the yellow key again to remove the information
window display and return to normal operation.
19
bed_anl_DIGITY CI_Quark3_en.qxd 31.01.03 16:47 Seite 19
Page 20
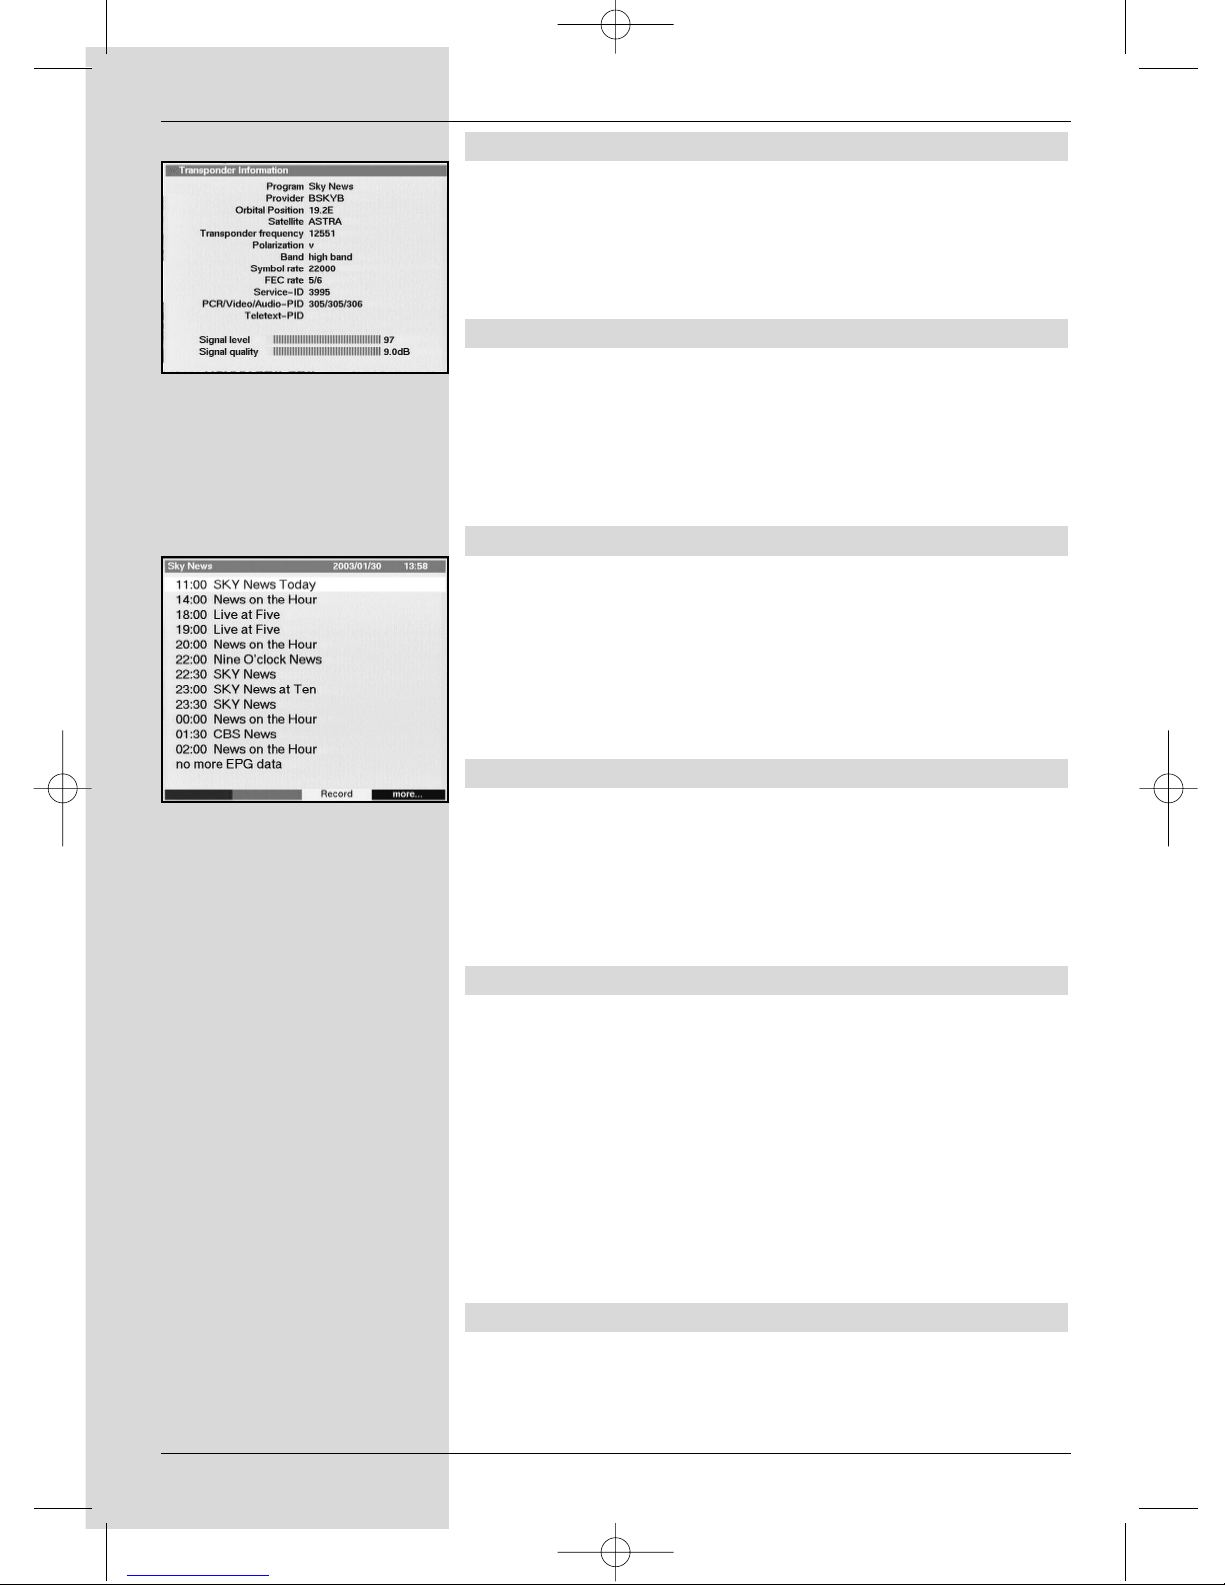
6.10 Transponder Information
> Press the green function key (Transponder
Information), to display the data relating to the
currently selected transponder
(Fig. 6-9)
.
> Press the green function key again to exit from
transponder information.
6.11 Electronic Programme Guide
The Electronic Programme Guide function allows you to
display programme schedules as well as content descriptions
of various programmes on the television screen. You can thus
very quickly obtain an overview of current programmes as
well as of the schedule for the remainder of the day and the
next few days, wherever this information is provided
6.11.1 Calling up the Electronic Programme Guide
> Switch on both the receiver and your TV set.
> Press the EPG key on the remote control of your
receiver.The electronic programme guide for the TV
channel currently being viewed will be displayed on
your screen. This includes data relating to the
programme for the current day
(Fig. 6-10)
.
The following functions are available:
6.11.2 Programme preview for following days
Wherever this information is provided, you can obtain information on the programm contents for the next few days relating to the channel currently selected, by pressing the arrow
key right.
Pressing the arrow key left will take you back to the previous
table displayed.
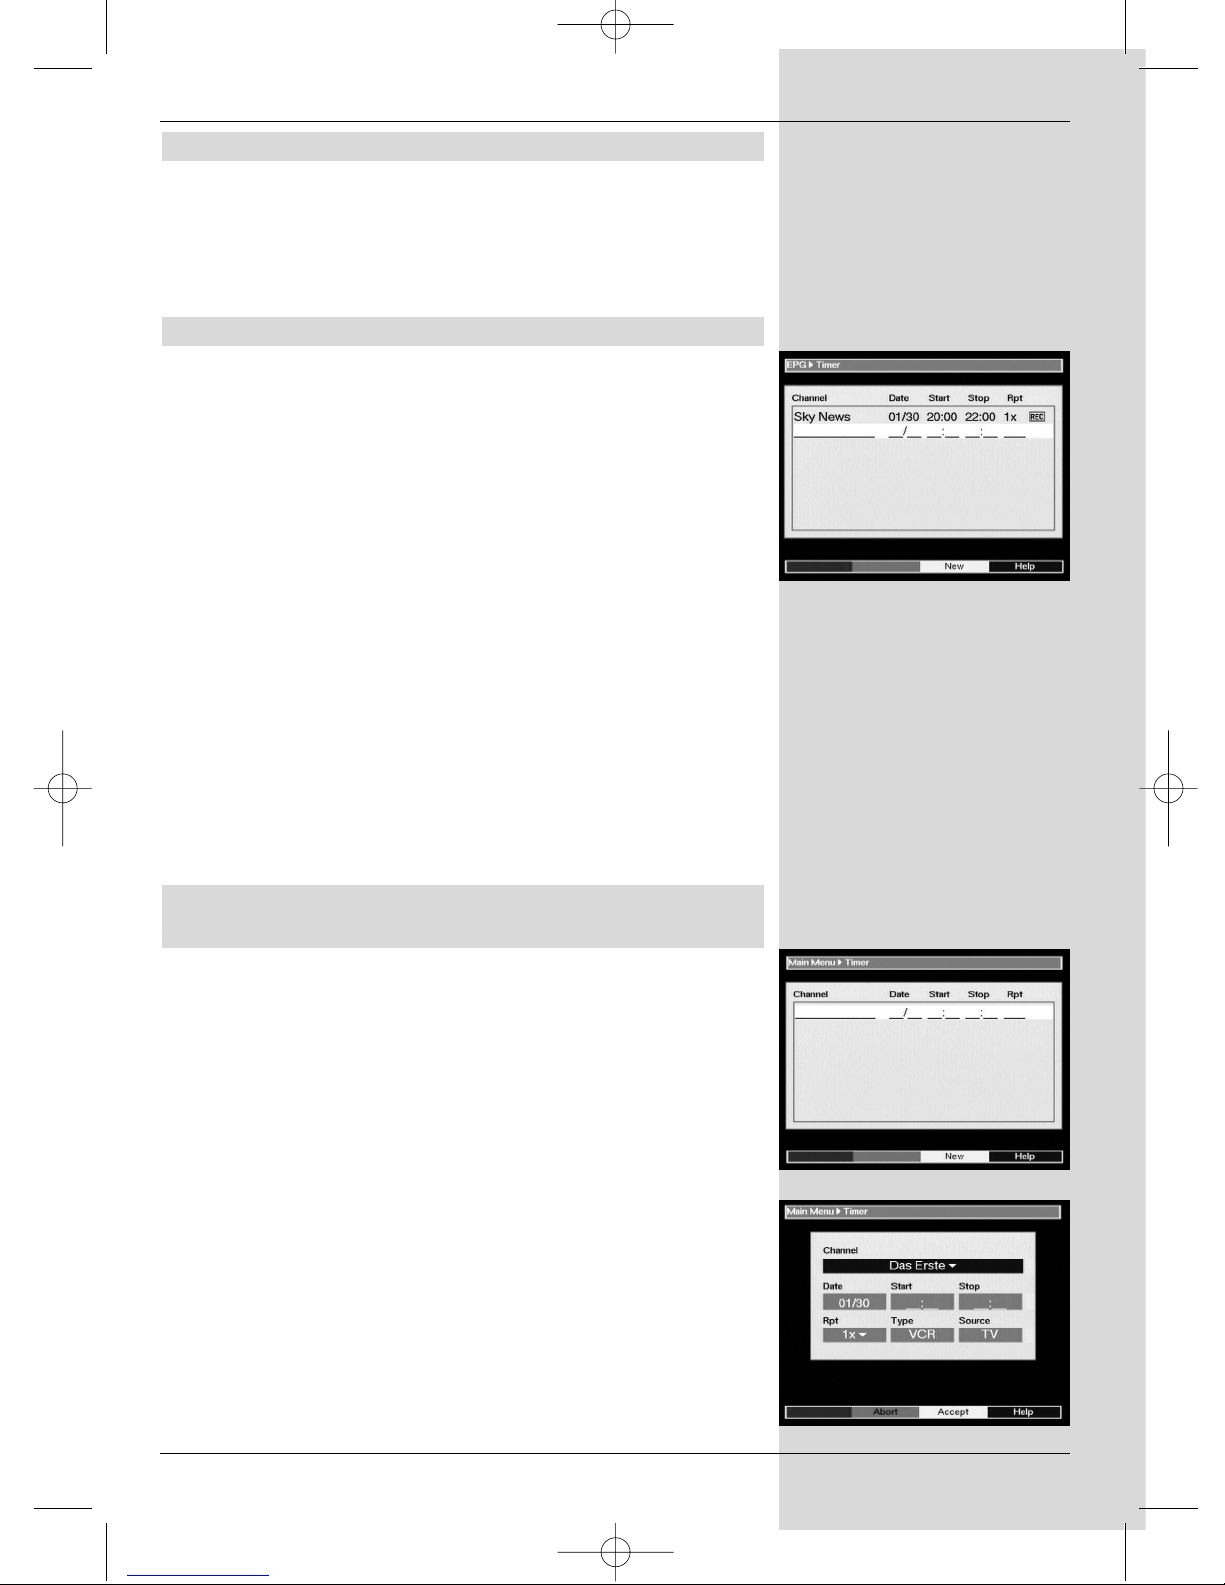
6.11.3 EPG Information
Wherever this information is broadcast, the EPG function will
provide you with information on various programmes:
> Use the arrow keys up/down to mark the desired
programme.
> Press either the EPG key or the blue function key
(more) to display the information.
Lengthy information text can be moved by using the
arrow keys up/down, while the arrow keys
left/right can be used to move through the text a
page at a time.
> Press the Back key to return to the previous table.
6.11.4 Exiting from EPG
> Press the Back key to return to normal operating
mode.
20
(Fig. 6-9)
(Fig. 6-10)
bed_anl_DIGITY CI_Quark3_en.qxd 31.01.03 16:47 Seite 20
Page 21
21
6.12 Timer
Your receiver is equipped with a timer. This allows you to
make video recordings even when you are away. The timer
mode is indicated by a blinking control LED in the display.
Timer mode can be cancelled by pressing the On/Standby
key.
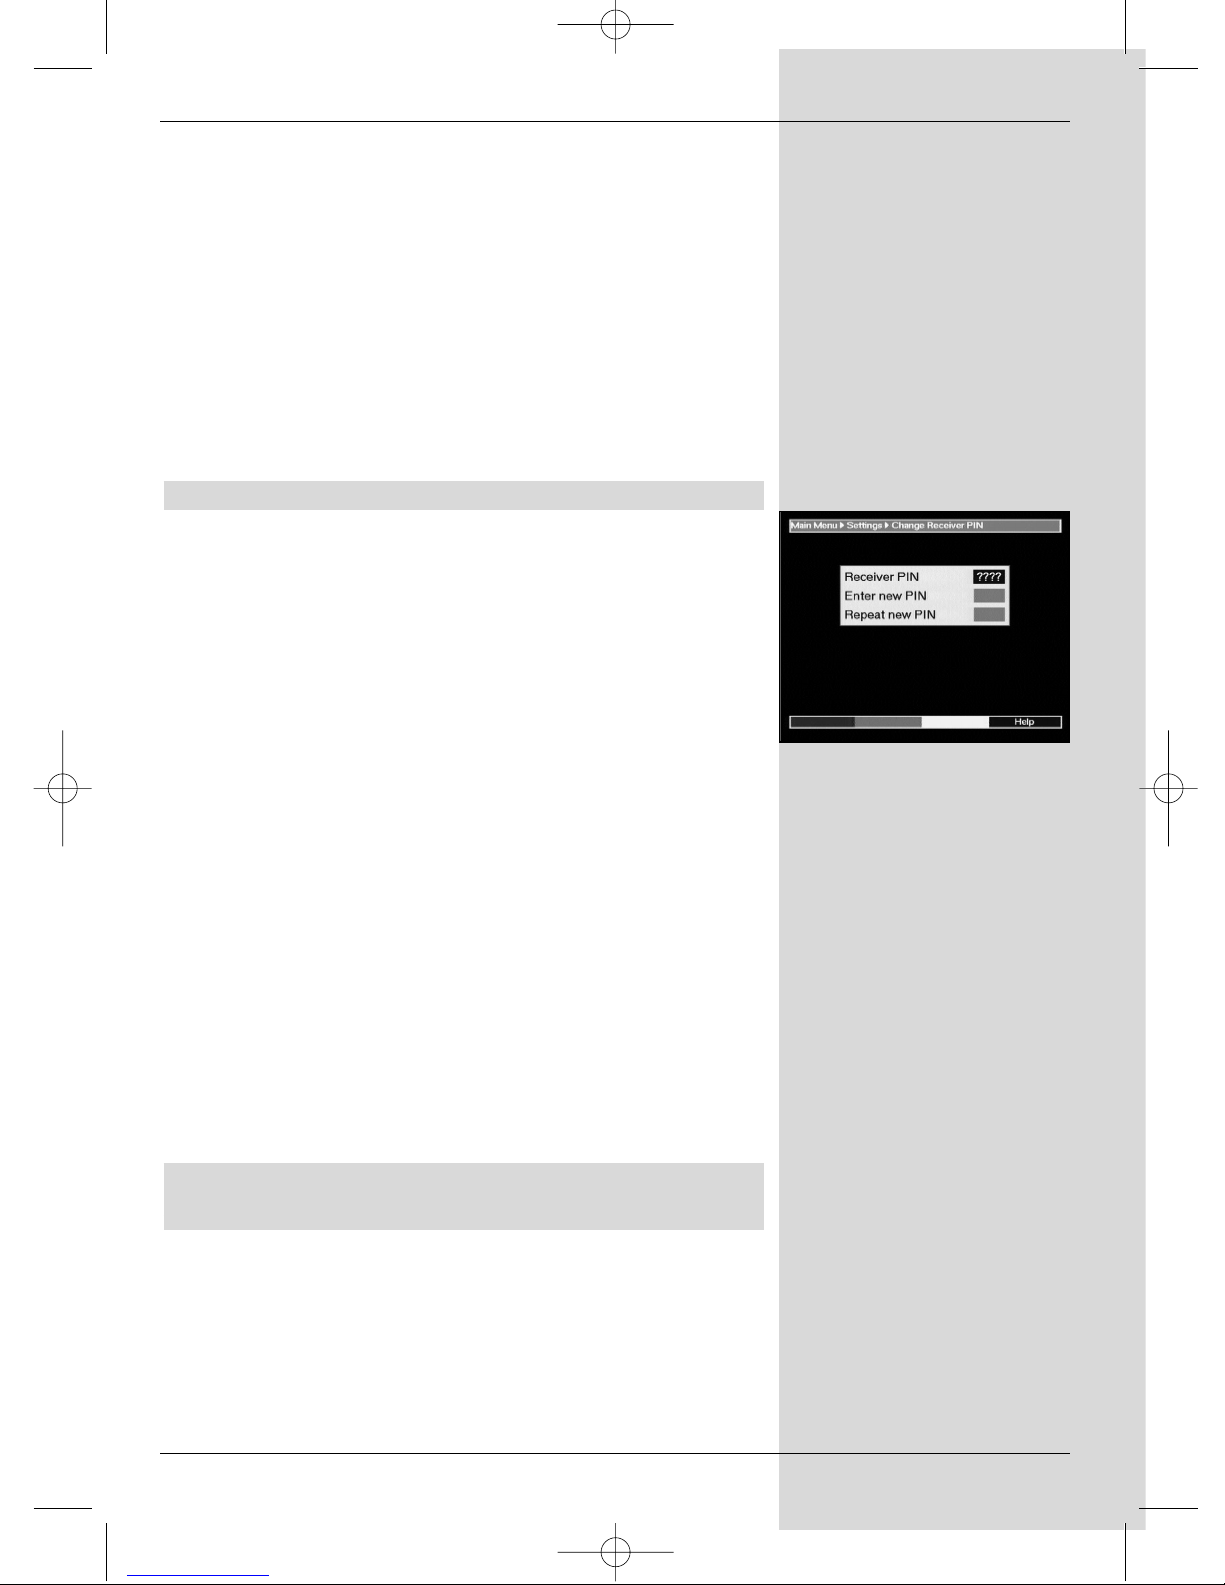
6.12.1 Programming via EPG:
> Switch to the programme on which the item to be
recorded is broadcast.
> Press the EPG key. The EPG table of the programme
selected will be displayed.
> Use the arrow keys up/down to mark the required
programme.
> Press the yellow function key (Record).
The data relating to the marked programme will now
be stored in the timer memory, and will be displayed
on screen for control purposes.
(Fig. 6-11)
> To delete a marked timer, press the green function key
(Delete) and confirm when asked to do so on screen.
> Press the Back key to return to the EPG table, and, if
you wish, to programme additional timer events
or
> Press the TV/Radio key to return to normal
operation.
The receiver will now select the appropriate programme at
the programmed time, and will, if instructed to do so, revert to
stand-by mode at the end of the programme.
6.12.2 Manual programming/Changing timer set-
tings
In addition to EPG timer programming you can also carry out
manual programming of the timer. To do this, proceed as
follows:
> Press the Menu key to display the Main Menu.
> Mark the item Timer and confirm by pressing OK.
The Timer menu will be displayed.
(Fig. 6-12)
> Press the yellow function key (New) to go to timer
programming, in order to programme a new timer
event.
(Fig. 6-13)
> To alter an existing timer setting, mark this by using
the arrow keys up/down. Press the yellow function
key (Change) to access the settings of the marked
timer.
For programming, proceed as follows:
Source
> Use the arrow keys to mark the item Source, then
use the OK key to enter the required source (TV or
Radio).
(Fig. 6-11)
(Fig. 6-12)
(Fig. 6-13)
bed_anl_DIGITY CI_Quark3_en.qxd 31.01.03 16:47 Seite 21
Page 22

Channel
In this line, select the television channel/station on which you
wish to record a programme:
> If necessary, use the arrow keys to mark the
Channel.
> Press OK. A programme list will be displayed.
> Use the arrow keys to mark the desired programme.
> Confirm by pressing OK.
The selected programme will now be accepted into the
timer menu.
Date
> Use the arrow keys to mark the item Date.
> Use the numeric keys to enter the recording date.
Start
> Use the arrow key right to select the item Start.
> In this line use the numeric keys to enter the starting
time.
Stop
> Repeat the steps as described under “Start” to enter
the stop time, or end of programme.
So that all events can be included, there should be an
interval of at least one minute between the stop time of a
timer event and the starting time of the next timer event!
Repeat (optional)
> Use the arrow key right to mark the item Rep.
> Press OK.
A selection window will be displayed, offering various
repeating suggestions.
1x Timer on
D Daily repeat
1xW Repeat once a week
1-5 Repeat only on weekday
6-7 Repeat only on weekends
> Use the arrow keys up/down to select the desired
function.
> Press OK to accept the setting into memory.
> When you have completed the programming, press
the yellow function key (Accept) to accept and store
the data in memory.
> Press the TV/Radio key to return to normal
operation.
Type
> Use the arrow key right to mark the item Type.
> Use the OK key to enter the required type in this line.
VCR
Your receiver will be switched on resp. off for the
selected programme. If the receiver is switched on by
means of the timer, most of the functions of the remote
control are disabled, as a safety precaution to prevent
22
bed_anl_DIGITY CI_Quark3_en.qxd 31.01.03 16:47 Seite 22
Page 23

inadvertent interruption of the recording.
Timer operation is indicated by blinking of the control
LED on the display.
Preselect
Your receiver switches itself on at the set time, and
selects the appropriate channel. In contrast to the
VCR setting, all functions of the remote control remain
active, and the unit does not switch off at the end of
the recording.
Note!!!
Please ensure that the information box shows the correct
time. If this is not the case, switch your receiver to ZDF or
any other channel providing standard clock time for at least
30 seconds, to allow the unit to synchronize with the correct
time.
6.13 Video text
6.13.1 Using the video text decoder of your
television set
Where available from the provider, video text will be available
on your TV set. To operate the video text function use the
remote control of your television set. Should you experience
any problems with your television set, such as graphics and
text being superimposed, switch your receiver to FBAS
mode (Point 5.3).
6.13.2 Using the internal video text decoder
If your television set is not equipped with an integrated video
text decoder, you can still receive video text, where broadcast
by the provider, through your receiver.
> Select the programme on which you wish to view
video text information.
> Press the red function key to switch on video text.
(Fig. 6-14)
> Use the numeric keys to enter the video text page
you wish to view. Your input will be displayed in the
upper left corner of the screen.
When you have entered the desired page number, the
receiver will search for the selected page. As not all
pages can be transmitted simultaneously, it may take
a few seconds before your receiver finds the page and
displays it on the TV screen.
All video text providers use page 100 for their
index/list of contents.
> Press the red resp. green function keys to move
forward resp. backward in the text one page at a time.
> Press the Back key to return to normal operation.
23
(Fig. 6-14)
bed_anl_DIGITY CI_Quark3_en.qxd 31.01.03 16:47 Seite 23
Page 24

7 Changing basic programming
7.1 Configuring the programme list This chapter
describes how you can change the pre-programming as well
as the Favourites list of your receiver to reflect your personal
preferences. This function is also required to sort newly found
programmes into the list after a programme search.
For your information, your receiver is equipped with two
programme lists, the Favourites List and the Total List. The
Favourites programme list includes all programmes you have
taken into the list by the following procedure. The Total list
includes all programmes.
This chapter also describes how you can delete programmes,
or how you can block access by means of the parental control
function. When calling up the programme list by pressing the
OK key, the Favourites programme list will be displayed.
When the receiver is in TV mode you can view and change
the list of TV programmes, and you can view and change the
radio programmes in Radio mode.
7.1.1 Calling up the programme list
> Press OK.
The Favourites programme list will be displayed.
(Fig.
7-1)
7.1.2 Adding programmes to the programme list
To add programmes to the programme list selected, proceed
as follows:
> Press the red function key (Category) to open a
selection window that will allow you to switch from the
Favourites list to the Total list. This Total list contains
all
available programmes. You can choose to sort the
Total list according to Providers or alphabetically
(ABC...).
> Use the arrow keys up/down to select a programme
sorting type. (e.g. ABC)
> Confirm by pressing OK.
An alphabetically sorted list will now be displayed.
(Fig. 7-2)
> Press the green function key (Select) to display a
selection window
(Fig. 7-3)
.
> Now use the arrow keys up/down to select the item
All, to display all available programmes in the Total
list, or All new, to display only the new programmes
found by the last programme search.
24
(Fig. 7-1)
(Fig. 7-2)
bed_anl_DIGITY CI_Quark3_en.qxd 31.01.03 16:47 Seite 24
Page 25

> Confirm by pressing OK. Now, depending on your sel-
ection, a programme list showing either all programmes or all new programmes will be displayed. Programmes already included in the Favourites list will be
indicated by a check-mark.
(Fig. 7-4)
To add programmes to the Favourites list, or to delete them
from the list, proceed as follows:
> Press the blue function key (Change).
> Use the arrow keys up/down to mark a programme
you wish to add to the list.
> Press the green function key (Add) to add the marked
programme to the Favourites list.
To mark several programmes simultaneously, proceed
as follows:
> Press the OK key to go to selection mode. The
marked programme will now be indicated by a cross
on the left hand margin, and the menu will be
displayed in transparent form, superimposed on the
background image.
> Now use the arrow keys up/down to mark additional
programmes of your choice.
> When you have completed selecting and marking
programmes, press the green function key (Add) to
add the programmes to the Favourites list.
7.1.3 Deleting programmes
7.1.3.1 Deleting from the Favourites list
If the above procedure is used to mark programmes with a
cross that are already included in the Favourites list (checkmark at right), these marked programmes can be deleted
from the user table by pressing the green function key. These
programmes remain stored in the Total list, and can be added
to the Favourites list again at any time.
7.1.3.2 Deleting from the Total list
To delete marked programmes from the Total list, press the
red function key (Delete). You will be asked to confirm the
command, then the programme will be deleted from the Total
list.
> Mark the programmes you wish to delete as described
above.
> Press the red function key (Delete). The following will
be displayed on screen “Do you really want to delete
the programme(s)?”.
> Use the arrow keys left/right to select Yes or No.
> Confirm by pressing OK.
25
(Fig. 7-3)
(Fig. 7-4)
bed_anl_DIGITY CI_Quark3_en.qxd 31.01.03 16:47 Seite 25
Page 26

7.1.4 Sorting programmes
To sort the programmes on your Favourites list in the order
you prefer, proceed as follows:
> Press OK to display the Favourites list.
> Press the blue function key (Change) to go to the
programme list
(Fig. 7-5).
> Use the arrow keys up/down to mark the programme
you wish to place at a different position in the list.
> Press the yellow function key to select the Sort
function.
A double arrow will be displayed next to the
programme selected.
> You can now position the selected programme at any
desired position in the programme list, using the arrow
keys up/down or the numeric keys.
> Press the yellow function key (Save) to store the
programme at the new position.
To mark several programmes simultaneously, proceed
as follows:
> Press OK to go to Select mode.
The selected programme will now be indicated by a
cross in the left margin.
> Now, use the arrow keys up/down to select additional
programmes of your choice.
> When you have completed marking programmes in
this manner, press the yellow function key (Sort).
> You can now use the arrow keys up/down and/or the
numeric keys to move the marked programmes to the
desired position in the programme list.
> Press the yellow function key (Save) to store the
programmes at the new position.
> When you have completed configuring the programme
list according to your preferences, press the Back key
twice to return to normal operation.
7.1.5 Blocking access to programmes (parental
control)
You have the facility to block access to any programme. A
blocked programme can only be displayed on screen if the
personal PIN code is entered after the programme has been
selected. Once this code has been entered, the programme
remains unblocked for the entire viewing session, i.e. until it is
switched off, resp. switched into standby mode.
To block access to a programme, proceed as follows:
> Press OK to display a programme list.
> Press the blue function key (Change).
> Now use the arrow keys up/down to mark the
programme to which you wish to block the access.
26
(Fig. 7-5)
bed_anl_DIGITY CI_Quark3_en.qxd 31.01.03 16:47 Seite 26
Page 27
> Use the green function key to select the function
Parental Control.
A key symbol will be displayed next to the selected
programme.
> Repeat this procedure until you have blocked access
to all the programmes you wish to mark in this way.
> When you have completed configuring the programme
list according to your preferences, press the Back key
twice to return to normal operation.
> To activate the parental control function, you must now
enter your personal PIN code in the Point Changing
PIN, you must then activate the parental control
function as described in Point 5.2 (Basic Settings).
7.2 Changing the PIN
The Pin code is set at the factory (default value) to 0000. In
order to activate the parental control feature, you must input
your own personal PIN code instead of the default setting.
Note! Be sure not to forget your PIN code. If this
should happen, consult your specialist retailer!
To change the PIN code proceed as follows:
> Press the Menu key to display the Main Menu.
> Use the arrow keys up/down to mark the item
Settings.
> Confirm by pressing OK.
The sub-menu Settings will be displayed.
> Use the arrow keys up/down to mark the item
Change Unit PIN.
> Confirm by pressing OK. The menu Change Unit
PIN will be displayed.
(Fig. 7-6)
.
> Now use the numeric keys to enter the current PIN
code (default setting 0000).
> Use the numeric keys to enter the new PIN code you
have chosen.
> Repeat entry of the new code.
> You have completed changing the PIN code. Press
Back twice to return to normal operation.
Please note that you must still activate the parental control
function as described under Point 7.3.
7.3 Unblocking access control for individual
programmes
To delete the parental control function for individual
programmes, proceed as described under Point 7.1.5. Press
the blue function key (Change), then enter the appropriate
PIN code. Select the programme you wish to unblock, and
remove the access control by pressing the green function
key (Parental Control).
27
(Fig. 7-6)
bed_anl_DIGITY CI_Quark3_en.qxd 31.01.03 16:47 Seite 27
Page 28

7.4 Programme Search
As mentioned previously, your receiver is pre-programmed for
all programmes available on the ASTRA and EUTELSAT
satellites. To receive new programmes, or those of other
satellites, several options are available to carry out a
programme search/scan.
1. Satellite:
All, to search all satellites selected in the menu LNB
Settings (Point 5.4) for programmes
Satellite, to scan only the selected satellite for
programmes and bouquets.
2. Transponder:
Select this scan/search function to scan only a specific
transponder of a satellite. This will search for individual resp.
all programmes of a transponder.
3. Manual Search
Use this type of search to search for for specific programmes
for which you have the unique PID numbers available.
When the search has been completed, a display will appear
on your screen, informing you how many programmes were
found and how many of these are new additions.
New programmes will be stored in the Total List. You can
then add them to your Favourites List as described under
Point 7.1.
> To perform a programme search call up the Main
Menu.
(Fig. 7-7)
> Use the arrow keys up/down to mark the item
Search.
> Confirm by pressing OK.
The sub-menu Search will be displayed.
(Fig. 7-8)
> Use the arrow keys up/down to select the type of
search you wish to perform.
7.4.1 Satellite
Activating this type of search will scan all active satellites
(Point 5.4) and transponders for programmes.
> Use the arrow keys up/down to select the menu line
Satellite.
> Press OK to display the corresponding sub-menu.
(Fig. 7-9)
> Press OK again to open the selection table for the
active satellites.
> Use the arrow keys up/down to mark the menu line
All, to search all active satellites for programmes, or
mark a specific satellite to search only this satellite for
programmes.
28
(Fig. 7-7)
(Fig. 7-8)
(Fig. 7-9)
bed_anl_DIGITY CI_Quark3_en.qxd 31.01.03 16:47 Seite 28
Page 29

29
> Press the green function key (Search mode) to decide
whether you want to search only for free-to-air
programmes (Free programmes), or whether you
want to include encrypted programmes (All
programmes).
> Confirm by pressing the red function key (“Start
search”).
The search will be started. Please note any
information displayed on your screen.
> Pressing the red function key again will stop the
search procedure.
A full search can take approximately 15 minutes to complete.
Please also note any information displayed on your screen.
7.4.2 Transponder
This menu item allows you to search a specific transponder
(see Point 9 Technical terms) for programmes. To do this you
will have to enter the appropriate transponder data.
> Use the arrow keys up/down to select the menu item.
> Confirm by pressing OK. The menu Search
Transponder will be displayed.
(Fig. 7-10)
Satellite
In this line, set the satellite on which the desired transponder
is located.
> Use the arrow keys up/down to mark the line
Satellite.
> Press OK. A table showing the active satellites will be
displayed.
> Use the arrow keys up/down to mark the desired
satellite.
> Confirm by pressing OK.
The selected satellite will now be displayed in the line
Satellite.
Transponder frequency
> Use the arrow keys up/down to mark the line
Transponder frequency.
> Using the numeric keys, enter the desired frequency
in this line.
Symbol rate
The symbol rate indicates the volume of data transmitted per
second. This value can be, for example, 27500 (27500
symbols per second).
> Use the arrow keys up/down to mark the item
Symbol rate.
> Use the numeric keys to enter the appropriate symbol
rate.
(Fig. 7-10)
bed_anl_DIGITY CI_Quark3_en.qxd 31.01.03 16:47 Seite 29
Page 30

Polarisation
> Use the arrow keys up/down to mark the item
Polarisation.
> Use the OK key to enter the polarisation plane
(horizontal or vertical) on which the desired
programme is broadcast.
> Press the green function key to decide whether you
wish to search only for free-to-air programmes (Free
programmes) or whether you wish to include encrypted programmes (All programmes) in the search.
> Press the red function key (Start search) to commence
the search..
The search will be started. Please note any
information displayed on your screen.
> The search procedure can be stopped by again
pressing the red function key.
7.4.3 Manual search
If you are unable to find a programme using the search
methods as described under Points 7.4.1 and 7.4.2, it may be
necessary to enter additional unique. and programme-specific
PID numbers. These numbers can be found in the Internet, or
you can contact the respective programme providers for this
information.
To perform a manual search, call up the menu Search
Manual Search.
(Fig. 7-11)
> Use the arrow keys up/down to select the menu item
Manual Search.
> Confirm by pressing OK.
The menu >Search>Manual Search will be
displayed.
The menu differs from the menu Transponder only with
respect to the menu items PCR PID, Audio PID and
Video PID.
> Proceed as described under Point 7.4.3.
> Use the arrow keys up/down to mark the lines PCR
PID, Audio PID and Video PID, then use the
numeric keys to enter the corresponding numbers.
7.4.4 Integrating programmes after a search
As the search of one or more transponders progresses, you
can follow this on the screen. When the search has been
completed, the number of transponders found, will be displayed. In addition, you will be asked by the display
(Fig. 7-12)
whether you wish to integrate the programmes found automatically in the TV or radio programme lists. If you wish to incorporate the programmes automatically, you can decide
whether they should be added to the Favourites list in sor-
ted or unsorted order.
30
(Fig. 7-11)
(Fig. 7-12)
bed_anl_DIGITY CI_Quark3_en.qxd 31.01.03 16:47 Seite 30
Page 31

Sorted
The new programmes found will be sorted into the Favourites
list according to a preprogrammed list.
Unsorted
The new programmes found will be added in unsorted order
at the end of the Favourites list.
No
The new programmes found will not be added to the
Favourites list.
> Use the arrow keys left/right to indicate whether
you want to add the programmes in sorted or unsorted form.
> Confirm by pressing OK.
Please take note of any additional information
displayed on screen.
> Press Menu to return to normal operation
> Independently of whether you have added the newly
found programmes to the Favourites list automatically,
you can also, as described in Chapter 7.1, add these
to the Favourites list manually at any time.
7.5 Restoring basic programming/ Delete all
You can revert to the original default setting for the LNB at
any time. Also, if the programme list is out of date because of
changes made by the providers, you can delete this list
completely, in order to perform a new programme search.
Please note that if you have performed the delete function
you must first start a new programme search, and must then
copy the programmes you wish to view from the Total list to
the Favourites list before proceeding further.
> Press Menu to display the Main Menu.
> Use the arrow keys up/down to select the menu item
Settings.
> Confirm by pressing OK. The sub-menu Settings will
be displayed.
(Fig. 7-13)
> Use the arrow keys up/down to mark the menu item
Default setting.
> Confirm by pressing OK. The sub-menu Default
setting will be displayed.
(Fig. 7-14)
7.5.1 Activating default setting
This function allows you to revert to the default setting
programmed in the factory. It also deletes your own personal
settings.
> Use the arrow keys up/down to mark the item
Activate default setting.
> Press OK. The message “Do you really want to
activate the default setting?” will be displayed.
> Use the arrow keys left/right to select Yes or No.
> Confirm by pressing OK.
31
(Fig. 7-13)
(Fig. 7-14)
bed_anl_DIGITY CI_Quark3_en.qxd 31.01.03 16:47 Seite 31
Page 32
7.5.2 Delete all programmes
This function allows you to delete totally the programme
memory banks.
> Use the arrow keys up/down to mark the line Delete
all programmes.
> Press OK. The message “Do you really want to delete
all programmes?” will be displayed
Use the arrow keys left/right to indicate Yes or
Abort.
> Confirm by pressing OK.
Please note any messages displayed on your screen.
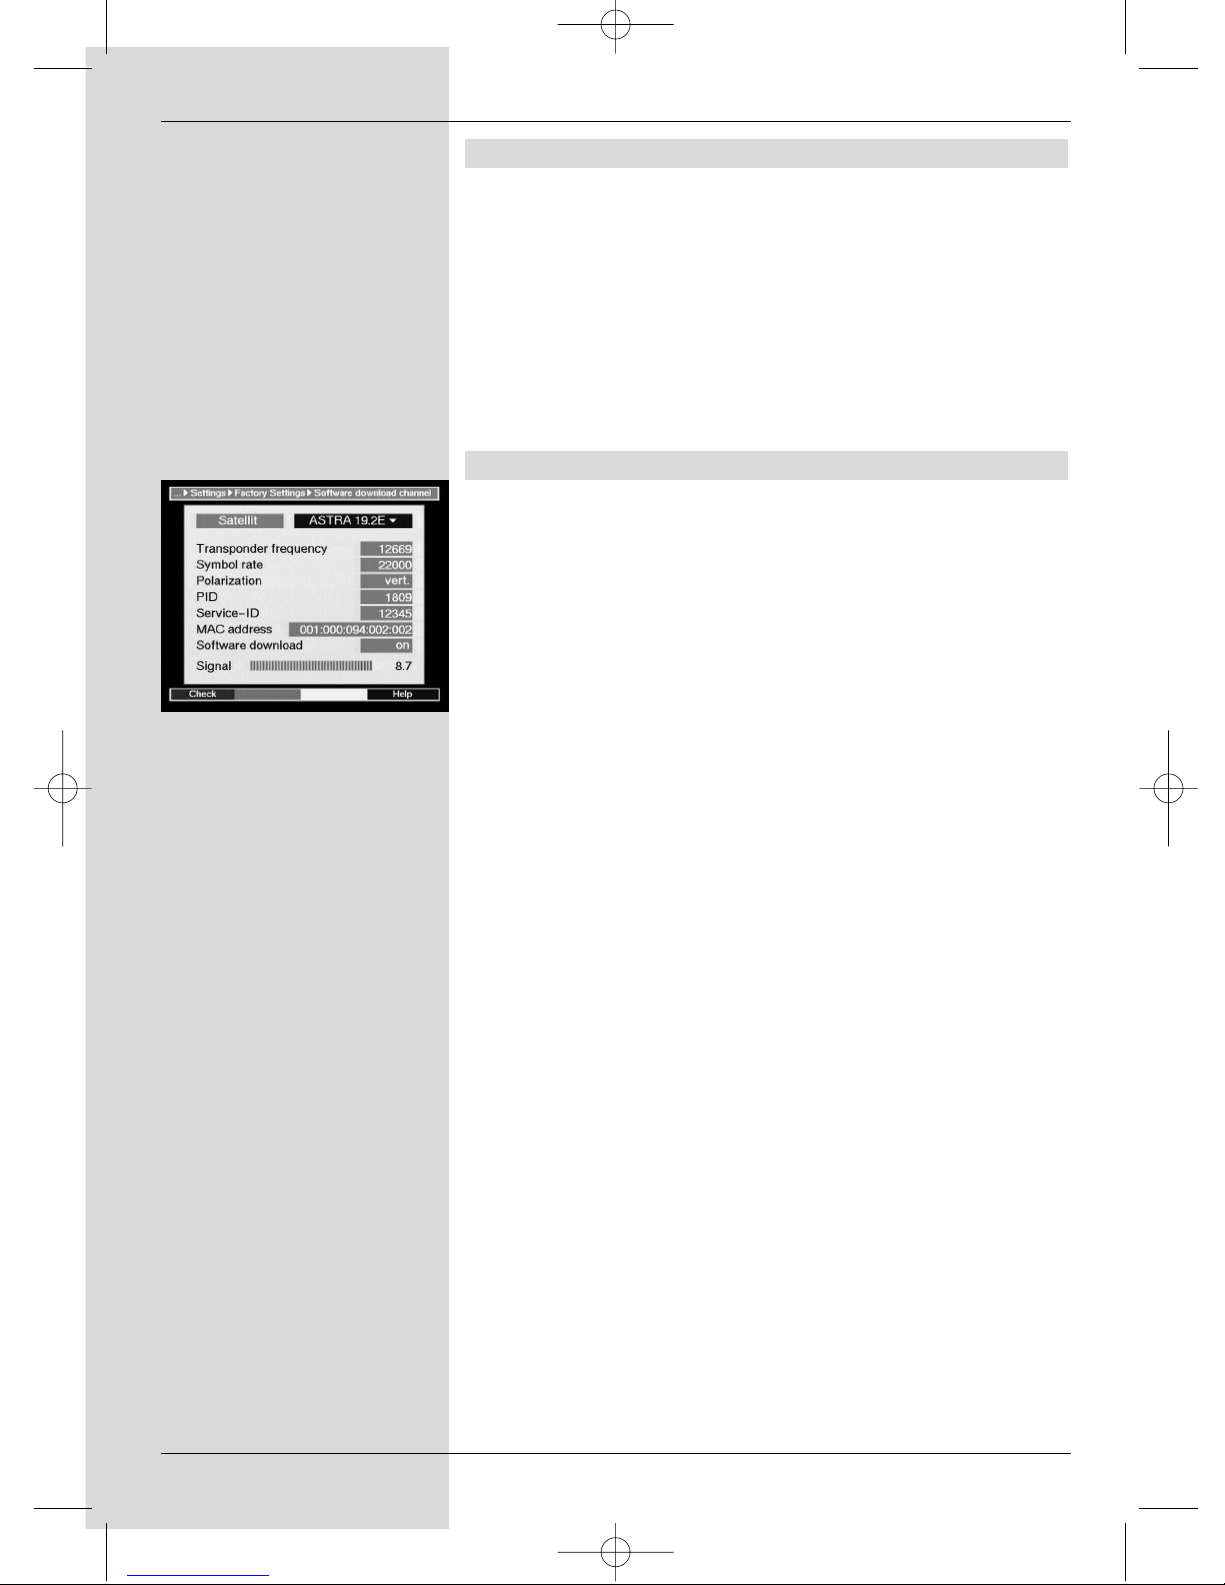
7.5.3 Updating software
In addition, you have the facility to update the operating
software of your receiver via satellite (ASTRA 19° East).
> Use the arrow keys up/down to mark the item
Update software.
> Press OK. The sub-menu Update software will be
displayed.
(Fig. 7-15)
To update your software, mark the item Update
software.
> Use the OK key to switch the software update function
On.
> Press the Menu key to return to normal operation.
In order for the new software to be downloaded
overnight, the receiver must remain in stand-by
mode. The download procedure is indicated by a
blinking LED light on the unit. This procedure
must not be interrupted by switching the unit on
or off, nor may it be disconnected from the mains
power supply.
> To start the update of the operating software manually,
press the red function key (Test) in the menu
Software Update .
To download any new software that may be available,
follow the instructions displayed on your screen.
Should the parameters of the data channel used to download
software updates have changed, you can correct them in this
menu as described under Point 7.4.3 (manual programme
search). Current transponder data can be obtained from your
specialist retailer. In general, however, you should not make
any changes in this menu.
Note:
This function should not be activated if you have
made changes in the menues Basic Settings
and LNB configuration, as any changes made
there would be deleted when this function is
performed, and you would have to repeat the
changes there
32
(Fig. 7-15)
bed_anl_DIGITY CI_Quark3_en.qxd 31.01.03 16:47 Seite 32
Page 33
33
7.6 System configuration
You can use this menu item to view the specific unit data.
> Use the arrow keys up/down to mark this line in the
sub-menu Settings.
> Confirm by pressing OK.
> Press the Menu key to return to normal operation.
7.7 Encryption system
Use this menu item to go to the sub-menues related to the
CA module. Use the arrow keys to mark the CA module, then
confirm by pressing OK to obtain information on the card
currently inserted.
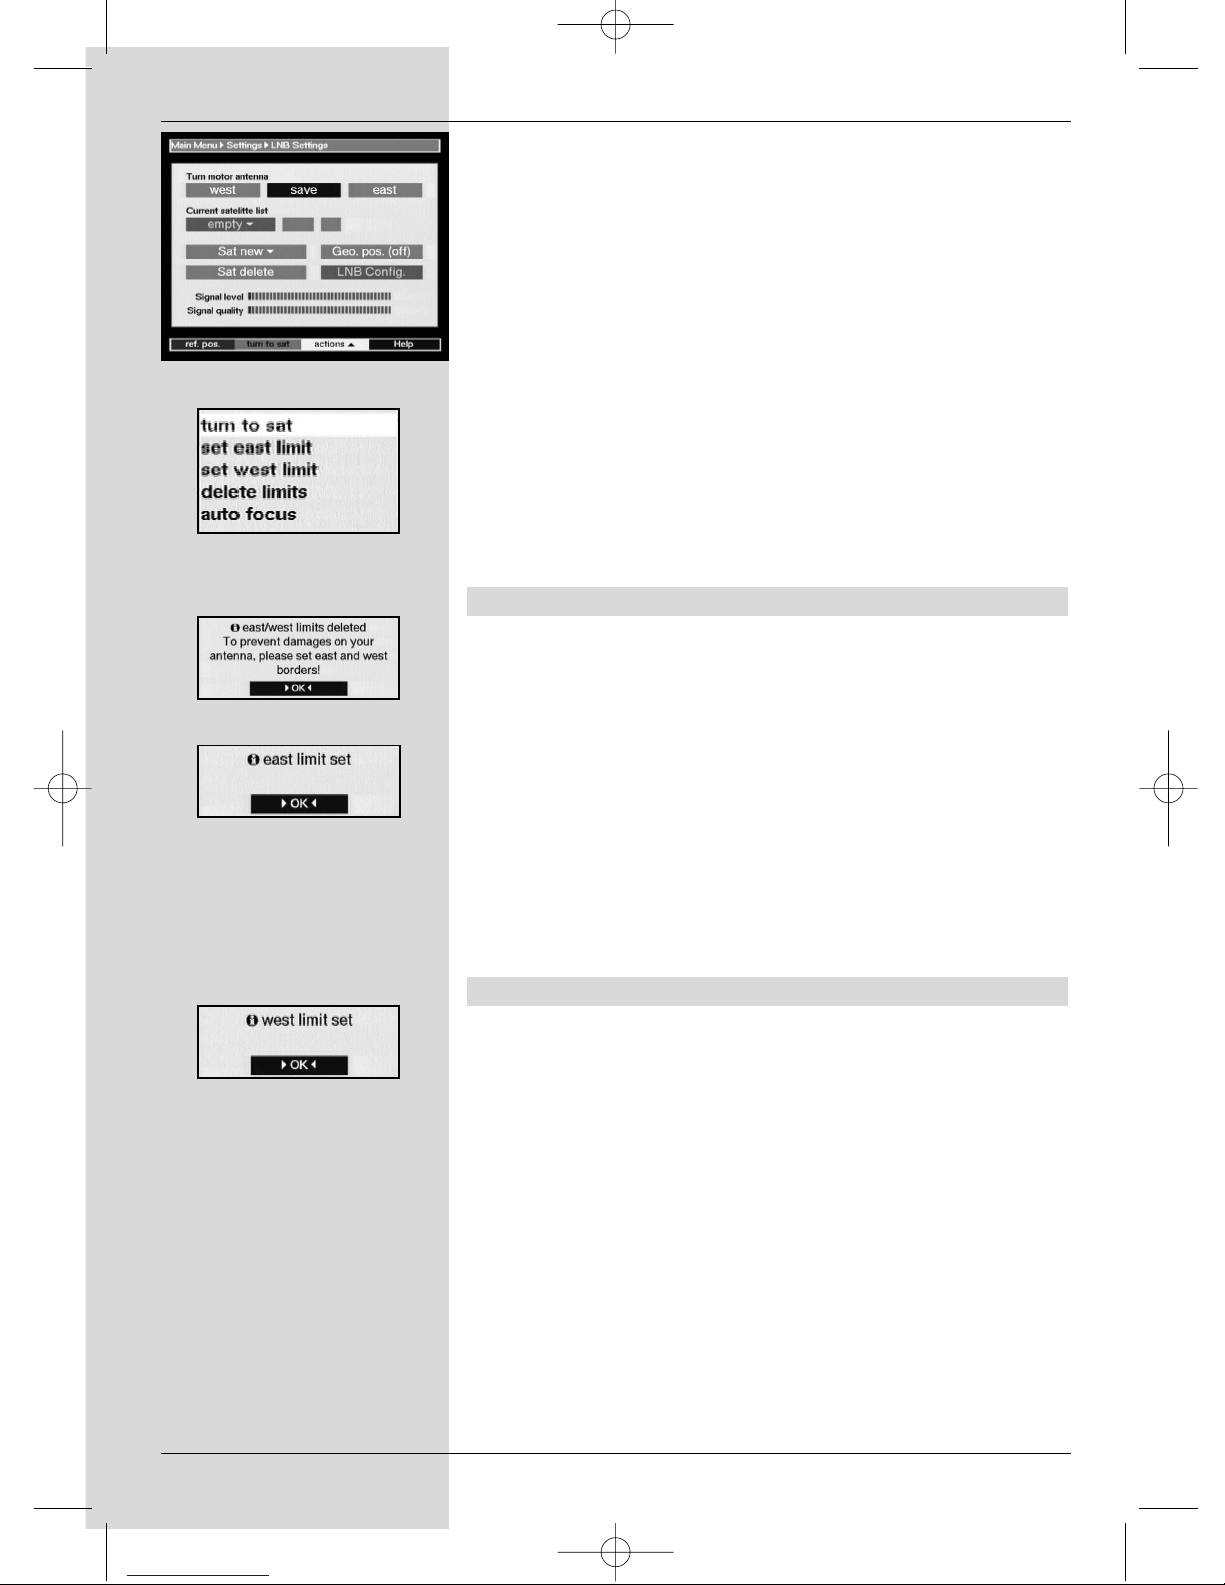
8 Operation in conjunction with a rotary
antenna
Your receiver is equipped to operate in conjunction with a
rotary antenna. The DiSEqC control feature (DiSEqC-Level
1.2) allows you to control an appropriate motor to rotate the
antenna, via the coaxial connection.
> As described in Point 5.4, call up the menu LNB
Settings
(Fig. 8-1) and switch the
DiSEqC control
(Point 5.4.1) to on.
> Use the arrow keys up/down to select the DiSEqC
position (e.g. A/B 3) to which you wish to allocate the
motor-driven rotating antenna.
> Press OK to open a window allowing you to select the
Satellites resp. the Motor antenna .
(Fig. 8-2)
> Use the arrow keys up/down to select the item
Motor antenna.
> Confirm by pressing OK.
> Observe the message displayed
(Fig. 8-3)
regarding
the setting of East and West limits, confirm by
pressing OK.
8.1 Eastern and Western limits
To avoid mechanical damage to the antenna dish or to the
LNB, caused by obstacles that may be in the way, you should
determine the maximum rotating range in both easterly and
westerly direction.Where there are structural obstacles, such
as chimneys or walls, these must definitely be considered
when setting the East-West limits. If there are no obstacles in
the rotating range, then you should determine the limits in
such a way that they are just a little beyond the most extreme
positions of the satellites from which you wish to receive
signals.
8.1.1 Deleting existing limits
You should first delete any existing limits set.
(Fig. 8-1)
(Fig. 8-2)
(Fig. 8-3)
bed_anl_DIGITY CI_Quark3_en.qxd 31.01.03 16:47 Seite 33
Page 34
34
> Use the arrow keys left/right to mark the item LNB
test.
> Use the arrow keys up/down to go to the line Motor
antenna, and mark the field Continue.
> Confirm by pressing OK.
The menu relating to settings for the motor antenna
will be displayed
(Fig. 8-4)
> Press the yellow function key (Action) to open a
further window.
(Fig. 8-5)
> Use the arrow keys up/down to mark the item Delete
limits.
> Confirm by pressing OK, to transfer the selected
action to the green function key.
> To delete the limits, press the green function key
(Delete limits).
> A note will be displayed. Confirm by pressing OK
(Fig.
8-6)
.
8.1.2 Setting Eastern limit
> To enter the Eastern limit, use the arrow keys to mark
the field Save.
> Press the arrow key right to turn the antenna to the
most easterly position possible, resp. the most
easterly position you wish to include.
> Press the yellow function key (Action), to open the
window showing the available actions.
> Use the arrow keys up/down to mark the entry Set
East limit.
> Confirm by pressing OK.
> To set the Eastern limit, press the green function key
(East limit), a note will be displayed
(Fig. 8-7)
, then
confirm by pressing OK.
8.1.3 Setting Western limit
> To enter the Western limit, use the arrow keys to
mark the field Save.
> Using the arrow key left, rotate the dish antenna to
the most westerly position possible, resp. to the
most westerly position you wish to include.
> Press the yellow function key (Actions) to open the
window listing all the available actions.
> Use the arrow keys up/down to mark the item Set
West limit.
> Confirm by pressing OK.
> To set the Western limit, press the green function key
(West limit), a note will be displayed
(Fig. 8-8)
, then
confirm by pressing OK.
(Fig. 8-4)
(Fig. 8-5)
(Fig. 8-6)
(Fig. 8-7)
(Fig. 8-8)
bed_anl_DIGITY CI_Quark3_en.qxd 31.01.03 16:47 Seite 34
Page 35

8.2 Geo-positioning
If you have a suitable motor and know the geographic coordinates of your location, this function will make it easier to
find the individual satellite positions. The co-ordinates of a
number of German cities are listed in the Annexure (Point
12).
Note! You should only switch on the geo-positioning
function if your DiSEqC motor supports this function.
> As described, call up the menu LNB Settings.
> Use the arrow keys to mark the field Geo.Pos.
> Confirm by pressing OK. The menu used to enter the
co-ordinates of your location will be displayed.
(Fig. 8-
9)
> Press the OK key to switch the geo-positioning
function on or off.
> Use the arrow keys to select the input field for
Longitude.
> Use the numeric keys to enter your geographic
longitude.
> Press the arrow key left.
> In this field, press the OK key to indicate whether the
value refers to longitude East (E) or longitude West
(W).
> Use the arrow keys to select the input field for
Latitude.
> Use the numeric keys to enter your geographic
latitude.
> Press the arrow key left.
> In this field, press the OK key to indicate whether the
value refers to latitude North (N) or South (S).
> Press the Back key to return to the menu LNB
Settings.
The co-ordinates for your location must be entered as a
decimal figure with one decimal place. As co-ordinates are
usually expressed in degrees, minutes and seconds, they
must be converted to decimal values as follows:
The degree figure does not change. The minutes are divided
by 60, and rounded to one decimal place. The result of this
division is added to the degree figure.
Seconds are not considered, as they have no influence on
the value of the first decimal place.
Example: Co-ordinates for Daun, Germany
Latitude 50° 11‘(45“) N
Longitude 06° 50‘ (10‘‘) E
Converting the latitude (lat):
Lat. = 50 + 11/60
Lat. = 50 + 0,2 (rounded)
Lat. = 50,2
35
(Fig. 8-9)
bed_anl_DIGITY CI_Quark3_en.qxd 31.01.03 16:47 Seite 35
Page 36

In the menu, enter the value for geographical latitude as a
decimal value correct to one decimal place (50,2) .
The decimal equivalent of the longitude can be calculated in
the same way.
8.3 Setting the satellite position
Work progressively through points 8.3.1 to 8.3.3 for each of
the satellite positions to be entered. We recommend that you
start by programming the most easterly satellite first. Then
proceed to enter each additional satellite position, working in
a westerly direction, until you reach the most westerly satellite
position.
Your receiver is programmed at the factory for the most common satellite positions. In addition you can enter and configure user-defined satellite positions for any orbital position (User
1 to User 14 ).
8.3.1 Selecting satellite positions
8.3.1.1 Selecting a pre-programmed satellite
position
> To enter a satellite position in the satellite list, use the
arrow keys to mark the field Sat new.
> Confirm by pressingt OK.
A list of all available satellite positions will be
displayed.
(Fig. 8-10)
> Use the arrow keys up/down to mark a satellite
position that you wish to include in the satellite list.
> Press the OK key to accept the selection into the list.
In the position Geo-positioning on (Point 8.2) the dish
antenna will now be automatically rotated to the programmed
satellite position. The rotation procedure is indicated by a
blinking message “rotating”.
In the position Geo-positioning off you will have to rotate
the antenna manually to the desired satellite position (Point
8.3.2.2).
8.3.1.2 Setting user-defined satellite positions (User
Satellite)
> To accept a satellite position into the satellite list, use
the arrow keys to mark the field Sat new.
> Confirm by pressing OK.
A list of the available satellite positions will be
displayed.
(Fig. 8-11)
> Use the arrow keys up/down to mark a user-defined
satellite position (User 1 to User 14).
> Press the OK key to display the menu for setting a
test transponder. In this menu, set the parameters of
the test transponder as well as of the LNB used, as
described in Point 5.4.3 .
36
(Fig. 8-10)
(Fig. 8-11)
bed_anl_DIGITY CI_Quark3_en.qxd 31.01.03 16:47 Seite 36
Page 37

37
> When you have entered the settings for the test
transponder, press the Back key to return to the menu
related to motor antenna settings. The field for
entering the orbital position is active.
> Use the numeric keys to enter the orbital position of
the satellite and confirm by pressing OK.
> Press the OK-key to indicate whether you are
entering a westerly (W) or an easterly (E) orbital
position.
In the position Geo-positioning on (Point 8.2) you can
now press Rotate to Sat (Point 8.4.1) to rotate the antenna
dish to the programmed user satellite position.
In the position Geo-positioning off you will have to rotate
the antenna manually (Point 8.3.2.2) to the required satellite
position.
8.3.2 Adjusting the satellite antenna
To adjust the antenna correctly for the satellite selected, resp.
to determine whether you can receive signals from the
satellite selected at the position you have set, a test
transponder setting is provided for each satellite.
The indication of signal strength and quality by this test
transponder allows you to align the antenna precisely.
8.3.2.1 Test-Transponder/LNB-configuration
To change the data relating to the respective test
transponder, proceed as follows:
> Use the arrow keys to select the entry Current
satellite list.
> Press the OK key to open the satellite list.> Use the
arrow keys up/down to select the satellite position
on which you wish to change data.
> Confirm by pressing OK.
> Now, use the arrow keys to select the field LNB
config. and press the OK key to confirm.
The menu LNB Settings will be displayed
(Fig 8-12)
> In this menu, proceed as described in Point 5.4.3 ,
and enter the data of the test transponder and of the
LNB being used.
> Press the Back key to return to the setting for the
motor-driven antenna.
8.3.2.2 Antenna manual adjustment
You can achieve the optimum positioning of the antenna by
referring to the signal strength and signal quality indicators
displayed. Adjust the antenna so that both bar graphs show
the maximum values..
> Use the arrow keys up/down to mark the field Save.
(Fig. 8-12)
bed_anl_DIGITY CI_Quark3_en.qxd 31.01.03 16:47 Seite 37
Page 38

38
> Now use the arrow keys left (Field East will be
marked) resp. right (Field West will be marked) to
rotate the dish antenna to the required position. Simply
keep the respective key depressed until the correct
position is achieved.
8.3.2.3 Automatic fine adjustment (Autofocus)
You should carry out an automatic focussing procedure
before saving the satellite position to memory. This will adjust
the antenna to optimum reception by instrument means.
> Press the yellow function key (Actions) to open the
window listing the available actions.
Use the arrow keys up/down to mark the item
Autofocus.
> Confirm by pressing OK.
> Press the green function key (Autofocus) to start the
procedure.
The message Autofocus will be displayed while the
procedure is in progress
(Fig. 8-13)
8.3.3 Saving satellite positions
When the autofocus procedure has been completed, you
must still save the satellite position to memory.
> Use the arrow keys to mark the field Save.
> Confirm by pressing OK.
The test transponder selected will now be used to
check whether a signal is being received at this positi-
on. The function will also check whether there is a pre-
programmed position in memory at this orbital position.
(Fig. 8-14)
If this is the case, the message : Orbital position
xx identified. Save satellite?
(Fig. 8-15)
> To save the satellite position to memory, use the
arrow keys left/right to mark the field Yes, and
confirm by pressing OK.
If the check procedure of the test transponder does
not identify any of the pre-programmed positions
stored in memory, or if the signal received is too weak,
this information will be displayed on screen.
(Figs. 8-
16 and 8-17)
> To save the satellite position in memory, use the arrow
keys left/right to mark the field Yes and confirm by
pressing OK.
8.4 List of current satellites
The satellite positions saved will be found in the satellite list.
Positions not yet saved will be indicated by “*” .
> To rotate the dish antenna to one of the positions on
the list, use the arrow keys to mark the item Current
satellite list.
(Fig. 8-13)
(Fig. 8-14)
(Fig. 8-15)
(Fig. 8-16)
(Fig. 8-17)
bed_anl_DIGITY CI_Quark3_en.qxd 31.01.03 16:47 Seite 38
Page 39
> Press OK.
> Use the arrow keys up/down to select the desired
position.
> Confirm by pressing OK.
The dish will now be rotated to the selected position.
The rotating procedure is indicated by a blinking
display “Rotating” in the menu.
8.4.1 Selecting a satellite position
To rotate the antenna to the position indicated in the satellite
list, your receiver is equipped with the function Rotate to
sat..
> Press the yellow function key (Actions) to open the
window listing the available actions.
> Use the arrow keys up/down to mark the item
Rotate to sat.
> Confirm by pressing OK.
> Press the green function key (Rotate to sat.) to rotate
the antenna to the selected position.
8.5 Deleting a satellite position
To delete a satellite position from the satellite list, proceed as
follows:
> Use the arrow keys to mark the item Current
satellite list.
> Press OK to display the current satellite list.
> Use the arrow keys up/down to select the satellite
you wish to delete.
> Confirm by pressing OK.
> Use the arrow keys to mark the item Delete sat..
> To delete the selected satellite, press OK, a
confirmatory message will be displayed, then press
OK again.
8.6 Reference position
When installing the external installation, the motor must be
parked in the reference position (0°). For this purpose you
can use the function “Go to reference position” at any time
to rotate to this position (0°).
> Press the red function key (Ref.pos) to rotate the
antenna automatically to the reference position.
39
bed_anl_DIGITY CI_Quark3_en.qxd 31.01.03 16:47 Seite 39
Page 40

9 Technical Terms
Antenna cable:
Connecting cable from the modulator of the satellite receiver
to the antenna input socket of the television set; used as an
alternative where no SCART socket is available
Coaxial cable:
Connecting cable between LNB and satellite receiver, used to
transmit the signal received, as well as to supply the LNB with
power
Data compression/MPEG1/MPEG2:
To transmit the current television standard (625 lines repeated
50 times per second) results in a digital data volume of 216
MBit/s. This would require bandwidths that cannot be
provided by either terrestrial or satellite sources. The volume
of data is thus compressed by electronic means to reduce the
volume. In Europe, the MPEG-2 standard has been laid down
as the international standard for data compression. MPEG2 is
a further development of MPEG1
Deemphasis:
Adaptation of the audio frequency profile to the broadcast
signa, this is defined by the broadcast parameters of the
satellite
DiSEqC:
Digital Satellite Equipment Control: a digital switching system
used to control DiSEqC-compatible components of the
extenbal installation via the antenna cable.
DVB:
Digital Video Broadcasting: a universal digital broadcast
standard used for all possible types of data, such as pictures,
graphics, sound and text, in an appropriate form providing
appropriate quality
External unit:
Description used for the complete system mounted outdoors,
consisting of parabolic dish antenna, as well as one or more
LNBs, used to receive signals from one or more satellites
Frequency:
Physical measurement, indicated the number of wave-cycles
per second, expressed as Hertz (Hz)
Frequency range:
a) Satellite resp. LNB:
11 GHz range from 10,70 GHz to 11,70 GHz, 12 GHz range
from 11,70 GHz to 12,75 GHz
40
bed_anl_DIGITY CI_Quark3_en.qxd 31.01.03 16:47 Seite 40
Page 41
b) Receiver: Intermediate frequency or 1.IF 950 to 2150 MHz
Unit Description Cycles per second
1 Hz 1 Hertz 1
1 kHz 1 Kilohertz 1.000
1 MHz 1 Megahertz 1.000.000
1 GHz 1 Gigahertz 1.000.000.000
LNB/LNC (Low Noise block converter):
The receiving unit at the focal point of the parabolic dish
antenna. Converts the satellite frequency range to that of the
intermediate frequency of the receiver
LOF:
Local oscillator frequency, stated in MHz or GHz, differs
depending on the LNB and frequency range received.
Receiving frequency of the receiver = broadcast frequency of
the satellite - LOF
Modulation at 22 KHz
Next to the 14/28 Volt switching facility, this serves to switch
between 2 LNBs. When used with a Universal LNB it serves
to switch to the high band
Modulator
Switching facility in the satellite receiver or video recorded,
used to connect to the television set using antenna cable
Mode:
determines whether a mono or a stereo programme will be
received
Multyfeed:
External installation consisting of a single parabolic dish and
several LNBs, used to receive signals from several satellites
Parabolic dish:
Dish antenna with parabolic shape, made of metal or coated
synthetics, serves to focus the electromagnetic waves
received from the satellite in a focal point
Polarisation plane:
In order to better utilise the available frequency range,
satellites will broadcast neighbouring frequencies using
opposite polarisation (horizontal and vertical, or dextrorotatory
and laevorotatory). To receive both polarisation planes you
will require two single LNBs or a single V/H LNB.
Satellite:
Designation of a satellite, usually coupled with its orbital
position,
ASTRA 19° East
EUTELSAT 13° East
41
bed_anl_DIGITY CI_Quark3_en.qxd 31.01.03 16:47 Seite 41
Page 42

Satellite receiver:
The signals received and converted by the LNB cannot be
interpreted by the television set. The satellite receiver further
converts these signals in such a way that it feeds audio and
video signals (AV) to its output connections in a form that can
be used by the television set.
SCART:
Connector plug used for television sets, video recorders,
satellite receivers and other appliances in the field of
entertainment electronics to transmit Audio and visual signals
(AV).
Software update:
Digital television is a new medium. Apart from the improved
picture and sound quality, it also provides the facility for
interactive services. These services are constantly being
developed and improved by providers. To utilise these
services, it may become necessary from time to time to
update the operating software of the receiver.
Transponder:
This processes one or several programmes within the
satellite. That is, reception of data from the ground station,
amplification and broadcast of the signal back to earth.
Universal-LNB:
Term used to describe a triple-band LNB. Used to receive the
ranges FFS (10,70 - 11,70 GHz), BBS (11,70 - 12,50 GHz)
and FFS High Band (12,50 - 12,75 GHz). The entire range is
divided into two bands:
Low Band: 10,70 - 11,80 GHz; LOF 9750 MHz
High Band 11,70 - 12,75 GHz ; LOF 10600 MHz
Supply voltage:
LNBs receive their power supply via the coaxial cable. To this
end the receiver delivers a supply of 14 or 18 Volts
Intermediate frequency:
The frequency range broadcast by satellites cannot be
transmitted via a cable. The LNB therefore converts the
incoming signal to a signal in the intermediate frequency
range of 950 to 2050 MHz. This signal can be transmitted via
cable, and can be interpreted by the receiver.
1. IF = Intermediate frequency
42
bed_anl_DIGITY CI_Quark3_en.qxd 31.01.03 16:47 Seite 42
Page 43
10 Technical data
DBS-Tuner:
Input frequency range 950 .... 2150 MHz
Input level range - 60 dBm ... - 25 dBm
DBS tuner input F -connector
Input/output impedance 75 Ohm
Output for 1.IF 950 ... 2150 MHz (loop through)
AFC capture range +/- 3 MHz
Demodulation Shaped QPSK
Symbol rate 1 ... 45 Mbaud/s, MCPC
FEC Viterbi and Reed-Solomon
Viterbi rates 1/2, 2/3, 3/4, 5/6, 7/8, automatic
adaptation
Roll-off Factor 35 %
Demultiplexing: in accordance w. ISO 13818-1
Video decoding:
Video compression MPEG-2 and MPEG-1
compatible
Up to MP@ML (main profile @
main level)
Video standard PAL / 25 Hz
Active image size 720 pixels x 576 lines
Picture format 4 : 3 / 16 : 9
Picture material 16:9 Automatic adjustment for 16:9 TV
sets (via SCART)
Letterbox filtering for 4:3 TV sets
Audio decoding:
Audio compression MPEG-1 & MPEG-2 Layer I and
II
Audio mode Dual (main/sub), Stereo
Sampling frequencies 32 kHz, 44.1 kHz, 48 kHz,
Audio parameters:
Input analogue:
Input levels L/R 0,5 V r.m.s. (nominal)
Input impedance > 40 kOhm
Output analogue:
Output levels L/R 0,5 V r.m.s. (nominal)
Output impedance 600 Ohm
THD > 60 dB (1 kHz)
Cross-talk < - 65 dB
Iniotial volume stores last value selected
43
bed_anl_DIGITY CI_Quark3_en.qxd 31.01.03 16:47 Seite 43
Page 44
Video parameters:
Input:
Input level FBAS 1 Vs-s +/- 0,3 dB into 75
Ohms
Input level RED 0,7 Vs-s +/- 0,1Vs-s into 75 Ohms
Input level GREEN 0,7 Vs-s +/- 0,1Vs-s into 75 Ohms
Input level BLUE 0,7 Vs-s +/- 0,1Vs-s into 75 Ohms
Teletext
Teletext filtering corresponding to ETS 300 472
standard
Display teletext data (FBAS) corresponding to ITU-R
BT.653-2 lines: 6-22 and 320-335
TV-SCART:
Output: switchable FBAS or RGB
VCR-SCART:
Input: FBAS or RGB
Output: FBAS
Serial interface RS 232:
Type RS 232, bi-directional
Bit rate 115 kBit/s
Connectior D-SUB-socket, 9 pin
Function Update f.operating software
LNB power supply:
LNB power 400 mA max.; double-
insulated
LNB voltage vertical <14,0V no load, > 11,5 V at 400
mA
LNB voltage horiz. < 20V no load, > 17,2 V
at 400 mA
LNB switched off in stand-by mode
22 kHz modulation: 22 kHz, Amplitude 0.6 V +/- 0.2 V
Programme memory:
999 TV programmes
999 RADIO programmes
DiSEqC Control:
DiSEqC 1.0 and DiSEqC 1.2
EPG data:
EPG preview
Timer:
32 events one year ahaead
OSD languages:
German, English
Remote control system RC-5
Subsystem adress 10 (SAT 2)
Modulation frequency 36 kHz
Infrared wavelengthe 950 nm
44
bed_anl_DIGITY CI_Quark3_en.qxd 31.01.03 16:47 Seite 44
Page 45

Power supply:
Mains power adapter:
Power requirement:
< 22 W (in operation, horizontal
polarisation/ 400 mA LNB power)
< 12 W (in operation, excl. LNB)
< 10 W (Stand-by Mode)
Mains voltage:
180 V.... 250 V / 47...63 Hz AC
General:
Ambient temperature +15°C...+35°C
Humidity < 80%
Dimensions (WxDxH): 305 mm x 135 mm x 65 mm
Weight: 0,8 kg
11 Trouble-shooting guide
Dear customer,
we would like to point out once again that, if you experience
the following problem, you should first follow our suggested
solution before contacting the repair service.
The unit does not function properly (controls do
not respond, image frozen ...)
> Disconnect the mains power supply for approx. 5
seconds, then connect it again.
> Then switch the receiver on again.
If the problem persists, you should then contact your repair
service.
45
?
Your appliance carries the CE mark, and complies with all relevant EU
standards.
Subject to alteration without notice. Not responsible for printing errors. Correct
at 10/02
Copying and reproduction only with specific permission of the publisher.
TechniSat and DIGITY CI are registerd trade marks of
TechniSat Digital GmbH
P.O. Box 560
D-54541 Daun
Germany
www. technisat.de
bed_anl_DIGITY CI_Quark3_en.qxd 31.01.03 16:47 Seite 45
Page 46

46
Problem Possible cause Solution
Various programmes not shown
in programme list
Incorrect programme list
selected
Select different programme list
(see Point 6.2.3.1)
Sound OK, screen blue Unit is in Radio mode Switch to TV mode
Programmes such as Pro 7,
Sat 1, TM3, Kabel 1, DSF and
HOT temporarily faulty
Interference by wireless
telephones (DECT standard)
Increase distance between
receiver and phone station
Controls cannot be operated Data stream defective -->unit
blocked
Pull mains plug for approx. 5
seconds, then switch unit on
again
Remote control not working Batteries are spent Fit new batteries
Intermittent square blocks on
screen. Temporary frozen
picture, no sound, screen
sometimes black with message
“no signal”.
Heavy rain or snow Remove snow from antenna
Antenna position incorrect Adjust antenna position
Antenna dish may be too small Adjust antenna position
An obstacle between the dish
and the satellite (e.g. a tree)
Mount antenna in position with
clear view
No picture, no sound, LED on Short circuit in LNB connection Switch unit off, eliminate short
circuit, switch unit on again
Cable connection defective or
not present
Check all cable connections
LNB defective Replace LNB
Incorrect external unit selected
on receiver
Correct setting (see Point 5.4)
Antenna adjustment incorrect Adjust antenna position
No picture, no sound, LED notonNo mains power Check mains cable and plugs
No reception of programmes
that were in order previously
Antenne verstellt oder defekt Check antenna
Programme has moved to a
different transponder
Perform search procedure (see
Point 7.4)
Programme no longer being
broadcast
None
Antenna cannot be rotated Motor not compatible with
DiSEqC 1.2
Use suitable motor
bed_anl_DIGITY CI_Quark3_en.qxd 31.01.03 16:47 Seite 46
Page 47

47
12 Annexure
Co-ordinates of selected German cities (1)
City Geogr. Longitude (E) Geogr. Latitude (N)
Aachen 6,1 50,8
Aalen 10,1 48,8
Augsburg 10,9 48,4
Aschaffenburg 9,2 50,0
Bad Neuenahr-Ahrweiler 7,1 50,6
Bad Reichenhall 12,9 47,7
Baden Baden 8,2 48,8
Bamberg 10,9 49,9
Berlin 13,4 52,5
Beucha 12,7 51,3
Bielefeld 8,5 52,0
Bonn 7,1 50,7
Brandenburg 12,6 52,4
Braunschweig 10,5 52,3
Bremen 8,8 53,1
Bremerhaven 8,6 53,6
Celle 10,1 52,6
Chemnitz 12,9 50,8
Cottbus 14,3 51,8
Darmstadt 8,7 49,9
Daun 6,8 50,2
Dippach 10,1 51,0
Donauwörth 10,8 48,7
Dortmund 7,5 51,5
Dresden 13,7 51,1
Duisburg 6,8 51,4
Düsseldorf 6,8 51,2
Eisenach 10,3 51,0
Elmshorn 9,7 53,8
Emden 7,2 53,4
Erfurt 11,0 51,0
Essen 7,0 51,5
Flensburg 9,4 54,8
Frankfurt/M. 8,7 50,1
Frankfurt/O. 14,5 52,3
Freiburg/Br. 7,9 48,0
Freising 11,8 48,4
Fulda 9,7 50,6
Fürstenberg 14,7 52,1
Fürth 11,0 49,5
bed_anl_DIGITY CI_Quark3_en.qxd 31.01.03 16:47 Seite 47
Page 48
48
Co-ordinates of selected German cities (2)
City Geogr. Longitude (E) Geogr. Latitude (N)
Garmisch-Partenkirchen 11,1 47,5
Gera 12,1 50,9
Görlitz 15,0 51,2
Göttingen 9,9 51,5
Halberstadt 11,0 51,9
Halle/Saale 12,0 51,5
Hameln 9,4 52,1
Hamburg 10,0 53,6
Hamm 7,8 51,7
Hannover 9,7 52,4
Heide 9,1 54,2
Heidelberg 8,7 49,4
Heilbronn 9,2 49,2
Hildesheim 10,0 52,2
Hof 11,9 50,3
Ingolstadt 11,4 48,8
Iserlohn 7,7 51,4
Kaiserslautern 7,8 49,5
Karlsruhe 8,4 49,0
Kassel 9,5 51,3
Kempten/Allgäu 10,3 47,7
Kiel 10,1 54,3
Koblenz 7,6 50,4
Konstanz 9,2 47,7
Köln 7,0 51,0
Krefeld 6,6 51,3
Landau/Pfalz 8,1 49,2
Landshut 12,2 48,5
Leipzig 12,4 51,3
Ludwigshafen 8,4 49,5
Lübeck 10,7 53,9
Lüneburg 10,4 53,3
Magdeburg 11,6 52,1
Mainz 8,3 50,0
Mannheim 8,5 49,5
Minden 8,9 52,3
Mönchengladbach 6,4 51,2
Mühlhausen 8,7 49,3
München 11,6 48,1
Münster 8,9 49,9
bed_anl_DIGITY CI_Quark3_en.qxd 31.01.03 16:47 Seite 48
Page 49

49
Co-ordinates of selected German cities (3)
City Geogr. Longitude(E) Geogr. Latitude (N)
Neubrandenburg 13,3 53,6
Neumünster 10,0 54,1
Nienburg 11,8 51,8
Nordhausen 10,8 51,5
Nürnberg 11,1 49,5
Oberhausen 6,9 51,5
Offenburg 8,0 48,5
Oldenburg/Holsn. 10,9 54,3
Oldenburg 8,2 53,2
Osnabrück 8,1 52,3
Paderborn 8,8 51,7
Passau 13,5 48,6
Plauen 12,1 50,5
Potsdam 13,1 52,4
Ravensburg 9,6 47,8
Regensburg 12,1 49,0
Reutlingen 9,2 48,5
Rostock 12,1 54,1
Saarbrücken 7,0 49,2
Salzgitter 10,4 52,1
Salzwedel 11,2 52,9
Schweinfurt 10,2 50,1
Schwerin 11,4 53,6
Siegen 8,0 50,9
Solingen 7,1 51,2
Speyer 8,4 49,3
Starnberg 11,3 48,0
Stuttgart 9,2 48,8
Trier 6,7 49,8
Tübingen 9,1 48,5
Ulm 10,0 48,4
Weimar 11,3 51,0
Wiesbaden 8,2 50,1
Wilhelmshaven 8,1 53,5
Wismar 11,5 53,9
Wolfsburg 10,8 52,4
Wuppertal 7,2 51,3
Würzburg 9,9 49,8
Zweibrücken 7,4 49,3
Zwickau 12,5 50,7
bed_anl_DIGITY CI_Quark3_en.qxd 31.01.03 16:47 Seite 49
Page 50
For everyday use
Switching on and off
> Switch the unit on by pressing the On/Stand-by key,
either on the receiver or on the remote control unit.
> Pressing the same key again, either on the receiver or
on the remote control unit, will switch the receiver off
again.
> The receiver is now in Stand-by mode.
Programme selection
Using the programme keys up/down
> Use the programme keys up/down to switch from
one programme to another, one slot at a time. You can
use the keys either on the receiver panel or those on
the remote control unit.
Using the numeric keys
> Enter the desired programme number using the
numeric keys. For example:
1 for programme slot 1
1, then 4 for programme slot 14
2, then 3, then 4 for programme slot 234
When entering programme numbers with more than one
digit, you have approximately 3 seconds after pressing each
key to complete the entry.
If you wish to enter a number consisting of only one or two
digits, you can speed up the selection process by keeping the
key depressed a little longer on the last digit.
Volume control
> To control the volume of your receiver, use the keys
Volume + to increase the volume and Volume - to
decrease the sound volume.
> Press the key Sound on/off to switch the sound off
(mute), press the key again to switch sound on again.
TV/radio switching
The pre-programming of your receiver includes radio as well
as television programmes You can thus also enjoy your
favourite radio programmes in digital quality, by switching to
Radio mode. In this case the corresponding TV image is not
displayed, you will see a blank screen with the programme
name displayed.
> Use the TV/Radio key to switch the receiver to radio
mode.
The receiver will now switch to the radio programme
last selected.
> Press the TV/Radio key again to switch to the
television programme last selected.
50
bed_anl_DIGITY CI_Quark3_en.qxd 31.01.03 16:47 Seite 50
 Loading...