

Page 1

JA550KS
JA550KP
JA550KB
5MP Digital Camera
Page 2

Page 3

IMPORTANT USER INFORMATION
Please read the following notes before operating your camera:
• This camera is a precision electronic device. Treat it with care
• Do not attempt to service this camera. Opening or removing covers may expose you to dangerous voltage points or
other risks and you will invalidate the warranty.
• Do not expose this camera to direct sunlight to avoid risk of fire.
• Any loss or damage caused by the malfunction of this product is the sole responsibility of the user .
• Avoid using or placing the camera in the following locations: Damp and dusty places. Sealed
vehicles, places exposed to direct sunlight or high temperatures. Places subject to severe vibration or physical shocks.
Locations full of smoke, fumes, dust or steam. Outdoors in rain or snow.
Before Using Your Camera
• Before taking pictures with this camera of any important occasion test the camera beforehand ensure that it is fully
functioning, that the batteries are charged and that there is sufficient space on the SD card.
• To ensure the camera photographs normally, do not drop, shake or hit the camera when taking pictures .
• Do not open the battery cover when the power is on.
• If water has entered the camera, immediately turn the power OFF and remove the batteries. Take the camera to
your dealer for examination and repair before using it again.
Good Practice
• If the lens, LCD monitor or viewfinder surface is dirty, use a lens brush or optical cloth to wipe the surface clean.
• Do NOT touch the lens with your fingers.
• Do NOT use any sharp object to avoid scratching the lens, LCD monitor or viewfinder surface.
• Clean the body only with a soft cloth. Do not use detergents, solvents or abrasive cleaners on the camera.
• Always transport and store the camera in the supplied pouch.
1
Page 4
Page 5
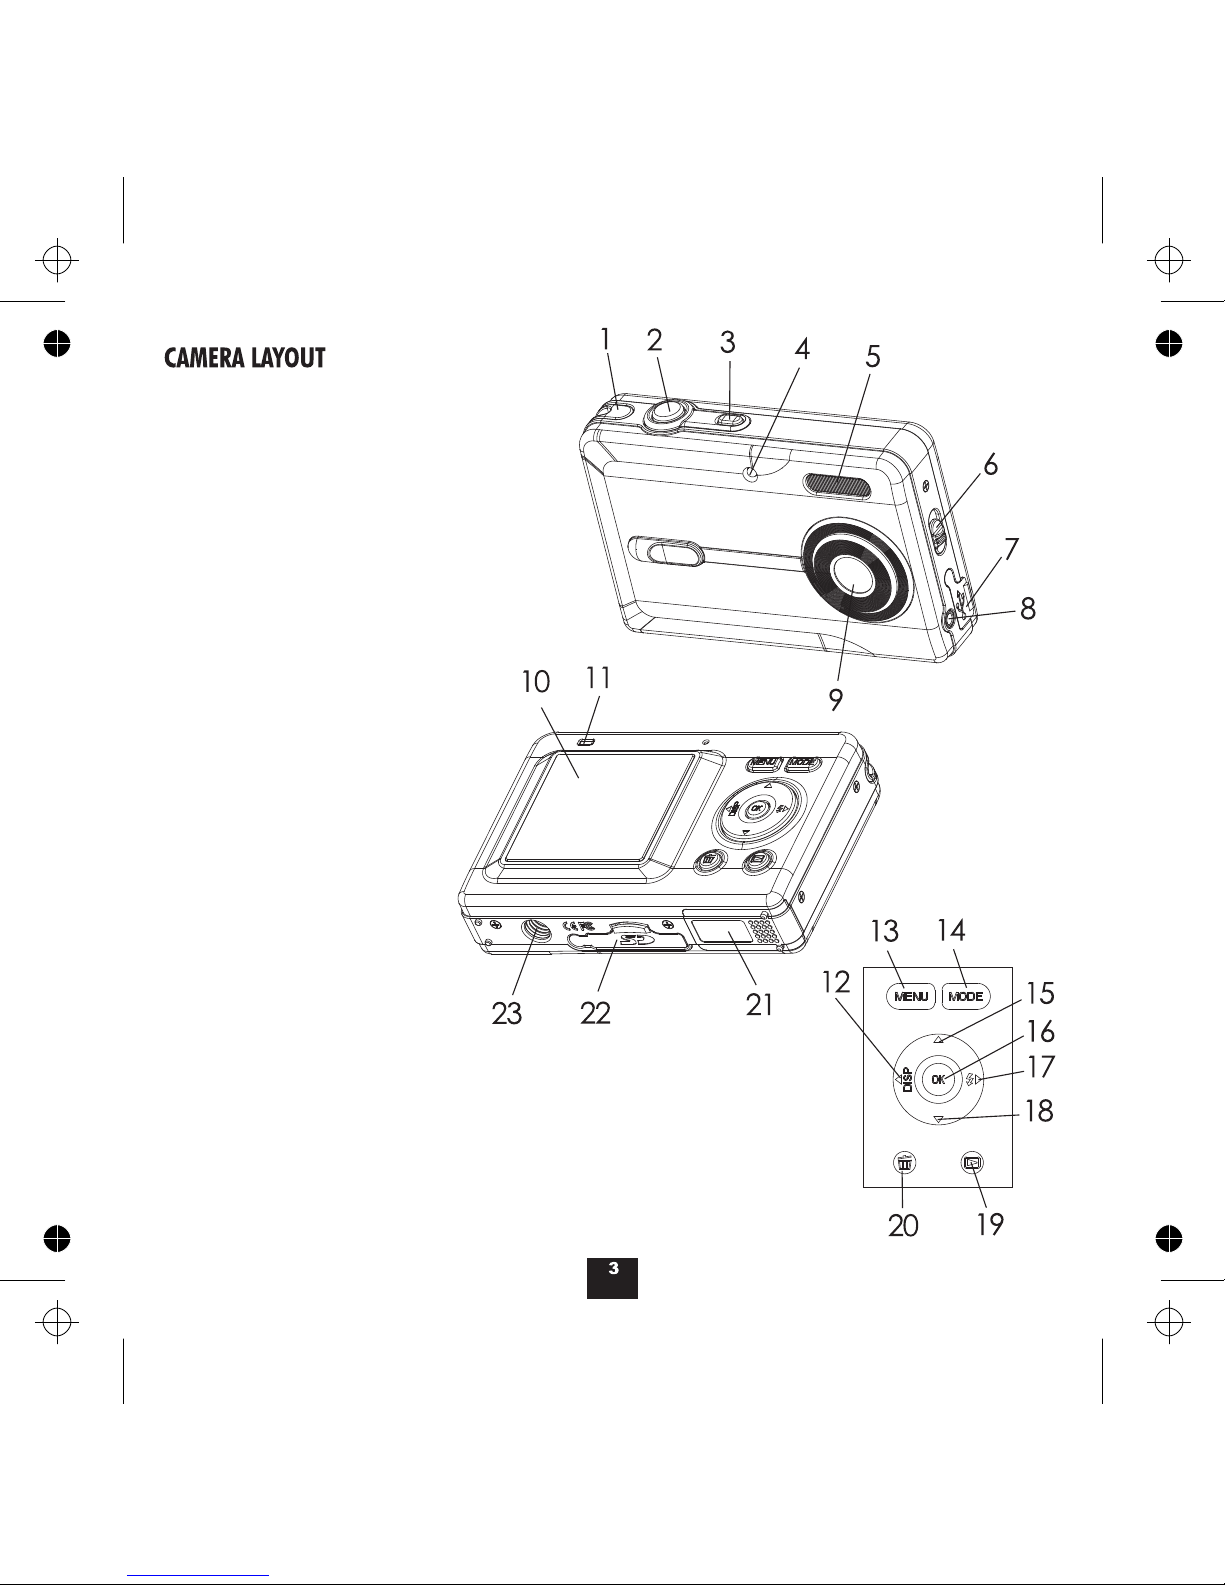
Wrist strap hook
SHUTTER Button
ON-OFF Button
TIMER Light
Flash Light
MACRO Switch
USB Socket
AV Socket
Lens
LCD Screen
BUSY Light
LEFT/DISPLAY ON-OFF-button
MENU button
MODE button
UP/ZOOM IN
OK button
RIGHT/FLASH ON-OFF
DOWN/ZOOM OUT
REPLAY button
DELETE button
Battery door
SD card slot
Tripod connector
1
2
3
4
5
6
7
8
9
10
11
12
13
14
15
16
17
18
19
20
21
22
23
Page 6
Page 7

10 Sec
Memory SD Card Inserted
Snapshot Mode
Flash Mode
Flash Off
Flash On
Flash Auto
Battery capacity
Full
Empty
Image Size (MP)
If you do not see the SD icon and a card is
inserted, format the card (see P28)
Macro Mode
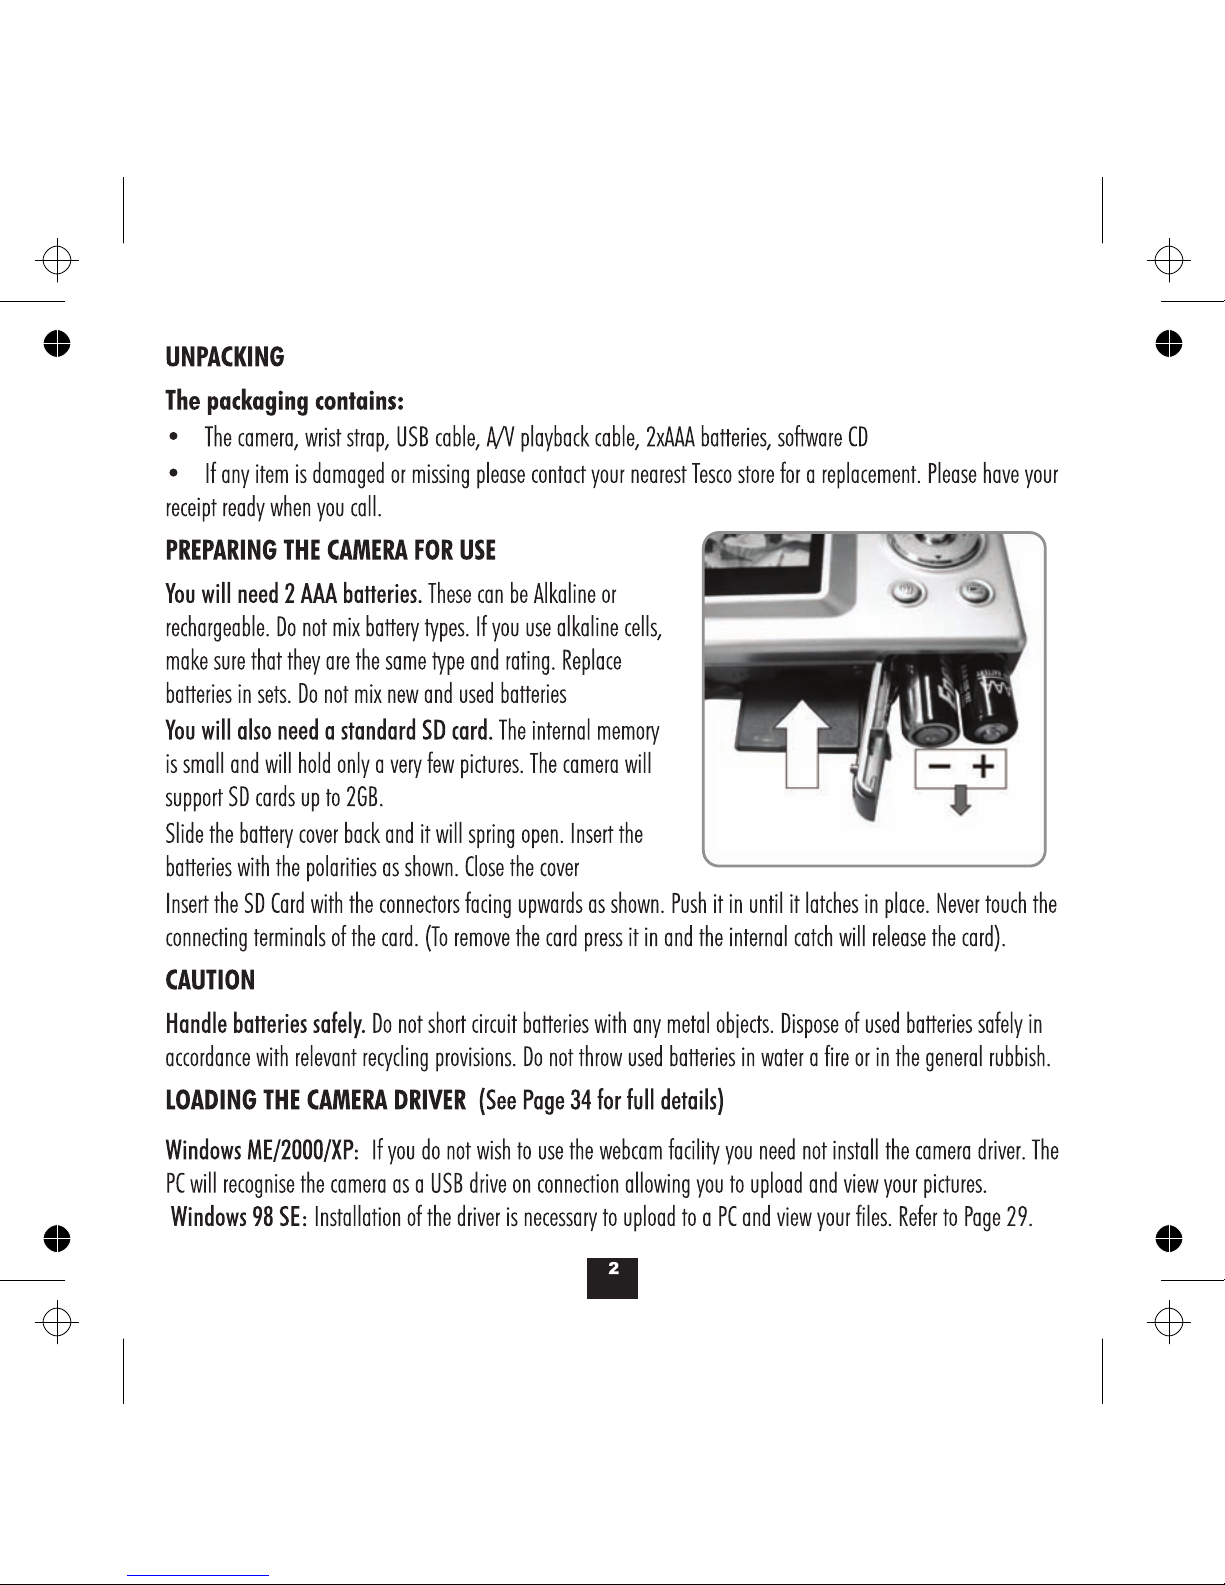
USING THE CAMERA
Switching On and Off
• Press the ON/OFF button until the welcome screen appears. When you switch the camera on the camera will
always come on in snapshot mode so you can just switch on, take a picture and switch off.
• When the camera is on, press the ON/OFF button The camera will then shut off.
• Auto Shut Off: When the camera is powered by the battery, after a few seconds of inactivity the camera will shut
off. This time can be set up in the Menu. When the camera is connected to a PC, Auto Shut Off will not operate.
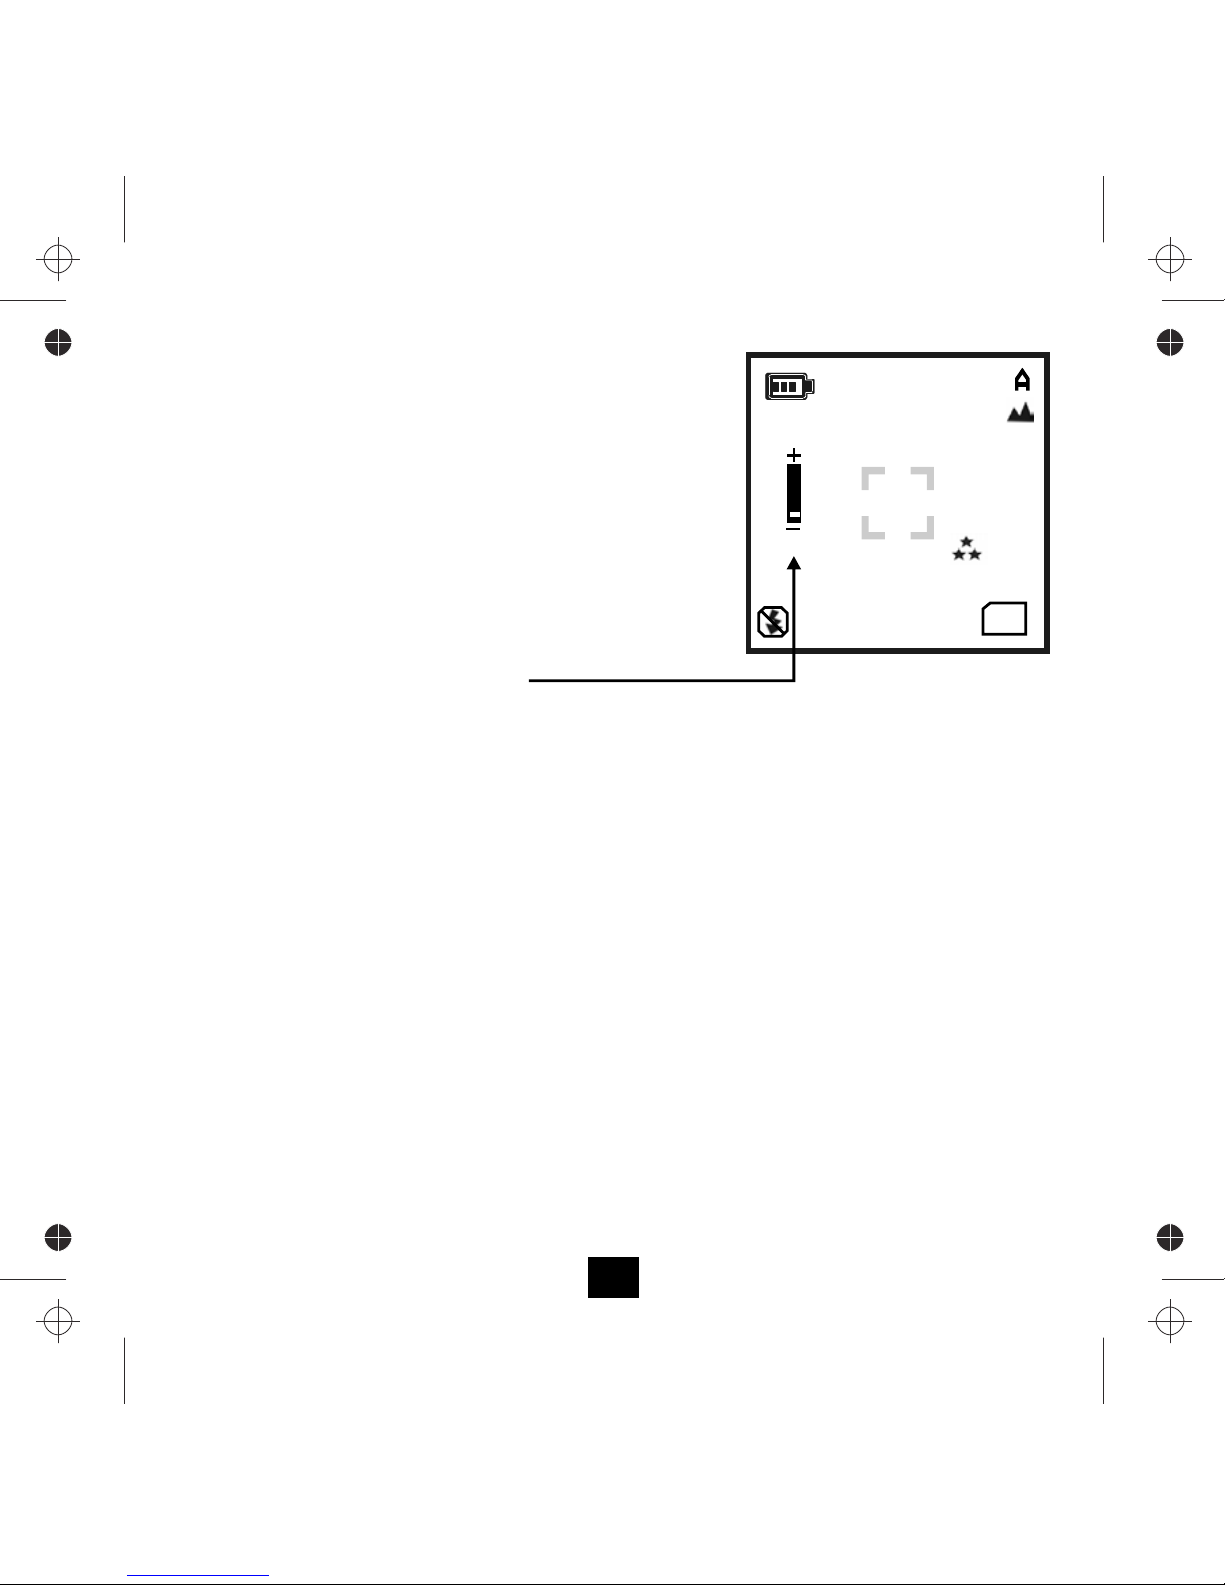
TAKING A PICTURE-BASIC
• Switch the camera on. The camera goes to Snapshot mode. The screen is overlaid with icons
(The black icons indicate the default operating mode. Icons described in grey are optional features. They will only
appear on the screen when you specifically select these modes.
5
SD
Internal Camera Memory
M
Video Mode
Normal Mode
A
Date
No. of pictures left
Image Quality (Fine)
Standard
Economy
00010
25/01/2007
SD
5M
Image Centre
Selftimer Mode (if selected)
Burst Mode (if selected)
No. of pictures left
Page 8

To take a picture:
• Line up the shot by looking at the image on screen.
• Keep the camera steady
• Press the shutter button gently
The camera will beep, momentarily go blank and begin to process the image. The picture
you have just taken appears on the screen. Let the camera to process the picture
before lining up the next shot. When the screen clears you can take another picture.
The ‘pictures remaining' indicator on the screen will decrease by one.
Using Flash
• Press the FLASH key to select FLASH off/on/auto.
The indicator appears on the screen
During this period the monitor screen will turn off and the"busy"light blinks.
When the light stops blinking and the screen turns on again, charging is done.
• You are now able to take a flash photograph.
When the shutter is pressed :
The FLASH ON function will always fire the flash.
The FLASH AUTO function will fire automatically as conditions require.
NOTES:
Wait for the light to go steady
before using the camera or
switching off!
BUSY
00100
25/01/2007
SD
5M
READY
BUSY
READY
Because the flash needs to be charged, the rate at which you take successive
pictures is reduced.
Battery life is reduced when using flash photographs.
If you are taking a photo of a distant object by night the flash has no effect.
When taking a shot of a very close object, the flash may "bounce" off the image
and the picture may be affected.
6
00099
25/01/2007
SD
5M
Flash Off
Flash On
Flash Auto
A
Page 9

Flash Images
In daylight the camera flash should be set to OFF as this speeds up processing and extends battery life
In low light you should set the flash to ON or AUTO.
No image on screen: If you cannot see the object clearly a usable picture will be unlikely to result.
The screen will also blank when processing an image.
It may also blank out briefly when the camera is moved because the image sensor needs to adjust.
Screen Illegible: In very bright sunlight you will not see the screen clearly. Shade the screen wherever possible.
7
Taking a Close Up Picture
The MACRO mode enables you to take close-up pictures with reduced blurring.
• Line up an object about 100mm from the camera. The fine detail is blurred.
• Slide the MACRO switch up to the
position.
The macro icon will appear on the screen beside the Camera icon.
Fine detail in the subject now comes up clearly.
• Keep the camera very steady. In Macro mode this is essential.
• Press the shutter button gently.
The camera processes the image and the picture you have taken appears on the screen.
After a while the screen clears and you may now take another picture. The ‘pictures
remaining' indicator on the monitor screen will decrease by one.
• Allow the camera to process the picture before lining up the next shot
• Always set the MACRO switch to OFF when you have finished.
Macro mode is especially useful for taking close up shots of flowers, insects and so on.
MACRO mode switch
OFF
ON
Taking a Timer-Delayed Picture
• See Page 14
Page 10
00010
25/01/2007
SD
5M
The Zoom Function
The camera has a Digital Zoom feature.
Digital Zoom may be used on single snapshots and timer snapshots.
It may also be used in Camcorder Mode
Using Zoom with single shots
• Line up the camera on the subject
• Press the buttons to increase or decrease the zoom.
The current zoom level appears on the screen.
• Press the shutter to take the picture
MN
The minimum zoom level is 1.0. The maximum Zoom is 8.0.
What is Digital Zoom?
When using digital zoom, the camera enlarges the area at the centre of the frame and discards the outside edges. The
image looks closer because it has been enlarged, however the image quality is also reduced. In effect the picture has
been expanded and cropped.
If you are unsure about using image processing software, digital zoom offers you a good method of lining up a specific
image. If you are likely to use high zoom levels, use a larger resolution. High levels of digital zoom at low resolutions
may result in grainy pictures.
Burst Photography
You can set the camera up to take rapid-fire shots in bursts of three snaps for each press of the shutter. Refer to Page 16
for details.
8
1.50
Page 11

Altering the Screen Display
The screen display has three modes
When the camera is switched on the normal mode appears.
Normal Mode displays the image on screen and all the relevant icons
• Press the DISPLAY button once
The icons will clear but the picture subject will remain.
• Press the DISPLAY button once more
The screen will be blanked out but the camera is still operational.
If you press the shutter, the camera will take the picture. After processing, the
shot will briefly be displayed after which time the screen will go blank again.
This mode of operation can be useful
• When you want to preserve battery life
• When you want to leave the camera switched on so that it is ready to take a quick shot
• In very bright sunlight
• Press the DISPLAY button a third time to restore normal mode.
X2
X3
DISP
DISP
DISP
9
00100
25/01/2007
SD
5M
The BUSY light will come on showing the camera is operational
BUSY
Page 12

Page 13

OK Set
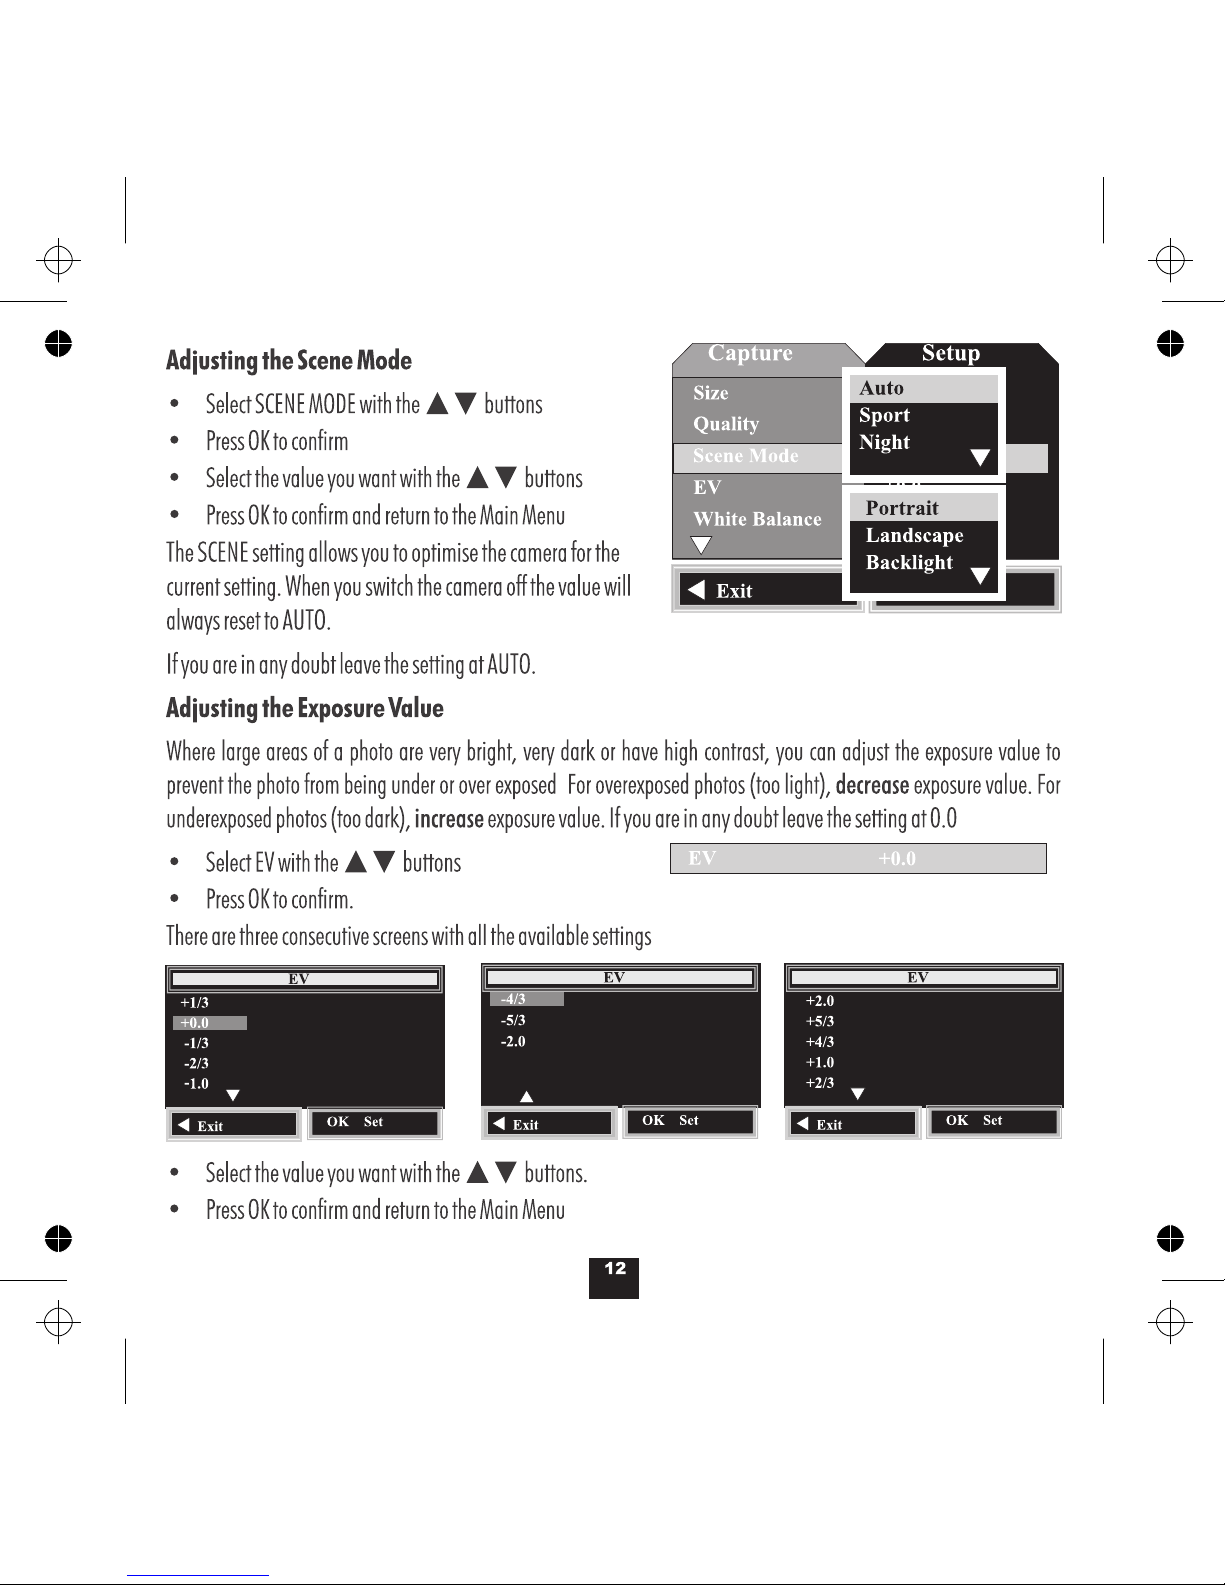
Scene Mode
EV
White Balance
Exit
Capture
Size
Quality
Fine
Auto
+0.0
Auto
Setup
5M
MENU
• Press the MENU button.
• The first item on the menu sets the picture size.
Adjusting the Picture Size
•
11
WHAT IMAGE SIZE IS BEST?
Large resolutions offer higher picture definition but only if you are printing large pictures! The downside is that large
formats take up more space, require more processing time which cuts down on battery life. They can also take a long
time to e-mail. A 19” monitor will typically be set to 1024 x 768 pixels, so a large picture may be larger than the screen!
Note: The NATIVE RESOLUTION of the camera is 3MP. This is the highest level the sensor in the camera can accept.
Higher settings are achieved by interpolation - an electronic process whereby the camera increases the resolution by
"borrowing" nearby pixels and inserting them into the picture to increase the size. If the picture you are taking is
complex, increasing the resolution may not necessarily give you a clearer picture.
Adjusting the Picture Quality
• Select QUALITY with the MN buttons
• Press OK to confirm
• Select the value you want with the MN buttons
• Press OK to confirm and return to the Main Menu
The QUALITY setting affects picture compression. The lower
the setting the higher the compression.
Use a high value for pictures you wish to print.
A lower value is acceptable for on-screen viewing.
Press OK to enter the SIZE menu
12M
8M
5M
3M
1.3M
VGA
The choices are arranged in two groups of three:
• Select the value you want with the MN buttons
•
Press OK to confirm and return to the Main Menu
OK Set
Scene Mode
EV
White Balance
Exit
Capture
Size
Quality
Fine
Auto
+0.0
Auto
Setup
5M
Fine
Standard
Economy
Page 14
Page 15
Adjusting the White Balance
• Select WHITE BALANCE with the MN buttons
• Press OK to confirm
• Select the value you want with the MN buttons
• Press OK to confirm and return to the Main Menu
If you are in any doubt leave the setting at AUTO.
Adjusting the ISO Number
The ISO number governs the speed of the camera response. Use a high value for low light and a low ISO for high light. A
high ISO number gives a faster response at the expense of grainy pictures. A low ISO number gives a better quality
picture but only in bright conditions.
• Select ISO with the MN buttons
• Press OK to confirm
• Select the value you want with the MN buttons
• Press OK to confirm and return to the Main Menu
If you are in any doubt leave the setting at AUTO.
Adjusting white balance ensures that objects which appear white in real life appear white in your photo. Photographing
areas of white in different lighting conditions can cause them to appear blue, yellow or even green or magenta. By
setting the appropriate WB you can optimise colour accuracy under a wide range of lighting conditions.
OK Set
Scene Mode
EV
White Balance
Exit
Capture
Size
Quality
Fine
Auto
+0.0
Auto
Setup
5M
Auto
Daylight
Cloudy
Tungsten
Fluorescent
OK Set
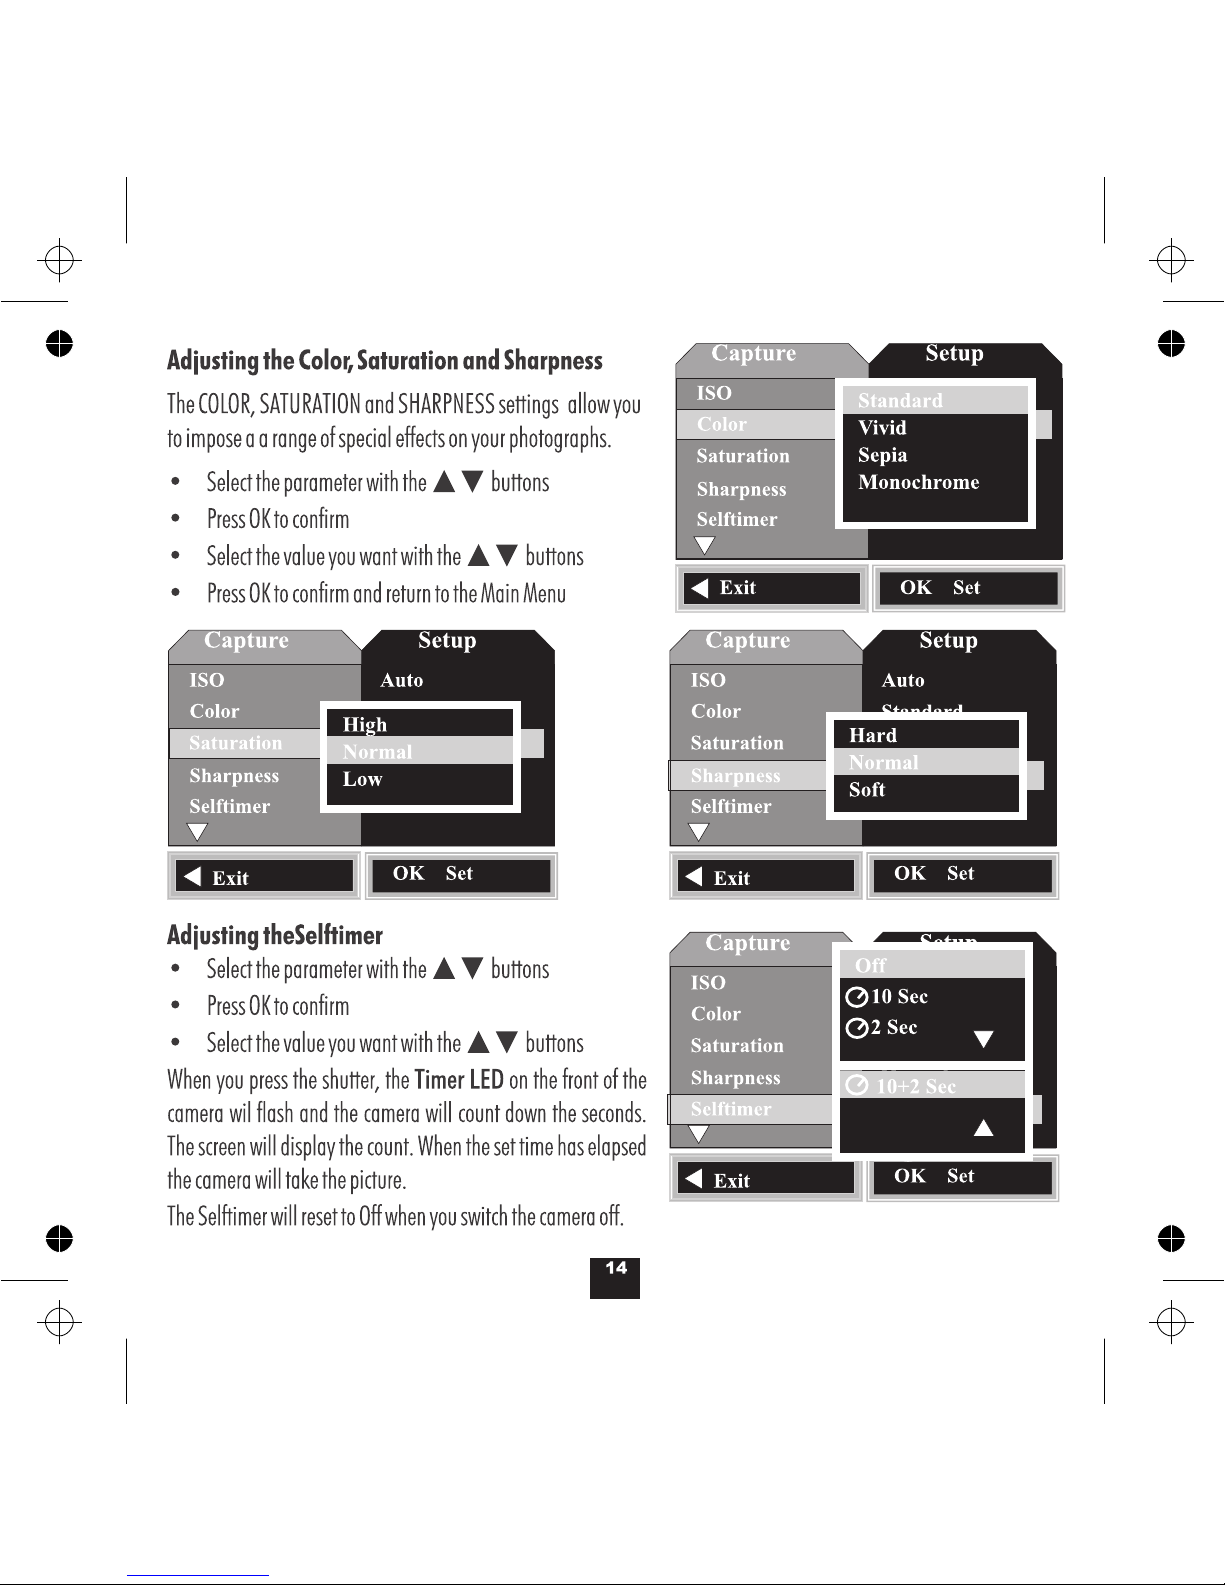
Saturation
Sharpness
Selftimer
Exit
Capture
ISO
Color
Standard
Normal
Normal
Off
Setup
Auto
Auto
100
200
13
Page 16
Page 17

Setting the Date
Before you can date stamp your photos or recordings you must set
up the date and time.
• Select DATE INPUT with the MN buttons
• Press OK to confirm
• Select SET with the MN buttons
• Press OK to confirm
To Set the Date and Time
• Select the Date Format with the MN buttons
You can select DD/MM/YYYY, MM/DD/YYYY; YYYY/MM/DD
• Press the OP keys to move to the Date section
• Press MN to set the Day, then press OP to move to the month.
• Set the Month and Year in the same way then press OP to move
to the time. Now set the time in the same way.
• Press OK to exit. The date will now appear in the Capture Menus.
Setting the Time Stamp
• Switch the camera on.
• When the menu screen loads press the MENU button.
• Select Time Stamp with the MN buttons
• Press OK to confirm.
• Select the type of Stamp you need
• Press OK to confirm
• Press the MENU key or O to EXIT
Off
Burst
OK Set
Exit
Capture
Date Input
Time Stamp
Off
Setup
Next Menu
Off
Set
DD / MM/YY
01 / 01 / 2007
00 : 00 : 00
OK: Exit
SET
Burst
OK Set
Exit
Capture
Date Input
Time Stamp
Off
Setup
Next Menu
Off
Date Only
Date and Time
15
Page 18

Burst Mode
BURST Mode enables you to take photos in bursts of three. This
is useful for capturing moving objects. The camera will take
three shots in rapid succession and display all three before
reverting to Capture Mode.
• Select the parameter with the MN buttons
• Press OK to confirm
• Select On or Off with the MN buttons
• Press OK to confirm and return to the Main Menu
In Burst Mode this icon will appear on the screen
CAUTION: Burst Mode will NOT reset when you switch the camera off. Be sure to manually reset the mode to
OFF before you switch the camera off or you may get an unpleasant surprise!!
Off
Burst
OK Set
Exit
Capture
Date Input
Time Stamp
Off
Setup
Next Menu
On
Off
16
Page 19

Page 20

18
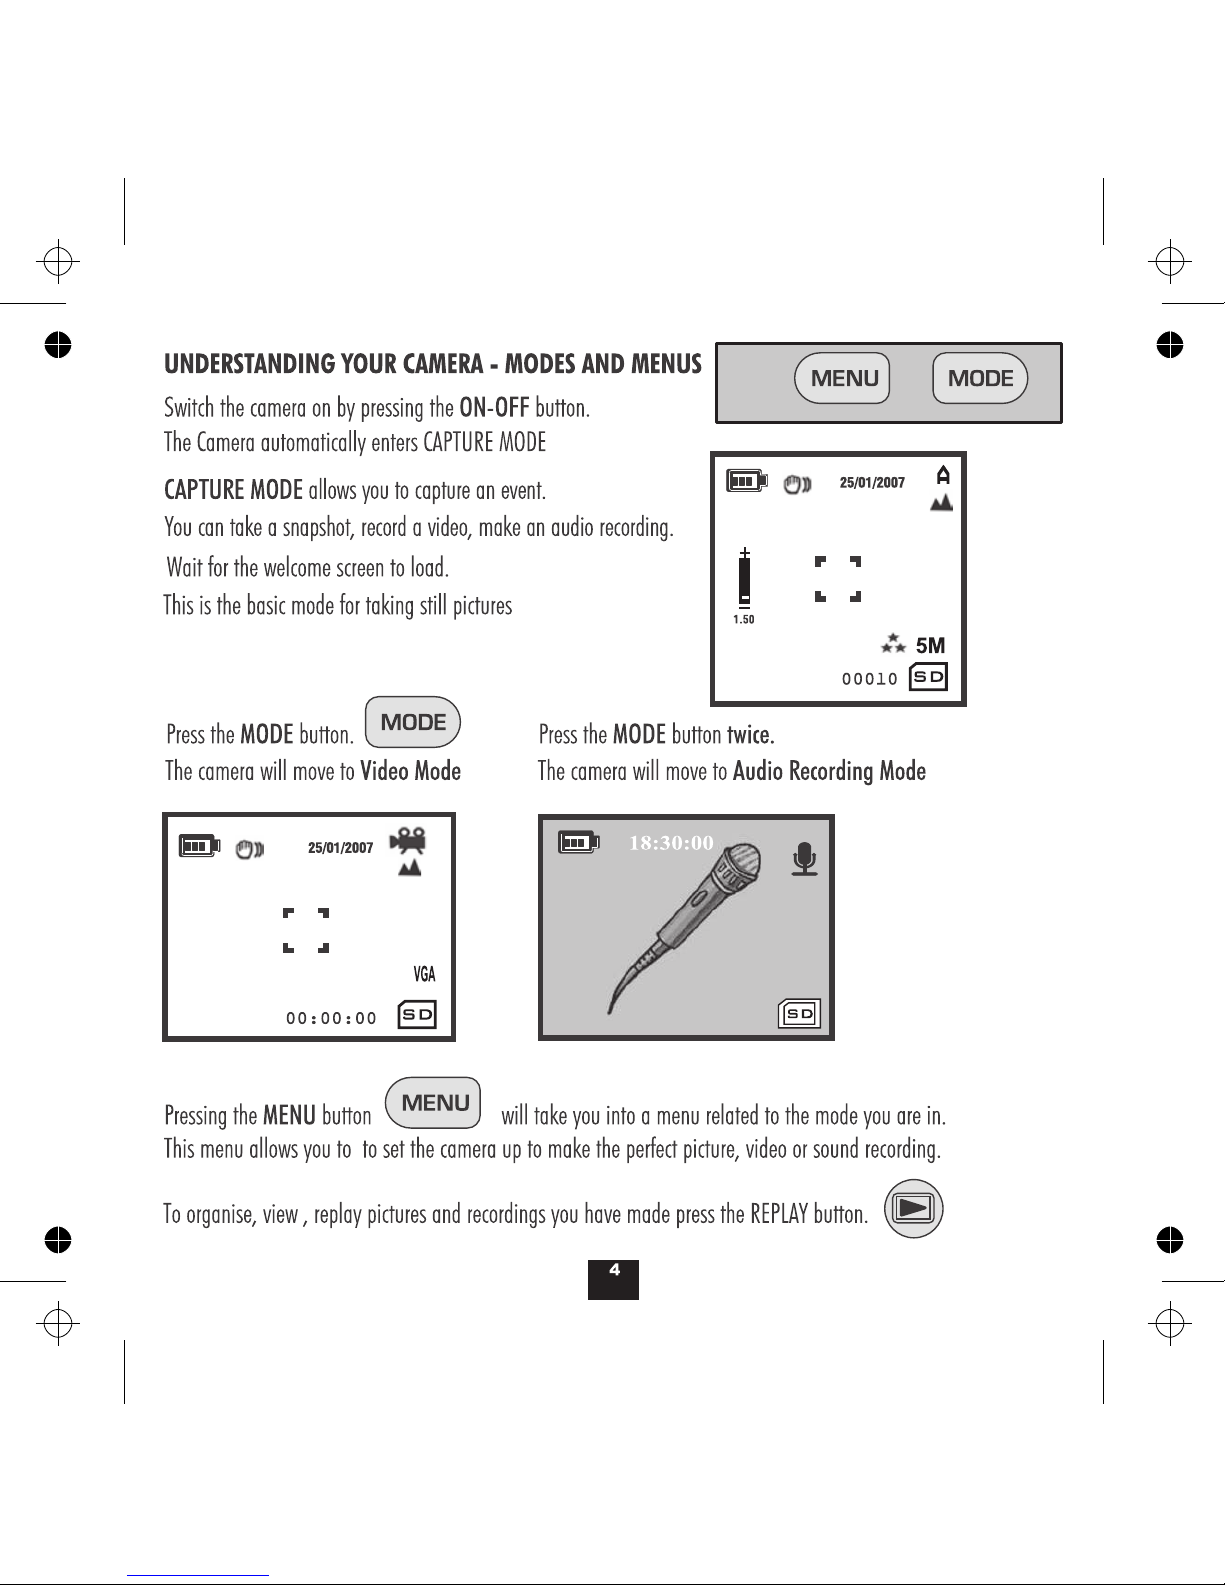
UNDERSTANDING THE CAMCORDER MENU
The CAMCORDER MENU is similar to but simpler than the Picture Menu
• Press the MODE button to enter Camcorder Mode
•
• Select the item you want to change with the
buttons.
•
MN
Press the MENU button.
Press OK. A second menu will now display
• Select the value you want to change with the
buttons.
MN
•
Press OK to confirm and return you to the main menu
• Press the MENU or O key to exit.
OK Set
EV
White Balance
Exit
Capture
Size
+0.0
Auto
Setup
QVGA
Item in List
Current Setting
• Switch the camera on by pressing the ON/OFF button.
OK Set
EV
White Balance
Exit
Capture
Size
+0.0
Auto
Setup
QVGA
VGA
QVGA
Setting the Picture Size
• Select SIZE with the MN buttons
• Press OK to confirm
• Select the value you want with the MN buttons
• Press OK to confirm and return to the Main Menu
Setting the Exposure Value (EV) and White Balance
These are set following the same procedure as for the Picture Menu.
VGA offers better picture quality but takes up more memory. QVGA
has an image size of 320 x 240 pixels.VGA is 640 x 480 pixels.
Page 21

MAKING AN AUDIO RECORDING
To access the main menu:
• Switch the camera on by pressing the ON/OFF button.
Wait for the welcome screen to load.
• Press the MODE button twice
The Camera will now enter Voice Recorder mode.
• Press the Shutter to commence recording
The ‘BUSY’ light will come on and the timer will begin running.
To stop recording:
• Press the Shutter.
• Press the Shutter again to start a new recording
To Exit :
• Press the Shutter to stop recording.
• Press the ON/OFF button to switch the Camera off.
Voice Recorder Ready
This mode has no associated settings menu.
19
18:30:00
SD
Voice Recorder Operating
SD
00:00:01
Page 22

REPLAYING PICTURES VIDEOS AND AUDIO FILES
Switch the camera on by pressing the ON/OFF button. Wait for the welcome screen to load.
The most recent picture or video on the disc displays first.
The picture or video information will briefly display followed by the image itself.
The numbering includes video and still pictures.
Image No.
0019
You can enter REPLAY mode from any screen on the camera. The REPLAY mode is common to all files.
Press the REPLAY button to enter replay mode.
Play/Pause/Icons
Picture Playback Screen
00:04:29
20
Playback
Icon
OK
Recording Duration
Playback
Icon
SD
Image No.
0029
SD
Video Playback Screen
Audio Playback Screen
Image No.
0049
SD
OK
Play/Pause/Icons
00:04:29
Playback
Icon
Recording Duration
Page 23

Viewing one picture at a time
•
to move back a picture
• Press P to move forward one picture
Zoom
• to increase Zoom
• to decrease Zoom
VIEWING PICTURES
Press O
Press M
Press N
21
0019
SD
If you move to the next or previous picture in Zoom mode the Zoom resets to 1.
00:04:29
OK
0029
SD
VIEWING VIDEOS
•
Press OK to commence playback
During Playback
•
Press OK to Pause and Restart playback
•
Press M to cycle the speed 1X, 2X, 4X 8X, 1X
Press N to stop the recording
Now press OP to move to the previous/next recording
To move to the next/previous image during playback:
•
•
REPLAYING AUDIO FILES
0049
SD
OK
00:04:29
These operate as Video Files
Page 24

22
Deleting a Single Image
• Select the image
• Press the Delete Key
• Select SINGLE with the MN buttons
• Press OK to confirm and delete the Image
To Delete All Images
• Select ALL with the MN buttons
• Press OK
• Select CANCEL and then OK to return to Playback Mode
• Select Execute and OK to delete all the images from the
disk.
• Press OK to exit. The date will now appear in the
Capture Menus.
To Delete Selected Images
• Choose SELECT with the MN buttons
• Press OK
• The pictures display as sets of 9 thumbnails
When you reach the first or last thumbnail
• Press O P to go to the next/previous set
• Select the picture using the MN O P keys
• Press OK to delete the picture and return to thumbnail
mode
• Press REPLAY to return to the Main Capture Screen
SINGLE
ALL
SELECT
DELETE
OK Set
Exit
Cancel
Execute
Delete All Images?
OK Set
Exit
008 009 010
013
016
012
015
011
014
100/009
Video (AVI) files Audio (WAV) files
Page 25

OK Set
Slide Show
DPOF
Protect
Exit
Play
Delete
Copy to Card
Next Menu
3 Sec
Next Menu
Next Menu
Setup
Next Menu
23
Organising, Deleting and Protecting Your Files
• Switch the Camera on
• Press the PLAYBACK key
• Press the MENU key to enter the Playback Setup Menu
Deleting Files
• Select DELETE with the MN buttons
• Press OK to enter the Delete menu
• Select Single/All/Select using the MN keys
• Follow the Delete Procedure on
Copy To Card
This menu allows you to copy images in the Camera memory to
the SD card in the camera.
• Choose Copy to Card with the MN buttons. Press OK
• Press OK to Execute. The copying takes some time
The camera now copies all the images in the camera memory to a
new folder on the card. If you replay all the images from the SD
card the original images on the card will play and then the
transferred camera images will play.
Any new images will be added to the new folder - not the images
existing on the card.
The original images in the camera memory are NOT deleted.
P.22
SINGLE
ALL
SELECT
DELETE
OK Set
Exit
OK Set
Slide Show
DPOF
Protect
Exit
Play
Delete
Copy to Card
Next Menu
3 Sec
Next Menu
Next Menu
Setup
Next Menu
Cancel
Execute
Copy to Card
OK Set
Exit
Page 26

OK Set
Slide Show
DPOF
Protect
Exit
Play
Delete
Copy to Card
Next Menu
3 Sec
Next Menu
Next Menu
Setup
Next Menu
Print Num 7
Print Enable Execute
Single
OK Set
Exit
Print Num
7
24
Slide Show
This replays all images on the SD card as a slide show
• Select SLIDE SHOW with the MN buttons
• Press OK
• Select the slide show time with the MN keys
• Press OK to start the Slide Show
In Slide Show view, only the first frame of a video file will appear.
DPOF (Digital Print Order Format)
You can select images on the SD card to print. The card can be taken
to a print shop or printed out via a compatible home printer.
PRINT ORDER FOR SINGLE PICTURES
• Enter Display Mode and navigate to the wanted image
• Press MENU. Navigate to DPOF with the MN buttons. •
• Press OK
• Choose Single with the MN buttons. Press OK
• Choose Print Num with the MN buttons. Press OK
• Choose the number of copies to print with MN keys
Choose ‘0 ‘ if you do not want to print the picture at all!
• Press OK. The number counter will disappear
OK Set
Slide Show
DPOF
Protect
Exit
Play
Delete
Copy to Card
Next Menu
3 Sec
Next Menu
Next Menu
Setup
Next Menu
3 sec
5 sec
10 sec
OK Set
Protect
Exit
Next Menu
Single
All
DPOF
OK
Set
Exit
Print Num 7
Print Enable Execute
Single
OK Set
Exit
Page 27

• Highlight Print Enable Execute with the MN keys.
• Press OK
The Print Enable Screen will now open
• Choose Execute with the MN buttons.
• Press OK
• Press MENU
• Press MENU
This will return you to the main menu screen
Print Num 7
Print Enable Execute
Single
OK Set
Exit
Cancel
Execute
Print Enable
OK Set
Exit
Print Num 7
Print Enable Execute
Single
OK Set
Exit
OK Set
Slide Show
DPOF
Protect
Exit
Play
Delete
Copy to Card
Next Menu
3 Sec
Next Menu
Next Menu
Setup
Next Menu
OK Set
Protect
Exit
Next Menu
Single
All
DPOF
OK
Set
Exit
25
Page 28

PRINT ORDER FOR ALL PICTURES
• Enter Display Mode and navigate to the wanted image
• Press MENU. Navigate to DPOF with the MN buttons.
• Press OK
• Choose ALL with the MN buttons.
Now proceed as for Single
When you select an image for
printing the Print symbol and
number are added to the image
Protecting Files
You can protect files from accidental erasure
• Choose PROTECT with the MN buttons.
• Press OK
You can choose to protect a single file, all the files or a selection.
The easiest way is to select the files
• Choose SELECT with the MN buttons •Press OK
• The pictures display as sets of 9 thumbnails
When you reach the first or last thumbnail
• Press O P to go to the next/previous set
• Select the picture using the MN O P keys
• Press OK to protect/unprotect the picture
• Press REPLAY to return to the Replay Screen
This symbol identifies a protected file
OK Set
Slide Show
DPOF
Protect
Exit
Play
Delete
Copy to Card
Next Menu
3 Sec
Next Menu
Next Menu
Setup
Next Menu
OK Set
Protect
Exit
Next Menu
Single
All
DPOF
OK
Set
Exit
0019
7
Protect
Next Menu
OK Set
Protect
Exit
Next Menu
Single
All
Select
Protect
OK
Set
Exit
008 009 010
013
016
012
015
011
014
100/008
26
Page 29

008 009 010
013
016
012
015
011
014
100/009
OK Set
Auto Off
Sys. Reset
Light Freq
Exit
Capture
Format
Language
English
3 min
Next Menu
60 Hz
Setup
Next Menu
Thumbnail Execute
Thumbnail mode
• Choose THUMBNAIL with the MN buttons
• Press OK
• The pictures display as sets of 9 thumbnails
• Select the picture using the MN O P keys
When you reach the first or last thumbnail
• Press O P to go to the next/previous set
• Press OK to display the picture
Setting the Volume
• Choose VOLUME with the MN buttons. Press OK
• Set the Volume using the MN keys
• Press OK to display the picture
SETTING UP THE CAMERA
To access the SETUP MENU you need to access the Camera
Capture Menu, the Video Capture menu or the Replay menu
Access any Menu
Press the P key
The SETUP MENU will display
OK Set
Slide Show
DPOF
Protect
Exit
Play
Delete
Copy to Card
Next Menu
3 Sec
Next Menu
Next Menu
Setup
Next Menu
OK Set
EV
White Balance
Exit
Capture
Size
+0.0
Auto
Setup
QVGA
OK Set
Scene Mode
EV
White Balance
Exit
Capture
Size
Quality
Fine
Auto
+0.0
Auto
Setup
5M
OK Set
Exit
Play
Thumbnail
Volume
Next Menu
Setup
Execute
1
2
3
4
5
6
7
8
27
Page 30

Page 31

Page 32

Page 33

Page 34

INSTALLING THE CAMERA SOFTWARE
The utilities disc supplied with this camera includes:
• The camera driver
• ArcSoft PhotoImpression 5 and VideoImpression 2
Installing the Camera Driver
DO NOT CONNECT THE CAMERA TO THE PC
Load the CD into your CD Drive
The welcome screen will appear
Click "Install Camera Driver"
Follow the prompts.
Let the software install
Press Finish to complete the installation.
If the CD does not auto start:
Go to the START/RUN menu
Type D:autorun
(where D: is the letter of the CD drive)
The welcome screen will now appear
Windows ME/2000/XP: If you do not wish to use the webcam you need not install the camera driver. When you
connect the camera to the PC the SD disk in the camera will appear as a removable drive allowing you to upload
and download images. We recommend you install this software to enjoy the full functionality of your new camera.
If you have Windows 98 installation of the camera driver is necessary.
The camera connects to the PC via the supplied USB2 cable. Images are stored on an SD card. If you have a card
reader you may download images to your PC from the card. You may also plug the card into a suitable printer for
direct printing.
32
Page 35

USB
Disk Drive
PC Cam
Disk Drive
Printer
TRANSFERRING FILES FROM CAMERA TO PC
Set the Camera USB connection to Disk Drive!
• Plug the camera into the PC
• Navigate to My Computer
The camera appears as a removable hard drive.
• Click the Removable Disc Icon to open the drive
• Click on the folder DCIM.
•
JPEG files may be opened with a variety of programs.
The included software programs can be used to view and
manipulate your images.
WMA and AVI files may be played in Windows Media Player
Unplugging the Camera from the PC
Click the "Safely Remove Hardware" Icon in the taskbar
Wait for the message 'safe to remove hardware'
You may now unplug the camera.
Click on the folder "100DSCIM”.
You can now access the contents of the hard drive.
100DSCIM
33
If you have copied the contents of the camera’s internal memory
there will be a second folder on the drive.
Page 36

INSTALLING THE CAMERA AS A WEBCAM
Navigate to the USB Connection page of the Setup Menu
Ensure that the camera is set to PC Cam!
• Connect the Camera to the PC via the supplied USB cord.
The camera driver will now be installed to the camera.
You will now see the download screen.
Downloading Files
All the files are visible in the window.
Jpeg files are pictures. View them with
standard image software.
Avi files are Video files
Wav files are audio recordings
These file types can be played in current
versions of Windows Media Player.
Click on the files you want to save
Select a folder to save the files in
Tip: If you select the desktop the utility
will create a folder for you
Click on Download
The utility will create and date the folder
09-07-2007-
13-00
34
OK Set
Exit
Capture
TV Output
USB
Disk Drive
Setup
PAL
PC Cam
Disk Drive
Printer
Page 37

USING THE CAMERA AS A WEBCAM IN WINDOWS XP
1. Connect your camera to the computer.
2. Navigate to My Computer
3. Click on Standard Camera
The video will now stream.
Camera Tasks
Take a new picture: Click on this to
capture a picture. The picture appears at
the bottom of the screen as a thumbnail.
You can now save the picture to your hard
drive.
Delete all pictures on camera: Click
this option to delete the captured video
images. This operation will not delete
any pictures actually stored in the
camera memory.
When you have finished: Unplug the
camera from the PC.
35
Standard Camera
Standard Camera
Standard Camera
Ensure that the camera is set to PC Cam!
Page 38

Installing ArcSoft PhotoImpression 5 and VideoImpression 2
36
PhotoImpression 5 enables you to access, archive and catalogue all the images on your PC. Using the inbuilt
capture mode you can also use the camera to take photographs when connected to the PC.
VideoImpression 2 is a powerful Video Capture and editing tool that turns your camera into a digital video
recorder with full audio support and a variety of post-processing options.
To take full advantage of your camera we recommend that you install both programs.
NOTE: Installation of the camera Driver is essential.
Installation procedure for both programs is identical
Installing ArcSoft PhotoImpression5
Do NOT connect the camera to the PC
• Launch the software CD
• Click ‘Install PhotoImpression’
• Click ‘Yes’
Page 39

• Click ‘Next’
• Click ‘Next’
37
Page 40

• Click ‘Next’
Allow the software to install fully
At the prompt:
•Click ‘Finish’
The installation is complete
Now return to the CD start screen and install VideoImpression2 using the same procedure.
You will find that these icons have been added to the desktop
Clicking on the icon to launch the associated program.
38
Page 41

USING THE CAMERA WITH PHOTOIMPRESSION 5
• Connect the camera to the PC
• Click on the icon to launch the program
• Click ‘Standard Camera’
All images stored on the
camera will now display
• Click on a stored image.
Several choices appear
Ensure that the camera is set to PC Cam!
Take a picture of the image on screen
Delete the selected image from the Camera
Save the to the PCselected image
Set up the camera properties for use with the PC
Reload the camera screen
Transfer the to PhotoImpression for processingselected image
Switch Off
Object the camera is pointing at
39
Page 42

TAKING A PICTURE
• Click TAKE
• A thumbnail will be added to the image
display
PROCESSING A PICTURE
• Select one or more pictures
• Click Transfer
You can now apply a variety of post
processing options to the image.
The help menu has comprehensive
information as to the range of
options available.
40
Page 43

CAPTURING A STILL IMAGE FROM A
VIDEO SOURCE
METHOD A
• Click W\A Standard Camera
You can now operate the camera as a webcam
but will only be able to capture static pictures
To capture the picture on screen:
• Click Capture
You can now save the image or apply
postprocessing effects - the Help menu has full
details on all the options available
METHOD B
• Click FILE/GET PHOTO
1. Click CAMERA/SCANNER to take you to
the above screen
2. Click VIDEO.
A
B
1 2
Another video capture screen will open from which
you can capture and manipulate still images
41
Page 44

USING THE CAMER AS A WEBCAM WITH VIDEOIMPRESSION 2
Ensure that the camera is set to PC Cam!
• Connect the camera to the PC
• Click on the icon to launch the program
• Click ‘Create a New Video’
A second menu will open
• Click ‘Capture From Device’
• If you have saved Video files on the PC you can also open, view and apply post-production effects by clicking
‘Get From File’
42
Page 45

CAPTURING A VIDEO
The Video Capture window will open
When you have finished
shooting the video:
• Click STOP
The video will now be transferred to
the Project File.
You can now record another video or
process the video you have just
recorded.
• Press the RED record button
You may now rename and choose
other options.
• Click ‘Start Capturing’
43
Page 46

VIEWING AND
• Double Click the Thumbnail as indicated. The Video will start playing and the thumbnail will be copied to the
storyboard -the strip at the bottom of the screen.
• Click PLAY to commence playing. Click the button again to pause and restart play.
• Other functions are indicated below
PROCESSING A VIDEO
x2
Press to PLAY/PAUSE
Press to RESTART
Alter Volume
Double Click to view
Full Screen
Right Click to
display options
Select and Left Click
to execute options
44
Page 47

PROCESSING AND SAVING YOUR VIDEO
• Stop the Video
You can now process the video as you choose. The bar at the top of the screen allows you to edit the video length, add
effects, text, audio narration.
• Click PRODUCE
• From the dialog box: Press START
The completed video will now save to a location of your choice on the PC
After you have processed all the aspects of the video:
45
Page 48

TROUBLESHOOTING
If your camera does not work as expected please run through this checklist before you contact Tesco.
Camera will not turn on
1. Batteries are not properly installed- remove and reinstall the batteries.
2. Insufficient battery voltage - Do not use old batteries or batteries with mixed battery life.
Do not use low voltage or low capacity rechargeable batteries
Flash will not fire
1. Flash set to OFF -Set the flash to Auto or On.
2. Flash has not been fully charged The flash takes a few seconds to charge -the Operation LED blinks. The Flash
light is fully charged when the Operation LED turns off.
3. Battery level low - the voltage is too low for the flash to work. Insert new batteries.
Image is blurred or out of focus
1. Subject is out of focal range. Ensure that there is at least 1.5m (5ft ) between the camera lens and subject.
2. The camera moved- Hold the camera steady while taking the picture.
The PC does not recognize the Camera.
In Windows 98SE, the camera driver has to be installed before downloading.
Subject in recorded image is too dark
Insufficient light for shooting Set the flash ON, or adjust the exposure value to a positive (+) setting.
Flickering on LCD screen or recorded image
Incorrect frequency setting. Check the anti-flicker frequency ( 50Hz or 60Hz ) under fluorescent light.
Flash card does not display images recorded.
The flash card is faulty or improperly formatted. Re-format the SD card and if necessary, replace it.
The SD card is locked. Move the switch at the side of the card to unlock it.
46
Page 49

If you get a warning
This may be due to a conflict with another camera or capture device. If this is the case you should uninstall the
software you have just loaded and also any other camera software that may be on your PC.
Uninstalling old drivers and devices
The most common problem occurring during installation is the presence of a driver for a similar, old device. The best
solution is remove all the drivers related to the old devices before installing the new driver. Make sure you delete
programs and drivers relating to old, unused and similar devices and nothing else.
1. Enter Windows ‘Safe Mode’ (press F8 when starting Windows and then select ‘Safe Mode’ from the menu)
2. Click on ‘Start – Settings – Control Panel’ and double-click on ‘Add/Remove Programs’ icon.
3. Find all the programs for similar, old devices and remove these by clicking on the ‘Add/Remove’ button.
4. Remove the camera driver for this camera.
5.
Restart the computer.
Now re-install the camera driver following the instructions in the previous pages.
message: “Capture device was not detected” when trying to open the PC cam.
WARRANTY AND DISPOSAL
If you are in any doubt about carrying out this procedure, consult a competent computer technician!
Your camera is covered by a warranty for 12 months from the date of purchase. If a fault develops during this period,
please contact the TESCO electrical help line on 0845 456 6767. Please have your original purchase receipt with you
when you call. This warranty in no way affects your consumer rights.
UK: Waste electrical products should not be disposed of with household waste.
e for details.
ROI: Produced after 13th August 2005. Waste electrical products should not be disposed of with
household waste. Please recycle where facilities exist. Check with your Local Authority or retailer for
recycling advice.
Separate disposal facilities
exist, for your nearest facilities. See www.recycle-more.co.uk or in-stor
47
Page 50

Page 51

AM-D550K-TES-1
Page 52

 Loading...