

Page 1

BRSS10
O wner’s
Handbook
Blu-ray disc player
Page 2

Page 3
IMPORTANT SAFETY INFORMATION
CAUTION!
RISK OF ELECTRIC SHOCK
DO NOT OPEN
TO REDUCE THE RISK OF ELECTRIC SHOCK
DO NOT REMOVE COVER (OR BACK)
This symbol indicates that there are
important operating and maintenance
instructions in the literature accompanying
this unit.
This symbol indicates that dangerous
voltage constituting a risk of electric shock
is present within this unit.
Read these instructions.
Keep these instructions.
Heed all warnings.
Follow all instructions.
Do not use this apparatus near water.
Clean only with a slightly damp cloth.
Do not block any ventilation openings.
Install in accordance with the manufacturer’s instructions.
Do not install or operate near any heat sources such as
radiators, stoves, or other apparatus that produce heat.
Unplug this apparatus during lightning storms or when
unused for long periods of time.
Refer all servicing to qualied service personnel. Servicing
is required when the apparatus has been damaged
in any way, such as the power-supply cord or plug is
damaged, liquid has been spilled or objects have fallen
into the apparatus, the apparatus has been exposed to
rain or moisture, does not operate normally, or has been
dropped.
Warning: To reduce the risk of re or electrical shock, do
not expose this product to rain or moisture. The product
must not be exposed to dripping and splashing and no
object lled with liquids such as a vase of owers should
be placed on the product.
No naked ame sources such as candles should be placed
on the product.
Caution: Changes or modications not expressly approved
by the manufacturer could void the user’s authority to
operate this device.
Caution: Usage of controls or adjustments or performance
of procedures other than those specied herein may result
in hazardous exposure.
IMPORTANT
This equipment generates, uses and can radiate radio
frequency energy and, if not installed and used in
accordance with the instructions, may cause harmful
interference to radio communication. However, this is no
guarantee that interference will not occur in a particular
installation. If this equipment does cause harmful
interference to radio or television reception, which can be
determined by turning the equipment o and on, the user
is encouraged to try to correct the interference by one of
the following measures:
- Reorient or relocate the receiving antenna.
- Increase the separation between the equipment and
receiver.
- Connect the equipment into an outlet on a circuit
dierent from that to which the receiver is connected.
- Consult the dealer or an experienced radio/TV
technician for help.
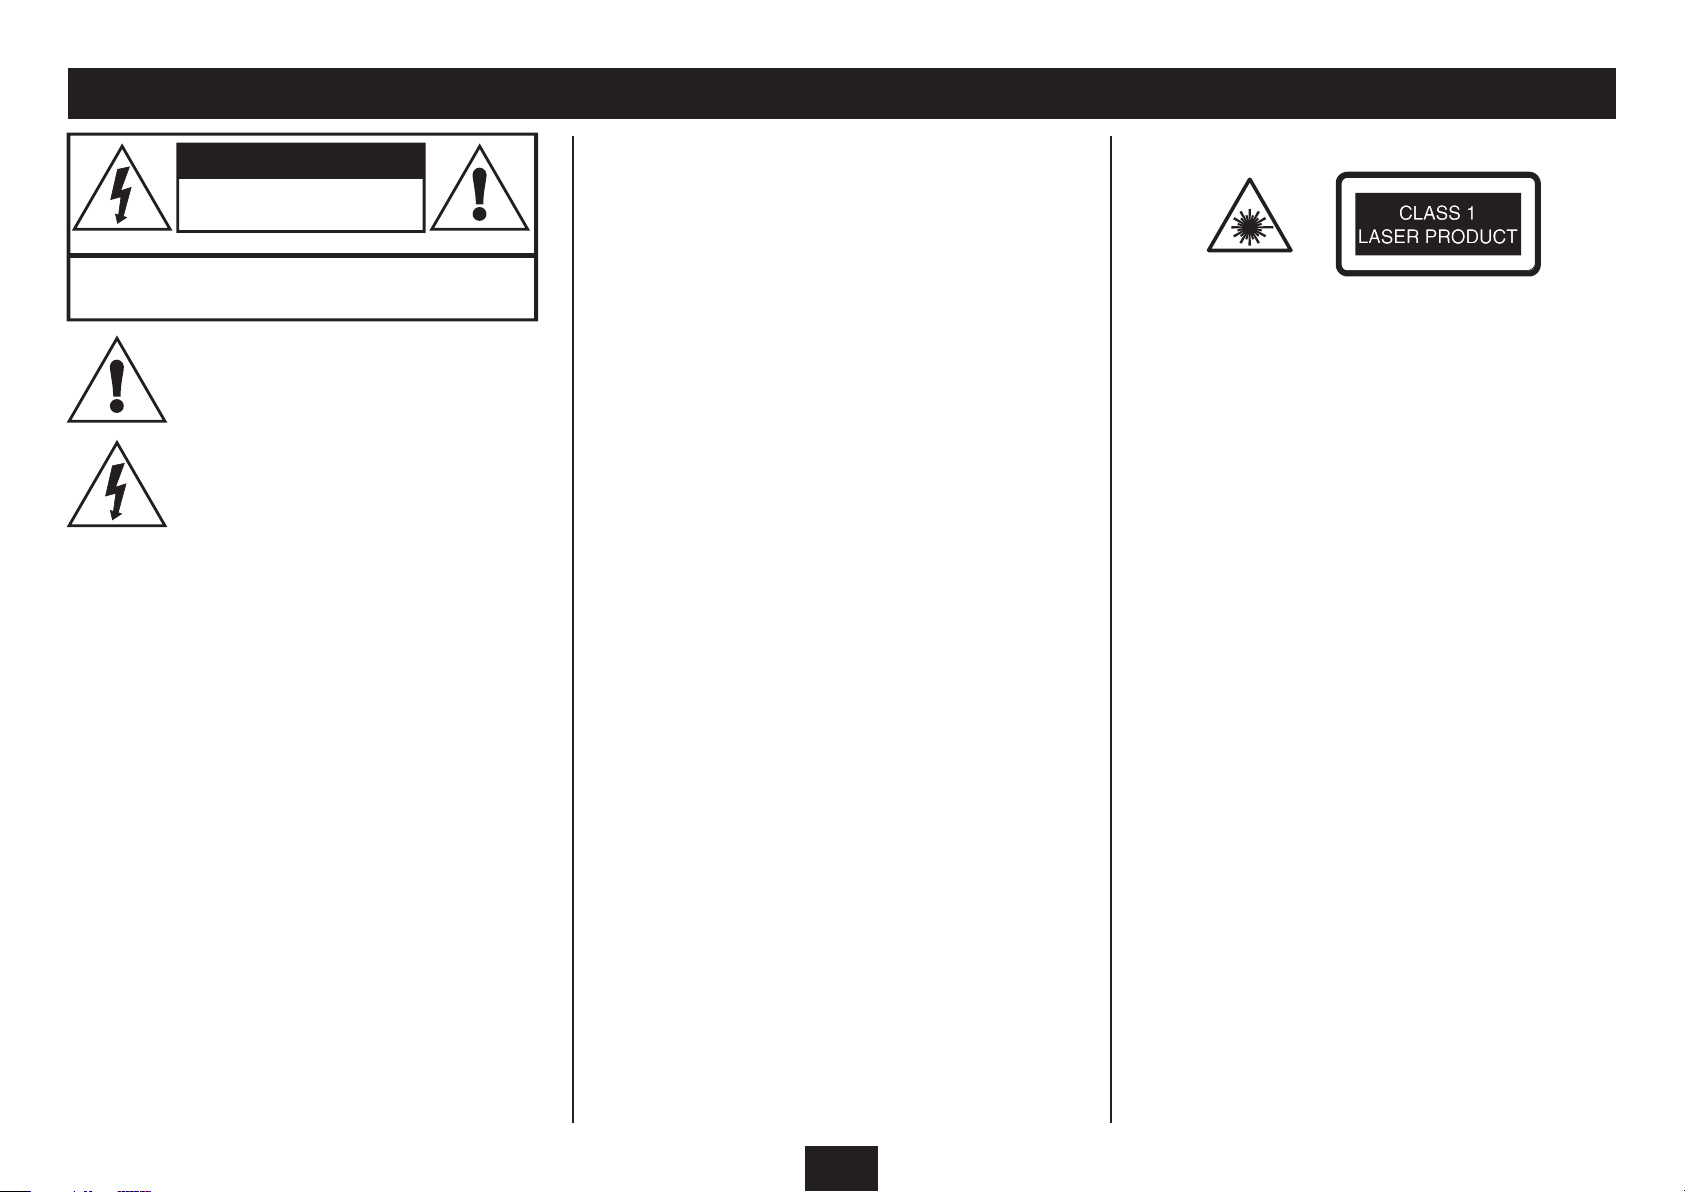
WARNING: DANGER OF RADIATION
These labels tell you that the unit contains a laser
component. Opening the CD compartment lid and
defeating the safety interlocks will expose the user to
radiation from the laser beam. Do not stare into the laser
while it is operating.
ELECTRICAL INFORMATION
Mains Supply: The mains operating voltage of this unit is
marked on a rating plate on the underside of the unit.
The means of disconnecting this appliance from the mains
supply is the mains plug. This should be unobstructed and
readily operable at all times.
1
Page 4
INDEX INTRODUCTION
PLAYER FEATURES
Important safety information ..................................................1
Introduction ...................................................................................2
Player features ...............................................................................2
Disc region codes .........................................................................3
Film ratings .....................................................................................3
Controls and connections .........................................................4
Remote control .............................................................................5
HDMI connection .........................................................................6
Composite video (CVBS) and SCART connection .............7
Digital audio connection ...........................................................8
Network connection ...................................................................9
Connecting power, loading a disc .......................................10
Playing Blu-ray or DVD-Video discs .................................... 11
Blu-ray disc special features ..................................................14
BD-Live .......................................................................................... 15
Playing CD audio discs ............................................................16
Viewing JPEG digital photos .................................................17
Playing WMA music les .........................................................19
Playing MPEG video les.........................................................21
System settings - overview ....................................................23
System settings - System category ..................................... 24
System settings - Network category ..................................25
System settings - Display category .....................................27
System settings - Audio category ........................................ 28
System settings - Language category ................................ 29
System settings - Parental category ................................... 30
Troubleshooting ........................................................................31
Care and cleaning .....................................................................32
Specications .............................................................................. 32
Warranty ....................................................................................... 32
Read this manual before using your player.
The Player is set to play Region B Blu ray or Region 2 DVD
Video discs.
The player will accept the following disc types (among
others): Blu-Ray, DVD Video, DVD-RAM, DVD-R, DVD+R,
DVD-RW, DVD+RW, CD, CD-R, CD-RW, WMA, JPEG,
MPEG4.
The following formats are not acceptable:
Discs with other region codes.
Improperly formatted recordable discs, including
recordable discs which are not nalised.
IMPORTANT NOTE
Blu-ray and DVD Video discs contain various features.
Many features are determined by the program or software
content on the disc itself. Some procedures in this manual
cannot be performed if the disc does not support the
feature. Also, some discs may need special settings which
are unsupported by the player.
CAUTION: during playback, the disc spins at high speed,
do not lift or move the player, doing so may damage the
disc.
Full, high-denition video playback at up to 1080p •
resolution.
Up-conversion of standard DVD Video discs for •
enhanced picture quality at up to 1080p resolution.
HDMI AV Connection.•
Stereo analogue and digital audio outputs. •
PIP (picture in picture) functionality.*•
Pop-up menu display during playback.*•
Wired ethernet connection to enable access to BD-•
Live features.*
*Where available on Blu-ray discs.
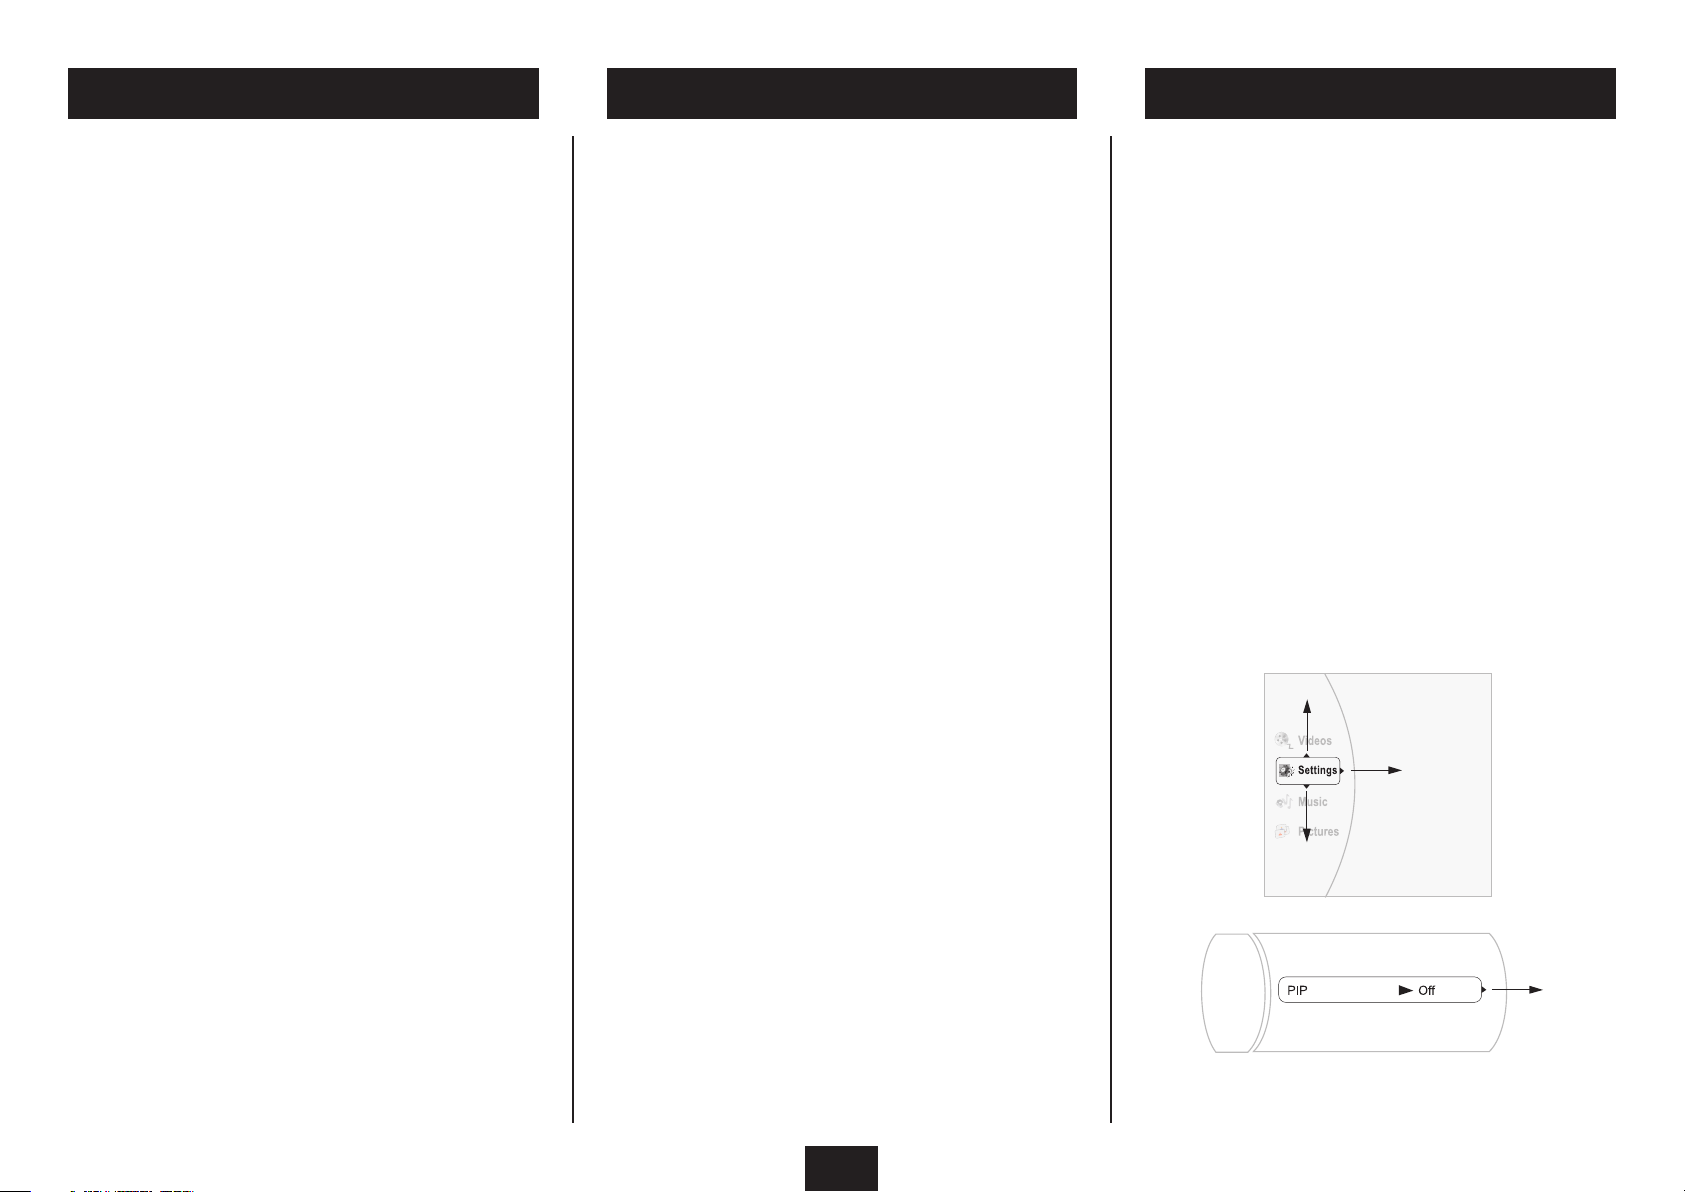
Menu navigation assistance:
Your Blu-ray player includes menus to enable you to
navigate the content of your discs and to change settings.
To help you navigate the menus, a selection box is placed
over the currently selected menu item.
In the two menu examples below, the pointers on the
box indicate which directions you can navigate with the
cursor buttons on the remote control.
2
Page 5

FILM RATINGSDISC REGION CODES NOTICES
Blu-ray and DVD discs and players are covered by a
worldwide agreement which limits playback of discs
to specic regions as determined by the software
manufacturer. Most discs come marked with a region
coding. A disc specied as playable in one region may not
play on a player designed for a dierent region. A disc
specied as universal or with no region coding may be
played in any region.
The regions are:
Blu Ray discs:
Region A: The Americas and their dependancies, East Asia
(except China and Mongolia) and Southeast Asia.
Region B: Africa, Southwest Asia, Europe (except
Belarus, Russia and the Ukraine), Oceania and their
dependancies.
Region C: Central Asia, East Asia (China and Mongolia only),
South Asia, Eastern Europe and their dependancies.
DVD Video discs:
Region 1: Canada, USA
Region 2: Europe, Japan, Mid-East, South Africa.
Region 3: South-East Asia.
Region 4: Australia, Caribbean, Central & South America,
New Zealand.
Region 5: Africa, Former Soviet Union, India, North Korea,
Pakistan.
Region 6: China.
THIS PLAYER PLAYS REGION B BLU-RAY AND REGION
2 DVD VIDEO DISCS, ALSO REGION FREE, UNIVERSAL
DISCS.
An international agreement limits playback of discs to
certain age groups as below:
I KID SAFE •
2 G •
3 PG •
4 PG 13 •
5 PGR •
6 R •
7 NC17 •
8 ADULT •
From the factory, this player is set to play all disc ratings.
Each disc and packaging has information about the
classication of the disc.
If there are children in your house you can restrict viewing
to particular age groups by following the instructions in
the Parental settings Menu on page 30. Once restrictions
are set, access to higher rated content will require a
password.
This player incorporates copyright protection technology
that is protected by method claims of certain U.S.
patents and other intellectual property rights owned by
Macrovision Corporation and other rights owners. Use of
this copyright protection technology must be authorized
by Macrovision Corporation. and is intended for home
and other limited viewing uses only unless otherwise
authorized by Macrovision Corporation. Reverse
engineering or disassembly is prohibited.
The HDMI output of the player has High Denition
Copyright Protection (HDCP) technology. Connecting the
HDMI output of the player to a video screen not supporting
HDCP technology will downgrade the picture.
Manufactured under license from Dolby Laboratories.
Dolby and the double-D symbol are trade marks of Dolby
Laboratories.
Manufactured under license under U.S. Patent #’s:
5,451,942; 5,956,674;5,974,380; 5,978,762; 6,487,535 &
other U.S. and worldwide patents issued & pending. DTS
is a registered trademark and the DTS logos, symbol and
DTS-HD Advanced Digital Out are trademarks of DTS, Inc.
1996-2008 DTS, Inc. All rights reserved.
3
Page 6
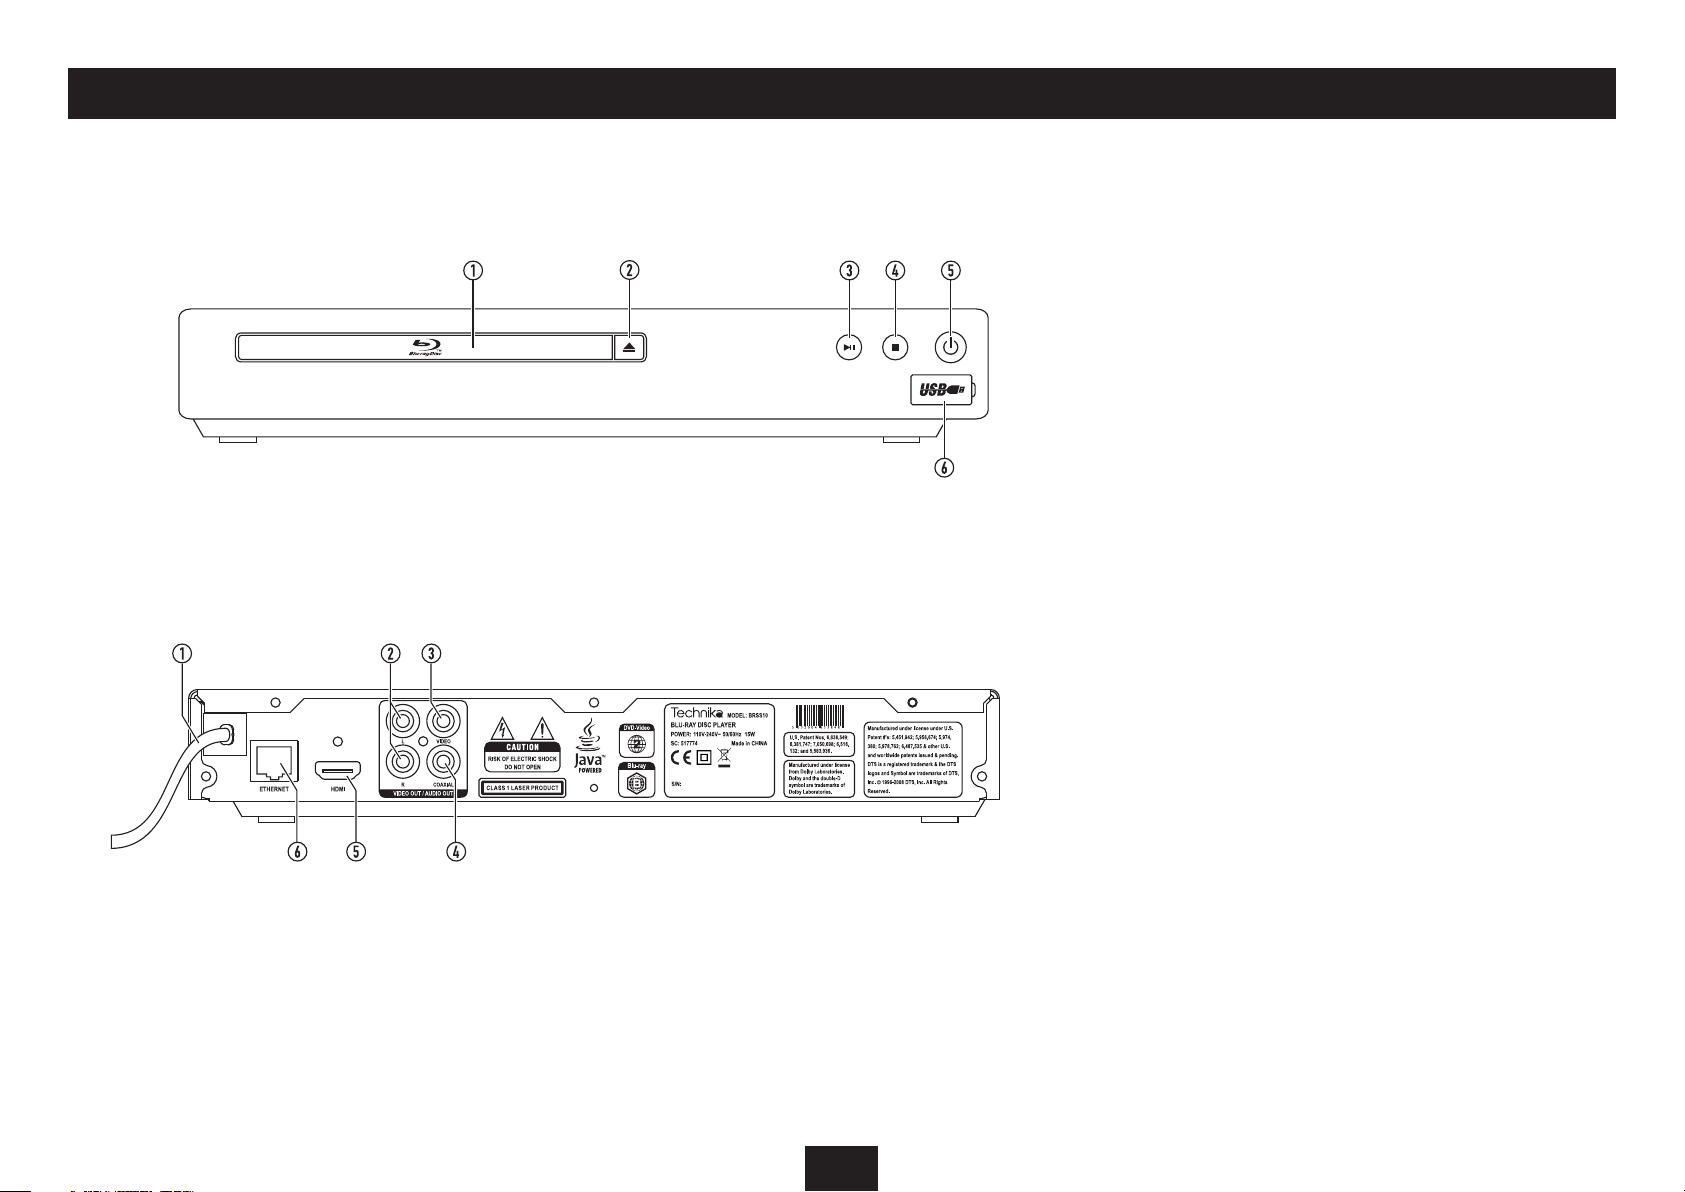
CONTROLS AND CONNECTIONS
FRONT VIEW
BACK VIEW
Disc loading tray1.
Open/close button2.
Play/pause button3.
Stop button4.
Standby/On button5.
USB dock (under cover)6.
Power cord1.
Analogue stereo audio out2.
Analogue composite video out3.
Digital audio out4.
HDMI Digital A/V out5.
RJ45 ethernet connector6.
4
Page 7
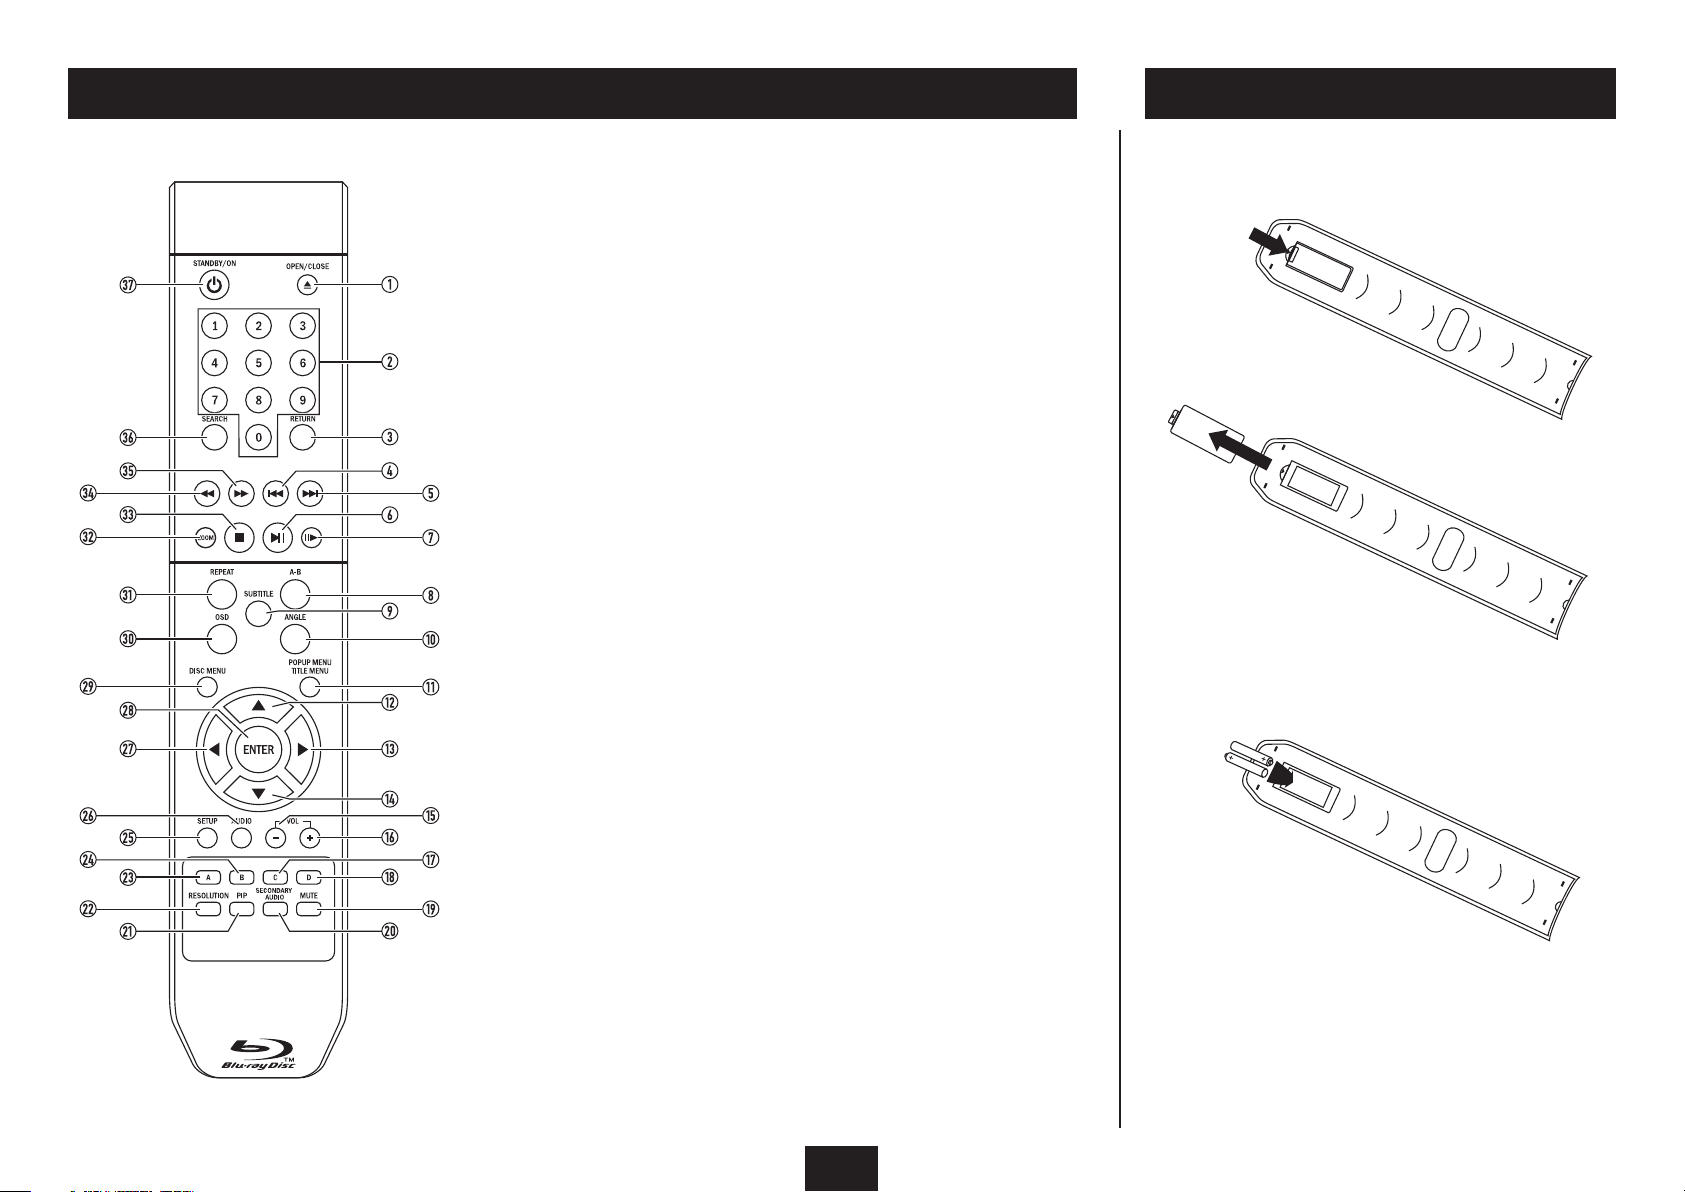
REMOTE CONTROL
FITTING BATTERIES
When replacing the batteries in the remote control, refer
to the diagram above.
1. Press the catch on the battery cover.
Open/close button1.
Numeric keypad2.
Return button3.
Previous button4.
Next button5.
Play/pause button6.
Step button7.
Repeat A-B button8.
Subtitle button9.
Angle button10.
Popup/Title menu button11.
Up cursor button12.
Right cursor button13.
Down cursor button14.
Volume down button15.
Volume up button16.
Yellow (C) button17.
Blue (D) button18.
Mute button19.
Secondary audio button20.
Picture in picture button21.
Resolution button22.
Red (A) button23.
Green (B) button24.
Setup menu button25.
Audio select button26.
Left cursor button27.
Enter button28.
Disc menu button29.
OSD button30.
Repeat button31.
Zoom button32.
Stop button33.
Fast reverse button34.
Fast forward button35.
Search button36.
Standby/On button37.
2. Lift o the battery cover.
3. Fit two AAA batteries observing polarity as shown.
When replacing the batteries, use only the same AAA
type specied.
4. Re-t the battery door and clip it in place.
DISPOSAL OF BATTERIES
Dispose of used batteries with regard to the recycling
regulations in your area. Do NOT short circuit batteries or
throw them into water, the general rubbish or in a re.
Weak batteries can leak and damage the remote control.
Replace them in good time!
5
Page 8
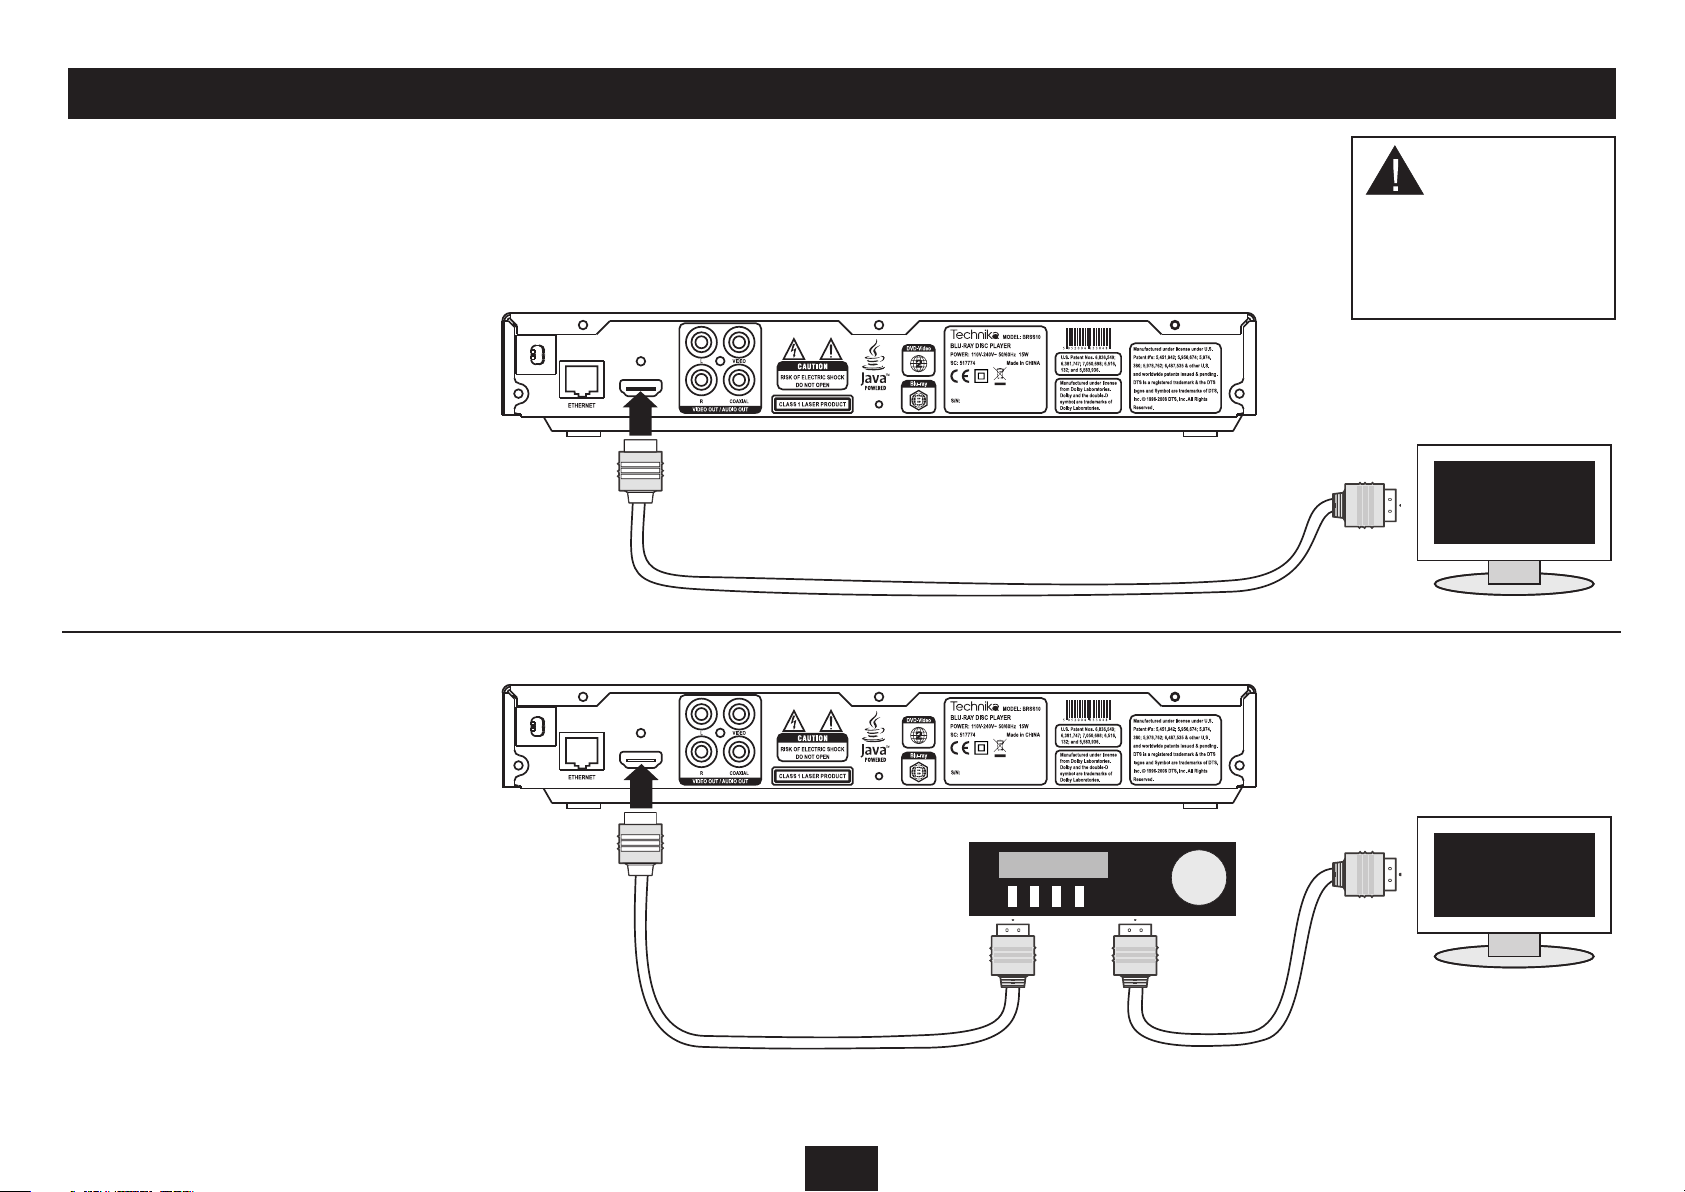
CONNECTING HDMI DIGITAL VIDEO AND AUDIO TO A TV AND (OPTIONAL) SURROUND-SOUND DECODER
HDMI CONNECTION TO A TV
Your Blu-ray player includes dierent connection options.
Digital HDMI connection is recommended for the highest
quality video and audio performance.
If your TV includes HDMI digital connections, connect
an HDMI cable (not supplied) as shown for the highest
quality of picture and sound from your TV.
CAUTION: Always
disconnect the player,
TV, and any other AV
system components
from the mains before
making or changing
any connections.
HDMI CONNECTION TO A SURROUNDSOUND DECODER
If your audio-visual system includes a separate surroundsound decoder with HDMI connections, you can use two
HDMI cables (not supplied) to connect your player to the
decoder and then to the TV.
NOTE: It is advisable to check that the settings for HDMI
digital audio are correct for your AV surround decoder.
These can be found in the section ‘System settings - audio
category’.
SURROUND-SOUND
DECODER
Connect to an HDMI input
of the decoder.
6
Connect from the HDMI output
of the decoder to the TV
Page 9
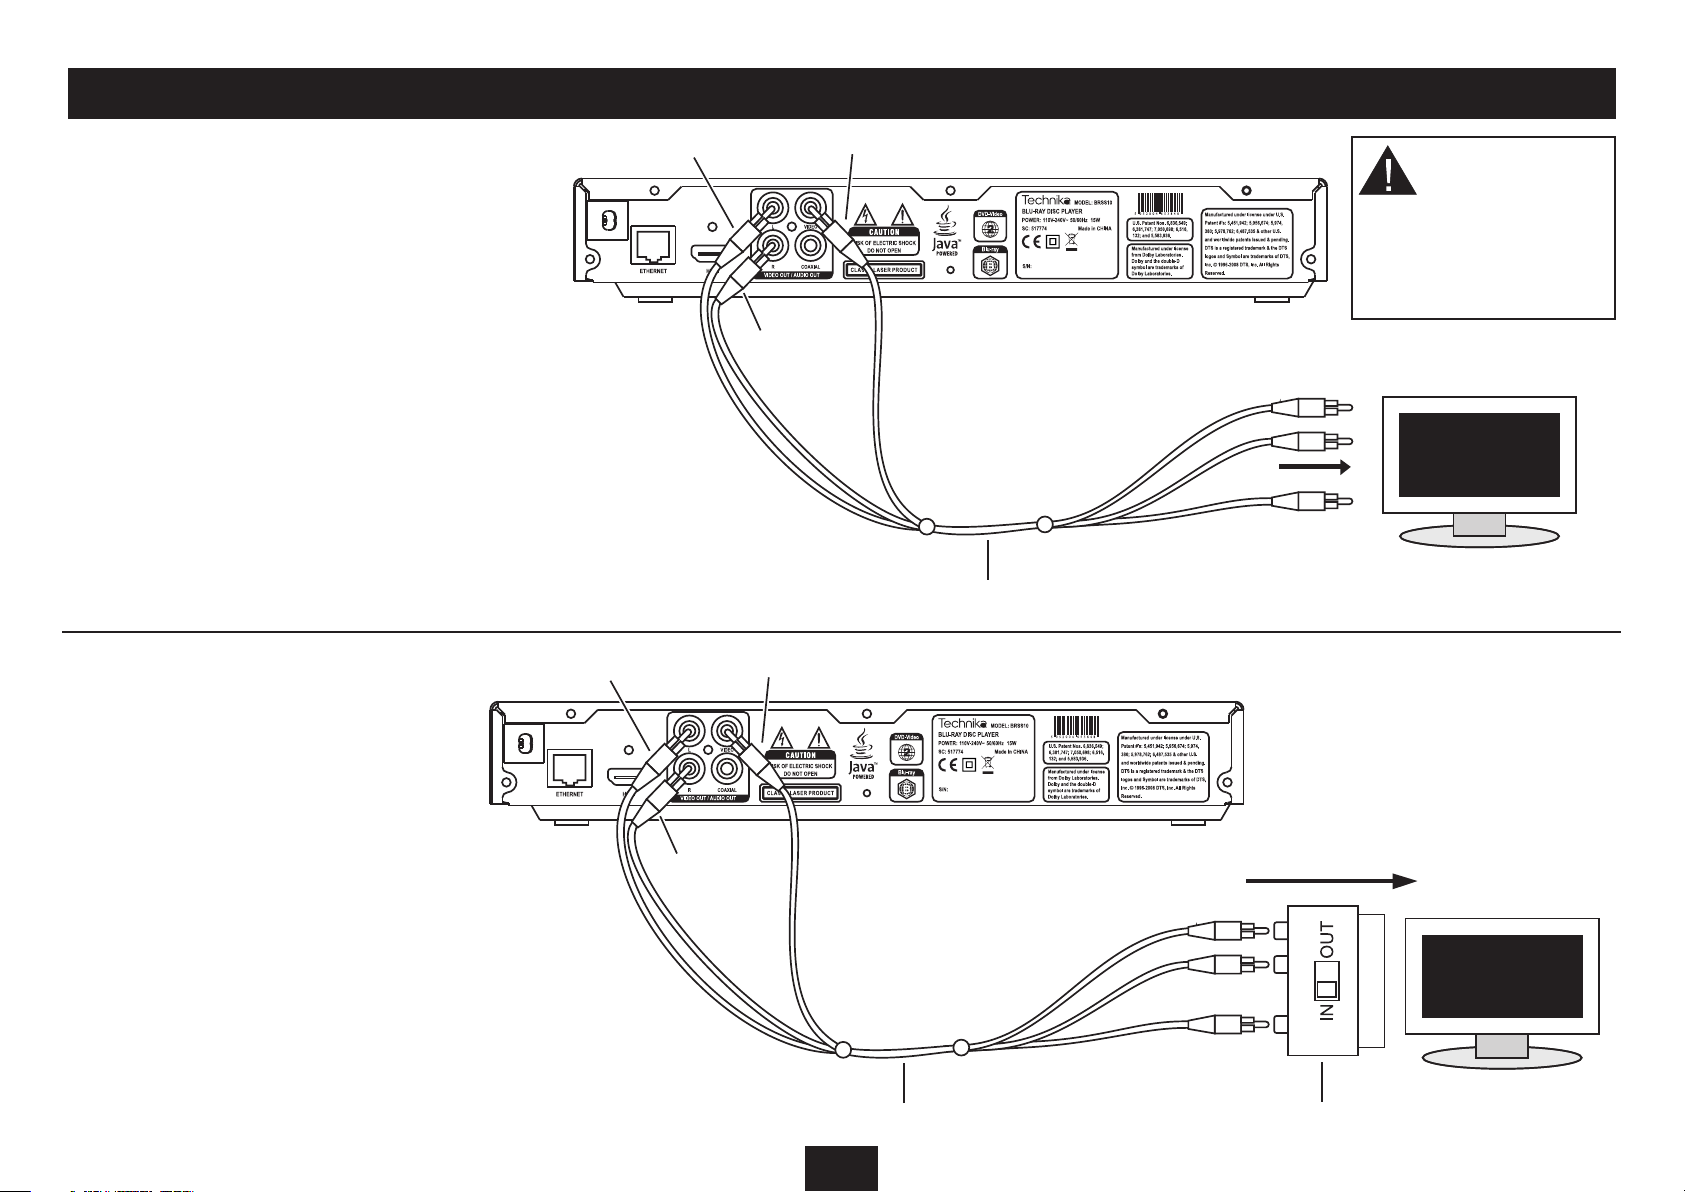
CONNECTING ANALOGUE VIDEO, AUDIO AND SCART
ANALOGUE AUDIO AND VIDEO
If your TV doesn’t include a digital HDMI connection, it
may have separate composite video (CVBS) and stereo
audio connection.
The input jacks for these connections are normally
coloured yellow (composite video), white (left audio)
and red (right audio). To connect to composite video and
stereo audio you will need a 3-way AV phono cable (not
supplied).
Connect the AV phono cable to the player as shown, then
connect the other end to the TV, matching the coloured
plugs to the coloured sockets on the TV.
White plug
White plug
Red plug
Yellow plug
Yellow plug
CAUTION: Always
disconnect the player,
TV, and any other AV
system components
from the mains before
making or changing
any connections.
3-way AV cable
SCART CONNECTION TO A TV
If your TV doesn’t have separate audio and video
connections, it may have a SCART audio/visual connector.
To connect to a SCART input you will need a 3-way AV
phono cable and a SCART adaptor (not supplied).
Connect the AV phono cable to the player as shown, then
connect the cable to the adaptor as shown. If the SCART
adaptor includes a switch, set this to ‘IN’. Connect the
SCART adaptor to a free SCART input of the TV.
Red plug
3-way AV cable
7
Connect to a free
SCART input
SCART adaptor
Page 10
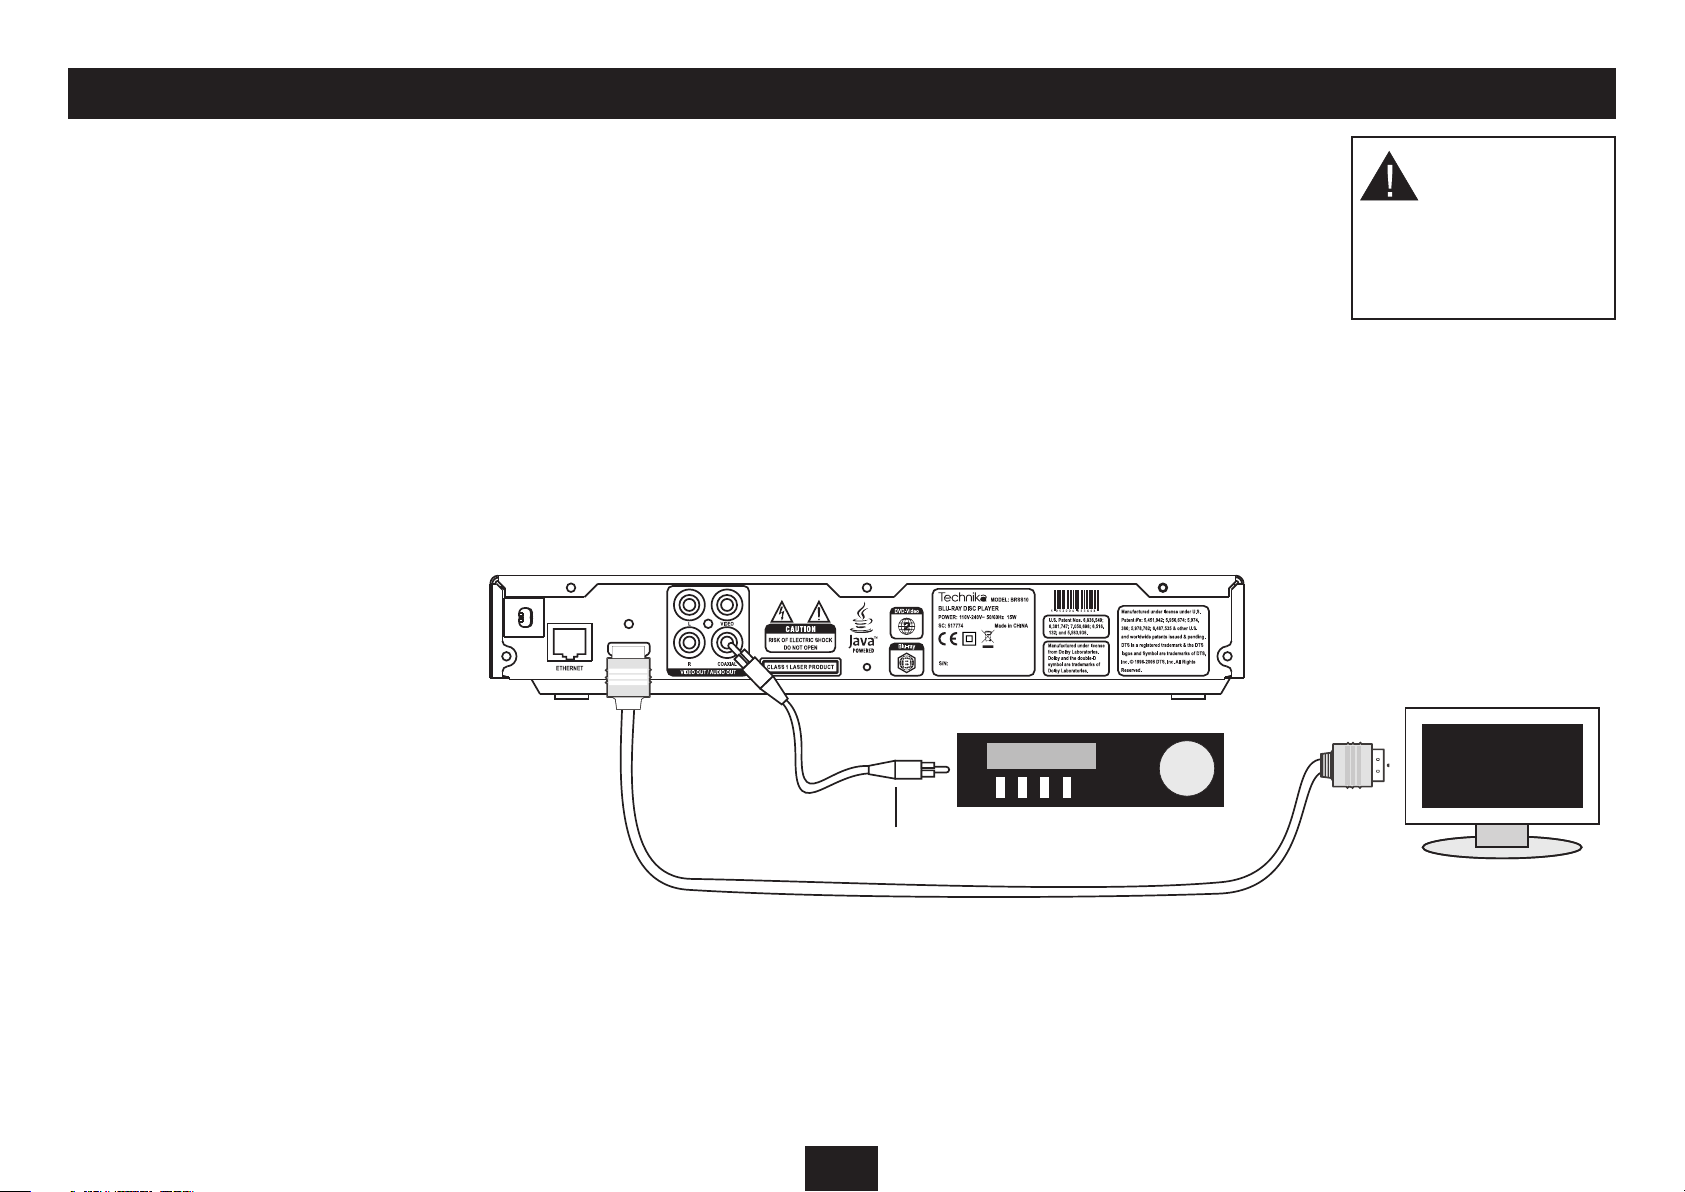
DIGITAL AUDIO OUTPUT
USING THE DIGITAL AUDIO OUTPUT
Your player also includes a co-axial digital audio
output. You can use this jack to connect digital audio
to a surround-sound decoder that doesn’t have HDMI
connections.
Connect a single digital audio phono interconnect
between the digital audio output of the player and a free
digital audio input of the decoder.
NOTE: Video may be connected to the TV via HDMI or
CVBS (Composite) analogue video out. In the system
illustrated, video and audio are connected to the TV via
the HDMI connection.
NOTE: It is advisable to check that the settings for the
digital audio output are correct for your AV surround
decoder. These can be found in the section ‘System
settings - audio category’.
CAUTION: Always
disconnect the player,
TV, and any other AV
system components
from the mains before
making or changing
any connections.
To a digital
audio input
8
Page 11
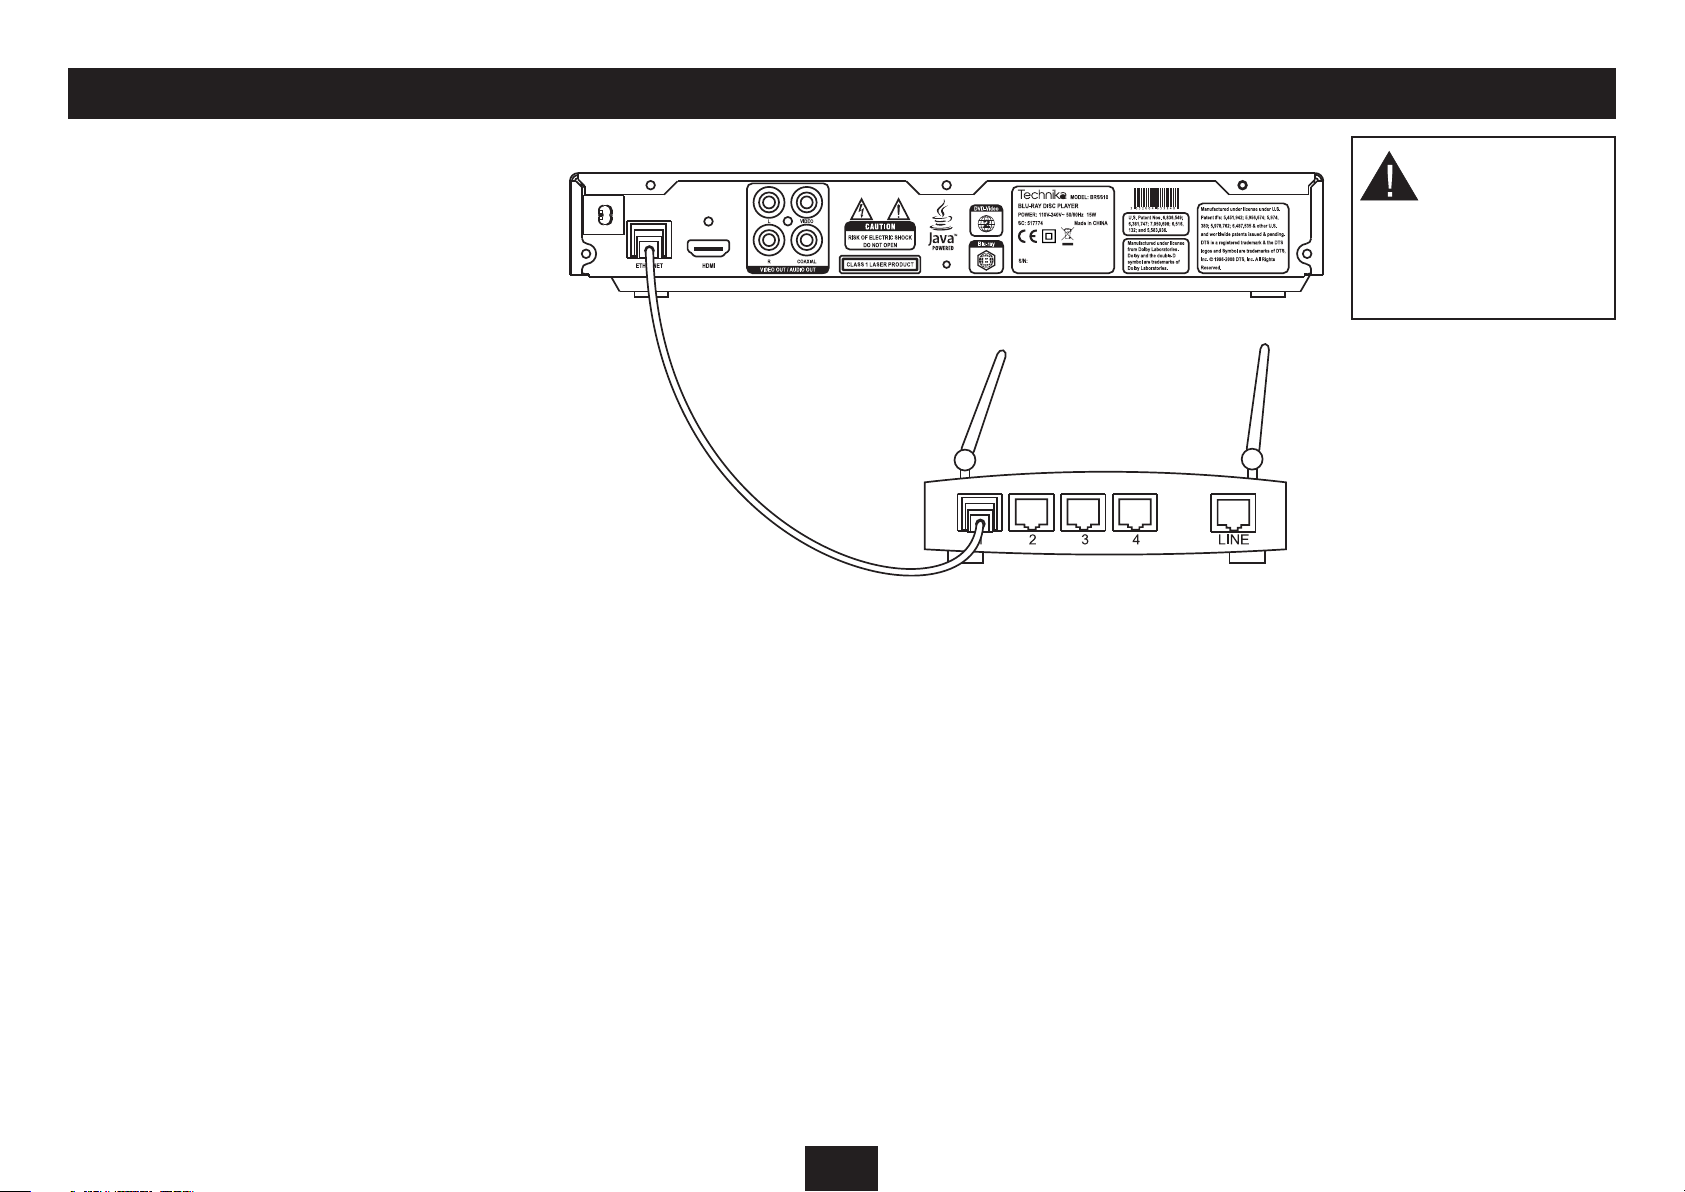
CONNECTING TO THE INTERNET
NETWORK CONNECTION
An RJ45 socket is provided on the rear panel of the player
for optional connection to the Internet via your home
network.
This connection is not essential, but if you connect your
player to the Internet you can retrieve additional bonus
information when you are playing a Blu-ray disc that
features ‘BD-Live’. You can also check through the settings
menu if there are any updates for your player.
To make this connection your home network will require
an ‘always on’ connection to the Internet so you will need
access to a spare port on the network modem/router.
The illustration shows the connection arrangements
found on a typical modem/router.
CAUTION: Always
disconnect the player,
TV, and any other AV
system components
from the mains before
making or changing
any connections.
Modem/router
9
Page 12

GETTING STARTED
PLACEMENT
Place the player on a level surface where it is unlikely to
be knocked over or fall and where the connecting leads
do not constitute a cause of danger.
The means of disconnection from the mains supply is
via the mains plug on the power cord. This must not be
obstructed and be readily operable at all times.
CONNECTING POWER
Before connecting power, connect the player to your TV
and any other components in your system (see pages
6-9).
When you have completed all signal connections, •
plug the player, TV and other system components
into the mains.
The Standby/On button will glow red.
SWITCHING THE PLAYER ON AND OFF
CAUTION: Discs spin at high speed. To avoid damage to
your discs or player, never lift or move the player when
the power is switched on.
To switch the player on:
Press the • STANDBY/ON button.
The Standby/On button will glow blue and ‘HELLO’ will
be displayed. The player will check for the presence of an
Internet connection, then check if a disc is loaded. If a disc is
found it will read automatically.
To switch the player o:
Press the • STANDBY/ON button.
The Standby/On button will glow red and ‘OFF’ will be
displayed.
SWITCHING ON FOR THE FIRST TIME
After switching on the player, and before loading a •
disc, select the AV input on your TV that corresponds
to the connections you have made. For example, this
may be HDMI, SCART or CVBS.
The TV should display the player Settings Menu screen.
Internet
notice
In the unlikely event that no picture or a distorted picture
is visible, refer to the Troubleshooting section on page
31.
If you can see an Internet notice as in the above example,
your player is not connected to the Internet. This may be
because there is no connection cable in place or because
the Internet connection is not working.
If you are not planning to use BD-Live features on Bluray discs, then this notice can be ignored. If you do
plan to use BD-Live, then you may want to refer to the
sections ‘Connecting to the Internet’ and ‘System settings
- network category’ to check your Internet connections
and settings.
LOADING A DISC
Press the • button to open the disc tray.
Place the disc label side up on the disc tray.•
Press the • button to close the disc tray.
The disc will read.
NOTE: The disc tray will open again after a short delay
if the disc loaded does not include compatible material
(non-supported music/movie les etc).
Blu-ray or DVD-Video discs
If the disc is a Blu-ray or DVD-Video movie disc, the TV
display will show the initial ‘root’ menu of the disc. Refer
now to page 11 for full instructions for playing a movie
disc.
CD audio discs
If the disc is a music CD, the disc will begin to play, the track
and elapsed time will be displayed on the front panel and
the TV will show the CD playback status display. Refer to
page 16 for full instructions for playing an audio CD.
CD-ROM or DVD-ROM discs
If the disc is a CD-ROM or DVD-ROM containing WMA
music and/or JPEG photo or compatible MPEG movie les,
the TV will show a folder/le display. Refer now to page
17 (JPEG), 19 (WMA) or 21 (MPEG) for full instructions for
playing a CD-ROM/DVD-ROM.
UNLOADING A DISC
If the disc is playing, stop play and wait for a few •
seconds for the disc to stop spinning.
Press the • button.
After a delay while the disc is stopped fully, the disc tray will
open.
Carefully lift the disc o the disc tray and place it back •
in its case immediately.
If you have nished using your player, press the •
button to close the disc tray.
10
Page 13

PLAYING A BLU-RAY OR DVD-VIDEO DISC
The instructions for playing Blu-ray and DVD-Video
discs are the same. Blu-ray discs do include some more
advanced features. These are listed in a later section ‘Bluray disc special features’.
Load the disc.•
After a short delay while the disc reads, the initial disc ‘root’
menu will be displayed on the TV screen. This menu resides
on the disc so the features of the menu are dependant
entirely on the disc content. Most Disc Menus will allow you
to begin playing the movie, jump to scenes and change discrelated settings.
Press the • O,P,M,N buttons to navigate the menu
options.
Press the • ENTER button to choose an option.
One of the options will be ‘play’ or ‘play movie’. Choose this
option to play the movie.
Discs may also include menu options to activate extra
features within the movies.
PLAYBACK CONTROL
When a movie is playing.
Play/pause/still frame:
Press the • /, button to pause the movie.
A still frame will be displayed.
Press the • /, button to resume play.
Stepping frame by frame:
Press the • ,/ button to step forward frame by frame.
Press the • /, button to resume play.
Navigating chapters:
Blu-ray and DVD-Video discs are organised so that you
can jump back or forward and resume watching the
movie from a particular scene (chapter).
Press the • } or { button to jump forward or backward
through the chapters on the disc.
NOTE: Pressing the { button for the rst time will return
play to the start of the current chapter.
Fast search
Press the • ] or [ button to fast-search forward or
backward through a movie. Pressing the button
repeatedly will increase search speed in the range -
2X " 4X " 8X " 16X " 32X " 64X " 128X "
The search speed is displayed on the TV screen
Normal
Jumping to a particular scene:
The Disc Menu will often include an index of chapters. •
To jump to a chapter, press the DISC MENU button.
The disc will stop playing and the Disc Menu appears.
Select the ‘scenes’ or ‘chapters’ menu (not all discs will •
have this menu).
Press the • O,P,M,N buttons to navigate to the
chapter you want using the on-screen disc menu.
Press • ENTER to re-start play from this chapter.
Jumping to a title, chapter or time on the disc:
If you want to jump to a particular title, chapter or •
elapsed time on the disc, press the SEARCH button
repeatedly to display the search item you want.
The Title, Chapter or Time search box opens.
Enter the title number, chapter number or elapsed •
time using the numbers on the NUMERIC KEYPAD. If
you are entering a time, use the O or P button to
change between hours and minutes and seconds.
When you have nished entering the digits required, •
press the ENTER button to conrm.
The player will jump to the point you selected.
Press the • /, button to return to normal speed play.
Stopping the disc
Press the • . button (also available on the front panel)
to stop the disc.
Play will stop.
If the disc you are playing features play resume, you can later
press the /, button to resume the movie from the point at
which play stopped.
To fully stop a disc (clearing play resume), press the • .
button twice.
11
Page 14

PLAYING A BLU-RAY OR DVD-VIDEO DISC
Repeat play:
NOTE: Repeat features may not be available on some Bluray discs.
There are two repeat modes.
Press the • REPEAT button repeatedly to step through
the two repeat modes.
The repeat mode selected will be displayed on the TV
screen.
Repeat Title: The player will repeat the current title
continuously.
Repeat Chapter: The player will repeat the current chapter
continuously.
Repeat A-B:
You can also set the player to repeat a particular passage
from the disc. This can include one or more chapters.
Press the • A-B button to mark the start of the section
you want to repeat.
The indication ‘A-’ will appear under the repeat symbol on
the status display.
When you reach the end of the section you want to •
repeat, press the A-B button again.
The indication ‘A-B’ will appear under the repeat symbol on
the status display.
The player will now continuously repeat the section
between the start and end markers.
Press the • A-B button again to clear an A-B repeat
section.
On-Screen status display:
When a Blu-ray or DVD-Video disc is playing you can open
the On-Screen status display to show information about
the disc that is currently playing.
Press the • OSD button.
The On-Screen status display will open.
Chapter
playing
Title
playing
Title
Elapsed
time
Press the • OSD button again to switch o the On-
Screen status display.
Total
chapters
Elapsed time
bargraph
Title
total
time
Repeat
status
Play
status
Subtitles:
Most discs will include at least one subtitle option.
To switch on and select subtitles -
Press the • SUBTITLE button.
The Subtitle yout menu will open and show the subtitle
option currently selected.
Press the P button if you want to change the subtitle.
Press the • M or N button to scroll through the options
available.
Press the • ENTER button to choose an option.
If you have chosen a subtitle, it will now display on the TV
screen. After a short delay, the yout will close.
Camera angle:
Some discs will include the option to view from a choice
of camera angles.
To change camera angle -
Press the • ANGLE button.
The Angle yout menu will open.
Press the • M or N button to scroll through the options
available.
Press the • ENTER button to choose an option.
If you have changed the camera angle, the lming angle will
now change on the TV screen. After a short delay, the yout
will close.
12
Page 15

PLAYING A BLU-RAY OR DVD-VIDEO DISC
Audio selection:
Some discs will include multiple soundtracks in dierent
languages or using dierent encoding methods.
To change the audio soundtrack -
Press the • AUDIO button.
The Audio yout menu will open.
Press the • M or N button to scroll through the options
available.
Press the • ENTER button to choose an option.
Play will now resume with your choice of audio soundtrack.
After a short delay, the yout will close.
Zoom and pan (DVD Video discs only):
Press the • ZOOM button repeatedly to select the zoom
level you want from the options of Zoom o, Zoom x
2, Zoom x 4.
The view will zoom to the centre of the picture.
Press the • O,P,M,N buttons to pan the zoomed area
around the photo.
The zoom icon will show where the zoomed area is on the
photo.
Press the • ZOOM button repeatedly to return to normal
view.
Zoom O is indicated on the TV screen.
Volume and mute:
The volume setting for the sound of your system should
normally be set on the TV or AV surround decoder (if
you have one in your AV system). If required, you can
independantly adjust the player volume from the remote
control.
Press the • VOL+ button to increase the volume
setting.
Press the • VOL- button to decrease the volume
setting.
The volume level will be shown on-screen as a number in the
range 0-100 and also as a bargraph display.
To mute the sound completely, press the • MUTE
button.
To un-mute the sound, press the • MUTE button again.
The mute status will be displayed briey.
Resolution (HDMI only):
CAUTION: If you change to display resolution
settings that are incompatible with your TV, you
may lose the TV picture completely. If your TV is
connected via HDMI, the ‘Auto’ setting (factory
setting) is strongly recommended as the TV will
automatically set the resolution of the player for
optimum results.
NOTE: Although resolution settings will display on a TV
connected to the composite video (CVBS) video output,
the resolution of this video output is xed at 576i (PAL
operation) or 480i (NTSC operation).
To change the resolution -
Press the • RESOLUTION button once to display the
resolution setting currently in use.
Press the • RESOLUTION button repeatedly to switch
between the available resolutions.
Wait after each press for the picture to stabilise (this •
may take around 7 seconds) before pressing again to
step to the next resolution setting.
The resolution settings available are -
Auto•
1080p•
1080i•
720p•
576p•
576i•
NOTE: Changing the resolution setting from HDMI Auto
may result in the loss of a stable picture. If this happens
refer to the Troubleshooting section for instructions to
recover the picture.
13
Page 16

BLU-RAY DISC SPECIAL FEATURES
The special features in this section apply to Blu-ray
discs only.
NOTE: Not all Blu-ray discs will support these features.
Blu-ray disc Popup Menu
Some Blu-ray discs feature a Pop-up Menu. This enables
you to view the Disc Menu to change settings or jump to
scenes (chapters) without stopping playback.
Press the • POPUP MENU button.
The Popup Menu will be displayed.
If you want to change a setting from the Popup Menu, •
navigate the menu with the O or P button to select
the setting you want to change.
Press the • ENTER button to select the setting.
NOTE: Pressing the POPUP MENU button during DVDVideo playback will return to the Disc Menu.
Blu-ray picture in picture (bonus view):
Some Blu-ray discs may include secondary video. This is
displayed as a second picture within the main picture.
Press the PIP button.•
The PIP yout menu appears, showing the current PIP
status.
Press the • P button to open the PIP setting screen.
The PIP options will be displayed.
Press the • M or N button to scroll through the
options.
In the example above, scroll down to select the rst •
(01) option of the two (02) PIP options avaiable.
Press the • ENTER button to select an option.
If you have selected one of the picture in picture options, a
secondary picture will be displayed on the TV screen.
Secondary audio:
When secondary (picture in picture) video is displayed,
it is possible to switch the soundtrack to the secondary
video picture. The Secondary Audio menus are similar in
style to the PIP menus.
Press the • SECONDARY AUDIO button to open the
secondary audio yout menu.
Press the • P button to open the Secondary Audio
setting screen.
The Secondary Audio options will be displayed.
Press the • M or N button to scroll through the
options.
Press the • ENTER button to select an option.
Colour buttons:
The red, green, yellow and blue colour buttons are used
with interactive menus when operating a Blu-ray disc
that includes Java applications.
Operating instructions will be included with the disc.
To close the picture in picture display, select the ‘O’ •
option from the PIP setting screen.
The secondary PIP display will close.
14
Main picture
Secondary picture
Page 17

BD-LIVE
BD-Live content via the Internet:
Some Blu-ray discs include access to BD-Live content.
BD-Live content is provided via the Internet by the disc
producer.
To access BD-Live content -
Check that your player is connected to the Internet.•
Load a blank USB drive to the USB port on the front •
panel. The drive capacity should be between 2GB and
16GB.
NOTE: The USB memory is not optional. BD-Live will only
function when a USB drive memory is installed. If USB
memory is not installed you may see a warning message
stating that your player is incompatible with BD-Live.
Load the disc with BD-Live feature.•
Select the BD-Live menu option from the disc menu.•
You may now be required to follow the screen prompts to
register with the disc producer. Once registration is complete
you can browse the BD-Live content available by following
the screen prompts.
NOTE: You may experience delays as BD-Live content is
retrieved from the Internet.
15
Page 18

PLAYING A CD AUDIO DISC
Load the disc•
After a short delay while the disc reads, the disc will start
to play from track 1. The track and elapsed time will be
displayed on the front panel and the TV will show the CD
playback status display.
Total
tracks
Track
playing
Elapsed
time
NOTE: In systems where the player is used for audio
playback of CDs through an audio Surround Decoder
or amplier, a basic CD playback display is available on
the unit (the TV display is not required for track/time
navigation). To set advanced play modes such as Repeat,
it will be necessary to use the TV display to determine the
status of the player.
Elapsed time
bargraph
Track
time
Repeat
Shue
status
status
Play
status
PLAYBACK CONTROL
When a CD is playing.
Play/pause:
Press the • /, button.
PAUSE will be displayed on the TV screen status display.
Press the • /, button to resume play.
Navigating tracks:
Press the • } or { button to jump forward or backward
through the tracks.
NOTE: Pressing the { button for the rst time will return
play to the start of the current track.
Jumping to a particular track:
Press one of the number keys on the • NUMERIC
KEYPAD to jump directly to a track number.
To enter a two digit track number, press the two •
number buttons (for example 1 then 2 to select track
12).
The player will jump directly to the track you selected.
Fast search
Press the • ] or [ button to fast-search forward
or backward through a disc. Pressing the button
repeatedly will increase search speed in the range -
2X " 4X " 8X " 16X " 32X " 64X " 128X "
The search speed is displayed on the TV screen
Press the • /, button to return to normal speed play.
Stopping the disc
Press the • . button (also available on the front panel)
to stop the disc.
Normal
Repeat/random play:
There are three repeat/random modes.
Press the • REPEAT button repeatedly to step through
the three repeat modes.
The repeat mode selected will be displayed on the TV
screen.
Repeat All: The player will repeat all tracks on the disc
continuously.
Repeat All + Random: The player will repeat all tracks on
the disc continuously, but in a random sequence.
Repeat track: The player will repeat the track currently
playing.
Repeat A-B:
You can also set the player to repeat a particular passage
from the disc. This can include one or more tracks.
Press the • A-B button to mark the start of the section
you want to repeat.
The indication ‘A-’ will appear under the repeat symbol on
the status display.
When you reach the end of the section you want to •
repeat, press the A-B button again.
The indication ‘A-B’ will appear under the repeat symbol on
the status display.
The player will now continuously repeat the section
between the start and end markers.
Press the • A-B button again to clear an A-B repeat
section.
16
Page 19

VIEWING JPEG PHOTO FILES
Playing photos from a CD-ROM or DVD-ROM:
Load the disc.•
Playing photos from a USB Flash drive:
Dock the USB drive into the USB port located under •
the protective cover on the front panel.
You will now see the Main Menu selection options. The
options available will depend on the content of your disc/
drive. In the example below, the drive contains music, photos
and videos.
Disc/drive
contents
Press the • M or N button to highlight the Pictures
option.
Press the • ENTER button to select this option.
If your photos are not stored in folders you will now see a
thumbnail view of your photos.
If your photos are stored in folders, the folders will •
be displayed in the thumbnail pane. Use the P, M,
N buttons to navigate to the folder containing your
photos.
The thumbnail view will appear. To run a slideshow of the photos:
Menu
pane
Selected
photo
Press to start
slideshow
From the thumbnail view -
To display a single photo:
Use the • O,P,M,N buttons to highlight the thumbnail
you want to display.
Press the • ENTER button to display this photo.
To view other photos:
Press the • } or { button to step through the photos
in the folder.
To return to the thumbnail view:
Press the • . button.
The thumbnail view will be displayed.
Thumbnail
pane
From the thumbnail view, press the • O button to
navigate to the left pane.
Press the • M or N button to select the ‘Start Slide
Show’ option from the menu.
The slideshow will start. When all the photos have been
displayed, the slideshow will stop.
To continually play a slideshow:
Press the • REPEAT button to switch slideshow repeat
mode on or o.
To pause a slideshow:
Press the • /, button to pause a slideshow display.
Press the • /, button to re-start the slideshow.
Changing Slideshow Settings:
Press the • POPUP MENU button to open the slideshow
settings yout menu.
The slideshow settings yout will open.
Press the • M or N button to choose the option of Slide
Show Eects or Slide Show Delay.
Press the • P button to change a setting for the option
you selected.
Press the • M or N button to select the setting you
want.
Press the • ENTER button to conrm the setting.
The setting will change and the yout will close after a short
delay.
17
Page 20

VIEWING JPEG PHOTO FILES
Zoom and pan (during a slideshow):
Press the • /, button.
The slideshow will pause at the picture displayed.
Press the • ZOOM button repeatedly to select the zoom
level you want from the options of Zoom o, zoom x
2, zoom x 4.
The view will zoom to the top left corner of the picture and a
zoom icon is shown on the screen.
Zoom is currently displaying
this area of the screen
Press the • O,P,M,N buttons to pan the zoomed area
around the photo.
The zoom icon will show where the zoomed area is on the
photo.
Press the • /, button to return to the slideshow.
Zoom and pan (single picture display):
Press the • ZOOM button repeatedly to select the zoom
level you want from the options of Zoom o, zoom x
2, zoom x 4.
The view will zoom to the top left corner of the picture and a
zoom icon is shown on the screen.
Zoom is currently displaying
this area of the screen
Photo information banner:
Press the • OSD button while a photo is displayed to
open the photo information banner.
The photo information banner will open.
Total les
File
number
Press the • OSD button again to close the photo
information banner.
File name
Slideshow repeat
Slideshow display time
Play
status
Background music:
While viewing your photos you can also play background
music.
Check that you have loaded the background music •
WMA les that you want to play onto the disc or drive
containing your photo les.
Load the disc or drive.•
Select the ‘Pictures’ option.•
The thumbnail view will appear. If music les are included
on your disc/drive, the ‘Browse Music’ option will appear on
this menu.
Browse
music
Select the ‘Browse Music’ option before displaying •
your pictures.
You can now browse for the music that you want to play.
Once the music is playing, press the • ENTER button.
Choose the ‘Browse pictures’ option from this menu.•
You can now navigate to a picture to display or start •
a slideshow.
Press the • O,P,M,N buttons to pan the zoomed area
around the photo.
The zoom icon will show where the zoomed area is on the
photo.
18
Page 21

PLAYING WMA MUSIC FILES
Playing WMA music les from a CD-ROM or DVD-ROM:
Load the disc.•
Playing WMA music les from a USB Flash drive:
Dock the USB drive into the USB port located under •
the protective cover on the front panel.
You will now see the Main Menu selection options. The
options available will depend on the content of your disc/
drive. In the example below, the drive contains music, photos
and videos.
Disc/drive
contents
Press the • M or N button to highlight the Music
option.
Press the • ENTER button to select this option.
If your music is not stored in folders you will now see a list of
tracks and can skip to the ‘Playing Music’ section.
Playing music:
You should now see a track list in the centre pane.
NOTE: Only WMA format music les are compatible, other
formats will not be displayed.
Menu
pane
Press the • M or N button to highlight the track you
want to play on the track list.
Press the • ENTER button
Centre
pane
Selected
track
The tracks will play, starting with the selected track, and the
Music information banner will appear.
Track playing
Total tracks
Elapsed
time
Music le information
(when available)
Elapsed time
bargraph
Track
time
Repeat
Shue
status
status
Play
status
Music stored in folders (albums):
If your music is stored in folders (albums), the folders •
will be displayed in the centre pane. Use the P, M, N
buttons to navigate to the folder (album) containing
your tracks.
Press the • ENTER button to select your choice of
folder.
19
Page 22

PLAYING WMA MUSIC FILES
PLAYBACK CONTROL
Play/pause:
Press the • /, button to pause play.
PAUSE will be displayed on the front panel and on the TV
screen status display.
Press the • /, button to resume play.
Navigating tracks (music les):
Press the • } or { button to jump forward or backward
through the tracks.
NOTE: Pressing the { button for the rst time will return
play to the start of the current track.
Jumping to a track (music le) or time within a track:
If you want to jump to a particular track on the disc/•
drive, press the SEARCH button.
The search box opens.
Enter the track or elapsed time using the numbers •
on the NUMERIC KEYPAD. If you are entering a time,
use the O or P button to change between hours and
minutes and seconds.
When you have nished entering the digits required, •
press the ENTER button to conrm.
The player will jump to the point you selected.
Repeat/random play:
There are three repeat/random modes.
Press the • REPEAT button repeatedly to step through
the three repeat modes.
The repeat mode selected will be displayed on the TV
screen.
Repeat All: The player will repeat all les (tracks) on the
disc continuously.
Repeat All + Random: The player will repeat all les (tracks)
on the disc continuously, but in a random sequence.
Repeat le: The player will repeat the le (track) currently
playing.
Fast search
Press the • ] or [ button to fast-search forward
or backward through a track. Pressing the button
repeatedly will increase search speed in the range -
2X " 4X " 8X " 16X " 32X " 64X " 128X "
The search speed is displayed on the TV screen
Press the • /, button to return to normal speed play.
Stopping playback
Press the • . button (also available on the front panel)
to stop playback.
Normal
20
Page 23

PLAYING MPEG VIDEO FILES
Playing MPEG video les from a CD-ROM or DVD-ROM:
Load the disc•
Playing MPEG video les from a USB Flash drive:
Dock the USB drive into the USB port located under •
the protective cover on the front panel.
You will now see the Main Menu selection options. The
options available will depend on the content of your disc/
drive. In the example below, the drive contains music, photos
and videos.
Disc/drive
contents
Press the • M or N button to highlight the Videos
option.
Press the • ENTER button to select this option.
If your music is not stored in folders you will now see a list of
videos and can skip to the ‘Playing videos’ section.
Playing videos:
You should now see a list of video les in the centre pane.
NOTE: Only MPEG format video les are compatible, other
formats will not be displayed.
Menu
pane
Press the • M or N button to highlight the video you
want to play on the list.
Press the • ENTER button
The video will play.
Centre
pane
Selected
video
Video playback status:
Press the • OSD button at any time during video
playback to show the Video information banner on
the TV.
Press the • OSD button again to switch o the
information banner.
Total les
File playing
Elapsed
time
Video le information
Elapsed time
bargraph
Total
time
Repeat
status
Shue
status
Play
status
Videos stored in folders:
If your videos are stored in folders, the folders will be •
displayed in the centre pane. Use the P, M, N buttons
to navigate to the folder containing your videos.
Press the • ENTER button to select your choice of
folder.
21
Page 24

PLAYING MPEG VIDEO FILES
PLAYBACK CONTROL
Play/pause:
Press the • /, button to pause play.
PAUSE will be displayed on the front panel and a still frame
will be displayed on the TV screen.
Press the • /, button to resume play.
Navigating video les:
Press the • } or { button to jump forward or backward
through the les in the folder.
NOTE: Pressing the { button for the rst time will return
play to the start of the current video.
Jumping to a video le or time within a video:
If you want to jump to a particular video le on the •
disc/drive, press the SEARCH button.
The search box opens.
Enter the le number or elapsed time using the •
numbers on the NUMERIC KEYPAD. If you are entering
a time, use the O or P button to change between
hours and minutes and seconds.
When you have nished entering the digits required, •
press the ENTER button to conrm.
The player will jump to the point you selected.
Repeat/random play:
There are three repeat/random modes.
Press the • REPEAT button repeatedly to step through
the three repeat modes.
The repeat mode selected will be displayed on the TV
screen.
Repeat All: The player will repeat all video les on the disc
continuously.
Repeat All + Random: The player will repeat all video les
on the disc continuously, but in a random sequence.
Repeat le: The player will repeat the video le currently
playing.
Fast forward search
Press the • ] button to fast-search forward through a
track at double speed.
Press the • /, button to return to normal speed play.
Stopping playback
Press the • . button (also available on the front panel)
to stop playback.
The video will stop and the navigation menu will appear on
the TV screen.
22
Page 25

SYSTEM SETTINGS - OVERVIEW AND NAVIGATION
This section includes instructions for conguring your
player to best match your system and also to customise
the player to your requirements.
THE SETTINGS MENU
All conguration and customisation settings are made
through the Settings Menu.
Viewing settings:
Press the • SETUP button to display the six settings
menu categories.
Menu
pane
System•
Network•
Display•
Audio•
Language•
Parental•
Press the • P button to move to the centre pane and
highlight one of the categories.
Settings
categories
The current settings in this category will be displayed in the
right pane (display settings in the example below).
Menu
pane
Press the • M or N button to scroll up or down the
settings categories.
As each category is highlighted, the current settings will be
displayed.
Settings
categories
Settings
display
Changing settings:
All settings are displayed and changed in the same way.
To change settings, rst select a category.•
The current settings are displayed.
Press the • P button.
The settings may now be changed (display setting edit is
shown in the example below).
Press the • M or N button to highlight the setting you
want to change.
Press the • ENTER button to view the options for this
setting.
Press the • M or N button to choose a new setting.
Press the • ENTER button to save your changes.
The category settings will be displayed, updated with your
changes.
NOTE: To step back through the menu, press the O
button.
For more details of the settings you can change, refer to the
following pages.
23
Page 26

SYSTEM SETTINGS - SYSTEM CATEGORY
The system category includes the following settings - BD Live Internet Access:
There are 3 settings available -
Limit access. When set to ‘Limit Access’ it will be •
possible to access BD Live content, except when
errors are reported from a DRM-certied network.
Always allow access (factory setting). When set •
to ‘Always allow’ and an Internet connection is
provided to the player, it will be possible to access
content available from the Internet when a Blu-ray
disc is loaded which includes BD Live access as a
feature.
Optical Disc AutoPlay:
When Optical Disc AutoPlay is set ‘On’ (the factory setting)
the player will automatically start to play any disc that is
inserted. If Optical Disc AutoPlay is set to ‘O ’ it will be
necessary to press the /, button to start an audio/video/
photo disc playing after loading the disc.
Prohibit access. When set to ‘Prohibit Access’, the •
player will never allow access to BD Live content.
BD Live Storage:
There are no settings possible for BD Live storage. This
menu item will display the size of free storage that is
available for BD Live content download.
Erase Blu-ray Storage:
This setting enables you to erase all les and other content
from a USB drive that is loaded into the player.
NOTE: This process is not reversible - all content will be
erased. Ensure that you there are no les or other content
that you wish to keep on the USB drive before erasing it.
Screen Saver Duration:
If the player is not playing a disc and no controls are
operated, a screensaver will be displayed on your TV to
protect the TV screen from permanent damage. Through
this menu item you can set a time delay of between
5 minutes and 30 minutes before the screen saver
activates.
You can also choose to set the screen saver ‘O’. This
option is not recommended as a static screen pattern
may cause permanent damage to your TV screen.
Restore Factory Defaults:
By selecting this option you can return all player settings
to the ‘standard’ settings when the player was new from
the factory. This operation is not reversible.
24
Page 27

SYSTEM SETTINGS - NETWORK CATEGORY
Why connect your player to a network?:
It is only necessary to connect your player to a network if
you plan to use the BD Live feature or if you want to check
on-line for updates for your player.
Network warning messages:
If your player is not connected to a network, you will see
warning messages such as -
If you are not planning to connect your player to a
network, this message can be ignored.
Why change network settings?:
If you have connected your player to your Home Network
and discs featuring BD Live are retrieving content from the
Internet, then there is no reason to change any network
settings from the factory default. In fact, it is highly likely
that changing any network settings will stop the network
connection from working.
Testing your network connection:
If you think there may be a problem with your network
connection -
Navigate to the Network category of the Settings •
Menu.
A window will open which will display the current status of
your network.
Link status
If the player is not connecting to the Internet:
If the tests in the previous section prove that your player
is not connected to the Internet, then it is possible
that your network has been congured for a manual IP
address. If so, these settings must be entered into your
player manually as described in the next section before it
can join your network.
NOTE: Settings shown are examples only.
If the ‘Link Status’ line reads ‘Link Up’, then the Network is
connected correctly.
You can further check the network connection.
From the Network Status screen above -
Press the • P button.
Scroll to the ‘Network Test’ option.•
Press the • ENTER button.
If the line ‘Connection to Internet’ reads ‘...
successfully established’ then your Internet
connection is working correctly.
25
Page 28

SYSTEM SETTINGS - NETWORK CATEGORY
Conguring manual IP settings:
Do not attempt to change any of these settings
unless you have experience with Home Network
conguration. If you are in any doubt, consult an
IT professional.
Before attempting to enter manual network settings,.
you will need to know the following -
A free IP address on your network.•
A valid Subnet Mask number for your network.•
The IP address of your network gateway.•
Primary and secondary DNS settings for your •
network.
If you have the above data -
Select the ‘Network’ category of the Settings Menu.•
The Network status screen appears.
Link status
Press the • P button.
You will now see the IP settings screen. You can now continue to enter the other manual network
conguration values to complete manual network
conguration. Select the ‘Apply’ option to close the screen
To enable manual IP setting -
Select the IP mode option.•
You can now choose an IP
mode.
Select the ‘Manual’ option •
on the IP mode menu.
The lines required for •
manual IP entry can now
be selected for editing.
Scroll to each line in turn •
that you want to change.
Press the • ENTER button to
open a dialogue box for
number entry.
and save settings.
Scroll down and select ‘Apply’ to save the new settings •
leave this menu.
To enable Dynamic (DHCP) IP setting:
If you want to change to Dynamic (DHCP) IP setting (the
factory setting) -
Select the Network category of the Settings Menu.•
The Network status screen appears.
Press the • P button.
Select the ‘Wired’ option •
on this screen.
You will now see the IP settings screen.
Select the IP mode option.•
You can now enter each setting
with the number buttons or
Select the ‘Wired’ option on this screen.•
scroll between boxes with the
O or P button.
When you have nished •
entering the setting, scroll
down to select OK.
You will return to the IP settings
screen.
26
Example of entering
an IP address
Select the ‘Dynamic’ option •
on the IP mode menu.
Scroll down and select •
‘Apply’ to save this setting
and leave this menu.
Dynamic (DHCP) IP setting will
be applied.
Page 29

SYSTEM SETTINGS - DISPLAY CATEGORY
The display category settings change the way in which
the player is set up to work with your TV.
To check the current display settings:
Navigate to the Display category of the Settings •
Menu.
A window will open which will display the current display
settings.
Current display
settings
To change settings in the display category, press the •
P button.
The display settings edit window will open.
TV type:
You can select either PAL or NTSC video signals. The
correct setting for the UK and Europe is PAL.
Resolution (HDMI only):
CAUTION: If you change to display resolution
settings that are incompatible with your TV, you
may lose the TV picture completely. If your TV is
connected via HDMI, the ‘Auto’ setting (factory
setting) is strongly recommended as the TV will
automatically set the resolution of the player
for optimum results. If you lose the picture as
a result of changing the resolution, refer to the
Troubleshooting section for instructions to
recover the picture.
From the resolution sub-menu you can choose to
manually set the HDMI resolution in the range -
Auto (the player resolution is set by your TV)•
1080p•
1080i•
720p•
576p•
576i•
NOTE: Although resolution settings will be displayed
on a TV connected to the composite video (CVBS) video
output, the resolution of the composite video output is
xed at 576i (PAL operation) or 480i (NTSC operation).
TV Aspect:
Change this setting to match the aspect ratio (shape) of
your TV. Widescreen TVs generally have an aspect ratio of
16:9, older full-screen TVs have an aspect ration of 4:3.
If you have a widescreen 16:9 format TV, choose one of
the 16:9 formats -
Choose 16:9 Wide (factory setting) to present •
widescreen programs correctly on a 16:9
widescreen TV.
Choose 16:9 Pillarbox when watching an older 4:3 •
movie on a widescreen TV. This will display the
movie in its correct proportions and with black bars
at the edges of the picture, rather than stretching
the picture to t the full width of a widescreen TV.
If you have a full-screen 4:3 format TV, choose one of the
4:3 formats -
Choose 4:3 Pan and Scan to display 16:9 movies •
on the 4:3 TV with full height, but cropping of the
picture at the screen edges.
Choose 4:3 Letterbox to display 16:9 movies in full •
width on a 4:3 TV (but black bars at the top and
bottom of the screen).
Film Mode (1080p24)
Movies are recorded on lm at a rate of 24 frames per
second. Many movies on Blu-ray discs are recorded at this
frame rate.
If your TV is compatible with a frame rate of 24 frames
per second, then change this setting to ‘On’ (the factory
setting is o).
You can now edit the display settings.
Deep Color:
The HDMI 1.3 specication features a maximum colour
resolution of 16 bits.
Set Deep Color to ‘On’ to expand the colour range possible
from your player to a maximum of 36 bits.
27
Page 30

SYSTEM SETTINGS - AUDIO CATEGORY
The audio category settings change the way in which the
sound of your player is set up.
To check the current audio settings:
Navigate to the Audio category of the Settings Menu.•
A window will open which will display the current audio
settings.
To change settings in the audio category, press the • P
button.
The audio settings edit window will open.
You can now edit the audio settings.
PCM Downsampling:
This setting sets up the digital audio output (SPDIF) to
match an AV surround decoder or digital amplier that
you may have connected.
There are 3 settings available -
O. Choose this setting if you are not using the •
digital audio output connection.
96kHz. Choose 96kHz if you have connected the •
digital audio output to an AV surround decoder
that is compatible with a 96k digital source.
48kHz. Choose 48kHz if you have connected the •
digital audio output to an AV surround decoder
that is not compatible with a 96k digital source.
In this case, any 96k audio programs will be
downsampled to 48k.
Digital Output:
The Digital Output setting enables you to match your
player correctly to the audio system in your TV or AV
surround decoder.
Choose PCM if your audio plays through a two •
channel stereo TV or audio system.
Choose Bitstream HD if your AV system includes •
an advanced surround decoder with features such
as Dolby TrueHD.
Choose Bitstream Legacy if your AV system •
includes a surround decoder, but this does not
feature Dolby TrueHD.
Choose Bitstream Mixed to mix the multi-channel •
sound into two channels. This setting is correct
if your system includes a multi-channel TV or AV
surround decoder featuring Dolby Pro Logic or a
similar decoding system.
NOTE: PiP audio and eects audio are not available
when the Bitstream HD or Bitstream Legacy settings are
selected.
Dynamic Range Control:
Switching on the Dynamic Range Control setting will
enhance low level sounds and reduce the volume of high
level sounds. This may be helpful when listening at low
volumes or late at night.
NOTE: The Dynamic Range Control setting is only active
when a movie encoded with Dolby Digital is playing.
28
Page 31

SYSTEM SETTINGS - LANGUAGE CATEGORY
The language category settings enable you to set up the
language interface with your player and the discs you
play.
To check the current language settings:
Navigate to the Language category of the Settings •
Menu.
A window will open which will display the current language
settings.
To change settings in the language category, press •
the P button.
The language settings edit window will open.
OSD:
Changing the OSD language will change the language
for the On-Screen Displays on your player.
Menu:
Changing the Menu language will change the default
language for the Disc Menus. This language will be
selected when available on a disc.
The ‘Auto’ setting is recommended for Menu language.
When ‘Auto’ is set the disc menus will be set (where
possible) in the same language as that set for OSD
menus.
Audio:
Changing the Audio language will change the default
audio language when movies are playing (if the selected
language is available).
The ‘Auto’ setting is recommended for Audio language.
When ‘Auto’ is set the audio language will be set (where
possible) in the same language as that set for Disc
menus.
NOTE: For some Blu-ray or DVD Video discs, the audio
language must be set via the Disc Menu.
Subtitle:
Changing the Subtitle setting will display a subtitle in
the selected language when movies are playing (if the
selected language is available).
Change the subtitle setting to ‘O’ to switch o subtitles.
NOTE: For some Blu-ray or DVD Video discs, the subtitle
language must be set via the Disc Menu.
You can now edit the language settings.
29
Page 32

SYSTEM SETTINGS - PARENTAL CATEGORY
The parental category settings enable you to restrict the
playback of discs with a particular rating.
You may want to activate parental control settings if you
want to restrict accessibility to movies above a certain
censorship rating.
If parental control has been activated, it will be necessary
to enter a four digit (user dened) password before
playing a movie with a rating over the censorship limit
you have set.
To check the current parental settings:
Navigate to the Parental category of the Settings •
Menu.
A window will open which will display the current parental
settings.
Parental control:
Choose this option to switch Parental Control on or o
(factory setting). When Parental Control is set on, any
viewing restrictions set within this category will be
applied.
NOTE: Once Parental Control has been activated for
the rst time, the Parental Password will be required to
open the edit window. The default password is 0000. If
you have set Parental Control ‘On’, then it is advisable to
change the Parental Password to a new number. Ensure
that you have made a note of the new password.
Parental level:
Choose this option to set the censorship limit that your
player will play when Parental Control is set ‘On’.
Parental Password:
Choose this option to change the parental control
password.
To change settings in the language category, press •
the P button.
The parental settings edit window will open.
You can now edit the parental settings.
30
Page 33

TROUBLESHOOTING
No power:
Check that power is connected.
No picture after changing display resolution settings:
If you have inadvertantly changed the resolution 1.
setting and lost a stable picture, the correct setting
can be recovered by stepping through all the available
resolution settings -
Press the • RESOLUTION button twice on the
remote control.
This will change the resolution setting once.•
Wait for 10 seconds.•
Press the • RESOLUTION button once.
Repeat the last two steps up to 6 times to step •
through all available resolution options. It is
important to wait between making each resolution
change to allow the TV to re-synchronise with the
player.
When you reach a resolution setting that is compatible
with your TV, the picture will re-appear.
No sound or picture from the TV:
Check the system connections.1.
Check that the correct AV input is selected on the TV.2.
No sound from the TV:
Check that the volume control on the TV is turned 1.
up.
Check that the volume control on the player remote 2.
control is turned up.
Check that audio mute is not set (press the 3. MUTE
button to check status).
If the TV is connected to the composite video (CVBS) 4.
jack, check that separate audio connections have
been made.
NOTE: HDMI connection includes both video and audio
signals.
No sound from an AV surround decoder:
Check that you have made the correct connection 1.
(HDMI or Digital Out) between your player and your
surround decoder.
Check that you have selected the correct audio input 2.
at the surround decoder and the decoder volume is
turned up.
Check that the audio format is set correctly to match 3.
your surround decoder (Audio Settings menu).
Check that the volume control on the player remote 4.
control is turned up.
Check that audio mute is not set (press the 5. MUTE
button to check status).
Disc problems - playback skips or the disc will not
read:
The disc may be dirty or scratched. Try other discs to 1.
conrm.
The disc may be from the wrong region. Check the 2.
packaging or label on the disc to conrm if the disc is
the same region as your player.
Some functions are not working:
Functions such as Angle, Subtitle, Picture in picture, 1.
multiple audio soundtracks, resume play, BD-Live
and others are disc dependant and will only function
when supported on the disc.
Video resolution will not change:
If the TV is connected to the Composite (CVBS) video 1.
output, the resolution will be xed. Resolution can
only be adjusted for the HDMI output.
Music, photo or video les will not play from a CD-ROM,
DVD-ROM or USB drive:
The le types may not be compatible with your 1.
player.
Unable to access BD-Live content:
Check that the player is connecting to the Internet 1.
(see page 25).
Check that the disc includes the BD-Live feature.2.
Check that a USB drive with free space has been 3.
docked to the front panel USB port for download of
BD-Live content.
BD-Live content is accessible, but will not download:
There may not be enough free space on the docked 1.
USB drive. Either dock another drive with enough
space or erase the docked memory.
No remote control response:
The batteries may be exhausted or inserted incorrectly. 1.
Check the installation of the batteries and replace if
exhausted.
Controls lock up or behave erratically:
Your Blu-ray Player is a complex electronic product 1.
and there may be occasions when playback of certain
media combinations could cause the control system
to ‘lock’. In this case, disconnect the power, wait for
one minute, then reconnect the power. This will reset
the control system of the player.
31
Page 34

SPECIFICATIONSCARE AND CLEANING WARRANTY
All care and cleaning operations should be carried out
with the unit unplugged from the mains power.
The surface of the unit can be cleaned with a barely
damp cloth and then dried carefully. Never use abrasives,
abrasive cloths or chemical solvents .
Supply voltage: 110-240V~, 50/60Hz
Power consumption: 15W
Standby power consumption: <1W
TV system: PAL/NTSC
Audio output: 2Vrms (1kHz, 0dB)
Audio frequency range: 4Hz-22kHz (48k)
4Hz-44kHz (96k)
THD: 0.004%
S/n ratio: 90dB
Dynamic range: 80dB
Video output: 1Vp-p//75 Ω
Weight: 2.5kg
Class II construction double insulated.
This product must not be connected to earth.
UK: Waste electrical products/batteries should
not be disposed of with household waste.
Separate disposal facilities exist, for your nearest
facilities see www.recycle-more.co.uk or in-store
for details.
ROI: Produced after 13th August 2005. Waste
electrical products/batteries should not be
disposed of with household waste. Please recycle
where facilities exist. Check with your Local
Authority or retailer for recycling advice.
Your Tesco appliance is covered by a warranty for 12
months from the date of purchase. If a fault develops
during this period, please contact the TESCO electrical
help line on 0845 456 6767. Please have your original
purchase receipt with you when you call. This warranty in
no way aects your consumer rights.
32
Page 35

Page 36

Te sco Stores Ltd,
Delamare Road, Cheshunt, Herts, EN8 9SL
Technika Helpline: 0845 456 6767 (Calls cost up to 4p per minute from a BT landline, other providers may vary)
BRSS10 V0.3
 Loading...