

Page 1
BB 20
4
Portable CD Radio Cassette Player
User Handbook
Imported by Tesco Stores Ltd, Delamare Road, Cheshunt, Herts, EN8 9SL
ADJUSTING THE VOLUME HEADPHONE LISTENING
To increase the volume:
Your BB
204
has a stereo 3.5 mm headphone socket for quiet
! Rotate the volume knob clockwise.
listening. The recommended impedance is 32 Ohms.
To decrease the volume:
MUSIC ON THE MOVE
! Rotate the volume knob anticlockwise.
When on the move please observe these simple precautions:
IMPORTANT NOTE:
! Carry the unit ONLY by the handle.
The position of the Volume knob is not a reliable guide as to
! Do NOT swing the unit around.
‘how loud’ your equipment will play. Always refrain from
! When playing a CD do not shake the unit.
turning the volume knob to very loud settings, especially on
! Do not drop the unit.
CD, as the distortion is unpleasant to listen to and in extreme
! NEVER carry the unit with the FM antenna extended.
cases could damage the loudspeakers or your hearing.
! Make sure the batteries have plenty of life in them.
USING THE TAPE
! Avoid excessive heat or cold.
! Do not operate the unit in rain, snow, or where it is likely
GENERAL OPERATION
to get splashed with water.
STOP /EJECT KEY
! Do NOT play the unit at loud volumes in public places.
This key stops all tape functions. Press once to stop the tape; A
second press opens the tape door to load and remove tapes.
CARE AND CLEANING
FAST FORWARD AND FAST REVERSE KEYS
All care and cleaning operations should be carried out with
Press the appropriate key to fast wind the tape in the forward
the unit unplugged from the mains power.
or reverse directions. When the tape reaches the end, press
The surface of the unit can be cleaned with a barely damp
STOP
cloth and then dried carefully.
PLAY KEY
Do NOT clean the inside of the CD player with a cloth. Lightly
Press this key to start playing the tape
blow out any dust.
PAUSE KEY
If your CDs don’t play properly, this is more likely to be caused
by surface damage or dirt on the actual CD rather than any
Press this key to pause the tape temporarily. Do not leave a
fault of the unit. In extreme cases, these phenomena could be
tape in pause mode for long periods.
due to dirt or dust on the lens
RECORD KEY
If the CD lens gets dusty or dirty, use a proprietary lens cleaner
Press this key together with the
and follow the instructions carefully. If you keep the CD cover
NOTE: This key will not work if a commercially pre-recorded
closed at all times when the unit is not in use, the lens is
tape is in the player or if you try to re-record over a tape which
extremely unlikely to get dirty.
has had the recording tab removed.
We recommend that you use a tape head cleaner if the sound
PLAYING BACK A TAPE
from the tape becomes muffled; fluid based cleaners are best.
! Set the function selector to TAPE
BATTERIES
! Open the cassette door with the STOP/EJECT key
Batteries should be regularly replaced. Never allow batteries
! Load a cassette with the tape side down. Close the door.
to run down completely as they may leak. If the unit is not
! Press PLAY
going to be used for some time, remove the batteries to avoid
the risk of exposure and leakage.
! To pause the tape press . . Press again to restart
When disposing of used batteries, follow all recycling
! Press when you are finished.
provisions that may be in force in your area. NEVER dispose of
RECORDING FROM THE RADIO
batteries by putting them in the general rubbish. NEVER throw
! Set the FUNCTION selector to TUNER and tune the station
batteries in the fire or expose them to excessive heat or damp.
! Load a cassette with the tape side down. Close the door.
! Press RECORD and PLAY together to start recording.
! Press when you are finished.
NOTE: The recording will be unaffected by the setting of the
volume control.
RECORDING FROM A CD
! Set the FUNCTION selector to CD
! Load a cassette with the tape side down. Close the door.
! Press PAUSE and then press RECORD
! Start the CD player and press PAUSE on the Cassette
! The Cassette will start recording the CD
! To stop recording, first stop the CD and then press STOP/
EJECT to stop the cassette deck
WARRANTY
Your Technika appliance is covered by a warranty for 12
months from the date of purchase. If a fault develops during
this period, please contact the TESCO electrical help line on
0845 601
2459
. Please have your original purchase receipt with
you when you call. This warranty in no way affects your
consumer rights.
SPECIFICATIONS
Power Source
AC:
: 1
Frequency Range
FM: 88 - 108MHz
MW: 530 - 1600kHz
DC 2V ("C" SIZE 1.5V X 8)
BB 205 Portable CD Radio Cassette Player
205
PLAY KEY to record a tape
and PLAY
together The cassette tapeis nowin standby mode
2549
230V - 240V ~ 50Hz
5
Page 2
UNPACKING USING THE CD
PRELIMINARIES
Carefully unpack the unit. If it is damaged, please return it to
your nearest Tesco store for replacement. Remember to take
! Set the Function Switch to ‘CD’
your purchase receipt with you.
!Open the CD door by pressing the
Retain the User Handbook. If you pass the unit on to a third
! Place a CD (label up)on the central spindle lock
party make sure you pass on the handbook.
! Press gently to secure the CD in place.
We suggest you retain the packaging. If you dispose of it, do so
! Close the CD door
having regard to any recycling regulations in your area.
The disc will spin briefly, then stop. The display indicates
the number of tracks on the disc
OPERATION
TO PLAY A CD FROM THE START
Place the unit on dry stable surface away from heat and damp.
! Press the PLAY/PAUSE button
When moving the unit always use the handle. The handle
! The disc will play from Track 1
should be stowed during normal operation.
TO PAUSE A CD WHILE PLAYING
MAINS OPERATION
! Press the PLAY/PAUSE button
! Check that the mains voltage on the rating plate is 230/240
! The disc will pause. In Pause mode the sound mutes
Volts 50 Hz.
and the
! Set the Power Switch to the ‘AC’ position
TO STOP A CD WHILE PLAYING
! Set the Function Switch to the ‘OFF/TAPE’ position.
! Press the STOP button
! Invert the unit. Slide the battery compartment cover
TO PLAY A CD FROM A SELECTED TRACK
forward and carefully lift off the cover.
! Insert the CD
! Uncoil the AC power cord fully.
! Press SKIP or repeatedly, to select the
! Replace the cover making sure the cord is threaded
desired track. The track number will flash
through the slot at the side of the cover.
! Plug the mains plug into the wall socket and switch the
! Press PLAY/PAUSE to play from the track.
mains power on. Your unit is now ready for use.
TO CHANGE TRACKS DURING PLAY
BATTERY OPERATION
! Press SKIP or repeatedly, to select and then
! Set the Power Switch to the ‘DC’ position
play from the desired track.
! Set the Function Switch to the ‘OFF/TAPE’ position.
TO GO BACK TO THE START OF A TRACK DURING PLAY
! Carefully lift off the cover.
! Press SKIP once.
! Ensure the power cord is stowed away in the area provided
TO SEARCH FOR A PARTICULAR PASSAGE DURING PLAY
to the right of the battery compartment
! Press and hold SKIP or until the desired passage
! Place 8 UM2, type ‘C’ (or equivalent) batteries in the
is located. During the search the sound is played faster
battery compartment. The correct battery positions are
than normal and at a reduced volume.
indicated at the bottom of the compartment
! Play returns to normal when SKIP or is released.
! Carefully replace the cover. Your unit is ready for use.
REPEATING A TRACK OR A COMPLETE DISC
NOTE: Check your batteries regularly. Old or discharged
! A single track or the complete disc may be repeated. Press
batteries should be replaced. If the unit is not going to be used
the REPEAT button to cycle the repeat mode:
for some time or is being run exclusively on AC power, remove
the batteries to avoid leakage and damage.
REPEAT TRACK REPEAT DISC REPEA T OFF
Use the AC power supply to conserve battery life.
! Repeat can be selected when the disc is playing or stopped.
When operating the unit on battery power make sure the
! Search and track select functions operate in Repeat mode.
power cord is unplugged and stowed away.
! Press STOP to cancel Repeat mode and stop the disc.
USING THE RADIO
PROGRAMMED DISC PLAY
FM RECEPTION
Programme play can only be selected when the CD is stopped.
! Carefully extend the FM Antenna fully.
To select and play a Program:
!Set the Band selector to
!Press the PROGRAM Button. The
!Set the Function Switch to
‘PROG’ indicator flashes.
! Select the desired station using the Tuning Knob. The
! Press SKIP or repeatedly, to select the
Tuning is calibrated to help you find the correct frequency.
desired track
! Rotate the antenna to obtain the best signal quality
! Press PROGRAM to store the selection.
! If the station is broadcasting in stereo the FM stereo
! Choose another track (or the same track). The
indicator will light.
display flashes the chosen track
NOTE: Stereo reception requires a strong signal. If you are in a
!Press PROGRAM to store the selection. (You may
poor signal area, stereo reception may be noisy. Switching the
choose up to 20 tracks in this way)
! Press PLAY The program will play once and stop.
NOTE: The antenna is required only for FM reception. For
reception or when listening to the Cassette or CD player, we
Note: In ‘Program’ mode, if you stop the disc and then press
recommended that the antenna is in the stowed position.
PLAY, the disc will play from track 1 as normal but the program
MW RECEPTION
will still be in the memory.
!Set the MW/FM selector to ‘MW’
!To replay the program: Press PROGRAM followed by PLAY.
!Set the Function Switch to
!To clear the program:
!Select the desired statio
! Rotate the unit for the best signal quality. The medium
wave is liable to interference from mains appliances, cars
etc. so careful positioning will improve reception.
------ ------
^ ^ ^ ^
been spilled or objects have fallen into the apparatus, the apparatus has been exposed to rain
IMPORTANT SAFETY INFORMATION
or moisture, does not operate normally, or has been dropped.
Warning: To reduce the risk of fire or electrical shock, do not expose this product to rain or
moisture. The product must not be exposed to dripping and splashing and no object filled with
liquids such as a vase of flowers should be placed on the product.
No naked flame sources such as candles should be placed on the product.
Caution: Changes or modifications not expressly approved by the manufacturer could void the
user's authority to operate this device.
Caution: Usage of controls or adjustments or performance of procedures other than those
specified herein may result in hazardous exposure.
IMPORTANT: These labels tell you that the unit contains a Laser component. Do not
stare at the laser lens. Lifting the CD cover and defeating the interlocks will expose the user to
radiation from the laser beam.
ELECTRICAL INFORMATION
Read these instructions.
Keep these instructions.
Mains Supply: The mains operating voltage of this unit is on the rating plate on
the rear. In the UK this is 230/240 V. This appliance must not be earthed (grounded)
Heed all warnings.
Follow all instructions.
IMPORTANT NOTICE TO UK USERS
Do not use this product near water where it could get splashed.
The appliance cord is terminated with a UK approved mains plug fitted with a A fuse. If
Clean only with dry cloth.
Do not block any ventilation openings.
Install in accordance with the manufacturer's instructions.
Do not install or operate near any heat sources such as radiators, stoves, or other apparatus
that produce heat.
Protect the power cord from being walked on or pinched, particularly at plugs, convenience
receptacles, and the point where it exits from the apparatus.
Do not allow the power cord to overhang the edge of a table.
Unplug this apparatus during lightning storms or when unused for long periods of time.
To avoid interference, switch this unit off while operating other radio devices in the immediate
vicinity.
Refer all servicing to qualified service personnel. Servicing is required when the apparatus has
been damaged in any way, such as the power-supply cord or plug is damaged, liquid has
3 the
fuse needs to be replaced, an ASTA or BSI approved BS1362 fuse rated at 3A must be used. If
you need to change the mains plug, remove the fuse and dispose of this plug safely
immediately after cutting it from the cord.
Connecting a Mains Plug
The wires in the mains lead are coloured in
accordance with the code: Blue: NEUTRAL Brown:
LIVE: As these colours may not correspond to the
coloured markings identifying the terminals in
your plug, proceed as follows: The BLUE wire must
be connected to the terminal marked with the
letter N or coloured BLUE or BLACK. The BROWN
wire must be connected to the terminal marked
with the letter L or coloured BROWN or RED.
CAUTION!
RISK OF ELECTRIC SHOCK
DO NOT OPEN
TO REDUCE THE RISK OF ELECTRIC SHOCK DO NOT REMOVE COVER (OR BACK)
NO USER-REMOVEABLE PARTS INSIDE
REFER SERVICING TO QUALIFIED PERSONNEL
This symbol indicates that there are important operating and
maintenance instructions in the literature accompanying this unit.
This symbol indicates that dangerous voltage constituting a risk of
electric shock is present within this unit.
3A FUSE
BS 1362
BROWN
(Live)
BLUE
(Neutral)
User Handbook
BB 205 Portable CD Radio Cassette Player
‘CD D OOR OPE N’ butte n
track number in the display flashes.
ALL
32
- In STOP mode Press PROGRAM and
then press STOP - Open the 'CD door'
To check the contents of a program in STOP mode press
PROGRAM repeatedly - the track nos. will display in order.
In program mode SKIP. Search and REPEAT are all available.
!
FM(ST) or FM
'RADIO'
AM
FM(ST) to FM eliminates most of the noise.
AM
AM
'RADIO'
n using the Tuning Knob.
Band
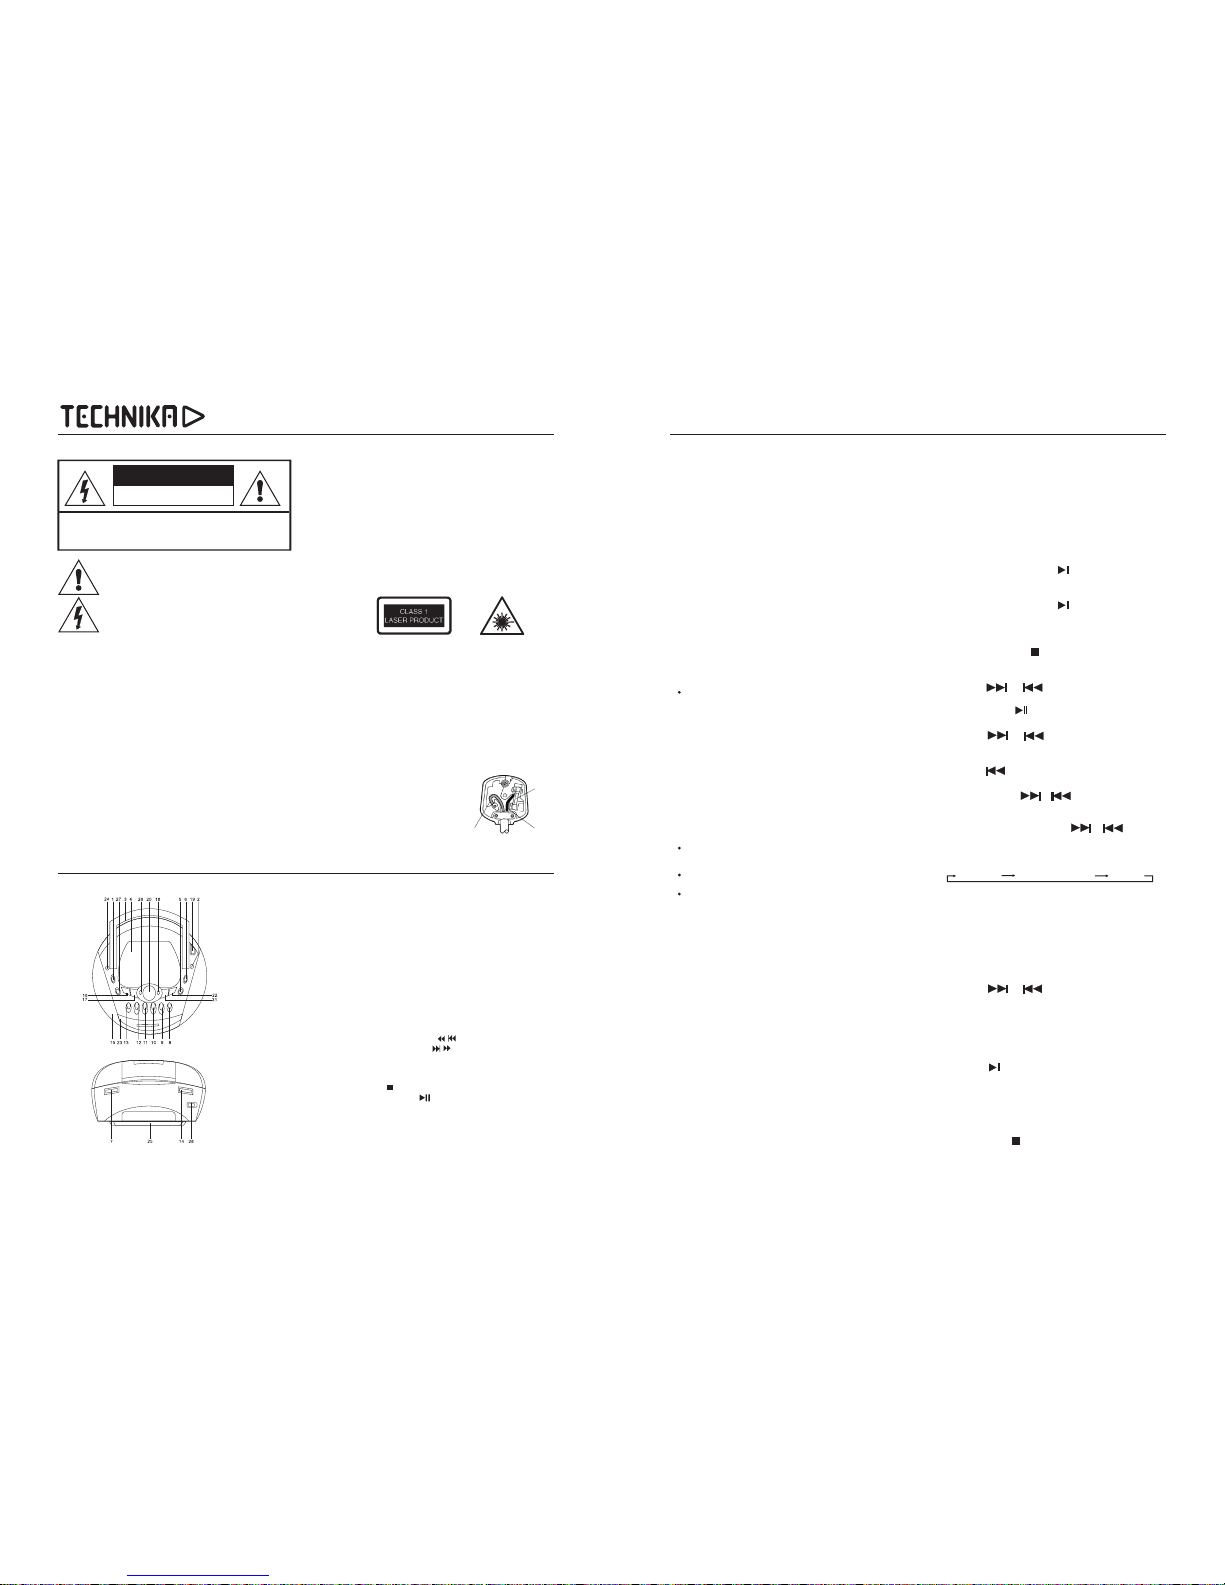
2. FM ANTENNA
20. CD TRACK(S) INDICATOR
1. FUNCTION SWITCH
3. HANDLE
4. CD DOOR
5. CD DOOR OPEN
6. BANE SELECTOR
7. TUNING KNOB
8. CASSETTE RECORDER BUTTON
9. CASSETTE PLAY BUTTON
10. CASSETTE REWIND BUTTON
11. CASSETTE F.FEW BUTTON
12. CASSETTE STOP/EJECT BUTTON
13. CASSETTE PAUSE BUTTON
14. VOLUME KNOB
15. SPEAKERS
16. CD SKIP SEARCH BUTTON
17. CD SKIP SEARCH BUTTON
18. CD REPEAT ONE/ALL BUTTON
19. RADIO DIAL WINDOW
21. CD STOP BUTTON
22. CD PLAY/PAUSE BUTTON
23. CASSETTE DOOR
24. PHONES SOCKET
25. BATTERY COMPARTMENT
26. PROGRAM BUTTON
27. DBBS BUTTON
28. AC INPUT SOCKET
MAI NS OPER ATION
1. Ch eck if th e power v oltag e, as sho wn on the t ype
pla te loca ted on th e botto m of the se t, corr espon ds
to yo ur loca l AC po wer sup ply. If it do es not,
con sult yo ur deal er or ser vice ce ntre.
2. Co nnect t he powe r cord to t he AC MAIN S inlet a nd
the w all out let. The p ower su pply is n ow
con necte d and rea dy for us e.
3. To swit ch off co mplet ely, unp lug the p ower co rd
fro m the wal l outle t.
Unp lug the p ower co rd from t he wall o utlet t o
pro tect yo ur set du ring he avy thu nders torms
BATTE RY OPERAT ION
Bat terie s( not in clude d).
Ope n the bat tery co mpart ment an d inser t eight
bat terie s, type R -14,U M-2 or C- cells ,(pre ferab ly
alk aline ) with th e corre ct pola rity as i ndica ted by th e
“+” and”- ”. Symb ols ins ide the c ompar tment .
Bat terie s conta in chem ical su bstan ces, so t hey
sho uld be di spose d of prope rly.
Inc orrec t use of ba tteri es can ca use ele ctrol yte
lea kage an d will co rrode t he comp artme nt or cau se
the b atter ies to bu rst Ther efore :
Do no t mix bat tery ty pes:e .g. alk aline w ith car bon
zin c. Only u se batt eries o f the sam e type fo r the
set .
Whe n inser ting ne w batte ries, d o not try t o mix old
bat terie s with th e new one s.
Rem ove the b atter ies if th e set is no t to be use d
for a l ong tim e.
 Loading...