

Page 1

Picture Frame
A700
Owner’s
Handbook
Page 2
IMPORTANT SAFETY INFORMATION
Read these instructions.
Keep these instructions.
Heed all warnings.
Follow all instructions.
Do not use this apparatus near water.
Clean only with a slightly damp cloth.
Do not block any ventilation openings.
Install in accordance with the manufacturer’s instructions.
Do not install or operate near any heat sources such
as radiators, stoves, or other apparatus that produce
heat.
Unplug this apparatus during lightning storms or
when unused for long periods of time.
Refer all servicing to qualied service personnel.
Servicing is required when the apparatus has been
damaged in any way, such as the power-supply
cord or plug is damaged, liquid has been spilled or
objects have fallen into the apparatus, the apparatus has been exposed to rain or moisture, does not
This symbol indicates that dangerous voltage constituting
a risk of electric shock is present within this unit.
This symbol indicates that there are important operating and
maintenance instructions in the literature accompanying this unit.
operate normally, or has been dropped.
Warning: To reduce the risk of re or electrical
shock, do not expose this product to rain or moisture. The product must not be exposed to dripping
and splashing and no object lled with liquids
such as a vase of owers should be placed on the
product.
No naked ame sources such as candles should be
placed on the product.
Caution: Changes or modications not expressly
approved by the manufacturer could void the user’s
authority to operate this device.
Caution: Usage of controls or adjustments or performance of procedures other than those specied
herein may result in hazardous exposure.
IMPORTANT
Use this appliance with the supplied AC convertor.
Using non-approved power supplies will void the
warranty.
This equipment generates, uses and can radiate radio frequency energy and, if not installed and used
Page 2
in accordance with the instructions, may cause
harmful interference to radio communication.
However,this is no guarantee that interference will
not occur in a particular installation. If this equipment does cause harmful interference to radio or
television reception, which can be determined by
turning the equipment o and on,the user is encouraged to try to correct the interference by one of
the following measures:
- Reorient or relocate the receiving antenna.
- Increase the separation between the equipment
and receiver.
- Connect the equipment into an outlet on a circuit
dierent from that to which the receiver is connected.
- Consult the dealer or an experienced radio/TV
technician for help.
The means of disconnection from the mains supply
is via the AC power adapter. This must be readily
accessible and capable of being unplugged at all
times.
Page 3

CONTENTS
SAFETY INFORMATION ................................................................................................2
INTRODUCTION ...........................................................................................................4
UNPACKING ................................................................................................................4
CONTROLS AND FUNCTIONS ........................................................................................5
REMOTE CONTROL HANDSET .......................................................................................6
GETTING STARTED ......................................................................................................7
CONNECTING THE POWER SUPPLY ............................................................................... 8
SWITCHING ON ...........................................................................................................8
INSERTING MEDIA .......................................................................................................8
NAVIGATING THE FRAME ............................................................................................. 9
VIEWING PICTURES ................................................................................................... 10
NAVIGATING A SLIDESHOW .......................................................................................11
THUMBNAIL MODE ...................................................................................................11
VIEWING THE CLOCK AND CALENDAR ........................................................................12
SYSTEM SETUP .........................................................................................................13
TROUBLESHOOTING .................................................................................................. 18
AFTER USE ................................................................................................................18
CARE, WARRANTY & SPECIFICATIONS ........................................................................19
Page 3
Page 4

IINTRODUCTION
Your Digital Picture Frame (DPF) enables you to view digital
pictures from either a memory card or from a USB drive.
The DPF is compatible with the following card formats: SD™
(Secure Disk), MMC™(Multimedia Card), MS™ (Memory Stick) and
SDHC (Secure Disk High Capacity).
The Frame will also support a USB 2.0 or 1.1 drive.
PICTURE FORMATS
The DPF will play pictures conforming to the .jpg (jpeg) standard.
Other picture formats must be converted to jpgs via photo editing
software (not supplied).
FILES AND FOLDERS
You may have your pictures grouped into Albums (folders) with
several pictures inside each album. The DPF will read the pictures and
play them in sets but you cannot identify or select individual folders.
The DPF will take time to load and display pictures. Lots of high
resolution pictures will slow loading times considerably.
UNPACKING
The carton should contain:
• The Photo Frame
• External Power Adapter
• Remote Control Handset
• Operating Manual
If any items are missing or damaged, contact your nearest TESCO store
for a replacement. Have your receipt ready when you call. Retain the
packaging. If you dispose of it, do so having regard to any recycling
regulations in your area.
Before using the Photo Frame carefully remove any protective
lm covering the screen. Take care not to press on the screen.
Page 4
Page 5
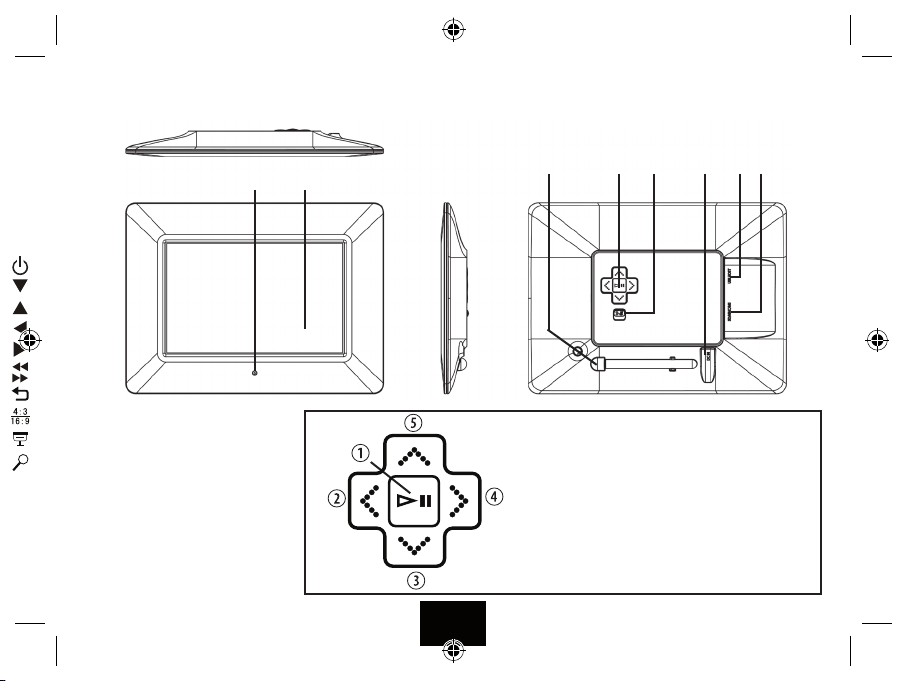
CONTROLS AND FUNCTIONS
8
7
SD/MMC/MS Card Slot1.
USB Socket2.
5V DC Input Socket3.
ON/OFF Switch4.
Navigation Keys*5.
Detachable Stand6.
7” Display Screen7.
Remote Control Sensor8.
Page 5
6 5
*NAVIGATION KEYS
Play/Pause; Conrm/Enter; hold to enter main menu1.
Previous/Left button2.
Down button; Rotate photo while playing a slideshow3.
Next / Right button 4.
Up button; Back to preview while playing a slideshow5.
1
234
Page 6
REMOTE HANDSET
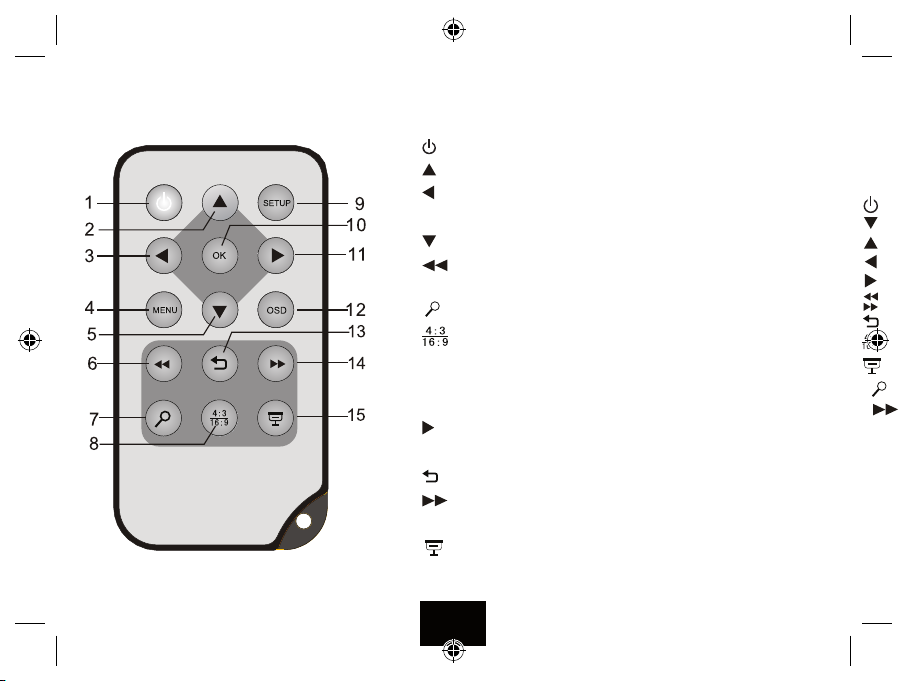
HANDSET KEYS AND FUNCTIONS
1 Press to set the player in and out of Standby.
2
Press to move the cursor upward.
3
Press to move the cursor leftward or select the previous picture.
4 MENU Press to return to the main menu.
5
Press to move the cursor downward.
6
Press to select the previous picture when viewing pictures
Switch to the previous page in thumbnail mode.
7
Press to zoom the picture.
8
Press to select 4:3 or 16:9 aspect ratio for a picture
9 SETUP Press to go to the setup menu.
10 OK Press to conrm a selection
Start or pause playback.
11
Press to move the cursor rightwards or select the next picture.
12 OSD Press to open or exit the OSD bar display.
13
Press to return to the previous menu.
14
Press to select the next picture when viewing pictures
Switch to the next page in thumbnail mode.
15
Press to start the slide show.
Page 6
Page 7

GETTING STARTED
HANDSET PREPARATION
Remove the protective strip from the batter y compartment to activate
the battery.
If the handset behaves erratically or fails to
operate the battery should be replaced.
1: Press the catch at the side of the battery
compartment. Slide out the battery cage
2: Remove the old battery. Place the new battery in the cage with the polarity as shown.
Close the cage.
There is a risk of re and burns if the battery
is handled improperly. Do not disassemble,
crush, puncture, shor t external contacts, or
dispose of in re or water.
Do not attempt to open or service the battery. Replace only with the
battery designated for this product. Discard used batteries in accordance with recycling regulations in force in your area.
PLACEMENT
Remove the stand from the
clip at the rear of the frame
Screw the stand tmly
into the threaded insert
Place the frame on a rm stable surface where it is unlikely to fall or
get knocked o.
Page 7
Page 8
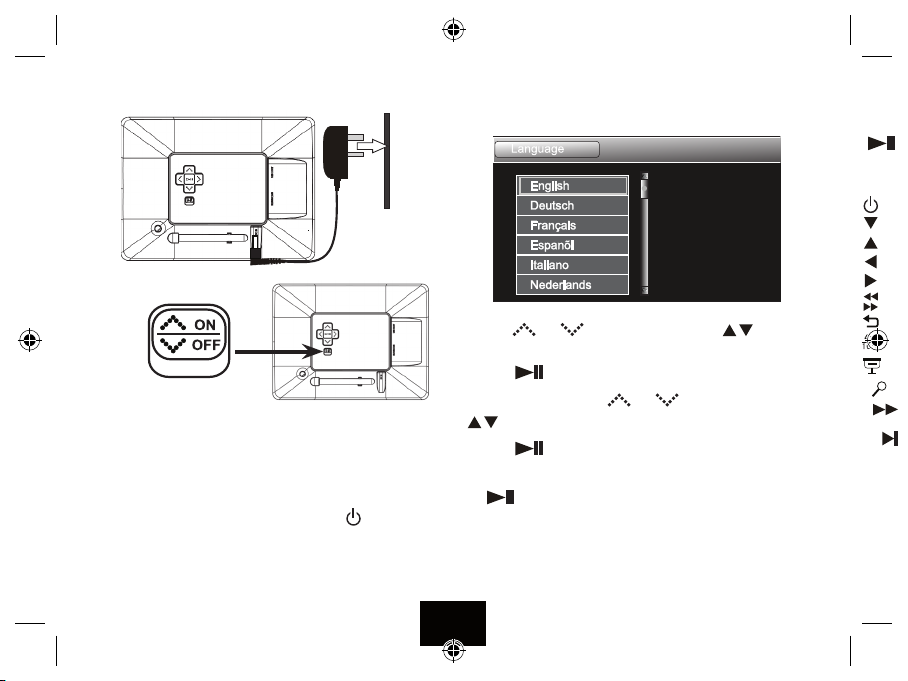
CONNECTING POWER
ON
If the DPF is being switched on for the rst time, or after a default
setting reset, you must rst select a display language.
OFF
Plug the DC power jack of the adapter into the DC socket in the DPF.
Plug the power adapter into the mains point.
Switch on at the mains.
Switch the ON /OFF switch on the frame to ON.
• You can leave the power switch on, and use the
button on the
handset to turn the frame on or set it to Standby mode.
• To turn o the power o, slide the ON/OFF switch to OFF.
Use the (
) or ( ) buttons on the DPF or the buttons on
the handset to make your selection.
Press the button on the DPF or OK on the handset to conrm.
In the next screen, Use the (
) or ( ) buttons on the DPF or the
buttons on the handset to select YES or NO.
Press the
button on the DPF or OK on the handset to conrm.
There are 14 languages to choose from. Make your selection and press
button on the DPF or OK on the handset to conrm.
the
The welcome screen will briey display followed by the Main Menu.
Page 8
Page 9

INSTALLING A USB DEVICE OR MEMORY CARD
To insert a memory card. Position the card with the cropped corner facing
the top of the screen and press gently in.
To release a memory card. Grip both sides of the card and gently pull out.
When rst switched on the pictures will display as a Slide Show. Thereafter
the display will depend on the setup you have customised.
• If you switch on the DPF with a USB drive and a memory card inserted in
the frame, the USB drive photos will be displayed.
USB Drive
SD Card, etc
You can navigate the frame in three ways.
Via the Rear Panel controls.
Via the Remote handset. This manual concentrates on handset navigation
as it the easiest and has the most comprehensive control functions.
You can also navigate a slide show via the On Screen Menu. See Page14
VIEWING PHOTOS
In the main menu, you can select a connected memory device to view
photos, and set other parameters.
1 When pictures are being displayed press the MENU button to access the
main menu.
2 Use the
buttons on the handset to select one of the 5 options.
3 Press OK on the handset to conrm the option or enter the menu item.
Page 9
This icon indicates the current choice
The main menu choices are:
USB/ Card: View images on the USB or SD Card.
Clock/Calendar: Set up the Clock and Calendar.
Setup: Set up slideshows and frame parameters.
Page 10

VIEWING PICTURES
Switch the ON /OFF switch on the frame to ON or press the
button
on the handset to bring the frame out of Standby.
If there is a memory device inserted the device will start a slideshow.
When the frame detects a memory devices it displays all the viewable
images. All folder structures are ignored.
VIEWING PICTURES IN SLIDE SHOW MODE
Slide show mode displays all viewable pictures in sequence.
• Tomovetothenextpicture:Press the
• Tomoveonseveralpictures: repeatedly press the
• Tomovetothepreviouspicture:Press the
• Tomovebackseveralpictures: repeatedly press the
key once
key.
key once
key.
PAUSE MODE
• Topausetheslideshow:Press the OK key
The On Screen Navigation menu will deploy: You can navigate
using either the On Screen menu or the handset/panel controls.
To navigate with the regular controls: Press the OSD button to clear
the OSD menu (if you do nothing the menu will clear after a few seconds).
• Toadvanceonepictureatatime:Press the key.
• Togobackonepictureatatime: Press the
key
• Toresumenormalslideshowplay: Press the OK key again.
ZOOM AND PAN
Press the
key to cycle the picture size:
→ x2 → x4 → x8→x16 →Normal...
Entering ZOOM mode automatically pauses the slideshow.
When the Zoom is positive (i.e greater than 1)
• Press the
• Press the
keys to pan the picture to left or right
keys to pan the picture up or down
• Toresumeslideshowplay:cycle Zoom to Normal and press OK.
CHANGING THE ASPECT RATIO
• Press the
key to change the aspect ratio from 4:3 to 16:9.
What does this mean? Most digital cameras take pictures in the ratio
4:3. This is also the ratio of the frame. If a picture is in “widescreen”
mode (16:9), pressing the
key will increase the picture’s height to
t the frame screen, though the sides may be cropped.
You can also use this key to change the ratio the other way. The picture
will be compressed sideways to t the screen though in this case you
may see black bars above and below the picture.
Press the key again to restore normal screen size.
Note: This feature can only be be used when a picture is larger than
the frame. If a picture is fully visible in the frame the key has no eect.
Page 10
Page 11
NAVIGATING A SLIDESHOW VIA THE OSD MENU
During a slideshow:
Press the OSD key
The OSD menu appears on the screen and slideshow pauses.
Press the
or key on the handset to navigate between the icons
on the OSD menu.
• To start the slide show from the current picture, highlight
press the OK key on the handset.
• To skip to theprevious picture, highlight
• To skip to nex t picture, highlight
• To rotate the picture, highlight
and press the OK key.
and press the OK key.
and press the OK key.
• To stop the slideshow and return to thumbnail display,
highlight
• To zoom in the pic ture, highlight
and press the OK key.
and press the OK key.
When a picture is magnied
• Press the
• Press the
keys on the handset to pan the picture left or right
keys on the handset to pan the picture up or down
• Press the OK key again to resume normal slideshow play.
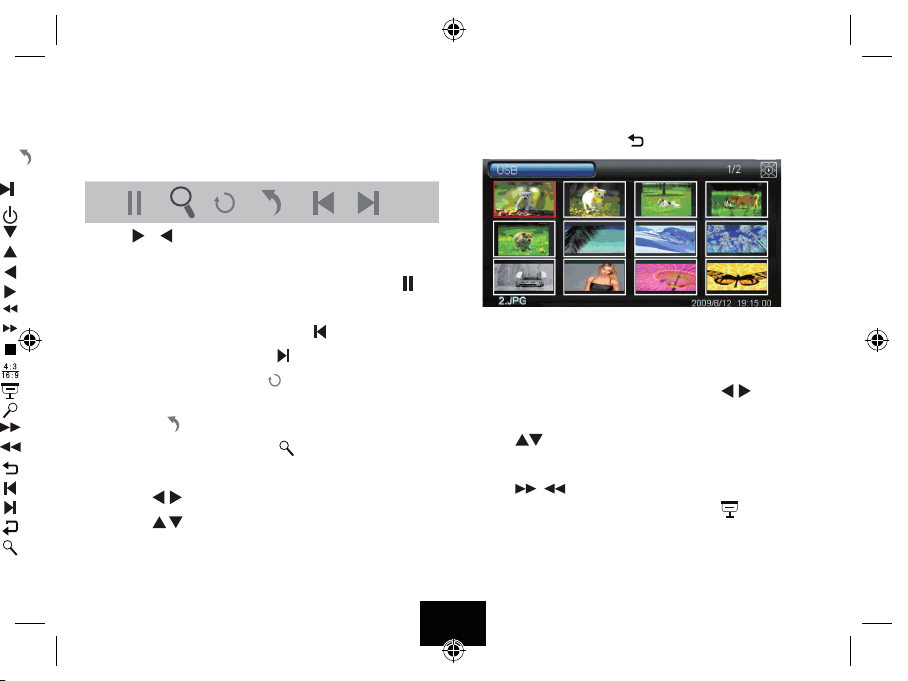
THUMBNAIL MODE
You can enter thumbnail mode in two ways:
During a Slideshow: Press the
key
and
The pictures display in pages of 15 thumbnails. The picture you were
viewing is highlighted. Picture details appear at the bottom. The
number of pages of thumbnails appears at the top right.
To move back or forward one picture: Press the
To move to the next/previous row of 5 thumbnails:
Press the
keys
To move to the next or previous page of thumbnails:
Press the
/ keys
To view a picture: Select the picture; Press OK or
The slide show starts with the picture selected.
Page 11
keys.
Page 12

Accessing Thumbnail Mode from the Main Menu
Switch the ON /OFF switch on the frame to ON. or
Press the
key to bring the frame out of standby
Press MENU to display the main menu
Press the
or key on the handset to select a memory device.
Press OK: Thumbnail Mode will deploy.
You can now browse your pictures and start a slideshow from a
selected picture. See Page 11.
VIEWING THE CLOCK
Switch the the frame to ON. or
Press the
key
Press the or key toselect Clock.
Press OK
The Clock time/date will display.
Main Menu
USB
Card
Clock
Calendar
Setup
23:37:06
20/08/10
Friday
or MENU to return to the Menu or
Press
Press
to start a slide show from a connected memory device.
VIEWING THE CALENDAR
Switch the the frame to ON. or
Press the
Press
key
or key toselect Calendar.
Press OK
The current month and time will display.
Press or MENU to return to the Menu
Press to start a slide show from a connected memory device.
A special mode is available which allows you to view a slide show
when diaplaying the Clock or Calendar. Refer to Page XX
Page 12
NOTE: The Time and Date should be set in
the Setup Menu. Refer to Page XX.
Main Menu
USB
Card
Clock
Calendar
Setup
Page 13
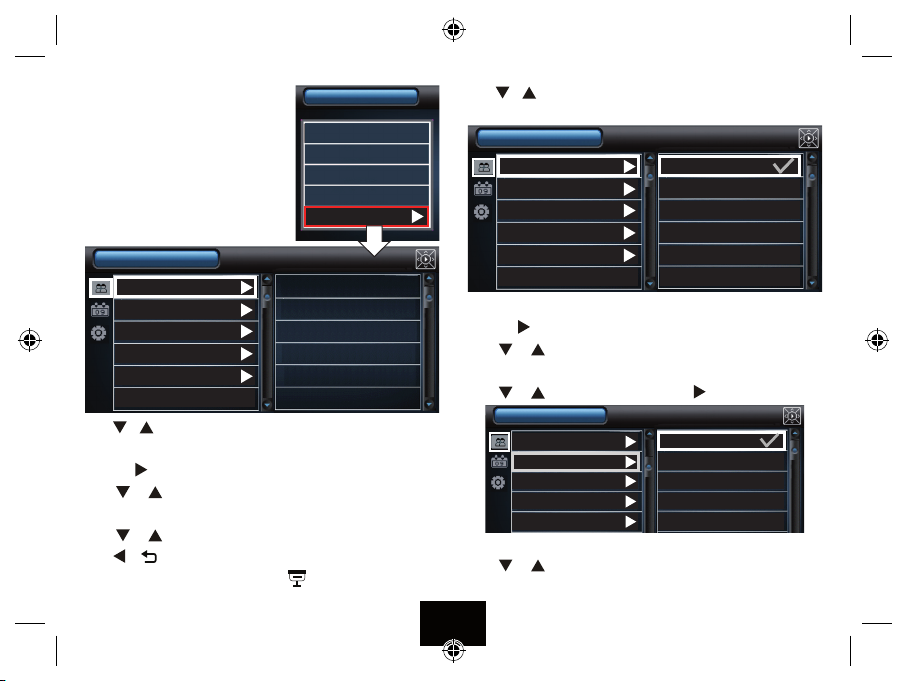
SYSTEM SETUP
Access the Main Menu.
Select SETUP: Press OK.
(You can also enter the Setup Menu at by
pressing the SETUP key on the handset)
There are three Setup menus
Photo Setup
Sliding show time
Photo Mode
Transition Effect
Date Stamp
Shufe
Main Menu
USB
Card
Clock
Calendar
Setup
Press or to select a setup menu. A highlight indicates the menu.
Press OK to enter the menu and display the menu contents.
Press the key to move the cursor to the options list.
Press or to select a menu option.
Press OK to conrm/deselect. A tick means the option is conrmed.
Press or to select another menu option
Press or to return to the main menu list
Press MENU to exit to the main menu or
to start a slide show.
Press or to select the Photo Setup Menu.
Press OK to enter the menu and display the menu contents.
Photo Setup
Sliding show time 3 s
Photo Mode 5 s
Transition Effect 15 s
Date Stamp 1 min
Shufe
15 min
1 hour
The Sliding Show Time. alters the time each slide displays on screen.
Press the
key to move the cursor to the options list.
Press or to select a Slide Show Time.
Press OK to conrm and return to the Photo Setup Menu.
Press or to select Photo Mode. Press to go to the options.
Photo Setup
Sliding show time Full screen
Photo Mode Standard screen
Transition Effect
Date Stamp
Shufe
Press or to select Full/Standard Screen. (See P10)
Press OK to conrm and return to the Photo Setup Menu.
Page 13
Page 14

Press OK to conrm and return to the Photo Setup Menu.
Press
or to select Transition Eect. Press
Photo Setup
Sliding show time Off
Photo Mode Random
Transition Effect
Date Stamp
Shufe
or to select O or Random.
Press
O: the slides change with no eects in between
Random: The slides change with a variety of eects between slides.
Press OK to conrm and return to the Photo Setup Menu.
Press
or to select Date Stamp. Press
Photo Setup
Sliding show time Off
Photo Mode On
Transition Effect
Date Stamp
Shufe
or to select On or O.
Press
Selecting “Date Stamp On” on displays on the screen the date the
photo was originally taken - providing the date was correctly set up on
the camera taking the original picture.
Press OK to conrm and return to the Photo Setup Menu.
Press
or to select Shue. Press
Photo Setup
Sliding show time Off
Photo Mode On
Transition Effect
Date Stamp
Shufe
or to select On or O.
Press
Selecting “On” means that the pictures display in a dierent (random)
order when a slide show is started. Thumbnail mode is unaected.
Press OK to conrm and return to the Photo Setup Menu.
Press or to return to the main menu list.
Press or to select Clock/Calendar setup.
Clock/Calendar Setup
Show photo
Set time
Set time format
Set date
Set date format
Page 14
Page 15

CLOCK/CALENDAR SETUP
Press
or to select Clock/Calendar setup. Press OK
Clock/Calendar Setup
Show photo Off
Set time On
Set time format
Set date
Set date format
Press
or to select Show Photo. Press
Press or to select On or O. Press OK to conrm and return.
The “Show Photo” default setting is O. However, when On is
selected a slide show is visible when the DPF is in Clock/Calendar
display mode - see Page 12.
• Select On in the Show photo menu
• Press MENU to exit Setup and go to the
Main Menu.
Main Menu
USB
Card
Clock
• Select Clock (or Calendar)
• Press OK
The clock/calendar will display with a
slide show of photos from the connected
23:37:06
20/08/10
Friday
media.
Setting the Time
The Default Time Format is for a 24 hour clock. Before setting the time
you may wish to change the time format to 12 hour (AM/PM).
Clock/Calendar Setup
Show photo 12hr
Set time 24hr
Set time format
Set date
Set date format
or to select Set Time Format. Press
Press
Press or to select 12hr /24 hr. Press OK to conrm and return.
Press or to select Set time. Press
Clock/Calendar Setup
Show photo
Set time
Set time format
Set date
Set date format
keys to toggle between minutes and the hours.
Press the
(hh:mm)
09 58 AM
Press or to change the minutes/hours.
If you have selected the 12 hour clock, AM and PM will be displayed.
Press OK to conrm and return to Clock/Calendar Setup.
Page 15
Page 16

Setting the Date
The Default Date format is Month/Date/Year (mm/dd/yy). Before
setting the date you may wish to change the format to dd/mm/yy.
Clock/Calendar Setup
Show photo mm/dd/yy
Set time dd/mm/yy
Set time format yy/mm/dd
Set date
Set date format
or to select Set date format. Press
Press
Press or to select the format. Press OK to conrm and return.
Press or to select Set date. Press
Clock/Calendar Setup
Show photo
Set time
Set time format
Set date
Set date format
keys to toggle Year, Month and Day.
Press the
YYYY MM DD
2010 108
Press or to change the values.
Press OK to conrm and return to Clock/Calendar Setup.
Press or to return to the main menu list.
Press or to select General setup. Press OK
Setting the Language
The language setting aects all the menus and selections in the DPF.
General Setup
Language English
Brightness Deutsch
Contrast Francais
Saturation Espanol
Auto run
Power on
Press
or to select Language. Press
Italiano
Nederlands
Press or to select a language. Press OK to conrm and return.
Setting the Brightness, Contrast and Saturation.
These parameters are all set in the same manner. There are seven setting +3,+2,+1, 0, –1, –2, –3. The changes display immediately.
General Setup
Language +3
Brightness +2
Contrast +1
Saturation 0
Auto run
Power on
or to select Brightness/Contrast/Saturation. Press
Press
1
2
Press or to select a parameter. Press OK to conrm and return.
Page 16
Page 17

Auto Run
This setting selects the display which comes on when the DPF is
switched on or brought out of Standby, Photo is the default. .
General Setup
Language Photo
Brightness MainMenu
Contrast Clock
Saturation Calendar
Auto run
Power on
Press
or to select Auto Run. Press
Press or to select the item. Press OK to conrm and return.
Power On and Power O.
These parameters are set in the same manner. If you wish the frame to
switch on or o at a certain time you can set this up. The On/O times
can be set to operate independently or together.
General Setup
Contrast Photo
Saturation MainMenu
Auto run Clock
Power on Calendar
Power off
Default
(hh:mm)
09 58
Off
Press
or to select Power on/Power o. Press
Press the keys to cycle Hour, Min and Frequenc y.
Press or to change the values.
You can set the On/O time to operate once only, or daily.
The default is OFF.
If you set a Power ON time the frame wiill “Wake up” at the appointed
time and then display the “Auto Run” option which you have selected.
Press OK to conrm and return.
Default
This setting returns the DPF to factory settings.
General Setup
Contrast YES
Saturation
Auto run
Power on
Power off
Default
Press
or to select Default. Press
NO
Press or to toggle YES/NO. Press OK to conifrm
If you select NO: you will be returned to the General Setup Screen.
If you select YES: the screen will momentarily blank. The DPF will
then switch on and the language sel;ection screen will appear. Refer
to Page 8.
Page 17
Page 18

TROUBLESHOOTING
If your DPF seems not to be working as well as you might expect, please
work through this checklist before returning the product to Tesco.
The DPF will not switch on.
Switch o, Check the power supply connections, switch on again.
The DPF will not recognise a memory card.
Re-insert the card. You may need to reformat the card.
The DPF will not play pictures on a card.
The pictures must be in jpg form and smaller than 8000x8000 pixels.
The handset is erratic.
The handset is too far from the frame. There is something bet ween the
handset and the DPF. Replace the battery.
AFTER USE
Though you can leave the frame in Standby indenitely we do not recommend this for the following reasons:
• The connected AC adaptor cable could be a source of danger.
• You will consume power unnecessarily. If you have enabled the Power
ON facility swiitch the DPF into standby.
Otherwise, witch the set o via the POWER switch. Unplug the adaptor
from the mains and then unplug the adaptor from the Picture Frame.
Unplug any memory card or USB stick.
Store the unit and power adaptor in a cool dry place, out of the reach
of children and pets.
Further Information
After extended use, the frame may get warm. This is normal and not a
cause for concern.
The best resolution for pictures is 432*234 pixels. Pictures above this
resolution will not display any better and large pictures will slow loading times.
Page 18
Page 19

CARE AND CLEANING
Care and cleaning operations should be carried out with the unit unplugged from the mains.
Clean the plastic parts with a barely damp cloth and then dry carefully.
Do NOT touch the screen with bare ngers, hard or pointed objects.
Clean the screen carefully with a special cloth, with a special optical
cleaning cloth available from opticians and photography stores..
SPECIFICATIONS
Power Supply: DC 5V
Power adaptor: DC 5V1.0A/AC100-240V
Picture Format: JPEG, ≤ 8000*8000 ppixels
USB Compliance: USB 2.0 (+1.1or higher)
Memory Card: SD/MMC/MS/SDHC
Weight: 263 grams
WARRANTY
Your Technika appliance is covered by a warranty for 12 months from the
date of purchase. If a fault develops during this period, please contact the
TESCO electrical help line on 0845 456 6767. Please have your original
purchase receipt with you when you call. This warranty in no way aects
your consumer rights.
UK: Waste elec trical produc ts should not be disposed of
with household waste. Separate disposal facilities exist,
for your nearest facilities see ww w.recycle-more.co.uk or
in-store for details.
ROI: Produced after 13th August 2005. Waste electrical products should
not be disposed of with household waste. Please recycle where facilities
exist. Check with your Local Authority or retailer for recycling advice.
Page 19
Page 20

Te scoStoresLtd,
DelamareRoad, Cheshunt, Herts, EN89SL
Technika Helpline: 0845 456 6767 (Calls cost up to 4p per minute from a BT landline, other providers may vary)
 Loading...