

Page 1

TB30
Administrator Guide
SIP STACK
VERSION 1.3
9 September, 2010
Page 2

European Community Declaration of Conformity
This equipment complies with the requirements relating to electromagnetic compatibility,
EN55022 Class B for ITE and EN55024.
This meets the essential protection requirements of the European Council Directive 89/336/EEC
on the approximation of the laws of the Member States relating to electromagnetic compatibility.
Techicolor declares that this TB30 IP Phone is in compliance with the essential requirements and
other relevant provisions of Directive 1999/5/EC.
You can download the declaration of conformity on www.thomsonbroadbandpartner.com.
The CE logo involves the conformity of the product with the essential requirements of
implemented directives.
Northern America Federal Communications Commission (FCC) Statement
This equipment generates, uses and can radiate radio frequency energy and, if not installed and
used in accordance with the instructions in this manual, may cause interference to radio
communications. This equipment has been tested and found to comply with the limits for a Class
B digital device pursuant to Subpart J of Part 15 of FCC rules, which are designed to provide
reasonable protection against radio interference when operated in a commercial environment.
Operation of this equipment in a residential area is likely to cause interference, in which case the
user, at his own expense, will be required to take whatever measures are necessary to correct the
interface.
Copyright Notice & Trademarks
© Technicolor 2010. All rights reserved. Technicolor reserves the right to alter material or
technical specification of its products without prior notice.
SpeedTouch and Technicolor are registered trademarks. Various elements (including but not
limited to trademarks, service marks, designs, logos and copyrighted material) shown on this
Admin Guide are protected by intellectual property or other rights.
Page 3

I
Table of Contents
PART 1 SAFETY INFORMATION ........................................................................................................................................ 1
OPERATING CONDITIONS ........................................................................................................................................................ 1
LOCATION SAFETY INSTRUCTIONS ........................................................................................................................................... 1
CARE ....................................................................................................................................................................................... 1
CONNECTIONS ......................................................................................................................................................................... 1
QUALIFIED SERVICE ................................................................................................................................................................. 2
PART 2 PRODUCT OVERVIEW AND CONNECTIONS........................................................................................................... 3
INTRODUCTION ....................................................................................................................................................................... 3
NOTE AND CAUTION ............................................................................................................................................................... 3
PACKAGE CONTENTS ............................................................................................................................................................... 3
CONNECTING TO THE NETWORK AND THE PC ................................................................................................................................ 4
POWERING UP THE PHONE ............................................................................................................................................................. 5
CONNECTED A HEADSET ................................................................................................................................................................ 6
CONNECTION ................................................................................................................................................................................... 6
HEADSET COMPABILITY. ..................................................................................................................................................................... 6
AUX WIRELESS HEADSET SETUP ........................................................................................................................................................... 6
USING HEADSET ................................................................................................................................................................................ 6
OVERVIEW .............................................................................................................................................................................. 7
MAIN FEATURES ...................................................................................................................................................................... 7
SUPPORTED FEATURES ............................................................................................................................................................ 7
SUPPORTED PROTOCOLS ......................................................................................................................................................... 8
ABBREVIATIONS .....................................................................................................................................................................10
PART 3 PHONE OPERATIONS .........................................................................................................................................11
GENERAL APPEARANCE ..........................................................................................................................................................11
PHYSICAL FEATURES ...............................................................................................................................................................12
DISPLAY ..................................................................................................................................................................................15
DEFINITIONS OF SOFT KEYS ....................................................................................................................................................15
ICONS & INDICATORS .............................................................................................................................................................17
DEFINITIONS OF LED ...............................................................................................................................................................18
EXTENSION MODULE ..............................................................................................................................................................18
MEMORY................................................................................................................................................................................18
POWER SUPPLY ......................................................................................................................................................................18
PART 4 CALL SERVICES ...................................................................................................................................................19
TALKING MODE & OPERATIONS .............................................................................................................................................19
5 kinds of communication mode ........................................................................................................................................... 19
Operation of off hook ........................................................................................................................................................... 19
Operation of on hook............................................................................................................................................................ 19
Operation of mode switch during call .................................................................................................................................. 19
MAIN CALL FUNCTIONS ..........................................................................................................................................................20
Make a call ........................................................................................................................................................................... 20
Last number Redial: .............................................................................................................................................................. 21
Speed dial ............................................................................................................................................................................. 21
Answer a call ........................................................................................................................................................................ 22
Reject a call .......................................................................................................................................................................... 22
Call back .............................................................................................................................................................................. 22
Call forward ......................................................................................................................................................................... 23
Transfer Message to Voice Mail........................................................................................................................................... 23
CALL FUNCTIONS DURING CONVERSATION ............................................................................................................................24
Hold and Retrieve a call ....................................................................................................................................................... 24
Call Transfer ........................................................................................................................................................................ 24
Conference call .................................................................................................................................................................... 25
Options during a call............................................................................................................................................................ 26
Volume adjustment ............................................................................................................................................................... 26
Mute: .................................................................................................................................................................................... 26
Multi line .............................................................................................................................................................................. 27
Display of Line/Call status .................................................................................................................................................... 27
Pick up ................................................................................................................................................................................. 28
Park up ................................................................................................................................................................................. 29
PHONE BOOK & CALL LOG ......................................................................................................................................................29
Call logs ............................................................................................................................................................................... 29
Page 4

II
Phone book ........................................................................................................................................................................... 31
CHARACTER INPUT- EDIT MODE .............................................................................................................................................32
PART 5 CONFIGURATION THROUGH LCD ........................................................................................................................33
MENU LIST .............................................................................................................................................................................33
OPERATION MENU DISPLAY ...................................................................................................................................................35
Home operation menu display .............................................................................................................................................. 35
Config Menu Display ........................................................................................................................................................... 35
Admin Menu Display ............................................................................................................................................................ 36
Option Menu Display ........................................................................................................................................................... 37
Detailed LCD menu settings ................................................................................................................................................. 38
PART 6 CONFIGURATION VIA WEB INTERFACE ...............................................................................................................47
CONFIGURATION THROUGH THE WEB INTERFACE ..................................................................................................................47
FIND IP ADDRESS ....................................................................................................................................................................47
DETAILED WEB PAGES ............................................................................................................................................................48
USER MODE WEB PAGES ........................................................................................................................................................49
ADMIN MODE WEB PAGES .....................................................................................................................................................51
PART 7 AUTO-PROVISIONING .........................................................................................................................................54
AUTOMATIC PHONE PROVISIONING WITH TFTP .....................................................................................................................54
AUTOMATIC PHONE PROVISIONING WITH HTTP ....................................................................................................................58
USB AUTOMATIC PHONE PROVISIONING ...............................................................................................................................60
PART 8 RINGTONES CONFIGURATION ............................................................................................................................62
PART 9 BACKLIGHT SAVING MODE .................................................................................................................................66
PART 10 FEATURE OVERVIEW ..........................................................................................................................................67
UNAUTHENTICATED SRTP NEED TO BE CONFIGURED (3440) – V1.72 ......................................................................................67
INTRODUCTION ......................................................................................................................................................................... 67
VOICE MAIL KEY IS ACTIVE ALL THE TIME (3600) – V1.72 ........................................................................................................68
INTRODUCTION ......................................................................................................................................................................... 68
REQUIREMENT ............................................................................................................................................................................... 68
VOICE MAIL KEY DIAL "VOICE MAIL TELEPHONE NUMBER" EVEN NO SUBSCRIBE (4066) ........................................................69
INTRODUCTION ............................................................................................................................................................................... 69
REQUIREMENT ............................................................................................................................................................................... 69
DISPLAY CUSTOMER ICON IN STANDBY (3959) – V1.72 ...........................................................................................................70
INTRODUCTION ......................................................................................................................................................................... 70
REQUIREMENT ............................................................................................................................................................................... 70
STANDBY ....................................................................................................................................................................................... 70
RESET TO DEFAULT SINGLE PARAMETER (3864) – V1.72 .........................................................................................................72
INTRODUCTION ......................................................................................................................................................................... 72
PHONE LOCK (3999) – V1.72 ...................................................................................................................................................73
INTRODUCTION ......................................................................................................................................................................... 73
REQUIREMENT ............................................................................................................................................................................... 73
Phone Lock Mode = 0 ........................................................................................................................................................... 73
Phone Lock Mode = 1 ........................................................................................................................................................... 73
Example Setting .................................................................................................................................................................... 75
Password Protection ............................................................................................................................................................. 75
BLOCK WEB GUI (4067) – V1.72 ..............................................................................................................................................79
INTRODUCTION ............................................................................................................................................................................... 79
REQUIREMENT ............................................................................................................................................................................... 79
DISPLAY CUSTOMER ICON ON WEB (4096) – V1.72 .................................................................................................................80
INTRODUCTION ............................................................................................................................................................................... 80
REQUIREMENT ............................................................................................................................................................................... 80
USB LOGIN/LOGOUT (3995) V1.72 ..........................................................................................................................................81
INTRODUCTION ......................................................................................................................................................................... 81
REQUIREMENT ............................................................................................................................................................................... 81
CALL LOG PREFIX ....................................................................................................................................................................82
VENEZUELA NUMBERING PLAN ..............................................................................................................................................83
LLDP .......................................................................................................................................................................................85
CIRPACK MGC & HUA WEI SOFTSWITCH .................................................................................................................................86
HUA WEI SOFTSWITCH (MGC_SERVICE = 1) ........................................................................................................................................ 86
CIRPACK MGC SERVICE (MGC_SERVICE = 2) ....................................................................................................................................... 89
BLF .........................................................................................................................................................................................91
USER-ORIENTED BLF ....................................................................................................................................................................... 91
High level technical description ............................................................................................................................................ 91
User interaction .................................................................................................................................................................... 92
EXAMPLES WITH ASTERISK SIP SERVER AS NOTIFIER ................................................................................................................................. 93
LIST-ORIENTED BLF ......................................................................................................................................................................... 95
Page 5

III
LED state: ............................................................................................................................................................................. 95
User action ........................................................................................................................................................................... 96
Call pickup (directed pickup)................................................................................................................................................. 96
Feature Activation ................................................................................................................................................................ 96
PRESENCE BASESD BLF ..................................................................................................................................................................... 98
Feature Activation ................................................................................................................................................................ 99
ACR RESPONSE ..................................................................................................................................................................... 100
ATTEND TRANSFER ............................................................................................................................................................... 101
PREFERRED IDENTITY ........................................................................................................................................................... 102
DSCP OF DHCP ...................................................................................................................................................................... 103
INPUT MODE ........................................................................................................................................................................ 104
CONFIG WITHOUT RELOAD ................................................................................................................................................... 105
CCBS ENABLE/DISABLE ......................................................................................................................................................... 106
SECURITY FEATURES ............................................................................................................................................................. 107
IMPROVE HTTPS APS FEATURE ............................................................................................................................................. 110
SUPPORT ENCRYPTION OF CONFIGURATION FILES IN APS .................................................................................................... 112
CALL DIALING FROM WEBGUI ............................................................................................................................................... 115
SIP MESSAGE DURING CALL (RFC 3428) ................................................................................................................................ 119
DNS QUERY ( CIRCULAR METHOD) ....................................................................................................................................... 121
SUPPORT REMOTE CALL LOGS FOR LOCAL USER ................................................................................................................... 123
TRANSFER ON RINGING ........................................................................................................................................................ 126
CALL-HOLD “INACTIVE” METHOD ......................................................................................................................................... 128
COMVERSE: LINE AND SERVICE SUPERVISION (REG & UA-PROFILE EVENT PACKAGE) ........................................................... 130
COMVERSE: REDIRECTING IDENTITY AND NAME PRESENTATION ......................................................................................... 140
MULTI-REGISTRATION ON A SAME SERVER .......................................................................................................................... 142
SUPPORT PRIVATE NUMBER ................................................................................................................................................. 143
SOFTKEY LEFT SCROLLING IN TALKING MODE ....................................................................................................................... 144
INCOMING CALL DURING TRANSFER..................................................................................................................................... 145
NUMBER DISPLAY IN STANDBY............................................................................................................................................. 151
IMPROVED SHARED CALL APPEARANCE (SCA) ............................................................................................ 152
SECOND DIAL-TONE FOR PBX-LIKE ENVIRONMENTS. .............................................................................. 154
NEW SPECIFIC KEYS IN THE DIAL PLAN......................................................................................................... 156
NEW ERROR MESSAGE DISPLAY FOR 403 RESPONSE. ............................................................................. 158
SERVICES SUPERVISION FEATURE. ................................................................................................................... 159
STAR CODES. ................................................................................................................................................................. 163
CALL PICK-UP SERVICE ................................................................................................................................................................... 164
Behavior ............................................................................................................................................................................. 164
CALL FORWARD SERVICE ................................................................................................................................................................. 165
Behavior ............................................................................................................................................................................. 166
DO NOT DISTURB SERVICE .............................................................................................................................................................. 167
Behavior ............................................................................................................................................................................. 168
TRANSFER TO VOICEMAIL SERVICE .................................................................................................................................................... 168
Behavior ............................................................................................................................................................................. 169
CALL PARK SERVICE ....................................................................................................................................................................... 169
Behavior ............................................................................................................................................................................. 169
CALL BLOCKING SERVICE ................................................................................................................................................................. 170
Behavior ............................................................................................................................................................................. 170
PRIVACY CALL SERVICE ................................................................................................................................................................... 171
Behavior ............................................................................................................................................................................. 171
CALL WAITING SERVICE .................................................................................................................................................................. 171
Behavior ............................................................................................................................................................................. 172
SPECIAL SERVICES ACTIVATION THROUGH DTMF.................................................................................................................................. 172
Behavior ............................................................................................................................................................................. 173
OTHER SPECIAL SERVICES ACTIVATION................................................................................................................................................ 173
Behavior ............................................................................................................................................................................. 174
AD-HOC CONF (RFC 4579) ..................................................................................................................................... 175
SYLANTRO SIP-B......................................................................................................................................................... 178
IDENTITY HEADER PRECEDENCE ........................................................................................................................ 179
NAT KEEP ALIVE .......................................................................................................................................................... 181
TRUSTED IP FOR NOTIFY “CHECK-SYNC” ....................................................................................................... 183
REBOOT ON NOTIFY “CHECK-SYNC; REBOOT=TRUE” ............................................................................... 185
DOWNLOADABLE/UPLOADABLE LOCAL PHONEBOOK ............................................................................... 186
MIXED PAGING REMOTE PHONEBOOK ............................................................................................................. 188
LOGIN/LOGOUT – DISABLE SUBSCRIBE TO DIALOG ................................................................................ 190
TRACING TOOL............................................................................................................................................................. 192
Page 6

IV
DOWNLOAD AND UPDATE TONE AND LANGUAGE TABLES ...................................................................... 195
SIP MESSAGE SUPPORT (RFC 3428) FOR STATUS DISPLAY APPLICATIONS ............................................................................. 201
DISABLE CALL WAITING TONE............................................................................................................................................... 202
SOFT KEYS REORDERING ....................................................................................................................................................... 203
EARLY MEDIA TYPE PARAMETER .......................................................................................................................................... 204
LOGIN/LOGOUT .................................................................................................................................................................... 205
BROADSOFT SHARED CALL APPEARANCE.............................................................................................................................. 206
AUTOMATIC HANG UP ......................................................................................................................................................... 207
CALL PARK TYPE ................................................................................................................................................................... 208
RINGER IN THE HEADSET. ..................................................................................................................................................... 209
RINGER OFF .......................................................................................................................................................................... 209
IGNORING FIRMWARE UPDATE ............................................................................................................................................ 209
CALL-INFO HEADER WITH ANSWER-AFTER PARAMETER ....................................................................................................... 210
NETWORK CONFERENCE ....................................................................................................................................................... 211
CONFIGURABLE REFER-TO HEADER POPULATION ................................................................................................................. 212
CHECK PHONEBOOK DOMAIN NAME .................................................................................................................................... 213
APS IMPROVEMENT ............................................................................................................................................................. 213
TALK AND HOLD EVENT PACKAGES FOR CLICK-TO-ANSWER AND OTHER 3PCC SCENARIOS ................................................... 214
PERSISTENT VLAN ................................................................................................................................................................. 214
USER CLASS IDENTIFIER ........................................................................................................................................................ 215
ADDITIONAL SOFTKEY CONTROL ....................................................................................................................... 216
CALL PROGRESS INDICATION CONTROL ........................................................................................................ 217
PHONE NUMBER DISPLAY IN IDLE MODE CONTROL ................................................................................. 218
AUTOMATIC CALL WHEN OFFHOOK...................................................................................................................................... 219
HIDE MISSED CALLS FLAG ..................................................................................................................................................... 220
AUTOANSWER DEVICE ROUTING .......................................................................................................................................... 220
DAYLIGHT SAVING REFINEMENTS ........................................................................................................................................ 221
NTP ADDRESS SOURCE CONFIGURATION .............................................................................................................................. 222
INFORMATION SHORTCUT-“MENU” LONG PRESS ................................................................................................................. 222
TB30 SIP DISTINCTIVE RINGING AND CWT USING <ALERT-INFO> HEADER .............................. 223
<ALERT-INFO> HEADER AND RINGING MANAGEMENT ........................................................................................................................... 223
System ringers .................................................................................................................................................................... 223
Void or not understood Alert-Info ...................................................................................................................................... 223
Alert-Info with local URL ..................................................................................................................................................... 223
Alert-Info with URN ............................................................................................................................................................ 223
Alert-Info with info parameter ........................................................................................................................................... 224
<ALERT-INFO> HEADER AND CALL WAITING TONES MANAGEMENT.......................................................................................................... 224
Description ......................................................................................................................................................................... 224
SYSTEM MELODIES AND CALL WAITING TONES DOWNLOAD .................................................................................................................... 224
PART 11 - REMOTE PHONEBOOK SPECIFICATION .................................................................................................................. 225
1. DESCRIPTION OF THE SERVICE .......................................................................................................................................... 225
2. SERVER SPECIFICATIONS ................................................................................................................................................... 225
2.1 GENERAL STRUCTURE ............................................................................................................................................................... 225
2.2 PHONE QUERY ........................................................................................................................................................................ 226
2.3 XML TAGS USED BY TB30 ........................................................................................................................................................ 226
2.4 ANSWER TO THE REQUEST FROM THE SERVER ................................................................................................................................. 227
2.4.1 No answers ................................................................................................................................................................ 227
2.4.2 Less than 32 results to the query ............................................................................................................................... 227
2.4.3 More than 32 results to the query ............................................................................................................................. 227
3. TB30 PHONE SPECIFICATIONS ........................................................................................................................................... 229
3.1 PRESENTATION ....................................................................................................................................................................... 229
3.2 CONFIGURATION ..................................................................................................................................................................... 229
3.3 CANCEL KEY ........................................................................................................................................................................... 229
3.4 ACCESSING THE PHONEBOOKS .................................................................................................................................................... 230
3.4.1 MGCP ......................................................................................................................................................................... 230
3.4.2 SIP .............................................................................................................................................................................. 230
3.5 QUERY MENU ........................................................................................................................................................................ 230
3.6 INCOMING CALL DURING SEARCH ................................................................................................................................................. 231
3.7 DISPLAYING EMPTY PHONEBOOK ................................................................................................................................................. 231
3.8 DISPLAYING LESS THAN 32 RESULTS PHONEBOOK ............................................................................................................................ 231
3.9 DISPLAYING MORE THAN 32 RESULTS PHONEBOOK .......................................................................................................................... 231
3.10 DISPLAYING AN ENTRY IN THE PHONEBOOK ................................................................................................................................. 232
3.11 CALLING AN ENTRY IN THE PHONEBOOK ...................................................................................................................................... 232
3.12TIMEOUT ............................................................................................................................................................................. 232
PART 12 TELNET ACTIVATION ............................................................................................................................................... 233
Page 7

V
INTRODUCTION .................................................................................................................................................................... 233
ENABLE TELNET SERVICE ....................................................................................................................................................... 233
OPEN A TELNET SESSION ...................................................................................................................................................... 234
TELNET COMMANDS ............................................................................................................................................................ 235
RESET TO DEFAULT ............................................................................................................................................................... 236
PART 13 TR069 & TR111 ...................................................................................................................................................... 237
PURPOSE .................................................................................................................................................................................... 237
INTRODUCTION ............................................................................................................................................................................. 237
CPE CONFIGURE SETTINGS ............................................................................................................................................................. 238
Webpage ............................................................................................................................................................................ 238
Parameter in config file & CLI ............................................................................................................................................. 239
SUPPORTED TR069 RPC METHODS WITH TB30 ..................................................................................................................... 240
LIST OF SUPPORTED RPC IN TB30 .................................................................................................................................................... 240
ACS HTTP CONNECTION FLOW........................................................................................................................................................ 240
SUPPORTED RPC INTRODUCTION ...................................................................................................................................................... 241
GetRPCMethods ................................................................................................................................................................. 241
GetParameterNames .......................................................................................................................................................... 241
GetParameterValues .......................................................................................................................................................... 241
SetParameterValues ........................................................................................................................................................... 241
GetParameterAttributes ..................................................................................................................................................... 242
SetParameterAttributes ..................................................................................................................................................... 242
Reboot ................................................................................................................................................................................ 242
Upload ................................................................................................................................................................................ 242
Download ........................................................................................................................................................................... 242
FactoryReset ....................................................................................................................................................................... 242
DETAIL DESCRITION OF DOWNLOAD ................................................................................................................................................... 242
Download supported file .................................................................................................................................................... 242
TR-111 SUPPORT WITH TB30 ................................................................................................................................................ 244
ABOUT TR-111 ........................................................................................................................................................................... 244
TR-111 Part I: Device Gateway Association ........................................................................................................................ 244
TR-111 Part II: Connection request via NAT gateway ......................................................................................................... 244
RPC TRIGGER ........................................................................................................................................................................ 245
ACS INITIAL THE CONNECT .............................................................................................................................................................. 245
CPE INITIAL THE CONNECT .............................................................................................................................................................. 245
EXAMPLE .................................................................................................................................................................................... 245
PART 14 TROUBLESHOOTING............................................................................................................................................... 247
PART 15 APPENDIX......................................................................................................................................................... 248
CONFIGURATION AND COMMANDS ..................................................................................................................................... 248
EXAMPLES OF FILES TO CONFIGURE AUTO PROVISIONING VIA TFTP..................................................................................... 250
RELEASE PACKAGE FIRMWARE ............................................................................................................................................. 259
Figures
FIGURE 1 IP PHONE CABLE CONNECTIONS .................................................................................................................................................. 4
FIGURE 2 HEADSET CONNECTION ............................................................................................................................................................. 6
FIGURE 3 TB30 GENERAL APPEARANCE................................................................................................................................................... 11
FIGURE 4 TB30 USER PANEL ................................................................................................................................................................ 12
FIGURE 5 OPERATIONSMENU LCD DISPLAY ............................................................................................................................................. 34
FIGURE 6 RINGTONE CONVERTER ............................................................................................................................................................ 62
FIGURE 7 RINGTONE CONVERTER ............................................................................................................................................................ 63
FIGURE 8 RINGTONE COMPOSER ............................................................................................................................................................. 63
FIGURE 9 RINGTONE COMPOSER ............................................................................................................................................................. 64
Tables
TABLE 1 HANDSET/HEADSET PIN ............................................................................................................................................................... 6
TABLE 2 TB30 PHYSCICAL FEATURES ...................................................................................................................................................... 14
TABLE 3 DEFINITIONS OF SOFT KEYS ........................................................................................................................................................ 17
TABLE 4 DEFINITIONS OF LED ................................................................................................................................................................ 18
TABLE 5 OPERATIONS MODE SWITCH DURING CALL ..................................................................................................................................... 19
TABLE 6 CHARACTER INPUT METHOD TABLE ............................................................................................................................................. 32
TABLE 7 DSP AND BOOT CODE USED ..................................................................................................................................................... 259
Page 8

TB30s SIP Administrator Guide v1.3 Page 1 of 259
Part 1 Safety Information
Operating conditions
This telephone is to be operated on a local area network. The telephone must be equipped with
the appropriate software version. This guide is written for the actual version of firmware v1.72
Caution
Read these instructions carefully before connecting the SIP phone to its power source.
Location safety instructions
Do not expose the IP Phone to fire, direct sunlight or excessive heat.
Do not expose the IP Phone to rain or moisture and do not allow it to come into contact with water.
Do not install the IP phone in an environment likely to present a THREAT OF IMPACT.
The IP phone must be installed at least 1 meter from radio frequency equipment, such as TVs,
radios, hi-fi or video equipment (which radiate electromagnetic fields).
The IP phone is designed to work in temperatures from 0°C to 40°C.
Care
You may clean the IP phone using a fine damp cloth. Never use solvents (such as
trichloroethylene or acetone), which may damage the phone‟s plastic surface and LCD screen.
Never spray the phone with any cleaning product whatsoever.
Connections
Equally, incorrect reassembly could cause electric shock on re-use of the appliance.
The IP Phone must be powered using the power adaptor or PoE.
If you do use an alternative power adaptor, it must comply with the following standards:
- EN60950, CE mark, U/L
- Output: 12VDC /1A.
Any damage caused to the IP Phone as a result of using unsupported power adaptors will not be
covered by the manufacturer‟s warranty.
Do not connect the LAN/PC ports to any network other than an Ethernet network.
Do not work on the system or connect or disconnect cables during lightning storms.
Before working on any system fitted with an ON/OFF switch, turn OFF the power and unplug
the power cord.
Page 9

TB30s SIP Administrator Guide v1.3 Page 2 of 259
Qualified service
No repair can by performed by the customer, if you experience trouble with this equipment for
repair or warranty information, please contact your administrator.
Technicolor disclaims all responsibility in the event of use that does not comply with the present
instructions.
Product disposal warning:
Ultimate disposal of this product should be handled in accordance with national laws and
regulations.
Information regarding the products in this manual is subject to change without notice. This guide
is believed to be accurate but is presented without warranty of any kind, express or implied. The
usable services and features on the phone depend on the installed software release and on call
manager. Therefore, the conformity of the admin guide cannot be guaranteed.
Page 10
TB30s SIP Administrator Guide v1.3 Page 3 of 259
Part 2 Product overview and connections
Introduction
This administrator guide describes how to set up, connect cables, and configure your TB30 SIP
Phone. It also provides information on how to configure the Network settings and change the
settings of your IP Phone. The administrator guide also includes the way to view and upgrade
the firmware.
Note and Caution
Note and Caution in this manual are highlighted with graphics as below to indicate important information.
Note
Contains related information that corresponds to a topic.
Caution
Represents essential steps, actions, or messages that should not be ignored.
Package contents
1. IP phone base unit
2. Handset
3. Stand
4. Coiled handset connecting cord
5. Quick installation and user guide
6. 1 Ethernet cable
Not included: Ethernet cable to connect any PC to the telephone through its PC switch
Optional:
1. Extension module
2. Headset
3. Power supply : model IU18-312100-WP
Page 11

TB30s SIP Administrator Guide v1.3 Page 4 of 259
(a)Extension Module (b)Adapter (b) LAN (c) PC (d) Handset (e)Headset
Figure 1 IP Phone Cable Connections
Connecting to the Network and the PC
The SIP Phone has 2 RJ-45 ports that each support 10/100 Mbps full duplex Ethernet connection
to external devices- Network port and access port (one for PC and one for LAN).
Network Port (10/100LAN)
Use the Ethernet cable to connect the LAN port to an Internet equipment, such as a hub, switch.
Or directly to the Network. In Power over Ethernet (PoE) office environment, the IP phone can
be powered from a switch via Ethernet cable, in which case the external power adaptor is not
needed.
Access port (10/100PC)
Use the Ethernet cable to connect a network device, such as a computer to the PC port on the
back of your phone.
Page 12

TB30s SIP Administrator Guide v1.3 Page 5 of 259
Powering up the Phone
The TB30 could be powered by either a main power unit, or PoE.
Its power consumption is under 15.4W(PoE class 3).
Power Plug
The power plug is fed with 12VDC, 1A switching adapter.
The power plug unit will be adapted specifically to the target country requirements:
EU plug for Europe
US plug for US, Japan and North America
UK plug for UK and Hong Kong
Australian plug for Australa and New Zealand
China plug China
Power Over Ethernet
The TB30 supports PoE as defined by 802.3af Standard. It is class 3, and supports class
negociation (in order to plug as many devices as possible on a PoE hub).
It can be powered with PoE up to 100 meters with category 5,5e or 6 cables.
Page 13

TB30s SIP Administrator Guide v1.3 Page 6 of 259
Connected a headset
If you will use a headset, plug the RJ45 headset connector into the headset jack port on the back
of your IP Phone (see the Figure 1)
If your external headset supports Electronic Hook Switch (EHS) following DHSG protocol, you
can use your compatible Jabra wireless headset to answer the phone remotely. Just activate your
headset when you hear the ringer and the handset off-hook to connect the call.
You can use EHS (following DHSG protocol) with your compatible Jabra wireless headset (e.g.
Jabra GN9350e) to answer the phone remotely.
Connection
Plug the RJ45 headset connector into the headset jack port on the back right side of your IP Phone.
Figure 2 Headset Connection
Headset Compability.
TB30 supports Jabra and Planronic headsets.
RJ9
Pin-1
Pin-2
Pin-3
Pin-4
RJ45
Pin-1
Pin-2
Pin-3
Pin-4
Pin-5
Pin-6
Pin-7
Pin-8
TB30 handset
MIC+
SPK-
SPK+
MIC-
TB30 headset
DTX
GND
MIC-
SPK+
SPK-
MIC+
3V3
DRX
Table 1 Handset/Headset pin
Jabra Headset Compatibility: To be confirm.
Plantronics Headset Compatibility: http://www.plantro.net/compatibility
- PROFESSIONAL CORDED H-Top HEADSETS with Quick Disconnect plug and U10P-S19 RJ45
bottom cable.
- PROFESSIONAL WIRELESS HEADSETS with electronic hookswitch cable
AUX Wireless headset setup
You can use EHS (following DHSG protocol) with your compatible wireless headset to answer the
phone remotely. Please read wireless headset's user manual and set it to DHSG mode.
Using headset
Answer and end calls
Headset key on phone keypad
Talk button (EHS): build-in electronic hook switch (wireless headset only)
Page 14

TB30s SIP Administrator Guide v1.3 Page 7 of 259
Overview
TB30 SIP is a VoIP Phone that can be plugged directly into an IP Network and used very much
like a standard private branch exchange (PBX) telephone. TB30 is an IP telephony instrument
that can be used in a VoIP environment. The product is to be connected only to Ethernetworks
without routing to the outside plant.
The TB30 IP phone is compliant with SIP protocol.
Main Features
6-line LCD display
Font supports ISO8859-2, ISO8859-5, ISO8859-8
Connectivity: Integrated 2 ports 10/100 Ethernet switch
Phone services:
Multilines (up to 9), Call Forward, Call Transfer (attended), Call Hold, Redial
Group listening, Hands free
Message Waiting Indicator
Speed dial, Conference call
Phonebook, Call logs
Caller ID display
Audio extension connection: Integrated headset RJ45 port
Multiple power options: power over Ethernet 802.3af or external power supply adaptor
VoIP Standard: SIP V2 (RFC 3261)
Web browser interface for configuration
Note
This administrator guide is based on firmware v1.72, you can download the
latest administrator guide on:
www.thomsonbroadbandpartner.com
Supported Features
In addition to the physical features illustrated in Figure 1 and table 1, your TB30 also provides
the following:
Technical specifications:
An integrated 2 Ethernet ports switch that allows the telephone and a computer to share a
single Ethernet jack.
A direct connection to a 10BaseT or 100Base100BAseT Ethernet (RJ45) network (half or
full duplex connections are supported.
G.711, G.723, G.729ab, G.722, L16 & ILBC voice compression standards
In band Dual-Tone Multi Frequency (DTMF) support for touch-tone dialing
Out-of-band DTMF signalling for codecs that do not transport the DTMF signalling
correctly (for example, G729 orG729a)
Page 15

TB30s SIP Administrator Guide v1.3 Page 8 of 259
Configuration:
IP Number addressing: manually configured via local setup menu, static or dynamic IP
configuration (integrated Dynamic Host Configuration Protocol DHCP)
Configuration support:
Local & remote warm reboot
Network start up via DHCP and TFTP (Trivial File Transfer Protocol)
TFTP/HTTP sever download
Web browser management
Password protection for configuration
Phone set function support and Call Options:
Call hold, Call Transfer, Call Forward, Conference Call, Call Park and Call Pick-up.
On-hook dialing, Dial from call log, multi line (10 lines)
Redial, Mute, Call log, phone book (30 entries), 10 Speed dial memory keys
Hands free (full-duplex)
Supported Protocols
Your TB30 SIP Phone supports the following standard Internet protocols:
Internet Protocol (IP)
IP is a network layer protocol that sends datagram packets between nodes on the Internet.
IP also provides features for addressing, type-of-service (ToS) specification,
fragmentation and reassembly, and security.
User Datagram Protocol (UDP)
UDP is a simple protocol that exchanges data packets without acknowledgments or
guaranteed delivery. SIP can use UDP as the underlying transport protocol. If UDP is
used, retransmissions are used to ensure reliability.
Trivial File Transfer Protocol (TFTP)
TFTP allows files to be transferred from one computer to another over a network.
Dynamic Host Control Protocol (DHCP)
DHCP is used to dynamically allocate and assign IP addresses. DHCP allows you to
move network devices from one subnet to another without administrative attention. If
using DHCP, you can connect TB30 IP phone to the network and become operational
without having to manually assign an IP address and additional network parameters.
Domain Name System (DNS)
DNS is used in the Internet for translating names of network nodes into addresses. Sip
uses DNS to resolve the host names of end points to IP addresses.
Hyper Text Transfer Protocol (HTTP)
HTTP is the underlying protocol used by the World Wide Web. It defines how messages
are formatted and transmitted, and what actions Web servers and browsers should take in
response to various commands.
Simple Network Time Protocol (SNTP)
Page 16

TB30s SIP Administrator Guide v1.3 Page 9 of 259
SNTP is a simplified version of NTP. SNTP can be used when the ultimate performance
of the full NTP implementation described in RFC 1305 is not needed or justified.
Network Time Protocol (NTP)
NTP is an Internet standard protocol that assures accurate synchronization to the
millisecond of computer clock times in a network of computers. NTP sends periodic time
requests to servers, obtaining server time stamps and using them to adjust the client's
clock.
Simple Network Management Protocol (SNMP)
SNMP is a set of protocols for managing complex networks. It works by sending
messages, called protocol data units (PDUs), to different parts of a network. SNMPcompliant devices, called agents, store data about themselves in Management Information
Bases (MIBs) and return this data to the SNMP requesters.
Address Resolution Protocol (ARP)
ARP is a network layer protocol used to convert an IP address into a physical address
(called a DLC address), such as an Ethernet address. A host wishing to obtain a physical
address broadcasts an ARP request onto the TCP/IP network. The host on the network
that has the IP address in the request then replies with its physical hardware address
Transmission Control Protocol (TCP)
TCP is one of the main protocols in TCP/IP networks. Whereas the IP protocol deals only
with packets, TCP enables two hosts to establish a connection and exchange streams of
data. TCP guarantees delivery of data and also guarantees that packets will be delivered
in the same order in which they were sent.
Session Description Protocol (SDP)
SDP is a protocol that defines a text-based format for describing streaming media
sessions and multicast transmissions. SDP is not a transport protocol but a method of
describing the details of the transmission. For example, a SDP file contains information
about the format, timing and authorship of the transmission, name and purpose of the
session, any media, protocols or codec formats, the version number, contact information
and broadcast times.
Technical Report 069 (TR069)
TR069 is a Broadband Forum technical specification entitled CPE WAN Management
Protocol (CWMP). It defines an application layer protocol for remote management of
end-user devices. It includes both a safe auto configuration and the control of other CPE
management functions within an integrated framework. Using TR-069 the terminals can
get in contact with the Auto Configuration Servers (ACS) and establish the configuration
automatically.
Page 17

TB30s SIP Administrator Guide v1.3 Page 10 of 259
Abbreviations
SIP Session Initiation Protocol. An IP telephony signalling text-based protocol
developed by the IETF
DNS Domaine Name Server
DHCP Dynamic Host Control Protocol
FTP File Transfer Protocol
H323 An ITU standard for realtime voice and videoconferencing over packet networks,
including LANs, WANs and the Internet
LAN Local Area Network
MGCP Media Gateway Control Protocol
RFC 3261 Request For Comments. This document describes the specifications for business
extended services under the MGCP protocol.
TFTP Trivial File Transfer Protocol
XML EXtensible Markup Language
DTMF Dual Tone Multi-Frequency
The system used by touch-tone telephones. DTMF assigns a specific frequency
(consisting of two separate tones) to each key so that it can easily be identified by
a microprocessor.
Page 18
TB30s SIP Administrator Guide v1.3 Page 11 of 259
Part 3 Phone operations
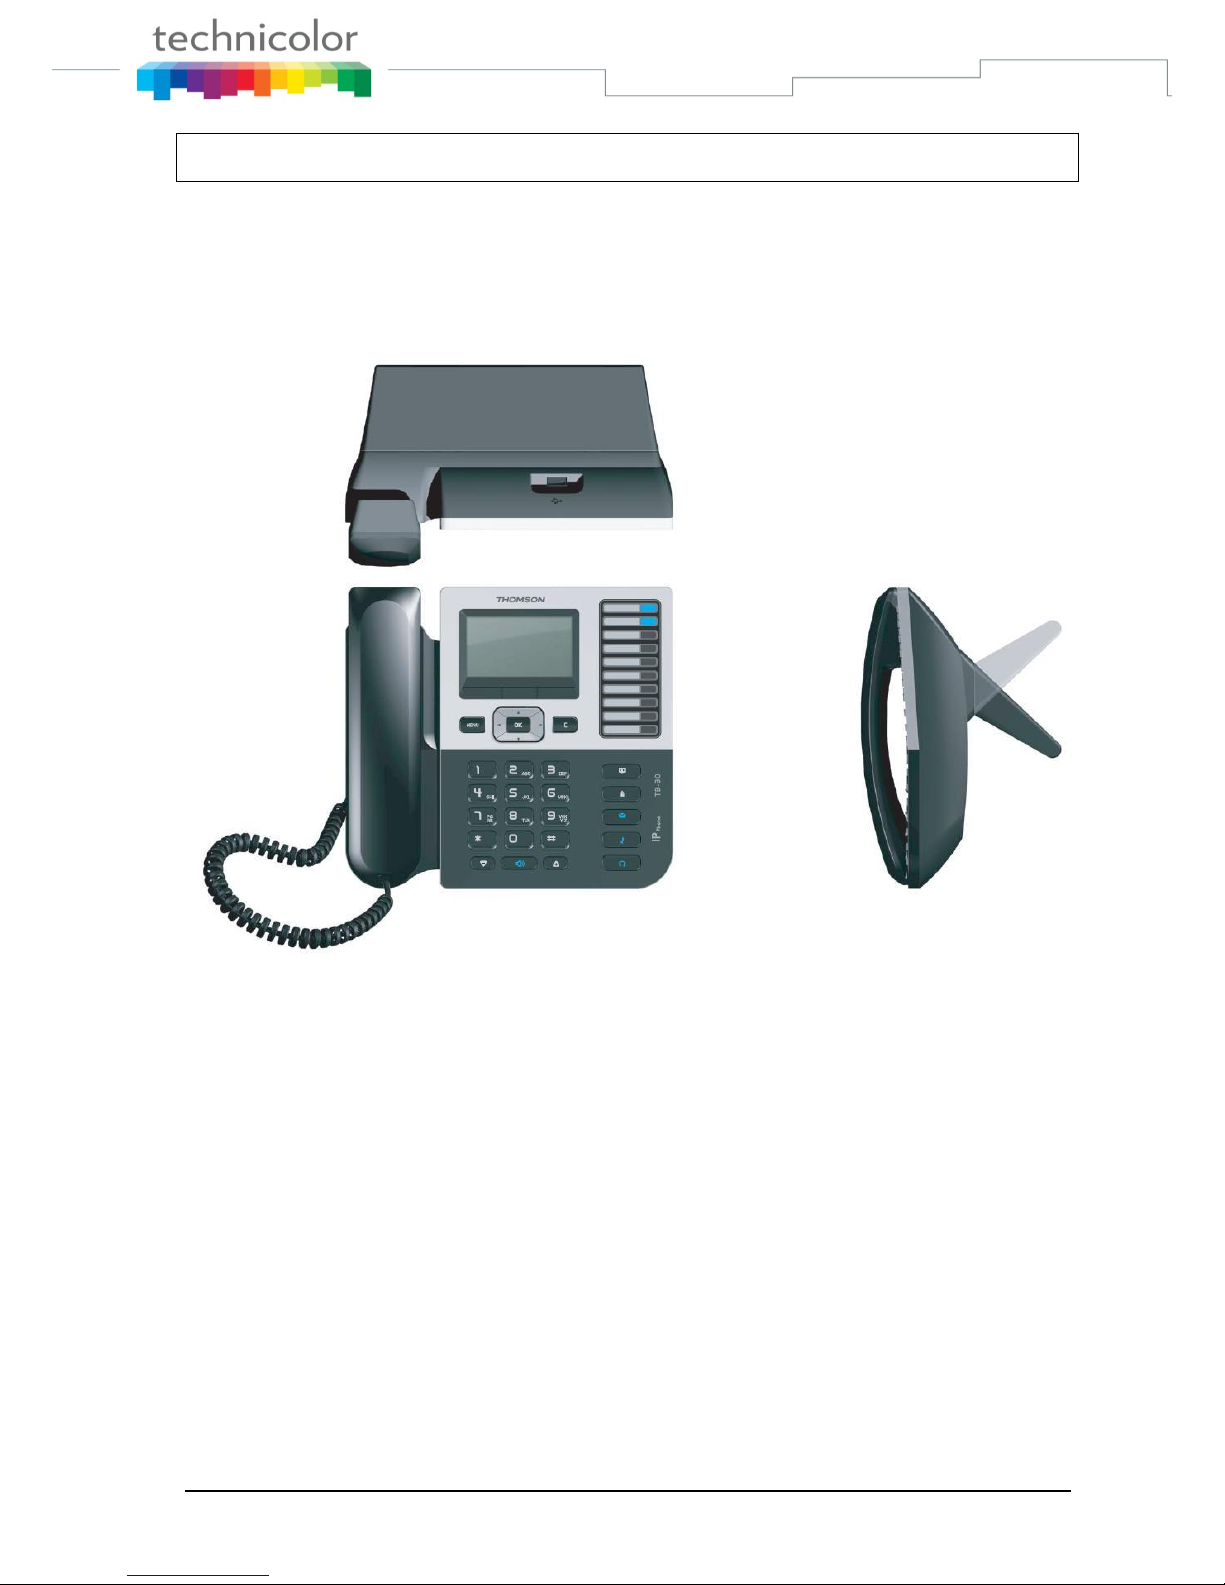
General appearance
The general appearance of the TB30 is as below:
Figure 3 TB30 General Appearance
Page 19

TB30s SIP Administrator Guide v1.3 Page 12 of 259
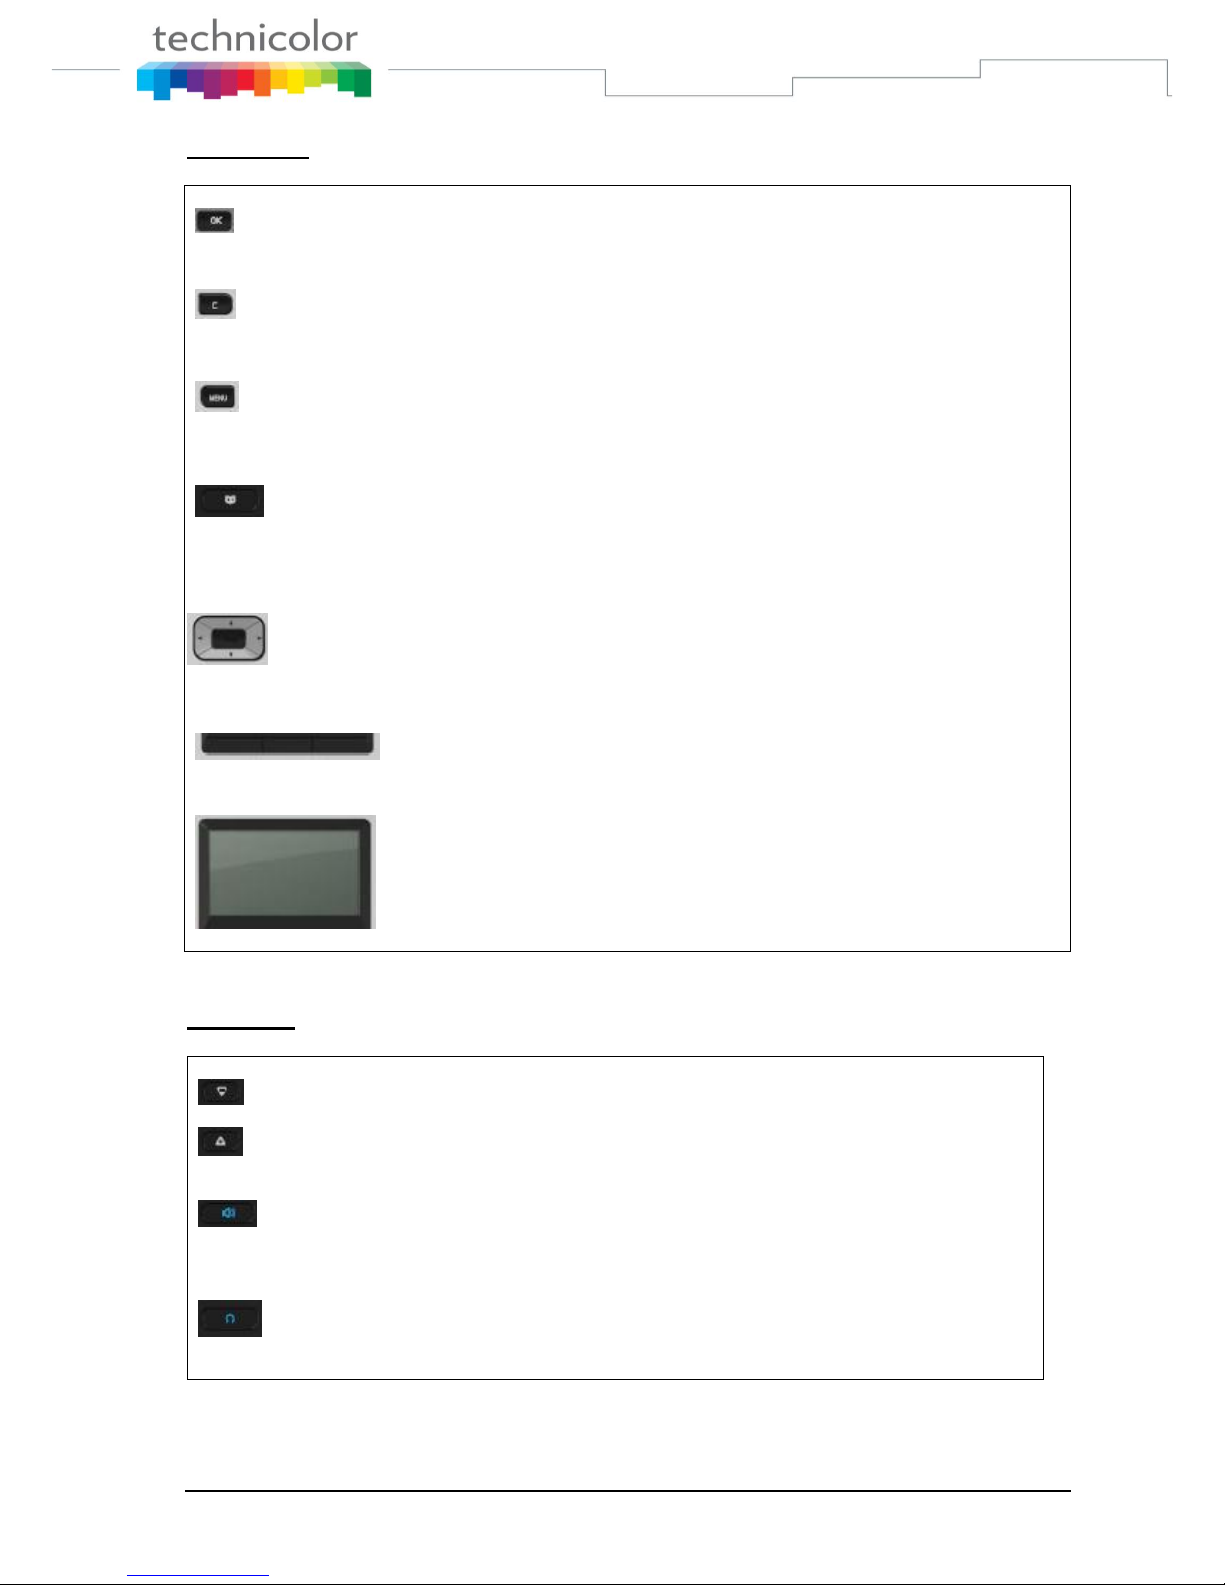
Physical Features
Figure 4 and Table 1 illustrate physical features of the TB30 SIP Phone:
Handset Dialing
Pad
Figure 4 TB30 User Panel
3 Soft Keys
Move &
Scrolling keys
Menu
key
Clear key
Functions
keys
LCD
Memory
Keys
Page 20
TB30s SIP Administrator Guide v1.3 Page 13 of 259
Display keys
Confirmation key:
Clear key:
Clear characters in editing mode or exit to standby display (long click) or return
back to the previous page.
Menu key:
Enables access to menu
Phone book key:
Enables to access the phonebook and view the names and phone numbers
the user wants to dial.
Scrolling and move keys:
Enable browsing setting options, display the latest 30 call numbers in standby
mode and move among soft keys options in editing mode.
3 Soft keys:
Activate the features described by the text message directly above on the LCD
screen.
LCD Screen:
Displays information about the phone settings, such as the number dialing
out or calling in, date, time, calls status, call duration timer etc. It is a 6line of 20 characters LCD screen.
Audio keys
Volume keys:
Adjust the volume of the handset, headset, speaker phone, ringer phone.
Speaker key:
Activates/disables hands free or group-listing function and switch on/off
the microphone
Headset key:
Activates headset mode during a call
Page 21

TB30s SIP Administrator Guide v1.3 Page 14 of 259
Mute key:
Activates/deactivates mute function.
Voice Mail key:
Voice Mail Function
Dialing keys
Dialing pad
Press the dial pad buttons to dial a number. Dial pad buttons work exactly
like those on your existing telephone. In the editing mode, it can be used to
input characters.
Redial key:
Calls the last number dialed.
Memory keys:
Are used as Speed dial keys.
Handset:
Makes and receives calls
Table 2 TB30 Physcical Features
Page 22
TB30s SIP Administrator Guide v1.3 Page 15 of 259
Display
The product has a full dot matrix LCD screen with a resolution of 240 x 120 pixels. Its screen is
monochrome and with backlighted.
The viewing area of the screen is 75 x 40 mm (active area: 72 x 36 mm).
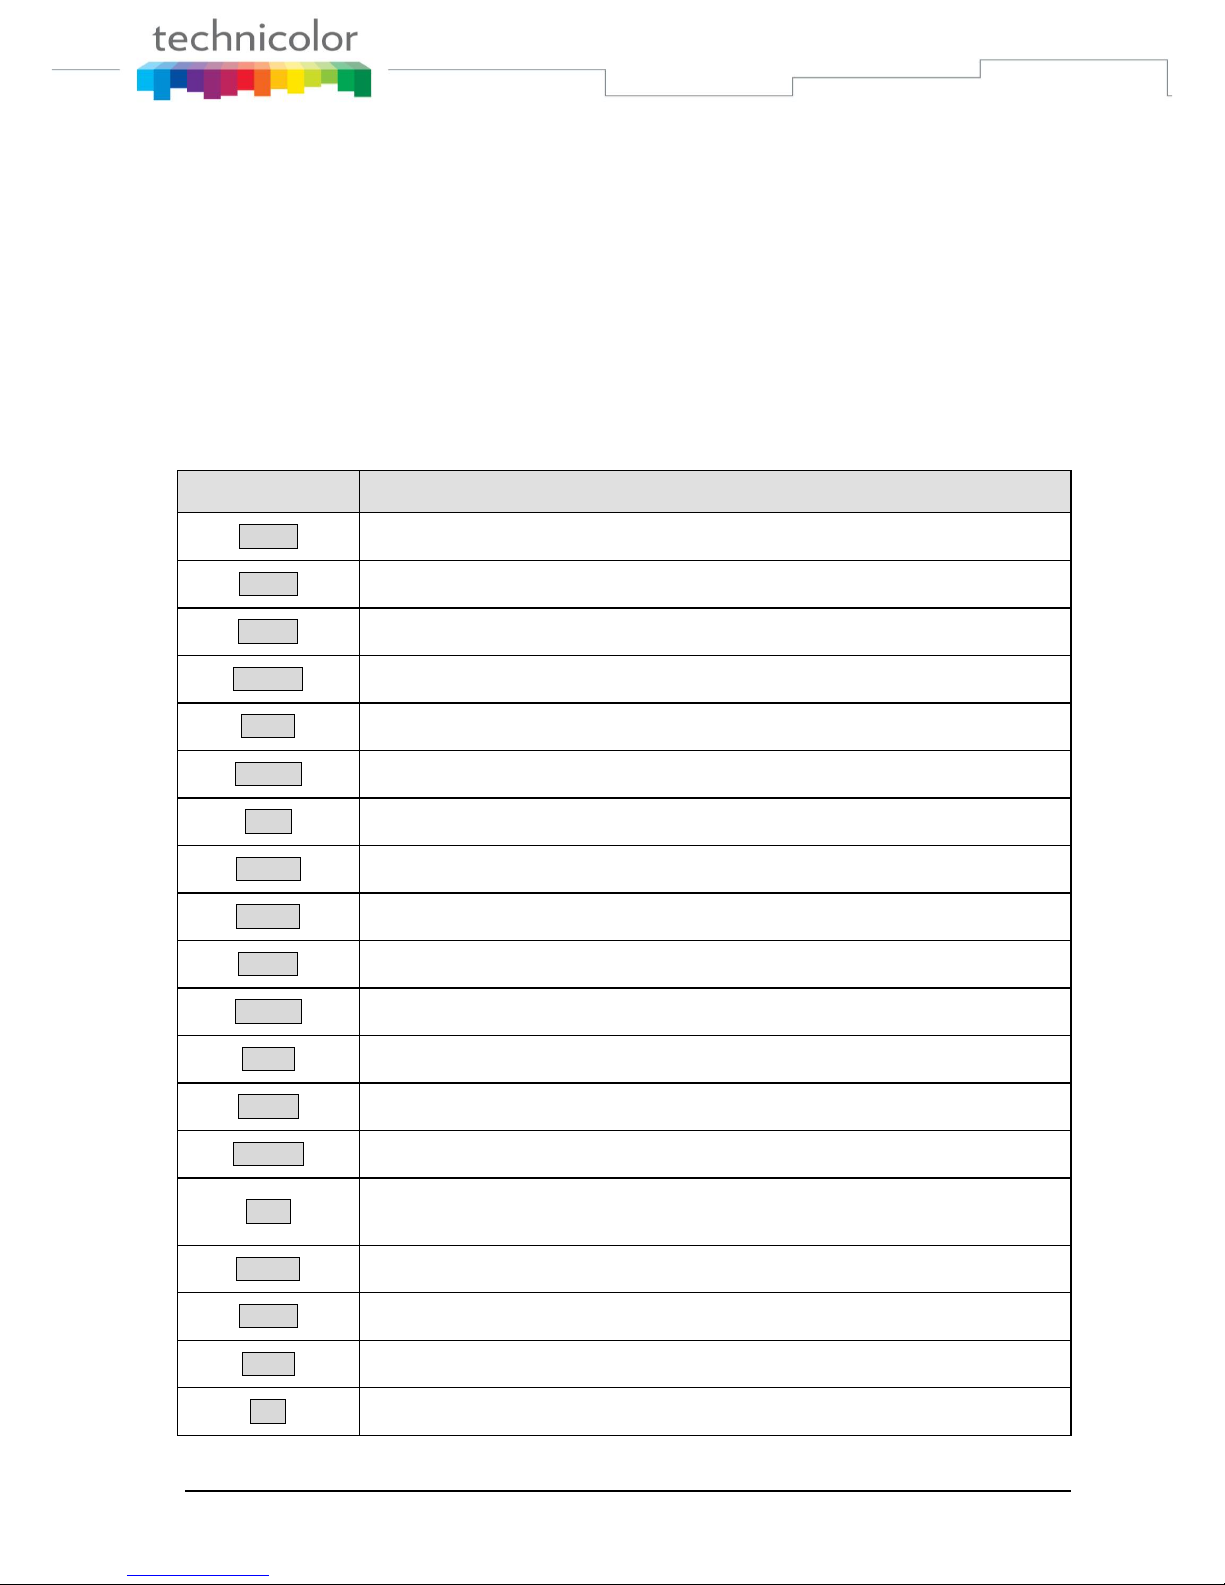
Definitions of Soft Keys
The table 2 describes the main functions of each soft keys you can use on the SIP phone.
Soft Key
Brief Description
A>a>1
Input mode switch in edit state
Active
Activate option/service
Admin
Enter to administration sub-menu
Answer
Answer an incoming call
Anym
Shortcut to “Anonymous”
Autoan
Shortcut to “Auto Answer”
Back
Return to previous menu
CalLog
Shortcut to Call log
Cancel
Cancel an action or exit to previous menu without applying changes
CBack
Perform Callback function
CBlock
Shortcut to “Call Block”
CFwd
Shortcut to “call forwarding”
CidDis
Shortcut to “Number Display”
Change
Change phone password
Conf
Create a conference call. During a call/conference and another call is coming,
press the soft key will join a conference
DelChr
Delete character in edit mode
Delete
Delete specific entry
Detail
Show detailed information
Dial
Dial an entered phone number
Page 23
TB30s SIP Administrator Guide v1.3 Page 16 of 259
DNDst
Do Not Disturb
Down
Contrast adjustment
Dsub
Shortcut to “Dial Subscriber”
EndCal
Terminate active call
Edit
Edit parameter content
Exit
Return to previous menu
Format
Change display format of specific parameter, such like Date and Time etc.
Hold
Hold current active line
Join
Join several connected calls to create a conference call
Lock
Shortcut to lock phone
Mail
Dial to voice mail server
MsCall
Shortcut to missed call list
NewCal
Make a new call
OFF
Set specific service OFF
OK
Confirm setting
ON
Set specific Service ON
Option
Shortcut to phone services
Park
Store a call using Call Park
PhBook
Shortcut to phone book
PickUp
Answer a call on another phone
Play
Play music or melody
Reject
Reject a call
Remove
Remove a conference participant
Resume
Resume to original call from call transfer
RtPark
Retrieve Park
Save
Save the chosen setting
Select
Select current item on the screen
Page 24
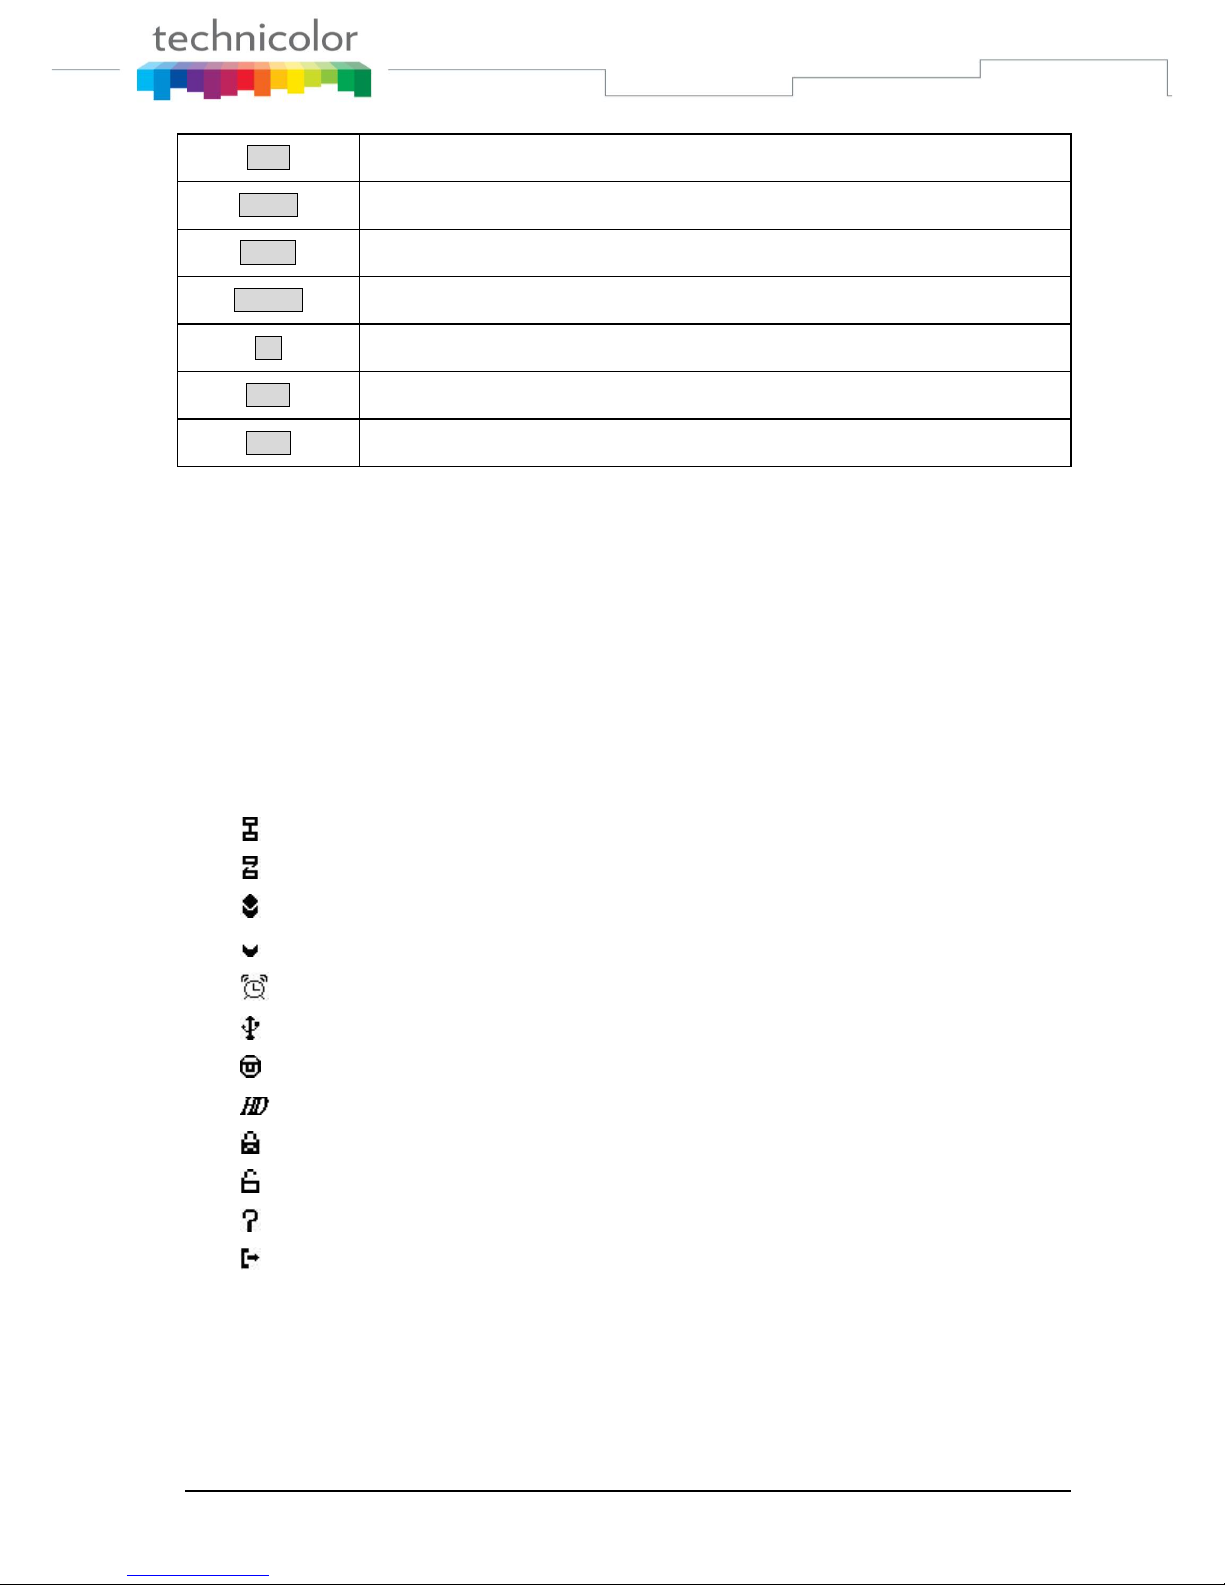
TB30s SIP Administrator Guide v1.3 Page 17 of 259
Table 3 Definitions of Soft Keys
Icons & Indicators
The SIP Phone has a 6-line of 26 characters LCD display
Line 1 : date/time and icons information
Line 2 to Line 5: operation information
Line 6 : Soft keys display
Network status is okay
Network is disconnected
SIP register that is okay
SIP register that is disconnected
“Alarm” setting is enabled
No USB device connected
USB DISK to USB jack port is okay
HD icon will show up when communication with wideband codec
Phone is locked
Phone does not lock
Privacy call
Call forward enabled
Stop
Stop music or melody
Transf
Transfer a call
TrMail
Transfer call to voice mail system
UnHold
Unhold a held line
Up
Contrast adjustment
User
Enter to user submenu
View
Show details when data item content is more than LCD can display in one line
Page 25

TB30s SIP Administrator Guide v1.3 Page 18 of 259
Definitions of LED
LED Indicator
Condition
Color
Status
Speaker
Default
Blue
OFF
During FW boot
ON
Loudspeaker is activated during a call
ON
Voice Mail
Default
Blue
OFF
During FW boot
ON
Voice Mail
Blinking
Headset
Default
Blue
OFF
During FW boot
ON
Headset or Headset group-listing mode is activated during call
ON
Mute
Default
Blue
OFF
During FW boot
ON
Mute is active
ON
Feature keys
Default
Blue
OFF
During FW boot
ON
Used for speed dial keys in standby mode
OFF
Line appearance: standby mode
OFF
Line appearance: a call is incoming
Fast blinking
Line appearance: is active
ON
Line appearance: hold or remote hold
Slow blinking
Table 4 Definitions of LED
Extension module
The extension module features 36 keys. One can plug up to 2 extension modules in a row,
leading to a total of 10 + 2 x 36 = 82 possible “multiline” keys.
Memory
The TB30 has 8MB of Flash, and 32MB of RAM
Power supply
The TB30 could be powered by either a main power unit or PoE. The power plug and PoE can
be plugged at the same time. The power plug has priority, and PoE takes over in case of power
failure. Its power consumption is under 15.4W.
Page 26

TB30s SIP Administrator Guide v1.3 Page 19 of 259
Part 4 Call Services
Talking Mode & Operations
5 kinds of communication mode
Handset mode
Hands free mode
Headset mode
Wireless headset mode.
Handset group listening
Headset group listening
Operation of off hook
There are five ways supported for Off Hook operation
Picking up the handset: Handset mode
Press Speaker key: Hands free mode
Press Headset key: Headset mode
Pick up wireless headset : Headset mode
Press F1 when phone is ringing
Operation of on hook
Handset mode: replacing the handset
Handset -Group-Listening mode: press Speaker key and replace the handset
Hands free mode: press Speaker key
Headset/Headset-Group-Listening mode: press Headset key
Wireless Headset/Headset-Group-Listening mode:Hang up wireless headset
Operation of mode switch during call
Handset
Hands free
Headset
Handset -GL
Headset-GL
Handset
1. Press Speaker key
2. Replace handset
Press Headset
key/Pick up
wireless headset
Press Speaker
key
N/A
Hands free
Pick up handset
Press Headset
key/Pick up
wireless headset
N/A
N/A
Headset
Pick up Handset
1. Press Speaker key
2. Press headset
key/Pick up
wireless headset
N/A
Press Speaker
key
Handset -GL
Press Speaker key
Replace handset
N/A
Press headset
key/Pick up
wireless headset
Headset-GL
N/A
Press headset
key/Hangup wireless
headset
Press Speaker
key
Pick up Handset
Table 5 Operations mode switch during call
Page 27

TB30s SIP Administrator Guide v1.3 Page 20 of 259
Main Call Functions
Make a call
On-hook dialing
In standby mode, there are several ways to show dial number.
Press after / before pressing digital keys directly
In standby mode, press “”, ”” or “Redial” key to display the last 30 phone numbers
you called
Key Pressed
LCD display
“”, ”” : Scrolling
and select number
you desired.
“” or “”: scrolling
to view rest.
Press View to get
details (Date, Time)
V i e w D i a l B a c k
D e l e t e D e l A l l
If number is stored in phone book, the associated name will be displayed.
Press one of speed dial keys (i.e. feature keys) F1 – F10 to display number
Query phone book: press
Query call log (dialed, received, missed)
Query memory key (F1 - F10)
And then you can trigger dialing by any one of following.
Press soft key Dial
Press OK key
Go off-hook
Off-hook dialing
Performing off-hook operation first, and then you can dial out by any one of following ways.
Press digital keys
Press Redial key
Press any one of memory keys F1 to F10
Date
Time
Icons
Page 28

TB30s SIP Administrator Guide v1.3 Page 21 of 259
Use the call log
Key Pressed
LCD display
Press CalLog to show
Call Log messages
Scrolling and confirm
by pressing Ok
M i s s e d C a l l L o G
R e c e i v e d C a l l L o
g
D i a l e d C a l l L o g
D e l e t e C a l l L o g
s
S e l e c t B a c k
“”,””: Scrolling and
dial number you
desired and press
“Dial» or Ok
V i e w D i a l B a c k
D e l e t e D e l A l l
Use the phonebook
Key Pressed
LCD display
Press or
PhBook to show
phone book
information.
“”,””: Scrolling and
press “Dial» or Ok
V i e w D i a l D e l e t
E
A d d B a c k
Last number Redial:
Pick up the handset and press .
Press then
Speed dial
Save memory keys
Press any one of F1 – F10 in standby mode
Press Edit
Key in number you want to save
Press Save to store the entry
The memory keys could be modified too in a submenu.
Date
Time
Icons
Date
Time
Icons
Date
Time
Icons
Page 29
TB30s SIP Administrator Guide v1.3 Page 22 of 259
Speed dialing – on-hook dialing
Press any one of F1 – F10 in standby mode
On-hook dialing : go off-hook, re-press the feature key, or press OK key
Speed dialing – off-hook dialing
Perform off-hook action
Press any one of F1 – F10 in dialing mode
Answer a call
When a call is coming, the caller number and alias are displayed, if the caller number is stored in
the phonebook, the associated name is displayed.
While the phone is ringing, you can perform off-hook action or press Answer to answer the call
Note
Incoming call display is visible only when phone is in talking state or in
standby mode.
When the phone is ringing
1 2 3 4 5 6 7 8 9 …
24
25
26
A n s w e r R e j e c t T r a n s f
►
Reject a call
Press Reject when the phone is ringing
Call back
Executes Auto Call Back when the called party is busy or does not reply.
ringing on any other station within his own predefined “pickup group”
When you fail to make a call due to destination is “Busy”, you can activate callback function to
complete the call automatically in standby mode.
Date
Time
Icons
Caller Name (Alias)
Caller Number/Name
Page 30

TB30s SIP Administrator Guide v1.3 Page 23 of 259
Press and Option then select” DialSubscribe” to view the status.
You can do modifications by pressing Change to enter the phone number you want to auto call
back, the time of the call and the status.
Operation of Call Completion to Busy Subscriber (CCBS)
Place a call and you hear busy tone
Press soft key CBack
Replace handset (i.e. Go on-hook, and CCBS is activated)
When CCBS is successful
The phone is ringing
Go off-hook.
You hear ring-back tone if party doesn‟t answer yet. Or start conversation if part answers
the call.
The party will hear ring-back tone, if you don‟t go off-hook yet.
You can cancel CCBS function by any one of following ways.
Go off-hook
Press any digital key
Call forward
The function of the Call Forward processed the line forwarding to another phone number. The
user can set the system to another phone number. When a call is coming, the system will forward
the line to another phone number that is set previously. The system supports three kinds of ways
to implement this function including “Unconditional”, “Busy”, and “No Answer”.
Unconditional: Provided that a call is coming, the system will forward the line immediately.
Busy: A call is coming and the user is on a busy line. Then, the system will forward the calling
line.
No Answer: On condition that the user does not respond to the calling for 30 seconds, the system
will forward the line to another phone number.
Press and Option and select “Call Forward” to view the status of Call Forward you have.
You can change this status by pressing Change .
Enter the phone number towards which you want to forward your calls.
Once this process is completed, press up/down of the cursor to the Call forward type.
Finally, press Save.
Transfer Message to Voice Mail
You can transfer all the calls you receive to your Voice Mail.
Press TrMail, then activate the transfert of your messages to your Voice Mail Box.
Press Change until obtaining “TrToVoiceMail-ON”,
finally validate it by pressing OK
Menu
Menu
Page 31

TB30s SIP Administrator Guide v1.3 Page 24 of 259
Call functions during conversation
Hold and Retrieve a call
During a call, press Hold to put a call on hold.
Press Unhold to retrieve a held call.
Call Transfer
During conversation mode, you can press the soft key Transf to activate Call-Transfer service.
Operation of “Blind” transfer
Press Transf
Dial the desired phone number to which you want to transfer the current call
Press Transf
Hang Up
Operation of “Attended” transfer
Press Transf
Dial the desired phone number to which you want to transfer the current call
Wait for the transfer recipient to answer.
Press Transf, if the recipient accepts the transferred call.
Press Back, if the recipient refuses the transferred call.
After pressing once Transf
1 2 3 4 5 6 7 8 9 …
24
25
26
E n t e r A N u M b e r P h B o o k C a l L o G B a c k
Date
Time
Icons
Dialed number display
Page 32

TB30s SIP Administrator Guide v1.3 Page 25 of 259
When the callee picks up
1 2 3 4 5 6 7 8 9 …
24
25
26
T a l k i n g . . . T r a n s f B a c k
Conference call
The TB30 SIP phone allows a 3-way conference.
Start a conference by calling other party:
During conversation, Press Conf
Dial the desired phone number (see the LCD display below)
When the callee picks up, press Conf to add the first and second calls into the calling party.
Drop any one participant of the conference call:
Scrolling to the line
Press Remove to drop the held participant.
End the conference call:
Clear each participant one by one.
When pressing Conf once.
1 2 3 4 5 6 7 8 9 …
24
25
26
E n t e r A N u m b e r
P h B o o k C a l L o g B a c k
Date
Time
Icons
Date
Time
Icons
Dialed number display
Page 33

TB30s SIP Administrator Guide v1.3 Page 26 of 259
When a call/conference is active
1 2 3 4 5 6 7 8 9 …
24
25
26
0 1 N u m b e r / N a m e C o n f D u r a t i o n 0 2 N u m b e r / N a m e C o n f D u r a t i o n
H o l d T r a n s f C o n f
►
When the callee picks up
1 2 3 4 5 6 7 8 9 …
24
25
26
T a l k i n g . . .
C o n f B a c k
Options during a call
Group Listening
Hands free
Volume adjustment
While the phone is ringing you can adjust ring volume by pressing the volume keys.
During conversation, you can also adjust volume of any of 5 modes by pressing volume keys.
Mute:
During conversation, press mute key to prevent the callee from hearing what you say.
◄
C a l L o g P h B o o k
R e m o v
e
◄
P a r k N e w C a l
Page 2
Page 3
Date
Time
Icons
Page 1
Date
Time
Icons
Page 34

TB30s SIP Administrator Guide v1.3 Page 27 of 259
Multi line
Display of Line/Call status
The IP phone supports up to 10 multi-lines that is configurable by administrator via Web-Page
access. Each line can be separately operated various services, including answer, reject, hold,
transfer and conference call etc. When the phone is in conversation mode, following is the
Line/Call status displayed on LCD.
1 2 3 4 5 6 7 8 9 …
24
25
26
▲
▼
H O l d T r a n s f C o n f
►
◄
C a l L o g P h B o o k E n d C a
l
◄
P a r k N e w C a l
Note
If we have more than 2 lines connected, up and down arrows to display other lines.
Definition of Status
Talking
Hold: hold line
R-Bye: remote terminates the line
R-Hold: remote side holds the line
Conf: conference call
Page 3
Page 2
Time
Status
Page 1
Line#
Duration
Line#
Number/Name
Status
Duration
Number/Name
Icons
Date
Page 35

TB30s SIP Administrator Guide v1.3 Page 28 of 259
Switch Between Line/Call
The IP phone supports up to 10 multi-lines that is configurable by administrator. Each line can be
switched by pressing line keys (i.e. keys F1 – F10). Besides the current active line, all others are held by
IP phone and can be resumed by pressing associated line key or pressing proper soft key. And the first
call is always assigned to line 1.
Press active line key will terminate the call.
<For example >
When you are communicating with one party and wish to make a brief to another party.
Press a free line key (then you will hear dial tone, and the original call is held)
Key in number you want to call
Or
Press NewCal (then you will hear dial tone, and the original call is held)
Key in number you want to call
Answer an incoming call when another call is active.
The phone will assign a free line dedicated to the incoming call, and the associated LED
will blink fast.
Press the line key, and the original line is held by phone automatically
Or
Scrolling the ringing line
Press Answer to answer the call
Switch between lines.
Press the line key you desire, and the original line is held by phone automatically
Or
Scrolling to the line
Press UnHold to resume the call
Pick up
A station user may dial a special code to answer any incoming calls
Use menu (table, arborescence)
Use HD, SP, HD, Adjust volume
To pick up call on another phone.
Press PickUp key in standby mode
Key in the phone number. You are connected with the caller.
Press OK
Page 36

TB30s SIP Administrator Guide v1.3 Page 29 of 259
Park up
Somewhat similar to the Call Hold feature; however, once a call is placed in the “park” condition, any
station within the system may retrieve it by either dialing the appropriate access code.
Park a call at the phone, and resume the call at another phone.
Set Call park
Press Park
Replace the handset
Retrieve Call park on an other phone
Press RtPark in standby mode
Key in the parked phone number
Press OK
Phone book & Call log
Call logs
Press CalLog to view, add, clear call logs and dial from call logs.
There are 3 kinds of call logs: Missed call logs, Received call logs and dialed call logs.
You can also dial from call logs by pressing OK on selected call.
Key Pressed
LCD display
Press CalLog to show
Call Log messages
Scrolling and confirm
by pressing Select
M i s s e d C a l l L o G
R e c e i v e d C a l l L o
g
D i a l e d C a l l L o g
D e l e t e A l l L o g
S e l e c t B a c k
Options list
No.
Option Message
Comment
(1)
Missed Call Log
30 entries supported
(2)
Received Call Log
30 entries supported
(3)
Dialed Call Log
30 entries supported
(4)
Delete all Logs
Date
Time
Icons
Page 37

TB30s SIP Administrator Guide v1.3 Page 30 of 259
Missed Calls
1
2 3 4 5 6 7 8 9
..
24
25
26
( n / m ) n b r - 1
n b r - 2
n b r - 3
V i e w D i a l B a c K
D e l e t e D e l A l l
When pressing feature key, the behavior is the same as in Phone book.
During the Query, you can press Delete to delete the displayed entry,.
Press View to entry sub-menu as following.
When you have pressed View
1
2 3 4 5 6 7 8 9
..
24
25
26
E d i t B a c k
When pressing feature key, the behavior is the same as in Phone book.
Content of missed call Parameters
Item Name
Data Format
Max.
Length
Comment
Number
Numeric
24
While length of number is more than that LCD
can display, press “” or “” to get remainder.
Alias (Phone name)
Alphanumeric
20
Date Time
YY/MM/DD hh:mm
Display when there are any messages or missed calls
CalLog
Idle
Missed Call log
Line 1
Entry number is
refreshed when pressing
scrolling key
Scroll by pressing
Up/Down key
Exit to higher-level
menu by pressing C or
“Back”
If the number is stored
on phone book, the
associated name will be
displayed.
Line 5
Line 6
Line 2
Line 3
Line 4
Date
Exit to higher-level
menu by pressing C or
“Back”
Line 3
Line 4
Line 5
Line 2
Line 6
Date
Line 1
Page 38

TB30s SIP Administrator Guide v1.3 Page 31 of 259
1 2 3 4 5 6 7 8 9 …
24
25
26
R e c e i v e d
x m e s s a g e s
H a v e
X m i s s e d c a l l s
M s C a l l B a c k
Note
The reminding message “Received X messages” is always displayed in
standby mode till you press softkey Back or Cancel key.
The reminding message “Have X missed calls” is always displayed in
standby mode till you press softkey MsCall, Back or Cancel key.
Received Call & Dialed Calls
Be the same as operation of Missed Calls
Phone book
Press to access the phone book.
You can view, delete and add phone numbers in the phonebook.
You can also dial from phonebook.
1
2 3 4 5 6 7 8 9
..
24
25
26
V i e w D i a l D e l e t
e
A d d
B a c k
The user is able to search and retrieve a phone number without having to scroll between all the entries
by typing on a letter. For instance, if the user presses quickly 2 times on key „2‟ (corresponding to “b”
letter), the first name beginning with “b” will be displayed on top of screen.
When pressing feature key, then replace current memory display by item to be memorized is displayed.
And corresponding softkeys Replace, Edit and Back are displayed.
Edit function is for editing the feature key.
Date
Time
Icons
Line 3
Line 4
Line 5
Line 6
Line 2
Date
Line 1
Page 39

TB30s SIP Administrator Guide v1.3 Page 32 of 259
Content of Phone book entry
Item Name
Data Format
Options List
Max. Length
Comment
Name
Alphanumeric
20
Number
(TelNbr)
numeric 24
While length of number is more
than that LCD can display, press
“” “” to get rest.
RingType (Bell)
Options
Ringer-1
Ringer-2...
Ringer-n
Music-1
Music-2
Character Input- Edit Mode
The editor is automatically activated whenever you are modifying content of configurable
parameters. Apart from entering characters, you can use this editor to navigate through text or
delete characters. Even though the maximal text length is not limited by the number of characters
on the display because the text can be shifted to the left and right, there are limits for the certain
scenarios. E.g. for phone book name, the limit is 15. For number, it is 31. For IP address, it is 15.
The following overview shows all characters that can be entered. Number keys must be
repeatedly pressed until the required letter appears; the cursor advances after a short delay (one
second) or pressing any other key(0..9,*,#, up, down etc.) indicating that the required letter has
been accepted.
Key
Lower case
Upper case
1
1 . , = + - & ^ |
2
a b c 2 à á å ã â ç
A B C 2 Ã Ä Å Æ
3
d e f 3 è é ê ë
D E F 3 É
4
g h i 4 ì í î ï
G H I 4
5
j k l 5
J K L 5
6
m n o 6 ñ ò ó ô õ ö ø
M N O 6 Ñ Ø
7
p q r s 7
P Q R S 7
8
t u v 8 ù ú û
T U V 8 Ü
9
w x y z 9 ÿ
W X Y Z 9
0
0 Space @ % ( ) [ ] < >
*
* # ? ! : ; „ “ _ /
#
#
Note
Softkey ABab12:Switch uppercase (with indicator “>ABC”), lowercase
(with indicator “>abc”) and numeric (with indicator “>123”) when entering
letters.
All other symbol needed will be appended to „*‟ key.
Table 6 Character Input Method Table
Page 40

TB30s SIP Administrator Guide v1.3 Page 33 of 259
Part 5 Configuration through LCD
Menu list
Config
Personalize
Alarm Clock
Contrast
PIN Setting
Shortcut
Memory Key
Information
Key Echo
Language
Time
Date
Ringer
Status
Sample text : AB…H
Bell
Type
Time
Sample text : 1…8
Enter Password
Shortcut 1 SC (1)
Shortcut 2 SC (2)
Memory Key F(1)
Memory Key F(…)
Memory Key F(10)
APP Version
HW Version
IP
MAC
GW
Mask
Page 41

TB30s SIP Administrator Guide v1.3 Page 34 of 259
Figure 5 OperationsMenu LCD Display
Admin
Input
Password :
784518 (select
number with
A>a>1
Option
Dial Subscibe
Call Blocking
Call Forward
Call Waiting
Anonymblock
Auto Answer
Auto Stop
Auto HangUp
Number Display
DoNotDisturb
PhoneLock
Reboot
NTP Setting
SIP Configuration
Ethernet configuration
VLAN setting
Emergency Dial Plan
Reset Default
PPPoE
Networking
Auto Reject
Page 42

TB30s SIP Administrator Guide v1.3 Page 35 of 259
Operation menu display
Home operation menu display
1 2 3 4 5 6 7 8 …
24
25
26
O P E R A T I O N M E N U
C o n f i g A d m i n O p t i o n
Config Menu Display
1
2 3 4 5 6 7 8 9
..
24
25
26
S e l e c t B a c k
Date
Time
Icon
Scroll by pressing
Up/Down key
Select by pressing OK
or “Select”
Return to idle state by
pressing C or “Back”
Line 2
Line 3
Line 4
Line 5
Line 6
Date
Icon
SUB-MENU LIST
Line 1
Page 43

TB30s SIP Administrator Guide v1.3 Page 36 of 259
Sub-menu list of User Setting
No.
Option Message
Comment
(1)
Personalize
Set date/time format, Key-echo, language and Ringer type
(2)
Alarm Clock
Activate Alarm clock, set bell and time
(3)
Contrast
(4)
PIN Setting
Change personal phone password
(5)
Shortcut
Shortcut setting
(6)
Memory Keys
Configure Speed dial keys
(7)
Information
Software Version, IP, MAC, Gateway , Mask
Admin Menu Display
Caution
You have to input a password to access Admin settings: 784518
Don‟t forget to switch from uppercase to numeric ABC to 123
1
2 3 4 5 6 7 8 9
..
24
25
26
S e l e c t B a c k
Sub-menu list of admin setting
No.
Option Message
Comment
(1)
Networking
(2)
PPPoE
Invisible when PPPoE function is disabled
(3)
NTP Setting
(4)
SIP Configuration
(5)
VLAN setting
(6)
Ethernet configuration
.
(7)
Emergency Dial Plan
(8)
Reset Default
Scroll by pressing
Up/Down key
Select by pressing OK
or “Select”
Return to idle state by
pressing C or “Back”
Line 2
Line 3
Line 4
Line 5
Line 6
Date
SUB-MENU LIST
Icon
Line 1
Page 44

TB30s SIP Administrator Guide v1.3 Page 37 of 259
Option Menu Display
1
2 3 4 5 6 7 8 9 … 24
25
26
S e l e c t B a c k
Sub-menu list of admin setting
No.
Option Message
Comment
(1)
Dial Subscribe
(2)
Call Blocking
(3)
Call Forward
(4)
Call waiting
(5)
Anonymblock
(6)
Auto Answer
(7)
Auto Reject
(8)
Auto Stop
(9)
Auto HangUp
(10)
Number Display
(11)
DoNot Disturb
(12)
PhoneLock
(13)
Reboot
You need to reboot for saving your modifications
Content of Shortcut Parameters
Item Name
Data Format
Comment
X
options
Dial Subscriber -> Dsub
Call Blocking -> CBlock
Call Forward -> CFwd
Anonymous -> Anym
Auto Answer -> AutoAn
Number Display -> CidDis
Else . . .
Idle
Menu
Shortcut
Option
Line 1
Scroll by pressing
Up/Down key
Select by pressing OK
or “Select”
Return to idle state by
pressing C or “Back”
Line 2
Line 3
Line 4
Line 5
Line 6
Date
SUB-MENU LIST
Page 45

TB30s SIP Administrator Guide v1.3 Page 38 of 259
Detailed LCD menu settings
Home operation menu display
1 2 3 4 5 6 7 8 …
24
25
26
O P E R A T I O N M E N U
U s e r A d m i n O p t i o n
User Menu Display
Menu
Idle
Menu
Config
Idle
Date
Time
Page 46

TB30s SIP Administrator Guide v1.3 Page 39 of 259
1
2 3 4 5 6 7 8 9 … 24
25
26
S e l e c t B a c k
Sub-menu list of User Setting
No.
Option Message
Comment
(8)
Personalize
Set date/time format, Key-echo, language and Ringer type
(9)
Alarm Clock
(10)
Contrast
(11)
PIN Setting
Change personal phone password
(12)
Shortcut
Shortcut setting
(13)
Memory Keys
(14)
Information
Software and hardware Version, IP, MAC, Gateway , Mask
Personalize Setting
1
2 3 4 5 6 7 8 9 … 24
25
26
E d i t B a c k
Idle
Menu
Personalize
Config
Line 2
Line 3
Line 4
Line 5
Line 6
Date
SUB-MENU LIST
Icon
Line 1
Scroll by pressing
Up/Down key
Select by pressing OK
or “Select”
Return to idle state by
pressing C or “Back”
Line 3
Line 4
Line 5
Line 6
Line 2
Date
Item Name
CONTENT
Line 1
Page 47

TB30s SIP Administrator Guide v1.3 Page 40 of 259
Content of Phone Option/Parameters
Item Name
Configurable
Data Format
Options List
Comment
Name
Yes
Alphanumeric
Max. length: 15
Ringer
Yes
Options
Ringer-1
…
Ringer-4
Canon
Shuffle
You can press soft key Play when
editing the content.
Date
Yes
(Configurable when
NTP is disabled)
MM/DD/YY
DD/MM/YY
YY/MM/DD
You can press soft key Format to
change format.
MM/DD/YY
DD/MM/YY
YY/MM/DD
Time
Yes
(Configurable when
NTP is disabled)
hh:mm
hh:mm
am hh:mm
You can press soft key Format to
change format.
12 Hours
24 Hours
Language (Lang)
Yes
Options
English
French
Spanish
Deutsch
Italian
Norsk
Russian
Portuguese
Nederlands
Key Echo (KeyEch)
Yes
Options
ON
OFF
Alarm Clock
1
2 3 4 5 6 7 8 9 … 24
25
26
E d i t B a c k
Idle
Menu
Alarm
Clock
Config
Line 3
Line 4
Line 5
Line 6
Line 2
Date
Item Name
CONTENT
Line 1
Page 48

TB30s SIP Administrator Guide v1.3 Page 41 of 259
Content of Alarm Parameters
Item Name
Configurable
Data Format
Options List
Comment
Startup (Status)
Yes
Options
ON
OFF
Time
Yes
hh:mm
Type
Yes
Options
One Shot
Periodic
Bell Type (Bell)
Yes
Options
Ringer-1
…
Ringer-4
Canon
Shuffle
You can press soft key Play to
play option when editing the
content of Bell Type.
First activate alarm clock then change time.
Contrast
1
2 3 4 5 6 7 8 9 … 24
25
26
S a m p l
e
T e x t : A B C D E F G H S a m p l e T e x t : 1 2 3 4 5 6 7 8 D o w n U p O K
PIN Setting
1
2 3 4 5 6 7 8 9 … 24
25
26
E n t e r P a s s w o r d * * * *
O k C l e a r C a n c e
l
Caution
The password is : 0000
Idle
Menu
Contrast
Config
Idle
Menu
PIN Setting
Config
Line 3
Line 4
Line 5
Line 2
Line 6
Date
Line 1
Line 2
Line 3
Line 4
Line 5
Date
Line 6
Line 1
Page 49

TB30s SIP Administrator Guide v1.3 Page 42 of 259
1
2 3 4 5 6 7 8 9 … 24
25
26
C h a n g e B a c
k
Options list
No.
Option Message
Data Format
Comment
(1)
Flag
ON
OFF
When Status is ON, the phone lock setting will be
authorized by checking personal code.
Press Change to enable/disable the item.
(2)
Change Code
Press soft key “Change” to change PSW
The default password is 0000.
Shortcut Setting
You can edit two shortcuts
Information
Content
Item Name
Configurable
Comment
FW version
No
Indicate to the user the firmware‟s version
HW version
No
Indicate to the use r the hardware‟s version
IP address
No
Indicate to the user the IP address
MAC address
No
Indicate to the user the MAC address
Gateway
No
Indicate to the user the gateway address
Mask
No
Indicate to the user the mask address
Idle
Menu
Shortcut
Config
Idle
Menu
Information
Config
Line 2
Line 3
Line 4
Line 5
Line 6
Date
Icon
Options list
Line 1
Page 50

TB30s SIP Administrator Guide v1.3 Page 43 of 259
Memory Keys Setting
Menu of Admin Settings
Caution
You have to input a password to access Admin settings: 784518
1 2 3 4 5 6 7 8 9 …
24
25
26
S e l e c t B a c k
Sub-menu list of admin setting
No.
Option Message
Comment
(7)
Networking
(8)
PPPoE
Invisible when PPPoE function is disabled
(9)
NTP Setting
(10)
SIP Configuration
(11)
VLAN setting
(12)
Ethernet configuration
.
(13)
Emergency Dial Plan
(14)
Reset Default
1
2 3 4 5 6 7 8 9 … 24
25
26
F ( x ) E d i t D i a l B a c k
Idle
Menu
Memory
Key
Config
Idle
Menu
Admin
Line 1
Scroll by pressing
Up/Down key
Select by pressing OK
or “Select”
Return to idle state by
pressing C or “Back”
Line 2
Line 3
Line 4
Line 5
Line 6
Date
Line 1
Scroll by pressing
Up/Down key
Select by pressing OK
or “Select”
Return to idle state by
pressing C or “Back”
Line 2
Line 3
Line 4
Line 5
Line 6
Date
SUB-MENU LIST
Line 1
Page 51

TB30s SIP Administrator Guide v1.3 Page 44 of 259
Networking Configuration
1
2 3 4 5 6 7 8 9 … 24
25
26
E d i t B a c k
Content of Network Parameters
Item Name
Configurable
Data Format
Options List
Max. Length
Mode
Yes
Options
Fix IP
DHCP
PPPoE
IP
Yes
(For Fix-IP only)
xxx.xxx.xxx.xxx
15
MAC
No
xx:xx:xx:xx:xx:xx
Gateway (GW)
Yes
(For Fix-IP only)
xxx.xxx.xxx.xxx
15
Net mask (Mask)
Yes
(For Fix-IP only)
xxx.xxx.xxx.xxx
15
Pri DNS
Yes
(For Fix-IP only)
xxx.xxx.xxx.xxx
15
Sec DNS
Yes
(For Fix-IP only)
xxx.xxx.xxx.xxx
15
PPPoE Setting
Press Menu key in idle state triggers menu operation.
1
2 3 4 5 6 7 8 9 … 24
25
26
E d i t B a c k
Line 1
ItemName is refreshed
when pressing scrolling
key
Scroll by pressing
Up/Down key
Exit to higher-level
menu by pressing C or
“Back”
Line 2
Line 3
Line 4
Line 5
Line 6
Date
Item Name
Idle
Menu
Networking
Admin
Idle
Menu
PPPoE
Admin
CONTENT
Line 2
Line 3
Line 4
Line 5
Line 6
Date
Item Name
CONTENT
Line 1
Page 52

TB30s SIP Administrator Guide v1.3 Page 45 of 259
Content of PPPoE Parameters
Item Name
Configurable
Data Format
Options List
Max. Length
ACC Name (Acc)
Yes
Alphanumeric
63
PASSWORD (Pwd)
Yes
Alphanumeric
31
NTP Setting
1
2 3 4 5 6 7 8 9 … 24
25
26
E d i t B a c k
Content of NTP Parameters
Item Name
Configurable
Data Format
Options List
Max. Length
Status
Yes
Options
ON
OFF
IP
Yes
xxx.xxx.xxx.xxx
Domain Name
15
63
Zone
Yes
Options
- 12:00 ~ +12:00
DST
Yes
Options
ON
OFF
SIP Configuration Setting
1
2 3 4 5 6 7 8 9 … 24
25
26
S e l e c t A c t i v e B a c k
Line 1
Scroll by pressing
Up/Down key
Exit to higher-level
menu by pressing C or
“Back”
Line 3
Line 4
Line 5
Line 2
Line 6
Date
Idle
Menu
NTP setting
Admin
Idle
Menu
SIP Config
Admin
Profile list
Prof (n)
Line 3
Line 4
Line 5
Line 6
Line 2
Date
Item Name
CONTENT
Line 1
ItemName is refreshed
when pressing scrolling
key
Scroll by pressing
Up/Down key
Exit to higher-level
menu by pressing C or
“Back”
Page 53

TB30s SIP Administrator Guide v1.3 Page 46 of 259
Profile List
No.
Profile Name
Comment
(1)
Profile 1
Profile name is configurable (refer to “3.4.1 SIP Profile Parameter”)
Only one of profiles is active, and the active profile will be marked
with “(ON)”
(2)
Profile 2
(3)
Profile 3
(4)
Profile 4
SIP Profile Parameters
1
2 3 4 5 6 7 8 9 … 24
25
26
E d i t B a c k
Content of SIP Profile
Item Name
Configurable
Data Format
Options List
Max. Length
ID
Yes
Alphanumeric
15
PhoneName (Name)
Yes
Alphanumeric
20
PxySrv
Yes
xxx.xxx.xxx.xxx
DomainName
15
127
RegSrv
Yes
xxx.xxx.xxx.xxx
DomainName
15
127
RegID
Yes
Alphanumeric
63
RegPwd
Yes
Alphanumeric
63
DomainName (Dname)
Yes
Alphanumeric
127
TelNbr
Yes
Numeric 24
2ndPxy
Yes
xxx.xxx.xxx.xxx
DomainName
15
127
2ndReg
Yes
xxx.xxx.xxx.xxx
DomainName
15
127
Idle
Menu
Select profile
Admin
SIP
Configuration
Line 3
Line 4
Line 5
Line 6
Line 2
Date
Item Name
Profile parameters
Line 1
ItemName is refreshed
when pressing scrolling
key
Scroll by pressing
Up/Down key
Exit to higher-level
menu by pressing C or
“Back”
Page 54

TB30s SIP Administrator Guide v1.3 Page 47 of 259
Part 6 Configuration via Web Interface
Configuration through the Web interface
The phone can also be configured using the web browser. It has a friendly web interface to set
and modify parameters.
Step 1 – Before starting
The IP phone should be connected to the Network and then be powered it up before the
connection to the web server.
Step 2 – Connect to the IP Phone web server
1) Start a web browser session
2) Input the phone‟s IP address into the address field.
For example:
i. http://10.1.97.6 for user mode.
ii. http://10.1.97.6/admin.html for admin mode.
3) Enter the username (by default: administrator)
4) Enter the password (by default: 784518)
5) Once the process is completed, you can change the settings values to your
convenience.
Step 3 – Reboot the phone
Some parameters will require the phone to be rebooted for changes to be operated.
The web pages below will be displayed once you have input the phone‟s IP address into the
address field.
Find IP Address
There are two ways to check the phone IP address.
Long press MENU
Press MENU to enter operation manual. Press Config soft key and then choose
« Information »
Page 55

TB30s SIP Administrator Guide v1.3 Page 48 of 259
Detailed Web pages
There are two mode of web pages – user mode and admin mode
To access user mode, you just type the IP address in your browser. In user mode, many setting
are not avaialbe.
(e.g. http://192.168.1.100)
To access user mode, you type the IP address and the admin.html in your browser.
(e.g. http://192.168.1.100/admin.html)
Please find below the web pages related to the configuration of phone settings via web interface
CONNECTION PAGE
Page 56

TB30s SIP Administrator Guide v1.3 Page 49 of 259
User Mode Web pages
Page 57

TB30s SIP Administrator Guide v1.3 Page 50 of 259
Page 58

TB30s SIP Administrator Guide v1.3 Page 51 of 259
Admin Mode Web pages
Page 59

TB30s SIP Administrator Guide v1.3 Page 52 of 259
Page 60

TB30s SIP Administrator Guide v1.3 Page 53 of 259
Page 61

TB30s SIP Administrator Guide v1.3 Page 54 of 259
Part 7 Auto-Provisioning
The automatic provisioning requires one DHCP server and one HTTP/TFTP server.
The USB automatic provisioning requires one USB disk.
Please find below the way to provision your IP Phone.
Automatic phone provisioning with TFTP
The automatic phone provisioning is particularly adapted to the provision of several phones at
the same time, of any large-scale deployment environment. Auto-provisioning is achieved using
2 well-known protocols: Dynamic Host Control Protocol (DHCP) and Trivial File Transfer
Protocol (TFTP).
Simply follow next steps to provision your IP Phone:
Needed:
1 DHCP server which one can manage the options
1 TFTP server
1 TB30 (SIP or MGCP)
Several files which one can need (correctly filled) are:
SIP: File INF
Firmware
File « common_config »
File MAC specific
File « Telconf »
MGCP: File INF
Firmware
Files Deck
File« common_config »
File MAC specific
File « TelConf »
(See examples of these files in Appendix.)
Page 62

TB30s SIP Administrator Guide v1.3 Page 55 of 259
The files:
File INF: (extension .txt or .inf) inform about the place of the various files to download (relative
way or absolute)
Firmware: Version‟s code which needs to be upgrade by the phone
File “common_config”: (extension.txt) informs the phone about configurations which need to be
upgrade on the level network, sip (or mgcp), auto provisioning, etc…
File MAC: (extension.txt). Same that the file “common_config” but its name is based on phone‟s
MAC address which needs to be upgrade and the configuration which is made inside will
concern only the phone which has this MAC address. It has priority if the two files are on TFTP
server.
File “TelConf”: (extension.txt), a set of audio parameters, which configures the phone for the
audio performance.
Files Deck: (ONLY MGCP) (extension .thd), allow phone to know how to display some flows
(xml) on screen. Generally, it‟s files which are sent via the operator chosen to connection to the
service.
We provide often to the customer only the upgrade firmware. The other files are normally
managed by the administrator who takes care of the procedure of auto provisioning.
DHCP option:
Option 66: IP address of TFTP server where are the files which need to be downloaded.
Option 67: File INF‟s name on TFTP server
Option 150: IP address of TFTP server used if this option (optional) is in DHCP options
Option 43: Used to http upgrade. If options 66 or 150 are not present, option 43 will be selected.
Option Next server Address: IP address of TFTP server used in some case when the other
options are not manageable but this one yes.
Put in the following way in the file of configuration of DHCP (dhcpd.conf)
Page 63

TB30s SIP Administrator Guide v1.3 Page 56 of 259
option tftp-server-name "@IP serveur TFTP"; --------------> option 66
option bootfile-name "nomDeFichierINF.txt"; --------------> option 67
option provision-server-ip code 150 = text; ------------->option 150 is text, not binary mode
option provision-server-ip "@IP serveur TFTP "; -------------> next server address
option vendor-encapsulated-options "http://192.168.70.10/swupgrade_TB30m.txt" ---->option 43
Installation of the platform
Installation of the DHCP server
To set up all the necessary options (option 66 and 67)
Installation of the TFTP server
To put in the repertory of the TFTP server the last version of the firmware
Provisioning process
Process of auto provisioning in the theory:
At the time of the connection of a phone to the network, it will ask an IP address to DHCP
server. This one will provide him an IP address but also the address of TFTP server where file
INF is. This file will indicate on the phone the configuration file names which it must upgrade.
Process of auto provisioning in the practice:
1. Do not connect the phone with electricity. To put the cable (RJ45) in the Ethernet LAN
port at the back of the phone.
2. Restore the default parameters. With this intention, it is necessary to maintain inserted
the keys "headset" (ear-phone) and "transfers" (dumb) of the phone.
3. Connect phone with electricity.
Maintain the keys "headset" (ear-phone) and "transfers" (dumb) of the phone inserted,
until seeing that the provisioning is carried out.
4. The phone will start (it will recover an IP address by DHCP server, the IP address of
TFTP server and the name of file INF which will be downloaded) and will begin the
process of auto provisioning.
Page 64

TB30s SIP Administrator Guide v1.3 Page 57 of 259
1. In the order:
Remote loading of file INF
Remote loading of the firmware
Reboot
2nd Remote loading of file INF
Remote loading of the file TelConf
Remote loading of the file Common_config
Attempt of remote loading of the specific file MAC if he is
Reboot
Remote loading of file INF
2nd Attempt of remote loading of the specific file MAC if he is
(Remote loading of the files Deck for MGCP)
2. The phone is connected to the service of the operator.
Some precise details:
If phone doesn‟t receive an IP address, you need to check up that the parameter ModeDHCP is
activated
The file “Common_config” will be downloaded only if the file‟s name has been change
compared to the last upgrade.
The specific file MAC is downloaded (if there exists) if his parameter “config_sg” was
incremented.
It is imperatively necessary to download the file TelConf before returning it to the customer.
It is possible to pass from a phone SIP and quite simply to transform it into MGCP (but not the
reverse) by providing on phone SIP a firmware corresponding to MGCP protocol as well as the
good files which go with.
Page 65

TB30s SIP Administrator Guide v1.3 Page 58 of 259
Automatic phone provisioning with HTTP
Also the provisioning can be carried out via HTTP. For that, it is necessary to follow following
steps
Needed :
1 router DHCP
1 TB30 (SIP or MGCP)
The last version of the firmware
Process of auto provisioning in the theory:
At the time of the connection of a phone to the network, it will ask an IP address to DHCP
server. This one will provide him an IP address. While going on the WEB interface of the phone
in mode admin, you can upgrade the firmware.
Process of auto provisioning in the practice:
1. Do not connect the phone with electricity. Connect an end of the cable (RJ45) in the
Ethernet LAN port at the back of the phone and the other end is plugged into the
router DHCP.
2. Restore the default parameters. With this intention, it is necessary to maintain inserted
the keys "headset" (ear-phone) and "transfers" (dumb) of the phone
3. Connect phone with electricity.
Maintain the keys "headset" (ear-phone) and "transfers" (dumb) of the phone inserted,
until seeing that the provisioning is carried out.
4. The phone not having for the moment anything with provision and no gateway to
connect itself, it will continue to blink.
5. Find the phone IP address (provided by router DHCP). So :
If MGCP phone :
Press on the key menu of the phone
Press on the softkey admin
Press on the button OK of the phone
Select Network configuration while going down with the arrows
Select IP address and note the address indicated
If SIP phone:
Press on the key menu of the phone
descend the cursor using the low button until Information
Select Information and note the IP address indicated
6. Open a WEB browser (Internet Explorer, Mozilla,…)
Page 66

TB30s SIP Administrator Guide v1.3 Page 59 of 259
7. Enter the bar of address : IPaddressofphone/admin.html
The IPaddressofthephone being that noted in (5).The Web interface appears.
8. Login is : administrator
Password is: 784518
9. Select « UTILITY ».
10. Select « Firmware Update »
11. In the box Firmware Update Using leave "HTTP" and click on the button "Browse...”
In the window which opens, select the version of the firmware to be installed.
12. Press « Apply »
13. The phone will normally reboot.
14. Start again from step 7) to step 11). Select « Telephone Configure »
15. In the box Firmware Update Using leave "HTTP" and click on the button "Browse...”
In the window which opens, select the file TelConf to be installed.
16. Press « Apply »
17. The phone will normally reboot.
18. Start again the process (find IP address, open WEB interface as admin). On the
banner page of the WEB interface, you should see the firmware‟s version of the
phone. Look in « System Information », at the line « APP Version ».
Caution: the main power supply must not be interrupted during the booting session. The
phone could be damaged.
[Note]: when you want to upgrade the firmware or download a new configuration, you
have to follow steps 1 and 2 and reboot the phone from its web-based interface.
Page 67

TB30s SIP Administrator Guide v1.3 Page 60 of 259
USB Automatic phone provisioning
USB automatic phone provisioning is one of the simply way to upgrade firmware or other config
when that has no network environment. USB auto-provisioning is achieved using usb device.
Simply follow next steps to provision IP Phone:
Needed:
1 USB Disk
1 TB30 (SIP or MGCP)
Several files which one can need (correctly filled) are:
SIP: File INF (TB30S.INF)
Firmware
File « common_config »
File MAC specific
File « Telconf »
MGCP: File INF (TB30M.INF)
Firmware
Files Deck
File« common_config »
File MAC specific
File « TelConf »
The files:
File INF: (TB30S.INF for SIP, TB30M.INF for MGCP) inform about the place of the various
files to download (relative way or absolute)
Firmware: (externsion .zz) Firmware, DSP and/or Boot code which needs to be upgrade by the
phone
File “common_config”: (extension .txt) informs the phone about configurations which need to be
upgrade on the level network, sip (or mgcp), auto provisioning, etc…
File MAC: (extension .txt). Same that the file “common_config” but its name is based on
phone‟s MAC address which needs to be upgrade and the configuration which is made inside
will concern only the phone which has this MAC address. It has priority if the two files are on
TFTP server.
File “TelConf”: (extension .txt), a set of audio parameters, which configures the phone for the
audio performance.
Files Deck: (ONLY MGCP) (extension .thd), allow phone to know how to display some flows
(xml) on screen. Generally, it‟s files which are sent via the operator chosen to connection to the
service.
Process of auto provisioning in the theory:
Plug in USB disk at the time of boot up, it will search INF file in root path. This file will indicate
on the phone the configuration file names which it must upgrade.
Page 68

TB30s SIP Administrator Guide v1.3 Page 61 of 259
Process of auto provisioning in the practice:
1. Do not connect the phone with electricity. To put the cable (RJ45) in the Ethernet LAN port
at the back of the phone.
2. Restore the default parameters. With this intention, it is necessary to maintain inserted the
keys "headset" (ear-phone) and "transfers" (dumb) of the phone.
3. Plug in USB disk
4. Connect phone with electricity. Maintain the keys "headset" (ear-phone) and "transfers"
(dumb) of the phone inserted, until seeing that the provisioning is carried out.
5. The phone will start (the INF which will be downloaded) and will begin the process of auto
provisioning.
In the order:
Remote loading of file INF
Remote loading of the firmware
Reboot
2nd Remote loading of file INF
Remote loading of the file TelConf
Remote loading of the file Common_config
Attempt of remote loading of the specific file MAC if he is
Reboot
Remote loading of file INF
2nd Attempt of remote loading of the specific file MAC if he is
(Remote loading of the files Deck for MGCP)
6. The phone is connected to the service of the operator.
Some precise details:
If phone doesn‟t search INF from USB disk, you need to check up that usb icon display on
LCDUSB is activated
The file “Common_config” will be downloaded only if the file‟s name has been change
compared to the last upgrade.
The specific file MAC is downloaded (if there exists) if his parameter “config_sn” was
incremented.
It is imperatively necessary to download the file TelConf before returning it to the customer.
Page 69

TB30s SIP Administrator Guide v1.3 Page 62 of 259
Part 8 Ringtones configuration
1. Description
The ringtones which are integrated into the TB30 use a RTTTL format. A ringing with
RTTTL format looks like the following example:
Halloween:d=4,o=5,b=180:8d6,8g,8g,8d6,8g,8g,8d6,8g,8d#6,8g,8d6,8g,8g,8d6,8g,8g,8
d6,8g,8d#6,8g,8c#6,8f#,8f#,8c#6,8f#,8f#,8c#6,8f#,8d6,8f#,8c#6,8f#,8f#,8c#6,8f#,8f#,8c
#6,8f#,8d6,8f#
These ringtones can be created by the user and they can be also downloaded for free
on Internet.
We give a series of specialized websites where you can find example of tones:
didier.elo.free.fr/ringtones.html
www.xgsmonline.com/smartsmslogos.shtml
www.kortable.com/sonneries/sonneries-nokia-rtttl.asp
2. Make a melody
There is the software Ringtone Converter which is free and simple of use that we advise
you.
Figure 6 Ringtone Converter
You can download this software here:
www.codingworkshop.com/ringtones/
Page 70

TB30s SIP Administrator Guide v1.3 Page 63 of 259
This software makes it possible to the user to create their own melodies directly with
RTTTL format. For that, it is necessary to go in "File", "Ringtone composer" and finally
"open with new melody"
Figure 7 Ringtone Converter
The following screen is displayed and will make it possible to the user to compose the
melodies according to its choice.
Figure 8 Ringtone Composer
Moreover, a data base, already comprising a great number of melodies to RTTTL
format, is integrated into this software. To reach these rings, it is necessary to carry out
the handling which is presented to you on the screenshot below.
Page 71

TB30s SIP Administrator Guide v1.3 Page 64 of 259
Figure 9 Ringtone Composer
3. Integration of the rings with TB30
In order to be able to integrate new ringtones, with RTTTL format, in his phone, the user
must start by recopying all these rings with RTTTL format in a file with a txt extension. It
is thus necessary to use software like NotePad.
Page 72

TB30s SIP Administrator Guide v1.3 Page 65 of 259
Next we need to find the phone IP address. So:
If MGCP phone:
Press on the key menu of the phone
Press on the softkey admin
Press on the button OK of the phone
Select Network configuration while going down with the arrows
Select IP address and note the address indicated
If SIP phone:
Press on the key menu of the phone
descend the cursor using the low button until Information
Select Information and note the IP address indicated
IP address, that we recovered, must have returned in an Internet navigator (Mozilla,
Internet explorer, etc.) in the following way: adresseIPduTelephone/admin.html
Next, we must click on « Advanced »:
Lastly, it is necessary to select "Melody management" and to enter the name of the file
(txt extension) which contains the rings while clicking on browser.
Page 73

TB30s SIP Administrator Guide v1.3 Page 66 of 259
Part 9 Backlight saving mode
1. Description
In order to correspond to implement Directive 2005/32/EC of the European Parliament
and of the Council with regard to eco-design requirements for standby and off mode
electric power consumption of electrical and electronic household and office equipment
(hereafter referred to as EuP Directive) for power saving, new power saving features
has added into TB30 IP phone.
2. Enter in idle mode with backlight OFF in TB30
Step 1 : Power up TB30 IP phone, after required initialization procedure finished, phone
number and name will show on LCD display with backlight on. In this time, TB30 IP
phone is under active mode.
Step 2 : After 30 seconds, backlight is OFF and TB30 enters to idle mode for power
saving. At this moment, TB30 IP phone is entering idle mode and its power
consumption will be under 2.00 W.
Page 74

TB30s SIP Administrator Guide v1.3 Page 67 of 259
Part 10 Feature Overview
This part is to show the number of new features implemented in each
software new release, up to 1.72.
Note
This administrator guide is based on firmware v1.72, you can download the
latest administrator guide on:
www.thomsonbroadbandpartner.com
Unauthenticated SRTP need to be configured (3440) – v1.72
INTRODUCTION
Presently:
- unencrypted_SRTCP: it works half way (thanks to your "set sec_prof 0 rtcp negotiate"
command)
- unauthenticated_SRTP: not yet configurable
For these 2 parameters, we expect they could be configurable.
On the set (mandatory to integrate SIP set in our TLS solution):
-Yes:
. proposed in offer made
. expected in offer receive (if not received: reject offer)
- No:
. not proposed in offer made
. not expected in offer receive (if present: reject offer)
- Adaptive (not proposed / accepted):
. not proposed in offer made
. accept offers with or without the parameter
The updated command is as bellow:
set sec_prof <prof_id> rtp <off |on | negotiate> (off: unauthenticated, on: authenticated,
negotiate - default)
Page 75

TB30s SIP Administrator Guide v1.3 Page 68 of 259
Voice Mail Key is active all the time (3600) – v1.72
INTRODUCTION
The Voice mail dedicated key is working only when you have received an Notify for Message
Waiting Indicator.
Requirement
It would be better to make the key active all the time if “Subscribe to MWI” is enabled. So you
could call the voice mail even if you have no messages.
Page 76

TB30s SIP Administrator Guide v1.3 Page 69 of 259
Voice Mail Key dial "Voice Mail Telephone Number" even no
subscribe (4066)
Introduction
Be able to access Voice Mail if no subscribe & no notification.
Requirement
Request:
In some configuration there is no Voice Mail server & No Subscribe possible.
In this case the Key Voice mail is useless:
- No new message indication
- No Access to the Voice Mail
Some voice mail server doesn't provide the MWI & no Subscribe.
It would be nice that as soon as the field "Voice Mail Telephone Number" is filled in, you should
be able to dial to that number with the MWI key.
In this case the Voice mail is like a direct memory Key.
Solution:
If Voice Number is fill. When user Press the Number the number associated is dial out.
Config File:
VoiceMailAddr=
VoiceMailTelNum=1234
VoiceMailPort=5060
If Voice Mail is press, Phone dial 1234.
Page 77

TB30s SIP Administrator Guide v1.3 Page 70 of 259
Display Customer Icon in Standby (3959) – v1.72
INTRODUCTION
We have a customer that is requesting a new feature on TB30: Display on his Logo
icon.
Requirement
- Standby (for SIP only):
o After a time out the Phone displays the Logo Icon.
o Default (empty)
Standby
In standby mode, the logo can be turn on or off. This logo displays in the middle 4 line of the
screen (except 1st line and last line).
So it will not cover the softkey and some information. This logo can download by APS. It
should support bitmap file format.
If there is a message (Missed call, CHP Supervision & SIP message) on the display, it should
blink between the logo and the message.
A new parameter is added for APS.
app_logo_bmp=xxxx.bmp (B/W bitmap file only and the bitmap with inverted)
Icon Size = 240 x 80
To clean the icon:
app_logo_bmp= <empty>
The upgrade behavior is same as language table. It will include in XXX.inf file. Format as
below:
XXX.inf with tftp
Tone_table=xxxx
Language_table=xxxx
app_logo_bmp=xxxx.bmp
xxx.inf with http
tone_table=http://path/filename
language_table=http://path/filename
Page 78

TB30s SIP Administrator Guide v1.3 Page 71 of 259
app_logo_bmp= http://path/xxxx.bmp
Another new parameter is added for logo on/off. This parameter is configurable in common config file
and telnet.
Config file: LogoDisplay = 0/1 (0: Off - Default, 1: On)
Telnet: lcdui set LogoDisplay 0/1
Remark: if there is no bitmap downloaded, even it is on; it will be the same as off.
Another new parameter is added for timeout for display logo. This parameter is configurable in
common config file and telnet.
Config file: LogoTimeOut = 10 ~ 255s (30s default)
Telnet: lcdui set LogTimeOut 10 ~ 255
Page 79

TB30s SIP Administrator Guide v1.3 Page 72 of 259
Reset to default single parameter (3864) – v1.72
INTRODUCTION
For the current implementation of APS mechanism, if the value is empty of some parameter, we
don‟t change anything, for example, if you set “CWMPACSUser=” in
ComConfTB30S_100204.txt, it will follow the setting you set before, so if you want to change
this parameter for blank in this version, you must reset to default. So it is no way to set the
parameter to empty.
As a result two keywords <default> and <empty> are defined.
CWMPACSUser=<default> will set to default value after APS.
CWMPACSUser=<empty> will set to empty value after APS.
Remark: <empty> is only apply for string parameter.
Page 80

TB30s SIP Administrator Guide v1.3 Page 73 of 259
Phone Lock (3999) – v1.72
INTRODUCTION
It is required to implement the possibility to lock the phone as required by our
customer.
When lock the phone:
- Can‟t phone the user. (can‟t dial out, view call list, view phonebook etc.)
- Emergency number can dial out in any case.
- Can‟t go off-hook for Incoming call
Requirement
Instead of “Wrong Number”, the phone should display “Phone Locked”.
It must be able to dial the EmgDialPlan number even the phone is locked.
Some new parameters are added for this feature.
These parameters are configurable in common config file and telnet.
All these parameters are managed by Admin.
Admin make the choice of how the phone behave during phone lock.
Config file: PhoneLockMode = 0/1 (0: display “Phone Locked” when dial - Default; 1: key locked.)
Telnet: lcdui set phonelockmode 0/1
Config file: AutoLockTimeout = 0 ~ 6000 second (0 - default )
Telnet: lcdui set AutoLockTmrout 0 ~ 6000
// 0: de-active auto lock
// 1 ~ 6000: means active auto lock. The minimum value is 30s. If it is setting at 1-30s, it will process as 30s.
Phone will lock after xx (s).
Use OptionVisible = … the same way as auto answer, user can choose to display or not display
in MMI with the setting in webpage Option Configure. And auto lock will be only used when
PhoneLockMode=1
Config file: IncomingLock = 0/1 (0: Incoming call is not lock – default; 1: Incoming call is lock.)
Telnet: lcdui set incomingLock
Phone Lock Mode = 0
For PhoneLockMode = 0, it is same as the current implementation until software version x.72
but display “Phone Locked” when dial. AutoLockTimeout and IncomingLock are not work in
this mode.
Phone Lock Mode = 1
Locking the phone
Press the “lock” soft key and change it to PhoneLock-On to key the Phone. When the phone is
locked, “Unlock” soft key should be displayed and Lock icon is displayed.
Page 81

TB30s SIP Administrator Guide v1.3 Page 74 of 259
PhoneLock
PhoneLock flag is used for enable/disable phone lock function. If the phone is locked, after
power reset it must be still locked.
Key response
Any key is pressed except number key and “Unlock” soft key, it will display “Phone Locked”
when phone is locked.
When number key is pressed, user goes off-hook, headset or handsfree key pressed, it will check
for EmgDialPlan.
If it is not in the dial plan, it displays “Phone Locked”. Otherwise, it will let the phone to dial the
number.
During dialing the emergency number call log and phonebook function are not available. And if
press callLog and Phbook softkey or Hardkey will be ignore. It can only dial out emergency
number.
During Emergency if press Tran or conf or New Call only emergency call number can be dial
out. If user dials a normal number, it displays “Phone Locked”.
Incoming call cannot be received in the case of dial out emergency number. The phone will not
alert the user that is an incoming call. If the incoming call is finished before Emergency call, it
stores the incoming call into the miss call list. Otherwise, when Emergency call is ended, the
phone will ring.
Incoming Call
When IncomingLock = 0, the phone will ring for the incoming call and the phone lock function
is temporary disable until it goes call end, on-hook or ring stop.
Date
Hour
Icons
Name
Phone
Unlock
Date
Hour
Icons
Enter a Number
Back
Date
Hour
Icons
01 XXXX
Talking 00:00:XX
hold
Tran
Conf
CallLog
PhBook
Endcal
Newcal
Date
Hour
Icons
Ringing…
XXXX
Back
Page 82

TB30s SIP Administrator Guide v1.3 Page 75 of 259
When IncomingLock = 1, the phone will ring but the user must press the unlock key to unlock
the phone first before use the phone.
AutoLock
Use OptionVisible = … the same way as auto answer, user can choose to display or not display
in MMI with the setting in webpage Option Configure. And auto lock menu will be only
appeared and used when PhoneLockMode=1 & AutoLockTimeout != 0.
AutoLock = 0 AutoLock = 1
AutoLock Timeout
If AutoLockTimeout != 0, it will go to phone lock mode after timeout when in idle mode. The
timeout can be changed by AutoLockTimeout. AutoLockTimeout is fixed by Admin.
Example Setting
Display “Phone Locked” when dial
PhoneLockMode = 0
Key Lock without incoming call lock
PhoneLockMode = 1
IncomingLock = 0
Key Lock with incoming call lock
PhoneLockMode = 1
IncomingLock = 1
Password Protection
Same as Current implementation
Date
Hour
Icons
Incoming Call Lock
Unlock
Date
Hour
Icons
Config
Admin
Option
Date
Hour
Icons
DoNotDisturb-OFF
PhoneLock-OFF
PhoneAutoLock-OFF
Reboot
Change
Back
Date
Hour
Icons
DoNotDisturb-OFF
PhoneLock-OFF
PhoneAutoLock-ON
Reboot
Change
Back
Idle
Menu
PIN Setting
Config
Page 83

TB30s SIP Administrator Guide v1.3 Page 76 of 259
Options list
No.
Option Message
Data Format
Comment
(3)
Flag
ON
OFF
When Status is ON, the phone lock setting will be
authorized by checking personal code.
Press Change to enable/disable the item.
(4)
Change Code
Press soft key “Change” to change PSW
The default password is 0000.
Date
Hour
Icons
Enter Password
****
OK
Clear
Cancel
Date
Hour
Icons
Flag-OFF
Change PIN Code
Change
Back
Page 84

TB30s SIP Administrator Guide v1.3 Page 77 of 259
Page 85

TB30s SIP Administrator Guide v1.3 Page 78 of 259
Locking phone with Password Protection
Pressing the “Lock”soft key
Pressing “Change” soft key
Press “OK” soft key to lock the phone.
Date
Hour
Icons
Enter Password
****
Clear
Cancel
Date
Hour
Icons
PhoneLock-OFF
Change
Back
Date
Hour
Icons
PhoneLock-ON
Change
OK
Back
Page 86

TB30s SIP Administrator Guide v1.3 Page 79 of 259
Block Web GUI (4067) – v1.72
Introduction
Suppress access to TB30 Web GUI for user & admin.
Requirement
Request: Block Web Gui access for Admin & User access.
Solution: Disable Webpage. Telnet, Tr69, SNMPS and APS need to work fine.
New parameters are added for this feature:
Config File: WebGuiBlocked= 0/1 (0: WebPage is accessible – default; 1: WebPage is
Blocked)
Telnet: sys set web_blocked 0/1
When WebGUI is blocked. Configuraiton is done by telnet, APS and Tr69. In order to unblock
WebGUI, you can do it by APS or Telnet.
Page 87

TB30s SIP Administrator Guide v1.3 Page 80 of 259
Display Customer Icon on Web (4096) – v1.72
Introduction
Implement change of the Web Gui Icon to Customer icon.
Requirement
Request: Change the WebGui Default Icon to Customer Icon
Solution: Introduce a new parameter in config file to allow customer to change the icon.
Default Icon: Thomson (logo_THOMSON_smal_2.bmp)
logo _T HOMSON_smal_2.zip
Size of the Icon: 180*60 Max.(Thomson is 169*58)
Format of the Icon: .bmp
Parameter Add in .inf: Web_logo_bmp=xxxx.bmp
The upgrade behavior is same as language table. It will include in XXX.inf file. Format as
below:
XXX.inf with tftp
xxx.inf with http
Tone_table=xxxx
Language_table=xxxx
Web_logo_bmp=xxxx.bmp
tone_table=http://path/filename
language_table=http://path/filename
Web_logo_bmp= http://path/xxxx.bmp
Parameter is added for logo on/off.
This parameter is configurable in common config file and telnet, Tr69.
Config file: WebLogoDisplay = 0/1
Telnet: sys set WebLogoDisplay 0/1
(0: off - Display Default “Thomson” Icon; 1: on - Display Web_logo_bmp)
Remark: if there is no bitmap downloaded, even it is ON, it will be display default “Thomson”
icon.
Page 88

TB30s SIP Administrator Guide v1.3 Page 81 of 259
USB Login/logout (3995) v1.72
INTRODUCTION
The idea is to use USB for Login/Logout so that we can work for Open Office with FreeSeating.
User has a single USB with Name & Phone number & one configuration.
If the user plugs the USB into TB30, it will login automatically. If the user unplugs the USB
drive from TB30, it will logout automatically.
Requirement
Same as the current manual login/logout, we need to enable the manual_log configuration.
Config file: ManualLog = 1
Telnet: sys set manual_log 1
A new parameter is added for USB logon/out. This parameter is configurable in common config
file and telnet.
Config file: logINlogOUTmode = 0/1
Telnet: sys set LoginLogoutMode 0/1
(0: current login/logout behavior; 1: usb login/logout behavior)
Also in web, there is a check box to enable/disable this feature.
When the USB drive (FAT32 format only) is plug into TB30, it will check for the login/logout
config file (TB30LogINLogOUT.txt or TB30LogINLogOUT.ser. If both files exist, only
TB30LogINLogOUT.ser will use). If a config file is in the USB key, it will read the config file
and setup the phone automatically. When the USB drive is unplug, it will restore the original
setting. The config file format is:
UserID /PWD/PhoneName/PhoneNum/PinCode
e.g. RegID/RegPwd/Hong/1000/0000
If the Pin is not empty, it prompts the user for a PIN code when you insert the USB key. If the
PIN code is correct apply the dynamic profile, else stay with default profile (in reference of
login/logout spec).
Encryption/Decryption tools:
Name: Window_Aes_cbc_128.exe (including in release package/ Decryption tool folder)
Press F1 for get HELP window
Decryption key
Config file: Log_Decryption_Key = Th0mson2$8s8@9z! (default)
Telnet: sys set LoginDecKey Th0mson2$8s8@9z!
USBlogINlogOUT = 0
USBlogINlogOUT = 1
USB Drive plug into TB30
No Action
USB Login
USB Drive remove from TB30
No Action
USB Logout
Page 89

TB30s SIP Administrator Guide v1.3 Page 82 of 259
Call Log Prefix
You can set Call Log Prefix in Web GUI – advance -> Call feature -> Call Log Prefix. Then call
from call log, the prefix number will be carried before dialed number.
Page 90

TB30s SIP Administrator Guide v1.3 Page 83 of 259
Venezuela Numbering Plan
Feature Activation
Check_phonebook_domain_name=0
V_flag=1
V_state_prefix=212 (for example)
Via APS
APS in [sys] section of both Common and Specific-MAC config files with the
new parameter – V_flag, V_state_prefix.
V_flag = 0/1, // 0: Disable Venezuela Numbering Plan (default)
// 1: Enable Venezuela Numbering Plan
V_state_prefix = (empty for default), prefix
[ipp]
…
Check_phonebook_domain_name=0
…
[sys]
…
V_flag=1
V_state_prefix=212
…
Via Telnet
To configure, open a command line console, and telnet the phone:
Example:
V_flag is set to enable (sys set V_flag 1)
V_state_prefix is set to 212 (sys set V_state_prefix 212)
Check_phonebook_domain_name is set to disable (ipp set
Check_phonebook_domain_name 1)
[administrator]# sys set V_flag 1
[OK] Set OK
[administrator]#
[administrator]# sys set V__state_prefix 212
[OK] Set OK
[administrator]#
[administrator]# ipp set Check_phonebook_domain_name 0
[OK] Set OK
[administrator]#
Page 91

TB30s SIP Administrator Guide v1.3 Page 84 of 259
Then type commit and then activate to apply the change.
After setting,
Example 1-Received p-asserted-id (user part of sip uri): 582125671234
Number to be displayed for the incoming call: 5671234
Number to be stored in call log: 5671234
Matches with phonebook number entry: 5671234
Example 2- Received p-asserted-id (user part of sip uri): +582461234567
Number to be displayed: 02461234567
Number to be stored in call log: 02461234567
Matches with phonebook number entry: 02461234567
Example 3- Received p-asserted-id (user part of sip uri): +584147654321
Number to be displayed: 04147654321
Number to be stored in call log: 04147654321
Matches with phonebook number entry: 04147654321
Page 92

TB30s SIP Administrator Guide v1.3 Page 85 of 259
LLDP
The following parameters are added for LLDP Service. This parameter is configurable in
common config file and telnet.
lldpXFlag = 0/1 // 0: Disable LLDP function (Default)
// 1: Enable LLDP function
lldpTxPeriod = 5 – 32768 (30 default)
lldpTTL=120
lldpPortDesc=
lldpSysName=
lldpSysDesc=
lldpSysCap=2097184
lldpChassisID=4
lldpPortID=4
lldpXMediaCap=65539
lldpXNetPolicy=1
lldpXEndpLocIdenti=0
lldpXAssetID=
Feature Activation
Via APS
APS in [net] section of both Common and Specific-MAC config files with all
LLDP parameters.
[net]
…
lldpXFlag=0
lldpTxPeriod=30
lldpTTL=120
lldpPortDesc=
lldpSysName=
lldpSysDesc=
lldpSysCap=2097184
lldpChassisID=4
lldpPortID=4
lldpXMediaCap=65539
lldpXNetPolicy=1
lldpXEndpLocIdenti=0
lldpXAssetID=…
…
Via Telnet
To configure, open a command line console, and telnet the phone:
Example:
lldpXFlag is set to enable (lldp set lldpXFlage 1)
Then type commit and then activate to apply the change.
[administrator]# lldp set lldpXFlag 1
[OK] Set OK
[administrator]#
Page 93

TB30s SIP Administrator Guide v1.3 Page 86 of 259
Cirpack MGC & Hua Wei SoftSwitch
TB30 have implement Softswitch (Hua Wei SoftX3000 V300R006) PSTN call
handling including call waiting and switching. It is also support Cirpack MGC
service
A parameter is used to set Hua Wei SoftSwitch & Cirpack MGC Service. This parameter is
configurable in common config file and telnet.
For the flag for this feature
MGC_service = 0/1/2 // 0: disable (default)
// 1: HW_pstn
// 2: Cirpack MGC service
Hua Wei SoftSwitch (MGC_service = 1)
Flow descriptions:
Below is to list out a flow which shows PSTN 1 call to IP phone B in conversation, then PSTN 2
call to IP phone B.
[Answer] and [Reject] softkey displays on the screen.
TB30s (Phone B)
Remark: Go back to previous screen when [Reject] is pressed.
Date
Hour
Icons
01 PSTN Call
Answer
Reject
Press [Answer] to take the PSTN 2 call.
INFO: flashhook when press [Answer]
INFO
200 OK
PSTN1 and phone B are in conversation
INFO: tone-type, duration, gap, times
Phone will play the beep sound
INVITE ( with SDP1)
100 Trying
180 Ringing
200 OK (with SDP1)
ACK
INFO
200 OK
Page 94

TB30s SIP Administrator Guide v1.3 Page 87 of 259
TB30s (Phone B)
Remark: Pressing [Hold], [Conf] and [Transfer] will keep the same as current implementation.
Date
Hour
Icons
01 PSTN Call/phone number
Taking Duration
Hold
Switch
Conf
PSTN1 is on hold and B stops the call waiting tone
INFO: tone-type, duration, gap, times
Phone sends INFO to take the call, INFO: digit =2
Phone is able to talk with PSTN 2
Page 95

TB30s SIP Administrator Guide v1.3 Page 88 of 259
Switch implementation
Requirement
- [Switch] softkey is required to caller parties to switch between caller during conversation
Below is to list out a flow which shows IP Phone B call to IP phone A in conversation, then
PSTN 1 call to IP phone B. B and PSTN 1 are in conversation. Phone B presses [Switch] back to
phone A and start conversation.
Flow descriptions:
Phone A Phone B, operate in normal SIP protocol
PSTN 1 phone B, call waiting tone is played, same as the call waiting flow above call
activated
Phone B presses [Switch] to talk back with phone A
(PSTN 1 and Phone B are in conversation)
TB30s (Phone B)
When [Switch] is pressed, switching is processed.
Date
Hour
Icons
01 PSTN Call/phone number
Taking Duration
Hold
Switch
Conf
Transf >
Phone B press [Switch] to start switching to other party
INFO: flashhook
PSTN1 is on hold and B stops the call waiting tone
INFO: Tone-type=specialdial, dial-timer=0
Phone send “2” to enable the take the call,
INFO: digit =2
Page 96

TB30s SIP Administrator Guide v1.3 Page 89 of 259
TB30s (Phone B)
Cirpack MGC service (MGC_service = 2)
The following parameters are added for Cirpack MGC service/
Dial_Dtmf_Code = „#5‟ (default)
Alternate_Dtmf_Code = „#2‟ (default)
Rel_Libretre_Dtmf_Code = „#0‟ (default)
Ans_Libretre_Dtmf_Code = „#1‟ (default)
Transfer_Dtmf_Code = „#4‟ (default)
Conference_Dtmf_Code = „#3‟ (default)
Date
Hour
Icons
01 PSTN Call/phone number
Taking Duration
Hold
Transf
Conf
Server invites phone A
Server invites phone B
Phone A hang up the call
INFO: tone-type=busy
Phone B know that the waiting
phone is hang up and the
[Switch] soft key should be
changed back to [Transf]
BYE
200 OK
INFO
Page 97

TB30s SIP Administrator Guide v1.3 Page 90 of 259
Feature Activation
Via APS
APS in [sys] section of both Common and Specific-MAC config files with all
MGC parameter.
MGC_service = 0 disable (default)
[sys]
…
MGC_service=0 // Disable (default)
…
MGC_service = 1 Hua Wei Softswitch PSTN handling
[sys]
…
MGC_service=1 // Hua Wei Softswitch
…
MGC_service = 2 MGC Cirpack Service
[sys]
…
MGC_service=2
Dial_Dtmf_Code=#5
Alternate_Dtmf_Code=#2
Rel_Libretre_Dtmf_Code=#0
Ans_Libretre_Dtmf_Code=#1
Transfer_Dtmf_Code=#4
Conference_Dtmf_Code=#3
…
Via Telnet
To configure, open a command line console, and telnet the phone:
Example:
1. MGC_service is set to disable (sys set mgc_service 0)
2. MGC_service is set to Hua Wei Softswitch PSTN handling (sys set
mgc_service 1)
3. MGC_service is set to Cirpack MGC Service (sys set mgc_service 2)
Then type commit and then activate to apply the change.
[administrator]# sys set mgc_service 2
[OK] Set OK
[administrator]#
[administrator]# sys set mgc_service 0
[OK] Set OK
[administrator]#
[administrator]# sys set mgc_service 1
[OK] Set OK
[administrator]#
Page 98

TB30s SIP Administrator Guide v1.3 Page 91 of 259
BLF
The objective of this section is to present the way TB30 SIP uses backlit
function keys to monitor the state of other extensions. The backlit function
keys will indicate if an extension is idle, in use, or ringing. This feature is
known as BLF or Monitoring Extension function.
TB30 extension module can be used to have more programmable keys on
board. There are basically two scenarios:
- Server-to-phone scenarios: there is a SIP proxy which controls the
state of each extension and sends the appropriate messages to the
supervisor phone. Asterisk is an example and the reference followed for
implementation.
- Phone-to-phone scenarios: each phone is responsible for notifying its
own state to supervisor phones
TB30 supports three types of BLF – two types of BLF based on “dialog” event
package: User and List-oriented, third BLF: Presence basesd BLF. Please
note default mode for BLF is User-Based.
User-oriented BLF
Mechanism used for BLF is SUBSCRIBE/NOTIFY messages described in RFC-
3265.
The device will subscribe to the state of the extension of interest and receive
status notifications from this extension or from the proxy in order to drive
the LEDs.
High level technical description
When the phone is initialized, it will send out a SUBSCRIBE message to the
proxy for each extension it would like to monitor. This is to subscribe to the
state of the other extension. The proxy (and in some cases the other
extension) needs to support these subscriptions. At this point 2 things can
happen depending on the Proxy, which correspond to the scenarios listed
above:
• Phone-to-phone scenarios : the proxy will forward the SUBSCRIBE to
the far phone. Then the phone needs to log all extensions which subscribed,
and send out NOTIFY messages when changes happens in its state.
Page 99

TB30s SIP Administrator Guide v1.3 Page 92 of 259
• Server-to-phone scenarios : the proxy captures the SUBSCRIBE, does
not forward it and sends state changes as the body of a NOTIFY on behalf of
the phone. Asterisk Server does this.
The "<state>early|confirmed|void</state>" in the received NOTIFY msgs
determines the LEDs activity.
• If the line on the extension rings, the programmable key LED on the phone
blinks. Related state is early.
• If the line on the extension is busy, the programmable key LED on the
phone is steadily lit. Related state is confirmed.
• If the programmable key LED on the phone is off, then the programmable
key can act as a speed dial key for the same supervised destination number.
Related state is void (state not provided), or terminated.
Other tags could be supported in future releases.
User interaction
In idle mode
Pressing a key whose LED is off ( phone in idle mode, state void ) performs
a call to the corresponding phone.
Pressing a key whose LED is on (phone busy, state confirmed) performs a
call to the corresponding phone, a normal call.
Pressing a key whose LED is blinking (phone ringing, state early)
performs a call pickup of the corresponding phone.
During a call or conference
Same behaviour as in idle mode except it is in a second call (or third…). This
would be equivalent to the user pressing the softkey “New Call” and placed a
call to that extension.
BLF Configuration
Web GUI
The setup of the function keys can be done using the TB30 web interface.
First, if you are going to use any of the function keys in the phone instead of
an extension module, you need to reconfigure the max number of lines in
Advanced Advanced. In this example it has been set to 5, which leaves
room for 5 supervision lines:
To configure the function keys, visit Advanced Call features and click on
Page 100

TB30s SIP Administrator Guide v1.3 Page 93 of 259
Function keys:
The feature keys are split in 3 pages:
F1 to F10
F11 to F38 (1st extension module, will only appear if the module is detected)
F39 to F66 (2nd extension module, will only appear if the module is detected)
On each page, the feature keys are detailed in a list.
For each line the administrator is able to setup:
The line type:
Line (normal speedial)
or
Supervised Line (Supervised behavior described above)
The corresponding extension
3.2 Provisioning files (APS)
Feature keys are configurable using configuration files, either common or
MAC specific, and syntax is the same for both. These parameters, as can be
checked in TB30S_Config file syntax document and sample files, will be
included in [sys] section.
The parameters will follow this pattern:
FeatureKeyExtXX=Y/<sip:2006@10.0.0.5>
With: 01 <= XX <= 66
With: Y = [L:S]
L= Line (no supervision)
S= Supervised Line
Ex:
FeatureKeyExt01=L/<sip:2345@domain1.com>
FeatureKeyExt02=L/<sip:3455>
FeatureKeyExt03=L/<sip:number@domain2.com>
FeatureKeyExt04=L/<sip:>
FeatureKeyExt05=L/<sip:>
FeatureKeyExt06=S/<sip:346666666>
FeatureKeyExt07=S/<sip:345455555@mydomain.com>
Examples with Asterisk SIP server as notifier
--------------------------------------------------------------------------------
Sent to udp:10.0.0.5:5060 at 19/10/2005 12:26:20:770 (425 bytes):
#With this message 2200@lan subscribes to the state of 2205. The message will be forwarded to
2205 or not depending on Proxy capabilities
SUBSCRIBE sip:2205@lan.net;user=phone SIP/2.0
Via: SIP/2.0/UDP 10.0.0.1:2051;branch=z9hG4bK-wkwhbwu19wgc;rport
From: <sip:2200@lan.net>tag=gumvap0ha0
To: <sip:2205@lan.net;user=phone>
Call-ID: 3c2675eaad57-2fjnztudzq25@TB30
CSeq: 1 SUBSCRIBE
Max-Forwards: 70
Contact: <sip:2200@10.0.0.1:2051;line=xjqldyhz>
Event: dialog
 Loading...