

Page 1
Mediatune
Installation Guide
© 2012 Technicolor. All Rights reserved
Page 2

Technicolor MCS
101 W. 103rd St
Indianapolis, IN 46290
www.technicolor.com/mcs
Introduction
This document will take you through a typical installation process for Mediatune, a new webbased interface for the COM1000 product enabling switched matrix control capabilities.
Mediatune can be used with an HD COM1000 system to direct content from any source tuner
to any output QAM channel, or allow for a simple tuning interface for IP installations or
systems which don’t utilize the Technicolor integrated EdgeQAM. They system is based on
the web server on the COM24 card, so any browser based device can interact and become a
control point, allowing for maximum flexibility for the users. You can have several PCs,
iPads, and other tablet devices which will all synchronize with the interface running on the
COM1000.
Installing the Mediatune Files
Mediatune is made up of several files which are transferred to one of the COM24 cards within
a COM1000 system. You can also use a COM24-FLX card if it has been upgraded to an HD
card. Transferring the Mediatune files is similar to the software upgrade process and utilizes
the TFTP mechanism. Please read through and understand this process in the Technicolor
COM1000 Integrator’s Manual if you are not familiar.
First, select the card in the system you wish to have the Mediatune files installed. Typically,
this is the first card in the chassis, but you can select any card in the system to become the
Mediatune card. Technicolor will process and deliver an “Authorization File” specifically
tied to the RID of this card. It will be called “authXXX.tga” with XXX being the last 3 digits
of the RID selected.
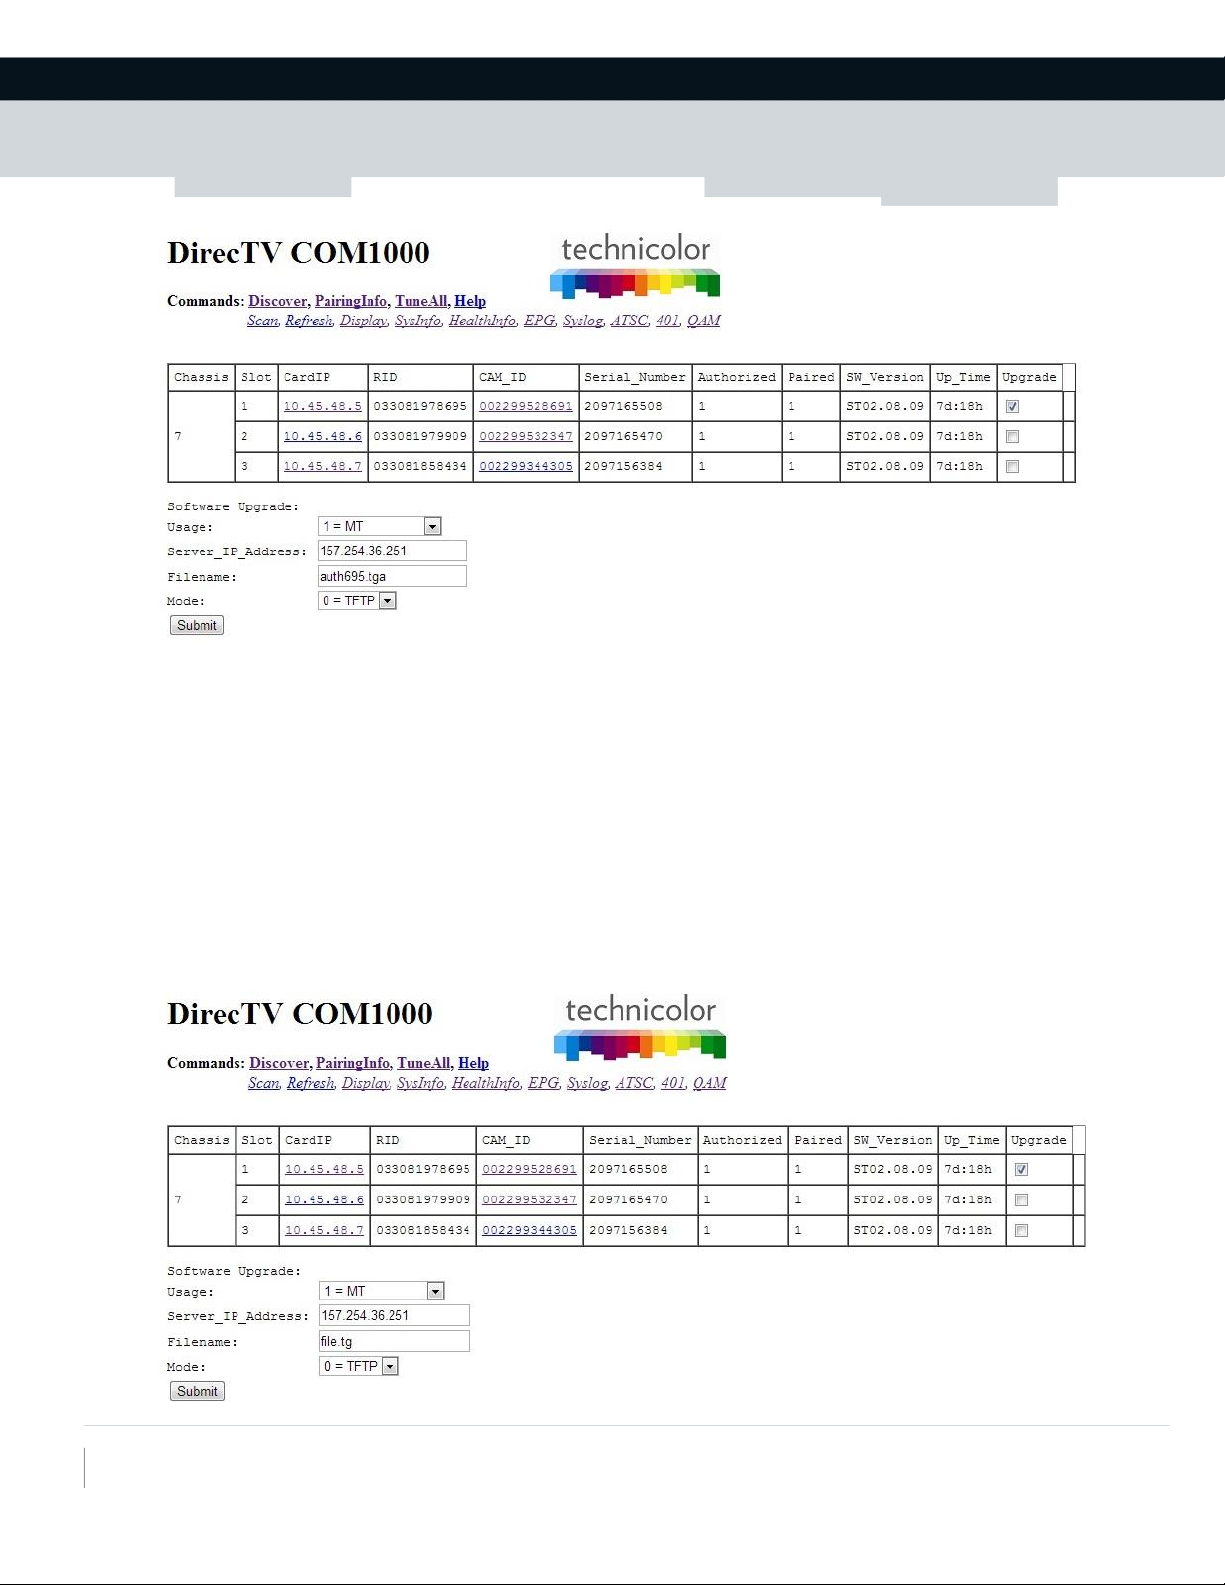
UPLOAD THE AUTHORIZATION FILE
1) From the PairingInfo page on the COM1000 interface, check the box in the Upgrade
column for the card you wish to upload the authorization file.
2) Select Usage: 1 = MT from the drop down list
3) Enter the IP address of the TFPT server
4) Enter the Filename: authXXX.tga
5) Mode: 0 = TFPT
6) Press SUBMIT
Page 3
Technicolor MCS
101 W. 103rd St
Indianapolis, IN 46290
www.technicolor.com/mcs
Once this file has been successfully transferred, you will be able to make other transfers
including the Mediatune directory. You can quickly test to see if this transfer was successful
by opening a browser and typing XXX.XXX.XXX.XXX/info/channels.xml in the address bar
where XXX.XXX.XXX.XXX is the IP address of the COM24 card just authorized. In the example
above, this would be 10.45.48.5/info/channels.xml. In the browser, you will see this file
either downloaded or displayed depending on your browser settings.
UPLOADING THE MEDIATUNE FILES
Mediatune will be available as a “file.tg” file from Technicolor. In the same manner you
uploaded the authorization file, upload the “file.tg” Mediatune directory.
Page 4
Technicolor MCS
101 W. 103rd St
Indianapolis, IN 46290
www.technicolor.com/mcs
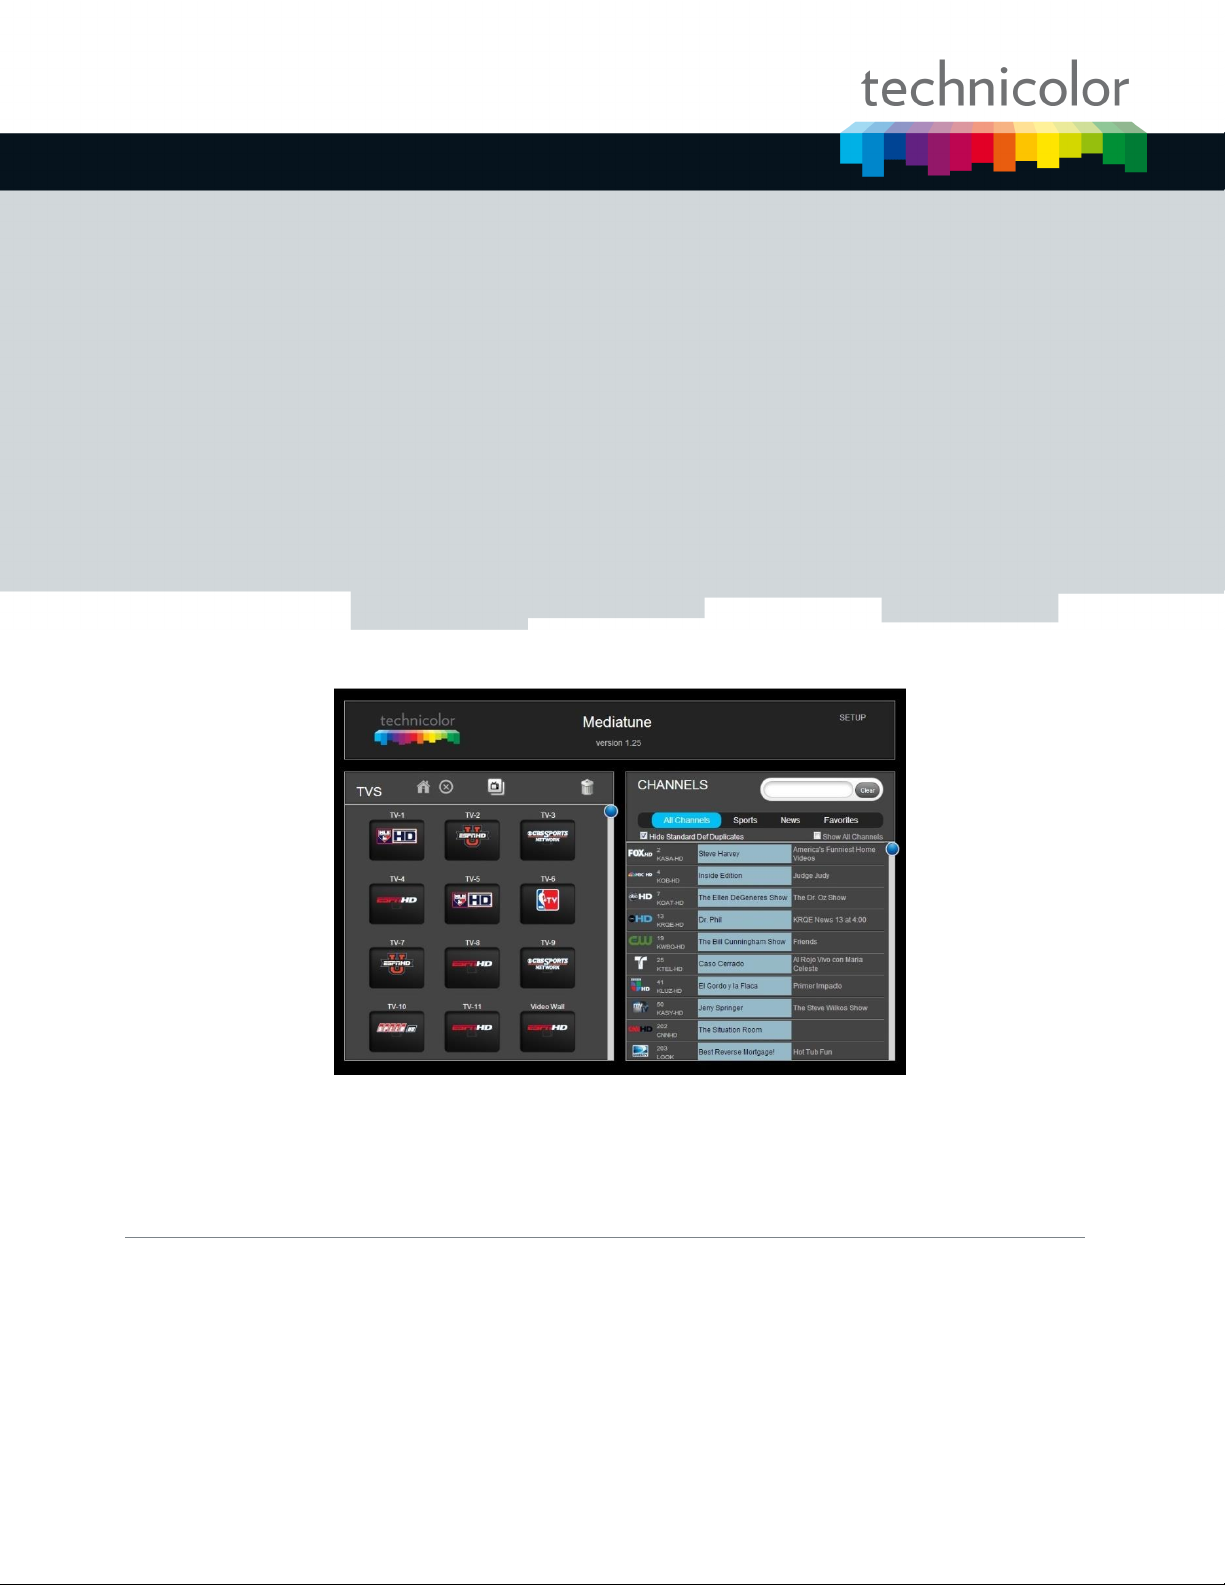
Once uploaded, you will be able to browse to the Mediatune file. On a PC, using Chrome,
browse to XXX.XXX.XXX.XXX/mediatune.html where XXX.XXX.XXX.XXX is the IP address of the
COM24 card containing the Mediatune files.
NOTE: The unzipping process may take 30 seconds to 1 minute to complete, so please allow
a little time for the Mediatune files to be accessible.
You should see something like this….
Success!
Page 5
Technicolor MCS
101 W. 103rd St
Indianapolis, IN 46290
www.technicolor.com/mcs
Configuring Mediatune
Mediatune will utilize all available HD tuners which can be accessed by the COM24 containing
the Mediatune files. If the chassis containing Mediatune is to have cards which are not
desired to work within the Mediatune interface, it is very important to isolate the IP
addresses of these cards so that Mediatune cannot see them. Please contact Technicolor if
you need assistance with this configuration.
TV Mode
Most commonly, Mediatune will be used in “TV Mode”, where it will act as a software matrix
switch to control which content is being sent to each QAM channel or zone. The QAM6 will
need to first be configured in a manner best suited for the property. The default
recommendation by Technicolor would be to assign A=30, B=34, C=38 in the QAM
configuration page. Mediatune always have 2X the license count for available channels in
the interface. If License Count = 6, then there will be 12 independent output channels or
zones. If the License Count = 8, then 16 zones, etc…
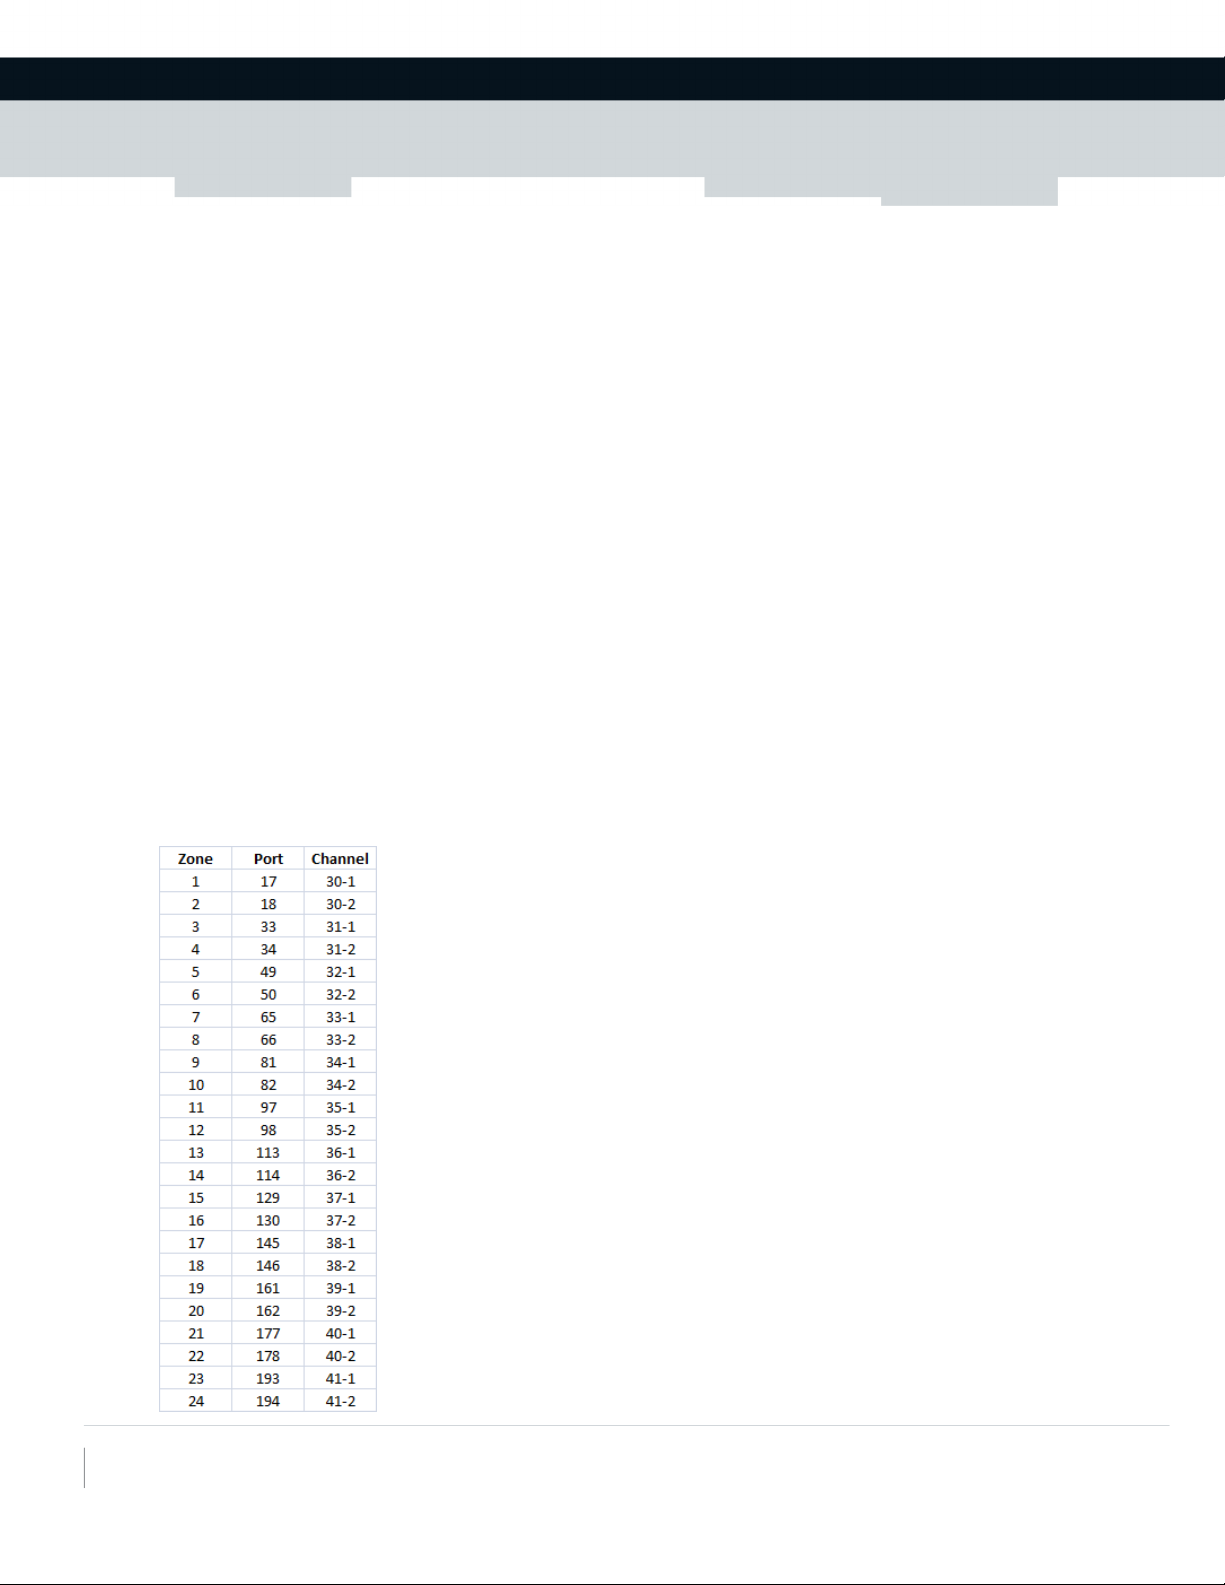
Mediatune is configured so that the first zone will be port 17 on the QAM, and the second
zone is port 18. Since this is an HD product only, the third zone will be 33 and the fourth
zone is 34. The below table indicates how zones are mapped within the Mediatune interface
and how these correspond to the QAM outputs per the default QAM settings.
Page 6

Technicolor MCS
101 W. 103rd St
Indianapolis, IN 46290
www.technicolor.com/mcs
Entering Setup
Click on the SETUP link within the Mediatune interface. The default password for SETUP is
“1234”.
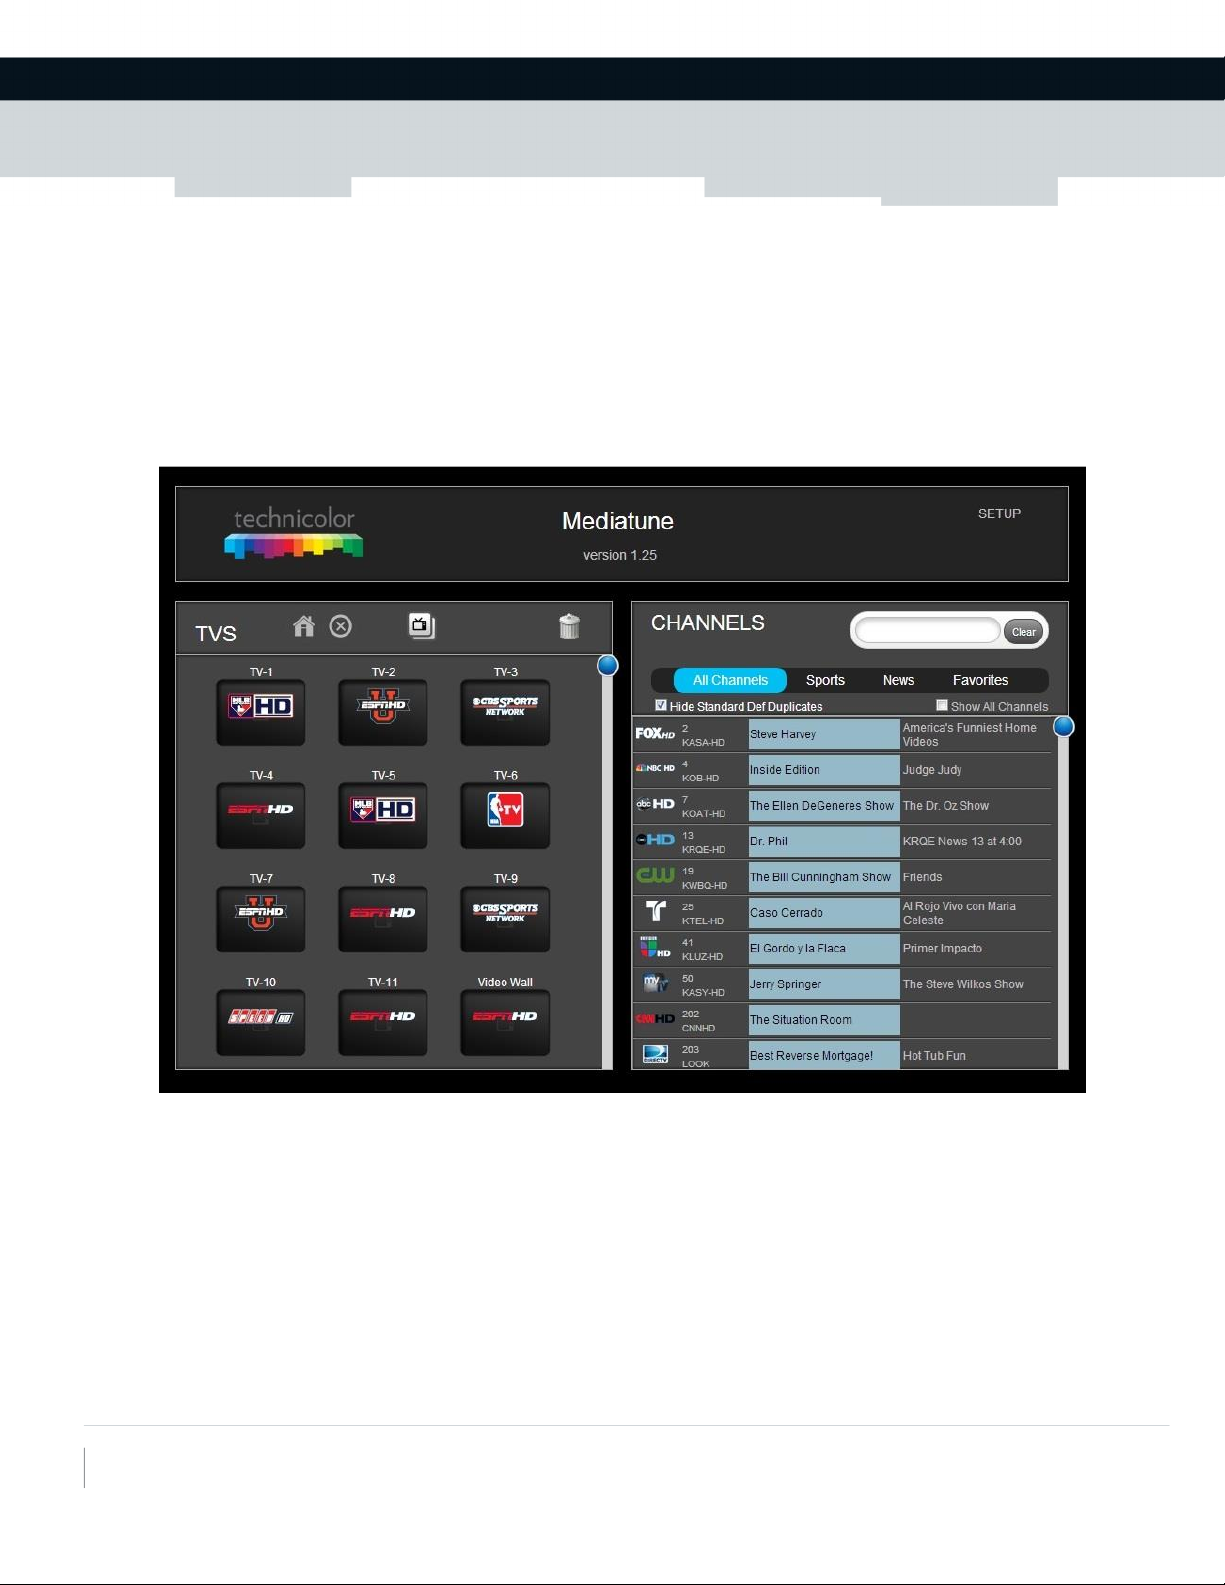
Select TV Mode in the setup screen to assign Mediatune to this mode if not already set.
Once TV mode is selected or confirmed, you can add TVs or zones to the interface by
selecting “Edit TVs”. Remember, each TV is equal to a zone which is also equal to a QAM
channel. If you have 12 zones then you can add up to 12 TVs, each will be tied to a QAM
channel based on the table above. You are allowed to name the TV anything you want. This
should correspond to a label or sticker on the TV so that users can easily identify the
physical TV with the name in Mediatune. Numbering the TVs is typically the best
recommendation.
Page 7

Technicolor MCS
101 W. 103rd St
Indianapolis, IN 46290
www.technicolor.com/mcs
Example of TV names…
Setting up the TVs
Mediatune is designed such that a TV is set to a specific QAM channel and does not change.
Once set to the correct channel, there is no reason to change the channel. Based on the
chart above, each zone or can be assigned to a specific TV or to several TVs tied together as
one zone. Once the TV has been set, you may try to lock it to that channel via the user
interface so that accidental channel changes do not occur with an IR remote control.
If you are using a DCI401MCS device to receive the Pro:Idiom encrypted MPEG4 content from
the COM1000, you can perform a couple tricks to assure that you are on the correct channel
as well as prevent any accidental channel changes.
Channel Map all the DCI401MCS devices
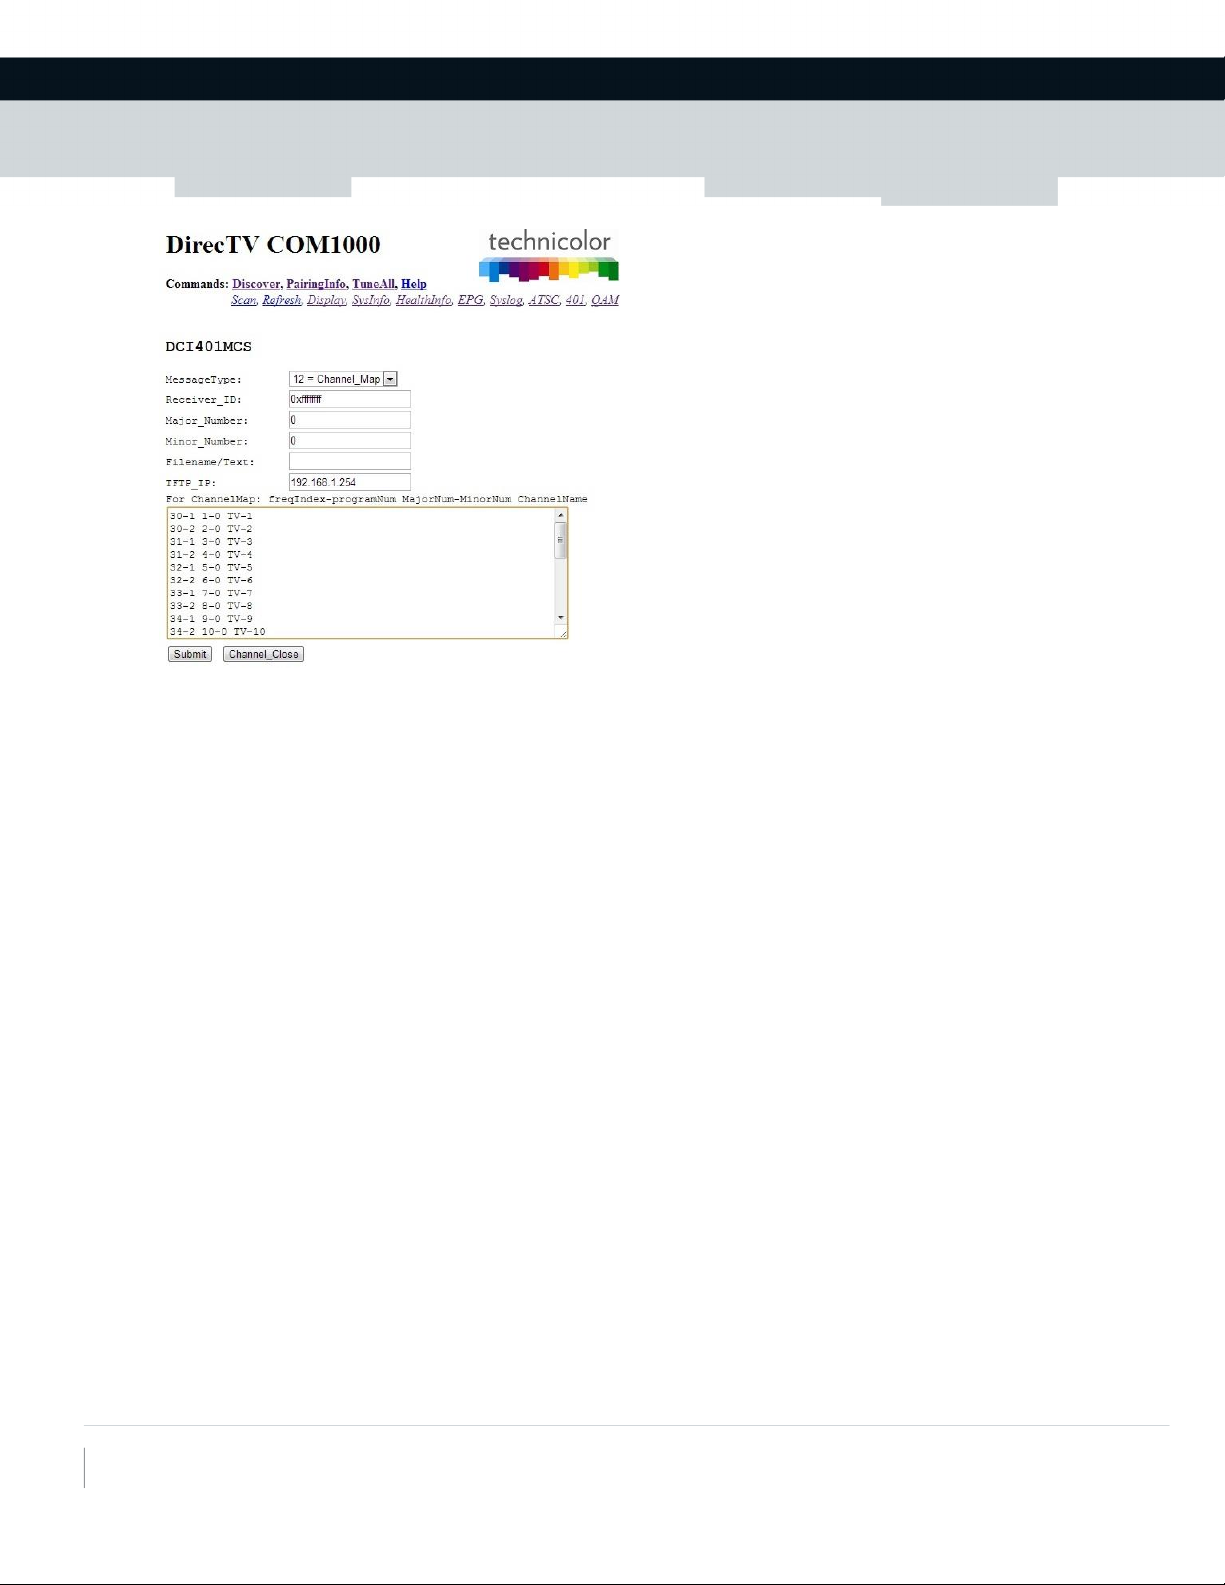
Using the channel map feature of on the 401 tab, you can send a very simple channel map to
each of the DCI401MCS’s so that users can easily tune to the correct channel corresponding
with the desired zone.
Page 8
Technicolor MCS
101 W. 103rd St
Indianapolis, IN 46290
www.technicolor.com/mcs
Using the setting shown above and sending the following channel map would change the
channel lineup on the DCI401MCS to show RF channel 30-1 as virtual channel “1” with the
title TV-1. This way, any TV marked as zone 1 can be easily identified and tuned to the
correct channel. Please see the DCI401MCS Command Set Primer for more information.
30-1 1-0 TV-1
30-2 2-0 TV-2
31-1 3-0 TV-3
31-2 4-0 TV-4
32-1 5-0 TV-5
32-2 6-0 TV-6
33-1 7-0 TV-7
33-2 8-0 TV-8
34-1 9-0 TV-9
34-2 10-0 TV-10
35-1 11-0 TV-11
35-2 12-0 TV-12
36-1 13-0 TV-13
36-2 14-0 TV-14
37-1 15-0 TV-15
37-2 16-0 TV-16
38-1 17-0 TV-17
38-2 18-0 TV-18
39-1 19-0 TV-19
39-2 20-0 TV-20
40-1 21-0 TV-21
40-2 22-0 TV-22
41-1 23-0 TV-23
41-2 24-0 TV-24
Page 9

Technicolor MCS
101 W. 103rd St
Indianapolis, IN 46290
www.technicolor.com/mcs
Locking the DCI401MCS
Once the DCI401MCS is tuned to the correct channel for each TV or zone, it is good practice
to lock the device so that it cannot accidentally change to a different channel or power off.
From the DCI401MCS Command Set Primer, this can be done with the following command.
Editing Channels
Once you’ve configured the TVs, you can edit how and which channels are displayed in the
programming list. By default, all the DIRECTV channels are displayed once Mediatune is
installed. After you enter setup and select “Edit Channels” will the interface save and
display only the channels you’ve selected. Hint: Editing channels requires paging though
several screens and is best completed on a PC running the Chrome browser.
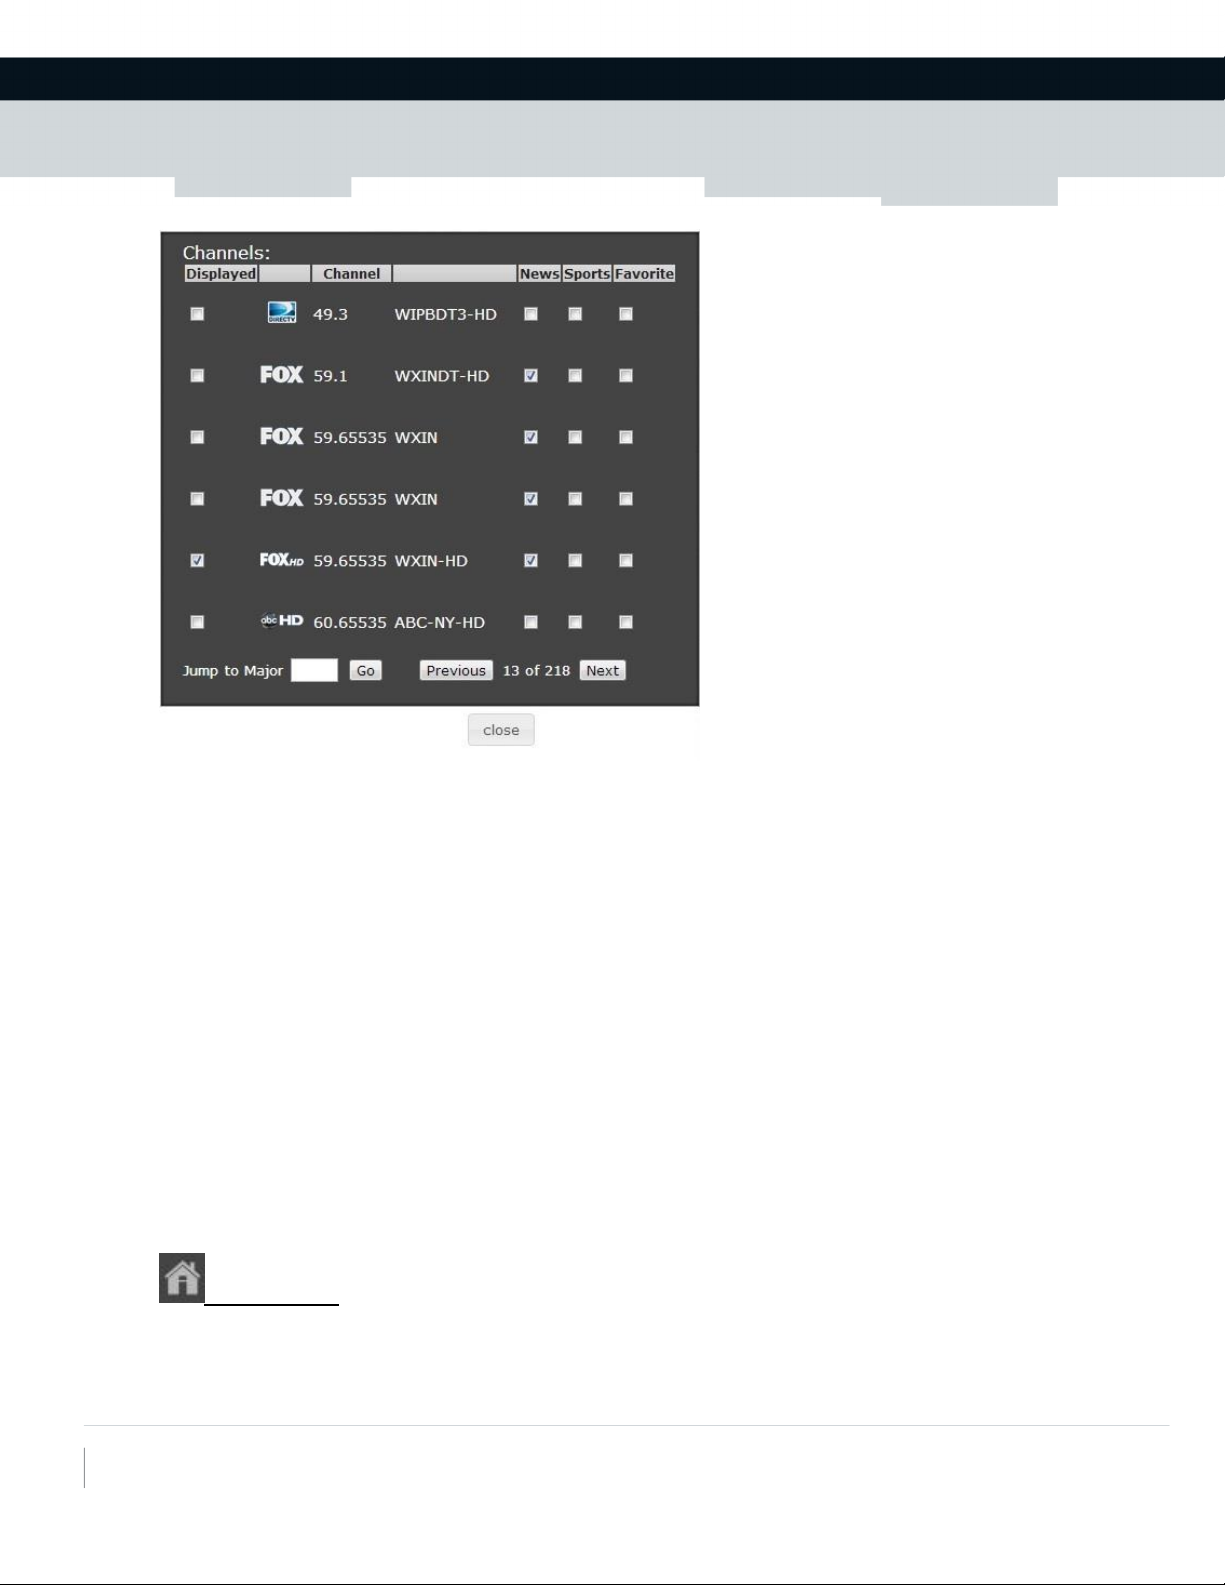
Selecting Local Channels
All local channels are shown in a list which may also include channels from other markets
than the ones displayed. You must carefully browse through this list and select to display
the correct channels corresponding to the correct HD channel. You may also see channels
for local content via an antenna—these need to be ignored as they do not carry any
programming. All valid DIRECTV local channels will have a .65535 after the channel number.
As an example, in Indianapolis, Fox is channel 59, so in the DIRECTV guide, channel 59.65535
WXIN-HD would be the correct HD version of the local Fox affiliate.
Page 10
Technicolor MCS
101 W. 103rd St
Indianapolis, IN 46290
www.technicolor.com/mcs
Check the box in the Display column to display on the Mediatune interface. You can also
select channels to be added to a Favorites list or change the default genre if desired.
HINT: Mediatune does not know what channel package has been authorized by DIRECTV for
the COM24 cards, so it is recommended to page through the channel setup screen to display
only the channels authorized. This will reduce the possibility of unauthorized messages
coming to the TVs when an unauthorized channel is dropped on a zone.
Using Mediatune
Mediatune was designed to be a simple drag and drop style user interface. Simply click on a
desired channel to watch and drop it on the TV or zone you would like to watch it on.
Mediatune will do the rest to assign a tuner, tune the content, and route the content to the
desired output.
Home Button
You can set up a fixed “Home” configuration so that at anytime you can easily tune all the
TVs to a known desired output. Once you have all the zones playing the desired
configuration, enter SETUP and click “Save Home Setup”. Now anytime you press the Home
button, Mediatune will revert back to this known desired configuration.
Page 11

Technicolor MCS
101 W. 103rd St
Indianapolis, IN 46290
www.technicolor.com/mcs
Clear All
If you’d like to clear all the tuners, simply click the clear all button. You will be prompted
to confirm.
Tune All
If you’d like all the TVs or zones to play the same channel, drag the desired channel to the
Tune All button. You will be prompted to confirm, then all TVs will tune to the desired
channel.
Clear TV
If you’d like to clear a specific TV, you can drag that TV to the trash can icon. You will be
prompted to confirm.
General Tip, Tricks and Best Practices
Mediatune is always accessed via the web page XXX.XXX.XXX.XXX/mediatune.html
where XXX.XXX.XXX.XXX is the IP address of the card containing the Mediatune files.
If you are using a wireless network to connect an iPad or other tablet device, you
must make sure you have a very good wireless signal in all areas where the wireless
devices are used. It is good practice to always have a connected PC running Chrome
wired directly into the network to insure a good connection to the interface.
On the iPad, you can save the Mediatune web interface to the home screen by
selecting “Add to Home Screen”. This will provide an icon you can click on the home
screen which takes you directly to Mediatune.
If you are using an iPad, it is helpful to permanently mount the device with a
connected power supply. If on a power supply, you can prevent the interface from
timing out by setting the Auto-Lock to Never. You can turn on and off the device
from the Sleep/Wake button on the top corner.
 Loading...