

Page 1
MOVABLE AIR CONDITIONER
●
CLIMATIZZATORE PORTATILE
CLIMATISEUR MOBILE
●
MOBILES KLIMAGERÄT
ACONDICIONADOR PORTATIL
●
AR CONDICIONADO PORTÁTIL
OPERATING INSTRUCTIONS
●
ISTRUZIONI D'USO
NOTICE D’UTILISATION
●
BEDIENUNGSANLEITUNG
INSTRUCCIONES DE USO ● INSTRUCÇÕES DE FUNCIONAMENTO
EG
I
F
D
E
37.4252.003.1 09/2004
Save these instructions / Conservate queste istruzioni / Conserver cette notice d’utilisation
Bewahren Sie bitte diese Bedienungsanleitungen auf / Guardeis estas instrucciones / Guarde estas instruções
P
Page 2
2
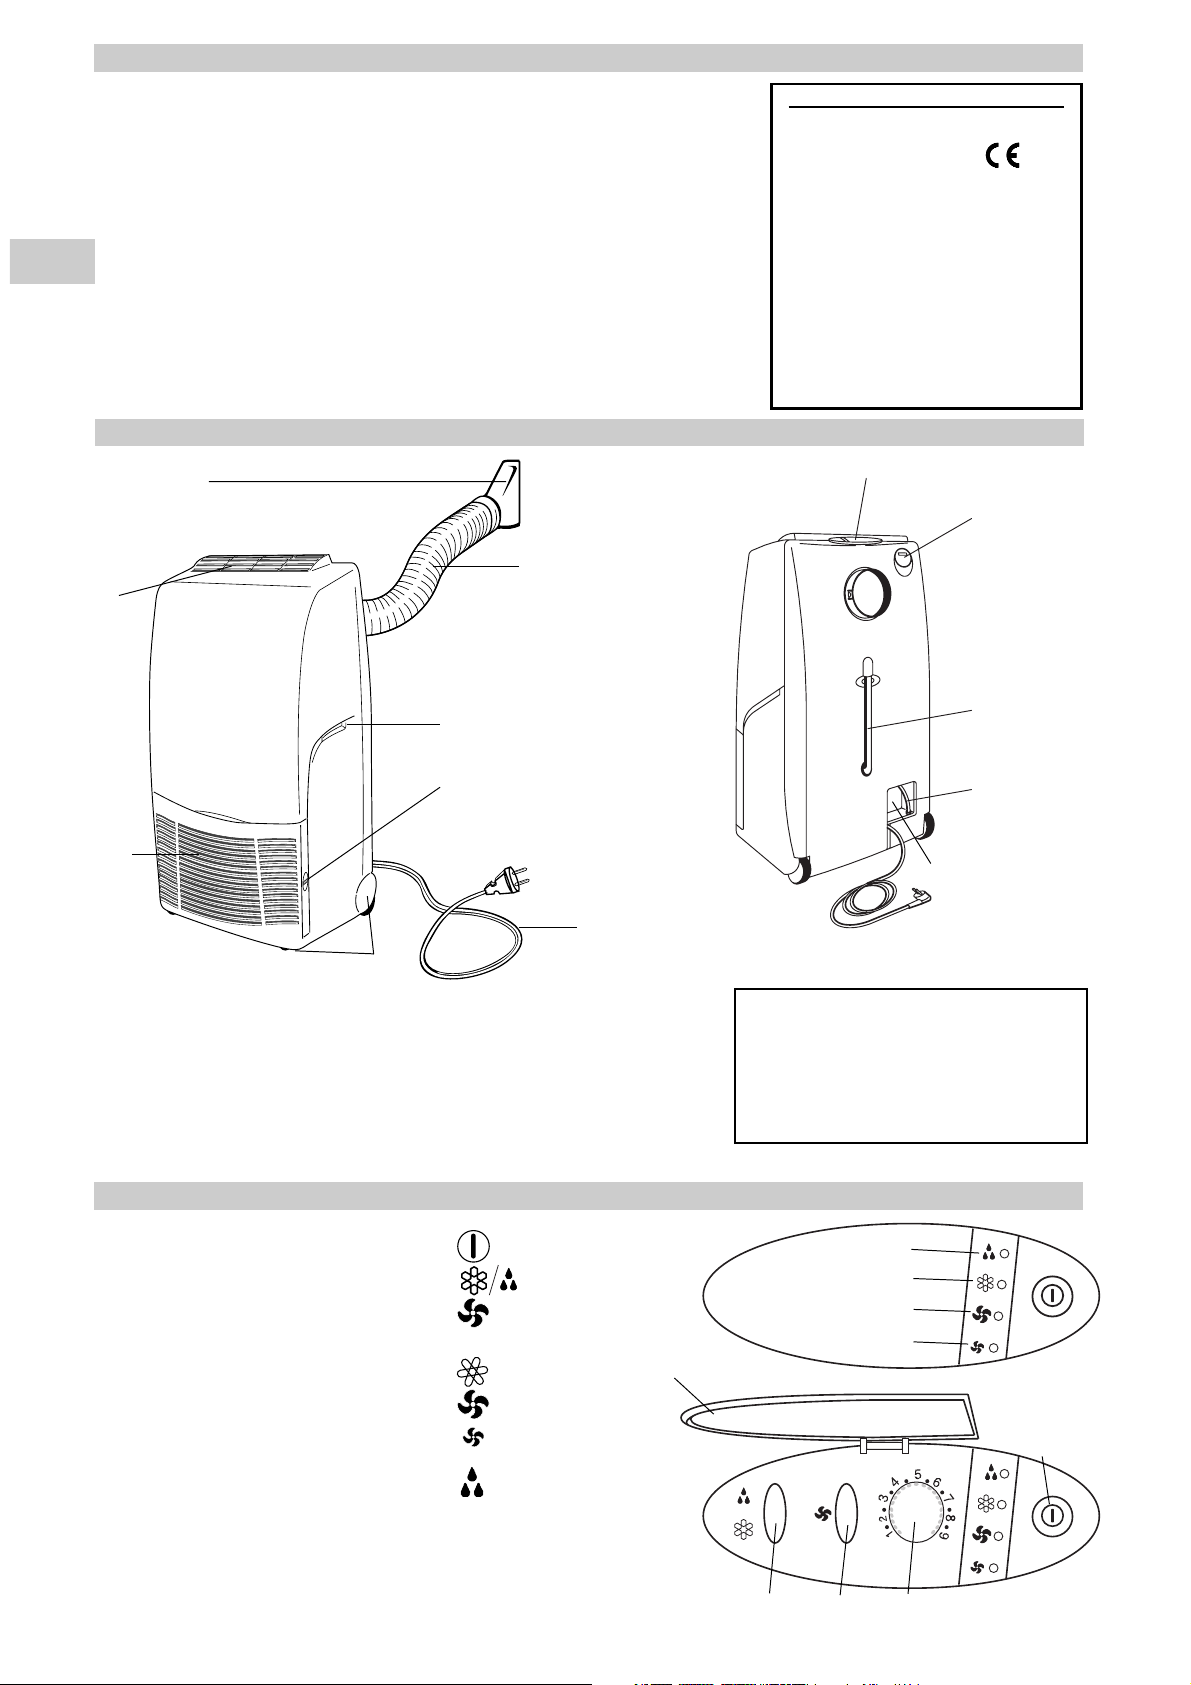
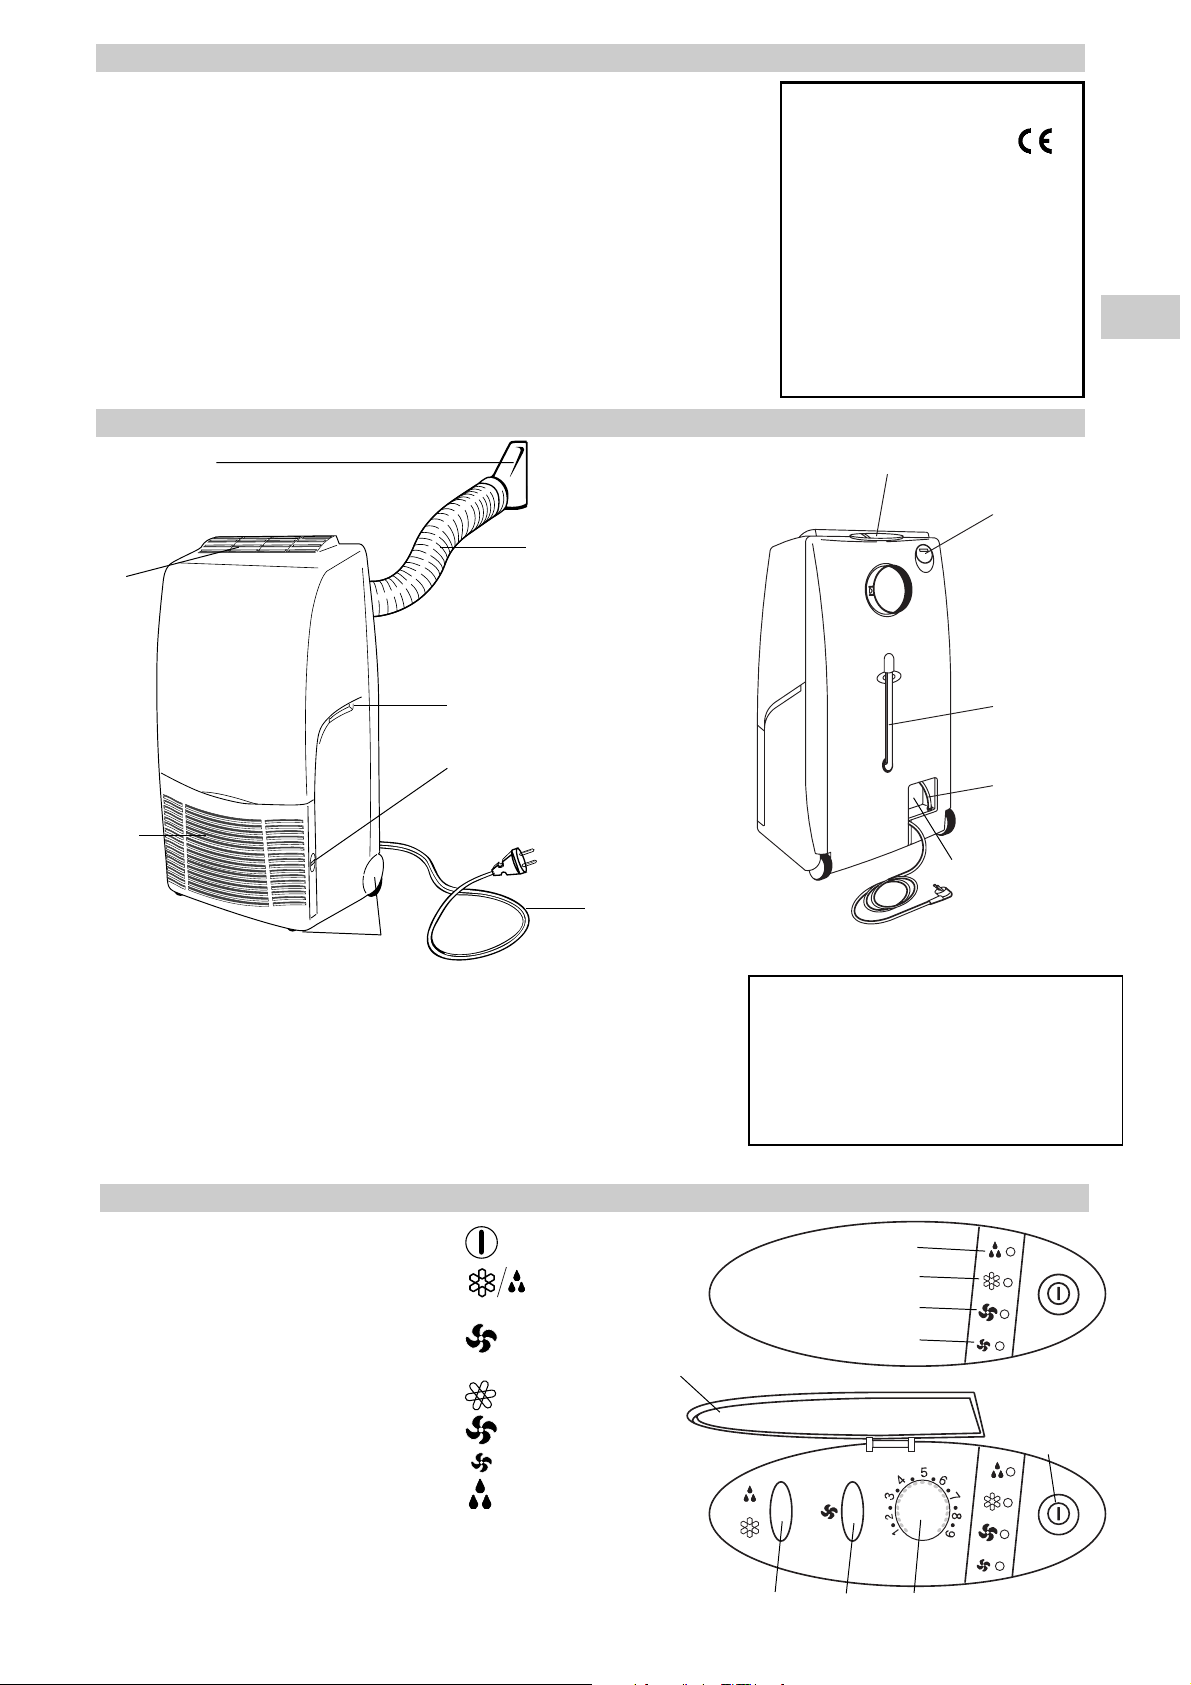
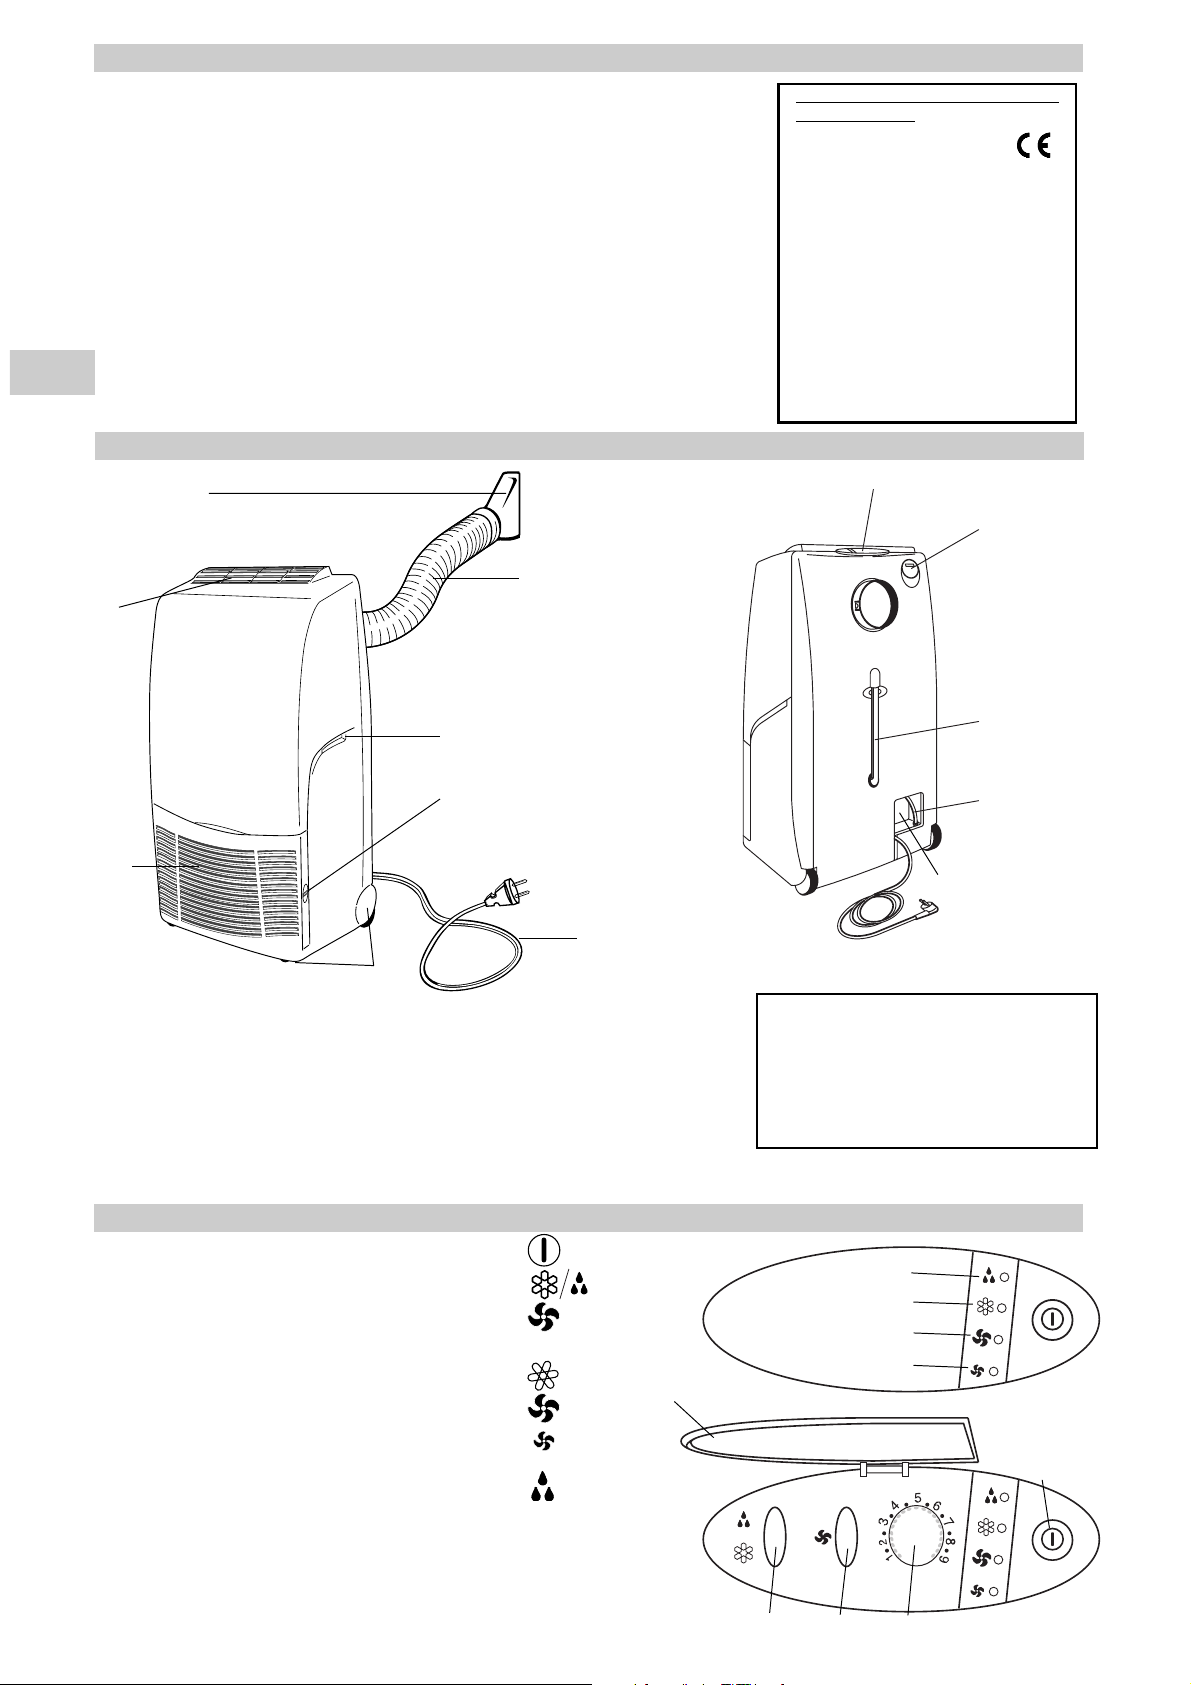
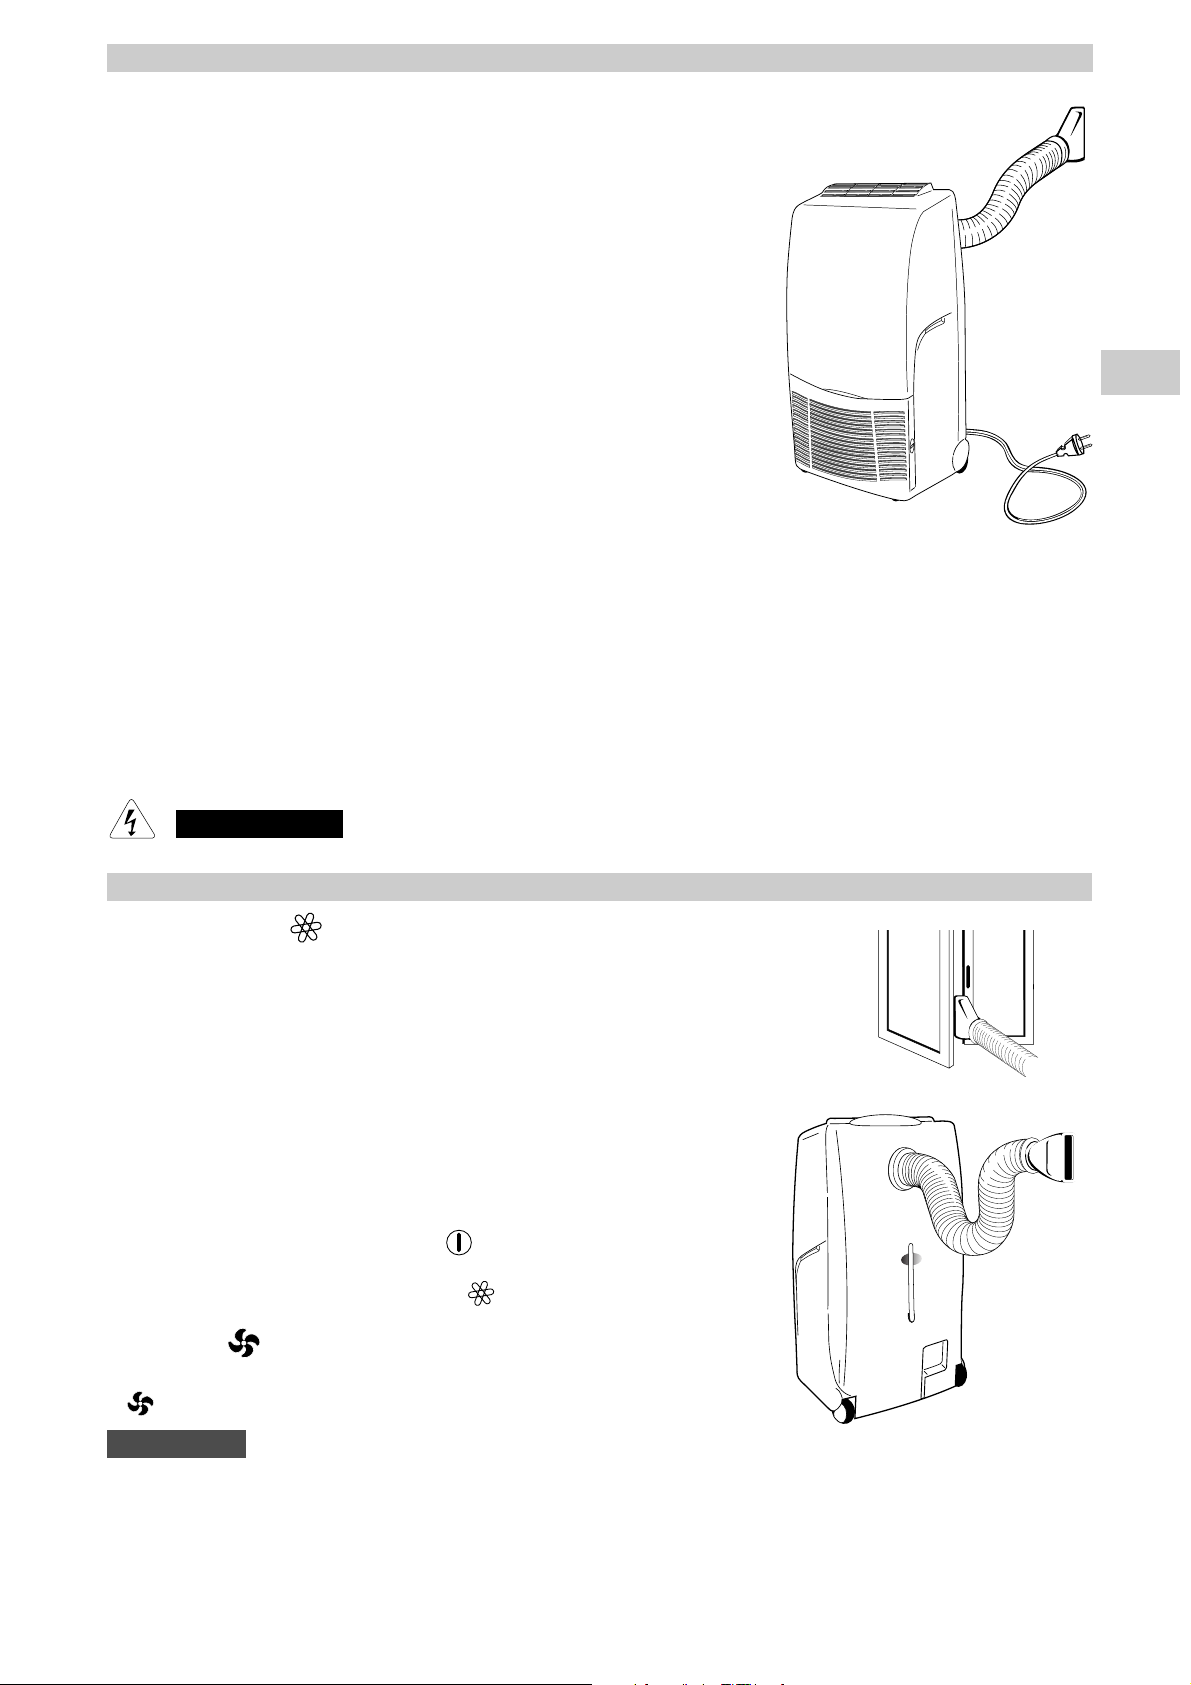
PRODUCT IDENTIFICATION
CONTENTS
1. Control panel
2. Supply air deflector
3. Transportation handle (both sides)
4. Return air grille
5. Transportation wheels
6. Timer (if installed)
7. Retractile flexible pipe
8. Terminal pipe fitting
9. Air filter (right side)
10. Electric cable with plug
11. Tube for condensate discharge
(Main tank)
12. Tube for condensate discharge
(Secondary tank)
13. Space for cable winding
EG
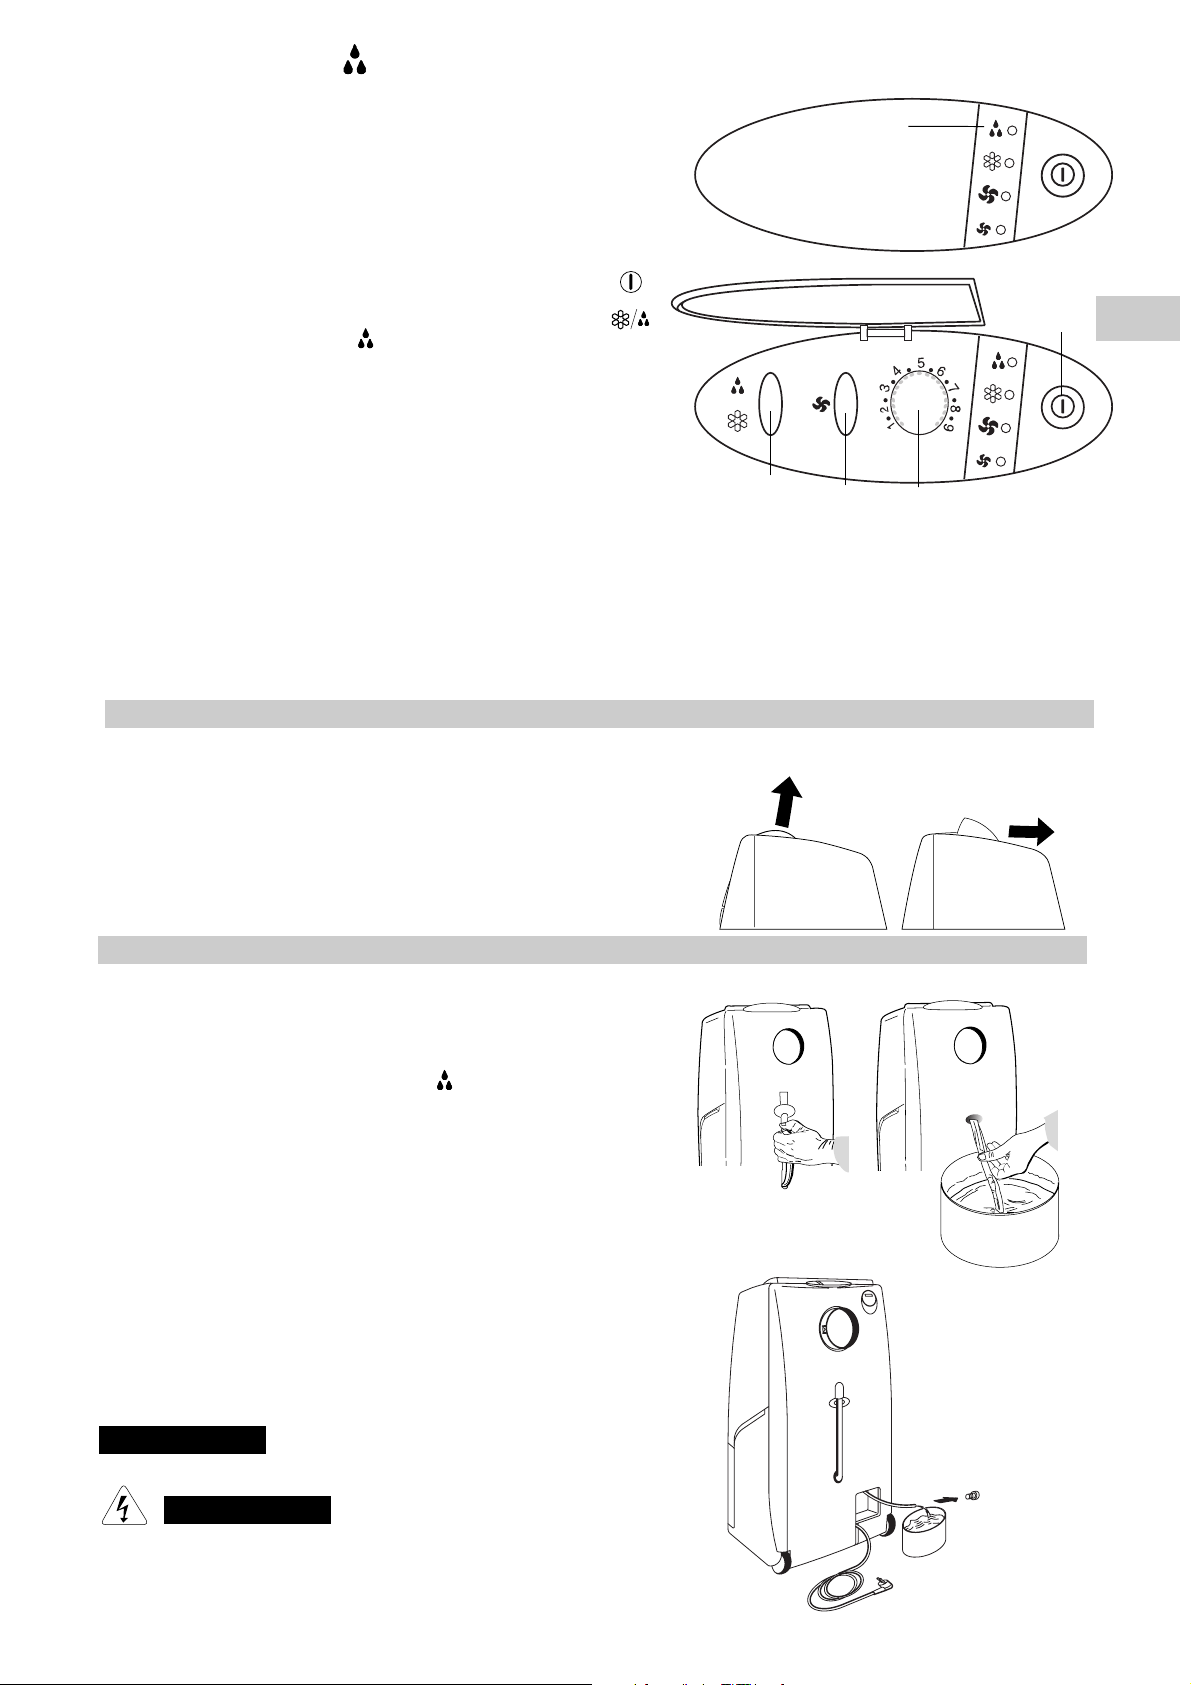
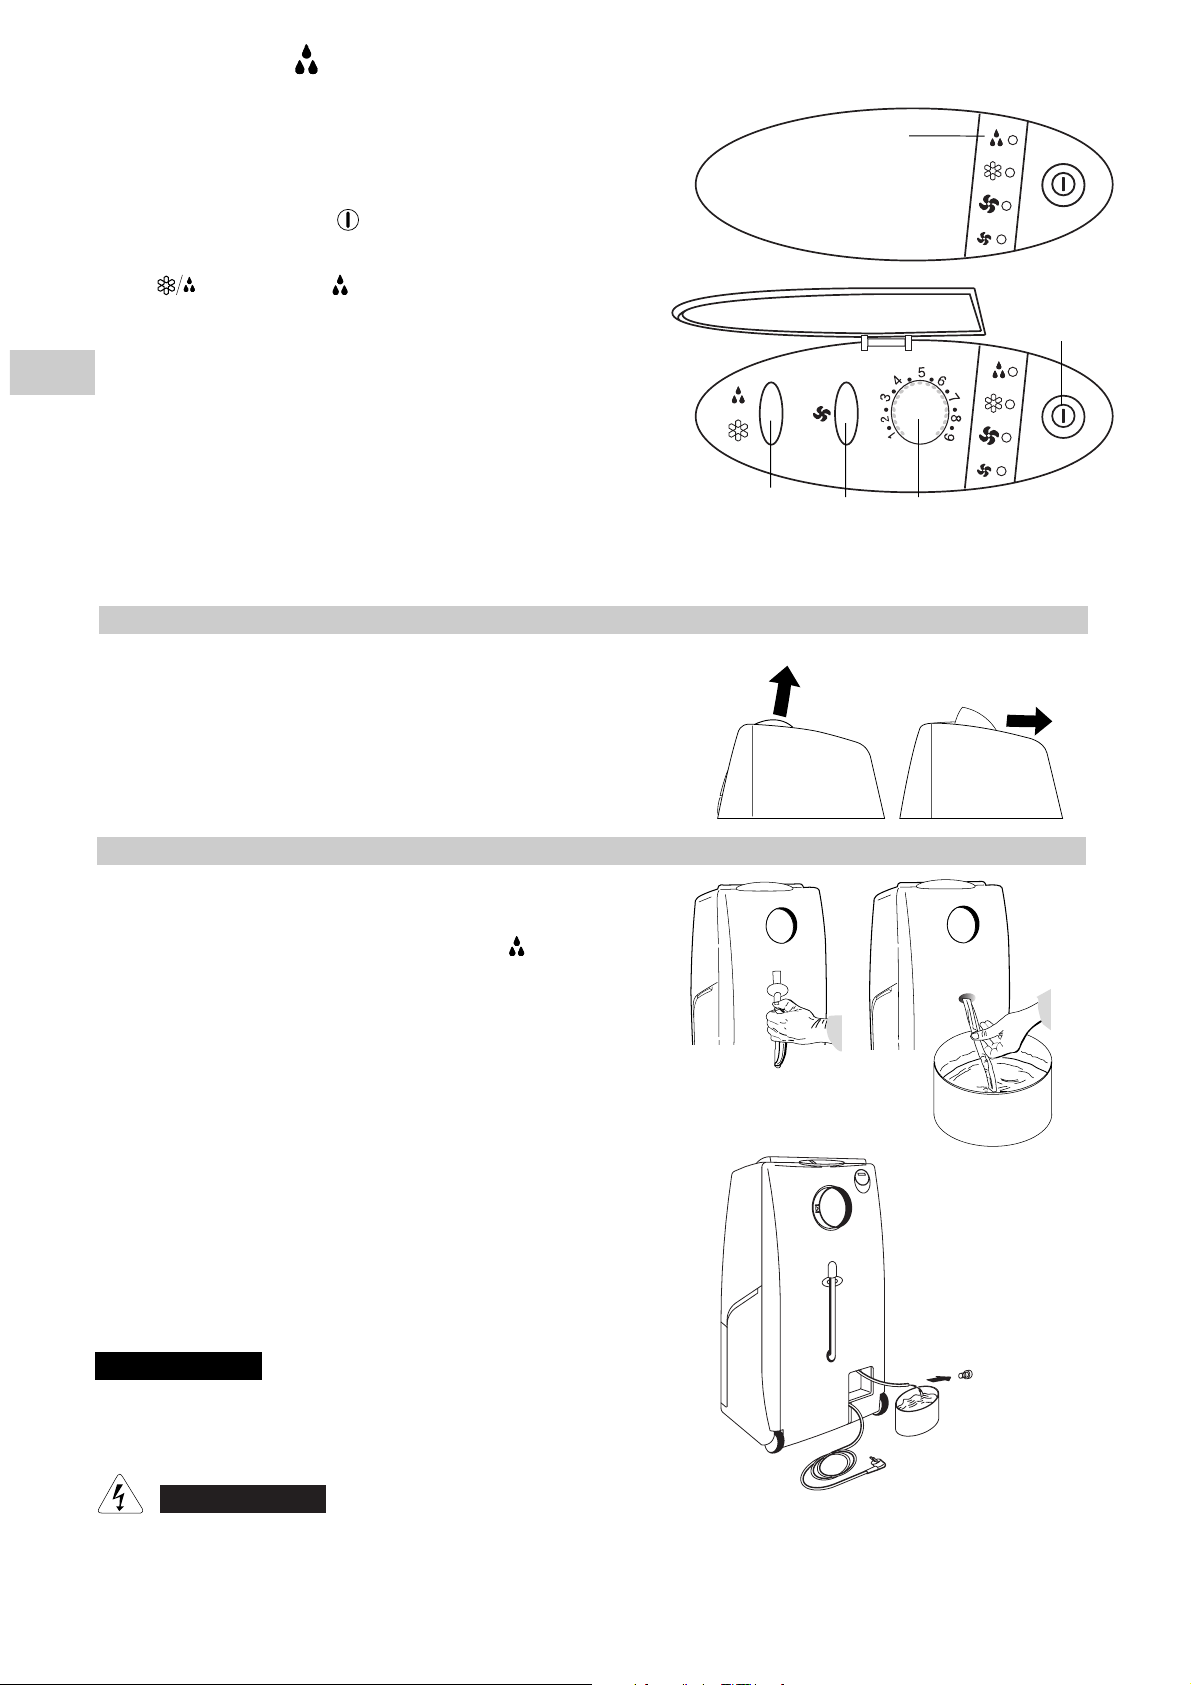
CONTROL PANEL
A. ON/OFF Push-button switch
B. Cooling / Dehumidification push-button
C. High / Low fan speed push-button
D. Electronic thermostat Knob
E. Cooling lamp
F. High fan speed lamp
G. Low fan speed lamp
H. Light up lamp for dehumidification.
Blinking lamp for full water tank.
I. Control panel cover
PRODUCT IDENTIFICATION................................................................................. 2
CONTROL PANEL ................................................................................................. 2
BEFORE USING THE APPLIANCE ....................................................................... 3
OPERATION
Cooling ............................................................................................ 3
Dehumidification (dry)...................................................................... 4
SETTING AIR FLOW DIRECTION ......................................................................... 4
HOW TO DISCHARGE THE WATER TANKS ....................................................... 4
PORTHOLE KIT ..................................................................................................... 5
ACCESSORIES (SUPPLIED ON REQUEST)......................................................... 5
Air clean filter ....................................................................................5
CARE AND CLEANING .......................................................................................... 6
USEFUL ADVICE.................................................................................................... 6
DECLARATION OF CONFORMITY
This product is marked as it
satisfies Directives:
– Low voltage no. 73/23 EEC and
93/68 EEC.
– Electromagnetic compatibility no.
89/336 EEC, 92/31 EEC and 93/68
EEC.
This declaration will become void in
case of of misusage and/or non
observance though partial of
manufacturer's installation and/or
operating instructions.
2
3
5
4
7
8
9
10
Operating limits:
Room Temperature:
Cooling: MIN: 15°C D.B. / 12°C W.B.
MAX: 35°C D.B. / 24°C W.B.
Dehumidification: MIN: 10°C D.B / 80% R.H.
MAX: 35°C D.B. / 80% R.H.
H
E
F
G
B
I
A
C
D
12
11
1
6
13
Page 3
3
EG
●
WARNING! Do not stick anything into the air outlet of the air conditioner. This is very dangerous because the fan is rotating
at high speed.
●
WARNING!
The air conditioner is provided with a time-guard system, which does not allow re-starting of compressor until after 3 minutes from a previous stop. So avoid quick movements of the thermostat knob in both directions when compressor is running.
●
Make sure that there are no obstacles around the unit affecting the free circulation of air. Do not block the air intake and
outlet of the unit with curtains or other. Never put objects on the top of the unit.
●
The air conditioner reaches the maximum efficiency at the following conditions:
1-The flexible tube is retracted, without bends and without the outlet nozzle.
2-When you switch on the air conditioner for the first time, set the fan at the LOW speed for at least one hour, then set the
HIGH speed.
●
The manufacturer assumes no responsibilities if the safety regulations or local codes are not observed.
1.Always unplug the unit from the power socket before moving or cleaning it.
BEFORE USING THE APPLIANCE
OPERATION
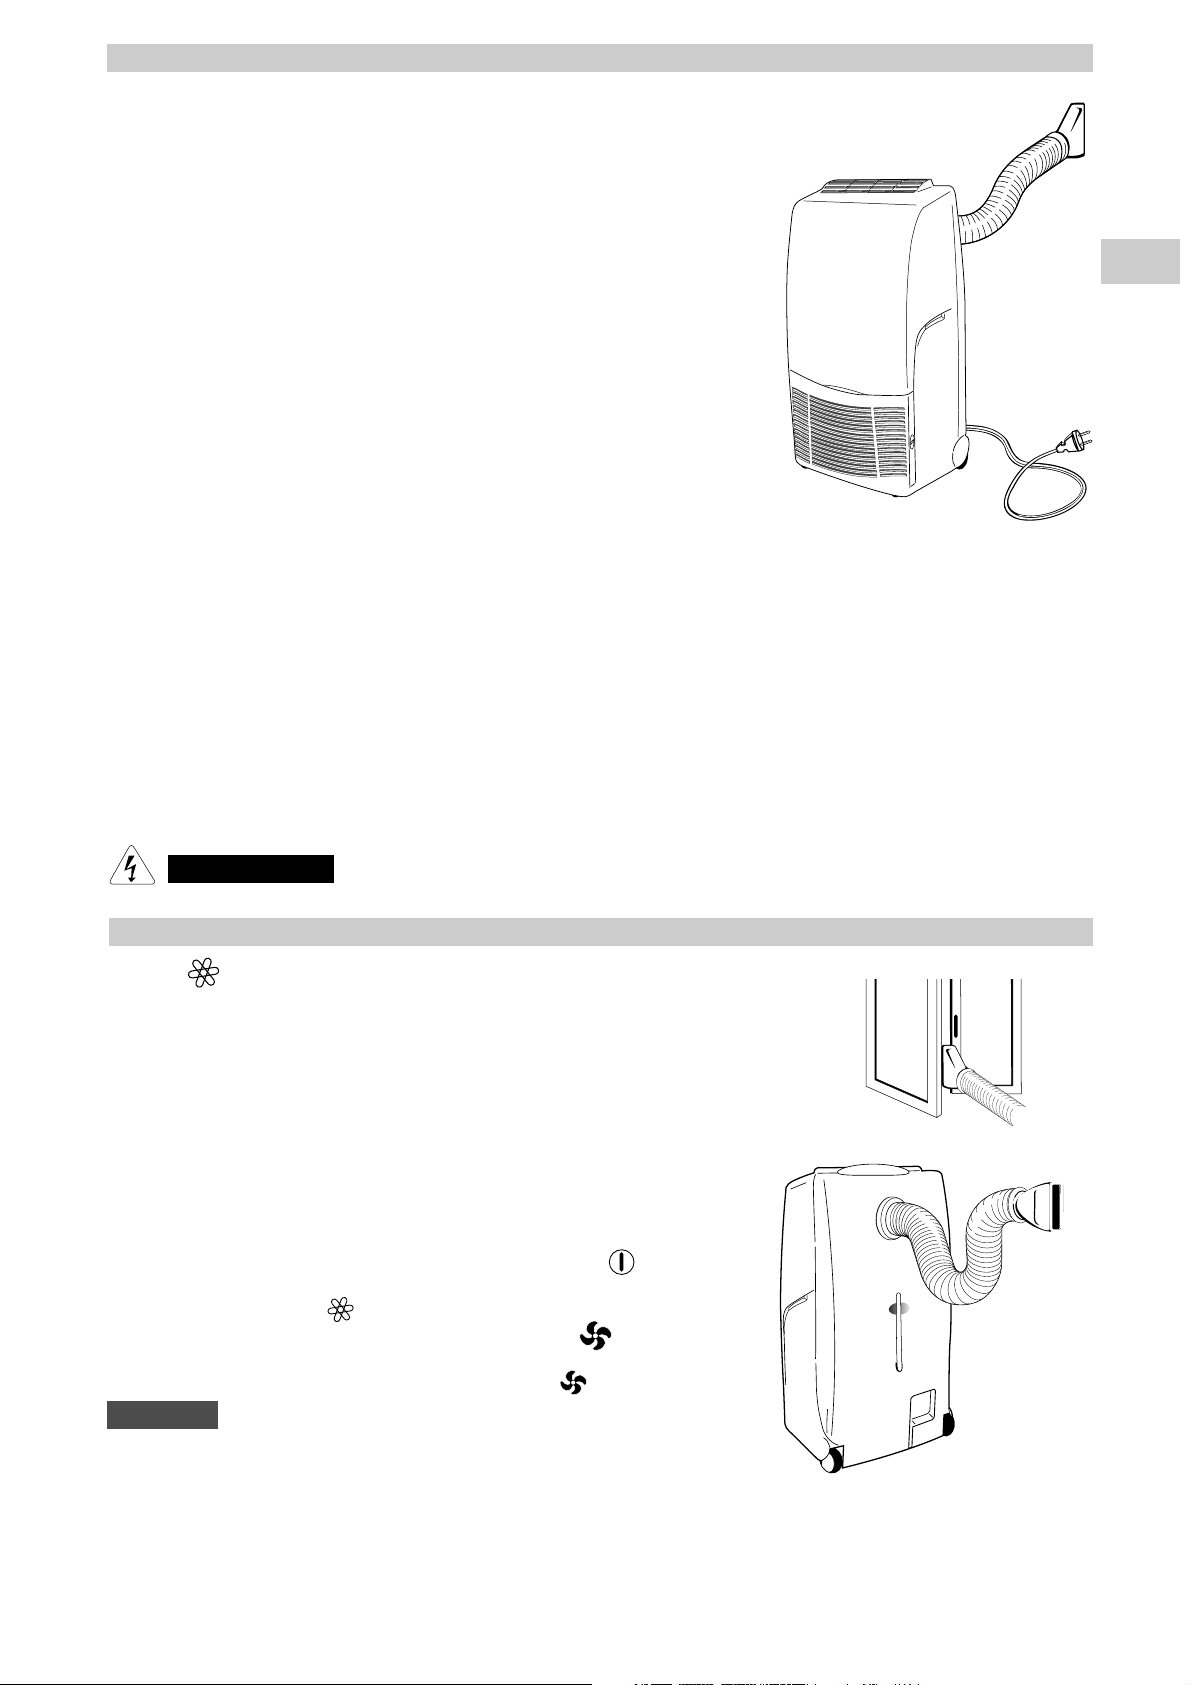
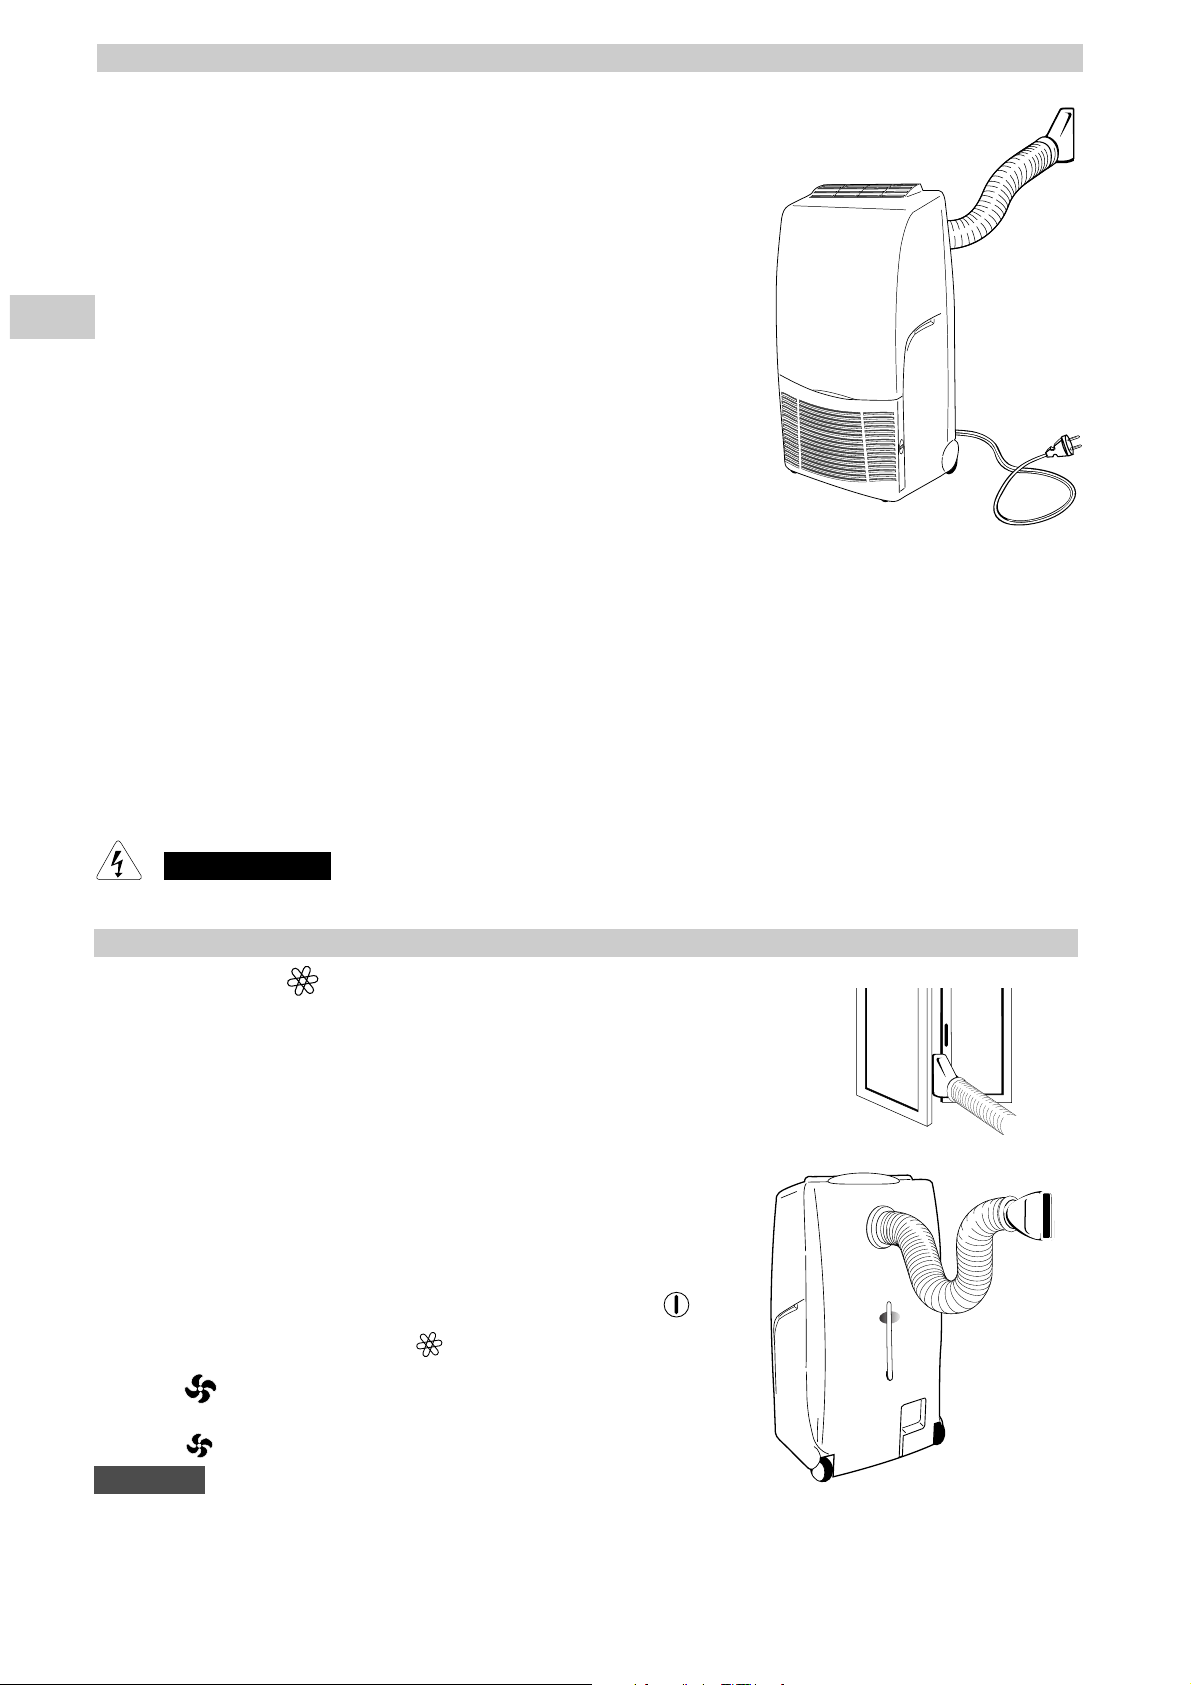
COOLING
●
Place the air conditioner as near as possible to the window. Fit the flexible tube by hooking
it to the rear of the unit. Extend the flexible tube just enough to reach the outdoor, passing
under the window shutters set ajar
.
●
In case there is a window sill towards the inside of the room, it might be better to use the
supplied outlet nozzle. Insert the nozzle into the free end of the flexible tube
.
●
Open the window and lock one of the shutters. Place the outlet nozzle between the two
shutters, held together with the supplied lace
.
●
Avoid sharp bends or plies of the flexible tube
.
●
In case of porthole utilise make a 138 mm diameter hole in the window pane
.
●
Twist the knob (D) of the thermostat to the right until you reach the position of maximum
cooling
.
●
Switch on the air conditioner pressing the ON/OFF push-button (A) ,lamps of last operations are displayed
.
●
Select the cooling operation pressing the push-button (B) , lamp (E) lights
.
●
Press the push-button (C) to select the high fan speed, lamp (F) lights
.
●
When room temperature has reached the most suitable value for your comfort, press again
the push-button (C) to select the low fan speed, the lamp (G) lights
.
The air conditioner disposes of the condensate water automatically at the HIGH fan
speed, on the contrary at the LOW fan speed the condensate water is collected in
the tank
.
●
Check that the power supply at the location where the air conditioner is going to be
used is 220-240V ~ 50Hz .
●
Make sure that the electrical installation is suitable to supply continuously current
necessary for the air conditioner in addition to that already used by other electric
appliances (white goods, lighting). See the max electric input indicated on the
name plate positioned on the air conditioner.
●
The installation of a double-pole switch, protected by 10 A fuses of the delayed
type, upstream the electricity wall socket, is recommended.
●
The unit has to be connected according to the local electrical rules.
●
Make sure that circuit breakers, fuses, etc, are of sufficient capacity to handle a
start-up current of 20 A (generally less then 1 second).
●
Do not install the air conditioner where it could be wetted by drops of water (i.e. in
laundries).
●
Make sure that the ON - OFF push-button switch on the control panel of the air
conditioner is in OFF position.
●
Before connecting the air conditioner to a power socket, make sure that the socket
is provided with an earth connection in compliance with local codes.
●
Never use the power plug as a mean to start or stop the air conditioner: always
use the ON/OFF push-button switch on the air conditioner control panel.
●
Do not move the air conditioner during operation, turn it off and disconnect the
plug from the power supply. Verify and eventually discharge the condensate water,
through the discharge tube located on the rear of the unit.
WARNING
NO!
NOTE
●
Now slowly twist the thermostat knob back towards the left until the compressor stops.
At this point the air conditioner is set for automatic operation under the control of the electronic thermostat to maintain the room temperature at the pre-set value.
●
To stop the air conditioner press again the ON/OFF push-button. (A).
Page 4
4
When the air conditioner is in the dehumidification mode, it doesn’t
cool the room.
When you use the air conditioner in the dehumidification mode, you
don’t have to use the flexible tube. For maximum dehumidification efficiency leave the rear discharge outlet free to discharge directly into
the room.
●
Remove the flexible tube by grasping it at the attachment point on
the air conditioner and twisting it until you release it from the blocking hooks.
Press the ON /OFF push button (A) to start the air conditioner.
●
Select dehumidification mode pressing the push button (B) ,
lamp (H) lights up . The humidity of the room (condensate
water) will be collected in the internal tank of the air conditioner.
●
To stop the air conditioner press again the ON/OFF push-button.
(A).
WARNING !
The air conditioner may be used as dehumidifier only if the room temperature is above 10 °C. When the room temperature is below 10 °C,
the compressor stops and the dehumidification doesn’t occur, while
the fan goes on working.
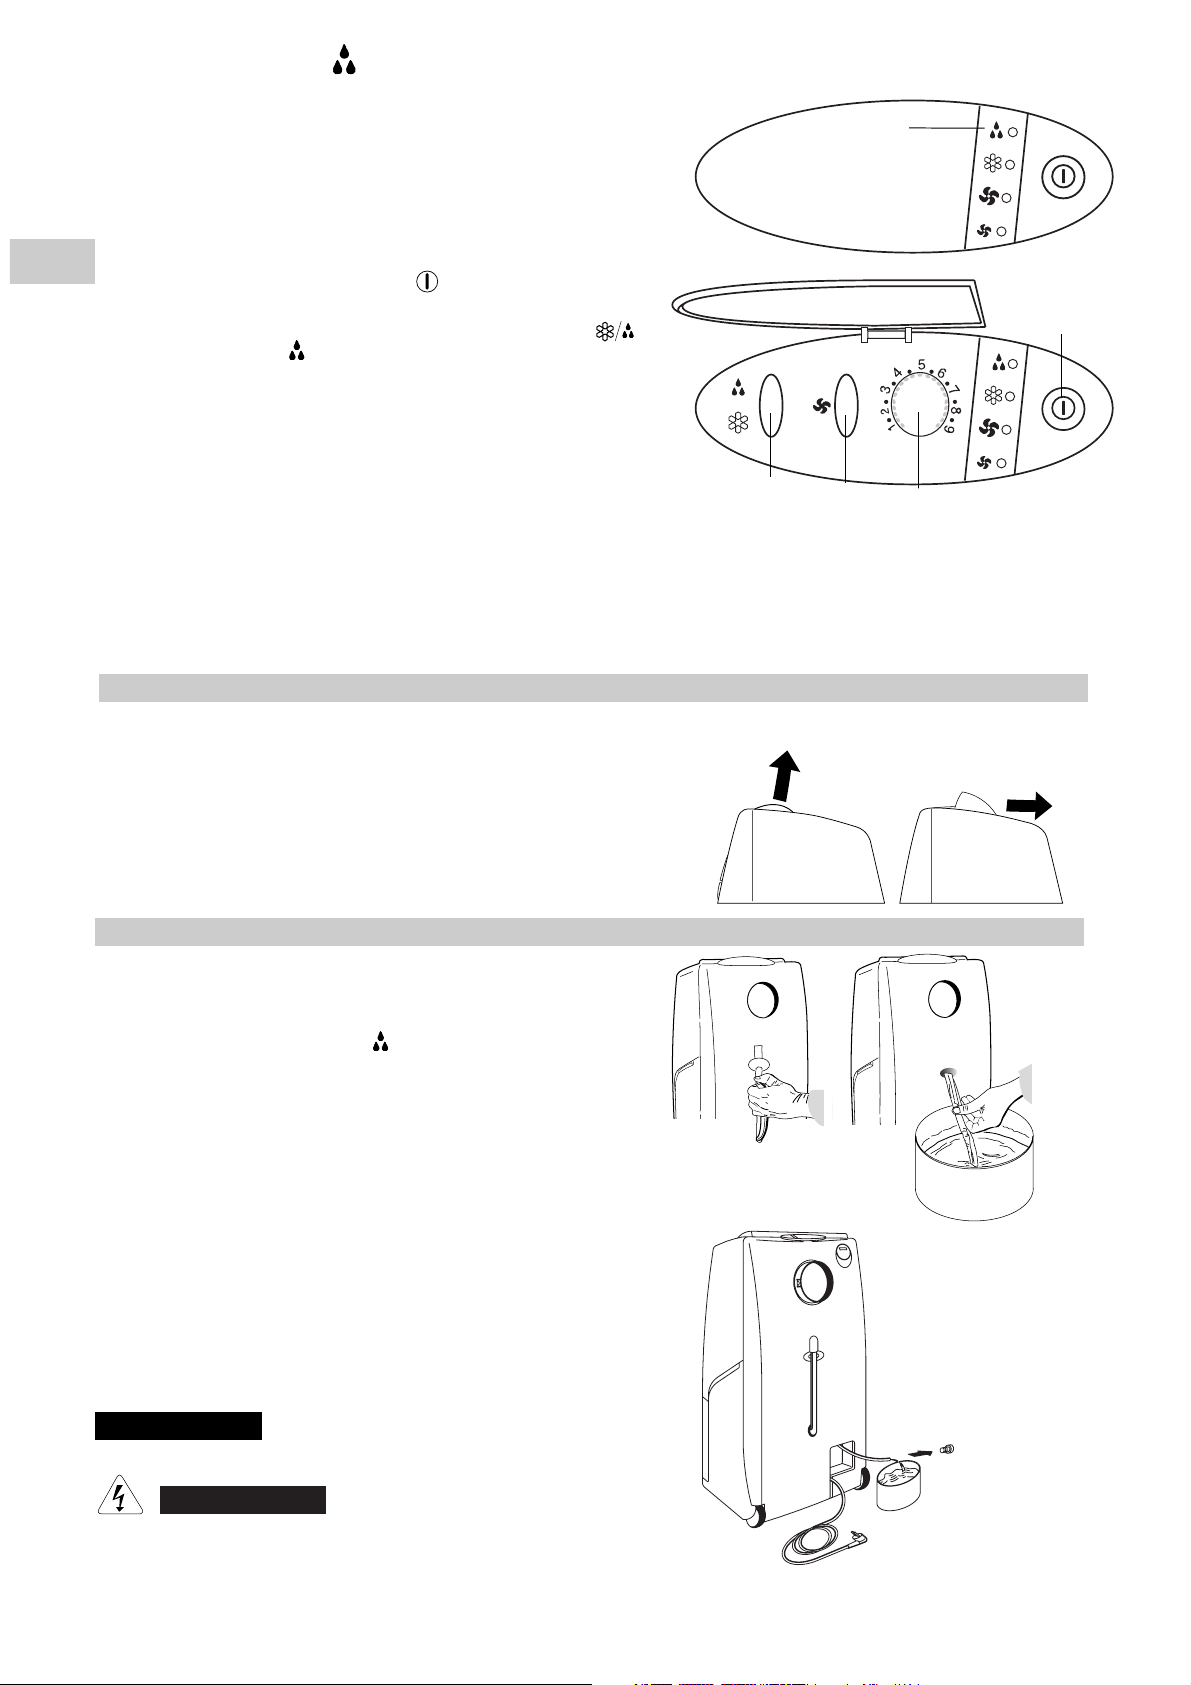
The air conditioner removes humidity of the air, collecting the condensate into the internal tank. The condensate water can be evacuated
through the external discharge tube located on the rear of the unit.
●
When the internal tank is full, the air conditioner will automatically
stop and the water tank alarm begins flashing.
The tank capacity allows approx. 6 hours operation.
●
Verify the presence of water inside the air conditioner, looking at
the rear external discharge tube.
●
Press the ON /OFF push button to switch off the unit, then unplug
the cable.
●
Position a container under the discharge tube.
●
Grasp the tube removing it from its seat on the rear of the air conditioner
●
Close with the inch the open end of the tube and, tilting it towards
the container, let the condensate water flow.
●
At the end of the operations reinsert the discharge tube into its
place.
Every time you move the unit to another room or when you store it,
discharge also the condensate water of the secondary tank, through
the tube located inside the space for cable winding.
At the end of the operation close the tube with its stopper.
●
Always switch off the air conditioner before unplugging it from the
power socket.
●
Always unplug the air conditioner before discharging the condensate water collected inside.
WARNING
ATTENTION:
the control causes a compressor starting delay of about three
minutes each time buttons A, B and thermostat D are activated or
when the plug of supply electric cable is took out and in.
EG
DEHUMIDIFICATION (DRY)
To set the air flow direction, seize with both hands one of the deflector
blades and pull towards you
SETTING AIR FLOW DIRECTION
Vertical Flow
Horizontal Flow
HOW TO DISCHARGE THE WATER TANKS
B
H
C
D
A
IMPORTANT
SECONDARY TANK
Page 5
5
EG
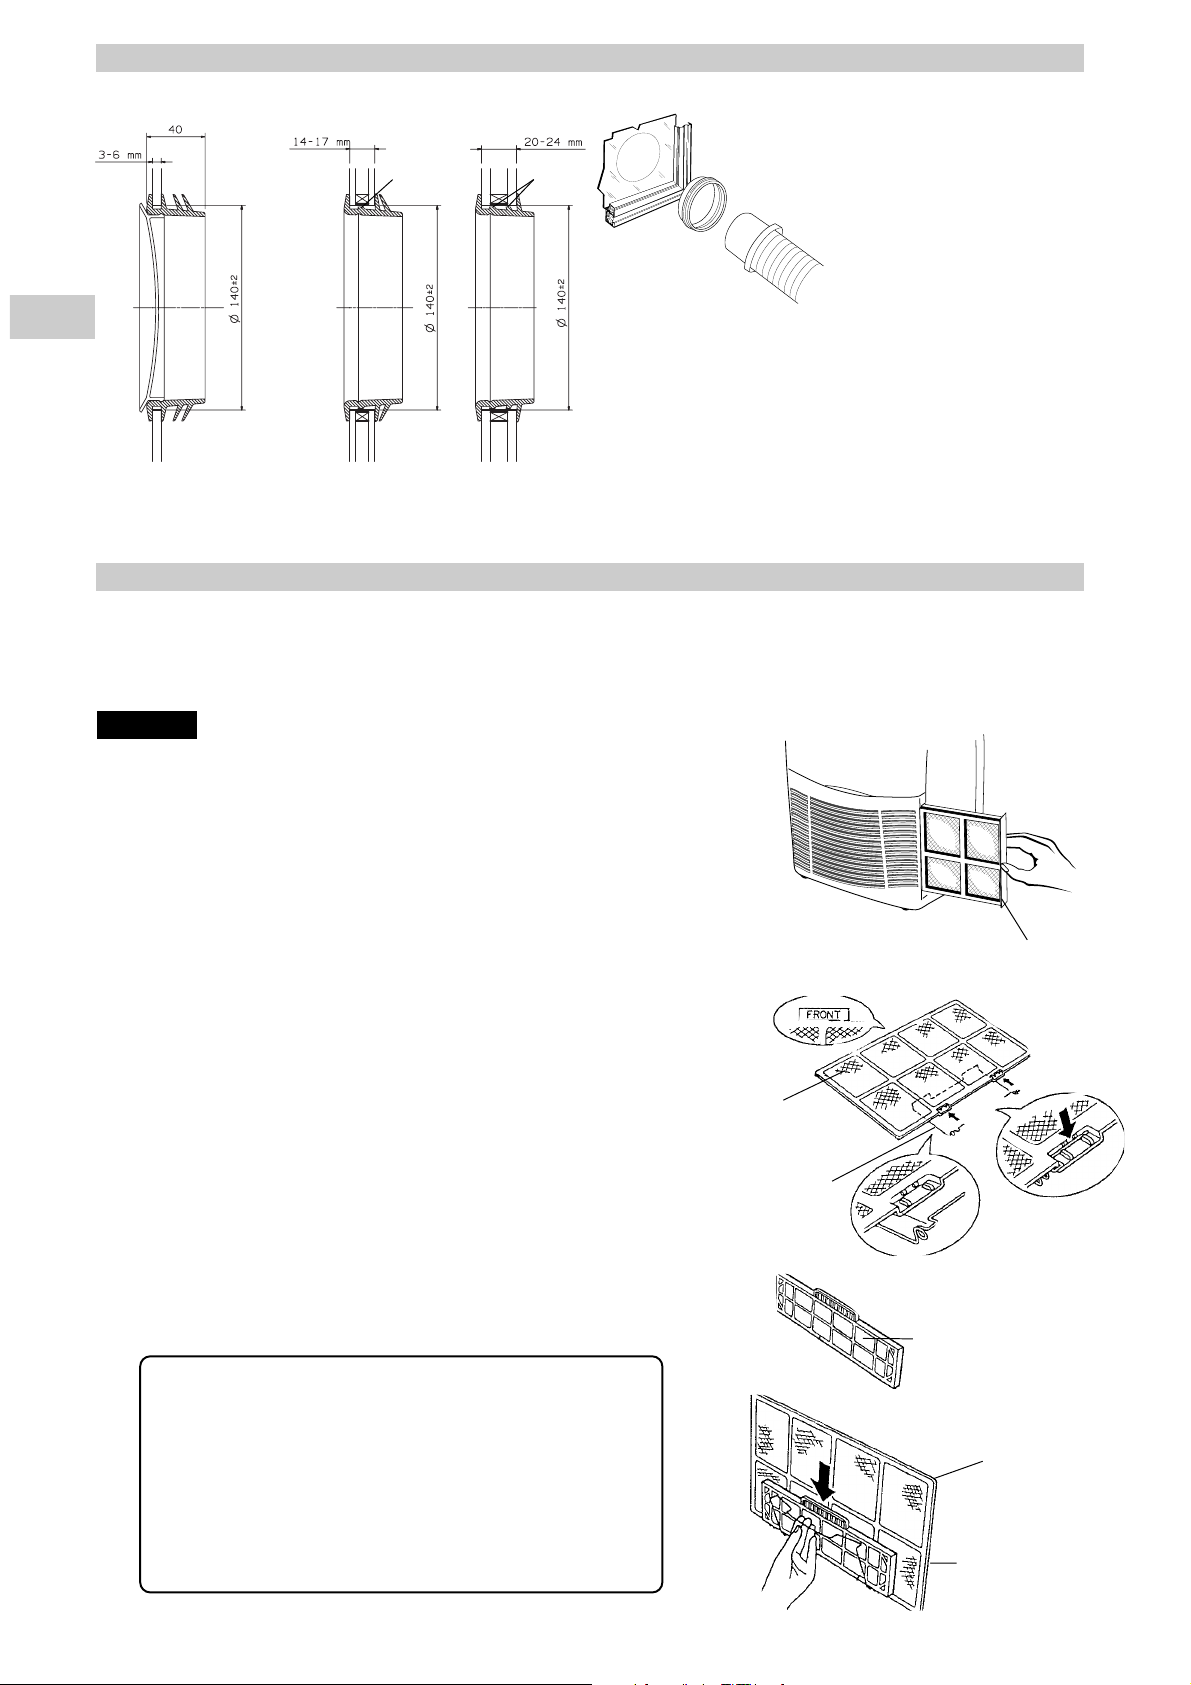
PORTHOLE KIT
ACCESSORIES (SUPPLIED ON REQUEST)
Secure the “air clean filter” on to the standard filter by the spring
attached before in step 2.
3
Hook the handle to the standard filter and reinsert the filter
assembly in the unit with its “FRONT” mark towards you.
Replacement of air clean filter
●
The air clean filter is disposable.
●
Do not throw away the filter frame and spring.
●
The used filter cannot be reused even after cleaning up.
●
Buy the air clean filter for replacement at your nearest dealer.
●
Check the state of dirtiness at least once every two weeks
and replace the filter when it changes to be so dirty as the
colour of the label “colour gauge for filter replacement”.
4
“Air clean filter”
standard filter side: white
(dust collecting filter)
Spring side: black
(deodorizing filter)
standard filter
spring
1. This carton box contains an air clean filter, a spring and a label
“Color gauge for filter replacement”.
2. Open the bag just before installing the air clean filter.
lf not, the deodorization effect durability of the filter may be
decreased.
AIR CLEAN FILTER
●
Read these instructions before starting replacement work.
●
This “Air Clean Filter” collects dust as well as deodorizes.
NOTE
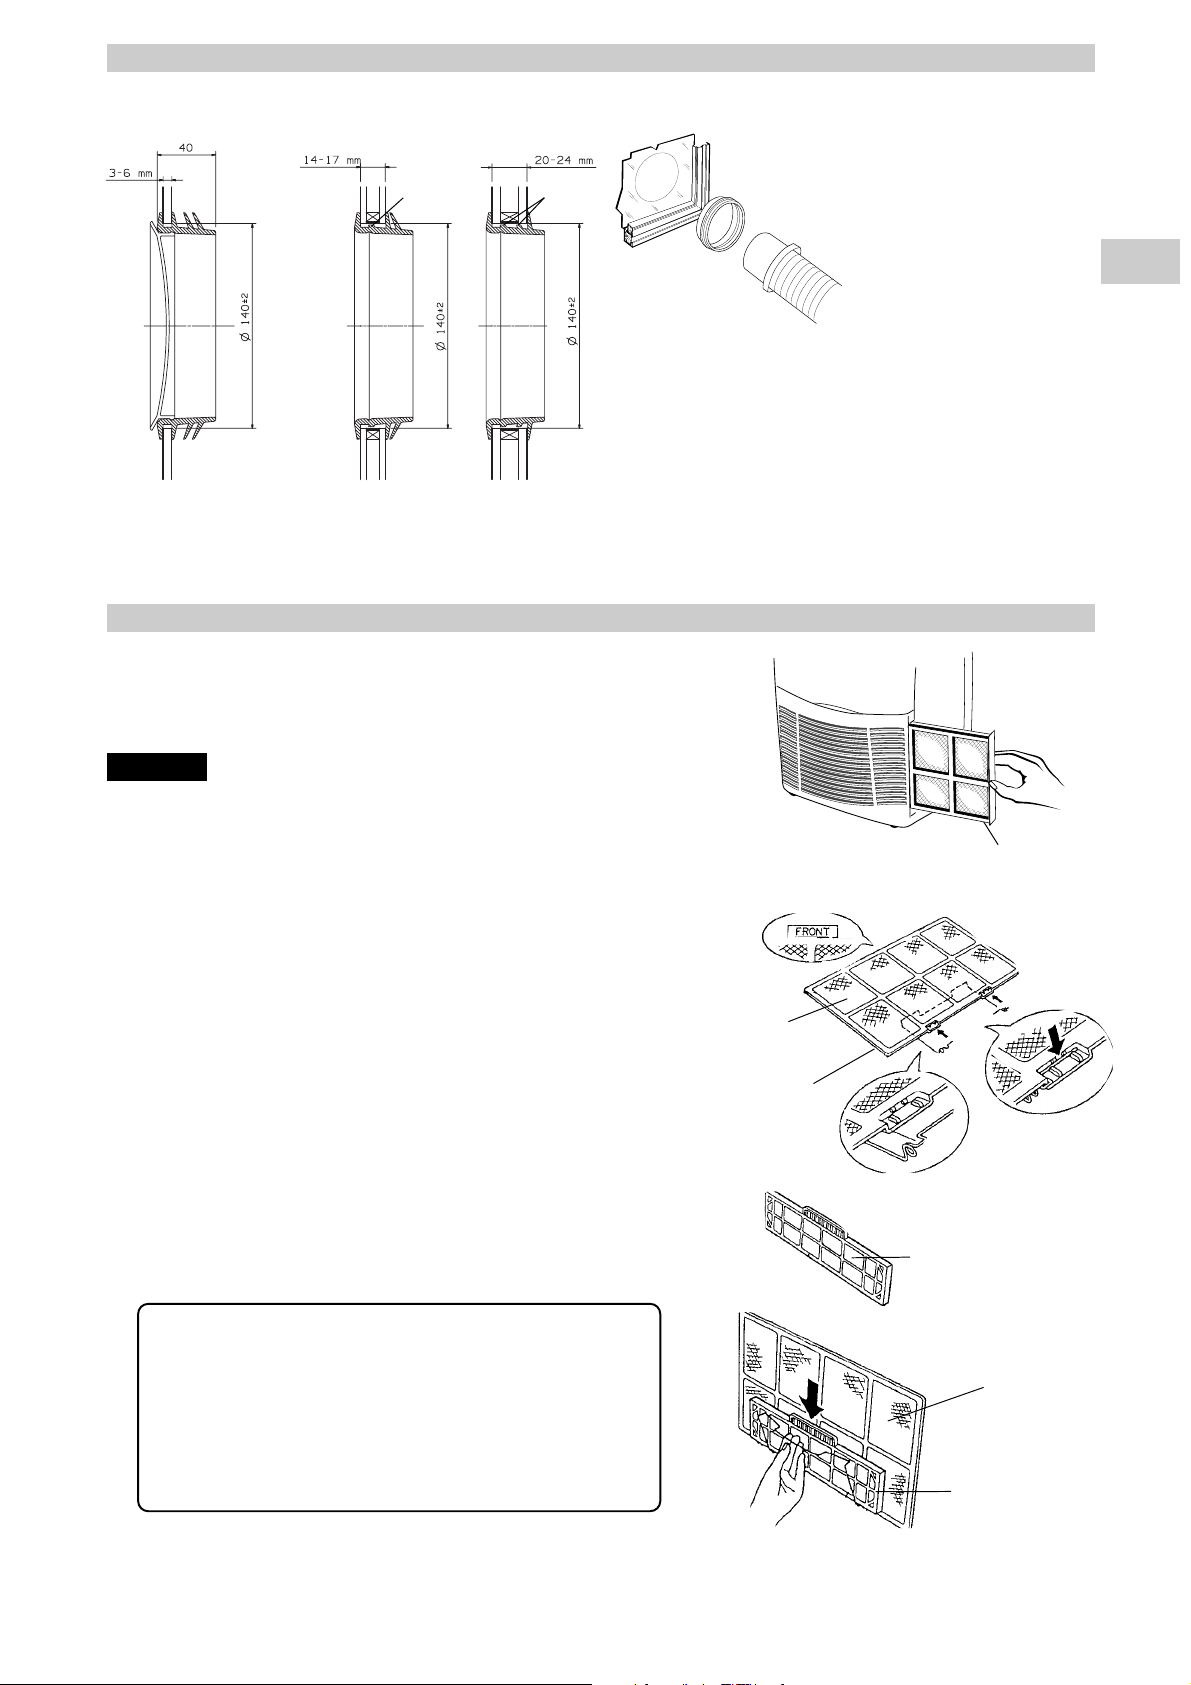
Filter installation procedure:
Take out the filter assembly.
Separate the standard filter from the handle.
Stick the label “Color gauge for filter replacement” in an easy-tosee position (inside of control panel cover).
1
Attach the spring onto the standard filter:
Hook the spring onto the air filter from its rear side and engage it
into the groove on the “FRONT” mark side (use of a standard
screwdriver is recommended for easy setting).
2
standard
filter
Filter
assembly
spring
ASSEMBLING
●
Make a hole in the window
pane.
●
Insert the porthole without
the plug.
●
Remove the terminal pipe
fitting of the warm air outlet
from the retractile flexible
pipe.
●
Bring the air conditioner
near the window and insert
the air outlet in the porthole.
SINGLE GLASS
DOUBLE GLASS
If you want to utilise the air conditioner in several rooms, it is
possible to buy varies portholes for air discharge separately.
HOLE
NOTE
HOLE
HOLE
NOTE
NOTE
Eliminate one or two membranes, cutting them with the scissors according
to the thickness of the glass.
Page 6
6
EG
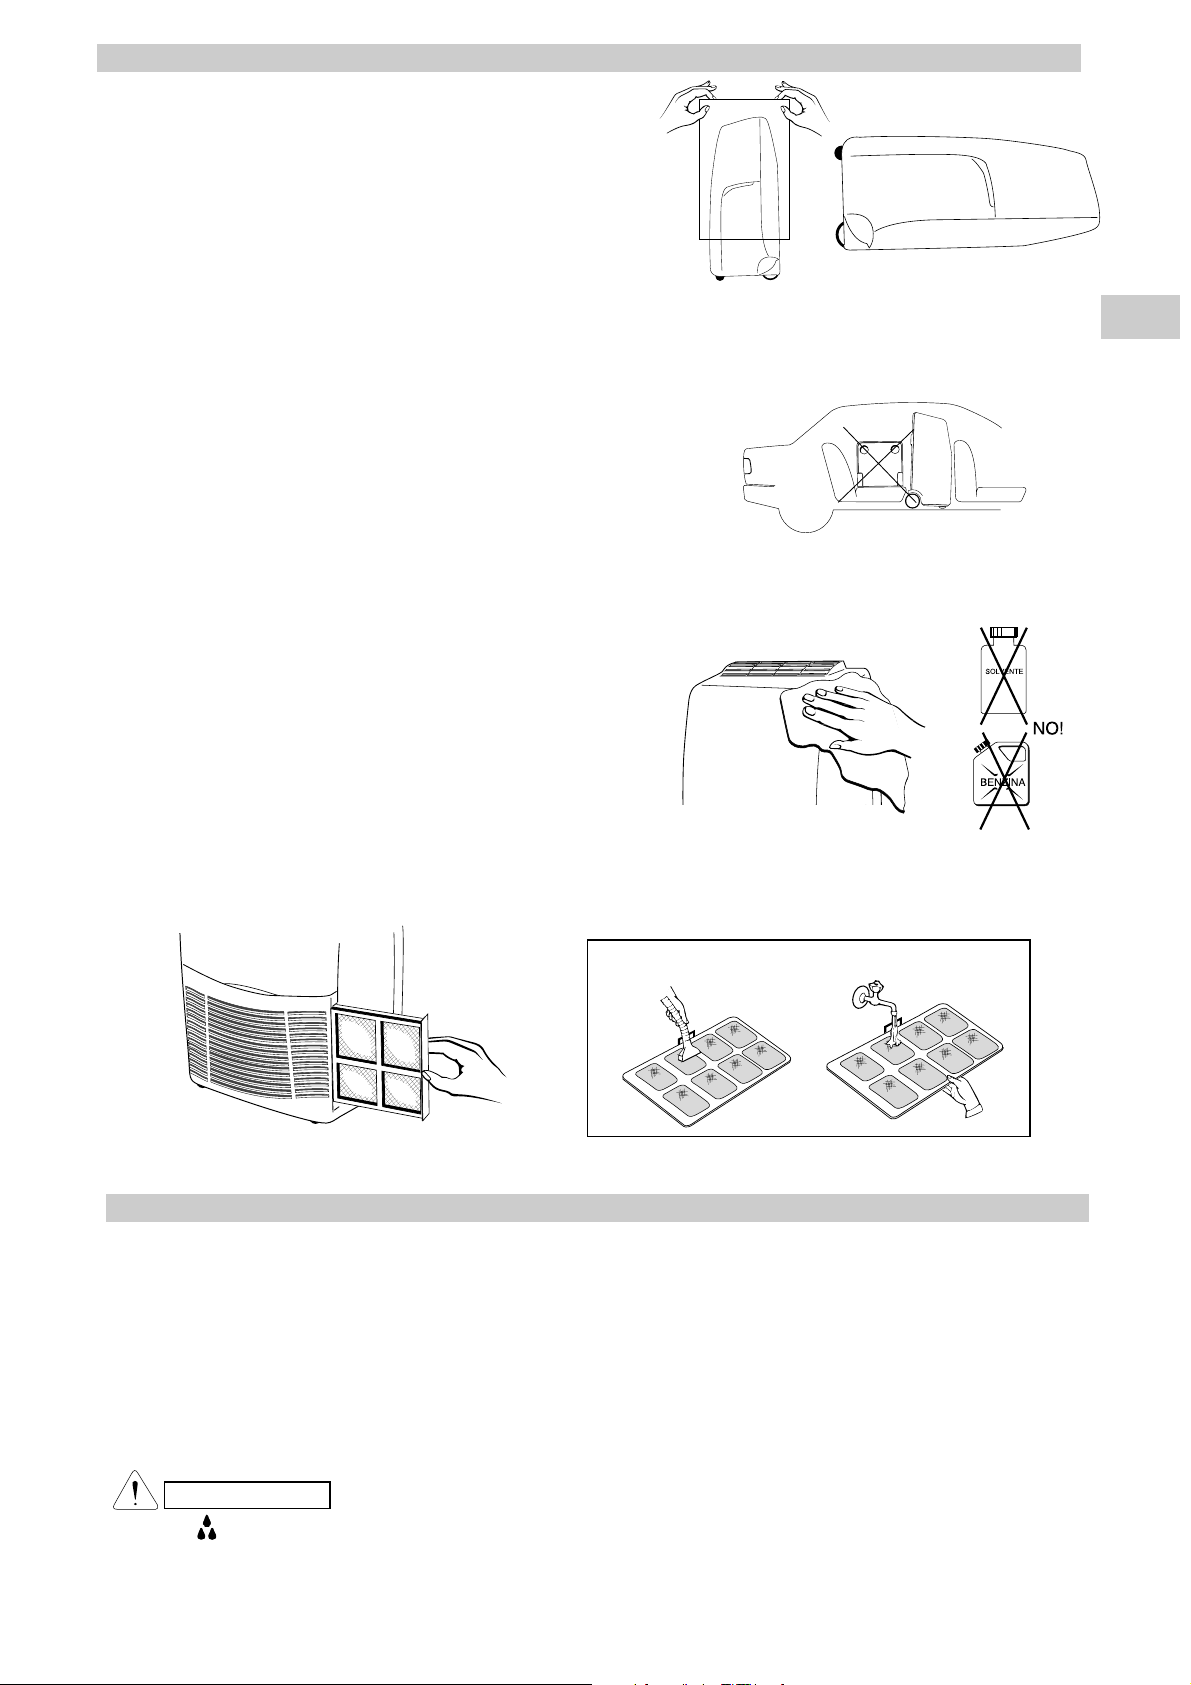
CARE AND CLEANING
WARNING! For safety’s sake, be sure to turn the air conditioner OFF
and also disconnect it from the power supply before cleaning it.
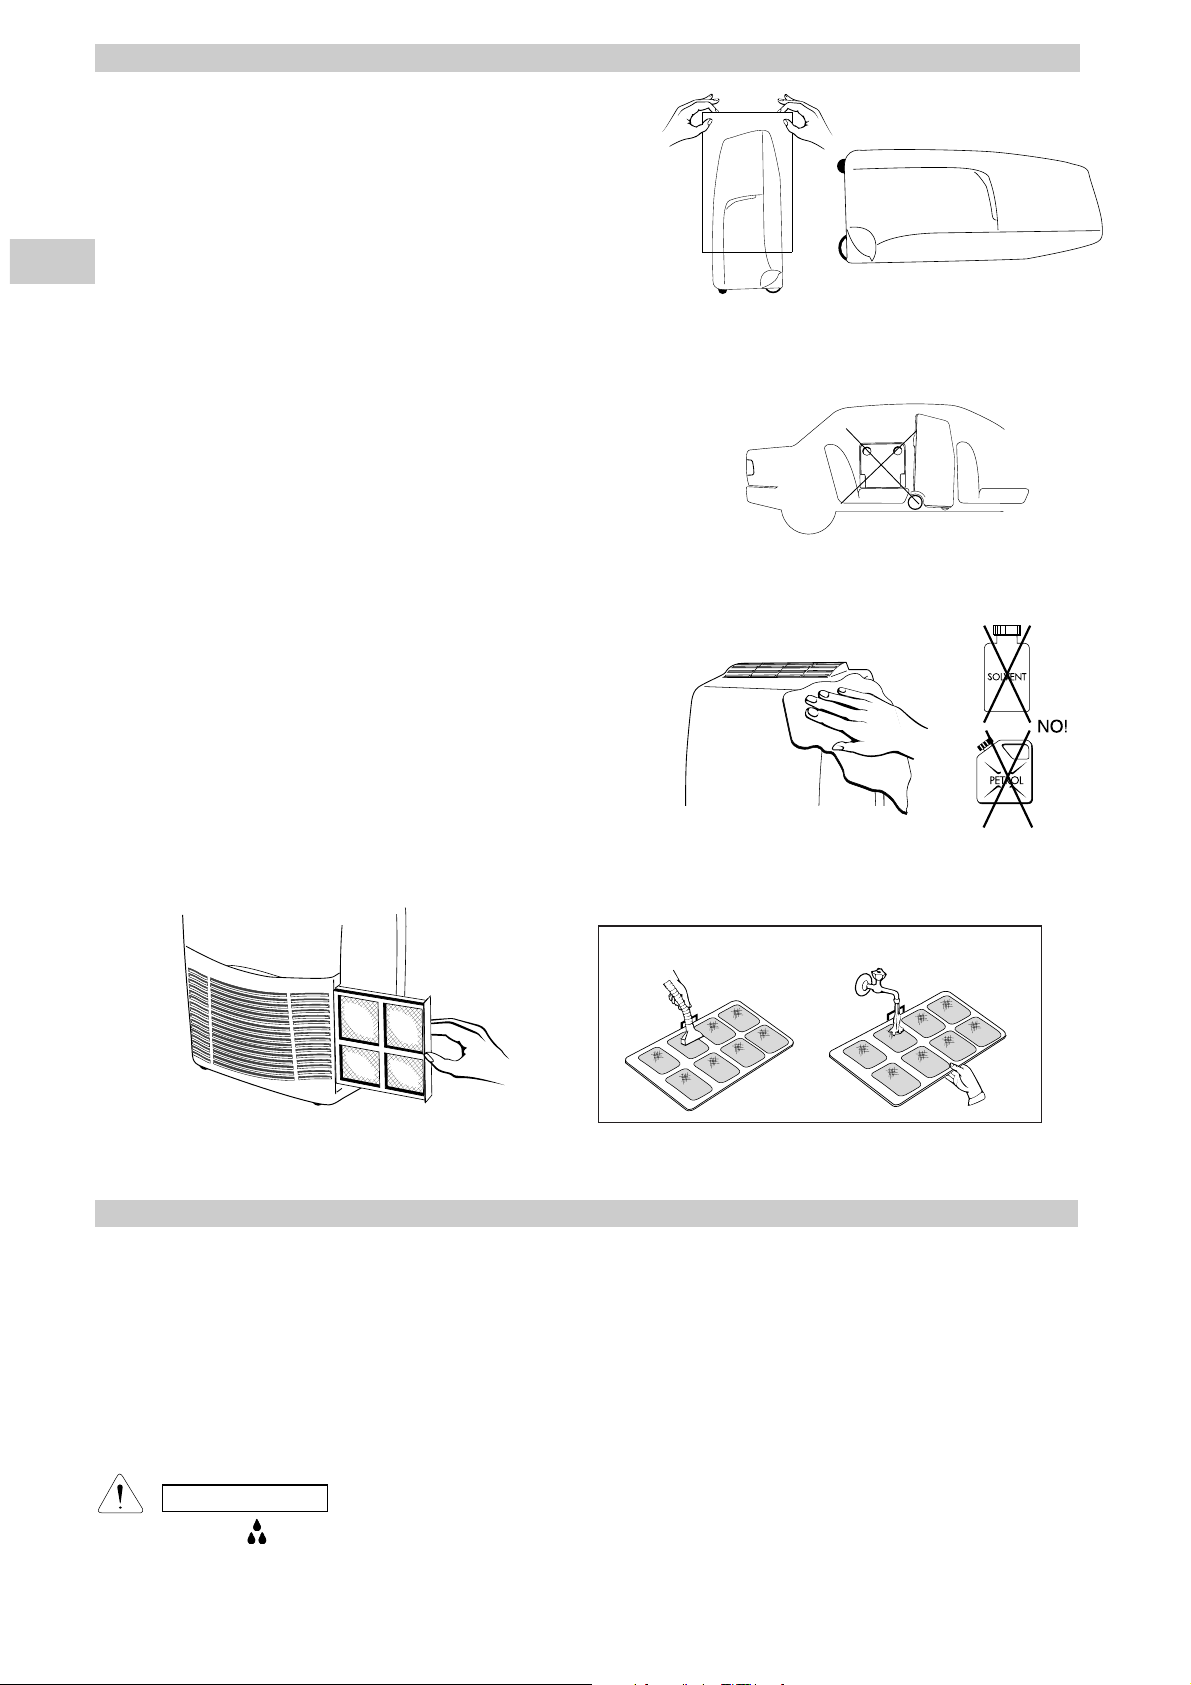
1. Cleaning of the Air Filter.
The air filter must be checked at least once every two weeks operation. Operation with a dirty filter always causes a lower efficiency of
the air conditioner and severe product damage.The filter is located
at the back of the intake grille and shall be removed from the right
side of the unit. Use a vacuum cleaner to remove light dust. If there
is sticky dust on the filter, wash it with lukewarm soapy water, then
rinse in clean, cold water and dry it before reinstallation.
2. Cleaning of Casing and Grille.
To clean the air conditioner, wipe it with a clean soft cloth, lightly
moisted. In case it is stained, moisten the cloth with soapy water.
Never use solvents or harsh chemicals, nor very hot water. Do not
pour water over the air conditioner to clean it: this will damage the
internal components and cause an electric shock hazard.
3. Storage.
If you are not going to make use of the air conditioner for a long
period, before storing it away clean the air filter and verify that both
the internal water tanks are empty. Always store the unit in the vertical position. Do not put heavy objects on top of the unit and protect it with a cloth or a plastic bag.
4. Transport.
Preferably keep the air conditioner in the vertical position during
transportation. If this is not possible, then lay it on one side; when at
destination put the air conditioner back in the vertical position and
wait at least 10 minutes before using it for cooling.
5. For your safety care check periodically the conditions of the
electric supply cable and in case you should notice any damage due to usage call the nearest After Sale Service and get
the cable replaced.
If your air conditioner doesn’t work properly, before requesting service, verify that:
●
the plug is properly inserted into the power socket;
●
the circuit breaker is in the ON position and fuses have not blown;
●
the air filter is not clogged;
●
the flexible tube is correctly positioned without any sharp bends nor plies;
●
the thermostat knob is in the proper position for the suitable temperature (twisting it clockwise verify the compressor restart, after the delayed time);
●
the room temperature is above 15°C for cooling mode and 10°C for dehumidification mode;
●
you have correctly carried-out the instructions contained in this manual.
USEFUL ADVICE
FILTER CLEANING
NO!
NO!
ATTENTION
The blinking lamp , together with the stop of the air conditioner indicate that the condensate water tank is full.
Page 7
2
H
E
F
G
B
I
A
C
D
12
11
1
IL PRODOTTO
INDICE
1. Pannello comando e controllo
2. Deflettore mandata aria
3. Maniglia trasporto (su entrambi i lati)
4. Griglia aspirazione aria
5. Ruote trasporto
6. Programmatore (se installato)
7. Tubo flessibile retrattile
8. Raccordo terminale scarico aria calda
9. Filtro Aria (lato destro)
10. Cavo elettrico con spina
11. Tubo scarico condensa
(serbatoio principale)
12. Tubo scarico condensa
(serbatoio secondario)
13. Alloggiamento cavo
I
2
3
5
4
7
8
9
10
PANNELLO COMANDO E CONTROLLO
Condizioni limite di funzionamento:
Temperatura interna:
Raffreddamento:MIN: 15°C B.S. / 12°C B.U.
MAX: 35°C B.S. / 24°C B.U.
Deumidificazione:MIN: 10°C B.S / 80% U.R.
MAX: 35°C B.S. / 80% U.R.
A. Pulsante marcia/arresto
B. Pulsante raffreddamento /
Deumidificazione
C. Pulsante alta / bassa velocità ventilatore
D. Manopola termostato elettronico
E. Spia raffreddamento
F. Spia alta velocità ventilatore
G. Spia bassa velocità ventilatore
H. Spia accesa per deumidificazione
Spia lampeggiante per serbatoio acqua
pieno
I. Sportello comandi
IL PRODOTTO ................................................................................................. 2
PANNELLO COMANDO E CONTROLLO ........................................................ 2
PRIMA DI USARE IL CLIMATIZZATORE ........................................................ 3
MODALITÀ D'USO
Raffreddamento .................................................................................... 3
Deumidificazione (dry) .......................................................................... 4
REGOLAZIONE DEL FLUSSO D'ARIA ............................................................ 4
COME SVUOTARE I SERBATOI CONDENSA ................................................. 4
KIT OBLÓ ......................................................................................................... 5
ACCESSORI (FORNITI SU RICHIESTA) ......................................................... 5
Filtro Aria pulita ...................................................................................... 5
MANUTENZIONE E CURA .............................................................................. 6
CONSIGLI UTILI .............................................................................................. 6
DICHIARAZIONE DI
CONFORMITÀ
Questo prodotto è marcato
in quanto conforme alle Direttive:
– Bassa Tensione n. 73/23 CEE e
93/68 CEE.
– Compatibilità Elettromagnetica n.
89/336 CEE, 92/31 CEE e 93/68
CEE.
Questa dichiarazione sarà nulla nel
caso di impiego diverso da quello
dichiarato dal Fabbricante e/o di
mancata osservanza, anche solo
parziale, delle istruzioni
d'installazione e/o d'uso.
6
13
Page 8
3
I
●
PRECAUZIONE! Non inserite oggetti nel condizionatore. É molto pericoloso perché il ventilatore gira ad alta velocità.
●
ATTENZIONE!
Il climatizzatore è dotato di un sistema di protezione del compressore dai sovraccarichi che non consente la partenza del
compressore se non sono trascorsi almeno 3 minuti da un precedente arresto. Evitare quindi spostamenti veloci della
manopola termostato nei due sensi quando il compressore è in funzione.
●
Assicurare la libera circolazione dell'aria all'unità interna. Non ostruire con tendaggi o simili la griglia di aspirazione e quella
di mandata. La parte superiore deve essere libera da qualsiasi ostacolo, non depositare oggetti sul climatizzatore.
●
L’apparecchio raggiunge le massime prestazioni alle seguenti condizioni:
1-Il tubo flessibile é retratto, senza curve e senza bocchetta di raccordo.
2-Alla prima accensione, far funzionare l’apparecchio per almeno un’ora alla BASSA velocità di ventilazione, poi passare
alla ALTA velocità.
●
Il costruttore non si assume responsabilità alcuna nel caso in cui le norme di sicurezza e antinfortunistiche non vengano
rispettate.
1.
Prima di eseguire una qualsiasi operazione di spostamento o pulizia, assicuratevi che la spina sia disinserita dalla presa di
corrente.
PRIMA DI USARE IL CLIMATIZZATORE
MODALITÁ D'USO
RAFFREDDAMENTO
●
Avvicinate il più possibile il climatizzatore alla finestra. Inserite il tubo flessibile
agganciandolo, alla parte posteriore del climatizzatore. Estendete il flessibile quanto basta per raggiungere l’esterno passando sotto i battenti accostati della finestra.
Accostate la finestra in posizione di minima apertura.
●
Se la finestra ha un davanzale verso l’interno può rendersi necessario l’uso
dell’apposito raccordo terminale fornito in dotazione. Inserite il raccordo nell’estremità libera del flessibile.
●
Aprite la finestra e bloccate uno dei battenti con la maniglia. Appoggiate il raccordo
terminale al battente fisso, accostate l’altro battente della finestra e bloccatelo in
posizione usando l’apposito laccio.
●
Evitate curve troppo strette o pieghe del tubo flessibile.
●
Nel caso di utilizzo dell’obló eseguire un foro del diametro di 138 mm nel vetro
della finestra.
●
Ruotare la manopola del termostato (D) verso destra, fino a raggiungere la posizione massimo freddo.
●
Accendere il climatizzatore premendo il pulsante (A) Marcia/Arresto , le spie
visualizzano le ultime funzioni selezionate.
●
Selezionare la funzione raffreddamento con il pulsante (B), si accende la spia (E).
●
Premere il pulsante (C) per selezionare l’alta velocità del ventilatore, si accende la
spia (F) .
●
Quando la temperatura nel locale ha raggiunto il valore da voi desiderato premete
di nuovo il pulsante (C) per selezionare la bassa velocità ventilatore, si accende la
spia (G) .
NO!
●
Verificare che la tensione monofase di alimentazione nel luogo di utilizzo sia di
220V-240V~ 50Hz.
●
Assicuratevi che l'impianto elettrico sia in grado di erogare la corrente di esercizio
necessaria per il climatizzatore oltre a quella assorbita normalmente da altre utenze (elettrodomestici, illuminazione). Vedere gli assorbimenti massimi sulla targhetta dati posta sul climatizzatore.
●
Si raccomanda l'installazione di un interruttore bipolare, con fusibile di protezione
da 10 A del tipo ritardato, a monte della presa d'alimentazione.
●
L'allacciamento alla rete elettrica del climatizzatore deve essere eseguito in
conformità alle norme d'installazione vigenti.
●
Assicuratevi che interruttori automatici e valvole di protezione dell'impianto siano
in grado di sopportare una corrente di spunto di 20 A, (normalmente per un tempo
inferiore a 1 secondo).
●
Evitare di installare il climatizzatore in locali dove potrebbe essere investito da
spruzzi d'acqua (es. lavanderie).
●
Accertatevi che il pulsante marcia - arresto sul pannello di comando del climatizzatore sia nella posizione OFF.
●
La presa dell'impianto deve essere sempre provvista di messa a terra efficiente.
●
Non usare mai la spina come mezzo per arrestare o avviare il climatizzatore:
usare sempre il pulsante marcia/arresto sul pannello di comando dell'unità.
●
Non movimentate il climatizzatore mentre é in funzione, spegnere e togliere la
spina dalla presa di corrente. Controllare ed eventualmente svuotare la condensa,
tramite il tubo di scarico posto sul retro.
AVVERTIMENTO
NOTA
Il climatizzatore provvede a smaltire automaticamente l’acqua di condensa alla ALTA velocità di ventilazione, mentre alla
BASSA velocità la condensa viene raccolta nel serbatoio.
●
Quindi ruotare lentamente la manopola del termostato verso sinistra fino ad ottenere l'arresto del compressore. A questo
punto il climatizzatore è predisposto per funzionare automaticamente sotto il controllo del termostato, mantenendo nel locale la temperatura da voi desiderata.
●
Per arrestare il climatizzatore premete nuovamente il pulsante (A) Marcia-Arresto, per riportarlo nella posizione OFF.
Page 9
4
Il climatizzatore non raffredda l’ambiente quando funziona come deumidificatore.
Quando usate l’apparecchio come deumidificatore, non dovete colle-
gare il tubo flessibile. Per ottenere la massima efficienza di deumidificazione lasciate l’attacco di scarico posteriore libero di scaricare
direttamente in ambiente.
●
Scollegate il tubo flessibile afferrandolo in prossimità del punto di
attacco sull’apparecchio e ruotandolo sino a liberarlo dai ganci di
bloccaggio.
Avviate il climatizzatore premendo il pulsante (A) Marcia/Arresto .
●
Selezionate la funzione deumidificazione tramite il pulsante
(B), si accende la spia (H) . L’umidità rimossa dall’ambiente
(condensa) sarà raccolta nel serbatoio interno del climatizzatore.
●
Per arrestare il climatizzatore premete nuovamente il pulsante (A)
riportandolo nella posizione OFF.
AVVERTENZA
Il condizionatore può funzionare come deumidificatore solo se la temperatura del locale è superiore a 10 °C. Quando la temperatura è inferiore a 10 °C il compressore si ferma e la deumidificazione non ha
luogo, mentre il ventilatore continua a funzionare.
L’umidità asportata viene raccolta nel serbatoio interno e può essere
scaricata tramite il tubo esterno sul retro dell’unità.
La capacità del serbatoio consente un’autonomia di funzionamento in
deumidificazione di circa 6 ore.
●
Quando il serbatoio interno è pieno, il climatizzatore si arresta automaticamente e la spia serbatoio pieno inizia a lampeggiare.
●
Verificate la presenza d’acqua all’interno dell’apparecchio controllando visivamente il tubo di scarico esterno posto nel retro.
●
Premete il pulsante marcia-arresto, portandolo nella posizione OFF,
quindi togliete la spina dalla presa.
●
Posizionate un recipiente al di sotto del tubo di scarico.
●
Afferrate il tubo estraendolo dalla sede nel retro dell’apparecchio.
●
Chiudete con il pollice l’estremità aperta del tubo e inclinandolo
verso il recipiente lasciate defluire la condensa.
●
Al termine delle operazioni riposizionate il tubo di scarico nell’apposito alloggiamento.
Ogni volta che l’apparecchio deve essere spostato in un altro locale
oppure riposto a fine stagione, svuotare anche il serbatoio secondario,
tramite l’apposito tubetto situato all’interno dell’alloggiamento cavo
elettrico.
A lavoro ultimato richiudere il tubetto con l’apposito tappo.
●
Arrestate sempre il climatizzatore prima di togliere la spina dalla
presa.
●
Staccate sempre la spina prima di scaricare la condensa raccolta
all’interno dell’apparecchio.
AVVERTIMENTO
ATTENZIONE:
il comando inserisce un ritardo di circa 3 minuti alla partenza del
compressore ogni qualvolta si azionano i pulsanti A, B e il termostato D o togliendo e inserendo la spina del cavo di alimentazione.
I
DEUMIDIFICAZIONE (DRY)
B
H
C
D
A
Potete regolare la direzione del flusso dell’aria agendo sul deflettore
posto sulla bocca di mandata aria; afferrate una aletta del deflettore
con entrambe le mani e tirate verso di voi per orientare il flusso
dell’aria.
REGOLAZIONE DEL FLUSSO D'ARIA
Mandata verticale
Mandata orizzontale
COME SVUOTARE I SERBATOI CONDENSA
SERBATOIO SECONDARIO
IMPORTANTE
Page 10
5
I
KIT OBLÓ
ACCESSORI (FORNITI SU RICHIESTA)
Fissare il “filtro aria pulita” sul filtro standard con la molla applicata nel passo 2 precedente.
3
Agganciare la maniglia sul filtro standard e reinserire il gruppo
filtro nell’unità in modo che la dicitura FRONT sia di fronte
all’operatore.
Sostituzione del filtro aria pulita
●
Il filtro aria pulita è smaltibile.
●
Non gettare il telaio del filtro e la molla.
●
Il filtro usato non può essere riutilizzato anche dopo pulitura.
● Procurarsi il filtro aria pulita per la sostituzione presso il riven-
ditore più vicino.
●
Controllare lo stato di contaminazione almeno ogni due settimane e sostituire il filtro quando la contaminazione è tale che
il suo colore uguaglia quello della targhetta “Color gauge for
filter replacement”.
4
“Filtro aria pulita”
Lato filtro standard: Bianco
(filtro raccolta polvere)
Lato molla: nero
(Filtro deodorante)
Filtro standard
Molla
1.La scatola di cartone contiene un filtro aria pulita, una molla ed
una targhetta “color gauge for filter replacement”.
2.Aprire il sacchetto solo immediatamente prima di installare il
filtro. Altrimenti si abbrevia la durata dell’effetto deodorante del
filtro.
FILTRO ARIA PULITA
●
Leggere queste istruzioni prima di iniziare la sostituzione.
●
Le funzioni del “filtro aria pulita” sono: raccogliere la polvere e
deodorare.
NOTA
Procedura per l’installazione del filtro:
Estraete il gruppo filtro. Separate il filtro Standard dalla
maniglia.
Applicare la targhetta “Color gauge for filter replacement” in una
posizione facilmente visibile (all’interno dello sportello comandi).
1
Applicare la molla sul filtro standard:
Agganciare la molla sul filtro aria dal lato posteriore e inserirla
nella scanalatura presente sul lato che porta la dicitura “FRONT”
(per facilitare l’operazione si consiglia l’uso di un normale cacciavite).
2
Filtro
standard
Molla
gruppo
filtro
MONTAGGIO
●
Praticare un foro sul vetro
della finestra.
●
Inserire l'oblò privo di tappo
chiusura.
●
Togliere il raccordo terminale scarico aria calda dal tubo
flessibile retrattile.
●
Avvicinare il climatizzatore
alla finestra e inserire il tubo
scarico aria nell'oblò.
VETRO SINGOLO
DOPPIO VETRO
FORO
NOTA
Se si desidera usufruire del climatizzatore in vari locali è possibile acquistare più KIT OBLÓ scarico aria separatamente.
FORO
FORO
NOTA
NOTA
Eliminare tagliando con le forbici una
o due membrane a secondo dello
spessore della vetrata.
Page 11
6
I
MANUTENZIONE E CURA
ATTENZIONE! Prima di procedere a operazioni di pulizia e manuten-
zione togliere la spina dalla presa di corrente.
1. Pulizia del filtro d'aria
Il filtro deve essere controllato almeno una volta ogni due settimane
di funzionamento. Il funzionamento con filtro sporco o intasato
causa sempre una diminuzione dell’efficienza del climatizzatore e
può provocare inconvenienti gravi. Il filtro è collocato dietro la griglia
d’aspirazione e si estrae dal lato destro (guardando frontalmente il
climatizzatore). Usate un aspirapolvere per asportare la polvere. Se
ciò non fosse sufficiente lavate il filtro con acqua tiepida leggermente saponata, sciacquatelo con acqua fredda e lasciatelo asciugare
prima di reinserirlo.
2. Pulizia involucro e griglia.
Per pulire il climatizzatore strofinatelo con un panno soffice, leggermente inumidito. Per togliere eventuali macchie usate acqua saponata. Non usate solventi, benzina o altri composti chimici aggressivi, né acqua molto calda. Non versate acqua sul climatizzatore per
pulirlo: potreste danneggiare i componenti interni o provocare un
corto circuito.
3. Conservazione.
Quando prevedete di non utilizzare il climatizzatore per un lungo
periodo, prima di riporlo pulite il filtro e controllate che entrambi i
serbatoi di raccolta condensa siano vuoti. Se mettete l’apparecchio
in un ripostiglio, abbiate cura di mantenerlo sempre in posizione
verticale. Non appoggiate oggetti pesanti sul piano superiore e possibilmente proteggete il climatizzatore con un foglio di plastica.
4. Trasporto.
Quando trasportate il climatizzatore, mantenetelo se possibile in
posizione verticale. Qualora ciò non fosse possibile, coricatelo sul
fianco destro; quando arrivate a destinazione rimettete subito
l’apparecchio in posizione verticale e attendete almeno 10 minuti
prima di utilizzarlo in raffreddamento.
5. Per la vostra sicurezza abbiate cura di verificare periodicamen-
te lo stato del cavo d’alimentazione e qualora fosse danneggiato dall’uso fatelo sostituire. Il cavo di alimentazione dell’apparecchio é del tipo X. Per la sostituzione rivolgersi al Centro
Assistenza.
NO!
NO!
Se il climatizzatore non funziona, prima di richiedere l’intervento del Servizio Assistenza verificare che:
●
la spina sia correttamente inserita nella presa di corrente;
●
l’interruttore generale sia inserito e che non vi sia alcun fusibile interrotto;
●
il filtro aria sia pulito;
●
il flessibile sia correttamente posizionato, senza pieghe né curve troppo strette;
●
la manopola del termostato sia nella posizione più idonea per la temperatura desiderata (ruotandola progressivamente in
senso orario verificare che il compressore si avvii, dopo il periodo di ritardo);
●
la temperatura ambiente sia superiore a 15°C per la funzione raffreddamento e 10°C in deumidificazione;
●
tutte le istruzioni contenute in questo manuale siano state osservate scrupolosamente.
CONSIGLI UTILI
PULIZIA FILTRO
ATTENZIONE
La spia lampeggiante con il contemporaneo arresto del condizionatore sono dovuti al serbatoio raccolta condensa
pieno.
Page 12
2
LE PRODUIT
SOMMAIRE
1. Tableau de commandes
2. Déflecteur de soufflage d’air
3. Poignée pour le transport (sur les
deux côtés)
4. Grille d’aspiration d’air
5. Roues pour le déplacement
6. Programmateur (si installé)
7. Manchette d’évacuation d’air/ tube
flexible retractable
8. Raccord terminal d’expulsion d’air
9. Filtre à air (côté droit)
10. Câble électrique avec fiche
11. Tuyau de drainage sortie de condesât
(principal)
12. Tuyau de drainage sortie de condesât
(secondaire)
13. Compartiment du câble électrique.
F
TABLEAU DE COMMANDES
A. Touche marche - arrêt
B. Touche refroidissement / Déshumidification
C. Touche grande et petite vitesse du ventilateur
D. Sélecteur thermostat électronique
E. Voyant refroidissement
F. Voyant grande vitesse du ventilateur
G. Voyant petite vitesse du ventilateur
H. Voyant allumé pour déshumidification.
Quand le voyant clignote le réservoir est plein.
I. Couvercle du tableau de commandes
LE PRODUIT .............................................................................................................. 2
TABLEAU DE COMMANDES ..................................................................................... 2
AVANT D’UTILISER LE CLIMATISEUR ..................................................................... 3
MODE D’EMPLOI
Refroidissement ..........................................................................................3
Déshumidification (dry) ...............................................................................4
REGLAGE DU FLUX D’AIR ....................................................................................... 4
COMME VIDER LES RESERVOIRS DE CONDENSAT ............................................ 4
KIT HUBLOT ............................................................................................................... 5
ACCESSOIRES (FOURNIS SUR DEMANDE) ........................................................... 5
Filtre de purification de l’aire ........................................................................5
ENTRETIEN ET NETTOYAGE ................................................................................... 6
CONSEILS UTILES ..................................................................................................... 6
DECLARATION DE
CONFORMITE
Ce produit est marqué
puisque il est conforme aux
Directives:
– Basse Tension n. 73/23 CEE et
93/68 CEE.
– Compatibilité Electromagnétique
n. 89/336 CEE, 92/31 CEE et
93/68 CEE.
Cette declaration sera nulle en cas
d'une utilisation différente de celle
déclarée par le Constructeur et/ou
de la non-observation, même si
partielle des instructions
d'installation et/ou usage.
2
3
5
4
7
8
9
10
H
E
F
G
B
I
A
C
D
12
11
1
6
13
Limites de fonctionnement:
Température intérieure
:
Refroidissement: MIN: 15°C B.S. / 12°C B.H.
MAX: 35°C B.S. / 24°C B.H.
Déshumidification: MIN: 10°C B.S / 80% H.R.
MAX: 35°C B.S. / 80% H.R.
Page 13
Le climatiseur élimine l’eau de condensation automatiquement à la GRANDE vitesse du ventilateur, tandis que à la PETITE
vitesse l’eau de condensation est recueillie dans le réservoir.
●
Dès lors, déplacez lentement le sélecteur du thermostat vers la gauche afin d’obtenir l’arrêt du compresseur. A ce stade, le
climatiseur est programmé pour fonctionner automatiquement sous le contrôle du thermostat, en maintenant la température
désirée dans la pièce.
●
Pour arrêter le climatiseur, appuyez à nouveau sur la touche (A) marche-arrêt pour mettre l’unité en position OFF.
3
F
PRECAUTION ! Ne rien introduire dans le climatiseur. Cela est très dangereux car le ventilateur tourne à grande vitesse.
●
ATTENTION!
Le climatiseur est pourvu d’un système de protection du compresseur contre les surcharges qui l’empêche de fonctionner
pendant trois minutes après l’arrêt précédent. Evitez donc les déplacements rapides du sélecteur du thermostat dans les
deux sens quand le compresseur fonctionne.
●
Assurez-vous que l’air puisse circuler librement autour de l’unité intérieure. Ne pas obstruer avec des rideaux ou similaires
les grilles d’arrivée et de sortie d’air. Ne pas déposer des objets sur le climatiseur.
●
Le constructeur décline toute responsabilité dans le cas où les normes de sécurité et de prévention contre les accidents ne
seraient pas respectées.
●
Le climatiseur rejoint l’efficacité maximum aux conditions suivantes:
1-Le tube flexible est rétracté, sans courbes et sans le raccord terminal.
2-A la première mise en marche, faire fonctionner le climatiseur avec le ventilateur sur la PETITE vitesse pendant au moins
une heure, puis mettre le ventilateur sur la GRANDE vitesse.
1.Avant de procéder au déplacement ou au nettoyage du climatiseur, débranchez toujours la fiche de la prise de courant
AVANT D’UTILISER LE CLIMATISEUR
MODE D’EMPLOI
REFROIDISSEMENT
●
Approchez au maximum le climatiseur de la fenêtre. Introduire le tube flexible en
l’accrochant à l’arrière de l’unité. Tirez le tube flexible afin d’atteindre l’extérieur en
passant sous les battants entrouverts de la fenêtre.
●
Si la fenêtre a un rebord intérieur, il peut s’avérer nécessaire d’utiliser le raccord
terminal prévu à cet effet (fourni avec l’unité). Introduisez le raccord dans l’extrémité libre du flexible.
●
Ouvrez la fenêtre et bloquez un des battants avec la poignée. Posez le raccord
terminal sur le battant fixe, rapprochez l’autre battant de la fenêtre et bloquez-le
dans cette position en utilisant le cordon ad hoc.
●
Evitez de trop courber ou plier le tube flexible.
●
Si vous utilisez le hublot, pratiquez un trou de 138 mm dans le carreau de la
fenêtre.
●
Déplacez le sélecteur (D) thermostat vers la droite, en position de froid maximum.
●
Appuyez sur la touche (A) marche-arrêt pour mettre le climatiseur en marche:
les voyants des dernières fonctions sélectionnées s’allumeront.
●
Appuyez sur la touche (B) refroidissement , le voyant (E) s’allume.
●
Appuyez sur la touche (C) pour sélectionner la grande vitesse du ventilateur, le
voyant (F) s’allume.
●
Quand la température désirée est obtenue dans la pièce, appuyez de nouveau sur
la touche (C) pour sélectionner la petite vitesse du ventilateur, le voyant (G)
.......s’allume.
NON!
●
Vérifiez que la tension du réseau d’alimentation est bien de 220-240V ~ 50Hz.
●
Assurez-vous que l’installation électrique est en mesure de débiter un courant
nécessaire au climatiseur, en plus du courant normalement utilisé pour d’autres
usages (appareils électroménagers, éclairage). Voir la puissance absorbée sur la
plaquette signalétique du climatiseur.
●
Nous conseillons l’installation d’un interrupteur bipolaire, avec un fusible de protection de 10 ampères à retardement, en amont de la fiche d’alimentation.
●
L’unité doit être raccordée selon les normes et règlements électriques en vigueur.
●
Assurez-vous que le disjoncteur de protection de l’installation est calibré pour supporter un courant de pointe de 20 ampères ( normalement pour un temps inférieur
à une seconde).
●
Ne pas installer le climatiseur dans un local, où il pourrait recevoir des projections
d’eau (par exemple dans la buanderie).
●
Vérifiez que la touche marche-arrêt sur le tableau de commandes du climatiseur
est sur la position OFF.
●
La prise du climatiseur doit toujours être pourvue d’une prise de terre efficace.
●
N’utilisez jamais la fiche pour arrêter ou mettre en marche le climatiseur; utilisez
toujours l’interrupteur prévu sur le tableau de commande de l’appareil.
●
Ne pas transportez le climatiseur pendant le fonctionnement, arretez-le et débranchez la fiche de la prise de courant. Vérifier et eventuellement vider l’eau de
condensation, par le tube de vidange placé à l’arrière.
DANGER!
REMARQUE
Page 14
4
Quand le climatiseur fonctionne comme déshumidificateur, il ne rafraî-
chit pas la pièce.
Quand vous utilisez l’appareil comme déshumidificateur, le tube
flexible ne doit pas être monté sur le climatiseur.
●
Décrochez le tube flexible en saisissant le point d’accrochage sur le
climatiseur et faites-le le tourner jusqu’au décrochage.
Appuyez sur la touche (A) marche-arrêt pour mettre le climatiseur en marche.
●
Sélectionnez le mode déshumidification en appuyant sur la touche
(B) . le voyant (H) s’allume. L’humidité absorbée de la
pièce (condensât) est recueillie dans le réservoir intérieur.
●
Pour arrêter le climatiseur, appuyez à nouveau sur la touche (A)
marche-arrêt pour le mettre en position OFF.
ATTENTION!
Le climatiseur peut fonctionner comme déshumidificateur seulement si
la température de la pièce est supérieure à 10 °C. Si la température
est inférieure à 10 °C, le compresseur s’arrête et la déshumidification
n’a pas lieu, tandis que le ventilateur continue a fonctionner.
L’humidité absorbée est recueillie dans le réservoir intérieur et peut
être vidée par le tube de vidange extérieur à l’arrière de l’unité.
●
Quand le réservoir de condensât est plein, le climatiseur s’arrête
automatiquement et le témoin “réservoir plein” commence à
clignoter
La capacité du réservoir permet une autonomie de fonctionnement
d’environ 6 heures.
●
Vérifier l’existence d’eau à l’intérieur du climatiseur en regardant le
tube de vidange extérieur placé à l’arrière.
●
Appuyez sur la touche marche / arrêt, mettez-la en position OFF et
enlevez la fiche de la prise de courant.
●
Placez un récipient au dessous du tube de vidange.
●
Saisissez le tube et tires le de son logement à l’arrière du climatiseur.
●
Fermez avec le pouce l’ouverture du tube et, en l’inclinant vers le
récipient, videz l’eau de condensation.
●
A la fin des opérations, remettez le tube de vidange en place.
Chaque fois que le climatiseur doit être déplacer dans un autre local
ou ranger à la fin de la saison, vider aussi le réservoir secondaire, par
le tube de vidange qui se trouve à l’intérieur du compartiment du câble
électrique.
A la fin des opérations boucher le tube avec son bouchon.
●
Placez toujours la touche marche / arrêt sur OFF avant de débrancher l’appareil.
●
Débrancher toujours l’appareil avant de vider l’eau de condensation
collectée à l’intérieur du climatiseur.
DANGER!
F
DESHUMIDIFICATION
Vous pouvez régler la direction du flux d’air grâce au déflecteur situé
sur la bouche de sortie d’air. Saisir avec les deux mains une ailette du
déflecteur et tirez-la vers vous afin d’orienter le flux d’air.
REGLAGE DU FLUX D’AIR
Flux vertical
Flux Horizontal
COMME VIDER LES RESERVOIRS DE CONDENSAT
ATTENTION:
la commande provoque un retard à peu près de trois minutes
chaque foi que les touches A, B et le thermostat D sont activés
ou en ôtant et insérant la fiche du câble d’alimentation électrique.
B
H
C
D
A
IMPORTANTE
RESERVOIR SECONDAIRE
Page 15

5
F
KIT HUBLOT
ACCESSOIRES (FOURNIS SUR DEMANDE)
Placer le filtre de purification de l’air sur le filtre standard à l’aide
du ressort monté au point 2 précédent.
3
Accrocher la poignée sur le filtre standard et remettre le groupe
filtre dans l’unité avec l’indication “FRONT” dirigée vers vous.
Remplacement du filtre de purification de l’air
●
Le filtre de purification de l’air est démontable.
●
Ne jeter ni le cadre du filtre, ni le ressort.
●
Un filtre usagé ne peut pas être réutilisé, même après nettoyage.
●
Des filtres de purification de l’air peuvent être achetés auprès
de votre revendeur le plus proche.
●
Contrôler l’encrassement du filtre au moins une fois toutes les
deux semaines et remplacer le filtre lorsqu’il est devenu aussi
foncé que la couleur de l’étiquette “color gauge for filter replacement”.
4
“Filtre de purification de l’air”
Côté filtre standard: blanc
(Filtre qui collecte la poussière)
Côté ressort: noir
(Filtre désodorisant)
Filtre
Standard
Ressort
1. Il y a un filtre de purification de l’air, un ressort et une étiquette “color gauge for filter replacement”.
2. Ouvrir le sac juste avant le montage du filtre de purification.
Si non, la durée de l’effet désodorisant du filtre peut être réduite
FILTRE DE PURIFICATION DE L’AIR
●
Lisez ces instructions avant de commencer les opérations de
mise en place.
●
Ce “filtre de purification de l’air” collecte la poussière et désodorise en même temps.
NOTE
Installation du filtre:
Retirer le groupe filtre. Séparez le filtre standard de la poignée.
Placer l’étiquette “color gauge for filter replacement” dans un
endroit facilement visible (à l’intérieur du couvercle du tableau de
commande).
1
Fixer le ressort sur le filtre standard:
Accrocher le ressort sur le filtre à air côté arrière et l’engager
dans la gorge du côté avec l’indication “FRONT” (l’utilisation d’un
tournevis est recommandée pour faciliter la mise en place).
2
Filtre
Standard
Ressort
groupe
filtre
MONTAGE
●
Pratiquez un trou dans le
carreau de la fenêtre.
●
Enchâssez le hublot sans
le bouchon.
●
Enlevez le raccord final de
la sortie d’air chaud du
tuyau flexible rétractable.
●
Approchez le climatiseur
de la fenêtre et enchâssez
le tuyau de sortie d’air
dans le hublot.
VITRAGE SIMPLE
VITRAGE DOUBLE
Si on désire utiliser le climatiseur dans plusieurs locaux, Il
est possible d’acheter séparément plusieurs hublots pour
l’expulsion de l’air.
TROU
REMARQUE
TROU
TROU
REMARQUE
NOTE
Eliminer une ou deux membranes, en
les coupant avec des ciseaux d’après
l’epesseur du vitrage.
Page 16

6
F
ENTRETIEN ET NETTOYAGE
ATTENTION! Avant de procéder à des opérations de nettoyage et
d’entretien, débranchez l’appareil.
1. Nettoyage du filtre à air.
Le filtre doit être contrôlé au moins une fois toutes les deux
semaines (pendant les périodes de fonctionnement). Le fonctionnement avec un filtre sale ou obstrué provoque une diminution de
l’efficacité du climatiseur et peut causer de graves problèmes. Le
filtre est placé derrière la grille d’aspiration et s’extrait en la soulevant vers le côté droit. Utilisez un aspirateur pour éliminer la poussière. Si ce la n’ait pas suffisant, lavez le filtre à l’eau tiède et
savonneuse, rincez-le à l’eau froide et séchez-le avant de le replacer.
2. Nettoyage de l’habillage et de la grille.
Pour nettoyer le climatiseur, frottez-le avec un chiffon doux, légèrement humide. Pour enlever les taches éventuelles, utilisez de l’eau
savonneuse. N’utilisez jamais de dissolvants, essence ou autres
produits chimiques agressifs, ni de l’eau très chaude. Ne versez
jamais d’eau sur le climatiseur pour le nettoyer: vous pourriez
endommager les composants internes ou provoquer des décharges
électriques.
3. En cas de non utilisation.
Si vous prévoyez de ne pas utiliser le climatiseur pendant une
longue période, nettoyez le filtre et vérifiez que les réservoirs intérieurs sont vide. Si vous rangez l’appareil dans un débarras, prenez
bien soin de le mettre en position verticale. Ne déposez pas
d’objets lourds dessus et si possible protégez- le avec une housse
en plastique.
4. Transport.
Quand vous transportez le climatiseur, maintenez-le autant que
possible en position verticale. Si cela s’avérait impossible, couchezle sur un côté; lorsque vous arrivez à destination, remettez au plus
vite l’appareil en position verticale et attendez au moins 10 minutes
avant d’utiliser la fonction de refroidissement.
5. Pour votre sécurité, vérifiez périodiquement les conditions du
câble d’alimentation électrique et dans le cas où il est endommagé par l’usage, faites-le remplacer. Pour le remplacement,
adressez-vous au Service Après-Vente.
NON!
NON!
Si le climatiseur ne fonctionne pas, avant de faire appel au Service Après-Vente, vérifiez que:
●
la fiche est correctement branchée dans la prise de courant;
●
l’interrupteur général est enclenché et qu’aucun fusible soit brûlé;
●
le filtre à air est propre;
●
le tube flexible est placé correctement, ni trop plié, ni trop courbé;
●
le sélecteur du thermostat est placé correctement pour la température désirée (déplacez le sélecteur progressivement
dans le sens des aiguilles d’une montre jusqu’à la mise en marche du compresseur, après le période de retard);
●
la température ambiante est supérieure à 15 °C pour le mode refroidissement et 10°C pour la déshumidification.
●
toutes les instructions contenues dans cette notice ont été scrupuleusement observées.
CONSEILS UTILES
NETTOYAGE DU FILTRE
NON
!
ATTENTION
Le voyant qui clignote et l’arrêt simultané du climatiseur indiquent que le réservoir de condensât intérieur est plein.
Page 17

2
DAS PRODUKT
INHALTVERZEICHNIS
1. Schalt- und Kontrollpanel
2. Luftzufuhr Klappe
3. Transportgriff (beide Seiten)
4. Luftansauggrill
5. Transporträder
6. Zeitschaltuhr (wenn installiert)
7. Flexibler Abluftschlauch
8. Ausblasdüse
9. Luftfilter (rechte Seite)
10. Stromkabel mit Stecker
11. Haupt-Kondenswasserflußrohr
12. Untergeordnete Kondenswasserflußrohr
13. Öffnung für Kabelwicklung
D
SCHALT-UND KONTROLLPANEL
A. Ein/Aus-Taste (ON-OFF)
B. Kühlungs-Entfeuchtungs-Taste
C. Hohe / niedrige Ventilatorgeschwindigkeits-Taste
D. Wahlschalter des elektrischen Thermostates
E. Kühlungs-Kontrolleuchte
F. Hohe Ventilatorgeschwindigkeits-Kontrolleuchte
G. Niedrige Ventilatorgeschwindigkeits-Kontrolleuchte
H. Eingeschaltete Anzeigeleuchte für Entfeuchtung;
Die Anzeigeleuchte blinkt wenn der
Kondenswassersbehälter voll ist;
I. Kontrollpanel Deckel
DAS PRODUKT .......................................................................................................... 2
SCHALT- UND KONTROLLPANEL ............................................................................ 2
VOR INBETRIEBNAHME ............................................................................................ 3
ANWENDUNGSHINWEISE
Kühlung ......................................................................................................3
Entfeuchtung (dry) ......................................................................................4
LUFTSTROM-EINSTELLUNG .................................................................................... 4
WIE DIE KONDENSWASSERBEHÄLTER ZU ENTLEEREN ..................................... 4
RUNDES FENSTER KIT ............................................................................................. 5
ZUBEHÖRTEILE (AUF ANFRAGE) ............................................................................ 5
Luftfilter ......................................................................................................5
WARTUNG UND PFLEGE .......................................................................................... 6
NÜTZLICHE RATSCHLÄGE ....................................................................................... 6
KONFORMITÄTSERKLÄRUNG
Dieses Produkt ist mit Zeichen gekennzeichnet, weil es
den folgenden Richtlinien
entspricht:
– Niederspannungsrichtilinie 73/23
EWG und 93/68 EWG.
–Elektromagnetische
Verträglichkeit 89/336 EWG,
92/31 EWG und 93/68 EWG.
Bei falschem Einsatz des Gerätes
und/oder Nichtbeachtung auch nur
von Teilen der
Bedienungsanleitung und der
Installatinsanweisungen wird diese
Erklärung ungültig.
2
3
5
4
7
8
9
10
H
E
F
G
B
I
A
C
D
12
11
1
6
13
Betriebsgrenzen:
Raumtemperatur
:
Kühlung: MIN: 15°C T.K. / 12°C F.K
MAX: 35°C T.K. / 24°C F.K
Entfeuchtung: MIN: 10°C T.K. / 80% R.F.
MAX: 35°C T.K. / 80% R.F.
Page 18

Das Klimagerät verbraucht das Kondenswasser automatisch, wenn der Ventilator mit der hohen Geschwindigkeit läuft;
wenn der Ventilator mit der niedrigen Geschwindigkeit läuft, wird das Kondenswasser in dem Behälter aufgenommen.
●
Den Thermostwahlschalter nach links zum Ausschalten des Kompressors langsam drehen. Das Klimagerät wird automatisch vom Thermostat kontrolliert und hält die gewünschte Raumtemperatur ein.
●
Die Ein-/Aus-Taste (A) zum Ausschalten des Klimagerätes wieder drücken (Position OFF).
3
D
●
Während des Betriebs, transportieren Sie
Das
Klimagerät nicht, schalten Sie es aus und ziehen Sie den Stecker aus der
Steckdose. Kontrollieren und auslassen Sie das eventuelle Kondenswasser, durch den Kondenswasserrohr an der
Rückseite der Einheit.
●
VORSICHT ! Niemals Gegenstände in die Klimaanlage hineinstecken. Es ist sehr gefährlich, da sich der Ventilator mit
hoher Geschwindigkeit dreht.
●
ACHTUNG! Das Klimagerät ist mit einer Startverzögerung für den Kompressor ausgerüstet. Der Kompressor startet 3
Minuten verzögert nach einem vorstehenden EIN/AUS- Schaltvorgang. Vermeiden Sie schnelle Veränderungen des
Thermostatsreglers gegen beiden Richtungen, wenn der Kompressor arbeitet.
●
Vergewissern Sie sich, daß keine Hindernisse neben der Inneneinheit den Luftumlauf unterbrechen können. Den Luftzuführ
und Luftansauggrill der Einheit mit Vorhängen oder ähnlich nicht versperren.Keine Gegenstände auf das Gerät legen.
●
Die Einheit erreicht die höchste Leistungen am folgenden Bedingungen:
1-Der Abluftschlauch ist ruckgezieht, ohne Kurven und ohne Schlauchdüse.
2-Am ersten Einschalten der Einheit, stellen Sie die NIEDRIGE Ventilator-Geschwindigkeit ein und lassen Sie die Einheit
wenigstens eine Uhr lang funktionieren, dann stellen Sie die HOHE Ventilator-Geschwindigkeit ein.
●
Der Hersteller haftet nicht für unsachgemäßen Gebrauch oder Mißachtung nationaler Sicherheitsvorschriften.
1.Vor jeder Bewegungs- oder Reinigungshandeln, den Stecker aus der Steckdose ziehen.
KÜHLUNG
●
Das Klimagerät so nah wie möglich an das Fenster stellen. Den Abluftschlauch
stecken, indem er an der Rückseite des Gerätes angreift. Den Schlauch ausziehen, so weit es notwendig ist, und durch eine Fensteröffnung (zwischen den
Flügeln) stecken; das Fenster anlehnen.
●
Falls das Fenster ein Fensterbrett nach innen hat, benutzen Sie die mitgelieferte
Flachdüse. Die Flachdüse auf das Ende des Schlauches stecken.
●
Das Fenster öffnen und einen der Flügeln durch die Griffe befestigen. Die
Schlauchdüse zwischen den beiden mit Schlaufe fixierten Flügeln stecken.
●
Scharfes Abnicken des Schlauches vermeiden.
●
Wird die Seitelucke benutzt, ein Loch von 138 mm in das Fenster schneiden.
●
Den Thermostatwahlschalter (D) nach rechts auf die Position höchster Kälte drehen.
●
Die Ein-/Aus-Taste (A) drücken und das Klimagerät in Betrieb setzen. Die
Kontrolleuchten zeigen die letzte gewählte Funktionen.
●
Die Kühlbetrieb wählen, indem Sie die Taste (B) drücken, die Kontrolleuchte
(E) erscheint.
●
Die Taste (C) drücken, um die hohe Ventilatorgeschwindigkeit zu wählen, die
Kontrolleuchte (F) erscheint.
●
Wenn die gewünschte Raumtemperatur erreicht wird, die Taste (C) noch drücken,
um die niedrige Ventilatorgeschwindigkeit zu wählen, die Kontrolleuchte (G)
.......erscheint.
VOR INBETRIEBNAHME
ANWENDUNGSHINWEISE
FALSH!
●
Überprüfen Sie, daß die einphasige Nennspannung am Anwendungsort 220/240V
~ 50Hz ist.
●
Vergewissern Sie sich, daß die elektrische Anlage einen eingemessene
Betriebsstrom liefern kann, außer jenem der normalerweise von den anderen
Geräten (z.B. Haushaltgeräte, Beleuchtungen) verbraucht wird. Sehen die
Bedarfsspitze auf dem Datenschild vom Klimagerät.
●
Ist ein zweipoliger Schalter mit Schutzsicherung (träge) zu 10 A dem
Versorgungsstecker anzubringen.
●
Alle elektrische Anschlüsse müssen den örtlichen elektrischen Vorschriften entsprechen.
●
Vergewissern Sie sich, daß die automatischen Schalter und die
Schutzsicherungen der Anlage in der Lage sind, einen Zulaufstrom von 20A zu tragen (normalerweise weniger als 1 Sekunde Zeit lang).
●
Das Klimagerät nicht an Orten aufstellen, in denen es von Wassertropfen naß
gemacht werden könnte (z.B. in den Waschküchen).
●
Vergewissern Sie sich, daß der Ein/Aus-Taste (ON/OFF) auf dem Schaltpanel des
Klimagerätes sich auf der Position OFF befindet.
●
Vergewissern Sie sich, daß die Steckdose der elektrischen Anlage immer mit wirksamer Erdung versehen ist.
●
Verwenden Sie den Gerätestecker nicht zum Ein-und Ausschalten des Gerätes:
benutzen Sie immer den Gerätebetriebstaste, die auf dem Kontrollpanel gestellt
ist.
WARNUNG
ANMERKUNG
Page 19

4
Wenn das Klimagerät als Entfeuchter benutzt wird, kühlt er den Raum
nicht.
Wenn das Gerät als Entfeuchter benutzt wird, ist der Anschluß des
Abluftschlauches nicht notwendig. Die Schlauchanschlußöffnung auf
der Rückseite einfach offen lassen, um eine große Entfeuchter
Leistung zu erlangen.
●
Den Schlauch abnehmen, indem Sie den auf der Anschluß des
Klimagerätes fassen und drehen Sie, um den auszuziehen.
Die Ein / Aus Schalter (A) drücken, um das Klimagerät in
Betrieb zu setzen.
●
Die Entfeuchtungbetrieb mit der Taste (B) wählen, die
Anzeigeleuchte (H) einschaltet. Die Luftfeuchte des Zimmers
(Kondenswasser) wird in den innere Kondenswasserbehälter vom
Klimagerät aufgenommen.
●
Zum Ausschalten des Klimagerätes den Ein / Aus Taste (A) wiederdrucken (Position OFF).
HINWEIS
Das Klimagerät kann als Entfeuchter benutzt werden, nur wenn die
Raumtemperatur höher als 10 °C ist. Wenn die Temperatur unter 10
°C ist, schaltet sich der Kompressor aus und die Entfeuchtungsbetrieb
nicht aktiviert ist, während der Ventilator weiterartbeitet.
Das Klimagerät beseitigt die Luftfeuchte, die im innen Behälter aufgenommen wird. Das Kondenswasser kann durch den außen Flußrohr
ausgelassen werden, der sich auf der Rückseite des Gerätes befindet.
●
Wenn der innere Behälter voll ist, schaltet automatisch das
Klimagerät aus und die Alarm-Kontrolleuchte(gelbe) beginnt
zu blinken.
Die Kapazität des Behälters erlaubt einen ca. 6 Stunden langen
Betrieb.
●
Den Bestand von Wasser im Klimagerät nachprüfen, indem man
das aussere rückseitige Kondenswasserrohr kontrolliert.
●
Die Ein / Aus Taste drücken bis zur Position OFF und den Stecker
aus der Steckdose ziehen.
●
Einen Behälter unter das Kondenswasserrohr stellen.
●
Das Rohr fassen, indem es von seinen Sitz auf der Rückseite der
Einheit abnehmen.
●
Mit dem Zoll die öffnete Ende des Rohres schließen und neigen es
gegen den Behälter, indem die Kondenswasser auslassen.
●
Am Ende das Kondenswasserrohr in Sitz wiedereinsetzen.
Jedes Mal sollen Sie die Einheit zu ein anderes Zimmer bringen oder
vor der Lagerung für einen längeren Zeitraum, entleeren Sie auch den
untergeordnete Kondenswasserbehälter durch dem Flußrohr, der sich
am Inneren der Öffnung für Kabelwicklung befindet.
Am Ende machen Sie den Flußrohr mit dem Stöpsel zu.
●
Die Ein / Aus Taste muß immer in der Position OFF sein, bevor
man den Stecker aus der Steckdose zieht.
●
Den Stecker aus der Steckdose ziehen, bevor man das innere
Kondenswasser ausläßt.
WARNUNG
WARNUNG:
Das Kontrolle anrichtet eine Startverzögerung des Kompressors
von etwa drei Minuten, wenn die Tasten A, B und das Thermostat
D aktiviert werden oder den Stecker des Stromkabels aus und
eingezogen wird.
D
ENTFEUCHTUNG
Der Luftstrom kann eingestellt werden, indem man eine Klappe auf
dem Luftauslaß bewegt. Mit den beiden Händen eine Luftleitlamelle
fassen und an sich ziehen, um den Luftstrom einzustellen.
LUFTSTROM-EINSTELLUNG
Vertikal Lufstrom
Horizontal Lufstrom
WIE DIE KONDENSWASSERBEHÄLTER ZU ENTLEEREN
B
H
C
D
A
WICHTIG
UNTERGEORDNETE
BEHÄLTER
Page 20

5
D
RUNDES FENSTER KIT
ZUBEHÖRTEILE (AUF ANFRAGE)
Den Luftfilter mit der in Schritt 2 oben befestigen Feder am
Standard Filter befestigen.
3
Den Griff zu den Standard Filter einhaken. Den Standard Filter
mit der Markierung “FRONT” zu ihnen wieder einlegen.
Austausch des Luftfilters
●
Luftfilter ist ein Einwegfilter.
●
Den Filterrahmen und die Feder nicht wegwerfen.
●
Der alte Filter kann auch nach Reinigung nicht wiederverwendet werden.
●
Kaufen Sie den Austauschfilter bei ihrem nächsten Händler.
●
Die Verschmutzungsgrad mindestens alle zwei Wochen prüfen und den Filter austauschen, wenn er so schmutzig wie die
Farbe des Schildes “color gauge for filter replacement” ist.
4
“Luftfilter”
Standard Filter Seite: weiß
(Staubsammler Filter)
Feder Seite: schwarz
(Deodorant Filter)
Filter standard
Feder
1.Dieser Karton enthält einen Luftfilter, eine Feder und ein Schild
“color gauge for filter replacement”.
2.Den Beutel unmittelbar vor der Installation der Luftfilter öffnen.
Andernfalls kann die Deodorantwirkung und die Haltbarkeit des
Filters Schaden nehmen.
LUFTFILTER
●
Lesen Sie diese Anleitung bevor Sie mit der Austauscharbeit
beginnen.
●
Dieser Luftfilter wirkt als Staubsammler und Deodorant.
ANMERKUNG
Filterinstallation:
Die Filter Gruppe herausziehen.
Den Standard Filter vom Griff trennen. Das Schild “color gauge
for filter replacement” an eine sichtbare Stelle stecken (im
Kontrollpanel Deckel).
1
Die Feder am Standard Filter befestigen:
Die Feder von der Rückseite im Luftfilter einhacken und auf der
Seite mit der Markierung “FRONT” in die Nute einrasten lassen
(ein normaler Schraubenzieher erleichert das Einsetzen.
2
Filter
standard
Feder
Filter
Gruppe
MONTAGE
●
Das Fensterglas lochen.
●
Das runde Fenster ohne
Deckel einsetzen.
●
Die Ausblasedüse vom
Schlauch entfernen.
●
Das Klimagerät ans Fenster
nähern und das Auslaufrohr
in das runde Fenster einsetzen.
EINZELGLAS
DOPPELGLAS
Wenn man das Klimagerät in mehreren Zimmer brauchen
will, ist es möglich mehrere runde Fenstern für Luftauslassen
kaufen.
HOLE
ANMERKUNG
HOLE
HOLE
ANMERKUNG
ANMERKUNG
Beseitigen Sie eine oder zwei
Membranen, indem Sie mit der
Schere schneiden, gemäß der Dicke
des Glasses.
Page 21

6
D
WARTUNG UND PFLEGE
VORSICHT! Vor Beginn der Reinigungs-und Wartungsvorgänge ist
das Klimagerät abzuschalten und der Stecker aus der Steckdose zu
ziehen.
1. Filterreinigung.
Der Luftfilter muß wenigstens einmal alle 2 Betriebswochen überprüft und gereinigt werden. Der Betrieb mit schmutzigen oder verstopften Filter kann die Leistung des Klimagerätes verkleinern. Der
Filter ist hinter den Luftansauggrill angebracht und wird nach recht
herausgenommen. Zur Staubentfernung einen Staubsauger benutzen. Sollte dies nicht ausreichen, den Filter mit lauwarmen
Seifenwasser waschen, gut mit frischem Wasser abspülen und vor
dem Wiedereinsetzen trocknen lassen.
2. Gehäusereinigung.
Das Gehäuse nur mit weichem feuchtem Tuch abwischen. Wenn
das Gehäuse Flecken aufweist, mit etwas lauwarmen Seifenwasser
abwischen. Auf keinem Fall mit heißen Wasser, angreifenden chemischen Mitteln oder Benzin reinigen. Kein Wasser auf die Einheit
gießen. Es könnte die inneren Komponenten beschädigen oder
einen Kurzschluß verursachen.
3. Lagerung.
Vor der Lagerung für einen längeren Zeitraum den Filter reinigen
und vergewissern Sie sich, daß die innere Kondenswasserbehälter
leer sind. Das Gerät immer senkrecht lagern. Keine schweren
Gegenstände auf das Gerät legen und das Klimagerät mit einem
Plastik Beutel schützen.
4. Transport .
Das Gerät nur senkrecht transportieren. Falls dies nicht möglich ist,
das Gerät auf die rechte Seite legen. So bald wie möglich das
Gerät senkrecht wieder stellen. 10 Minuten warten, bevor es in
Betriebsart “Kühlung” gebraucht wird.
5. Aus Sicherheitsgründen das Stromkabel regelmäßig auf
Schäden überprüfen und wenn es beschädigt ist, lassen Sie
es durch einen Servicefachmann ersetzen.
FALSCH!
FALSCH!
Falls das Klimagerät nicht funktioniert, vergewissern Sie sich, bevor den Eingriff des Technischen Kundendiensts verlangen,
daß:
●
der Stecker richtig in der Steckdose eingesetzt ist;
●
der Hauptschalter eingeschaltet und keine Sicherung unterbrochen ist;
●
der Luftfilter sauber ist;
●
der Schlauch ordnungsgemäß verlegt ist, ohne Knick;
●
der Thermostatwahlschalter sich auf der richtigen Position für die gewünschte Raumtemperatur befindet (indem Sie im
Uhrzeigersinn drehen vergewissern Sie sich, daß der Kompressor sich nach dem Abstandzeit einschaltet);
●
die Raumtemperatur höher als 15 °C für Kühlungbetrieb und 10°C für Entfeuchtungbetrieb ist;
●
alle Anweisungen dieses Handbuches genau beachtet wurden.
NÜTZLICHE RATSCHLÄGE
FILTERREINIGUNG
FALSCH!
ACHTUNG
Das Blinken der Kontrollampe und das gleichzeitige Anhalten des Klimagerätes bedeuten, daß die
Kondenswasserbehälter voll ist.
Page 22

2
EL PRODUCTO
INDICE
1. Panel de mandos y controles
2. Deflector salida aire
3. Asa de transporte (en ambos
lados)
4. Rejilla aspiración aire
5. Ruedas fácil transporte
6. Programador (si instalado)
7. Tubo flexible plegable
8. Boquilla terminal expulsión aire
9. Filtro aire (lado derecho)
10. Cable eléctrico con clavija
11. Tubo de descarga de la condensación
(principal)
12. Tubo de descarga de la condensación
(secundario)
13. Alojamiento cable eléctrico
E
PANEL DE MANDOS Y CONTROLES
A. Pulsador arranque-parada
B. Pulsador refrigeración /
Deshumidificación
C. Pulsador alta o baja velocidad ventila-
dor
D. Selector del termostato electrónico
E. Luz refrigeración
F. Luz alta velocidad ventilador
G. Luz baja velocidad ventilador
H. Luz encendida para deshumidificación.
La luz lampagea si el depósito recogida
agua de condensación es lleno.
I. Cubertura mandos
EL PRODUCTO .................................................................................................... 2
PANEL DE MANDOS Y CONTROLES ................................................................. 2
ANTES DE USAR EL ACONDICIONADOR ......................................................... 3
COMO USARLO
Refrigeración ..............................................................................................3
Deshumidificación (dry) ..............................................................................4
REGULACION DEL FLUJO DEL AIRE ...................................................................................4
COMO DESCARGAR EL AGUA DE CONDENSACION .......................................4
KIT JUNTA ELASTICA ..........................................................................................5
ACCESORIOS (SUMINISTRADOS BAJO PEDIDO) ............................................5
Filtro aire limpio ...........................................................................5
MANTENIMIENTO Y LIMPIEZA ........................................................................... 6
CONSEJOS PRACTICOS .....................................................................................6
DECLARACION DE
CONFORMIDAD
Este Producto está marcado
porque responde a las Directivas:
– Baja Tensión n° 73/23 CEE y
93/68 CEE.
– Compatibilidad Electromagnética
n° 89/336 CEE, 92/31 CEE y
93/68 CEE.
Esta declaración no tendrá efecto
en sólo caso de que se haga un uso
diferente al declarado por el
Fabricante, y/o por el no respeto,
incluso parcial, de las instrucciones
de instalación y/o de uso.
2
3
5
4
7
8
9
10
H
E
F
G
B
I
A
C
D
12
11
1
6
13
Limites de funcionamiento:
Temperatura interior:
Refrigeración: MIN: 15°C B.S. / 12°C B.H.
MAX: 35°C B.S. / 24°C B.H.
Deshumidifición: MIN: 10°C B.S. / 80% H.R.
MAX: 35°C B.S. / 80% H.R.
Page 23

3
E
●
PRECAUCION No introducir objetos en el acondicionador. Es muy peligroso porque el ventilador gira a alta velocidad.
●
ATENCION!
El acondicionador está dotado de un sistema de protección contra sobrecargas que impide el arranque del mismo si no
han transcurrido por lo meno 3 minutos desde la parada anterior. Por lo tanto, evitar desplazamientos frecuentes del selector del termostato hacia ambos sentidos cuando el compresor esté funcionando.
●
Asegurarse de que el aire circule libremente en la unidad interior. No obstruir la salida y entrada del aire con cortinas o
semejantes. No colocar nada encima del aparato de modo que no obstaculice el paso del aire.
●
El fabricante no se asume ninguna responsabilidad si no vienen respetadas las normas de seguridad.
●
La unidad alcanza la máxima eficacia a las siguientes condiciones:
1-El tubo flexible es retracto, sin curvas y sin terminal.
2-Cuándo se enciende la unidad la primera vez, hacerla funcionar durante por lo menos una ora a la BAJA velocidad del
ventilador,después seleccionar la ALTA.
1.Antes de proceder al desplazamiento o limpieza del acondicionador, desconectar el enchufe eléctrico.
ANTES DE USAR EL ACONDICIONADOR
COMO USARLO
REFRIGERACION
●
Acercar lo más posible el acondicionador a una ventana. Acoplar el tubo flexible
enganchándolo en la parte posterior del aparato. Estirar el tubo flexible cuanto sea
necesario para llegar al exterior y pasarlo entre los batientes de la ventana con la
mínima abertura indispensable.
●
Si la ventana tiene un alfeizar interno es aconsejable utilizar la boquilla terminal
suministrada con el aparato. Acoplar el terminal al extremo libre del tubo flexible.
●
Abrir la ventana y bloquear uno de los batientes con la manilla. Apoyar el terminal
del tubo al batiente fijo, acercar el otro batiente de la ventana y atar los dos batientes entre si.
●
Evitar curvas cerradas o pliegues en el tubo flexible.
●
Si se utiliza la junta elástica, hacer un agujero de ø138 en el cristal de la ventana.
●
Desplazar hacia la derecha el selector (D) del termostato hasta la posición máximo frío.
●
Pulsar el botón (A) arranque-parada para poner en marcha el acondicionador, las luces muestran las últimas funciones seleccionadas.
●
Pulsar el botón (B) de refrigeración , se enciende la luz (E).
●
Pulsar el botón (C) para seleccionar la alta velocidad del ventilador , se enciende
la luz (F) .
● Cuando la temperatura del local alcance el valor deseado pulsar de nuevo el
botón (C) para seleccionar la baja velocidad del ventilador , se enciende la luz (G)
.......
NO!
●
Comprobar que la tensión eléctrica monofásica nominal de alimentación sea de
220/240 V ~ 50Hz.
●
Asegurarse que la instalación eléctrica sea dimensionada para la corriente necesaria al acondicionador aparte de la corriente absorbida por otros aparatos. (electrodomésticos, luces, etc.). Véase las absorciones máximas indicadas en la placa
de características del aparato.
●
Se aconseja instalar antes del enchufe de alimentación un interruptor bipolar, con
fusible de protección de 10 A del tipo retardado.
●
La conexión a la red eléctrica de la unidad debe ser realizada conforme a las normas locales de electricidad.
●
Asegurarse que los interruptores automáticos y válvulas de protección de la instalación sean capaces de soportar una corriente de arranque de 20 A (normalmente
por un tiempo inferior a un segundo).
●
Evitar instalar el acondicionador en lugares donde podría salpicarle el agua (como
por ejemplo las lavanderías).
●
Asegurarse que el pulsador arranque-parada situado en el panel de mandos esté
en posición OFF.
●
El enchufe de la instalación deberá estar dotado de una toma de tierra eficaz.
●
No utilizar nunca el enchufe para parar o poner en marcha el acondicionador: usar
siempre el interruptor del aparato.
●
No transportar el acondicionador durante el funcionamiento, pararlo y desconectar
el enchufe eléctrico. Verificar y vaciar el agua de condensación, si existe, a través
del tubo de descarga posterior.
PELIGRO!
NOTA
El acondicionador elimina el agua de condensación automáticamente a la ALTA velocidad del ventilador, mientras a la BAJA
velocidad el agua de condensación se recoge en el depósito.
●
Finalmente desplazar lentamente hacia la izquierda el selector del termostato hasta la parada del compresor. A partir de
ahora el acondicionador funciona automáticamente bajo el control del termostato, manteniendo en el local la temperatura
deseada.
●
Para parar el acondicionador pulsar nuevamente el botón arranque-parada (A) llevándolo a la posición OFF.
Page 24

El acondicionador absorbe la humedad del aire que se recoge en el
depósito interior y se puede vaciar a través del tubo de descarga
situado en la parte posterior del aparato.
La capacidad del depósito permite una autonomía de funcionamiento
continuo de 6 horas aproximadamente.
●
Cuando el depósito está lleno, el acondicionador se apaga automáticamente y el piloto de depósito lleno se enciende con intermitencia.
●
Verificar si hay agua en el interior del acondicionador, controlando
el tubo posterior, transparente.
●
Pulsar el botón arranque / parada para llevarlo a la posición OFF.
Después retirar la clavija del enchufe.
●
Colocar un recipiente debajo del tubo de descarga.
●
Retirar el tubo extrayéndolo de su alojamiento.
●
Cerrar la extremidad del tubo con el dedo pulgar e, inclinándolo
hacia el recipiente, vaciar el agua de condensación.
●
Después de estas operaciones volver a colocar de nuevo el tubo
de descarga en su alojamiento.
Cada vez que la unidad tiene que ser transportada en otros locales o
antes de retirarla, descargar también el deposito de la condensación
secundario, a través del tubo de descarga situado a l' interior del alojamiento cable eléctrico.
Después de esta operación volver a colocar el tapón del tubo.
4
Cuando el acondicionador funciona en deshumidificación, no enfría el
ambiente.
Usando el acondicionador como deshumidificator, no debe conectarse
el tubo flexible. Para obtener la máxima eficacia de deshumidificación
dejar la expulsión aire posterior libre para descargar directamente en
la habitación.
●
Quitar el tubo flexible del acondicionador girándolo hasta soltarlo
de los ganchos de bloqueo.
Pulsar el botón arranque / parada (A) para poner en marcha el
aparato.
●
Seleccionar la función de deshumidificación con el botón (B)
, se enciende la luz (H). La humedad absorbida viene
recogida en forma de agua (condensación) en el depósito interior
del acondicionador.
●
Para parar el acondicionador pulsar nuevamente el botón arranque-parada (A) llevándolo a la posición OFF.
ATENCION !
El acondicionador puede funcionar en deshumidificación solo si la
temperatura ambiente es superior a 10 °C. Cuando la temperatura es
inferior a 10 °C el compresor se para interrumpiendo la deshumidificación, mientras el ventilador sigue funcionando.
●
Colocar el pulsador arranque / parada siempre en la posición OFF
antes de desconectar el enchufe eléctrico
●
Desconectar siempre el enchufe eléctrico antes de vaciar el depósito interior.
PELIGRO!
ATENCION:
el controle provoca un retraso de aproximadamente tres minutos
al arranque del compresor cada vez se activan los pulsadores A,
B y el termostato D o cuando se saca y se inserta la clavija del
cable de alimentación.
E
DESHUMIDIFICACION
Se puede regular la dirección del flujo del aire actuando sobre el
deflector móvil situado en la boca superior de salida del aire; tomar
una aleta del deflector con ambas manos y tirar hacia sí mismo para
orientar el flujo del aire.
REGULACION DEL FLUJO DEL AIRE
Flujo Vertical
Flujo Horizontal
B
H
C
D
A
COMO DESCARGAR EL AGUA DE CONDENSACION
IMPORTANTE
DEPOSITO SECUNDARIO
Page 25

5
E
KIT JUNTA ELASTICA
ACCESORIOS (SUMINISTRADOS BAJO PEDIDO)
Fijar el “filtro aire limpia” al filtro standard mediante el resorte precedente.
3
Enganchar la asa al filtro standard y volver a colocar el grupo
filtro en el aparato de forma que la palabra “FRONT” se
encuentre delante de quien realiza la operación.
Sustitución del filtro aire limpia.
●
El filtro aire limpia se puede sustituir.
●
Aprovechar el marco de plástico y el resorte.
●
El filtro usado no puede utilizarse de nuevo ni siquiera después de lavarlo.
●
Adquirir un nuevo filtro para sustitución en la tienda más cercana.
●
Controlar el estado de contaminación por lo menos cada dos
semanas y sustituir el filtro cuando su color es igual al de la
etiqueta “color gauge for filter replacement”.
4
“Filtro aire limpia”
Lado blanco
(filtro recoge polvo)
Lado resorte:negro
(filtro deodorante)
Filtro Standard
Resorte
1. La caja de cartón contiene un filtro aire limpio, un resorte y
una etiqueta “color gauge for filter replacement”.
2. Abrir la bolsa solo al momento final antes de instalar el filtro.
Caso contrario se reduce el efecto deodorante del filtro.
FILTRE AIRE LIMPIA
NOTA
Procedimiento para instalar el filtro:
Quitar el grupo filtro. Separar el filtro standard de su asa.
Aplicar la etiqueta “color gauge for filter replacement” en una
posición visible fácilmente (en el interior cobertura mandos).
1
Colocar el resorte en el filtro standard:
Enganchar el resorte en el filtro par la parte posterior y alojarlo en
el canal situado en el lado donde está escrito “FRONT” (para
facilitar la operación se aconseja el uso de un destornillador).
2
Filtro
Standard
Grupo
filtro
Resorte
●
Lea estas instrucciones antes de iniciar la operación.
●
Las funciones del “filtro aire limpia” son las de recoger el polvo
y eliminar olores.
MONTAJE
●
Realizar un agujero en el
cristal de la ventana.
●
Montar la junta elástica sin
el cierre en el agujero.
●
Desmontar la boquilla del
tubo flexible.
●
Acercar el acondicionador a
la ventana y embocar el
extremo cilíndrico del tubo
flexible al agujero.
CRISTAL SIMPLE
CRISTAL DOBLE
Si se desea utilizar el mismo climatizador en varios locales
pueden adquirirse los “kit junta elástica / disco transparente”
que se necesiten.
AGUJERO
NOTA
AGUJERO
AGUJERO
NOTA
NOTA
Eliminar una o dos membranas cortando con las tijeras según el espesor
del cristal.
Page 26

E
MANTENIMIENTO Y LIMPIEZA
ATENCION! Antes de realizar cualquier operación de limpieza y/o de
mantenimiento desconectar la clavija de su enchufe.
1. Limpieza del filtro del aire.
El filtro debe ser controlado al menos una vez cada dos semanas
de funcionamiento. El filtro sucio o obstruido causa una disminución de la eficacia del acondicionador y puede provocar graves
inconvenientes. El filtro está situado detrás de la rejilla de aspiración del acondicionador y se extrae por el lado derecho. Utilizar
una aspiradora para eliminar el polvo almacenado. Si no fuese suficiente, lavar el filtro con agua templada ligeramente jabonosa,
enjuagarlo con agua fría y secar antes de volver a montarlo.
2. Limpieza de la envolvente y rejilla.
Para limpiar el acondicionador basta frotarlo con un paño suave
ligeramente humedecido. Para eliminar manchas usar agua jabonosa. No usar disolventes, gasolina o otros compuestos químicos
agresivos ni agua demasiado caliente. No volcar agua sobre el
aparato para limpiarlo; se pueden dañar los componentes internos
o provocar un corto circuito.
3. Conservación.
Cuando se decide no utilizar el acondicionador por un largo período
de tiempo, antes de retirarlo limpiar el filtro y verificar que los depósitos agua de condensación interior sean vacíos. Si desean meter
el aparato en un desván o similar, colocarlo siempre en posición
vertical. No apoyar objetos pesados en la parte superior del aparato. Si es posible, protegerlo con un saco de plástico o similar.
4. Transporte.
Si desea transportar el acondicionador, mantenerlo siempre que
sea posible en posición vertical. Si esto no fuese posible, ponerlo
en horizontal apoyándolo sobre el lado derecho; apenas llegado a
destino colocarlo de nuevo en posición vertical y esperar al menos
10 minutos antes de utilizarlo en función de refrigeración.
5. Para una mayor seguridad aconsejamos verificar periódicamente el cable de alimentación y si éste presenta síntomas de
deterioro háganlo sustituir. Para la sustitución consultar al
distribuidor o al Servicio Asistencia.
Si el acondicionador no funciona, antes de llamar al Servicio Asistencia Técnica verificar que
●
la clavija está bien conectada al enchufe;
●
el interruptor general de corriente está conectado y los fusibles en perfectas condiciones;
●
el filtro del aire está limpio;
●
el tubo flexible está correctamente posicionado, sin pliegues ni curvas demasiado cerradas;
●
el selector del termostato está en la posición correcta para la temperatura deseada (desplazando el mismo en sentido
horario hasta que arranque el compresor, después del tiempo de retardo);
●
la temperatura ambiente es superior a 15 °C para la refrigeración y 10°C para la deshumidificación;
●
todas las instrucciones contenidas en este manual han sido respetadas escrupulosamente.
CONSEJOS PRACTICOS
6
NO!
NO!
LIMPIEZA DEL FILTRO
ATENCION
Cuando el piloto lampagea e inmediatamente después se apaga el acondicionador, se debe a que el depósito agua de
condensación está lleno.
Page 27

IDENTIFICAÇÃO DO PRODUTO
CONTÉM
1. Painel de Comandos
2. Reflector de saída de ar
3. Pega manual (Dos dois lados)
4. Grelha de entrada de ar
5. Rodas para transporte
6. Timer (if installed)
7. Tubo flexível
8. Acessórios para tubo terminal
9. Filtro de ar (lado direito)
10. Cabo eléctrico com ficha
11. Tubo para evacuação condensada
(tanque principal)
12. Tubo para evacuação condensada
(tanque secundário)
13. Espaço para arrumar o fio de ligação
PAINEL DE COMANDO E CONTROLO
A. Interruptor para ligar e desligar
B. Tecla “Refrigerar / desumidificar”
C. Botão regulador de temperatura (Máxima/Miníma)
D. Termostato eléctrico
E. Luz de refrigeração
F. Luz de Temperatura alta
G. Luz de temperatura baixa
H. Desumidificar: luz de controlo está acesa
constantemente
Tanque de água cheio: luz de controlo pisca
I.Painel de Controlo tapado
IDENTIFICAÇÃO DO PRODUTO . . . . . . . . . . . . . . . . . . . . . . . . . . . . . . . . . . . . . .2
PAINEL DE COMANDO E CONTROLO . . . . . . . . . . . . . . . . . . . . . . . . . . . . . . . . .2
ANTES DE USAR O APARELHO . . . . . . . . . . . . . . . . . . . . . . . . . . . . . . . . . . . . . .3
FUNCIONAMENTO
Refrigeração . . . . . . . . . . . . . . . . . . . . . . . . . . . . . . . . . . . . . . . . . . . . .3
Desumidificação . . . . . . . . . . . . . . . . . . . . . . . . . . . . . . . . . . . . . . . . . . .4
AJUSTAR A DIRECÇÃO DO FLUXO DE AR . . . . . . . . . . . . . . . . . . . . . . . . . . . . .4
DESCARGA DE AGUA . . . . . . . . . . . . . . . . . . . . . . . . . . . . . . . . . . . . . . . . . . . . . .4
KIT DE ABERTURA . . . . . . . . . . . . . . . . . . . . . . . . . . . . . . . . . . . . . . . . . . . . . . . .5
ACESSORIOS (FORNECIDOS A PEDIDO) . . . . . . . . . . . . . . . . . . . . . . . . . . . . . .5
Filtro Purificador . . . . . . . . . . . . . . . . . . . . . . . . . . . . . . . . . . . . . . . . . . .5
LIMPEZA E CUIDADOS . . . . . . . . . . . . . . . . . . . . . . . . . . . . . . . . . . . . . . . . . . . . .6
CONCELHOS UTEIS . . . . . . . . . . . . . . . . . . . . . . . . . . . . . . . . . . . . . . . . . . . . . . .6
2
3
5
4
7
8
9
10
H
E
F
G
B
I
A
C
D
DECLARAÇÃO DE CONFORMIDADE
Este produto tem a marca porque
responde às Directrizes:
– Baixa tensão N° 73/23/CEE,
93/68/CEE.
– Compatibilidade eletromagnética n°
89/336/CEE, 92/31/CEE e
93/68/CEE.
Esta declaração será considerada nula
se a sua utilização for diferente da do
fabricante e/ou se não forem seguidas,
mesmo que parcialmente, as instruções
de instalação e/ou de modo de
emprego.
P
12
11
1
6
13
2
Operating limits:
Room Temperature:
Cooling: MIN: 15°C D.B. / 12°C W.B.
MAX: 35°C D.B. / 24°C W.B.
Dehumidification: MIN: 10°C D.B / 80% R.H.
MAX: 35°C D.B. / 80% R.H.
Page 28

P
3
ANTES DE USAR O APARELHO
FUNCIONAMENTO
REFRIGERAÇÃO
●
Coloque o ar condicionado o mais perto possível de uma janela. Ajuste o tubo
flexível prendendo-o na parte traseira do aparelho.Estenda o referido tubo até
alcançar a janela passando-o através da mesma com as persianas entreabertas.
●
No caso de haver uma janela soleira na sala, talvez seja melhor usar a extremidade do alimentador exterior.
●
Coloque a extremidade na parte livre do tubo flexível.
●
Abra a janela e feche uma das persianas. Coloque a extermidade exterior entre as
duas persianas.
●
Evite que o tubo flexível faça uma curvatura.
●
Faça uma abertura de 138 mm de diâmetro no vidro da janela.
●
Rode o botão (D) do termostato para a direita até atingir a temperatura máxima de
refrigeração.
●
Pressione o interruptor de ligação (A) as lâmpadas da operação anterior
acenderão.
●
Selecione a função de refrigeração pressionando o botão (B), lâmpada
(E)luzes.
●
Pressione o botão (C) para selecionar a mais alta ventilação , lâmpada (F)
iiiiiiiiiluzes.
●
Quando a temperatura da sala antingir o valor mais apropriado ao seu conforto,
pressione novamente o botão (C) para seleccionar uma mais baixa ventilação,
lâmpada (G) luzes.
NO!
● Verifique se a tomada onde o aparelho de ar concionado vai ser ligado é de : 220
- 240 V - 50 Hz.
● Certifique-se que a inatalação eléctrica é apropriada para fornecer a corrente
necessária ao seu aparelho em conjunto com os outros aparelhos usados em
sua casa (aparelhos de linha branca, candeeiros). Veja a potÍncia eléctrica máxima indicada na placa que está clocada no seu aparelho.
● A instalação de uma ficha dupla, protegida por fusíveis de 20A é recomendada.
● O aparelho tem que ser ligado de acordo com as normas eléctricas do local.
● Certifique-se de que, o circuito fechado,fusíveis,etc. tÍem suficiente capacidade
para aguentar um arranque de 18A (geralmente menos de um segundo)
● Não instale o ar condicionado onde possa ficar molhado ainda que só por salpi-
cos de água (ex:lavandarias).
● Assegure-se de que o botão do interruptor para Ligar/Desligar, está na posição
de desligado.
● Antes de ligar o seu ar condicionado certifique-se de que a tomada onde o vai
ligar tem ligação à terra de acordo com as nosmas do local.
● Nunca use a ficha eléctrica como uma forma de Ligar/Desligar oseu aparelho.
Use sempre o botão do painel de comandos.
● Não movimente o climatizador durante o funcionamento, desligue o interruptor e
retire a ficha da tomada. Controlar e descarregar a condensação eventual,
através do tubo de descarga colocado no lado traseiro.
ATENÇÃO
Por questões de segurança antes de limpar ou transportar o seu aparelho desligue
sempre o interruptor e retire a ficha da tomada.
● AVISO!
Não cole nem coloque nada na saída de ar do seu aparelho. A ventoínha roda a grande velocidade e pode ser muito perigoso.
● AVISO!
O ar condicionado incorpora um sistema relógio que só permite o recomeço do seu funcionamento após trÍs minutos
depois da última paragem.Por isso evite movimentos rápidos no botão do termostato, nos dois sentidos, quando o compressor etá a trabalhar.
● Certifique-se de que não há qualquer obstáculo á volta do aparelho que afecte a circulação de ar. Não bloqueie a saída do
ar com cortinas ou outros objectos. Nunca coloque nada em cima do aparelho.
● O aparelho alcança os rendimentos máximos com as condiçõers seguintes
1-O tubo flexível está retraído, sem curvas e sem bocal de junta
2-Na primeira ligação, fazer funcionar o aparelho pelo menos por uma hora com a velocidade BAIXA de ventilação, depois
passar para a velocidade ALTA.
● O fabricante não assume qualquer responsabilidade se as instrucções de segurança não forem cumpridas.
NOTA
El acondicionador elimina el agua de condensación automáticamente a la ALTA velocidad del ventilador, mientras a la BAJA
velocidad el agua de condensación se recoge en el depósito.
●
Agora devagar rode o botão do termostato para trás em direcção à esquerda até o compressor parar.Nesta altura o seu
aparelho de ar condicionado está pronto para o modo de operação automático através do controlo de termostato electrónico e de acordo com os valores de temperatura pré estabelecidos.
●
Para desligar o ar condicionado pressione novamente o botão de : Ligar/Desligar (A).
Page 29

Quando utilizar o ar condicionado no modo de desumidificação , não
terá de usar o tubo flexível. Para uma maior eficiÍncia na desumidificação deixe a saída da parte traseira descarregar livremente e directamente para a sala.
●
Retire o tubo flexível de exaustão da parte traseira do aparelho.
Aperte o interruptor para ligar e desligar (A) para iniciar o uso
do aparelho de ar condicionado.
●
Ligue o modo “Desumidificação“ apertando a tecla “Desumidificar“
(B) .
A luz de controlo (H) acende. Na forma de água condensada, a
humidade é levada ao tanque de água dentro do aparelho de ar
condicionado.
●
Pressione o botão Ligar/Desligar para parar o ar condicionado (A).
AVISO!
O ar condicionado só pode ser usado como desumidificador se a temperatura da sala for superior a 10oC.
Quando a temperatura da sala está abaixo dos 10oC o termostato
pára o compressor e a desumidificação não se faz.
O ar condicionado retira humidade do ar e condensa-a para dentro de
um depósito interno.A água condensada pode ser titada através do
tubo de descarga externa localizado na parte traseira da unidade.
●
Quando o tanque de água estiver cheio o aparelho de ar condicionado desliga-se automaticamente e a luz de controlo pisca
com luz amarela.
A capacidade do reservatório permite um funcionamento de cerca
de 6 horas.
●
Verifique a existÍncia de água dentro do ar condicionado, olhando
através do tubo traseiro de descarga.
●
Pressione o botão Ligar/Desligar do interruptor, para desligar o
aparelho depois desconecte o cabo.
●
Coloque um recipiente debaixo do tubo de descarga.
●
Aperte o tubo retirando-o da parte traseira onde está colocado.
●
Aperte com o polegar a abertura final do tubo e incline-o para o
recipiente, deixe o fluxo de água sair.
●
No final desta operação volte a inserir o tubo de descarga no seu
sítio.
Cada vez que o aparelho deve ser deslocado num outro lugar o guardado no fim da estação, desvaziar também o tanque secundário por
meio do tubinho apropriado situado no interno do alojamento cabo
eléctrico.
Terminado o trabalho fechar o tubinho com a tampa apropriada.
●
Desligue sempre o ar condicionado no interruptor antes de o desligar na ficha.
●
Desconecte sempre o aparelho antes de descarregar a água que
ele tem no depósito.
AVISO
DESUMIDIFICAÇÃO
Para ajustar a direcção do fluxo de ar, com as duas mão agarre uma
das lâminas do reflector e puxe na sua direcção.
AJUSTAR A DIRECÇÃO DO FLUXO DE AR
Fluxo Vertical
Fluxo Horizontal
DESCARGA DE ÁGUA
P
ATENÇÃO:
O comando acciona um atraso de mais ou menos 3 minutos na
partida do compressor cada vez que são accionados os botões
A, B e o termostato D ou tirando e ligando a tomada do cabo de
alimentação.
IMPORTANTE
TANQUE SECUNDARIO
4
B
H
C
D
A
Page 30

P
KIT DE ABERTURA
ACESSORIOS (FORNECIDOS A PEDIDO)
Assegure que o „filtro purificador de ar“ por cima do filtro standart
está preso com a mola antes do passo 2.
3
Coloque o filtro standart no ar condicionado com „Frente“ voltada para si e feche a grelha de entrada de ar.
Substituição do filtro de ar purificador:
● O filtro purificador de ar é descartável.
● Não deite fora a moldura e a mola do filtro.
● O filtro usado não pode ser reusado mesmo depois de limpo.
● Compre o filtro purificador de substituição na loja onde com-
prou o seu aparelho.
● Verifique o estado de sujidade do filtro pelo menos uma vez
de duas em duas semanas. Substitua-o quando a cÙr indicada na etiqueta mudar „Calibre de côr para mudança de filtro“.
4
„Filtro de purificador de arì, lado
standart do filtro: branco
(filtro de recolha de pó),
lado da mola: preto
(filtro desodorinzante)
filtro standart
mola
1. Esta caixa contém um filtro purificador, uma mola e uma
etiqueta de „Calibre de côr para substituição de filtro“.
2. Abra o saco apenas no momento de instalar o filtro purificador. Caso contrário o efeito dezodorizante do filtro fica diminuido.
FILTRO PURIFICADOR
●
Leia as instrucções antes de começar o trabalho de substituição de filtro.
●
Este filtro purificador absorve pó e maus odores.
NOTA
Procedimentos para a instalação de filtro:
Abra a grelha de entrada de ar e retire o filtro standart.
Cole a etiqueta „Calibre de cÙr para substituição de filtroì de
forma a ser fácil ver a posição (dentro do painel de controlo).
1
Una a mola ao filtro standart:
Encaixe a mola por cima da parte traseira do filtro e ajuste-o ao
encaixe do lado da marca „frente“ (uma chave de fenda standart
é recomendada para uma mais fácil montagem).
2
Filtro
standart
Conjunto
de filtro
mola
5
Montagem:
● Faça uma abertura no vidro
da janela.
● Insira a vigia sem a ficha
eléctrica.
● Remova o tubo terminal de
saída de ar quente do tubo
flexível.
● Coloque o ar condicionado
junto á janela e insira o tubo
de saída de ar na abertura.
VIDRO SIMPLES VIDRO DUPLO
Se quiser utilizar o ar condicionado em diferentes salas , é
possível comprar vigias separadas para descargas de ar.
BURACO
NOTA
BURACO
BURACO
NOTA
NOTA
Cortar uma ou duas membranas com
as tesoura conforme ao espessor do
vidro.
Page 31

LIMPEZA E CUIDADOS
AVISO! Por questões de segurança antes de limpar o seu aparelho
desligue sempre o interruptor e retire a ficha da tomada.
1. Limpeza do filtro purificador de ar
O filtro purificador tem que ser verificado em funcionamento pelo
menos uma vez de duas em duas semanas. O funcionamento com
um filtro sujo retira eficiÍncia ao seu aparelho e pode causar grave
estragos. O filtro está localizado na parte traseira da grelha de entrada de ar, na parte da frente do ar condicionado, e deve ser removido pelo lado direito do aparelho .Use um aspirador para retirar a
sujidade superficial.Se a sujidade acumulada no filtro ficar pegajosa , lave-o com água e sabão, depois enxague-o com água fria e
depois de seco pode voltar a instalá-lo.
2. Limpeza da Grelha e da Coberttura
Para limpar o ar condicionado passe-lhe com um pano levemente
humedecido que seja limpo e macio.Se o seu aparelho tiver alguma mancha humedeça o pano em água e sabão.Nunca use detergentes ásperos,nem água muito quente.Não despeche água em
cima do seu aparelho isso poderia causar danos irreparáveis aos
seus componentes internos assim como choques eléctricos perigosos.
3. Arrumação
Se não vai usar o seu aparelho durante um largo período de
tempo, antes de o arrumar limpe o filtro e despeche a água condensada acumulada nos depósitos, da forma atrás explicada.
Arrume sempre o seu aparelho na posição vertical. Nunca coloque
objectos pesados em cima do seu aparelho e proteja-o com um
pano ou com um plástico.
4. Transporte
Preferencialmente mantenha o ar condicionado na posição vertical
durante o transporte. Se isto não for possível, deite-o de lado;
quando estiver no seu destino levante o ar condicionado para a
posição vertical e espere pelo menos 10 minutos antes de o ligar.
5. Para sua segurança verifique periódicamente as condições do
cabo eléctrico; a ligação do cabo de alimentação é do tipo X e
em caso de estar danificado contacte o Serviço de assistÍncia
técnica para substituição do cabo.
NO!
NO!
Se o seu ar-condicionado não funciona bem , antes de chamar a assistÍncia técnica, verifique :
● Se a ficha está bem inserida na tomada.
● Se o circuito está ligado e se os fusíveis não rebentaram.
● Se i filtro de ar não está obstruído.
● Se o tubo flexível está correctamente colocado.;
● Se o batão do termostato está na posição correcta para uma temperatura agradável (rode-o no sentido dos ponteiros do
relógio e verifique se o compressor recomeça a fincionar, após o tempo normal de espera)
● A temperatura ambiente para o modo de refrigeração é de mais de 15 °C, para o modo “Desumidificação” é de mais de
10 °C.
● Todas as instruções deste manual de instruções foram bem observadas.
Se a luz de controlo piscar com luz e o aparelho de ar condicionado desligar-se ao mesmo tempo o tanque de água está
cheio.
CONCELHOS ÚTEIS
LIMPEZA DO FILTRO
CHEMISCHE
MITTEL
BENZIN
NO!
ATENÇÃO
P
6
Page 32

EG I F D E P
BLK BLACK NERO NOIR SCHWARZ NEGRO PRETO
BLU BLUE BLU BLEU BLAU AZUL AZUL
BRN BROWN MARRONE MARRON BRAUN MARRÓN CASTANHO
GRN / YEL GREEN / YELLOW VERDE / GIALLO VERT / JAUNE GRÜN / GELB VERDE / AMARILLO VERDE / AMARELO
GRY GREY GRIGIO GRIS GRAU GRIS CINZENTO
ORG ORANGE ARANCIONE ORANGE ORANGE NARANJA COR-DE-LARANJA
PNK PINK ROSA ROSE ROSA ROSA COR-DE-ROSA
RED RED ROSSO ROUGE ROT ROJO ENCARNADO
VLT VIOLET VIOLA VIOLET VIOLETT VIOLETA VIOLETA
WHT WHITE BIANCO BLANC WEISS BLANCO BRANCO
YEL YELLOW GIALLO JAUNE GELB AMARILLO AMARELO
AZU LIGHT BLUE AZZURRO AZUR HIMMEL BLAU AZUL CLARO AZUL CLARO
S.A.C. - printed in Italy
SYMBOL EG I F D E P
PC CONDENSATE PUMP MOTOR MOTORE POMPA CONDENSA MOTEUR POMPE CONDENSATION KONDENSWASSERPUMPE-MOTOR MOTOR BOMBA DE AGUA MOTOR BOMBA DE AGUA
CM COMPRESSOR MOTOR MOTORE COMPRESSORE MOTEUR DE COMPRESSEUR KOMPRESSORMOTOR MOTOR DEL COMPRESOR COMPRESSOR
C1, 2, 3,4 CAPACITOR CONDENSATORE CONDENSATEUR KONDENSATOR CONDENSADOR CONDENSADOR
DEF THERMO DEFROST THERMOSTAT TERMOSTATO SBRINATORE THERMOSTAT DE DEGIVRAGE ENTFROSTER-THERMOSTAT TERMOSTATO DE DESCONGELACION TERMOSTATO DE DESCONGELAÇAO
FLP FLAP MOTOR MOTORE DEFLETTORE MOTEUR DE VOLET KLAPPENMOTOR MOTOR DEL DEFLECTOR MOTOR DA PLACA
LM LOUVER MOTOR MOTORE DEFLETTORE MOTEUR D’AUVENT LUFTKLAPPENMOTOR MOTOR CON ABERTURAS MOTOR COM ABERTURAS LATERAIS
FMO OUTDOOR FAN MOTOR MOTORE ESTERNO VENTOLA MOTEUR DE VENTILATEUR EXTERIEUR AUSSENLÜFTERMOTOR MOTOR EXTERIOR DE LA TURBINA MOTOR DA VENTOINHA EXTERIOR
FMI, FM INDOOR FAN MOTOR MOTORE INTERNO VENTOLA MOTEUR DE VENTILATEUR INTERIEUR INNENLÜFTERMOTOR MOTOR INTERIOR DE LA TURBINA MOTOR DA VENTOINHA INTERIOR
IND. ASSY INDICATOR ASSY GRUPPO INDICATORI ENSEMBLE INDICATEUR EANZEIGE-BAUGRUPPE GRUPO DE INDICADORES GRUPO DE INDICADORES
MG MAGNETIC CONTACTOR CONTATTORE MAGNETICO CONTACTEUR MAGNETIQUE MAGNETKONTGEBER CONTACTOR MAGNÉTICO CONTADOR MAGNÉTICO
NF NOISE FILTER FILTRO RUMORE FILTRE ANTI PARASSITE LÄRMSCHUTZFILTER FILTRO DEL RUIDO FILTRO DE RUÍDO
OLR OVERLOAD RELAY RELÉ SOVRACCARICO RELAIS DE SURCHARGE ÜBERLASTRELAIS RELÉ DE SOBRECARGA RELÉ DE SOBRECARGA
CE CONTROLLER SCHEDA ELETTRICA CARTE ELECTRONIQUE STEUERGERÄT CONTROLADOR PAINEL ELÉTRICO
PR POWER RELAY RELÉ ALIMENTAZIONE RELAIS D’ALIMENTATION LEISTUNGSRELAIS RELÉ DE ALIMENTACION RELÉ DA ALIMENTAÇAO
RP PUMP RELAY RELÉ POMPA RELAIS POMPE PUMPE RELAIS RELÉ BOMBA DE AGUA RELÉ BOMBA
SSR SOLID STATE RELAY RELÉ STATO SOLIDO RELAIS A SEMI-CONDUCTEUR FESTKÖRPERRELAIS RELÉ DEL ESTADO SOLIDO RELÉ DO ESTADO SÓLIDO
RA STARTING RELAY RELÉ DI AVVIAMENTO RELAIS DE DEMARRAGE STARTRELAIS RELÉ DE ARRANQUE RELÉ DE ARRANQUE
SV SOLENOID VALVE VALVOLA SOLENOIDE ELECTROVANNE MAGNETVENTIL VALVULA SOLENOIDE VALVULA SOLENOIDE
MS SAFETY FLOAT SWITCH INT. SICUREZZA A GALL. INTERR. DE SECURITE A FLOTTEUR SCHWEMM-SCHUTZSCHALTER
INTERR. DE SEGURIDAD DE FLOTADOR
INTERR. DE SEGURANÇA
ON-OFF SW ON-OFF SWITCH INTERRUTTORE MARCIA/ARRESTO TOUCHE MARCHE/ARRÊT EIN/QUS TQSTE BOTON ARRANQUE/PARADA INTERRUPTOR LIGAR/DESLIGAR
TH1, 2, THERMISTOR TERMISTORE THERMISTANCE THERMISTOR TERMISTOR TERMISTOR
P TIMER PROGRAMMATORE PROGRAMMATEUR ZEITSCHALT-UHR PROGRAMADOR TIMER
TR1, 2 POWER TRANSFORMER TRASFORMATORE DI POTENZA TRANSFORMATEUR DE PUISSANCE NETZTRANSFORMATOR TRANSFORMADOR DE POTENCIA TRANSFORMADOR DE CORRENTE
20S 4-WAY VALVE VALVOLA 4 VIE VANNE 4 VOIES 4-WEG-VENTIL VALVULA DE 4 VIAS VALVULA DE 4 VIAS
47C NEGATIVE PHASE RELAY RELÉ A FASE NEGATIVA RELAIS D’ORDRE DE PHASE NEGATIVPHASENRELAIS RELÉ DE FASE NEGATIVA RELÉ DA FASE NEGATIVA
E
lectric wiring diagrams’ symbols / Simboli schemi elettici / Symboles des schemas électriques / Symbole der System-Schaltplanen
Símbolos de los esquemas eléctricos / Símbolos dos esquemas elétricos
Wires color legend
Legenda colori fili elettrici
Légende des couleurs des fils électriques
Beschriftung der Leitungs-Farben
Leyenda de los colores de los cable electricos
Legenda das côres dos fios elétricos
R.D. 28 Reyrieux BP 131 - 01601 Trévoux CEDEX France
Tél. 04.74.00.92.92 - Fax 04.74.00.42.00
R.C.S. Bourg-en-Bresse B 759 200 728
In order to carry on a constant improvement, our products can be modified without prior notice.
Per garantire un costante miglioramento dei nostri prodotti, ci riserviamo di modificarli senza preavviso.
Par souci d’amélioration constante, nos produits peuvent être modifiés sans préavis.
Unsere Produkte werden laufend verbessert und können Vorankündigung abgeändert Werden.
En el interés de mejoras constantes, nuestros productos pueden modificarse sin aviso prévio.
Page 33

MOVABLE AIR CONDITIONER ●CLIMATIZZATORE PORTATILE
CLIMATISEUR MOBILE
●
MOBILES KLIMAGERÄT
ACONDICIONADOR PORTATIL
ELECTRONIC BUILT-IN-TIMER OPERATION INSTRUCTIONS
ISTRUZIONI D’USO DEL PROGRAMMATORE ELETTRONICO
NOTICE D’UTILISATION DU PROGRAMMATEUR ELECTRONIQUE
BEDIENUNGSANLEITUNG DER ELEKTRONISCHEN ZEITSCHALTUHR
INSTRUCCIONES DE USO DEL PROGRAMMADOR ELECTRONICO
EG
I
F
D
E
37.4117.148.0 01/2002
Page 34

ELECTRONIC BUILT-IN-TIMER 24 HOURS OR
Technical data
– Programmed memory of up to 5 years without power supply due to Lithium battery
– Display 24 hours
– Daily and weekly programming possibility
–8 switching ON programs, 8 switching OFF programs
Operating modes of timer:
I: the air conditioner is permanently ON (use directly the ON/OFF push button of the air conditioner to switch it OFF)
AUTO: the timer will switch on and off the air conditioner according to the selected program
0: the air conditioner is permanently OFF (it can’t be switched ON neither with the ON/OFF push button of the air conditioner)
OPERATING INSTRUCTIONS FOR THE TIMER
1. Reset of the timer:
Be sure that the switch is in the RUN position and press down the reset button R with the tip of a pencil (the display will begin blinking).
2. Setting the current time and day:
Slide the switch into position, press down the button 1…7 until you set the day of the current week (indicated by an arrow ▲ on the display), press down
the button h to set the current hour, press down the button m to set the minutes. Slide again the switch into RUN position.
3. Selection of the days or the blocks of days to be set:
It is possible to set each single day and the following blocks of days, pressing the button 1…7:
1-2-3-4-5 (from Monday to Friday)
6-7 (Saturday and Sunday)
1-2-3-4-5-6 (from Monday to Saturday)
1-2-3-4-5-6-7 (from Monday to Sunday)
4. Programming the switching times:
● Slide the switch into P position (the time indication on the display begins blinking, the bulb symbol and the number 1 of the first switching time are vi-
sualised).
● Press down the button 1…7 until you set the day of the week or the block of days to be stored (an arrow ▲ corresponding to the selected day or many
arrows if you set a block of days will appear on the display).
● Press down the button h and then the button m to set the switching ON hour.
● Press the button P to set the switching OFF hour (the time indication on the display begins blinking again, the symbol of the bulb disappears and the
number 2 appears).
● Confirm the day with the button 1…7 and set the switching OFF hour with the buttons h and m.
● Repeat these operations sequentially up to 8 switching ON and 8 switching OFF programs maximum, divided among the days you want to set.
● At the end of programming slide the switches into RUN and AUTO position.
NOTE: During the non set days the air conditioner will be OFF.
5. SKIP mode:
The SKIP mode (program override) can be set only during the automatic mode of the timer (AUTO) + (RUN); by pressing the skip button ➞x the timer will
be switched into the opposite functional mode (from ON to OFF and vice versa); this mode remains activated up to the following set program.
When the skip mode is activated the skip symbol
➞
x appears on the display.
Pressing the SKIP button again will cancel the skip mode.
6. Visualisation, correction or deletion of the stored programs:
You can visualise the stored programs, during operation, sliding the switch into P position and pressing many times the P button.
In this way, you can modify the switching ON and OFF hours with the buttons h and m and delete one or more programs, pressing contemporary the but-
tons P and ➞x.
MANUAL ON
PROGRAM MODE
MANUAL OFF
TIME SETTING
OPERATING MODE
PROGRAM SETTING
SWITCH
DAYS OF THE WEEK
ON/OFF INDICATION
SKIP MODE INDICATION
SKIP MODE ON/OFF
MINUTES SETTING
HOURS SETTING
RESET BUTTON
DAYS OF THE WEEK SETTING
1: MONDAY, 7: SUNDAY
PROGRAMS STORING
8 ON PROGRAMS, 8 OFF PROGRAMS
2
EG
Page 35

ELECTRONIC BUILT-IN-TIMER 24 HOURS
Technical data
– Programmed memory without power supply: 150 hours
– Display 24 hours
– Daily and weekly programming possibility
–6 switching ON programs, 6 switching OFF programs
OPERATING INSTRUCTIONS FOR THE TIMER
1. Reset of the timer:
Press down the RST (reset) button with the tip of a pencil.
2. Setting the current day and time:
Keep pressed down the TIME button while you are setting the current time or correcting it; press down the DAY button to set the current day (shown by the
english abbreviation on the display), press down the HR button to set the current hour, press down the MIN button to set the current minutes.
3. Selection of the days or the groups of days to be set:
Press down PRG (programming) button once: you will see “PROG 1 ON” on the display which indicates the switch-on time command to be entered.
Press the DAY button and the display will show you in sequence (each time you press it) the following groups of days or single days:
MO-TU-WE-TH-FR-SA-SU (group of days from Monday to Sunday)
MO-TU-WE-TH-FR-SA-SU (each day of the week, one by one)
MO-TU-WE-TH-FR (group of days from Monday to Friday)
SA-SU (Saturday and Sunday)
MO-TU-WE-TH-FR-SA (group of days from Monday to Saturday)
MO-WE-FR (Monday, Wednesday and Friday)
TU-TH-SA (Tuesday, Thursday and Saturday)
4. Programming the switching times:
After having pressed down the PRG button and then the DAY button until you set the day or the group of days to be stored (see section 3)
● Press down the HR button and then the MIN button to set the switching ON hour.
● Press the PRG button again to set the switching OFF hour (you will see “PROG 1 OFF” on the display which indicates the switch-off time command to
be entered).
● Confirm the day or group of days with the DAY button and set the switching OFF hour with the HR and MIN buttons.
● Repeat these operations in sequence up to 6 switching ON and 6 switching OFF programs maximum, divided among the days you want to set.
● At the end of programming press the TIME button to switch to the current time, otherwise these switching times will not be executed. (However, the dis-
play will be switched to current time mode automatically if no button is pressed within about 2 minutes).
NOTE: During the non set days the air conditioner will be OFF.
5. Visualise, correct, disable and enable the stored programs:
You can visualise the stored programs, during operation, pressing many times the PRG button.
In this way, you can modify the switching ON and OFF hours with the HR and MIN buttons and disable or enable one or more programs, pressing the RCL
button (see RECALL function, section 6).
6. RECALL function:
The RECALL function allows you to disable a switching time of a program, without losing preset memory:
● Press the PRG button until the preset memory you want to disable is present
● Press RCL button, using the tip of a pencil (the set time disappears and the display shows “--:--” for the hours and minute, indicating that the specified
memory location will not be executed).
● Press the TIME button to switch to the current time
● You can enable again the switching time, following the same procedure and pressing again the RCL button.
7. SUMMER/WINTER TIME change-over:
● To change from winter time to summer time, keep TIME button pressed while pressing one of the button (the display will indicate the “+1h” sign
and the current time will be advanced one hour).
● To change from summer time to winter time simply perform the step before (the “+1hr” sign will disappear from the display and the current time will re-
tard one hour).
8. RANDOM function:
The programmed memories you have preset will be executed in a random delay from 2 to 32 minutes, in case of current interruption, using this function.
● Keep the TIME button pressed while pressing PRG button (the display will indicate RND sign).
● Press again the TIME and PRG button to cancel the random mode (the RND sign will disappear from the display).
9. Manual operation:
If you press one of the buttons, you can set the timer manually; the display will show in the sequence: AUTO OFF-ON-AUTO ON-OFF
AUTO: the air conditioner is controlled by the timer (it is possible to change from AUTO ON to AUTO OFF or vice versa, if you want to switch on or of f the air
conditioner without losing the control of the timer that will go on executing the other set programs).
ON: the air conditioner is permanently ON (use directly the ON/OFF push button of the air conditioner to switch it OFF)
OFF: the air conditioner is permanently OFF (it can’t be switched ON neither with the ON/OFF push button of the air conditioner)
3
DAYS OF THE WEEK
OPERATING MODE INDICATION
AUTO OFF - ON - AUTO ON - OFF
RANDOM FUNCTION INDICATION
MINUTES SETTING
HOURS SETTING
RESET BUTTON
DAYOF THE WEEK SETTING
(OR GROUP OF DAYS)
PROGRAMS STORING
6 ON PROGRAMS, 6 OFF PROGRAMS
RECALL FUNCTION: TO DISABLE AND
ENABLE THE PROGRAMMS
PROGRAM INDICATION
CURRENT DATE AND TIME SETTING
SUMMER AND WINTER TIME INDICATION
EG
Page 36

PROGRAMMATORE ELETTRONICO 24 ORE O
Caratteristiche tecniche
– Riserva di carica senza alimentazione elettrica con batteria al litio di durata >= cinque anni
– Display 24 ore
– Programma giornaliero e settimanale
–8 programmi d’accensione, 8 programmi di spegnimento.
Modi di funzionamento del programmatore:
I: il condizionatore è permanentemente acceso (può essere spento con il pulsante marcia/arresto sul pannello comando del con-
dizionatore.
AUTO: il condizionatore funziona con il programmatore.
0: il condizionatore è permanentemente spento (non può essere acceso neppure con il pulsante marcia/arresto del condizionato-
re).
ISTRUZIONI PER L’UTILIZZO DEL PROGRAMMATORE
1. Azzeramento del programmatore:
Accertarsi che il selettore sia sulla posizione RUN e premere il tasto R con la punta di una matita (l’indicazione sul display comincerà
a lampeggiare).
2. Impostazione del giorno della settimana e dell’orologio:
Spostare il selettore sulla posizione , premere il tasto 1…7 fino ad impostare il giorno della settimana attuale (visualizzato con una
freccia ▲ sul display), premere il tasto h per impostare l’ora attuale, premere il tasto m per impostare i minuti. Rimettere il selettore
sulla posizione RUN.
3. Scelta dei giorni o dei blocchi dei giorni da programmare:
Premendo il tasto 1…7 è possibile programmare i giorni singolarmente e i seguenti blocchi di giorni:
1-2-3-4-5 (dal lunedì al venerdì)
6-7 (sabato e domenica)
1-2-3-4-5-6 (dal lunedì al sabato)
1-2-3-4-5-6-7 (dal lunedì alla domenica)
4. Impostazione dei programmi d’accensione e spegnimento:
● Spostare il selettore sulla posizione P (l’indicazione dell’orario sul display comincia a lampeggiare, vengono visualizzati il simbo-
lo della lampadina e il numero 1 della prima impostazione d’orario).
● Premere il tasto 1..7 fino ad impostare il giorno o il blocco dei giorni che si vuole programmare (sul display appare una freccia ▲
in corrispondenza del giorno o tante frecce per il blocco dei giorni).
● Premere il tasto h e successivamente il tasto m ed impostare l’ora d’accensione.
● Premere il tasto P per impostare l’ora di spegnimento (l’indicazione dell’orario sul display ricomincia a lampeggiare, scompare il
simbolo della lampadina e appare il numero 2).
● Confermare il giorno con il tasto 1..7 e impostare l’ora di spegnimento con i tasti h e m.
● Ripetere queste operazioni, in sequenza, fino ad un massimo di 8 programmi di accensione e 8 di spegnimento, distribuiti per i
giorni che si intende programmare.
● Al termine della programmazione, posizionare i selettori sulla posizione RUN e AUTO.
NOTA: Nei giorni non programmati il condizionatore rimarrà spento.
5. Funzione SKIP:
La funzione SKIP (salto programma) è attiva solo durante il funzionamento automatico del programmatore (AUTO) + (RUN) e permette
di cambiare da ON ad OFF e viceversa, premendo il tasto ➞x; questa funzione rimane attiva fino al successivo intervento programmato.
Quando la funzione skip è attiva sul display appare il simbolo ➞x.
Per disattivare la funzione SKIP, premere nuovamente il relativo tasto.
6. Visualizzazione, correzione o cancellazione dei programmi memorizzati:
Per visualizzare i programmi memorizzati, durante il funzionamento, spostare il selettore su P e premere ripetutamente il tasto P.
È possibile, a questo punto, modificare gli orari di accensione e spegnimento con i tasti h e m e cancellare uno o più programmi, premendo contemporaneamente i tasti P e ➞x.
ACCENSIONE MANUALE
FUNZIONAMENTO CON PROGRAMMATORE
SPEGNIMENTO MANUALE
REGOLAZIONE ORARIO
POSIZIONE DI FUNZIONAMENTO
IMPOSTAZIONE PROGRAMMI
SELETTORE
GIORNI DELLA SETTIMANA
INDICAZIONE ACCESO/SPENTO
INDICAZIONE FUNZIONE SKIPATTIVA
INSERIMENTO FUNZIONE SKIP
IMPOSTAZIONE MINUTI
IMPOSTAZIONE ORE
TASTO D’AZZERAMENTO
IMPOSTAZIONE GIORNO DELLASETTIMANA
1 = LUNEDÌ, 7 = DOMENICA
MEMORIZZAZIONE PROGRAMMI
8 ACCENSIONI, 8 SPEGNIMENTI
4
GIG
Page 37

PROGRAMMATORE ELETTRONICO 24 ORE
Caratteristiche tecniche
– Riserva di carica senza alimentazione elettrica : 150 ore
– Display 24 ore
– Programma giornaliero e settimanale
–6 programmi d’accensione, 6 programmi di spegnimento.
ISTRUZIONI PER L’UTILIZZO DEL PROGRAMMATORE
1. Azzeramento del programmatore:
Premere il tasto RST con la punta di una matita.
2. Impostazione del giorno della settimana e dell’orologio:
Tenere premuto il tasto TIME mentre si imposta o si corregge l’ora; premere il tasto DAY fino ad impostare il giorno della settimana attuale (visualizzato con
le abbreviazioni in inglese sul display), premere il tasto HR per impostare l’ora attuale, premere il tasto MIN per impostare i minuti.
3. Scelta dei giorni o dei blocchi dei giorni da programmare:
Premere il tasto PRG una volta: apparirà sul display “PROG 1 ON” che indica il programma di accensione da impostare.
Premere il tasto DAY e appariranno in sequenza (ad ogni pressione del tasto) i seguenti blocchi di giorni o giorni singoli:
MO-TU-WE-TH-FR-SA-SU (blocco di giorni da lunedì a domenica)
MO-TU-WE-TH-FR-SA-SU (giorno per giorno singolarmente, ad ogni pressione del tasto)
MO-TU-WE-TH-FR (blocco di giorni da lunedì a venerdì)
SA-SU (sabato e domenica)
MO-TU-WE-TH-FR-SA (blocco di giorni da lunedì a sabato)
MO-WE-FR (lunedì, mercoledì e venerdì)
TU-TH-SA (martedì, giovedì e sabato)
4. Impostazione dei programmi d’accensione e spegnimento:
Dopo aver premuto il tasto PRG e il tasto DAY per scegliere il giorno o il blocco di giorni da programmare (v. punto 3)
● Premere il tasto HR e successivamente il tasto MIN ed impostare l’ora d’accensione.
● Premere di nuovo il tasto PRG per impostare l’ora di spegnimento (apparirà sul display “PROG 1 OFF” che indica il programma di spegnimento da im-
postare).
● Confermare il giorno o il gruppo di giorni con il tasto DAY e impostare l’ora di spegnimento con i tasti HR e MIN.
● Ripetere queste operazioni, in sequenza, fino ad un massimo di 6 programmi di accensione e 6 di spegnimento, distribuiti per i giorni che si intende
programmare.
● Al termine della programmazione, premere il tasto TIME per ritornare all’ora corrente, altrimenti la programmazione non ha luogo (il display torna co-
munque automaticamente all’ora corrente dopo 2 minuti, se nessun tasto viene premuto).
NOTA: Nei giorni non programmati il condizionatore rimarrà spento.
5. Visualizzazione, correzione, disattivazione e riattivazione dei programmi memorizzati:
Per visualizzare i programmi memorizzati, durante il funzionamento, premere ripetutamente il tasto PRG.
È possibile, a questo punto, modificare gli orari di accensione e spegnimento con i tasti HR e MIN e attivare o disattivare uno o più programmi, premendo
RCL (v. funzione RECALLal punto 6).
6. Funzione RECALL:
Se per qualsiasi ragione non si vuole fare eseguire un programma, senza però perdere la memoria impostata
● Premere il tasto PRG fino a visualizzare il programma da disattivare.
● Premere il tasto RCL con la punta di una matita (sul visore scompare l’orario impostato e appare “--:--”).
● Premere il tasto TIME per tornare all’ora attuale.
● Per riattivare il programma ripetere la stessa procedura.
7. Passaggio ORA LEGALE/ORA SOLARE:
● Per passare dall’ora legale all’ora solare, tenere premuto il tasto TIME e premere uno dei tasti (apparirà il simbolo “+1h” sul display e l’orario cor-
rente avanzerà di un ora).
● Per ritornare all’ora legale ripetere la stessa procedura (il simbolo “+1h” sparirà e l’orario corrente diminuirà di un’ora).
8. Funzione RANDOM:
I programmi impostati saranno eseguiti con un ritardo da 2 a 32 minuti, in caso di interruzione di corrente, utilizzando questa funzione
● Tenere premuto il tasto TIME e premere il tasto PRG (sul display appare il simbolo “RND” per indicare che la funzione RANDOM é attiva).
● Per disattivare la funzione ripetere la stessa procedura (il simbolo “RND” scompare dal display).
9. Funzionamento manuale:
Premendo uno dei tasti si può intervenire manualmente sul funzionamento del programmatore; appariranno in sequenza:
AUTO OFF - ON - AUTO ON - OFF
AUTO: il condizionatore funziona con il programmatore (é possibile passare da AUTO ON a AUTO OFF o viceversa: é una forzatura per accendere o spe-
gnere il condizionatore, senza perdere il controllo del programmatore che continuerà a eseguire i programmi impostati di seguito).
ON: il condizionatore è permanentemente acceso (può essere spento con il pulsante marcia/arresto sul pannello comando del condizionatore).
OFF: il condizionatore è permanentemente spento (non può essere acceso neppure con il pulsante marcia/arresto del condizionatore).
GIORNI DELLA SETTIMANA
INDICAZIONE MODO DI FUNZIONAMENTO
AUTO OFF - ON - AUTO ON - OFF
INDICAZIONE RANDOM ATTIVA
IMPOSTAZIONE MINUTI
IMPOSTAZIONE ORE
TASTO D’AZZERAMENTO
IMPOSTAZIONE GIORNO DELLASETTIMANA
(O GRUPPO DI GIORNI)
MEMORIZZAZIONE PROGRAMMI
6 ACCENSIONI, 6 SPEGNIMENTI
5
TASTO RECALL: PER DISATTIVARE E
RIATTIVARE I PROGRAMMI
INDICAZIONE PROGRAMMA
IMPOSTAZIONE DATA E ORACORRENTI
INDICAZIONE ORA SOLARE/LEGALE
I
Page 38

PROGRAMMATEUR ELECTRONIQUE 24 HEURES OU
Caractéristiques techniques
– Sécurité de sauvegarde de programmes par pile lithium avec autonomie d’environ de 5 ans
–Afficheur 24 heures
– Programmation journalière et hebdomadaire
–8 programmes ON , 8 programmes OFF
Fonctions du programmateur:
I: le climatiseur fonctionne avec permanence (utiliser directement la touche marche/arrêt du climatiseur pour le arrêter)
AUTO: le climatiseur fonctionne selon les programmes choisis avec le programmateur
0: le climatiseur est avec permanence arrêté (il ne peut être mis en marche pas même avec la touche marche/arrêt du climatiseur
NOTICE D’UTILISATION DU PROGRAMMATEUR
1. Remise à zéro du programmateur:
Assurez-vous que le sélecteur soit sur la position RUN et appuyez-vous la touche R avec la point d’un crayon (l’afficheur clignote).
2. Réglage du jour de la semaine et de l’heure actuelle:
Mettre le sélecteur sur la position , choisir le jour actuel par la touche 1…7 (visualisé par une flèche ▲ dans l’afficheur), effectuer
la mise à l’heure par les touches h et m. Remettre le sélecteur sur la position RUN.
3. Choix des jours ou des groupes des jours:
Il est possible établir des programmes pour des jours particulières et pour les suivants groupes de jours, en appuyant la touche 1…7:
1-2-3-4-5 (de lundi a mardi)
6-7 (samedi et dimanche)
1-2-3-4-5-6 (de lundi a samedi)
1-2-3-4-5-6-7 (de lundi a dimanche)
4. Etablissement des programmes ON/OFF:
● Mettre le sélecteur sur la position P (l’indication de l’heure dans l’afficheur clignote, apparaît le symbole de une ampoule et le nom-
bre 1 de le premier réglage de l’heure).
● Choisir le jour ou le groupe de jours par la touche 1…7 (une flèche ▲ apparaît dans l’afficheur en correspondance au jour ou
beaucoup de flèches en cas du groupe des jours).
● Régler l’heure de mise en marche par les touches h et m.
● Appuyer sur la touche P pour établir l’heur d’arrêt (l’indication de l’heure dans l’afficheur clignote de nouveau, le symbole de l’am-
poule disparaît et apparaît le nombre 2).
● Confirmer le jour par la touche 1…7 et régler l’heure d’arrêt par les touches h et m.
● Répéter ces opérations, en séquence, jusque maximum 8 programmes ON et 8 OFF, distribués pour les jours que on veut pro-
grammer.
● Quand le réglage des programmes est terminé, remettre les sélecteurs sur la position RUN et AUTO.
NOTE: Pendant les jours que n’ ont pas été programmés, le climatiseur est arrêté.
5. Fonction SKIP:
La fonction SKIP (saut de programme) est active seulement pendant le fonctionnement automatique du programmateur (AUTO) + (RUN);
en appuyant la touche ➞x le programmateur change le mode de fonctionnement de ON en OFF et vice versa; cette fonction reste active jusqu’au programme suivant.
Si cette fonctionne est active le symbole ➞x apparaît sur l’afficheur.
Pour désactiver la fonction SKIP, appuyer encore la même touche.
6. Visualisation, correction ou élimination des programmes établis:
Pour visualiser les programmes établis, pendant le fonctionnement, mettre le sélecteur sur la position P et appuyer plus fois sur la touche P.
Il est possible, de cette façon, modifier les heures de mise en marche et d’arrêt par les touches h et m et éliminer un ou plus programmes,
en appuyant a le même temps sur les touches P et ➞x.
MISE EN MARCHE MANUELLE
FONCTIONNEMENTAVEC LE PROGRAMMATEUR
ARRET MANUEL
REGLAGE DE L‘HEURE
POSITION DE FONCTIONNEMENT
REGLAGE DES PROGRAMMES
SELECTEUR
JOURS DE LA SEMAINE
INDICATION MARCHE/ARRÊT
INDICATION FONCTION SKIP
FONCTION SKIPACTIVÉE
REGLAGE DES MINUTES
REGLAGE DE L‘HEURE
TOUCHE DE REMISE AZERO
REGLAGE DU JOUR DE LA SEMAINE
1: LUNDI, 7: DIMANCHE
MEMORISATION DES PROGRAMMES
8 PROGRAMMES ON, 8 PROGRAMMMES OFF
6
GFG
Page 39

PROGRAMMATEUR ELECTRONIQUE 24 HEURES
Caractéristiques techniques
– Sécurité de sauvegarde de programmes : 150 heures
–Afficheur 24 heures
– Programmation journalière et hebdomadaire
–6 programmes ON , 6 programmes OFF
NOTICE D’UTILISATION DU PROGRAMMATEUR
1. Remise à zéro du programmateur:
Appuyez-vous la touche RST avec la point d’un crayon.
2. Réglage du jour de la semaine et de l’heure actuelle:
Maintenir appuyé la touche TIME pendant le réglage ou la correction de l’heure; appuyer sur la touche DAY jusqu'à régler le jour de la semaine(visualisé
par les abréviations en Anglais dans l’afficheur), effectuer la mise à l’heure par les touches HR et MIN.
3. Choix des jours ou des groupes des jours:
Appuyer sur la touche PRG une fois: “PROG 1 ON” apparaît dans l’afficheur qui indique le premier programme ON.
Appuyer sur la touche DAY et les suivants groupes de jours ou jours particulières apparient en séquence(chaque fois on appuie sur la touche):
MO-TU-WE-TH-FR-SA-SU (groupe des jours de lundi a dimanche)
MO-TU-WE-TH-FR-SA-SU (jours particulières, chaque fois on appuie sur la touche)
MO-TU-WE-TH-FR (groupe des jours de lundi a vendredi)
SA-SU (samedi et dimanche)
MO-TU-WE-TH-FR-SA (groupe des jours de lundi a samedi)
MO-WE-FR (lundi, mercredi et vendredi)
TU-TH-SA (mardi, jeudi et samedi)
4. Etablissement des programmes ON/OFF
Après avoir appuyé sur la touche PRG et sur la touche DAY pour choisir le jour ou le groupe des jours (voir point 3)
● Régler l’heure de mise en marche par les touches HR et MIN.
● Appuyer sur la touche PRG de nouveau pour établir l’heur d’arrêt (“PROG 1 OFF” apparaît dans l’afficheur qui indique le premier programme OFF).
● Confirmer le jour ou groupe des jours par la touche DAY et régler l’heure d’arrêt par les touches HR et MIN.
● Répéter ces opérations, en séquence, jusque maximum 6 programmes ON et 6 OFF, distribués pour les jours qu’on veut programmer.
● Quand le réglage des programmes est terminé, appuyer sur la touche TIME pour visualiser l’heure actuelle, au contraire la programmation n’à pas lieu
(l’affichage retourne toutefois automatiquement à l’heure actuelle après 2 minutes s’on n’appuie pas des touches).
NOTE: Pendant les jours que n’ ont pas été programmés, le climatiseur est arrêté.
5. Visualisation, correction, désactivation et activation des programmes établis
Pour visualiser les programmes établis, pendant le fonctionnement, appuyer plus fois sur la touche PRG.
Il est possible, de cette façon, modifier les heures de mise en marche et d’arrêt par les touches HR et MIN et désactiver ou activer un ou plus programmes,
en appuyant RCL (voir la fonctionne RECALL - point 6).
6. Fonction RECALL
Si ne voulez pas faire exécuter un programme pour n’importe quelle raison, sans cependant perdre la mémoire réglée
● Appuyer sur la touche PRG jusqu'à visualiser le programme que vous volez désactiver.
● Appuyer sur la touche RCL avec la point d’un crayon (dans l’affichage l’heure réglée disparaît et apparaît “--:--”).
● Appuyer sur la touche TIME pour visualiser l’heure actuelle.
● Pour activer de nouveau le programme, suivre la même procédure.
7. HEURE LEGALE / HEURE SOLAIRE
● Pour changer de l’heure légale à l’heure solaire, maintenir appuyé la touche TIME et appuyer un de les touches (dans l’affichage le symbole “+1h”
apparaît).
● Pour retourner à l’heure légale suivre la même procédure (dans l’affichage le symbole “+1h” disparaît).
8. Fonction RANDOM
Les programmes réglés seront exécutés avec un retard de 2 à 32 minutes, en cas de interruption de courant, en utilisant cette fonction
● Maintenir appuyé la touche TIME et appuyer la touche PRG (dans l’affichage le symbole RND apparaît à indiquer que la fonction RANDOM est acti-
ve).
● Pour désactiver la fonction suivre la même procédure (dans l’affichage le symbole RND disparaît).
9. Fonctionnement manuel:
En appuyant une de les touches on peut régler manuellement le programmateur; dans l’afficheur apparent en séquence: AU TO OFF-ON-AUTO ON-OFF
AUTO: le climatiseur fonctionne selon les programmes choisis avec le programmateur (on peut changer de AUTO ON à AUTO OFF ou vice versa, si vous
voulez allumer ou éteindre le climatiseur sans perdre le contrôle du programmateur qui puis suivra à exécuter les programmes mémorisées)
ON: le climatiseur fonctionne avec permanence (utiliser directement la touche marche/arrêt du climatiseur pour le arrêter
OFF: le climatiseur est avec permanence arrêté (il ne peut être mis en marche pas même avec la touche marche/arrêt du climatiseur)
7
JOURS DE LA SEMAINE
INDICATION FONCTIONNEMENT
AUTO OFF - ON - AUTO ON - OFF
INDICATION FONCTION RANDOM
REGLAGE DES MINUTES
REGLAGE DE L‘HEURE
TOUCHE DE REMISE AZERO
REGLAGE DU JOUR DE LA SEMAINE
(OU GROUPE DES JOURS)
MEMORISATION DES PROGRAMMES
8 PROGRAMMES ON, 8 PROGRAMMMES OFF
TOUCHE RECALL : POUR DEACTIVER ET
ACTIVER LES PROGRAMMES
INDICATION PROGRAMME
REGLAGE DU JOUR ET DE L’HEURE
ACTUELS
INDICATION HEURE SOLAIRE/LEGALE
F
Page 40

ELEKTRONISCHE ZEITSCHALT-UHR 24-STUNDEN-PROGRAMM ODER
Technische Eigenschaften
– Aufzugreserve, ohne elektrische Stromversorgung, mit 5 Jahren (oder mehr) Betriebsdauer Lithiumbatterie
– Display 24 Stunden
– Tägliches und wöchentliches Programm
–8 Programme ON, 8 Programme OFF
Betriebsarten der Zeitschaltuhr:
I: das Klimagerät ist ständig ein (ON) (benutzen Sie die Ein/Aus Taste des Klimagerätes, um es auszuschalten)
AUTO: das Klimagerät arbeitet mit der Zeitschaltuhr
0: das Klimagerät ist ständig aus (OFF) (es kann nicht mit der Ein/Aus Taste des Klimagerätes einschalten werden)
BEDIENUNGSANLEITUNG VOM ZEITSCHALTUHR
1. Reset der Zeitschaltuhr:
Vergewissern Sie sich, daß der Wählschalter auf der Position RUN ist und drücken Sie die Reset Taste R mit der Spitze einer Feder
(die Displayanzeige beginnt zu blinken).
2. Tag und Uhreinstellung:
Schieben Sie den Wählschalter auf die Position , drücken Sie die Taste 1…7, um den Tag der aktuellen Woche einzustellen (ein
Pfeil ▲erscheint auf dem Display), drücken Sie die Taste h, um die aktuelle Uhr einzustellen, drücken Sie die Taste m, um die Minuten
einzustellen. Schieben Sie den Wählschalter auf die Position RUN wieder.
3. Wahl der einstellenden Tagen oder Gruppen von Tagen:
Es ist möglich die einzigen Tagen und die folgenden Gruppen von Tagen einzustellen, indem Sie die Taste 1…7 drücken:
1-2-3-4-5 (von Montag bis Freitag)
6-7 (Sonnabend und Sonntag)
1-2-3-4-5-6 (von Montag bis Sonnabend)
1-2-3-4-5-6-7 (von Montag bis Sonntag)
4. Ein-Ausschalten Programme Einstellung
● Schieben Sie den Schalter auf die Position P (die Uhranzeige auf dem Display beginnt zu blinken, das Zeichnen einer Glühbirne
und der Nummer 1 der ersten Uhreinstellung erscheinen).
● Drücken Sie solange die taste 1…7, bis den Tag der W oche oder die Gruppe von Tagen eingestellt werden (ein Pfeil ▲ unter dem
entsprechenden Tag erscheint, oder viele Pfeile erscheinen, wenn Sie die Gruppe von Tagen gewählt haben).
● Drücken Sie die Taste h und nachdem die Taste m, um den Einschaltuhrzeit einzustellen.
● Drücken Sie die Taste P, um den Ausschaltuhrzeit einzustellen (die Uhranzeige auf dem Display beginnt wieder zu blinken, das
Zeichnen der Glühbirne verschwindet und der Nummer 2 erscheint).
● Quittieren Sie den Tag mit der Taste 1…7 und stellen Sie den Ausschaltuhrzeit mit den Tasten h und m ein.
● Wiederholen Sie diese Operationen, bis Maximum 8 ON Programme und 8 OFF Programme eingestellt werden, indem Sie unter
den eingestellenden Tagen verteilen.
● Am Ende der Programme Einstellung, schieben Sie die Schaltern auf die Position RUN und AUTO.
ANMERKUNG: Während den nicht eingestellten Tagen bleibt das Klimagerät aus.
5. SKIP Betrieb:
Das Betrieb SKIP (Programm Sprung) kann nur während des automatischen Betriebs (AUTO) der Zeitschaltuhr eingestellt werden;
indem Sie die SKIP Taste ➞x drücken, wechselt das Betriebsart des Klimagerätes von ON zu OFF und umgekehrt; das SKIP Betrieb
ist aktiv bis dem folgenden eingestellten Programm.
Wenn das SKIP Betrieb aktiv ist, erscheint das Zeichnen ➞x auf dem Display.
Um das Betrieb SKIP auszuschalten, drücken Sie dieselbe Taste wieder.
6. Überprüfung, Korrektion oder Löschung der eingestellten Programmen
Um die eingestellte Programme während des Betriebs zu überprüfen, schieben Sie den Schalter auf P und drücken Sie vielen Malen
den Schalter P.
Es ist möglich, auf dieser Weise, die Ein-ausschaltuhrzeiten mit den Tasten h und m zu wechseln und ein oder mehr Programme zu
löschen, indem Sie gleichzeitig die Tasten P und ➞x drücken.
MANUELLE EINSCHALTUNG
BETRIEB MIT ZEITSCHLTUHR
MANUELLE AUSSCHALTUNG
EINSTELLUNG DER UHR
BETRIEB POSITION
EINSTELLUNG DER PROGRAMMEN
WÄHLSCHALTER
TAGEN DER WOCHE
ON/OFF ANZEIGE
FUNKTION SKIPANZEIGE
EINSCHALTUNG DER FUNKTION SKIP
EINSTELLUNG DER MINUTEN
EINSTELLUNG DER UHR
RESET TASTE
EINSTELLUNG VOM TAG DER WOCHE
1: MONTAG, 7: SONNABEND
PROGRAMMSPEICHERUNG
8 ON PROGRAMME, 8 OFF PROGRAMME
8
Page 41

ELEKTRONISCHE ZEITSCHALTUHR 24-STUNDEN-PROGRAMM
Technische Eigenschaften
– Aufzugreserve, ohne elektrische Stromversorgung: 150 Stunden
– Display 24 Stunden
– Tägliches und wöchentliches Programm
–6 Programme ON, 6 Programme OFF
BEDIENUNGSANLEITUNG VOM ZEITSCHALTUHR
1. Reset der Zeitschaltuhr:
Drücken Sie die Reset Taste RST mit der Spitze einer Feder.
2. Tag und Uhreinstellung:
Halten Sie die Taste TIME gedrückt,während Sie die Uhr einstellen oder korrigieren; drücken Sie die Taste DAY, um den aktuellen Tag der Woche einzustellen (die Abkürzungen auf Englisch erscheinen auf dem Display), drücken Sie die Taste HR, um die aktuelle Stunde einzustellen, drücken Sie die Taste
MIN, um die Minuten einzustellen.
3. Wahl der einstellenden Tagen oder Gruppen von Tagen:
Drücken Sie die Taste PRG einmal: “PROG 1 ON” erscheint auf dem Display, daß die erste Einschaltuhrzeit eindeutet.
Drücken Sie die Taste DAYund die folgenden Gruppen von Tagen oder einzigen T agen in Aufeinanderfolge erscheinen (jedes Mal die Taste gedrückt wird).
MO-TU-WE-TH-FR-SA-SU (von Montag bis Sonntag)
MO-TU-WE-TH-FR-SA-SU (die einzigen Tagen der Woche, jedes Mal die Taste gedrückt wird)
MO-TU-WE-TH-FR (von Montag bis Freitag)
SA-SU (Sonnabend und Sonntag)
MO-TU-WE-TH-FR-SA (von Montag bis Sonnabend)
MO-WE-FR (Montag, Mittwoch und Freitag)
TU-TH-SA (Dienstag, Donnerstag und Sonnabend)
4. Ein-Ausschalten Programme Einstellung
Nachdem die Taste PRG und die Taste DAY gedrückt zu haben, um die Gruppen von Tagen oder einzigen Tagen zu wählen
● Drücken Sie die Taste HR und nachdem die Taste MIN, um die Einschaltuhrzeit einzustellen.
● Drücken Sie nochmals die Taste PRG, um die Ausschaltuhrzeit einzustellen (“PROG 1 OFF” erscheint auf dem Display, daß die Ausschaltuhrzeit ein-
deutet).
● Quittieren Sie den Tag oder Gruppe von Tagen mit der Taste DAY und stellen Sie die Ausschaltuhrzeit mit den Tasten HR und MIN ein.
● Wiederholen Sie diese Operationen, bis Maximum 6 ON Programme und 6 OFF Programme eingestellt werden, indem Sie unter den eingestellenden
Tagen verteilen.
● Am Ende der Programme Einstellung, drücken Sie die Taste TIME, um die aktuelle Zeit erscheinen zu machen; anders funktioniert die Programmen
nicht (auf jeden Fall erscheint die aktuelle Zeit nach 2 Minuten automatisch auf dem Display, wenn keine Taste gedruckt wird)
ANMERKUNG: Während den nicht eingestellten Tagen bleibt das Klimagerät aus.
5. Überprüfung, Korrektion, Ausschalten und Einschalten der eingestellten Programmen
Um die eingestellte Programme während des Betriebs zu überprüfen, drücken Sie vielen Malen die taste PRG.
Es ist möglich, auf dieser Weise, die Ein-Ausschaltuhrzeiten mit den Tasten HR und MIN zu wechseln und ein oder mehr Programme aus-einzuschalten,
indem Sie die Taste RCL drücken (Sieh RECALL Funktion am Punkt 6).
6. RECALL Funktion:
Wenn Sie einen Programm nicht ausführen machen wollen, ohne die Programmspeicherung einzubüßen
● Drücken Sie die Taste PRG, bis zu dem ausschaltenden Programm.
● Drücken Sie die Taste RCL mit der Spitze einer Feder (auf dem Display verschwindet die eingestellte Uhrzeit und “--:--” erscheint).
● Drücken Sie die Taste TIME, um die aktuelle Zeit erscheinen zu machen.
● Um das Programm wieder einzuschalten, wiederholen Sie dasselbe Verfahren.
7. WINTER/SOMMERZEIT
● Um von Winterzeit zu Sommerzeit zu ändern, halten Sie die Taste TIME gedrückt und drücken Sie eine der Tasten (das Zeichen “+1h” erscheint
auf dem Display und die Uhrzeit ändert).
● Um zur Winterzeit zurückzukehren, wiederholen Sie dasselbe Verfahren (auf dem Display verschwindet das Zeichen “+1h” und die Uhrzeit ändert).
8. RANDOM Funktion:
Die eingestellte Programme werden mit einer Verzögerung von 2 zu 32 Minuten ausführen, wenn die Stromversorgung unterbrecht, indem Sie diese Funktion
benutzen
● Halten Sie die Taste TIME gedrückt und drucken Sie die Taste PRG (das Zeichen RND erscheint auf dem Display).
● Um diese Funktion auszuschalten, wiederholen Sie dasselbe Verfahren (auf dem Display verschwindet das Zeichen RND).
9. Manueller Betrieb:
Indem Sie eine der Tasten drücken, können Sie die Zeitschaltuhr manuell einstellen; der Display wird in Aufeinanderfolge zeigen: AUTO OFF-ON-AUTO
ON-OFF
AUTO: das Klimagerät arbeitet mit der Zeitschaltuhr (es ist möglich von AUTO ON zu AUTO OFF ändern, wenn Sie das Klimagerät ein oder ausschalten
wollen, ohne die Programmspeicherung der Zeitschaltuhr einzubüßen; dann wird sie tatsächlich die eingestellte programme ausführen)
ON: das Klimagerät ist ständig ein (ON) (benutzen Sie die Ein/Aus Taste des Klimagerätes, um es auszuschalten)
OFF: das Klimagerät ist ständig aus (OFF) (es kann nicht mit der Ein/Aus Taste des Klimagerätes einschalten werden)
9
TAGEN DER WOCHE
BETRIEBSARTANZEIGE
AUTO OFF - ON - AUTO ON - OFF
RANDOMANZEIGE
EINSTELLUNG DER MINUTEN
EINSTELLUNG DER STUNDEN
RESET TASTE
EINSTELLUNG VOM TAG DER WOCHE
(ODER GRUPPE VON TAGEN)
PROGRAMMSPEICHERUNG
6 ON PROGRAMME, 6 OFF PROGRAMME
RECALL TASTE : UM DIE PROGRAMMEN AUS/EINSCHALTEN
PROGRAMMANZEIGE
TAG UND UHREINSTELLUNG
SOMMER/WINTERZEITANZEIGE
D
Page 42

PROGRAMADOR ELECTRONICO 24 HORAS O
Características técnicas
– Reserva de carga sin alimentación eléctrica con pilas de litio durante cinco años o más
– Pantalla 24 horas
– Programa diario y semanal
–8 programas ON, 8 programas OFF
Modos de funcionamiento del programador:
I: el acondicionador está siempre encendido (usar directamente el pulsador arranque/parada del acondicionador para apagarlo)
AUTO: el acondicionador funciona con el programador
0: el acondicionador está siempre apagado (no puede encenderse tampoco con el pulsador arranque/parada del acondicionador)
INSTRUCCIONES DE USO DEL PROGRAMADOR
1. Reset del programador:
Asegurarse de que el selector sea en la posición RUN y pulsar el botón R de reset con la punta de un lápiz (la indicación en la pantalla empieza a parpadear).
2. Regulación del día de la semana y de la hora curriente:
Desplazar el selector en al posición , pulsar el botón 1…7 hasta regular el día de la semana corriente (visualizado par una flecha
▲ en la pantalla), pulsar el botón h para regular la hora corriente, pulsar el botón m para regular los minutos. Desplazar de nuevo el
selector en la posición RUN.
3. Elección de los días o de los bloqueos de días para programar:
Pueden programarse los días singularmente y los siguientes bloqueos de días, pulsando el botón 1…7:
1-2-3-4-5 (desde lunes hasta viernes)
6-7 (sábado y domingo)
1-2-3-4-5-6 (desde lunes hasta sábado)
1-2-3-4-5-6-7 (desde lunes hasta domingo)
4. Regulación de los programas de arranque y parada:
● Desplazar el selector en la posición P (la indicación de la hora en la pantalla empieza a parpadear, aparece el símbolo de la bom-
billa y el numero 1 de la primera regulación de la hora).
● Pulsar el botón 1…7 hasta regular el día de la semana o el bloqueo de los días que quieren programarse (en la pantalla aparece
una flecha ▲ correspondiente al día o muchas flechas si se elige el bloqueo de los días).
● Pulsar el botón h y después el botón m para regular la hora de arranque.
● Pulsar el botón P para regular la hora de parada (la indicación de la hora en la pantalla empieza de nuevo a parpadear, el sím-
bolo de la bombilla desaparece y aparece el numero 2).
● Confirmar el día con el botón 1…7 y regular la hora de parada con los botones h y m.
● Repetir estas operaciones en secuencia hasta máximo 8 programas de arranque y 8 programas de parada, divididos entre los días
che se quieren programar.
● Al final de la regulación de los programas, desplazar los selectores en la posición RUN y AUTO.
NOTA: Durante los días que no han sido programados, el acondicionador se quedará apagado.
5. Función SKIP:
La función SKIP (salto de programa) puede activarse solo durante el funcionamiento automático del programador (AUTO) + (RUN) y
permite de cambiar el modo de funcionamiento de ON hasta OFF y viceversa, pulsando el botón ➞x; esta función se queda activada
hasta el inicio del próximo programa memorizado.
Si la función SKIP está activada aparece en la pantalla el símbolo ➞x.
Para anular la función SKIP, pulsar de nuevo el mismo botón.
6. Lectura, corrección o anulación de los programas memorizados:
Para leer los programas memorizados, durante el funcionamiento, desplazar el selector en P y pulsar varias veces el botón P.
Es posible, de esta manera, corregir las horas de arranque y parada con los botones h y m y anular un programa o más, pulsando
en el mismo tiempo los botones P y ➞x.
ARRANQUE MANUAL
FUNCIONAMIENTO CON EL PROGRAMADOR
PARADAMANUAL
REGULACION DEL RELOJ
POSICION DE FUNCIONAMIENTO
REGULACION DE LOS PROGRAMAS
SELECTOR
DIAS DE LA SEMANA
INDICACION ENCENDIDO/APAGADO
INDICACION DE LA FUNCION SKIP
ACTIVACION DE LAFUNCION SKIP
REGULACION DE LOS MINUTOS
REGULACION DE LAS HORAS
BOTON DE RESET
REGULACION DEL DIADE LA SEMANA
1: LUNES, 7: DOMINGO
MEMORIZACION DE LOS PROGRAMAS
8 PROGRAMAS ON, 8 PROGRAMAS OFF
10
Page 43

PROGRAMADOR ELECTRONICO 24 HORAS
Características técnicas
– Reserva de carga sin alimentación eléctrica : 150 horas
– Pantalla 24 horas
– Programa diario y semanal
–6 programas ON, 6 programas OFF
INSTRUCCIONES DE USO DEL PROGRAMADOR
1. Reset del programador:
Pulsar el botón RST de reset con la punta de un lápiz.
2. Regulación del día de la semana y de la hora corriente:
Tener pulsado el botón TIME mientras se regula o se corrige el reloj; pulsar el botón DAY hasta regular el día de la semana corriente (visualizado par las
abreviaturas en inglés), pulsar el botón HR para regular la hora corriente, pulsar el botón MIN para regular los minutos.
3. Elección de los días o de los bloqueos de días para programar:
Pulsar el botón PRG una vez: en la pantalla aparece “PROG 1 ON” que indica la hora de arranque para programar.
Pulsar el botón DAY y aparecen en secuencia los siguientes bloqueos de días o los días singularmente:
MO-TU-WE-TH-FR-SA-SU (desde lunes hasta domingo)
MO-TU-WE-TH-FR-SA-SU (días singolos, cada vez se pulsa el botón)
MO-TU-WE-TH-FR (desde lunes hasta viernes)
SA-SU (sábado y domingo)
MO-TU-WE-TH-FR-SA (desde lunes hasta sábado)
MO-WE-FR (lunes, miércoles e viernes)
TU-TH-SA (martes, jueves y sábado)
4. Regulación de los programas de arranque y parada:
Después haber pulsado el botón PRG y el el botón DAY para elegir el día o el bloqueo de días para programar (véase punto 3)
● Pulsar el botón HR y después el botón MIN para regular la hora de arranque.
● Pulsar de nuevo el botón PRG para regular la hora de parada (en la pantalla aparece “PROG 1 OFF” que indica la hora de parada para programar).
● Confirmar el día con el botón DAY y regular la hora de parada con los botones HR y MIN.
● Repetir estas operaciones en secuencia hasta máximo 6 programas de arranque y 6 programas de parada, divididos entre los días que se quieren pro-
gramar.
● Al final de la regulación de los programas, pulsar el botón TIME para volver a la hora corriente, de otra manera la programación no funciona (de todo
modo la pantalla vuelve automáticamente a la hora corriente después de 2 minutos, si ningún botón es presionado).
NOTA: Durante los días que no han sido programados, el acondicionador se quedará apagado.
5. Lectura, corrección, activación y desactivación de los programas memorizados:
Para leer los programas memorizados, durante el funcionamiento, pulsar varias veces el botón PRG.
Es posible, de esta manera, corregir las horas de arranque y parada con los botones HR y MIN y desactivar o activar un programa o más, pulsando RCL
(véase la función RECALL al punto 6).
6. Función RECALL:
Si, por cualquiera razón, no se quiere hacer ejecutar un programa, sin pero perder la memoria programada
● Pulsar el botón PRG hasta visualizar el programa para desactivar.
● Pulsar el botón RCL con la punta de un lápiz (en la pantalla desaparece la hora programada y aparece “--:--”).
● Pulsar el botón TIME para volver a la hora corriente.
● Para activar de nuevo el programa, repetir el mismo procedimiento.
7. ORARIO DE INVIERNO/DE VERANO:
● Para cambiar desde el orario de invierno hasta el orario de verano, tener pulsado el botón TIME y pulsar uno de los botones (en la pantalla apa-
rece “+1h” y la hora cambia).
● Para volver al orario de verano repetir el mismo procedimiento (en la pantalla desaparece “+1h” y la hora cambia).
8. Función RANDOM:
Los programas memorizados empezarán con un retraso de 2 hasta 32 minutos, en caso de interrupción de corriente, utilizando esta función
● Tener pulsado el botón TIME y pulsar el botón PRG (en la pantalla aparece RND que indica la función RANDOM activa).
● Para desactivar la función, repetir el mismo procedimiento (en la pantalla desaparece RND).
9. Funcionamiento manual:
Pulsando uno de los botones se puede regular manualmente el programador; aparecerán en secuencia: AUTO OFF-ON-AUTO ON-OFF
AUTO: el acondicionador funciona con el programador (es posible pasar desde AUTO ON hasta AUTO OFF si queréis encender o apagar el acondiciona-
dor sin perder el control del programador; después el programador seguirá en efecto à ejecutar los programas memorizados
ON: el acondicionador está siempre encendido (usar directamente el pulsador arranque/parada del acondicionador para apagarlo)
OFF: el acondicionador está siempre apagado (no puede encenderse tampoco con el pulsador arranque/parada del acondicionador)
11
DIAS DE LA SEMANA
INDICACION MODO DE FUNCIONAMIENTO
AUTO OFF - ON - AUTO ON - OFF
INDICACION DE LA FUNCION RANDOM
REGULACION DE LOS MINUTOS
REGULACION DE LAS HORAS
BOTON DE RESET
REGULACION DEL DIADE LA SEMANA
(O BLOQUEO DE DIAS)
MEMORIZACION DE LOS PROGRAMAS
6 PROGRAMAS ON, 6 PROGRAMAS OFF
BOTON RECALL : PARAAPAGAR Y
ENCENDER LOS PROGRAMAS
INDICACION PROGRAMA
REGULACION DIAY HORA CURRIENTES
INDICACION ORARIO DE VERANO/DE INVIERNO
E
 Loading...