

Page 1

Copies of the I/B. Please reproduce them without any
Fax +32 2 359 95 50
Dampfbügelstation
Steam Ironing Station
Centrale Vapeur
Stoomgenerator
Central de planchado
Ferro com caldeira a vapor
Sistema stirante
Żelazko z generatorem pary
Statie de calcat cu vapori
Naparovacia žehliaca stanica
TKG SIS 1002
230V~ 50Hz 2180W
I/B Version
130424
changes except under special instruction from Team
International BELGIUM. The pages must be reproduced
and folded in order to obtain a booklet A5 (+/- 148.5 mm
width x 210 mm height). When folding, make sure you
keep the good numbering when you turn the pages of
the I/B. Don’t change the page numbering. Keep the
language integrity.
Front cover page (first page)
Assembly page 1/64
Page 2
Fax +32 2 359 95 50
D
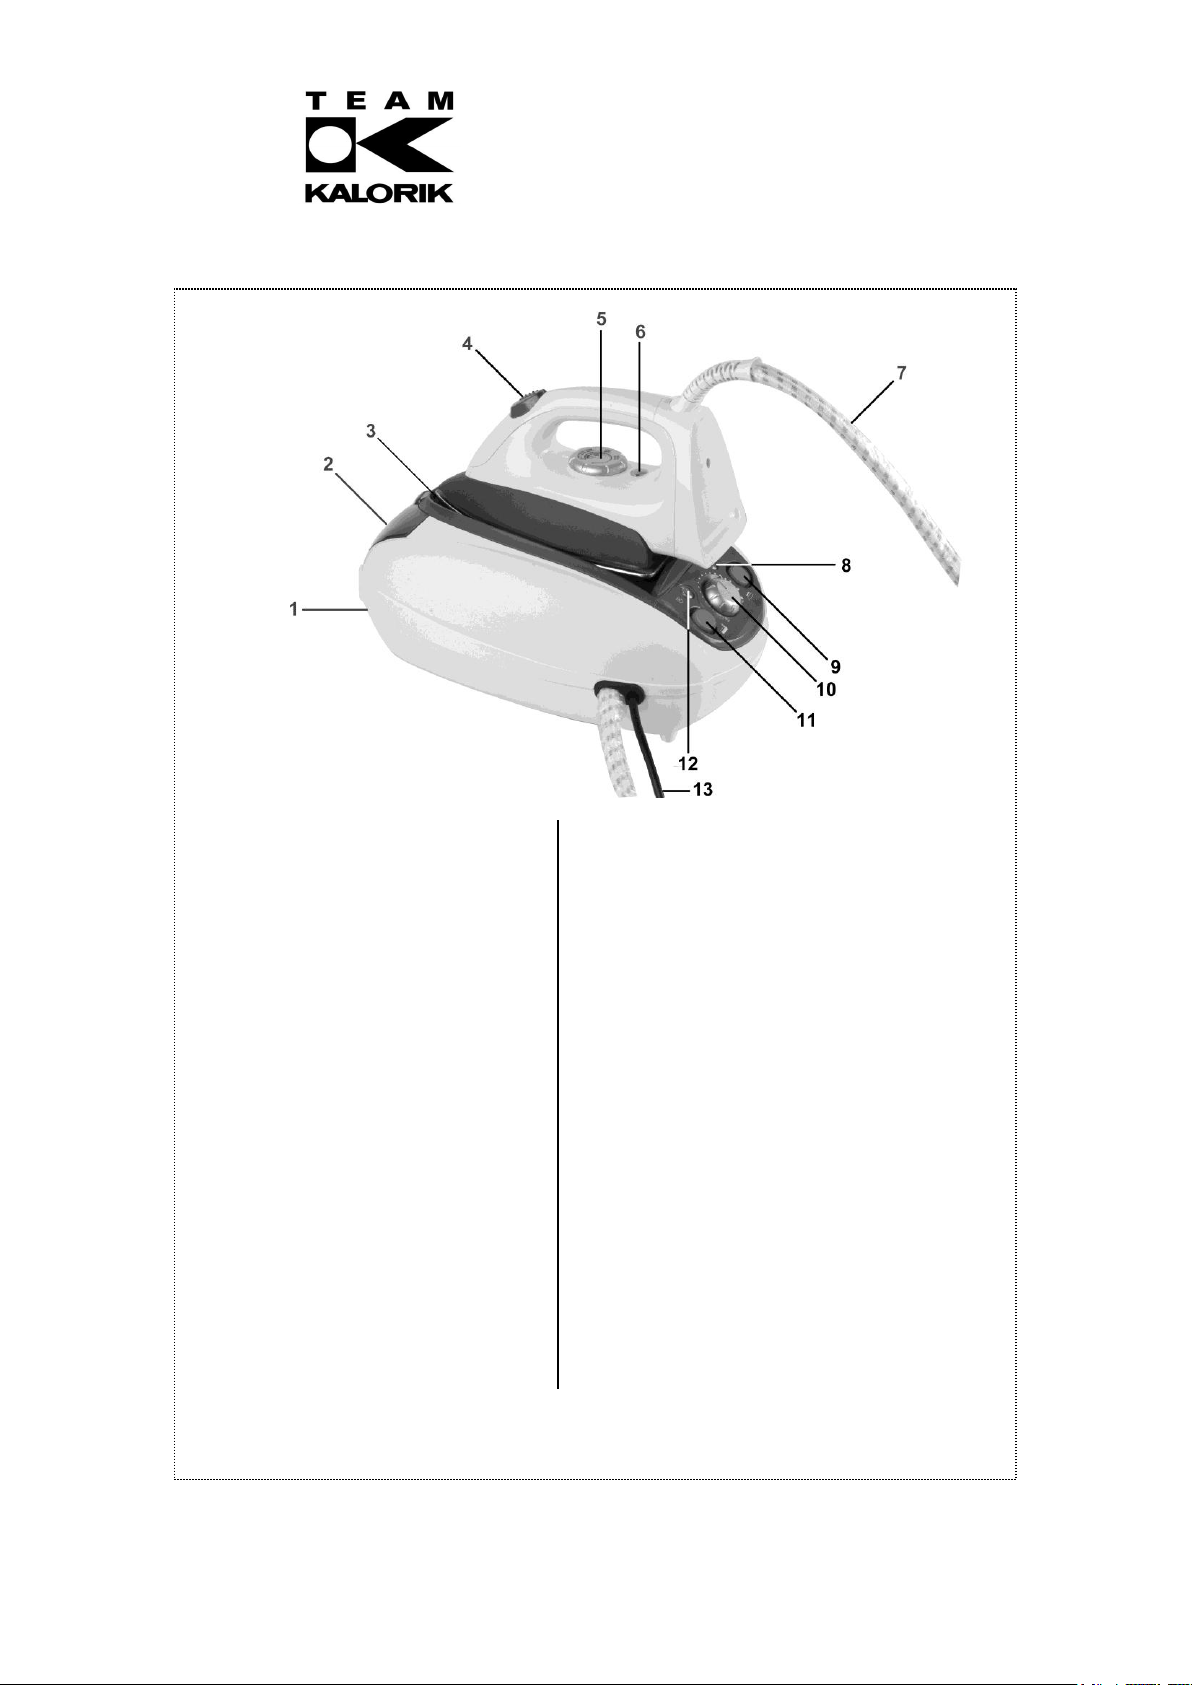
1. Wassertank
2. Verschluss des Wassertankes
3. Basis
4. Dampfdruckknopf
5. Thermostat
6. Kontrollleuchte des Bügeleisens
7. Verbindungskabel
8. Wassernachfüllkontrollleuchte
9. Schalter des Bügeleisens
10. Dampfregelknopf
11. Schalter des Dampfkessels
12. Pumpe-Kontrollleuchte
13. Anschlussleitung
GB
1. Water tank
2. Water tank cap
3. Iron support
4. Steam button
5. Temperature dial
6. Pilot light of the iron
7. Connection cord
8. Water refill indicator
9. Iron power switch
10. Steam control knob
11. Boiler power switch
12. Pump pilot light
13. Power cord
Copies of the I/B. Please reproduce them without any
changes except under special instruction from Team
International BELGIUM. The pages must be reproduced
and folded in order to obtain a booklet A5 (+/- 148.5 mm
width x 210 mm height). When folding, make sure you
keep the good numbering when you turn the pages of
the I/B. Don’t change the page numbering. Keep the
language integrity.
F
1. Réservoir
2. Couvercle du réservoir
3. Support du fer
4. Bouton jet de vapeur
5. Thermostat réglable
6. Témoin lumineux de contrôle du fer
7. Cordon de raccord
8. Témoin lumineux de remplissage du réservoir
9. Interrupteur du fer
10. Régulateur de vapeur
11. Interrupteur de la chaudière
12. Témoin lumineux de contrôle de la pompe
13. Cordon d’alimentation
NL
1. Waterreservoir
2. Klepje van het waterreservoir
3. Basis
4. Stoomknop
5. Thermostaatknop
6. Controlelampje van het strijkijzer
7. Verbindingssnoer
8. Bijvulcontrolelampje
9. Schakelaar van het strijkijzer
10. Stoomregelaar
11. Schakelaar van de stoomketel
12. Controlelampje van de pomp
13. Elektrisch snoer
2 TKG SIS 1002 - 130424
Assembly page 2/64
Page 3
Copies of the I/B. Please reproduce them without any
Fax +32 2 359 95 50
changes except under special instruction from Team
International BELGIUM. The pages must be reproduced
and folded in order to obtain a booklet A5 (+/- 148.5 mm
width x 210 mm height). When folding, make sure you
keep the good numbering when you turn the pages of
the I/B. Don’t change the page numbering. Keep the
language integrity.
SP
1. Depósito de agua
2. Tapa del depósito
3. Suporte para la plancha
4. Botón vaporizador
5. Termostato regulable
6. Testigo luminoso de la plancha
7. Cable de conexión
8. Indicador de suministro de agua
9. Interruptor de la plancha
10. Mando de control del vapor
11. Interruptor de la caldera
12. Testigo luminoso de la bomba
13. Cable de alimentación
P
1. Reservatório da água
2. Tampa do reservatório da água
3. Descanso, no corpo da central a
vapor, para a base do ferro
4. Botão do vapor
5. Termóstato regulável
6. Sinalizador do aquecimento do ferro
7. Cabo de corrente e vapor
8. Indicador de recarga de água
9. Interruptor do ferro
10. Regulador da pressão do vapor
11. Interruptor da caldeira
12. Sinalizador luminoso da bomba vapor
13. Cabo da alimentação
I
1. Serbatoio
2. Tappo del serbatoio
3. Supporto per il ferro
4. Pulsante di getto di vapore
5. Termostato regolabile
6. Spia luminosa del ferro
7. Cavo di connessione
8. Spia luminosa assenza acqua
9. Interruttore del ferro da stiro
10. Manopola di regolazione del vapore
11. Interruttore della caldaia
12. Spia luminosa della pompa
vapore/caldaia
13. Cavo d’alimentazione
PL
1. Zbiornik na wodę
2. Wlew zbiornika na wodę
3. Podstawka
4. Przycisk uderzenia parą
5. Pokrętło temperatury
6. Lampka kontrolna żelazka
7. Podłączenie przewodu
8. Wskaźnik uzupełniania wody
9. Włącznik zasilania żelazka
10. Pokrętło regulacji pary
11. Włącznik zasilania bojlera
12. Lampka kontrolna pompy
13. Przewód zasilający
RO
1. Rezervor apa
2. Capacul rezervorului
3. Suport din fier
4. Buton de abur
5. Termostat reglabil
6. Buton luminous de pornire
7. Cablu de conectare
8. Indicator nivel apa
9. Intrerupator al fierului
10. Buton de abur
11. Intrerupator al boilerului
12. Buton luminos ptr. pompa
13. Cablu de alimentare
SK
1. Nádržka na vodu
2. Kryt nádržky na vodu
3. Podstavec
4. Tlačidlo pary
5. Ovládanie teploty
6. Kontrolka zapnutia
7. Napájací kábel
8. Indikátor doplnenia vody
9. Vypínač žehliacej plochy
10. Gombík - kontrolka pary
11. Vypínač ohrevu vody
12. Kontrolka čerpadla
13. Prívodný kábel
3 TKG SIS 1002 - 130424
Assembly page 3/64
Page 4
Copies of the I/B. Please reproduce them without any
Fax +32 2 359 95 50
changes except under special instruction from Team
International BELGIUM. The pages must be reproduced
and folded in order to obtain a booklet A5 (+/- 148.5 mm
width x 210 mm height). When folding, make sure you
keep the good numbering when you turn the pages of
the I/B. Don’t change the page numbering. Keep the
language integrity.
WICHTIGE SICHERHEITSVORSCHRIFTEN
Lesen Sie aufmerksam die Gebrauchsanleitung, bevor Sie Ihr Gerät benutzen, und befolgen Sie
immer die Sicherheitsvorschriften und die Gebrauchsanweisung.
Wichtig: Das Gerät kann von Kindern ab 14 Jahren und von Personen mit einer körperlichen,
sensorischen, geistigen oder motorischen Behinderung oder einem Mangel an Erfahrung und
Kenntnissen verwendet werden, sofern diese Personen beaufsichtigt oder über den sicheren
Gebrauch des Geräts unterrichtet wurden und die damit verbundenen Gefahren verstanden
haben. Kinder dürfen nicht mit dem Gerät spielen. Die Reinigung und Wartung darf nicht von
Kindern ohne Aufsicht durchgeführt werden.
Kontrollieren Sie, ob die Netzspannung mit der auf dem Gerät vermerkten Spannung
übereinstimmt, bevor Sie das Gerät benutzen.
Lassen Sie Ihr Gerät niemals beim Gebrauch unbeaufsichtigt.
Stellen Sie den Sockel des Gerätes immer auf ein stabiles Bügelbrett, einen Tisch oder auf
den Boden.
Schließen Sie das Gerät nur an Schukosteckdosen an.
Um eine Überlastung zu vermeiden, sollten Sie kein weiteres Gerät mit hoher Wattleistung
an dem selben Stromkreis benutzen.
Falls ein Verlängerungskabel notwendig ist, sollte es mindestens für eine Stromstärke von
10 Ampere ausgelegt sein. Benutzen Sie nie ein Verlängerungskabel mit einer niedrigen
Stromstärkenzulassung. Achten Sie immer darauf, dass das Kabel so verlegt ist, dass es
weder verknotet noch verheddert ist, so dass Sie nicht darüber stolpern können.
Lassen Sie Ihr Gerät (vor allem das Bügeleisen und dessen Kabel) nie unbeaufsichtigt und
in Reichweite von Kindern oder unverantwortlichen Personen, wenn es an der Steckdose
hängt oder wenn es abkühlt.
Überprüfen Sie regelmäßig, dass das Gerät nicht beschädigt ist. Bei Beschädigung der
Anschlussleitung oder des Gerätes, letzteres nicht benutzen, sondern von einem
Fachmann(*) überprüfen bzw. reparieren lassen. Eine beschädigte Anschlussleitung muss
von einem Fachmann(*) ausgewechselt werden, damit jede Gefahr gemieden wird.
Benutzen Sie das Gerät nur zu Haushaltszwecken, wie in der Bedienungsanleitung
angegeben.
Tauchen Sie das Bügeleisen und den Dampfgenerator niemals in Wasser oder andere
Flüssigkeiten, weder zum Reinigen, noch zu einem anderen Zweck.
Benutzen Sie das Gerät nicht in der Nähe einer Wärmequelle.
Lassen Sie die Anschlussleitung und das Verbindungskabel zwischen dem Sockel und dem
Bügeleisen nicht in Berührung mit heißen Oberflächen kommen.
Benutzen Sie das Gerät nicht im Freien und bewahren Sie es an einem trockenen Platz auf.
Benutzen Sie nur Zubehör, welches vom Lieferanten empfohlen wurde. Anderes Zubehör
stellt eine Gefahr für den Benutzer dar und das Gerät könnte dadurch beschädigt
werden.
Ziehen Sie niemals an der Anschlussleitung, um das Gerät zu bewegen. Achten Sie darauf,
dass die Anschlussleitung nicht irgendwo hängen bleibt und dies zum Fall des Gerätes
führen könnte. Wickeln Sie die Anschlussleitung nicht um das Gerät oder knicken Sie diese
nicht.
Ziehen Sie immer den Stecker, wenn das Gerät nicht in Gebrauch ist.
Verbrennungen können durch Berühren der Metallfläche, heißen Wassers oder
Wasserdampfes entstehen. Wenn das Symbol auf einer bestimmten Fläche des
Gerätes angebracht wurde, ist dies ein Warnhinweis. Dieses Symbol bedeutet: ACHTUNG,
diese Fläche kann während des Gebrauches heiß werden.
4 TKG SIS 1002 - 130424
Assembly page 4/64
Page 5

Copies of the I/B. Please reproduce them without any
Fax +32 2 359 95 50
changes except under special instruction from Team
International BELGIUM. The pages must be reproduced
and folded in order to obtain a booklet A5 (+/- 148.5 mm
width x 210 mm height). When folding, make sure you
keep the good numbering when you turn the pages of
the I/B. Don’t change the page numbering. Keep the
language integrity.
Stellen Sie das Bügeleisen immer auf den Sockel des Gerätes, auf den dafür
vorgesehenen Platz. Stellen Sie das Bügeleisen nicht auf die Hinterseite und achten Sie
darauf, dass es nicht in Berührung mit leicht entflammbaren Materialien und der
Anschlussleitung kommt.
Füllen Sie den Wassertank niemals mit Essig, Entkalkungsmitteln oder anderen Chemikalien.
Vor der ersten Benutzung entfernen Sie alle Aufkleber oder Schutzfolien von der
Bügeleisensohle. Säubern Sie die Sohle mit einem weichen Tuch.
Einige Teile des Bügeleisens wurden leicht eingefettet, daher kann das Bügeleisen beim
ersten Gebrauch leicht riechen. Das wird sich jedoch nach kurzer Zeit geben.
Das Bügeleisen muss auf einer stabilen, flachen Ebene benutzt und hingestellt werden.
Benutzen Sie das Bügeleisen nicht, wenn es gefallen ist oder irgendwelche sichtbaren
Schäden aufweist oder leckt.
Wenn Sie das Bügeleisen auf dessen Ständer stellen (wenn vorhanden bei diesem Modell),
achten Sie darauf, dass Sie den Ständer auf eine stabile Fläche hinstellen.
Dies gilt auch dem Wassertank. Um das Risiko von Elektroschocks zu vermeiden, sollten Sie
das Gerät nicht selber auseinander bauen, sondern zu einem Fachmann(*) bringen, um es
prüfen und reparieren zu lassen. Falsches Zusammenbauen kann bei Benutzung zu
Elektroschocks führen.
Entrollen Sie die Anschlussleitung und das Verbindungskabel, bevor Sie das Gerät
anschalten.
Die Schalter sollten immer auf die AUS-Stellung (0) gestellt werden, bevor Sie den Stecker
einstecken oder herausziehen.
Ziehen Sie den Stecker aus der Steckdose und lassen Sie das Bügeleisen und den
Wassertank abkühlen, bevor Sie diese reinigen und wegräumen. Ziehen Sie ebenfalls den
Stecker aus bei Dampfbügelstationen mit Dampfkessel (abhängig vom Modell), bevor Sie
sie öffnen, füllen oder bevor Sie den Wassertank entleeren.
ÖFFNEN SIE BEI DAMPFBÜGELSTATIONEN MIT DAMPFKESSELN (ABHÄNGIG VOM MODELL)
NIEMALS DEN VERSCHLUSS DES WASSERTANKS, WÄHREND DAS GERÄT UNTER SPANNUNG IST
UND VOR ALLEM WENN DAMPF ERZEUGT WIRD.
(*) Fachmann: Anerkannter Kundendienst des Lieferanten oder des Importeurs, der für
derartige Reparaturen zuständig ist. Wenden Sie sich für eventuelle Reparaturen an diesen
Kundendienst.
VOR DEM ERSTEN GEBRAUCH
Wir empfehlen Ihnen, das Bügeleisen vor dem ersten Gebrauch wie folgt zu reinigen: füllen
Sie den Wassertank mit Wasser, stecken Sie den Stecker in die Steckdose, drücken Sie den
Schalter des Dampfkessels und den Schalter des Bügeleisens, stellen Sie den Thermostat
auf Stufe "LINEN" ein und den Dampfregler auf MAX und lassen Sie das Bügeleisen 10
Minuten aufheizen. Sobald die Temperatur erreicht ist, nehmen Sie das Bügeleisen von der
Basis ab, halten Sie es senkrecht und betätigen Sie den Dampfdruckknopf während 30
Sekunden, warten Sie dann 30 Sekunden und wiederholen Sie diesen Zyklus zweimal.
Schalten Sie das Gerät aus (Schalter des Dampfkessels und Schalter des Bügeleisens auf
Aus-Stellung “0”), ziehen Sie den Stecker aus der Steckdose und lassen Sie das Gerät
abkühlen. Reinigen Sie dann die Sohle mit einem feuchten Tuch.
BÜGELEISEN: VORSICHTSMAßNAHMEN UND TEMPERATUREN
Überprüfen Sie immer als erstes, ob an dem zu bügelnden Artikel Bügelanweisungen
angegeben sind.
Wenn die Bügelanweisungen fehlen, sollten Sie aber das Material kennen, richten Sie sich
nach den empfohlenen Bügeltemperaturen in der nachfolgenden Tabelle.
5 TKG SIS 1002 - 130424
Assembly page 5/64
Page 6
Copies of the I/B. Please reproduce them without any
Fax +32 2 359 95 50
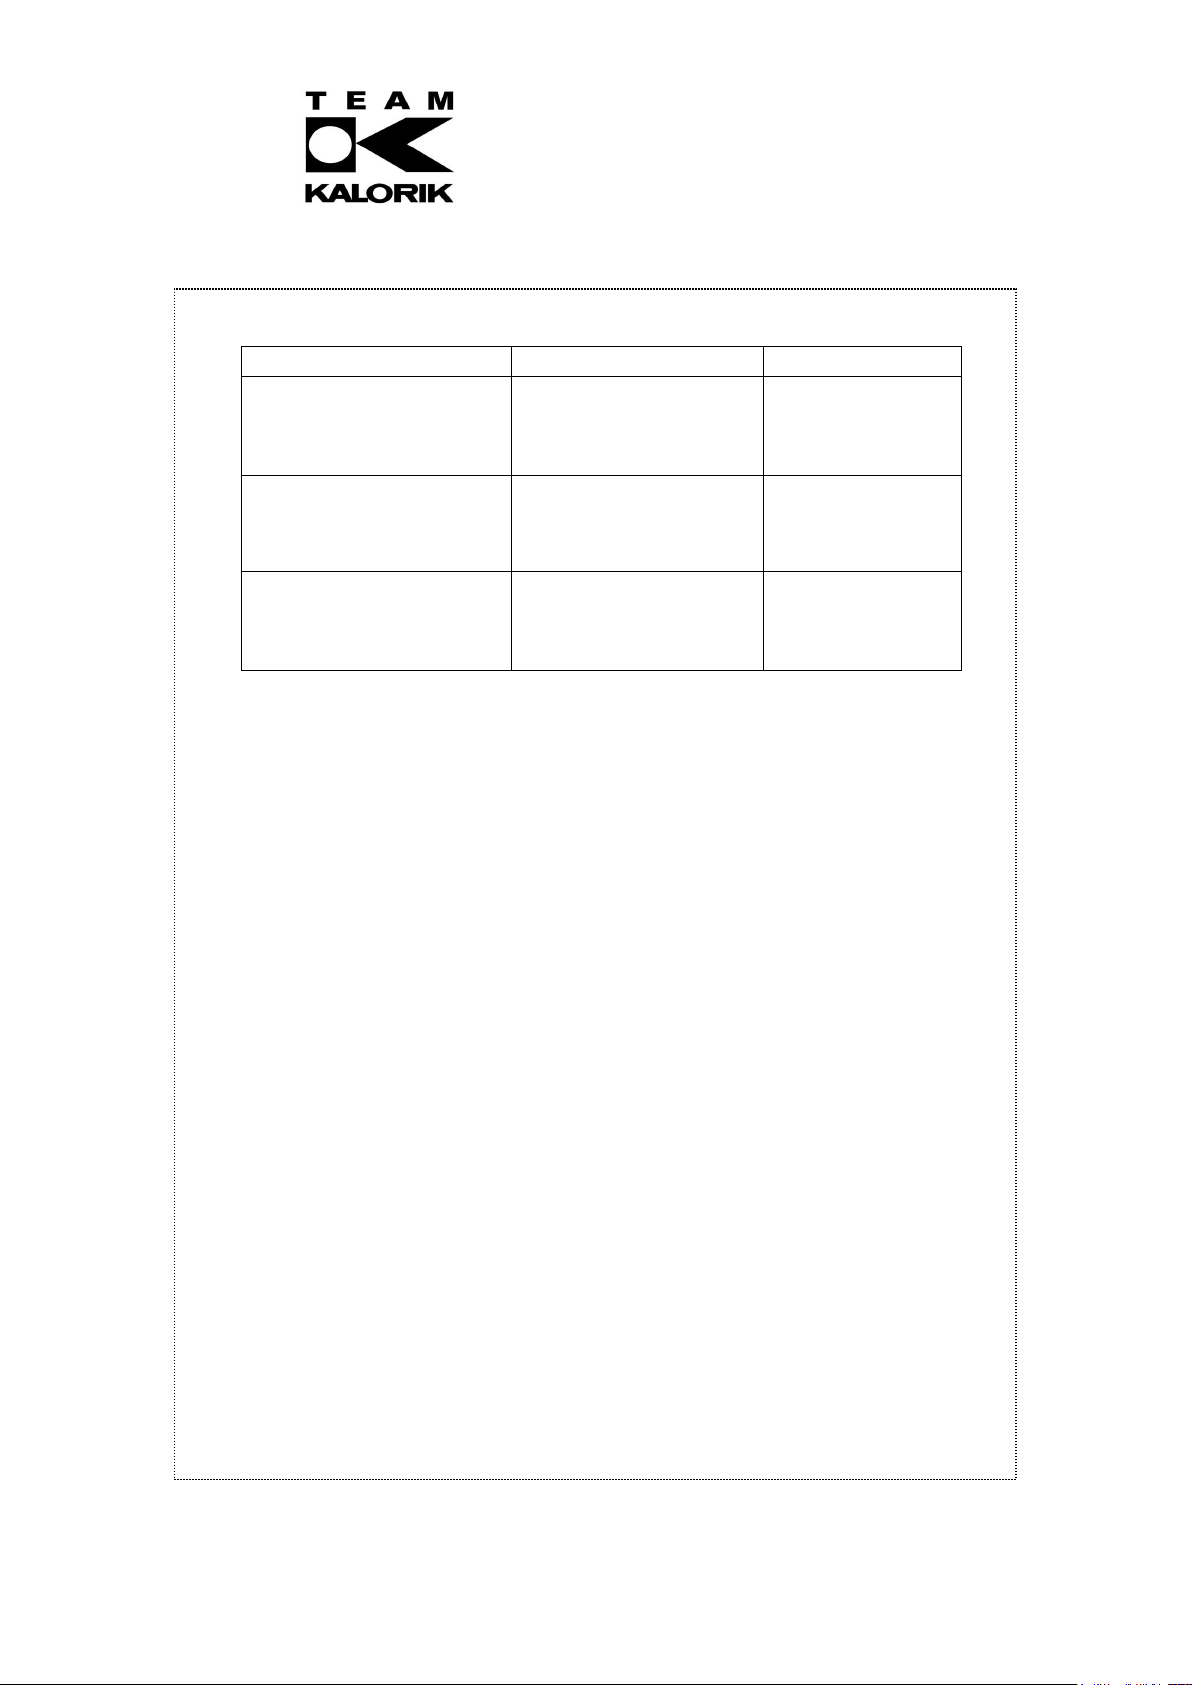
Textilart
Temperaturskala
Dampfbügeln
Nylon
Synthetik (z.B. Azetat,
Acrylic, Viskose,
Polyamide, Polyester,...)
Seide
MIN
NEIN
Wolle
JA
Baumwolle
Leinen
MAX
JA
changes except under special instruction from Team
International BELGIUM. The pages must be reproduced
and folded in order to obtain a booklet A5 (+/- 148.5 mm
width x 210 mm height). When folding, make sure you
keep the good numbering when you turn the pages of
the I/B. Don’t change the page numbering. Keep the
language integrity.
Stecken Sie den Stecker in die Steckdose und drücken Sie den Schalter des Bügeleisens.
Der Schalter leuchtet auf und deutet darauf hin, dass das Gerät in Betrieb ist und dass das
Bügeleisen aufheizt. Stellen Sie den Thermostat auf die gewünschte Temperatur. Die
Kontrollleuchte des Bügeleisens leuchtet auf. Sobald die gewünschte Temperatur erreicht
ist, erlischt die Kontrollleuchte des Bügeleisens. Sie können nun zu bügeln anfangen.
Während des Bügelns wird diese Kontrollleuchte von Zeit zu Zeit angehen. Wenn dies
geschieht, erhitzt sich die Sohle erneut auf die gewünschte Temperatur. Sie können weiter
bügeln.
Die Tabelle ist nur für Faserstoffe geeignet. Sortieren Sie gemäß Bügeltemperatur die
Kleiderstoffe aus: Wolle mit Wolle, Baumwolle mit Baumwolle usw.
Das Bügeleisen erwärmt sich schneller, als es sich abkühlt. Fangen Sie daher mit Stoffen an,
die niedrige Temperaturen benötigen wie z.B. synthetische Stoffe und steigern Sie dann zu
höheren Temperaturen.
Wenn ein Artikel aus mehreren Fasern besteht, müssen Sie immer die Bügelstufe wählen,
die der empfindlichsten Faser entspricht. (z.B. ein Stoff besteht aus 60% Polyester und 40%
Baumwolle und sollte mit der Temperatur gebügelt werden, die für Polyester angegeben
ist, ohne Wasserdampf.) Wenn Sie nicht wissen, aus welchen Fasern der Artikel ist, suchen
Sie eine Stelle, die man nicht sieht, wenn das Kleidungsstück angezogen ist und probieren
Sie an dieser Stelle eine Temperatur aus. Fangen Sie immer mit der niedrigsten Stufe an
und steigern Sie dann um eine weitere, bis das gewünschte Resultat erzielt ist.
Pure Wollstoffe (100% Wolle) können mit Dampf gebügelt werden. Es wird empfohlen, den
Dampfstoß und ein Trockenbügeltuch zu benutzen.
Beim Bügeln von Wollfaserartikeln können glänzende Stellen entstehen, diese können
vermieden werden, indem man das Bügelstück nach links dreht und von der Innenseite
bügelt oder man ein leicht feuchtes Tuch dazwischen legt.
Samt und andere Gewebe, die leicht glänzende Flecken aufweisen, sollten nur in eine
Richtung gebügelt werden (mit einem Tuch). Nur leicht drücken.
Halten Sie das Bügeleisen immer in Bewegung.
Bügeln Sie die umgekehrte Seite von synthetischen Artikeln. Es ist ratsam, nicht
dampfzubügeln, da dies Flecken erzeugen kann.
WASSERTANK FÜLLEN (FÜR DAS DAMPFBÜGELN)
1. Stellen Sie das Gerät auf eine stabile Fläche.
2. Öffnen Sie den Verschluss des Wassertanks und gießen Sie klares Wasser in den
3. Schließen Sie den Verschluss des Wassertanks.
Wassertank, ohne die "MAX"-Markierung zu überschreiten! Sie können Leitungswasser
benutzen, jedoch empfehlen wir Ihnen destilliertes Wasser zu benutzen.
6 TKG SIS 1002 - 130424
Assembly page 6/64
Page 7

Copies of the I/B. Please reproduce them without any
Fax +32 2 359 95 50
changes except under special instruction from Team
International BELGIUM. The pages must be reproduced
and folded in order to obtain a booklet A5 (+/- 148.5 mm
width x 210 mm height). When folding, make sure you
keep the good numbering when you turn the pages of
the I/B. Don’t change the page numbering. Keep the
language integrity.
4. Benutzen Sie niemals Essig, Entkalkungsmittel oder andere Chemikalien.
Achtung: Vergewissern Sie sich, dass die Antikalk-Kassette richtig im Wassertank installiert ist.
Benutzen Sie das Gerät nie ohne Antikalk-Kassette.
WASSER EINFÜLLEN WÄHREND DES BÜGELNS
Da der Wassertank dieses Gerätes nicht unter Druck steht, ist er während des Betriebes
nachfüllbar. Schalten Sie dazu das Gerät aus, ziehen Sie den Stecker aus der Steckdose und
gehen Sie vor wie im Abschnitt "Wassertank füllen" beschrieben.
DAMPFBÜGELN
Füllen Sie den Wassertank mit Wasser und stecken Sie den Stecker in die Steckdose.
Wie auf dem Temperaturregler und in der Tabelle angegeben, ist Dampfbügeln nur mit
hohen Temperaturen möglich. Stellen Sie den Temperaturregler also auf oder auf
.
Betätigen Sie den Schalter des Dampfkessels. Der Schalter leuchtet auf und die Pumpe-
Kontrollleuchte wird blinken, bis die benötigte Temperatur erreicht ist. Dann leuchtet die
Pumpe-Kontrollleuchte ständig.
Betätigen Sie den Schalter des Bügeleisens und drehen Sie den Thermostat zur
gewünschten Stellung. Der Schalter des Bügeleisens und die Kontrollleuchte des
Bügeleisens leuchten auf. Sobald das Gerät die gewünschte Temperatur erreicht, erlischt
die Kontrollleuchte des Bügeleisens. Sie können jetzt die Dampffunktion benutzen.
Drehen Sie den Dampfregelknopf um die Dampfmenge zu regeln. Anmerkung: Sie können
die maximale Dampfmenge (“MAX”) nur verwenden, wenn die Bügeltemperatur höher ist
als die Stellung , sonst tropft Wasser aus der Sohle heraus.
Drücken Sie den Dampfdruckknopf, kommt Dampf aus der Sohle des Bügeleisens. Lassen
Sie ihn los, hört der Dampf auf. Für Dauerdampf, drücken Sie auf den Druckknopf und
schieben Sie dessen lilafarbenen Oberteil nach hinten bis der Druckknopf einrastet. Auch
wenn Sie dann den Knopf loslassen, dauert der Dampf an. Um den andauernden
Dampfausstoß aufhören zu lassen, schieben Sie den lilafarbenen Oberteil wieder nach
vorne und lassen Sie den Dampfdruckknopf los.
Während des Bügelns wird die Kontrollleuchte des Bügeleisens von Zeit zu Zeit angehen.
Wenn dies geschieht, erhitzt sich die Sohle erneut auf die gewünschte Temperatur. Sie
können weiter bügeln.
Wenn Sie viel Dampf in einer sehr kurzen Zeit benutzt haben, reduziert sich die
Dampfmenge, bis Ihr Gerät wieder genügend Dampf erzeugt, um den Dampfverlust
auszugleichen. Diese Erscheinung tritt auch auf, wenn nicht genug Wasser im Tank ist.
Wenn der Wassertank (fast) leer ist, wird die Wassernachfüllkontrollleuchte aufleuchten.
Wenn Sie die Dampffunktion weiter benutzen möchten, müssen Sie den Wassertank
nachfüllen. Die Wassernachfüllkontrollleuchte wird ausgehen, wenn Sie den Wassertank
gefüllt haben.
Anmerkung: Wenn Sie damit anfangen, die Dampffunktion zu verwenden, macht die
elektrische Pumpe ein vibrierendes Geräusch. Das Geräusch ergibt sich aus der Luft innerhalb
der Antikalk-Kassette und wird sich vermindern, wenn die Luft ausgepumpt worden ist. Falls das
Geräusch sich nach 60 Sekunden immer noch nicht verringert hat, kontrollieren Sie ob die
Antikalk-Kassette richtig installiert ist.
IN EINER VERTIKALEN POSITION BÜGELN
Stellen Sie den Thermostat auf die Maximumstufe um vertikal mit Dampf zu bügeln. Die
Dampfmenge kann Ihrem Wunsch gemäß angepasst werden.
7 TKG SIS 1002 - 130424
Assembly page 7/64
Page 8

Copies of the I/B. Please reproduce them without any
Fax +32 2 359 95 50
changes except under special instruction from Team
International BELGIUM. The pages must be reproduced
and folded in order to obtain a booklet A5 (+/- 148.5 mm
width x 210 mm height). When folding, make sure you
keep the good numbering when you turn the pages of
the I/B. Don’t change the page numbering. Keep the
language integrity.
Hängen Sie das zu bügelnde Kleidungsstück auf einen Bügel. Damit vermeidet man Falten.
Halten Sie das Bügeleisen vertikal einige Zentimeter von dem Kleidungsstück entfernt und
bewegen Sie es, bei gleichzeitiger Benutzung des Dampfstoßes.
TROCKENBÜGELN
Stecken Sie den Stecker in eine Steckdose und betätigen Sie den Schalter des
Bügeleisens.
Drehen Sie den Thermostat um die gewünschte Temperatur einzustellen.
Wenn die Kontrollleuchte des Bügeleisens zum zweiten Mal erlischt, können Sie zu bügeln
anfangen.
Um ohne Dampf zu bügeln, lassen Sie den Schalter des Dampfkessels in der Aus-Stellung
und betätigen Sie den Dampfdruckknopf und dessen Verriegelung nicht.
NACH DEM BÜGELN
Wir empfehlen Ihnen, das Bügeleisen nach dem Gebrauch wie folgt zu reinigen: füllen Sie
den Wassertank mit Wasser, stecken Sie den Stecker in die Steckdose, drücken Sie den
Schalter des Dampfkessels und den Schalter des Bügeleisens, stellen Sie den Thermostat
auf Stufe "LINEN" ein und den Dampfregler auf MAX und lassen Sie das Bügeleisen 10
Minuten aufheizen. Sobald die Temperatur erreicht ist, nehmen Sie das Bügeleisen von der
Basis ab, halten Sie es senkrecht und betätigen Sie den Dampfdruckknopf während 30
Sekunden, warten Sie dann 30 Sekunden und wiederholen Sie diesen Zyklus zweimal.
Schalten Sie das Gerät aus (Schalter des Dampfkessels und Schalter des Bügeleisens in
Aus-Stellung “0”), ziehen Sie den Stecker aus der Steckdose und lassen Sie das Gerät
vollständig abkühlen.
Gießen Sie das restliche Wasser aus dem Wassertank heraus.
Zum Aufräumen wird empfohlen, das Bügeleisen auf die Station zu stellen. Die dafür
vorgesehene Stelle ist rutschfest und wird die Sohle des Bügeleisens nicht beschädigen.
ANTIKALK-KASSETTE
Ihr Gerät ist mit einer Antikalk-Kassette ausgestattet, die sich im Wassertank befindet. Sie
Es ist notwendig, diese Antikalk-Kassette etwa jede 2 oder 3 Monate auszuwechseln. Diese
Um die Antikalk-Kassette zu entfernen, öffnen Sie den Wassertank und heben Sie die
Wenden Sie sich bitte an den nächsten Kundendienst um eine neue Antikalk-Kassette zu
Benutzen Sie das Gerät nie ohne Antikalk-Kassette.
REINIGUNG
Die Plastikteile des Gerätes können mit einem feuchten Tuch gereinigt werden.
Um die Sohle des Bügeleisens zu reinigen, gibt es auch handelsübliche Produkte. Befolgen
Tauchen Sie das Gerät nie in Wasser oder irgendwelche andere Flüssigkeit.
können also Leitungswasser benutzen, es wird filtriert werden.
Zeit kann jedoch auch kürzer oder länger sein, je nach der Häufigkeit des Gebrauches
und nach der Kalkhaltigkeit des Wassers. Je kalkhaltiger das Wasser, desto häufiger muss
die Kassette ausgewechselt werden. Sie können den Austausch der Kassette verzögern,
indem Sie destilliertes Wasser benutzen oder eine Mischung von 50% Leitungswasser und
50% destilliertes Wasser.
Kassette aus dem Wassertank heraus. Wenn Sie eine neue Kassette in den Wassertank
einsetzen, tauchen Sie sie einige Minuten in Wasser ein, bevor Sie das Gerät erneut
benutzen, damit eine größere Leistungsfähigkeit bekommen wird.
erhalten.
Sie deren Bedienungsanleitung. Benutzen Sie nie Schleifmittel.
8 TKG SIS 1002 - 130424
Assembly page 8/64
Page 9
Fax +32 2 359 95 50
Problem
Mögliche Ursache
Lösung
Weißmehl kommt aus
der Sohle des
Bügeleisens heraus
Dies ist normal wenn das
Bügeleisen neu ist
Dieses Mehl ist nicht schädlich
und verschwindet nach einigen
Malen
Wasser tropft aus der
Sohle während des
Dampfbügelns
Wenn Sie mit dem Dampfbügeln
anfangen, ist die Dampfdüse
noch kühl, so dass sich der Dampf
abkühlt
Dies ist normal; nach einigen
Sekunden normalisiert sich der
Dampfausstoß. Sie können am
Anfang das Bügeleisen auf ein
altes Kleidungsstück setzen, damit
das Wasser absorbiert wird
Der Dampftank erzeugt
keinen Dampf
Der Schalter des Dampfkessels ist
nicht angeschaltet worden oder
es gibt nicht genügend Wasser im
Wassertank
Betätigen Sie den Schalter des
Dampfkessels oder füllen Sie den
Wassertank und warten Sie, bis die
Kontrollleuchte des Bügeleisens
erlischt
Das Bügeleisen erzeugt
keinen Dampf, wenn
der Dampfdruckknopf
niedergedrückt wird
Wenn Sie bügeln bei hoher
Temperatur, ist Dampf mit einer
sehr hohen Temperatur nicht
sichtbar
Legen Sie einen Spiegel unter die
Sohle um zu kontrollieren, ob
Dampf herauskommt
Die Sohle ist schmutzig
Unreinheiten im Wasser haften an
der Sohle oder die Temperatur ist
zu hoch für die Kleidungsstücke
Reinigen Sie die Sohle mit einem
weichen feuchtigen Tuch oder
passen Sie die Temperatur an
PROBLEMBEHANDLUNG
Copies of the I/B. Please reproduce them without any
changes except under special instruction from Team
International BELGIUM. The pages must be reproduced
and folded in order to obtain a booklet A5 (+/- 148.5 mm
width x 210 mm height). When folding, make sure you
keep the good numbering when you turn the pages of
the I/B. Don’t change the page numbering. Keep the
language integrity.
UMWELTSCHUTZ – RICHTLINIE 2002/96/EG
Zum Schutz unserer Umwelt und unserer Gesundheit sind Elektro- und Elektronik-Altgeräte nach
bestimmten Regeln zu entsorgen. Dies fordert den Einsatz sowohl des Herstellers bzw.
Lieferanten als auch des Verbrauchers.
Aus diesem Grund darf dieses Gerät, wie das Symbol auf dem Typenschild bzw. auf der
Verpackung zeigt, nicht in den unsortierten Restmüll gegeben werden. Der Verbraucher hat
das Recht, dieses Gerät über kommunale Sammelstellen zu entsorgen; von dort aus wird die
spezifische Behandlung, Verwertung bzw. das Recycling gem. den Erfordernissen der Richtlinie
sichergestellt.
9 TKG SIS 1002 - 130424
Assembly page 9/64
Page 10
Copies of the I/B. Please reproduce them without any
Fax +32 2 359 95 50
changes except under special instruction from Team
International BELGIUM. The pages must be reproduced
and folded in order to obtain a booklet A5 (+/- 148.5 mm
width x 210 mm height). When folding, make sure you
keep the good numbering when you turn the pages of
the I/B. Don’t change the page numbering. Keep the
language integrity.
IMPORTANT SAFEGUARDS
Please read these instructions carefully before using the appliance, and always follow the
safety and operating instructions.
Important: This appliance can be used by children over 14 years old and people with reduced
physical, sensory or mental capacities or with a lack of experience or knowledge if they have
been given supervision or instructions concerning the safe use of the appliance and the risks
involved. Children shall not play with the appliance. Cleaning and user maintenance shall not
be made by children without supervision.
Check that your main voltage corresponds to that stated on the appliance.
Never leave the appliance unsupervised when in use.
Always place the base of the appliance on a stable ironing board, table or on the
ground.
Only connect the appliance to a mains earthed wall socket.
To avoid a circuit overload, do not operate another high wattage appliance on the same
circuit.
If an extension cord is absolutely necessary, a 10-ampere or higher cord should be used.
Never use cords rated for less than 10-ampere. Care should be taken to arrange the cord
so that it cannot be pulled or tripped over.
Never leave the appliance (especially the iron and its cord) unsupervised and within
reach of children or irresponsible persons when it is plugged into the wall or when it is
cooling down.
From time to time check the appliance for damages. Never use the appliance if cord or
appliance shows any signs of damage. In that case, repairs should be made by a
competent qualified electrician(*). Should the cord be damaged, it must be replaced by
a competent qualified electrician(*) in order to avoid all danger.
Only use the appliance for domestic purposes and in the way indicated in these
instructions.
Never immerse the iron or the base in water or any other liquid for any reason whatsoever.
Never use the appliance near hot surfaces.
Do not allow the power cord and the cord binding the base to the steam iron to touch
hot surfaces.
Never use the appliance outside and always place it in a dry environment.
Never use accessories that are not recommended by the producer. They could constitute
a danger to the user and risk to damage the appliance.
Never move the appliance by pulling the cord. Make sure the cord cannot get caught in
any way. Do not wind the cord around the appliance and do not bend it.
Always unplug the appliance when it is not in use.
Burns can occur from touching hot metal parts, hot water, or steam. Should the symbol
be indicated on a certain surface, you need to be careful when handling the
product. This symbol means: CAUTION, this surface may get very hot during use.
Always place the iron on the base of the appliance, on the therefore foreseen place. Do
not place the iron by its rear cover. Be sure that it does not come in contact with
flammable materials or with the main cord.
Never fill the steam tank with vinegar, descaling agents or other chemicals.
Before the first use, remove any sticker or protective foil from the soleplate. Clean the
soleplate with a soft cloth.
Some parts of the iron have been slightly greased and as a result the iron might slightly
smoke when switched on for the first time. After a short while, however, this will cease.
The iron shall be used and placed on a stable level surface.
10 TKG SIS 1002 - 130424
Assembly page 10/64
Page 11
Copies of the I/B. Please reproduce them without any
Fax +32 2 359 95 50
Kind of textile
Temperature dial
Steam ironing
Nylon
Synthetic (e.g. acetate,
acrylic, viscose,
polyamide, polyester, …)
Silk
MIN
NO
Wool
YES
Cotton
Linen
MAX
YES
changes except under special instruction from Team
International BELGIUM. The pages must be reproduced
and folded in order to obtain a booklet A5 (+/- 148.5 mm
width x 210 mm height). When folding, make sure you
keep the good numbering when you turn the pages of
the I/B. Don’t change the page numbering. Keep the
language integrity.
Do not use the iron if it has fallen, if it shows any visible signs of damage or if it leaks.
When you place the iron on its support (if available with the model), make sure that the
surface on which you put the support is stable.
Proceed the same way if the water tank stops working or is damaged. To avoid the risk of
electric shock, do not disassemble the iron or steam tank, take it to a qualified technician
for examination and repair. Incorrect re-assembly can cause a risk of electric shock when
the iron or steam tank is used.
Fully unwind the main cord and supply hose before starting to iron.
The power switches should always be put in the off-position (“0”) before plugging or
unplugging the power cord from outlet.
Unplug the appliance and allow the iron and the water tank to cool down before
cleaning or storing them and for pressurized steam iron station (depending on the model)
before opening, filling or emptying the water tank.
FOR PRESSURIZED STEAM IRONING STATION (DEPENDING ON THE MODEL), NEVER OPEN THE
CAP OF THE STEAM TANK WHILE THE APPLIANCE IS CONNECTED TO THE MAINS WALL SOCKET
AND ESPECIALLY WHEN STEAM IS BEING PRODUCED.
(*) Competent qualified service: after-sales department of the producer or importer or any
person who is qualified, approved and competent to perform this kind of repairs in order to
avoid all danger. In case of need you should return the appliance to this service.
BEFORE THE FIRST USE
We recommend cleaning the iron before the first use as follows: fill the water tank, plug in
Switch off the appliance (boiler power switch and iron power switch in the off-position
STEAM IRON: PRECAUTION FOR USE AND TEMPERATURES
Always check first if a label with ironing instructions is attached to the article that needs to
If ironing instructions are missing but you know the kind of fabric, then see the table for
the appliance, press the boiler power switch and the iron power switch, put the
temperature dial on position “LINEN” and the steam regulator on MAX and let the iron
heat for 10 minutes. When the temperature has been reached, take the iron from the
base, hold it vertically and keep the steam button pressed for 30 seconds, then wait 30
seconds and repeat this cycle twice.
“0”), unplug it and let it cool down sufficiently, then clean the soleplate with a damp
cloth.
be ironed. Follow these ironing instructions in all cases.
recommended ironing temperatures.
11 TKG SIS 1002 - 130424
Assembly page 11/64
Page 12

Copies of the I/B. Please reproduce them without any
Fax +32 2 359 95 50
changes except under special instruction from Team
International BELGIUM. The pages must be reproduced
and folded in order to obtain a booklet A5 (+/- 148.5 mm
width x 210 mm height). When folding, make sure you
keep the good numbering when you turn the pages of
the I/B. Don’t change the page numbering. Keep the
language integrity.
Plug in the appliance and press the iron power switch. The switch will light up, indicating
that the appliance is working and the iron is heating. Set the temperature dial of the iron
to the desired position, the indicator lamp of the iron will light up. As soon as the desired
temperature is reached, the pilot light of the iron will go out and you can start ironing.
During ironing this pilot light will come on from time to time. When this happens, the
soleplate is being heated up to the required temperature again. You can continue
ironing.
The table is valid for the fibre materials only. If some kind of finish has been applied (gloss,
wrinkle, relief etc.), the textile can best be ironed at a lower temperature.
First sort out the fabrics according to ironing temperature: wool with wool, cotton with
cotton, etc.
The iron heats up quicker than it cools down. Therefore, start ironing the articles requiring
the lowest temperature such as those made of synthetic fibres. Then progress to the higher
temperatures.
If the article is made of a mixture of different fibres, you must always select the lowest
ironing temperature of the composition of those fibres.
(E.g. an article consisting of “60% polyester and 40% cotton” should be ironed at the
temperature indicated for polyester and without steam.)
If you do not know what kind(s) of fabric(s) the article has been made of, find a spot
which will be invisible when wearing or using the article to try out the ironing temperature.
(Always start at a low temperature and increase to one which gives the required results.)
Pure woollen fabrics (100% wool) may be pressed with the iron set to a steam position. It is
recommended to apply shot-of-steam and use a dry pressing cloth.
When steam-ironing woollen fabrics, shining of the fabric may occur. This can be
prevented by turning the article inside out and ironing the inside or by interposing a light
damp cloth.
Velvet and other textures that rapidly acquire shiny spots should be ironed in one direction
only (with the nap), applying only light pressure.
Always keep the iron moving.
Iron the reverse side of synthetic materials and silk, it is not advisable to use steam as this
may cause stains.
FILLING WITH WATER (FOR STEAM-IRONING)
1. Put the base on a stable surface.
2. Open the cap of the water tank and fill the water tank with clear water up to its "MAX"
level. Do not fill beyond this maximum level! You can use tap water, but we advise you to
use distilled water.
3. Close the cap of the water tank.
4. Never use vinegar, detergents or other chemical products.
Caution: always make sure that the anti-scale cartridge situated inside the water tank is well
put into place. Never use the appliance without anti-scale cartridge.
FILLING THE WATER TANK DURING USE
As the water tank of this appliance is not under pressure, you can refill it during use. To do so,
switch off the appliance, unplug it and just proceed as described above in the "Filling with
water" section.
12 TKG SIS 1002 - 130424
Assembly page 12/64
Page 13
Copies of the I/B. Please reproduce them without any
Fax +32 2 359 95 50
changes except under special instruction from Team
International BELGIUM. The pages must be reproduced
and folded in order to obtain a booklet A5 (+/- 148.5 mm
width x 210 mm height). When folding, make sure you
keep the good numbering when you turn the pages of
the I/B. Don’t change the page numbering. Keep the
language integrity.
STEAM-IRONING
Fill the water tank with water and insert the mains plug into a wall socket.
As indicated on the temperature dial and in the table, steam ironing is only possible at
higher ironing temperatures, so set the dial to or .
Press the boiler power switch. The switch will light up and the pump pilot light will flash until
the required temperature is reached. Then it becomes steady.
Press the iron power switch and set the temperature dial of the iron to the desired position.
The iron power switch and the indicator lamp of the iron will light up. When the iron has
reached the desired temperature, its pilot light will go out. You can now use the steam
function.
Turn the steam control knob to regulate the amount of steam. Note: the maximal steam
rate (“MAX”) can only be used when the ironing temperature is higher than position ,
or else water will drip from the sole.
Press the steam button to release steam from the soleplate of the iron. Release the button
and the steam will stop. If you want a continuous jet of steam, press the steam button
down and slide its purple top part backwards so that the steam button locks. To stop the
continuous jet of steam, push the purple part of the button forward again and release the
steam button.
When ironing, the pilot light of the iron will go on and off from time to time. This means that
the temperature of the iron is regulated by its thermostat. You can continue ironing.
When you use a lot of steam in a very short time, the steam output is lightly reduced until
your appliance produces enough steam to reduce the difference. This phenomenon also
happens when there is not enough water in the water tank.
When the water tank is running empty, the water refill indicator will come on. If you want
to go on using the steam function, you will have to refill the water tank. The water refill
indicator will go out when the water tank has been filled.
Note: when you start using the steam function, it is normal that the electrical pump makes
some vibrating sounds. This is due to the air inside the anti-calc cartridge and will lessen when
the air has been pumped out. If the noise has not diminished after 60 seconds, check if the
cartridge has been assembled correctly.
STEAMING IN A VERTICAL POSITION
Position the temperature dial on its maximum level for vertical steam ironing. The steam rate
can be adjusted according to your needs.
You have to hang the cloth you want to smooth out avoiding the creases and place the iron in
a vertical position at a few centimetres from the piece of cloth. Then move the iron and press
the burst of steam button at the same time.
DRY IRONING
Plug in the appliance and press the iron power switch.
Use the temperature dial to set the temperature needed.
When the indicator lamp of the iron goes out for the second time, you can start ironing.
For ironing without steam, leave the boiler power switch in OFF position and do not press
the steam button.
WHEN FINISHED IRONING
We recommend cleaning the iron after use as follows: fill the water tank, plug in the
appliance, press the boiler power switch and the iron power switch, put the temperature
dial on position “LINEN” and the steam regulator on MAX and let the iron heat for 10
13 TKG SIS 1002 - 130424
Assembly page 13/64
Page 14

Copies of the I/B. Please reproduce them without any
Fax +32 2 359 95 50
Problem
Possible cause
Solution
White flour comes out
of the soleplate
This is normal when the iron is new
The flour is not harmful and will
disappear after a few times
Water drips from the
soleplate when steam
ironing
When you start steam ironing, the
steam fitter is still cool and the
steam will cool down
This is normal; after a few seconds,
the steam jet will be OK. You can
put the iron on an old cloth to
start so that the water is absorbed
No steam comes out of
the steam tank
The boiler power switch has not
been turned on or there is not
enough water in the water tank
Press the boiler power switch or fill
the water tank and wait until the
indicator light of the iron goes out
No steam comes out of
the iron when the
steam button is pressed
When ironing at a high
temperature, steam with a too
high temperature cannot be seen
Put a mirror under the soleplate to
check if steam comes out
The soleplate is dirty
Impurities in the water adhere to
the soleplate or the temperature
is too high for the clothes
Clean the soleplate with a soft,
damp cloth or adjust the
temperature
changes except under special instruction from Team
International BELGIUM. The pages must be reproduced
and folded in order to obtain a booklet A5 (+/- 148.5 mm
width x 210 mm height). When folding, make sure you
keep the good numbering when you turn the pages of
the I/B. Don’t change the page numbering. Keep the
language integrity.
minutes. When the temperature has been reached, take the iron from the base, hold it
vertically and keep the steam button pressed for 30 seconds, then wait 30 seconds and
repeat this cycle twice.
Switch off the appliance (boiler power switch and iron power switch in the off-position
“0”), unplug the appliance and let it cool down.
Empty the water tank.
We recommend placing the iron on its base when you store it. The therefore foreseen
place is non-slip and will not damage the soleplate of the iron.
ANTI-SCALE CARTRIDGE
Your appliance is equipped with an anti-calc cartridge located inside the water tank. As a
It is necessary to replace the cartridge approximately every 2 or 3 months. However this
To take it out, open the water tank and lift the cartridge out of the water tank. When you
To buy a new cartridge, please contact the nearest customer service.
Never use the appliance without anti-scale cartridge!
CLEANING
The plastic parts of the appliance can be cleaned with a damp cloth.
To clean the soleplate of the iron, you will find specific products in the shops. Please also
Never immerse the appliance in water or any other liquid.
TROUBLESHOOTING
result, you can use tap water as it will be filtered by the cartridge.
period may vary depending on the frequency of use and of the scale content of the
water in your area. If the water contains much scale, you will have to replace the
cartridge more frequently. You can delay the replacement of the cartridge by using
distilled water or a mixture of 50% tap water and 50% distilled water.
put a new anti-calc cartridge in the water tank, immerse it in water for some time before
using the appliance again in order to obtain a better performance.
read the instructions of use. Never use abrasive products to clean it.
14 TKG SIS 1002 - 130424
Assembly page 14/64
Page 15
Copies of the I/B. Please reproduce them without any
Fax +32 2 359 95 50
changes except under special instruction from Team
International BELGIUM. The pages must be reproduced
and folded in order to obtain a booklet A5 (+/- 148.5 mm
width x 210 mm height). When folding, make sure you
keep the good numbering when you turn the pages of
the I/B. Don’t change the page numbering. Keep the
language integrity.
PROTECTION OF THE ENVIRONMENT – DIRECTIVE 2002/96/EC
In order to preserve our environment and protect human health, the waste electrical and
electronic equipment should be disposed of in accordance with specific rules with the
implication of both suppliers and users. For this reason, as indicated by the symbol on the
rating label or on the packaging, your appliance should not be disposed of as unsorted
municipal waste. The user has the right to bring it to a municipal collection point performing
waste recovery by means of reuse, recycling or use for other applications in accordance with
the directive.
15 TKG SIS 1002 - 130424
Assembly page 15/64
Page 16

Copies of the I/B. Please reproduce them without any
Fax +32 2 359 95 50
changes except under special instruction from Team
International BELGIUM. The pages must be reproduced
and folded in order to obtain a booklet A5 (+/- 148.5 mm
width x 210 mm height). When folding, make sure you
keep the good numbering when you turn the pages of
the I/B. Don’t change the page numbering. Keep the
language integrity.
POUR VOTRE SECURITE
Lisez attentivement cette notice avant toute utilisation, et respectez bien à la fois les consignes
de sécurité et d'usage.
Important: Votre appareil peut être utilisé par des enfants âgés de plus de 14 ans et des
personnes ayant des capacités physiques, sensorielles ou mentales réduites ou des personnes
dénuées d’expérience ou de connaissances, s’ils ont pu bénéficier, au préalable, d’une
surveillance ou d’instructions concernant son utilisation en toute sécurité et sur les risques
encourus. Les enfants ne doivent surtout pas jouer avec l’appareil. Le nettoyage et l’entretien
ne doivent pas être effectués par des enfants sans surveillance.
Avant d'utiliser l'appareil, vérifiez que la tension du réseau correspond bien à celle de
l'appareil.
Ne laissez jamais votre appareil sans surveillance lorsque celui-ci est en fonctionnement ou
sous tension.
Toujours déposer la base de l’appareil sur une surface stable (planche à repasser, table
ou sur le sol).
Connectez uniquement l’appareil à une prise murale reliée à la terre.
Afin d’éviter une surcharge électrique, n’utilisez pas un autre appareil de puissance
élevée sur le même circuit électrique.
Si une rallonge électrique est nécessaire, elle doit être équipée d’une prise de terre et
capable de supporter un minimum de 10 ampères. Prenez les dispositions nécessaires afin
que l’on ne puisse rester accroché ou trébucher sur le cordon électrique.
Ne laissez jamais votre appareil (surtout le fer et son cordon) sans surveillance et à la
portée des enfants ou des personnes non responsables, lorsque celui-ci est sous tension ou
pendant sa phase de refroidissement.
Vérifiez régulièrement l’état de votre appareil et s’il est endommagé de quelque façon
que ce soit, ne l'utilisez pas mais faites-le vérifier et réparer par un service qualifié
compétent(*). Si le câble est endommagé, il doit être obligatoirement remplacé par un
service qualifié compétent(*) afin d’éviter tout danger.
Utilisez l'appareil uniquement pour des usages domestiques et de la manière indiquée
dans la notice.
Ne plongez jamais le fer à repasser ainsi que la base de l'appareil dans l'eau ou dans tout
autre liquide ni pour son nettoyage ni pour toute autre raison.
N'utilisez pas l'appareil près de sources de chaleur.
Veillez à ce que le cordon électrique et le cordon de liaison entre la base et le fer ne
soient en contact avec des surfaces chaudes.
Veillez à ne pas utiliser l'appareil à l'extérieur et entreposez-le dans un endroit sec.
Ne pas utiliser des accessoires non recommandés par le fabricant, cela peut présenter un
danger pour l’utilisateur et risque d’endommager l’appareil.
Ne déplacez jamais l’appareil en tirant sur le câble. Veillez à ce que le cordon
d’alimentation ne puisse être accidentellement accroché et ce, afin d’éviter toute chute
de l’appareil. Évitez d’enrouler le cordon autour de l’appareil et ne le tordez pas.
Débranchez toujours le cordon électrique lorsque vous n’utilisez pas l’appareil.
Faites attention car vous pourriez vous brûler en touchant l’eau chaude, la vapeur ou les
parties en métal. Lorsque le symbole est apposé sur une surface particulière, il
accentue la mise en garde et signifie: ATTENTION, cette surface peut devenir très chaude
pendant l'utilisation.
Déposez toujours le fer à repasser sur la base de l’appareil, à l’emplacement prévu à cet
effet. Ne le déposez pas sur son talon et prenez garde qu’il n’entre pas en contact avec
des matériaux inflammables ni avec le cordon d’alimentation.
16 TKG SIS 1002 - 130424
Assembly page 16/64
Page 17

Copies of the I/B. Please reproduce them without any
Fax +32 2 359 95 50
changes except under special instruction from Team
International BELGIUM. The pages must be reproduced
and folded in order to obtain a booklet A5 (+/- 148.5 mm
width x 210 mm height). When folding, make sure you
keep the good numbering when you turn the pages of
the I/B. Don’t change the page numbering. Keep the
language integrity.
Ne remplissez jamais le réservoir d’eau avec du vinaigre, détartrant ou autre produit
chimique.
Avant la première utilisation, veillez à enlever toute protection de l’appareil ainsi que de la
semelle. Nettoyez la semelle avec un chiffon doux.
Certaines parties du fer à repasser ont été légèrement graissées. De ce fait, le fer à
repasser pourrait dégager un peu de fumée lorsque vous le mettez en marche pour la
première fois, mais cela ne durera qu’un court moment.
Le fer à repasser doit être utilisé et reposé sur une surface stable.
N'utilisez pas le fer à repasser s'il a subi une chute, s’il a des signes visibles de dommages
ou s’il fuit.
Lorsque le fer est remis sur son repose-fer (selon modèles), assurez-vous que la surface sur
laquelle est posé le repose-fer est stable.
De même si le réservoir d’eau s’est arrêté de fonctionner ou s’il est endommagé. Pour
éviter toute décharge électrique, ne démontez pas le fer à repasser ou le réservoir d’eau:
présentez votre appareil chez un technicien qualifié afin qu’il examine votre appareil. Un
montage incorrect peut causer un risque de décharges électriques lorsque le fer à
repasser ou le réservoir d’eau est utilisé.
Déroulez entièrement le cordon électrique ainsi que le tuyau d’alimentation avant de
mettre l’appareil en marche.
Les interrupteurs doivent toujours être en position arrêt (“0”) avant de brancher et
débrancher l’appareil.
Débranchez l’appareil et laissez refroidir complètement le fer à repasser ainsi que le
réservoir d’eau avant de les nettoyer et de les ranger, et pour les centrales vapeur avec
chaudière (selon modèle), avant d’ouvrir, de remplir ou de vider le réservoir d’eau.
POUR LES CENTRALES VAPEUR AVEC CHAUDIERE (SELON MODELE), NE JAMAIS OUVRIR LE
RESERVOIR D’EAU TANT QUE L’APPAREIL EST SOUS TENSION ET PARTICULIEREMENT LORSQUE
LA PRODUCTION DE VAPEUR EST EN COURS.
(*) Service qualifié compétent: service après-vente du fabricant ou de l'importateur ou une
personne qualifiée, reconnue et habilitée à faire ce genre de réparation afin d'éviter tout
danger. Dans tous les cas, veuillez retourner l'appareil auprès de ce service.
AVANT DE REPASSER POUR LA PREMIERE FOIS
Avant le premier usage, nous vous conseillons de nettoyer le fer de la manière suivante:
remplissez le réservoir, branchez l’appareil, appuyez sur l’interrupteur de la chaudière et
sur l’interrupteur du fer, mettez le thermostat sur "LINEN", le régulateur de vapeur sur MAX
et laissez chauffer 10 minutes. Lorsque la température est atteinte, enlevez le fer de la
base, tenez-le verticalement et appuyez sur le bouton jet de vapeur pendant 30
secondes, puis attendez 30 secondes et répétez ce cycle deux fois.
Eteignez l’appareil (interrupteur de la chaudière et interrupteur du fer sur la position arrêt
“0”), débranchez-le et laissez-le refroidir suffisamment, puis nettoyez la semelle avec un
tissu humide.
FER A REPASSER: PRECAUTION D’USAGE ET TEMPERATURES
Choisissez la température en fonction de la nature du tissu. Vérifiez l’étiquette du
vêtement avant de positionner le thermostat.
Si les instructions de repassage ne sont pas mentionnées sur l’étiquette mais que vous
connaissez la composition de la matière à repasser, suivez les instructions mentionnées
dans le tableau ci-dessous.
17 TKG SIS 1002 - 130424
Assembly page 17/64
Page 18
Copies of the I/B. Please reproduce them without any
Fax +32 2 359 95 50
Type de textile
Réglage de température
Réglage de la vapeur
Nylon
Synthétique (ex. acétate,
acrylique, viscose, polyamide,
polyester, …)
Soie
MIN
NON
Laine
OUI
Coton
Lin
MAX
OUI
changes except under special instruction from Team
International BELGIUM. The pages must be reproduced
and folded in order to obtain a booklet A5 (+/- 148.5 mm
width x 210 mm height). When folding, make sure you
keep the good numbering when you turn the pages of
the I/B. Don’t change the page numbering. Keep the
language integrity.
Branchez l’appareil et appuyez sur l’interrupteur du fer. L’interrupteur s'allume, vous
indiquant que l’appareil fonctionne et que le fer chauffe. Placez le thermostat du fer sur
la position désirée, le témoin lumineux du fer s’allume. Dès que ce témoin lumineux
s'éteint, cela signifie que la semelle du fer a atteint la température désirée, vous pouvez
commencer à repasser.
Pendant le repassage, le témoin lumineux du fer s’allume et s’éteint régulièrement.
Lorsqu’il s’allume, cela veut dire que la semelle chauffe pour atteindre la température
demandée. Vous pouvez continuer à repasser.
Le tableau ci-dessus est valable pour les fibres uniquement. Si le tissu se plisse ou brille ou
encore bombe sous le fer à repasser, il est préférable de baisser la température à l’aide
du thermostat réglable pour éviter d’abîmer le textile. Triez les articles à repasser en
fonction des fibres textiles: laine avec laine, coton avec coton, etc. L’appareil chauffe
plus vite qu’il ne refroidit. De ce fait, commencez à repasser les articles qui demandent
une température basse, comme ceux qui sont composés de fibres synthétiques ou laine.
Ensuite, les articles qui demandent une température moyenne, pour finir avec ceux qui
demandent une température élevée.
Si l’article à repasser est fabriqué en différentes fibres textiles, choisissez la température en
fonction de la fibre qui demande la plus basse température (par exemple si vous devez
repasser un tissu comprenant 40% de polyester et 60% de coton, il faudrait choisir la
température correspondant au polyester et sans vapeur).
Si vous ne connaissez pas la composition textile du tissu à repasser, prenez une partie qui
n’est pas visible lorsque vous portez le vêtement et commencez à repasser à basse
température pour augmenter petit à petit.
Les articles 100% laine peuvent être repassés avec le fer à repasser sur position vapeur. Il
est recommandé d’appliquer un jet de vapeur et d’appliquer un morceau de tissu sec
entre le fer et la matière en laine. Lorsque vous repassez avec vapeur, veillez à ce que le
tissu ne brille pas. Ceci peut être évité en repassant l’article à l’envers ou en interposant
un linge légèrement humide.
Le velours et autres textiles qui brillent rapidement devraient être repassés dans une seule
direction (de préférence dans le sens des fibres). Veillez à ne pas appliquer une pression
trop forte et évitez de laisser le fer à repasser pendant un laps de temps (même court) sur
la même place.
Repassez l’envers des tissus synthétiques ou en soie. Il est recommandé de ne pas utiliser la
vapeur car cela provoque des taches inconvenantes (auréoles, ...).
18 TKG SIS 1002 - 130424
Assembly page 18/64
Page 19

Copies of the I/B. Please reproduce them without any
Fax +32 2 359 95 50
changes except under special instruction from Team
International BELGIUM. The pages must be reproduced
and folded in order to obtain a booklet A5 (+/- 148.5 mm
width x 210 mm height). When folding, make sure you
keep the good numbering when you turn the pages of
the I/B. Don’t change the page numbering. Keep the
language integrity.
REMPLISSAGE DU RESERVOIR (POUR REPASSAGE AVEC VAPEUR)
1. Posez la base de l’appareil sur une surface stable.
2. Ouvrez le couvercle du réservoir d’eau et versez de l’eau claire dans le réservoir sans
dépasser le niveau "MAX". Vous pouvez utiliser l’eau du robinet, mais il est préférable
d’utiliser de l’eau distillée.
3. Fermez le réservoir.
4. Ne jamais utiliser de vinaigre, agent détartrant ou autre produit chimique.
Attention: assurez-vous toujours que la cartouche anticalcaire située dans le réservoir est bien
en place. N'utilisez jamais l'appareil sans cartouche.
REMPLISSAGE DU RESERVOIR PENDANT LE REPASSAGE
Etant donné que le réservoir de cet appareil n'est pas sous pression, il vous est possible de
remplir le réservoir en cours de fonctionnement. Pour cela, éteignez l’appareil, débranchez-le
et procédez comme décrit ci-dessus dans le paragraphe "Remplissage du réservoir".
REPASSAGE A LA VAPEUR
Remplissez le réservoir d’eau et mettez l’appareil sous tension.
Suivez les indications reprises dans le tableau concernant le réglage du thermostat du fer,
le repassage à vapeur est uniquement possible pour le repassage à haute température. Il
faut donc placer le thermostat sur ●● ou ●●●.
Appuyez sur l’interrupteur de la chaudière. L’interrupteur s’allumera et le témoin lumineux
de contrôle de la pompe clignotera jusqu’à ce que la température nécessaire soit
atteinte. Alors le témoin lumineux restera allumé de manière constante.
Appuyez sur l’interrupteur du fer. Réglez la température du fer à l’aide du thermostat.
L’interrupteur du fer et le témoin lumineux de contrôle du fer s’allumeront. Dès que le fer a
atteint la température désirée, le témoin lumineux de contrôle du fer s'éteint. Vous
pouvez alors utiliser la fonction vapeur.
Tournez le régulateur de vapeur pour régler la quantité de vapeur. Remarque: la quantité
de vapeur maximale (“MAX”) ne peut être utilisée que quand la température de
repassage est plus élevée que la position ●●●, sinon de l’eau coulera de la semelle.
Poussez sur le bouton jet de vapeur pour faire sortir la vapeur de la semelle du fer.
Relâchez le bouton et la vapeur cessera de sortir de la semelle. Pour un jet de vapeur
continu, maintenez le bouton enfoncé et glissez la partie supérieure pourpre en arrière
pour verrouiller le bouton jet de vapeur. Pour arrêter le jet de vapeur continu, glissez la
partie pourpre du bouton en avant et relâchez le bouton.
Pendant le repassage, le témoin lumineux du fer s’allumera alternativement signifiant que
la température du fer à repasser se régule en fonction du réglage du thermostat. Vous
pouvez continuer à repasser.
Lorsque vous avez utilisé beaucoup de vapeur dans un laps de temps très court, le débit
de vapeur sera légèrement réduit le temps que votre appareil produise à nouveau
suffisamment de vapeur pour compenser cette différence. Ce phénomène se produira
aussi lorsqu’il n’y aura plus suffisamment d’eau dans le réservoir.
Lorsqu'il n'y a plus d'eau dans le réservoir, le témoin lumineux de remplissage du réservoir
s’allumera. Si vous désirez continuer d'utiliser la fonction vapeur, il sera alors nécessaire de
remplir le réservoir. Le témoin lumineux de remplissage du réservoir s’éteindra quand le
réservoir aura été rempli.
Remarque: lorsque vous commencez à utiliser la fonction vapeur, il est normal que l’amorçage
de la pompe produise des sons vibrants. Ils sont causés par l’air dans la cartouche anticalcaire
19 TKG SIS 1002 - 130424
Assembly page 19/64
Page 20

Copies of the I/B. Please reproduce them without any
Fax +32 2 359 95 50
changes except under special instruction from Team
International BELGIUM. The pages must be reproduced
and folded in order to obtain a booklet A5 (+/- 148.5 mm
width x 210 mm height). When folding, make sure you
keep the good numbering when you turn the pages of
the I/B. Don’t change the page numbering. Keep the
language integrity.
et ils seront réduits lorsque l’air est sorti de la cartouche. Si le bruit n’a pas diminué après 60
secondes, contrôlez si la cartouche anticalcaire a été installée correctement.
DEFROISSAGE VERTICAL
Mettez le thermostat sur son niveau maximal pour le repassage à la vapeur vertical. La
quantité de vapeur peut être adaptée selon vos besoins.
Il faut suspendre le vêtement à défroisser en évitant les mauvais plis et positionner le fer à
repasser verticalement à quelques centimètres du vêtement. Déplacez ensuite le fer à
repasser en envoyant simultanément de la vapeur.
REPASSAGE A SEC
Branchez l’appareil et appuyez sur l’interrupteur du fer.
Tournez le thermostat pour régler la température désirée.
Quand le témoin lumineux du fer s’éteint pour la deuxième fois, vous pouvez commencer
à repasser.
Pour repasser sans vapeur, laissez l’interrupteur de la chaudière dans la position arrêt (“0”)
et ne pressez pas le bouton jet de vapeur.
LORSQUE VOUS AVEZ TERMINE DE REPASSER
Nous vous conseillons de nettoyer le fer après usage de la manière suivante: remplissez le
réservoir, branchez l’appareil, appuyez sur l’interrupteur de la chaudière et sur
l’interrupteur du fer, mettez le thermostat sur "LINEN", le régulateur de vapeur sur MAX et
laissez chauffer 10 minutes. Lorsque la température est atteinte, enlevez le fer de la base,
tenez-le verticalement et appuyez sur le bouton jet de vapeur pendant 30 secondes, alors
attendez 30 secondes et répétez ce cycle deux fois.
Eteignez l’appareil (interrupteur de la chaudière et interrupteur du fer sur la position arrêt
“0”), débranchez-le et laissez-le refroidir suffisamment.
Videz le réservoir d’eau.
Il est conseillé de poser le fer sur sa base lors du rangement. L’emplacement prévu à cet
effet est antidérapant et ne dégradera pas la semelle du fer.
CARTOUCHE ANTICALCAIRE
Votre appareil est muni d'une cartouche anticalcaire située dans le réservoir. Vous pouvez
donc utiliser de l'eau du robinet, elle sera filtrée par la cartouche.
Il est nécessaire de remplacer la cartouche environ tous les 2 ou 3 mois. Cependant, cette
période peut varier en fonction de la fréquence d'utilisation et du taux de calcaire dans
l'eau de votre région. Si le taux de calcaire est élevé, il faudra changer la cartouche plus
fréquemment. Vous pouvez retarder le remplacement de la cartouche en utilisant de
l’eau distillée ou un mélange de 50% de l’eau du robinet et 50% de l’eau distillée.
Pour retirer la cartouche, ouvrez le réservoir et enlevez la cartouche du réservoir. Quand
vous mettez une nouvelle cartouche dans le réservoir, plongez-la dans l’eau pendant
quelques minutes avant d’utiliser l’appareil de nouveau afin d’obtenir une meilleure
performance.
Pour vous procurer une nouvelle cartouche, faites appel au service après-vente le plus
proche.
N'utilisez jamais l'appareil sans cartouche anticalcaire!
NETTOYAGE
Les parties plastiques de l’appareil peuvent être nettoyées avec un tissu humide.
20 TKG SIS 1002 - 130424
Assembly page 20/64
Page 21

Copies of the I/B. Please reproduce them without any
Fax +32 2 359 95 50
Problème
Cause possible
Solution
De la farine blanche
échappe de la semelle
C’est normal quand le fer est
nouveau
La farine n’est pas nocive et
disparaîtra après quelques usages
De l’eau dégoutte de
la semelle lors du
repassage à la vapeur
Quand vous commencez à
repasser à la vapeur, le monteur
de vapeur est encore froid et la
vapeur se refroidira alors
C’est normal; après quelques
secondes, le jet de vapeur
deviendra normal. Vous pouvez
commencer par mettre le fer sur
un vieux vêtement afin
d’absorber l’eau
Le réservoir ne produit
pas de vapeur
L’interrupteur de la chaudière n’a
pas été mis en marche ou il n’y a
pas suffisamment d’eau dans le
réservoir
Appuyez sur l’interrupteur de la
chaudière ou remplissez le
réservoir d’eau et attendez
jusqu’à ce que le témoin
lumineux du fer s’éteigne
Il n’y a pas de jet de
vapeur quand le
bouton jet de vapeur
est pressé
Lors du repassage à haute
température, la vapeur avec une
température très élevée n’est pas
visible
Mettez un miroir sous la semelle
pour vérifier si de la vapeur est
produite
La semelle est sale
Les impuretés dans l’eau
adhèrent à la semelle ou la
température est trop élevée pour
les vêtements
Nettoyez la semelle à l’aide d’un
chiffon doux humide ou ajustez la
température
changes except under special instruction from Team
International BELGIUM. The pages must be reproduced
and folded in order to obtain a booklet A5 (+/- 148.5 mm
width x 210 mm height). When folding, make sure you
keep the good numbering when you turn the pages of
the I/B. Don’t change the page numbering. Keep the
language integrity.
Pour nettoyer la semelle du fer, vous trouverez des produits spécifiques dans le commerce
et suivez les consignes indiquées. N’utilisez jamais d’éponge abrasive ou équivalent.
Ne plongez jamais l'appareil dans l'eau ou tout autre liquide.
PROBLÈMES ET SOLUTIONS
PROTECTION DE L’ENVIRONNEMENT – DIRECTIVE 2002/96/CE
Afin de préserver notre environnement et notre santé, l’élimination en fin de vie des appareils
électriques et électroniques doit se faire selon des règles bien précises et nécessite
l’implication de chacun, qu’il soit fournisseur ou utilisateur. C’est pour cette raison que votre
appareil, tel que le signale le symbole apposé sur sa plaque signalétique ou sur
l'emballage, ne doit en aucun cas être jeté dans une poubelle publique ou privée destinée
aux ordures ménagères. L'utilisateur a le droit de déposer l'appareil dans des lieux publics de
collecte procédant à un tri sélectif des déchets pour être soit recyclé, soit réutilisé pour
d’autres applications conformément à la directive.
21 TKG SIS 1002 - 130424
Assembly page 21/64
Page 22

Copies of the I/B. Please reproduce them without any
Fax +32 2 359 95 50
changes except under special instruction from Team
International BELGIUM. The pages must be reproduced
and folded in order to obtain a booklet A5 (+/- 148.5 mm
width x 210 mm height). When folding, make sure you
keep the good numbering when you turn the pages of
the I/B. Don’t change the page numbering. Keep the
language integrity.
BELANGRIJKE VEILIGHEIDSVOORSCHRIFTEN
Lees de gebruiksaanwijzing aandachtig alvorens u uw toestel gebruikt, en respecteer altijd de
veiligheids- en de gebruiksvoorschriften.
Belangrijk: Het toestel mag worden gebruikt door kinderen van meer dan 14 jaar oud en door
personen met beperkte fysieke, sensoriële of mentale capaciteiten of met een gebrek aan
ervaring of kennis als ze onder toezicht staan of vooraf instructies hebben gekregen
betreffende een veilig gebruik van het toestel en de risico’s die ermee gepaard gaan.
Kinderen mogen in geen geval met het toestel spelen. Schoonmaak en onderhoud mogen
niet worden uitgevoerd door kinderen zonder toezicht.
Controleer of de netspanning overeenkomt met deze van het toestel vooraleer u het
gebruikt.
Laat uw toestel tijdens het gebruik nooit zonder toezicht.
Plaats de sokkel van het toestel steeds op een stabiele ondergrond (strijkplank, tafel of op
de grond).
Steek de stekker van het toestel enkel in een stopcontact met aardleiding.
Gebruik geen ander toestel met hoog vermogen op hetzelfde stroomcircuit teneinde elke
elektrische overbelasting te vermijden.
Indien een elektrische verlengdraad nodig blijkt, gebruik dan een snoer met een minimum
sterkte van 10 ampère. Gebruik geen snoer van minder dan 10 ampère. Neem de nodige
maatregelen opdat men niet over het snoer kan struikelen of erachter kan blijven haken.
Laat uw toestel (en dan vooral het strijkijzer en diens snoer) nooit zonder toezicht en
binnen het bereik van kinderen of van ontoerekeningsvatbare personen wanneer het
onder spanning staat of wanneer het aan het afkoelen is.
Controleer regelmatig of het toestel of het snoer niet beschadigd is. Gebruik het toestel
niet indien het snoer of het toestel zelf enige beschadiging zouden vertonen maar laat het
in dit geval nakijken en herstellen door een bekwame gekwalificeerde dienst(*) om ieder
gevaar te vermijden.
Gebruik het toestel enkel voor huishoudelijke doeleinden en op de wijze aangeduid in de
gebruiksaanwijzing.
Dompel het strijkijzer of de basis nooit onder in water of in een andere vloeistof voor
reiniging of enig ander doel.
Gebruik het toestel niet in de nabijheid van warmtebronnen.
Controleer of de snoeren niet in contact komen met warme oppervlakken.
Gebruik het toestel niet buiten en berg het steeds op in een droge ruimte.
Gebruik geen accessoires die niet door de fabrikant zijn aanbevolen. Dit kan gevaarlijk zijn
voor de gebruiker en het apparaat beschadigen.
Trek nooit aan het snoer om het toestel te verplaatsen. Controleer of het snoer nergens
kan achterhaken, hetgeen het toestel kan doen vallen. Draai het snoer niet rond het
toestel en plooi het niet.
Trek steeds de stekker uit het stopcontact wanneer u het toestel niet gebruikt.
Let erop dat u zich niet verbrandt aan het warme water, de stoom of de metalen
onderdelen. Wanneer het symbool op een bepaald oppervlak gekleefd is, moet u
voorzichtig zijn. Dit symbool betekent het volgende: OPGELET, dit oppervlak kan tijdens het
gebruik heel warm worden.
Plaats het strijkijzer steeds op de basis van het toestel en op de hiervoor voorziene plaats.
Plaats het strijkijzer nooit op zijn hiel en wees voorzichtig dat het niet in contact komt met
brandbare materialen of met het elektrische snoer.
Vul het waterreservoir nooit met azijn, een ontkalkingsmiddel of een ander chemisch
product.
22 TKG SIS 1002 - 130424
Assembly page 22/64
Page 23

Copies of the I/B. Please reproduce them without any
Fax +32 2 359 95 50
changes except under special instruction from Team
International BELGIUM. The pages must be reproduced
and folded in order to obtain a booklet A5 (+/- 148.5 mm
width x 210 mm height). When folding, make sure you
keep the good numbering when you turn the pages of
the I/B. Don’t change the page numbering. Keep the
language integrity.
Let er alvorens het toestel te gebruiken op dat alle bescherming van het apparaat en van
de strijkzool verwijderd is. Reinig de strijkzool met een zachte doek.
Sommige onderdelen van het strijkijzer werden licht ingevet. Hierdoor kan het strijkijzer een
beetje rook afgeven wanneer u het voor de eerste maal gebruikt, maar dat zal niet lang
duren.
Het strijkijzer moet gebruikt en geplaatst worden op een stabiel oppervlak.
Gebruik het strijkijzer niet wanneer het gevallen is of wanneer het zichtbare schade
vertoont of lekt.
Wanneer u het strijkijzer op zijn basis (indien aanwezig bij dit model) plaatst, zorg er dan
voor dat de basis op een stabiel oppervlak staat.
Hetzelfde geldt voor het reservoir dat beschadigd is of niet meer werkt. Haal nooit het
strijkijzer of het reservoir uiteen, en dit om elektrische schokken te voorkomen. Ga met uw
apparaat bij een bevoegd technicus langs zodat hij het kan onderzoeken. Een onjuiste
montage heeft het risico van elektrische schokken te veroorzaken wanneer het strijkijzer of
het reservoir wordt gebruikt.
Ontrol de elektrische snoeren volledig alvorens het toestel onder spanning te zetten.
De schakelaars moeten steeds in de UIT-stand (0) staan, alvorens u de stekker in het
stopcontact steekt of uittrekt.
Trek de stekker uit het stopcontact en laat het strijkijzer en het waterreservoir afkoelen
alvorens deze te reinigen en op te bergen. Trek eveneens de stekker uit bij
stoomgeneratoren met stoomketels (afhankelijk van het model) alvorens het
waterreservoir te openen, vullen of leeg te gieten.
BIJ STOOMGENERATOREN MET STOOMKETEL (AFHANKELIJK VAN HET MODEL): NOOIT HET
RESERVOIR OPENEN WANNEER HET TOESTEL ONDER SPANNING STAAT EN IN HET BIJZONDER
WANNEER DE STOOMOPBOUW AAN DE GANG IS.
(*) Bekwame gekwalificeerde dienst: klantendienst van de fabrikant of de invoerder, die
erkend en bevoegd is om dergelijke herstellingen te doen zodat elk gevaar vermeden wordt.
Gelieve het toestel bij problemen naar deze dienst terug te brengen.
VOOR HET EERSTE GEBRUIK
Wij raden u aan om het strijkijzer voor het eerste gebruik als volgt te reinigen: vul het
waterreservoir, steek de stekker in het stopcontact, druk de schakelaar van de stoomketel
en de schakelaar van het strijkijzer in, zet de thermostaatknop op stand “LINEN” en de
stoomregelaar op MAX en laat het strijkijzer 10 minuten opwarmen. Wanneer de
temperatuur is bereikt, neem dan het strijkijzer van de basis, houd het verticaal en druk de
stoomknop gedurende 30 seconden in, wacht dan 30 seconden en herhaal deze cyclus
twee keer.
Schakel het toestel uit (schakelaar van de stoomketel en schakelaar van het strijkijzer op
uit-stand “0”), trek de stekker uit het stopcontact en laat het toestel voldoende afkoelen.
Reinig dan de zool van het strijkijzer met een licht vochtige doek.
STRIJKIJZER: VOORZORGSMAATREGEL EN TEMPERATUURSTANDEN
Kies de temperatuur in functie van het weefsel. Controleer het etiket van het kledingstuk
alvorens de thermostaatknop in te stellen.
Indien de strijkinstructies niet vermeld zijn op het etiket, maar u de samenstelling van de te
strijken stof kent, volg dan de instructies vermeld in onderstaande tabel:
23 TKG SIS 1002 - 130424
Assembly page 23/64
Page 24

Copies of the I/B. Please reproduce them without any
Fax +32 2 359 95 50
Weefseltype
Regeling van de temperatuur
Stoomregeling
Nylon
Synthetisch (Acetaat, Acrylic,
Viscose, Polyamide,
Polyester)
Zijde
MIN
NEEN
Wol
JA
Katoen
Linnen
MAX
JA
changes except under special instruction from Team
International BELGIUM. The pages must be reproduced
and folded in order to obtain a booklet A5 (+/- 148.5 mm
width x 210 mm height). When folding, make sure you
keep the good numbering when you turn the pages of
the I/B. Don’t change the page numbering. Keep the
language integrity.
Steek de stekker in het stopcontact en druk de schakelaar van het strijkijzer in. De
schakelaar licht op om aan te duiden dat het toestel in werking is en dat het strijkijzer
opwarmt. Zet de thermostaatknop op de gewenste temperatuur. Het controlelampje van
het strijkijzer licht op. Zodra de gewenste temperatuur bereikt is, zal het controlelampje
van het strijkijzer uitgaan. U kunt nu beginnen te strijken.
Tijdens het strijken gaat dit controlelampje regelmatig aan en uit. Wanneer het aangaat,
betekent dit dat de strijkzool opwarmt om de gewenste temperatuur te bereiken. U kunt
verder strijken.
De tabel hierboven is enkel geldig voor vezelstoffen. Indien het weefsel plooit, glanst of
kromtrekt onder het strijkijzer, dient u de temperatuur te verminderen met de regelbare
thermostaat opdat het weefsel niet beschadigd zou worden.
Verdeel de te strijken stoffen volgens de textielweefsels: wol bij wol, katoen bij katoen enz.
Het apparaat warmt sneller op dan het afkoelt. Daarom is het aanbevolen te beginnen
met de stoffen die een lage temperatuur vergen, zoals wollen of synthetische weefsels.
Strijk daarna de stoffen die een gemiddelde temperatuur vragen, en ten slotte de stoffen
die een hoge temperatuur nodig hebben.
Indien de te strijken stof samengesteld is uit verschillende soorten weefsels, kies dan de
temperatuur voor het weefsel dat de laagste temperatuur vergt (bv. indien u een stof
dient te strijken die 40% polyester en 60% katoen bevat, dient u de temperatuur te kiezen
voor polyester en zonder stoom).
Indien u de samenstelling van het weefsel niet kent, neem dan een gedeelte dat niet
zichtbaar is wanneer u het kledingstuk draagt, en begin te strijken bij lage temperatuur om
deze langzaam te verhogen tot u de gepaste temperatuur gevonden heeft.
Stoffen met 100% wol mogen met een strijkijzer op stoomstand gestreken worden. Het is
aanbevolen een stoomstoot te gebruiken en een droog stuk stof tussen het strijkijzer en de
wollen stof te leggen.
Wanneer u met stoom strijkt, let er dan op dat het weefsel niet glanst. Dit kan vermeden
worden door het weefsel langs de omgekeerde zijde te strijken of door het plaatsen van
een licht vochtige doek tussen het strijkijzer en de stof. Fluweel en andere stoffen die vlug
glanzen, zouden moeten gestreken worden in één enkele richting (bij voorkeur in de
richting van de vezels) en enkel met een lichte druk van het strijkijzer.
Let erop geen te sterke druk uit te oefenen en vermijd het strijkijzer op éénzelfde plaats te
houden gedurende een zekere tijd (zelfs een korte tijd).
Strijk de binnenzijde van synthetische stoffen en zijde. Hier is het aangeraden om geen
stoom te gebruiken, want deze zou vlekken kunnen veroorzaken (kringen).
24 TKG SIS 1002 - 130424
Assembly page 24/64
Page 25

Copies of the I/B. Please reproduce them without any
Fax +32 2 359 95 50
changes except under special instruction from Team
International BELGIUM. The pages must be reproduced
and folded in order to obtain a booklet A5 (+/- 148.5 mm
width x 210 mm height). When folding, make sure you
keep the good numbering when you turn the pages of
the I/B. Don’t change the page numbering. Keep the
language integrity.
WATERRESERVOIR VULLEN (OM MET STOOM TE STRIJKEN)
1. Plaats het toestel op een stabiel oppervlak.
2. Open het klepje van het waterreservoir en giet zuiver water in het reservoir zonder de
"MAX"-aanduiding te overschrijden. U mag kraantjeswater gebruiken, maar wij raden u
aan om gedestilleerd water te gebruiken.
3. Sluit het klepje van het waterreservoir.
4. Nooit azijn, een ontkalkingsmiddel of een ander chemisch product gebruiken.
Opgelet: zorg ervoor dat de antikalkcassette in het waterreservoir altijd goed op haar plaats is.
Gebruik het toestel nooit zonder antikalkcassette.
HET RESERVOIR VULLEN TIJDENS HET STRIJKEN
Aangezien het waterreservoir van dit toestel niet onder druk staat, is het ook bijvulbaar tijdens
het gebruik. Schakel daarvoor het toestel uit, trek de stekker uit het stopcontact en ga te werk
zoals hierboven beschreven onder paragraaf "Waterreservoir vullen".
STOOMSTRIJKEN
Vul het waterreservoir met water en steek de stekker in het stopcontact.
Volg de aanduidingen in de tabel en op de regelbare thermostaat. Stoomstrijken is enkel
mogelijk op hoge temperatuur. De thermostaat moet dus op ●● of op ●●● ingesteld
worden.
Druk de schakelaar van de stoomketel in. De schakelaar licht op en het controlelampje
van de pomp zal flikkeren tot de benodigde temperatuur is bereikt. Daarna brandt het
aanhoudend.
Druk de schakelaar van het strijkijzer in en zet de thermostaat van het strijkijzer op de
gewenste temperatuurstand. De schakelaar van het strijkijzer en het controlelampje van
het strijkijzer lichten op. Zodra de gewenste temperatuur is bereikt, gaat het lampje van
het strijkijzer uit. U kunt nu de stoomfunctie gebruiken.
Draai de stoomregelaar om de hoeveelheid stoom te regelen. Opmerking: de maximale
hoeveelheid stoom (stand “MAX”) kan enkel worden gebruikt wanneer de
strijktemperatuur hoger is dan stand ●●● , want anders komt er water uit de strijkzool.
Druk op de stoomknop om een stoomstoot uit de zool van het strijkijzer te laten komen.
Laat de knop los en de stoom zal stoppen. Indien u continue stoom wenst, houd de
stoomknop dan ingedrukt en schuif het paarse, bovenste deel van de knop naar
achteren om de stoomknop te vergrendelen. Om de continue stoomontwikkeling te doen
stoppen, schuift u het paarse deel van de knop weer naar voren en laat u de stoomknop
los.
Gedurende het strijken zal het controlelampje van het strijkijzer nu en dan branden. Dit
duidt aan dat het strijkijzer opwarmt om de gewenste temperatuur te bereiken. U kunt
rustig verder strijken.
Wanneer u veel stoom in een heel korte tijd gebruikt, zal het stoomdebiet een beetje
verminderen, totdat uw toestel opnieuw genoeg stoom genereert om het verschil te
compenseren. Dit verschijnsel gebeurt ook wanneer er niet genoeg water meer in het
waterreservoir is.
Wanneer er niet meer genoeg water in het reservoir is, zal het bijvulcontrolelampje
oplichten. Indien u de stoomfunctie verder wilt gebruiken, zult u het waterreservoir moeten
bijvullen. Het bijvulcontrolelampje gaat uit wanneer het waterreservoir gevuld is.
Opmerking: wanneer u de stoomfunctie begint te gebruiken, is het normaal dat de elektrische
pomp trillende geluiden produceert. Dit komt door de lucht in de antikalkcassette en zal
25 TKG SIS 1002 - 130424
Assembly page 25/64
Page 26

Copies of the I/B. Please reproduce them without any
Fax +32 2 359 95 50
changes except under special instruction from Team
International BELGIUM. The pages must be reproduced
and folded in order to obtain a booklet A5 (+/- 148.5 mm
width x 210 mm height). When folding, make sure you
keep the good numbering when you turn the pages of
the I/B. Don’t change the page numbering. Keep the
language integrity.
verminderen wanneer de lucht is uitgepompt. Als het geluid na 60 seconden nog niet
verminderd is, controleer dan of de antikalkcassette correct is bevestigd.
STOOMSTRIJKEN IN VERTICALE STAND
Zet de thermostaatknop op zijn maximale stand om verticaal te strijken met stoom. De
hoeveelheid stoom kan aangepast worden volgens uw behoeften.
Het stuk stof dat moet gestreken worden, dient te worden opgehangen om kreuken te
vermijden.
Houd het strijkijzer verticaal op enkele centimeters van het kledingstuk (of gordijn...).
Beweeg dan het strijkijzer verticaal en druk hierbij op de stoomknop.
DROOGSTRIJKEN
Steek de stekker in het stopcontact en druk de schakelaar van het strijkijzer in.
Draai de thermostaatknop om de benodigde temperatuur in te stellen.
Wanneer het controlelampje van het strijkijzer voor de tweede keer uitgaat, kunt u
beginnen te strijken.
Om droog te strijken, de schakelaar van de stoomketel in de uit-stand laten en niet op de
stoomknop drukken.
ALS U GEDAAN HEEFT MET STRIJKEN
Wij raden u aan om het strijkijzer na gebruik als volgt te reinigen: vul het waterreservoir,
steek de stekker in het stopcontact, druk de schakelaar van de stoomketel en de
schakelaar van het strijkijzer in, zet de thermostaatknop op stand “LINEN” en de
stoomregelaar op MAX en laat het strijkijzer 10 minuten opwarmen. Wanneer de
temperatuur is bereikt, neem dan het strijkijzer van de basis, houd het verticaal en druk de
stoomknop gedurende 30 seconden in, wacht dan 30 seconden en herhaal deze cyclus
twee keer.
Schakel het toestel uit (schakelaar van de stoomketel en schakelaar van het strijkijzer op
uit-stand “0”), trek de stekker uit het stopcontact en laat het toestel voldoende afkoelen.
Het waterreservoir dient te worden geledigd.
Het is raadzaam het strijkijzer op de basis te zetten om het op te bergen. De hiervoor
voorziene plaats is voorzien van antislip en zal de zool van het strijkijzer niet beschadigen.
ANTIKALKCASSETTE
Uw toestel is met een antikalkcassette uitgerust die zich in het waterreservoir bevindt. U
kunt dus kraantjeswater gebruiken, het zal door de cassette worden gefilterd.
Het is noodzakelijk de antikalkcassette ongeveer om de 2 tot 3 maanden te vervangen.
Naargelang de gebruiksfrequentie en het kalkgehalte in het water in uw streek kan deze
periode korter of langer zijn. Indien het kalkgehalte hoog ligt, zult u de cassette vaker
moeten vervangen. U kunt de vervanging van de cassette uitstellen door gedestilleerd
water te gebruiken of een mengeling van 50% kraantjeswater en 50% gedestilleerd water.
Om de antikalkcassette te verwijderen opent u het waterreservoir en tilt u de cassette uit
het waterreservoir. Wanneer u een nieuwe antikalkcassette in het reservoir plaatst,
dompel ze dan een tijdje in water onder alvorens het toestel opnieuw te gebruiken. Zo
verkrijgt het toestel een beter prestatievermogen.
Om nieuwe cassettes te verkrijgen, gelieve contact op te nemen met de dichtstbijzijnde
klantendienst.
Gebruik het toestel nooit zonder antikalkcassette.
26 TKG SIS 1002 - 130424
Assembly page 26/64
Page 27

Copies of the I/B. Please reproduce them without any
Fax +32 2 359 95 50
Probleem
Mogelijke oorzaak
Oplossing
Witte bloem komt uit de
zool van het strijkijzer
Dit is normaal bij een nieuw
strijkijzer
De bloem is niet schadelijk en
verdwijnt vanzelf na een paar
keer
Water druipt uit de zool
van het strijkijzer bij het
stoomstrijken
Wanneer u begint te strijken met
stoom, is de stoomslang nog koel
en koelt de stoom af
Dit is normaal; na enkele
seconden normaliseert de
stoomuitstoot zich. U kunt het
strijkijzer op een oud kleed zetten
om te beginnen zodat het water
wordt geabsorbeerd
Er komt geen stoom uit
het stoomreservoir
De schakelaar van de stoomketel
is niet aangezet of er is niet
genoeg water in het
waterreservoir
Druk de schakelaar van de
stoomketel in of vul het
waterreservoir en wacht tot het
lampje van het strijkijzer uitgaat
Er komt geen stoom uit
het strijkijzer wanneer
de stoomknop wordt
ingedrukt
Bij het strijken op hoge
temperatuur is stoom met een erg
hoge temperatuur niet zichtbaar
Leg een spiegel onder de strijkzool
om te kijken of er stoom uit komt
De strijkzool is vuil
Onzuiverheden in het water
blijven plakken aan de strijkzool of
de temperatuur is te hoog voor
de kleren
Maak de strijkzool schoon met
een zachte, vochtige doek of pas
de temperatuur aan
changes except under special instruction from Team
International BELGIUM. The pages must be reproduced
and folded in order to obtain a booklet A5 (+/- 148.5 mm
width x 210 mm height). When folding, make sure you
keep the good numbering when you turn the pages of
the I/B. Don’t change the page numbering. Keep the
language integrity.
REINIGING
De plastic delen van het toestel kunnen met een licht vochtige doek worden gereinigd.
Voor de reiniging van de zool van het strijkijzer zijn speciale producten in de vakhandel
verkrijgbaar. Lees aandachtig hun gebruiksaanwijzing. Gebruik nooit schuurmiddelen.
Dompel het toestel nooit onder in water of enige andere vloeistof.
PROBLEEMBEHANDELING
MILIEUBESCHERMING – RICHTLIJN 2002/96/EG
Om ons milieu en onze gezondheid te beschermen, moet afgedankte elektrische en
elektronische apparatuur in overeenstemming met welbepaalde regels weggegooid worden.
Dit vergt zowel de inzet van de leveranciers als van de gebruikers. Daarom mag uw apparaat,
zoals op het typeplaatje of op de verpakking aangegeven door het symbool , niet met
het gewone huisvuil weggegooid worden. De gebruiker heeft het recht het toestel naar een
gemeentelijk centrum van gescheiden inzameling te brengen waar het overeenkomstig de
richtlijn hergebruikt, gerecycleerd of voor andere doeleinden gebruikt zal worden.
27 TKG SIS 1002 - 130424
Assembly page 27/64
Page 28

Copies of the I/B. Please reproduce them without any
Fax +32 2 359 95 50
changes except under special instruction from Team
International BELGIUM. The pages must be reproduced
and folded in order to obtain a booklet A5 (+/- 148.5 mm
width x 210 mm height). When folding, make sure you
keep the good numbering when you turn the pages of
the I/B. Don’t change the page numbering. Keep the
language integrity.
CONSEJOS DE SEGURIDAD
Lea detenidamente el modo de empleo antes de utilizar el aparato, y siempre siga las
medidas de seguridad y el modo de funcionamiento.
Importante: Este aparato puede ser utilizado por niños mayores de 14 años y personas con
capacidades físicas reducidas, sensoriales o mentales o con falta de experiencia o
conocimiento, si se les ha dado la supervisión o instrucciones relativas al uso seguro del
aparato y los riesgos involucrados. Los niños no deben jugar con el aparato. La limpieza y
mantenimiento del aparato no debe ser hecho por niños sin supervisión.
Antes de utilizar el aparato, compruebe que el voltaje de la red eléctrica coincide con el
del aparato.
No deje nunca su aparato sin vigilancia cuando esté en marcha.
Deposite siempre el depósito de agua sobre una superficie estable (tabla de planchar o
mesa).
Conecte únicamente el aparato a una toma de tierra.
Con el fin de evitar una sobrecarga eléctrica, no utilice otro aparato de potencia
elevada en el mismo circuito eléctrico.
Si fuese precisa la utilización de un alargador, se debería usar un mínimo de 10 amperios. Si
utiliza un alargador de menos de 10 amperios, podría provocarse un sobrecalentamiento.
Tome las precauciones necesarias para que no se enganche o tropiece con el cordón
eléctrico.
No deje de vigilar su aparato (especialmente la plancha y su cable) y no lo deje nunca a
cargo de niños o de personas no responsables cuando está enchufada a la toma de
corriente o se está enfriando.
Compruebe de vez en cuando que el aparato no esté dañado y no utilice su aparato si el
cable o el aparato están dañados por el motivo que sea. Cualquier reparación debe ser
realizada por un servicio cualificado competente(*). Si el cable está dañado, debe ser
reemplazado por un servicio cualificado competente(*) para evitar cualquier tipo de daño.
Utilice el aparato únicamente para uso doméstico y según indican las instrucciones.
No introduzca nunca la plancha ni el depósito de agua, en agua o en cualquier otro
líquido, ni para su limpieza ni por cualquier otra razón.
No utilice nunca el aparato cerca de fuentes de calor.
Vigile que el cordón eléctrico y el tubo de alimentación no estén en contacto con
superficies calientes.
No utilice el aparato en el exterior y guárdelo en lugar seco.
No utilice accesorios no recomendados por el fabricante, esto supondría un peligro para
el usuario y riesgo de dañar el aparato.
No desplace jamás el aparato tirando del cable. Compruebe que el cordón de
alimentación no haya quedado enganchado accidentalmente, para así evitar una
caída del aparato. Evite enrollar el cordón alrededor del aparato y no lo retuerza.
Desconecte siempre el cordón eléctrico cuando no utilice el aparato.
Tenga cuidado, pues podría quemarse al tocar el agua caliente, el vapor o las piezas
metálicas. Cuando el símbolo se encuentra en una superficie especifica, es para
llamarle la atención y significa: “¡CUIDADO! Esta superficie puede volverse muy caliente
durante el uso”.
Coloque siempre la plancha en la posición adecuada. No la deposite sobre su base
anterior, sobre el depósito de agua o sobre el cordón eléctrico.
No llene nunca el depósito de agua con vinagre, desincrustante u otros productos
químicos.
Antes de la primera utilización, retire toda protección del aparato así como de la suela
de la plancha. Limpie la base con un paño suave.
28 TKG SIS 1002 - 130424
Assembly page 28/64
Page 29

Copies of the I/B. Please reproduce them without any
Fax +32 2 359 95 50
changes except under special instruction from Team
International BELGIUM. The pages must be reproduced
and folded in order to obtain a booklet A5 (+/- 148.5 mm
width x 210 mm height). When folding, make sure you
keep the good numbering when you turn the pages of
the I/B. Don’t change the page numbering. Keep the
language integrity.
Algunas partes de la plancha han sido ligeramente engrasadas. Por este motivo, la
plancha podría provocar un poco de humo cuando lo ponga en marcha por primera
vez, pero esto no durará más que unos momentos.
La plancha debe ser utilizada y puesta en una superficie lisa y estable.
No utilice la plancha se cayó, si está visiblemente dañada o si pierde agua.
Cuando ponga la plancha en su soporte (según el modelo), asegúrese de que la
superficie en la cual está puesto el soporte es estable.
Lo mismo deberá hacerse si el depósito de agua deja de funcionar o está dañado. Para
evitar una descarga eléctrica, no desmonte la plancha o el depósito de agua; lleve su
aparato a un técnico cualificado con el fin de que lo examine. Un montaje incorrecto
puede ser causa de descargas eléctricas cuando se utilicen la plancha o el depósito de
agua.
Desenrolle totalmente el cordón eléctrico así como el tubo de alimentación antes de
poner el aparato en marcha.
El interruptor debería estar siempre en la posición “0” antes de conectar y desconectar el
aparato.
Desenchufe el aparato y deje que se enfríe completamente la plancha así como el
depósito de agua antes de limpiar o recogerlos, y para las centrales de planchado a
presión (dependiendo del modelo), antes de abrir, llenar o vaciar el depósito de agua.
PARA LAS CENTRALES DE PLANCHADO A PRESIÓN (DEPENDIENDO DEL MODELO), NO ABRA
NUNCA EL TAPÓN DEL DEPOSITO DE AGUA CUANDO EL APARATO ESTÉ CONECTADO Y
PARTICULARMENTE MIENTRAS SE PRODUCE VAPOR.
(*) Servicio cualificado competente: servicio posventa del fabricante, del importador u otra
persona cualificada, reconocida y capacitada para realizar este tipo de reparaciones con el
fin de evitar cualquier peligro. En cualquier caso, lleve el aparato a estos servicios.
ANTES DE SU PRIMER USO
Nosotros recomendamos limpiar la plancha antes de su primer uso de la siguiente
manera: llene el tanque de agua, enchufar el aparato, pulse el interruptor de la caldera
y el interruptor de la plancha, ponga la temperatura en posición “LINEN” y el regulador
de vapor al MAX y deje que la plancha se caliente durante 10 minutos. Cuando la
temperatura haya sido alcanzada, quite la plancha de la base, mantenga-la en posición
vertical y mantenga presionado el botón del vapor durante 30 segundos, entonces
espere 30 segundos y repita este ciclo dos veces.
Apague el aparato (interruptor de la caldera y el interruptor de la plancha - posición “0”),
desenchufe y déjelo enfriar lo suficiente, luego limpie la suela con un trapo húmedo.
TEMPERATURA DE PLANCHADO
Elija la temperatura en función del tipo de tejido. Compruebe la etiqueta de la prenda
antes de seleccionar el botón.
Si las instrucciones de planchado no se mencionan en la etiqueta, pero conoce la
composición del material a planchar, siga las instrucciones que se mencionan en la tabla
que aparece a continuación:
29 TKG SIS 1002 - 130424
Assembly page 29/64
Page 30

Copies of the I/B. Please reproduce them without any
Fax +32 2 359 95 50
Tipo de tejido
Regulación de temperatura
Regulación del vapor
Nylon, Sintetico (e.g.
acelato, acrilico, viscosa,
poliamida, poliester, ...)
Seda
MIN
NO
Lana
SI
Algodón
Lino
MAX
SI
changes except under special instruction from Team
International BELGIUM. The pages must be reproduced
and folded in order to obtain a booklet A5 (+/- 148.5 mm
width x 210 mm height). When folding, make sure you
keep the good numbering when you turn the pages of
the I/B. Don’t change the page numbering. Keep the
language integrity.
Enchufe el aparato y presione el interruptor de la plancha. El interruptor se encenderá,
indicando que el aparato está funcionando y que la plancha está calentando. Ponga el
dial de temperatura de la plancha en la posición deseada, la luz indicadora de la
plancha se encenderá. Tan pronto como haya alcanzado la temperatura deseada, la luz
de la plancha se apagará y usted podrá empezar a planchar.
Durante el planchado, el testigo luminoso se enciende y se apaga regularmente.
Cuando se enciende indica que la suela de la plancha está caliente al alcanzar la
temperatura deseada. Puede continuar planchando.
La tabla que presentamos arriba sólo es válida para fibras. Si el tejido se arruga, brilla o
bien se abomba bajo la plancha, es aconsejable bajar la temperatura con la ayuda del
termostato regulable para no estropear el tejido. Escoja las prendas a planchar en
función de sus fibras textiles: lana con lana, algodón con algodón, etc. El aparato se
calienta más rápidamente que se enfría. Por este motivo, empiece por planchar las
prendas que exijan una temperatura baja, como por ejemplo aquellos que están
compuestos de fibras sintéticas o lana. A continuación, las prendas que exijan una
temperatura media, para terminar por aquellas que exijan una temperatura alta.
Si la prenda a planchar está fabricada con diferentes fibras textiles, escoja la
temperatura en función de la fibra que necesite la temperatura más baja
(por ejemplo, si debe planchar un tejido que contiene un 40% de poliéster y un 60% de
algodón, será necesario elegir la temperatura correspondiente al poliéster y sin vapor).
Si desconoce la composición textil del tejido a planchar, elija une zona que no sea visible
cuando lleve vestida la prenda y empiece a planchar a baja temperatura y vaya
aumentándola poco a poco.
Las prendas 100% lana se pueden planchar con la plancha en posición vapor. Se
recomienda aplicar un chorro de vapor y colocar un trozo de tela seco entre la plancha
y la prenda de lana.
Cuando planche con vapor, vigile que el tejido no brille. Esto se puede evitar
planchando la prenda al revés.
El terciopelo y otros textiles que brillan rápidamente, deberían plancharse en una solo
dirección (preferentemente en el sentido de la fibra). Procure no aplicar una presión
demasiado fuerte y evite dejar la plancha sobre la prenda aunque sea por un corto
espacio de tiempo.
Planche el reverso de los tejidos sintéticos o de seda. Se recomienda no utilizar el vapor
pues esto puede provocar la aparición de manchas (aureolas, …).
LLENADO DEL DEPOSITO (para planchado con vapor)
1. Coloque la base del aparato sobre una superficie estable.
30 TKG SIS 1002 - 130424
Assembly page 30/64
Page 31

Copies of the I/B. Please reproduce them without any
Fax +32 2 359 95 50
changes except under special instruction from Team
International BELGIUM. The pages must be reproduced
and folded in order to obtain a booklet A5 (+/- 148.5 mm
width x 210 mm height). When folding, make sure you
keep the good numbering when you turn the pages of
the I/B. Don’t change the page numbering. Keep the
language integrity.
2. Abra la tapa del depósito y llene el depósito con agua limpia hasta el nivel “MAX”. No lo
llene más de dicho nivel. Usted puede usar agua corriente pero le recomendamos agua
destilada.
3. Cierre el tapón del depósito.
4. No llene nunca el depósito de agua con vinagre, desincrustante u otros productos
químicos.
CUIDADO: asegúrese siempre de que la recarga antical colocada en el depósito esté bien
instalada. No utilice nunca el aparato sin recarga.
LLENADO DEL DEPÓSITO DURANTE EL PLANCHADO
Como el depósito de agua no esta bajo presión, usted puede rellenar durante su uso. Para
hacer esto, apaguem desenchufe y proceda como se indica en “llenado del deposito”.
PLANCHADO A VAPOR
Llene de agua el depósito y ponga el aparato bajo tensión eléctrica.
Siga las indicaciones del recuadro concerniente el ajuste del termostato de la plancha, el
planchado a vapor es posible únicamente para planchado a altas temperaturas. Por lo
tanto hay que situar el termostato en ●● o ●●●.
Presione el interruptor de la caldera. El interruptor se encenderá y el piloto luminoso de la
bomba parpadeará hasta que se haya alcanzado la temperatura deseada. Entonces ya
está listo.
Presione el interruptor de la plancha y ponga el termostato de la plancha en la posición
deseada. El interruptor de potencia de la plancha y el indicador luminoso de la plancha
se encenderán. Cuando el testigo luminoso de la plancha se apaga, ya puede empezar
a planchar con vapor.
Gire el mando de control del vapor para regular el vapor. Nota: el vapor máximo
(“MAX”) solo se puede usar cuando la temperatura de la plancha es mayor a la posición
●●●, o más agua saldrá por la suela.
Apriete sobre el botón flujo de vapor para la salida del vapor de la suela de la plancha.
Suelte el botón y el vapor parará de salir de la suela. Si desea un vapor continuo, presione
el botón del vapor hacia abajo y deslice la parte púrpura de arriba para bloquear el
botón del vapor. Para parar la salida continua de vapor, presione la parte púrpura del
botón otra vez y suelte el botón del vapor.
Durante el planchado, el testigo luminoso de la plancha se encenderá alternativamente
significando así que la temperatura de la plancha se regula en función del ajuste del
termostato. Puede seguir planchando.
Cuando utiliza gran cantidad vapor durante un tiempo muy corto, el flujo de vapor se
reducirá ligeramente, el lapso de tiempo que su aparato produzca de nuevo suficiente
vapor para compensar esta diferencia. Este fenómeno se producirá también cuando no
habrá suficiente agua en el depósito.
Cuando no hay suficiente agua en el depósito, el indicador de llenado de agua se
encenderá. Si quiere seguir utilizando la función de vapor, tendrá que llenar el depósito.
El indicador de llenado de agua se apagará cuando el tanque de agua se haya llenado.
Nota: cuando usted empieza a utilizar la función de vapor, es normal que la bomba eléctrica
haga algunos sonidos de vibración. Esto es debido al aire que hay dentro del cartucho antical e irá disminuyendo a medida que el aire salga de la bomba. Si el ruido no remite en 60
segundos, compruebe que el cartucho está bien colocado.
31 TKG SIS 1002 - 130424
Assembly page 31/64
Page 32

Copies of the I/B. Please reproduce them without any
Fax +32 2 359 95 50
changes except under special instruction from Team
International BELGIUM. The pages must be reproduced
and folded in order to obtain a booklet A5 (+/- 148.5 mm
width x 210 mm height). When folding, make sure you
keep the good numbering when you turn the pages of
the I/B. Don’t change the page numbering. Keep the
language integrity.
PLANCHADO VERTICAL
Ponga el dial de la temperatura en la posición máxima para un planchado vertical. El vapor
se ajustará de acuerdo a sus necesidades.
Debe colgar la prenda que vaya a planchar y colocar la plancha en posición vertical a
algunos centímetros de la prenda. Desplace la plancha y utilice la función de vapor
simultáneamente.
PLANCHADO EN SECO
Enchufe el aparato y presione el interruptor de la plancha.
Ponga la temperatura deseada.
Cuando la luz de la plancha se vaya por segunda vez, usted puede empezar a planchar.
Para planchar sin vapor, deje el interruptor de la caldera en posición OFF y no presione el
botón flujo de vapor.
CUANDO HAYA ACABADO DE PLANCHAR
Le recomendamos limpiar la plancha después de su uso: llene el depósito de agua,
enchufe el aparato, presione el interruptor de la caldera y el interruptor de la plancha,
ponga en temperatura “LINO” (“LINEN”) y el regulador de vapor a MAX, y deje calentar
durante 10 minutos. Cuando la temperatura haya sido alcanzada, saque la plancha de
la base, mantenga-la en posición vertical y mantenga presionado el botón del vapor
durante 30 segundos, después espera 30 segundos para repetir este ciclo dos veces.
Desenchufe el aparato (interruptor de la caldera e interruptor de la plancha en posición
apagado “0”). Desconecte el aparato y deje que se enfríe lo suficiente.
Vaciar el agua del depósito de agua.
Se aconseja posar la plancha sobre su base una vez guarde el aparato. El
emplazamiento previsto para ello es antideslizante y no deteriorará la suela de la
plancha.
RECARGA ANTICAL
Su aparato está provisto de una recarga antical situada dentro del depósito. Por lo tanto,
podrá utilizar agua de grifo ya que la recarga la filtrará.
Es necesario reemplazar la recarga aproximadamente cada 2 ó 3 meses. Sin embargo
este período puede variar dependiendo de la frecuencia del uso y del contenido de la
cal del agua en su área. Si el agua contiene mucha cal, usted tendrá que reemplazar la
recarga con más frecuencia. Usted puede dejar de reemplazar el filtro usando agua
destilada o una mixta de 50% del grifo y 50% destilada.
Para sacar la recarga, abra el depósito de agua y quite el cartucho del depósito de
agua. Cuando ponga un nuevo cartucho anti-cal en el depósito de agua, sumérjalo en
agua durante un tiempo antes de su uso otra vez para obtener un mejor resultado.
Para proporcionarse una nueva recarga, contacte el Servicio Post-Venta más cercano.
¡No utilice nunca el aparato sin recarga antical!
LIMPIEZA
Los partes de plástico pueden limpiarse con un paño húmedo.
Para limpiar la suela de la plancha, utilice cualquier producto que venden en el mercado
para este fin y siga sus instrucciones.
No introduzca nunca el aparato en agua o en cualquier otro líquido.
32 TKG SIS 1002 - 130424
Assembly page 32/64
Page 33

Fax +32 2 359 95 50
POSIBLES PROBLEMAS
Problemas
Posibles causas
Solución
Harina blanca sale de
la suela.
Es normal cuando la plancha es
nueva.
Desaparecerá en poco tiempo.
Sale agua de la suela
cuando se plancha a
vapor.
Cuando usted empieza a
planchar, el ajustador de vapor
está todavía frío y el vapor se
enfriará.
Esto es normal: después de unos
segundos, el vapor OK. Usted
puede poner la plancha en una
ropa vieja para empezar para
que el agua se absorba.
No sale vapor.
El interruptor de la caldera no ha
sido puesto en marcha o no hay
agua suficiente en el depósito.
Presione el interruptor de la
caldera o rellene el depósito.
No sale vapor cuando
se presiona el botón de
vapor.
Cuando la plancha está muy
alta. Vapor con una alta
temperatura no se puede ver.
Ponga un espejo debajo de la
suela y compruebe si sale vapor.
La suela está sucia.
Las impurezas del agua se
adhieren a la suela o la
temperatura es muy alta para la
ropa.
Limpie la suela con un trapo
húmedo o ajuste la temperatura
del vapor.
Copies of the I/B. Please reproduce them without any
changes except under special instruction from Team
International BELGIUM. The pages must be reproduced
and folded in order to obtain a booklet A5 (+/- 148.5 mm
width x 210 mm height). When folding, make sure you
keep the good numbering when you turn the pages of
the I/B. Don’t change the page numbering. Keep the
language integrity.
PROTECCIÓN DEL MEDIO AMBIENTE – DIRECTIVA 2002/96/CE
Para poder preservar nuestro medio ambiente y proteger la salud humana, los residuos
eléctricos y equipos electrónicos deberían ser destruidos de acuerdo con unas normas
especificas con la implicación de ambos proveedores y consumidores. Por esta razón, como
indica el símbolo en la placa de datos técnicos, su aparato no debería ser tirado en un
contenedor municipal sino que debería ser devuelto a la tienda, o dejado en un punto de
recolección para ser reciclado o usado para otras aplicaciones conforme a la directiva.
33 TKG SIS 1002 - 130424
Assembly page 33/64
Page 34

Copies of the I/B. Please reproduce them without any
Fax +32 2 359 95 50
changes except under special instruction from Team
International BELGIUM. The pages must be reproduced
and folded in order to obtain a booklet A5 (+/- 148.5 mm
width x 210 mm height). When folding, make sure you
keep the good numbering when you turn the pages of
the I/B. Don’t change the page numbering. Keep the
language integrity.
PARA A SUA SEGURANÇA
Antes de utilizar o aparelho leia com sentido de responsabilidade as instruções de
funcionamento e respeite sempre as orientações de segurança e de utilização dadas no
manual das instruções.
Importante: Este aparelho pode ser utilizado por crianças maiores de 14 anos de idade e
pessoas com incapacidades físicas, sensoriais ou mentais, ou pessoas sem experiência ou
conhecimento, se receberem supervisão ou instruções sobre a utilização segura do aparelho
e os riscos que este envolve. As crianças não devem brincar com o aparelho. A limpeza e a
manutenção do mesmo não deve ser feito por crianças sem supervisão.
Antes de ligar a ficha do cabo da alimentação à tomada eléctrica certifique-se que esta
é igual à indicada na placa sinalética do aparelho.
Mantenha o aparelho sob vigilância quando em funcionamento.
Coloque sempre a central a vapor numa superfície plana, segura e seca.
Use tomadas eléctricas com fio de terra.
Afim de evitar uma sobrecarga eléctrica nunca utilize outro aparelho com voltagem
superior no mesmo circuito eléctrico.
O quadro geral da eletricidade tem de ter no mínimo 10 amperes, caso contrário poderá
ocorrer um sobreaquecimento. Evite o enrolamento do cabo da alimentação pois pode
originar acidentes.
Os aparelhos (sobretudo o ferro e o seu cabo) nunca podem ser abandonados ou
deixados perto de crianças ou de pessoas que necessitam de ser vigiadas quando estão
ligados á corrente elétrica ou a arrefecer.
Verifique com regularidade o estado do aparelho e em caso de danos leve-o a um
serviço técnico competente para o analisar e reparar(*). Se o cabo da alimentação
estiver danificado este tem de ser obrigatoriamente substituído pelo que deve levar o
aparelho a um serviço técnico competente(*) a fim de evitar qualquer perigo.
Os aparelhos destinam-se ao uso doméstico.
Nunca mergulhe o aparelho em água ou em qualquer outro líquido.
Não utilize o aparelho perto de fontes de calor.
Certifique-se que o cabo de alimentação não se encontra em contacto com superfícies
quentes.
O aparelho não deve ser utilizado fora de casa e deve ser guardado em locais secos.
Na reparação dos aparelhos use apenas os acessórios recomendados pelo fabricante.
Ao retirar a ficha do cabo de alimentação da tomada eléctrica, não o faça puxando
pelo cabo. Nunca deixe que o cabo da alimentação se enrole em objetos. As quedas
dos aparelhos provocam danos não cobertos pela garantia.
Sempre que o aparelho não estiver a ser utilizado desligue-o.
Evite queimaduras. Tenha cuidado com a água quente e com o vapor da central bem
como as partes metálicas dos aparelhos. Quando o símbolo está afixado numa
superfície, tal reforça os cuidados a ter na utilização do aparelho pois significa:
ATENÇÃO, esta superfície pode tornar-se muito quente durante a utilização do aparelho.
Ponha sempre o ferro a vapor no suporte superior da caldeira, no lugar previsto para esse
efeito. Nunca assente o ferro a vapor pela traseira do corpo e tenha cuidado que para
que o ferro a vapor não entre em contacto com materiais inflamáveis ou com o cabo da
alimentação. Coloque, sempre, o ferro num lugar seguro. Evite as quedas.
Nunca coloque na caldeira vinagre ou outro produto corrosivo.
Antes da primeira utilização retire a proteção que protege a base e limpe-a com um
pano seco e macio.
34 TKG SIS 1002 - 130424
Assembly page 34/64
Page 35

Copies of the I/B. Please reproduce them without any
Fax +32 2 359 95 50
changes except under special instruction from Team
International BELGIUM. The pages must be reproduced
and folded in order to obtain a booklet A5 (+/- 148.5 mm
width x 210 mm height). When folding, make sure you
keep the good numbering when you turn the pages of
the I/B. Don’t change the page numbering. Keep the
language integrity.
O ferro contém certas substâncias que na primeira utilização podem provocar fumos que
desaparecem com o tempo de aquecimento.
O ferro deve ser utilizado e pousado numa superfície estável.
Não utilize o ferro se caiu, se estiver visivelmente danificado ou em caso de fuga de
água.
Quando ponha o ferro no suporte (se for o modelo do aparelho), verifique se a superfície
na qual está colocado o suporte é estável.
Proceda da mesma forma se o reservatório da água deixar de funcionar o estiver
danificado. Para evitar choques eléctricos não tente desmontar nem o ferro nem o
reservatório da água: leve o aparelho a um técnico credenciado. Um arranjo ou
desmontagem e montagem incorreta pode provocar choques eléctricos assim que se
ligue o ferro ou o depósito da água.
Desenrole completamente o cabo da alimentação bem como o tubo da alimentação
antes de colocar em funcionamento o aparelho.
Antes de retirar a ficha do cabo da alimentação da tomada eléctrica coloque o
interruptor da central a vapor na posição desligado “0”.
Antes de limpar ou arrumar o aparelho, e se a caldeira estiver sobre pressão
(dependendo do modelo) antes de abrir, encher ou despejar o reservatório da água, a
central a vapor tem de estar com a ficha do cabo da alimentação retirada da tomada
eléctrica e fria.
SE A CALDEIRA ESTIVER SOBRE PRESSÃO (DEPENDENDO DO MODELO), NUNCA ABRA O
DEPÓSITO DA ÁGUA DA CALDEIRA COM O APARELHO EM FUNCIONAMENTO E MUITO
MENOS DURANTE A PRODUÇÃO DO VAPOR.
(*) Serviço técnico habilitado: serviço técnico do fabricante ou importador ou de uma pessoa
qualificada, reconhecida e habilitada para evitar qualquer perigo. Em caso de avaria dos
aparelhos contacte o estabelecimento onde os comprou.
ANTES DA PRIMEIRA PASSAGEM DA ROUPA A FERRO
Antes da primeira passagem dos tecidos a ferro, limpe o ferro procedendo como se
indica: encha o reservatório da água com água, conecte o aparelho, pressione o
interruptor da caldeira e o do ferro, coloque o termóstato na posição “LINEN”, o
regulador do vapor na posição MAX e deixe aquecer o ferro cerca de 10 minutos. Assim
que a temperatura seja alcançada, retire o ferro do descanso, mantenha-o na posição
vertical e prima sobre o botão da saída do vapor durante cerca de 30 segundos, com
intervalos de 30 segundos, e repita a saída de vapor por mais duas vezes.
Desligue o aparelho (ponha o interruptor da caldeira e o interruptor do ferro na posição
desligado “0”), retire a ficha do cabo da alimentação da tomada eléctrica e deixe
arrefecer a base do ferro para a poder limpar com um pano macio e ligeiramente
húmido.
ESCOLHA DA TEMPERATURA IDEAL
Leia a etiqueta que acompanha os tecidos, veja a temperatura aconselhada e
seguidamente coloque o termóstato na posição correta.
Se conhece bem a composição dos tecidos e na falta da etiqueta pode seguir as
instruções do quadro que lhe apresentamos:
35 TKG SIS 1002 - 130424
Assembly page 35/64
Page 36

Copies of the I/B. Please reproduce them without any
Fax +32 2 359 95 50
Tipo de tecido
Regulação da temperatura
Regulação do vapor
Nylon
Sintético (cetim, acrílico,
viscose, polymide ou
polyester)
Seda
MIN
NO
Lã
SI
Algodão
Linho
MAX
SI
changes except under special instruction from Team
International BELGIUM. The pages must be reproduced
and folded in order to obtain a booklet A5 (+/- 148.5 mm
width x 210 mm height). When folding, make sure you
keep the good numbering when you turn the pages of
the I/B. Don’t change the page numbering. Keep the
language integrity.
Coloque a ficha do cabo da alimentação na tomada eléctrica e pressione sobre o
interruptor do ferro, este acender-se-á, informando que o aparelho está ligado e que o
ferro se está aquecendo. Coloque o termóstato do ferro na posição desejada e o
sinalizador luminoso do ferro acender-se-á. Quando o sinalizador luminoso se desligar, isso
significa que a temperatura escolhida para a base do ferro foi alcançada pelo que pode
começar a passar os tecidos.
Durante o tempo que estiver a passar a ferro, o sinalizador luminoso do ferro acender-se-
á e apagar-se-á sempre que a temperatura do ferro for inferior à escolhida ou tenha sido
alcançada. Continue a passar os tecidos a ferro.
O quadro que fornecemos serve apenas para fibras únicas, pelo que em situações mais
delicadas deve baixar a temperatura com ajuda do termóstato regulável para evitar
danificar o tecido. Escolha a temperatura conforme a etiqueta que acompanha a roupa
ao mesmo tempo que consulta o quadro que fornecemos. Se a composição do tecido
tem diferentes fibras inicie a passagem de acordo com a fibra que exija a temperatura
mais baixa. Não use o vapor.
Se o tecido a passar contém diferentes fibras na sua composição, escolha a temperatura
em função da fibra que exija menor temperatura (por exemplo se estiver a passar um
tecido com a composição de 40% de polyester e 60% de algodão escolha a
temperatura exigida pelo polyester e passe o tecido sem vapor).
Se não conhecer a composição das fibras do tecido que vai passar a ferro, escolha uma
parte do tecido que não seja visível quando o veste e comece a passar a baixa
temperatura para depois a ir aumentando lentamente.
Os artigos 100% lã poderão ser passados com o ferro na posição de vapor. Recomenda-
se que utilize o jacto de vapor e coloque um pequeno tecido seco entre a peça de lã e
o ferro. Se o tecido for lustroso procure passar pelo avesso sempre na mesma direção.
Não pressione em demasia o ferro contra o tecido e mantenha a base do ferro o menos
tempo possível em contacto com o tecido.
Quando passar a ferro com vapor, tenha cuidado que o tecido não lustre. Pode ser
evitado passando a peça pelo avesso e colocando um tecido ligeiramente húmido
entre a roupa a passar e o ferro.
Se o tecido for lustroso procure passar pelo avesso sempre na mesma direção. Não
pressione em demasia o ferro contra o tecido e mantenha a base do ferro o menos
tempo possível em contacto com o tecido.
Passe pelo avesso os tecidos sintéticos ou as sedas e não utilize o vapor pois pode
provocar manchas no tecido.
36 TKG SIS 1002 - 130424
Assembly page 36/64
Page 37

Copies of the I/B. Please reproduce them without any
Fax +32 2 359 95 50
changes except under special instruction from Team
International BELGIUM. The pages must be reproduced
and folded in order to obtain a booklet A5 (+/- 148.5 mm
width x 210 mm height). When folding, make sure you
keep the good numbering when you turn the pages of
the I/B. Don’t change the page numbering. Keep the
language integrity.
ENCHIMENTO DO RESERVATÓRIO COM ÁGUA
1. Coloque a caldeira numa superfície plana e estável.
2. Abra o fecho do reservatório e ponha água no reservatório sem ultrapassar o "MAX".
Pode utilizar água da torneira, mas de preferência use água destilada.
3. Feche o fecho.
4. Nunca utilize vinagre, produtos descalcificantes ou outros produtos químicos.
Atenção: certifique-se sempre que a recarga anticalcário está bem colocada no alojamento
apropriado. Nunca utilize o aparelho sem a recarga anticalcário no reservatório da água.
ENCHIMENTO DO RESERVATÓRIO DURANTE A PASSAGEM A FERRO
Desde que a água do reservatório não esteja sob pressão, pode colocar água no reservatório
da água durante a passagem a ferro dos tecidos. Para colocar a água no reservatório,
desligue o ferro e a caldeira, retire a ficha do cabo da alimentação da tomada eléctrica e
faça como descrevemos acima no “Enchimento do reservatório com água”.
PASSAGEM A VAPOR
Encha o depósito com água e coloque a ficha do cabo da alimentação na tomada
eléctrica.
Siga as indicações indicadas no quadro acima apresentado, leia as etiquetas dos
tecidos e regule o termóstato do ferro para a temperatura desejada. A passagem a
vapor é unicamente possível para altas temperaturas. O termóstato tem de estar nas
posições ou .
Pulse sobre o interruptor da caldeira, este acender-se-á. Será ativada uma luz
intermitente, até que a temperatura desejada seja atingida. Depois, tornar-se-á
constante.
Pressione o interruptor do ferro e selecione a temperatura do ferro com a ajuda do
termóstato do ferro. O interruptor do ferro, assim como, a luz indicadora do ferro,
acender-se-ão. Assim que a base do ferro alcance a temperatura escolhida o sinalizador
luminoso do ferro desligar-se-á. Pode começar a passar os tecidos com vapor.
Rode o regulador de vapor para regular a quantidade de saída do vapor. Note: a
quantidade de vapor “MAX” só pode ser utilizada na temperatura de passagem dos
tecidos na posição máxima , se não cairá água pela perfuração da base.
Prima sobre o botão da saída de vapor para fazer sair vapor pela perfuração da base do
ferro. Descomprima o botão e o vapor deixará de sair pela perfuração da base. Para a
saída contínua de vapor, mantenha o botão pressionado e deslize a parte superior
púrpura na traseira do ferro para manter o botão ativo para a saída contínua de vapor.
Para anular a saída contínua do vapor, deslize a parte púrpura do botão para a posição
inicial e descomprima o botão do vapor.
Durante a passagem dos tecidos a ferro, o sinalizador luminoso do ferro acender-se-á
alternativamente em função da regulação do termóstato da temperatura escolhida
para a base do ferro. Pode continuar a passar a ferro os tecidos.
Se utilizar muito vapor num período de tempo demasiado curto, a pressão da saída do
vapor enfraquece até o ferro produzir mais vapor e compensar a diferença. O
enfraquecimento da pressão da saída do vapor pode ser devido a insuficiência de água
no reservatório.
Quando há falta de água no reservatório, o indicador de recarga de água acende-se.
Para continuarmos a passar a vapor temos de colocar água no reservatório. A luz
indicadora do reservatório de água apagar-se-á quando o reservatório se encher de
água.
37 TKG SIS 1002 - 130424
Assembly page 37/64
Page 38

Copies of the I/B. Please reproduce them without any
Fax +32 2 359 95 50
changes except under special instruction from Team
International BELGIUM. The pages must be reproduced
and folded in order to obtain a booklet A5 (+/- 148.5 mm
width x 210 mm height). When folding, make sure you
keep the good numbering when you turn the pages of
the I/B. Don’t change the page numbering. Keep the
language integrity.
Atenção: assim que comece a utilizar a função vapor é normal que a bomba produza sons
vibratórios que têm origem no ar que está no interior do cartucho anticalcário. Com a
contínua saída do ar desaparecerão os ruídos. Se o ruído não tiver baixado após 60
segundos, verifique se o cartucho anticalcário está corretamente instalado.
PASSAGEM NA VERTICAL
Coloque o termóstato na posição de temperatura máxima para passagem a ferro dos
tecidos na vertical. A quantidade de vapor pode ser adaptado às necessidades.
Os tecidos têm de estar pendurados para que possam ser passados na vertical. Com o ferro a
alguns centímetros dos tecidos e na posição de passagem na vertical colocar o ferro na
posição de passagem a vapor.
PASSAGEM A SECO
Coloque a ficha do cabo da alimentação na tomada eléctrica e pulse sobre o
interruptor do ferro.
Rode o termóstato para a temperatura desejada.
Quando o sinalizador luminoso do ferro se apagar pela segunda vez, comece a passar os
tecidos a ferro.
Para passar os tecidos sem vapor, deixe o interruptor da caldeira na posição de
desligado (OFF) e não pressione o botão da saída de vapor.
QUANDO TERMINAR DE PASSAR A FERRO
Após ter terminado de passar os tecidos a ferro desligue o aparelho, retire a ficha do
cabo da alimentação da tomada eléctrica, deixe arrefecer a base do ferro e deixe que
a água no reservatório fique sem pressão, encha o reservatório com água, coloque a
ficha do cabo da alimentação na tomada eléctrica, pulse sobre o interruptor da
caldeira e no do ferro, coloque o termóstato na posição “LINEN”, o regulador de vapor
na posição MAX e deixe que a base do ferro aqueça cerca de 10 minutos. Assim que a
temperatura seja alcançada, retire o ferro do descanso, mantenha o ferro na vertical e
pressione o botão da saída de vapor durante cerca de 30 segundos. Repita o
procedimento por mais duas vezes.
Desligue o ferro (colocando o interruptor da caldeira e do ferro na posição de desligado
“0”), retire a ficha do cabo da alimentação da tomada eléctrica e deixe arrefecer muito
bem a base do ferro.
Despeje a água do reservatório da água.
Guarde o ferro no descanso do corpo da central a vapor. O alojamento do descanso é
antiderrapante e manterá a base do ferro em bom estado de conservação.
CARTUCHO ANTI-CALCÁRIA
O aparelho possui um cartucho anticalcário dentro do reservatório da água. Deste modo
pode utilizar água da torneira pois ela vai ser filtrada pelo cartucho anticalcário.
É necessário substituir a cassete aproximadamente em cada 2 a 3 meses. Este período
pode variar em função do tempo de frequência de utilização e do nível da dureza da
água que estiver a utilizar. Quanto maior for a dureza da água e a frequência de
utilização do ferro com central a vapor, mais vezes terá de substituir o cartucho
anticalcário. A durabilidade do cartucho anticalcário pode ser prolongada pela
utilização de água destilada ou utilizando uma mistura de 50% de água destilada e 50%
de água da torneira.
38 TKG SIS 1002 - 130424
Assembly page 38/64
Page 39

Copies of the I/B. Please reproduce them without any
Fax +32 2 359 95 50
Problema
Causa possível
Solução
Pelos orifícios da base sai
uma espécie de farinha
branca.
Pode acontecer nas primeiras
utilizações do ferro.
Não se preocupe. O problema
desaparece com as utilizações
sucessivas do ferro.
Durante a passagem a
ferro dos tecidos
escapam-se gotas de
água pela base.
A base do ferro não está bem
quente ou a seleção da
temperatura mal escolhida.
No começo da passagem dos
tecidos a vapor tal pode acontecer
mas desaparecerá de seguida pelo
que deve, antes de passar, ensaiar
sobre um tecido usado. Deixe
aquecer o ferro.
Não há produção de
vapor.
O interruptor da caldeira não foi
posto a funcionar ou não há água
suficiente no reservatório da água.
Pulse sobre o interruptor da caldeira
ou encha o reservatório com água
e espere que o sinalizador do vapor
se apague.
Quando pressiona o
botão para a saída do
vapor, este não sai.
Após ter estado a passar a alta
temperatura, a pressão do vapor
enfraquece.
Deixe que a pressão de vapor seja
resposta.
A base suja-se.
As impurezas da água fixam-se à
base ou a temperatura é
demasiado elevada para os tecidos
que esteve a passar.
Limpe a base com um esfregão não
abrasivo e ligeiramente húmido ou
ajuste a temperatura.
changes except under special instruction from Team
International BELGIUM. The pages must be reproduced
and folded in order to obtain a booklet A5 (+/- 148.5 mm
width x 210 mm height). When folding, make sure you
keep the good numbering when you turn the pages of
the I/B. Don’t change the page numbering. Keep the
language integrity.
Para retirar o cartucho anticalcário, abra o reservatório da água e retire o cartucho
anticalcário. Antes de colocar um novo cartucho anticalcário no reservatório da água,
coloque-o durante alguns minutos mergulhado em água para obter melhores resultados.
Adquira os cartuchos nos estabelecimentos da especialidade ou onde comprou o
aparelho.
Nunca utilize o aparelho sem um cartucho anticalcário dentro do reservatório da água!
LIMPEZA
As partes plásticas podem ser limpas com um pano húmido.
A base do ferro também é limpa com produtos comercializados para esse fim. Siga as
instruções dos mesmos. Nunca use abrasivos na limpeza do ferro ou da central a vapor.
Nunca mergulhe o aparelho em água ou qualquer outro líquido.
PROBLEMAS E SOLUÇÕES
PROTECÇÃO DO MEIO AMBIENTE – DIRECTIVA 2002/96/CE
Para a preservação do ambiente e da nossa saúde, a eliminação no fim da vida útil dos
aparelhos elétricos e eletrônicos, deve-se efetuar no cumprimento das legislações em vigor e
pela participação de todos quer sejam produtores ou utilizadores. É por esta razão que o
vosso aparelho tem na placa sinalética o símbolo , informando que em caso algum o
aparelho deve ser colocado no caixote do lixo camarário ou privado para que não vá para
as lixeiras comuns mas sim devolvido ao revendedor ou depositado nos locais apropriados e
identificados para a recolha destes aparelhos para que uma vez recolhidos sejam reciclados,
reutilizados ou lhe sejam dados outras aplicações.
39 TKG SIS 1002 - 130424
Assembly page 39/64
Page 40

Copies of the I/B. Please reproduce them without any
Fax +32 2 359 95 50
changes except under special instruction from Team
International BELGIUM. The pages must be reproduced
and folded in order to obtain a booklet A5 (+/- 148.5 mm
width x 210 mm height). When folding, make sure you
keep the good numbering when you turn the pages of
the I/B. Don’t change the page numbering. Keep the
language integrity.
AVVERTENZE
Vi invitiamo a leggere attentamente le istruzioni prima di utilizzare l’apparecchio, e vi
preghiamo di seguire sempre attentamente le istruzioni di sicurezza e di utilizzo.
Importante: Questo apparecchio non deve essere usato da minori o persone con ridotte
capacità fisiche, sensoriali o mentali, o senza la necessaria esperienza o conoscenza a meno
che non siano stati istruiti sull’uso dell’apparecchio in tutta sicurezza, e sui rischi inerenti. Ai
bambini non deve essere permesso giocare con l’apparecchio. I minori non devono pulire
l’apparecchio o eseguire operazioni di manutenzione se non sotto la stretta sorveglianza di un
adulto.
Prima di mettere in funzione l’apparecchio, controllare che la tensione sia conforme a
quella dell’apparecchio.
Non lasciare l’apparecchio incustodito durante il funzionamento.
Posizionare il serbatoio sempre su una superficie stabile (asse da stiro o tavolo).
Collegare l’apparecchio esclusivamente ad una presa di terra.
Al fine di evitare un sovraccarico elettrico non usare un altro apparecchio di potenza
elevata sullo stesso circuito elettrico.
Se una prolunga elettrica è indispensabile, utilizzare un cavo per un assorbimento di 10
‘ampère’. Se si usa una prolunga di meno di 10 ‘ampère’, questo può provocare un
surriscaldamento. Prendere le precauzioni necessarie per non impigliarsi o incespicare nel
cavo elettrico.
Non lasciare l’apparecchio (soprattutto il ferro e il suo cavo) senza sorveglianza o alla
portata di bambini o persone irresponsabili quando è collegato alla presa a muro o
quando si sta raffreddando.
Verificare regolarmente che l'apparecchio non sia danneggiato. Non accendere
l’apparecchio qualora il cavo o l’apparecchio stesso dovessero presentare un qualsiasi
danneggiamento. Tutte le riparazioni devono essere eseguite da un servizio qualificato(*). Un
cavo danneggiato deve essere sostituito da un servizio qualificato(*) per evitare qualsiasi
pericolo.
Questo apparecchio dovrà essere destinato solo all’uso domestico e secondo le indicazioni
riportate in queste istruzioni.
Non immergere mai l'apparecchio in acqua o in qualsiasi altro liquido, né per pulirlo né
per qualsiasi altra ragione.
Non usare l’apparecchio in prossimità di sorgenti di calore.
Assicurarsi che il cavo e il tubo d’alimentazione non siano in contatto con superfici calde.
Non usare l’apparecchio all'aperto e sistemarlo in un luogo secco.
Richiedere l’utilizzo di accessori consigliati dal fabbricante. Il mancato rispetto di questo
consiglio può compromettere la sicurezza dell’utente e danneggiare l’apparecchio.
Non tirare al cavo per spostare l’apparecchio. Assicurarsi che il cavo elettrico non possa
impigliarsi per evitare una caduta dell’apparecchio. Non avvolgere il cavo intorno
all’apparecchio e non storcerlo.
Togliere la spina dalla presa di corrente quando l’apparecchio non è in funzione.
Fare attenzione perché ci si può bruciare toccando l’acqua calda, il vapore o le parti di
metallo. Quando questo simbolo è apposto su una superficie particolare, accentua
la messa in guardia e significa: ATTENZIONE, questa superficie può diventare calda
durante l'uso.
Posare sempre il ferro da stiro nella sua sede. Non posarlo mai sul suo tallone né sul
serbatoio, né sul cavo. Assicurarsi che non entri in contatto con materiali infiammabili.
Non riempire mai il serbatoio con aceto, disincrostante o qualsiasi altro prodotto chimico.
Prima del primo uso, togliere tutte le protezioni dell’apparecchio e della piastra. Pulire la
piastrina con un panno morbido.
40 TKG SIS 1002 - 130424
Assembly page 40/64
Page 41

Copies of the I/B. Please reproduce them without any
Fax +32 2 359 95 50
changes except under special instruction from Team
International BELGIUM. The pages must be reproduced
and folded in order to obtain a booklet A5 (+/- 148.5 mm
width x 210 mm height). When folding, make sure you
keep the good numbering when you turn the pages of
the I/B. Don’t change the page numbering. Keep the
language integrity.
Certe parti del ferro da stiro sono state leggermente ingrassate. Perciò il ferro potrebbe
emanare un po’ di fumo quando lo si mette in funzione per la prima volta, ma questo
durerà solo un istante.
Utilizzare e porre sempre il ferro in una superficie stabile.
Non utilizzare il ferro se è caduto, se é visibilmente danneggiato o se perde acqua.
Quando si pone il ferro sul proprio supporto (a seconda del modello), controllare che la
superficie sulla quale si pone il supporto é stabile.
Procedere nello stesso modo se il serbatoio smette di funzionare o se è danneggiato. Per
evitare una pericolosa scarica elettrica, non smontare il ferro da stiro né il serbatoio:
portare l’apparecchio sempre ad un tecnico qualificato affinché lo esamini.
Un’installazione non corretta può essere molto pericolosa poiché durante il
funzionamento del ferro o della caldaia potrebbe dare origine ad una scarica elettrica.
Svolgere interamente il cavo d’alimentazione e il tubo flessibile prima di mettere
l’apparecchio in posizione accesa.
L'interruttore deve essere sempre in posizione “0” spento prima di collegare e scollegare
l’apparecchio.
Scollegare e lasciare raffreddare completamente il ferro da stiro e il serbatoio prima di
pulirli o guardarli e per i sistemi stiranti a pressione (a seconda del modello), prima di
aprire, riempire o vuotare il serbatoio.
PER I SISTEMI STIRANTI A PRESSIONE (A SECONDA DEL MODELLO), NON SVITARE MAI IL
TAPPO DEL SERBATOIO MENTRE L’APPARECCHIO È IN FUNZIONE IN PARTICOLARE DURANTE
LA PRODUZIONE DI VAPORE.
(*) Servizio qualificato: servizio assistenza tecnica del fabbricante o dell’importatore o una
persona qualificata, riconosciuta ed autorizzata ad effettuare riparazioni, cui inviare
l’apparecchio per la riparazione o il controllo. Rivolgere in ogni caso l’apparecchio a questo
servizio.
PRIMA DEL PRIMO UTILIZZO
Si consiglia di pulire il ferro, prima del primo utilizzo come segue: riempire il serbatoio di
acqua, collegare l’apparecchio alla presa di corrente, premere il tasto on della caldaia e
del ferro, mettere la temperatura sulla posizione “Lino” (“Linen”) e il regolatore del vapore
sulla posizione “MAX” e lasciare che il ferro si riscaldi per circa 10 minuti. Quando
l’apparecchio ha raggiunto la temperatura, prenderlo dalla base, porlo in posizione
verticale e premere per 30 secondi il tasto vapore. Attendere 30 secondi e ripetere
l’operazione 2 volte.
Spegnere l’apparecchio posizionando il selettore della caldaia e del ferro sulla posizione
off “0”, scollegarlo e lasciarlo raffreddare sufficientemente per pulire la piastra con un
panno umido.
SISTEMA STIRANTE: TEMPERATURE E AVVERTENZE
Controllare sempre se sugli indumenti da stirare sono presenti targhette con le indicazioni
per la stiratura: in questo caso, seguire le istruzioni riportate.
Se si è persa l’etichetta, ma si conosce la tipologia del tessuto vedere la tabella sotto
riportata in cui è consigliata la temperatura da utilizzare.
41 TKG SIS 1002 - 130424
Assembly page 41/64
Page 42

Copies of the I/B. Please reproduce them without any
Fax +32 2 359 95 50
Tipo di tessile
Regolazione della temperatura
Regolazione del vapore
Nylon
Sintetico (es. acetato,
acrilico, viscosa,
poliammide, poliestere, …)
Seta
MIN
NO
Lana
SI
Cotone
Lino
MAX
SI
changes except under special instruction from Team
International BELGIUM. The pages must be reproduced
and folded in order to obtain a booklet A5 (+/- 148.5 mm
width x 210 mm height). When folding, make sure you
keep the good numbering when you turn the pages of
the I/B. Don’t change the page numbering. Keep the
language integrity.
Per mettere in funzione l’apparecchio collegare e premere il tasto di accensione del
ferro. Il tasto si illuminerà, indicando che il ferro si sta riscaldando. Selezionare la
temperatura del ferro: si accenderà la spia luminosa che indica il funzionamento del ferro.
Quest’ultima rimarrà accesa fino a ché la piastra non ha raggiunto la temperatura
impostata; una volta spenta pertanto, si può iniziare a stirare.
Durante la stiratura, questa spia luminosa si accende e si spegne regolarmente. Quando si
accende, significa che la piastra si scalda per raggiungere la temperatura richiesta. Si
può continuare a stirare.
La tabella sopra indicata è valida solo per le fibre. Se il tessuto si sgualcisce, si lucida
oppure si gonfia sotto il ferro da stiro, è preferibile abbassare la temperatura con l’aiuto
del termostato regolabile per evitare di rovinare il tessuto.
Dividere gli articoli da stirare in funzione delle fibre tessili: lana con lana, cotone con
cotone, ecc. Il tempo di raffreddamento è maggiore di quello di riscaldamento: si
consiglia di iniziare a stirare gli articoli che richiedono una temperatura bassa, come quelli
che si compongono di fibre sintetiche o di lana. Poi, gli articoli che richiedono una
temperatura media, ed infine quelli che richiedono una temperatura elevata.
Se l’articolo da stirare è fabbricato in diverse fibre tessili, scegliere la temperatura in
funzione della fibra che richiede la temperatura più bassa (per esempio se si deve stirare
un tessuto che si compone di 40% di poliestere e di 60% di cotone, bisognerebbe scegliere
la temperatura corrispondente al poliestere e non usare vapore).
Se non si conosce la composizione del tessuto da stirare, prendere una parte del vestito
che non sia visibile e cominciare a stirare a bassa temperatura per poi aumentarla
progressivamente.
Gli articoli 100% lana possono essere stirati con il ferro da stiro in posizione ‘vapore’. Si
consiglia di applicare un getto di vapore e di utilizzare un pezzo di stoffa tra il ferro ed il
tessuto di lana.
Quando si stira con l’aiuto del vapore, assicurarsi che il tessuto non brilli. Questo può
essere evitato stirando l’articolo al rovescio.
Il velluto e gli altri tessili che brillano rapidamente dovrebbero essere stirati in una sola
direzione (preferibilmente nella stessa direzione delle fibre tessili del tessuto). Inoltre,
applicare una lieve pressione sul tessile ed evitare anche di lasciare il ferro da stiro per un
lasso di tempo (anche breve) sullo stesso punto.
Stirare il rovescio dei tessuti sintetici o di seta. Si consiglia di non usare il vapore perché
questo causerebbe delle macchie.
42 TKG SIS 1002 - 130424
Assembly page 42/64
Page 43

Copies of the I/B. Please reproduce them without any
Fax +32 2 359 95 50
changes except under special instruction from Team
International BELGIUM. The pages must be reproduced
and folded in order to obtain a booklet A5 (+/- 148.5 mm
width x 210 mm height). When folding, make sure you
keep the good numbering when you turn the pages of
the I/B. Don’t change the page numbering. Keep the
language integrity.
RIEMPIMENTO DEL SERBATOIO (PER STIRATURA A VAPORE)
1. Mettere il serbatoio su una superficie stabile.
2. Aprire il tappo del serbatoio e riempire il serbatoio fino al livello “MAX”. Non oltrepassare
tale livello. Si può usare acqua del rubinetto, ma si consiglia l’utilizzo d’acqua distillata.
3. Successivamente richiudere il tappo del serbatoio.
4. Non usare mai aceto, disincrostante o qualsiasi altro prodotto chimico.
Attenzione: controllare che la cartuccia anticalcare sia ben posizionata. Non usare
l’apparecchio senza la cartuccia.
RIEMPIMENTO DEL SERBATOIO DURANTE LA STIRATURA
Poiché il serbatoio di acqua non è in pressione è possibile riempirlo durante il funzionamento.
Spegnere e scollegare l’apparecchio. Procedere come indicato nel paragrafo precedente e
ricollegarlo.
STIRATURA A VAPORE
Riempire il serbatoio e accendere l’apparecchio.
Seguire le indicazioni riportate nella tabella e sul termostato regolabile, la stiratura a
vapore è possibile solo per la stiratura ad alta temperatura. Bisogna quindi posizionare il
termostato su o .
Premere il tasto della caldaia. Il tasto lampeggerà fino a che la caldaia non raggiunge la
temperatura; dopodiché la luce diventerà stabile.
Premere il tasto del ferro e selezionare la temperatura tramite la manopola del termostato
posto sul ferro. Il tasto di accensione del ferro si illuminerà e si accendera anche la luce
posta sul ferro. Quando la spia del ferro si spegne, significa che l’acqua e la piastra hanno
raggiunto la corretta temperatura pertanto si può cominciare a stirare.
Ruotare la manopola del vapore per regolarne la fuoriuscita. Attenzione: il livello “Max”
può essere utilizzato solo quando la temperatura del ferro è molto alta , altrimenti si
verificheranno piccole perdite d’acqua dalla piastra.
Per far uscire il vapore dalla piastra basta premere il pulsante mentre basta rilasciarlo per
interrompere il flusso di vapore pertanto se si desidera mantenere continuo il getto di
vapore bisogna premere il pulsante. Per interrompere il flusso di vapore premere in avanti
la parte viola del tasto e rilasciare il pulsante del vapore.
Durante la stiratura, la spia del ferro si accende e si spegne regolarmente, in funzione del
termostato che regola la temperatura impostata.
Quando si usa molto vapore in breve tempo, il flusso è leggermente inferiore perché si
deve dare il tempo alla caldaia di produrlo. Lo stesso fenomeno avviene quando l’acqua
nel serbatoio sta finendo.
Quando il serbatoio dell’acqua si sta svuotando, la spia che indica l’assenza di acqua si
accende. Se si vuole usare la funzione erogazione di vapore, è necessario riempire il
serbatoio d’acqua. L'indicatore di livello dell'acqua si spegne quando il serbatoio è stato
riempito.
Nota: quando si utilizza la funzione vapore, è normale che la pompa emetta qualche
vibrazione. Questo è dovuto all’aria che passa attraverso la cartuccia anti-calcare. Il suono
tenderà a diminuire. Se così non fosse verificare che la cartuccia sia inserita correttamente.
43 TKG SIS 1002 - 130424
Assembly page 43/64
Page 44

Copies of the I/B. Please reproduce them without any
Fax +32 2 359 95 50
changes except under special instruction from Team
International BELGIUM. The pages must be reproduced
and folded in order to obtain a booklet A5 (+/- 148.5 mm
width x 210 mm height). When folding, make sure you
keep the good numbering when you turn the pages of
the I/B. Don’t change the page numbering. Keep the
language integrity.
STIRARE IN POSIZIONE VERTICALE
Posizionare il selettore della temperatura su max. Il flusso di vapore può essere regolato in base
alle vostre esigenze.
Appendere il tessuto da stirare e posizionare il ferro da stiro verticalmente. Spostare il ferro a
qualche centimetro dal tessuto premendo simultaneamente il pulsante di vapore.
STIRATURA A SECCO
Collegare l’apparecchio e premere il tasto di accensione del ferro.
Selezionare la temperatura desiderata.
Quando la spia del ferro si spegne per la seconda volta potete iniziare a stirare.
Per stirare senza vapore, posizionare il tasto della caldaia su OFF e non premere il tasto
vapore.
QUANDO SI HA FINITO DI STIRARE
Si consiglia di pulire il ferro dopo l'uso come segue: riempire il serbatoio d’acqua,
collegare la presa alla corrente, accendere il ferro e la caldaia, mettere la temperatura
sulla posizione LINO (“LINEN”) e il regolatore di vapore su MAX e lasciare che il ferro si
scaldi per 10 minuti. Quando la temperatura è stato raggiunta, prendere il ferro dalla
base, tenerlo in verticale e mantenere premuto il pulsante di vapore per 30 secondi,
quindi attendere 30 secondi e ripetere due volte questa operazione.
Spegnere l'apparecchio (il tasto della caldaia e il interruttore del ferro in posizione off "0").
Togliere il cavo dalla presa di terra.
È necessario svuotare l’acqua dal serbatoio.
Si raccomanda di collocare il ferro nella propria sede. Il supporto previsto a tal fine è
antiscivolo e non danneggerà la piastra del ferro.
CARTUCCIA ANTI-CALCARE
L’apparecchio è dotato di una cartuccia anti-calcare, posta del serbatoio dell’acqua
pertanto è possibile usare acqua di rubinetto poiché sarà filtrata dalla cartuccia.
È necessario per sostituire la cartuccia approssimativamente ogni 2 o 3 mesi. Comunque
questo periodo può variare per dipendere dalla frequenza di uso e del contenuto di
calcare nell'acqua. Se l'acqua contiene molto calcare, bisognerà sostituire la cartuccia
più frequentemente. È possibile ritardare la sostituzione della cartuccia usando acqua
distillata o una miscela di acqua di rubinetto 50% e acqua distillata 50%.
Per estrarre la cartuccia, aprire il serbatoio e togliere la cartuccia anticalcare. Quando si
utilizza una nuova cartuccia anticalcare, immergerla nell’acqua per qualche minuto per
ottenere una migliore prestazione.
Per avere una nuova cartuccia, rivolgersi ad un centro assistenza qualificato.
Non usare l’apparecchio senza la cartuccia.
PULIZIA
Le parti in plastica possono essere pulite con un panno morbido.
Per pulire la piastra, utilizzare i prodotti specifici, non usare prodotti abrasivi.
Non immergere mai l'apparecchio in acqua o in qualsiasi altro liquido, né per pulirlo né
per qualsiasi altra ragione.
44 TKG SIS 1002 - 130424
Assembly page 44/64
Page 45

Fax +32 2 359 95 50
Problema
Possibile causa
Soluzione
Fuoriuscita di una
polvere bianca dalla
piastra
E’ normale quando
l’apparecchio è nuovo
Scompare dopo un paio di utilizzo
Fuoriuscita di gocce
d’acqua dalla piastra
Appena acceso la temperature
non è ancora abbastanza alta
per produrre vapore
Attendere qualche secondo
posizionando il ferro su un tessuto
vecchio
Non fuoriesce vapore
dalla caldaia
Non c’è abbastanza acqua nel
serbatoio o il tasto di accensione
della caldaia non è stato
premuto
Premere il tasto di accensione
della caldaia e riempire il
serbatoio
Non fuoriesce vapore
dal ferro quando si
preme il tasto
Quando si stira a temperature
alta il vapore non è visibile
Posizionare uno specchio davanti
alla piastra e verificare la
fuoriucita
La piastra è sporca
La temperatura della piastra è
troppo alta o l’acqua contiene
delle impurità
Pulire la piastra con un panno e
selezionare una temperature più
bassa
PROBLEMI E SOLUZIONI
Copies of the I/B. Please reproduce them without any
changes except under special instruction from Team
International BELGIUM. The pages must be reproduced
and folded in order to obtain a booklet A5 (+/- 148.5 mm
width x 210 mm height). When folding, make sure you
keep the good numbering when you turn the pages of
the I/B. Don’t change the page numbering. Keep the
language integrity.
DIRETTIVA 2002/96/CE PER LO SMALTIMENTO DELLE APPARECCHIATURE ELETTRICHE ED
ELETTRONICHE
Per preservare l'ambiente e la nostra salute, i vecchi apparecchi elettrici e elettronici non più
utilizzati devono essere smaltiti secondo la direttiva sopra citata che impone l'obbligo al
costruttore, al commerciante e all'utilizzatore di consegnare gli apparecchi ai centri di
raccolta specializzati, i quali saranno in grado di smaltire e riciclare i vecchi prodotti come la
legge prescrive.
Per questa ragione troverete apposto sulla targhetta identificativa o sull'imballaggio il simbolo
che indica di non gettare il vecchio apparecchio in pattumiera o nel cassonetto delle
immondizie.
Per eliminare il vecchio apparecchio non più utilizzato, potete consegnarlo al rivenditore il
cambio di quello nuovo acquistato, o direttamente nei centri di raccolta specializzati messi a
disposizione dal vostro comune di residenza.
45 TKG SIS 1002 - 130424
Assembly page 45/64
Page 46

Copies of the I/B. Please reproduce them without any
Fax +32 2 359 95 50
changes except under special instruction from Team
International BELGIUM. The pages must be reproduced
and folded in order to obtain a booklet A5 (+/- 148.5 mm
width x 210 mm height). When folding, make sure you
keep the good numbering when you turn the pages of
the I/B. Don’t change the page numbering. Keep the
language integrity.
ZASADY BEZPIECZNEGO UŻYTKOWANIA
Zanim zaczniesz używać urządzenie przeczytaj uważnie instrukcję i postępuj wyłącznie z jej
wskazaniami.
Ważne: Urządzenie może być użytkowane przez dzieci w wieku 14 lat i więcej oraz osoby z
ograniczonymi zdolnościami fizycznymi, czuciowymi lub umysłowymi, albo osoby nie mające
doświadczenia i znajomości sprzętu, jeśli zastosowano nad nimi nadzór lub udzielono im
instrukcji dotyczących bezpiecznego użytkowania urządzenia i związanych z tym
niebezpieczeństw. Dzieci nie powinny bawić się tym urządzeniem. Czyszczenie i konserwacja
przez użytkownika nie powinny być wykonywane przez dzieci bez nadzoru.
Zanim włączysz urządzenie sprawdź czy napięcie sieciowe zgadza się z parametrami
podanymi na tabliczce znamionowej urządzenia.
Podczas użycia nie zostawiaj urządzenia bez nadzoru.
Bazę urządzenia ustaw na stabilnej powierzchni (stole lub podłodze).
Urządzenie podłącz do uziemionego gniazda zasilającego.
Aby uniknąć przeładowania linii zasilającej nie podłączaj do tego samego obwodu
elektrycznego innego urządzenia.
Urządzenie należy podłączyć do gniazda wyposażonego w bezpiecznik 10-amperowy lub
większy. Nie podłączaj urządzenia jeżeli gniazdo nie jest zabezpieczone takim
bezpiecznikiem. Ze względów bezpieczeństwa nie usuwaj bezpiecznika.
Nie zostawiaj włączonego urządzenia (zwłaszcza żelazka i przewodu) bez nadzoru, i
trzymaj z dala od dzieci i osób niepowołanych kiedy jest podłączone do sieci lub się
chłodzi.
Regularnie sprawdzaj czy kabel zasilający nie jest uszkodzony. Nie używaj urządzenia z
uszkodzonym kablem zasilającym. Wszelkie naprawy powinny być dokonane przez
wykwalifikowanego elektryka(*). Jeżeli przewód jest uszkodzony, musi zostać zastąpiony
przez wykwalifikowanego elektryka(*) w celu uniknięcia niebezpieczeństwa.
Urządzenie służy tylko do użytku domowego i powinno być używane zgodnie ze
wskazaniami niniejszej instrukcji.
Nie zanurzaj żelazka i bazy w wodzie ani żadnym innym płynie.
Nie używaj w pobliżu źródeł ciepła.
Zadbaj aby przewód zasilający i przewód łączący żelazko z bazą nie stykały się z
gorącymi powierzchniami.
Nie używaj na zewnątrz, zadbaj aby urządzenie pracowało w suchym otoczeniu.
Nigdy nie używaj urządzeń ani części nie posiadających rekomendacji producenta
ponieważ może to być niebezpieczne dla użytkownika. Mogą one również wpłynąć na
wadliwe działanie urządzenia lub jego uszkodzenie.
Nigdy nie ciągnij, nie podnoś itp. urządzenia za kabel ani nie wyłączaj wtyczki z sieci w ten
sposób. Nie owijaj kabla wokół urządzenia, nie zginaj go, nie skręcaj.
Wyłączaj urządzenie z sieci kiedy nie jest używane.
Zachowaj ostrożność aby nie poparzyć się przez dotkniecie metalowych części lub
gorącą wodą i parą wodną. Nagrzewające się powierzchnie zostały zaznaczone
symboleml . Zachowaj szczególna ostrożnoć: płyty mogą być bardzo gorace.
Używaj urządzenia w przestronnym miejscu. Zadbaj aby nie stykało się z zasłonami,
firanami i innymi łatwopalnymi materiałami.
Nie wlewaj do zbiornika na wodę octu, detergentów odkamieniających lub innych
chemikaliów.
Nie używaj urządzenia bez zbiornika na wodę i wkładki odkamieniającej.
Przed pierwszym użyciem zdejmij naklejki i wszystkie materiały, w które zapakowane jest
urządzenie. Przetrzyj stopę żelazka miękką ściereczką.
46 TKG SIS 1002 - 130424
Assembly page 46/64
Page 47

Copies of the I/B. Please reproduce them without any
Fax +32 2 359 95 50
Rodzaj tkaniny
Temperatura
Prasowanie parą
Nylon
Syntetyczne (np. akryl,
wiskoza, poliamid,
poliester, …)
Jedwab
MIN
NIE
Wełna
TAK
Bawełna
Len
MAX
TAK
changes except under special instruction from Team
International BELGIUM. The pages must be reproduced
and folded in order to obtain a booklet A5 (+/- 148.5 mm
width x 210 mm height). When folding, make sure you
keep the good numbering when you turn the pages of
the I/B. Don’t change the page numbering. Keep the
language integrity.
Przy pierwszym użyciu, po włączeniu, może pojawić się niewielka ilość dymu i nieprzyjemny
zapach. Wszelkie pozostałości procesu produkcyjnego ulegną wypaleniu. Jest to zjawisko
normalne.
Urządzenie powinno być używane i przechowywane na równej, stabilnej powierzchni.
Nie używaj urządzenia jeśli zauważysz widoczne oznaki zniszczenia np. po upadku.
Jeżeli ustawiasz żelazko na jego podstawie (jeżeli ten model urządzenia jest dodatkowo
wyposażony) zwróć uwagę aby całość stała stabilnie.
Nie używaj urządzenia, jeśli zbiornik na wodę przestanie działać lub ulegnie zniszczeniu.
Aby uniknąć ryzyka porażenia prądem, wszelkie naprawy powinny być dokonane przez
serwis naprawczy.
Przed użyciem całkowicie rozwiń i wyprostuj przewód zasilający i łączący.
Włącznik, przy włączaniu i wyłączaniu urządzenia powinien być ustawiony w pozycji “0”.
Przed czyszczeniem lub przechowywaniem wyłącz urządzenie z sieci i pozostaw aż
całkowicie ostygnie.
W CZASIE GDY URZADZENIE JEST PODŁĄCZONE DO SIECI I GDY PRODUKUJE PARĘ WODNĄ,
NIE OTWIERAJ ZATYCZKI WLEWU ZBIORNIKA WODY.
(*) Wykwalifikowany elektryk: Osoba wskazana przez dział sprzedaży producenta lub importera
lub każda osoba posiadająca niezbędne kwalifikacje umożliwiające dokonywanie tego typu
napraw bez stwarzania zagrożenia. W każdym przypadku urządzenie należy przekazywać tym
osobom.
PRZED PIERWSZYM UŻYCIEM
Zalecamy wyczyszczenie żelazka zgodnie z następującą procedurą: napełnij zbiornik na
wodę, podłącz urządzenie do gniazdka, naciśnij włącznik zasilania bojlera i włącznik
zasilania żelazka, ustaw temperaturę w pozycji “LINEN” oraz regulację parowania w
pozycji MAX i pozwól aby urządzenie pracowało przez 10 minut. Kiedy urządzenie
rozgrzeje się do ustawionej temperatury, zdejmij żelazko z bazy i trzymając w pozycji
wertykalnej naciśnij przycisk parowania i trzymaj wciśnięty przez około 30 sekund.
Następnie odczekaj kolejne 30 sekund i powtórz cykl dwukrotnie.
Wyłącz urządzenie (włącznik zasilania bojlera i włącznik zasilania żelazka w pozycji OFF
“0”), odłącz urządzenie od sieci zasilającej i pozostaw do ostygnięcia. Następnie przetrzyj
stopę żelazka miękką wilgotną ściereczką.
ŻELAZKO: ZALECENIA I USTAWIENIA TEMPERATURY
Przed prasowaniem sprawdź wskazania producenta na metce ubrania.
Jeżeli producent nie wskazał sposobu prasowania a znasz rodzaj materiału możesz
postępować według wskazówek poniższej tabeli.
47 TKG SIS 1002 - 130424
Assembly page 47/64
Page 48

Copies of the I/B. Please reproduce them without any
Fax +32 2 359 95 50
changes except under special instruction from Team
International BELGIUM. The pages must be reproduced
and folded in order to obtain a booklet A5 (+/- 148.5 mm
width x 210 mm height). When folding, make sure you
keep the good numbering when you turn the pages of
the I/B. Don’t change the page numbering. Keep the
language integrity.
Włącz urządzenie do sieci zasilającej i naciśnij włącznik zasilania żelazka. Włącznik się
zaświeci, wskazując, że urządzenie pracuje i rozgrzewa się. Następnie ustaw temperaturę
żelazka w żądanej pozycji. Lampka wskaźnika temperatury zapali się sygnalizując
nagrzewanie żelazka. Po osiągnieciu ustawionej temperatury lampka zgaśnie. Możesz
rozpocząć prasowanie.
Podczas prasowania lampka będzie zapalać się co jakiś czas. Urządzenie sygnalizuje w
ten sposób nagrzewanie stopy.
Tabela wskazuje najbardziej popularne materiały. Jeżeli tkanina wykonana jest z mniej
znanych materiałów zalecamy prasowanie najniższą temperaturą urządzenia.
Żelazko szybciej nagrzewa się szybciej niż stygnie. Rozpoczynaj prasowanie na najniższej
temperaturze i stopniowo zwiększaj.
Jeżeli prasowany materiał wykonany jest z mieszanki różnego rodzaju włókien, ustawiaj
najniższa temperaturę pracy urządzenia (np. dla materiału wykonanego z 60% poliestru i
40% bawełny ustaw temperaturę odpowiednia dla poliestru, bez użycia pary). Jeżeli nie
znasz rodzaju tkaniny spróbuj dopasować podobny materiał i na ścinku materiału dobierz
temperaturę.
Dla tkanin w 100% wełnianych zalecamy prasowanie przez inny materiał. Dotyczy to
również prasowania parą.
Prasowanie parą może spowodować “świecenie” tkaniny. Aby uniknąć tego rodzaju
efekty, prasuj na lewej stronie lub przykrywając innym, cienkim materiałem.
Aksamit i podobne materiały prasuj w jednym kierunku, nie przytrzymuj w jednym miejscu.
Tkaniny syntetyczne I jedwab prasuj na lewej stronie bez użycia pary.
NAPEŁNIANIE ZBIORNIKA WODY
1. Ustaw bazę na stabilnej, płaskiej powierzchni.
2. Otwórz wlew zbiornika na wodę i napełnij czystą wodą do poziomu "MAX", ale nie
przekraczaj tego poziomu aby nie przepełnić. Zalecamy używanie zdemineralizowanej
wody.
3. Zamknij nasadkę zbiornika na wodę.
4. Nie napełniaj octem, detergentami I środkami chemicznymi.
UWAGA: wkładka zapobiegająca odkładaniu kamienia powinna zawsze znajdować się na
swoim miejscu. Nie używaj urządzenia bez wkładki.
NAPEŁNIANIE ZBIORNIKA PODCZAS UŻYCIA
Zbiornik można napełniać tylko, jeżeli urządzenie nie wytwarza pary pod ciśnieniem. Wyłącz
urządzenie, odłącz z sieci i dalej postępuj zgodnie ze wskazówkami w dziale "Napełnianie
zbiornika wody".
PRASOWANIE PARĄ
Napełnij zbiornik wodą i włącz urządzenie do sieci.
Jak wskazano na pokrętle i tabeli ustawień temperatury prasowanie parą możliwe jest
tylko w zakresach lub .
Naciśnij włącznik zasilania bojlera. Włącznik się zaświeci a lampka kontrolna pompy
będzie migać do momentu osiągnięcia przez urządzenie żądanej temperatury – wtedy
zaświeci się na stałe.
Naciśnij włącznik zasilania żelazka i ustaw pokrętło temperatury w żądanej pozycji.
Włącznik zasilania żelazka oraz lampka kontrolna żelazka, zaświecą się. Kiedy żelazko
nagrzeje się do ustawionej temperatury, lampka kontrolna zgaśnie. Możesz rozpocząć
prasowanie.
48 TKG SIS 1002 - 130424
Assembly page 48/64
Page 49

Copies of the I/B. Please reproduce them without any
Fax +32 2 359 95 50
changes except under special instruction from Team
International BELGIUM. The pages must be reproduced
and folded in order to obtain a booklet A5 (+/- 148.5 mm
width x 210 mm height). When folding, make sure you
keep the good numbering when you turn the pages of
the I/B. Don’t change the page numbering. Keep the
language integrity.
Za pomocą pokrętła regulacji pary możesz ustawić siłę parowania. Uwaga: maksymalny
poziom parowania (“MAX”) tylko jeżeli temperaturę prasowania jest wyższa niż pozycja
, w przeciwnym wypadku ze stopy żelazka może kapać woda.
Naciśnij przycisk uderzenia parą aby gorąca para zaczęła wydobywać się ze stopy
żelazka. Po zwolnieniu przycisku para przestanie się wydobywać. Jeżeli chcesz aby para
wydobywała się ze stopy żelazka przytrzymaj przycisk wciśnięty.
Podczas prasowania lampka kontrolna będzie zapalać się i gasnąć. Oznacza to
nagrzewanie urządzenia. Możesz kontynuować prasowanie.
Jeżeli używasz dużą ilość pary do prasowania w dość krótkim czasie, urządzenie może nie
nadążać z produkcją pary podobnie jak przy braku wody w zbiorniku.
Kiedy zbiornik na wodę jest pusty, wskaźnik wody zapali się. Napełnij zbiornik, aby
kontynuować prasowanie parą. Wskaźnik uzupełniania wody zgaśnie gdy zbiornik na
wodę zostanie uzupełniony.
Uwaga: przy prasowaniu parą możesz zaobserwować lekkie wibracje urządzenia. Jest to
zjawisko normalne i występuje podczas włączania pompy. Jeśli hałas nie zmniejszyła się po 60
sekundach, sprawdź czy kartridż został zmontowany poprawnie.
PRASOWANIE W POZYCJI PIONOWEJ
Ustaw temperaturę prasowania w pozycji MAX. Prasowanie parą można regulować w
dowolnym zakresie.
Powieś tkaninę na wieszaku I ustaw żelazko stopa równolegle do materiału w odległości kilku
centymetrów. Przesuwaj żelazko naciskając przycisk uderzenia parą.
PRASOWANIE NA SUCHO
Podłącz urządzenie do sieci i naciśnij włącznik zasilania żelazka.
Ustaw temperaturę prasowania.
Kiedy zgaśnie lampka kontrolna możesz rozpocząć prasowanie.
Aby prasować bez użycia pary, pozostaw włącznik zasilania bojlera w pozycji OFF i nie
PO ZAKOŃCZENIU PRASOWANIA
Zalecamy wyczyszczenie żelazka zgodnie z następującą procedurą: napełnij zbiornik na
Wyłącz urządzenie (włącznik zasilania bojlera i wyłącznik żelazka w pozycji OFF “0”),
Opróżnij zbiornik na wodę.
Podczas przechowywania zalecamy umieszczenie żelazka na bazie i ustawienie całości w
WKŁADKA ZAPOBIEGAJĄCA ODKŁADANIU KAMIENIA (ANTI-CALC)
Urządzenie wyposażone jest w specjalna wkładkę znajdującą się wewnątrz zbiornika na
Wkładkę należy wymienić mniej więcej raz na 2-3 miesiące. Czas działania wkładki może
naciskaj przycisku.
wodę, podłącz urządzenie do gniazdka, naciśnij włącznik zasilania bojlera oraz włącznik
zasilania żelazka, ustaw temperaturę w pozycji “LINEN” oraz regulację parowania w
pozycji MAX i pozwól aby urządzenie pracowało przez 10 minut. Kiedy urządzenie
rozgrzeje się do ustawionej temperatury, zdejmij żelazko z bazy i trzymając w pozycji
wertykalnej naciśnij przycisk parowania i trzymaj wciśnięty przez około 30 sekund.
Następnie odczekaj kolejne 30 sekund i powtórz cykl dwukrotnie.
wyłącz urządzenie z sieci i pozostaw aż ostygnie.
miejscu nie narażonym na uderzenia.
wodę. Dzięki niej woda z kranu zostanie poddana filtracji.
być mniejszy w przypadku używania bardzo twardej wody. Jakość wody używanej do
49 TKG SIS 1002 - 130424
Assembly page 49/64
Page 50

Copies of the I/B. Please reproduce them without any
Fax +32 2 359 95 50
Problem
Przyczyna
Rozwiązanie
Ze stopy żelazka
wydobywa się biały
osad
Jest to zjawisko normalne jeżeli
żelazko jest nowe
Osad powinien zniknąć po kilku
użyciach
Podczas prasowania
parą, ze stopy żelazka
kapie woda
Po rozpoczęciu prasowania,
czujnik pary może być nadal
zimny przez co temperatura pary
spada
Jest to zjawisko normalne, które
powinno ustąpić po kilku
sekundach. Można ustawić
żelazko n kawałku starego
materiału, aby wchłoną
wydobywającą się wodę
Para nie wydobywa się
z generatora
Włącznik zasilania bojlera nie
został włączony lub w zbiorniku
nie ma wystarczającej ilości wody
Naciśnij włącznik zasilania bojlera
lub napełnij zbiornik wodą.
Poczekaj aż zgaśnie lampka
kontrolna
Para nie wydobywa się
z żelazka kiedy wciskam
przycisk
Podczas pracy w najwyższym
zakresie temperatury, nie widać
bardzo gorącej pary
Aby sprawdzić czy wydobywa się
para, ustaw po wylotem lusterko
Stopa żelazka jest
brudna
Zanieczyszczenia z wody osadzają
się na stopie lub temperaturę
prasowania została źle dobrana
do rodzaju materiału
Wyczyść stopę miękką wilgotną
ściereczką
changes except under special instruction from Team
International BELGIUM. The pages must be reproduced
and folded in order to obtain a booklet A5 (+/- 148.5 mm
width x 210 mm height). When folding, make sure you
keep the good numbering when you turn the pages of
the I/B. Don’t change the page numbering. Keep the
language integrity.
prasowania można poprawić mieszając wodę z kranu z wodą destylowaną w
proporcjach 50-50 %.
Aby wyjąć wkładkę, otwórz zbiornik na wodę, a następnie wyjmij wkładkę. Przed
założeniem nowej wkładki, zanurz ją na kilka minut w czystej wodzie.
W celu zakupu wkładki skontaktuj się z serwisem klienta.
Nie używaj urządzenia bez wkładki odkamieiającej!
CZYSZCZENIE
Plastikowe części urządzenia przetrzyj wilgotną ściereczka.
Stopę żelazka czyść za pomocą specjalnych preparatów. Nie używaj preparatów
ściernych ani ostrych narzędzi.
Nie zanurzaj w wodzie ani żadnym innym płynie.
PROBLEMY Z DZIAŁANIEM URZĄDZENIA
OCHRONA ŚRODOWISKA NATURALNEGO
Symbol na tabliczce znamionowej urządzenia oznacza, że produktu nie wolno wyrzucać
razem z innymi odpadami z gospodarstw domowych. Polskie prawo zabrania pod karą
grzywny łączenia zużytego sprzętu elektrycznego i elektronicznego wraz z innymi odpadami.
Dbając o pozbycie się produktu w należyty sposób, można zapobiec potencjalnym
negatywnym skutkom dla środowiska naturalnego i zdrowia ludzkiego, jakie mogłyby wyniknąć
z niewłaściwego postępowania z odpadami powstałymi ze zużytego sprzętu elektronicznego.
System zbierania zużytego sprzętu jest zgodny z obowiązującymi na terenie Rzeczpospolitej
Polskiej normami prawnymi, (Ustawa z dnia 29 lipca 2005, Dziennik Ustaw Nr 180 poz.1494 i
1495) obowiązki wynikające z ustawy przejęła w imieniu przedsiębiorcy Organizacja Odzysku.
Gospodarstwo domowe pełni istotną rolę w przyczynianiu się do ponownego użycia i odzysku,
w tym recyklingu, zużytego sprzętu elektrycznego. Przestrzeganie zasad selektywnej zbiórki
sprzętu ma zapewnić właściwy poziom ochrony zdrowia ludzkiego i środowiska naturalnego.
Waga netto urządzenia - 3.7 kg
50 TKG SIS 1002 - 130424
Assembly page 50/64
Page 51

Copies of the I/B. Please reproduce them without any
Fax +32 2 359 95 50
changes except under special instruction from Team
International BELGIUM. The pages must be reproduced
and folded in order to obtain a booklet A5 (+/- 148.5 mm
width x 210 mm height). When folding, make sure you
keep the good numbering when you turn the pages of
the I/B. Don’t change the page numbering. Keep the
language integrity.
MĂSURI DE SIGURANŢĂ
Va rugam citiţi cu atenţie aceste instrucţiuni înainte de a folosi aparatul si intotdeauna urmati
instructiunile de siguranta si operare.
Important: Acest aparat poate fi utilizat de către copii peste 14 ani şi persoanele cu capacităti
reduse, fizice, senzoriale sau mentale sau cu o lipsă de experientă sau cunostinte, dacă
acestea sunt supravegheate sau instruite privind utilizarea în sigurantă a aparatului si riscurile
implicate. Copiii nu trebuie să se joace cu aparatul. Curătarea si întretinerea de catre utilizator
nu trebuie să fie făcută de către copii fără supraveghere.
Verificati daca tensiunea la care conectati aparatul corespunde cu tensiunea
recomandata.
Nu lasati aparatul nesupravegheat in timpul folosirii.
Plasati baza/rezervor pe o masa sau o suprafata plana stabila.
Conectati aparatul la o priza cu impamantare.
Pentru a evita supraincarcarea circuitelor, nu folositi mai multe aparate cu voltaj inalt pe
acelasi circuit electric.
Daca este necesar un prelungitor intre aparat si priza, se recomanda folosirea unuia de
cel putin 10 amperi. Niciodata nu folositi un cablu mai mic de 10 amperi.
Niciodata nu lasati aparatul (in special fierul de calcat si firul) nesupravegheat sau la
indemana copiilor sau persoanelor neavizate cand este introdus in priza sau cand se
raceste.
Din cand in cand verificati cordonul electric pentru deteriorari. Niciodata nu folositi
aparatul daca cordonul electric sau aparatul prezinta semen de deteriorare. In acest caz,
reparatiile trebuiesc facute de un electrician calificat(*). Daca cordonul electric prezinta
deteriorari acesta trebuie schimbat de un electrician calificat(*) in scopul de a evita orice
pericol.
Utilizati aparatul numai in scopuri casnice si conform cu instructiunile de folosire.
Nu scufundati aparatul sau cablul de alimentare in apa sau alte lichide. Nu-l spalati in
masina de spalat vase.
Nu utilizati aparatul pe sau langa suprafete fierbinti.
Nu permiteti cordonului electric sa atinga partile fierbinti ale bazei aparatului.
Nu folositi aparatul in exterior. Depozitati-l intr-un mediu uscat.
Nu utilizati accesorii care nu sunt recomandate de producator. Folosirea lor poate
constitui un risc pentru dvs si integritatea aparatului.
Nu deconectati aparatul tragand de firul de alimentare. Verificati inainte ca firul de
alimentare sa nu fie prins sau rasucit.
Deconectati aparatul de la retea, atunci cand nu il folositi.
Arsurile pot apare de la atingerea partilor metalice incinse, apa fierbinte sau aburu. Daca
apare simbolul pe o suprafata va trebui sa fiti atenti cand puneti mana in aceasta
zona. Acest symbol inseamna "ATENTIE aceasta suprafata poate sa fie foarte fierbinte in
timpul functionarii".
Intotdeauna asezati fierul pe baza aparatului, prin urmare la locul prevazut. Nu asezati
fierul pe suportul din spate. Asigurativa ca nu intra in contact cu material inflamabile sau
cu cordonul de alimentare.
Nu umpleti rezervorul cu otet, substante decapante sau alte produse chimice.
Inainte de prima folosire indepartati etichetele si foliile de protectie. Stergeti talpa fierului
cu o carpa umeda non-abraziva.
Unele parti ale aparatului sunt unse cu un strat subtire de lubrifiant care se arde la prima
folosire putand rezulta fum. Acest lucru nu este periculos pentru dvs sau aparat.
Fierul de calcat va fi folosit si amplasat pe o suprafata plana si stabila.
51 TKG SIS 1002 - 130424
Assembly page 51/64
Page 52

Copies of the I/B. Please reproduce them without any
Fax +32 2 359 95 50
Tipul de textile
Temperatura
Calcare cu aburi
Nylon
Sintetic (acrylic, vascoza,
poliamide, polyester...)
Matase
MIN
NU
Lana
DA
Bumbac
Lenjerie
MAX
DA
changes except under special instruction from Team
International BELGIUM. The pages must be reproduced
and folded in order to obtain a booklet A5 (+/- 148.5 mm
width x 210 mm height). When folding, make sure you
keep the good numbering when you turn the pages of
the I/B. Don’t change the page numbering. Keep the
language integrity.
Nu folositi fierul de calcat daca a cazut pe jos daca prezinta stricaciuni sau curge.
Cand fierul de calcat este pus pe baza sa, asigurati-va ca suprafata este deasemeni
stabila.
Procedati la fel daca rezervorul nu mai functioneaza. Pentru a evita riscul de
electrocutare, nu dezasamblati rezervorul de aburi, duceti-l la service. Asamblarea
incorecta poate cauza electrocutare daca rezervorul de aburi este folosit.
Desfaceti complet cablul electric si furtunul de alimentare inainte sa incepeti sa calcati.
Atat baza rezervor cat si fierul de calcat trebuie setate pe pozitia ‘0’ inainte de a le
conecta sau deconecta de la retea.
Scoateti din priza aparatul si lasati fierul si tancul de apa sa se raceasca inainte de a-l
curata sau depozita si pentru statiile de calcat presurizate (depinde de model) inainte de
deschidere, umpleti sau goliti tancul de apa.
PENTRU STATIILE DE CALCAT PRESURIZATE (DEPINDE DE MODEL), NICIODATA NU DESFACETI
CAPACUL TANCULUI DE ABUR ATATA TIMP CAT APARATUL ESTE CONECTAT LA PRIZA DE
CURENT SI IN SPECIAL CAND ABURUL ESTE PRODUS.
(*) Electrician calificat: departmental de vanzari al producatorului sau imporatorului sau orice
persoana care este calificata, competenta si aprobata de acestia sa execute astfel de
reparatii in scopul de a evita orice fel de pericol. In orice caz trebuie sa returnati aparatul
acestui electrician.
INAINTE DE UTILIZARE
Va recomandam sa curatati aparatul inainte de prima utilizare: umpleti rezervorul cu apa,
introduceti in priza aparatul, apasati butonul de pornire al boilerului si butonul de pornire
al fierului, puneti termostatul pe pozitia “LENJERIE” (“LINEN”) si regulatorul de abur la
putere maxima (MAX) si lasati sa se incalzeasca 10 minute. Cand a s-a ajuns la
temperatura dorita, luati fierul dupa baza, tineti-l vertical si tineti butonul pentru abur
apasat timp de 30 de secunde, asteptati 30 de secunde si repetati ciclul de 2 ori.
Opriti aparatul (intrerupatorul de putere al boilerului si al fierului in pozitia oprit “0”),
scoateti-l din prize, lasati-l sa se raceasca suficient si curatati talpa cu un material umed.
FIERUL DE CALCAT: MASURI DE PREVEDERE SI TEMPERATURI
Verificati etichetele atasate pe haine si respectati temperaturile recomandate.
Daca etichetele lipsesc, dar cunoasteti tipul de material, folositi tabelul de mai jos.
52 TKG SIS 1002 - 130424
Assembly page 52/64
Page 53

Copies of the I/B. Please reproduce them without any
Fax +32 2 359 95 50
changes except under special instruction from Team
International BELGIUM. The pages must be reproduced
and folded in order to obtain a booklet A5 (+/- 148.5 mm
width x 210 mm height). When folding, make sure you
keep the good numbering when you turn the pages of
the I/B. Don’t change the page numbering. Keep the
language integrity.
Bagati aparatul in priza si apasati intrerupatorul fierului de calcat. Becul se va aprinde,
indicand ca aparatul functioneaza si se incalzeste. Setati temperatura pe pozitia dorita,
lampa indicatoare a aparatului se va aprinde. Cand temperatura dorita este atinsa
lampa se va stinge si puteti incepe.
In timp ce veti calca, aceasta lampa se va mai aprinde din cand in cand. Cand se
intampla asta, talpa se incalzeste dinnou la temperature dorita. Puteti continua.
Tabelul este valabil doar pentru material din fibre. Daca sunt aplicate incretituri, sclipici,
trebuie calcat la temperatura mica.
Fierul de calcat se incalzeste mai repede decat se raceste. De accea incepeti sa calcati
produse care cer temperature mica.
Daca articolul este facut dintr-o textura de diferite fibre, trebuie sa alegeti cea mai mica
temperatura pentru combinatia de fibre.
Articolele din lana 100% se pot calca cu abur. Este recomandat sa folositi abur si calcare
uscata.
Catifeaua si alte texturi care se pateaza trebuie calcate intr-un singur sens. Intotdeauna
miscati fierul.
Calcati pe spate materialele sintetice si din matase, nu este recomandat sa folositi abur
pentru ca pot aparea pete.
UMPLEREA REZERVORULUI CU APA (pentru calcare cu aburi)
1. Asezati baza pe o suprafata sigura.
2. Deschideti capacul rezervorului si umpleti rezervorul de apa pana la nivelul MAX. Nu
umpleti peste acest nivel. Puteti folosi apa de la robinet dar este mai bine sa folositi apa
distilata.
3. Inchideti capacul rezervorului de apa.
4. Niciodata nu folositi otet, detergent sau alte produse chimicale.
Atentie! Intotdeauna asigurativa ca cartusul anti-calcar situat in tancul de apa este bine fixat.
Niciodata nu folositi aparatul fara cartusul anti-calcar.
UMPLEREA REZERVORULUI CU APA IN TIMPUL FUNCTIONARII
Daca rezervorul de apa al aparatului nu are presiune, il puteti umple din nou in timpul
functionari. Pt. a face asta, opriti aparatului , scoateti-l din priza si procedati asa cum este scris
in sectiunea “umplerea rezervorului cu apa”.
CALCARE CU ABURI
Umpleti rezervorul cu apa si bagati aparatul in priza.
Asa cum indica termostatul reglabil si tabelul calcarea cu abur este posibila numai la
temperaturi inalte, asa ca setati pe sau .
Apasati butonul de pornire al boilerului. Intrerupatorul se va aprinde si lumina pilot a
pompei va licari pana cand temperature dorita este atinsa.
Apasati butonul de pornire a fierului si setati termostatul la temperatura dorita. Butonul de
pornire a fierului si lampa indicatoare se vor aprinde. Cand s-a ajuns la temperature
dorita, lampa de pornire se stinge si veti putea folosi functia de abur.
Folositi butonul de abur pentru a regal cantitatea de abur. NOTA: Cantitatea maxima de
abur (“max”) poate fi folosita doar atunci cand temperature este mai mare de
altfel apa va curge.
Apasati butonul de aburi pentru a elibera aburi prin talpa. Nu mai apasati si aburii se
opresc. Daca doriti un jet continuu de abur tineti apasat butonul si trageti partea violeta
53 TKG SIS 1002 - 130424
Assembly page 53/64
Page 54

Copies of the I/B. Please reproduce them without any
Fax +32 2 359 95 50
changes except under special instruction from Team
International BELGIUM. The pages must be reproduced
and folded in order to obtain a booklet A5 (+/- 148.5 mm
width x 210 mm height). When folding, make sure you
keep the good numbering when you turn the pages of
the I/B. Don’t change the page numbering. Keep the
language integrity.
inapoi ptr a bloca butonul de abur. Pentru a oprii jetul de abur continu impingeti partea
violeta si deblocati butonul de abur.
Cand folositi aparatul, lampa de functionare se va oprii si va pornii din cand in cand, asta
inseamna ca temperatura este regulate cu ajutorul termostatului. Puteti calca in
continuare.
Cand folositi mult abur intr-o perioada scurta de timp, cantitatea de abur este redusa
pana cand aparatul produce din nou indeajuns pentru a reduce diferenta. Acest
fenomen se produce si atunci cand nu este suficienta apa in rezervor.
Cand rezervorul de apa se goleste, indicatorul pentru reumplere se aprinde. Daca vreti sa
folositi abur trebuie sa umpleti rezervorul cu apa. Indicatorul de avertizare reumplere apa
se va stinge cand rezervorul s-a umplut.
Nota: cand incepeti sa folositi functia de abur, este normal ca pompa electrica sa scoata
niste sunete de vibratii. Aceasta se datoreaza aerului din interiorul cartusului anti-calcar si se va
reduce cand aerul a fost pompat in afara. Daca zgomotul nu s-a diminuat dupa 60 de
secunde, verificati ca asamblarea cartusului sa fie corecta.
VAPORIZARE IN POZITIE VERTICALA
Pozitionati pe temperature maxima pentru o calcare cu abur vertical. Rata aburului poate fi
reglata tinand cont de nevoile dorite. Pentru a calca usor se aseaza hainele pe un umeras si
se deplaseaza fierul la mica distanta de material si se actioneaza butonul pentru vapori.
CALCARE USCATA
Bagati aparatul in priza si apasati butonul de pornire a fierului.
Setati temperature dorita.
Cand lampa de functionare se stinge ptr. prima data, puteti incepe sa calcati.
La folosirea fara abur, lasati butonul de pornire a boilerului pe OFF si nu apasati butonul.
CAND ATI TERMINAT DE CALCAT
Va recomandam sa curatati fierul dupa folosire: umpleti rezervorul cu apa, introduceti
stecherul in priza, apasati butonul de pornire al boilerului si butonul de pornire al fierului,
setati temperatura ptr. “LENJERIE” (“LINEN”) si regulatorul de abur pe MAX si lasati fierul sa
se incalzeasca ptr 10 minute. Cand temperatura a fost atinsa, luati fierul dupa baza, tineti-
l vertical si tineti butonul de abur dedesubt ptr. 30 de sec., asteptati 30 de sec. si repetati
ciclul.
Opriti fierul (butonul boiler si butonul fier in pozitia oprit “0”), scoateti din priza si lasati-l sa
se raceasca.
Goliti rezervorul de apa.
Va recomndam sa asezati fierul pe baza atunci cand il depozitati. Locul de depozitare
trebuie sa fie non alunecos pentru a nu deteriora talpa fierului.
CARTUS ANTI-CALCAR
Aparatul este prevazut cu un cartus anti-calcar localizat inauntrul rezervorului de apa.
Este necesar sa inlocuiti cartusul la 2-3 luni. Aceasta perioada poate sa varieze in functie
Pentru a il scoate, deschideti rezervorul si ridicati cartusul din rezervor. Cand puneti un nou
Puteti folosi apa de la robinet ptr ca este filtrata de cartus.
de cat de des este folosit. Puteti intarzia inlocirea filtrului fososind apa distilata sau un mix
50% apa de la robinet 50% apa distilata.
cartus anti-calcar in rezervorul de apa scufundati-l in apa inainte sa folositi aparatul ptr a
obtine o performanta mai buna.
54 TKG SIS 1002 - 130424
Assembly page 54/64
Page 55

Copies of the I/B. Please reproduce them without any
Fax +32 2 359 95 50
Problema
Cauze posibile
Solutie
Praf alb cade din plita
Este normal cand aparatul este
nou
Praful nu este daunator si va
disparea dupa cateva folosiri
Apa curge cand
calcati cu abur
Cand incepeti sa calcati cu abur,
filtrul de abur este rece si raceste
aburul
Asta este normal, dupa cateva
secunde jetul de abur va fi OK.
Puteti pune fierul la inceput pe o
haina veche ptr a fi absorbita
apa
Nu iese abur din aparat
Butonul de pornire a boilerului nu
a fost pornit sau nu este destula
apa in rezervor
Apasati butonul de pornire a
boilerului sau umpleti rezervorul
de apa si asteptati pana se stinge
lampa de functionare ptr prima
data
Nu iese abur cand
butonul ptr abur este
apasat
Cand calcati la o temperature
foarte ridicata, aburul nu poate fi
vazut
Puneti o oglinda sub aparat ptr a
vedea daca iese abur
Plita este murdara
Temperature este prea ridicata
ptr materialul pe care-l calcati
Curatati plita sau reglati
temperatura
changes except under special instruction from Team
International BELGIUM. The pages must be reproduced
and folded in order to obtain a booklet A5 (+/- 148.5 mm
width x 210 mm height). When folding, make sure you
keep the good numbering when you turn the pages of
the I/B. Don’t change the page numbering. Keep the
language integrity.
Pentru a cumpara un nou cartus contactati cel mai apropiat service.
Niciodata nu folositi aparatul fara cartus anti-calcar.
CURATARE SI INTRETINERE
Partile de plastic ale aparatului pot fi curatate cu un material umed.
Pentru a curata talpa fierului gasiti produse speciale in magazine. Nu folositi niciodata
produse abrazive.
Niciodata nu scufundati aparatul in apa sau alt lichid.
PROBLEME
PROTECTIA MEDIULUI – DIRECTIVA 2002/96/EC
Simbolul de pe tăbliţa cu datele tehnice înseamnă că produsul nu se poate arunca
împreună cu alte reziduuri menajere. Legea pedepseşte cu amendă persoanele care aruncă
aparatele electrice şi electronice împreună cu alte reziduuri.
Debarasarea corespunzătoare a produselor uzate previne formarea unor efecte negative
pentru mediul natural şi sănătatea umană, care pot fi produse de manipularea nepotrivită a
reziduurilor rămase din uzarea aparatelor electronice.
55 TKG SIS 1002 - 130424
Assembly page 55/64
Page 56

Copies of the I/B. Please reproduce them without any
Fax +32 2 359 95 50
changes except under special instruction from Team
International BELGIUM. The pages must be reproduced
and folded in order to obtain a booklet A5 (+/- 148.5 mm
width x 210 mm height). When folding, make sure you
keep the good numbering when you turn the pages of
the I/B. Don’t change the page numbering. Keep the
language integrity.
POKYNY NA OBSLUHU
DÔLEŽITÉ BEZPEČNOSTNÉ UPOZORNENIA
Pred používaním zariadenia si pozorne prečítajte tieto pokyny, a vždy dodržujte bezpečnostné
a prevádzkové pokyny v návode.
Dôležité: Osoby (vrátane detí nad 14 rokov), ktoré nie sú schopné používať zariadenie
bezpečným spôsobom kvôli fyzickým, zmyslovým alebo duševným schopnostiam alebo kvôli
nedostatku skúseností alebo vedomostí, nesmú nikdy používať toto zariadenie, ak nie sú pod
dohľadom osoby zodpovednej za ich bezpečnosť alebo ak predtým nedostali pokyny
týkajúce sa bezpečného používania zariadenia.
Na deti je potrebné dôsledne dohliadať, aby nepoužívali toto zariadenie ako hračku. Čistenie
a údržbu prístroja nesmie vykonávať dieťa bez dohľadu zodpovednej osoby.
Skontrolujte, či sa napätie v elektrickej sieti zhoduje s napätím uvedeným na zariadení.
Prístroj nikdy nenechávajte bez dozoru, keď sa používa.
Vždy umiestnite žehličku na stabilnú žehliacu plochu, stôl alebo zem.
Prístroj pripojte iba do uzemnenej sieťovej zásuvky.
Aby sa zabránilo preťaženiu obvodu, nepoužívajte prosím iný spotrebič s vysokým
Ak používate predlžovací kábel, je potrebné použiť o 10 Amperov vyšší kábel. Nikdy
Nikdy nenechávajte spotrebič (predovšetkým žehličku a jej kábel) bez dozoru a v dosahu
Z času na čas skontrolujte, či kábel nie je poškodený. Zariadenie nikdy nepoužívajte, ak
Zariadenie používajte iba na domáce účely a spôsobom, aký je uvedený v týchto
Nikdy prístroj neponárajte do vody alebo iných tekutín, či už kvôli čisteniu alebo inému
Zariadenie nikdy nepoužívajte v blízkosti horúcich plôch.
Dávajte pozor na to, aby sa prívodná šnúra nedotýkala žiadnych teplých častí.
Zariadenie nikdy nepoužívajte vonku a vždy ho umiestňujte do suchého prostredia.
Nikdy nepoužívajte príslušenstvo, ktoré neodporúča výrobca. Môže predstavovať
Zariadenie nikdy nepremiestňujte ťahaním za kábel. Ubezpečte sa, že kábel sa žiadnym
Keď prístroj nepoužívate vždy ho odpojte od zásuvky.
Dotykom horúcich častí, horúcej vody a pary si môžete spôsobiť popáleniny. Buďte prosím
Vždy umiestnite žehličku na podstavec, na to určený. Neklaďte žehličku na jej zadný kryt.
Nikdy neplňte zásobník pary octom, odvápňovacími prostriedkami alebo inými
Pred prvým použitím odstráňte prosím zo žehliacej plochy všetky etikety a ochrannú fóliu.
Pri prvom použití môže vychádzať zo žehličky jemný dym, avšak po krátkej chvíli tento dym
príkonom na rovnakom obvode.
nepožívajte káble pre menovité napätie nižšie ako 10 Amper. Dbajte o to, aby ste o kábel
nezakopli a nevytiahli za kábel spotrebič so siete.
detí alebo nezodpovedných osôb, hlavne ak je prístroj zapojený na sieť, či sa chladí.
kábel alebo samotné zariadenie vykazujú akékoľvek príznaky poškodenia. Všetky opravy
by mal vykonávať kompetentný, kvalifikovaný odborník(*) aby sa predišlo
nebezpečenstvu.
pokynoch.
účelu.
nebezpečenstvo pre používateľa a riziko poškodenia spotrebiča.
spôsobom nemôže niekde zachytiť. Neomotávajte kábel okolo zariadenia ani ho
nezohýbajte.
opatrní. Ak sa nachádza symbol na určitej ploche, znamená to, že plocha sa počas
prevádzky zohreje a je veľmi horúca.
Uistite sa, že to nepríde do styku s horľavými materiálmi alebo prívodným káblom.
chemikáliami.
Utrite žehliacu plochu s mäkkou handričkou.
pominie.
56 TKG SIS 1002 - 130424
Assembly page 56/64
Page 57

Copies of the I/B. Please reproduce them without any
Fax +32 2 359 95 50
Druh textílie
Voľba teploty
Žehlenie parou
Nylon
Syntetika (napr. viskóza,
polyester, …)
Hodváb
MIN
Nie
Vlna
Áno
Bavlna
Ľan
MAX
Áno
changes except under special instruction from Team
International BELGIUM. The pages must be reproduced
and folded in order to obtain a booklet A5 (+/- 148.5 mm
width x 210 mm height). When folding, make sure you
keep the good numbering when you turn the pages of
the I/B. Don’t change the page numbering. Keep the
language integrity.
Žehlička by mala byť používaná a umiestnená na stabilnom rovnom povrchu.
Žehličku nepoužívajte, ak Vám spadla a vykazuje viditeľné znaky poškodenia alebo
vyteká voda.
Keď umiestnite žehličku do podstavca (podľa modelu) prosím uistite sa či je povrch, na
ktorý ste podstavec umiestnili stabilný.
Postupujte rovnako nádržka na vodu prestane fungovať alebo je poškodená. Aby sa
zabránilo elektrickému šoku nerozoberajte žehličku alebo nádržku ale prístroj odovzdajte
kvalifikovanému odborníkovi (*). Nesprávna montáž môže spôsobiť elektrický sok.
Rozmotajte si celé káble pred začatím žehlenia.
Prepínače by ste si mali vždy dať do off polohy ("0") pred zapojením do zásuvky alebo
odpojením zo zásuvky.
Pred čistením odpojte spotrebič zo zásuvky a nechajte vodu vychladnúť. To platí aj pre
umiestnenie žehličky na podstavec alebo pri dopĺňaní vody do nádržky.
Pri parných staniciach (záleží od modelu) nikdy neotvárajte uzáver zásobníka pary, kým
je prístroj pripojený do sieťovej zásuvky a najmä, keď sa para vyrába.
(*) Odborník: Osvedčená zákaznícka služba dodávateľa alebo importéra, ktorý je zodpovedný
za takéto opravy. Pre eventuálne opravy sa prosím obráťte na tento zákaznícky servis.
PRED PRVÝM POUŽITÍM
Pred prvým použitím odporúčame vyčistiť žehličku nasledovne: naplňte nádržku na vodu,
zapojte prístroj do siete, zatlačte vypínač žehliacej plochy a vypínač ohrevu vody dajte
ovládač teploty do polohy "LINEN" a regulátor pary na MAX a nechajte žehličku nahriať
na 10 minút. Keď je teplota dosiahnutá, zoberte žehličku z podstavca, držte ju vo
vertikálnej polohe a držte tlačidlo pary zatlačené na 30 sekúnd, potom počkajte 30
sekúnd a tento cyklus zopakujte dva krát.
Vypnite prístroj (vypínač žehliacej plochy a vypínač ohrevu vody dajte ovládač teploty
do polohy "0") odpojte zo zásuvky, nechajte dostatočne vychladnúť, potom umyte
žehliacu plochu s vlhkou handričkou.
ŽEHLENIE S PAROU: upozornenie pre použitie a teploty
Vždy skontrolujte etiketu s informáciami o žehlení na artikli, ktorý potrebujete ožehliť.
Postupujte podľa nasledujúcich pokynov žehlenia vo všetkých prípadoch.
Ak informácia o spôsobe žehlenia chýba, ale vy poznáte druh materiálu, potom si prosím
pozrite nasledovnú tabuľku teplôt.
57 TKG SIS 1002 - 130424
Assembly page 57/64
Page 58

Copies of the I/B. Please reproduce them without any
Fax +32 2 359 95 50
changes except under special instruction from Team
International BELGIUM. The pages must be reproduced
and folded in order to obtain a booklet A5 (+/- 148.5 mm
width x 210 mm height). When folding, make sure you
keep the good numbering when you turn the pages of
the I/B. Don’t change the page numbering. Keep the
language integrity.
Zapojte prístroj do zásuvky a zatlačte vypínač žehliacej plochy. Prepínač sa rozsvieti, čo
znamená, že spotrebič pracuje a žehlička sa nahrieva. Nastavte požadovanú teplotu,
kontrolka sa rozsvieti. Akonáhle je dosiahnutá požadovaná teplota, kontrolka zhasne a vy
môžete začať žehliť.
Počas žehlenia sa svetelná kontrolka z času na čas rozsvieti. Ak sa takto stane, žehliaca
plocha sa opäť nahrieva na požadovanú teplotu. Môžete pokračovať v žehlení.
Uvedená tabuľka je platná iba pre vláknité materiály. Ak je použité iné prevedenie (lesk,
záhyby...), textíliu prosím žehlite pri nižšej teplote.
Pri žehlení si textílie vytrieďte podľa teploty žehlenia: vlna s vlnou, bavlna s bavlnou...
Žehlička sa nahrieva rýchlejšie, než sa ochladí. Preto začnite žehliť textílie vyžadujúce nižšiu
teplotu, ako sú syntetické materiály. Potom postupne zvyšujte teplotu.
Ak je textília vyrobená z rôznych vlákien, je potrebné vždy vybrať najnižšiu teplotu žehlenia
podľa zloženia týchto vlákien (napr. textília skladajúca sa z 60% polyesteru a 40% bavlny,
by sa mala žehliť pri teplote uvedenej pre polyester a bez pary).
Ak neviete z akého druhu látky je textília vyrobená, nájdite miesto, ktoré bude neviditeľné
pri nosení a vyskúšajte teplotu žehlenie (vždy začnite pri nízkej teplote a postupne zvyšujte
a pozorujte výsledok).
Pri čistých vlnených tkaniny (100% vlna) môže byť stlačená parná pozícia. Odporúča sa
použiť suchú handričku.
Pri textíliách, pri ktorým môže dôjsť pri žehlení ku poškodeniu (lesklé škvrny) odporúčame
žehliť textíliu naruby alebo prerušovane s vlhkou handričkou.
Zamat a ďalšie textílie, ktoré rýchlo získajú lesklé škvrny by sa mali žehliť len v jednom smere
iba ľahkým tlakom.
Vždy žehlite pohybom.
Na zadnú stranu syntetických materiálov a hodváb nie je vhodné používať paru, pretože
to môže spôsobiť škvrny.
NAPLNENIE VODOU (pre žehlenie s naparovaním)
1. Položte žehličku na pevnú plochu.
2. Otvorte kryt na nádržke na vodu a doplňte nádržku vodou na "MAX". Nedopĺňajte vodu
nad "MAX". Môžete použiť vodu z vodovou, ale odporúčame použiť destilovanú vodu.
3. Zatvorte kryt na nádržke na vodu.
4. Nikdy nepoužívajte ocot, saponáty alebo iné chemické prostriedky.
Upozornenie: vždy sa uistite, či sa odvápňovacia kazeta nachádza vo vnútri zásobníka na
vodu a či je dobre zavedená. Nikdy nepoužívajte prístroj bez odvápňovacej kazety.
DOPĹŇANIE VODY POČAS POUŽITIA
Vzhľadom k tomu, že nádrž na vodu nie je pod tlakom, môžete vodu doplniť počas používania.
Ak tak chcete urobiť, vypnite prosím prístroj, odpojte ho zo zásuvky a pokračujte ako je
napísane v odstavci "naplnenie vodou".
ŽEHLENIE S PAROU
Naplňte nádržku na vodu s vodou a zapojte žehličku do zástrčky.
Ako je uvedené na teplote voľby a v tabuľke, parné žehlenie je možné iba pri vyšších
žehliacich teplotách, tak nastavte do potrebnej polohy na alebo .
Zatlačte vypínač ohrevu vody. Vypínač sa rozsvieti a svetelná kontrolka čerpadla bude
blikať, pokiaľ nebude dosiahnutá požadovaná teplota. Potom je teplota stabilizovaná.
Zatlačte vypínač žehliacej plochy a nastavte teplotu na číselníku do požadovanej polohy.
Keď žehlička dosiahne požadovanú teplotu, kontrolka zhasne. Teraz môžete použiť parnú
funkciu.
58 TKG SIS 1002 - 130424
Assembly page 58/64
Page 59

Copies of the I/B. Please reproduce them without any
Fax +32 2 359 95 50
changes except under special instruction from Team
International BELGIUM. The pages must be reproduced
and folded in order to obtain a booklet A5 (+/- 148.5 mm
width x 210 mm height). When folding, make sure you
keep the good numbering when you turn the pages of
the I/B. Don’t change the page numbering. Keep the
language integrity.
Otočte gombíkom regulácie množstva pary na reguláciu pary. Poznámka: maximálna
hodnota (MAX) môže byť použitá vtedy, keď žehliaca teplota je vyššia ako pozícia ,
inak voda kvapká zo žehliacej plochy.
Stlačením tlačidla pary uvoľníte paru zo žehliacej plochy. Uvoľnením tlačidla sa para
zastaví. Ak chcete kontinuálny prúd pary, stlačte tlačidlo pary dole a posuňte hornú
fialovú časť dozadu tak, že sa tlačidlo pary zaistí. Ak chcete zastaviť kontinuálny prúd
pary, zatlačte na fialovú časť tlačidla dopredu a uvoľnite tlačidlo pary.
Počas žehlenia bude kontrolka žehličky zapnutá a občas svetlo zhasne. To znamená, že
teplota žehličky je regulovaná termostatom. Môžete pokračovať v žehlení.
Pri použití veľkého množstva pary vo veľmi krátkom čase je výstup pary redukovaný pokiaľ
spotrebič vyprodukuje dostatok pary na zníženie rozdielu. Tento jav sa deje aj v prípade,
ak nie je dostatok vody v nádržke na vodu.
Keď je nádržka na vodu prázdna počas chodu žehličky, indikátor dopĺňania vody sa
rozsvieti. Ak chcete používať parnú funkciu, musíte doplniť vodu do nádržky na vodu.
Indikátor doplnenia vody sa zhasne po naplnení nádržky vodou.
Poznámka: keď začnete používať funkciu pary, je normálne ak elektrické čerpadlo robí
vibračné zvuky. Je to spôsobené vzduchom vo vnútri odvápňovacieho zásobníka a jeho
poklesom, pokiaľ nebude vzduch odčerpaný. Ak sa zvuk nezníži po 60 sekundách, skontrolujte
či bol zásobník namontovaný správne.
NAPAROVANIE VO VERTIKÁLNEJ POHOLE
Nastavte teplotu na maximum pre vertikálne žehlenie s parou. Para môže byť upravená podľa
Vašich potrieb. Zaveste textíliu, ktorú chcete žehliť a umiestnite žehličku do zvislej polohy
niekoľko centimetrov od textílie. Potom pohybujte so žehličkou a zatlačte tlačidlo pary
súčasne.
ŽEHLENIE NA SUCHO
Zapojte žehličku zástrčky a zatlačte vypínač žehliacej plochy.
Nastavte požadovanú teplotu.
Ako náhle prestane svietiť kontrolné svetlo môžete začať so žehlením.
Pre žehlenie bez pary, dajte vypínač žehliacej plochy do polohy OFF a nezatláčajte
gombík na paru.
KEĎ SKONČÍTE ŽEHLENIE
Odporúčame vyčistiť žehličku po použití nasledovne: naplňte nádržku na vodu, zapojte
Vypnite prístroj/dajte vypínač žehliacej plochy a vypínač ohrevu vody do polohy OFF,
Vyprázdnite nádržku na vodu.
Odporúčame uskladniť žehličku na podstavci. Takto zabránite poškodeniu žehliacej
žehličku do zástrčky, zatlačte vypínač žehliacej plochy a vypínač ohrevu vody, nastavte
teplotu na pozíciu "LINEN" a regulátor pary na "MAX" a nechajte zohriať žehličku na 10
minút. Keď je teplota dosiahnutú, zoberte žehličku z podstavca, držte ju vo vertikálnej
polohe a držte zatlačený gombík pary na 30 sekúnd, potom počkajte 30 sekúnd a cyklus
opakujte dva krát.
vytiahnite prístroj zo zástrčky a nechajte vychladnúť.
plochy.
59 TKG SIS 1002 - 130424
Assembly page 59/64
Page 60

Copies of the I/B. Please reproduce them without any
Fax +32 2 359 95 50
Problém
Možná príčina
Riešenie
Biely prášok vypadáva zo
žehliacej plochy
To je normálne, keď je
žehlička nová
Prášok nie je škodný, zmizne
po niekoľkých sekundách
Kvapká voda pri žehlení
s naparovaním
Keď začínate naparovať,
parný filter je studený a para
je studená
To je normálne, po niekoľkých
sekundách bude para OK.
Môžte žehličku dať na staré
oblečenie, aby absorbovala
vodu
Para nevychádza
Vypínač ohrevu vody nie je
zapnutý alebo v nádržke nie
je dostatok vody
Zatlačte vypínač ohrevu
vody alebo naplňte nádržku
vodou a čakajte kým
kontrolka prestane svietiť
Žiadna para pri zatlačení
parného gombíka
Pri žehlení pri vysokej teplote
s naparovaním je teplota
pary tiež vysoká a nemusí byť
viditeľná
Dajte zrkadlo pod žehliacu
plochu a presvedčte sa o
pare
Žehliaca plocha je špinavá
Nečistoty vo vode, alebo
teplota je príliš vysoká na
daný druh oblečenia
Očistite žehliacu plochu
s mäkkou handričkou
a nastavte teplotu
changes except under special instruction from Team
International BELGIUM. The pages must be reproduced
and folded in order to obtain a booklet A5 (+/- 148.5 mm
width x 210 mm height). When folding, make sure you
keep the good numbering when you turn the pages of
the I/B. Don’t change the page numbering. Keep the
language integrity.
ODVÁPŇOVACIA KAZETA
Váš spotrebič je vybavený odvápňovacou kazetou, ktorá je umiestnená vo vnútri nádržky
na vodu. V dôsledku toho možné použiť vodu z vododovu, ktorá bude filtrovaná cez
kazetu.
Je potrebné vymeniť kazetu každé 2 – 3 mesiace. Toto však závisí od frekvencie žehlenia
a tvrdosti vodu vo Vašej lokalite. Ak obsahuje voda veľa kameňa, je potrebné meniť
kazetu častejšie. Ak budete používať destilovanú vodu výmena kazety nie je potrebná tak
často. Prípadne môžete používať mix 50% vody z vodovodu a 50% destilovanej vody.
Ak chcete vybrať kazetu otvorte zásobník vody a vyberte kazetu z nádrže. Ak vložíte novú
kazetu do nádržky, ponorte ju do vody nejaký čas pred použitím s cieľom získať lepší
výkon.
Ak chcete kúpiť novú kazetu, prosím obráťte sa na najbližší zákaznícky servis.
NIKDY nepoužívajte prístroj bez odvápňovacej kazety.
ČISTENIE
Plastové časti môžete čistiť s vlhkou handričkou.
Na čistenie žehliacej plochy prosím použite špeciálne prostriedky. Prosím prečítajte si
návod na použitie na špeciálnych čistiacich prostriedkoch. Nikdy nepoužívajte abrazívne
čistiace prostriedky.
NIKDY neponárajte spotrebič do vody alebo iných tekutín.
PROBLÉMY
60 TKG SIS 1002 - 130424
Assembly page 60/64
Page 61

Copies of the I/B. Please reproduce them without any
Fax +32 2 359 95 50
changes except under special instruction from Team
International BELGIUM. The pages must be reproduced
and folded in order to obtain a booklet A5 (+/- 148.5 mm
width x 210 mm height). When folding, make sure you
keep the good numbering when you turn the pages of
the I/B. Don’t change the page numbering. Keep the
language integrity.
OCHRANA ŽIVOTNÉHO PROSTREDIA – DIREKTÍVA 2002/96/EC
Za účelom ochrany životného prostredia a ochrany ľudského zdravia, elektronický odpad
a elektrické zariadenia by mali byt zlikvidované v súlade so špecifickými pravidlami
dodávateľa a používateľa. Z tohto dôvodu, ako je indikované symbolom na
charakteristickej nálepke, alebo na balení, vaše zariadenie by malo byt zlikvidovane ako
netriedený komunálny odpad. Užívateľ ma pravo priniesť ho na miesto komunálnej zbierky na
recyklovanie odpadu v zmysle znovu použitia v súlade s direktívou.
61 TKG SIS 1002 - 130424
Assembly page 61/64
Page 62

Copies of the I/B. Please reproduce them without any
Fax +32 2 359 95 50
Oprava v záručnej dobe Vám bude vykonaná bezplatne iba vtedy, ak priložíte k spotrebiču doklad o
zakúpení prístroja (pokladničný blok, faktúra) a toto záručné vyhlásenie, kde sú servisné záznamy.
changes except under special instruction from Team
International BELGIUM. The pages must be reproduced
and folded in order to obtain a booklet A5 (+/- 148.5 mm
width x 210 mm height). When folding, make sure you
keep the good numbering when you turn the pages of
the I/B. Don’t change the page numbering. Keep the
language integrity.
Návod na použitie, záručné vyhlásenie a servis
Vážený zákazník,
aby Vám Váš elektrospotrebič slúžil čo najlepšie, pozorne si pred jeho prvým uvedením do prevádzky
prečítajte celý návod na použitie. Tento elektrospotrebič bol riadne preskúšaný. Predávajúci Vám poskytuje
záručnú dobu v trvaní 2 rokov od dátumu jeho zakúpenia. V tejto dobe odstránime bezplatne všetky závady
a nedostatky, ktoré podstatne obmedzujú jeho funkciu a ktoré prekázateľne vznikli vadou materiálu alebo
nedostatkami pri výrobe. Závady odstránime podľa nášho uváženia opravou alebo výmenou vadnej časti
prístroja. Záruka sa nevzťahuje na závady spôsobené nedodržaním návodu na použitie, nesprávnym
zapojením, neprimeraným zaobchádzaním, normálnym opotrebovaním a na nedostatky, ktoré sú pre
vlastnú funkciu prístroja nepodstatné a vznikli napríklad na krehkých dieloch elektrospotrebiča, napr.ľahko
rozbitné diely zo skla, umelých hmôt a žiarovky. Záruka stráca platnosť zásahom do prístroja inou osobou,
ako osobou nami poverenou servisom. Ak sa vyskytne na Vašom prístroji závada, zašlite alebo odovzdajte
elektrospotrebič s kompletným príslušenstvom s uvedením Vašej adresy a tel. čísla a popisom závady na
adresu servisu.
Nárok na záruku zaniká, ak je porucha spôsobená:
- mechanickým poškodením (vrátane poškodenia v priebehu prepravy),
- nešetrným a nesprávnym používaním v nesúlade s návodom, nepozornosťou, znečistením
a zanedbanou údržbou,
- vonkajšou udalosťou (prepätie v sieti, živelná pohroma a pod.),
- pripojením výrobku na iné sieťové napätie, aké je preň určené,
- pri nepredložení originálneho dokladu o zakúpení.
Nárok zaniká takisto v prípade, keď ktokoľvek vykonal modifikácie alebo adaptácie na rozšírenie funkcií
výrobku oproti zakúpenému vyhotoveniu alebo kvôli možnosti jeho prevádzkovania v inej krajine, ako pre
ktorú bol navrhnutý. Nárok nebude uznaný na časti, podliehajúce bežnému opotrebeniu, ktoré je v priebehu
prevádzky nutné meniť kvôli správnej funkcii výrobku (napr. filtre, sáčky, gumové tesnenia, odvápňovacie
tyčinky, batérie, žiarovky, obaly a pod.)
Servisné záznamy:
Dodávateľ výrobku pre Slovensko spol. s r.o.
Centrum 1746 / 265, 017 01 Považská Bystrica, tel.: 042/4330791, fax: 042/4260610, www.brel.sk, brel@brel.sk
Organizácia poverená servisom výrobkov:
Brel, spol. s r.o., Centrum 1746/265, 017 01 Považská Bystrica
Tel.: 042/4340193, fax: 042/4260610, mobil: 0910/357277, brel@brel.sk, www.brel.sk
62 TKG SIS 1002 - 130424
Assembly page 62/64
Page 63

Copies of the I/B. Please reproduce them without any
Fax +32 2 359 95 50
changes except under special instruction from Team
International BELGIUM. The pages must be reproduced
and folded in order to obtain a booklet A5 (+/- 148.5 mm
width x 210 mm height). When folding, make sure you
keep the good numbering when you turn the pages of
the I/B. Don’t change the page numbering. Keep the
language integrity.
63 TKG SIS 1002 - 130424
Assembly page 63/64
Page 64

Copies of the I/B. Please reproduce them without any
Fax +32 2 359 95 50
Deutsch
4
English
10
Français
16
Nederlands
22
Español
28
Português
34
Italiano
40
Polski
46
Română
51
Slovenský
56
TKG SIS 1002
changes except under special instruction from Team
International BELGIUM. The pages must be reproduced
and folded in order to obtain a booklet A5 (+/- 148.5 mm
width x 210 mm height). When folding, make sure you
keep the good numbering when you turn the pages of
the I/B. Don’t change the page numbering. Keep the
language integrity.
Back cover page (last page)
Assembly page 64/64
 Loading...