

Page 1

SR-60i
TABLE-TOP AUDIO
OWNER’S MANUAL
77-20SR60I00000
Page 2

2
IMPORTANT SAFETY INSTRUCTIONS
1) Read these instructions.
2) Keep these instructions.
3) Heed all warnings.
4) Follow all instructions.
5) Do not use this apparatus near water.
6) Clean only with dry cloth.
7) Do not block any ventilation openings . Install in
accordance with the manufacturer’s instructions.
8) Do not install near any heat sources such as radiators,
heat registers, stoves, or other apparatus (including
amplifiers) that produce heat.
9) Do not defeat the safety purpose of the polarized or
grounding-type plug. A polarized plug has two blades
with one wider than the other. A grounding type plug
has two blades and a third grounding prong. The wide
blade or the third prong are provided for your safety. If
the provided plug does not fit into your outlet, consult
an electrician for replacement of the obsolete outlet.
10) Protec t the power cord from being walked on or
pinched particularly at plugs, convenience receptacles,
and the point where they exit from the apparatus.
11) Only use attachments/accessories specified by the
manufacturer.
12) Use only with the cart, stand,
tripod, bracket, or table specified
by the manufacturer, or sold with
the apparatus. When a cart is used,
use caution when moving the cart/
apparatus combination to avoid
injury from tip-over.
13) Unplug this apparatus during lightning storms or when
unused for long periods of time.
14) Refer all ser vicing to qualified ser vice personnel.
Servicing is required when the apparatus has been
damaged in any way, such as power-supply cord or
plug is damaged, liquid has been spilled or objects
have fallen into the apparatus, the apparatus has been
exposed to rain or moisture, does not operate normally,
or has been dropped.
CAUTION: TO REDUCE THE RISK OF ELECTRIC SHOCK,
DO NOT REMOV E COV ER (OR BACK). N O USERSERVICEABLE PARTS INSIDE. REFER SERVICING TO
QUALIFIED SERVICE PERSONNEL.
The lightning flash with arrowhead symbol,
within an equilateral triangle, is intended to
alert the user to the presence of uninsulated
“dangerous voltage” within the product’s
enclosure that may be of sufficient magnitude
to constitute a risk of electric shock to persons.
The exclamation point within an equilateral
triangle is intended to alert the user to the
presen c e of imp o rt a n t oper a t in g and
maintenance (servicing) instructions in the
literature accompanying the appliance.
Page 3

3
< Do not expose this apparatus to drips or splashes.
< Do not place any objects filled with liquids, such as
vases, on the apparatus.
< Do not install this apparatus in a confined space such as
a book case or similar unit.
< The apparatus draws nominal non-operating power
from the AC outlet with its POWER or STANDBY/ON
switch not in the ON position.
< The apparatus should be located close enough to the
AC outlet so that you can easily grasp the power cord
plug at any time.
< The mains plug is used as the disconnect device, the
disconnect device shall remain readily operable.
< If the product uses batteries (including a battery pack
or installed batteries), they should not be exposed to
sunshine, fire or excessive heat.
< CAUTION for products that use replaceable lithium
batteries: there is danger of explosion if a battery is
replaced with an incorrect type of battery. Replace only
with the same or equivalent type.
WARNING: TO PREVENT FIRE OR SHOCK
HAZARD, DO NOT EXPOSE THIS APPLIANCE
TO RAIN OR MOISTURE.
CAUTION
< DO NOT REMOVE THE EXTERNAL CASES OR CABINETS
TO EXPOSE THE ELECTRONICS. NO USER SERVICEABLE
PARTS ARE WITHIN!
< IF YOU ARE E XPERIENCING PRO BLEMS WITH THIS
PRODUCT, CONTACT TEAC FOR A SERVICE REFERRAL. DO
NOT USE THE PRODUCT UNTIL IT HAS BEEN REPAIRED.
MPEG Layer-3 audio coding technology licensed from
Fraunhofer IIS and Thomson.
iPad, iPhone, iPod, iPod classic, iPod nano, and iPod touch
are trademarks of Apple Inc., registered in the U.S. and
other countries.
“Made for iPod,” “Made for iPhone,” and “Made for iPad”
mean that an electronic accessory has been designed to
connect specifically to iPod, iPhone, or iPad, respectively,
and has been certified by the developer to meet Apple
performance standards.
Apple is not responsible for the operation of this device or
its compliance with safety and regulatory standards. Please
note that the use of this accessory with iPod, iPhone, or
iPad may affect wireless performance.
Oth er comp any names a nd produ c t name s in this
document are the trademarks or registered trademarks of
their respective owners.
Page 4

4
Thank you for choosing TEAC. Read this manual
carefully to get the best performance from this unit.
Contents
Before Using the Unit . . . . . . . . . . . . . . . . . . . . . . . . . . . . . . . . . . 5
Connections . . . . . . . . . . . . . . . . . . . . . . . . . . . . . . . . . . . . . . . . . . 6
Remote Control Unit . . . . . . . . . . . . . . . . . . . . . . . . . . . . . . . . . . 8
Identifying the Parts (Main Unit) . . . . . . . . . . . . . . . . . . . . . . . 9
Identifying the Parts (Remote Control Unit) . . . . . . . . . . .10
Basic Operation . . . . . . . . . . . . . . . . . . . . . . . . . . . . . . . . . . . . . . 11
iPod/iPhone/iPad . . . . . . . . . . . . . . . . . . . . . . . . . . . . . . . . . . . .12
Listening to an iPod/iPhone/iPad . . . . . . . . . . . . . . . . . . . . . 13
USB Flash Memory . . . . . . . . . . . . . . . . . . . . . . . . . . . . . . . . . . .14
MP3 . . . . . . . . . . . . . . . . . . . . . . . . . . . . . . . . . . . . . . . . . . . . . . . . . .14
Listening to a USB Flash Memory . . . . . . . . . . . . . . . . . . . . . 15
Listening to an External Source . . . . . . . . . . . . . . . . . . . . . . .16
Troubleshooting . . . . . . . . . . . . . . . . . . . . . . . . . . . . . . . . . . . . . . 17
Specifications . . . . . . . . . . . . . . . . . . . . . . . . . . . . . . . . . . . . . . . . 18
Page 5

5
What’s in the box
Confirm the supplied standard accessories.
Remote control unit (RC-1290) x 1
Battery (CR-2032) for the remote control unit x 1
AC adapter (PS-M0930) x 1
Mini pin Stereo Cable x 1
Owner’s manual (this document) x 1
< Keep this manual in a safe place for future reference.
Warranty card x 1
Before Using the Unit
CAUTION
< The voltage supplied to the unit should match the
voltage as printed on the AC adapter. If you are in any
doubt regarding this matter, consult an electrician.
< Do not open the cabinet because this might result in
damage to the circuitry or electrical shock. If a foreign
object should get into the unit, contact your dealer or
service company.
< When removing the AC power plug from the wall
socket, always pull directly on the plug, never yank on
the cord.
Placement of the unit
< Choose the installation location of your unit carefully.
Avoid placing it in direct sunlight or close to a source of
heat. You should also avoid locations that are subject to
vibration, excessive dust, heat, cold or moisture.
< As the unit may become warm during operation, always
leave sufficient space around it for ventilation.
< Do not place the unit on an amplifier, a receiver or any
other device that generates heat.
< When the unit is turned on, if a TV is turned on nearby
lines might appear on the TV screen depending on the
frequency of the TV broadcast. This is not a malfunction
of the unit or the TV. If you see such lines, move the unit
and the TV further apart.
Maintenance
If the surface of the unit gets dirty, wipe with a soft cloth or
use a diluted mild liquid soap. Allow the surface of the unit
to dry completely before using.
For safety, disconnect the AC power plug from the
outlet before cleaning.
< Never spray liquid directly on this unit.
< Do not use thinner or alcohol as they could damage the
surface of the unit.
Page 6

6
Connections
After all connections are complete, connect the power cord’s plug to the AC wall socket.
< Read the instructions of each device that you intend to use with this unit.
< Be sure to connect each plug securely. To avoid hum and noise, do not bundle the connection cords.
AUX IN
DC IN 9V
VIDEO IN
+
-
A
B
B
C
C
D
Back
USB ash memory
Portable audio player
TV (monitor) etc.
AC wall socket
PS-M0930
Mini pin stereo plug cable
RCA (pin) video cable
Page 7

7
A
VIDEO OUT jack
This terminal outputs video signal from an iPod/
iPhone/iPad connected to the dock of the SR-60i.
Connect the unit to the composite video connector
of a television or monitor using the RCA (pin) video
cable.
< When you output video to a TV from your iPod/
iPhone/iPad, the video is not displayed on the iPod/
iPhone/iPad’s screen.
< If your iPod/iPhone/iPad has “TV OUT” menu, select
“On” or “Ask”. Or the iPod/iPhone/iPad will not output
video signal.
When you have set “T V OUT” to “Ask ”, each time
you play a video your iPod prompts you to specif y
whether to output it to a TV.
< To display video from your iPod iPhone or iPad on a
TV or any other device through the VIDEO OUT jack,
insert your iPod iPhone or iPad into the iPod/iPhone/
iPad dock of the SR-60i before you start playing the
video.
B
AUX IN Jack
Analog 2-channel audio signal is input from these
jacks. Connect a portable audio player using the
supplied mini-pin stereo plug cable.
< When using the headphones jack of the component,
if you do not adjust its volume, you might not hear
any sound from SR-60i.
< Turning the volume of the connected component
up too high might cause the sound from SR-60i to
be distorted. In this case, reduce the volume of the
component until the distortion stops and then adjust
the volume level of SR-60i to a comfortable listening
level.
C
USB port
Connect an external USB flash memory to this port.
D
DC IN
Connect the supplied AC adapter (PS-M0930) to this
jack.
After all other connections are complete, connect
the power cord's plug to an AC wall socket.
Use the supplied AC adapter (PS-M0930). Do not
use any AC adapter other than the one included
with this unit.
Be sure to connect the power cord to an AC outlet
which supplies the correct voltage.
< If you are not going to use the unit for some time,
disconnect the power cord from the wall socket.
Page 8
8
Remote Control Unit
The provided remote control unit allows the unit to be
operated from a distance.
When operating the remote control unit, point it towards
the remote sensor on the front panel of the unit.
< Even if the remote control unit is operated within the
effective range (5m), remote control operation may be
impossible if there are any obstacles between the unit
and the remote control.
< If the remote control unit is operate d near other
produc ts which generate infrared rays, or if other
remote control devices using infrared rays are used
near the unit, it may operate incorrectly. Conversely, the
other products may operate incorrectly.
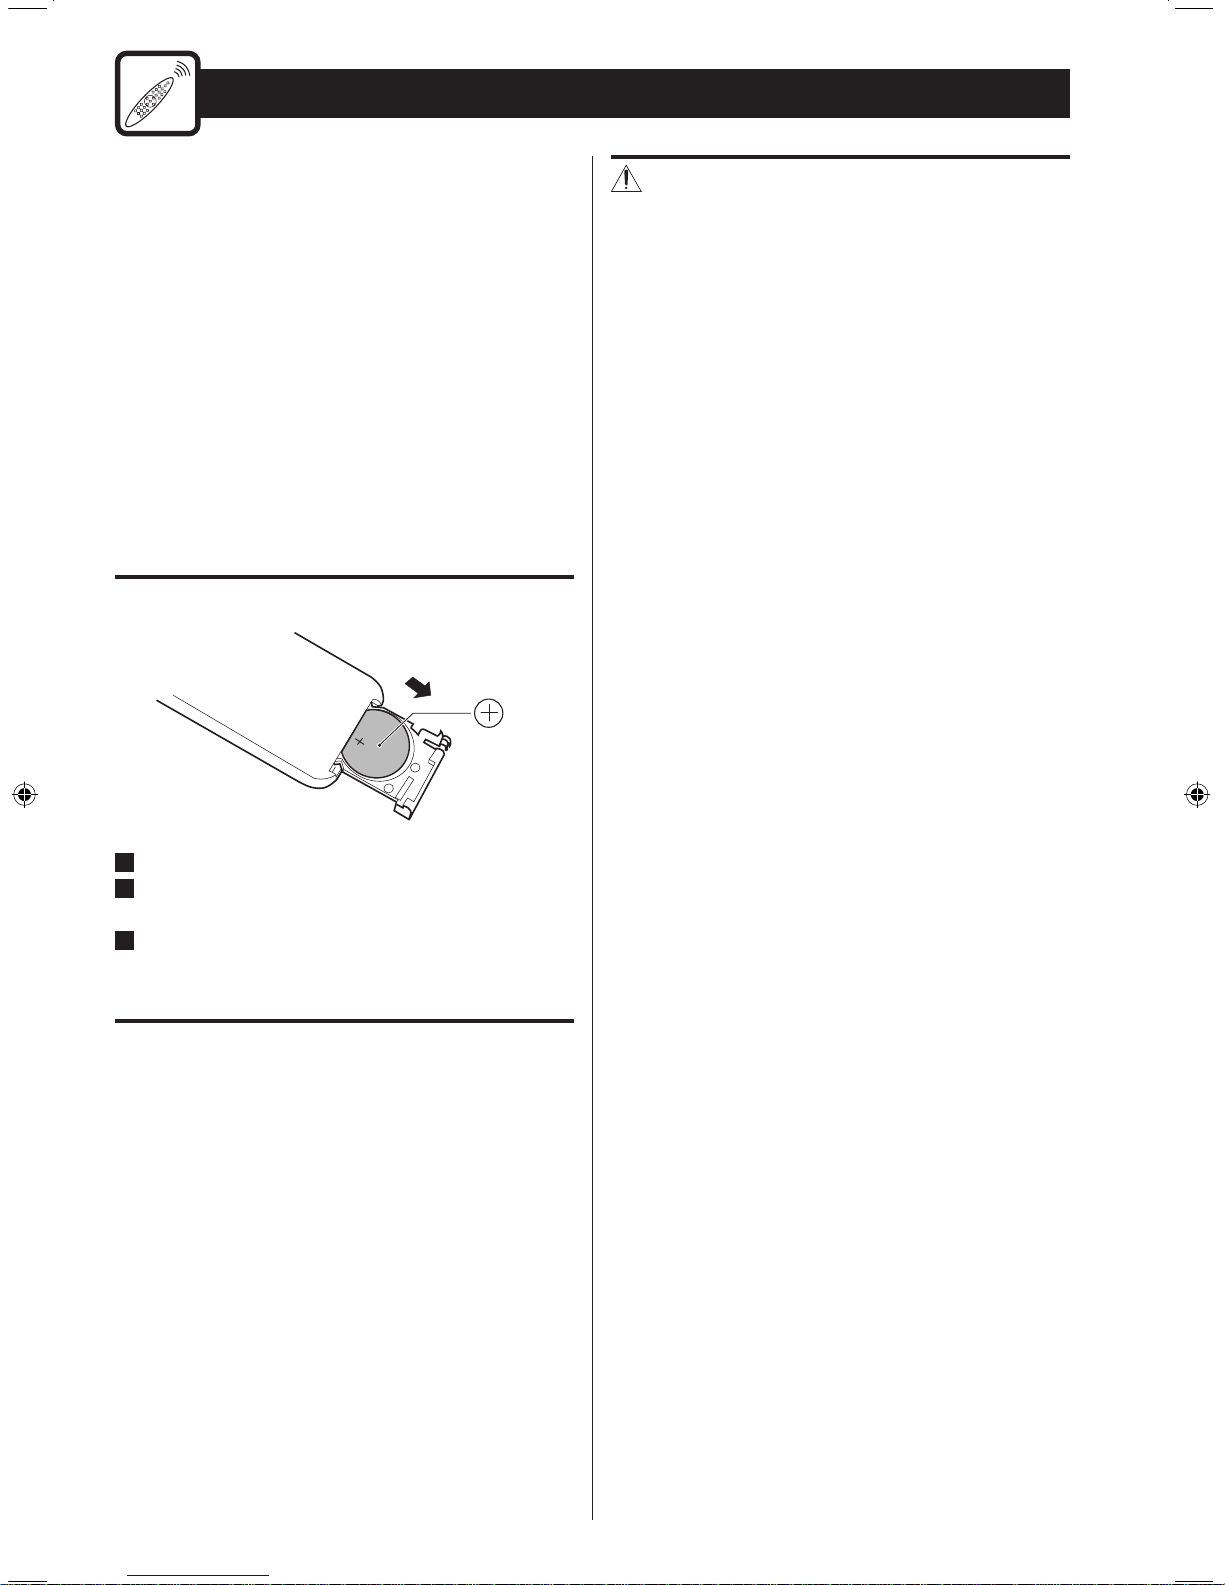
Battery installation
1
Remove the battery compartment cover.
2
Put the lithium-ion battery (CR2032, 3 V) in with the “+”
side up.
3
Close the cover.
Battery replacement
If the distance required between the remote control unit
and main unit decreases, the battery is exhausted. In this
case, replace the battery with a new one.
< For information about the collection of batteries, please
contact your local municipality, your waste disposal
service or the place where you purchased them.
Battery Precautions
Misuse of batteries could cause them to rupture or leak
leading to fire, injury or the staining of nearby things. Please
read and observe the following precautions carefully.
< Be sure to insert the battery with the positive “+” and
negative “ - ” polarities correctly positioned.
< If the battery leaks, wipe away the leakage inside the
battery compartment and replace the battery with a
new one.
< If the remote control unit is not to be used for a long
time (more than a month), remove the battery from the
remote control unit to prevent it from being exhausted.
< Do not use any batteries other than those specified.
< Do not heat or disassemble batteries. Never throw them
in fire or water.
< Do not carry or store batteries with other metallic
objec t s. The batteries could short circuit, leak or
explode.
Page 9
9
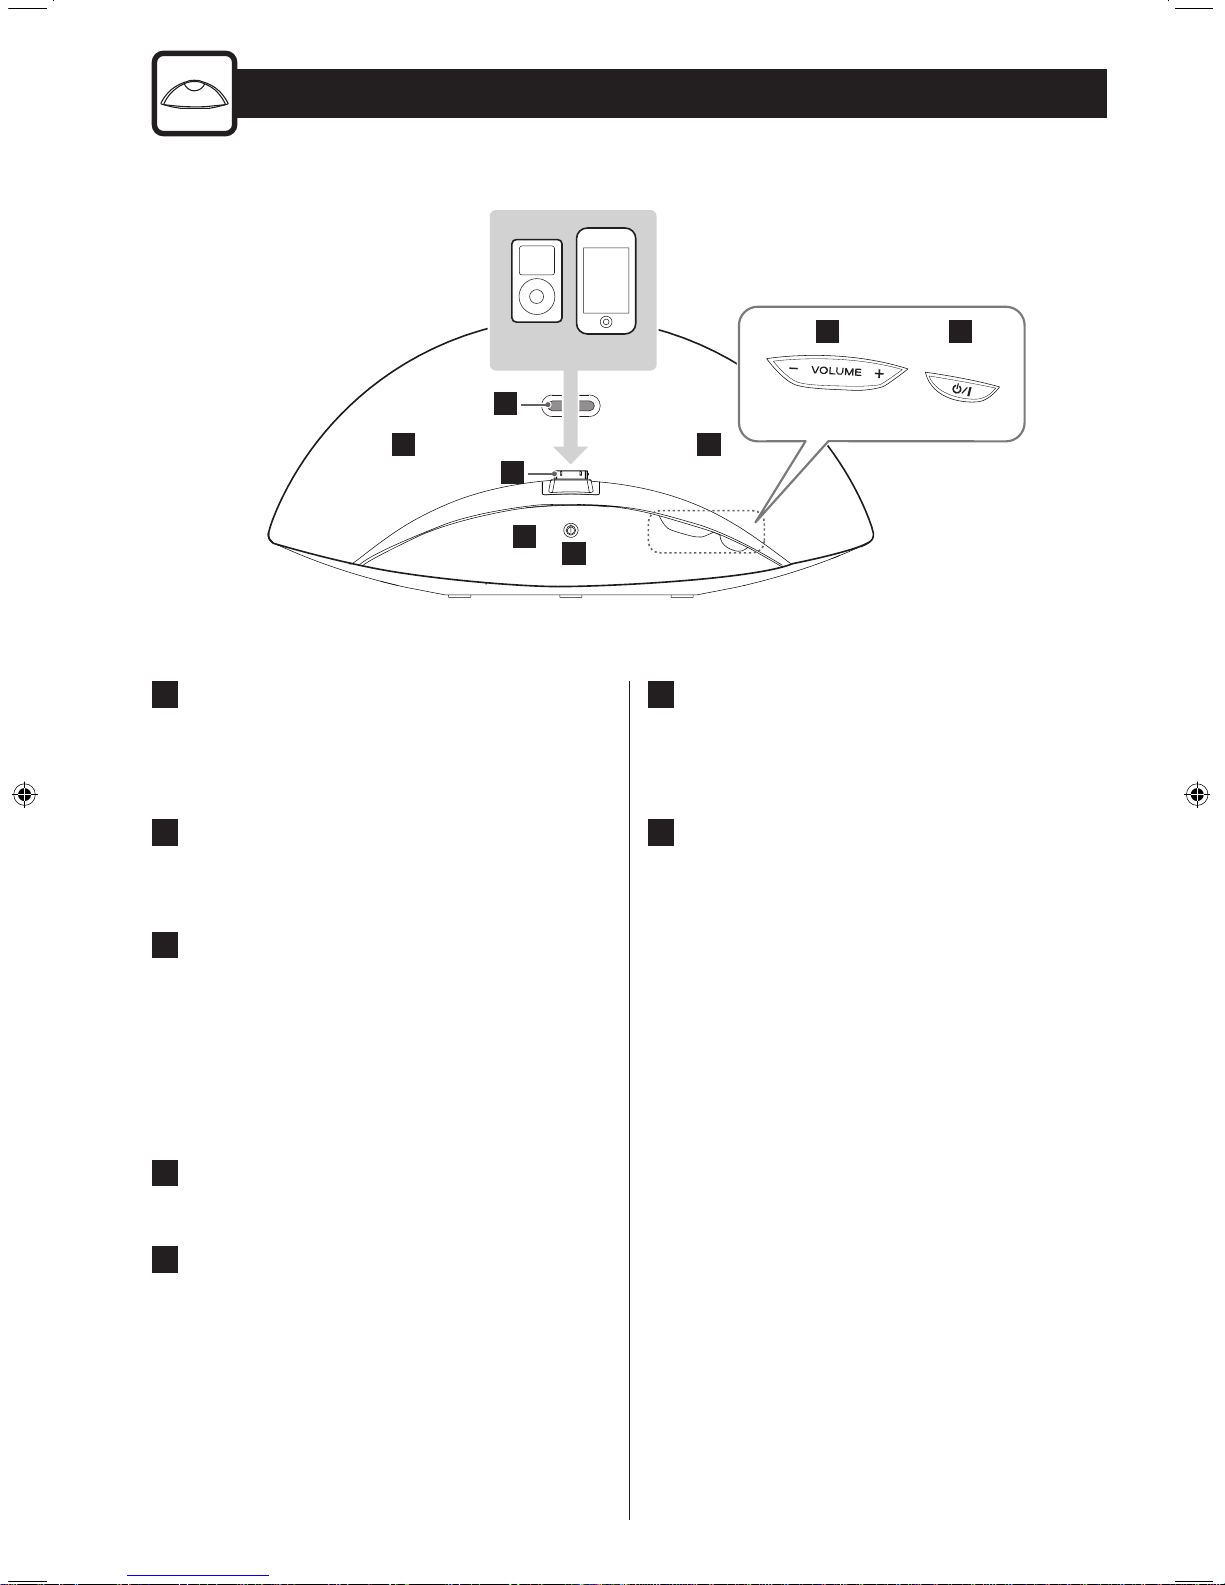
A
Standby/On (
¤
)
Press this button to turn the unit on and put it into
standby.
B
VOLUME (
– / +
)
Press these buttons to adjust the volume level.
C
iPod/iPhone/iPad dock
Insert an iPod/iPhone/iPad into this dock.
< Before connecting the iPod/iPhone/iPad to the dock
set the iPod/iPhone/iPad “power on”. If the iPod/
iPhone/iPad is connected to the dock with the “power
off” the playback may not start correctly.
D
iPod/iPhone/iPad stopper
E
Remote sensor
When operating the remote control unit, point it
towards here.
Identifying the Parts (Main Unit)
F
POWER indicator
When the unit is turn on, the light is blue.
When the unit is standby, the light is red.
G
Speakers (Stereo)
G G
B
D
E
F
A
C
Top
Page 10
10
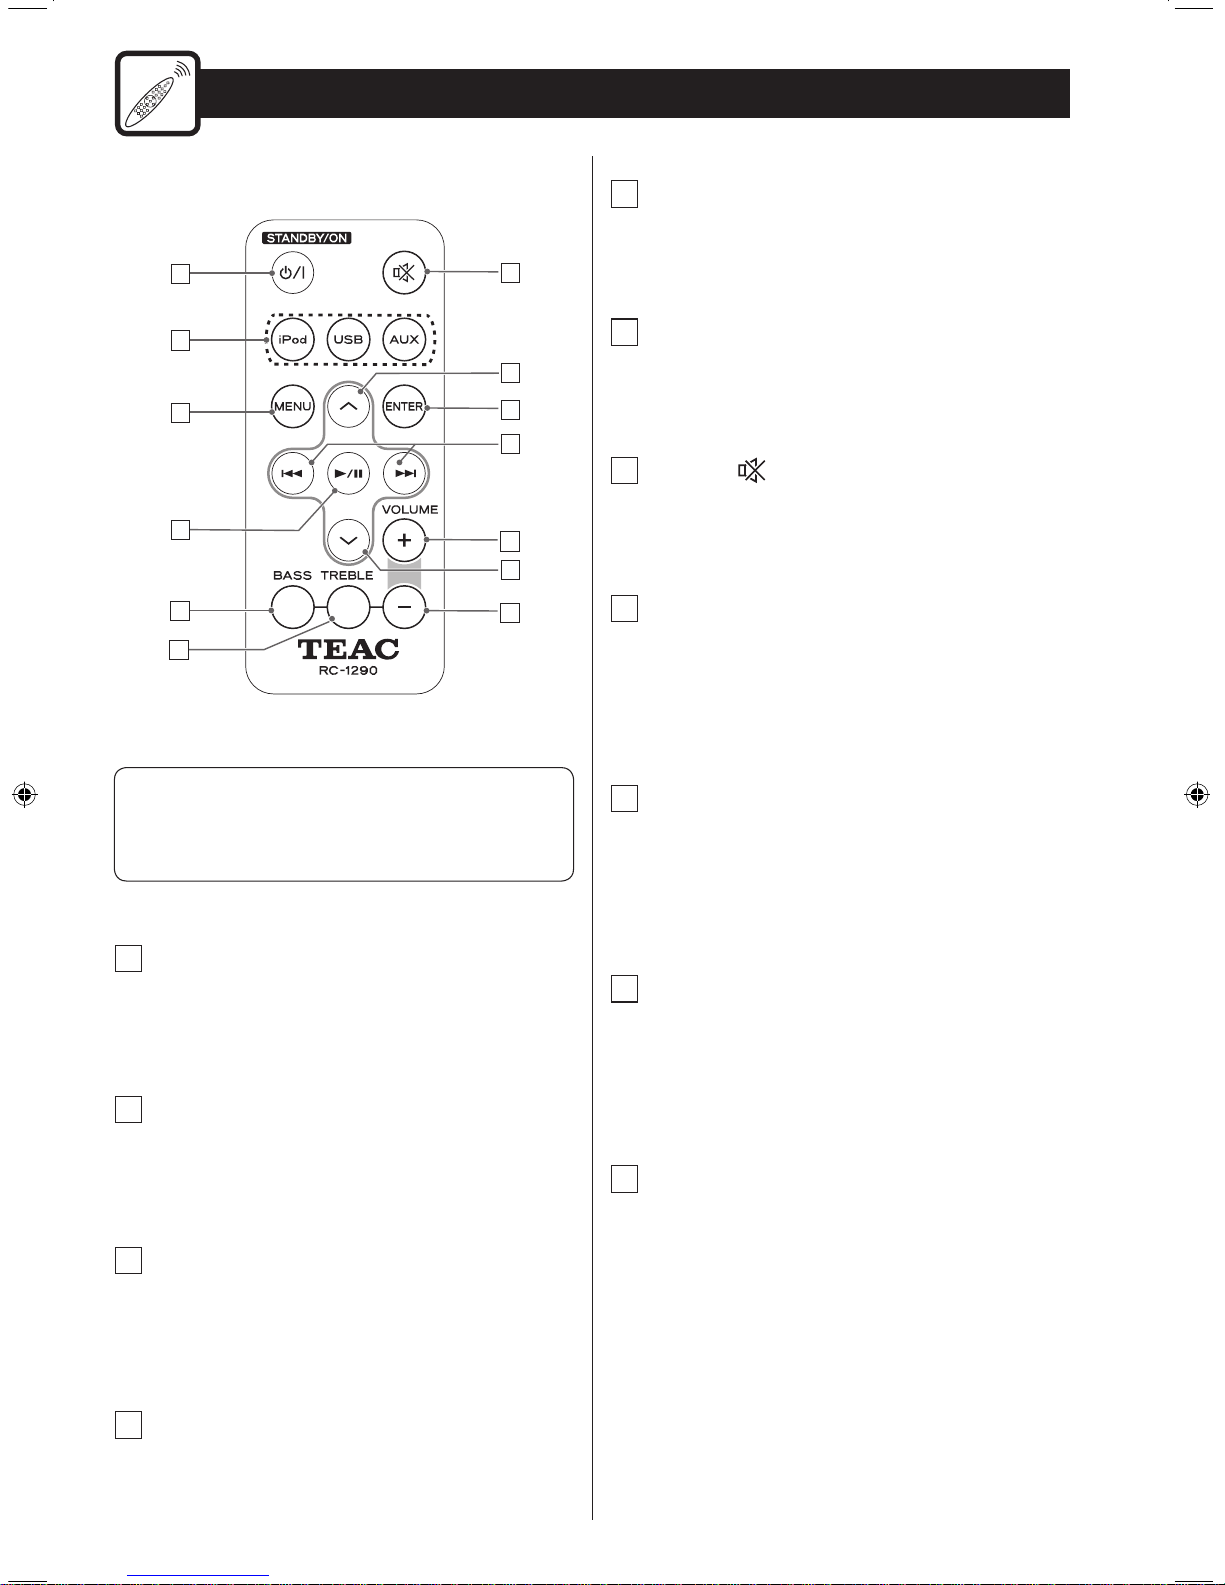
a
STANDBY/ON (
¤
)
Press this button to turn the unit on and put it into
standby.
b
iPod/USB/AUX
Press these but tons to select the desired sound
source.
c
MENU
When the source is “iPod”, press this button to go back
to the previous iPod/iPhone/iPad menu. This button
has the same functions as its iPod counterpart.
d
Play/Pause (y/J)
When the source is “iPod” or “USB”, press this button
to start or pause playback.
a
b
c
d
e
f
g
h
h
i
j
k
k
To simplify explanations, instructions in this manual
might refer to the main unit or remote control unit only.
In such cases, the same controls on the remote control
and main unit will operate similarly.
Identifying the Parts (Remote Control Unit)
e
BASS
Use this button to adjust the level of low frequency
sound (page12).
f
TREBLE
Use this button to adjust the level of high frequency
sound (page12)
g
Muting ( )
Press this button to mute the sound. Press this button
again to restore the sound.
h
Folder/Scroll(j/k)
When the source is “iPod”, press these buttons to
scroll up and down in an iPod/iPhone/iPad menu.
These buttons have the same functions as the Click
Wheel of iPod.
i
ENTER
When the source is “iPod”, press this button to confirm
selection in an iPod/iPhone/iPad menu.
This button is equivalent to the center button of iPod.
j
Search/Skip (.//)
When the source is “iPod” or “USB”, press these
buttons to skip to the next or previous song/file. Hold
down these buttons to search for a specific part of a
song/file.
k
VOLUME (
– / +
)
Press these buttons to adjust the volume level.
Page 11
11
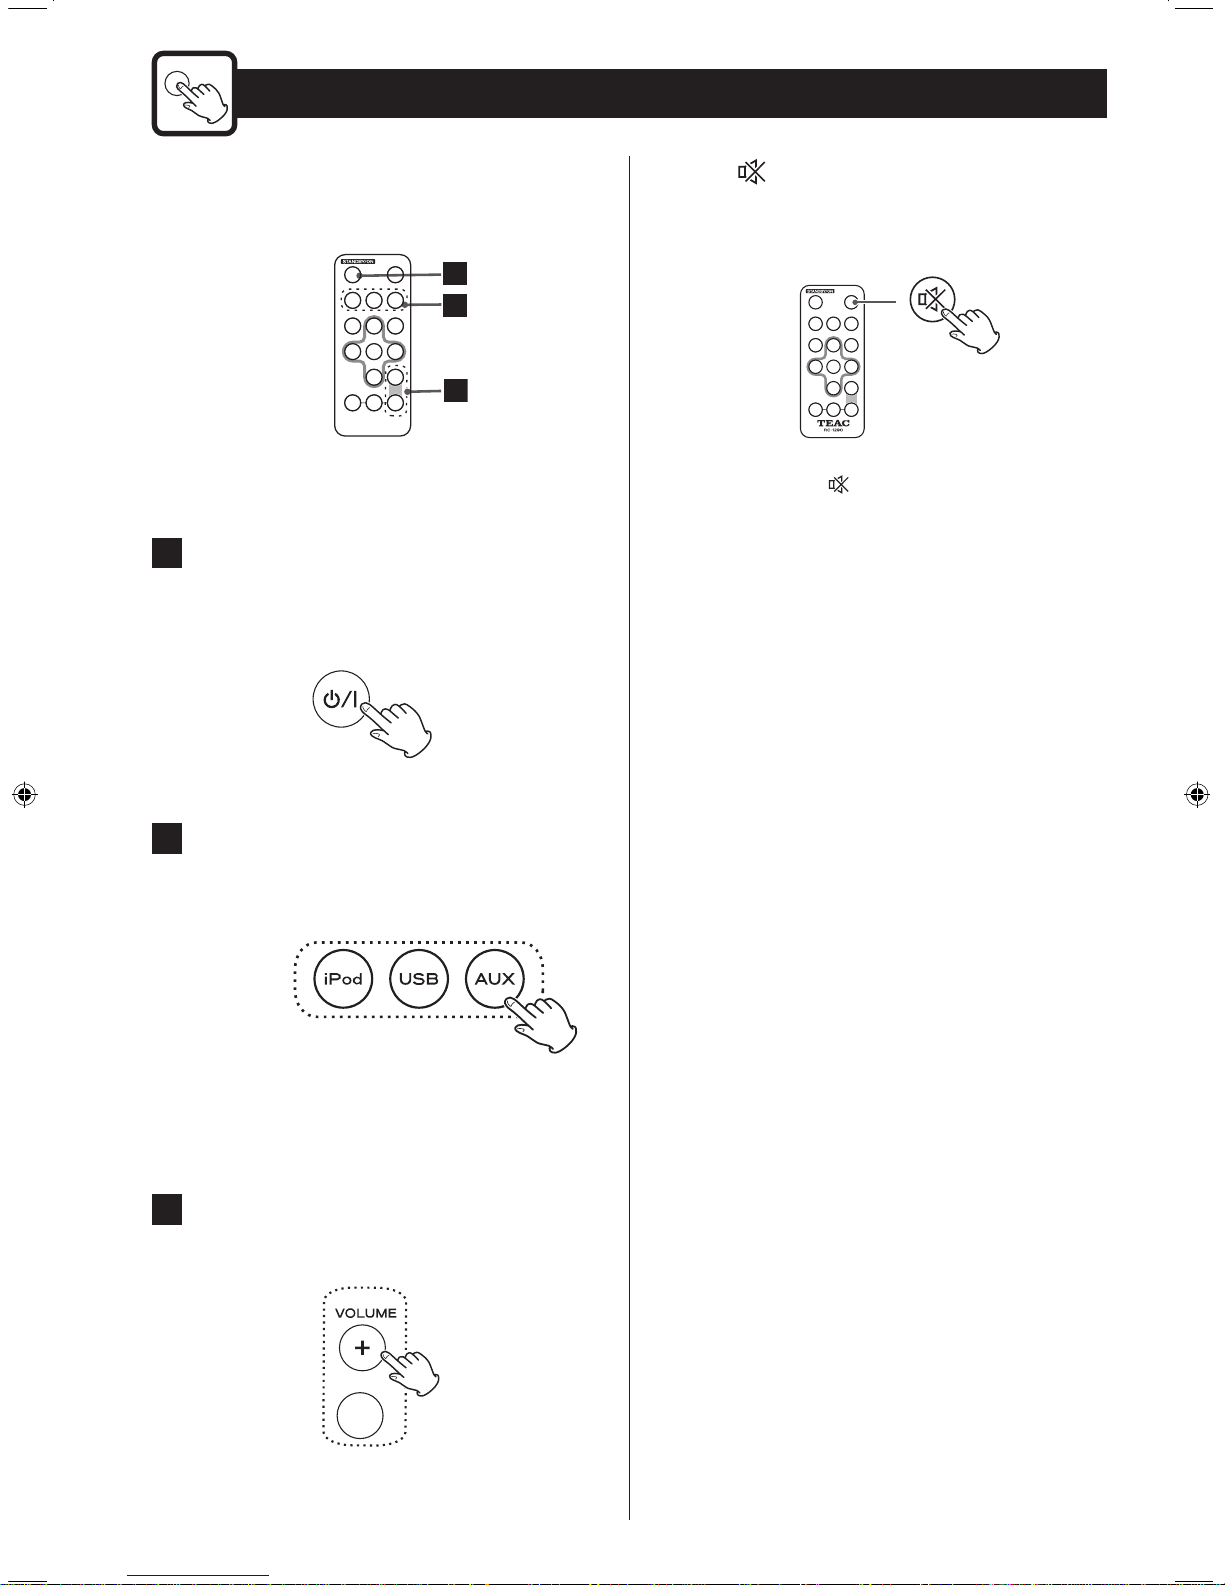
This chapter describes the basic operation which is
available in every sound source.
1
2
3
1
Press the Standby/On (¤ ) button to turn the
unit on.
2
Press the iPod,USB,AUX button on the Remote
Control to select a source.
o To listen to an external component connected to the
AUX in jacks, select “AUX”.
3
Play the source, and adjust the volume using
the VOLUME ( + / – ) buttons.
㻐
The volume can be adjusted from MIN (0) to MAX
(40).
Muting ( )
You can mute the sound temporarily.
Muting
Press the Muting(
) button.
Press the Muting button again to restore the sound.
o If you change the volume level or sound source when
the sound is muted, muting is cancelled.
Basic Operation (1)
Page 12
12
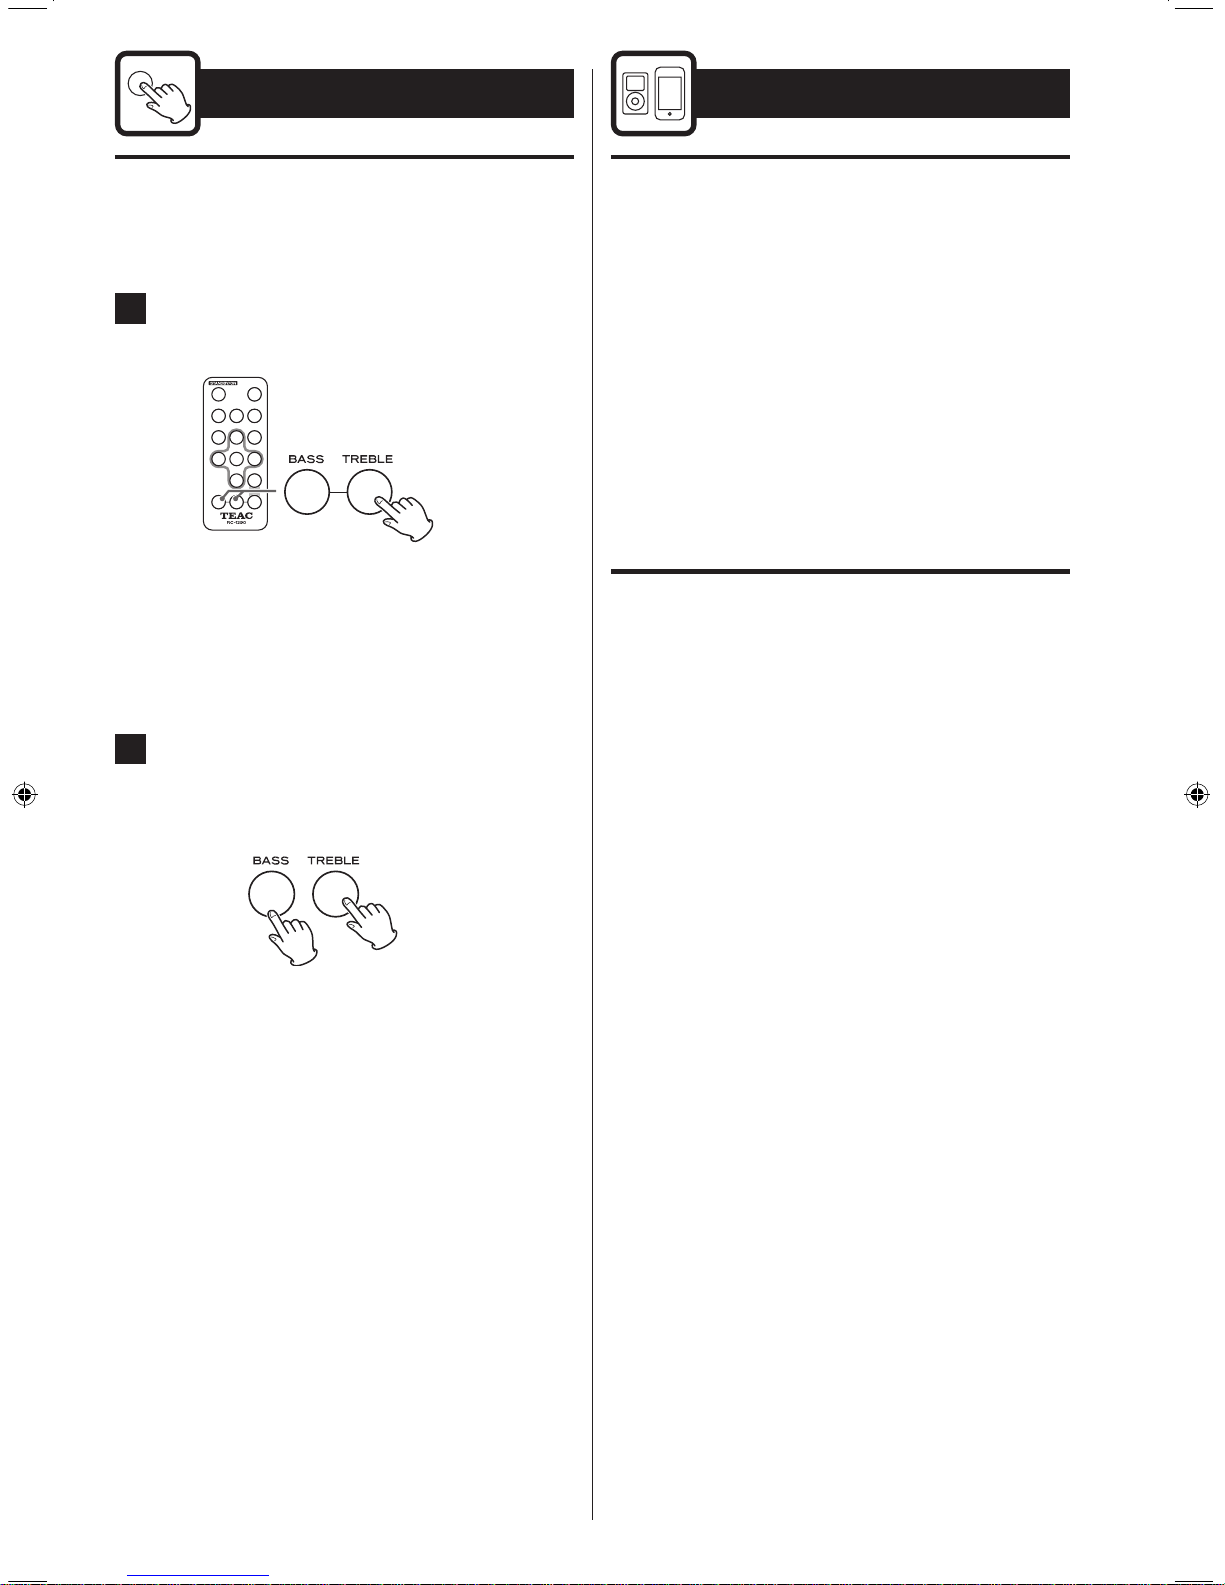
Tone Control
You can change the bass and treble sound between “–5”
to “+5”.
1
Press the BASS or TREBLE button.
To adjust the level of low frequency sound range,
press the BASS button.
To adjust the level of high frequency sound range,
press the TREBLE button.
2
Press the BASS or TREBLE button repeatedly to
change the setting
or
The level can be adjusted from “–5” to “+5”
The higher the treble number, the more the high
frequencies are emphasized.
The higher the bass number, the more the low
frequencies are emphasized.
iPod/iPhone/iPad
iPod/iPhone/iPad compatibility
The following iPod/iPhone/iPad models can be connected
to and used with this unit:
iPhone 4
iPhone 3GS
iPhone 3G
iPod touch (1st, 2nd, 3rd and 4th generation)
iPod classic
iPod nano (2nd, 3rd, 4th, 5th and 6th generation)
iPad and iPad 2
o iPod classic cannot charge.
o To remove the adapter, hold its left and right sides and
gently pull it up.
Compatible iPod/iPhone/iPad software
In case your iPod/iPhone/iPad will not work with the
SR-60i or with the remote control unit, software update
may solve the problem.
Basic Operation (2)
Page 13
13
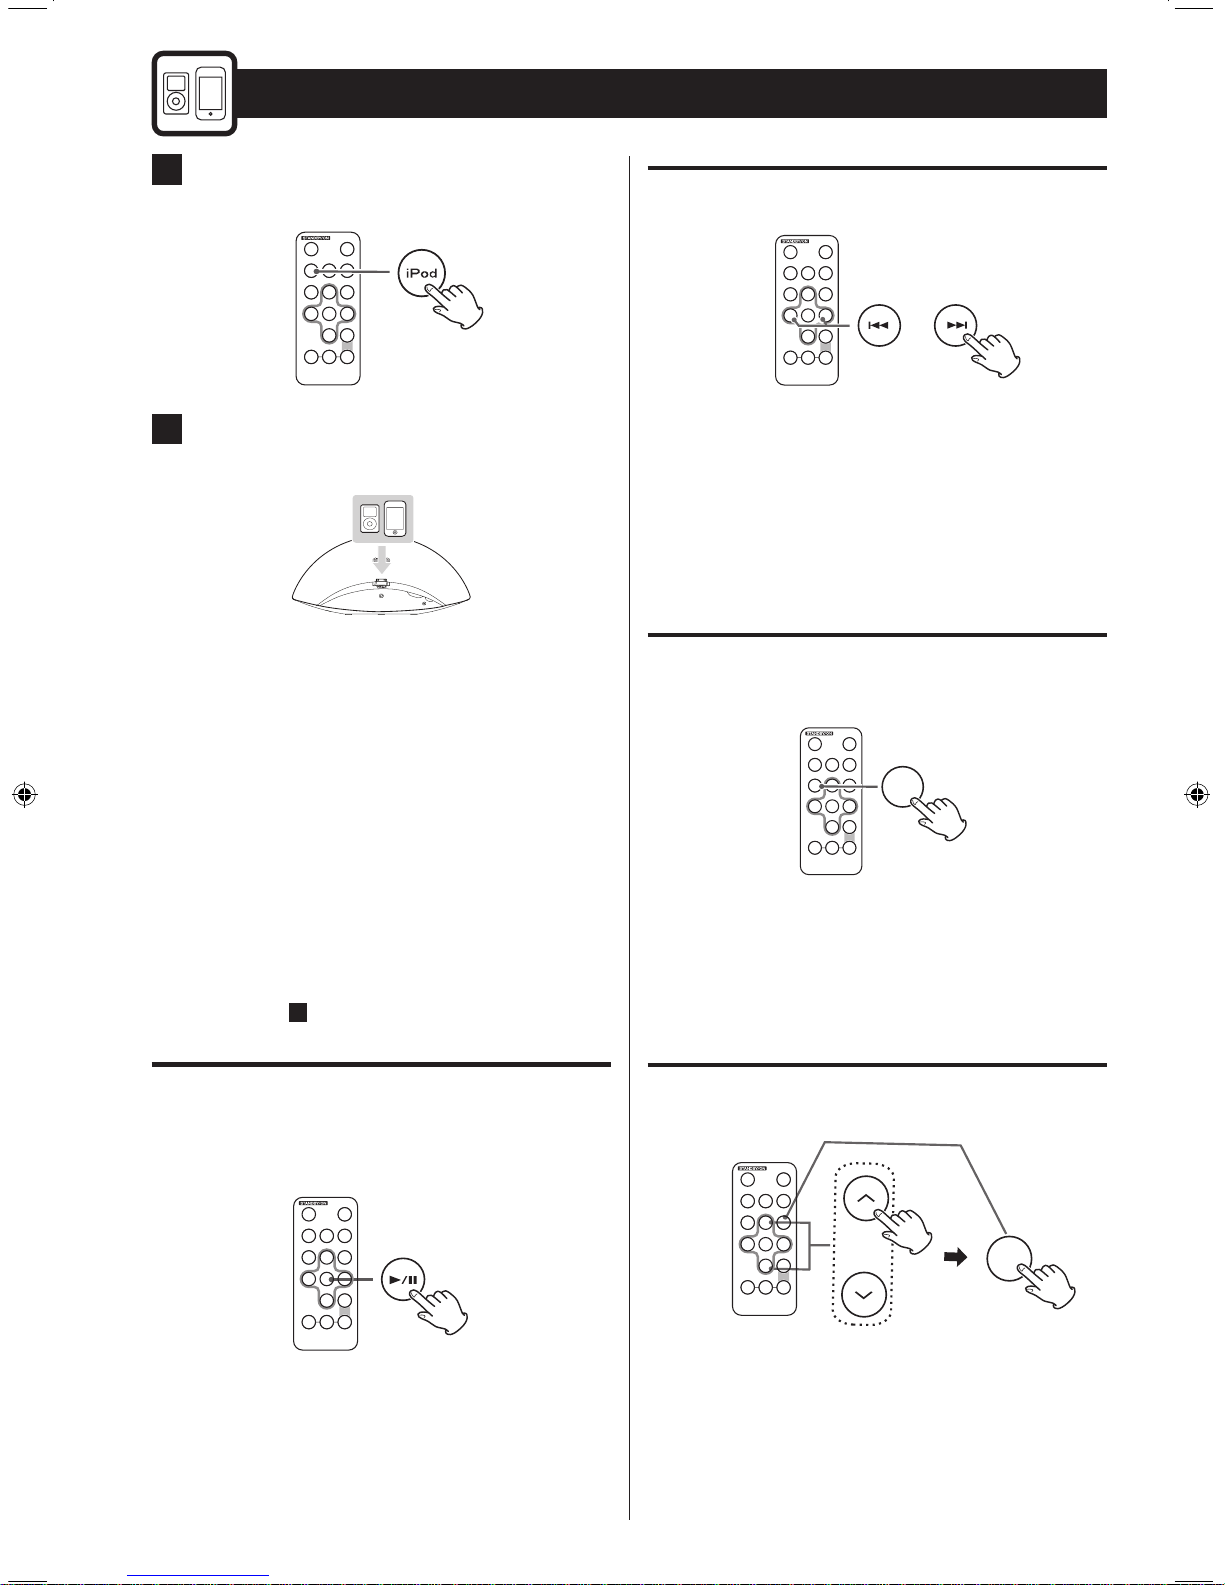
Skipping to the next or previous song
During playback, press the Skip (.//) button
repeatedly until you find the desired song.
The selected song will be played from the beginning.
< If the . button is pressed once during playback, the
current song will be played from the beginning.
Returning to the previous iPod/iPhone/
iPad menu
MENU
Press the MENU button.
This but ton has the same functions as i t s i Pod
counterpart.
Selecting an iPod/iPhone/iPad menu item
ENTER
Press the scroll (j/k) buttons to select the menu
item you want, then press the ENTER button.
1
Press the iPod button to select.
2
Turn your iPod, iPhone or iPad on, and then
insert it into the dock of the SR-60i.
o Before connecting the iPod/iPhone/iPad to the
dock set the iPod/iPhone/iPad “power on”. If the
iPod/iPhone/iPad is connected to the dock with the
“power off” the playback may not start correctly.
o The battery of an iPod/iPhone/iPad is recharged to
the full whenever the iPod/iPhone/iPad is docked
and the SR-60i is connected to the AC power supply
o If headphones are plugged into the iPod/iPhone/
iPad, no sound comes out from the headphones.
o The video signal from a connected iPod/iPhone/iPad
can be output from the VIDEO OUT jack of the SR-60i
(pages6 - 7
A
).
Stopping playback temporarily
(Pause mode)
Press the Play/Pause (y/9 ) button during playback.
Playback stops at the current position.
To resume playback , press the Play/ Pause (y/9)
button again.
Listening to an iPod/iPhone/iPad
Page 14
14
USB Flash Memory
CAUTION
Never turn the unit off or disconnect a USB flash
memory when it is being accessed.
Doing s o c o u ld dam a g e the SR- 60 i and the
connected USB flash memory.
< Do not use a device that has a maximum current
consumption of 100 mA or more.
< Do not use a device that has security functions or other
special functions.
< Do not use a device that is divided into two or more
partitions.
< A USB hub cannot be used to connect USB devices to
this unit.
USB storage devices that can be played on this unit
o USB flash memory can be used. Do NOT use a high-
capacity USB hard disc (more than 32G) with this unit.
< Some flash memory players that charge from a USB
terminal cannot be used for playback.
< Hard disk drives, CD/DVD drives, and other devices
connected via USB cannot be used.
< This unit cannot copy or move files.
< Playable formats: FAT16, FAT32
< Depending on the conditions of a USB flash memory,
this unit might not be able to play the files on it or
skipping might occur.
< NTFS, HFS and HFS+ formats cannot be used.
< Max. number of playable folders: 500
< Max. number of playable files: 999
MP3
This unit can play MP3 files recorded on a USB flash
memor y. Refer the instruction manual of the software
when making an MP3 file using a PC.
Playable file format
MP3 (extension “.mp3”)
Bit rate: 8kbps to 320kbps
Sampling rate: 16, 22.05, 24, 32, 44.1 or 48kHz
< This unit cannot play back files that are larger than 4GB.
< This unit cannot play copyright protected files such as
DRM (Digital Right Management).
Caut i o ns wh e n prep a ring M P 3 f ile s u sing a
computer or other device
< Always include the extension in the file name. This unit
recognizes MP3 files by their “.mp3”.
< Carefully read the manual for the software that you are
using when you create an MP3 file.
Files that are unplayable or only partially playable
< Files without extensions cannot be played. Files that are
not in the MP3 format cannot be played even if they
have extensions.
< Variable bit rate files might not play back correctly.
< If the USB flash memory contains more than 999files or
500folders, this unit can not play it back correctly.
Page 15
15
Do not use a high-capacity USB hard discs larger
than 32GB. USB flash memory can be used.
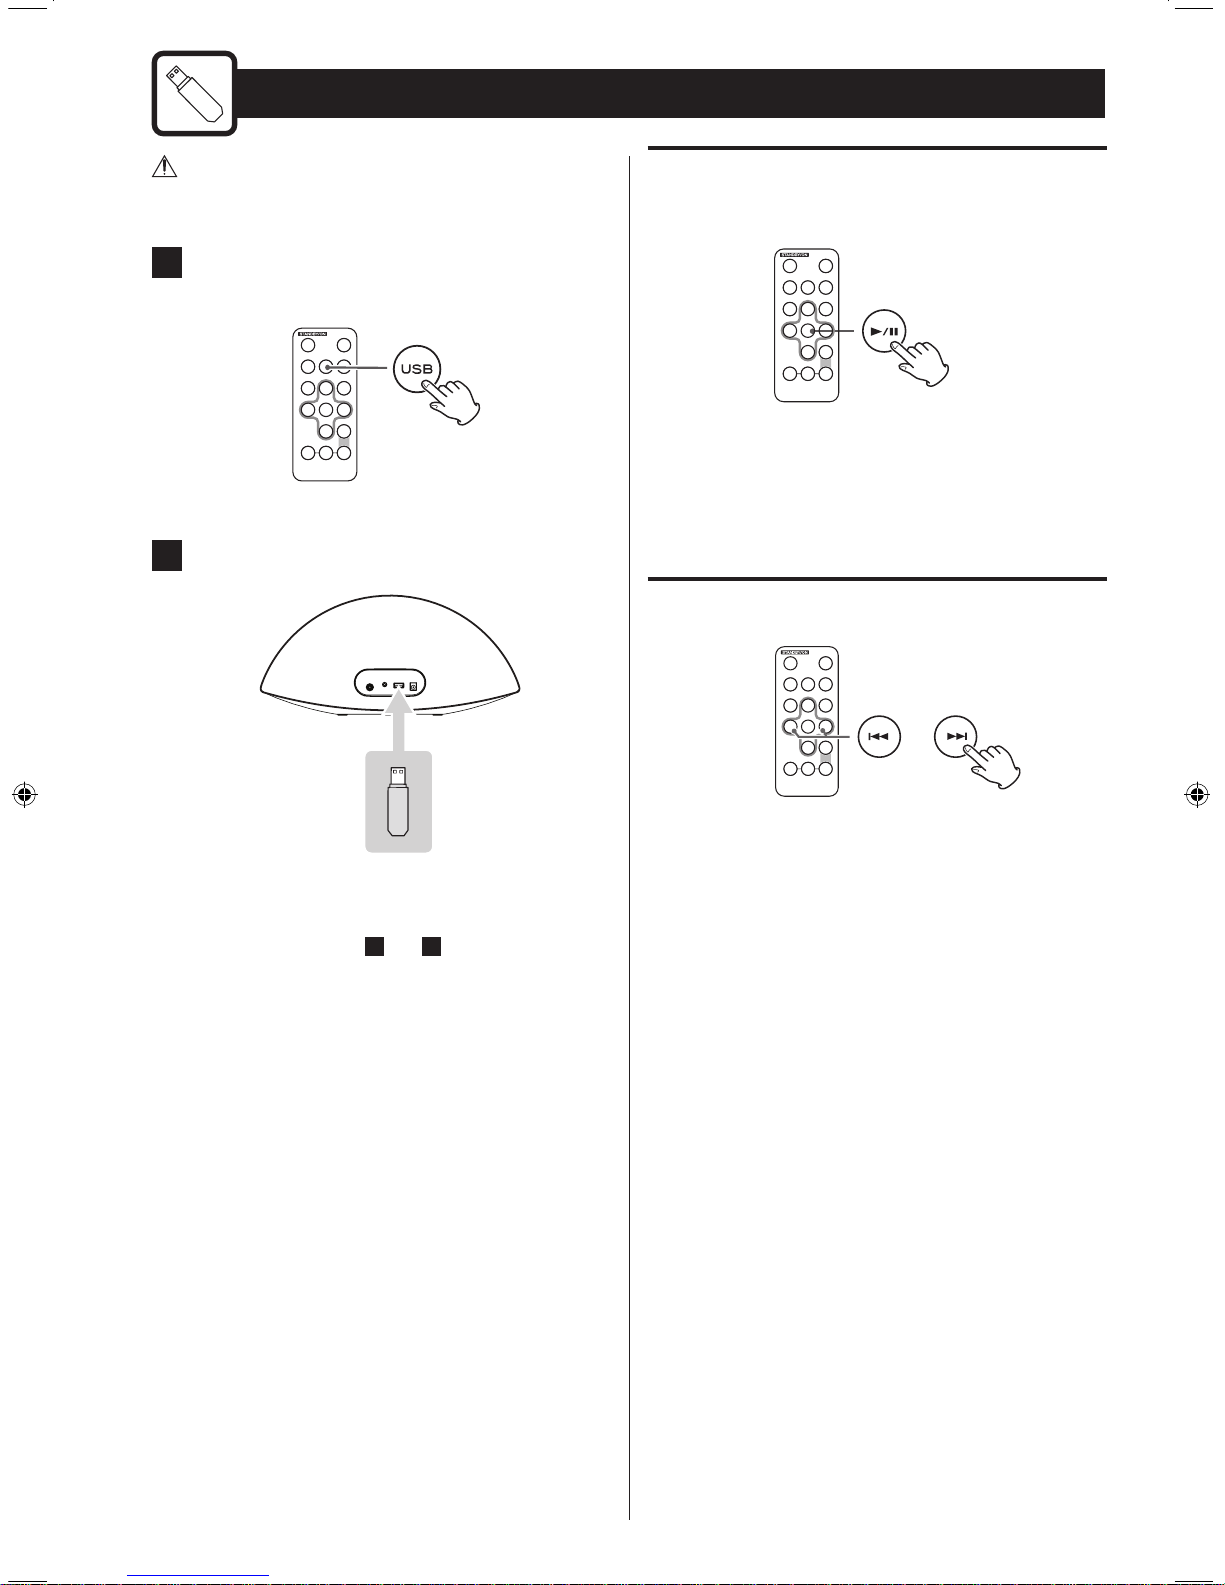
1
Press USB button to select.
2
Plug your USB flash memory into the USB port.
Back
< It takes a few seconds for the unit to load the USB
flash memory.
< You can reverse steps 1 and 2 .
Listening to a USB Flash Memory
Stopping playback temporarily
(Pause mode)
Press the Play/Pause (y/9 ) button during playback.
Playback stops at the current position.
To resume playback, press the Play/Pause (y/J)
button again.
Skipping to the next or previous file
During playback, press the Skip (.//) button
repeatedly until you find the desired file.
The selected file will be played from the beginning.
Page 16
16
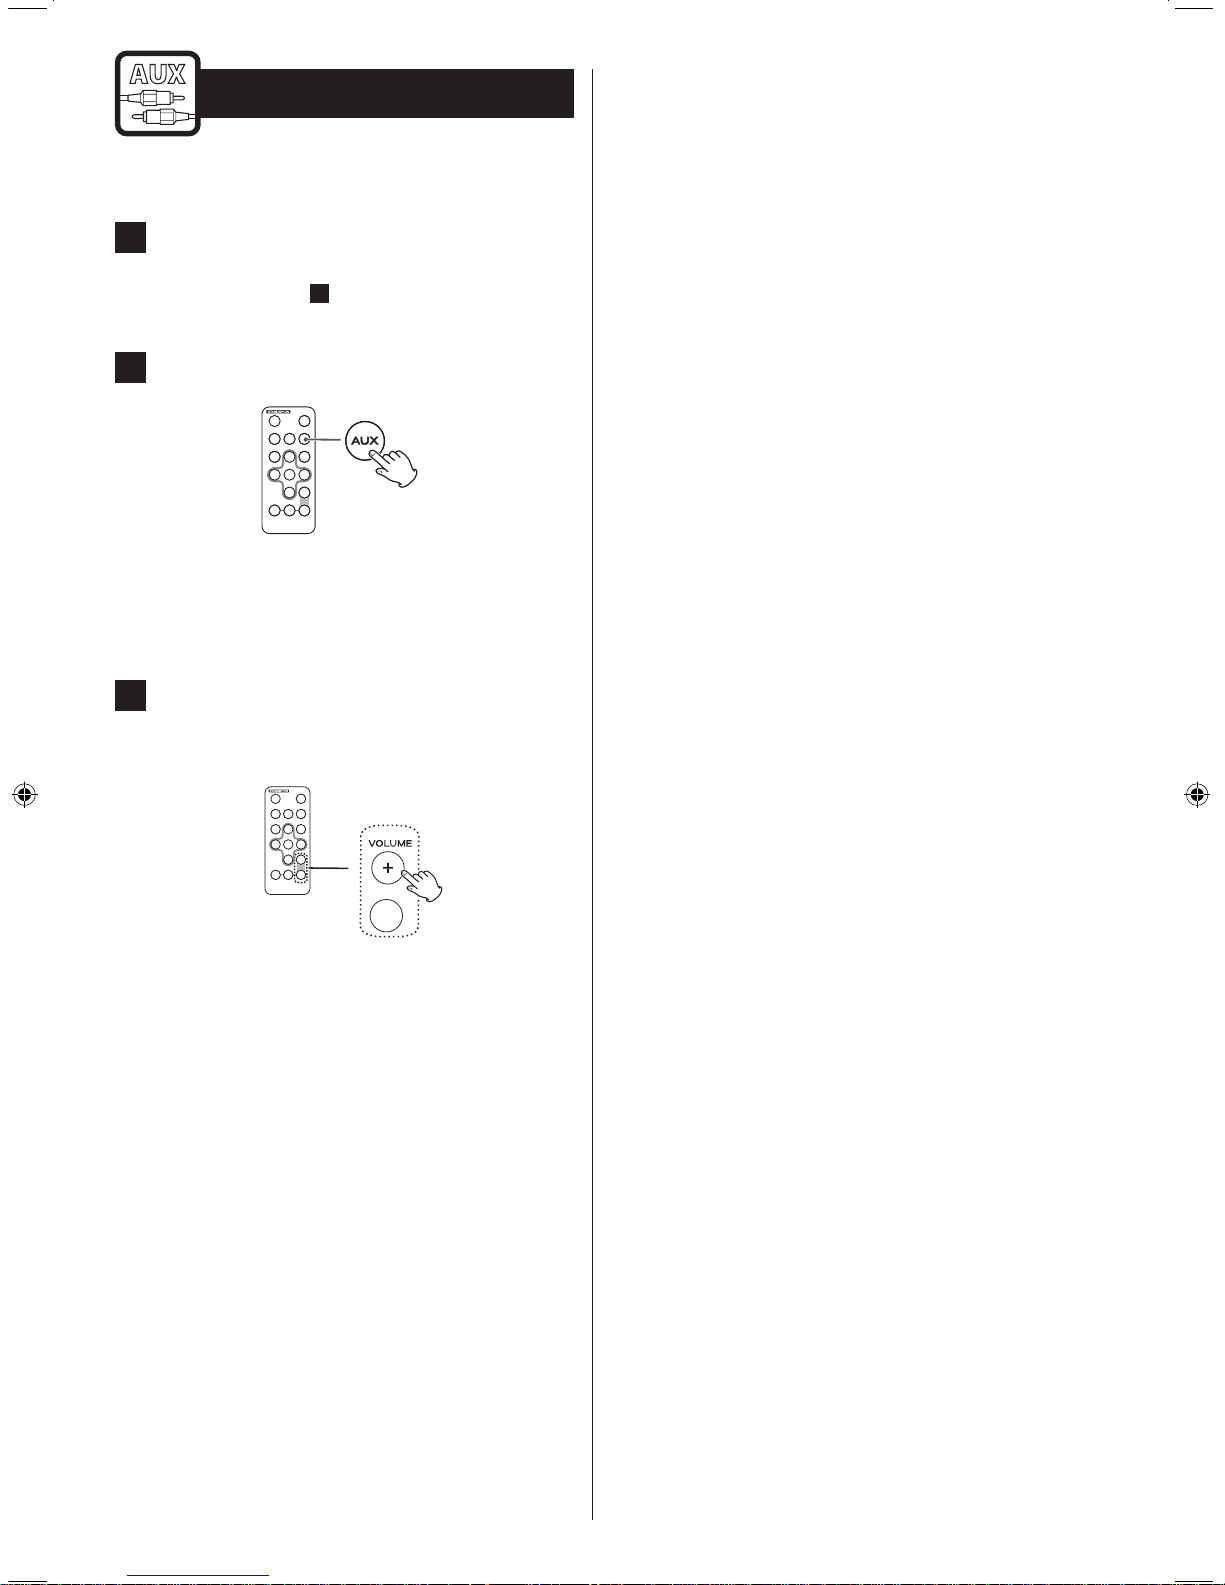
Listening to an External Source
See pages6 - 7 “Connections”.
1
Connect a portable audio player to the AUX IN
jacks using the supplied mini pin stereo plug
cable
(page
s6 - 7
B ).
2
Press the AUX button to select.
3
Play the source, and adjust the volume using
the VOLUME b u ttons a n d th e co nnect e d
portable audio player.
㻐
< When using the headphones jack of the component,
if you do not adjust its volume, you might not hear
any sound from SR-60i.
< Turning the volume of the connected component
up too high might cause the sound from SR-60i to
be distorted. In this case, reduce the volume of the
component until the distortion stops and then adjust
the volume level of SR-60i to a comfortable listening
level.
Page 17
17
If you a have problem with your system, read this page and
try to solve the problem yourself before calling your dealer
or a TEAC service Center.
General
No power
e Check the connection to the AC power supply. Check
whether or not the AC source is a switched socket. If it
is, confirm that the switch is turned on.
e Confirm that there is power to the AC wall socket by
plugging another item such as a lamp or fan into it.
No sound from the speakers.
e Select the source by the remote control.
e Adjust the volume.
e If “Muting” works, press the Muting( ) button.
The sound is noisy.
e The unit is too close to a TV or similar device. Relocate
it away from the interfering device or turn it off.
The remote control does not work.
e If the battery is exhausted, replace it with a new one.
e Use the remote control unit within the operation
range (5m) and point it at the remote sensor on the
front panel.
e Remove obstacles between the remote control unit
and the main unit.
e If a bright light is near the unit, turn it off.
iPod/iPhone/iPad Player
Cannot connect the iPod/iPhone/iPad.
e Remove dust or obstacles from the dock connector
of SR-60i and the iPod/iPhone/iPad, then connect the
iPod/iPhone/iPad again.
Cannot operate the iPod/iPhone/iPad.
e Release the iPod/iPhone/iPad HOLD switch.
Cannot play.
e Before connecting the iPod/iPhone/iPad to the dock
set the iPod/iPhone/iPad “power on”. If the iPod/
iPhone/iPad is connected to the dock with the “power
off” the playback may not start correctly.
e Remove the iPod/iPhone/iPad from the dock, wait a
few seconds, then connect it again.
e A software update might solve the problem. Visit the
Apple website and download the latest iPod/iPhone/
iPad software.
USB Player
Will not play.
e Confirm that there are MP3 files on the USB flash
memory.
MP3
Cannot play.
e Check the MP3 file extension. This unit recognizes
MP3 files by their “.mp3”.
e MP3 file data might have been corrupted.
e The file data format might not be an MP3 format.
e For more information about playable file formats, see
page14.
If normal operation cannot be obtained, unplug
the power cord from the outlet and plug it again.
This re sets th e internal micro-co mpute r whic h
can be disturbed during electrical storms, power
interruptions, etc.
Troubleshooting
Page 18

18
Amplifier Section
Output Power . . . . . . . . . . . . . . . . . . . 5W + 5W (THD 10 %)
Speaker System Section
Unit size . . . . . . . . . . . . . . . . . . . . . . . . . . . . . . . . . . . . 3.0inch x 2
Impedance . . . . . . . . . . . . . . . . . . . . . . . . . . . . . . . . . . . . .8ohms
USB Section
USB bus-power output. . . . . . . . . . . . . . . . . . . . . . . . 5V, 0.5A
MP3
Playable MP3
Format. . . . . . . . . . . . . . . . . . . . . . MPEG1/2/2.5 Audio Layer-3
Extension . . . . . . . . . . . . . . . . . . . . . . . . . . . . . . . . . . . . . . . .“.mp3”
Bit rate: . . . . . . . . . . . . . . . . . . . . . . . . . . . . . 8kbps to 320kbps
Sampling rate: . . . . . . . . . . .16, 22.05, 24, 32, 44.1 or 48kHz
Max. number of playable folders . . . . . . . . . . . . . . . . . . . . . . 500
Max. number of playable files . . . . . . . . . . . . . . . . . . . . . . . . . 999
Specifications
General
Power Requirements. . . . . . . . . . . . . . . .100-240V, 50/60Hz
Power Consumption (nominal). . . . . . . . . . . . . . .under 1W
Dimension (W x H x D) . . . . . . . . . . . . . 384 x 190 x 178mm
Weight (Net) . . . . . . . . . . . . . . . . . . . . . . . . . . . . . . . . . . . . 1.57kg
Standard Accessories
Remote control unit (RC1290) x 1
Battery (CR-2032) for the remote control unit x 1
AC adapter (PS-M0930) x 1
Mini-pin stereo plug cable x 1
Owner’s manual (this document) x 1
Warranty card x 1
< Design and specifications are subject to change without
notice.
< Weight and dimensions are approximate.
< Illustrations may differ slightly from production models.
Page 19

Z
0411.MA-1636B_CN
This appliance has a serial number located on the rear panel. Please record the
serial number and retain it for your records.
Model name: SR-60i Serial number
TEAC CORPORATION
1-47 Ochiai, Tama-shi, Tokyo 206-8530 Japan Phone: (042) 356-9156
TEAC AMERICA, INC. 7733 Telegraph Road, Montebello, California 90640 U.S.A. Phone: (323) 726-0303
TEAC CANADA LTD. 5939 Wallace Street, Mississauga, Ontario L4Z 1Z8, Canada Phone: (905) 890-8008
TEAC MEXICO, S.A. DE C.V.
Río Churubusco 364, Colonia Del Carmen, Delegación Coyoacàn, CP 04100, México DF, México Phone: (5255)5010-6000
TEAC UK Ltd. Suites 19 & 20, Building 6, Croxley Green Business Park, Hatters Lane, Watford, Hertfordshire, WD18 8TE, U.K.
Phone: (0845) 130-2511
TEAC EUROPE GMBH Bahnstraße 12, D-65205 Wiesbaden-Erbenheim, Deutschland Phone: 0611-71580
 Loading...