

Page 1

TASCAM
TEAC Professional Division
MX-View
Graphical User Interface
MX-View Version 1.0b1
Owner’s Manual
Page 2

Table of Contents
CHAPTER 1: INTRODUCTION ........................................................................... 8
1-1
1-2
Introduction ....................................................................................................................................8
Conventions and Symbols Used..................................................................................................... 8
CHAPTER 2: ETHERNET SETUP ...................................................................... 9
2-1
2-2
2-3
2-4
System Requirements.................................................................................................................... 9
MX-2424/MMR direct to Computer............................................................................................ 9
MX-2424/MMR to Computer via Ethernet Hub ........................................................................ 9
Setting IP Addresses.................................................................................................................... 10
CHAPTER 3: OVERVIEW ................................................................................. 12
3-1
3-2
3-3
Main MX-View Window............................................................................................................. 12
Transport Window ...................................................................................................................... 13
Project/Track Window................................................................................................................ 13
3-4
3-5
3-6
3-7
3-8
3-9
3-10 Machine Info Bar......................................................................................................................... 15
3-11 Network Window......................................................................................................................... 16
3-12 Starting a New Project ................................................................................................................ 16
3-13 Basic Playback and Record ........................................................................................................17
3-14 Performing a Copy and Paste Edit............................................................................................. 17
3-15 Trimming Audio .......................................................................................................................... 19
3-16 Virtual Track Basics.................................................................................................................... 20
Overview Window ....................................................................................................................... 14
Level Meters Window ................................................................................................................. 14
Menu Settings (N/A) .................................................................................................................... 14
Location Markers Window (N/A) ..............................................................................................14
Group Window (N/A).................................................................................................................. 14
Edit Bar ........................................................................................................................................ 15
2
Page 3

CHAPTER 4: MX-VIEW FUNDAMENTALS AND TERMINOLOGY.................. 21
4-1
4-2
4-3
4-4
4-5
4-6
4-7
4-8
4-9
Working with Windows .............................................................................................................. 21
Docking windows......................................................................................................................... 22
Expandable Windows.................................................................................................................. 24
Window sets (N/A)....................................................................................................................... 24
Working With Projects ............................................................................................................... 24
Working with Tracks .................................................................................................................. 25
Events, Regions and Waveforms................................................................................................ 26
Register Entry.............................................................................................................................. 27
Setting In and Out Points............................................................................................................ 27
CHAPTER 5: PLAYBACK, NAVIGATION, AND RECORD .............................. 29
5-1
Play ............................................................................................................................................... 29
5-2
5-3
5-4
5-5
5-6
5-7
5-8
5-9
5-10 Return View To Playhead........................................................................................................... 32
5-11 Reverse Play................................................................................................................................. 32
5-12 Using the Playhead Counter ....................................................................................................... 32
5-13 Fast Forward and Rewind .......................................................................................................... 32
5-14 Move Playhead to Next/Previous Locate Marker..................................................................... 33
Pages With Playhead Scrolling................................................................................................... 29
“In to Out“ Play........................................................................................................................... 29
Loop Play...................................................................................................................................... 30
Last Play....................................................................................................................................... 30
Audition Play Modes ................................................................................................................... 31
Locate With View ........................................................................................................................ 31
Pre/Post Roll On Play.................................................................................................................. 31
Return After Play ........................................................................................................................ 32
5-15 Move Playhead to Next/Previous Edit ....................................................................................... 33
5-16 Locate to Head/Tail ..................................................................................................................... 33
3
Page 4

5-17 Locating to In and Out Points .................................................................................................... 33
5-18 Roll Back and Roll Forward....................................................................................................... 33
5-19 Clicking in the Main MX-View Window ................................................................................... 34
5-20 Overview window ........................................................................................................................34
5-21 Horizontal Zoom.......................................................................................................................... 34
5-22 View Whole Project..................................................................................................................... 35
5-23 View Samples ............................................................................................................................... 35
5-24 Track Height ................................................................................................................................ 35
5-25 Vertical Zoom ..............................................................................................................................35
5-26 Scrolling with the Mouse............................................................................................................. 35
5-27 Scrolling Up/Down in the MX-View Main Window ................................................................. 35
5-28 Basic Recording ........................................................................................................................... 36
5-29 Auto Record and Auto Rehearse................................................................................................ 36
5-30 Loop Record................................................................................................................................. 37
5-31 External Synchronization ........................................................................................................... 38
5-32 View Options................................................................................................................................ 38
CHAPTER 6: EDITING ...................................................................................... 40
6-1
6-2
6-3
6-4
6-5
6-6
6-7
6-8
Selecting a Region for Edit ..........................................................................................................40
Force Region Select .....................................................................................................................42
Cut.................................................................................................................................................. 43
Local Cut ...................................................................................................................................... 43
Left Cut ........................................................................................................................................ 44
Local Left Cut.............................................................................................................................. 44
Copy.............................................................................................................................................. 45
Paste.............................................................................................................................................. 45
6-9
6-10 Paste at Playhead......................................................................................................................... 47
Paste Left...................................................................................................................................... 46
4
Page 5

6-11 Clear .............................................................................................................................................47
6-12 Open.............................................................................................................................................. 48
6-13 Insert............................................................................................................................................. 49
6-14 Repeat Selection........................................................................................................................... 50
6-15 Split............................................................................................................................................... 51
6-16 Separate........................................................................................................................................ 52
6-17 Discard.......................................................................................................................................... 52
6-18 Sync Paste..................................................................................................................................... 53
6-19 Sync Insert.................................................................................................................................... 54
6-20 Nudge............................................................................................................................................ 54
6-21 “In to Now” .................................................................................................................................. 56
6-22 Renaming Events......................................................................................................................... 56
6-23 Render ..........................................................................................................................................57
6-24 Reverse .........................................................................................................................................58
6-25 Undo and Redo ............................................................................................................................58
6-26 Drag and Drop Editing................................................................................................................58
6-27 Drag and Trim Tool Fundamentals ........................................................................................... 59
CHAPTER 7: ADVANCED EDITING................................................................. 60
7-1
7-2
7-3
7-4
7-5
7-6
7-7
Event Trimming Basics............................................................................................................... 60
Horizontal Trimming .................................................................................................................. 60
Trimming Multiple Events .........................................................................................................61
Event Ripple Trim....................................................................................................................... 62
Trim to Next................................................................................................................................. 62
Lock Trim .................................................................................................................................... 63
Event Volume Trimming ............................................................................................................ 63
7-8
7-9
Fades and Cross-Fades................................................................................................................ 64
Multiple Clipboard Select........................................................................................................... 66
5
Page 6

7-10 Event Slip .....................................................................................................................................67
7-11 Compile......................................................................................................................................... 68
CHAPTER 8: ADVANCED OPERATIONS........................................................ 69
8-1
8-2
8-3
8-4
8-5
Using Groups (N/A)..................................................................................................................... 69
Using Location Markers .............................................................................................................69
Level Meters................................................................................................................................. 69
Breakpoint Volume Automation ................................................................................................ 70
Mute Automation......................................................................................................................... 71
CHAPTER 9: PROJECTS AND UTILITIES....................................................... 72
9-1
9-2
9-3
Loading Projects.......................................................................................................................... 72
Project Utilities ............................................................................................................................72
Network Backup and Restore.....................................................................................................74
9-4
9-5
9-6
Disk Utilities................................................................................................................................. 76
Updating Software (MX-2424) ................................................................................................... 77
Preferences (N/A)......................................................................................................................... 78
CHAPTER 10: TRACKS.................................................................................... 79
10-1 Track Menu.................................................................................................................................. 79
10-2 Creating a New Virtual Track.................................................................................................... 79
10-3 Loading a Track ..........................................................................................................................80
10-4 Unloading Tracks ........................................................................................................................80
10-5 Renaming Tracks......................................................................................................................... 80
10-6 Deleting a Track ..........................................................................................................................80
CHAPTER 11: USING MULTIPLE MACHINES ................................................ 81
11-1 Connecting to Multiple Machines .............................................................................................. 81
11-2 Studio Setup ................................................................................................................................. 82
11-3 Multiple Machines in Use............................................................................................................ 83
6
Page 7

APPENDIX A: KEYBOARD SHORTCUTS ....................................................... 84
APPENDIX B: TROUBLESHOOTING............................................................... 88
Online Support............................................................................................................................................ 88
Software Updates ........................................................................................................................................ 88
Customer Service Contacts ........................................................................................................................ 88
APPENDIX C: ERROR AND WARNINGS DESCRIPTIONS............................. 89
APPENDIX D: PROJECT/TRACK WINDOW ICONS........................................ 89
INDEX ................................................................................................................ 90
7
Page 8

Chapter 1: Introduction
1-1 Introduction
Welcome to MX-View, the graphical user interface for the MX and MM series TASCAM
recorders.
This user manual will guide both new and experienced audio engineers in audio recording using
the MX-View graphical user interface. The experienced computer audio veterans may wish to take
the shortest route and avoid reading this entire manual. If you happen to fall into this category, we
encourage you to at least go through Chapter 2 Overview, which will briefly cover all the MXView windows and buttons, as well as some basic elements of recording, editing, trimming, and
virtual tracks. You will be surprised to find quite a few new MX-View features, quick keys and
ways of working that were previously unavailable. For those of you that are new to editing audio
on a computer, welcome! Please take the time to browse through the manual and familiarize
yourself with the various windows and buttons before proceeding. Hang on to your mouse as we
guide you through everything you’ll need to know about MX-View, from record and playback to
editing and backups and get ready for a new experience in audio engineering.
Before we get started, please note that this user manual will cover all aspects of the MX-View user
interface and is meant to complement the MX-2424 and MMR/MMP manuals. It does not explain
synchronization, digital I/O setup, or front panel operations. Please refer to your MX-2424 or
MMR/MMP manuals for this information.
1-2 Conventions and Symbols Used
The following conventions and symbols will be used throughout the manual:
→
The arrow symbol is used to denote a menu location. For example,
View Menu
Waveforms option.
Cmd Cmd denotes pressing the Command key on a Macintosh computer.
Ctrl Ctrl denotes pressing the Control key on a Microsoft Windows or Macintosh computer.
+ The plus symbol is used describe the act of holding down a quick key. Example: Cmd +
B denotes holding down the Cmd key and pressing the B key.
Q
The quick key symbol is used to note an alternate way of performing a function using a
K
quick key short cut.
T
iP
______________________________________________________________________________________
The note symbol is an important notice that may be often overlooked
The Tip symbol notes an insightful and important tip to help you get the most out of your
recorder.
Note:
graphics. This is due in part by the use of the BeOS platform for screenshots, as well as some
recent changes, which have not yet been incorporated into this version of the manual.
→→→→
Waveforms
Some screenshots in the MX-View Manual may not reflect the most current software release
, directs you to the View pull down menu, then to the
.
8
Page 9
Chapter 2: Ethernet Setup
Chapter 2 reviews the two basic Ethernet hardware configurations as well as System requirements. Please
refer to the MX-View software release notes for software installation instructions.
2-1 System Requirements
Please refer to the software release notes for system requirements.
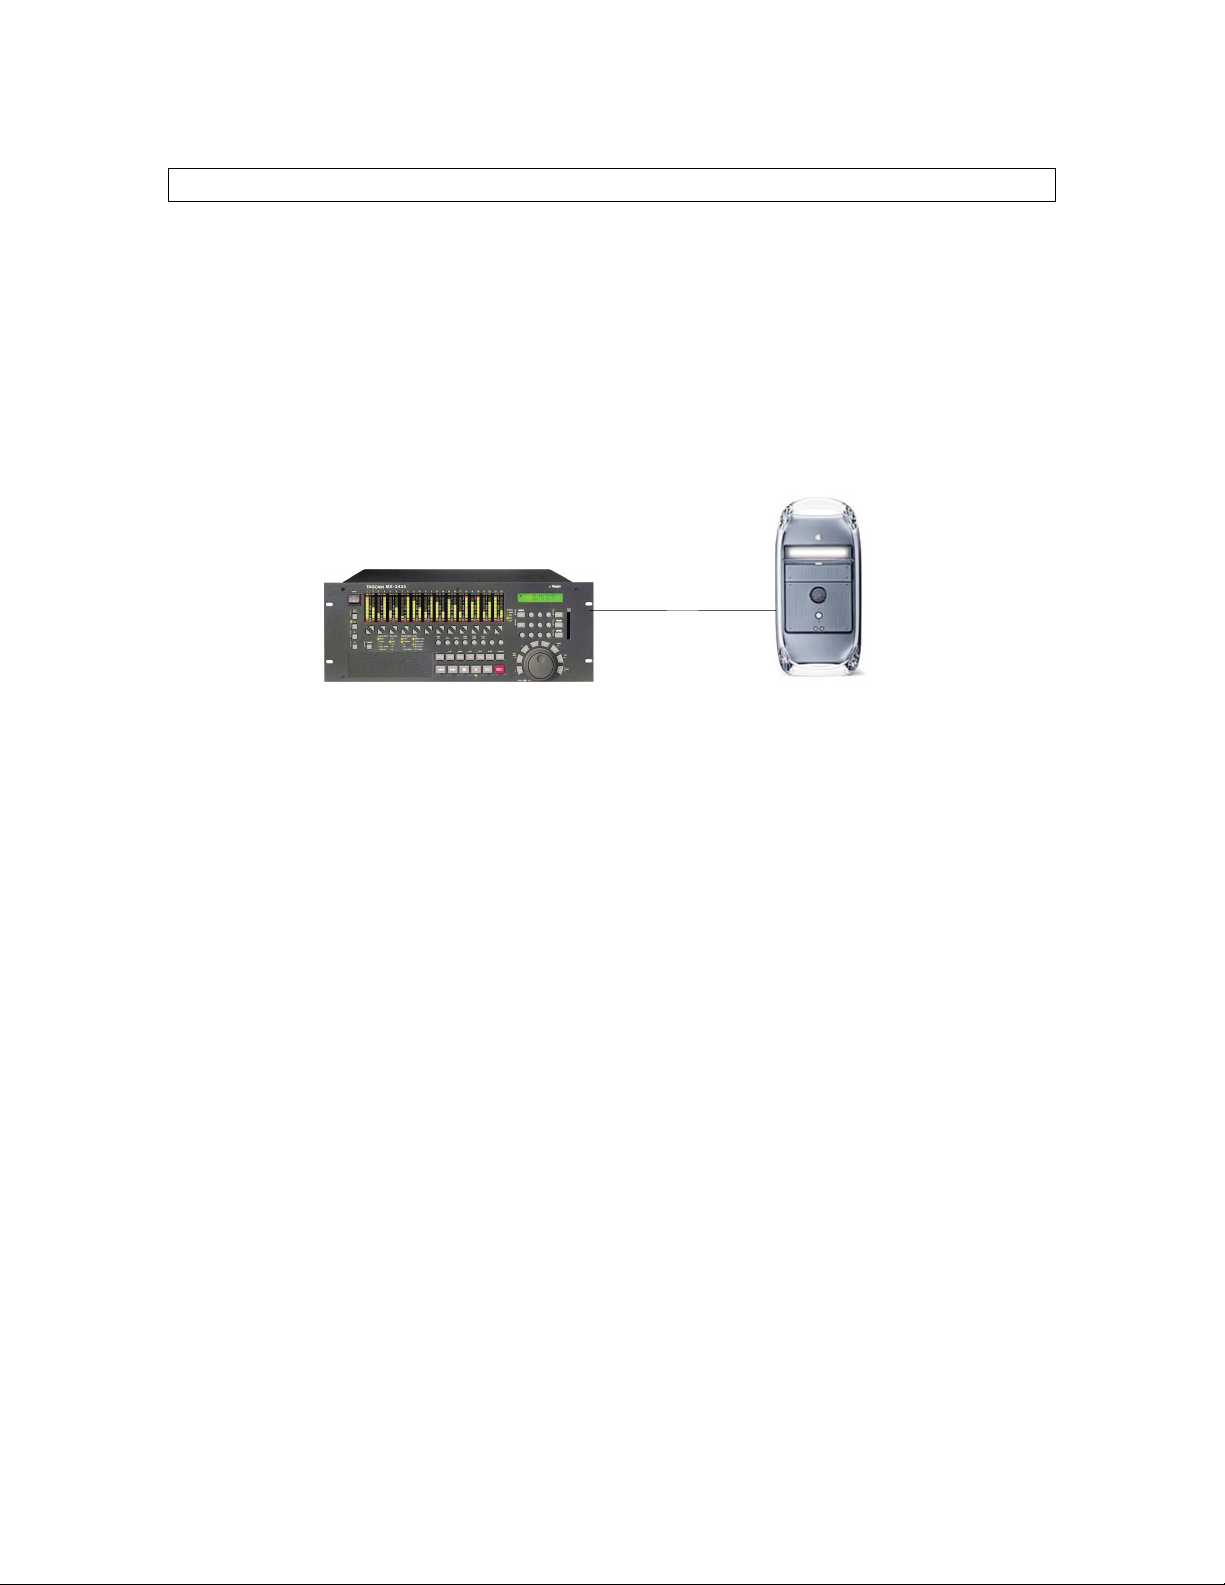
2-2 MX-2424/MMR direct to Computer
A computer running MX-View can connect directly to an MX-2424/MMR using one
Category 5 Crossover Ethernet cable. Connect one end of the cable to the Ethernet port
on the recorder and the other end to the computer Ethernet port.
Crossover Ethernet Cable
2-3 MX-2424/MMR to Computer via Ethernet Hub
A single or group of MX-2424/MMR machines can be connected to an MX-View
computer via a 100-baseT Fast Ethernet hub. All cables in this configuration must be
standard Category 5 Ethernet “Patch” cables (also referred to as “Straight” cables).
Connect each machine to the hub, including the computer. The Uplink port on the hub
may be used only when connecting that specific hub to another hub.
Most Ethernet cable runs should not exceed 100 meters/328 feet.
Note:
Computer
9
Page 10
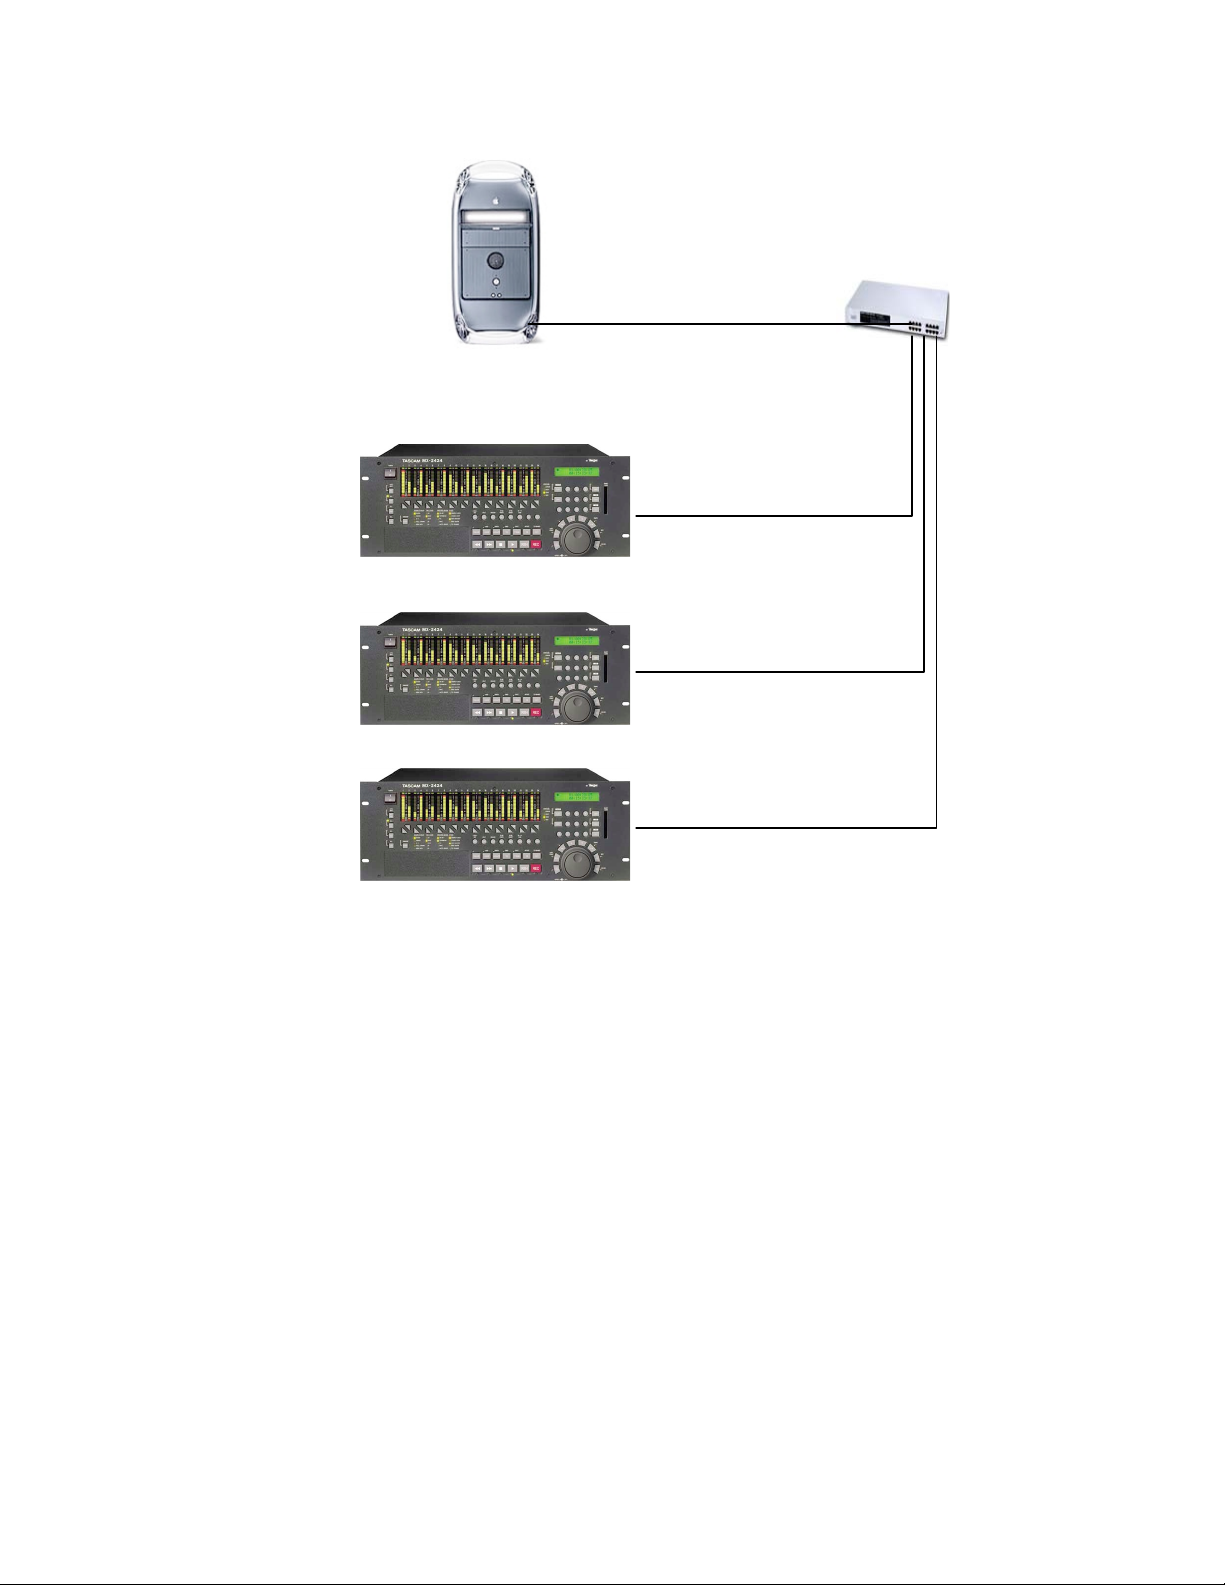
Computer
Ethernet Hub
Ethernet Patch Cable
Ethernet Patch Cable
Ethernet Patch Cable
More complex network hardware configurations are possible, involving a number of MX-
Note:
View workstations, routers, hubs, and recorders. Please consult your facility network administrator
when setting up a complex network.
2-4 Setting IP Addresses
MX-2424 IP Settings
Access Menu 950 on the MX-2424 by pressing SETUP, the numerical key “0” then the
Down Arrow Key repeatedly. There will be an IP address displayed similar to this:
192.168.100.001. NOTE: Your number may be different but will follow the
XXX.XXX.XXX.YYY rule.
If your computer is already connected to a network, including a Cable/DSL modem, the
XXX.XXX.XXX portion of the IP address must match the corresponding portion of the
IP address that your computer is already assigned. The YYY portion of the MX-2424's IP
address must be a different, unique number than the computer's YYY portion. Make sure
this number is between 1 and 254.
Windows Computers:
On your computer’s desktop right click the Network Neighborhood icon and select
Properties. Highlight the TCP/IP icon that corresponds to the Ethernet card installed in
your computer and press Properties.
Ethernet Patch Cable
10
Page 11

Select “Specify an IP address” and enter XXX.XXX.XXX portion from Menu 950 on the
MX-2424 into the IP Address field exactly as they are displayed on the MX-2424. Enter a
different value for the YYY portion of the IP address. Make sure this number is between
1 and 254.
Example: If Menu 950 displays 192.168.100.001 then the IP Address field on the
computer should display 192.168.100.YYY where YYY is anything between 002 and
254. On the computer, enter 255.255.255.000 as the value for Subnet Mask. Press OK
twice and restart the computer.
Macintosh Computers:
Open the TCI/IP control panel, which is accessible under the Apple menu in the Control
Panels folder. Set the Connect via option to “Ethernet” and the Configure option to
“Using Mac IP Manually”.
Enter the XXX.XXX.XXX portion from Menu 950 on the MX-2424 into the IP Address
field exactly as they are displayed on the MX-2424. Enter a different value for the YYY
portion of the IP address. Make sure this number is between 1 and 254.
Example: If Menu 950 displays 192.168.100.001 then the IP Address field on the
computer should display 192.168.100.YYY where YYY is anything between 002 and
254.
On the computer enter 255.255.255.000 as the value for
Subnet Mask. Close the TCP/IP control panel, saving changes and
restart the computer.
11
Page 12
Chapter 3: Overview
Chapter 3 consists of two sections: MX-View Windows and a Quick-Start Guide. The Quick Start Guide
provides some quick tips on getting up and running, with examples of some common operations. The MXView Windows section previews the major MX-View windows, with brief descriptions to familiarize you
with MX-Views’ features.
MX-View Windows
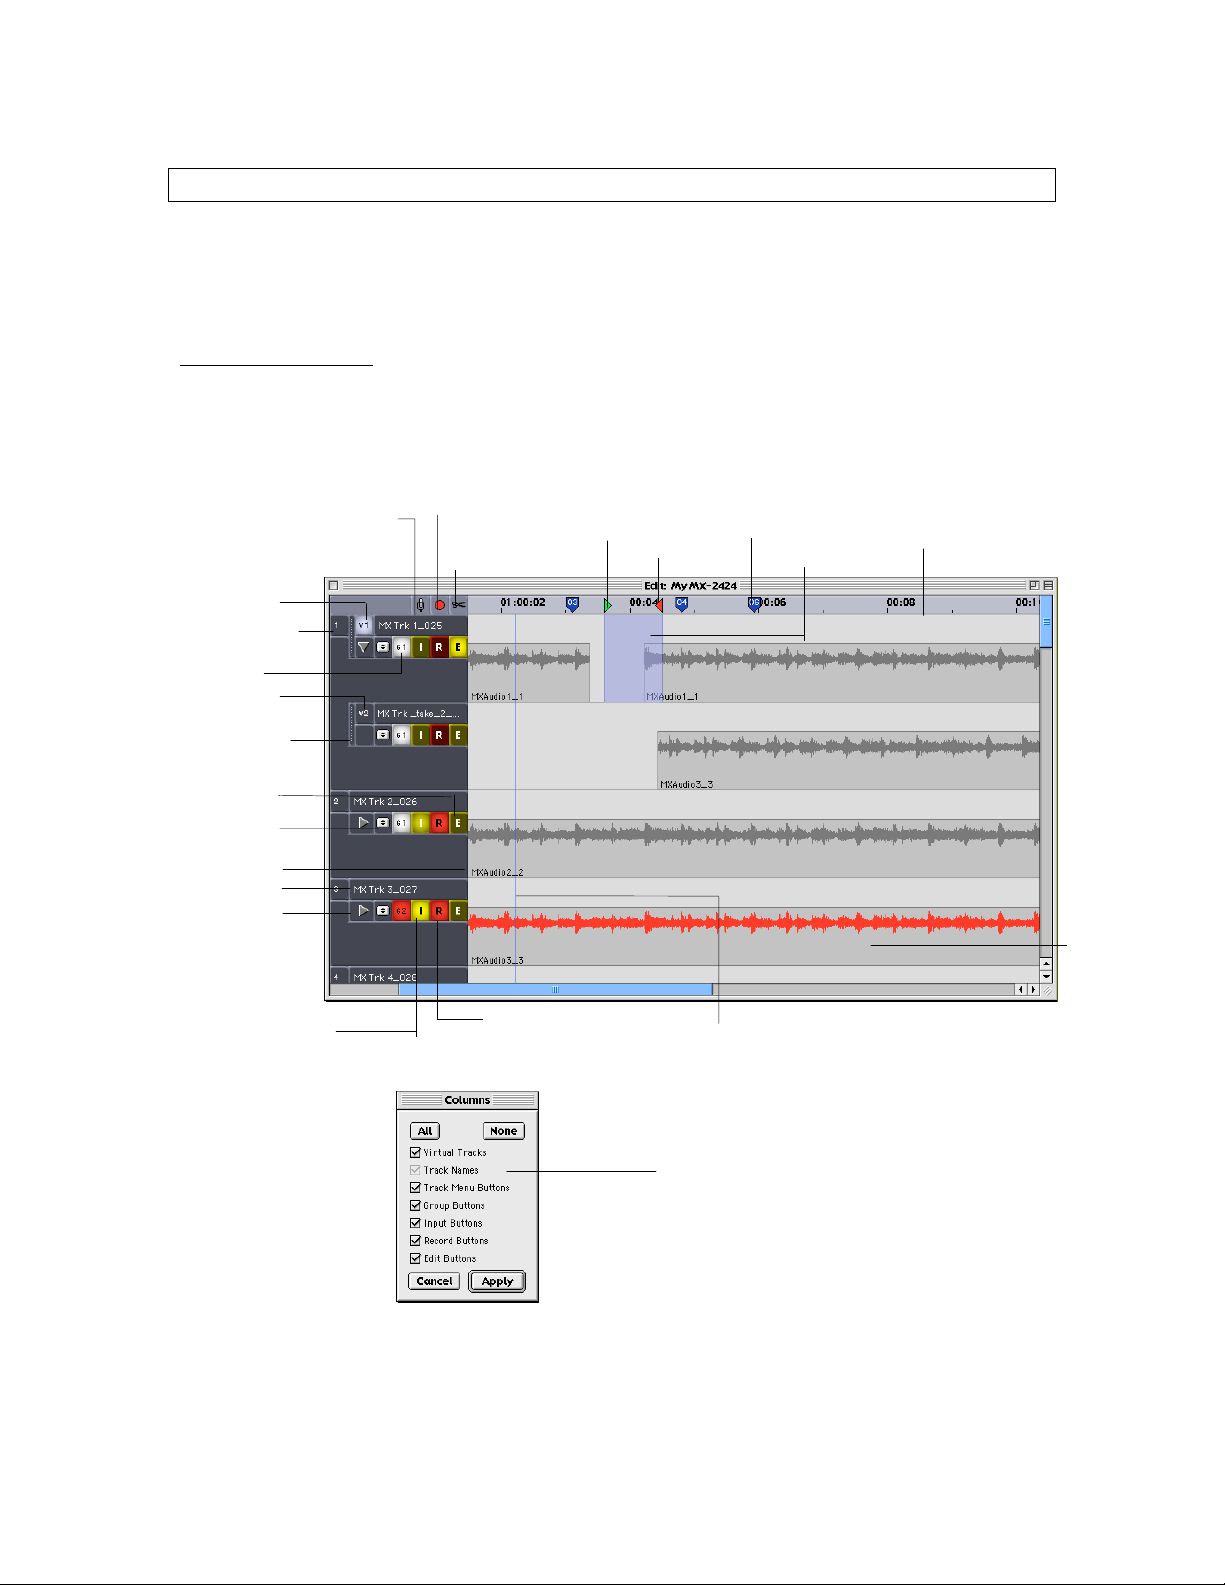
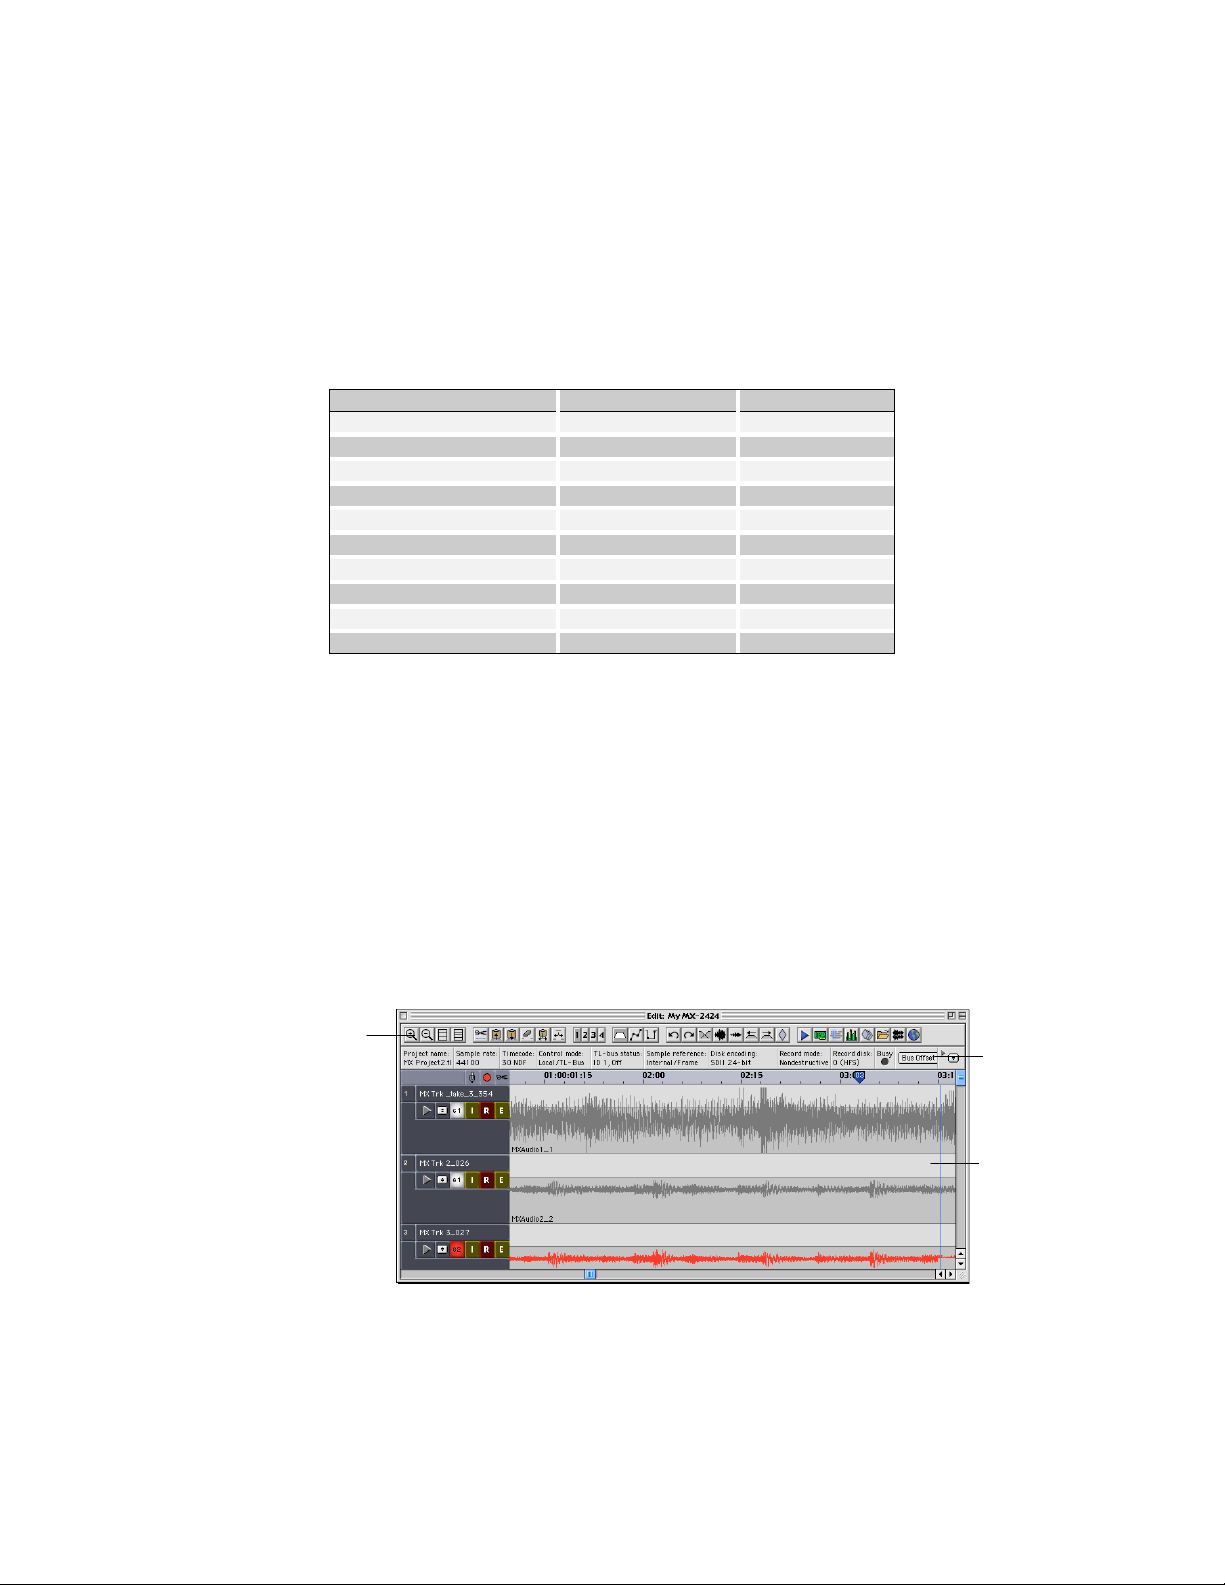
3-1 Main MX-View Window
Active Track
Track Number
Input All: Places
all active tracks
into Input mode.
Record Arm All: Record
arms all active tracks.
Edit All: Places all
tracks into Edit. Useful
when editing all tracks.
In Point
Out Point
Location Marker
Selected audio
Time Ruler
Group
Inactive/ Virtual
Track
Virtual Track
Drag Handle
Track Edit
Track Menu
Event Name
Track Name
Show/Hide
Virtual Tracks
Input:
Solid Yellow – Input Armed.
Half Lit - Record Armed.
Record Arm:
Blinking Red - Record Armed.
Solid Red - Recording.
Playhead
Columns within the main MX-View
window have the ability to be hidden
or shown in order to provide more
screen real estate. To hide or show
columns, access the column window in
View Menu
columns you wish to display.
→→→→
Columns
and select the
Track
12
Page 13
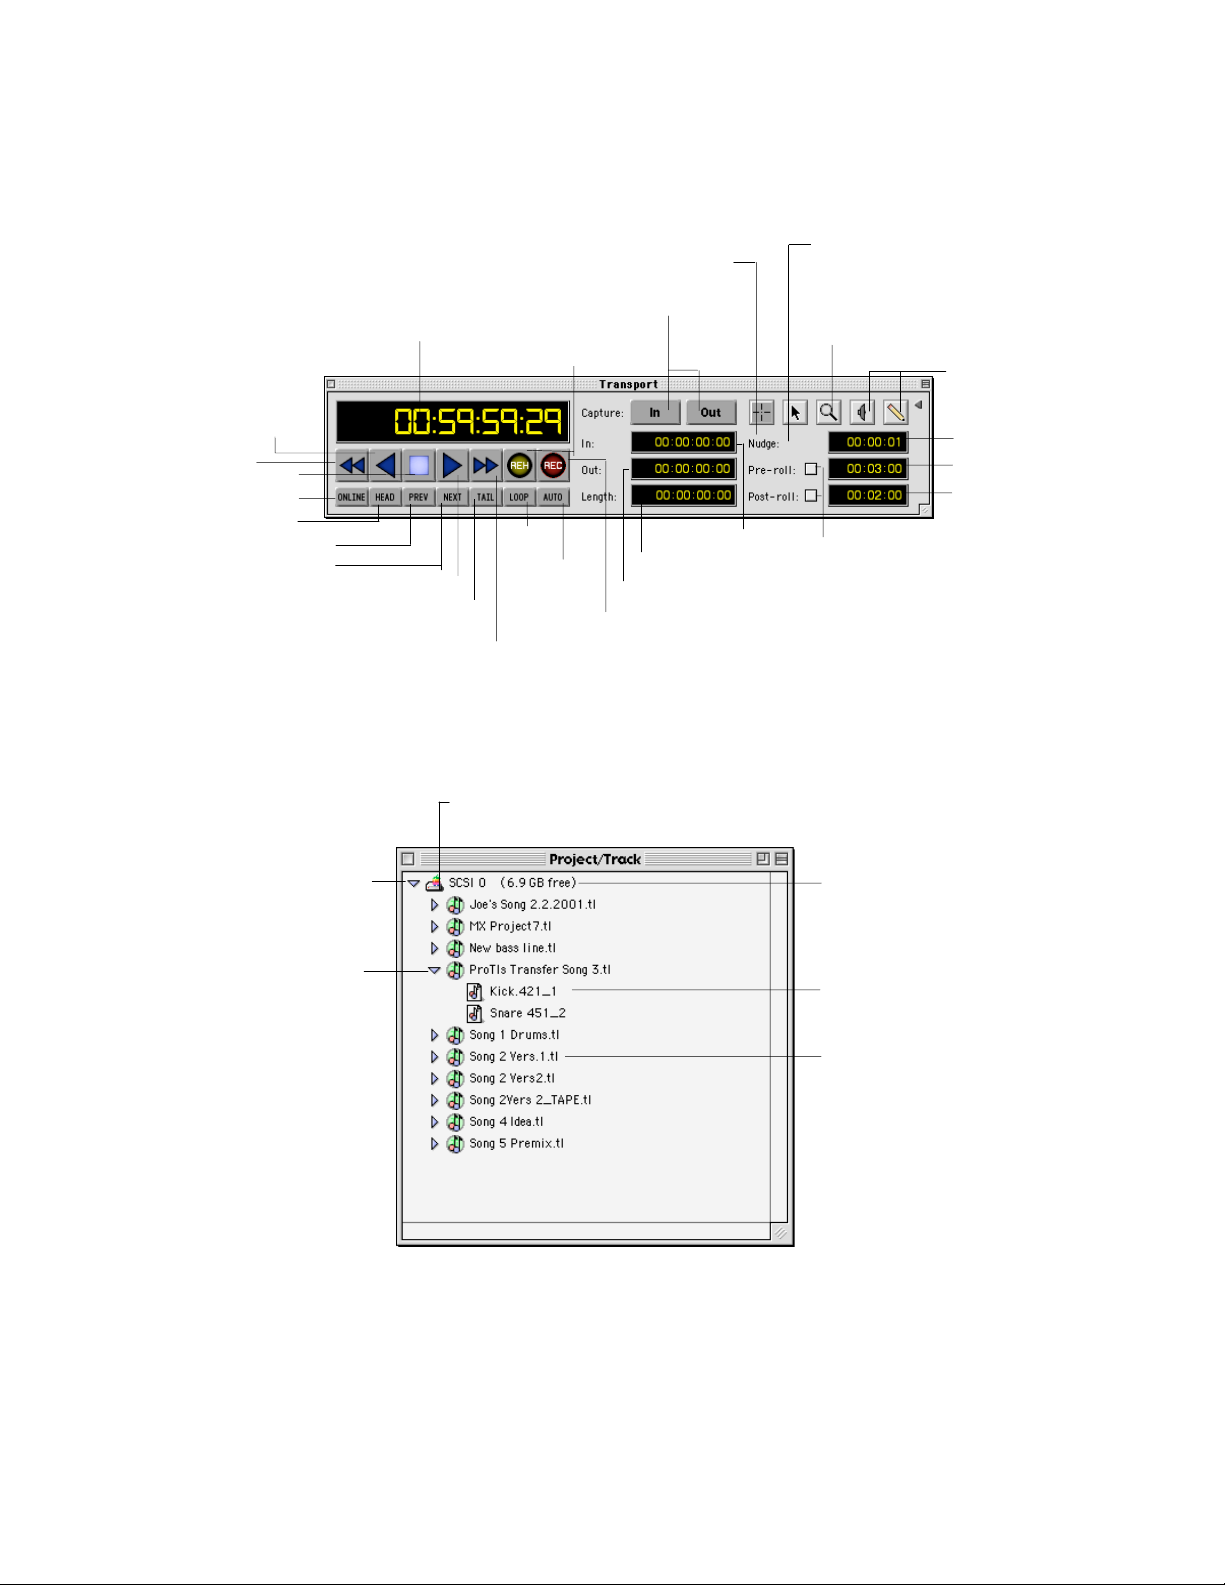
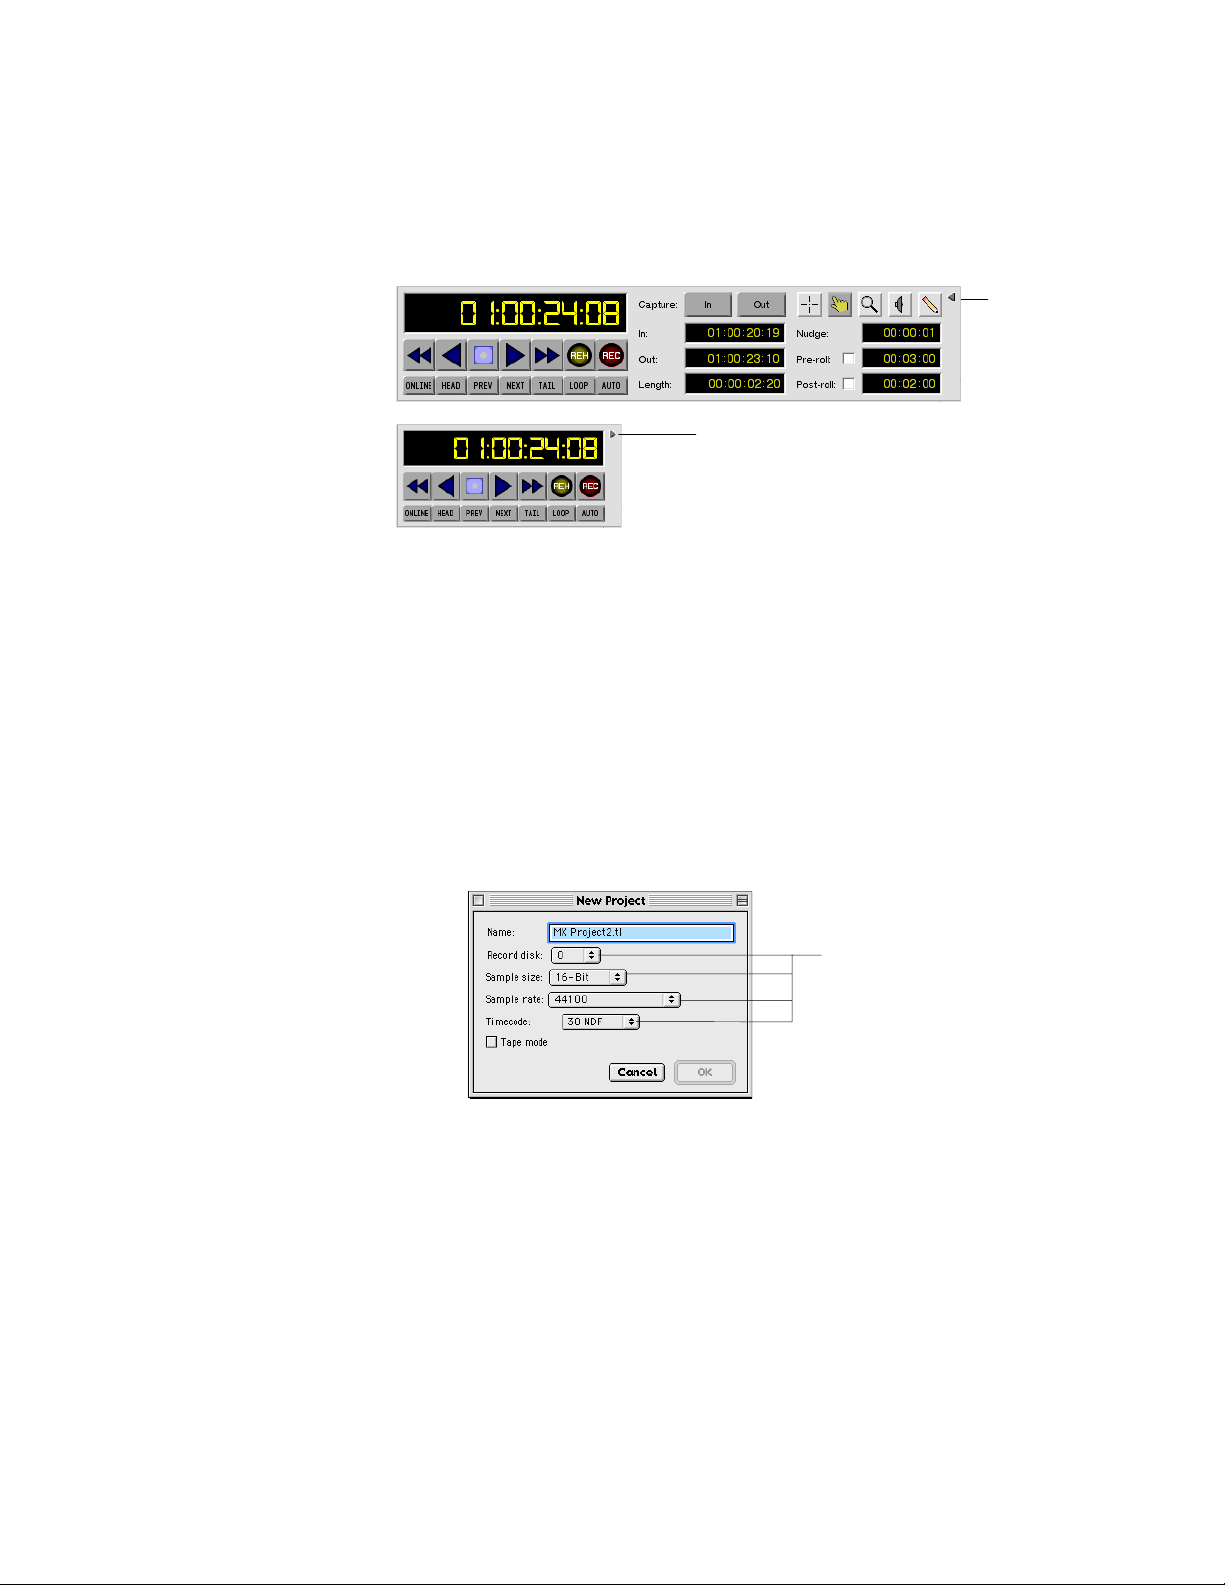
3-2 Transport Window
Reverse Play
Re-Wind
Locate to Head
Locate to Previous
Online
Locate to Next
T
Playhead Counter: Displays playhead
position. Clan be used to locate
playhead (section 4-8).
Stop
Loop
Play
Locate to Tail
By selecting the box for Show Transport Hints, under the Edit window's help menu, tool
iP
Auto (AutoRecord/Rehearse)
Fast Forward
tips are available for all the quick keys that aren't visible by looking in the menus.
Selector Tool: Primarily used to
select and edit audio regions.
Capture In and
Out points
Rehearse
In Point Register
Selection Length Register
Out Point Register
Record
Drag and Trim Tool: Used to select
and edit individual events, drag and
trim events as well as Volume and
Mute Automation.
Zoom Tool: Used to zoom in or
out on an audio region.
Scrub Tool and
Pencil Tool.
Available in
future upgrade.
Nudge Register
Pre-Roll Register
Post-Roll Register
Pre and Post-Roll Enable/Disable.
Click in box to enable.
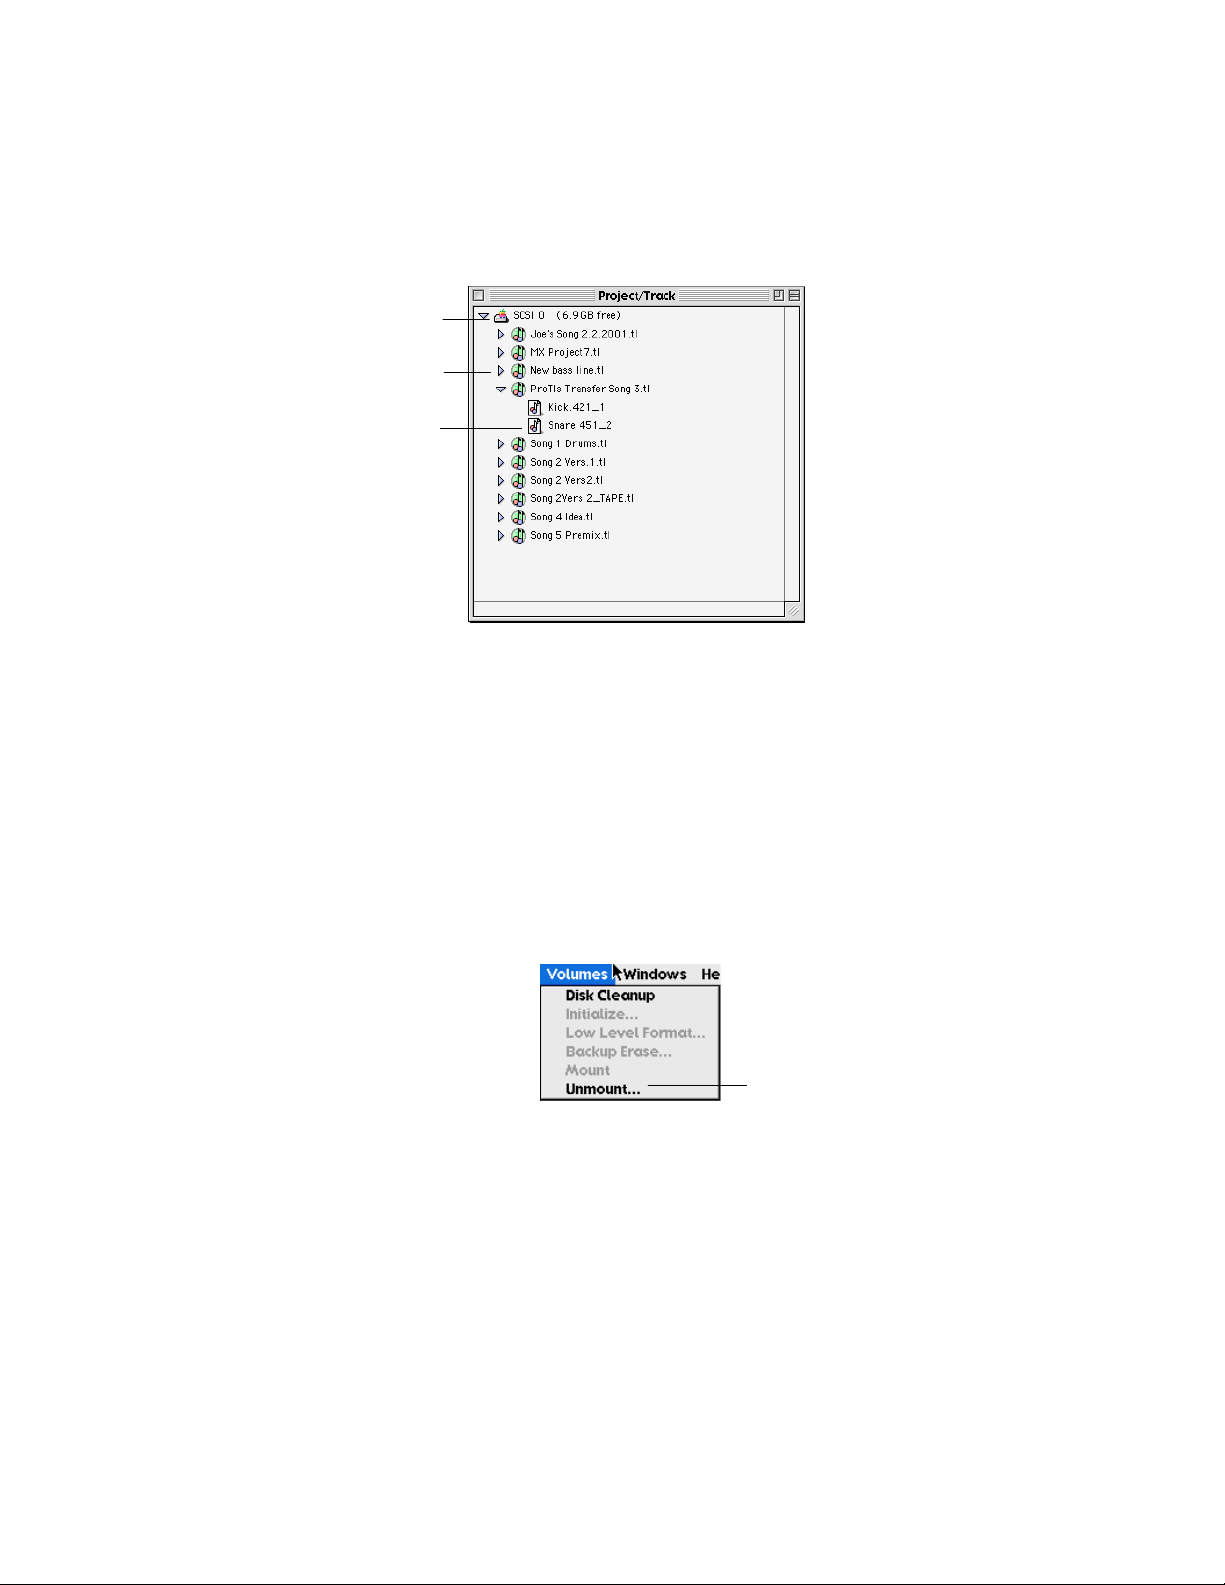
3-3 Project/Track Window
Show/Hide
Projects
Show/Hide
Tracks
Icon: Note that Icon displays File
system type (in this case the Apple
Logo).
Disk: SCSI Disk ID
followed by available disk
space in parentheses
Track Name
Project Name: Double click
to open a project.
13
Page 14
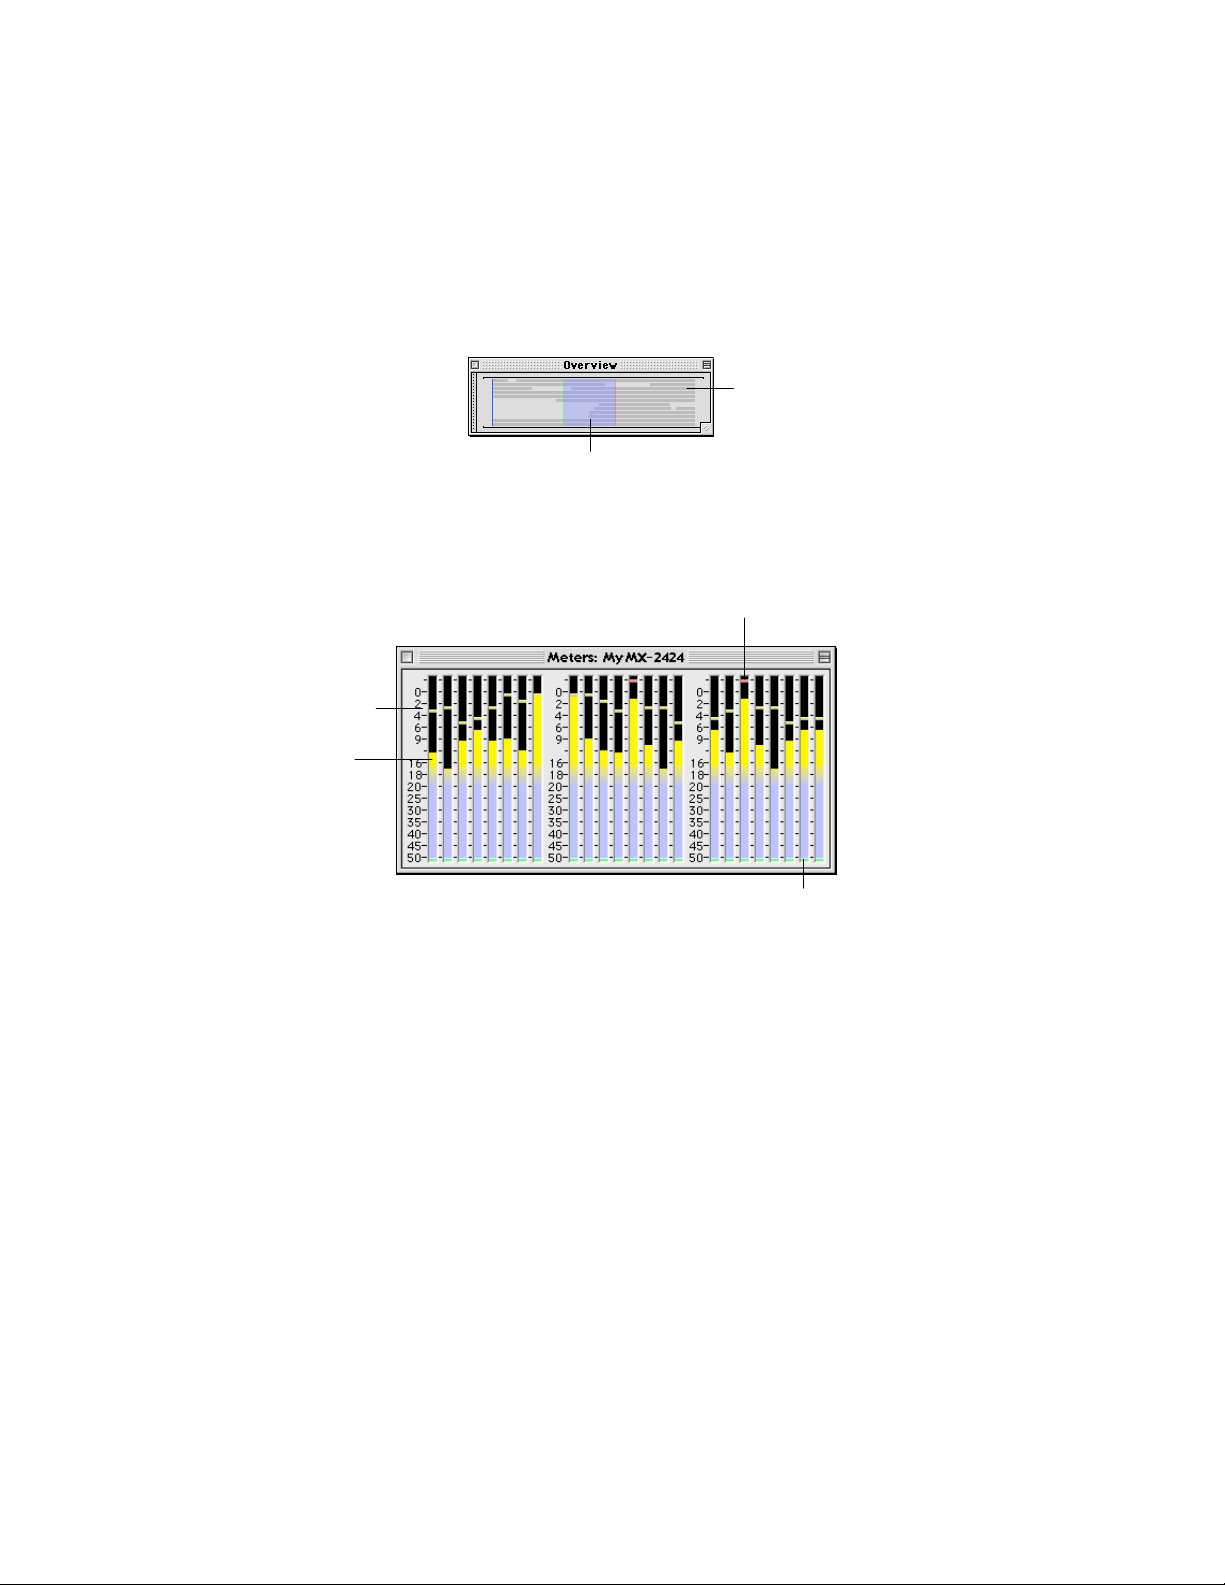
3-4 Overview Window
The Overview window displays the entire project and allows for quick view and
navigation to any location in a project. Selecting an area within the Overview window
causes the main MX-View window to view that selection. A single click in the window
moves the view in the main MX-View window to the clicked location. If the
→→→→
Menu
playhead will locate to the center of the new view.
Locate with View
Playback
option is selected and the MX-2424 is not in motion, the
Events (dark gray)
Main screen view (blue highlight)
3-5 Level Meters Window
The Meters window displays 24 meters indicating the amplitude of audio level, much like
on the MX-2424 front panel.
Peak hold
Signal Level
3-6 Menu Settings (N/A)
This feature will be available in a future update.
Signal Clip (0 dB)
Signal Present
(-50 db)
3-7 Location Markers Window (N/A)
This feature will be available in a future update.
3-8 Group Window (N/A)
This feature will be available in a future update.
14
Page 15
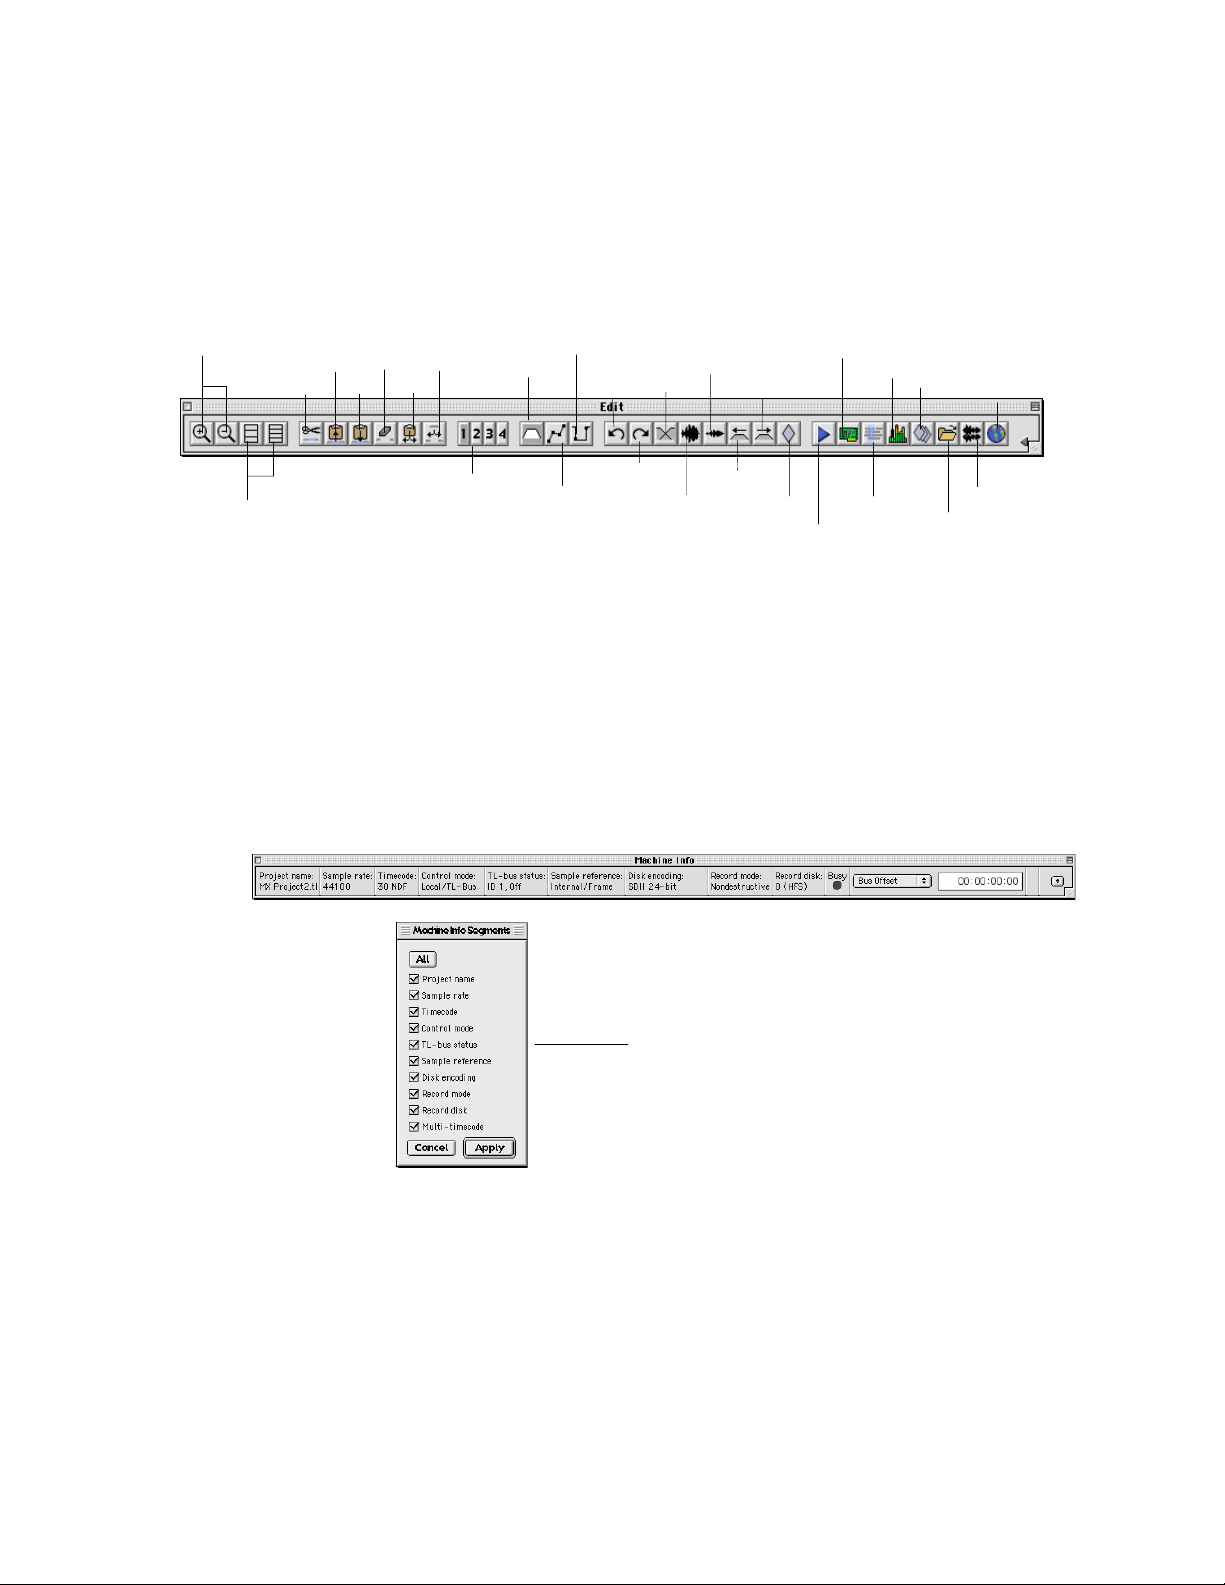
3-9 Edit Bar
The Edit bar contains commonly used functions, divided into six sections (from left to
right): Track View, Basic Editing Functions, Clipboard Select, Edit Mode Select,
Advanced Editing Functions, and window open section.
Zoom In/Out
(Horizontal)
Copy Clear Open
Cut Paste Insert
Edit Sound
Events
Edit Mute
Automation
Undo
Vertical Zoom Out
Fade
Nudge Right
Machine Settings Window
Meters Window
Location Markers Window
Network Window
Increase/Decrease
Track Height
Multiple Clipboard
Selection
3-10 Machine Info Bar
The Machine Info bar contains important machine information including Project Name,
Sample Rate, Timecode Type, Control Mode, Bus status, Sample Reference, Disk
Encoding, Record Mode, and Record Disk (ID and Type). The Busy LED reflects the
front panel Busy LED and is helpful when the unit is in a machine room or out of direct
view. The pull-down menu can be switched between Bus Offset, Timecode Offset,
Timecode Reader, and Free space, using the register on the right.
Edit Volume
Automation
Redo
Vertical Zoom In
The Machine Info bar can be customized to
show or hide information segments. Select
View Menu
select the segments you wish to display.
Nudge Left
Mark
Transport Window
→→→→
Machine Info Segments
Overview Window
Groups Window
Project/Track Window
and
15
Page 16
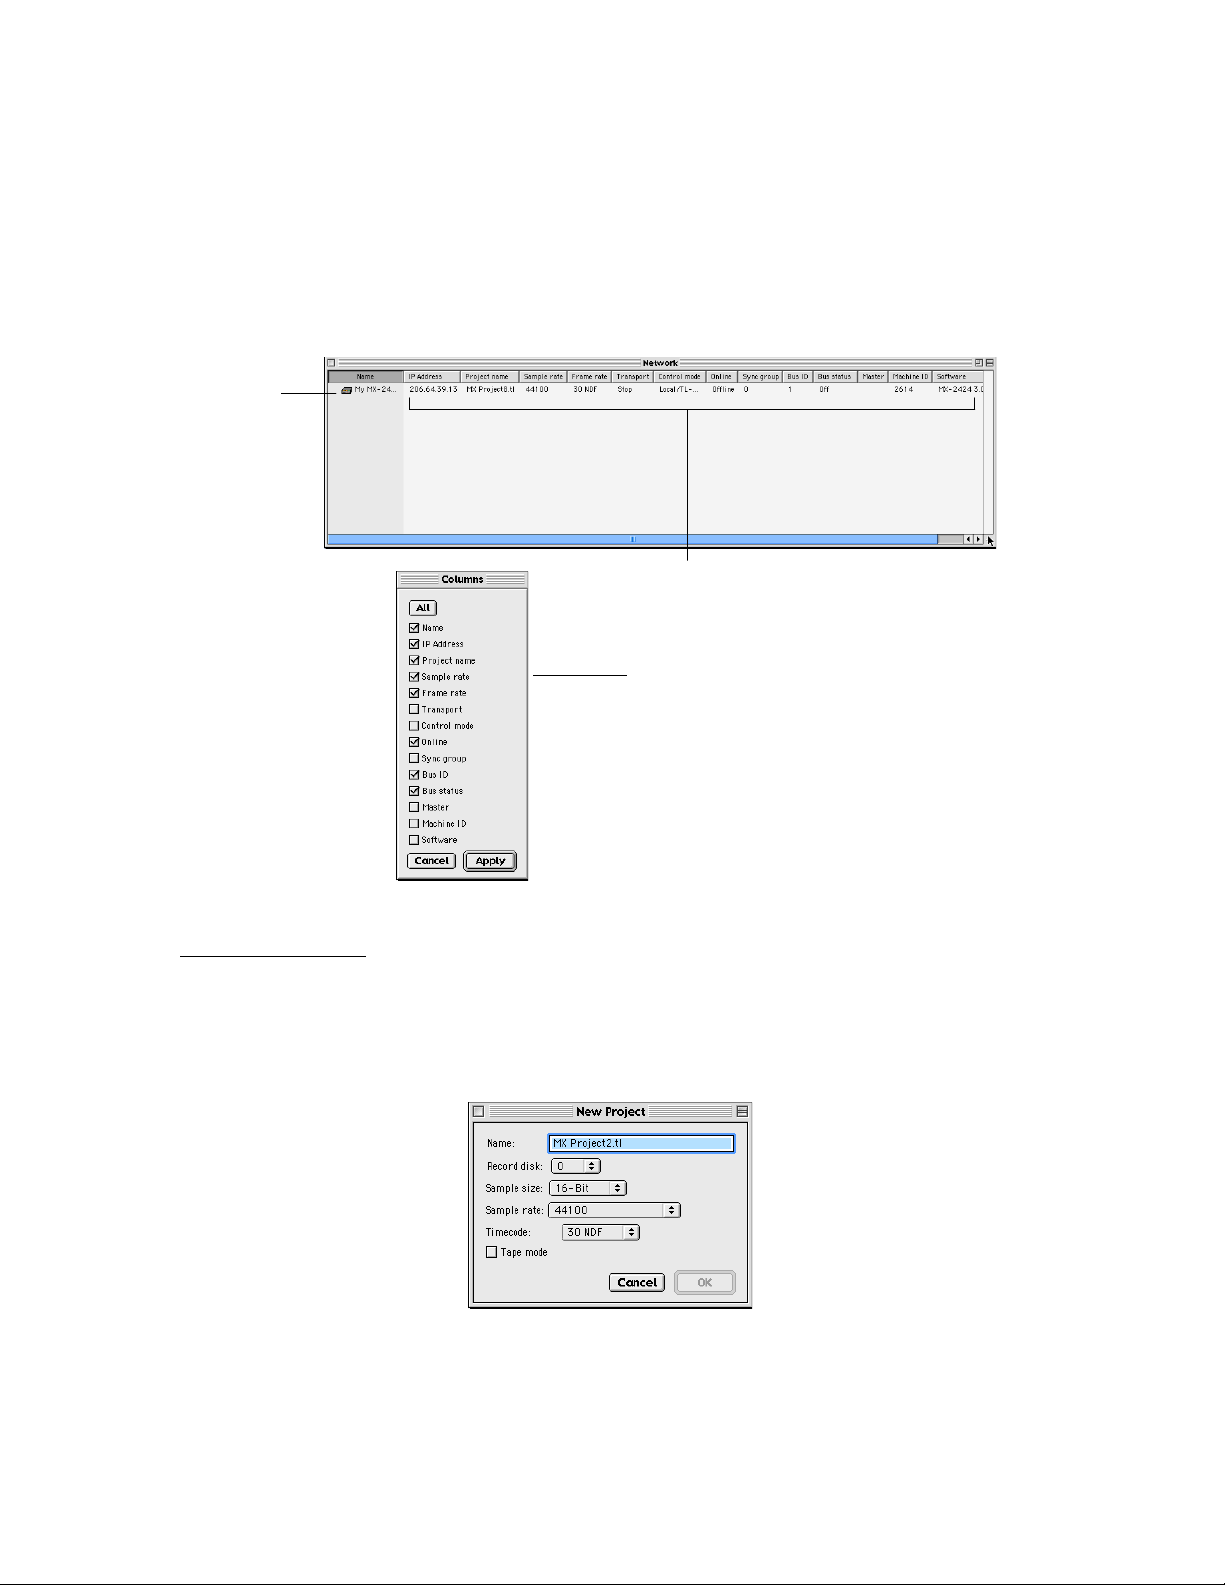
3-11 Network Window
The Network window shows machines you may connect to. It is especially useful for
those with multiple machines on a synchronized bus. Multiple machines may be selected
by holding down the Cmd key on Macintosh or the Ctrl key on Windows, and clicking
the desired machines to highlight them. Once selected, a main MX-View window with all
of the selected machines can be opened by pressing the space bar or by selecting
→→→→
Machine Name:
Double click to open
main MX-View window.
Menu
Edit
.
File
Quick Start Guide
3-12 Starting a New Project
To start a new project, first connect to the desired machine by accessing the Network
window. Double clicking on the desired machine name will launch the main MX-View
window. From the File menu, choose New Project. The following window will appear:
Machine Information
The Network Window can be customized to show or hide
columns. Select
Network window and select the columns you wish to
display.
Machine Menu
→→→→
Columns
in the
Enter the project name, and then choose the Record Disk SCSI ID, Sample Size, Sample
Rate and Timecode type. If you wish your session to be in Tapemode, click once on the
Tapemode check box. Click on OK to continue. You are now ready to record!
16
Page 17
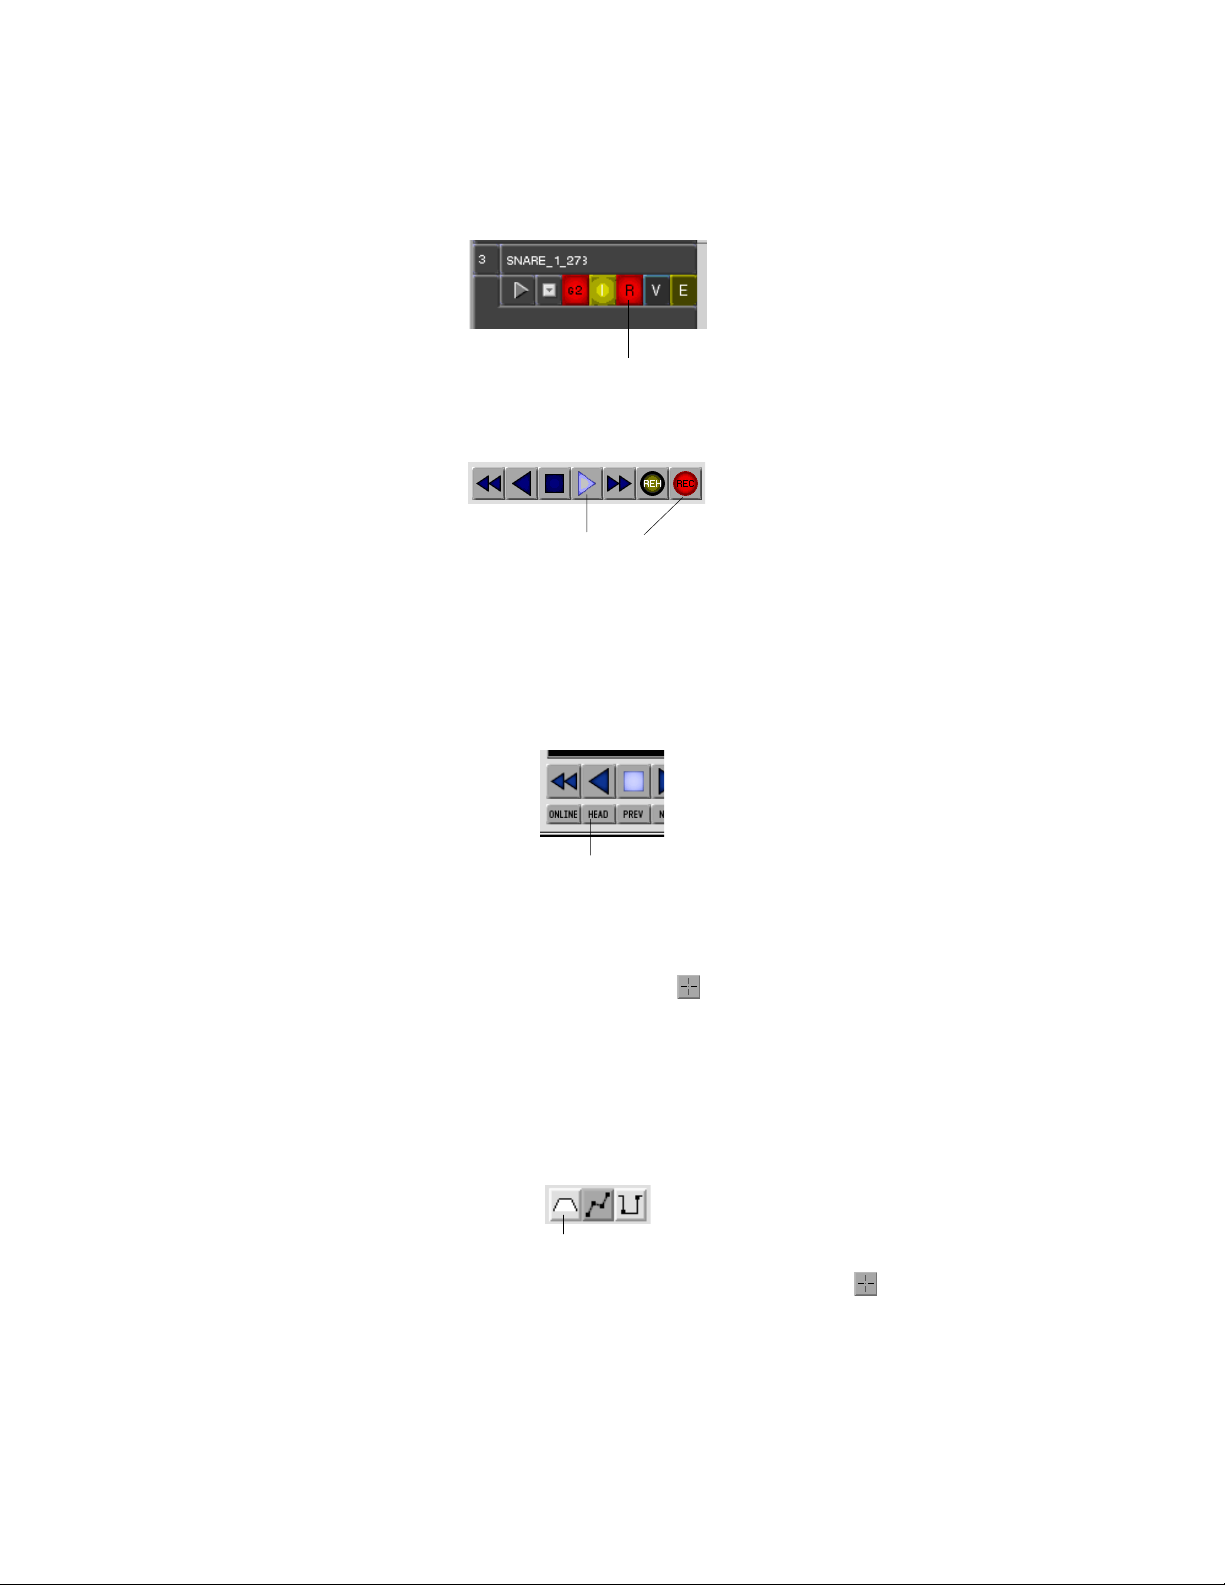
3-13 Basic Playback and Record
Recording:
Use the record arm buttons to select the tracks you wish to record onto.
To begin recording, click the record button in the Transport Window so that it is blinking,
followed by the Play button. The blinking record button and record arm buttons will turn
solid - you are now recording.
Record arm
Play and Record are both solid when in record
To stop the recording, press the spacebar or use the Stop button in the Transport window.
Disarm any record-armed tracks.
Playing Back Your Recording:
To move the playhead to the beginning of the project, click the Head button located in the
Transport window.
You may then click the play button or press the Spacebar key to begin playback of your
recorded audio.
The playhead can be moved anywhere in the main MX-View window with a single click
of the mouse, when in Selector Tool mode (
Playback, Record and Navigation is covered in detail in Chapter 5.
Locate to Head
).
3-14 Performing a Copy and Paste Edit
Selecting an area:
In order to select an area for edit the Edit Sound event icon must be selected (located in
the Edit bar). Note that the Edit Sound Event must be selected for all audio event editing.
Edit Sound Event
To select an area, use the Selector Tool in the Transport window (
Click and drag over the desired audio region so that it appears highlighted.
17
).
Page 18
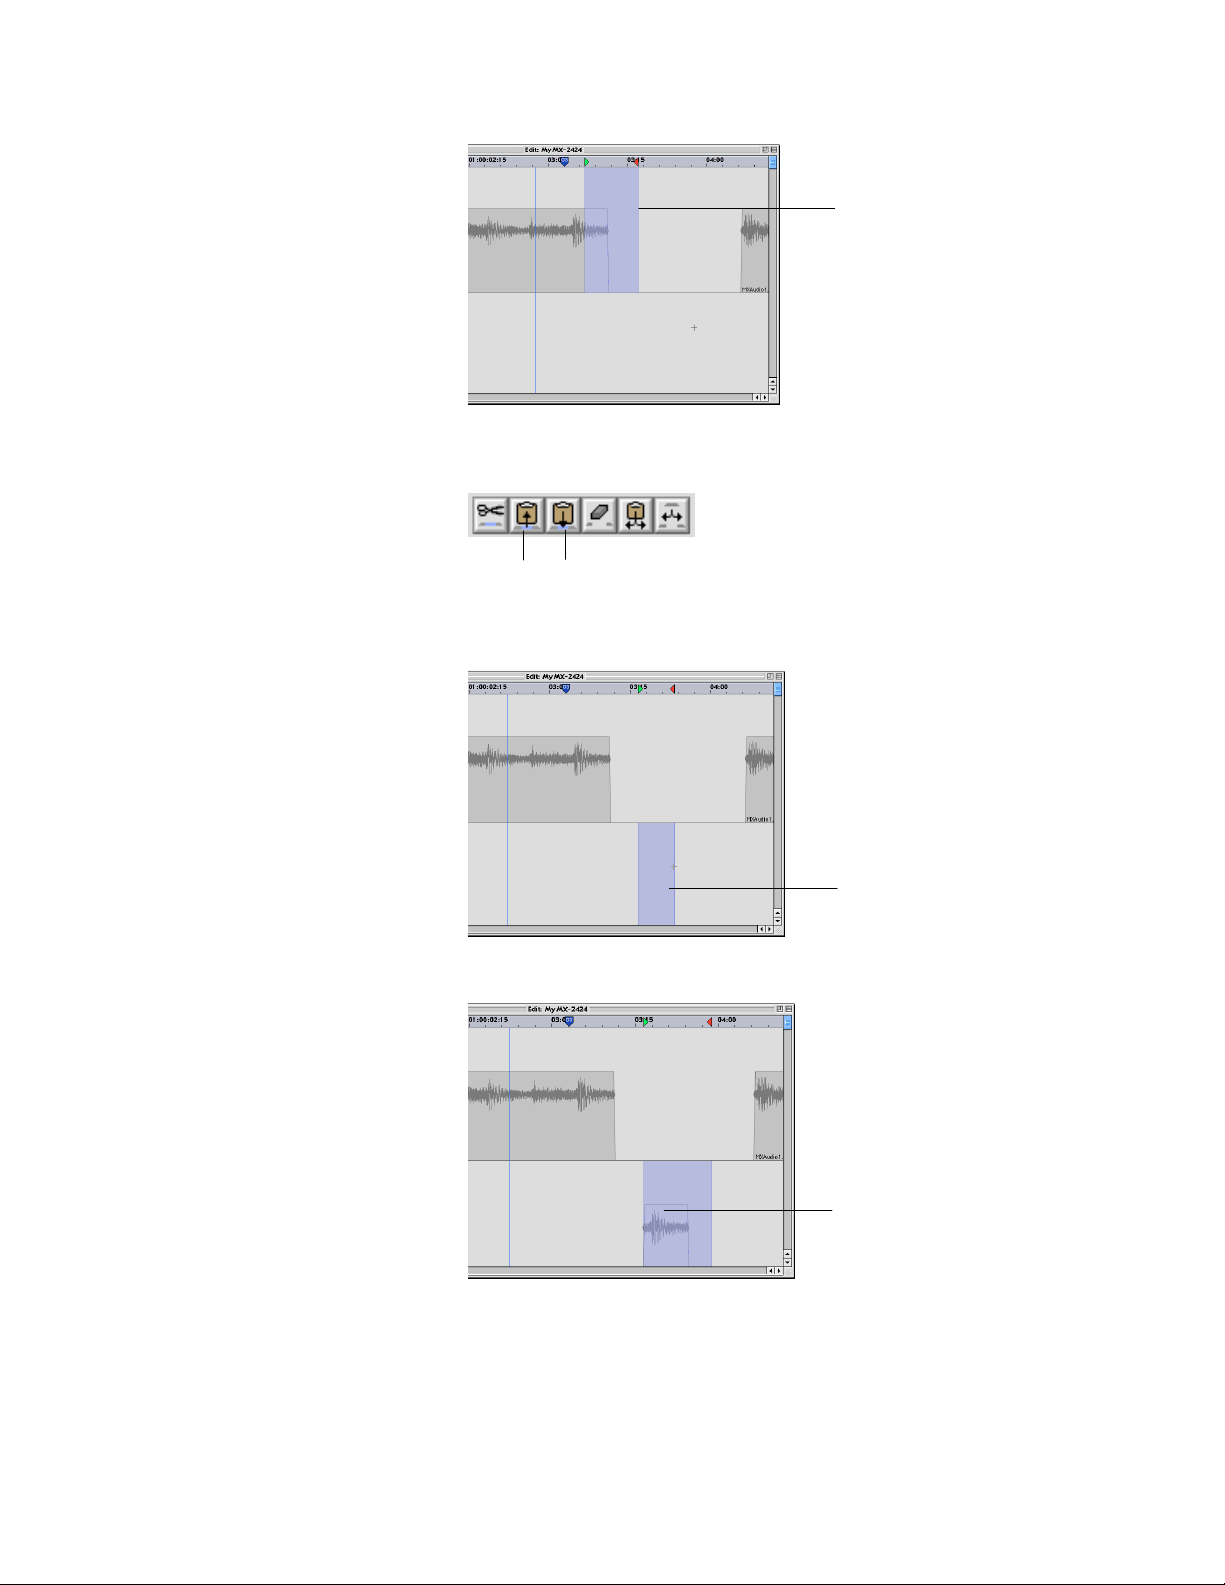
Highlighted region
selected for edit
Performing a Copy:
To Copy the highlighted region to the clipboard, click the Copy button in the Edit bar.
Copy Paste
Performing a Paste:
To Perform a Paste, you must first choose the location for which to paste onto. Using the
Selector Tool, click and drag where desired.
New location
for Paste
Click the Paste button to place contents from the clipboard at the desired location.
Audio event
pasted from
clipboard
18
Page 19

You may Undo or Redo an edit by clicking on the Undo or Redo buttons, located in the
Edit bar.
Editing covered in detail in Chapter 6, with Advanced Editing covered in Chapter 7.
3-15 Trimming Audio
To Trim an Audio Event, first select the event using the Drag and Trim Tool (
located in the Transport window. The events’ trim handles will appear, offering you the
option to trim the volume, horizontal length, or fade. For the example below, the event’s
Horizontal trim handles will be used to extend the events left edge.
Selected Event
Fade Trim
Handles
To trim an event’s length move the mouse over the left Horizontal Trim handle so that it
appears like a double-sided arrow (
Undo Redo
Volume Trim
Handles
Horizontal
Trim Handles
↔↔↔↔
). Click and drag to the left to extend the event.
),
Trimming is covered in detail in sections 7-1 through 7-8.
19
Page 20

3-16 Virtual Track Basics
There are three types of tracks used in MX-View: Loaded tracks, Virtual tracks, and
Unloaded tracks. This section reviews Loaded and Virtual tracks.
Loaded tracks
edit. These tracks are visible in the main MX-View window.
Virtual tracks
However, you cannot playback or record onto these tracks.
Creating a New Virtual Track:
To create a new Virtual track choose a track for which you wish to record an alternate
take. Access the Track drop down menu, as shown below, and select New Virtual Track.
Type in a new track name for the Virtual track and click on OK. The new Virtual track
will appear below.
are “active” tracks that you can play and record onto, as well as
are “inactive” tracks. They are visible tracks that can be edited.
Tracks Menu button
Track dropdown menu
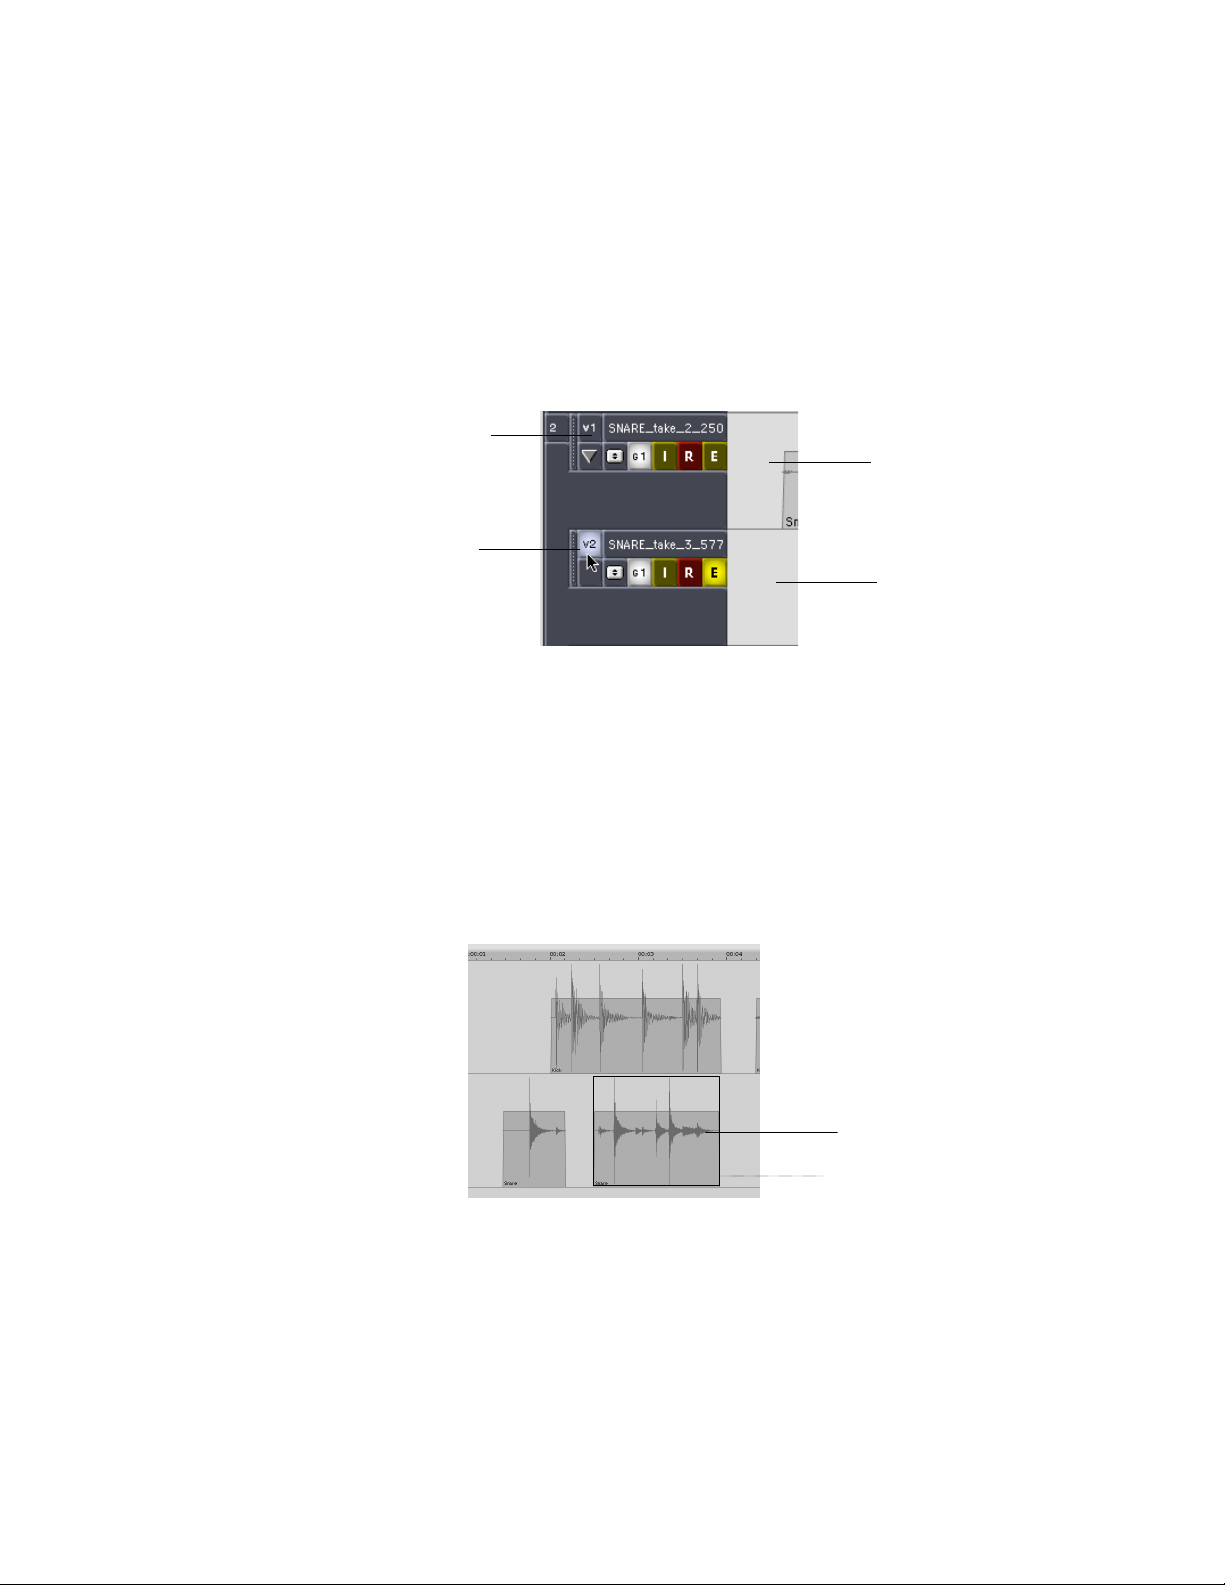
Loading a Virtual Track
To switch playback and record abilities to a Virtual track, you must load, or “activate”,
the desired track. Clicking on the Active/Inactive track button, so that it appears lit, will
load, or activate, the track.
Virtual track 1 is inactive. Audio
within this track can be viewed
and edited, but cannot be played
back or recorded on to.
Clicking on the Active/Inactive
track button caused Virtual track 2
to become active, or loaded. Audio
from this track is audible and can
be recorded on to.
Virtual track 3 is inactive. Audio
within this track can be viewed
and edited, but cannot be played
back or recorded on to.
Virtual Track management is covered in detail in section 4-6 and Chapter 10.
20
Page 21
Chapter 4: MX-View Fundamentals and Terminology
This chapter provides a general overview of projects, tracks, events, and waveforms as well as working
with windows. The last two sections in this chapter cover setting In and Out points and register entry.
4-1 Working with Windows
The Windows within MX-View allow you to customize how you wish to work. You can
hide or display MX-View windows, move them around or minimize and resize them.
MX-View windows can be opened by using either the open window buttons located on
the right section of the Edit bar, by choosing the desired window from the Windows pull
down menu, or by using the quick key short cuts.
Windows within MX-View do not all share the same properties. Windows with distinct
Note:
features will be pointed out.
Macintosh:
When working from a Macintosh platform, an MX-View window can be conveniently
moved around the screen by clicking and dragging the sides of the window. The MXView window can be resized by clicking and dragging the bottom right corner tab of the
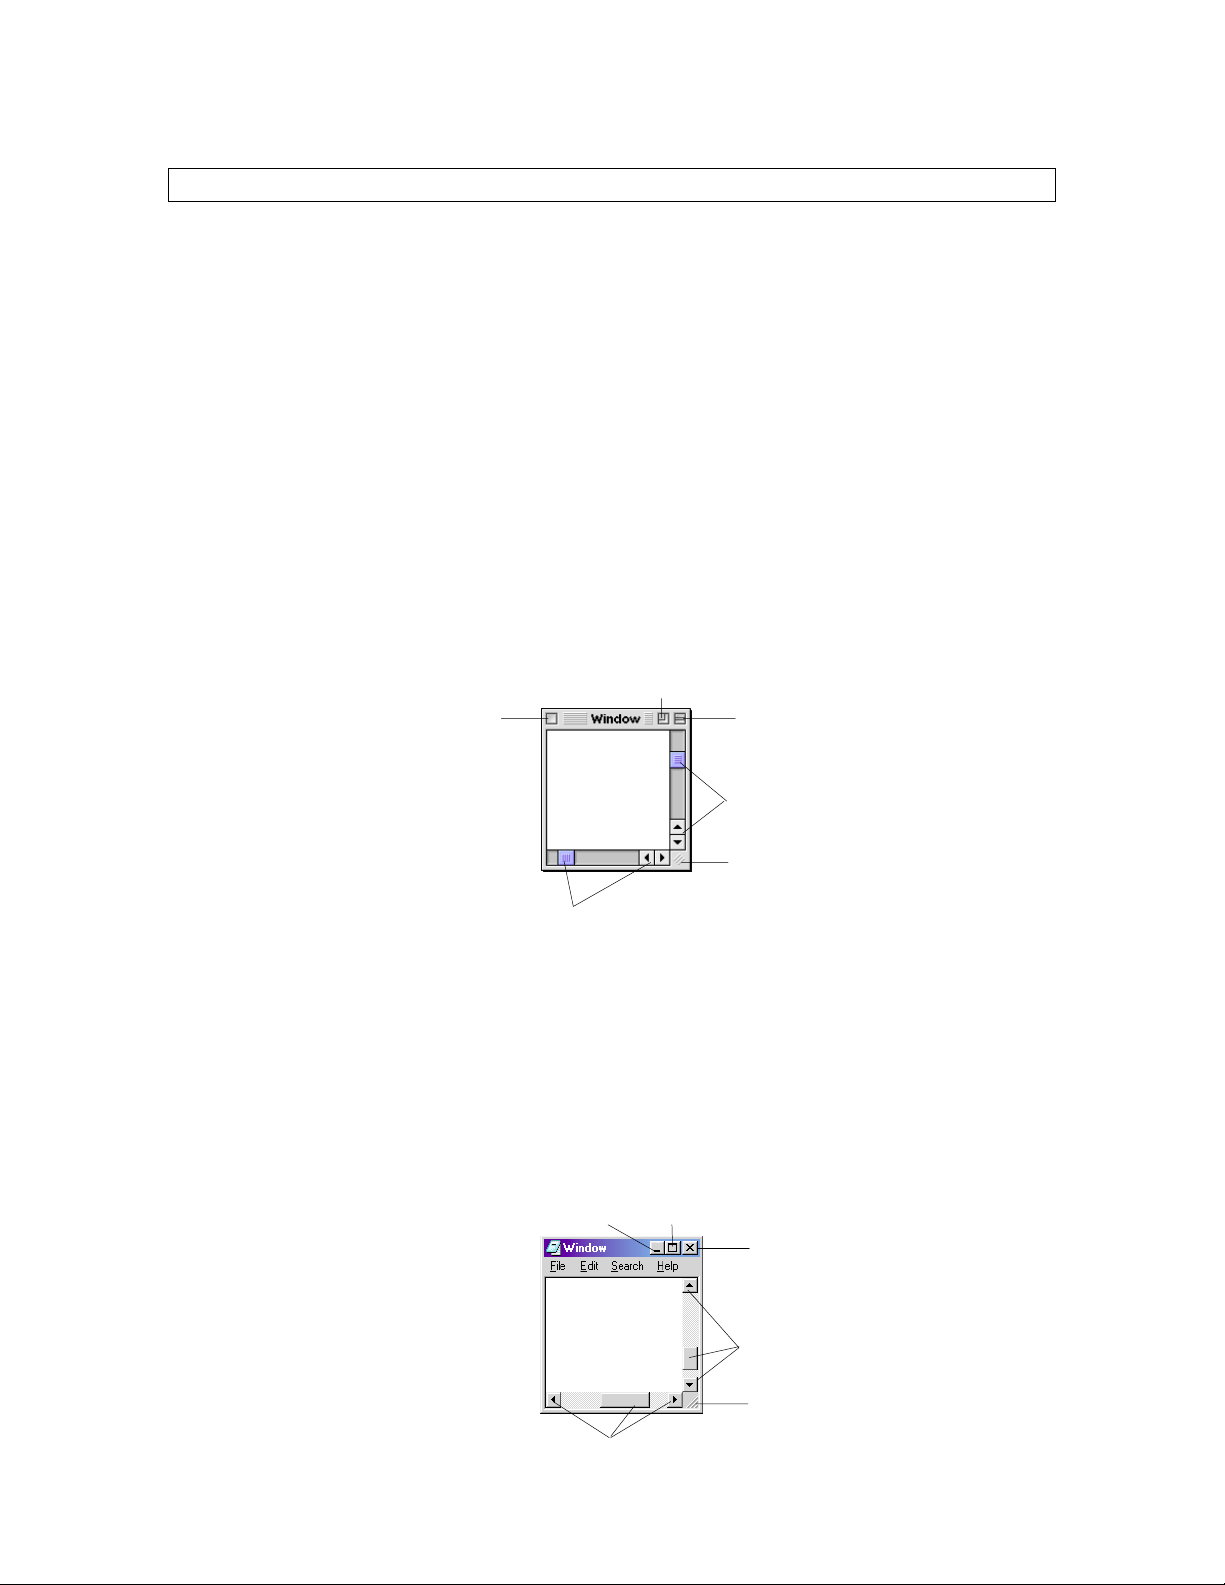
window. The Macintosh OS 9 window has the following features:
Close Window
Zoom/Reset Window
Collapse/Hide
Window
Scroll Window Contents
Up and Down
Resize Window
Scroll Window Contents
Left and Right
(drag to resize)
Q
Close window on a Macintosh: Cmd +W
K
Microsoft Windows:
When working from a Microsoft Windows platform an MX-View window can be
conveniently moved around the screen by clicking and dragging the top bar of the
window. The MX-View window can also be resized by either clicking and dragging on
the sides or bottom of the window or by using the bottom right corner tab of the window.
The following Microsoft Windows 98 window has the following features:
Minimize
Window
Scroll Window Contents
Left and Right
21
Maximize/Restore
Window
Close Window
Scroll Window Contents
Up and Down
Resize Window
(drag to resize)
Page 22
Q
Close window on Microsoft Windows: Ctrl +W
K
Windows can be opened via the Windows pull down menu in the main MX-View
window. MX-View windows can also be opened or closed using the following quick
keys:
Q
MX-View Window Quick Keys
K
Window Microsoft Windows Macintosh
Transport Ctrl + 1 Cmd + 1
Machine Settings Ctrl + 2 Cmd + 2
Overview Ctrl + 3 Cmd + 3
Meters Ctrl + 4 Cmd + 4
Markers Ctrl + 5 Cmd + 5
Groups Ctrl + 6 Cmd + 6
Project/Track Ctrl + 7 Cmd + 7
Import/Export Audio Ctrl + 8 Cmd + 8
Edit Ctrl + 9 Cmd + 9
Network Ctrl + 0 Cmd + 0
T
Microsoft Windows machines only: Ctrl+Tab or Ctrl+F6 will cycle you through the open
iP
windows on the screen that are not floating windows. For example, if you have the
Network window, Project/Track window, Meters window, and Edit window all open.
Ctrl+Tab will cycle you through them one at a time.
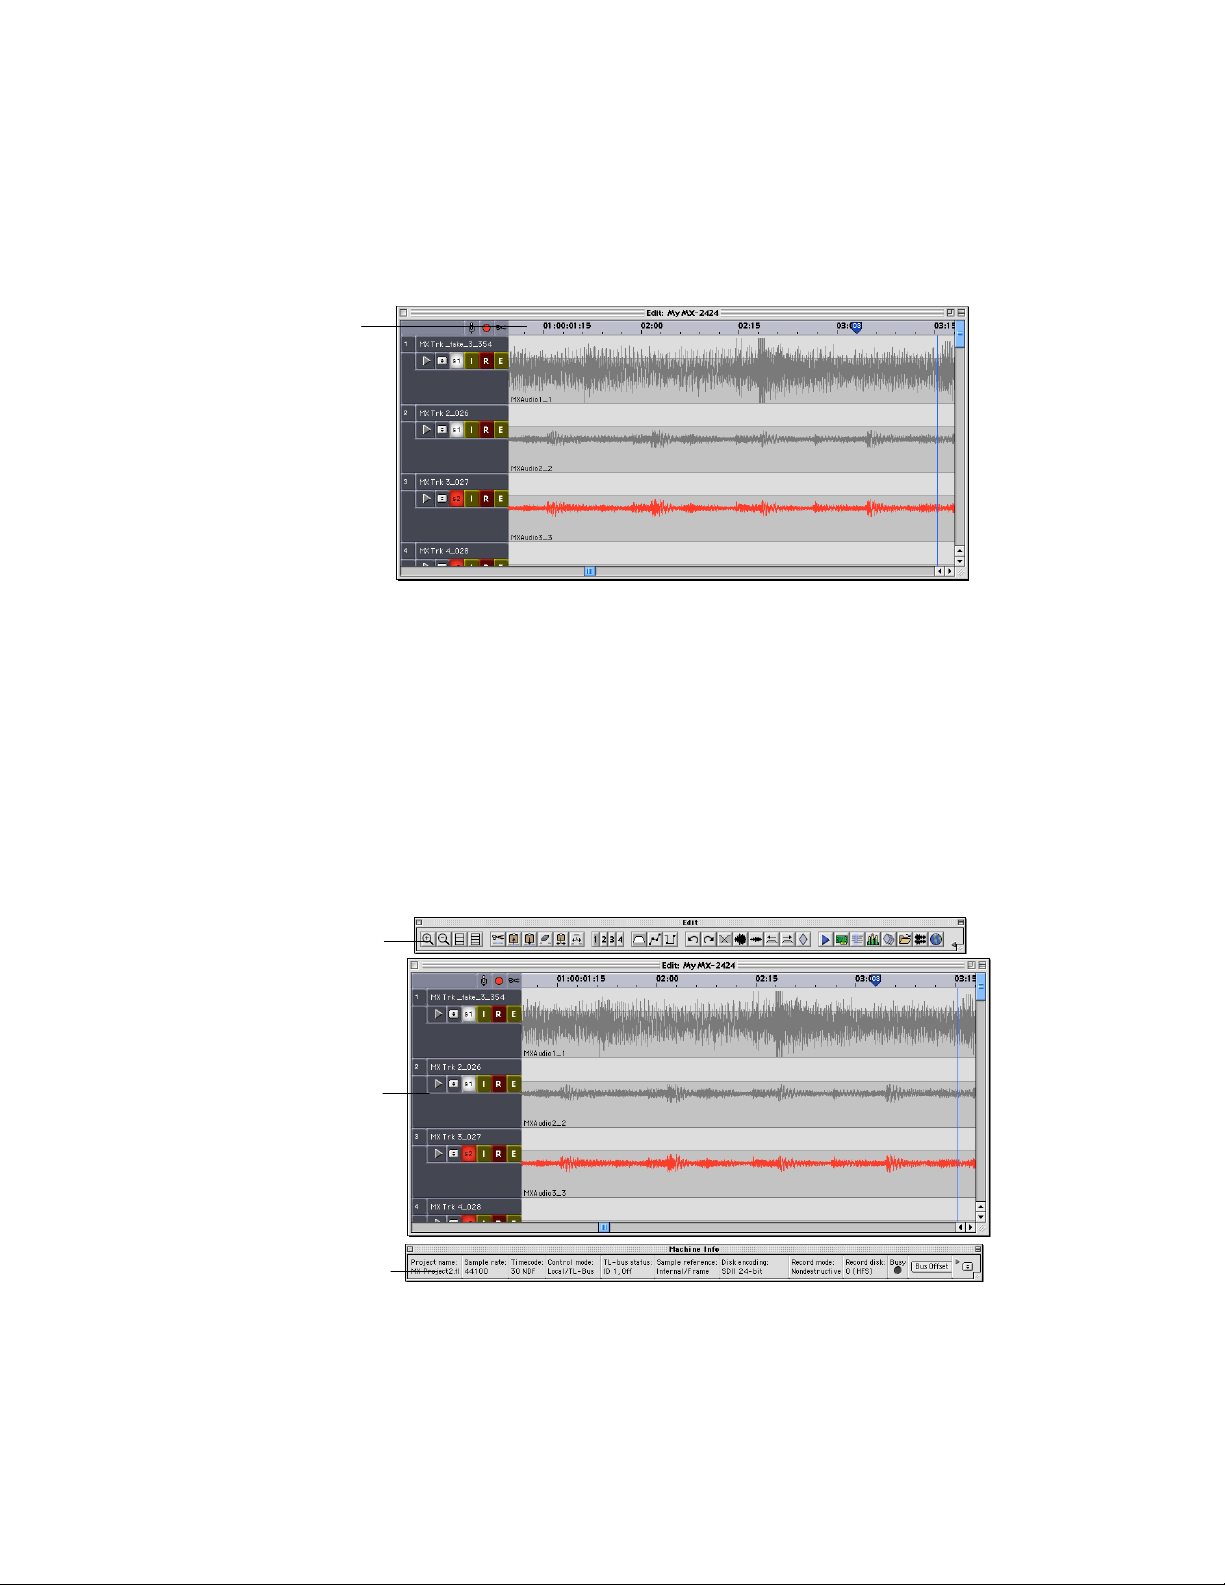
4-2 Docking windows
The Transport and Overview windows as well as Machine Info and Edit bars have the
ability to dock, meaning they can be attached to the main MX-View window, float above
it, or be hidden from view.
By default, when MX-View is launched, the Transport and Overview windows are visible
and are in a floating state above the main MX-View window. The Machine Info and Edit
bars are both docked above the time ruler in the main MX-View window.
Edit bar in
docked state
Hiding and Showing a Docking Window or Bar
When in a floating state, the Transport and Overview windows can be hidden from view
by simply closing the window (see section 4-1 on closing a window on a Macintosh or
Microsoft Windows PC). The window can be restored to view by either clicking on the
desired quick button in the Edit bar or by selecting the desired window under the
Machine Info
bar in docked
state
Main MXView window
22
Page 23
Windows menu
(Windows Menu
→→→→
Transport
Windows Menu
and
The Edit and Machine Info bars can be hidden or shown by selecting
bar or
View Menu
→→→→
Machine Info bar
. When in a floating state, the Edit bar and
→→→→
Overview
View Menu
→→→→
).
Edit
Machine Info bar can also be hidden from view by closing the window as described in
section 4-1.
Edit and Info
bar are hidden
from view.
From Floating to Docking State
Each docking window or bar has a specific location in the main MX-View window where
it can dock. To dock a floating window or bar, click in any "empty" space within the
docking window or bar, or in its drag handle if applicable, and drag towards it’s docking
location. The window or bar will snap to its docking location.
From Docking State to Floating State
To transform a docking window or bar into its floating state, click in any "empty" space
within the docking window or bar, or in its drag handle if applicable, and drag away from
its docked location. Drag the Transport or Overview window towards the bottom of the
screen and the Machine and Edit bar towards the top of the screen. The window or bar
will be removed from the main MX-View window and will float above it. The floating
window or bar can then be positioned anywhere on the screen.
Edit bar in
floating state
Main MX-View
window
Machine Info bar
in floating state
T
Microsoft Windows machines only: Floating windows can be “re-docked” instantly by
iP
simply double-clicking the title bar of the floating window. A floating window can be
forced to remain floating by holding down the Ctrl key while releasing the mouse.
23
Page 24
4-3 Expandable Windows
The Transport Window, Machine Info Bar, and Edit Bar can expand or reduce in size to
show more or less information. To reduce or increase the size of a window, it must be in
an undocked, floating state. Click the Reduce or Expand arrow buttons, shown below, to
expand or reduce the size of the window or bar.
Reduce
4-4 Window sets (N/A)
This feature will be available in a future upgrade.
T
Each time the MX-View application is closed, window positions are remembered by
iP
MX-View. When MX-View is launched again, windows are returned to their last
locations.
4-5 Working With Projects
Creating a New Project:
Project
. The New Project window will appear, prompting you to choose the desired
A new project can be created by selecting
project name (limited to 28 characters), record disk ID, sample size and rate, Timecode
type, and TapeMode or Non-destructive settings.
Expand
File Menu
Use the drop down boxes to
select the desired settings.
→→→→
New
24
Page 25
Q
New Project: Ctrl+N on Microsoft Windows, Cmd+N on Macintosh
K
Opening Projects:
To open an existing project, select
Project/Track window.
Disk
Project
Track
File Menu
→→→→
Project/Track
. This will open the
Note that the Project/Track window may contain a number of machines with a number of
disks. Click on the desired machine and disk ID so that all projects on disk are visible. To
open an existing project, double click on the desired project icon. A list of Project/Track
window icons is available in Appendix D.
Q
Opening a Project: Ctrl + O on Microsoft Windows, Cmd + O on Macintosh
K
Closing Projects:
When a new or different project is opened, the current loaded project is automatically
closed. If you wish to close a project and power down the recorder, you must first
unmount all disk drives. Unmount is located in the Volumes menu of the Project/Track
window as well as on the recorder front panel. Following the unmount, you may turn off
the machine.
Projects are automatically saved to disk once you have pressed stop and the Busy and Disk
Note:
LEDs are no longer active
.
4-6 Working with Tracks
Three types of tracks exist in MX-View: Loaded Tracks, Virtual Tracks, and Unloaded
Tracks.
Loaded Track (Active Track)
A Loaded Track in MX-View is much like a track on a multi-track tape deck. You can
play back all loaded tracks simultaneously and record different instruments on different
tracks. Loaded tracks appear in the main MX-View window and are referred to as
“active” tracks, due to their record and playback ability. You can edit and organize
numerous audio events on each track.
Unmount all disks
25
Page 26
The number of loaded Tracks MX-View allows for is limited by the recorder itself. So
the MX-2424 can never play/record more than 24 tracks back and the MMR-8 can never
play/record more than 8 tracks.
Virtual Track (Inactive Track)
Virtual Tracks appear in the main MX-View window, but cannot be played back or
recorded onto. They are quite useful when “comping” many takes onto one track as well
as for auditioning different takes. The MX-2424 can have up to 100 virtual tracks.
Virtual tracks, which are “inactive” tracks, can become active by clicking on the
Active/Inactive Track button, thus deactivating the previously loaded/active track.
V1 is inactive and cannot
be recorded onto or
played back. It can,
however, be edited.
V2 is active and can be
recorded onto or played back.
Inactive Virtual Track
Active/Loaded Track
Unloaded Track
Unloaded Tracks do not appear in the main MX-View screen. They are available in list
form in the Project/Track. Unloaded tracks must be loaded into the main MX-View
window if you wish to play them back. An MX-2424 can have up to 999 unloaded tracks
per project.
For more on Track management please refer to Chapter 10.
4-7 Events, Regions and Waveforms
An Event is a clip of audio that can be edited and moved around within loaded and virtual
tracks.
Audio events can be viewed as waveforms, which are a graphical representation of the
audio. Waveforms can be hidden or shown by checking or unchecking the Waveforms
option in
View Menu
→→→→
Waveforms
process.
An Audio Region can be an event, part of an event, or group of events that can be
selected for an edit.
Waveform(dark grey)
Event
. Waveforms are generated during the recording
26
Page 27
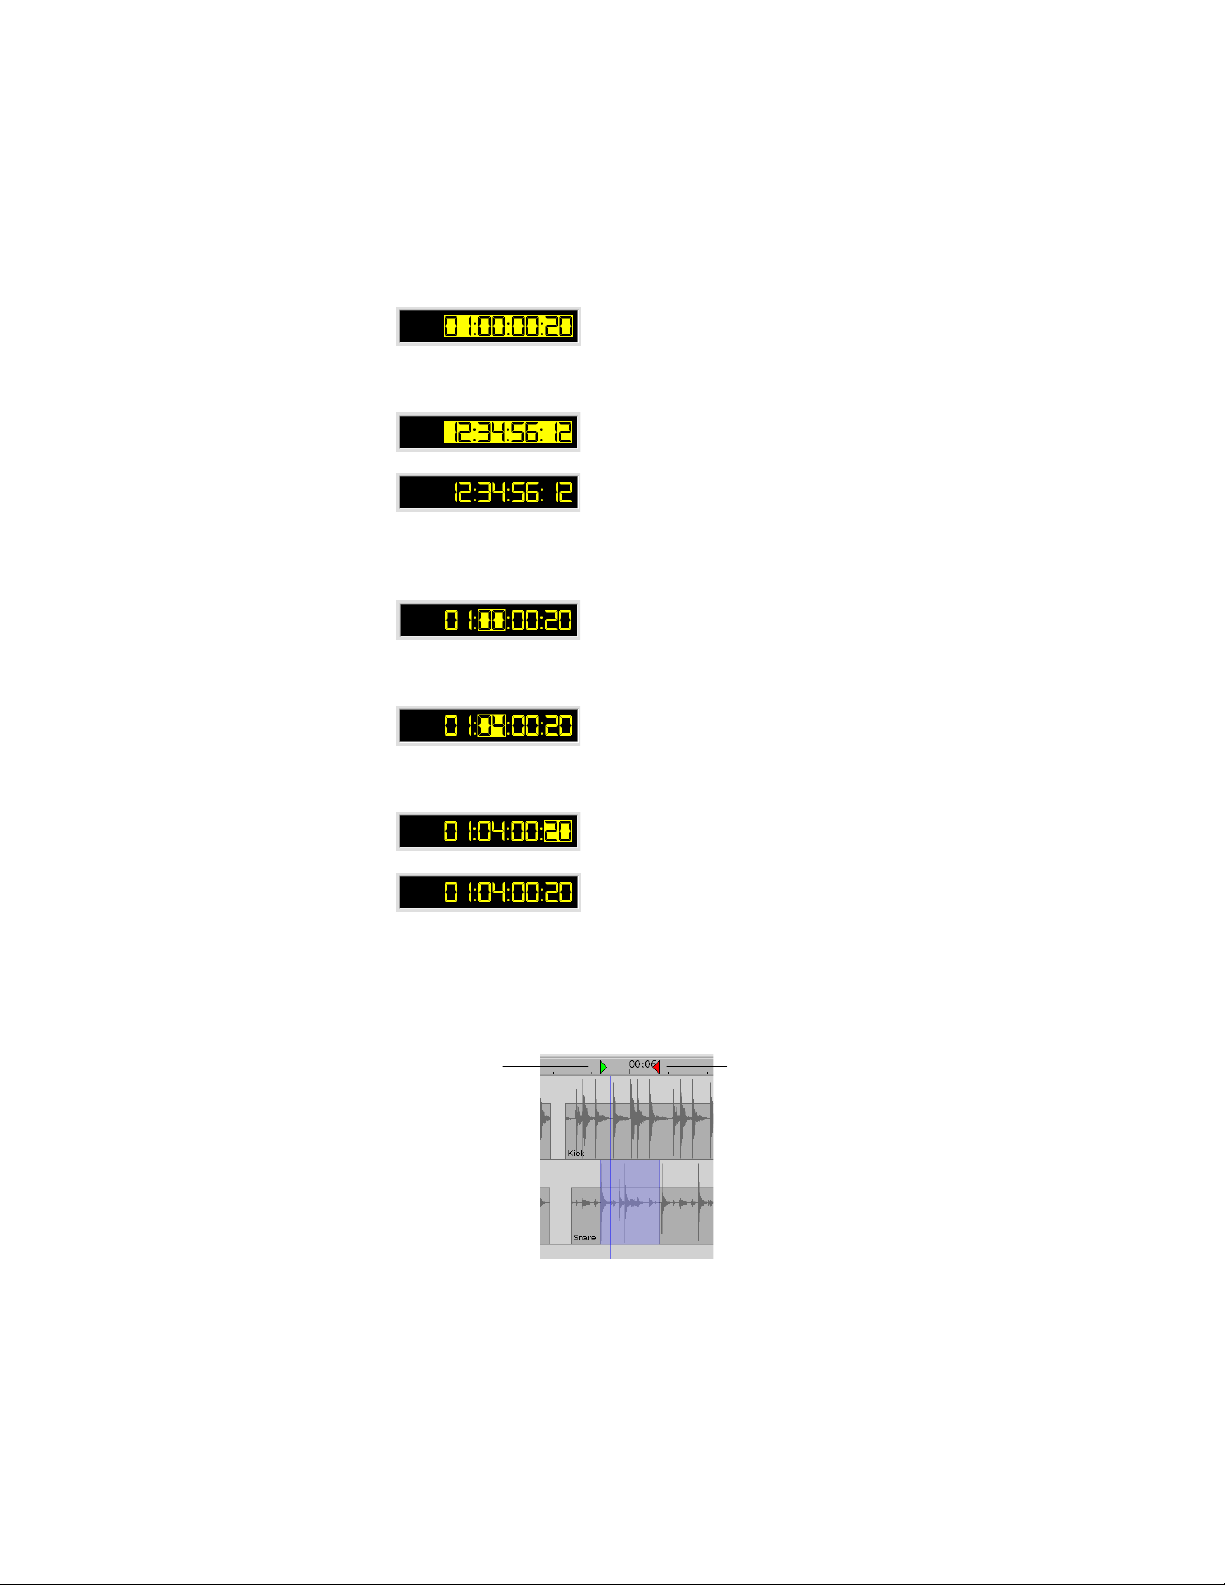
4-8 Register Entry
Registers in MX-View can be used to view and alter Location values, In and Out Points,
Nudge settings, and Pre and Post-rolls, to name a few. The two ways of performing a
register entry are outlined below.
Highlighting the Entire Register:
1. Click and drag within the entire register so that it appears highlighted.
2. Enter the desired numbers, which will appear from right to left, as on the MX-2424
front panel. For the example below, the number sequence 12345612 was entered
(starting with 1).
3. Press the Enter key to commit to the entry and exit the register.
4. To exit the register without changing the current location press Esc.
Highlighting Number Pairs:
1. Single click over a pair of numbers so that they appear highlighted.
2. Press the Up and Down Arrow keys to increment/decrement the value, or enter a
two-digit number. For the following example, the Up Arrow key was pressed four
times:
3. Press the Left and Right Arrow keys to toggle to the next pair of numbers (i.e. jump
between hours, minutes, seconds, and frames). For the following example, the Right
Arrow key was pressed twice.
4. Press the Enter key to commit to the entry and exit the register.
5. To exit the register without changing the current location press Esc.
4-9 Setting In and Out Points
Setting In and Out points is essential to most operations in MX-View. In and Out points
can be set in several way.
In point
27
Out point
Page 28
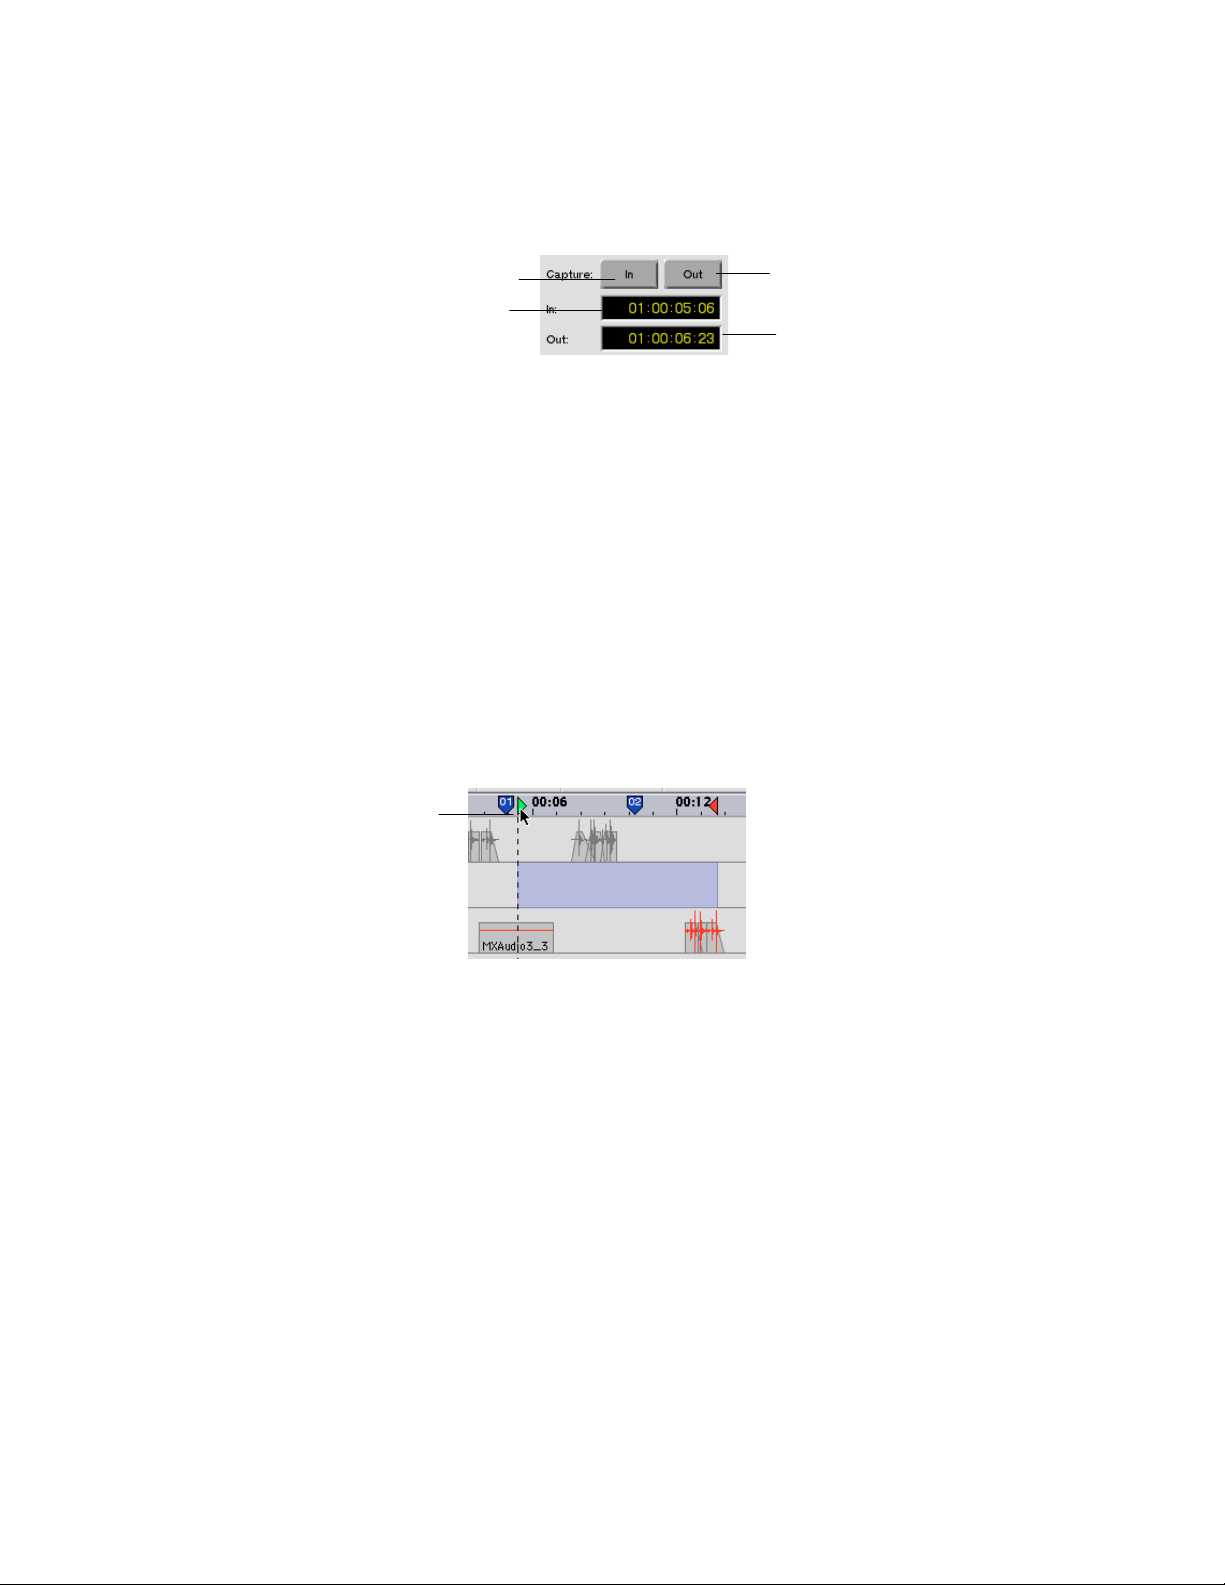
Capture In and Capture Out buttons in the Transport window:
Clicking on the Capture In button will place the In point at the current playhead position.
Similarly, clicking on the Capture Out button will place the Out point at the current
playhead position
Capture In point
In point register
Capture Out point
Out point register
Using the In and Out point Registers:
Click and enter the desired In or Out point location in these registers, as described in
section 4-8.
Highlighting an area or Event:
Using the Selector Tool, click and drag over the desired area. In and Out points will
appear at the outer edges of the highlighted area. Alternately, use Drag and Trim Tool
and click once on an event or (group of events). The events’ start and end times will turn
in to the In an Out points, respectively. For more on the Selector and Drag and Trim
Tools please refer to section 6-1.
Using Quick Keys:
Q
Microsoft Windows: Ctrl + × for Capture In, Ctrl + Ø for Capture Out.
K
Macintosh: Cmd +
×
for Capture In, Cmd + Ø for Capture Out.
In and Out points can also be dragged within the time ruler. This is done by clicking
on the desired In or Out point and dragging left or right to the desired location.
Dragging the
In point
28
Page 29

Chapter 5: Playback, Navigation, and Record
Chapter 5 reviews recording and playback operations, modes, and options. In addition to this, a
comprehensive Navigation section covers locating, zooming, and maneuvering within a project.
Playback Modes and Options
5-1 Play
The transport can be set to play by clicking the play button (
or via the Space Bar quick key. When in play, the playhead will remain stationary at the
center of the screen while audio tracks move horizontally to the left, unless one of the
other Playback options is selected.
Q
Play or Stop: Space Bar for both Microsoft Windows and Macintosh.
K
5-2 Pages With Playhead Scrolling
When Pages With Playhead is selected (
playhead scrolls to the right across the screen when in play. When the right edge of the
screen is reached, the main MX-View window contents are scrolled and the playhead is
moved to the left of the screen to repeat this process again.
Playback Menu
) in the Transport window
→→→→
Pages With Playhead
), the
5-3 “In to Out“ Play
“In to Out” play sets the transport into play from the In point. After reaching the Out
point, the playhead relocates back to the In point and stops. This is a very convenient
means of auditioning audio. To perform an “In to Out” playback, set In and Out points
(refer to section 4-9) and select
{
The playhead locates to In point
and initiates a Play.
|
After reaching the Out point, the
playhead relocates to the In point
and stops.
Q
In to Out Play: Shift + Spacebar on both Microsoft Windows and Macintosh
K
T
To include Pre and Post-roll playback for an “In to Out” command, click the Pre and
iP
Post-roll checkboxes in the Transport. “In to Out” play will then begin at the Pre-roll
before the In point and end at the Post-roll following the Out point. More on Pre and
Post-roll settings can be found in section 5-8.
Pre-roll and
Post-roll
enable/disable
Playback Menu
Example: In and Out points are set and “In to Out” is initiated
In Point
{
→→→→
In to Out
.
Out Point
|
29
Page 30

5-4 Loop Play
To perform a Loop Play, you must first set In and Out points as explained in section 4-9.
Click the Loop button in the Transport Window to begin a Loop Play.
Three Loop Modes are available – Play Repeatedly (default), Play Once and Cue, and Play
Note:
Once and Stop - which can be set in the MX-2424 Menu 210. For more detail on Loop modes
please refer to MX-2424 Manual Menu Bank 200: System Controls (Page 38 of the Complete MX2424 User Manual).
In and out points selected,
Loop Mode initiated.
{
The playhead locates to
the Pre-roll before the In
point and begins to play
|
The playhead plays all the
way to the Post-roll after the
Out point and stops.
}
Depending on the loop
mode defined in MX-2424
Menu 210, a loop may
repeat until stopped, relocate
to point 1 and stop or remain
at point 2.
Loop button: turns bright
Pre-roll
In Point
{
yellow when selected.
Out Point
Post-roll
Press any transport key to stop a Loop play.
Q
Ctrl + L on Microsoft Windows, Cmd + L on Macintosh
K
5-5 Last Play
A Last Play command initiates a Play command at the location where Play was last
initiated. To perform a Last Play select
Playback Menu
→→→→
Last
or press the L key.
|
30
Page 31

5-6 Audition Play Modes
Several Audition Play modes simplify play back of desired audio events and sections.
They are located in the Playback Menu and also have assigned quick key short cuts.
Audition Play
modes under the
Playback menu
Audition Play modes are explained in detail in the MX-2424 Reference Manual:
TO/PREV/REF and FROM/NEXT/SYNC (page 23 of the Complete MX-2424 User
Manual).
Q
For both Microsoft Windows and Macintosh:
K
To In – T followed by I
To Out – T followed by O
From In – F followed by I
From Out – F followed by O
Thru In - Y followed by I
Thru Out - Y followed by O
5-7 Locate With View
The Locate With View option will react differently depending on whether or not the
transport is in motion. If you select
motion
and move to view another area of the project, the playhead will relocate with your
view and appear at the center of the screen. For example, if you use the bottom scroll bar
to view a chorus downstream, the playhead will follow the view.
If the transport
is in motion
project, the playhead will continue rolling at its present position. You will not see the
playhead until you return your view manually or choose “Return View To Playhead “
from the Playback Menu. For example, if the transport is in play at the head of the project
and the view is moved to the tail of the project, the transport will continue to play while
you view the tail of the project. By selecting “Return View to Playhead”, the main MXView screen jumps to the playhead location.
Playback Menu
→→→→
Locate With View
while
not in
(play or record) and you move to view another area of the
5-8 Pre/Post Roll On Play
In normal operation, rewinding the playhead by a small amount is needed to allow the
user to hear a small portion of the audio before the current location. Likewise, playing
beyond the Out point by a small amount is often desirable to check the selection.
This operation can be accomplished by enabling the “Pre/Post Roll on Play” feature in
Playback Menu
→→→→
Pre/Post Roll On Play
the Transport window) is checked before initiating the play command. The Pre-Roll
amount is used by the Play and Play “In to Out” commands. The Post-Roll amount is
31
and ensuring that the Pre-Roll checkbox (in
Page 32

only used when playing a selection using the Play In to Out command with Post-Roll
checked in the Transport window.
Q
Enable/Disable Pre and Post roll: Ctrl + K on Microsoft Windows, Cmd + K on
K
Macintosh
5-9 Return After Play
5-10 Return View To Playhead
Q
Return View to Playhead: Ctrl + P on Microsoft Windows, Cmd + P on Macintosh
K
This feature is separate from the Pre/Post-roll menus 212 and 213, as set from the MX-
Note:
2424’s front panel. Menu 212 and 213 Pre/Post-rolls are applied only to a Loop or audition play
modes. The Pre-roll and Post-roll lengths in the Transport window do not affect the functions of the
MX-2424 front panel transport buttons and can be used with commands such as play and “In to
Out” play.
Selecting Return After Play under the Playback Menu causes the playhead to return to its
previous start point after the transport is stopped.
This feature, located in the
View Menu
View to the playhead. This feature is particularly useful whenever the transport is in
motion and the playhead is out of view.
→→→→
Return View To Playhead
, will return the
5-11 Reverse Play
Reverse Play sets the transport into backwards, or “reverse” play, such that the playhead
is moving to the left of the screen at normal play speed. To initiate a reverse play, click
on the reverse play button in the Transport window.
Locating Around a Project
MX-View allows you to locate around a project with ease. The following location tools are available.
5-12 Using the Playhead Counter
The playhead position counter, located in the upper left of Transport window, allows you
to enter and locate to a desired playhead location. Simply enter the location, as described
in section 4-8 (Register Entry), and press Enter.
5-13 Fast Forward and Rewind
Fast Forward and Rewind work just like on a regular tape machine, including ramp-up
and ramp-down. You can access the Fast Forward and Rewind buttons via the Transport
window or via short cut quick keys.
Q
Fast Forward: Ctrl + . (period) on Microsoft Windows, Cmd + . (period) on Macintosh.
K
Q
Rewind: Ctrl + , (comma) on Microsoft Windows, Cmd + , (comma) on Macintosh.
K
Rewind Fast Forward
32
Page 33

5-14 Move Playhead to Next/Previous Locate Marker
Next/Previous Locate Marker is used to move the playhead to the next or previous locate
marker quickly. This function is only available via quick keys:
Q
Next Locate Marker: Ctrl + Ö on Microsoft Windows, Cmd + Ö on Macintosh.
K
Previous Locate Marker: Ctrl + Õ on Microsoft Windows, Cmd + Õ on Macintosh.
T
Microsoft Windows: to select an area between location markers, hold down the Shift and
iP
Ctrl keys and use the arrow keys to jump to the next or previous location point.
Macintosh: to select an area between location markers, hold down the Shift and Cmd
keys and use the arrow keys to jump to the next or previous location point.
5-15 Move Playhead to Next/Previous Edit
Q
Next/Previous Edit: Tab/Shift + Tab on both Microsoft Windows and Macintosh.
K
Please refer to section 8-2: Using Location Markers
Note:
Using Shift + Tab for previous and Tab for next, the Playhead can easily jump from one
edit to the next. This function is also available via the Next and Previous buttons in the
Transport window.
Previous Next
for more on location markers.
5-16 Locate to Head/Tail
Locating to the “head”, or beginning, of the project can be done by clicking on the Head
button in the Transport window (
beginning of the first audio event. Locating to the “tail”, or end, of the project can be
done by clicking on the Tail button in the Transport window (
playhead at the very end of the last audio event.
5-17 Locating to In and Out Points
To move the playhead to the In point press the “I” key. To move the playhead to the Out
point press “O”
Q
Locate to In: I on both Microsoft Windows and Macintosh.
K
Locate to Out: O on both Microsoft Windows and Macintosh.
5-18 Roll Back and Roll Forward
Pressing the comma “,” key will cause the playhead to “roll” or jump backwards by the
Rollback length amount set in MX-2424 Menu 260 (Default is 5 seconds). You can also
press the comma “,” key several times and Roll back by that amount. For example: With
a default setting of 5 seconds, you can press the comma “,” key three times and cause the
playhead to jump back by 15 seconds. Roll forward operates in the same manner only
using the period “.” key. Roll Back and Roll Forward are also available by selecting
Playback Menu
Q
Roll Back: “,” on both Microsoft Windows and Macintosh.
K
Roll Forward: “.” on both Microsoft Windows and Macintosh.
This function is equivalent to double tapping the rewind or fast forward buttons on the MX-
Note:
2424 Front Panel or RC-2424
→→→→
Roll Back
and
.
)
. This will place the playhead at the very
). This will place the
Playback Menu
→→→→
Roll Forward
.
33
Page 34

5-19 Clicking in the Main MX-View Window
Using the Selector Tool (
window relocates the playhead to that specified location.
5-20 Overview window
The Overview window displays the entire project and allows for quick view and
navigation to any location in a project. Selecting an area within the Overview window
causes the main MX-View window to view that selection. A single click in the window
moves the view in the main MX-View window to the clicked location. If the
→→→→
Menu
Locate with View
playhead will locate to the center of the new view.
The Overview window can float and be moved anywhere on the screen. When the
transport is in motion, the blue highlighted section scrolls with the Edit screen.
), a single mouse click on a track within the main MX-View
option is selected and the MX-2424 is not in motion, the
Main screen view (black outline)
Events (dark gray)
In/out selection (blue highlight)
Playback
The Overview window has no locate functionality during record.
Note:
Navigational Tools
5-21 Horizontal Zoom
Horizontal Zoom allows you to view detailed waveforms all the way down to the sample
level. There are three different methods to zoom in and out in the main MX-View
window: The Zoom In and Out buttons located in the Edit bar, the Zoom Tool located in
the Transport window, or the zoom quick key short cuts.
•
The Zoom In and Zoom Out buttons, located on the Edit bar, can be clicked to zoom
in or out at single level increments. When clicking on these buttons the playhead
remains in the center of the screen.
•
The Zoom Tool, located in the Transport window (
you wish to view in more detail. To zoom in, click and drag the mouse on an area
you wish to enlarge. Note that this will not relocate the playhead unless “Locate with
View” is selected (
zoom in or out at single level increments. Click on an area you wish to enlarge to
zoom in or hold the Shift button while clicking to zoom out.
•
The Zoom quick keys function identically to the Zoom In and Zoom Out buttons.
Zoom In Zoom Out
Playback Menu
→→→→
Locate with View
Overview window
in docked state
), allows you to select the area
). The Zoom Tool can also
34
Page 35

Q
Zoom In: Ctrl + [ on Microsoft Windows or Cmd + [ on Macintosh.
K
Zoom Out: Ctrl + ] on Microsoft Windows or Cmd + ] on Macintosh
5-22 View Whole Project
To View an entire project, from head to tail, choose
Q
View Whole Project: Cmd + Shift + Z on Microsoft Windows, Ctrl + Shift + Z on
K
Macintosh.
T
You may also double click on the Zoom Tool button, located in the Transport window, to
iP
view the whole project.
5-23 View Samples
MX-View allows you to zoom all the way down to the sample level by simply holding
down the Z key. This allows you to quickly view an edit or splice. Releasing the Z key
returns the main MX-View window to its previous view. This function is also available in
View menu
Q
View Samples: Z on both Microsoft Windows and Macintosh.
K
5-24 Track Height
There are 10 levels of track height available. To increase or decrease the track height
click on the Increase Track Height or Decrease Track Height buttons located in the upper
left of the Edit Bar.
→→→→
View Samples
View Menu
→→→→
View Whole Project
, however, without returning to the previous view.
.
Q
Increase Track Height: Ctrl + = (equals) on Microsoft Windows, Cmd + = (equals) on
K
Increase Track Height Decrease Track Height
Macintosh.
Reduce Track Height: Ctrl + - (minus) on Microsoft Windows, Cmd + - (minus) on
Macintosh.
When in 2 x Sample Rate recording modes (96/88.2 kHz) the track count is reduced to 12
Note:
tracks.
5-25 Vertical Zoom
Vertical Zoom causes the waveform to increase in amplitude so that an edit can be
performed with more precision. To Zoom in or out vertically, click the Vertical Zoom In
and Vertical Zoom Out buttons located in the midsection of the Edit Bar.
Vertical Zoom In Vertical Zoom Out
5-26 Scrolling with the Mouse
The mouse can be used as a Tool for scrolling by clicking and dragging to either left or
right of the main MX-View screen.
5-27 Scrolling Up/Down in the MX-View Main Window
Tracks can be scrolled up and down using the Page Up and Page Down buttons. For
example, if you are viewing tracks 9-16, pressing the Page Up button will scroll the main
MX-View window so that track 1 is the first visible track.
35
Page 36

To scroll the main MX-View screen all the way to the top, so that track 1 is viewable,
press the Home key. To scroll the main MX-View screen all the way to the bottom so
that track 24 is viewable, press the End key.
Recording
5-28 Basic Recording
S
Note:
ome laptops and compact keyboards may not include Page Up/Down and
.
Home/End buttons
To select a track for record, click the record arm button next to the track you wish to
record on so that it is blinking.
To begin recording, click the record button in the Transport Window so that it too is
blinking, followed by the Play button. The blinking record button and record arm buttons
will turn solid - you are now recording.
Record arm
Play and Record are both solid when the MX-2424 is in record
T
Use the Record Arm All button , located above the record arm buttons, to record arm
iP
all tracks. It can also be used to disarm all tracks.
To stop the recording, simply press the spacebar or use the Stop button in the Transport
window. To punch out of record but continue playing, press the play button in the
Transport window. You can also disarm individual tracks that are in record by clicking
once on the track arm button for the desired track.
Q
Record: Ctrl + Spacebar on Microsoft Windows, Cmd + Spacebar on Macintosh.
K
Q
Stop: Spacebar on Microsoft Windows and Macintosh.
K
Q
Punch out of Record and back into Play: Ctrl + Spacebar on Microsoft Windows and
K
Macintosh.
T
To Undo a recording just click the undo button , located in the Edit bar. Please refer
iP
to section 6-25 for more on Undo and Redo.
5-29 Auto Record and Auto Rehearse
Auto record will put the transport into record at the In point and back into play at the Out
point. To perform an Auto Record you must first set In and Out Points. Record-arm the
desired tracks and click on the Auto button followed by the Record button in the
Transport window. At this point the record arm buttons and record button should be
blinking red and the Auto button should be solid red:
.
36
Page 37

Place the playhead prior to the In point by the desired amount and press play. The
recorder will begin to play and will punch into record at the In point. It will punch out of
record and back into play at the Out point. You must press stop for the transport to stop.
Auto Rehearse works in the same manner, except that instead of switching to record
mode, the MX switches to input allowing you to audition the record process. To enter
Auto Rehearse mode you must press Auto followed by the Rehearse button. The
Rehearse button will blink yellow and the Auto button will appear solid yellow. To begin
an Auto Rehearse, press play.
To exit either Auto Rehearse or Auto Record click once on the Auto button.
Q
Auto Record/Rehearse mode: Ctrl + Shift + A on Microsoft Windows, Cmd + Shift + A
K
5-30 Loop Record
Note:
You can use Auto Record with Pre and Post roll to easily provide auto punch
capabilities.
on Macintosh.
Several types of Loop modes are available in MX-View:
•
Play Repeatedly (default): This mode will continuously record over the existing
audio without stopping.
•
Play Once and Stop: This mode will record once and stop at the Post-roll
location following the Out point.
•
Play Once and Cue: This mode will record once and place the playhead at the
Pre-roll location before the In point.
For more detail on these settings please refer to the Menu Bank 200: System Controls
section of the Complete MX-2424 User Manual (page 38).
Before performing a Record Loop, you must choose and set the loop mode you desire in
MX-2424 Menu 210. Next set the desired In and Out points, record-arm the desired
tracks, and click the Auto button in the Transport. The Auto button should now appear
solid red. Press the record button in the transport so that it and the record-armed tracks
are blinking. Click on Loop in the Transport window to begin the record loop. The
transport will look as follows:
Note that a Rehearse Loop can also be performed in the same manner: only the Rehearse
button is armed instead of the Record button.
Transport in Play
Loop button solid yellow
Rehearse (Blinking Yellow)
Auto (Solid Yellow)
Record button solid red
Auto button solid red
37
Page 38

Q
Loop: Ctrl + L on Microsoft Windows, Cmd + L on Macintosh.
K
Loop Record with Auto Unload
Auto Unload automatically unloads a track so that a new recording can take place,
without deleting the previous take. Loop Record, set in MX-2424 Menu 211, toggles
between Auto Unload On and Off. This mode is particularly useful for users who wish to
record the best take, without recording over previous takes.
5-31 External Synchronization
While most of the external synchronization parameters for the MX-2424 and MM-series
machines are located in the Machine Settings, several essential features are located in the
Machine Info bar and the Transport window. When the transport is synchronized to
external device, the Online button must be engaged. The Online button is located in the
lower left of the Transport window and will appear solid yellow when engaged (
T
Opt + click (On Macintosh) or Alt + click (Microsoft Windows) on the Online button
iP
enables all valid machines online.
The Machine Info bar contains a brief overview of important machine settings. In
addition to this, the Machine Info bar enables you to view incoming Timecode, set Bus
and TC Offsets, and view disk space available for record. To view or change these
settings, access the drop down menu located to the right of the Busy LED.
Drop down menu Register
).
Click to select
TC and Bus offsets can be set in the register located to the right of the drop down menu
(as described in section 4-8), while the Free space and TC Reader are read-only registers.
5-32 View Options
Preload All Waveforms
Preload All Waveforms, available under View menu, is for advanced users. At zoom
levels typically used when working, MX-View has available to it all the information
necessary to show waveforms. When zoomed in far enough, MX-View may not have
this information and may need to transfer the information from the MX-2424 "on the
fly." This normally occurs very quickly, with a slight delay as MX-View "fills in" the
missing information. When zoomed in far enough and with the MX-2424 in motion,
however, waveforms may disappear and reappear frequently. If this is observed, Preload
All Waveforms causes MX-View to transfer from the MX-2424 all the waveform
information for the entire project, eliminating the waveform flicker, but with the
drawback that it is very time consuming and uses a large amount of disk space on the
hard drive of the computer running MX-View.
38
Page 39

Subframes
Selecting the Subframes option under the View Menu adds the two-digit subframe
counter to MX-View registers.
Subframes
Feet/Frames
N/A
(
)
This feature will be available in a future upgrade.
Splice Points
Enabling Splice points, under the View menu, provides lines at each audio event’s start
and end points. Splice points create more pronounced separation lines between events,
making it easier to differentiate between closely located events.
Splice points
disabled
Splice points
Enabled
Splice point
39
Page 40

Chapter 6: Editing
Chapter 6 provides an in depth explanation of fundamental edit functions, including selecting a region, cut,
copy, paste, and other edit commands. In order to use these commands and functions, the Edit Sound event
icon must be selected (located in the Edit bar).
Edit Sound Event
6-1 Selecting a Region for Edit
Prior to performing an edit, an audio region must be selected. There are a number of ways
to select a region: Using the Selector Tool, Drag and Trim Tool, or by individual
selection of Track Edit buttons and In and Out points.
Selector Tool
The Selector Tool, located in the Transport window (
highlight, regions for editing. To select a region, click and drag over the desired area. In
and Out points are automatically set and Track Edit buttons are automatically enabled
when selecting the region.
Track Edit
button armed
To add an edit track to already highlighted group of tracks, hold down Shift while
clicking on the desired tracks. To deselect a track either hold down the Shift key and
click once on the selected track or Ctrl + Click on the selected track. You may also add or
remove tracks for editing by selecting or deselecting the desired Track Edit buttons ( ).
An already highlighted region can be extended by performing a Shift + Click + Drag over
the desired area. To remove an area from a highlighted region, perform a Ctrl + Click +
Drag. A drag selection can be aborted (if the mouse is still held down) using the Esc
(escape) button. A summary of Selector Tool shortcuts is available in Appendix A.
*
T
To deselect all Edit tracks but keep the In and Out points unchanged, use the Deselect All
iP
function under the Edit menu or the Escape key.
), can be used to select, or
In and Out points
automatically set
Selected audio
region
40
Page 41

Drag and Trim Tool
The Drag and Trim Tool, located in the Transport Window (
event or group of events and drag them to a new location. To select a single event simply
click on it once. To select a group of events, hold down Shift and click on the desired
events. In and Out points are automatically set and Track Edit buttons automatically
armed when selecting events. To deselect an event, hold down Shift and click on the
selected event, or hold down Ctrl and click on selected event
Track Edit
button armed
) can be used to select an
In and Out
points
Selected audio
region
Note blank areas can
also be selected
Additional events can be selected by holding down the Shift button, clicking from an
empty area, and dragging over the desired additional events. Using the same method of
clicking and dragging from an empty area, events can be deselecting while holding down
the Ctrl key.
A group of events can also be selected by clicking on an empty area and dragging across
an event or group of events. Use the Escape key to abort a drag selection.
Selected audio
region
Begin drag from
1
empty area
2
End drag (release
2
mouse)
1
41
Page 42

Track Edit Buttons and In and Out Points
To select a track for editing, click on the Edit button for the respective track. The Edit
button will become solid yellow
9. The selected region will appear highlighted.
. Next, set In and Out points as described in section 4-
In and Out points
selected for edit
Track selected
for edit
T
To arm or disarm all tracks for editing click the Edit All button, located above the Track
iP
1 edit button (
).
Note that when the machine is in busy state, the mouse will temporarily change to a busy
cursor (
6-2 Force Region Select
When selecting an area surrounded by events (as shown below), using the Drag and Trim
Tool, a Force Region select must be performed to prevent dragging the event.
).
Region selected
for edit
Events (in white) selected
using Force Area selected.
Note that the events are
surrounded by other events.
With the Drag and Trim Tool, hold R and click and drag to the left of the first event to be
selected. A rectangle selection will appear highlighted when the mouse is released
Q
Force Region Select: R + Click + Drag on event on both Microsoft Windows and
K
Force Region select is not necessary when selecting an area using the Selector Tool.
Note:
Macintosh.
42
Page 43

T
Region selection can be combined with the shift key to add events to, or with the control
iP
6-3 Cut
key, to remove events from an existing selection.
Cut will remove audio between the In and Out points and slip all the downstream audio to
the left. To perform a Cut, selected the desired region and click on Cut in the Edit Bar or
Edit menu. Any audio region that is cut is saved in the clipboard.
Before:
Selected audio to be cut
Q
Cut: Ctrl + X on Microsoft Windows, Cmd + X on Macintosh
K
6-4 Local Cut
A Local Cut will only move the event associate with the edit. Audio associated with the
edit is moved to the left as shown below.
After:
Events downstream are
slipped to the left
Before:
Selected audio to be cut
After:
Events not associated with the
Fade created
automatically
edited event are unaltered
Right part of the event
is slipped to the left
43
Page 44

Q
Local Cut: Ctrl + Shift + S on Microsoft Windows, Cmd + Shift + S on Macintosh
K
6-5 Left Cut
A Left Cut slips all audio left of the event to the right, as shown below.
Before:
Selected audio to be cut
All events to the left
of the edit are slipped
to the right
Q
Left cut: Ctrl + Shift + X on Microsoft Windows, Cmd + Shift + X on Macintosh
K
6-6 Local Left Cut
Local Left Cut is a Left Cut that will only move the event associated with the edit. Audio
associated with the edit is moved to the right.
After:
Before:
Audio for Local left
Cut is selected
44
Page 45

After:
Q
Local Left Cut: Ctrl + Shift + D on Microsoft Windows, Cmd + Shift + D on Macintosh.
K
Events not associated with the
edited event remain unaltered
6-7 Copy
Copy places selected audio regions, defined by In and Out points and Track Edit buttons,
in a desired clipboard location. Clipboard contents can then be pasted or inserted into
audio tracks. To perform a Copy, select audio and press Copy on the Edit bar or select
Copy from the Edit menu.
Q
Copy: Ctrl + C on Microsoft Windows, Cmd C on Macintosh.
K
MX-View has four clipboard locations. For more on using multiple clipboards please refer to
Note:
section 7-9.
Area selected
for copy
Note empty
area is also
copied
Left part of the event is
slipped to the right
6-8 Paste
For all Paste commands, audio must first be copied to the clipboard. After an In point is
defined, the paste edit operation can be performed. Paste will place the selected clipboard
contents at the In point, overwriting any audio downstream.
Audio region is selected
and copied top clipboard
Before:
45
Page 46

New In point is selected
Audio region is pasted,
overwriting existing audio
to the right of the In point.
Q
Paste: Ctrl + V on Microsoft Windows, Cmd + V on Macintosh
K
6-9 Paste Left
Paste Left is similar to a Paste with the exception of overwriting clipboard content to the
left of the In point.
In point selected
After:
Before:
Audio region is selected
and copied to the clipboard
After:
Audio region is pasted,
overwriting existing audio
to the left of the In point.
Q
Paste Left: Ctrl + Shift + L on Microsoft Windows, Cmd + Shift + L on Macintosh
K
46
Page 47

6-10 Paste at Playhead
This edit command moves the In point to the playhead and pastes clipboard contents
there.
Playhead
Audio region is
selected and copied
to the clipboard
Playhead
Before:
After:
Audio region is pasted
to the right of the
playhead, overwriting
existing audio
Q
Paste at Playhead: Ctrl + Shift + P on Microsoft Windows, Cmd + Shift + P on
K
Macintosh
6-11 Clear
Clear removes audio between the In and Out points without slipping audio events time.
The cleared region is then saved to the clipboard.
Audio region is
selected
Before:
47
Page 48

Audio region is
cleared, not affecting
any other events
Q
Clear: Ctrl + B or Delete/Backspace on Microsoft Windows, Cmd + B or
K
Delete/Backspace on Macintosh
6-12 Open
Open moves audio located between the In and Out points downstream to the Out point
and leaves silence between the In and Out points.
After:
Before:
Audio region is
selected for
Open edit
After:
Edit is performed,
opening a blank area
at the In and Out
points, moving all
audio to the right.
Q
Open: Ctrl + H on Microsoft Windows, Cmd + H on Macintosh
K
48
Page 49

6-13 Insert
The Insert command places audio from the clipboard at the In point and moves all audio
downstream.
Audio
region is
selected and
copied to
clipboard
Before:
In and Out points
selected for insert
After:
Audio event is inserted,
moving audio events
down stream
Q
Insert: Ctrl + I on Microsoft Windows, Cmd + I on Macintosh
K
49
Page 50

6-14 Repeat Selection
Two types of Repeat functions are possible, Repeat Paste and Repeat Insert. To perform a
Repeat Paste or Insert, select In and Out points and choose
Selection
not go to the clipboard. Enter the number of times you wish to repeat audio in the prompt
box and select Paste or Insert. A Repeat Paste overwrites the repeated audio over existing
audio.
Check box to choose Repeat
Insert. Default is unchecked
box for Repeat Paste function
Audio region selected
for Repeat. Note that it
does not need to be
copied to the clipboard
. Note that a copy is not required for Repeat, as contents that are repeated do
Before:
Edit Menu
Number of
times an audio
region is to be
repeated
→→→→
Repeat
Repeat selected for
Paste 20 times.
Repeat Pasted 20 times,
overwriting over
existing audio.
After:
50
Page 51

Repeat Insert is similar to a Repeat Paste, only it moves contents downstream instead of
overwriting existing audio.
Before:
Audio region
selected for Repeat
Repeat selected
for Insert 5 times
The audio region is
repeatedly inserted 5
times, moving existing
audio downstream (to the
right).
Q
Repeat: Ctrl + R on Microsoft Windows, Cmd + R on Macintosh
K
6-15 Split
A Split command separates, or “splits”, an audio event into two at the location of the
playhead.
Playhead is
positioned for a Split
After:
Before:
51
Page 52

After:
Split is performed,
creating two events,
separated by a cross-fade.
Q
Split: Ctrl + E on Microsoft Windows, Cmd + E on Macintosh
K
T
Turning on Splice Points (
iP
separation line between events allowing you to more easily view when a Split, Separate,
or Discard edit is performed.
6-16 Separate
The Separate command is similar to a Split, in that it separates an audio event. However,
a Separate performs a “split” at the In and Out points, separating an audio event into three
events.
Audio region
is selected.
View Menu
Before:
After:
→→→→
Splice Points
) creates a more pronounced
The audio event is
separated at the In and
Out points
Q
Separate: Ctrl + U on Microsoft Windows, Cmd + U on Macintosh
K
6-17 Discard
The Discard command will remove audio on either side of the In and Out points, not
affecting other audio events.
Audio region is
selected.
Before:
52
Page 53

After:
Q
Discard: Ctrl + T on Microsoft Windows, Cmd + T on Macintosh
K
6-18 Sync Paste
One of the key differences between a Sync Paste and a normal Paste is that for a Sync
Paste to be performed, an In point need not be selected. Instead, the playhead is moved,
and audio from the clipboard is pasted at the In point referenced to the playhead. In other
words, the Sync Paste is offset by the distance between the playhead and the In point. To
perform a sync paste, you must first copy audio to the clipboard, noting where the In
point is with reference to the playhead. Move the playhead where desired and perform the
Sync Paste.
The selected audio
region is copied to
the clipboard
Discard is performed,
removing audio to the left
and right of the event.
Before:
Note the distance
between the In point
and the playhead
The playhead is
moved to another
location
53
Page 54

After:
Note that the pasted
region has the exact same
distance between the In
point and playhead
A Sync Paste is
performed,
overwriting
existing audio.
Q
Sync Paste: Ctrl + Shift + V on Microsoft Windows, Cmd + Shift + V on Macintosh
K
For the MMR, Sync at Playhead must be turned on.
Note:
6-19 Sync Insert
Sync Insert is similar to Sync Paste, in that the edit is also referenced to the playhead.
However, with Sync Insert, the inserted audio region does not overwrite over existing
audio. Instead, the audio region is inserted, moving all existing audio downstream (to the
right).
Q
Sync Insert: Ctrl + Shift + I on Microsoft Windows, Cmd + Shift + I on Macintosh
K
T
Sync insert and paste are both very useful when editing events to video, such as placing
iP
the sound of gunshot to the video of a gun firing. Simply place the playhead at the
gunshot audio event’s peak and perform a sync paste with the playhead located where the
picture of a gun is being shot. Other applications also include placing a drum sound at a
fill.
6-20 Nudge
A Nudge moves audio by a preset amount, set in the Transport window register.
Audio can be nudged repeatedly to the left or the right using the + (plus) and – (minus)
keys. Audio that is nudged will overwrite existing audio events.
54
Page 55

t
To perform a nudge, select an audio region. Press the + (plus) key to nudge audio to the
right or the – (minus) key to nudge audio to the left.
Before:
Audio region
selected
Nudge Right is performed,
moving the selected event
to the right by the nudge
value. Note that a Separate
edit was automatically
performed at the In and Ou
points.
After Nudge Right:
After Nudge Left:
Nudge Left is performed,
moving the selected event to
the left by the nudge value.
A nudge will automatically perform a Split at the In and Out points if the In and Out
points are within an audio event.
Q
Nudge Right: + (plus) or = (equals) on Microsoft Windows, + (plus) or = (equals) on
K
Macintosh
Nudge Left: - (minus) on Microsoft Windows, - (minus) on Macintosh
55
Page 56

6-21 “In to Now”
This command will first perform a Separate edit at defined In and Out points (if needed)
and then Paste the event at the playhead. To perform this function select In and Out
points, making sure the edit button is enabled for the appropriate track(s). Place the
playhead at the location where you want the selected audio to go and then select “In to
Now” in the Edit Menu.
Before:
Audio region
selected
After:
Selected audio
region is cleared
and pasted at the
playhead.
Q
“In to Now”: Ctrl + M on Microsoft Windows, Cmd + M on Macintosh
K
6-22 Renaming Events
To assign an audio event a new name, double click on the event using the Drag and Trim
Tool. A window will display the existing highlighted name and present the option of
renaming the event.
Playhead
A Rename event does not rename the audio file on disk.
Note:
56
Page 57

6-23 Render
The Render command creates a continuous audio event, which is very useful in
increasing disk performance. Much like a TapeMode convert, a Render uses the In and
Out points as start and end times. A Render can be performed on events within a single
track or across a number of tracks. Once the Render is complete, the newly rendered
event will replace existing audio events.
To perform a Render, select the desired events and select Render under the Edit Menu.
Depending on the length and number of tracks selected, a Render may take up to a few
minutes to process. The busy cursor will appear during this process.
Audio region is
selected.
Before:
After:
Audio region is rendered.
Note that empty spaces
between events were also
rendered.
Q
Render: Ctrl + Shift + R on Microsoft Windows, Cmd + Shift + R on Macintosh
K
A Render command will take into account volume and mute automation. The newly rendered
Note:
audio file will reflect the changes in volume level.
57
Page 58

6-24 Reverse
Reverse “reverses” an audio event or region, as if audio was played backwards, without
affecting unselected tracks. The newly reversed audio event will replace the existing
audio region. To perform a Reverse, select the desired events or audio region and select
Reverse under the Edit Menu. Depending on the length and number of tracks selected, a
Reverse may take up to a few minutes to process. The busy cursor will appear during this
process.
Audio Event is
selected
Before:
Reverse edit is
performed, the
waveform reversed.
6-25 Undo and Redo
The MX-2424 has 99 levels of undo, meaning it can undo the last 99 edits or recordings
performed. Undos are only valid in the existing project, meaning you cannot perform an
undo on a previous project. Undos are not stored with the project - the Undo list is
cleared each time you start a new project, unmount a disk, or turn off the recorder. Press
Redo to go back an Undo level. Undo and Redo functions are available on the Edit bar,
Edit menu, or as quick key short cuts.
Q
Undo: Ctrl + Z on Microsoft Windows, Cmd + Z on Macintosh
K
Redo: Ctrl + Y on Microsoft Windows, Cmd + Y on Macintosh
The MMR is limited to 10 levels of undo.
Note:
After:
6-26 Drag and Drop Editing
Drag and drop editing allows you to use the mouse, in conjunction with various keyboard
short cut keys, to edit and move audio events around with great flexibility. While the
Selector Tool is used mostly to select audio regions, the Drag and Trim Tool can trim
events and fades, move and drag audio events, insert and edit volume automation
breakpoints, and move location markers (Breakpoint volume automation and Event and
Fade trimming are covered in Chapter 7).
58
Page 59

6-27 Drag and Trim Tool Fundamentals
To move a single event, click on the event and drag to the desired location. To move a
group of events, click on the first desired event, then hold down the shift key and click on
the other desired events, and then perform a drag. Note that whenever multiple events are
selected, only the event last selected will show trim handles, even though the trim
command will affect all selected events. Trimming is covered in Chapter 7.
More complex functions are also available using the Drag and Trim Tool. While holding
down the Alt key, click and drag an event. This will create a copy of the event, rather
than moving it, which you can paste simply by releasing the mouse.
Holding down the control key while performing a click and drag enables you to move
audio events vertically from one track to another, without moving them horizontally in
time. This is particularly useful if you wish to move audio to another track without
loosing sync.
Q
Several quick key short cuts can be used to temporarily switch from one tool to another.
K
The temporary switch takes affect as long as the F6 and F7 key is held down, with the
edit mode returning to its previous state when the key is released.
•
When in Drag and Trim mode hold down F6 to temporarily switch to the Selector
Tool
•
When in Drag and Trim mode hold down F7 to temporarily switch to the Zoom Tool
•
When in Selector Tool mode hold down F6 to temporarily switch to the Drag and
Trim Tool
•
When in Selector Tool mode hold down F7 to temporarily switch to the Zoom Tool
•
F6 and F7 can be thought of as temporarily selecting the "other" tools on the left and
right, respectively, within the often-used Selector, Drag and Trim, and Zoom tools.
59
Page 60

Chapter 7: Advanced Editing
This chapter covers advanced editing functions including Horizontal, Event Volume, and Fade trimming,
creating Fades and Cross-fades and using Multiple Clipboards when editing.
7-1 Event Trimming Basics
To enable event trimming, click once on an event using the Drag and Trim Tool. The
event will appear highlighted and have seven handles as shown below.
In and Out
marker lines
Volume trim handles
Horizontal trim handles
When selecting an event using the Selector Tool, events appear highlighted in blue between
Note:
the In and Out points. Event trimming is not possible using the Selector Tool.
7-2 Horizontal Trimming
Horizontal trimming alters the length of the event but does not move the audio event in
time. To trim an audio event click once on the event, so that the trim handles appear.
Position the mouse over the horizontal trim handles so that it temporarily turns into the
Trim Tool (↔). Click and drag to the left or right and release the mouse when the desired
length is reached.
Before:
Fade trim handles
Left Horizontal trim
handle is moved to the left.
60
Page 61

t
After:
An event cannot be trimmed to extend beyond the length of the recorded audio file it is
Note:
associated with. If you are trying to trim left or right, and notice the Trim Tool getting stuck, you
have reached the boundary of the audio file.
Trim handle is released and the event
is extended to the left. Note that the
Out point remains unaffected.
7-3 Trimming Multiple Events
To Trim multiple events, hold down the shift button and select events using the Drag and
Trim Tool. You can also use the Drag and Trim Tool and click and drag over an area to
select multiple events. Note that only the last selected event will have trim handles, but
all selected events will appear highlighted. Proceed by performing the trim on the last
event clicked and all events selected will be modified simultaneously.
Before:
Last selected event,
thus trim handles
appear on this event.
First selected
event
After:
Last selected
event is trimmed
to the right
First selected even
is also trimmed to
the right
61
Page 62

7-4 Event Ripple Trim
A Ripple Trim is a horizontal trim that will cause all audio on the selected track to slide
downstream or upstream, depending on the direction of the trim. To perform a Ripple
trim, hold down the Alt button, click and drag the handle.
Before:
Event selected
for ripple trim
Q
Event ripple trim Alt + Click + Drag handle on both Microsoft Windows and Macintosh
K
7-5 Trim to Next
“Trim to Next” is a horizontal trim that will automatically trim all the way to the next
event in the selected track. To perform a “Trim to Next”, select the desired event, hold
down Shift and drag the handle by a slight amount. Release the mouse and the trimmed
edge of the selected event will snap to the next event so that their edges touch.
After:
Before:
Event is trimmed
to the right while
holding down the
Alt key.
Events located
downstream are moved to
the right
The same distance between
the events is maintained
Selected Event is
trimmed slightly
to the right while
holding down the
Shift key.
After:
62
Selected event snaps to
the next event.
Page 63

Q
Event Trim to Next: Shift + Click + Drag handle on both Microsoft Windows and
K
Macintosh
7-6 Lock Trim
When two side-by-side events are selected, a red trim handle will appear between the two
events, as shown below. This trim handle is used to trim the events’ shared edge. To
perform a Lock Trim, first select two events that share an edge. Trim the red handle at the
events’ shared edge and release the mouse where desired.
Before:
Two side by side
selected events
share red Lock
Trim handle
After:
7-7 Event Volume Trimming
There are two methods of altering audio volume levels in MX-View: Breakpoint Volume
Automation and Event Volume Trimming. Volume Automation, reviewed in section 8-4,
involves creating and moving breakpoints to vary the volume of a track. It is the more
flexible of the two methods. Event Volume Trimming allows you to modify the volume
of an event or group of events. It is quick method of modifying volume levels for an
event or group events. Note that both methods of modifying volume levels can be used
concurrently.
Note that the In and
Out points remain
stationary
Red handle is
trimmed to the right
63
Page 64

The three Event Volume trim handles can be used in a combination to increase or
decrease an event’s volume level. To view event volume handles, click on the desired
event so that it appears highlighted. Click and drag on the desired trim handle.
Before:
Event is selected
After:
Left Event Volume Trim handle
T
iP
moved downwards. Note the change
in the waveform reflects the lower
volume
An Event handle can be fine adjusted by holding down the Ctrl key while clicking and
dragging the handle.
7-8 Fades and Cross-Fades
Creating fades:
To create a Fade-in, use the Selector Tool and select an In point to the left of the event
and an Out point located inside the event.
Before:
Middle Event Volume Trim handle
moved downwards. Note the change
in the waveform reflects the lower
volume
Right Event Volume Trim handle
moved downwards. Note the change
in the waveform reflects the lower
volume
Audio region
selected for fade-in
64
Page 65

This area will appear highlighted. The length of the selection will determine the length of
the fade. Click on the Fade button in the Edit bar or the quick key to perform the fade.
After:
Fade-in is performed.
Note that the waveform
has reflected the fade in.
Q
Fade: Ctrl + F on Microsoft Windows, Cmd + F on Macintosh
K
A Fade-out is performed similarly, only the In point must be located within the event and
the Out point must be to the right of the event.
Creating Crossfades:
To create a Cross-Fade, use the Selector Tool to select an In point within the left event
and an out point within the right event. The area will appear highlighted. Press the Fade
button or quick key to create the Cross-Fade.
Before:
Area between two
events selected for
cross-fade
After:
Cross-fade starts
at In point and
ends at Out point
65
Page 66

A Cross-fade can also be created by sliding an event with a Fade-in into an event with a
Fade-out. Simply grab the event using the Drag and Trim Tool and slide into the next
event.
Before:
Event is selected
and moved to the
right using the Drag
and Trim Tool
The Fade-out of the
left event and the
Fade-in of the right
event overlap and
create a cross-fade
After:
Fade Trimming
Fades can be trimmed using the Fade trim handles. To access these handles click once on
an event using the Drag and Trim Tool. Move the mouse over the desired fade trim
handle so that it turns into the Trim Tool. Click and drag to Trim.
Before:
Event is selected. The
lower right Fade trim
handles is moved to the
right.
After:
The fade out is extended
7-9 Multiple Clipboard Select
With MX-View, you have the ability of storing up to four independent clipboards,
selectable from the Edit Bar.
Storing Contents to the Clipboard:
Click the clipboard you desire to store to so that it appears selected. Select an area or
event and choose an edit command that will place the selected region to the clipboard.
66
Page 67

These edit commands include Cut, Copy, and Clear. You may switch to a different
clipboard number and perform another Cut, Copy, or Clear command.
Placing Contents from the Clipboard:
First select the desired clipboard. Choose any type of Paste or Insert edit command to
place contents from the clipboard onto the main MX-View window. You may switch to a
different clipboard number and perform another Paste or Insert command.
All clipboard entries retain their information from project to project. They are, however,
cleared when the MX-2424 is turned off or when an Unmount or disk cleanup command
is issued.
7-10 Event Slip
If a clipboard is not selected, contents will be placed to clipboard 1, the default clipboard.
Note:
An Event Slip edit slides audio to the left or right without moving the In or Out points.
An Event Slip can be performed by selecting an event, holding down A, and Clicking and
Dragging the selected event. Note that you must use the Drag and Trim Tool for this
feature.
Before:
Event is selected for
Event Slip
After:
Note that the In and Out
points remain unaltered
Event is Slipped to the
right by holding down
the A key, selecting the
event, and dragging to
the right.
Event Slip retains the In and Out points and grabs more audio on the left or right side.
Audio outside the In and Out point remains unaffected.
67
Page 68

7-11 Compile
The Compile function creates a “comp” virtual track containing selected audio events
from selected virtual tracks. With the Shift key held down, select individual events using
the Drag and Trim Tool. Note that only events within a group of virtual tracks can be
selected.
Events selected for
a Compile edit.
In the Edit menu, select Compile. Enter a new name for the compiled track to be created.
A new virtual track containing the compiled events will be created.
Compiled track
Events located closer to the top will have priority when there is an overlap between events,
Note:
68
Page 69

Chapter 8: Advanced Operations
Chapter 8 takes an in-depth look at Groups, Location Markers, and Level Meters, as well as Mute and
Volume Automation.
8-1 Using Groups (N/A)
This feature will be available in a future upgrade.
8-2 Using Location Markers
Note: Location Markers Window will be available in a future upgrade. This window will
allow naming, deleting, and moving of location markers. The following Quick keys can
be used in the interim:
Q
Create New Marker:
K
Return Key on both Microsoft Windows and Macintosh
Q
Create a number specific Marker:
K
C followed by two numbers specifying a particular memory register on both Microsoft
Windows and Macintosh
Q
Locate to a Specific Marker:
K
V followed by two numbers specifying a particular memory register on both Microsoft
Windows and Macintosh
8-3 Level Meters
The Meters window displays 24 meters indicating the amplitude of audio level, much like
on the MX-2424 front panel.
Peak hold
Signal Level
Under the File menu of the Meters window, you can configure the Meter windows height
and width.
Signal Clip (0 dB)
Signal Present
(-60 db)
Note that in 2 x sample rates (88.1-96kHz) only 12 meters will appear for each MX-2424.
69
Page 70

8-4 Breakpoint Volume Automation
Breakpoint Volume Automation allows you to create and move breakpoints to vary the
volume of a track. Each individual track has it’s own volume automation data, and
functions similar to an automated moving fader system found on mixing consoles.
Creating Automation Breakpoints:
To start using volume automation, click the volume automation button (
located in the Edit bar and select the Drag and Trim Tool. To create an automation point,
click within the desired track and move the point to the desired volume level. A small
box containing the gain value (as well as change in gain in parenthesis) will appear on the
screen to help you move the automation point to the desired volume level. To adjust an
existing breakpoint, click on the point so that it appears white and drag vertically or
horizontally within the track. To fine-adjust (in smaller increments) an existing
breakpoint hold down Control, then Click and Drag.
Automation break
point highlighted
for editing.
Automation data,
including gain
value and change
in gain for the
highlighted point.
Editing Automation Breakpoints:
When the Automation breakpoint data is displayed, editing of audio material is locked
out. Only break point data can be altered. However, Automation data can be edited
(copy, paste, delete, etc.) when in the Selector Tool mode. Use the selector key to select
automation data for editing. The area will appear highlighted and the breakpoints will
appear in a white in color. You may now perform the edit you desire, including nudge,
copy, paste, etc. To delete breakpoints, select the desired points and press the
delete/backspace key.
Before:
) button,
Area selected
and copied to
the clipboard.
70
Page 71

After:
A paste command
places automation
data from the
clipboard at the In
point.
T
You can copy and paste automation data downstream in a song or from one track to the
iP
other when in the Selector Tool mode. So, a chorus or verse can easily have identical
volume automation data!
Q
Other Useful Breakpoint Volume Automation Quick Keys:
K
Shift-Click: select more gain points
Alt-Click & Drag: copy gain points
Shift-Click & Drag: constrain gain or time while trimming or copying
8-5 Mute Automation
Mute Automation allows you to mute and unmute each individual track, much like a
mute button on an automated mixing console. To use mute automation, first click the
Mute Automation button (
Trim Tool. A mute automation point can be either at the top or bottom of a track,
functioning as an unmute or mute, respectively. To create a mute breakpoint, click within
the desired track and move the point to either the top or bottom of the track. You can also
slide a mute automation point to the left or right.
Track is unmuted
Track is muted
) button, located in the Edit bar, and select the Drag and
The same rules for editing automation data as described above in section 8-4, Volume
Automation, apply to mute automation.
Q
The following quick keys simplify switching back and forth between Waveform,
K
Volume, and Mute automation.
F8: Edit Sound Events
F9: Edit Volume Automation
F10: Edit Mute Automation
71
Page 72

Chapter 9: Projects and Utilities
Chapter 9 covers project and disk management, from loading and smart copying projects to Ethernet
backup and restore. Also covered are preferences and disk utilities, including Disk Cleanup, Initialize, Low
Level Formatting, and more.
9-1 Loading Projects
The Project/Track window displays all disks, projects, and tracks available on each
networked MX-2424 or MMR/MMP. Menu arrows, are used to display or hide items. To
load a project, access the Project/Track window, and click the desired machine’s menu
arrow so that all attached disks are displayed. Click once again on the disk (SCSI ID)
menu arrow to display all existing projects on that disk. To load a project, double click on
the desired project name or icon. Note that a single click on the drop down arrow will
display all tracks within a project.
Machine drop
down menu
Disk drop down
menu
Project drop down
menu
Tracks
9-2 Project Utilities
In order to perform a project utility, such as a Smart Copy, Rename or TapeMode
convert, a project must be highlighted in the Project/Track Window. Note that the
progress of an operation and an abort button are located at the bottom of the
Project/Track window.
Smart Copy:
To perform a Smart Copy, select the desired project and choose
→→→→
File Menu
→→→→
Smart Copy
the project as well as a destination device (SCSI disk ID).
T
iP
It is also possible to Smart Copy a project by selecting the project in the
Project/Track window and dragging it onto another disk
Project/Track window
. A window will appear, presenting the option to rename
72
Page 73

After a Smart Copy is initiated, a progress percentage will appear at the bottom of the
Project/Track window. Upon completion of the task, a pop-up message will appear and a
check will be placed next to the operation. Note that once you click on the completed
operation, it will disappear from the list.
Clicking on the check will
remove the message from
the window.
Tape Mode Convert:
To perform a Tape Mode convert, select the desired project and choose
window
→→→→
File Menu
→→→→
Tape Mode Convert
. A window will appear, prompting you to
Project/Track
choose a destination device (SCSI disk ID).
As with a Smart Copy, a progress percentage will appear at the bottom, along with an
Abort button. Pressing the Abort button will prompt you to verify the operation before
proceeding.
Type of operation
in progress
Abort button
Percentage complete
73
Page 74

Rename Project:
To rename a project, select the desired project and choose
File Menu
project. Type the desired name and click on “Rename” to proceed or “Cancel” to exit
without performing the operation.
→→→→
Rename Project
. A pop-up window will present the option to rename the
Project/Track window
→→→→
Delete Project/Track:
To delete a project, select the desired project or track and choose
→→→→
File Menu
performing the operation.
9-3 Network Backup and Restore
Network Backup:
MX-View allows you to backup your project via Ethernet onto your host computer.
Backups are saved in BU (TimeLine BackUp) format, which allows you to segment a
project to accommodate different backup media. Once on your host computer, BU
segments can be easily backed up onto CD-R, CD-RW, DVD-R or other backup medium,
using your host computer. That way, for example, a 4 GB project on your recorder hard
disk can be backed up to a few CD-Rs using your computer. Before proceeding with a
Network Backup, choose the desired format under
(located in the Project/Track window).
→→→→
Delete Project
. Press “Delete” to proceed or “Cancel” to exit without
File Menu
Project/Track window
→→→→
Net Backup Format
Note that you can also custom set the size of each segment by choosing the Manual
option.
74
Page 75

After choosing a format, select Network Backup under the File menu. You will be
prompted to choose a location and new name for the backup. Selecting Save will start
the process and a progress counter will appear at the bottom of the Project/Track window.
Network Restore:
To restore a project form your host computer, select
(located in the Project/Track window). Locate and select the last backup file in a set. For
example, when restoring a project with 3 segments, MXProject.bu, MXProject_2.bu, and
MXProject_3.bu, select MXProject_3.bu first.
After selecting the BU file, click on Open. You will be prompted to enter a project name
and choose the destination SCSI device you wish the project to be restored onto.
File Menu
→→→→
Network Restore
Clicking OK will start the process and a progress counter will appear at the bottom of the
Project/Track window. When the restore is complete, a message will appear notifying if
the process was completed successfully.
75
Page 76

9-4 Disk Utilities
In order to perform a disk utility other than Disk Cleanup, all volumes must be
unmounted. Mounting and Unmounting is possible via the
Volumes Menu
functionality is available on page 19 of the complete MX-2424 manual.
→→→→
Unmount or Mount.
Project/Track window
More information on Mount/Unmount
→→→→
Disk Cleanup:
To perform a Disk Cleanup, verify that all disks are mounted and select
window
→→→→
Volumes Menu
→→→→
Disk Cleanup.
Upon completion, a message will confirm
Project/Track
disk cleanup was completed successfully. More information on performing a Disk
Cleanup is provided on Page 46 of the MX-2424 tutorial.
Initialize:
To initialize a volume, verify all disks are unmounted and select
→→→→
Volumes Menu
→→→→
Initialize.
A window will appear, prompting you to select the
Project/Track window
SCSI Device ID and Format (HFS, HFS+, or FAT32). Upon completion, a message will
confirm the Initialize was completed successfully.
SCSI Device ID
drop down menu
SCSI Device ID
entry box
More information on performing a disk Initialize is available on Page 48 of the MX-2424
tutorial.
If the SCSI Device ID does not appear in the device drop down menu choose the “Other”
Note:
option in the drop down menu. Then enter the SCSI ID number in the Device entry box.
Low Level Format:
To Low Level Format a volume, verify all disks are unmounted and select
window
→→→→
Volumes Menu
→→→→
Low Level Format.
A window will appear, prompting
Project/Track
you to select the SCSI Device ID. Press Format to proceed. Upon completion, a message
will confirm Formatting was completed successfully. More information on performing a
Low Level Format is available on Page 47 of the MX-2424 tutorial.
76
Page 77

Backup Erase:
To Backup Erase a volume, verify all disks are unmounted and select
window
select the SCSI Device ID. Note that only a Backup erase can only be performed on a
DVD-RAM or Travan media. Upon completion, a message will confirm Formatting was
completed successfully.
→→→→
Volumes Menu
→→→→
Backup Erase.
A window will appear, prompting you to
Project/Track
More information on performing a Backup Erase is available on Page 44 of the Complete
MX-2424 manual.
9-5 Updating Software (MX-2424)
Updating software is possible via the Machines menu, located in the Network window.
Choosing Update Software will prompt you to select the DXIMAGE, or software image,
to be sent to the TL Media card (smart media card). Clicking on Open will start the
software update.
Upon completion of the update, you will be asked to leave the TL Media card in the MX2424 and cycle power. Upon rebooting, the TL Media card will update the MX-2424
software. Remove the TL Media card and cycle the MX-2424s power once more. With
the software update complete, the MX-2424 is ready to use.
77
Page 78

9-6 Preferences (N/A)
This feature will be available in a future upgrade.
T
Clearing Preferences on Microsoft Windows Machines: MX-View stores various user
iP
preferences such as window sizes and positions, etc. These preferences are maintained to
allow users to return to the same window layout present when the application was last
closed. To clear these preferences and return MX-View to it’s initial state, simply run the
application titled “Clear MX-View Preferences” from the MX-View program group. The
MX-View program group is accessible from your Windows Start button.
78
Page 79

Chapter 10: Tracks
Chapter 10 covers Track management in depth, including unloading, loading, deleting and renaming tracks,
as well as using Virtual tracks. Note that definitions of Loaded tracks, Unloaded tracks, and Virtual tracks
are available in section 4-6 as well as page 35 of the MX-2424 Tutorial (Virtual Tracks).
10-1 Track Menu
In order to perform any track-based function, you must first click on the Tracks Menu
button, displaying the track drop-down menu. This menu is available for any Virtual or
Loaded tracks.
Tracks Menu button
Track dropdown menu
The menu presents the options of creating a New Virtual Track, Loading a Track,
Unloading a Track, Renaming a Track and Deleting a Track.
10-2 Creating a New Virtual Track
Access the Track drop down menu and select the “New Virtual Track” option. The
prompt box, as shown below, will appear, presenting the option to provide the new
Virtual track with a name. The default name will include the existing Track name
followed by the take number. Pressing “OK” will create a new Virtual track.
The new Virtual track will appear above the original track.
Activating Virtual Tracks
To switch between an active and inactive virtual track, simply click once on the desired
Active/Inactive Track Button, so that it appears highlighted. You may choose to hide all
virtual tracks by clicking the Hide/Show Virtual tracks button, as pointed out below.
Inactive Virtual Track
Button: This track will not
play or record any audio.
You can still perform edits
on this track.
Active Virtual Track
Button: This track will
play or record audio.
Hide/Show Virtual
tracks button
Drag Handle
79
Page 80

Moving Virtual Tracks
Inactive virtual tracks may be moved up or down by using the track drag handles. A
white line will appear, guiding you in the placement of the desired inactive virtual track.
White guiding line
used in a “move
track” operation
10-3 Loading a Track
Access the Track drop down menu and select the “Load Track” option. This will launch
the Project/Track window and allow you to choose the desired track to load. You may
choose to load a track from the loaded project as well as from other projects. Once a track
is selected for loading, you may place it in the desired track destination using the drop
down box. Note that projects with double sample rates (88.2 - 96 kHz) will only operate
in 12-track mode, and thus will only allow you to choose destination tracks 1 through 12.
Active virtual track
Inactive virtual
tracks
Destination Track
drop-down menu.
10-4 Unloading Tracks
Access the Track drop down menu and select the “Unload Track” option. A pop-up
window will provide the option of canceling the operation or proceeding with the track
unload.
10-5 Renaming Tracks
Access the Track drop down menu and select the “Rename Track” option. A pop-up
window will present the option to rename the track. Enter the desired track name, and
click “OK” to continue or “Cancel” to exit.
10-6 Deleting a Track
Access the Track drop down menu and select the “Delete Track” option. Click on
“Delete” to proceed or “Cancel” to abort the operation.
80
Page 81

Chapter 11: Using Multiple Machines
Multiple machines can be viewed in the main MX-View window. This chapter reviews using a multiple
machines setup.
11-1 Connecting to Multiple Machines
Loading Machines onto the Main MX-View Window:
MX-View auto-detects all machines available on the local network and automatically
places them in the Network window. In the Network window, select the desired machines
(local and remote) while holding down the Ctrl key on Microsoft Windows, or Cmd key
on Macintosh, so that they appear highlighted. Then select
File Menu
the space bar. The machines will now appear stacked in the main MX-View window. The
order that machines appear in the main MX-View window is dependent on the order in
which the machines were selected in the network window. Each machine is separated by
it’s own time-ruler and may be run independent of other machines on the network,
although this feature is most effectively used with machines that are synchronized
through the TL-Bus.
→→→→
Edit
or press
Machine 1
time-ruler
Machine 1 Tracks
Machine 2 Tracks
When multiple machines are launched in the main MX-View window, an additional
column of machine ID (Bus ID) numbers is added to the right of the main transport
controls. The Transport window as well as keyboard, has control of only the machine ID
that is highlighted. To change Transport and keyboard focus from one machine to the
next, click once on the desired ID number.
Machine ID (Bus ID). In this case, the
Transport has control over Machine
with Bus ID 2.
Machine 2
time-ruler
81
Page 82

When multiple machines are present, a Transport focus segment is provided in the
Machine Info bar.
Transport Focus
segment
Connecting to Remote Machines:
In certain situations, you may want to connect to a machine not on the local network. For
example, an MX-View user in a New York studio wishes to connect to an MX-2424 in a
Los Angeles studio. This is possible using the New Remote Machine feature. To add a
remote machine to the Network window, open the Network window and select
→→→→
Menu
machine.
The machine will then appear in the Network window’s main list, with a globe icon at it’s
left to help differentiate it as a remote machine.
New Remote Machine
. Enter the desired name and IP address for the remote
Machine Info Bar
Machine
11-2 Studio Setup
The Network window is equipped with a system to help organize a multi-room facility
with multiple machines.
Creating a New Studio:
Select “New Studio” under the Machine menu (Network window).
Enter the name of the new studio. Each studio appears as a folder. To add machines to a
studio, drag the machine icon into the desired studio folder. In the example below, the
Network window shows three studios: Studio A, Studio B, and Studio C. Studio B has
one remote 24-track machine.
82
Page 83

Machines can be moved from one studio to another, be renamed, or deleted, all using the
Machines menu in the Network window. Studios can also be renamed and deleted using
this menu.
11-3 Multiple Machines in Use
In order to have all machines running on the main MX-View window simultaneously,
they must be synchronized via the TL-Bus (MMR-Bus for MMR/MMPs). Verify that all
machines are Online and that the Bus Master has Transport focus (refer to section 11-1
on changing Transport and keyboard focus). Each machine has an Online button, located
to the left of its time-ruler, making it easy to identify which machines are online.
Machine dropdown menu
To the left of the Online button is a Machine drop-down menu, only present when there
are multiple machines on one main MX-View window. The Machine drop-down menu
enables you to access Machines Settings, launch the Level Meters window, start a new
project, access the Project/Track window, and in a future upgrade, import and export
sound files.
Editing with multiple machines on the main MX-View window is much like editing on a
single machine. However, audio selected from one machine cannot be moved onto audio
tracks of another machine.
Online button
83
Page 84

Appendix A: Keyboard Shortcuts
Project Keys Macintosh Windows
New project Cmd + N Ctrl + N
Load project/track (open
Project/Track window)
Close window Cmd + W Ctrl + W
Quit Cmd + Q Ctrl + Q
Window Keys (Show/Hide) Macintosh Windows
Transport Cmd + 1 Ctrl + 1
Settings Cmd + 2 Ctrl + 2
Overview Cmd + 3 Ctrl + 3
Level meters Cmd + 4 Ctrl + 4
Location markers Cmd + 5 Ctrl + 5
Groups Cmd + 6 Ctrl + 6
Project/Track window (load and
utilities)
Import/Export Audio Cmd + 8 Ctrl + 8
Edit (Main MX-View) window Cmd + 9 Ctrl + 9
Network Cmd + 0 or Cmd + Shift + N Ctrl + 0 or Ctrl + Shift + N
Edit Keys Macintosh Windows
Undo Cmd + Z Ctrl + Z
Redo Cmd + Y Ctrl + Y
Cut Cmd + X Ctrl + X
Copy Cmd + C Ctrl + C
Paste Cmd + V Ctrl + V
Clear Cmd + B or Delete/Backspace Ctrl + B or Delete/Backspace
Insert Cmd + I Ctrl + I
Open Cmd + H Ctrl + H
Select all events in Cmd + A Ctrl + A
Select more events to left/right
Split Cmd + E Ctrl + E
Separate Cmd + U Ctrl + U
Duplicate Cmd + D Ctrl + D
Discard Cmd + T Ctrl + T
Nudge - / + (or =) - / + (or =)
Fade Cmd + F Ctrl + F
Fade to start Opt + D Alt + D
Fade to end Opt + G Alt + G
Repeat Cmd + R Ctrl + R
Sync insert Cmd + Shift + I Ctrl + Shift + I
Sync paste Cmd + Shift + V Ctrl + Shift + V
Paste left Cmd + Shift + L Ctrl + Shift + L
Paste at playhead Cmd + Shift + P Ctrl + Shift + P
In to now Cmd + M Ctrl + M
Left cut Cmd + Shift + X Ctrl + Shift + X
Local cut Cmd + Shift + S Ctrl + Shift + S
Local left cut Cmd + Shift + D Ctrl + Shift + D
Render Cmd + Shift + R Ctrl + Shift + R
Cmd + O Ctrl + O
Cmd + 7 or Cmd + O Ctrl + 7
Shift + Õ/Ö Shift +
Õ/Ö
84
Page 85

Transport and Locator Macintosh Windows
Play/stop Space Bar Space Bar
Return view to playhead Cmd + P Ctrl + P
Record Cmd + Space Bar Ctrl + Space Bar
Play in to out Shift + Space Bar Shift + Space Bar
Online/Offline
Online/Offline all machines Cmd + Alt + J Ctrl + Alt + J
Capture in
Capture out
Capture new location marker Enter (auto-increments) Enter (auto-increments)
Capture C followed by two numbers for
Locate to marker V followed by two numbers for
Move playhead to previous/next
locate marker
Move playhead to previous/next
edit
In I (Locate when used alone, or
Out O (Locate when used alone, or
To T followed by I or O T followed by I or O
From F followed by I or O F followed by I or O
Thru Y followed by I or O Y followed by I or O
Last Play L L
Roll Back/Forward , / . , / .
Fast Forward Cmd + . (period) Ctrl + . (period)
Rewind Cmd + , (comma) Ctrl + , (comma)
Register Entry Macintosh Windows
Toggle to next register ` (backquote) ` (backquote)
Increment / decrement
Toggle between hours, minutes,
seconds, frames, subframes
Abandon Entry Escape Escape
Commit to entry Enter Enter
Track Button Modifiers Macintosh Windows
Toggle item & set all others to
same new state (record arm, view
volume automation, edit etc.)
Toggle item & set others to
opposite state
Cmd + J
Cmd + × Ctrl +
Cmd + Ø Ctrl +
memory point, or I for in, O for
out
memory point, or I for in, O for
out
Cmd + Õ/Ö Ctrl +
Shift + Tab / Tab
(previous/next)
target after F,T,Y,C,V)
target after F,T,Y,C,V)
×
Õ, Ö
Alt Alt
Ctrl Ctrl
/ Ø
Ctrl + J
×
Ø
C followed by two numbers for
memory point, or I for in, O for
out
V followed by two numbers for
memory point, or I for in, O for
out
Õ/Ö
Shift + Tab / Tab
(previous/next)
I (Locate when used alone, or
target after F,T,Y,C,V)
O (Locate when used alone, or
target after F,T,Y,C,V)
/ Ø
×
Õ, Ö
85
Page 86

Select Macintosh Windows
Selector tool F1 F1
Hand tool F2 F2
Zoom tool F3 F3
Scrub tool F4 F4
Temporary Left Toggle F6 F6
Temporary Right Toggle F7 F7
Edit Sound Events F8 F8
Edit Volume Automation F9 F9
Edit Mute Automation F10 Unavailable
Playback Modes Macintosh Windows
Auto (record/rehearse) Cmd + Shift + A Ctrl + Shift + A
Pre/post-roll on playback Cmd + K Ctrl + K
Loop Cmd + L Ctrl + L
Selector Cursor Modifiers Macintosh Windows
Locate Click Click
Select in, out, edit tracks Click + Drag Click + Drag
Add an edit track Shift + Click Shift + Click
Extend in, out, edit tracks Shift + Click + Drag Shift + Click + Drag
Deselect an edit track Shift + Click on selected track
Or
Ctrl + Click on selected track
Remove area from in, out, edit
tracks selection
Abort drag selection Esc Esc
Temporarily switch to drag and
trim tool
Temporarily switch to zoom tool F7 F7
Drag and Trim Cursor Modifiers Macintosh Windows
Select event Click Click
Add an event to selection Shift + Click on unselected event Shift + Click on unselected event
Deselect event Shift + Click on selected event
Move Click + Drag Click + Drag
Constrain move in time Ctrl Ctrl
Copy instead of move Alt Alt
Rename Event Double Click Event Double Click Event
Slip audio under event A + Click + Drag on selected
Select events in area Click + Drag from empty area Click + Drag from empty area
Select additional events in area Shift + Click + Drag from empty
Deselect events in area Ctrl + Click + Drag from empty
Force Region select R + Click + Drag on event, also
Abort a drag selection, event drag,
or event trim
Event or volume automation trim Click + Drag handle Click + Drag handle
Ctrl + Click + Drag Ctrl + Click + Drag
F6 F6
Or
Ctrl + Click on selected event
event
area
area
works with Shift (add) or Ctrl
(remove)
Esc Esc
Shift + Click on selected track
Or
Ctrl + Click on selected track
Shift + Click on selected event
Or
Ctrl + Click on selected event
A + Click + Drag on selected
event
Shift + Click + Drag from empty
area
Ctrl + Click + Drag from empty
area
R + Click + Drag on event, also
works with Shift (add) or Ctrl
(remove)
86
Page 87

Drag and Trim Cursor Modifiers Macintosh Windows
Event or volume automation fine
adjustment
Event ripple trim Alt + Click + Drag handle Alt + Click + Drag handle
Event trim to next Shift + Click + Drag handle Shift + Click + Drag handle
Temporarily switch to Selector tool F6 F6
Temporarily switch to Zoom tool F7 F7
Zoom Cursor Modifiers Macintosh Windows
Select view Click + Drag Click + Drag
Zoom in 2X Click Click
Zoom out 2X Shift + Click Shift + Click
Temporarily switch to selector tool F6 F6
Temporarily switch to hand tool F7 F7
Navigation Macintosh Windows
Zoom in/out Cmd + [ / ] Ctrl + [ / ]
View whole project Cmd + Shift + Z Ctrl + Shift + Z
View samples Hold down Z Hold down Z
Edit screen up/down Page Up / Page Down Page Up / Page Down
Edit screen top/bottom Home / End Home / End
Track height taller/shorter Cmd + = / - Ctrl + = / Move view to in Shift + I Shift + I
Move view to out Shift + O Shift + O
Ctrl + Click + Drag handle Ctrl + Click + Drag handle
87
Page 88

Appendix B: Troubleshooting
Online Support
Please refer to release notes for updated online support information.
Software Updates
Please refer to release notes for software update information.
Customer Service Contacts
Please refer to release notes for updated Customer Service contact information.
88
Page 89

Appendix C: Error and Warnings Descriptions
List of error and warnings descriptions. (N/A)
Appendix D: Project/Track Window Icons
Icon Description
Macintosh Volume
Windows Volume
WaveFrame Volume (MMR/MMP Only)
Backup Volume
Unidentified Volume
Folder
89
Page 90

Index
A
Audition play modes, 31
Auto record and auto rehearse, 36
B
Basic playback and record, 17
Basic recording, 36
Breakpoint volume automation, 63, 70, 71
C
Clear, 47
Clicking in the main MX-View window, 34
Compile, 68
Connecting to multiple machines, 81, 83
Conventions and symbols used, 8
Copy, 45
Creating a new virtual track, 79
Cut, 43
D
Deleting a track, 80
Discard, 52
Disk utilities, 76
Docking windows, 22
Drag and drop editing, 58
Drag and trim tool fundamentals, 59
E
Edit bar, 15
Event ripple trim, 62
Event slip, 67
Event trimming basics, 19, 60, 67, 68
Event volume trimming, 63
Events, regions and waveforms, 26
Expandable windows, 24
External synchronization, 38
F
H
Horizontal trimming, 60
Horizontal zoom, 34
I
In to now, 56
In to Out play, 29, 37, 38
Insert, 49
Introduction, 8
L
Last play, 30
Left cut, 44
Level meters, 69
Level meters window, 14
Loading a track, 80
Loading projects, 35, 72
Local cut, 43
Local left cut, 44
Locate to head/tail, 33
Locate with view, 31
Locating to In and Out points, 33
Location markers window (n/a), 14
Lock trim, 63
Loop play, 30
Loop record, 37
M
Machine info bar, 15
Main MX-View window, 12, 15, 16, 17, 19, 20
Menu settings (n/a), 14
Move playhead to next/previous edit, 33
Move playhead to next/previous locate marker,
33
Multiple clipboard select, 45, 66
Multiple machines in use, 83
Mute automation, 71
MX-2424/MMR direct to computer, 9
MX-2424/MMRto computer via Ethernet hub, 9
Fades and cross-fades, 19, 64
Fast forward and rewind, 32
Force region select, 36, 42, 54, 56, 57, 58, 59
G
Group window (n/a), 14
N
Network backup and restore, 74
Network window, 16
Nudge, 54
O
Open, 48
90
Page 91

Overview window, 14, 34
P
Pages with playhead scrolling, 29, 34, 35, 36
Paste, 45
Paste at playhead, 47
Paste left, 46
Performing a copy and paste edit, 17
Play, 29, 32, 33, 34
Pre/post roll on play, 29, 31
Preferences (n/a), 78
Project utilities, 72
Project/track window, 13
R
Register entry, 27, 28, 32, 38
Renaming events, 56
Renaming tracks, 80
Render, 57
Repeat selection, 50
Return after play, 32
Return view to playhead, 32
Reverse, 58
Reverse play, 32
Roll back and roll forward, 33
S
Scrolling up/down in the MX-View main
window, 35
Scrolling with the mouse, 35
Selecting a region for edit, 28, 40, 47, 48, 49, 50,
51, 52, 53, 54
Separate, 52
Setting In and Out points, 27, 29, 30, 42
Setting IP addresses, 10
Split, 51
Starting a new project, 16
Studio setup, 82
Sync insert, 54
Sync paste, 53
System requirements, 9
T
Track height, 35
Track menu, 79
Transport window, 13
Trim to next, 62
Trimming audio, 19
Trimming multiple events, 61
U
Undo and redo, 36, 58
Unloading tracks, 80
Updating software (MX-2424), 77
Using groups (n/a), 69
Using location markers, 33, 69
Using the playhead counter, 32
V
Vertical zoom, 35
View options, 38
View samples, 35
View whole project, 35
Virtual track basics, 20
W
Window sets (n/a), 24
Working with projects, 24
Working with tracks, 20, 25, 79
Working with windows, 21, 22
91
Page 92

TASCAM
TEAC Professional Division
MX-View
Version 1.0b1 Owner's Manual
TEAC CORPORATION
TEAC AMERICA, INC. 7733 Telegraph Road, Montebello, California 90640 Phone: (213) 726-0303
TEAC CANADA LTD. 5939 Wallace Street, Mississauga, Ontario L4Z 1Z8, Canada Phone: 905-890-8008 Facsimile: 905-890-9888
TEAC MEXICO, S.A. De C.V Privada De Corina, No.18, Colonia Del Carmen Coyoacon, Mexico DF 04100 Phone: 5-658-1943
TEAC UK LIMITED 5 Marlin House, Marlins Meadow, The Croxley Centre, Watford, Herts. WD1 8YA, U.K. Phone: 01923-819699
TEAC DEUTSCHLAND GmbH Bahnstrasse 12, 65205 Wiesbaden-Erbenheim, Germany Phone: 0611-71580
TEAC FRANCE S. A. 17 Rue Alexis-de-Tocqueville, CE 005 92182 Antony Cedex, France Phone: (01) 42.37.01.02
TEAC BELGIUM NV/SA P.A. TEAC Nederland BV, Perkinsbaan 11a, 3439 ND Nieuwegein, Netherlands Phone: 0031-30-6048115
TEAC NEDERLAND BV Perkinsbaan 11a, 3439 ND Nieuwegein, Netherlands Phone: 030-6030229
TEAC AUSTRALIA PTY., LTD. 106 Bay Street, Port Melbourne, Victoria 3207, Australia Phone: (03) 9644-2442 A.C.N. 005 408 462
TEAC ITALIANA S.p.A. Via C. Cantù 5, 20092 Cinisello Balsamo, Milano, Italy Phone: 02-66010500
3-7-3, Nakacho, Musashino-shi, Tokyo 180, Japan Phone: (0422) 52-5082
92
 Loading...